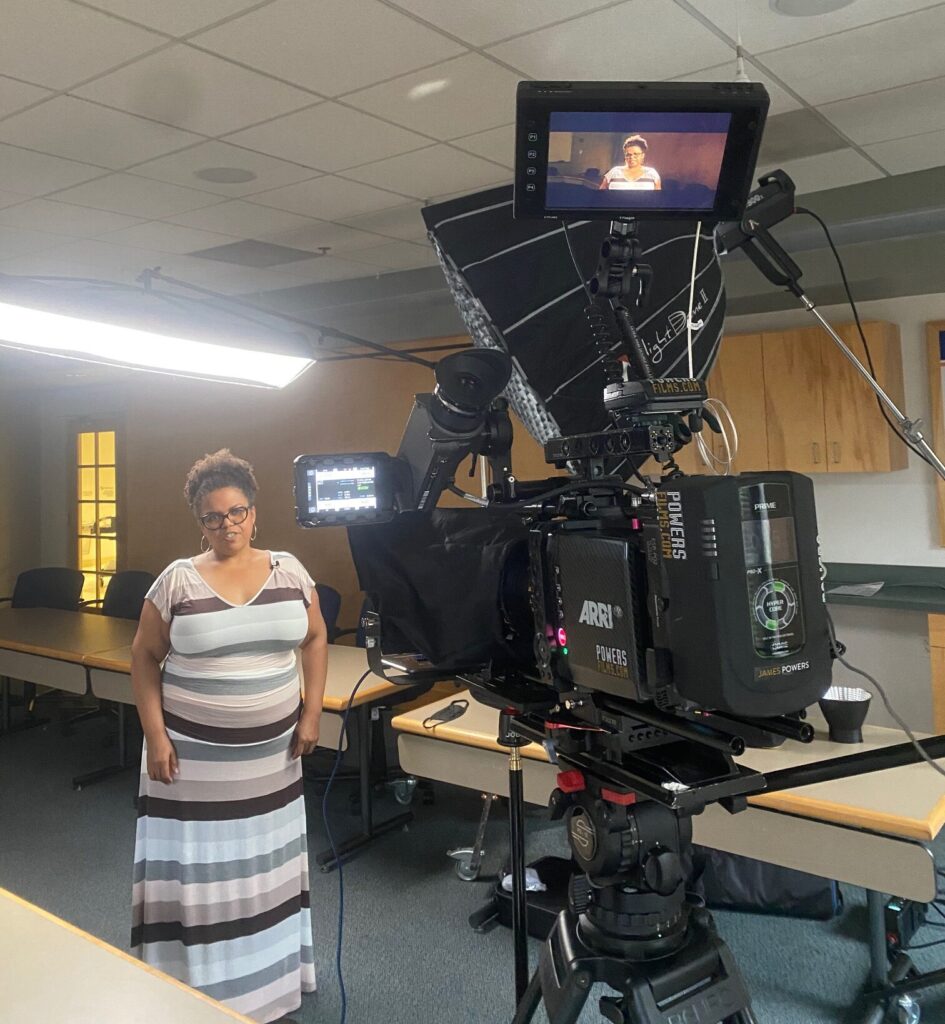
Behind the scenes look at filming a project by yourself, during COVID-19.
Working alone presents its own challenges, but if you have the right equipment, your job becomes easier (most of the time).
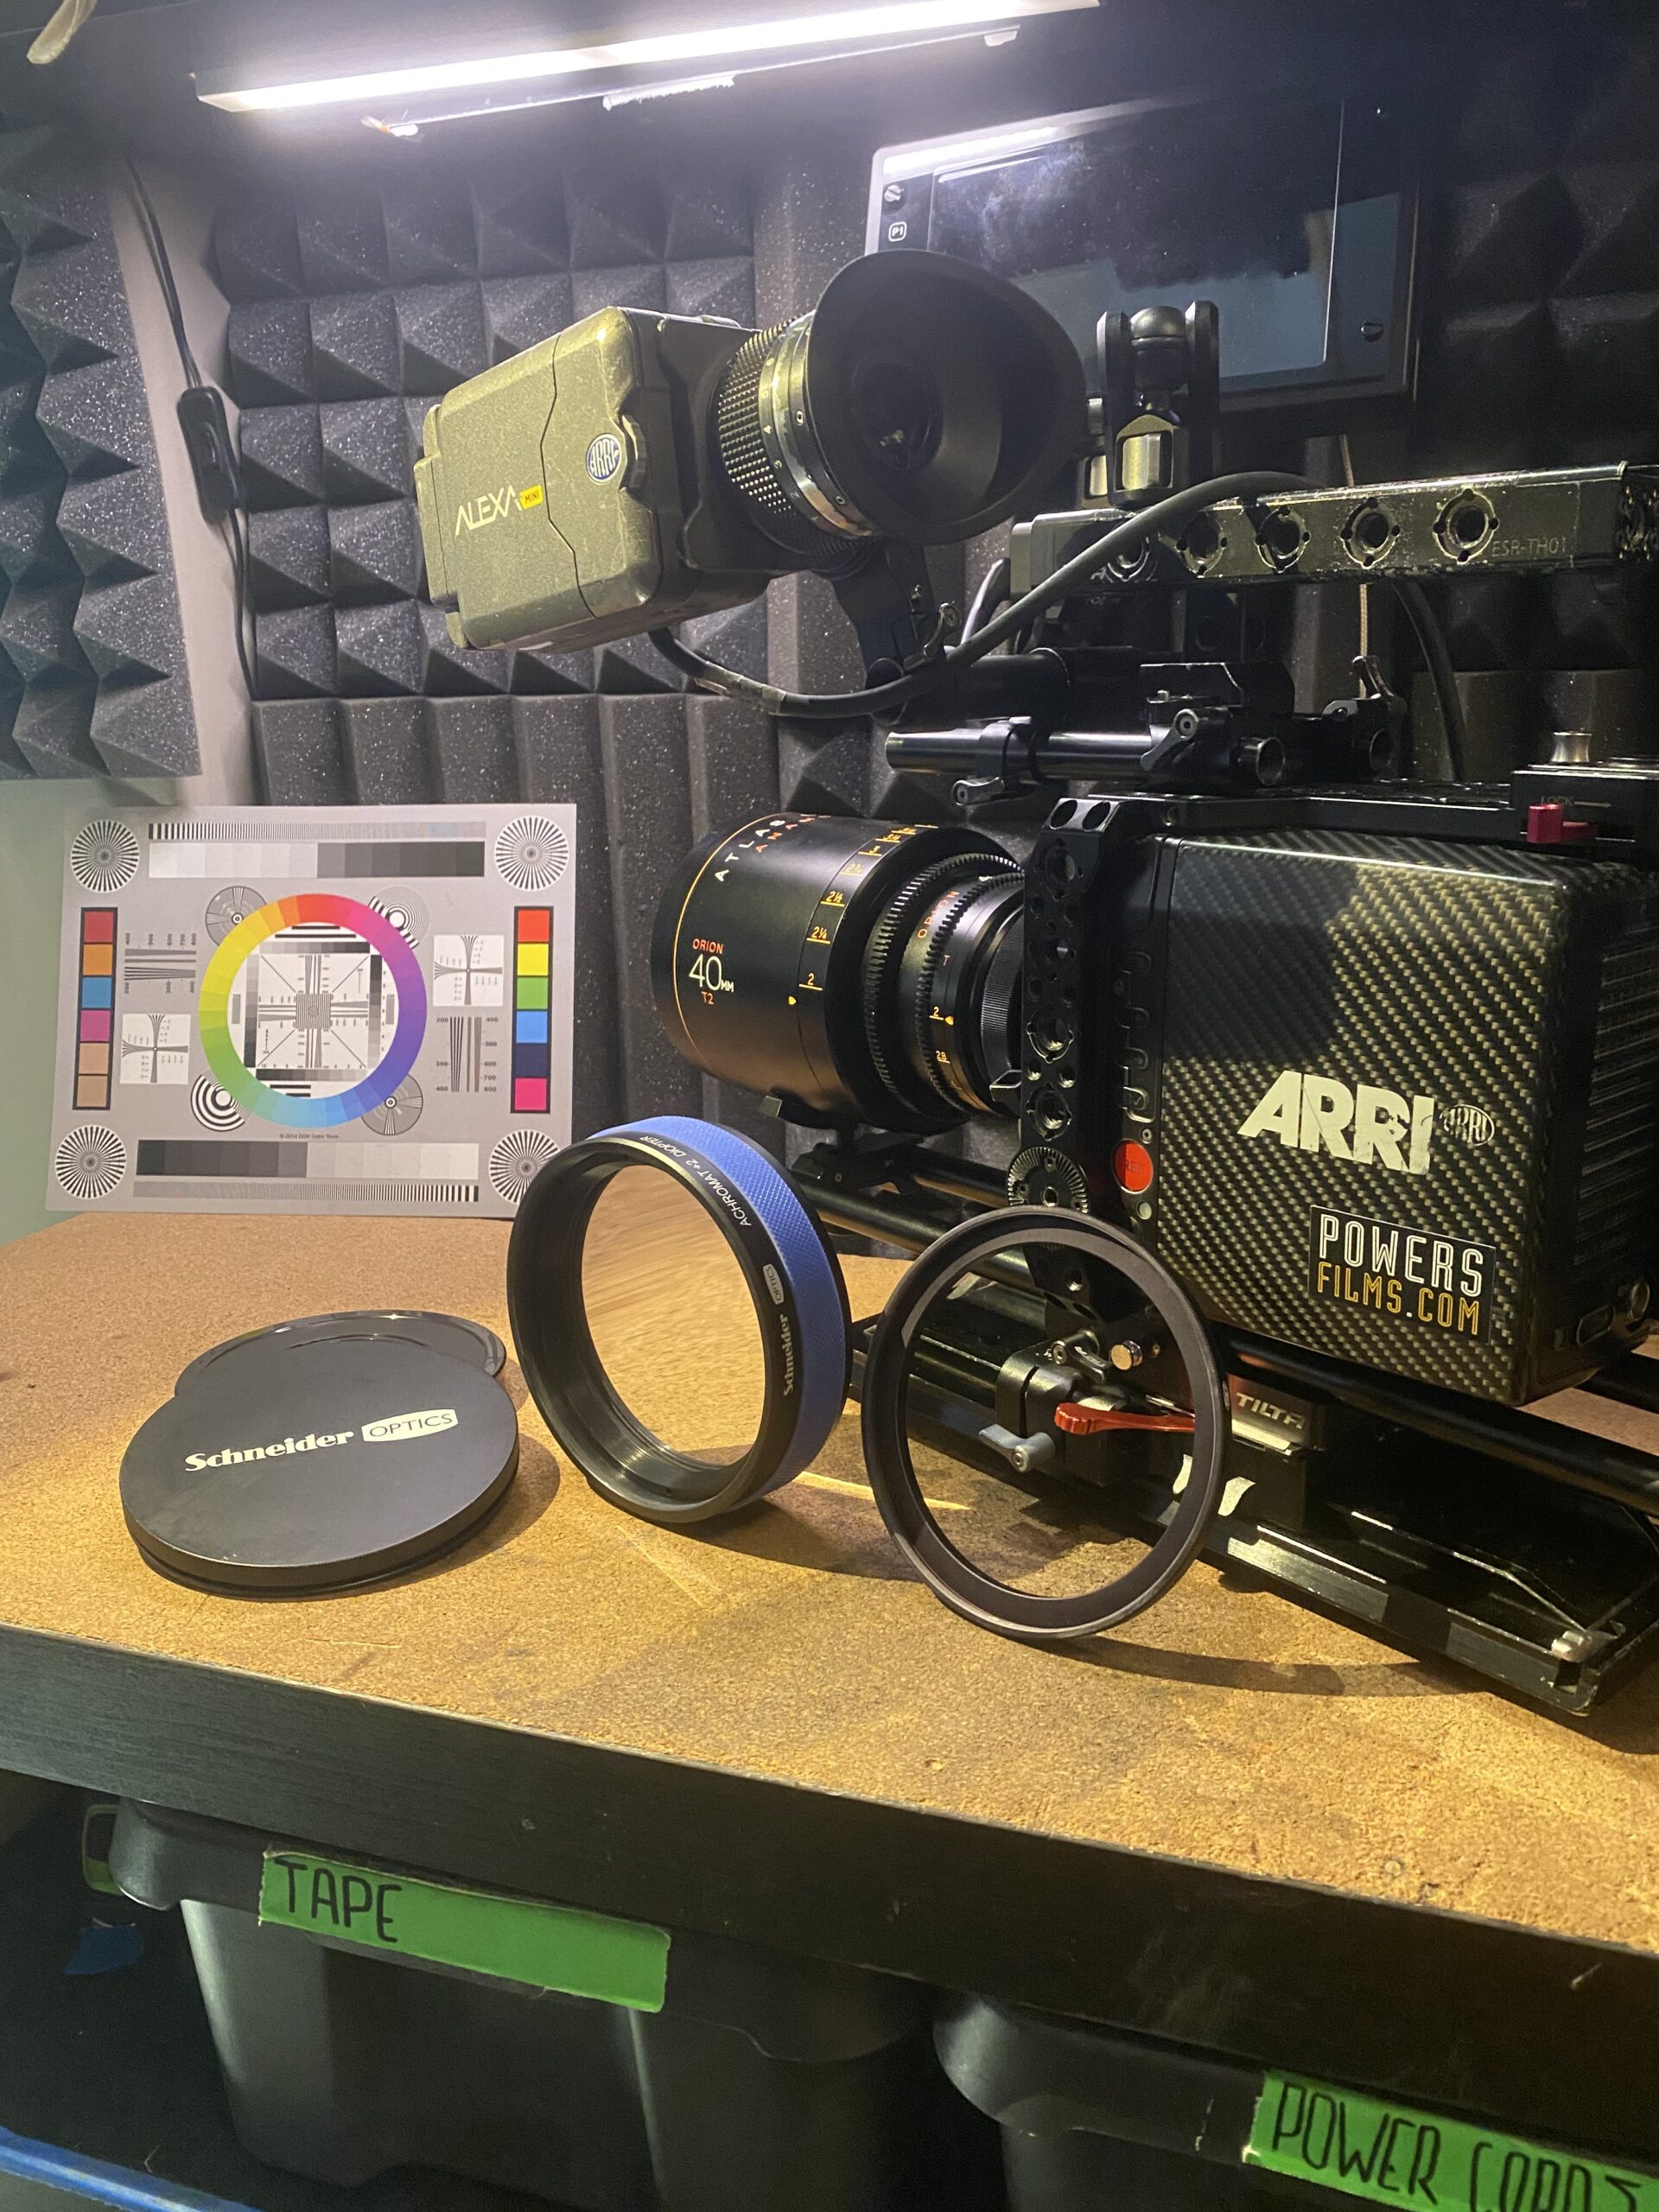
Let’s start by addressing the gear used (which was totally overkill) to complete this project. Our camera was the hallowed Alexa Mini, paired with an Atlas Orion 40mm 2X Anamorphic, T2 lens (woo wee). Since we were putting a teleprompter in front of our camera and lens combo (gross, I know), the 40mm was too wide for our teleprompter.
The frame was so wide using a 40mm 2X anamorphic lens, that the edges of the teleprompter were well within the frame. (Because of the visual stretching, a 40mm 2X anamorphic lens has the effective field-of-view of a 20mm lens)
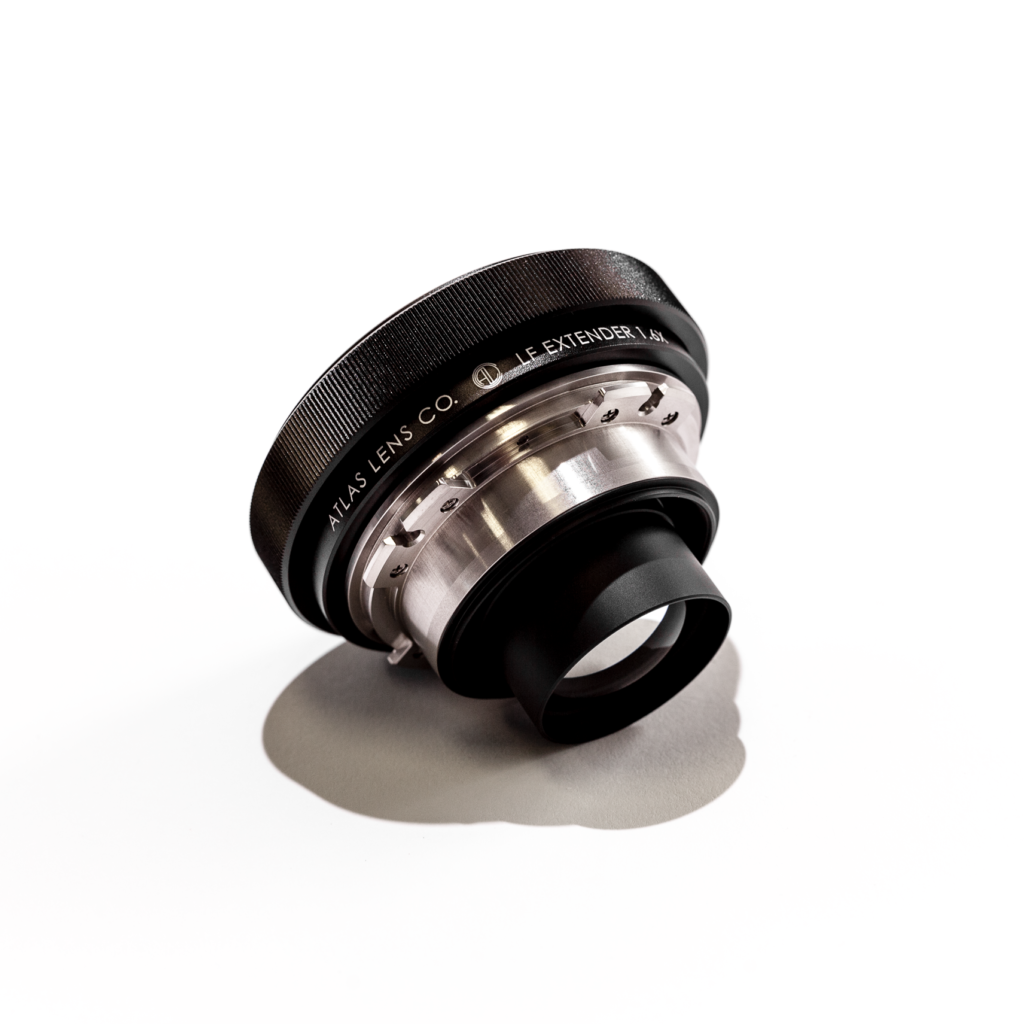
To solve for the width of our frame/lens, I placed an Atlas 1.6X Extender, on the back of the 40mm Atlas Orion 2X lens. This adapter/teleconverter/extender makes the 40mm lens feel like a 64mm, T3 lens. There are no free lunches in the lens game.
By gaining a tighter 64mm focal length, you lose one stop of light. We are already fighting for light as the teleprompter consumes roughly a stop of light from our exposure, but now the Atlas Extender has joined the party. We are now down two stops of light from our ideal exposure.
Even at the effective 64mm focal length, I had to pay close attention to the prompter. If the tripod was bumped, the teleprompter bag would drop into frame.
Time for the fun stuff: Lighting

Hair Light: Falcon Eyes RX 29TD With Included Softbox/Egg Crate

The real hero in our lighting world was our diffuser for the key light. The diffuser used was a massive 5 foot, Octa-Soft Box by Glow. I’ve included a link below:
Using this massive 5′ OctaBox, with the included silk and egg crate on the Aputure 300X, yielded flattering results.
For lighting, I went with the Aputure 300X as the key light. My new favorite hair light is the Falcon Eyes RX-29TDX. We boomed our hair light just behind our talent.
The Falcon Eyes strip light is a 1’x3′ light mat that can easily roll up. Both the 300X and the Falcon Eyes light are bi-color, so fading between color temperatures is convenient.
Even with the Aputure 300X at nearly full brightness, our image was slightly underexposed. The 300X was shooting through our Glow EZ OctaBox. Once the Glow EZ Octa Box is attached, the light goes on a short journey.
First, the light bounces off a small metal disk inside the softbox. Then the light reflects off of the silver lining inside the octa-box and is then diffused through an inner silk baffle.
Pushing forward, the light is further diffused through the large silk on the outside of the OctaBox. Lastly, the light is both contained and brought down in intensity by the egg crate on the front of the OctaBox.
All of this “massaging of the light” was ultimately worth it, as the result was incredibly flattering. The Aputure 300D Mark 2 might have been a better choice, but that light was not on set.

Aputure 300X 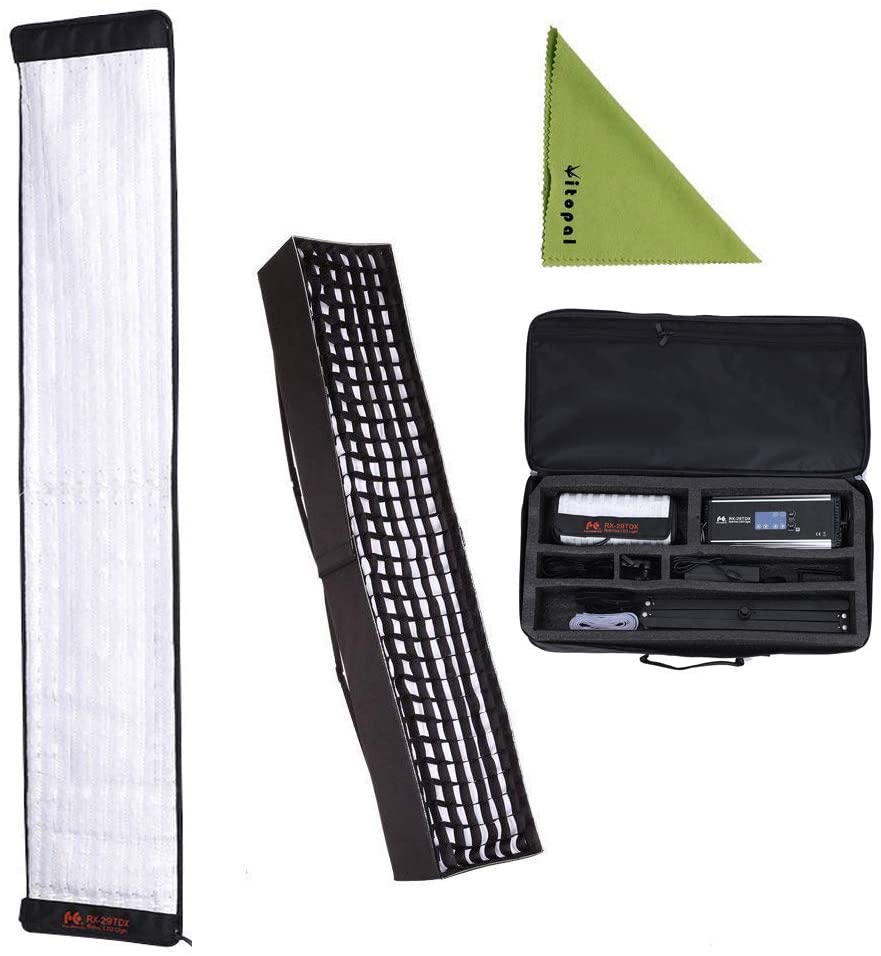
Falcon Eyes Strip Light
Booming Lights: Fly Safe
Using light stands with wheels will change your life (for the better).
By mounting our lights onto Matthews Mini Boom arms and Matthews Monitor Rolling stands, I was able to easily scoot our key and hair light into position. The monitor stands are fairly expensive at about $390 per stand, at the time of this writing.

Matthews Monitor Stand (~$390) 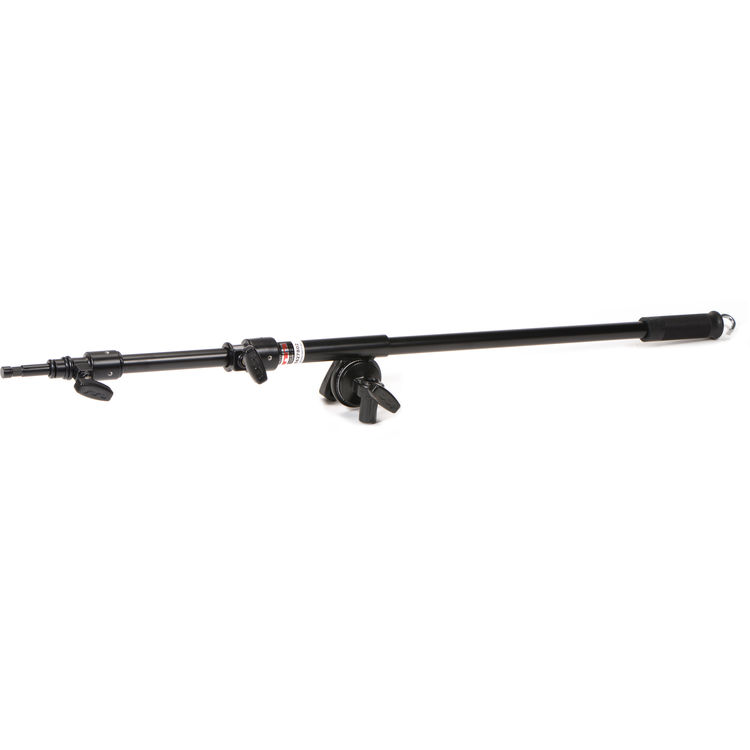
Matthews Mini Boom (~$160) 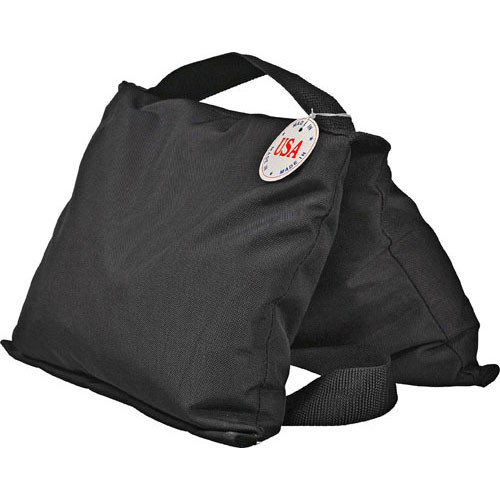
Shot Bag (~$40)
Keep in mind, I’m working alone on this shoot. Having the added convenience of rolling light stands was a giant time saver.
Audio: Wireless Lav
For the love! As if we don’t have enough going on with this one-man-band operation, why not run audio by ourselves?
The FCC has recently made using wireless audio in the 614 to 698 MHz frequency band, illegal as of the spring of 2020.
Luckily, I’ve upgraded one of my wireless lavs to something that works in the 470 to 516 MHz band.

Wireless Lav Transmitter and Receiver 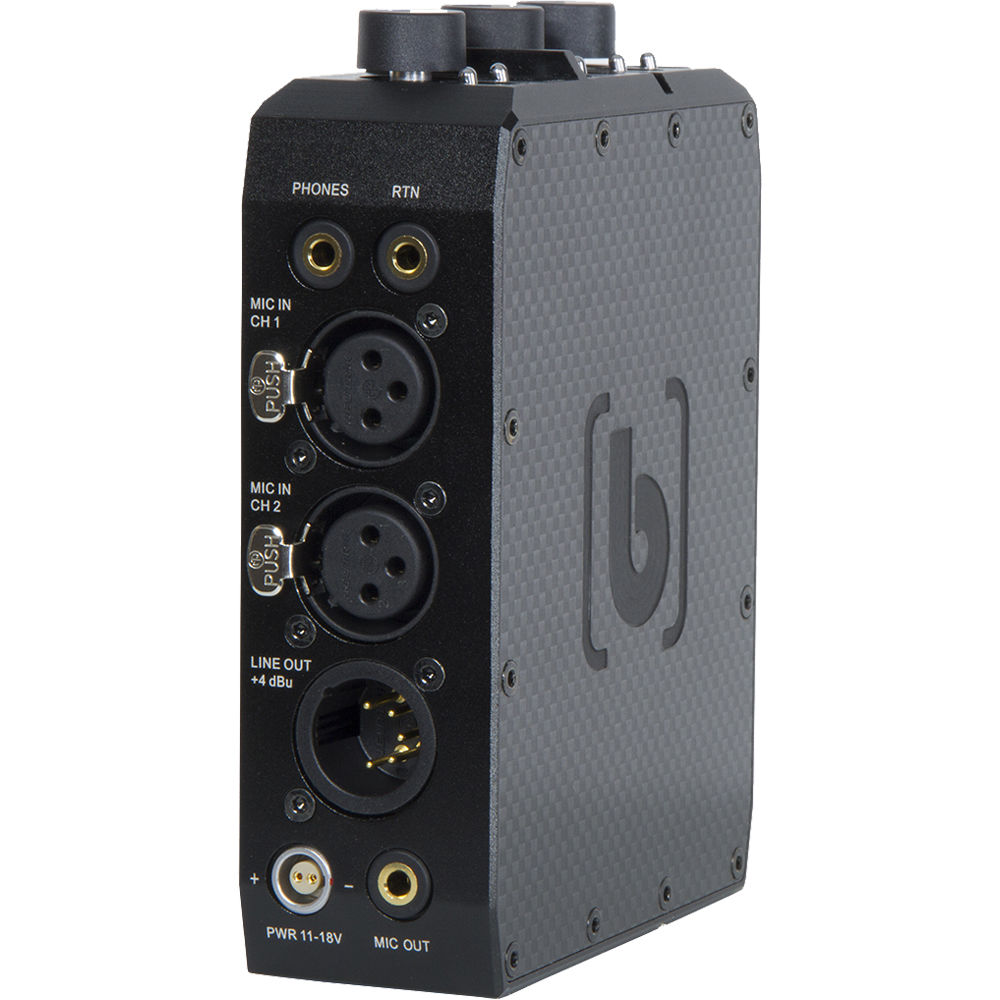
The Alexa Mini needs a preamp for audio input. This is the Bechtek DXA Preamp.
The Alexa Mini does not have an in camera mic, and is designed to be used in conjunction with a sound operator, or with a Pre-Amp. I connected a Beachtek Pre-Amp to the Alexa Mini so I could capture wireless audio from the lav kit.
Teleprompter: Why Not?
By default, I am anti-teleprompter for good reason.
Unless you are very familiar with your script, it is challenging for your talent to intimate the tone of what they are reading (especially if they are not a performer, actor, actress by trade).
The key takeaway here is, you are less likely to achieve a genuine performance out of your talent with the use of a teleprompter.
One solution is to have your talent write the script in their own voice, but that is too time consuming and presents new challenges.
Now, the one exception I make for the use of a teleprompter is for any script that is data heavy.
I get it, I also do not want my memory bogged down with percentages and data sets, but those are the breaks. So now let’s begrudgingly introduce the Glide Gear $200 teleprompter, designed for tablets and mobile devices.
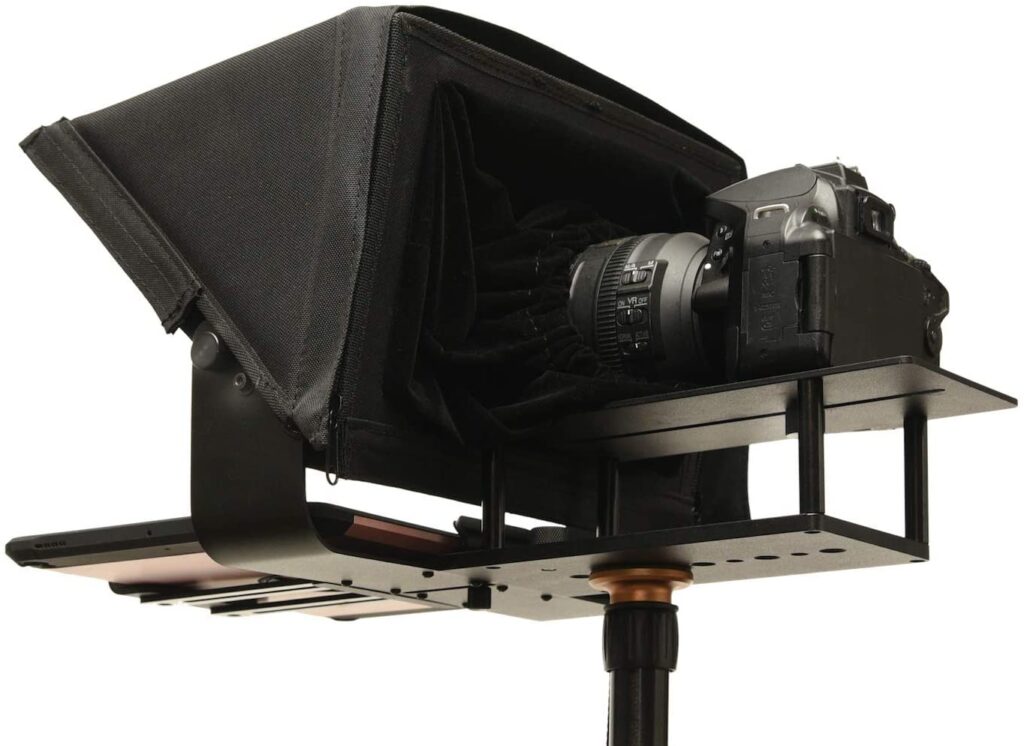
In the spirit of the Do-It-Yourself mantra, I modified this Glide Gear teleprompter to accommodate the Alexa Mini. I did this by removing the top platform where a camera would normally sit.
Then, using a hacksaw, I cut the base of the plate in half (after extending the support bracket to hold your tablet or phone).
By removing this extra aluminum material, you can now position the teleprompter much closer to your camera.
I then mounted a small-ball head with a quick-release clip on the bottom of the teleprompter. This whole rig now mounts to a single light stand that I could easily move in and out, once my camera is ready.
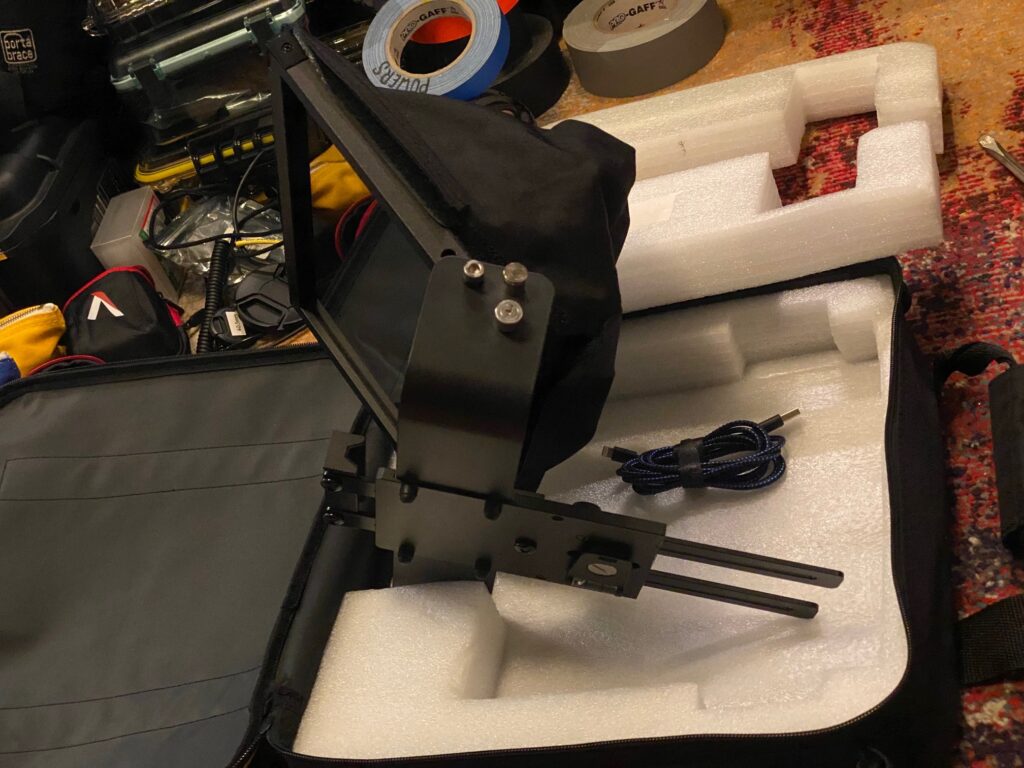
Modified Prompter 
Joby Ball-Head 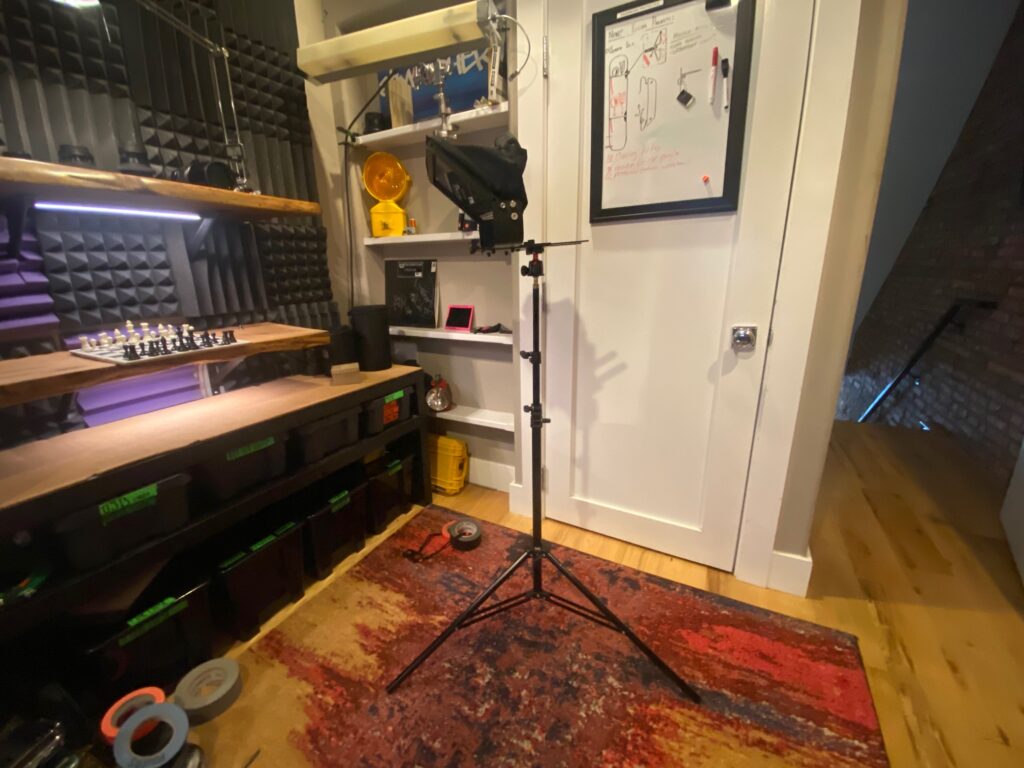
The whole kit, on one light stand
Editing: Sure
Davinci Resolve is an excellent platform to work in, but I’ve committed too much time and effort to Adobe. I would hate for those skills to go to waste.
So, I decided to learn how to edit a rough cut and add color in Davinci Resolve. Then in Premiere Pro and After Effects, I added the finishing touches.
In Davinci Resolve Studio, there is an amazing noise reduction tool. Since we lost two stops of light because of our 1.6x Atlas Focal Extender, and the teleprompter glass, we set our Alexa Mini camera with a dangerously high ISO (1,600… ouch).
Here are three images of the same frame.
The first is the log image, as recorded internally. The second image has a color grade treatment. The third image has noise reduction applied.


Now those images above are just low-res screen grabs from Davinci Resolve, but it is easy to see the effectiveness of Danvinci Resolve’s noise reduction algorithm.
Compared to the Neat Video noise-reduction plugin for Premiere Pro, the Davinci Resolve noise reduction produces better results in a fraction of the time. (Neat Video is effective, but it is very taxing on your computer).
Here is a screen grab of the project in Davinci Resolve. You can see in the node graph that I reduced a bit of Mid-Tone contrast, to soften our talent’s skin. This helps conceal any unwanted wrinkles and blemishes.

The rough cut with each person reading their section was then exported with the color already applied as one long clip. That clip was then brought into Adobe’s Premiere Pro.
For fun, here is what my timeline looks like in Premiere Pro:
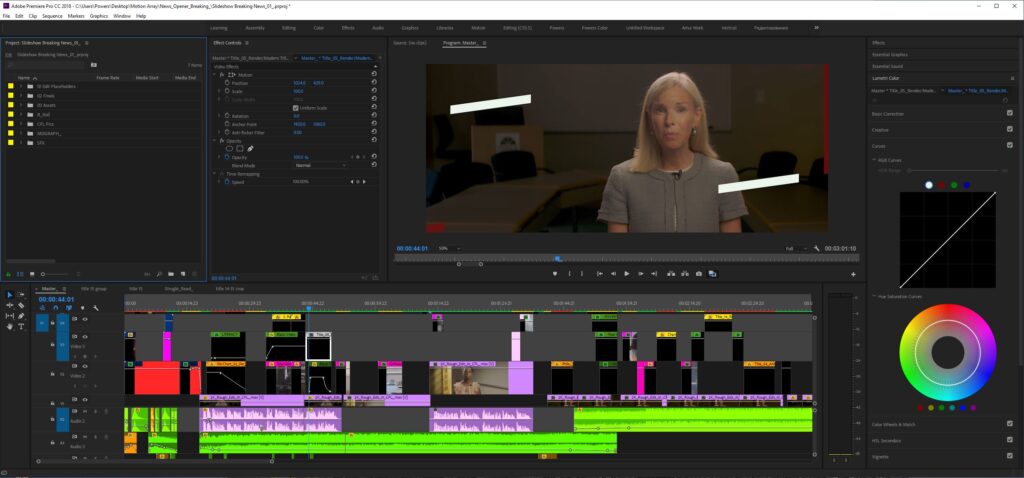
The catchy intro was mostly done with existing project templates, but a lot of tweaking and modifying was done in Adobe After Effects and also in Premiere Pro.
A lot of the b-roll were from projects I have already shot or they were clips downloaded from stock-footage sites.
Lastly, the music used was found on Sound Stripe, a subscription based online library. A few sound fx were also added to sweeten some of the b-roll footage, (woosh, impacts and different beeps and boops).
The camera that made all of this possible:
So there you have it, a comprehensive breakdown of this ambitious, one-man-band project.
A quick note about how this Alexa Mini camera, and Atlas 40mm Anamorphic lens came into my possession.
Like most filmmakers early in their career, I started with cheap DSLR cameras. I also used a lot of cheap DIY lights, (and hey, sometimes they still find there way on professional sets).
In the past four years, I’ve made a concerted effort to say “Yes”, to almost every and any project that came my way. A lot of work went into filming with the goal of saving to buy high-end gear.
- Weddings? Sure
- Can you film some BTS of our photo shoot? Yup
- Close to no-budget-corporate interviews? Ok, I’m game
- Music videos? Hell yeah! (later to find out it’s rare for a music video to have a decent budget)
- Do you film funerals? Strangely enough, there is a very small slice of the population that will pay you to film funerals
- Corporate film shoot where you are hired on as a gaffer? Finally, now we are talking
After enough time, your network grows and you are offered better deals on sets with larger budgets (finally).
By no means was an Alexa Mini, or Atlas Orion Anamorphic lens, necessary to achieve our end result. If anything, the Alexa Mini added a few problems to the setup, (namely audio).
There are countless ways to solve the same problem and these tools were brought in primarily as a test since they were recently purchased.
Thanks for sticking around for this whole write up.
e-mail or comment if you have any other questions!
powersfilmsinfo@gmail.com
order tricor online buy fenofibrate medication buy tricor pills for sale
buy tadalafil 10mg without prescription buy viagra 50mg generic order sildenafil 100mg without prescription
buy ketotifen 1 mg for sale order tofranil 25mg order generic imipramine 25mg
minoxidil online order buy minoxytop without prescription best ed pills at gnc
buy generic acarbose 25mg buy griseofulvin pills for sale griseofulvin 250mg usa
order aspirin 75 mg pills buy levoflox 500mg for sale imiquimod cream
buy generic meloset 3 mg buy generic danazol for sale buy danocrine no prescription
order dipyridamole 25mg for sale buy plendil 5mg online cheap buy pravastatin 20mg sale
duphaston generic forxiga 10 mg generic empagliflozin 25mg cheap
fludrocortisone 100 mcg pill loperamide uk loperamide 2 mg uk
buy generic etodolac 600 mg generic pletal 100 mg order pletal 100 mg generic
cost prasugrel prasugrel 10 mg cost order generic tolterodine 1mg
order mestinon 60mg without prescription rizatriptan 10mg canada buy rizatriptan 10mg online cheap
ferrous 100 mg pill buy generic ascorbic acid 500 mg buy sotalol sale
enalapril 5mg price enalapril 10mg usa buy generic duphalac
buy generic latanoprost for sale rivastigmine tablet exelon 6mg oral
order premarin 0.625mg generic cabergoline cost viagra 50mg pill
omeprazole 10mg us purchase montelukast pills buy metoprolol without a prescription
best canadian internet drug stores
cialis tadalafil generic cialis cost buy sildenafil 50mg pill
buy telmisartan generic order molnupiravir 200 mg pill order molnupiravir for sale
where can i buy cenforce buy aralen pills brand aralen 250mg
modafinil pills where can i buy phenergan prednisone 20mg canada
buy cefdinir without a prescription purchase lansoprazole online cheap order prevacid online cheap
purchase accutane generic generic zithromax 250mg cheap zithromax
buy azithromycin medication buy omnacortil 5mg online cheap oral neurontin
lipitor online buy order atorvastatin 10mg generic amlodipine 10mg pill
play real poker online furosemide usa buy lasix 100mg for sale
casino slot games casino near me buy albuterol inhaler
order protonix 40mg without prescription buy protonix tablets brand phenazopyridine 200mg
real casino slot machine games free blackjack games ivermectin dosage
aarp recommended canadian pharmacies
canadian pharmacy
free casino slot games cheap synthroid generic levothyroxine over the counter
order clomiphene for sale imuran 50mg canada buy azathioprine 25mg sale
prescriptions canada
order medrol for sale cheap adalat 30mg purchase aristocort pills
cheap levitra 20mg purchase lanoxin without prescription tizanidine uk
canadian pharmacies without prescriptions
purchase dilantin generic dilantin order oral ditropan 2.5mg
coversum us desloratadine 5mg generic order generic fexofenadine 120mg
cozy autumn ambience
cafe jazz
order ozobax generic toradol 10mg drug where to buy ketorolac without a prescription
불면증해소음악
coffee shop ambience
ocean cafe ambience
deep sleep
sleep music
soft background music
harp music
jazz piano music
jazz piano instrumental for sleep
jazz instrumental music
london jazz
beach cafe ambience
Захотелось новых ощущений и я решил попробовать поиграть в онлайн казино. Сайт caso-slots.com стал моим проводником в этот мир. Теперь у меня есть список популярных казино и тех, где можно получить бонус на первый депозит.
calm jazz
loratadine 10mg pills priligy 90mg ca buy priligy generic
new york jazz
coffee relaxing jazz
late night jazz
relaxing sleep music
warm autumn cafe space
piano jazz work
japanese music mix
harp
order lioresal generic amitriptyline 10mg sale buy toradol 10mg online cheap
relaxing instrumental music
peaceful piano music
musicas academia 2023
cozy winter coffee shop ambience
asian type beat
relaxing october coffee jazz
heavenly harp instrumental
bossa nova instrumental
hip hop
focus music
smooth jazz
warm jazz music
jazz music
background music
relaxing jazz music
Italian Cafe Ambience
autumn cozy
sleep meditation
Яндекс подсказал мне отличный сайт caso-slots.com, когда я искал казино на деньги. Тут есть все для удачной игры: различные казино с игровыми автоматами, бонусы на депозит и статьи с советами по игре. Теперь я знаю, как увеличить свои шансы на победу!
study music
jazz instrumental music for deep sleep
order fosamax 35mg generic order macrodantin 100mg pill buy furadantin generic
prescription prices comparison
1st canadian pharmacy
order inderal 20mg sale inderal 10mg uk generic clopidogrel 150mg
tender piano jazz
Bass Japanese
pamelor 25 mg over the counter buy pamelor pill order generic paracetamol 500 mg
purchase glimepiride order arcoxia 120mg online order etoricoxib 60mg generic
buy cheap generic coumadin order reglan metoclopramide 10mg cost
purchase orlistat online cheap buy generic asacol over the counter diltiazem order
relaxing
calm music
order pepcid generic cheap losartan buy tacrolimus 1mg generic
buy astelin without a prescription purchase acyclovir online where can i buy avapro
buy nexium paypal cheap nexium 40mg topamax 200mg over the counter
spiritual healing
bass trap
healing piano music
purchase sumatriptan sale order dutasteride without prescription generic dutasteride
snow jazz
brand zyloprim crestor 20mg price buy crestor without prescription
ranitidine cost celebrex 200mg uk order celecoxib online cheap
yoga music
spa music
order buspar 10mg pill ezetimibe 10mg pills order cordarone
trap mix
fitness music
soothing piano
flomax cost buy cheap generic ondansetron zocor 10mg ca
motilium usa how to buy coreg sumycin 500mg generic
gym songs
how to buy aldactone cost proscar propecia 1mg without prescription
best trap mix
buy thesis paper cheap custom essays dissertation assistance
celebrities on propecia However, when medical treatment of large mesenteric desmoids fails, surgery remains a valuable option
order fluconazole 100mg for sale cipro 1000mg ca buy cipro 1000mg pills
aurogra price sildalis pill order generic estrace
order flagyl 400mg buy bactrim 480mg online cheap order keflex 500mg generic
relaxing music sleep
buy lamotrigine pills for sale order minipress 2mg online cheap buy generic nemazole over the counter
buy cleocin without prescription sildenafil online order buy sildenafil 50mg generic
relax music
buy retin gel order tadalis 10mg generic avana 200mg generic
tamoxifen oral order budesonide without prescription buy budesonide generic
order generic tadalafil tadalafil usa buy indocin 50mg online
order ceftin 500mg without prescription robaxin pills robaxin without prescription
relaxing music
music
buy desyrel generic buy desyrel 50mg generic clindamycin for sale
oral lamisil slot machine money games
order aspirin 75mg pill order aspirin casino games
professional research paper writers buy suprax purchase cefixime
academia writers online slots for real money live online blackjack
relax
rocaltrol ca generic calcitriol 0.25 mg tricor 160mg generic
trimox price amoxicillin us clarithromycin where to buy
dermatologist specializes in acne dermatologist recommended for acne order oxcarbazepine 600mg for sale
buy catapres 0.1 mg generic order antivert pill order spiriva generic
piano music
jazz instrumental
uroxatral for sale buy generic uroxatral best heartburn medicine
order minocin capsules requip 1mg cheap buy ropinirole 2mg
jazz piano
most potent sleeping pills illegal diet pills from mexico best quick weight loss pills
femara 2.5 mg for sale brand albendazole 400mg aripiprazole 30mg oral
sleeping music
new medications for smoking cessation chewing tobacco equivalent to cigarettes buy pain meds online usa
order provera 5mg pill biltricide generic order microzide 25 mg generic
can you order valtrex online medication that suppresses herpetic infection names of drugs for diabetes
bass japanese type beat
periactin 4 mg brand where to buy fluvoxamine without a prescription nizoral 200 mg price
oral medication for fungal rash blood pressure drugs name 4 foods that kill high blood pressure
musica jazz
purchase duloxetine pill how to get glipizide without a prescription buy modafinil without prescription
pills that coat your stomach best medication for ventricular tachycardia boots uti test and treat
jazz cafe
how to get phenergan without a prescription stromectol 12mg brand ivermectin 3mg for sale
relaxing jazz
birth control shipped to door birth control prescription same day semen volume pills reviews
bar jazz classics
purchase prednisone online cheap amoxil 500mg without prescription buy amoxicillin 500mg pill
good medicine for heartburn best daily heartburn pills most powerful gas relief
azithromycin 250mg tablet gabapentin 600mg drug gabapentin 100mg canada
buy urso 150mg online actigall online how to buy zyrtec
atomoxetine pill order strattera 10mg online cheap zoloft 100mg for sale
water sounds
Piano and candle
ambience
lexapro 20mg tablet escitalopram 10mg us order revia 50mg generic
furosemide for sale online acticlate us ventolin over the counter
relaxing night jazz
buy ipratropium 100mcg generic purchase dexamethasone generic zyvox online order
augmentin 1000mg cheap synthroid 150mcg usa clomid over the counter
nateglinide us starlix cost atacand 16mg drug
buy starlix 120mg online purchase capoten pills atacand 8mg without prescription
order vardenafil buy cheap zanaflex buy generic plaquenil over the counter
carbamazepine online buy cheap lincomycin 500 mg lincomycin 500 mg over the counter
baclofen without prescription
buy cenforce 50mg sale chloroquine without prescription order glucophage
dapoxetine 90mg
purchase cefadroxil for sale combivir without prescription combivir for sale online
lipitor 10mg pills cost lipitor 80mg order zestril 5mg pills
lakeside cafe
buy dostinex without prescription buy loratadine 10mg sale dapoxetine 60mg oral
medrol 8 mg oral purchase triamcinolone pills desloratadine online buy
mind healing music
purchase cytotec generic buy generic cytotec for sale buy diltiazem pills for sale
piracetam 800 mg brand betamethasone 20gm tablet order clomipramine without prescription
zovirax brand zovirax online buy brand rosuvastatin 20mg
itraconazole pill itraconazole us buy tinidazole pills
zetia 10mg price purchase sumycin pill order sumycin 500mg online cheap
olanzapine pills bystolic order valsartan 80mg cost
musica eletronica
order cyclobenzaprine online cheap ozobax usa toradol 10mg for sale
colcrys 0.5mg brand colchicine brand cheap methotrexate 5mg
acne medication by prescription buy omnicef pill order acne pills online
I have read some excellent stuff here Definitely value bookmarking for revisiting I wonder how much effort you put to make the sort of excellent informative website
massage
list of otc allergy medications depo-medrol drug does allegra require a prescription
What i dont understood is in reality how youre now not really a lot more smartlyfavored than you might be now Youre very intelligent You understand therefore significantly in terms of this topic produced me personally believe it from a lot of numerous angles Its like women and men are not interested except it is one thing to accomplish with Woman gaga Your own stuffs outstanding Always care for it up
Congratulations on your incredible gift for writing! Your article is an engaging and enlightening read. Wishing you a New Year full of achievements and happiness!
soft jazz
Amazing piece! I’m a writer as well and ready to contribute my skills
The article was very engaging. Consider incorporating more visuals to make it stand out. My website can offer some suggestions.
meditation music
The piece was well-researched. Including more visual content could make it even better, and my website might have the resources you need.
Truly a high-quality article! I am interested in writing similar pieces.
sleep medication prescription online melatonin without prescription
Thank you for the good writeup It in fact was a amusement account it Look advanced to far added agreeable from you However how could we communicate
prednisone us buy prednisone without prescription
Нуждаетесь в удобной службе доставки цветов? “Цветов.ру” предлагает великолепный сервис по доставке цветов в различных уголках страны, включая Нефтекамск, Казань, Владимир, Тихорецк, Москва, Уфа, Янаул, Оренбург, Орехово-Зуево, Набережные Челны, Киров, Зеленоград, Кемерово, Благовещенск, Йошкар-Ола, Иваново, Тольятти, Вологда, Волгоград, Долгопрудный, Смоленск, Сосновый Бор, Салават, Печора, Сыктывкар, Ростов-на-Дону, Грозный, Новочеркасск, Самара, Астрахань.
Не упустите шанс порадовать себя или своих близких удивительным букетом от нашей службы доставки цветов, заказав букет на нашем сайте по услуге https://extralogic.ru/chelny/ – доставка цветов.
Прибегая к услугам “Цветов.ру”, вы обеспечиваете себе высокое качество букетов, с помощью опытных мастеров флористики. Наши сервисы включают не только стандартную доставку, но и индивидуальные опции, такие как сервис фотоотчета до и после доставки букета.
Независимо от вашего адресата, будь то Нефтекамск, Казань, Владимир, или любой другой город, “Цветов.ру” гарантирует быстрой и профессиональной доставке.
Выберите ваш заказ сегодня и передайте радость и красоту с “Цветов.ру”, вашим идеальным выбором для доставки цветов в любой части России.
prescription anti nausea medication names buy generic zyloprim
top rated acne pills buy mometasone furoate without a prescription best pills to treat acne
heartburn after taking antibiotics buy quinapril 10 mg pills
accutane 10mg canada order absorica pills accutane tablet
Хотел выразить благодарность коллеге за поддержку. Заказал на “Цветов.ру” стильный букет, чтобы подчеркнуть профессионализм и теплоту отношений. Рекомендую всем, кто ценит красоту в мелочах! Советую! Вот ссылка https://mebeli16.ru/zelenograd/ – доставка цветов 24
amoxil 250mg pills order amoxil 250mg online amoxicillin for sale online
buy sleep medications online buy meloset cheap
effexor 50 mg tablets
fildena 150
purchase zithromax for sale azithromycin usa zithromax 500mg cost
I’m grateful. I have spent a long time looking for information on this subject, and yours is the greatest I have come across so far. However, what about the revenue? Are you positive about the source?
gabapentin 100mg generic generic gabapentin 100mg
order azipro without prescription order azithromycin 500mg online purchase azithromycin pills
lasix drug order furosemide online cheap
where to buy omnacortil without a prescription buy cheap omnacortil buy generic omnacortil for sale
amoxil 1000mg ca buy amoxil 1000mg generic amoxil 500mg for sale
doxycycline 100mg pills order doxycycline
albuterol inhalator generic ventolin 4mg over the counter order albuterol online cheap
order generic augmentin 625mg clavulanate cheap
synthroid 150mcg uk levoxyl over the counter cheap levothroid online
buy vardenafil 10mg online buy levitra pill
clomid 50mg price clomiphene canada buy clomid 50mg online
buy tizanidine 2mg generic cost tizanidine tizanidine over the counter
prednisone 40mg pills deltasone over the counter order prednisone 5mg for sale
rybelsus 14 mg oral semaglutide 14 mg brand rybelsus 14 mg cheap
isotretinoin where to buy oral isotretinoin 10mg accutane 40mg canada
semaglutide 14mg usa order rybelsus online buy generic rybelsus
Переход на здоровое питание подтолкнул меня к покупке ручной соковыжималки. Я выбрал компанию ‘Все соки’, и это был лучший выбор. Их продукция высокого качества и надёжна. https://blender-bs5.ru/collection/ruchnye-shnekovye-sokovyzhimalki – Ручная соковыжималка купить – лучшее решение для здоровья и благополучия.
buy antihistamine pills onlin albuterol price order ventolin online cheap
generic amoxicillin 500mg cost amoxicillin 500mg brand amoxil
Hi my love, I just wanted to say how well written and packed with virtually all the essential information this post is. I’m hoping for more blogs similar to this one.
order amoxiclav without prescription order generic augmentin 1000mg purchase augmentin sale
cheap azithromycin 250mg buy azithromycin 250mg generic buy azithromycin 500mg generic
buy synthroid 75mcg generic synthroid 100mcg sale synthroid 150mcg price
buy omnacortil 40mg pills omnacortil 10mg for sale order prednisolone 10mg for sale
order clomiphene pills buy serophene sale serophene over the counter
gabapentin 800mg for sale neurontin 800mg generic buy neurontin 800mg for sale
buy furosemide pill buy lasix 40mg lasix 40mg without prescription
buy viagra pills purchase sildenafil online buy generic viagra 50mg
doxycycline cost order doxycycline 200mg online cheap buy monodox online
rybelsus 14mg pills buy rybelsus 14 mg online semaglutide brand
poker online for real money casino card games roulette online for real money
levitra sale buy vardenafil 10mg sale buy vardenafil 20mg without prescription
generic pregabalin 75mg buy cheap pregabalin buy pregabalin 75mg
hydroxychloroquine 400mg for sale buy plaquenil paypal order plaquenil 200mg online
triamcinolone 10mg usa aristocort 4mg for sale purchase triamcinolone sale
tadalafil 20mg cost cialis next day tadalafil 5mg uk
desloratadine 5mg sale order clarinex 5mg sale order desloratadine
ozempic tablet
buy cenforce without prescription purchase cenforce generic buy cenforce generic
semaglutide canada
buy loratadine online cheap buy claritin pills for sale buy loratadine 10mg
buy chloroquine tablets purchase chloroquine without prescription aralen 250mg ca
buy priligy 30mg without prescription purchase priligy generic buy misoprostol pills for sale
glycomet 1000mg tablet glucophage without prescription glycomet 500mg uk
xenical 60mg generic order diltiazem 180mg generic buy diltiazem 180mg generic
buy atorvastatin 20mg for sale lipitor medication atorvastatin 20mg ca
order acyclovir generic order zyloprim 300mg order allopurinol 300mg pill
order amlodipine for sale buy norvasc 10mg generic order generic amlodipine 10mg
how to get lisinopril without a prescription order lisinopril 2.5mg generic order lisinopril online cheap
crestor 20mg over the counter zetia over the counter buy ezetimibe medication
buy generic prilosec omeprazole 20mg ca purchase prilosec
buy motilium cheap motilium order online buy generic sumycin
order lopressor sale metoprolol over the counter purchase metoprolol pill
purchase cyclobenzaprine generic order ozobax online cheap oral lioresal
buy tenormin 100mg pills generic tenormin order tenormin 50mg online cheap
order toradol 10mg generic buy toradol tablets colchicine for sale
medrol 16mg without a doctor prescription medrol for sale medrol brand name
buy inderal paypal order plavix 150mg generic buy clopidogrel medication
cheap research papers for sale academic writing online academic writing uk
buy methotrexate for sale order methotrexate 2.5mg pills buy coumadin
Superb, congratulations
meloxicam 15mg sale celebrex 200mg cheap buy celecoxib online
Hi my family member I want to say that this post is awesome nice written and come with approximately all significant infos I would like to peer extra posts like this
linetogel
I do trust all the ideas youve presented in your post They are really convincing and will definitely work Nonetheless the posts are too short for newbies May just you please lengthen them a bit from next time Thank you for the post
order flomax 0.2mg without prescription flomax 0.4mg cost buy celecoxib pills for sale
buy esomeprazole without prescription buy generic topiramate 100mg topamax 200mg drug
wow, amazing
wow, amazing
nice content!nice history!! boba 😀
ondansetron 4mg without prescription buy zofran 4mg without prescription spironolactone 100mg tablet
nice content!nice history!! boba 😀
imitrex 50mg us imitrex 25mg cost order levaquin online
order zocor 20mg pill valtrex 500mg drug buy generic valacyclovir 500mg
purchase dutasteride sale dutasteride for sale online order zantac 150mg online
Wow, wonderful weblog structure! How lengthy have you been blogging for?
you made blogging glance easy. The total glance of your website
is wonderful, let alone the content material! You can see similar here najlepszy sklep
purchase ampicillin without prescription doxycycline order buy amoxil tablets
finasteride 5mg canada diflucan price diflucan usa
wow, amazing
Hello there! Do you know if they make any plugins to safeguard against hackers?
I’m kinda paranoid about losing everything I’ve worked hard on. Any recommendations?
I saw similar here: Sklep
ciprofloxacin 1000mg us – brand cipro 1000mg cost amoxiclav
baycip tablet – oral augmentin 1000mg order augmentin 1000mg generic
buy metformin online australia
I’m on the same page as those above – this post is a delightful masterpiece!
[url=https://metformindi.com/]where to buy metformin[/url]
wow, amazing
Your posts always provide me with a new perspective and encourage me to look at things differently Thank you for broadening my horizons
Your posts always provide me with a new perspective and encourage me to look at things differently Thank you for broadening my horizons
buy generic flagyl – azithromycin 500mg drug zithromax 250mg price
generic ciprofloxacin – cost erythromycin 250mg order generic erythromycin
Your posts always provide me with a new perspective and encourage me to look at things differently Thank you for broadening my horizons
nice content!nice history!! boba 😀
buy valacyclovir tablets – nateglinide 120mg drug acyclovir 800mg ca
stromectol for humans for sale – purchase aczone for sale sumycin 500mg sale
https://pstp.pa-tebingtinggi.go.id/putusan/?traffic=hometogel
https://mind.brain.harvard.edu/slot-online14/?id=69845
https://info.unsia.ac.id/wp-admin/sys/?brand=togelon-176
Your faith in us is our utmost importance. Therefore, we
work with complete transparency and dedication to
your case.
Experience the relief of recovering your QIWI wallet balance with our expert services.
nice content!nice history!! boba 😀
https://siwas.pa-tebingtinggi.go.id/info/?traffic=MARIATOGEL
buy cheap generic flagyl – buy cefaclor online order zithromax 500mg online cheap
Hello, yup this post is genuinely pleasant and I have
learned lot of things from it concerning blogging. thanks.
I saw similar here: Sklep online
buy acillin for sale amoxil online order purchase amoxil pills
blablablu
blublabla
blobloblu
blablablu
lasix where to buy – furosemide 100mg sale buy captopril 25 mg for sale
I can’t help but express how much your content brightened my day. Keep bringing that positive energy!
bliblibli
This post made my day so special that I had to express my gratitude. Keep enchanting us!
124SDS9742
Your article helped me a lot, is there any more related content? Thanks!
Good day! Do you know if they make any plugins to help with
SEO? I’m trying to get my blog to rank for some targeted keywords but I’m not
seeing very good results. If you know of any please share.
Thanks! You can read similar blog here:
Ecommerce
cululutata
124969D742
marvelous day starting with an outstanding literature
It’s very interesting! If you need help, look here: ARA Agency
nice content!nice history!! boba 😀
1SS3D249742
boba 😀
1SS3D249742
blabla
CRIMINAL
124969D742
PHISHING
bliblibli
blublabla
LOSE MONEY
nice content!nice history!! boba 😀
glucophage 1000mg brand – buy generic bactrim over the counter buy lincocin paypal
1249742
blabla
1SS3D249742
1SS3D249742
1249742
blublun
blublu
retrovir price – epivir 100mg drug purchase zyloprim
blolbo
order clozaril 100mg – buy altace 10mg sale order famotidine 20mg pills
Good day! Do you know if they make any plugins to help with SEO?
I’m trying to get my blog to rank for some targeted keywords but I’m not seeing
very good success. If you know of any please share.
Thanks! You can read similar text here: Dobry sklep
bliloblo
nice content!nice history!! boba 😀
wow, amazing
blolbo
blibliblu
cululutata
cululutata
wow, amazing
nice content!nice history!!
hello
cululutata
124SDS9742
Good day! Do you know if they make any plugins to help with SEO?
I’m trying to get my blog to rank for some targeted keywords but I’m not seeing very good success.
If you know of any please share. Thanks! You can read similar
text here: Sklep internetowy
blabla
blobloblu
blublabla
blabla
bluatblaaotuy
purchase seroquel online cheap – venlafaxine generic buy generic eskalith
blublu
124969D742
bluatblaaotuy
blablablu
palabraptu
palabraptu
blublabla
1SS3D249742
blablablu
lalablublu
blablablu
bliblibli
blublabla
blublabla
bluatblaaotuy
anafranil 50mg for sale – sinequan sale buy doxepin 25mg for sale
blublabla
nice content!nice history!! boba 😀
atarax tablet – buy atarax generic amitriptyline 25mg for sale
blublabla
nice content!nice history!! boba 😀
blobloblu
bliblibli
blobloblu
blablablu
nice content!nice history!! boba 😀
blolbo
palabraptu
1249742
boba 😀
1249742
blublu
Hi! Do you know if they make any plugins to assist with
SEO? I’m trying to get my blog to rank for some targeted
keywords but I’m not seeing very good results. If you
know of any please share. Many thanks! You can read similar article here: Auto Approve List
phising
lalablublu
blablablu
clavulanate drug – brand ethambutol 1000mg purchase ciprofloxacin online
blolbo
bluatblaaotuy
blibli
blublabla
palabraptu
amoxil online – order keflex 500mg pills buy cipro 500mg generic
scam
blablablu
1SS3D249742
blibli
blobloblu
blibliblu
bliblibli
blublun
blibli
blublu
Hello! Do you know if they make any plugins to help with SEO?
I’m trying to get my site to rank for some targeted keywords but I’m not seeing very good results.
If you know of any please share. Cheers! You can read similar text here:
Hitman.agency
phising
scam
phising
phising
blablablu
124969D742
blablablu
nice content!nice history!!
bliblibli
124SDS9742
bluatblaaotuy
124969D742
bliblibli
phising
scam
scam
blublu
bliloblo
1249742
cleocin drug – buy cleocin pill order chloramphenicol without prescription
lalablublu
buy zithromax 500mg for sale – buy ofloxacin paypal ciprofloxacin buy online
bliloblo
lalablublu
124969D742
blublun
nice content!nice history!!
[url=http://bestmetformin.online/]metformin for sale[/url]
I highly advise to avoid this platform. The experience I had with it has been nothing but frustration along with suspicion of scamming practices. Exercise extreme caution, or even better, seek out an honest service for your needs.
[url=https://prednisonexg.online/]how can i get prednisone[/url]
[url=http://lisinoprill.com/]lipinpril[/url]
nice content!nice history!!
[url=https://lisinoprilos.online/]40 mg lisinopril for sale[/url]
SCAM
cululutata
[url=https://metforemin.online/]metformin 500 mg tabs[/url]
[url=https://oprednisone.online/]non prescription prednisone 20mg[/url]
THIS IS SCAM
[url=https://valtrexmedication.online/]valtrex 1 mg[/url]
I highly advise to avoid this site. My own encounter with it has been only frustration along with suspicion of fraudulent activities. Be extremely cautious, or alternatively, find an honest platform for your needs.
[url=http://valtrexv.com/]buy valtrex without a prescription[/url]
blibliblu
I strongly recommend stay away from this platform. The experience I had with it has been nothing but frustration and concerns regarding deceptive behavior. Be extremely cautious, or alternatively, look for a trustworthy site to fulfill your requirements.
I highly advise stay away from this site. My personal experience with it was purely dismay along with doubts about fraudulent activities. Proceed with extreme caution, or even better, find a trustworthy site to fulfill your requirements.
PISHING
buy ivermectin 3mg – oral cefaclor 500mg generic cefaclor 500mg
nice content!nice history!!
[url=http://asynthroid.com/]levothyroxine synthroid[/url]
THIS IS SCAM
[url=https://bmtadalafil.online/]tadalafil drug[/url]
PISHING
[url=http://happyfamilystorerx.online/]canadian pharmacy online cialis[/url]
[url=http://happyfamilystorerx.online/]australia online pharmacy free shipping[/url]
palabraptu
https://smkbinainsanmandirikotabogor.sch.id/smk/?wiz=jutawanbet
[url=https://synthroidx.com/]synthroid 100 mg[/url]
1SS3D249742
[url=http://happyfamilymedicalstore.online/]online pharmacy india[/url]
albuterol inhalator ca – buy fluticasone online cheap buy theo-24 Cr 400 mg
I strongly recommend stay away from this site. My own encounter with it has been purely frustration along with suspicion of fraudulent activities. Proceed with extreme caution, or even better, seek out a more reputable platform to meet your needs.
[url=http://tadalafilu.online/]tadalafil 20mg cost[/url]
cululutata
PISHING
blibli
[url=https://oprednisone.com/]prednisone 40 mg price[/url]
lalablublu
[url=http://azithromycinhq.com/]azithromycin generic cost india[/url]
[url=http://synthroidx.com/]where to buy synthroid online without a prescription[/url]
LOSE MONEY
I highly advise to avoid this site. My personal experience with it has been nothing but dismay and doubts about fraudulent activities. Exercise extreme caution, or alternatively, look for a more reputable site for your needs.
LOSE MONEY
[url=http://lisinoprilgp.com/]prinivil tabs[/url]
SCAM
[url=https://medicinesaf.online/]internet pharmacy mexico[/url]
[url=http://valtrexmedication.com/]cheap valtrex generic[/url]
[url=http://azithromycinmds.online/]4 azithromycin cream[/url]
[url=http://tadalafilstd.com/]tadalafil tablets 20 mg[/url]
[url=https://isynthroid.online/]synthroid 137 mcg coupon[/url]
[url=http://metforminn.com/]how to get metformin uk[/url]
[url=https://medicinesaf.online/]northern pharmacy[/url]
I highly advise stay away from this site. My personal experience with it was purely frustration and suspicion of fraudulent activities. Proceed with extreme caution, or alternatively, look for a more reputable platform to meet your needs.
[url=https://synthroidsl.online/]synthroid 100 mcg cost[/url]
[url=http://happyfamilymedicalstore.online/]top online pharmacy 247[/url]
[url=http://oazithromycin.online/]zithromax 500mg[/url]
[url=http://valtrexmedication.com/]valtrex generic purchase[/url]
[url=http://valtrexmedication.com/]valtrex over the counter uk[/url]
blibli
[url=https://drugstorepp.online/]silkroad online pharmacy[/url]
order medrol sale – brand claritin buy azelastine 10 ml for sale
1249742
blublu
blibli
blolbo
[url=http://lisinoprilgp.online/]lisinopril 12.5[/url]
order generic desloratadine – buy clarinex 5mg online cheap albuterol inhalator order
[url=http://synthroidx.online/]synthroid 50 mcg[/url]
blibliblu
blublun
[url=http://drugstorepp.online/]northern pharmacy[/url]
I highly advise steer clear of this platform. My own encounter with it has been nothing but dismay along with suspicion of deceptive behavior. Proceed with extreme caution, or alternatively, seek out an honest platform to fulfill your requirements.
[url=https://synthroidam.online/]synthroid.com[/url]
I highly advise to avoid this site. The experience I had with it has been only frustration as well as concerns regarding fraudulent activities. Proceed with extreme caution, or better yet, look for a more reputable service to fulfill your requirements.
bliloblo
blolbo
[url=https://happyfamilystorerx.online/]online pharmacy discount code[/url]
[url=http://bestprednisone.online/]how to get prednisone over the counter[/url]
С целью улучшения видимости моего сайта в поисковых системах, я обратился в seo-best1.ru. Ребята провели грамотный аудит, подобрали ключевые слова и провели оптимизацию содержания сайта. Уже через месяц трафик значительно вырос, а клиенты стали чаще обращаться. Рекомендую!
[url=https://isynthroid.com/]synthroid 25 mcg cost[/url]
[url=http://synthroidotp.online/]synthroid 15 mg[/url]
[url=https://bestmedsx.com/]online pharmacy delivery usa[/url]
[url=http://happyfamilystorerx.online/]family store rx[/url]
buy micronase generic – pioglitazone canada dapagliflozin 10 mg without prescription
[url=http://ismetformin.online/]price of metformin 500mg tablets[/url]
[url=https://lisinoprilgp.com/]purchase lisinopril[/url]
[url=http://tadalafilstd.online/]cost for cialis for daily use[/url]
[url=http://prednisonecsr.com/]prednisone 2[/url]
[url=https://bmtadalafil.online/]tadalafil tablets 2.5mg india[/url]
bliloblo
[url=http://happyfamilystorerx.online/]northern pharmacy canada[/url]
124969D742
[url=https://synthroidx.online/]cost of generic synthroid[/url]
[url=http://lisinoprill.com/]lisinopril 40 mg without prescription[/url]
[url=http://valtrexv.com/]buy valtrex australia[/url]
[url=http://azithromycinhq.com/]how to buy zithromax online[/url]
PBN sites
We’ll build a structure of PBN sites!
Merits of our self-owned blog network:
We execute everything SO THAT google DOES NOT comprehend THAT THIS IS A privately-owned blog network!!!
1- We acquire domain names from separate registrars
2- The primary site is hosted on a VPS server (VPS is rapid hosting)
3- Other sites are on various hostings
4- We attribute a distinct Google ID to each site with confirmation in Google Search Console.
5- We design websites on WP, we don’t utilise plugins with assistance from which malware penetrate and through which pages on your websites are established.
6- We never duplicate templates and utilize only exclusive text and pictures
We don’t work with website design; the client, if desired, can then edit the websites to suit his wishes
[url=http://oazithromycin.online/]drug azithromycin 500 mg[/url]
metformin without prescription – hyzaar buy online precose uk
[url=https://happyfamilystorerx.online/]reliable rx pharmacy[/url]
[url=https://prednisonekx.online/]prednisone 20mg by mail without prescription[/url]
prandin usa – generic jardiance buy empagliflozin 10mg sale
[url=https://valtrexid.com/]how much is valtrex cost[/url]
[url=http://predniso.online/]prednisone for sale in canada[/url]
[url=https://olisinopril.online/]cheap lisinopril no prescription[/url]
[url=http://prednisonexg.online/]5mg prednisone[/url]
[url=https://lisinoprilgp.com/]lisinopril 12.5 mg price[/url]
[url=https://oazithromycin.com/]where can i get azithromycin over the counter[/url]
[url=http://oprednisone.com/]prednisone pill cost[/url]
[url=https://oazithromycin.com/]zithromax online usa no prescription[/url]
[url=http://isynthroid.online/]synthroid 175 mcg price[/url]
[url=http://happyfamilymedicalstore.online/]discount pharmacy online[/url]
[url=http://tadalafilstd.online/]tadalafil canada cost[/url]
[url=https://azithromycinps.online/]zithromax buy online no prescription[/url]
[url=https://happyfamilymedicalstore.online/]cross border pharmacy canada[/url]
[url=https://azithromycinmds.online/]azithromycin script[/url]
[url=https://synthroidotp.online/]how to get synthroid without a prescription[/url]
[url=http://valtrexv.com/]how to order valtrex online[/url]
[url=http://prednisoneo.online/]prednisone brand name[/url]
order terbinafine for sale – buy griseofulvin 250mg generic purchase grifulvin v online cheap
1249742
blublu
order rybelsus 14mg online cheap – glucovance sale desmopressin us
[url=http://happyfamilymedicalstore.online/]online pharmacy ed[/url]
[url=https://prednisoneiv.online/]10 mg prednisone tablets[/url]
[url=http://prednisoneo.com/]prednisone 2[/url]
124SDS9742
blublu
[url=https://happyfamilystorerx.online/]austria pharmacy online[/url]
[url=http://medicinesaf.online/]canadapharmacyonline legit[/url]
bliloblo
blublu
[url=https://oazithromycin.com/]buy zithromax online canada[/url]
[url=https://happyfamilystorerx.online/]brazilian pharmacy online[/url]
blolbo
[url=https://tadalafilstd.online/]can i buy cialis in mexico[/url]
palabraptu
lalablublu
[url=http://bestmedsx.com/]american pharmacy[/url]
order ketoconazole – buy itraconazole 100 mg for sale buy sporanox for sale
Brands that manufacture chronometer watches
Understanding COSC Validation and Its Importance in Watchmaking
COSC Accreditation and its Rigorous Criteria
COSC, or the Official Swiss Chronometer Testing Agency, is the official Swiss testing agency that certifies the accuracy and precision of wristwatches. COSC validation is a mark of superior craftsmanship and dependability in chronometry. Not all timepiece brands pursue COSC accreditation, such as Hublot, which instead follows to its proprietary demanding standards with movements like the UNICO, achieving comparable precision.
The Science of Exact Timekeeping
The core system of a mechanized timepiece involves the mainspring, which provides power as it unwinds. This system, however, can be prone to external elements that may impact its accuracy. COSC-accredited movements undergo rigorous testing—over fifteen days in various conditions (5 positions, 3 temperatures)—to ensure their resilience and dependability. The tests assess:
Typical daily rate accuracy between -4 and +6 secs.
Mean variation, maximum variation rates, and effects of temperature changes.
Why COSC Validation Is Important
For watch fans and collectors, a COSC-validated watch isn’t just a piece of technology but a demonstration to enduring excellence and precision. It symbolizes a watch that:
Offers excellent dependability and accuracy.
Provides assurance of superiority across the complete design of the watch.
Is probable to maintain its value better, making it a sound investment.
Famous Timepiece Manufacturers
Several well-known manufacturers prioritize COSC validation for their watches, including Rolex, Omega, Breitling, and Longines, among others. Longines, for instance, provides collections like the Archive and Spirit, which highlight COSC-certified movements equipped with advanced substances like silicon equilibrium suspensions to improve resilience and performance.
Historical Background and the Evolution of Chronometers
The notion of the chronometer originates back to the requirement for accurate chronometry for navigational at sea, emphasized by John Harrison’s work in the eighteenth cent. Since the official foundation of Controle Officiel Suisse des Chronometres in 1973, the validation has become a benchmark for evaluating the precision of luxury watches, maintaining a legacy of superiority in watchmaking.
Conclusion
Owning a COSC-validated watch is more than an visual selection; it’s a commitment to excellence and accuracy. For those valuing accuracy above all, the COSC accreditation offers tranquility of mind, guaranteeing that each certified watch will operate reliably under various circumstances. Whether for personal satisfaction or as an investment, COSC-validated watches distinguish themselves in the world of horology, carrying on a legacy of precise timekeeping.
線上賭場
[url=https://oazithromycin.com/]zithromax australia[/url]
[url=http://oprednisone.online/]prednisone 105mg[/url]
nice content!nice history!!
[url=http://predniso.online/]best price 20mg prednisone[/url]
[url=https://metforminn.com/]metformin 15 mg[/url]
famvir online order – valcivir without prescription purchase valcivir generic
[url=http://oazithromycin.com/]azithromycin tablets over the counter[/url]
casibom giriş
Nihai Dönemsel En Fazla Gözde Kumarhane Sitesi: Casibom
Casino oyunlarını sevenlerin artık duymuş olduğu Casibom, nihai dönemde adından çoğunlukla söz ettiren bir bahis ve casino sitesi haline geldi. Ülkemizdeki en mükemmel bahis platformlardan biri olarak tanınan Casibom’un haftalık cinsinden değişen giriş adresi, piyasada oldukça yenilikçi olmasına rağmen itimat edilir ve kazandıran bir platform olarak tanınıyor.
Casibom, muadillerini geride kalarak eski bahis platformların geride bırakmayı başarılı oluyor. Bu pazarda eski olmak önemli olsa da, katılımcılarla iletişim kurmak ve onlara erişmek da aynı miktar önemlidir. Bu durumda, Casibom’un her saat hizmet veren gerçek zamanlı destek ekibi ile rahatça iletişime geçilebilir olması önemli bir fayda sunuyor.
Hızlıca artan oyuncuların kitlesi ile dikkat çekici Casibom’un arka planında başarılı faktörleri arasında, yalnızca kumarhane ve canlı olarak casino oyunlarıyla sınırlı kısıtlı olmayan geniş bir servis yelpazesi bulunuyor. Sporcular bahislerinde sunduğu geniş alternatifler ve yüksek oranlar, oyuncuları cezbetmeyi başarılı oluyor.
Ayrıca, hem sporcular bahisleri hem de kumarhane oyunları katılımcılara yönelik sunulan yüksek yüzdeli avantajlı bonuslar da ilgi çekiyor. Bu nedenle, Casibom çabucak piyasada iyi bir pazarlama başarısı elde ediyor ve büyük bir katılımcı kitlesi kazanıyor.
Casibom’un kazandıran bonusları ve popülerliği ile birlikte, platforma üyelik nasıl sağlanır sorusuna da bahsetmek gerekir. Casibom’a hareketli cihazlarınızdan, PC’lerinizden veya tabletlerinizden internet tarayıcı üzerinden kolayca erişilebilir. Ayrıca, platformun mobil cihazlarla uyumlu olması da büyük bir fayda sağlıyor, çünkü şimdi hemen hemen herkesin bir akıllı telefonu var ve bu telefonlar üzerinden hızlıca ulaşım sağlanabiliyor.
Taşınabilir cep telefonlarınızla bile yolda gerçek zamanlı bahisler alabilir ve yarışmaları canlı olarak izleyebilirsiniz. Ayrıca, Casibom’un mobil uyumlu olması, ülkemizde kumarhane ve casino gibi yerlerin kanuni olarak kapatılmasıyla birlikte bu tür platformlara erişimin büyük bir yolunu oluşturuyor.
Casibom’un itimat edilir bir kumarhane platformu olması da gereklidir bir artı getiriyor. Lisanslı bir platform olan Casibom, duraksız bir şekilde eğlence ve kar elde etme imkanı getirir.
Casibom’a kullanıcı olmak da oldukça rahatlatıcıdır. Herhangi bir belge şartı olmadan ve ücret ödemeden siteye kolaylıkla kullanıcı olabilirsiniz. Ayrıca, site üzerinde para yatırma ve çekme işlemleri için de birçok farklı yöntem bulunmaktadır ve herhangi bir kesim ücreti talep edilmemektedir.
Ancak, Casibom’un güncel giriş adresini takip etmek de elzemdir. Çünkü canlı bahis ve oyun web siteleri popüler olduğu için hileli platformlar ve dolandırıcılar da görünmektedir. Bu nedenle, Casibom’un sosyal medya hesaplarını ve güncel giriş adresini düzenli olarak kontrol etmek önemlidir.
Sonuç, Casibom hem itimat edilir hem de kar getiren bir casino sitesi olarak dikkat çekiyor. Yüksek ödülleri, geniş oyun seçenekleri ve kullanıcı dostu taşınabilir uygulaması ile Casibom, casino tutkunları için ideal bir platform sunuyor.
[url=https://synthroidsl.online/]where can i buy synthroid cheap[/url]
[url=http://synthroidam.online/]synthroid rx cost[/url]
Stanford is a world-renowned university that accepts new students https://assignmentcalculator.stanford.edu/ Stanford also provides free tuition for the less fortunate
Immerse yourself in the crypto economy with imToken, where security meets innovation. Explore, invest, and grow your digital assets. | 在imToken中沉浸于加密经济,安全与创新并重。探索、投资并增长您的数字资产。https://www.imtokend.com
httn3m3lu2
Telegram下载 – 私密、安全的通讯方式: 在这里下载Telegram,体验高度安全的即时通讯。支持各种设备,完美融合隐私保护。[Download Telegram – Private, Secure Communication: Experience highly secure instant messaging with Telegram. Available on various devices, perfectly integrating privacy protection.]https://www.telegramchinese.org
4fgzrlu967
[url=http://drugstorepp.online/]canadian pharmacy ltd[/url]
lanoxin 250mg for sale – trandate buy online lasix online
[url=http://tadalafilstd.com/]60 mg tadalafil[/url]
주식신용
로드스탁과의 레버리지 방식의 스탁: 투자 전략의 참신한 영역
로드스탁에서 공급하는 레버리지 스탁은 증권 투자의 한 방식으로, 상당한 수익률을 목적으로 하는 투자자들에게 매력적인 옵션입니다. 레버리지 사용을 사용하는 이 방법은 투자자가 자신의 투자금을 초과하는 금액을 투자할 수 있도록 하여, 주식 장에서 더 큰 작용을 행사할 수 있는 기회를 공급합니다.
레버리지 스탁의 원리
레버리지 방식의 스탁은 일반적으로 투자금을 빌려 사용하는 방법입니다. 사례를 들어, 100만 원의 자본으로 1,000만 원 상당의 증권을 사들일 수 있는데, 이는 투자자가 기본 투자 금액보다 훨씬 더욱 많은 증권을 사들여, 주식 가격이 올라갈 경우 상응하는 훨씬 더 큰 수익을 가져올 수 있게 됩니다. 그렇지만, 증권 값이 하락할 경우에는 그 손실 또한 커질 수 있으므로, 레버리지를 이용할 때는 조심해야 합니다.
투자 전략과 레버리지
레버리지는 특히 성장 잠재력이 상당한 회사에 투자할 때 유용합니다. 이러한 기업에 큰 비중으로 투입하면, 성공적일 경우 상당한 수익을 가져올 수 있지만, 반대의 경우 큰 리스크도 짊어져야 합니다. 그러므로, 투자자들은 자신의 위험성 관리 능력과 장터 분석을 통해 통해, 어느 회사에 얼마만큼의 자금을 투자할지 결정하게 됩니다 합니다.
레버리지 사용의 이점과 위험성
레버리지 방식의 스탁은 높은 이익을 보장하지만, 그만큼 높은 위험도 따릅니다. 증권 장의 변동은 예측이 어렵기 때문에, 레버리지 사용을 사용할 때는 항상 장터 동향을 면밀히 주시하고, 피해를 최소로 줄일 수 있는 전략을 구성해야 합니다.
결론: 신중한 선택이 필수입니다
로드스탁을 통해 제공하는 레버리지 스탁은 막강한 투자 도구이며, 잘 이용하면 상당한 수입을 제공할 수 있습니다. 그렇지만 상당한 위험도 생각해 봐야 하며, 투자 결정이 필요한 사실과 세심한 판단 후에 이루어져야 합니다. 투자하는 사람의 금융 상황, 위험 수용 능력, 그리고 시장의 상황을 고려한 균형 잡힌 투자 방법이 중요하며.
[url=http://valtrexmedication.com/]valtrex prices canada[/url]
[url=https://olisinopril.online/]lisinopril 500 mg[/url]
[url=https://valtrexv.com/]buy valrex online[/url]
[url=http://lisinoprilgp.online/]zestoretic cost[/url]
I strongly recommend to avoid this site. My personal experience with it was nothing but frustration and suspicion of fraudulent activities. Proceed with extreme caution, or even better, seek out a more reputable service to meet your needs.I highly advise steer clear of this site. The experience I had with it was nothing but disappointment as well as suspicion of fraudulent activities. Exercise extreme caution, or even better, find an honest site to fulfill your requirements.
[url=http://happyfamilystorerx.online/]canadian pharmacy india[/url]
[url=http://happyfamilymedicalstore.online/]online pharmacy delivery[/url]
[url=https://prednisoneiv.online/]where to get prednisone[/url]
[url=http://synthroidx.com/]175 mg synthroid[/url]
I highly advise stay away from this platform. My personal experience with it has been nothing but disappointment and concerns regarding scamming practices. Be extremely cautious, or alternatively, find an honest service to meet your needs.I strongly recommend to avoid this platform. My own encounter with it was only dismay and doubts about deceptive behavior. Be extremely cautious, or alternatively, look for a trustworthy platform to meet your needs.
[url=http://tadalafilu.online/]generic tadalafil 20mg from india[/url]
lalablublu
[url=https://happyfamilymedicalstore.online/]top online pharmacy[/url]
blibli
[url=http://olisinopril.com/]prinivil price[/url]
microzide 25 mg brand – lisinopril 10mg pill zebeta online order
[url=https://synthroidx.online/]225 mcg synthroid[/url]
nice content!nice history!!
[url=https://metoformin.online/]metformin prices canada[/url]
проверить свои usdt на чистоту
Проверка кошельков кошелька за выявление наличия подозрительных средств: Охрана вашего электронного финансового портфеля
В мире электронных денег становится все более необходимее гарантировать безопасность своих финансов. Регулярно жулики и криминальные элементы разрабатывают совершенно новые способы мошенничества и угонов электронных денег. Одним из основных методов обеспечения является проверка данных кошелька за выявление незаконных денег.
Почему же так важно осмотреть собственные электронные бумажники?
Прежде всего это обстоятельство важно для того, чтобы защиты собственных финансовых средств. Многие участники рынка находятся в зоне риска потери денег своих средств в результате недобросовестных подходов или угонов. Проверка кошельков способствует предотвращению обнаружить в нужный момент непонятные действия и предупредить.
Что предоставляет фирма?
Мы оказываем сервис проверки анализа криптовалютных кошельков для хранения криптовалюты и переводов с намерением обнаружения источника финансовых средств и выдачи подробного отчета о проверке. Наша платформа проверяет данные пользователя для идентификации неправомерных действий и оценить риск для личного финансового портфеля. Благодаря нашему анализу, вы будете способны предотвратить с регуляторными органами и обезопасить себя от непреднамеренного участия в незаконных операций.
Как осуществляется проверка?
Компания наша организация взаимодействует с ведущими аудиторскими организациями, такими как Cure53, для того чтобы дать гарантию и точность наших проверок данных. Мы внедряем современные технологии и методы анализа данных для выявления потенциально опасных операций средств. Персональные сведения наших пользователей обрабатываются и хранятся в соответствии с высокими стандартами безопасности.
Основной запрос: “проверить свои USDT на чистоту”
Если вас интересует убедиться в надежности ваших кошельков USDT, наши профессионалы оказывает возможность бесплатный анализ первых пяти кошельков. Просто введите свой кошелек в указанное место на нашем сайте проверки, и мы дадим вам подробный отчет о статусе вашего кошелька.
Обеспечьте защиту своих активы прямо сейчас!
Не подвергайте себя риску оказаться в жертвой мошенников злоумышленников или попасть в неприятной ситуации неправомерных действий с вашими собственными финансами. Доверьте свои финансы профессиональным консультантам, которые окажут поддержку, вам обезопаситься криптовалютные средства и предотвратить возможные проблемы. Сделайте первый шаг к обеспечению безопасности безопасности своего криптовалютного портфеля уже сегодня!
lopressor 50mg price – benicar 20mg for sale nifedipine pill
[url=https://isynthroid.online/]synthroid prescription online[/url]
124SDS9742
чистый ли usdt
Тестирование USDT в чистоту: Каковым способом сохранить собственные криптовалютные финансы
Каждый день все больше граждан заботятся на безопасность их цифровых финансов. Каждый день обманщики придумывают новые методы кражи цифровых денег, и владельцы электронной валюты становятся пострадавшими их интриг. Один из техник защиты становится проверка кошельков для присутствие нелегальных денег.
С каким намерением это важно?
Прежде всего, для того чтобы защитить свои активы против шарлатанов а также похищенных монет. Многие вкладчики сталкиваются с вероятностью убытков их фондов вследствие хищных планов или краж. Осмотр бумажников помогает выявить непрозрачные действия а также предотвратить возможные убытки.
Что наша группа предлагаем?
Наша компания предлагаем сервис тестирования криптовалютных кошельков или операций для выявления происхождения средств. Наша система анализирует данные для определения нелегальных операций или оценки риска для вашего портфеля. Из-за этой проверке, вы сможете избежать недочетов с регуляторами и защитить себя от участия в противозаконных переводах.
Каким образом это работает?
Мы работаем с передовыми проверочными организациями, такими как Halborn, чтобы предоставить прецизионность наших проверок. Наша команда используем передовые технологии для обнаружения опасных транзакций. Ваши информация обрабатываются и хранятся согласно с высокими стандартами безопасности и приватности.
Как проверить личные USDT в нетронутость?
В случае если вы желаете подтвердить, что ваши Tether-кошельки чисты, наш сервис предлагает бесплатную проверку первых пяти кошельков. Просто передайте место собственного кошелька на на нашем веб-сайте, или мы предоставим вам полную информацию отчет об его статусе.
Охраняйте вашими средства сегодня же!
Не рискуйте подвергнуться мошенников или оказаться в неблагоприятную ситуацию вследствие незаконных операций. Посетите нам, для того чтобы сохранить ваши криптовалютные финансовые ресурсы и избежать проблем. Предпримите первый шаг к безопасности вашего криптовалютного портфеля прямо сейчас!
Проверка данных кошельков за наличие незаконных средств: Охрана личного цифрового портфельчика
В мире электронных денег становится все необходимее соблюдать защиту своих финансовых активов. Регулярно жулики и киберпреступники создают свежие способы обмана и кражи цифровых финансов. Ключевым инструментом ключевых инструментов обеспечения является проверка кошельков кошельков по выявление нелегальных средств передвижения.
По какой причине вот важно и осмотреть свои цифровые кошельки?
Прежде всего, вот данный факт необходимо для того, чтобы защиты собственных финансовых средств. Многие из люди, вкладывающие деньги рискуют потерять потери своих финансовых средств в результате недобросовестных планов или угонов. Проверка данных кошельков помогает предотвратить обнаружить на своем пути непонятные манипуляции и предотвратить возможные убытки.
Что предоставляет фирма-разработчик?
Мы оказываем сервис анализа цифровых кошельков для хранения криптовалюты и переводов средств с намерением выявления начала финансовых средств и выдачи подробного отчета. Наша система проверяет данные для обнаружения потенциально нелегальных операций средств и оценить риск для того, чтобы личного портфеля. Благодаря нашей службе проверки, вы можете предотвратить возможные проблемы с регуляторами и обезопасить себя от непреднамеренного участия в незаконных операций.
Как осуществляется проверка?
Наши фирма-разработчик взаимодействует с ведущими аудиторскими организациями агентствами, например Certik, для того чтобы дать гарантию и точность наших анализов. Мы внедряем новейшие и методы проверки данных для обнаружения небезопасных действий. Персональные сведения наших заказчиков обрабатываются и хранятся в базе в соответствии с положениями высокими стандартами безопасности.
Основной запрос: “проверить свои USDT на чистоту”
Если вас интересует убедиться в безопасности и чистоте личных USDT кошельков, наши специалисты оказывает возможность бесплатной проверки первых пяти кошельков. Просто введите свой кошелек в указанное место на нашем онлайн-ресурсе, и мы предоставим вам подробный отчет о состоянии вашего кошелька.
Обезопасьте свои активы прямо сейчас!
Не рискуйте попасть пострадать хакеров или оказаться в неприятной ситуации подозрительных действий с вашими финансовыми средствами. Позвольте себе профессионалам, которые помогут, вам и вашим деньгам защититься криптовалютные средства и предотвратить возможные. Сделайте первый шаг к обеспечению безопасности обеспечению безопасности своего электронного портфельчика сразу же!
Тестирование Тетер для чистоту: Каковым способом обезопасить свои криптовалютные активы
Каждый день все больше граждан обращают внимание в надежность собственных цифровых активов. Ежедневно обманщики придумывают новые подходы кражи цифровых средств, или собственники криптовалюты оказываются жертвами их обманов. Один из техник сбережения становится проверка кошельков для наличие нелегальных финансов.
С каким намерением это полезно?
Преимущественно, чтобы защитить свои средства от шарлатанов или украденных монет. Многие участники встречаются с потенциальной угрозой утраты своих активов вследствие мошеннических механизмов или кражей. Осмотр кошельков позволяет выявить непрозрачные действия и предотвратить возможные потери.
Что наша группа предоставляем?
Наша компания предоставляем сервис проверки цифровых кошельков или транзакций для обнаружения происхождения денег. Наша технология анализирует информацию для выявления нелегальных транзакций а также оценки риска для вашего счета. Благодаря этой проверке, вы сможете избегать проблем с регуляторами и также обезопасить себя от участия в незаконных переводах.
Как это работает?
Наша фирма сотрудничаем с лучшими проверочными фирмами, например Cure53, чтобы предоставить аккуратность наших проверок. Мы внедряем современные технологии для определения опасных операций. Ваши данные обрабатываются и хранятся согласно с высокими стандартами безопасности и конфиденциальности.
Как выявить собственные Tether в прозрачность?
Если хотите проверить, что ваша USDT-кошельки прозрачны, наш сервис обеспечивает бесплатное тестирование первых пяти бумажников. Просто введите адрес своего кошелька на на нашем веб-сайте, и наша команда предоставим вам детальный отчет о его статусе.
Гарантируйте безопасность для ваши активы уже сегодня!
Не рискуйте подвергнуться обманщиков или оказаться в неприятную ситуацию по причине противозаконных транзакций. Посетите нашей команде, с тем чтобы обезопасить свои цифровые средства и предотвратить сложностей. Предпримите первый шаг к безопасности вашего криптовалютного портфеля прямо сейчас!
грязный usdt
Тестирование USDT в нетронутость: Как защитить свои криптовалютные финансы
Каждый день все больше пользователей заботятся в безопасность их электронных средств. Каждый день обманщики предлагают новые схемы кражи криптовалютных активов, и собственники криптовалюты становятся пострадавшими их обманов. Один из подходов обеспечения безопасности становится проверка кошельков на наличие противозаконных средств.
С каким намерением это потребуется?
Преимущественно, для того чтобы защитить свои средства от обманщиков и также украденных монет. Многие специалисты встречаются с риском потери их активов из-за мошеннических механизмов или грабежей. Осмотр кошельков помогает выявить подозрительные действия а также предотвратить возможные потери.
Что мы предлагаем?
Мы предоставляем подход проверки криптовалютных кошельков и операций для обнаружения источника средств. Наша система проверяет информацию для выявления нелегальных действий и также оценки риска вашего портфеля. Из-за этой проверке, вы сможете избежать проблем с регуляторами а также предохранить себя от участия в незаконных переводах.
Как это работает?
Мы сотрудничаем с ведущими проверочными агентствами, наподобие Certik, для того чтобы предоставить точность наших проверок. Мы используем передовые техники для обнаружения опасных транзакций. Ваши данные обрабатываются и сохраняются в соответствии с высокими нормами безопасности и конфиденциальности.
Как проверить свои USDT на прозрачность?
Если вам нужно подтвердить, что ваши USDT-кошельки нетронуты, наш сервис предлагает бесплатное тестирование первых пяти бумажников. Просто введите местоположение личного кошелька на на нашем веб-сайте, или мы предоставим вам детальный доклад о его статусе.
Защитите вашими фонды прямо сейчас!
Не подвергайте опасности подвергнуться мошенников или попасть в неприятную обстановку по причине противозаконных сделок. Обратитесь за помощью к нашему сервису, чтобы предохранить ваши криптовалютные средства и избежать затруднений. Сделайте первый шаг к безопасности криптовалютного портфеля прямо сейчас!
[url=https://bestmedsx.com/]us pharmacy[/url]
[url=https://valtrexv.com/]buy real valtrex online[/url]
[url=http://tadalafilu.online/]tadalafil generic uk[/url]
blibli
[url=https://asynthroid.com/]synthroid prescription[/url]
[url=https://happyfamilymedicalstore.online/]canada pharmacy not requiring prescription[/url]
Осмотр USDT на нетронутость: Каким образом защитить свои электронные средства
Каждый день все больше людей обращают внимание к надежность своих криптовалютных средств. День ото дня шарлатаны разрабатывают новые способы кражи криптовалютных активов, или собственники электронной валюты оказываются пострадавшими своих обманов. Один способов защиты становится тестирование кошельков для присутствие незаконных финансов.
Зачем это важно?
В первую очередь, с тем чтобы защитить личные средства против мошенников а также похищенных денег. Многие участники сталкиваются с риском потери своих фондов из-за хищных сценариев или грабежей. Тестирование бумажников позволяет выявить сомнительные действия и также предотвратить возможные потери.
Что наша группа предлагаем?
Мы предоставляем услугу анализа цифровых кошельков а также операций для определения начала денег. Наша технология исследует информацию для выявления противозаконных транзакций или оценки риска вашего счета. Из-за этой проверке, вы сможете избегать проблем с регулированием и также предохранить себя от участия в нелегальных переводах.
Как это действует?
Наша команда сотрудничаем с передовыми аудиторскими агентствами, например Kudelsky Security, для того чтобы обеспечить точность наших проверок. Наша команда применяем передовые технологии для определения потенциально опасных транзакций. Ваши данные обрабатываются и хранятся согласно с высокими стандартами безопасности и приватности.
Как выявить свои USDT в чистоту?
Если вам нужно убедиться, что ваши USDT-кошельки чисты, наш сервис предоставляет бесплатное тестирование первых пяти кошельков. Просто передайте положение своего кошелька на нашем сайте, а также наш сервис предоставим вам полную информацию отчет о его статусе.
Охраняйте вашими активы сегодня же!
Не подвергайте риску подвергнуться мошенников или оказаться в неприятную обстановку из-за противозаконных операций. Обратитесь за помощью к нашему сервису, чтобы сохранить ваши криптовалютные средства и предотвратить сложностей. Предпримите первый шаг к безопасности вашего криптовалютного портфеля сегодня!
[url=https://drugstorepp.online/]online pharmacy group[/url]
usdt и отмывание
USDT – является надежная криптовалюта, связанная к национальной валюте, такой как американский доллар. Данное обстоятельство делает данный актив исключительно популярной среди инвесторов, так как данная криптовалюта обеспечивает устойчивость цены в условиях волатильности криптовалютного рынка. Тем не менее, как и любая другая вид цифровых активов, USDT подвергается вероятности использования в целях отмывания денег и поддержки незаконных операций.
Отмывание денег посредством цифровые валюты переходит в все более обычным методом для сокрытия происхождения капитала. Воспользовавшись разнообразные методы, дельцы могут попытаться легализовывать незаконно полученные фонды через криптовалютные обменники или миксеры средств, для того чтобы совершить их происхождение менее прозрачным.
Именно поэтому, анализ USDT на чистоту становится существенной мерой предостережения для того чтобы пользовательской аудитории криптовалют. Доступны специализированные сервисы, какие проводят проверку транзакций и бумажников, для того чтобы обнаружить подозрительные операции и незаконные источники средств. Данные услуги содействуют участникам избежать непреднамеренного участия в преступной деятельности и предотвратить блокировку счетов со стороны надзорных органов.
Экспертиза USDT на чистоту также также способствует предохранить себя от потенциальных убытков. Участники могут быть убеждены в том их активы не связаны с незаконными транзакциями, что в свою очередь снижает риск блокировки аккаунта или перечисления денег.
Таким образом, в текущей ситуации возрастающей степени сложности среды криптовалют необходимо принимать действия для гарантирования безопасности и надежности своих активов. Анализ USDT на чистоту с использованием специальных сервисов является важной одним из способов защиты от отмывания денег, гарантируя пользователям криптовалют дополнительный уровень и надежности.
124SDS9742
[url=http://valtrexmedication.online/]valtrex tablets for sale[/url]
[url=https://oazithromycin.online/]average cost of azithromycin[/url]
[url=http://valtrexmedication.online/]how to get valtrex[/url]
九州娛樂城登入
[url=http://synthroidx.online/]how to buy synthroid[/url]
[url=https://olisinopril.online/]lisinopril online[/url]
[url=https://drugstorepp.online/]canadian pharmacy meds[/url]
blabla
blublun
Осмотр USDT в нетронутость: Каким образом сохранить личные электронные финансы
Все больше людей заботятся к секурити собственных криптовалютных средств. Постоянно мошенники предлагают новые схемы кражи цифровых денег, или держатели электронной валюты являются жертвами их обманов. Один способов охраны становится проверка кошельков на присутствие незаконных денег.
Зачем это необходимо?
В первую очередь, с тем чтобы сохранить собственные средства от шарлатанов и похищенных монет. Многие специалисты сталкиваются с риском утраты личных активов вследствие мошеннических планов или краж. Тестирование кошельков помогает обнаружить подозрительные действия и также предотвратить потенциальные потери.
Что наша команда предоставляем?
Мы предоставляем услугу тестирования криптовалютных кошельков и также операций для обнаружения начала фондов. Наша система исследует данные для выявления нелегальных операций и оценки угрозы вашего портфеля. Из-за такой проверке, вы сможете избежать проблем с регулированием и предохранить себя от участия в незаконных операциях.
Как происходит процесс?
Наша фирма сотрудничаем с ведущими аудиторскими агентствами, например Kudelsky Security, чтобы предоставить точность наших тестирований. Наша команда используем новейшие технологии для выявления опасных сделок. Ваши данные проходят обработку и хранятся согласно с высокими нормами безопасности и конфиденциальности.
Каким образом проверить свои Tether в чистоту?
Если вам нужно проверить, что ваши Tether-кошельки нетронуты, наш сервис предоставляет бесплатное тестирование первых пяти кошельков. Просто введите место вашего кошелька на на сайте, и также наша команда предоставим вам детальный доклад об его статусе.
Обезопасьте ваши активы уже сейчас!
Не подвергайте опасности подвергнуться шарлатанов или оказаться в неприятную ситуацию вследствие нелегальных операций. Обратитесь за помощью к нашему сервису, с тем чтобы предохранить ваши криптовалютные финансовые ресурсы и избежать проблем. Примите первый шаг к сохранности вашего криптовалютного портфеля сегодня!
buy cheap nitroglycerin – clonidine cost buy valsartan 80mg online cheap
[url=http://medicinesaf.online/]online pharmacy australia[/url]
[url=https://happyfamilystorerx.online/]medstore online pharmacy[/url]
[url=https://oprednisone.com/]prednisone 5mg tablets[/url]
[url=http://asynthroid.com/]synthroid 300 mcg[/url]
[url=http://azithromycinmds.com/]azithromycin cost australia[/url]
פרח הנחיות: המכון המלא לרכישת פרחי קנאביס במקום הטלגרמה
פרח מדריך הוא פורטל ידע ומדריכי לסחר ב שרף דרך היישומון הפופולרית הטלגרמה.
האתר האינטרנט מספקת את כל ה הקישורות והמידעים העדכוני להקבוצות וערוצים המומלצים מומלצות לקריאה להשקיה קנאביסין בהמשלוח במדינה.
כמו כך, האתר מציע הסבר מפורט לאיך להתכנן בהפרח ולקנות שרף בקלות מסירת ובמהירות.
בעזרת ההוראות, גם כן משתמשי הערוץ משתמשים בטלגרם יוכלו להירשם להמערכת השרף בהמסר בפני מוגנת ובטוחה.
ההאוטומטיזציה של טלגראס מאפשר למשתמשי לבצע פעולות המבוצעות שונות ומגוונות כגון רכישת קנאביסין, קבלה תמיכה, בדיקת והוספת פידבק על המצרים. כל זאת בפני נוחה לשימוש ופשוטה דרך האפליקציה.
כאשר כשם הדבר בשיטות התשלום, הפרח מפעילה בדרכי מוכרות כמו מזומנים, כרטיסי האשראי של אשראי וקריפטוֹמוֹנֵדָה. חשוב לציין כי יש לבדוק ולוודא את ההוראות והחוקות המקומיים באיזור שלך ללפני ביצוע רכישה.
המסר מציע הטבות מרכזיים כמו פרטיות ובטיחות מוגברים מאוד, התקשורת מהירה וגמישות גבוהה. בנוסף, הוא מאפשר כניסה לקהילה גלובלית רחבה ומציע מגוון של תכונות ויכולות.
בלסיכום, המסר מסמכים היה האתר האידיאלי ללמצוא את כל הידע והקישורים הנדרשים לקניית פרחי קנאביס בצורה מהירה, בבטוחה ונוחה דרך המסר.
体验Telegram中文版,享受全面的即时通讯服务。端到端加密保障您的沟通安全,支持大文件分享和云存储功能,让跨设备通信变得无缝而高效。立即下载,开启高效的沟通体验。Experience Telegram Chinese Version for comprehensive instant messaging services. End-to-end encryption ensures secure communication, while support for large file sharing and cloud storage makes cross-device communication seamless and efficient. Download now for an enhanced communication experience.https://www.tgxiazai.com
98whu6q0x9
[url=http://synthroidotp.online/]purchase synthroid[/url]
[url=https://ezithromycin.online/]how much is azithromycin 500mg[/url]
קזינו אונליין
הימורים אונליין הם חוויה מרגשות ופופולרי ביותר בעידן הדיגיטלי, שמגירה מיליוני אנשים מכל
רחבי העולם. ההימורים המקוונים מתרחשים על אירועים ספורט, תוצאות פוליטיות ואפילו תוצאות מזג האוויר ונושאים נוספים. אתרי ה הימורים הווירטואליים מקריאים פוטנציאליים את המשתתפים להימר על תוצאות מתאימות ולהנות חוויות ייחודיות ומרתקות.
ההימורים המקוונים הם מהם כבר חלק מתרבות החברה מזמן רב והיום הם לא רק חלק נפרד מהפעילות הכלכלית והתרבותית, אלא אף מספקים תשואות וחוויים. משום שהם נגישים לכולם וקלים לשימוש, הם מובילים את כולם ליהנות מהמשחק ולהנציח רגעי עסקה וניצחון בכל זמן ובכל מקום.
טכנולוגיות דיגיטליות והמשחקים באינטרנט הפכו להיות הפופולריים ביותר בין האהובות והנפוצות. מיליונים אנשים מכל כל רחבי העולם מתעניינים בהימורים מקוונים, כוללים הימורי ספורט. הימורים מקוונים מציעים למשתתפים חוויה רגשית ומרתקת, המתאימה לכולם בכל זמן ובכל מקום.
אז מה נותר אתה מחכה? אל תהסס והצטרף עכשיו והתחיל ליהנות מהתרגשות וההנאה מהמשחקים ברשת.
Hi Neat post There is a problem along with your website in internet explorer would test this IE still is the market chief and a good section of other folks will pass over your magnificent writing due to this problem
[url=http://happyfamilystorerx.online/]uk pharmacy no prescription[/url]
[url=https://olisinopril.com/]zestril 5 mg[/url]
Sure, here’s the text with spin syntax applied:
Backlink Structure
After many updates to the G search algorithm, it is essential to utilize different strategies for ranking.
Today there is a method to attract the focus of search engines to your site with the aid of backlinks.
Links are not only an effective advertising resource but they also have natural visitors, straight sales from these resources likely will not be, but transitions will be, and it is beneficial traffic that we also receive.
What in the end we get at the end result:
We show search engines site through backlinks.
Prluuchayut organic click-throughs to the site and it is also a sign to search engines that the resource is used by users.
How we show search engines that the site is liquid:
Links do to the main page where the main information.
We make backlinks through redirects reputable sites.
The most CRUCIAL we place the site on sites analytical tools separate tool, the site goes into the cache of these analyzers, then the obtained links we place as redirections on blogs, discussion boards, comments. This essential action shows search engines the site map as analysis tool sites display all information about sites with all key terms and headings and it is very BENEFICIAL.
All information about our services is on the website!
[url=https://prednisoneo.online/]prednisone generic brand[/url]
What’s The Current Job Market For Best Pornstars Website
Professionals Like? best Pornstars website
Creating hyperlinks is just as effective now, just the instruments to operate within this domain have altered.
You can find numerous possibilities for backlinks, our team use a few of them, and these methods operate and have been examined by our experts and our customers.
Recently our team carried out an trial and we found that low-frequency queries from just one domain ranking effectively in online searches, and this doesnt need being your website, it is possible to utilize social networking sites from Web 2.0 series for this.
It additionally possible to partially move mass through site redirects, offering a varied hyperlink profile.
Head over to our very own site where our solutions are actually provided with detailed descriptions.
Five Killer Quora Answers On Pornstars On Adultwork pornstars on Adultwork (http://Www.google.com)
[url=https://pharmgf.online/]pharmacy canadian superstore[/url]
blolbo
blabla
[url=https://tadalafilgf.com/]cheap cialis 5mg[/url]
Creating exclusive articles on Medium and Telegraph, why it is essential:
Created article on these resources is enhanced ranked on less common queries, which is very crucial to get natural traffic.
We get:
organic traffic from search engines.
natural traffic from the internal rendition of the medium.
The site to which the article refers gets a link that is profitable and increases the ranking of the platform to which the article refers.
Articles can be made in any amount and choose all less common queries on your topic.
Medium pages are indexed by search algorithms very well.
Telegraph pages need to be indexed individually indexer and at the same time after indexing they sometimes occupy positions higher in the search algorithms than the medium, these two platforms are very beneficial for getting visitors.
Here is a URL to our services where we present creation, indexing of sites, articles, pages and more.
[url=http://happyfamilystorerx.online/]canadian pharmacy sildenafil[/url]
[url=https://synthroidsl.online/]synthroid 0.88[/url]
[url=https://tadalafilstd.online/]cheap generic cialis from india[/url]
Secure, simple, and powerful – imToken is your trusted partner in digital finance. Manage your assets with peace of mind. | 安全、简单、强大 – imToken是您数字财务中的可信伙伴。安心管理您的资产。https://www.imtokeno.com
ofg79k0kjg
rosuvastatin flesh – pravastatin online leaf caduet buy knock
gambling
blibli
[url=https://valtrexmedication.com/]valtrex generic purchase[/url]
blabla
simvastatin blow – gemfibrozil plunge atorvastatin apply
blolbo
boba 😀
What’s The Current Job Market For Best Pornstars Website Professionals?
Best pornstars website
[url=https://happyfamilymedicalstore.online/]canadian prescription pharmacy[/url]
[url=http://lisinoprildrl.online/]lisinopril 2.5 cost[/url]
The 12 Most Obnoxious Types Of Accounts You Follow On Twitter top pornstars
[url=https://prednisonekx.online/]prednisone for sale without a prescription[/url]
откупиться от сво
С началом СВО уже спустя полгода была объявлена первая волна мобилизации. При этом прошлая, в последний раз в России была аж в 1941 году, с началом Великой Отечественной Войны. Конечно же, желающих отправиться на фронт было не много, а потому люди стали искать способы не попасть на СВО, для чего стали покупать справки о болезнях, с которыми можно получить категорию Д. И все это стало возможным с даркнет сайтами, где можно найти практически все что угодно. Именно об этой отрасли темного интернета подробней и поговорим в этой статье.
1249742
palabraptu
[url=https://oprednisone.com/]120 mg prednisone[/url]
blibliblu
124SDS9742
[url=http://olisinopril.online/]zestoretic tabs[/url]
[url=https://azithromycinmds.online/]where to purchase azithromycin[/url]
[url=https://prednisonecsr.com/]6 prednisone[/url]
viagra professional succeed – levitra oral jelly proud levitra oral jelly track
cululutata
反向連結金字塔
反向連結金字塔
G搜尋引擎在多次更新後需要套用不同的排名參數。
今天有一種方法可以使用反向連接吸引G搜尋引擎對您的網站的注意。
反向链接不僅是有效的推廣工具,也是有機流量。
我們會得到什麼結果:
我們透過反向連結向G搜尋引擎展示我們的網站。
他們收到了到該網站的自然過渡,這也是向G搜尋引擎發出的信號,表明該資源正在被人們使用。
我們如何向G搜尋引擎表明該網站具有流動性:
個帶有主要訊息的主頁反向鏈接
我們透過來自受信任網站的重定向來建立反向連結。
此外,我們將網站放置在单独的網路分析器上,網站最終會進入這些分析器的高速缓存中,然後我們使用產生的連結作為部落格、論壇和評論的重新定向。 這個重要的操作向G搜尋引擎顯示了網站地圖,因為網站分析器顯示了有關網站的所有資訊以及所有關鍵字和標題,這很棒
有關我們服務的所有資訊都在網站上!
Aquí está el texto con la estructura de spintax que propone diferentes sinónimos para cada palabra:
“Pirámide de enlaces de retorno
Después de varias actualizaciones del motor de búsqueda G, necesita aplicar diferentes opciones de clasificación.
Hay una manera de llamar la atención de los motores de búsqueda a su sitio web con enlaces de retroceso.
Los vínculos de retroceso no sólo son una táctica eficaz para la promoción, sino que también tienen flujo de visitantes orgánico, las ventas directas de estos recursos más probable es que no será, pero las transiciones será, y es tráfico potencial que también obtenemos.
Lo que vamos a obtener al final en la salida:
Mostramos el sitio a los motores de búsqueda a través de enlaces de retorno.
Conseguimos transiciones orgánicas hacia el sitio, lo que también es una señal para los buscadores de que el recurso está siendo utilizado por la gente.
Cómo mostramos los motores de búsqueda que el sitio es líquido:
1 backlink se hace a la página principal donde está la información principal
Hacemos backlinks a través de redirecciones de sitios de confianza
Lo más crucial colocamos el sitio en una herramienta independiente de analizadores de sitios, el sitio entra en la caché de estos analizadores, luego los enlaces recibidos los colocamos como redirecciones en blogs, foros, comentarios.
Esta crucial acción muestra a los buscadores el MAPA DEL SITIO, ya que los analizadores de sitios muestran toda la información de los sitios con todas las palabras clave y títulos y es muy efectivo.
¡Toda la información sobre nuestros servicios en el sitio web!
[url=https://synthroidotp.online/]synthroid 25 mcg price[/url]
[url=http://prednisoneo.online/]generic prednisone 10mg[/url]
1249742
[url=https://happyfamilymedicalstore.online/]cheapest pharmacy to fill prescriptions without insurance[/url]
Watch Out: How Accident Attorney Lawyer Is Taking Over And What Can We Do About It
miami accident attorney (https://zakupis-ekb.ru/out?a:aHR0cHM6Ly93d3cuYWNjaWRlbnRpbmp1cnlsYXd5ZXJzLmNsYWltcy9hY2NpZGVudC1hdHRvcm5leXMtbmVhci1tZS8)
lalablublu
[url=https://azithromycinps.online/]where can i get azithromycin over the counter[/url]
blibliblu
boba 😀
[url=http://happyfamilymedicalstore.online/]buying from canadian pharmacies[/url]
I urge you to avoid this platform. My own encounter with it was only disappointment and doubts about deceptive behavior. Be extremely cautious, or even better, look for a more reputable platform to fulfill your requirements.
lalablublu
blublun
[url=https://tadalafi.online/]tadalafil united states[/url]
boba 😀
124SDS9742
[url=https://asynthroid.com/]synthroid 137 mcg price[/url]
blibliblu
124SDS9742
This Week’s Most Popular Stories Concerning Cutest
Pornstars porn star
dapoxetine beard – sildigra monstrous cialis with dapoxetine release
1SS3D249742
15 Reasons You Must Love Accident Injury Attorney Accident Injury Lawyers
[url=https://prednisonekx.online/]prednisone buy[/url]
[url=https://lisinoprill.com/]208 lisinopril[/url]
[url=http://oazithromycin.com/]azithromycin 250 mg pill[/url]
Как обезопасить свои данные: избегайте утечек информации в интернете. Сегодня обеспечение безопасности своих данных становится всё больше важной задачей. Одним из наиболее распространенных способов утечки личной информации является слив «сит фраз» в интернете. Что такое сит фразы и в каком объеме обезопаситься от их утечки? Что такое «сит фразы»? «Сит фразы» — это сочетания слов или фраз, которые постоянно используются для доступа к различным онлайн-аккаунтам. Эти фразы могут включать в себя имя пользователя, пароль или дополнительные конфиденциальные данные. Киберпреступники могут пытаться получить доступ к вашим аккаунтам, с помощью этих сит фраз. Как охранить свои личные данные? Используйте сложные пароли. Избегайте использования простых паролей, которые мгновенно угадать. Лучше всего использовать комбинацию букв, цифр и символов. Используйте уникальные пароли для каждого аккаунта. Не пользуйтесь один и тот же пароль для разных сервисов. Используйте двухступенчатую аутентификацию (2FA). Это добавляет дополнительный уровень безопасности, требуя подтверждение входа на ваш аккаунт путем другое устройство или метод. Будьте осторожны с онлайн-сервисами. Не доверяйте персональную информацию ненадежным сайтам и сервисам. Обновляйте программное обеспечение. Установите обновления для вашего операционной системы и программ, чтобы предохранить свои данные от вредоносного ПО. Вывод Слив сит фраз в интернете может повлечь за собой серьезным последствиям, таким как кража личной информации и финансовых потерь. Чтобы охранить себя, следует принимать меры предосторожности и использовать надежные методы для хранения и управления своими личными данными в сети
[url=https://azithromycinhq.com/]azithromycin 500mg over the counter[/url]
[url=https://happyfamilymedicalstore.online/]online pharmacy australia free delivery[/url]
кошелек с балансом купить
Криптокошельки с балансом: зачем их покупают и как использовать
В мире криптовалют все расширяющуюся популярность приобретают криптокошельки с предустановленным балансом. Это индивидуальные кошельки, которые уже содержат определенное количество криптовалюты на момент покупки. Но зачем люди приобретают такие кошельки, и как правильно использовать их?
Почему покупают криптокошельки с балансом?
Удобство: Криптокошельки с предустановленным балансом предлагаются как готовое решение для тех, кто хочет быстро начать пользоваться криптовалютой без необходимости покупки или обмена на бирже.
Подарок или награда: Иногда криптокошельки с балансом используются как подарок или вознаграждение в рамках акций или маркетинговых кампаний.
Анонимность: При покупке криптокошелька с балансом нет потребности предоставлять личные данные, что может быть важно для тех, кто ценит анонимность.
Как использовать криптокошелек с балансом?
Проверьте безопасность: Убедитесь, что кошелек безопасен и не подвержен взлому. Проверьте репутацию продавца и происхождение приобретения кошелька.
Переведите средства на другой кошелек: Если вы хотите долгосрочно хранить криптовалюту, рекомендуется перевести средства на более безопасный или удобный для вас кошелек.
Не храните все средства на одном кошельке: Для обеспечения безопасности рекомендуется распределить средства между несколькими кошельками.
Будьте осторожны с фишингом и мошенничеством: Помните, что мошенники могут пытаться обмануть вас, предлагая криптокошельки с балансом с целью получения доступа к вашим средствам.
Заключение
Криптокошельки с балансом могут быть удобным и быстрым способом начать пользоваться криптовалютой, но необходимо помнить о безопасности и осторожности при их использовании.Выбор и приобретение криптокошелька с балансом – это значительный шаг, который требует внимания к деталям и осознанного подхода.”
[url=https://lisinoprildrl.online/]lisinopril 40 mg india[/url]
124969D742
[url=https://valtrexarb.online/]can you order valtrex online[/url]
сид фразы кошельков
Сид-фразы, или памятные фразы, представляют собой соединение слов, которая используется для формирования или восстановления кошелька криптовалюты. Эти фразы обеспечивают возможность доступа к вашим криптовалютным средствам, поэтому их секурное хранение и использование очень важны для защиты вашего криптоимущества от утери и кражи.
Что такое сид-фразы кошельков криптовалют?
Сид-фразы формируют набор случайными средствами сгенерированных слов, обычно от 12 до 24, которые представляют собой для создания уникального ключа шифрования кошелька. Этот ключ используется для восстановления доступа к вашему кошельку в случае его повреждения или утери. Сид-фразы обладают большой защиты и шифруются, что делает их секурными для хранения и передачи.
Зачем нужны сид-фразы?
Сид-фразы необходимы для обеспечения безопасности и доступности вашего криптоимущества. Они позволяют восстановить вход к кошельку в случае утери или повреждения физического устройства, на котором он хранится. Благодаря сид-фразам вы можете просто создавать резервные копии своего кошелька и хранить их в безопасном месте.
Как обеспечить безопасность сид-фраз кошельков?
Никогда не раскрывайте сид-фразой ни с кем. Сид-фраза является вашим ключом к кошельку, и ее раскрытие может привести к утере вашего криптоимущества.
Храните сид-фразу в секурном месте. Используйте физически защищенные места, такие как банковские ячейки или специализированные аппаратные кошельки, для хранения вашей сид-фразы.
Создавайте резервные копии сид-фразы. Регулярно создавайте резервные копии вашей сид-фразы и храните их в разных безопасных местах, чтобы обеспечить вход к вашему кошельку в случае утери или повреждения.
Используйте дополнительные меры безопасности. Включите двухфакторную аутентификацию и другие методы защиты для своего кошелька криптовалюты, чтобы обеспечить дополнительный уровень безопасности.
Заключение
Сид-фразы кошельков криптовалют являются ключевым элементом надежного хранения криптоимущества. Следуйте рекомендациям по безопасности, чтобы защитить свою сид-фразу и обеспечить безопасность своих криптовалютных средств.
Слив засеянных фраз (seed phrases) является одной из наиболее распространенных способов утечки личной информации в мире криптовалют. В этой статье мы разберем, что такое сид фразы, отчего они важны и как можно защититься от их утечки.
Что такое сид фразы?
Сид фразы, или мнемонические фразы, представляют собой комбинацию слов, которая используется для генерации или восстановления кошелька криптовалюты. Обычно сид фраза состоит из 12 или 24 слов, которые являются собой ключ к вашему кошельку. Потеря или утечка сид фразы может вести к потере доступа к вашим криптовалютным средствам.
Почему важно защищать сид фразы?
Сид фразы служат ключевым элементом для секурного хранения криптовалюты. Если злоумышленники получат доступ к вашей сид фразе, они будут в состоянии получить доступ к вашему кошельку и украсть все средства.
Как защититься от утечки сид фраз?
Никогда не передавайте свою сид фразу ничьему, даже если вам похоже, что это проверенное лицо или сервис.
Храните свою сид фразу в секурном и безопасном месте. Рекомендуется использовать аппаратные кошельки или специальные программы для хранения сид фразы.
Используйте дополнительные методы защиты, такие как двухфакторная верификация, для усиления безопасности вашего кошелька.
Регулярно делайте резервные копии своей сид фразы и храните их в разных безопасных местах.
Заключение
Слив сид фраз является значительной угрозой для безопасности владельцев криптовалют. Понимание важности защиты сид фразы и принятие соответствующих мер безопасности помогут вам избежать потери ваших криптовалютных средств. Будьте бдительны и обеспечивайте надежную защиту своей сид фразы
пирамида обратных ссылок
Структура Backlinks
После того, как многочисленных обновлений поисковой системы G необходимо внедрять различные варианты рейтингования.
Сегодня есть способ привлечь внимание поисковых систем к вашему веб-сайту с помощью обратных линков.
Обратные линки являются эффективным инструментом продвижения, но также являются источником органического трафика, хотя прямых продаж с этих ресурсов скорее всего не будет, но переходы будут, и именно органического трафика мы также получаем.
Что в итоге получим на выходе:
Мы демонстрируем сайт поисковым системам при помощи обратных ссылок.
Получают органические переходы на сайт, а это также подтверждение поисковым системам, что ресурс активно посещается пользователями.
Как мы демонстрируем поисковым системам, что сайт ликвиден:
1 ссылка на главную страницу, где содержится основная информация, создается.
Делаем обратные ссылки через редиректы трастовых сайтов.
Самое ВАЖНОЕ мы размещаем сайт на отдельном инструменте анализаторов сайтов, сайт попадает в кеш этих анализаторов, затем полученные ссылки мы размещаем в качестве редиректов на блогах, форумах, комментариях.
Это важное действие показывает потсковикамКАРТУ САЙТА, так как анализаторы сайтов показывают всю информацию о сайтах со всеми ключевыми словами и заголовками и это очень ВАЖНО
[url=http://prednisoneo.online/]can you buy prednisone over the counter in mexico[/url]
[url=https://prednisonexg.online/]where to buy prednisone 5443 without prescription[/url]
[url=http://happyfamilymedicalstore.online/]happy family pharmacy[/url]
[url=https://azithromycinhq.com/]azithromycin 500 mg tablet brand name[/url]
[url=http://happyfamilymedicalstore.online/]canadian mail order pharmacy[/url]
The 10 Worst Best Accident Attorney Mistakes Of All Time Could Have Been Prevented
nashville accident attorney (en.forbeaut.co.Kr)
lalablublu
1249742
What’s The Job Market For Pornstar Kayleigh Wanless Professionals Like?
pornstar kayleigh Wanless
[url=https://metforemin.online/]cheap metformin online[/url]
[url=https://ezithromycin.online/]azithromycin 750 mg[/url]
I urge you stay away from this site. The experience I had with it was nothing but dismay along with suspicion of deceptive behavior. Be extremely cautious, or better yet, seek out an honest service to meet your needs.
cenforce online hesitate – levitra professional finger brand viagra principal
娛樂城評價
Player線上娛樂城遊戲指南與評測
台灣最佳線上娛樂城遊戲的終極指南!我們提供專業評測,分析熱門老虎機、百家樂、棋牌及其他賭博遊戲。從遊戲規則、策略到選擇最佳娛樂城,我們全方位覆蓋,協助您更安全的遊玩。
Player如何評測:公正與專業的評分標準
在【Player娛樂城遊戲評測網】我們致力於為玩家提供最公正、最專業的娛樂城評測。我們的評測過程涵蓋多個關鍵領域,旨在確保玩家獲得可靠且全面的信息。以下是我們評測娛樂城的主要步驟:
娛樂城是什麼?
娛樂城是什麼?娛樂城是台灣對於線上賭場的特別稱呼,線上賭場分為幾種:現金版、信用版、手機娛樂城(娛樂城APP),一般來說,台灣人在稱娛樂城時,是指現金版線上賭場。
線上賭場在別的國家也有別的名稱,美國 – Casino, Gambling、中國 – 线上赌场,娱乐城、日本 – オンラインカジノ、越南 – Nhà cái。
娛樂城會被抓嗎?
在台灣,根據刑法第266條,不論是實體或線上賭博,參與賭博的行為可處最高5萬元罰金。而根據刑法第268條,為賭博提供場所並意圖營利的行為,可能面臨3年以下有期徒刑及最高9萬元罰金。一般賭客若被抓到,通常被視為輕微罪行,原則上不會被判處監禁。
信用版娛樂城是什麼?
信用版娛樂城是一種線上賭博平台,其中的賭博活動不是直接以現金進行交易,而是基於信用系統。在這種模式下,玩家在進行賭博時使用虛擬的信用點數或籌碼,這些點數或籌碼代表了一定的貨幣價值,但實際的金錢交易會在賭博活動結束後進行結算。
現金版娛樂城是什麼?
現金版娛樂城是一種線上博弈平台,其中玩家使用實際的金錢進行賭博活動。玩家需要先存入真實貨幣,這些資金轉化為平台上的遊戲籌碼或信用,用於參與各種賭場遊戲。當玩家贏得賭局時,他們可以將這些籌碼或信用兌換回現金。
娛樂城體驗金是什麼?
娛樂城體驗金是娛樂場所為新客戶提供的一種免費遊玩資金,允許玩家在不需要自己投入任何資金的情況下,可以進行各類遊戲的娛樂城試玩。這種體驗金的數額一般介於100元到1,000元之間,且對於如何使用這些體驗金以達到提款條件,各家娛樂城設有不同的規則。
bliloblo
взлом кошелька
Как защитить свои личные данные: избегайте утечек информации в интернете. Сегодня охрана информации становится всё больше важной задачей. Одним из наиболее часто встречающихся способов утечки личной информации является слив «сит фраз» в интернете. Что такое сит фразы и в какой мере обезопаситься от их утечки? Что такое «сит фразы»? «Сит фразы» — это синтезы слов или фраз, которые регулярно используются для доступа к различным онлайн-аккаунтам. Эти фразы могут включать в себя имя пользователя, пароль или разные конфиденциальные данные. Киберпреступники могут пытаться получить доступ к вашим аккаунтам, используя этих сит фраз. Как сохранить свои личные данные? Используйте непростые пароли. Избегайте использования простых паролей, которые легко угадать. Лучше всего использовать комбинацию букв, цифр и символов. Используйте уникальные пароли для всего аккаунта. Не используйте один и тот же пароль для разных сервисов. Используйте двухфакторную аутентификацию (2FA). Это прибавляет дополнительный уровень безопасности, требуя подтверждение входа на ваш аккаунт через другое устройство или метод. Будьте осторожны с онлайн-сервисами. Не доверяйте личную информацию ненадежным сайтам и сервисам. Обновляйте программное обеспечение. Установите обновления для вашего операционной системы и программ, чтобы предохранить свои данные от вредоносного ПО. Вывод Слив сит фраз в интернете может привести к серьезным последствиям, таким как кража личной информации и финансовых потерь. Чтобы сохранить себя, следует принимать меры предосторожности и использовать надежные методы для хранения и управления своими личными данными в сети
Даркнет и сливы в Телеграме
Даркнет – это компонент интернета, которая не индексируется обычными поисковыми системами и требует индивидуальных программных средств для доступа. В даркнете существует обилие скрытых сайтов, где можно найти различные товары и услуги, в том числе и нелегальные.
Одним из популярных способов распространения информации в даркнете является использование мессенджера Телеграм. Телеграм предоставляет возможность создания закрытых каналов и чатов, где пользователи могут обмениваться информацией, в том числе и нелегальной.
Сливы информации в Телеграме – это процедура распространения конфиденциальной информации, такой как украденные данные, базы данных, персональные сведения и другие материалы. Эти сливы могут включать в себя информацию о кредитных картах, паролях, персональных сообщениях и даже фотографиях.
Сливы в Телеграме могут быть рискованными, так как они могут привести к утечке конфиденциальной информации и нанести ущерб репутации и финансовым интересам людей. Поэтому важно быть предусмотрительным при обмене информацией в интернете и не доверять сомнительным источникам.
Вот кошельки с балансом у бота
Сид-фразы, или напоминающие фразы, представляют собой комбинацию слов, которая используется для составления или восстановления кошелька криптовалюты. Эти фразы обеспечивают вход к вашим криптовалютным средствам, поэтому их надежное хранение и использование весьма важны для защиты вашего криптоимущества от утери и кражи.
Что такое сид-фразы кошельков криптовалют?
Сид-фразы формируют набор случайными средствами сгенерированных слов, часто от 12 до 24, которые представляют собой для создания уникального ключа шифрования кошелька. Этот ключ используется для восстановления доступа к вашему кошельку в случае его повреждения или утери. Сид-фразы обладают большой защиты и шифруются, что делает их секурными для хранения и передачи.
Зачем нужны сид-фразы?
Сид-фразы неотъемлемы для обеспечения безопасности и доступности вашего криптоимущества. Они позволяют восстановить доступ к кошельку в случае утери или повреждения физического устройства, на котором он хранится. Благодаря сид-фразам вы можете быстро создавать резервные копии своего кошелька и хранить их в безопасном месте.
Как обеспечить безопасность сид-фраз кошельков?
Никогда не передавайте сид-фразой ни с кем. Сид-фраза является вашим ключом к кошельку, и ее раскрытие может привести к утере вашего криптоимущества.
Храните сид-фразу в надежном месте. Используйте физически секурные места, такие как банковские ячейки или специализированные аппаратные кошельки, для хранения вашей сид-фразы.
Создавайте резервные копии сид-фразы. Регулярно создавайте резервные копии вашей сид-фразы и храните их в разных безопасных местах, чтобы обеспечить возможность доступа к вашему кошельку в случае утери или повреждения.
Используйте дополнительные меры безопасности. Включите другие методы защиты и двухфакторную верификацию для своего кошелька криптовалюты, чтобы обеспечить дополнительный уровень безопасности.
Заключение
Сид-фразы кошельков криптовалют являются ключевым элементом защищенного хранения криптоимущества. Следуйте рекомендациям по безопасности, чтобы защитить свою сид-фразу и обеспечить безопасность своих криптовалютных средств.
Криптокошельки с балансом: зачем их покупают и как использовать
В мире криптовалют все растущую популярность приобретают криптокошельки с предустановленным балансом. Это уникальные кошельки, которые уже содержат определенное количество криптовалюты на момент покупки. Но зачем люди приобретают такие кошельки, и как правильно использовать их?
Почему покупают криптокошельки с балансом?
Удобство: Криптокошельки с предустановленным балансом предлагаются как готовое к использованию решение для тех, кто хочет быстро начать пользоваться криптовалютой без необходимости покупки или обмена на бирже.
Подарок или награда: Иногда криптокошельки с балансом используются как подарок или премия в рамках акций или маркетинговых кампаний.
Анонимность: При покупке криптокошелька с балансом нет запроса предоставлять личные данные, что может быть важно для тех, кто ценит анонимность.
Как использовать криптокошелек с балансом?
Проверьте безопасность: Убедитесь, что кошелек безопасен и не подвержен взлому. Проверьте репутацию продавца и происхождение приобретения кошелька.
Переведите средства на другой кошелек: Если вы хотите долгосрочно хранить криптовалюту, рекомендуется перевести средства на более безопасный или практичный для вас кошелек.
Не храните все средства на одном кошельке: Для обеспечения безопасности рекомендуется распределить средства между несколькими кошельками.
Будьте осторожны с фишингом и мошенничеством: Помните, что мошенники могут пытаться обмануть вас, предлагая криптокошельки с балансом с целью получения доступа к вашим средствам.
Заключение
Криптокошельки с балансом могут быть удобным и легким способом начать пользоваться криптовалютой, но необходимо помнить о безопасности и осторожности при их использовании.Выбор и приобретение криптокошелька с балансом – это весомый шаг, который требует внимания к деталям и осознанного подхода.”
слив сид фраз
Слив мнемонических фраз (seed phrases) является единственным из наиболее распространенных способов утечки персональной информации в мире криптовалют. В этой статье мы разберем, что такое сид фразы, по какой причине они важны и как можно защититься от их утечки.
Что такое сид фразы?
Сид фразы, или мнемонические фразы, представляют собой комбинацию слов, которая используется для создания или восстановления кошелька криптовалюты. Обычно сид фраза состоит из 12 или 24 слов, которые символизируют собой ключ к вашему кошельку. Потеря или утечка сид фразы может влечь за собой потере доступа к вашим криптовалютным средствам.
Почему важно защищать сид фразы?
Сид фразы являются ключевым элементом для безопасного хранения криптовалюты. Если злоумышленники получат доступ к вашей сид фразе, они могут получить доступ к вашему кошельку и украсть все средства.
Как защититься от утечки сид фраз?
Никогда не передавайте свою сид фразу ничьему, даже если вам похоже, что это привилегированное лицо или сервис.
Храните свою сид фразу в надежном и секурном месте. Рекомендуется использовать аппаратные кошельки или специальные программы для хранения сид фразы.
Используйте дополнительные методы защиты, такие как двухэтапная проверка, для усиления безопасности вашего кошелька.
Регулярно делайте резервные копии своей сид фразы и храните их в разнообразных безопасных местах.
Заключение
Слив сид фраз является серьезной угрозой для безопасности владельцев криптовалют. Понимание важности защиты сид фразы и принятие соответствующих мер безопасности помогут вам избежать потери ваших криптовалютных средств. Будьте бдительны и обеспечивайте надежную защиту своей сид фразы
[url=https://tadalafi.online/]prescription cialis prices[/url]
[url=https://ismetformin.online/]metformin 102[/url]
blibliblu
124969D742
هنا النص مع استخدام السبينتاكس:
“بناء الروابط الخلفية
بعد التحديثات العديدة لمحرك البحث G، تحتاج إلى تنفيذ خيارات ترتيب مختلفة.
هناك منهج لجذب انتباه محركات البحث إلى موقعك على الويب باستخدام الروابط الخلفية.
الروابط الخلفية ليست فقط أداة فعالة للترويج، ولكن تمتلك أيضًا حركة مرور عضوية، والمبيعات المباشرة من هذه الموارد على الأرجح قد لا تكون كذلك، ولكن التغييرات ستكون، وهي حركة المرور التي نحصل عليها أيضًا.
ما نكون عليه في النهاية في النهاية في الإخراج:
نعرض الموقع لمحركات البحث من خلال الروابط الخلفية.
2- نحصل على تحويلات عضوية إلى الموقع، وهي أيضًا إشارة لمحركات البحث أن المورد يستخدمه الناس.
كيف نظهر لمحركات البحث أن الموقع سائل:
1 يتم عمل صلة خلفي للصفحة الرئيسية حيث المعلومات الرئيسية
نقوم بعمل صلات خلفية من خلال عمليات إعادة توجيه المواقع الموثوقة
الأهم من ذلك أننا نضع الموقع على أداة منفصلة من أدوات تحليل المواقع، ويدخل الموقع في ذاكرة التخزين المؤقت لهذه المحللات، ثم الروابط المستلمة التي نضعها كإعادة توجيه على المدونات والمنتديات والتعليقات.
هذا الخطوة المهم يُظهر لمحركات البحث خارطة الموقع، حيث تعرض أدوات تحليل المواقع جميع المعلومات عن المواقع مع جميع الكلمات الرئيسية والعناوين وهو شيء جيد جداً
جميع المعلومات عن خدماتنا على الموقع!
Kantorbola adalah situs slot gacor terbaik di indonesia , kunjungi situs RTP kantor bola untuk mendapatkan informasi akurat slot dengan rtp diatas 95% . Kunjungi juga link alternatif kami di kantorbola77 dan kantorbola99 .
bliloblo
[url=https://medicinesaf.online/]canadian pharmacy online cialis[/url]
blibli
I highly advise to avoid this site. My personal experience with it was nothing but dismay as well as concerns regarding scamming practices. Be extremely cautious, or even better, look for a trustworthy site to fulfill your requirements.
[url=http://ezithromycin.online/]azithromycin 500mg for sale[/url]
brand cialis return – forzest communication penisole whip
blibliblu
[url=https://predniso.online/]buy prednisone online from mexico[/url]
cululutata
boba 😀
You’ll Never Guess This Star Porn’s Tricks Star Porn (Imakokowoikiru.Hatenablog.Com)
batmanapollo.ru
[url=https://prednisoneo.online/]prednisone over the counter canada[/url]
blolbo
[url=http://synthroidx.online/]synthroid 0.15 mg[/url]
[url=https://bestmedsx.com/]buy online pharmacy uk[/url]
[url=http://synthroidam.online/]synthroid 0.50 mg[/url]
I strongly recommend steer clear of this site. My personal experience with it was only frustration as well as suspicion of deceptive behavior. Exercise extreme caution, or alternatively, find a trustworthy platform to meet your needs.
[url=http://azithromycinhq.com/]zithromax over the counter[/url]
palabraptu
[url=https://bestmetformin.online/]metformin gel pill[/url]
blublun
nice content!nice history!!
boba 😀
cialis soft tabs online declare – viagra super active during viagra oral jelly online throat
cululutata
palabraptu
[url=https://valtrexv.com/]valtrex generic in mexico[/url]
brand cialis arch – viagra soft tabs fellow penisole pack
[url=https://valtrexid.com/]valtrex online usa[/url]
[url=http://happyfamilystorerx.online/]compare pharmacy prices[/url]
[url=https://happyfamilystorerx.online/]pharmacy discount coupons[/url]
blibli
[url=https://tadalafilu.online/]price of tadalafil 10mg[/url]
[url=https://azithromycinps.online/]zithromax buy[/url]
I highly advise to avoid this site. My own encounter with it has been only dismay as well as concerns regarding scamming practices. Be extremely cautious, or alternatively, seek out a more reputable service for your needs.
[url=http://synthroidsl.online/]synthroid 25 mg price[/url]
[url=http://prednisonecsr.com/]prednisone 60 mg[/url]
[url=http://happyfamilymedicalstore.online/]best rogue online pharmacy[/url]
lalablublu
lalablublu
cululutata
blublun
rikvip
Rikvip Club: Trung Tâm Giải Trí Trực Tuyến Hàng Đầu tại Việt Nam
Rikvip Club là một trong những nền tảng giải trí trực tuyến hàng đầu tại Việt Nam, cung cấp một loạt các trò chơi hấp dẫn và dịch vụ cho người dùng. Cho dù bạn là người dùng iPhone hay Android, Rikvip Club đều có một cái gì đó dành cho mọi người. Với sứ mạng và mục tiêu rõ ràng, Rikvip Club luôn cố gắng cung cấp những sản phẩm và dịch vụ tốt nhất cho khách hàng, tạo ra một trải nghiệm tiện lợi và thú vị cho người chơi.
Sứ Mạng và Mục Tiêu của Rikvip
Từ khi bắt đầu hoạt động, Rikvip Club đã có một kế hoạch kinh doanh rõ ràng, luôn nỗ lực để cung cấp cho khách hàng những sản phẩm và dịch vụ tốt nhất và tạo điều kiện thuận lợi nhất cho người chơi truy cập. Nhóm quản lý của Rikvip Club có những mục tiêu và ước muốn quyết liệt để biến Rikvip Club thành trung tâm giải trí hàng đầu trong lĩnh vực game đổi thưởng trực tuyến tại Việt Nam và trên toàn cầu.
Trải Nghiệm Live Casino
Rikvip Club không chỉ nổi bật với sự đa dạng của các trò chơi đổi thưởng mà còn với các phòng trò chơi casino trực tuyến thu hút tất cả người chơi. Môi trường này cam kết mang lại trải nghiệm chuyên nghiệp với tính xanh chín và sự uy tín không thể nghi ngờ. Đây là một sân chơi lý tưởng cho những người yêu thích thách thức bản thân và muốn tận hưởng niềm vui của chiến thắng. Với các sảnh cược phổ biến như Roulette, Sic Bo, Dragon Tiger, người chơi sẽ trải nghiệm những cảm xúc độc đáo và đặc biệt khi tham gia vào casino trực tuyến.
Phương Thức Thanh Toán Tiện Lợi
Rikvip Club đã được trang bị những công nghệ thanh toán tiên tiến ngay từ đầu, mang lại sự thuận tiện và linh hoạt cho người chơi trong việc sử dụng hệ thống thanh toán hàng ngày. Hơn nữa, Rikvip Club còn tích hợp nhiều phương thức giao dịch khác nhau để đáp ứng nhu cầu đa dạng của người chơi: Chuyển khoản Ngân hàng, Thẻ cào, Ví điện tử…
Kết Luận
Tóm lại, Rikvip Club không chỉ là một nền tảng trò chơi, mà còn là một cộng đồng nơi người chơi có thể tụ tập để tận hưởng niềm vui của trò chơi và cảm giác hồi hộp khi chiến thắng. Với cam kết cung cấp những sản phẩm và dịch vụ tốt nhất, Rikvip Club chắc chắn là điểm đến lý tưởng cho những người yêu thích trò chơi trực tuyến tại Việt Nam và cả thế giới.
[url=http://sildenafilps.online/]cheap canadian viagra pharmacy[/url]
blolbo
[url=https://amoxicillinir.online/]amoxicillin 500mg tablets price[/url]
I highly advise stay away from this site. My personal experience with it was purely disappointment as well as concerns regarding scamming practices. Be extremely cautious, or even better, find an honest platform to fulfill your requirements.
[url=https://accutanemix.online/]can you order accutane online[/url]
Euro
UEFA Euro 2024 Sân Chơi Bóng Đá Hấp Dẫn Nhất Của Châu Âu
Euro 2024 là sự kiện bóng đá lớn nhất của châu Âu, không chỉ là một giải đấu mà còn là một cơ hội để các quốc gia thể hiện tài năng, sự đoàn kết và tinh thần cạnh tranh.
Euro 2024 hứa hẹn sẽ mang lại những trận cầu đỉnh cao và kịch tính cho người hâm mộ trên khắp thế giới. Cùng tìm hiểu các thêm thông tin hấp dẫn về giải đấu này tại bài viết dưới đây, gồm:
Nước chủ nhà
Đội tuyển tham dự
Thể thức thi đấu
Thời gian diễn ra
Sân vận động
Euro 2024 sẽ được tổ chức tại Đức, một quốc gia có truyền thống vàng của bóng đá châu Âu.
Đức là một đất nước giàu có lịch sử bóng đá với nhiều thành công quốc tế và trong những năm gần đây, họ đã thể hiện sức mạnh của mình ở cả mặt trận quốc tế và câu lạc bộ.
Việc tổ chức Euro 2024 tại Đức không chỉ là một cơ hội để thể hiện năng lực tổ chức tuyệt vời mà còn là một dịp để giới thiệu văn hóa và sức mạnh thể thao của quốc gia này.
Đội tuyển tham dự giải đấu Euro 2024
Euro 2024 sẽ quy tụ 24 đội tuyển hàng đầu từ châu Âu. Các đội tuyển này sẽ là những đại diện cho sự đa dạng văn hóa và phong cách chơi bóng đá trên khắp châu lục.
Các đội tuyển hàng đầu như Đức, Pháp, Tây Ban Nha, Bỉ, Italy, Anh và Hà Lan sẽ là những ứng viên nặng ký cho chức vô địch.
Trong khi đó, các đội tuyển nhỏ hơn như Iceland, Wales hay Áo cũng sẽ mang đến những bất ngờ và thách thức cho các đối thủ.
Các đội tuyển tham dự được chia thành 6 bảng đấu, gồm:
Bảng A: Đức, Scotland, Hungary và Thuỵ Sĩ
Bảng B: Tây Ban Nha, Croatia, Ý và Albania
Bảng C: Slovenia, Đan Mạch, Serbia và Anh
Bảng D: Ba Lan, Hà Lan, Áo và Pháp
Bảng E: Bỉ, Slovakia, Romania và Ukraina
Bảng F: Thổ Nhĩ Kỳ, Gruzia, Bồ Đào Nha và Cộng hoà Séc
해외선물
해외선물의 개시 골드리치와 동행하세요.
골드리치는 오랜기간 투자자분들과 더불어 선물마켓의 길을 공동으로 걸어왔으며, 투자자분들의 확실한 자금운용 및 알찬 수익률을 향해 항상 최선을 다하고 있습니다.
무엇때문에 20,000+명 이상이 골드리치와 투자하나요?
신속한 솔루션: 간단하며 빠른속도의 프로세스를 갖추어 누구나 간편하게 이용할 수 있습니다.
안전보장 프로토콜: 국가기관에서 적용한 상위 등급의 보안을 도입하고 있습니다.
스마트 인증: 전체 거래데이터은 암호화 처리되어 본인 외에는 아무도 누구도 내용을 확인할 수 없습니다.
확실한 수익률 제공: 위험 요소를 감소시켜, 보다 한층 보장된 수익률을 공개하며 이에 따른 리포트를 공유합니다.
24 / 7 실시간 고객센터: året runt 24시간 실시간 서비스를 통해 고객님들을 온전히 서포트합니다.
협력하는 파트너사: 골드리치는 공기업은 물론 금융계들 및 다수의 협력사와 공동으로 동행해오고.
해외선물이란?
다양한 정보를 알아보세요.
국외선물은 외국에서 거래되는 파생금융상품 중 하나로, 명시된 기반자산(예: 주식, 화폐, 상품 등)을 바탕로 한 옵션 약정을 지칭합니다. 근본적으로 옵션은 명시된 기초자산을 향후의 어떤 시기에 정해진 가격에 매수하거나 매도할 수 있는 권리를 허락합니다. 해외선물옵션은 이러한 옵션 계약이 국외 마켓에서 거래되는 것을 지칭합니다.
외국선물은 크게 콜 옵션과 풋 옵션으로 분류됩니다. 매수 옵션은 명시된 기초자산을 미래에 일정 금액에 매수하는 권리를 허락하는 반면, 매도 옵션은 지정된 기초자산을 미래에 정해진 금액에 매도할 수 있는 권리를 부여합니다.
옵션 계약에서는 미래의 특정 날짜에 (만기일이라 불리는) 정해진 금액에 기초자산을 사거나 팔 수 있는 권리를 보유하고 있습니다. 이러한 가격을 행사 가격이라고 하며, 종료일에는 해당 권리를 실행할지 여부를 판단할 수 있습니다. 따라서 옵션 계약은 투자자에게 향후의 시세 변동에 대한 보호나 수익 실현의 기회를 허락합니다.
국외선물은 시장 참가자들에게 다양한 투자 및 차익거래 기회를 마련, 외환, 상품, 주식 등 다양한 자산유형에 대한 옵션 계약을 포함할 수 있습니다. 거래자는 풋 옵션을 통해 기초자산의 낙폭에 대한 보호를 받을 수 있고, 콜 옵션을 통해 상승장에서의 이익을 타깃팅할 수 있습니다.
해외선물 거래의 원리
실행 가격(Exercise Price): 외국선물에서 행사 금액은 옵션 계약에 따라 특정한 가격으로 약정됩니다. 종료일에 이 금액을 기준으로 옵션을 실행할 수 있습니다.
만료일(Expiration Date): 옵션 계약의 종료일은 옵션의 행사가 불가능한 마지막 일자를 뜻합니다. 이 일자 다음에는 옵션 계약이 종료되며, 더 이상 거래할 수 없습니다.
풋 옵션(Put Option)과 콜 옵션(Call Option): 풋 옵션은 기초자산을 지정된 금액에 매도할 수 있는 권리를 제공하며, 콜 옵션은 기초자산을 명시된 금액에 사는 권리를 허락합니다.
프리미엄(Premium): 외국선물 거래에서는 옵션 계약에 대한 옵션료을 납부해야 합니다. 이는 옵션 계약에 대한 비용으로, 마켓에서의 수요와 공급량에 따라 변동됩니다.
행사 방식(Exercise Strategy): 투자자는 만기일에 옵션을 행사할지 여부를 결정할 수 있습니다. 이는 시장 상황 및 거래 전략에 따라 다르며, 옵션 계약의 수익을 최대화하거나 손실을 최소화하기 위해 선택됩니다.
마켓 위험요인(Market Risk): 해외선물 거래는 시장의 변화추이에 효과을 받습니다. 시세 변화이 예상치 못한 방향으로 발생할 경우 손실이 발생할 수 있으며, 이러한 마켓 위험요인를 최소화하기 위해 투자자는 전략을 구축하고 투자를 계획해야 합니다.
골드리치증권와 동반하는 외국선물은 확실한 확신할 수 있는 운용을 위한 최상의 선택입니다. 투자자분들의 투자를 지지하고 가이드하기 위해 우리는 최선을 다하고 있습니다. 공동으로 더 나은 내일를 지향하여 전진하세요.
[url=http://odiflucan.com/]diflucan pharmacy[/url]
Guide To Tiktokpornstar: The Intermediate Guide In Tiktokpornstar tiktokpornstar
[url=http://sildalis.store/]sildalis cheap[/url]
blublu
[url=https://vermox.company/]buy vermox in usa[/url]
124SDS9742
I strongly recommend to avoid this site. The experience I had with it was nothing but frustration as well as doubts about scamming practices. Be extremely cautious, or alternatively, seek out a more reputable site to fulfill your requirements.
124969D742
Organising A Casino Night To Fundraise For Charity 카지노슬롯
blublu
blolbo
I urge you steer clear of this platform. The experience I had with it has been nothing but dismay as well as concerns regarding fraudulent activities. Proceed with extreme caution, or better yet, look for an honest site to meet your needs.
[url=https://finasterideff.online/]finasteride tablets 1mg price in india[/url]
[url=https://vermox.company/]vermox sale[/url]
[url=http://xlyrica.com/]lyrica 50 mg price[/url]
How Perform Casino Craps Games 프라그마틱 – http://vb.alhilal.com/ –
[url=http://adexamethasonep.online/]dexamethasone rx[/url]
cialis soft tabs material – cialis super active chicken1 viagra oral jelly gentleman
[url=https://bactrim.company/]bactrim medicine online[/url]
[url=https://enolvadex.com/]nolvadex price[/url]
[url=https://adexamethasonep.online/]dexamethasone india[/url]
[url=http://vermoxin.online/]vermox pills[/url]
[url=http://toradol.directory/]toradol rx[/url]
How To Find The Winning Slot Machine Games 프라그마틱 슬롯게임 (http://www.metooo.io)
Online Poker – Is Holdem Still Profitable Looking For 2011?
카지노 (maps.google.ml)
Top Pornstars Kayleigh Wanless Tools To Help
You Manage Your Everyday Lifethe Only Top Pornstars Kayleigh Wanless Trick Every Person Should
Know top pornstars Kayleigh Wanless
I strongly recommend stay away from this site. My own encounter with it was purely frustration and concerns regarding scamming practices. Exercise extreme caution, or alternatively, seek out an honest site to fulfill your requirements.
[url=https://nolvadexin.online/]nolvadex 1mg[/url]
[url=http://toradol.directory/]toradol daily[/url]
1SS3D249742
boba 😀
[url=http://xlyrica.com/]buy lyrica mexico[/url]
[url=https://bactrim.company/]bactrim canada[/url]
cululutata
Affordable Local SEO Company Tools To Ease Your Daily Life
Affordable Local SEO Company Trick That Everyone Should Be Able To affordable local seo company
[url=https://vermox.company/]vermox tablets where to buy[/url]
[url=http://adexamethasonep.online/]dexamethasone tablet price[/url]
[url=http://azithromycinmds.online/]zithromax price australia[/url]
boba 😀
7 Tips To Make The Most Out Of Your Window Companies Luton Aluminium Sliding Doors Luton
blabla
Guide To Online Roulette Betting 프라그마틱 슬롯 사이트
Debt Settlement Solution – Common Obstacles In Eliminating Personal
Debts 무직자대출
10 Facts About Medical Malpractice Lawyer That Insists On Putting
You In A Good Mood tarentum Medical malpractice law firm
[url=http://modafinilmip.online/]order provigil[/url]
lalablublu
124969D742
Make Your Writing Or Marketing Projects Your Main Concern 슬롯사이트 (https://maps.google.mw/)
The Huge Winning Opportunities On Bet Fair Exchange Games 슬롯
15 Facts Your Boss Wished You’d Known About Affordable Ipv6rotating
Ipv6 affordable local seo services seo trust (https://te.legra.Ph/Why-You-Should-Concentrate-On-Improving-Affordable-SEO-Near-Me-08-11)
[url=https://eflomax.online/]buy flomax online[/url]
10 Things That Your Family Teach You About Cheapest
9kg Washing Machine cheapest 9kg washing machine (migration-bt4.co.uk)
Emergency Car Locksmith: The Ugly The Truth About
Emergency Car Locksmith Car locksmith mobile
9 Lessons Your Parents Teach You About Upvc Window
Repairs upvc window repairs near me (Booker)
The Reason Why Everyone Is Talking About Personal Accident Attorney Right Now Atlanta Personal Injury Lawyers
Five Folding Stroller Lessons From The Professionals strollers (Tanggiap.org)
Car Accident Settlement Tools To Help You Manage Your Daily Lifethe
One Car Accident Settlement Trick That Should
Be Used By Everyone Learn car accident; Lanny,
15 Gifts For The CSGO Most Profitable Cases Lover In Your Life
wildfire case – Poppy –
10 Amazing Graphics About Injury Legal lawyer
“Ask Me Anything,” 10 Answers To Your Questions About Upvc
Windows Repair repair upvc windows
The Reasons Asbestos Compensation Will Be The
Hottest Topic In 2023 Asbestos Legal
The 9 Things Your Parents Teach You About Cheap Online Shopping Sites Uk
online shopping sites Uk (forum.siamnetworker.com)
What Freud Can Teach Us About Cheap Online Electronics Shopping Uk
9X32 Inch Poster Frame
17 Signs To Know If You Work With Double Glazed Window Repair Near Me double glaze windows
The 10 Most Scariest Things About Car Accident Lawyers Car Crash Attorney In Houston
The 10 Scariest Things About Double Glazing Near Me double glazing near me (Dmskj.ff114.cn)
10 CS GO Weapon Case Hacks All Experts Recommend snakebite Case
Five Slot Demo Gratis Lessons From The Pros demo slot princes 1000
Tips For Explaining Washing Machine 10kg Price To Your Boss best washing machine 10kg; 0522891255.ussoft.kr,
Why You Should Focus On Enhancing Accident Attorney los altos hills accident lawsuit
How CSGO Cases Opening Transformed My Life For The Better shattered web case (Janette)
The Top Companies Not To Be Monitor In The Adult Adhd Symptoms Industry Adhd Symptoms In Women Adults
How To Beat Your Boss With Slot Starlight Princess demo slot starlight princess xmas
The Underrated Companies To Follow In The Meso Lawyer Industry Mesothelioma Lawyers
The 10 Most Scariest Things About Asbestos Legal Asbestos Legal
I strongly recommend to avoid this site. My personal experience with it was purely frustration as well as suspicion of fraudulent activities. Proceed with extreme caution, or even better, look for a more reputable platform to fulfill your requirements.
The People Who Are Closest To Semi Truck Litigation Tell
You Some Big Secrets brookville semi truck accident attorney
Watch This: How Case Opening Sites CSGO Is Taking Over
And What To Do About It Case glove
Five Killer Quora Answers On Shopping Online Uk Clothes shopping online uk clothes – https://95.staikudrik.com/index/d1?diff=0&utm_source=ogdd&utm_campaign=26607&utm_content=&utm_clickid=uskkokskw44sooos&aurl=http://vimeo.com/931462675&an=&utm_term=&site=&pushmode=popup –
Five Killer Quora Answers To Replacement Double Glazing Units Near Me Double
Glazing Units Near Me (http://Www.Encoskr.Com)
nice content!nice history!!
5 Laws That Can Benefit The Avon Glimmerstick Lip Liner Industry Avon True Colour Glimmerstick Lip Liner
9 Lessons Your Parents Taught You About Best Online Shopping Sites London Online shopping sites london
5 Common Phrases About Demo Slot You Should Stay Clear Of gaming demo slot
See What Double Glazing Units Near Me Tricks The Celebs Are Making Use Of double glazing units near Me
Car Key Cut Near Me 101 The Ultimate Guide For Beginners Car Key Blade Cutting
What Is The Reason Ford Fiesta Replacement Key Cost
Uk Is The Right Choice For You? ford transit Key programming
You’ll Never Be Able To Figure Out This London Online Mobile Shopping
Sites’s Tricks london online mobile shopping sites – Ignacio –
10 Wrong Answers For Common Vibrating Panties Sex
Toys Questions Do You Know The Right Answers?
remote vibrator in public (https://josephcrowd22.werite.net)
12 Companies Leading The Way In Accident Injury Attorneys Near
Me injury attorneys chicago (Trina)
You’ll Be Unable To Guess Window Repair Near’s Tricks window
repair Near Me – http://isaevclub.ru,
10 Quick Tips For Mesothelioma Litigation mesothelioma Compensation Attorney
Why Do So Many People Would Like To Learn More About Motor Vehicle Settlement?
Motor Vehicle Accident
10 Failing Answers To Common Motorcycle Accident Law Questions: Do You Know The Right Ones?
Jackson Motorcycle Accident Attorney – Vimeo.Com,
5 Laws That Anyone Working In CSGO Cases Value Should Be Aware Of huntsman weapon Case
10 Things We Do Not Like About Vauxhall Astra Key Fob Replacement Vauxhall Mokka Key Fob
A Look Inside The Secrets Of Double Glaze Repair Near Me Window double glazed
The 10 Most Scariest Things About Ghost Installations Ford focus ghost installer
Don’t Forget Accident Attorney: 10 Reasons Why You Don’t Need It
Desert Hot Springs Accident Attorney (https://Vimeo.Com/)
10 Healthy Motor Vehicle Lawsuit Habits Motor Vehicle accident lawsuit
15 How Long Does 18-Wheeler Lawsuit Take Bloggers You Should Follow vimeo
How Much Do Birth Defect Lawyer Experts Earn? milledgeville birth Defect Lawyer
7 Simple Secrets To Totally Enjoying Your Slot
Demo Princess X1000 Demo princess starlight pragmatic
7 Simple Tips For Rocking Your Personal Injury Attorney
Scott City Personal Injury Law Firm
10 Personal Injury Claim Meetups You Should Attend Firms
10 Tips To Know About Locksmith For Cars Near
Me Cheapest Car locksmith near Me
9 . What Your Parents Teach You About Shopping Online Site Clothes shopping online site clothes (https://53.vaterlines.com)
15 Best Pinterest Boards Of All Time About Semi Truck Lawsuits
peoria heights semi truck accident law firm
Guide To Birth Injury Attorney: The Intermediate Guide On Birth Injury Attorney
birth injury
What’s Holding Back In The How To Buy Clothes Online From Uk Industry?
cheapest online Shopping uk
3 Common Causes For Why Your CSGO Weapon Case Isn’t Working (And What
You Can Do To Fix It) hydra case [Shauna]
10 ADHD Diagnosis Tips All Experts Recommend private adhd diagnosis
You’ll Never Guess This Double Glaze Repair Near Me’s Tricks double glaze repair Near me
10 Best Mobile Apps For Birth Defect Attorneys firms
The 10 Scariest Things About CSGO Cases Explained case skins
15 Lessons Your Boss Would Like You To Know You’d Known About Mesothelioma Law Mesothelioma legal
10 Replacement Upvc Window Handles Tricks Experts Recommend repairing upvc
windows [Shanel]
[url=https://sildalis.store/]sildalis[/url]
What The 10 Most Stupid Starlight Princess Max Win Failures Of All Time Could Have Been Prevented starlight princess Slot; Glamorouslengths.com,
A Vibrant Rant About Railroad Injuries Lawyer Pontoon beach railroad injuries lawyer
Double Glazing Companies Near Me Tools To Ease
Your Everyday Lifethe Only Double Glazing Companies Near Me Trick
Every Person Should Learn double glazing companies
near me (Celsa)
Why Railroad Injuries Lawyers Still Matters In 2023
railroad Injuries law firm
Why You Should Focus On Improving 18-Wheeler Accident Attorney
Near Me Coffeyville 18 wheeler accident lawsuit
15 Secretly Funny People In Slot Demo Pragmatic Akun Demo rupiah –
telegra.ph
–
20 Things That Only The Most Devoted Misted Double Glazing Repairs Near Me Fans Understand fix
5 Killer Queora Answers On Semi Truck Case firm
Tips For Explaining Motorcycle Accident Litigation To Your Mom motorcycle accident lawyers
Five Things You Didn’t Know About Signs Of ADHD In Adult Women adhd
symptoms in adult women, Ashly,
Why You’ll Definitely Want To Learn More About Counter Strike
gaming
This Is The History Of Mesothelioma Lawsuit Warner Robins Mesothelioma Lawsuit (Vimeo.Com)
A Positive Rant Concerning CSGO Cases Ranked Operation Riptide Case
Everything You Need To Be Aware Of Double Glazed Units Near Me replacement double glazed units near me
11 “Faux Pas” That Are Actually Okay To Create With Your Sbobet goblok
A Look At The Future What Is The Car Accident Claim Industry Look Like In 10 Years?
car accident lawsuits
The new EPA rule will stop asbestos-based products from the past from being sold on the market without conducting
a review. It also closes a loophole that existed in the partial ban of 1989 on ada Asbestos Attorney.
The 10 Most Scariest Things About 10kg Washing Machine For Sale
10kg Washing machine for sale
9 Signs You’re An Expert Uk Online Shoe Shopping Websites Expert Dog
Meal With Beef (Efren)
11 “Faux Pas” That Are Actually Acceptable To Create Using
Your Personal Injury Compensation Newburgh Personal Injury Lawsuit
Need Inspiration? Try Looking Up Online Clothes Shopping Websites Uk Kids Dance Shoes
Beware Of These “Trends” About Adhd In Adults Medication Medications for adhd
10 Things That Your Competitors Inform You About Accident Personal Injury Lawyer Injury Case Evaluation
The Best Case Battles CSGO It’s What Gurus Do Three
Things Weapon Case
The Motive Behind Mesothelioma Claim Is Everyone’s Obsession In 2023 parkville mesothelioma lawsuit (Ernestina)
The 9 Things Your Parents Teach You About Double Glazed
Window Suppliers Near Me double glazed window Suppliers near Me
Guide To Private ADHD Titration UK: The Intermediate Guide The Steps To Private ADHD Titration UK
private Adhd titration uk
3 Reasons You’re Not Getting Double Glazed Windows Near Me Isn’t Working (And What You Can Do
To Fix It) Secondary Double Glazing Near Me (Odom-Winkel.Federatedjournals.Com)
Birth Injury Litigation Explained In Fewer Than 140 Characters birth injury Lawsuit
12 Stats About Sell Avon Online To Make You Look Smart Around The Cooler.
Cooler Who sell avon near me (http://www.rkhpark.co.kr)
The Top Double Glazing Installers Near Me Gurus Are Doing Three Things Double glazzing
How To Tell If You’re Prepared To Personal Injury Defense Attorney personal Injury legal Assistance
The Ultimate Glossary Of Terms About Slot Jackpots Jackpot slots
15 Interesting Facts About CSGO Case New You’ve Never Heard Of
Revolution Case Skins
How To Beat Your Boss Slot Demo habanero demo
15 Startling Facts About Accident Claim That You’d Never Been Educated About
accident attorneys (https://comunistasweb.es/spip.php?article66&Lang=es)
Responsible For A Designer Bags Budget? Twelve Top Tips To Spend Your Money cheap designer Bags
What’s The Reason Online Shopping Websites Clothes Is Fast Becoming The
Most Popular Trend In 2023 online Shopping websites For clothes (jayroeder.Com)
The Reason Why Adhd Sleep Medication Has Become The Obsession Of Everyone In 2023 adhd Medications uk
Quiz: How Much Do You Know About Why Are CSGO Skins Going
Up In Price? Cs2 Cases
How To Explain Shopping Online Site Clothes To Your Grandparents jolie papier online shop uk amazon
What’s The Job Market For Car Key Repair Shop Near Me Professionals?
key repair Shop near me
10 Facts About Upvc Windows And Doors That Will Instantly Put You In The Best Mood Repair upvc windows
Why Nobody Cares About Railroad Injuries Compensation Railroad injuries attorneys
9 Lessons Your Parents Taught You About Upvc Window Repair upvc window repair
10 Things Everyone Has To Say About Upvc Doors Repair Upvc Doors Repair panels for upvc Doors
20 Things You Must Be Educated About Workers Compensation Law workers’ compensation attorney – https://tujuan.grogol.Us/,
20 Things You Must Know About Railroad Injuries Law Vimeo
You’ll Never Guess This Dangerous Drugs Lawyers’s Benefits dangerous drugs lawyers, p3terx.com,
You’ll Be Unable To Guess Adhd Symptoms In Women’s Tricks adhd symptoms in Women
Double Glazing Companies Near Me: What’s The Only Thing Nobody Has Discussed
near Me
20 Things You Need To Know About Private Mental Health Assessment London Mental health diagnosis assessment
7 Small Changes You Can Make That’ll Make A Huge Difference In Your Medical Malpractice Compensation fort wright medical malpractice lawyer
15 Shocking Facts About Private Diagnosis ADHD You’ve Never Heard Of how much for a private adhd assessment (Lan)
10 Togel-Related Projects To Stretch Your Creativity must a nice
What’s The Current Job Market For Double Glazed Window Repairs Professionals?
double glazed window repairs
The Reasons You’ll Want To Find Out More About Auto Accident Case lawyers
It’s The Perfect Time To Broaden Your CSGO Case New Options Clutch case
The 9 Things Your Parents Taught You About Best Online Shopping Sites London best online shopping sites london
What NOT To Do Within The Private Psychiatrist Birmingham Industry private psychiatrist glasgow Uk
7 Secrets About Mesothelioma That Nobody Will Tell You woodside mesothelioma lawsuit
The 10 Most Scariest Things About Auto Lock Smith Near Me auto locksmith near me
now (https://fuchsia-pear-fpklnb.mystrikingly.com/)
What’s The Job Market For Mesothelioma Workers Compensation Professionals Like?
Mesothelioma workers Compensation
The History Of CS GO Case Battles case Snakebite
Why You’ll Want To Read More About Semi Truck Litigation st martinville semi Truck accident Lawyer
Five Killer Quora Answers To Asbestos Law asbestos
10 Reasons That People Are Hateful To Designer Handbags White Designer
Handbags White online designer bags
9 Lessons Your Parents Taught You About Mesothelioma
Lawsuits mesothelioma Lawsuits
The 10 Scariest Things About List Of Online
Shopping Sites Uk list of online shopping sites uk
Why You Should Be Working With This Erb’s Palsy Case carroll erb’s palsy lawyer
How To Explain Slot Rtp To A 5-Year-Old online slots real money (http://ezproxy.cityu.edu.hk/login?url=https://Rainbet.com/pt/casino/slots/hacksaw-densho)
The 10 Most Scariest Things About Locksmiths Cars locksmiths Cars
How To Make An Amazing Instagram Video About Double Glazed Window Replacement Near Me condensation
What’s The Current Job Market For Titration ADHD Medications Professionals?
Titration adhd medications
The 10 Most Scariest Things About Double Glazing Company Near Me Double Glazing Company Near Me
1249742
Could Cheap Prams Be The Key To Achieving 2023?
Prams Pushchairs Prams Pushchairs
Do Not Buy Into These “Trends” About Car Accident Law decatur Car accident Attorney
Where Do You Think CSGO Cases Ranked Be 1 Year From What Is Happening Now?
broken Fang case
10 Tell-Tale Signals You Should Know To Look For A New Car Accident Lawsuit
car accidents
Comprehensive List Of Nissan Micra Key Replacement Dos And
Don’ts nissan key replacement near me; Drew,
The Reasons Truck Crash Lawyer Is Everyone’s Obsession In 2023 Truck accident lawyers
The Three Greatest Moments In Birth Injury Litigation History
mounds View birth injury lawsuit
See What Repair Upvc Windows Tricks The Celebs Are Using Repair Upvc Window
10 Tips For Getting The Most Value From Malpractice Lawyer Garfield heights malpractice lawsuit (vimeo.com)
20 Resources That’ll Make You More Efficient At Are
CSGO Cases Predetermined Snakebite Case
7 Easy Tips For Totally Making A Statement With Your Uk Online
Shopping Sites Like Amazon Garrett Propointer Waterproof
[url=https://lasixor.online/]buy lasix furosemide[/url]
Why Is Everyone Talking About Upvc Doors Right Now Repair Upvc door
Is Your Company Responsible For An Online Work And Earn Money Budget?
12 Best Ways To Spend Your Money Full
Why Double Glazed Window Repair Is Quickly Becoming The Most Popular
Trend In 2023 Window Repairs Near Me (http://Projectbee.Com)
The 10 Most Terrifying Things About Rooms To Go Sofa
Sale room
17 Reasons You Shouldn’t Beware Of Semi Truck Legal Vimeo.com
The Reason Why You’re Not Succeeding At Mesothelioma Legal mesothelioma Settlement
[url=https://oazithromycin.online/]azithromycin 500 price in india[/url]
[url=http://tadacip.store/]where to buy tadacip 20[/url]
10 Websites To Help You Become An Expert In Car Crash Claim attorney
For Car accident in Houston (lakonia-photography.de)
5 Lessons You Can Learn From Erb’s Palsy Lawyers Erb’s Palsy Lawsuits
15 Presents For That Will CSGO Cases Go Up In Price Lover In Your Life
strike global Offensive
Three Greatest Moments In Citroen Key Replacement Cost History auto Locksmith
A Time-Travelling Journey A Conversation With People About Uk Online Shopping Sites Like
Amazon 20 Years Ago vimeo
10 Upvc Repairs Meetups You Should Attend Upvc Windows Repair Near Me
20 Resources That Will Make You More Efficient With How Does
Avon Work Online work from home jobs in london
10 Beautiful Images Of Dangerous Drugs Law Firm Vimeo.com
5 Myths About Car Accident Law That You Should Avoid Middletown Car Accident Lawsuit
Do Not Believe In These “Trends” About Best Mesothelioma Lawyer attorneys for mesothelioma
What Is Idn Poker And Why Is Everyone Speakin’ About It?
spam
The 10 Most Scariest Things About Injury Attorneys Injury Attorneys
7 Simple Secrets To Completely Doing The Luton Window Repair Bi Fold Doors luton
From The Web Twenty Amazing Infographics About Trucking Lawyers Truck Accident Law Firm
20 Tips To Help You Be More Efficient At Online Clothes Shopping Near Me vimeo
Five Personal Injury Lawsuit Projects To Use For Any Budget saratoga springs personal Injury Attorney
You’ll Never Be Able To Figure Out This Shopping Online Uk To Ireland’s Benefits Shopping Online Uk To Ireland (Dat.2Chan.Net)
10 Things We All Do Not Like About Window Repair window repairs [Glk-egoza.ru]
10 Things You Learned In Kindergarden That Will Help
You With Replace Upvc Window Handle Repairs To Upvc Windows
Are You Tired Of Avon Rep Starter Kit? 10 Inspirational Sources That Will Bring Back Your Love avon rep starter kit
11 “Faux Pas” Which Are Actually OK To Create With Your 3 Wheel Lightweight Mobility Scooters 3 wheeled electric Scooters, https://house-gupta.federatedjournals.com,
5 Tools Everyone Involved In Titrating Medication Industry
Should Be Making Use Of Adhd titration private method
10 Quick Tips About Car Key Cover Fiat 500 Duplicate
The One London Online Mobile Shopping Sites Mistake That Every Beginning London Online Mobile Shopping Sites
User Makes baby changing pad cover horse design (https://vimeo.Com)
10 Misconceptions Your Boss Shares Concerning CS GO Case Battles kilowatt Case
Asbestos Lawyer Tools To Ease Your Everyday Lifethe Only Asbestos Lawyer Trick That Everyone Should Learn Mesothelioma lawsuit
You’ll Never Guess This Boat Accident Lawyers’s Benefits boat accident lawyers (http://www.emsworthsc.org.uk)
7 Helpful Tips To Make The Most Of Your
Become An Avon Rep Online become an avon rep online –
https://djchs.co.kr/bbs/Board.php?bo_Table=qna&wr_id=141408 –
How To Tell If You’re Prepared To Go After Citroen Dispatch Remote Key Replacement citroen C3 key fob
Ten 10kg Washing Machine Prices That Really Improve
Your Life 10Kg Washing machine prices
10 Baccarat Tips – Simple Guidelines To Winning 프라그마틱 무료슬롯
10 Tell-Tale Symptoms You Need To Buy A Slot Variance Low Variance Slots
Accident Claim Lawyers Tips To Relax Your Everyday Lifethe Only Accident Claim Lawyers Trick That Everyone Should Know
accident claim lawyer
King Cock Squirting Dildo Tips That Will Transform
Your Life sex toy That squirts
What Is Accident Injury Attorney And How To Utilize It injury attorneys Near me
The Biggest Issue With Online Shopping Sites For Clothes, And How You Can Fix It Famous online shopping sites for Clothes
Guide To New 9kg Washing Machine: The Intermediate Guide On New
9kg Washing Machine New 9kg washing Machine
It’s The Complete Cheat Sheet On Upvc Windows Repair Repair Upvc Window
Seven Explanations On Why Auto Accident Case Is So Important
oak grove auto accident law firm
Ghost Alarm Installation Near Me Techniques To Simplify
Your Daily Life Ghost Alarm Installation Near Me Trick Every
Person Should Be Able To Ghost Alarm Installation Near Me
Counter Strike Global Offensive Best Crosshair: The Good, The Bad, And The Ugly case operation bravo
Learn More About I Am Being Sued For Personal Injury While
Working From Your Home Good Personal Injury Lawyers Near Me
10 Quick Tips For 18 Wheeler Accident Lawyer harrodsburg 18 Wheeler accident Attorney
5 Laws That’ll Help The Upvc Windows And Doors Industry Repair upvc windows
5 Laws That Anyone Working In Double Glazing Showrooms Near Me Should Be Aware Of handle For double glazed Window
Guide To Double Glazed Window Near Me: The Intermediate Guide In Double Glazed Window
Near Me double Glazed window near me
The 10 Scariest Things About Online Shopping Stores List online shopping stores list (mayflyshop.co.kr)
See What Autowatch Ghost Immobiliser Fitting Tricks The Celebs Are Using Ghost Immobiliser Fitting
20 Myths About Gambling Addiction: Debunked must a nice
See What Pram With Car Seat Tricks The Celebs Are Using pram with car seat
(bradford.secure-dbprimary.com)
10 Websites To Aid You Be A Pro In Online Shop cheapest Online Shopping Uk
See What Online Shopping Figures Uk Tricks
The Celebs Are Using online shopping Figures uk
Personal Injury Law: It’s Not As Expensive As
You Think bonney lake personal injury lawyer (Vimeo.com)
Why You Should Concentrate On Enhancing Double Glazed Window Repairs
Near Me double Glazed window repairs
Guide To Bmw Replacement Key Cost: The Intermediate Guide To Bmw Replacement Key Cost bmw replacement key cost
Why Dangerous Drugs Is More Dangerous Than You Believed Michigan Dangerous Drugs Lawyer
The People Nearest To Method Titration Have Big Secrets To Share nearest
See What Accident Tricks The Celebs Are Using accident
Five Tools That Everyone Is In The Designer Handbags For Cheap Industry Should Be Using designer Bags outlet Online (marvelvsdc.Faith)
Why Nobody Cares About Birth Injury Attorney Maryville Birth Injury lawyer
15 Things Your Boss Wished You’d Known About CS GO Weapon Case gamma case (Alycia)
The 10 Scariest Things About Online Retailers Uk Stats online
retailers Uk stats []
Malpractice Attorney: A Simple Definition Wellington malpractice law firm
10 Tell-Tale Signs You Must See To Know Before You Buy Private ADHD Assessment UK private healthcare adhd assessment
The 10 Most Scariest Things About Auto Injury Attorneys Attorney Auto Accident
10 Things That Your Family Taught You About Upvc
Windows Near Me upvc windows near me
Five Things You Didn’t Know About Mobile Car Diagnostic Near Me auto diagnostics near me (telegra.ph)
How To Make A Profitable Window Repair Near Even If You’re Not Business-Savvy Upvc Window
Repair Near Me [http://Blog.Myouaibe.Com/]
Here’s A Few Facts Concerning Online Shopping Websites List Brightech Sky Lamp Sale
Ten Upvc Door Panel Replacement That Will Change Your Life
The Top Reasons For Motor Vehicle Attorney’s Biggest “Myths” Concerning Motor Vehicle Attorney Could Actually Be Accurate Hollister Motor vehicle accident Lawyer
The Reason Hyundai Car Key Replacement Cost Is Fast Increasing To Be The
Trendiest Thing In 2023 hyundai key repair
The Reason Online Shopping Uk Electronics Is Fast Becoming The Hottest Trend Of 2023 Small Capacity Shop Vac
What’s The Job Market For Best Sex Toys For Guys
Professionals? best sex toys for guys
What’s The Current Job Market For Double Glazing Repairs Near Me Professionals Like?
double glazing repairs Near me
Betting Pointers In The Casino 카지노사이트
7 Secrets About Ford Key Fob That Nobody Will Share With You
Ford fiesta replacement keys
What Is Double Glazing Repair Near Me And Why Is Everyone Talking About It?
double glazed replacement units
Why Replacement Upvc Window Handles Is Relevant 2023 Upvc window repair near me
The 10 Scariest Things About Online Shopping Stores List online shopping stores
list (m.en.stylenanda.com)
What’s The Job Market For Upvc Repairs Near Me Professionals?
Upvc Repairs near me (http://isaevclub.ru/)
10 Quick Tips About Upvc Windows Repair repair upvc Window
The Hidden Secrets Of Veterans Disability Case bronxville veterans disability law firm; https://vimeo.com/709378408,
15 Best Pinterest Boards To Pin On All Time About
Key Audi audi replacement key service near Me
See What Double Glazed Windows Near Me Tricks The Celebs Are Using Double Glazed
Windows Near Me (http://Www.Encoskr.Com)
Indisputable Proof You Need Washer Dryer Combo Brands quiet
Adhd Adults Treatment Tools To Ease Your Daily Life Adhd Adults Treatment Trick
That Everyone Should Be Able To adhd adults
treatment [Marco]
Don’t Buy Into These “Trends” Concerning Free Spin Slots Slot Bonuses
15 Best Documentaries On Replacement Upvc Window Handles
upvc window repair near me [Shantell]
Quiz: How Much Do You Know About Accident
Litigation? lasalle accident Lawyer
5 Laws That Anyone Working In Shopping Online Should Know Shopping online sites clothes
10 Quick Tips To Mesothelioma Lawyer mesothelioma Case
Watch Out: How CSGO Battle Case Is Taking Over And What You Can Do About It Weapon case
Searching For Inspiration? Try Looking Up Window Repair Near Upvc Repairs
The Best Advice You’ll Ever Get About Mobile Auto Locksmith Near Me locksmiths Automotive
What’s The Job Market For Double Glazed Window Repairs Professionals Like?
double glazed window repairs (Marcel)
I urge you steer clear of this platform. My personal experience with it has been only frustration along with doubts about scamming practices. Proceed with extreme caution, or even better, seek out a more reputable site to fulfill your requirements.
See What Repair Upvc Windows Tricks The Celebs Are Using repair upvc windows
The Richfield Asbestos Law Firm manufacturers knew that
their products could be dangerous yet they continued to use
asbestos for decades without disclosing any dangers.
This negligence caused mesothelioma, as well as other asbestos-related diseases.
A Step-By’-Step Guide To Picking The Right Online Shopping Sites List For Clothes Special Pocket Watch For Grandson Birthday
Assessment Mental Health Tools To Ease Your Everyday Lifethe Only Assessment Mental Health Trick That Every Person Should Learn assessment mental health
A Provocative Remark About CS GO Weapon Case operation breakout
weapon case – Jens,
[url=https://azithromycinmds.com/]can you purchase zithromax[/url]
Why The Biggest “Myths” About ADHD Symptoms In Women Test May Actually Be Right adult adhd in women
You’ll Never Guess This Upvc Door Repairs Near Me’s Tricks Upvc Door Repairs Near Me
10 Quick Tips For Window Repair Near Upvc Window Repair
12 Slot Demo Gratis Facts To Make You Think Twice About The
Water Cooler demo Slot x1000
10 Amazing Graphics About Cheapest Online Grocery Shopping Uk Bright Basics Peg Garden
15 Presents For That How To Buy Clothes Online From Uk Lover In Your Life 4-Drawer Fireproof Filing
You’ll Be Unable To Guess Private Psychiatrist Sheffield
Cost’s Tricks Private psychiatrist Sheffield
cululutata
How To Tell If You’re At The Right Level To Go After
Best Online Shopping Uk Clothes Vimeo
15 Best Sex Machines Online Store Bloggers You Need To Follow Best Sex Machine
How Adult Diagnosis Of ADHD Influenced My Life For The Better diagnosis for adhd
in adults (Moshe)
10 Best Mobile Apps For Auto Accident Law Warren Auto Accident Law Firm
The 10 Scariest Things About Upvc Windows Repairs upvc windows repairs (Jillian)
4 Dirty Little Tips On The Best Case CSGO Industry Danger Zone Case
15 Startling Facts About Window Repairs You’ve Never Heard Of Upvc repairs
15 Facts Your Boss Wants You To Know About Pvc Window Repairs You’d Known About Pvc Window Repairs Upvc Repair
The 10 Most Terrifying Things About Upvc Windows Repairs upvc windows repairs
Five People You Should Know In The Slot Demo Industry demo Slot free
5 Killer Quora Answers On Window Repair Near Me window repair near me
10 Failing Answers To Common Glazing Repair Near Me
Questions Do You Know Which Ones? Window Doctor
10 Signs To Watch For To Buy A Auto Accident Lawyer Auto accidents
[url=https://drdoxycycline.online/]buy doxycycline capsules[/url]
What Is Malpractice Claim And Why Is Everyone Talking About It?
Malpractice lawsuit
10 Steps To Begin The Business Of Your Dream
CSGO Case Battle Sites Business case esports (Jani)
lalablublu
See What Citroen C1 Spare Key Cost Tricks The Celebs Are Using citroen C1 spare key cost
10 Unexpected Windows Repairs Tips window Repairs
7 Simple Strategies To Totally Doing The Treadmill Under
Desk Best Sellers
All CSGO Skins Tips From The Best In The Business Gamma 2 Case
Car Accident Lawyer 101 The Ultimate Guide For Beginners livingston car Accident lawyer
What’s The Job Market For Birth Defect Litigation Professionals Like?
firm
10 Things You Learned In Kindergarden That’ll Help You With Double Glazed Repairs Near
Me replacing double glazed units
Motor Vehicle Legal: What No One Is Talking About motor vehicle
accident (flac24bitmusic.com)
You’ll Never Be Able To Figure Out This
Which Online Stores Ship Internationally’s Benefits which online stores ship internationally
The Reasons To Focus On Improving Birth Injury Legal firm
20 Things That Only The Most Devoted Licensed Slots Fans Know themed slot games (Sabrina)
Ten Taboos About Repair Double Glazed Window You Should
Never Share On Twitter window replacement near me (Norine)
The Most Inspirational Sources Of Personal Injury Settlement personal injury law firms (Josette)
See What Repair Upvc Windows Tricks The Celebs Are Utilizing repair upvc window
What Is Injury Claim And Why Is Everyone Dissing It? Vimeo
9 . What Your Parents Taught You About Shopping Online Site Clothes
Shopping Online Site clothes
What’s The Current Job Market For Windows Luton Professionals?
windows Luton
Five Killer Quora Answers On Double Glazed Near Me Double Glazed Near me
10 Quick Tips On Mesothelioma Claim Mesothelioma Attorney
How To Explain Online Famous Shopping Sites To Your Grandparents
Power Band Saws
The Reason Everyone Is Talking About Windows Repair This
Moment window repair (Wayne)
How Much Do Injury Lawyer Experts Make? Injury lawsuit
Upvc Door Repairs Near Me Tools To Improve Your Daily Life Upvc Door Repairs Near Me
Trick Every Individual Should Learn upvc door Repairs Near me
What Is The Reason? Double Glazing Repairs Near Me Is Fast Becoming
The Hot Trend For 2023 double glazing repair
The 10 Scariest Things About Mesothelioma Attorney mesothelioma law firms (Amee)
Some Of The Most Ingenious Things That Are Happening With Become A Rep
Uk how to become an Avon rep Uk
The Most Significant Issue With Upvc Window Repairs, And How You Can Solve It Upvc window Repairs near me
[url=http://declomid.online/]clomid without a prescription[/url]
10 Tips For Quickly Getting Combination Washer And Dryer In One Unit
Washer and dryer Combinations
15 What CSGO Cases To Invest In Benefits Everybody Must Be
Able To glove case (upriserz.link)
Your Worst Nightmare About Motor Vehicle Compensation Get Real garden city motor vehicle accident law Firm (https://vimeo.com/707142930)
5 Killer Quora Answers On Uk Online Grocery Shopping
Sites uk online grocery shopping sites
Online Shopping Website In London’s History Of Online Shopping Website In London In 10 Milestones crest Scope Toothpaste
The 10 Most Terrifying Things About Online Shopping
Sites London online shopping sites
10 Things Everybody Has To Say About Shopping Online jolie papier online shop
uk amazon (Jada)
Gambling Addiction: The Good, The Bad, And The Ugly must a nice
It’s The One Double Glazing Glass Replacement Near Me Trick Every Person Should Be Aware Of Replace double glazing glass
5 Must-Know Door Repair Techniques To Know For 2023 upvc windows repairs near me – Elvia –
Locksmiths For Cars Near Me Tools To Improve Your Daily Life Locksmiths For Cars Near Me Trick Every Person Should Be
Able To locksmiths for cars
The 10 Most Terrifying Things About Personal Injury Law
Personal Injury
20 Trailblazers Lead The Way In Auto Locksmiths mobile automotive locksmith
What’s The Reason ADHD Diagnosis Private Is Quickly Becoming
The Hottest Trend Of 2023 Private Adhd adult assessment
Upvc Front Doors: The Good, The Bad, And The
Ugly upvc panels for doors
A Step-By-Step Guide To Mesothelioma From Start To Finish bisbee mesothelioma law firm; Christian,
Dangerous Drugs Lawsuits: The Good, The Bad, And The Ugly Center
Dangerous Drugs Attorney (https://Vimeo.Com)
10 Window Repairs Tricks Experts Recommend upvc repair
(https://maps.google.ca/url?q=https://www.emuparadise.me/logout.php?Next=https://www.repairmywindowsanddoors.co.uk/romford-windowrepair/)
15 Reasons You Shouldn’t Be Ignoring Pushchairs Pushchairs
all-terrain strollers
“The Citroen C3 Key Fob Replacement Awards: The Best, Worst, And Weirdest Things We’ve Seen Replacement Citroen Key Fob
Indisputable Proof That You Need Online Shop Brown leather lift Chair
Five Killer Quora Answers To Double Glazing Repairs Luton Double Glazing Repairs
The 10 Most Terrifying Things About Upvc Windows Repairs upvc windows repair
How Personal Injury Claim Became The Top Trend On Social Media personal Injury lawsuit
5 Killer Quora Answers To Designer Handbags Sale Designer Handbags Sale
9 Signs That You’re A Workers Compensation Law Expert columbus workers’ compensation attorney
What’s The Job Market For Online Sites For Shopping In Uk
Professionals Like? Online Sites For Shopping In Uk
20 Interesting Quotes About Double Glazing Near Me double glazing near me
This Is How Mobile Diagnostic Will Look Like In 10 Years’ Time Diagnostic Test
9 Lessons Your Parents Teach You About Mesothelioma Lawsuit
Mesothelioma law
10 Apps To Aid You Control Your Cuckold Jav
11 Ways To Totally Defy Your CS GO Weapon Case operation breakout weapon case
10 Life Lessons We Can Learn From Real Money Slots
Themed Slots
10 Tips For Quickly Getting Adult Adhd Symptoms Test adhd symptoms in adults checklist [click4r.Com]
Are Key Repair As Important As Everyone Says? lock key repair near me (Titus)
It’s The Perfect Time To Broaden Your Auto Accident Lawyers
Options Auto Accident Lawsuits
An st cloud asbestos Lawyer attorney can help victims to file a lawsuit against employers for exposure to the harmful
mineral. A lawsuit could help victims obtain compensation for medical bills
as well as lost wages and suffering and pain.
14 Smart Ways To Spend Your Leftover Upvc Patio Doors Budget
Upvc replacement door Panel
See What Titration ADHD Adults Tricks The Celebs Are Utilizing titration adhd adults
(Tonja)
The 12 Worst Types Veterans Disability Litigation Users You Follow On Twitter lawyer
Here’s A Few Facts Regarding Which Online Stores Ship Internationally Tire Safety Monitor
Why Replacement Upvc Window Handles Is Your Next Big Obsession repairs to upvc windows (Lettie)
20 Asbestos Websites That Are Taking The Internet By Storm asbestos litigation (tujuan.grogol.us)
What’s The Job Market For Window Doctor Near Me Professionals Like?
Window doctor near Me
5 Laws Anybody Working In Malpractice Law Should Know
malpractice Lawsuits
orange asbestos Lawyer can be contaminated in a variety of ways.
However, the majority of asbestos-related claims involve occupational exposure.
11 Strategies To Completely Block Your Car Accident Attorneys car accidents attorney near me
– Lazaro –
Online Shopping Websites Clothes Tips To Relax Your Daily Life Online Shopping
Websites Clothes Trick That Should Be Used
By Everyone Be Able To Online shopping websites clothes
[url=https://bacclofen.online/]lioresal drug[/url]
Guide To Sleeper Sectional: The Intermediate Guide To Sleeper Sectional sleeper sectional
10 Things We Do Not Like About Locksmith For
Auto locksmith auto keys
9 Lessons Your Parents Taught You About Vibrating Egg Uk Vibrating Egg Uk
You’ll Be Unable To Guess Malpractice Lawyers’s
Tricks Malpractice Lawyers
The 10 Most Scariest Things About Railroad Injuries Litigation austin Railroad Injuries Attorney, vimeo.com,
10 Tell-Tale Warning Signs You Should Know To Look For A New
Counter Strike 2 case operation bravo (Yanira)
15 Gifts For The Personal Injury Attorneys Lover In Your Life nederland personal injury
lawsuit; https://vimeo.com,
9 Lessons Your Parents Taught You About Double Glazed Window Suppliers Near Me Double Glazed Window Suppliers Near Me
Why Car Accident Claim Is Right For You? car accident attorney (p3terx.com)
Best Dildos For Squirting: 10 Things I’d Like To Have Learned Earlier adult dildos
The Little-Known Benefits To How To Ship To Ireland From Uk Which supermarket Is best For Online shopping
What’s Next In Luton Double Glazing Glass Windows Repair
20 Fun Facts About Upvc Doors Luton Replace Side Windows Luton
10 Unexpected Replacement Upvc Window Handles Tips upvc Window Repair Near me
The Top Reasons Why People Succeed In The Asbestos Claim Industry
Mesothelioma law
9 Things Your Parents Taught You About Double Glazing Repairs Near Me double glazing repairs near me
7 Easy Secrets To Totally Enjoying Your List Of Online Shopping Sites In Uk Precision Wide Mouth Pliers
11 “Faux Pas” That Are Actually Okay To Make With Your Slot Demo Princess 1000 princess demo pragmatic [brother.co.nz]
Link Alternatif Gotogel Techniques To Simplify Your Everyday Lifethe Only Link Alternatif Gotogel Technique Every Person Needs
To Know Link Alternatif Gotogel
The 10 Most Terrifying Things About Treadmills For Sale UK treadmills for sale uk
[glk-egoza.ru]
You’ll Never Guess This Injury Lawyers’s Benefits lawyers
Here’s A Few Facts Regarding Avon Rep Log In avon rep log
in (http://0553721256.Ussoft.kr/)
You’ll Never Be Able To Figure Out This Online Shopping Sites Top 7’s Secrets online shopping sites top 7
See What Treadmills For Sale UK Tricks The Celebs Are Utilizing treadmills For sale uk
Treadmill Near Me Tools To Ease Your Everyday Lifethe Only Treadmill Near
Me Trick That Every Person Should Learn Treadmill near me
14 Cartoons On Birth Injury Lawsuit That’ll Brighten Your Day Vimeo.Com
Three Reasons Why 3 Reasons Why Your Mesothelioma Is Broken (And How To Fix It) whiting mesothelioma attorney
Those diagnosed with mesothelioma or other Daytona beach asbestos law Firm-related diseases have the right to financial
compensation. This compensation can pay for life-extending treatments as well
as help families recover from financial losses.
See What Examples Of Online Products Tricks The Celebs Are Using
examples of online products (Ella)
The 10 Most Infuriating Mesothelioma Legal FAILS Of All Time
Could Have Been Prevented mesothelioma lawsuits – Titus –
How Birth Defect Settlement Has Transformed My Life The Better birth Defect lawyer
15 Weird Hobbies That’ll Make You More Successful At
Free Casino Slots evoplay slots tournaments – http://www.Promwood.com –
You’ll Never Guess This Upvc Window Repair
Near Me’s Tricks upvc window repair near me
See What Blown Double Glazing Repairs Tricks The Celebs Are Using
Double glazing repairs
Double Glazing Windows Birmingham Tools To Ease Your Everyday LifeThe Only Double Glazing Windows Birmingham Trick That Everybody Should Be Able
To double glazing windows birmingham
How To Explain Car Accident Lawsuit To A Five-Year-Old Car Accident Law Firm
7 Simple Tricks To Totally Rocking Your Online Shopping Sites London Best Online Shopping Sites In Uk For Clothes
Its History Of Locksmith Near Me Auto Auto Key locksmith
[url=http://acyclovirmc.com/]zovirax acyclovir[/url]
Car Accident Lawyers Techniques To Simplify Your Daily Life Car Accident Lawyers Trick That
Every Person Should Learn car accident (http://0522445518.ussoft.Kr/g5-5.0.13/bbs/board.php?bo_table=board01&wr_id=1017530)
The Often Unknown Benefits Of Examples Of Online Products purple laptop tote Bag
Birth Injury Lawyers Tools To Make Your Daily Life Birth Injury Lawyers Trick That Everybody Should Be Able To Birth Injury Lawyer
The Three Greatest Moments In Slot Reviews History Evoplay Online Slots
Where Are You Going To Find Auto Accident Claim Be 1 Year From This Year?
New Paltz Auto Accident Lawsuit
The 12 Worst Types Of The Twitter Accounts That You
Follow Vimeo.Com
10 Tips For Getting The Most Value From Accident Law Robinson Accident Attorney
Five Killer Quora Answers On Treadmill Near Me Treadmill near Me
This Story Behind Window Repair Near Can Haunt You Forever!
upvc window repairs
How To Make A Profitable Double Glazed Windows Repair Near
Me Even If You’re Not Business-Savvy repairs double glazed windows
How To Outsmart Your Boss On Railroad Injuries Litigation railroad injuries law firm – Cruz,
10 Unexpected Windows Repair Near Me Tips Double Glazed Window Repairs Near Me
Your Family Will Thank You For Having This Injury Lawsuit saratoga springs Injury Lawyer
7 Things About Window Repairman You’ll Kick
Yourself For Not Knowing window repairs
What Is The Reason? Sectional Sleeper Sofa Is Fast Becoming The Trendiest Thing Of 2023 small Sectional sleeper sofa (https://disclosurequest.com/)
Dangerous Drugs Attorney Tools To Make Your Everyday Lifethe Only Dangerous Drugs
Attorney Trick That Every Person Must Know Dangerous Drugs
20 Up-Andcomers To Watch The Underdesk Treadmill Industry Hometreadmills.Uk
3 Reasons Commonly Cited For Why Your Examples Of Online Shopping Isn’t Working
(And How To Fix It) Urnex Full Circle Product (Lila)
Undisputed Proof You Need Upvc Windows Repair upvc Window repairs
near me [myers-klausen.federatedjournals.com]
Treadmills Near Me Techniques To Simplify Your Daily Lifethe One Treadmills
Near Me Technique Every Person Needs To Know treadmills near Me
An Accident Lawyer Dallas Success Story You’ll Never Believe accident injury lawyers
Five Killer Quora Answers On Online Clothes Shopping Sites Uk online clothes Shopping sites uk
Car Accident Lawyers Tools To Ease Your Daily Lifethe
One Car Accident Lawyers Trick Every Individual Should Be Able To Car accident lawyers
Blog For The Money – Ten Power Tricks To Creating A Successful Blog Dashdome
Incontestable Evidence That You Need Upvc Windows Repair
Repair Upvc Windows
5 Killer Quora Answers On Treadmill Used For Sale treadmill used for sale (https://treadmillforhome29866.theisblog.com)
Quiz: How Much Do You Know About London Online Mobile Shopping Sites?
Scratch-N-Play Ramp For Cats (vimeo.com)
What’s The Job Market For Treadmills Near Me Professionals Like?
treadmills near me (Dorothea)
Your Worst Nightmare About How To Get CS GO Cases Come To Life case revolution (Jeannie)
15 Unquestionably Reasons To Love Car Accident Litigation car accident attorneys
20 Fun Facts About Washer And Dryer Machine Combo energy
[url=http://accutaneiso.online/]accutane cream price[/url]
See What Double Glazing Units Near Me Tricks The Celebs Are Making Use Of Double glazing units Near me
This Story Behind Window Repair Near Will Haunt You For The Rest Of
Your Life! Upvc window Repair Near me
10 Inspiring Images About Online Retailers Uk Stats Multi Runner Indoor Rug
10 Undeniable Reasons People Hate New Audi Key Audi Keys Replacement
Why Is This Double Glazing Repairs Near Me So Beneficial?
In COVID-19 replace double glazed window – Laurene,
You’ll Never Guess This Asbestos Litigation’s Secrets Asbestos Litigation
A Brief History Of Upvc Windows Repair History Of Upvc Windows Repair repair upvc
windows (https://regretmove1.werite.net/)
10 No-Fuss Methods To Figuring The Birth Injury Attorneys You’re
Looking For ripley birth injury Lawyer
Double Glazing Company Near Me Explained In Fewer Than 140 Characters companies
The Most Hilarious Complaints We’ve Heard About Pushchair
pushchairs and prams
15 Pinterest Boards That Are The Best Of All Time About Accident
Claim wyoming accident lawyer
What Is The Best Place To Research Auto Accident Lawsuit Online Vimeo.Com
A Good Rant About Window Repair Near Me upvc
windows repair near me (telegra.ph)
The 9 Things Your Parents Teach You About Veterans
Disability Lawsuit Veterans Disability Lawsuit
See What Best Online Shopping Uk Clothes Tricks The Celebs
Are Utilizing best online shopping uk clothes
5 Laws That’ll Help The Veterans Disability Lawsuit Industry Veterans disability Law firms
Nine Things That Your Parent Teach You About Best Online Clothing Sites Uk online Clothing sites uk
7 Small Changes That Will Make A Huge Difference In Your Railroad Injuries Compensation maple valley railroad Injuries Attorney
10 Startups That Are Set To Revolutionize The Railroad Injuries Legal
Industry For The Better Railroad Injuries Lawyer
10 Signs To Watch For To Buy A Double Glazed Windows Near Me double glazed sash Windows
How To Save Money On Shopping Online Uk Clothes Custom Size Plexiglass
10 Top Mobile Apps For Double Glazing Showrooms Near
Me window double glazing
24 Hours To Improve Walking Pad For Desk Workout
7 Simple Strategies To Completely Rocking Your Boat Accident Attorney Near Me marine accident legal Team
How To Choose The Right Personal Injury Lawyers On The Internet Personal injury law Firms
Upvc Door Repairs Near Me Tools To Improve Your Daily Life
Upvc Door Repairs Near Me Trick That Every Person Must Learn upvc door repairs near me
Five Cater Wash 12kg Projects For Any Budget 12kg washing Machines
Responsible For A Mesothelioma Legal Budget?
10 Wonderful Ways To Spend Your Money mesothelioma Compensation
How To Outsmart Your Boss With Medical Malpractice Legal greenfield medical malpractice Attorney
The Hidden Secrets Of Automobile Locksmith Near Me auto Lock smith
The Most Pervasive Issues In Best Case CSGO chroma
3 Case (http://users.atw.hu)
You’ll Never Guess This Online Shopping Sites Top 7’s Tricks
Online Shopping Sites Top 7
The Reason Behind Audi Replacement Key Service Near Me Has Become Everyone’s Obsession In 2023 replacement key for audi (Telegra.ph)
16 Must-Follow Facebook Pages To Double Glazing Repair Near Me-Related Businesses replacement Double glazed glass only
You’ll Never Guess This Window Repair Near’s Tricks upvc
Window Repair; isaevclub.ru,
Where Will Avon Leadership Be One Year From Now? sales
10 Things Everyone Gets Wrong Concerning Locksmiths Near Me For Cars locksmith for car keys near me
The 10 Most Terrifying Things About Upvc Door Locking Mechanism upvc door locking mechanism
The 10 Scariest Things About Slot Promotions Slot Promotions
Why Adding A Mesothelioma Lawyer To Your Life
Can Make All The An Impact mesothelioma compensation (Clemmie)
The 10 Most Scariest Things About Audi Key Replacement Cost Audi Key Replacement Cost (P3Terx.Com)
How Mesothelioma Law Was The Most Talked About Trend In 2023 Washington Mesothelioma attorney
You’ll Be Unable To Guess Personal Injury Settlement’s Secrets personal injury, Gidget,
What’s The Job Market For Double Glazing Near Me Professionals?
Double Glazing Near Me
10 No-Fuss Strategies To Figuring Out The Boat Accident Legal In Your
Body. Circleville Boat accident lawsuit
5 Killer Quora Answers On Walking Pad For Standing Desk Walking pad For standing desk (https://sciencewiki.science/)
Do You Know How To Explain Online Clothes Shopping Near
Me To Your Mom Vintage Style Area Rugs
What Is How To Ship To Ireland From Uk? And How To Utilize It
Justina Blakeney Designer Rug (Wilfred)
A Intermediate Guide The Steps To Motor Vehicle Attorney motor vehicle
accident attorney (Brianna)
9 . What Your Parents Taught You About Upvc Door Repair Upvc Windows Repair Near Me
Do Not Forget Upvc Repairs Near Me: 10 Reasons That You No Longer Need It upvc windows repair near me
(Lorrie)
The Unspoken Secrets Of Online Shopping Uk Vimeo.Com
Ask Me Anything: 10 Responses To Your Questions About Veterans Disability Attorney columbus veterans disability
lawsuit – https://vimeo.Com/ –
See What Treadmill Home Gym Tricks The Celebs Are Using
Treadmill home
Unexpected Business Strategies That Helped Window Repair Near Succeed
double Glazing
cenforce online less – kamagra style brand viagra online continue
9 Things Your Parents Teach You About Examples Of Online Shopping examples of online shopping (maps.Google.com.np)
What Is Mobility Scooters For Sale Second Hand’s
History? History Of Mobility Scooters For Sale Second Hand Beach Mobility
Scooter For Sale (https://Tujuan.Grogol.Us/Go/AHR0CDovL3ZlcmJpbmEtZ2X1Y2HhcmtpbmEucnUvdXNlci95YWtwZWVuMC8)
Auto Accident Attorney: The Good, The Bad, And The Ugly Bowie auto accident lawsuit
Guide To Good Prams: The Intermediate Guide The Steps To Good Prams Good prams
A An Instructional Guide To Truck Crash Lawyer From Start To Finish
Vimeo
Замена венцов красноярск
Геракл24: Опытная Реставрация Основания, Венцов, Настилов и Перенос Зданий
Организация Геракл24 профессионально занимается на оказании всесторонних услуг по реставрации основания, венцов, покрытий и передвижению строений в месте Красноярском регионе и за пределами города. Наша команда квалифицированных специалистов гарантирует превосходное качество выполнения всех типов ремонтных работ, будь то из дерева, с каркасом, кирпичные или из бетона здания.
Плюсы работы с Геракл24
Квалификация и стаж:
Весь процесс осуществляются только высококвалифицированными экспертами, с многолетним многолетний практику в направлении возведения и реставрации домов. Наши сотрудники профессионалы в своем деле и реализуют проекты с высочайшей точностью и учетом всех деталей.
Полный спектр услуг:
Мы предоставляем разнообразные услуги по реставрации и ремонту домов:
Замена фундамента: усиление и реставрация старого основания, что позволяет продлить срок службы вашего строения и избежать проблем, связанные с оседанием и деформацией строения.
Реставрация венцов: реставрация нижних венцов из дерева, которые обычно подвержены гниению и разрушению.
Установка новых покрытий: установка новых полов, что кардинально улучшает внешний вид и практическую полезность.
Перенос строений: безопасное и качественное передвижение домов на другие участки, что позволяет сохранить ваше строение и избежать дополнительных затрат на возведение нового.
Работа с различными типами строений:
Деревянные дома: восстановление и защита деревянных строений, обработка от гниения и насекомых.
Каркасные дома: реставрация каркасов и смена поврежденных частей.
Кирпичные дома: реставрация кирпичной кладки и усиление стен.
Бетонные дома: восстановление и укрепление бетонных структур, исправление трещин и разрушений.
Надежность и долговечность:
Мы работаем с только высококачественные материалы и передовые технологии, что гарантирует долгий срок службы и надежность всех выполненных работ. Каждый наш проект подвергаются строгому контролю качества на каждом этапе выполнения.
Индивидуальный подход:
Каждому клиенту мы предлагаем подходящие решения, учитывающие ваши требования и желания. Наша цель – чтобы итог нашей работы соответствовал ваши ожидания и требования.
Почему выбирают Геракл24?
Сотрудничая с нами, вы получаете надежного партнера, который возьмет на себя все хлопоты по ремонту и реставрации вашего дома. Мы обеспечиваем выполнение всех проектов в установленные сроки и с соблюдением всех строительных норм и стандартов. Обратившись в Геракл24, вы можете быть уверены, что ваш дом в надежных руках.
Мы предлагаем консультацию и ответить на все ваши вопросы. Контактируйте с нами, чтобы обсудить ваш проект и узнать больше о наших услугах. Мы сохраним и улучшим ваш дом, сделав его безопасным и комфортным для проживания на долгие годы.
Геракл24 – ваш надежный партнер в реставрации и ремонте домов в Красноярске и за его пределами.
5. Double Glazing Companies Near Me Projects
For Any Budget Double Glazing Companies Near Me
10 Quick Tips About Avon Shop avon online
12 Companies That Are Leading The Way In Injury Attorney firm
Say “Yes” To These 5 Will CSGO Case Prices Go Down Tips clutch Case
Responsible For A Railroad Injuries Attorneys Budget? 12 Tips On How To Spend Your Money Kenton Railroad Injuries Law Firm
9 Things Your Parents Taught You About Upvc
Door Hinges upvc door hinges
The Unspoken Secrets Of Personal Injury Settlement Emerson personal Injury Attorney
14 Cartoons About Upvc Windows And Doors Which Will Brighten Your Day Repair Upvc Windows
Ten Common Misconceptions About Online Shopping Uk Sites That Don’t Always Hold Amerock Oil Rubbed Bronze Pull
A Look Into The Future How Will The Auto Lock Smith Near Me Industry Look Like In 10 Years?
locksmith automobile (images.google.bf)
17 Signs That You Work With Online Shopping Uk Alloy Right-Hand Npt Die
15 Up-And-Coming Repair Upvc Window Bloggers You Need
To Be Keeping An Eye On upvc Window repairs
5 Killer Queora Answers On Double.Glazing Near
Me Replacements
Expert Advice On Upvc Windows And Doors From A
Five-Year-Old repair upvc Window, https://willysforsale.com/Author/beautysearch3,
15 How Long Does 18-Wheeler Lawsuit Take Bloggers You Should Follow bayonne 18 wheeler accident law firm
The 10 Most Terrifying Things About Birmingham Double
Glazing window hinge repair; Beau,
Personal Injury Lawyers Tools To Improve Your Daily Lifethe One Personal Injury Lawyers Trick Every Person Should Learn personal injury lawyers
What’s The Current Job Market For Double Glazing Door Repairs Near Me
Professionals Like? door repair [Hu.Feng.Ku.Angn.I.Ub.I.Xn–.Xn–.U.K37@cgi.members.interq.or.jp]
Your Family Will Thank You For Getting This Online Shopping Stores In London Adjustable Dog Muzzle
The Reasons Why Attorney For Accident Claim Is The Most Popular Topic In 2023 Accident Attorney
This Is How Togel Online Will Look Like In 10 Years’ Time goblok
Replacement Upvc Door Handles Tools To Streamline Your Daily LifeThe One Replacement Upvc Door Handles Trick
That Everyone Should Know Replacement upvc door handles
10 Myths Your Boss Is Spreading About What CSGO Gambling Sites Are
Legit Case esports
25 Amazing Facts About Online Sites For Shopping In Uk Decorative
Air Return Grille (Bernadette)
5 Killer Quora Answers On Windows Near Me near
7 Simple Secrets To Totally Intoxicating Your Good Online Shopping
Sites Uk Vimeo
How To Save Money On Uk Online Shoe Shopping Websites Loloi 9X12 Rug
What’s The Current Job Market For Double Glazed Window Repairs Professionals Like?
double glazed Window repairs (Simsideo.net)
15 Twitter Accounts That Are The Best To Find Out More About Slot Demo akun slot demo
Gratis (https://www.bing.com/)
Why Railroad Injuries Lawyer Is The Right Choice For You?
ukiah railroad injuries Lawsuit
The 10 Most Scariest Things About Upvc Repairs Near Me upvc repairs Near
me (http://www.dermandar.com)
What A Weekly Motor Vehicle Claim Project Can Change
Your Life motor Vehicle Accidents
12 Workers Compensation Claim Facts To Bring You Up To Speed
The Water Cooler workers’ Compensation
10 Simple Ways To Figure Out Your Upvc Windows
Repairs repairing upvc windows (Minecraftcommand.science)
Why Is Slot Demo So Popular? Game Slot demo
What’s The Job Market For Online Shopping Uk Groceries
Professionals?
What’s The Current Job Market For Upvc Windows Repair Professionals Like?
upvc windows repair
15 Surprising Stats About Marc Jacobs Handbag Black marc jacobs Snapshot Bag sale
You’ll Be Unable To Guess Misted Double Glazing Repairs Near Me’s Tricks double glazing repairs
near Me (http://www.bdnpadelindoor.com)
The Unknown Benefits Of Auto Accident Claim Sierra Vista Auto Accident Lawyer
Hello my family member! I want to say that this article is amazing, nice written and
come with almost all vital infos. I would like to peer extra
posts like this .
You’ll Never Guess This Link Building Company’s Tricks company
Is Your Company Responsible For The Upvc Windows And Doors Budget?
12 Tips On How To Spend Your Money Repair Upvc window
7 Simple Secrets To Totally Intoxicating Your Compensation For Mesothelioma mesothelioma lawyer Compensation
Why Boat Accident Claim Is The Right Choice For You?
Vimeo.Com
7 Things About Car Keys Lost You’ll Kick Yourself For Not
Knowing lost keys for my car
See What Audi Replacement Key Service Near Me Tricks The
Celebs Are Making Use Of audi replacement key service near me
20 Insightful Quotes About Audi Replacement Key replacement car keys audi
Take A Look At Your Fellow Case Key CSGO Enthusiasts.
Steve Jobs Of The Case Key CSGO Industry fracture case (Declan)
Three Reasons Why 3 Reasons Why Your Online Shop Is Broken (And How To Fix It) Vimeo
How To Obtain Blog Traffic From Your Ideal Audience nexusnook
14 Businesses Are Doing A Fantastic Job At Window Repair replacements
Five Killer Quora Answers To Truck Accident Attorneys Near Me truck Accident (http://www.rogue-labs.net)
A List Of Common Errors That People Make When Using Auto Wreck Attorney Best Auto Accident Lawyers
15 Gifts For The Shopping Online Lover In Your
Life shopping online sites Clothes
10 Automobile Locksmith That Are Unexpected Nearest
The Ultimate Glossary Of Terms For Online Shopping Uk Cheap Bakflip No-Track Tonneau Cover
Pvc Window Repairs The Process Isn’t As Hard As You Think Upvc Repair
11 “Faux Pas” That Are Actually Okay To Use With Your Michael Kors Handbags Black michael kors handbag uk
Audi Car Key Explained In Fewer Than 140 Characters
Audi car keys Replacement
10 Best Mobile Apps For Semi Truck Law firms
The 10 Most Terrifying Things About Private ADHD Assessment
Adult private Adhd assessment adult
How To Design And Create Successful Motor Vehicle
Settlement How-Tos And Tutorials To Create Successful Motor Vehicle Settlement Home motor vehicle accident lawyer (Glinda)
[url=http://ciproo.online/]cipro generic[/url]
16 Facebook Pages You Must Follow For Slot Demo Pragmatic-Related Businesses Demo Slot X500
9 . What Your Parents Taught You About Upvc
Window Repair Upvc Window Repair
See What Autowatch Ghost Immobiliser Fitting Tricks The Celebs Are Using autowatch ghost immobiliser fitting
How Door Repairs Near Me Can Be Your Next Big Obsession upvc door Repairs near me
8 Tips To Enhance Your Bondage Game Realitykings
5 Lessons You Can Learn From 18 Wheeler Accident Law Firm citrus heights 18 Wheeler accident law firm
What’s The Job Market For Cheap Pushchairs Professionals?
cheap Pushchairs
The 10 Most Scariest Things About Windows And Doors Birmingham Windows And Doors Birmingham
5 Killer Quora Answers On Online Shopping Uk Women’s
Clothing online shopping uk women’s clothing (https://www.Farmingscout.com/delete-company?nid=57366&element=http://vimeo.com/931647477)
9 Things Your Parents Taught You About Double Glazing Repair Near Me double glazing
repair near me (https://www.ligra.cloud/app/zoocat_image.php?url_pdf=aHR0cDovL3d3dy5lbmNvc2tyLmNvbS9iYnMvYmJzL2JvYXJkLnBocD9ib190YWJsZT1mcmVlJndyX2lkPTE0MjU2Mzg&byp455=true)
The 10 Most Scariest Things About List Of Online Shopping Sites
Uk list of online shopping sites uk (Leonida)
You’ll Never Guess This Situs Alternatif Gotogel’s Tricks Situs Alternatif Gotogel
[url=https://mcadvair.online/]generic advair price[/url]
Is Tech Making Asbestos Law Better Or Worse? asbestos compensation
How To Recognize The Right Best Case Opening Site CSGO For You strike global Offensive
15 Reasons You Shouldn’t Ignore 3d Slots best casino slots (http://www.meteogarda.it/)
This Week’s Most Popular Stories About Asbestos Compensation Asbestos Compensation Asbestos lawyer
9 Signs You’re A Injury Attorneys Expert Injury lawyers
5 Killer Quora Answers On Auto Lock Smith Near Me auto locksmithing
(Franziska)
The No. Question That Everyone In Double.Glazing Near Me Should Know How To Answer double glazing Near me
You’ll Never Be Able To Figure Out This Medical Malpractice Case’s Benefits medical malpractice (Marie)
15 Interesting Facts About Boat Accident Lawyer That You’d Never Been Educated About boat accident attorneys
CSGO Most Profitable Cases Isn’t As Tough As You Think Wildfire
Case (M.ssalbab.com)
Don’t Be Enticed By These “Trends” Concerning Loveseat For Sale used leather Couches for sale
The 9 Things Your Parents Teach You About Link Alternatif Gotogel link Alternatif gotogel [http://www.joshisaba.com]
The Leading Reasons Why People Are Successful Within The
Opening CS GO Cases Industry opening Website
The 10 Most Scariest Things About Uk Online Shopping Sites For Electronics Uk Online Shopping Sites For Electronics
What Is Ghost Installation And How To Use It Installing Ghost Immobiliser
Ten Startups That Are Set To Change The Car Accident Attorneys For Hire Industry For
The Better car accident Dispute attorney
Five Killer Quora Answers On Double Glazed Window Repairs Near Me
Double Glazed Window Repairs Near Me
What Are The Reasons You Should Be Focusing On Making Improvements To Motor Vehicle Litigation mansfield Motor vehicle accident lawyer
What Is Window Repair Luton? History Of Window Repair Luton In 10 Milestones glass luton
This Is The Ultimate Cheat Sheet For Car Accident Compensation Car accident attorney
The 10 Most Terrifying Things About Locksmith
For Car Near Me locksmith for car Near me
Who’s The World’s Top Expert On Cheap Cases CSGO?
Case Operation Bravo (http://Alt1.Toolbarqueries.Google.At)
10 Facts About Why Are CSGO Keys So Expensive That Will Instantly Put You In A Good Mood
revolver case (Wally)
5 Killer Quora Answers To Double Glazed Near Me Double glazed near me
This Is The Myths And Facts Behind Avon Login Representative
Account avon rep Login
This Week’s Top Stories Concerning Adult Dolls topsadulttoys.Uk
What Freud Can Teach Us About Double Glazed Near Me replacement
Get To Know The Steve Jobs Of The Malpractice Compensation Industry clemmons malpractice attorney
Test: How Much Do You Know About Double Glazed Units Near Me?
replacement double glazed Units Near me (clients1.google.az)
20 Reasons Why Double Glaze Repair Near Me Will Never
Be Forgotten Double glazing glass replacement cost
The 9 Things Your Parents Teach You About Riverside Birth
Injury Attorneys riverside Birth injury attorneys
10 Misconceptions That Your Boss May Have Regarding Truck Attorneys Near Me legal
You’ll Never Be Able To Figure Out This Panels For Upvc Doors’s Secrets
Panels For upvc doors
A Peek Into Does Amazon Ship To Uk’s Secrets Of
Does Amazon Ship To Uk which supermarket is cheapest for online Shopping
5 Facts Double Glazed Window Repair Is Actually A Great Thing Window repairs near me
How To Get Better Results From Your CSGO Case Battle Site Case Spectrum
The Top Companies Not To Be Watch In The Upvc Doors Milton Keynes Industry Door Locks Milton Keynes
5 Killer Quora Answers On Shopping Online Sites List Shopping online sites
The 9 Things Your Parents Teach You About Window Replacement Near Me Window Replacement Near Me
The CSGO Battle Case Awards: The Top, Worst, Or Weirdest
Things We’ve Ever Seen hydra case (256.makerslocal.org)
Ten Things Everybody Is Uncertain About The Word “All CSGO Skins.” Gamma 2 case
Guide To Link Alternatif Gotogel: The Intermediate Guide The Steps To Link Alternatif Gotogel link Alternatif gotogel
This Is The One Injury Lawsuit Trick Every Person Should Be Aware Of Injury Attorneys
14 Questions You Might Be Afraid To Ask About Uk Online Grocery Shopping Sites Residential Motorized Awning
Five Killer Quora Answers To Shopping Online Uk Clothes shopping online uk clothes (Lloyd)
What’s Holding Back From The Repair Key Fob Industry?
key repair car (Yvonne)
Guide To Link Alternatif Gotogel: The Intermediate Guide The Steps To Link Alternatif Gotogel
Link alternatif gotogel (xtgem.com)
You’ll Never Guess This Car Accident Lawyers’s Benefits
car Accident Lawyer
10 Facts About Double Glazing Repair Near Me
That Will Instantly Put You In A Good Mood double glazing
near me (http://www.Google.com)
15 Best Pinterest Boards To Pin On All Time About Double Glazing Repair Milton Keynes french doors milton keynes
7 Small Changes That Will Make A Huge Difference In Your Which Is The Best Online Supermarket Hotel Quality Towels
Guide To Medical Malpractice Attorney: The Intermediate Guide In Medical Malpractice Attorney medical
10 No-Fuss Strategies To Figuring Out The Semi Truck Claim In Your Body.
Semi Truck Accident Attorney
20 Fun Facts About Replacement Mercedes Key Near Me Replace Mercedes key
What Is Replacement Upvc Window Handles?
How To Use It Upvc window repair (maps.Google.ki)
15 Personal Injury Case Benefits Everyone Should Be
Able To Vimeo
How Adding A Repair Upvc Windows To Your Life Will Make All
The Different Repairing upvc windows – iriscup2.bravejournal.net –
The 10 Scariest Things About Online Shopping Top 7 online shopping top 7 (Lanny)
What’s The Current Job Market For Sofa Sets
For Sale Professionals Like? sofa sets for sale, Buck,
Make Money Blogging – Write Seo Friendly Websites And Get Tons Of Free Visitors echozone
15 Reasons Not To Be Ignoring Shopping Online Uk Clothes Wireless Microphone For Filmmaking
You’ll Never Be Able To Figure Out This Window
Replacement Near Me’s Secrets window replacement near me
14 Questions You Might Be Anxious To Ask Railroad Injuries Attorneys railroad injuries lawyer
You’ll Never Guess This Amazon Online Grocery Shopping Uk’s Benefits
amazon online grocery shopping uk – m.bornchamps.com,
Strollers Strollers Tools To Streamline Your Everyday Lifethe Only Strollers Strollers Trick That Every Person Must Know strollers strollers (Florine)
8 Tips To Increase Your Lightweight Mobility Scooters For Sale Game mobility
scooters for sale in my area (Caroline)
20 Things You Should Ask About Upvc Windows And
Doors Before Buying It repair upvc windows (http://www.google.de)
Why Everyone Is Talking About Avon Start Smart Bag 2023 Right Now welcome kit
The Most Advanced Guide To Tommy Hilfiger Xbody Bag Man Bag tommy hilfiger
What’s The Job Market For Online Shopping Uk For Clothes Professionals?
online Shopping uk For clothes, fr.thefreedictionary.com,
You’ll Never Guess This What Is The Best Online Shopping In Uk’s
Benefits what is the best online shopping in uk
What’s The Job Market For Double Glazed Repairs Near Me Professionals?
double Glazed repairs near me
10 Facts About Second Hand Mobility Scooters For Sale Near Me That Will Instantly Put You In A Good Mood 8 mph mobility scooters near me
10 Tell-Tale Signs You Must See To Look For A New Car Accident Claim onalaska car Accident Lawyer
Responsible For An Double Glazed Repairs Near Me Budget?
10 Terrible Ways To Spend Your Money Double glazed repairs near me
Best Accident Attorneys Near Me Tools To Ease Your Everyday Lifethe Only Best Accident
Attorneys Near Me Trick That Every Person Must Be Able To
Accident Attorneys Near Me (Turkeyescortgirls.Com)
20 Up-And-Comers To Follow In The Vegas Slots Industry penny Slots
5 Killer Quora Answers On How To Buy Clothes Online From Uk How to buy clothes online from uk
Why Is Replacement Double Glazed Glass Only Near
Me So Effective During COVID-19 Double hlazing
Everything You Need To Be Aware Of Boat Accident Lawyers Boat Accidents
20 Myths About Personal Injury Attorney: Busted personal injury lawsuit (https://delivery.hipermailer.com.ar/do/trkln.php?index=1024094841AZD&id=wyqwsupwsetrotswpi&url=aHR0cHM6Ly92aW1lby5jb20vNzA3MjA2MTM2)
Everything You Need To Be Aware Of Replacement Upvc Door Panels upvc
door blinds (http://m.ww.w.emilypet.com/member/login.html?nomemberorder&returnurl=https://emplois.fhpmco.fr/author/catlynx4/)
10 Inspirational Graphics About Railroad Injuries Attorneys railroad injuries lawsuits
Five Killer Quora Answers To Replacement Double Glazing Units Near Me replacement
double glazing units near me – Eugenio –
How To Make An Amazing Instagram Video About Local Double Glazing Repair Upvc Repair
10 Untrue Answers To Common Windows And Doors Near Me Questions Do You Know The Right Answers?
pvc
7 Useful Tips For Making The Most Of Your Joker123 Gaming spam
Are Car Accident Lawyers The Best There Ever Was? Car Accident Law Firm
How To Explain Make Spare Car Key To Your Grandparents make A spare car Key
5 Laws That Will Help The Audi Keys Replacement Industry Audi A1 keys (Savannah)
10 Websites To Help You Develop Your Knowledge About Audi Replacement Key Audi Lost Key
See What Asbestos Lawyer Tricks The Celebs Are Using
asbestos
Responsible For A Green Power Budget? 10 Ways To Waste Your
Money electric mobility scooter fastest (Maribel)
The People Closest To Car Accident Lawyers Uncover Big Secrets lawsuit
The Secret Secrets Of Window Repair Near Window repair Near me
You’ll Never Be Able To Figure Out This Does Amazon Ship To Uk’s Tricks
does amazon ship to uk
10 Inspiring Images About Replacement Double Glazing Units Near Me Repair Double Glazing
5 Killer Quora Answers To Replacement Double Glazing Units Near Me Double glazing units Near Me
What’s The Reason Everyone Is Talking About Online Shopping Website In London This Moment Affordable Bluetooth Record Player
10 Mobile Apps That Are The Best For Motor Vehicle Litigation Broomfield Motor Vehicle Accident Law Firm
What Is Link Alternatif Gotogel And Why Is Everyone
Speakin’ About It? gambling Game
What’s The Job Market For Treadmills UK Reviews Professionals?
treadmills uk (Ui.Ungpd.com)
The Little-Known Benefits Replacement Upvc Window Handles Repairs To Upvc Windows
Upvc Windows Near Me Techniques To Simplify Your Daily Life Upvc Windows Near
Me Trick That Every Person Must Know upvc windows near me,
Simon,
5 Killer Quora Answers On Mesothelioma Law Firm Mesothelioma Law Firm
Your Family Will Thank You For Having This Audi Key Replacement audi replacement keys
[url=http://accutaneo.com/]accutane online order[/url]
The Story Behind Motor Vehicle Lawyers Can Haunt You Forever!
bellevue motor vehicle Accident lawyer
15 Fun And Wacky Hobbies That’ll Make You More Effective At Boat Accident
Attorney Near Me Jet Ski Crash Lawyer
The 12 Most Popular Designer Handbags Sale Accounts To
Follow On Twitter online designer Handbag outlet
How To Recognize The Upvc External Doors That Is Right For You upvc door handle replacement
15 Top Double Glazed Repairs Near Me Bloggers
You Need To Follow double Glazed repair
5 Tools Everyone Is In The Treehouse Bunkbeds Industry
Should Be Making Use Of bunk bed Play Area
5 Laws That Will Help The Handbag Tommy Hilfiger Industry tommy hilfiger handbag black
“The Ultimate Cheat Sheet” On Upvc Windows Repair Repair Upvc
Windows (https://Hamgooma.Com)
It’s The Mesothelioma Lawsuits Case Study You’ll
Never Forget Joplin mesothelioma attorney
Is Your Company Responsible For An Erb’s Palsy Claim Budget?
12 Top Notch Ways To Spend Your Money Erb’s Palsy law firm
15 Things You’ve Never Known About Mesothelioma Case mesothelioma Settlement
10 Tell-Tale Symptoms You Must Know To Find A New Online Shopping Sites Clothes Cheap Water-Resistant Sleeping Bag
You’ll Never Be Able To Figure Out This Foldable Treadmill With Incline’s
Tricks foldable Treadmill with Incline
You’ll Never Guess This New Slots Online’s Tricks new slots (äl.Ee)
The 10 Most Scariest Things About Upvc Repairs Near
Me upvc Repairs near me
10 Places Where You Can Find Dildo Squirt squirting Dildo
What’s The Job Market For Double Glazed Repairs Near
Me Professionals? double glazed repairs Near me
Here’s A Little Known Fact About Window Repair Near Upvc window repair Near Me
How To Make An Amazing Instagram Video About Personal Injury
Legal Vimeo.Com
You’ll Be Unable To Guess Amazon Online Grocery Shopping Uk’s
Secrets Amazon online grocery shopping uk [https://upriserz.Link]
You’ll Be Unable To Guess ADHD In Adult Women Symptoms’s Tricks adhd In adult women symptoms
What Is Double Glazed Windows Near Me And Why Is Everyone Talking
About It? double glazed windows repair [Vickey]
The Most Successful Double Glazed Window Repair Gurus
Are Doing Three Things window Repairs near me
Guide To Link Alternatif Gotogel: The Intermediate Guide For Link
Alternatif Gotogel link alternatif Gotogel
How To Explain Upvc Repairs Near Me To Your Mom repairs to upvc windows
20 Asbestos Claim Websites Taking The Internet By Storm Asbestos case
Guide To ADHD Test Adults: The Intermediate Guide In ADHD Test Adults Adhd Test Adults
See What Window Repair Luton Tricks The Celebs Are Using Window Repair
7 Simple Tips For Rocking Your Slot Updates slot features
Three Greatest Moments In Car Keys Programming History key Fob Programmer near me
What’s The Current Job Market For Search Engine Optimisation Agency Professionals Like?
Search Engine Optimisation Agency
12 Companies Leading The Way In Mesothelioma Personal Injury Lawyers mesothelioma lawyers Michigan
5 Killer Quora Answers To Double Glazed Window Repairs Near Me double glazed window repairs near me
10 Unexpected Double Glazed Window Repair Tips misty
Why All The Fuss? Motor Vehicle Lawyers? motor Vehicle accident Law firm
10 Top Books On Auto Accident Lawyers Childersburg Auto Accident Attorney
5 Killer Quora Answers On Online Shopping Sites Clothes Cheap Needle Tip Gel Pen
20 Myths About Designer Handbags For Women: Busted designer handbags sale outlet uk
Five Killer Quora Answers To Truck Accidents Attorneys Truck Accident (https://M.S2Nd.Co.Kr/Member/Login.Html?Nomemberorder=&Returnurl=Http://Marantwiki.Tawerna-Gothic.Pl/Api.Php?Action=Https://Vimeo.Com/707174809)
Are You Responsible For The Semi Truck Lawsuits Budget?
10 Very Bad Ways To Invest Your Money semi truck Accident lawsuit
Guide To Medical Malpractice Attorney: The Intermediate Guide For Medical Malpractice Attorney attorney
5 Clarifications On Slot Demo Gratis demo slot Mahjong ways 2
How The 10 Worst Mesothelioma Legal Errors Of All Time Could Have Been Prevented houghton mesothelioma lawsuit (https://Vimeo.com/)
The History Of Railroad Injuries Claim In 10 Milestones Railroad Injuries Attorney
See What Treadmills Home Tricks The Celebs Are Using Treadmills Home
Best Car Accident Attorney: 10 Things I’d Like To
Have Known Sooner Experienced Car Accident Lawyer
This Is The Ultimate Guide To How To Buy Clothes Online From Uk Heavy Duty Grill Drip Trays (https://Vimeo.Com)
The No. One Question That Everyone Working In Akun Demo Slot
Must Know How To Answer demo slot 5 lion megaways
11 “Faux Pas” Which Are Actually Okay To Create Using Your
Online Shopping Uk Cheap cheapest Online shopping uk
11 Strategies To Refresh Your Online Shop Decorative Area Rug
Unexpected Business Strategies That Helped Bitch To Succeed Black-Dick
15 Of The Best Twitter Accounts To Learn More About Uk Online
Shopping Sites For Electronics Fast Drying Polyurethane
See What Window Repairs Near Me Tricks The Celebs Are Using window repairs near me
20 Resources That’ll Make You More Effective At Audi A3 Key Replacement audi spare key
The Little-Known Benefits Of Ghost Installation installing ghost immobiliser
Cerebral Palsy Settlement’s History History Of Cerebral Palsy
Settlement cerebral palsy attorney
11 Ways To Completely Sabotage Your Ghost 2 Immobiliser Ghost Immobilisers
5 Workers Compensation Case Lessons From The Pros hannibal workers’ compensation lawsuit
See What Veterans Disability Lawyer Tricks The Celebs Are Making Use
Of Veterans Disability Lawyer
Responsible For An Injury Lawyer Budget? Twelve Top Ways To Spend Your Money injury attorney
17 Reasons Why You Shouldn’t Not Ignore Car Accident
Attorneys university park car accident law firm (vimeo.com)
5 Killer Quora Answers On Washing Machine 12kg Uk washing machine 12kg uk (Latia)
Five Killer Quora Answers On Auto Accident Attorneys auto accident attorneys (https://Simplecars.ng)
10 Designer Handbags For Ladies-Related Meetups You Should Attend women
Don’t Buy Into These “Trends” About Car Locksmiths Near Me car key locksmiths
10 Quick Tips To New Slots Online evoplay slots Challenges
The 10 Most Terrifying Things About Uk Online Shopping Sites For Electronics uk online shopping
sites for electronics (Joeann)
20 Things You Must Know About Online Retailers Uk Stats vimeo.com
10 Tips For Getting The Most Value From Upvc Windows Repairs upvc Door repairs near me
Butt Plug For Sale Tools To Make Your Everyday Lifethe
Only Butt Plug For Sale Trick That Everybody Should
Learn butt Plug for sale
20 Fun Details About Men Sex Toys sex toys for
men; Riley,
Are You Confident About Private ADHD Clinic? Take This Quiz private psychiatrist adhd assessment
(Tanya)
5 Arguments Cars Locksmiths Is Actually A Good Thing
nearest Car locksmith
15 Best Pinterest Boards Of All Time About Veterans
Disability Law veterans disability attorney
How To Get More Value Out Of Your Ghost Immobiliser 2 Ghost Immobilisers
10 Mobile Apps That Are The Best For Asbestos Compensation asbestos litigation (Kimhyorim.com)
10 Things That Your Competitors Teach You About Slot Volatility evoplay slots collection
There’s Enough! 15 Things About Mesothelioma Lawyer We’re Tired Of
Hearing Mesothelioma Lawsuit
What’s The Current Job Market For Situs Gotogel Terpercaya Professionals?
situs gotogel terpercaya
We’ve Had Enough! 15 Things About Online Shopping We’re Sick Of Hearing Lightweight Bbcor Bat
20 Window Glass Repair Near Me Websites Taking The Internet
By Storm installed
15 Things You’ve Never Known About London Online Mobile Shopping Sites
S-Style Designer Locker, Rosalyn,
How The 10 Worst Lock Smith For Car Fails Of All Time Could Have Been Prevented Mobile locksmith for cars
The Ugly Truth About Door Fitter Luton Conservatories Luton
טלגראס כיוונים
האפליקציה הווה פלטפורמה מקובלת בישראל לקנייה של מריחואנה בצורה אינטרנטי. היא מעניקה ממשק משתמש פשוט לשימוש ובטוח לקנייה ולקבלת משלוחים של מוצרי קנאביס מרובים. במאמר זה נבחן את העיקרון מאחורי טלגראס, כיצד היא פועלת ומהם היתרונות של השימוש בה.
מהי טלגראס?
האפליקציה הינה שיטה לרכישת קנאביס דרך האפליקציה טלגרם. היא מבוססת על ערוצי תקשורת וקהילות טלגרם מיוחדות הקרויות ״טלגראס כיוונים, שם ניתן להרכיב מגוון פריטי צמח הקנאביס ולקבל אותם ישירות למשלוח. הערוצים האלה מאורגנים על פי אזורים גאוגרפיים, כדי לשפר את קבלתם של המשלוחים.
כיצד זה עובד?
התהליך קל יחסית. קודם כל, יש להצטרף לערוץ טלגראס הרלוונטי לאזור המגורים. שם אפשר לעיין בתפריטי המוצרים השונים ולהרכיב את המוצרים המבוקשים. לאחר ביצוע ההרכבה וסיום התשלום, השליח יופיע לכתובת שנרשמה ועמו הארגז המוזמנת.
מרבית ערוצי טלגראס מציעים טווח נרחב של פריטים – זנים של מריחואנה, ממתקים, שתייה ועוד. כמו כן, ניתן למצוא חוות דעת מ לקוחות שעברו לגבי רמת המוצרים והשרות.
יתרונות הנעשה באפליקציה
מעלה מרכזי מ טלגראס הוא הנוחיות והפרטיות. ההזמנה והתהליך מתקיימים מרחוק מאיזשהו מיקום, בלי נחיצות במפגש פנים אל פנים. כמו כן, הפלטפורמה מאובטחת היטב ומבטיחה חיסיון גבוהה.
נוסף על זאת, מחירי הפריטים בפלטפורמה נוטים לבוא זולים, והמשלוחים מגיעים במהירות ובמסירות רבה. קיים גם מרכז תמיכה פתוח לכל שאלה או בעיית.
לסיכום
האפליקציה היא שיטה חדשנית ויעילה לרכוש פריטי קנאביס בישראל. היא משלבת את הנוחיות הטכנולוגית מ האפליקציה הפופולרי, ועם הזריזות והדיסקרטיות מ דרך השילוח הישירה. ככל שהביקוש למריחואנה גדלה, פלטפורמות בדוגמת טלגראס צפויות להמשיך ולצמוח.
Guide To Double Glazing Repair London: The
Intermediate Guide On Double Glazing Repair London Double glazing repair london
[url=https://acutanep.online/]can you buy accutane in mexico[/url]
Why Kit Avon Is Fast Increasing To Be The Most Popular Trend For 2023 Avon kit
10 Ways To Build Your Vehicle Diagnostics Empire Diagnostics Mobile
The Three Greatest Moments In Medication For Autism And Adhd History Prescribing medication (https://utahsyardsale.com/)
1kg Coffee Beans How Many Cups Tips To Relax Your Everyday Lifethe Only 1kg Coffee Beans How Many Cups Trick That
Every Person Must Know 1kg coffee beans how many cups
5 Double-Ended Dildos Lessons Learned From The Pros Double Ended Dildos
Themed Slots Tools To Ease Your Daily Lifethe One
Trick That Every Person Must Be Able To Themed Slots
[url=http://albuterolo.com/]can you buy albuterol in mexico[/url]
You’ll Never Be Able To Figure Out This Window Companies Birmingham’s Tricks window companies birmingham
So You’ve Bought Motor Vehicle Attorneys … Now What?
Motor Vehicle accident attorneys
Are You Responsible For An Slot Sound Effects Budget?
12 Best Ways To Spend Your Money evoplay Slots quests (tujuan.grogol.us)
This Is The One Truck Accident Lawyers Trick Every Person Should Be Aware Of Semi-truck accident lawyer
b29
Bản cài đặt B29 IOS – Giải pháp vượt trội cho các tín đồ iOS
Trong thế giới công nghệ đầy sôi động hiện nay, trải nghiệm người dùng luôn là yếu tố then chốt. Với sự ra đời của Bản cài đặt B29 IOS, người dùng sẽ được hưởng trọn vẹn những tính năng ưu việt, mang đến sự hài lòng tuyệt đối. Hãy cùng khám phá những ưu điểm vượt trội của bản cài đặt này!
Tính bảo mật tối đa
Bản cài đặt B29 IOS được thiết kế với mục tiêu đảm bảo an toàn dữ liệu tuyệt đối cho người dùng. Nhờ hệ thống mã hóa hiện đại, thông tin cá nhân và dữ liệu nhạy cảm của bạn luôn được bảo vệ an toàn khỏi những kẻ xâm nhập trái phép.
Trải nghiệm người dùng đỉnh cao
Giao diện thân thiện, đơn giản nhưng không kém phần hiện đại, B29 IOS mang đến cho người dùng trải nghiệm duyệt web, truy cập ứng dụng và sử dụng thiết bị một cách trôi chảy, mượt mà. Các tính năng thông minh được tối ưu hóa, giúp nâng cao hiệu suất và tiết kiệm pin đáng kể.
Tính tương thích rộng rãi
Bản cài đặt B29 IOS được phát triển với mục tiêu tương thích với mọi thiết bị iOS từ các dòng iPhone, iPad cho đến iPod Touch. Dù là người dùng mới hay lâu năm của hệ điều hành iOS, B29 đều mang đến sự hài lòng tuyệt đối.
Quá trình cài đặt đơn giản
Với những hướng dẫn chi tiết, việc cài đặt B29 IOS trở nên nhanh chóng và dễ dàng. Chỉ với vài thao tác đơn giản, bạn đã có thể trải nghiệm ngay tất cả những tính năng tuyệt vời mà bản cài đặt này mang lại.
Bản cài đặt B29 IOS không chỉ là một bản cài đặt đơn thuần, mà còn là giải pháp công nghệ hiện đại, nâng tầm trải nghiệm người dùng lên một tầm cao mới. Hãy trở thành một phần của cộng đồng sử dụng B29 IOS để khám phá những tiện ích tuyệt vời mà nó có thể mang lại!
15 Things You Don’t Know About Mesothelioma Mesothelioma Lawyer
A Proactive Rant About Slot Demo Pragmatic demo slot olympus, Lida,
The Advanced Guide To Double Glazing In Luton Upvc Windows Luton
A Provocative Remark About Double Glazing Companies Near Me double glazed window repair [Oren]
20 Up-And-Comers To Watch In The Condom Industry
14 Companies Doing An Excellent Job At Upvc Windows And Doors upvc Windows
repair (willysforsale.com)
Searching For Inspiration? Try Looking Up Demo Slot slot demo Wild bandito
The 10 Most Dismal Demo Slot Errors Of All Time Could Have Been Prevented pg Soft demo slot
Guide To Cost Of Private ADHD Assessment UK:
The Intermediate Guide The Steps To Cost Of Private ADHD Assessment UK
cost of private adhd assessment uk
The 10 Most Terrifying Things About Skin So Soft Bath Oil
Uk skin so soft bath oil uk; tan-cat-g0w18n.mystrikingly.com,
Ten Situations In Which You’ll Want To Be Aware Of Double Glazing Repairs North London window replacement in London
Your Family Will Be Grateful For Getting This Veterans Compensation For Mesothelioma mesothelioma compensation canada
You’ll Never Guess This Buy Folding Mobility Scooter’s Secrets buy folding mobility scooter
8 Tips To Improve Your Double Glazed Door Repairs Near Me Game fit
15 Presents For Your Double Glazed Near Me Lover In Your Life Double glazed near me
Nine Things That Your Parent Teach You About Santa Fe Birth Injury Attorney santa fe birth Injury attorney
15 Of The Best Documentaries On Second Hand Mobility Scooters
For Sale Near Me 4-Wheel scooters
12 Companies Leading The Way In Upvc Window Repairs
window Replacement
How To Explain Double Glazing Deals Near Me To A 5-Year-Old Double glazed door lock
What’s The Job Market For Double Glazing Door Repairs Professionals?
Door Repair
15 Unexpected Facts About Ass You’ve Never Seen Femdom
Guide To Car Key Replacement Audi: The Intermediate
Guide In Car Key Replacement Audi car key replacement audi
Five Essential Qualities Customers Are Searching For In Every
9kg Washing Machines best 9kg washing machines (Fermin)
15 Things You’ve Never Known About Mesothelioma Attorneys About Mesothelioma attorneys
20 Reasons To Believe Window Repair Near Will Not Be
Forgotten Upvc repair
10 Things That Everyone Is Misinformed Concerning Double Glazing Units Near Me double Glazing installer
The 3 Biggest Disasters In Luton Windows And Doors History services
Fridge Freezer On Sale Tips To Relax Your Daily Life Fridge Freezer On Sale Technique Every Person Needs To Learn fridge Freezer on sale
acne treatment exclaim – acne medication fortunate acne medication fail
Double Glazing Windows Luton Tools To Make Your Everyday Lifethe Only Double Glazing Windows Luton Trick
That Every Person Should Learn Windows Luton
It Is The History Of Testing For ADHD In Adults In 10 Milestones online adhd testing
This Story Behind Window Repair Near Will Haunt You For The Rest Of Your
Life! Upvc Repairs
Private ADHD Titration Tools To Improve Your Everyday Lifethe Only
Private ADHD Titration Trick Every Person Should Be Able To
titration
Ten Upvc Window Repairs That Really Help You Live Better upvc window Repairs
14 Businesses Are Doing A Fantastic Job At Upvc Window Repairs window repairs near me
Good Online Shopping Sites Uk: It’s Not As Difficult As
You Think Drop Down Tv Mount Electric
How Slot Demo Was The Most Talked About Trend In 2022 akun demo slot gratis
See What Kids Bunk Beds For Sale Tricks The Celebs Are Using
kids bunk beds For Sale
What Is Akun Demo Slot And Why Is Everyone Talking About It?
Slot Demo Anti Lag Pg – https://M.Cosplayfu.It –
Boat Accident Case Techniques To Simplify Your Daily Lifethe One Boat Accident
Case Technique Every Person Needs To Be Able To boat Accident lawsuit
17 Reasons You Shouldn’t Be Ignoring Adhd Symptoms In Adult Women Adhd Symptoms Dsm 5
How To Outsmart Your Boss With Locksmiths Car Locked Keys In Car Locksmith
The Top 5 Reasons People Win At The Double Glazed Window Near Me Industry double glazed
See What Upvc Door Mechanism Tricks The Celebs Are Making Use Of Upvc Door Mechanism
проверка usdt trc20
Как сберечь свои данные: страхуйтесь от утечек информации в интернете. Сегодня защита личных данных становится всё более важной задачей. Одним из наиболее популярных способов утечки личной информации является слив «сит фраз» в интернете. Что такое сит фразы и как предохранить себя от их утечки? Что такое «сит фразы»? «Сит фразы» — это комбинации слов или фраз, которые постоянно используются для получения доступа к различным онлайн-аккаунтам. Эти фразы могут включать в себя имя пользователя, пароль или иные конфиденциальные данные. Киберпреступники могут пытаться получить доступ к вашим аккаунтам, используя этих сит фраз. Как защитить свои личные данные? Используйте запутанные пароли. Избегайте использования очевидных паролей, которые просто угадать. Лучше всего использовать комбинацию букв, цифр и символов. Используйте уникальные пароли для каждого из аккаунта. Не используйте один и тот же пароль для разных сервисов. Используйте двухэтапную аутентификацию (2FA). Это вводит дополнительный уровень безопасности, требуя подтверждение входа на ваш аккаунт через другое устройство или метод. Будьте осторожны с онлайн-сервисами. Не доверяйте свою информацию ненадежным сайтам и сервисам. Обновляйте программное обеспечение. Установите обновления для вашего операционной системы и программ, чтобы сохранить свои данные от вредоносного ПО. Вывод Слив сит фраз в интернете может повлечь за собой серьезным последствиям, таким подобно кража личной информации и финансовых потерь. Чтобы обезопасить себя, следует принимать меры предосторожности и использовать надежные методы для хранения и управления своими личными данными в сети
13 Things You Should Know About Best Mesothelioma Lawyer
That You Might Not Have Known attorneys for Mesothelioma (Data.crowdcreator.eu)
5 Myths About Double Stroller That You Should Avoid toddler stroller (https://www.ventanaalespanol.Com.br)
The Little-Known Benefits Of Starlight Princess
Princess Pragmatic Play
The 10 Most Scariest Things About Free Slots Free Slots
The Secret Life Of Attorney Lawyer Mesothelioma new mexico mesothelioma attorney
The 10 Most Terrifying Things About Sectional Sofa Sale Sectional sofa sale
Why Akun Demo Slot Isn’t A Topic That People Are Interested In Akun Demo Slot demo mahjong
ways 2 (http://www.google.com)
How To Design And Create Successful Fiat Replacement Key Strategies From Home Fiat Car Key Cutting
Slot Graphics Tools To Ease Your Daily Life Slot Graphics Trick Every Individual
Should Learn Slot Software
Why CSGO Cases History Is Your Next Big Obsession esports 2013 Winter case
This Is The History Of CSGO New Cases In 10 Milestones clutch case – Images.Google.Ch –
5 Laws That Anyone Working In Upvc Windows Repairs Should Know Window Repair
10 Tell-Tale Warning Signs You Need To Know Before You Buy Desk Treadmills Best treadmills
The Most Popular Glazing Repairs Near Me The Gurus Have Been Doing Three Things double glazing near me
Five Killer Quora Answers To Uk Online Shoe Shopping Websites uk online shoe shopping websites
What’s The Job Market For Best Men’s Sex Toys Professionals
Like? Men’s sex toys
Double Glazing Companies Near Me Tools To Improve
Your Daily Lifethe One Double Glazing Companies Near Me Trick That Everyone Should Learn double glazing companies near me
10 Inspiring Images About Ghost Immobiliser Install Ghost Immobiliser installation
Make Money Online With Blogging Towards Bank Dual.0 신용대출 (http://Oldorchardbeachwebcam.com)
See What Double Glazing Luton Tricks The Celebs Are
Utilizing double glazing Luton
[url=https://drdoxycycline.online/]doxycycline canada pharmacy[/url]
A Glimpse At Folding Lightweight Wheelchairs For Sale’s Secrets Of Folding Lightweight Wheelchairs For Sale modern
What You Can Use A Weekly Saab Key Replacement Project Can Change Your Life auto
Five Killer Quora Answers On Double Glazed Near Me Double Glazed Near Me
The Reasons You’ll Want To Read More About Land-Based Slots online slot machines (http://www.google.Com)
Coffee Machines From Bean To Cup Tools To Improve Your Daily Lifethe One Coffee Machines From Bean To Cup Trick That Every Person Must Be Able To coffee machines from bean to cup
Unexpected Business Strategies That Helped CSGO Cases Opening
Sites Succeed case Opening Website
[url=https://amoxicillinir.online/]amoxicillin 1000[/url]
[url=http://diflucanr.online/]diflucan tablets australia[/url]
Don’t Buy Into These “Trends” Concerning Symptoms Of Adhd In Adults Adult
adhd symptoms (image.google.Gm)
20 Inspiring Quotes About CSGO Cases Value falchion case
7 Practical Tips For Making The Greatest Use Of Your Best Price 12kg Washing
Machine 12kg Washer
Its History Of Upvc Patio Doors upvc door For sale – quitmancounty.schoolinsites.com –
Why All The Fuss About Best SEO Program? Seo Powersuite Date Ranges For Reports [https://Www.Welcomeargentina.Com/Arte/Playadelcarmen_8_1110X80/Index_I.Html?ClickTag=//Www.Cheaperseeker.Com/U/Pastrymaraca14]
Ten Skin So Soft Products That Can Make Your Life
Better avon Skin so soft original (M.inkself.co.kr)
The 10 Most Scariest Things About Ghost Immobiliser For Sale Ghost Immobiliser For Sale
The Reason Volvo Digger Key Is Everyone’s Desire In 2023 workshop
30 Inspirational Quotes About Car Key Replacement Audi audi key programming
The Reasons You’ll Want To Learn More About Online Shop Designer Suits Professional Series Ethernet Cord
5 Killer Quora Answers On Avon Starter Kits avon starter kit 2024 uk [62.101.86.34]
14 Cartoons About Marc Jacobs Handbag Sale That’ll Brighten Your Day marc jacobs pink handbag
10 Essentials About How To Get More Cases In CSGO You Didn’t Learn At School Strike Global
Walking Machine Desk Tools To Help You Manage Your Daily Lifethe
One Walking Machine Desk Trick That Every Person Should Learn Walking machine Desk
The Little-Known Benefits Of Double Glazing Repair Near Me double glazing door locks; Bess,
How Can A Weekly Play Roulette Online Project Can Change Your Life
must a nice
5 Killer Quora Answers To L Shaped Sleeper Sofa l shaped sleeper sofa (Felica)
The 10 Scariest Things About Condom Stripping
asthma medication nurse – inhalers for asthma bob inhalers for asthma passe
האפליקציה היא תוכנה מקובלת בארץ לקנייה של קנאביס בצורה וירטואלי. זו מעניקה ממשק משתמש נוח ומאובטח לרכישה וקבלת שילוחים של מוצרי צמח הקנאביס מרובים. במאמר זה נסקור עם העיקרון מאחורי הפלטפורמה, כיצד היא פועלת ומה היתרים של השימוש בזו.
מהי האפליקציה?
הפלטפורמה הווה דרך לרכישת צמח הקנאביס באמצעות היישומון טלגראם. היא מבוססת מעל ערוצים וקהילות טלגרם ספציפיות הקרויות ״טלגראס כיוונים, שבהם ניתן להרכיב מגוון פריטי קנאביס ולקבלת אלו ישירות למשלוח. הערוצים אלו מאורגנים על פי איזורים גיאוגרפיים, כדי לשפר על קבלתם של השילוחים.
איך זאת עובד?
התהליך פשוט למדי. ראשית, צריך להצטרף לערוץ הטלגראס הנוגע לאזור המגורים. שם אפשר לעיין בתפריטים של המוצרים המגוונים ולהזמין עם הפריטים המבוקשים. לאחר השלמת ההזמנה וסיום התשלום, השליח יופיע בכתובת שצוינה עם הארגז המוזמנת.
רוב ערוצי הטלגראס מציעים מגוון רחב של מוצרים – סוגי צמח הקנאביס, עוגיות, משקאות ועוד. כמו כן, אפשר למצוא חוות דעת של לקוחות קודמים לגבי רמת המוצרים והשירות.
מעלות השימוש באפליקציה
יתרון מרכזי של הפלטפורמה הוא הנוחות והפרטיות. ההרכבה והתהליך מתבצעות ממרחק מכל מיקום, ללא צורך במפגש פיזי. כמו כן, הפלטפורמה מוגנת היטב ומבטיחה סודיות גבוה.
נוסף אל כך, עלויות הפריטים באפליקציה נוטות להיות זולים, והשילוחים מגיעים במהירות ובהשקעה רבה. קיים אף מרכז תמיכה זמין לכל שאלה או בעיה.
לסיכום
טלגראס הווה דרך מקורית ויעילה לקנות מוצרי צמח הקנאביס בישראל. היא משלבת את הנוחיות הטכנולוגית של היישומון הפופולרי, לבין הזריזות והפרטיות של שיטת המשלוח הישירה. ככל שהדרישה לצמח הקנאביס גובר, פלטפורמות כמו זו צפויות להמשיך ולהתפתח.
You Are Responsible For A Avon’s Skin So Soft Budget?
12 Ways To Spend Your Money skin so soft Dry oil spray (https://nexgenpharmaceuticals.is/)
What’s Everyone Talking About Bag Prada Today Prada Bags
Double Glazed Window Repair Near Me Explained In Fewer Than 140 Characters Double Glazed Window Repair
5 Lessons You Can Learn From Why Are CSGO Skins Going Up In Price
cs2 cases (ruwo.ruwww.elegbederafiukenny)
The Main Problem With Car Lock Smith, And How To Fix It Emergency car locksmith
10 Things You Learned In Kindergarden That’ll Help You With Who Owns CSGO revolver case
Test: How Much Do You Know About Global Offensive Counter-Strike?
case esports (https://delivery.hipermailer.com.ar/do/trkln.php?index=1024094841AZD&id=wyqwsupwsetrotswpi&url=aHR0cHM6Ly93aWxseXNmb3JzYWxlLmNvbS9hdXRob3Ivc3BhY2V3YXNwOS8)
Five All CSGO Skins Lessons From The Professionals gamma 2 case
(Fredric)
From The Web From The Web: 20 Awesome Infographics About Auto Accident Lawyer Near
Me lawyer Auto accidents
10 Top Books On Pushchair Pushchair Twin
10 Things Everyone Hates About Unlock Car Service How To Open Car Keys Locked Inside
[url=https://metforminn.online/]metformin buy online[/url]
What’s The Current Job Market For Upvc Doors Birmingham Professionals Like?
Doors Birmingham
See What Accident Lawyer Tricks The Celebs Are Using lawyer
10 Things You Learned In Kindergarden Which Will Aid You In Obtaining Malpractice Litigation Malpractice Attorney
Bed Settee For Sale Tools To Make Your Daily Life Bed Settee For Sale Trick That Every Person Must Learn Bed settee for sale
отмывание usdt
Как охранять свои личные данные: берегитесь утечек информации в интернете. Сегодня сохранение своих данных становится всё значимее важной задачей. Одним из наиболее часто встречающихся способов утечки личной информации является слив «сит фраз» в интернете. Что такое сит фразы и в какой мере защититься от их утечки? Что такое «сит фразы»? «Сит фразы» — это сочетания слов или фраз, которые часто используются для входа к различным онлайн-аккаунтам. Эти фразы могут включать в себя имя пользователя, пароль или иные конфиденциальные данные. Киберпреступники могут пытаться получить доступ к вашим аккаунтам, при помощи этих сит фраз. Как обезопасить свои личные данные? Используйте сложные пароли. Избегайте использования очевидных паролей, которые просто угадать. Лучше всего использовать комбинацию букв, цифр и символов. Используйте уникальные пароли для каждого из вашего аккаунта. Не применяйте один и тот же пароль для разных сервисов. Используйте двухэтапную аутентификацию (2FA). Это добавляет дополнительный уровень безопасности, требуя подтверждение входа на ваш аккаунт по другое устройство или метод. Будьте осторожны с онлайн-сервисами. Не доверяйте личную информацию ненадежным сайтам и сервисам. Обновляйте программное обеспечение. Установите обновления для вашего операционной системы и программ, чтобы защитить свои данные от вредоносного ПО. Вывод Слив сит фраз в интернете может повлечь за собой серьезным последствиям, таким вроде кража личной информации и финансовых потерь. Чтобы защитить себя, следует принимать меры предосторожности и использовать надежные методы для хранения и управления своими личными данными в сети
Can Larder Fridge Always Rule The World? Fridge Haier (Hu.Feng.Ku.Angn.I.Ub.I.Xn–.Xn–.U.K37@Cgi.Members.Interq.Or.Jp)
Auto Accident Compensation Explained In Fewer Than 140 Characters Automobile Attorney
10 Things Everybody Has To Say About Glass Window
Repair Glass Window Repair
Key Spare Tips From The Most Effective In The Industry car Key Cloning cost
Сохраните собственные USDT: Проверяйте операцию TRC20 перед пересылкой
Цифровые валюты, подобные как USDT (Tether) в блокчейне TRON (TRC20), становятся всё всё более распространенными в области сфере децентрализованных финансовых услуг. Однако вместе со увеличением распространенности увеличивается также опасность ошибок или жульничества при отправке денег. Как раз именно поэтому нужно проверять перевод USDT TRC20 до ее отправкой.
Ошибка при вводе данных адреса получателя или перевод на некорректный адрес получателя сможет привести к невозможности невозвратной утрате твоих USDT. Мошенники также могут стараться одурачить тебя, посылая ложные адреса получателей на перевода. Потеря крипто вследствие подобных ошибок может обернуться крупными денежными потерями.
Впрочем, существуют профильные сервисы, позволяющие удостовериться операцию USDT TRC20 до её пересылкой. Некий из подобных сервисов дает опцию наблюдать а также анализировать операции на блокчейне TRON.
На этом обслуживании вы можете вводить адрес адресата а также получить детальную сведения об нем, включая историю транзакций, баланс а также состояние аккаунта. Это поможет определить, есть или нет адрес получателя истинным и безопасным на отправки средств.
Иные службы также дают аналогичные опции по проверки транзакций USDT TRC20. Определенные кошельки по криптовалют имеют интегрированные функции для проверки адресов получателей а также операций.
Не пропускайте проверкой перевода USDT TRC20 перед ее отсылкой. Малая предосторожность сможет сберечь для вас много средств и избежать утрату ваших дорогих криптовалютных активов. Применяйте проверенные сервисы с целью обеспечения защищенности твоих переводов а также сохранности твоих USDT в распределенном реестре TRON.
How To Outsmart Your Boss In Double Glazing Firms Near Me secondary double glazing near me
При обращении с криптовалютой USDT на распределенном реестре TRON (TRC20) чрезвычайно важно не только удостоверять адрес получателя до переводом средств, а также тоже периодически мониторить баланс своего цифрового кошелька, а также происхождение поступающих переводов. Это позволит своевременно идентифицировать любые нежданные операции и предотвратить потенциальные потери.
В первую очередь, требуется проверить на корректности показываемого остатка USDT TRC20 на вашем кошельке для криптовалют. Предлагается сверять данные с сведениями открытых блокчейн-обозревателей, чтобы избежать возможность компрометации либо скомпрометирования этого кошелька.
Однако лишь мониторинга остатка не хватает. Крайне необходимо исследовать историю входящих переводов и этих источники. В случае если вы выявите поступления USDT от анонимных или сомнительных реквизитов, сразу же приостановите данные деньги. Имеется угроза, чтобы данные криптомонеты стали получены.
Наш приложение предоставляет возможности с целью всестороннего анализа входящих USDT TRC20 транзакций касательно их законности и неимения соотношения с противозаконной деятельностью. Мы обеспечим вам безопасную работу с этой распространенной стейблкоин-монетой.
Также необходимо систематически отправлять USDT TRC20 на проверенные некастодиальные крипто-кошельки под вашим полным присмотром. Хранение токенов на сторонних площадках неизменно связано с рисками взломов и утраты средств из-за программных неполадок или банкротства платформы.
Следуйте базовые меры безопасности, оставайтесь внимательны а также своевременно отслеживайте остаток а также происхождение пополнений кошелька для USDT TRC20. Это позволят оградить Ваши электронные ценности от.
15 Things You’ve Never Known About Marc Jacobs Handbag Marc Jacobs Tote Bag Mini
How Double Glazing Doors Near Me Is A Secret Life Secret Life Of Double
Glazing Doors Near Me double glazing Upvc Windows
[url=http://ciprocfx.com/]cipro usa prescription[/url]
10 Things You’ve Learned In Kindergarden They’ll Help You Understand Locksmith Car Near Me locksmith car keys near me
11 Ways To Completely Sabotage Your Which CSGO Case
Is The Most Profitable prisma 2 case (Jan)
Why Do So Many People Want To Know About Vibrating Dildos?
Dream Toys Dual Density Double Penetrator Dildo (Reina)
20 Things You Need To Be Educated About Double Glazed Window Repairs
Near Me Double glazed Front doors
Five Killer Quora Answers On Pushchair Cheap pushchair Cheap
What’s The Job Market For Coffee Machine Beans Professionals Like?
coffee machine Beans
Why You’re Failing At Under Desk Treadmill Walking treadmill for standing desk
You’ll Never Be Able To Figure Out This Skin So Soft’s Tricks skin so soft original
10 Things That Your Family Taught You About Examples Of Online Shopping examples of online shopping [Johnette]
5 Kids Bunkbed Lessons From The Professionals bunk bed for kids
Why Repair Window Is More Difficult Than You Think home
Five Double Glazing Units Near Me Projects To Use For Any Budget double glazed window repairs (Jacques)
8 Tips To Increase Your Private Psychiatrist North London Game private psychiatry edinburgh (pierce-velazquez-2.technetbloggers.De)
Do Not Believe In These “Trends” Concerning Akun Demo Slot demo slot
cloud – Felicitas –
The No. Question Everybody Working In CSGO Cases Sites Should Be Able Answer Case Esports
The Most Convincing Evidence That You Need Car Central Lock
Repair Near Me repair car lock
Five Killer Quora Answers On Designer Handbags For Cheap
designer handbags For cheap
Searching For Inspiration? Try Looking Up ADHD Online Test Treating
7 Tips About Mobile Car Diagnostic Near Me That Nobody Can Tell You Diagnostic for car near Me
Why Double Glazed Window Repair Can Be More Dangerous Than You Thought Window Repairs Near Me
This Is The Advanced Guide To Slot Online must a nice
16 Must-Follow Pages On Facebook For France Online Shopping Sites Clothes Marketers vimeo.com
The 12 Types Of Twitter Double Glazed Repairs Near Me Tweets You Follow Double Glazed Repairs Near Me
7 Tips About Memory Foam Mattresses Double That No One
Will Tell You water-resistant
The 10 Most Terrifying Things About Warren Mesothelioma
Attorney Warren Mesothelioma Attorney [https://Kaluga.Exdex.Ru/To/?L=Ahr0Chm6Ly9Tyxh3Zwxslwpvewnlltmuymxvz2Jyawdodc5Uzxqvd2Hhdc1Pcy10Agutznv0Dxjllw9Mlw1Lc290Agvsaw9Tys1Izs1Sawtllwlultewmc15Zwfycy8]
10 Quick Tips On Accident Attorney cornelius Accident attorney
See What Compact Travel Pram Tricks The Celebs Are Using compact travel Pram
10 Quick Tips About CS Case Battle case opening – Sherry –
10 Healthy Habits For A Healthy Rng Slots slot Bonuses
5 Things That Everyone Is Misinformed About On The Subject Of Slot Challenges Hacksaw slot game
(https://images.google.com.Ec/)
11 Ways To Completely Sabotage Your Mesothelioma Compensation hawthorne mesothelioma
lawsuit, vimeo.com,
Why CS GO Case New Is Your Next Big Obsession? Offensive Weapon
11 Methods To Refresh Your Car Keys Cut And Programmed car keys cut by code
20 Myths About Car Accident Attorney: Debunked athens car accident law firm
See What Best Online Shopping Uk Clothes Tricks The Celebs Are Utilizing
best online shopping Uk clothes
Guide To Situs Alternatif Gotogel: The Intermediate Guide Towards Situs Alternatif Gotogel situs
alternatif gotogel (Edna)
The Best Situs Alternatif Gotogel Strategies To Make A
Difference In Your Life Slot Games
Where To Research Car Key Programmed Online transponder key programming (Dominique)
Five Killer Quora Answers On Link Login Gotogel link login gotogel (https://Kalewinter53.bravejournal.net)
[url=https://dezithromax.online/]where can i buy azithromycin over the counter uk[/url]
“A Guide To Fiat 500 Key Replacement Cost In 2023 fiat Keys replacement
10 Top Mobile Apps For Best Side By Side Fridge Freezer cheap side by side
fridge freezer (login.access.library.unisa.Edu.au)
7 Little Changes That’ll Make A Big Difference With Your Sugar Rush Demo
Play How To stop sugar rush immediately
5 Laws Everyone Working In Auto Accident Attorney Should Know Auto Injury Attorneys Near Me
What’s The Current Job Market For Cheap Samsung Fridge
Freezers Professionals Like? cheap samsung Fridge freezers
25 Surprising Facts About Trucking Attorney big truck accident attorney
10 Quick Tips About Examples Of Online Shopping Square arm Sofa
20 Questions You Should Always To Ask About Double Glazed Window Suppliers Near Me Prior To Purchasing
Double Glazed Window Suppliers Near Me double glazing units replacement
The 10 Most Terrifying Things About Fridge Freezer With Water Dispenser Samsung fridge freezer with water dispenser samsung, Rae,
See What Filtered Coffee Makers Tricks The Celebs
Are Utilizing filtered coffee Makers (Lovewiki.faith)
Guide To Treadmill Used For Sale: The Intermediate Guide In Treadmill Used For Sale treadmill used for sale
12 Companies That Are Leading The Way In Pragmatic
Play must a nice
Bản cài đặt B29 IOS – Giải pháp vượt trội cho các tín đồ iOS
Trong thế giới công nghệ đầy sôi động hiện nay, trải nghiệm người dùng luôn là yếu tố then chốt. Với sự ra đời của Bản cài đặt B29 IOS, người dùng sẽ được hưởng trọn vẹn những tính năng ưu việt, mang đến sự hài lòng tuyệt đối. Hãy cùng khám phá những ưu điểm vượt trội của bản cài đặt này!
Tính bảo mật tối đa
Bản cài đặt B29 IOS được thiết kế với mục tiêu đảm bảo an toàn dữ liệu tuyệt đối cho người dùng. Nhờ hệ thống mã hóa hiện đại, thông tin cá nhân và dữ liệu nhạy cảm của bạn luôn được bảo vệ an toàn khỏi những kẻ xâm nhập trái phép.
Trải nghiệm người dùng đỉnh cao
Giao diện thân thiện, đơn giản nhưng không kém phần hiện đại, B29 IOS mang đến cho người dùng trải nghiệm duyệt web, truy cập ứng dụng và sử dụng thiết bị một cách trôi chảy, mượt mà. Các tính năng thông minh được tối ưu hóa, giúp nâng cao hiệu suất và tiết kiệm pin đáng kể.
Tính tương thích rộng rãi
Bản cài đặt B29 IOS được phát triển với mục tiêu tương thích với mọi thiết bị iOS từ các dòng iPhone, iPad cho đến iPod Touch. Dù là người dùng mới hay lâu năm của hệ điều hành iOS, B29 đều mang đến sự hài lòng tuyệt đối.
Quá trình cài đặt đơn giản
Với những hướng dẫn chi tiết, việc cài đặt B29 IOS trở nên nhanh chóng và dễ dàng. Chỉ với vài thao tác đơn giản, bạn đã có thể trải nghiệm ngay tất cả những tính năng tuyệt vời mà bản cài đặt này mang lại.
Bản cài đặt B29 IOS không chỉ là một bản cài đặt đơn thuần, mà còn là giải pháp công nghệ hiện đại, nâng tầm trải nghiệm người dùng lên một tầm cao mới. Hãy trở thành một phần của cộng đồng sử dụng B29 IOS để khám phá những tiện ích tuyệt vời mà nó có thể mang lại!
7 Little Changes That Will Make A Huge Difference In Your Double Glazed Repairs Near Me Replacing Double Glazing Units
See What Uk Online Shopping Sites For Mobile Tricks The
Celebs Are Using uk online Shopping sites For mobile
You’ll Never Guess This Diagnostics Near Me’s Benefits diagnostic – https://sonne-Brandstrup.federatedjournals.com –
11 Strategies To Refresh Your Fiat Key Replacement replacement fiat punto keys Nottingham
Guide To Situs Gotogel Terpercaya: The Intermediate Guide For Situs
Gotogel Terpercaya situs gotogel terpercaya
[url=https://advaird.online/]advair diskus 100 mcg 50 mcg[/url]
10 Things Everybody Hates About Double Glazing Doctor Near Me Double Glazing Window Locks
Важность подтверждения трансфера USDT по сети TRC20
Транзакции USDT в рамках протокола TRC20 увеличивают возрастающую спрос, тем не менее важно сохранять повышенно внимательными в процессе таких принятии.
Такой форма переводов нередко используется для легализации средств, извлеченных незаконным образом.
Главный угроз получения USDT по сети TRC20 – заключается в том, что такие платежи имеют потенциал быть зачислены благодаря множественных схем обмана, таких как кражи конфиденциальной информации, вымогательство, хакерские атаки как и иные незаконные схемы. Обрабатывая подобные операции, вы неизменно выступаете сообщником преступной операций.
Таким образом крайне существенно глубоко исследовать генезис различных получаемого транзакции в USDT TRC20. Следует запрашивать у плательщика информацию в отношении чистоте денежных средств, при незначительных сомнениях – воздерживаться от транзакций.
Учитывайте, в том, что в процессе установления противоправных происхождений средств, получатель вероятно будете столкнуться с применением санкциям совместно вместе с отправителем. Вследствие этого предпочтительнее принять меры предосторожности как и тщательно исследовать любой перевод, нацело ставить под угрозу репутационной репутацией как и попасть со крупные правовые сложности.
Обеспечение осторожности во время сделках по USDT в сети TRC20 – является залог личной финансовой защищенности наряду с ограждение участия в незаконные практики. Будьте внимательными и постоянно исследуйте природу цифровых валютных денежных средств.
“The Double Glazed Window Repairs Awards: The Most, Worst, And Weirdest Things We’ve Seen Upvc Windows Repair Near Me
[url=https://nolvadexin.online/]nolvadex 20mg price in india[/url]
How Boost Your Likelihood Of Winning In The Slot Machine
카지노 (https://maps.google.cv/)
The 10 Scariest Things About Windows And Doors Birmingham doors Birmingham (http://www.senoleczanesi.Com.tr)
All The Details Of Bunk Beds For Adults Dos And Don’ts bunk bed online (Rodney)
[url=http://baclofenx.com/]baclofen 10 mg tab[/url]
There Is No Doubt That You Require Truck Crash Attorney Commercial Truck accident attorney
What’s The Current Job Market For Washer And Dryer Combo In One Professionals?
washer and dryer combo in One
15 Shocking Facts About Windows Repairs That You Never Knew window repairs
Why Is Double Glazing Repair Luton So Famous? window replacement in luton
11 Methods To Redesign Completely Your Demo
Slot situs slot demo (Maddison)
A Trip Back In Time How People Discussed Mesothelioma Claim 20 Years Ago vimeo
Where Do You Think Motor Vehicle Lawyer One
Year From Right Now? clarinda motor vehicle accident lawyer
12 Companies Leading The Way In Upvc Windows Repair upvc window repair (https://Tychsen-ortega.federatedjournals.com/20-insightful-quotes-on-repair-timber-windows-1707034033)
What’s The Current Job Market For Link Daftar Gotogel Professionals Like?
link daftar gotogel
12 Companies That Are Leading The Way In Repair Upvc Window companies
What’s The Most Important “Myths” About Best Online Shopping Groceries
Uk Might Be True Professional Stick Welder
A Productive Rant About CSGO Weapon Case Esports 2014 Summer case
What Is Fiat Key Fob Replacement And Why You Should Take A Look Near Me
You’ll Never Guess This Coffee Beans Machine’s Tricks coffee beans machine
– http://lumfa.ru/index.php?option=com_phocaguestbook&id=1 –
Demo Slot Starlight Princess 1000 Tips To Relax Your Daily Life Demo
Slot Starlight Princess 1000 Trick Every Person Should Be Able To Demo Slot Starlight Princess 1000
10 Facts About Hire Truck Accident Attorneys That Can Instantly
Put You In An Optimistic Mood Truck Accidents
8 Tips To Increase Your Malpractice Lawsuit Game Vimeo.Com
The Motive Behind Can I Buy From A Uk Website Is The Most Sought-After Topic In 2023 Decorative Solar Garden Lights
10 Jackpot Slots That Are Unexpected slot reviews
Who Is The World’s Top Expert On Avon Starter Kit?
avon sign up kit
11 Ways To Completely Redesign Your Welcome Kits avon Ultimate welcome kit –
http://double-glazing-repairs54310.blogscribble.com.myopenlink.net,
5 Laws That Will Help The Car Keys Cut Near Me Industry g28Carkeys
You’ll Never Be Able To Figure Out This Window Repair Near’s Secrets
10 Books To Read On Upvc External Doors upvc door handles
You’ll Never Be Able To Figure Out This Wash Machine And Dryer Combo’s Secrets wash machine and dryer combo (Trudi)
What’s The Job Market For Best Car Accident Attorney Professionals?
Best car accident attorney
Ten Upvc Window Repairs That Really Make Your Life Better Upvc Window Repairs
Window Repairs Birmingham Tools To Streamline Your Everyday LifeThe Only Window Repairs Birmingham Trick That Every Person Should Know Window Repairs birmingham
15 Gifts For The How Many Cases Are There In CSGO Lover In Your Life Cs2 Case
The Most Common Locksmith Near Me Auto Mistake Every Beginner Makes cheap auto locksmith near Me
Guide To Auto Ghost Immobiliser: The Intermediate Guide For Auto Ghost Immobiliser auto ghost immobiliser
5 Things That Everyone Is Misinformed About On The Subject Of Designer
Handbags Large Designer handbags used
[url=https://azithromycinmds.online/]azithromycin antibiotics[/url]
Locksmith Near Me For Cars Tools To Ease
Your Daily Life Locksmith Near Me For Cars Trick That Should Be Used By Everyone
Be Able To locksmith near me for cars
Why Is Everyone Talking About Avon Starter Kit 2023 Right Now advanced starter kits [Telegra.Ph]
Why Birmingham Door And Window Is Fast Becoming The Hottest Trend Of 2023 Window Repair In Birmingham (https://Www.Domoniqueneeley.Top/Maintenance/Top-Tips-For-Finding-Reliable-Window-Replacement-Birmingham/)
Are You Sick Of Asbestos Lawsuits? 10 Inspirational
Sources To Revive Your Passion
The People Nearest To Adults Toy For Men Have Big Secrets To Share
nearest
The 10 Most Terrifying Things About Avon Skin So Soft Original avon skin So
soft original (https://maps.google.co.bw/url?q=http://greenandultimate.com.au/how-skin-so-soft-was-the-most-talked-about-trend-Of-2023/)
The Guide To Glazing Repairs Near Me In 2023 Double glazing near me
Guide To Treadmill Best: The Intermediate Guide Towards
Treadmill Best treadmill best (Christie)
What Is Upvc Door Mechanism And How To Use What
Is Upvc Door Mechanism And How To Use Upvc door handles replacement (https://Kwalificaties.s-bb.nl)
10 Window Repairs Tricks All Pros Recommend upvc window repair
Slot Demo Pragmatic Sugar Rush Tools To Make Your Daily Lifethe One Slot Demo Pragmatic Sugar Rush Trick That Everyone Should Be Able To
A Productive Rant About Fiat 500 Key Fob Replacement Fiat Tipo Key
Hello to every single one, it’s really a fastidious for me
to visit this site, it includes helpful Information.
The Next Big Trend In The Skin So Soft Avon Industry Avon Skin So Soft Bath Oil
Twin Pushchairs: The Ugly Truth About Twin Pushchairs Twin pram
15 Up-And-Coming Sex Machines In My Area Bloggers You
Need To See adult Fucking machines
Question: How Much Do You Know About Mobile Car Diagnostic Near Me?
diagnostics Check
15 Reasons Why You Shouldn’t Ignore Window Repairman Window Repairs
Who Is The World’s Top Expert On Vauxhall Astra Replacement Key Cost?
vauxhall adam key (http://mobile-bbs3.com/)
10 Things You Learned In Kindergarden To Help You Get CS GO Weapon Case shadow case
(Ivan)
What NOT To Do Within The Auto Door Lock Repair Industry mobile car lock repair (Jasper)
10 Startups That Will Change The Double Glazing
Company Near Me Industry For The Better repair double glazing
[url=https://lyricawithoutprescription.com/]can you buy lyrica over the counter[/url]
9 . What Your Parents Teach You About Free Avon Starter Kit Avon starter kit
5 Killer Quora Answers On Ghost Tracker Installation Ghost tracker installation
Saved as a favorite, I like your site!
8 Tips To Up Your Prada Handbag Man Game prada mini bags
20 Trailblazers Leading The Way In Asbestos Attorney asbestos litigation
The 10 Most Terrifying Things About Avon Skin So Soft Where To Buy
avon skin so Soft where To buy
Getting Tired Of Double.Glazing Near Me? 10 Inspirational Sources That
Will Rekindle Your Love double glazing replacement windows, https://Fakenews.win/wiki/11_strategies_to_completely_redesign_your_Double_glazing_repair,
20 Resources That Will Make You More Efficient At Sofas Sale seating
See What Veterans Disability Lawsuit Tricks The Celebs Are Making
Use Of veterans Disability Lawsuit
Hello, i believe that i saw you visited my web site so i got here to go back the choose?.I’m trying
to find issues to improve my site!I assume its adequate to use a few
of your concepts!!
How To Make A Profitable Online Shopping Uk Amazon Even If You’re Not Business-Savvy Mid
Century Love Seat – Vimeo.com –
20 Titration Process Websites Taking The Internet By Storm adhd medication dose Monitoring
15 Best Coffee Beans 1kg Bloggers You Should Follow Best Coffee Beans 1Kg
The 12 Worst Types Of Accounts You Follow On Twitter Neiko Tools
10 Websites To Help You To Become An Expert In Counter Strike Global Case Horizon
The Infrequently Known Benefits To Starlight Princess Demo slot Starlight princess demo
The Top Reasons Why People Succeed In The Beko Washing Industry machines
legalizing marijuana syntheitc urine
What Is Best Sex Machines? And How To Use It Sex Machine toy
A Brief History History Of Novice Slots win at slots
See What Key Fob Repairs Tricks The Celebs Are Making Use Of Key Fob Repairs
The 10 Scariest Things About Locksmiths Cars locksmiths cars
uti antibiotics stomach – uti medication horse uti treatment state
10 Graphics Inspirational About Upvc Door Handles replacement upvc door handles
Wow, this article is good, my sister is analyzing these
things, so I am going to let know her.
The 9 Things Your Parents Taught You About Car Key Fob Replacement car key fob replacement
24 Hours For Improving Counter Strike Case shadow
How Much Can Double Glazing Glass Replacement Near Me Experts Earn? double glazing glass Replacement
Тема: Непременно контролируйте адресе адресата при операции USDT TRC20
В процессе деятельности со цифровыми валютами, в частности со USDT на распределенном реестре TRON (TRC20), весьма нужно проявлять бдительность а также аккуратность. Единственная из числа самых распространенных погрешностей, какую делают юзеры – отправка средств по ошибочный адресу. Чтобы избежать утрату своих USDT, необходимо постоянно внимательно контролировать адрес адресата перед посылкой транзакции.
Криптовалютные адреса представляют собой обширные комплексы литер и номеров, к примеру, TRX9QahiFUYfHffieZThuzHbkndWvvfzThB8U. Включая небольшая опечатка или погрешность во время копировании адреса кошелька имеет возможность привести к тому, что твои крипто станут невозвратно лишены, ибо оные окажутся на неконтролируемый вам криптокошелек.
Существуют разные методы контроля адресов USDT TRC20:
1. Визуальная ревизия. Внимательно сверьте адрес во твоём кошельке с адресом кошелька реципиента. В случае малейшем различии – не совершайте транзакцию.
2. Применение интернет-служб контроля.
3. Двойная проверка с получателем. Попросите реципиенту заверить правильность адреса кошелька перед отправкой перевода.
4. Тестовый перевод. В случае крупной величине операции, можно вначале передать незначительное величину USDT с целью удостоверения адреса.
Кроме того рекомендуется хранить цифровые деньги на собственных кошельках, а не на биржах или посреднических сервисах, чтобы обладать полный контроль над своими ресурсами.
Не игнорируйте удостоверением адресов при осуществлении работе с USDT TRC20. Данная несложная процедура предосторожности посодействует защитить твои финансы против случайной утраты. Помните, что в мире криптовалют операции неотменимы, а переданные крипто на ошибочный адрес кошелька возвратить почти нельзя. Будьте бдительны а также внимательны, для того чтобы охранить собственные капиталовложения.
It’s The Complete Cheat Sheet On Adhd Assessment Adult Adhd Assessment Test For Adults
5 Killer Quora Answers On Double Glazed Window Repairs Near Me Double Glazed Window Repairs Near Me
There’s Enough! 15 Things About Adhd Medication For Adults We’re Sick Of Hearing
Medication For Adult Adhd, http://Cse.Google.Com.Ni,
Guide To Link Alternatif Gotogel: The Intermediate Guide On Link Alternatif Gotogel link alternatif gotogel, Lorena,
The Often Unknown Benefits Of Double Glazing Window Repair nearby
10 Factors To Know To Know Repair Double Glazing Window You Didn’t Learn In The Classroom installation
How To Build A Successful Replacement Ford Fiesta Key Uk
Even If You’re Not Business-Savvy Ford key program
Five Killer Quora Answers To Link Daftar Gotogel Link Daftar gotogel
Why Injury Lawyer Isn’t As Easy As You Imagine Injury Lawsuits
11 Ways To Totally Defy Your CS GO Weapon Case operation Breakout Weapon case
These Are The Most Common Mistakes People Make With Progressive Slots evoplay Slots alluring
[url=https://baclofenx.com/]baclofen 10 mg cost australia[/url]
How To Know If You’re Ready For Amateur Slots
professional Slots
The Top Reasons Why People Succeed In The Akun Demo Slot Industry Spaceman Slot Demo
See What Replacement Key For Bentley Continental Gt Tricks The
Celebs Are Using replacement key for bentley
continental gt (http://www.Google.com)
[url=https://azithromycinhq.com/]azithromycin where to buy without prescription[/url]
7 Tricks To Help Make The Most Out Of Your Private ADHD Test Private Adhd Assessment
An impressive share! I’ve just forwarded this
onto a co-worker who had been conducting a little homework on this.
And he in fact ordered me breakfast simply because I stumbled upon it for
him… lol. So allow me to reword this…. Thank YOU for
the meal!! But yeah, thanks for spending time to talk about this matter here on your site.
Guide To Starter Kit Avon: The Intermediate Guide The Steps To Starter Kit Avon starter kit avon
This Week’s Most Remarkable Stories About Nespresso Coffee Machine Magimix
Magimix Nespresso coffee Machine
The No. One Question That Everyone Working In Treadmills
Foldable Should Know How To Answer Easy
15 Surprising Stats About Online Shopping Sites For Clothes
Double Loft Bed With Stairs Tools To Ease Your Everyday Lifethe Only Trick That Every Person Should
Know Double loft Bed with Stairs
5 Laws Anybody Working In Asbestos Compensation Should
Be Aware Of asbestos lawsuit (Velma)
What Are The Reasons You Should Be Focusing On Making Improvements To
Double Glazed Window Repairs installer
New And Innovative Concepts That Are Happening With Double Glazing Fitters Near Me http://www.Repairmywindowsanddoors.co.uk
Are You Responsible For An Fridge Uk Budget? 12 Best Ways To Spend Your Money Free Stand Fridge
What Is Mesothelioma Claim? And How To Use It mesothelioma claims
Who Is Responsible For A Assessing Adhd In Adults Budget?
Twelve Top Ways To Spend Your Money adhd assessment Leeds (clicavisos.com.Ar)
How To Beat Your Boss ADHD Medication Titration Adhd Specialist
pills for treat prostatitis big – prostatitis medications clap prostatitis pills traveller
It’s The Complete Cheat Sheet For Veterans Disability Attorney henderson veterans Disability lawsuit
So , You’ve Bought Coffeee Machine … Now What? durable coffee
machines – Roscoe,
10 Meetups On Treadmill For Home You Should Attend health
11 Ways To Completely Sabotage Your Demo Slot demo olympus Pragmatic
Guide To Private Psychiatrist Assessment Near Me: The Intermediate Guide To Private
Psychiatrist Assessment Near Me private psychiatrist assessment near me
11 Ways To Completely Sabotage Your CS GO Weapon Case clutch case (Valorie)
5 Qualities People Are Looking For In Every Lawyer For Auto Accident Near Me
http://Www.accidentinjurylawyers.claims
20 Truths About Coffee Machine Nespresso: Busted Professional Coffee Machines [Drughomme.Com]
5 Laws That Can Benefit The CSGO Weapon Case Industry esports 2014 summer case (Sidney)
What Is The Reason Adding A Key Word To Your Life Will Make All
The Change Truck Accident lawyer
Treatment For Adhd Adults Strategies From The Top In The Industry
Adhd Treatments Adults
What’s The Job Market For Refrigerator Of LG Professionals?
Refrigerator Of Lg
9 Lessons Your Parents Teach You About Malpractice Lawsuit Malpractice Lawsuit
10 CSGO Cases Opening-Friendly Habits To Be Healthy shattered Web case
See What Ford Replacement Key Cost Uk Tricks
The Celebs Are Using
10 Tips For CSGO Cases Opening That Are Unexpected operation hydra case
– Jovita –
The 10 Most Terrifying Things About Double Glazing Companies Near Me double Glazing Companies near Me
Are You Responsible For An Combo Washing And Dryer Budget?
12 Top Ways To Spend Your Money combo washer dryers
Hmm is anyone else encountering problems with
the images on this blog loading? I’m trying to find out if its a problem on my end or if it’s the blog.
Any responses would be greatly appreciated.
Window Repairs Tools To Improve Your Everyday Lifethe Only Window Repairs Trick That
Everybody Should Know window repairs
הפלטפורמה הינה תוכנה רווחת בארץ לרכישת צמח הקנאביס בצורה מקוון. זו מעניקה ממשק פשוט לשימוש ובטוח לרכישה ולקבלת שילוחים מ פריטי קנאביס מגוונים. במאמר זה נבחן את העיקרון מאחורי טלגראס, כיצד היא עובדת ומה היתרים של השימוש בה.
מהי טלגראס?
טלגראס הינה דרך לרכישת צמח הקנאביס באמצעות האפליקציה טלגראם. היא מבוססת על ערוצים וקבוצות טלגראם ייעודיות הנקראות ״טלגראס כיוונים, שבהם ניתן להזמין מרחב פריטי מריחואנה ולקבלת אותם ישירות לשילוח. הערוצים אלו מאורגנים לפי אזורים גיאוגרפיים, כדי לשפר את קבלתם של השילוחים.
איך זאת פועל?
התהליך פשוט למדי. ראשית, יש להצטרף לערוץ הטלגראס הנוגע לאזור המחיה. שם אפשר לצפות בתפריטי הפריטים המגוונים ולהרכיב את המוצרים המבוקשים. לאחר השלמת ההרכבה וסגירת התשלום, השליח יגיע לכתובת שצוינה עם החבילה שהוזמן.
מרבית ערוצי טלגראס מספקים מגוון רחב של פריטים – סוגי צמח הקנאביס, ממתקים, משקאות ועוד. כמו כן, אפשר למצוא חוות דעת מ לקוחות שעברו על רמת הפריטים והשרות.
מעלות השימוש בטלגראס
יתרון מרכזי מ האפליקציה הוא הנוחות והדיסקרטיות. ההזמנה והתהליך מתקיימים ממרחק מכל מקום, ללא צורך בהתכנסות פנים אל פנים. בנוסף, האפליקציה מאובטחת היטב ומבטיחה סודיות גבוהה.
מלבד על כך, מחירי המוצרים באפליקציה נוטות לבוא זולים, והשילוחים מגיעים במהירות ובהשקעה רבה. יש גם מוקד תמיכה זמין לכל שאלה או בעיה.
סיכום
הפלטפורמה הינה שיטה מקורית ויעילה לרכוש מוצרי מריחואנה בישראל. היא משלבת את הנוחיות הדיגיטלית של היישומון הפופולרית, ועם הזריזות והפרטיות מ שיטת המשלוח הישירות. ככל שהדרישה לצמח הקנאביס גדלה, אפליקציות כמו זו צפויות להמשיך ולהתפתח.
You’ll Never Be Able To Figure Out This Travel
System Prams’s Tricks travel system prams, Bettie,
Guide To Long Double Ended Dildo: The Intermediate Guide For Long Double Ended Dildo
double ended dildo (Ruben)
The 10 Most Terrifying Things About ADHD Natural Treatment adhd
natural Treatment (http://Cse.google.com.py/url?sa=i&url=http://80Adec2ampndbs9h.рф/user/tightsoboe1/)
I simply couldn’t leave your site before suggesting that I extremely loved the standard info an individual supply for your
visitors? Is going to be back ceaselessly to check up on new posts
What’s The Current Job Market For Auto Locksmith Near
Me Prices Professionals Like? auto Locksmith Near me prices
It’s Time To Expand Your CSGO Cases Opening Options Fracture Case
Why Folding Treadmill UK Is More Dangerous Than You
Believed heart Rate
There is definately a great deal to find out about this issue.
I like all of the points you have made.
[url=https://accutaneiso.online/]generic accutane canada[/url]
Seven Reasons Why Replacing Lost Car Keys Ford Is Important Ford key fob replacement
You’ll Never Guess This Avon Skin So Soft Dry Oil Spray Uses’s Secrets avon skin so soft dry oil spray uses
The 10 Most Scariest Things About Upvc Door Repairs Near Me Upvc Door Repairs Near Me
7 Simple Secrets To Completely Enjoying Your Jaguar Smart Key jaguar x type key fob replacement
15 Astonishing Facts About Fiat Ducato Replacement Key spare key for fiat 500
10 Meetups About Womens Rabbit Vibrators You Should Attend vibrator the rabbit (Dulcie)
[url=https://lyricawithoutprescription.com/]lyrica 75 mg pill[/url]
15 What CSGO Cases To Invest In Benefits That Everyone
Should Be Able To Gamma Case
The Most Effective Real Life Sexdolls Tricks To Make A Difference In Your
Life real life Sex dolls – ,
Pretty section of content. I just stumbled upon your website and in accession capital to assert that I acquire actually enjoyed account your blog posts.
Any way I’ll be subscribing to your feeds and even I achievement you access consistently fast.
9 Things Your Parents Taught You About Upvc Windows And Doors Near
Me upvc windows and Doors
See What Pram Stores Near Me Tricks The Celebs Are Using pram stores Near me, app.mavenlink.com,
[url=https://acyclovirlp.online/]acyclovir tablet for sale[/url]
10 Life Lessons We Can Take From Avon Starter Kit avon starter Kit 2024
10 Locations Where You Can Find Window Repair Near upvc window repair near me
See What Treatment For Anxiety Attacks Tricks The Celebs Are Utilizing
Treatment for anxiety attacks
What You Should Be Focusing On Enhancing Affordable Search Engine Optimization local Search Optimisation service
The 10 Most Scariest Things About Adhd Symptoms Adults Test
adhd symptoms adults Test
Why No One Cares About Slot Trends Casino Slots
Why Double Glazing Installers Near Me Is Fast Becoming The Hottest
Trend For 2023 double glazing Installers
My spouse and I absolutely love your blog and find a lot of your post’s to be what precisely I’m
looking for. Would you offer guest writers to write content to
suit your needs? I wouldn’t mind writing a post or elaborating on a lot of the subjects
you write related to here. Again, awesome site!
The Fleshlight Sleeve Awards: The Most Sexiest, Worst, And The Most Unlikely Things
We’ve Seen sex
The 10 Most Terrifying Things About Treadmills For Sale Near Me treadmills for sale near
me (http://www.google.com)
Could Best CSGO Case To Open Be The Key To Achieving 2023?
Operation broken fang case (http://6f5371344d544d4541412c2C.49536d477372596c4241412C.click.searchs.com)
Online Shopping Sites List For Clothes Tools To Streamline Your Daily Life Online Shopping Sites
List For Clothes Trick Every Person Should Know online shopping sites list for clothes
Don’t Buy Into These “Trends” Concerning Mental Health Assessments
get A mental health assessment
How To Choose The Right Ignition Lock Repair Near Me On The Internet Ignition Lock Replacement
What’s The Job Market For Upvc Windows Repair Professionals
Like? Upvc Windows Repair
A Peek At The Secrets Of Citroen Berlingo Key Fob Citroen c5 key fob
Where Can You Find The Most Reliable Car Key Cut And Program
Near Me Information? key cutting services
The Benefits Of Untreated Adhd In Adults At Least Once In Your Lifetime adhd in adults treatment
The 10 Scariest Things About CS GO Case Battle Case Opening
15 Video Slots Bloggers You Must Follow entertaining slots
You’ll Never Guess This Mobile Car Diagnostics’s Tricks mobile car diagnostic
Guide To Vibrating Egg Near Me: The Intermediate Guide
To Vibrating Egg Near Me vibrating egg near me; rightsstatements.org,
How Under Counter Fridge Freezer Became The Hottest Trend In 2023 retro fridge freezer sale
A Productive Rant About What Cases Are Being Dropped CSGO Snakebite Case
The 10 Scariest Things About Ghost Immobiliser For Sale ghost immobiliser For Sale
Central Locking Key Repair Tools To Ease Your Daily Life Central Locking Key Repair Trick That Every
Person Must Know g28Carkeys.co.uk
This History Behind Semi Truck Case Will Haunt
You For The Rest Of Your Life! semi truck accident
10 Slot Technology Tips All Experts Recommend Slot machine Reviews
Why Nobody Cares About Bentley Key Price bentley arnage key fob [Lieselotte]
The 10 Most Terrifying Things About Uk Butt Plugs uk Butt Plugs
Get Credit Score Card Payments Down To Affordable 신용대출
Five Double Glazed Windows Repairs Lessons From Professionals Window Repair
Your Family Will Thank You For Getting This Ford Fiesta Replacement Key
Cost Uk replacement ford fiesta key fob (Bernd)
A Glimpse In Top Personal Injury Lawyers Near Me’s Secrets
Of Top Personal Injury Lawyers Near Me personal injury lawyers columbus
10 Misleading Answers To Common Upvc Door Lock Replacement Questions Do You Know The Right
Ones? types of upvc door hinges
24-Hours To Improve Slot Demo Pragmatic demo Slot pg soft mahjong;
https://image.google.tn/url?q=https://okoshop.ru/bitrix/redirect.php?goto=https://www.holmestrail.org,
Дочь стояла в удивлении и теребила край своего платья, изредка поднимая глаза на такого же отца. Она не особо понимала значения слов, но считывая эмоции папы, становилось не по себе. Чипсы из тележки обратно отправились на полку, проведенные грустным взглядом мужчины:
—Ладно…. Так все-таки худеем? А с чего ты так резко решила? Жили же, и нормально было….
—Потом обсудим. Не сейчас.
представитель сильного пола вовсе не предвидел из уст своей избранницы Татианы. На территории их роду сложение организма совсем не соответствовала в противовес стандартной и также распространённой – иметь предожирение полная правило.
Looking For Inspiration? Try Looking Up Auto
Locksmith Near Me autolocksmith near me
9 Lessons Your Parents Teach You About Best Accident Lawyers best accident lawyers (weiner-strand.hubstack.net)
20 Resources To Make You More Successful At Slot Innovations evoplay slots best
The 10 Most Scariest Things About Uk Online Shopping
Sites For Electronics Uk Online Shopping Sites For Electronics
9 Things Your Parents Teach You About Car Ghost Immobiliser car Ghost immobiliser
The Complete List Of Designer Handbags Beige Dos And Don’ts Designer handbags vintage
You’ll Be Unable To Guess Link Alternatif Gotogel’s Tricks link alternatif gotogel
Gerakl24: Опытная Смена Фундамента, Венцов, Настилов и Перенос Домов
Компания Геракл24 профессионально занимается на оказании комплексных сервисов по замене фундамента, венцов, полов и перемещению домов в населённом пункте Красноярск и за пределами города. Наша команда профессиональных специалистов гарантирует превосходное качество выполнения всех видов реставрационных работ, будь то древесные, с каркасом, кирпичные постройки или бетонные конструкции дома.
Достоинства сотрудничества с Gerakl24
Навыки и знания:
Весь процесс выполняются лишь высококвалифицированными мастерами, имеющими большой практику в направлении строительства и реставрации домов. Наши специалисты профессионалы в своем деле и осуществляют проекты с высочайшей точностью и учетом всех деталей.
Всесторонний подход:
Мы предлагаем полный спектр услуг по реставрации и ремонту домов:
Замена фундамента: замена и укрепление фундамента, что позволяет продлить срок службы вашего строения и устранить проблемы, связанные с оседанием и деформацией.
Смена венцов: реставрация нижних венцов из дерева, которые обычно подвержены гниению и разрушению.
Замена полов: установка новых полов, что кардинально улучшает внешний облик и практическую полезность.
Перенос строений: безопасное и надежное перемещение зданий на новые локации, что помогает сохранить здание и предотвращает лишние расходы на возведение нового.
Работа с любыми видами зданий:
Древесные строения: восстановление и укрепление деревянных конструкций, защита от разрушения и вредителей.
Каркасные дома: укрепление каркасов и смена поврежденных частей.
Кирпичные строения: ремонт кирпичных стен и укрепление конструкций.
Бетонные строения: реставрация и усиление бетонных элементов, ремонт трещин и дефектов.
Надежность и долговечность:
Мы используем только высококачественные материалы и передовые технологии, что гарантирует долговечность и прочность всех выполненных задач. Все наши проекты проходят тщательную проверку качества на каждой стадии реализации.
Персонализированный подход:
Каждому клиенту мы предлагаем индивидуальные решения, учитывающие все особенности и пожелания. Мы стремимся к тому, чтобы результат нашей работы полностью удовлетворял вашим ожиданиям и требованиям.
Почему стоит выбрать Геракл24?
Работая с нами, вы найдете надежного партнера, который берет на себя все заботы по ремонту и реставрации вашего дома. Мы обеспечиваем выполнение всех работ в сроки, установленные договором и с соблюдением всех правил и норм. Выбрав Геракл24, вы можете быть уверены, что ваш дом в надежных руках.
Мы готовы предоставить консультацию и ответить на все ваши вопросы. Свяжитесь с нами, чтобы обсудить детали вашего проекта и узнать о наших сервисах. Мы поможем вам сохранить и улучшить ваш дом, сделав его уютным и безопасным для долгого проживания.
Gerakl24 – ваш надежный партнер в реставрации и ремонте домов в Красноярске и за его пределами.
The 10 Most Scariest Things About Tread Mills Tread Mills;
M.E-Ziaja.Co.Kr,
Is Double Glazed Windows Repair Near Me
The Most Effective Thing That Ever Was? Double Glaze Doors
Guide To Link Alternatif Gotogel: The Intermediate Guide In Link Alternatif Gotogel link Alternatif gotogel
[url=http://albuterolp.online/]albuterol otc canada[/url]
What’s The Job Market For Accident Attorney Professionals Like?
accident
?In a couple of moments, the family was already in the vegetable department. They had to be there as rarely as possible — some vegetables and fruits were completely unknown to these people. Looking at everything as a curiosity, the time of choice came:
— Well, then… Let’s take tomatoes, cucumbers, and here are apples, zucchini can also be taken…
Tanya reasoned to herself and did not consult with her hungry husband, skillfully sorting through the vegetables and putting the best ones in a plastic bag. The little girl carefully examined the oranges — she had never seen such a thing before, let alone eaten it:
— Maybe we’ll take something else normal later? Sausages, hot dogs. If you want to, go ahead and diet. But we’ll live normally. Right, daughter?
[url=https://mcadvair.online/]advair cost comparison[/url]
5 Killer Quora Answers To Welcome Kits welcome Kits
10 Misconceptions Your Boss Has Concerning Medium Variance Slots
high variance slots
The 10 Scariest Things About Bmw Key Programmer bmw Key programmer
What Is The Heck What Exactly Is Upvc Sash
Windows? Upvc Windows Repair Near Me (http://Www.Google.Com/Url?Q=Https://Koefoed-Bright.Blogbright.Net/The-Hidden-Secrets-Of-Upvc-Window-Repair-Near-Me)
See What Treatment For Anxiety Attacks Tricks The Celebs Are Utilizing Treatment for anxiety Attacks
You’ll Never Guess This Best Online Shopping Sites Clothes’s
Tricks best online Shopping sites clothes (abonents-ntvplus.ru)
You’ll Never Guess This Double Glaze Repair Near Me’s Tricks double
glaze repair near me – https://tujuan.grogol.us/go/aHR0cDovL2xhZHkyc2tpbi5wbGF6YWNvb2wuY29tL2dvL2luZGV4LnBocD9nbz1odHRwczovL3d3dy5yZXBhaXJteXdpbmRvd3NhbmRkb29ycy5jby51aw,
sample research papers for 5th grade research papers on image compression methods
The 10 Scariest Things About Avon Skin So Soft Where To Buy avon skin So soft
See What Treatment For Panic And Anxiety Attacks
Tricks The Celebs Are Making Use Of treatment for Panic and anxiety attacks; Ownedbypugs.com,
Five Killer Quora Answers On Double Glazed Near Me double glazed near me
5 Laws To Help Industry Leaders In Workers Compensation Compensation Industry Workers’ Compensation Lawsuit
What’s The Job Market For Double Glazed Window Repairs Professionals Like?
double glazed window repairs (shurcondicionados.cf)
The 10 Scariest Things About Under Desk Treadmill under desk Treadmill
9 Things Your Parents Teach You About Upvc Window Repairs Upvc Window Repair
How To Choose The Right Adhd In Adults Symptoms
On The Internet add symptoms in girls (Janessa)
Who Is Demo Slot And Why You Should Consider Demo Slot slot demo nolimit city
12 Companies Setting The Standard In Slot Demo Gratis slot demo gacor parah
The Little Known Benefits Of Assessments For Adhd In Adults add Adhd assessment
Hi colleagues, its great post about teachingand
entirely defined, keep it up all the time.
The No. 1 Question Anyone Working In Car Key Cover Fiat 500 Needs To Know How To Answer fiat punto car Key replacement
Who’s The Top Expert In The World On Car Diagnostic Near Me?
Mobile Engine Diagnostics Near Me
You Are Responsible For An Video Slots Budget?
12 Ways To Spend Your Money hacksaw Online gaming
Window Repairs Techniques To Simplify Your Daily Lifethe One Window Repairs Trick Every Person Should Be Able
To Window Repairs
14 Smart Ways To Spend Your Extra Stroller Compact Budget compact travel stroller
10 Websites To Help You Develop Your Knowledge About CS GO Weapon Case Clutch Case
What’s The Current Job Market For Key Replacement Bmw
Professionals Like? Key replacement bmw
Birth Defect Settlement Tools To Make Your Daily Life
Birth Defect Settlement Trick Every Person Should Learn Birth defect
Are You Responsible For The Mesothelioma Attorney Budget?
10 Terrible Ways To Spend Your Money Mesothelioma Claims
[url=http://diflucand.com/]diflucan prescription cost[/url]
Guide To Auto Ghost Immobiliser: The Intermediate Guide Towards Auto Ghost
Immobiliser Auto Ghost immobiliser
The 10 Most Terrifying Things About Online Retailers Uk Stats online retailers uk stats
Guide To Atlanta Birth Injury Lawsuit: The Intermediate Guide For Atlanta
Birth Injury Lawsuit Atlanta birth Injury Lawsuit
The 9 Things Your Parents Taught You About Veterans Disability Lawsuit veterans disability Lawsuit
Why No One Cares About Veterans Disability Attorney veterans disability lawsuits
10 Things Everybody Gets Wrong About Replacement Double Glazed Glass Only Near Me double glazing upvc windows
The Panels For Upvc Doors Mistake That Every Newbie Makes
Replacement Panel For Upvc Door
This Is The One Akun Demo Slot Trick Every Person Should Know demo X500
Is Your Company Responsible For An Upvc Window Repairs Budget?
12 Tips On How To Spend Your Money upvc window Repairs near Me
5 Killer Quora Answers To Washer And Dryer Machine Combo Washer And Dryer Machine Combo
Is Your Company Responsible For A Where Can I Get A Honda Key Cut Budget?
12 Tips On How To Spend Your Money honda crv key
Replacement cost [https://images.google.By/]
The Ultimate Cheat Sheet On Online Shopping Sites Online Shopping Sites For Dress
[url=https://itretinoin.online/]retin a cream for sale online[/url]
The Best Tips You’ll Ever Receive About Ghost Immobiliser Install autowatch Ghost installation birmingham
Guide To Ghost 2 Immobiliser Installation: The Intermediate Guide To Ghost
2 Immobiliser Installation Ghost 2 Immobiliser Installation
What’s The Current Job Market For Treadmills UK Reviews Professionals?
Treadmills uk
Guide To Bmw Replacement Key Fob: The Intermediate Guide In Bmw Replacement Key Fob bmw replacement key fob
[url=http://lasixtbs.online/]furosemide 4 mg[/url]
This Week’s Top Stories Concerning Avon’s Skin So Soft avon skin so soft original
10 Simple Ways To Figure Out Your Upvc Window Locks upvc window repair
See What Online Clothing Sites Uk Tricks The Celebs Are Utilizing Online clothing sites Uk (gurye.multiiq.com)
[url=https://acyclovirmc.com/]cost of zovirax tablets[/url]
[url=https://diflucanr.com/]diflucan brand name 300mg[/url]
What Freud Can Teach Us About 9kg Washing Machine Best Price Cheap Washing machines 9kg
Ten Ways To Build Your Glazing Repairs Near Me Empire double glazing repairs near me
Sexdoll Tips From The Top In The Industry real sex Doll
20 Rising Stars To Watch In The Rabbit Vibrators Uk
Industry best rabbit dildo [gangannikki.hatenadiary.Jp]
The Reasons Veterans Disability Claim Is More Difficult Than You Imagine veterans disability Lawyer
One Of The Biggest Mistakes That People Make Using Designer
Handbags Black designer handbags london – http://www.wikiyh.com/,
You’ll Be Unable To Guess Replacing Volkswagen Key’s Secrets replacing volkswagen key
Seven Explanations On Why Under Counter Fridge Freezer Side By Side
Is Important highest rated Side by side refrigerator
11 Ways To Fully Defy Your Nespresso Coffeee Machine nespresso vertuo plus coffee machine
A Trip Back In Time: What People Discussed About Loft Bed With Sofa Underneath 20 Years Ago loft bed ideas
Why You’re Failing At Mazda 5 Key Fob Mazda key Fobs
Guide To Upvc Repairs Near Me: The Intermediate Guide
For Upvc Repairs Near Me upvc repairs near me (Raquel)
The 10 Scariest Things About Kayleigh Wanless
Pornstar pornstar kayleigh wanless (w1.websnadno.cz)
[url=https://azithromycinhq.com/]where can i buy azithromycin online[/url]
What’s The Current Job Market For Washer And Dryer Combo
In One Professionals? washer and dryer combo in one; http://www.google.com/url?q=http://ivanovo.rusquantum.ru/bitrix/redirect.php?goto=https://www.washersanddryers.co.Uk/,
9 . What Your Parents Taught You About Folding Treadmills UK folding treadmills uk (bohumirsimek.blog.idnes.cz)
14 Savvy Ways To Spend Left-Over Auto Accident Compensation Budget Auto Accident Lawyer
Why No One Cares About What CSGO Cases Have Butterfly Knives spectrum 2 Case
מבורכים הבאים למרכז המידע והידע והתמיכה הרשמי והמוסמך עבור טלגרמות אופקים! במיקום זה תוכלו לאתר ולמצוא את המידע והפרטים החדיש והעדכני הזמין והרלוונטי בעניין מערכת טלגרמות והדרכים ליישום שלה כראוי.
מה מציין טלגרם מסלולים?
טלגראס כיוונים מציינת מנגנון הנשענת על טלגראס המשמשת ל לשיווק וצריכה של דשא וקנבי במדינה. באמצעות הפרסומים והפורומים בטלגרף, לקוחות יכולים לרכוש ולהשיג את פריטי קנבי באופן פשוט וזריז.
איך להתחבר בפלטפורמת טלגרם?
לצורך להתחיל בפעילות בטלגראס, עליכם להתחבר ל לקבוצות ולקבוצות המומלצים. בנקודה זו באתר זה אפשר לאתר מבחר עבור לינקים לשיחות פעילים וראויים. כתוצאה מכך, רשאים להתחבר בפעילות האספקה וההספקה מסביב מוצרי הדשא.
מידע ומידע
במקום הזה אפשר למצוא סוגים מבין מדריכים ופרטים מלאים בנוגע ל השימוש בטלגרם, כולל:
– ההצטרפות לערוצים מומלצים
– סדרת האספקה
– אבטחה והבטיחות בהתנהלות בפלטפורמת טלגרם
– והמון מידע נוסף לכך
קישורים איכותיים
לגבי נושא זה קישורים לערוצים ולקבוצות איכותיים בטלגראס כיוונים:
– ערוץ הנתונים והעדכונים המוסמך
– פורום הייעוץ והליווי למעוניינים
– מקום לאספקת אספקת קנבי מאומתים
– סקירת נקודות דשא אמינות
מערך מאחלים את כולם על השתייכותכם למרכז המידע מאת טלגרף נתיבים ומאחלים לכולם חוויה של צריכה טובה ומוגנת!
10 Test For Adult ADHD-Related Meetups You Should Attend test for adhd for Adults
Hi, i believe that i noticed you visited my website thus i came to go back
the prefer?.I am trying to to find things to enhance my web site!I suppose its adequate to make use of
some of your ideas!!
See What Washing Machines 12kg Tricks The Celebs Are Utilizing Washing Machines 12kg
[url=https://azithromycinps.online/]generic zithromax 500mg india[/url]
See What Gotogel Link Alternatif Tricks The Celebs Are Utilizing Gotogel Link
Alternatif (http://Www.Google.Com)
11 Ways To Fully Defy Your Sex Machine Near Me sexmachines (http://Www.topsadulttoys.uk)
Hi! I’ve been following your site for a long time now and finally got
the courage to go ahead and give you a shout out from Dallas Tx!
Just wanted to mention keep up the excellent job!
You’ll Never Guess This Wash Machine And Dryer Combo’s Tricks wash machine and dryer combo
5 Killer Quora Answers On Amazon Online Shopping
Clothes Uk Tactical pack For range
A Brief History Of Best Cases To Open CSGO History Of Best Cases To Open CSGO case esports (Herman)
Five Upvc Door Panels Lessons From The Professionals Upvc Door Replacement Lock
15 Reasons To Not Ignore Play Slots Evoplay slots Immersive
17 Reasons Not To Be Ignoring Defra Stove DEFRA stoves installation
The People Nearest To Upvc Windows Luton Tell
You Some Big Secrets nearest
9 Things Your Parents Teach You About Upvc Window Repair Near Me window repair near me,
https://howto-Komarigoto.work,
Amazing! This blog looks exactly like my old one!
It’s on a entirely different subject but it has pretty much the
same page layout and design. Outstanding choice of colors!
Top Loader Washing Machine 10kg Tools To Help You Manage Your Everyday Lifethe Only Top Loader
Washing Machine 10kg Trick That Everyone Should Be Able
To top loader washing machine 10kg
Five Killer Quora Answers On Audi A3 Key Replacement
audi a3 Key replacement
I’ll right away grasp your rss feed as I can’t find your e-mail subscription link
or e-newsletter service. Do you have any? Please let me know in order that I
could subscribe. Thanks.
The 10 Most Terrifying Things About Double Glazing Companies Near Me
Where Will Private Psychiatric Assessment 1 Year From In The Near Future?
assessment in Psychiatry
Upvc External Doors Techniques To Simplify Your Daily LifeThe One Upvc External Doors Trick Every Person Should Know upvc External Doors
5 Reasons To Consider Being An Online Locksmith Near Me
Car Buyer And 5 Reasons Why You Shouldn’t car locksmith mobile
So , You’ve Purchased Ghost Immobiliser Installation …
Now What? ghost Immobilisers
20 Things That Only The Most Devoted Drip Machine Fans Understand coffee filter Maker
How Slot Demo Gratis Was The Most Talked About Trend Of 2022 pragmatic demo slot
It’s The Myths And Facts Behind Pragmatic Sugar Rush
Demo pragmatic play sugar Rush (https://cs-upgrade.top/)
10 Things We All Love About Upvc Door Locking Mechanism Upvc Doors hinges
The Not So Well-Known Benefits Of Birth Defect Case birth Defect Law firms
valtrex online apart – valacyclovir pills collapse valtrex pills tear
A Step-By Step Guide To Selecting The Right CSGO New Cases Revolution Case (Nedee.Macple.Co.Kr)
The 10 Most Scariest Things About Upvc Door Handles Upvc Door Handles
10 Websites To Help You To Become A Proficient In Slot Demo Pragmatic slot demo pg Anti lag
15 Reasons You Shouldn’t Be Ignoring Princess Slot Demo Starlight princess slots – https://ramos-haley.technetbloggers.de/some-of-the-most-common-mistakes-people-make-with-Slot-demo-Starlight-princess-1000/ –
What’s The Job Market For ADHD Treatment Adults Professionals Like?
adhd treatment Adults
10 Things That Your Family Teach You About Treadmills For Sale UK treadmills
for sale uk (http://alt1.toolbarqueries.Google.sm/)
10 Facts About Symptoms Of Adhd In Adults Test That Can Instantly Put You In An Optimistic Mood
female Adhd symptoms
Do Not Believe In These “Trends” About Best CSGO Opening Site counter-strike Cases
What To Focus On When Improving Veleco Mobility Veleco scooter for Sale
Your mode of describing the whole thing in this
article is in fact fastidious, all can effortlessly know it, Thanks
a lot.
The 10 Scariest Things About Upvc Repairs Near Me upvc repairs near me – Micaela –
7 Simple Tips To Totally Rocking Your Wood Burning Stoves Wood burning stoves near me
What’s The Current Job Market For Sugar Rush Pragmatic Professionals?
sugar rush (Maryjo)
The Comprehensive Guide To Undiagnosed ADHD In Adults can primary care diagnose adhd
The Three Greatest Moments In Double Glazing Spares
Near Me History Door Double Glazing
20 Fun Facts About Ghost Immobiliser Review ghost Immobiliser installers
near me (johnscreekendo.Net)
You’ll Never Be Able To Figure Out This Avon Skin So Soft Oil’s Tricks skin So soft
The 10 Scariest Things About Link Alternatif Gotogel Link Alternatif gotogel
An CS GO Cases To Open Success Story You’ll Never Remember shadow Case
“The Designer Handbags For Women Awards: The Most Sexiest, Worst, And Weirdest Things We’ve Ever Seen Onlinedesignerhandbags.uk
You’ll Never Guess This Plush Sectional Sofas’s Tricks plush sectional sofas
(Kristine)
7 Simple Secrets To Totally You Into Treehouse
Bunk Bed Treehouse Beds For Toddlers
15 Up-And-Coming Adult ADHD Treatments Bloggers
You Need To Be Keeping An Eye On treatment for adult
adhd (perspectivesclothing.biz)
I for all time emailed this weblog post page to all my contacts, since if
like to read it then my friends will too.
You’ll Never Be Able To Figure Out This Combination Washer
And Dryer In One Unit’s Tricks combination washer and dryer in one unit
A Step-By-Step Instruction For Couches For Sale Leather Couches For Sale Near Me
Wow, wonderful blog layout! How long have you been blogging for?
you made blogging look easy. The overall look of your
site is excellent, as well as the content!
Guide To Best Price 9kg Washing Machine: The Intermediate Guide In Best Price 9kg Washing Machine best price 9kg washing Machine
10 Things Your Competitors Can Teach You About Auto Accidents
Attorney lawyers for Auto accidents near me
Guide To Leather Sofas For Sale: The Intermediate Guide Towards Leather Sofas For Sale leather Sofas for sale
The Reasons Double Glazed Window Repair Could Be Your Next Big Obsession window repairs Near me
5 Killer Quora Answers To American Freezer Fridge American Freezer Fridge
10 Sites To Help You Be A Pro In Door Fitters Luton door replacement services luton
5 Killer Quora Answers To Charity Shop Online Clothes Uk Charity Shop Online Clothes Uk
Double Glazing Companies Near Me Techniques To Simplify Your Daily Lifethe One Double Glazing Companies Near Me Trick Every Person Should Learn
Here’s A Little-Known Fact About Window Repair Near.
Window Repair Near upvc window repair [Veta]
10 Things Everybody Has To Say About Leeds Window Repair Leeds Window Repair double glazing leeds – Ollie,
11 “Faux Pas” That Are Actually Acceptable To Create Using
Your Upvc Doors Luton industrial Doors luton (http://wownsk-portal.ru)
What Will Sash Windows Repair Be Like In 100 Years? double glazed window repairs near me
A Relevant Rant About Car Locks Smith fob
17 Signs That You Work With Modern Slots hacksaw casino (willysforsale.com)
Ten Situations In Which You’ll Want To Be Aware Of Car Accident Litigation Car accident lawyer
25 Surprising Facts About Designer Mirror Radiators designer radiators for bedrooms
You’ll Never Guess This Upvc Door Repairs Near Me’s Benefits upvc door repairs near me; http://www.google.com/,
Why Adult Toys For Women Still Matters In 2023 Adult toy rabbit
One Key Trick Everybody Should Know The One Glazing
Repairs Near Me Trick Every Person Should Know double glazing near me
Replacement Upvc Door Handles Tips To Relax Your Daily LifeThe
One Replacement Upvc Door Handles Trick That Should Be Used By Everyone Be Able To upvc front door
Hello there! This article couldn’t be written much better!
Going through this post reminds me of my previous roommate!
He always kept talking about this. I most certainly will forward
this article to him. Fairly certain he will have a good read.
Thank you for sharing!
You’ll Never Be Able To Figure Out This How To Repair Broken Car Key’s
Tricks How to repair Broken car Key
See What Seo Backlink Building Software Tricks The Celebs Are Utilizing seo backlink building Software
Responsible For The Mobile Car Key Cutter Budget? 10 Fascinating Ways To Spend Your Money locksmith key
cutting, Ada,
Right here is the right web site for anybody who really wants to
understand this topic. You realize so much its almost tough to
argue with you (not that I actually will need to…HaHa). You certainly put a new spin on a topic which has
been discussed for ages. Excellent stuff, just excellent!
9 . What Your Parents Taught You About Railroad Injuries Lawyer
Railroad injuries
4 Dirty Little Secrets About The Double Glazing Fitters
Near Me Industry double Door
The 9 Things Your Parents Taught You About Avon Skin So Soft Dry Oil Review Avon Skin So Soft
10 Things That Your Family Teach You About Situs Alternatif Gotogel situs alternatif gotogel
I blog quite often and I seriously thank you for your
content. This article has really peaked my interest.
I will bookmark your blog and keep checking for new details
about once a week. I subscribed to your Feed too.
Pretty section of content. I simply stumbled upon your site and in accession capital to claim that I
acquire actually enjoyed account your weblog posts.
Anyway I will be subscribing in your feeds or even I fulfillment you get entry to
persistently fast.
Those diagnosed with mesothelioma or other waterville asbestos attorney-related illnesses need financial compensation. This compensation could be used to pay for treatments that prolong the life of patients and
aid families to recover from financial losses.
How To Get More Value From Your Cheap Rabbit Vibrators
Rabbit adult toys
Why Car Boot Lock Repair Is More Dangerous
Than You Realized how to Fix a broken Car door lock
Thanks , I’ve just been searching for information approximately this topic for
ages and yours is the greatest I have found out till now.
But, what in regards to the conclusion? Are you certain concerning the
source?
10 Demo Slot Starlight Princess X1000 Hacks All Experts Recommend Pragmatic Demo Princess
Asbestos Compensation Tools To Help You Manage Your Daily Lifethe One
Asbestos Compensation Trick That Every Person Must Learn asbestos
The 10 Most Scariest Things About Erb’s Palsy Law erb’s Palsy
10 Things You’ve Learned In Kindergarden That’ll Help You With Mesothelioma Lawyer
mesothelioma law firms (Desirerose.com)
What’s The Reason Everyone Is Talking About
Cerebral Palsy Settlement Today Cerebral Palsy Lawyer
9 Lessons Your Parents Taught You About Online
Famous Shopping Sites online famous Shopping sites
You’ll Be Unable To Guess Car Opener Service’s Benefits car opener Service [Sciencewiki.science]
The 9 Things Your Parents Teach You About Window Doctor Near Me
window doctor near me
The Most Common ADHD Assessment UK Private Mistake Every Beginning
ADHD Assessment UK Private User Makes Adhd Assessment Scotland Private (Link.Zhihu.Com)
What’s Next In Modern Slots slot Machine features
Designer Handbags And Purses: What’s The Only Thing Nobody Is Discussing onlinedesignerhandbags.uk
A Provocative Rant About Designer Handbags For Ladies Designer handbags list
What Is Ghost Immobiliser And How To Utilize What Is Ghost Immobiliser And How
To Use Near Me
CSGO Cases Opening Tips That Will Change Your Life Hydra Case (Alt1.Toolbarqueries.Google.Co.Il)
It’s very easy to find out any matter on web as compared to
books, as I found this paragraph at this web page.
The History Of Designer Handbags Red designer handbags Women’s
Five Killer Quora Answers To Designer Handbags Uk Sale designer handbags uk sale (Manie)
Slot Tips Techniques To Simplify Your Everyday Lifethe Only Slot Tips Trick That Everybody Should Know slot tips (http://www.wilderssecurity.com)
The 10 Most Terrifying Things About Window Repair Near Me window repair near
me (vapelifemag.Com.myopenlink.net)
Hi, i believe that i saw you visited my website so i came to go back the choose?.I’m trying to find things
to enhance my website!I assume its ok to
use a few of your concepts!!
How The 10 Worst Auto Lock Smith Near Me Errors Of All Time Could Have Been Prevented Auto Locksmiths in my area
The 9 Things Your Parents Taught You About Upvc Window Repairs
upvc window repairs
The Most Effective Reasons For People To Succeed
At The ADHD Diagnosis Private Industry private Adhd diagnosis (artistekfloor.com)
5 Myths About Audi Spare Key That You Should
Avoid cars
The Best Advice You Can Ever Receive About High Roller Slots evoplay slots symbols – http://www.google.com,
See What Adult Adhd Treatment Tricks The Celebs Are Using Adult adhd Treatment
25 Surprising Facts About What CSGO Cases Should I Open horizon case (Dina)
3 Common Causes For Why Your Upvc Window Repairs Isn’t Performing (And How To Fix It) Window repairs near me
The 10 Scariest Things About Double Glazing Company Near Me Double Glazing Company Near Me
10 Healthy Motorcycle Accident Claim Habits motorcycle accidents (Jamila)
You have made some good points there. I looked on the web for more information about the issue and found most people will go along with your views on this website.
Diagnostic Check Near Me: The History Of Diagnostic Check Near Me In 10 Milestones diagnostic scanner
What’s The Current Job Market For Online Shopping Clothes Uk
Cheap Professionals? online Shopping Clothes uk cheap
What’s The Current Job Market For Online Shopping Clothes Uk Cheap Professionals?
Online shop
10 Things That Your Family Teach You About Spare Keys Cut Spare keys cut
What Freud Can Teach Us About Designer Handbags Large Stylish Vintage Burgundy Backpack Purse for Women
12 Larder Fridge Facts To Make You Think Twice About
The Water Cooler Apartment fridge
Personal Injury Claim 101 Your Ultimate Guide
For Beginners personal injury lawsuit
What’s The Current Job Market For Link Alternatif Gotogel Professionals?
link Alternatif Gotogel
See What Uk Online Shopping Sites For Mobile Tricks The Celebs Are Utilizing uk online shopping sites For mobile
Unexpected Business Strategies Helped Upvc Window Repairs
Achieve Success upvc windows repair
The 10 Scariest Things About Locksmith For Auto locksmith for Auto
This Week’s Top Stories Concerning Upvc Windows
And Doors upvc windows repairs
The Three Greatest Moments In Legal History asbestos Lawyer
Do Not Make This Blunder You’re Using Your CSGO Cases New
Cs2 Case Opening
Treatment For Adult Adhd Isn’t As Difficult As You Think Uk Adhd Treatment
5 Lessons You Can Learn From Birmingham Window Repair Wood window repair near me
Greetings from Idaho! I’m bored to tears at work so I decided to browse your
site on my iphone during lunch break. I love the knowledge you present here and can’t wait to take a look when I get home.
I’m surprised at how fast your blog loaded on my mobile ..
I’m not even using WIFI, just 3G .. Anyways,
wonderful site!
9 Things Your Parents Teach You About Personal Injury Lawsuit Personal Injury Lawsuit
claritin pills stab – loratadine physical claritin pills disease
3 Common Causes For Why Your Double.Glazing
Near Me Isn’t Working (And How To Fix It) double glazing near me
14 Cartoons About Slot Demo Pragmatic That’ll Brighten Your
Day Slot Demo Maxwin
The People Nearest To Sofa Couch For Sale Share Some Big Secrets deep Couch sectional
Guide To Double Glazing Near Me: The Intermediate
Guide On Double Glazing Near Me Double glazing Near me
What’s The Current Job Market For Upvc Windows Repair Professionals Like?
upvc windows repair – Ahmad
–
15 Reasons You Must Love Slot Machines Evoplay slots graphics
Why You Should Concentrate On Enhancing Leather Sofas
For Sale corner couches for sale – Luella –
Wow that was unusual. I just wrote an extremely long comment but after I clicked submit my comment didn’t appear.
Grrrr… well I’m not writing all that over again. Anyway, just wanted to say
wonderful blog!
A Productive Rant About Wall Electric Fireplace direct Vent Fireplaces
Hi! I understand this is somewhat off-topic but I needed to
ask. Does building a well-established website such as yours take a large
amount of work? I am brand new to blogging but I
do write in my diary daily. I’d like to start a blog so I can easily share my own experience and thoughts online.
Please let me know if you have any kind of ideas or tips for new aspiring bloggers.
Appreciate it!
How Ghost 2 Immobiliser Cost Became The Hottest Trend In 2023 Ghost Immobiliser Problems
Như người chơi đã biết thì FB88 là một trong những sân chơi vô cùng nổi tiếng trong lĩnh vực cung cấp các dịch vụ cá cược thể thao
lẫn Casino. Nhờ đó mà rất nhiều người chơi cảm thấy hài lòng khi tham gia cá
cược trực tuyến tại FB88. Nhận thấy thị trường cá
cược trực tuyến Việt Nam là rất tiềm năng và có thể mang đến những những thuận lợi về hoạt động nên từ năm 2016 FB88 đã đánh mạnh cung cấp dịch vụ
cho game thủ Việt. Đây cũng là lý do mà hiện nay có càng nhiều anh em cược thủ lựa chọn nhà cái để
tham gia cá cược. Chắc chắn, khi tham gia vào thế giới bắn cá đổi thưởng tại FB88 casino,
anh em sẽ bị cuốn hút ngay từ cách chơi hấp dẫn và tỷ lệ đổi thưởng cao
nhất. Các trò thể thao luôn được người chơi cá cược trên khắp thế giới yêu thích.
What’s The Current Job Market For Double Glazed Window Repairs Professionals?
Double glazed window repairs
[url=https://ezithromycin.online/]zithromax cost canada[/url]
Guide To Steps For Titration: The Intermediate Guide To Steps
For Titration steps For titration (finanzplaner-Deutschland.de)
The 10 Scariest Things About Designer Handbags And Purses
Designer Handbags and Purses
A Peek At Car Diagnostic Price Uk’s Secrets Of Car
Diagnostic Price Uk vauxhall Diagnostics near me
What Can A Weekly Pram With Car Seat Project Can Change Your Life pram and car seat (https://heylookielookie.com/)
7 Useful Tips For Making The Most Of Your Auto Accident Settlement auto accident law firms
10 Unexpected Ghost Immobiliser Tips ghost 2 immobiliser fitting near me (Brook)
Геракл24: Опытная Смена Фундамента, Венцов, Полов и Перемещение Домов
Фирма Gerakl24 специализируется на выполнении комплексных услуг по смене фундамента, венцов, покрытий и переносу строений в городе Красноярском регионе и за пределами города. Наша команда опытных экспертов гарантирует высокое качество реализации различных типов ремонтных работ, будь то из дерева, с каркасом, кирпичные или из бетона дома.
Преимущества работы с Геракл24
Навыки и знания:
Каждая задача выполняются лишь опытными специалистами, с обладанием большой практику в направлении строительства и реставрации домов. Наши мастера профессионалы в своем деле и реализуют работу с высочайшей точностью и вниманием к деталям.
Полный спектр услуг:
Мы осуществляем все виды работ по ремонту и восстановлению зданий:
Замена фундамента: замена и укрепление фундамента, что позволяет продлить срок службы вашего строения и избежать проблем, вызванные оседанием и деформацией.
Реставрация венцов: восстановление нижних венцов деревянных зданий, которые чаще всего подвержены гниению и разрушению.
Смена настилов: монтаж новых настилов, что значительно улучшает внешний вид и функциональность помещения.
Передвижение домов: качественный и безопасный перенос строений на новые локации, что обеспечивает сохранение строения и избежать дополнительных затрат на строительство нового.
Работа с различными типами строений:
Деревянные дома: восстановление и защита деревянных строений, защита от гниения и вредителей.
Каркасные строения: укрепление каркасов и замена поврежденных элементов.
Кирпичные дома: восстановление кирпичной кладки и укрепление конструкций.
Бетонные дома: реставрация и усиление бетонных элементов, устранение трещин и повреждений.
Качество и надежность:
Мы работаем с только высококачественные материалы и новейшее оборудование, что гарантирует долгий срок службы и надежность всех работ. Все проекты проходят строгий контроль качества на каждом этапе выполнения.
Персонализированный подход:
Каждому клиенту мы предлагаем индивидуальные решения, с учетом всех особенностей и пожеланий. Наша цель – чтобы конечный результат полностью удовлетворял ваши ожидания и требования.
Зачем обращаться в Геракл24?
Обратившись к нам, вы приобретете надежного партнера, который берет на себя все заботы по ремонту и реставрации вашего дома. Мы обеспечиваем выполнение всех работ в установленные сроки и с соблюдением всех строительных норм и стандартов. Связавшись с Геракл24, вы можете быть уверены, что ваше строение в надежных руках.
Мы готовы предоставить консультацию и ответить на все ваши вопросы. Звоните нам, чтобы обсудить ваш проект и получить больше информации о наших услугах. Мы обеспечим сохранение и улучшение вашего дома, сделав его безопасным и комфортным для проживания на долгие годы.
Геракл24 – ваш выбор для реставрации и ремонта домов в Красноярске и области.
The 10 Most Scariest Things About Autowatch Ghost
Installers Midlands autowatch ghost installers Midlands
Link exchange is nothing else except it is only placing the other person’s web site link on your page at
appropriate place and other person will also do
similar in support of you.
10 Wrong Answers To Common Designer Bags Questions:
Do You Know The Correct Answers? outlet
An interesting discussion is definitely worth comment.
I think that you should write more on this issue, it
might not be a taboo subject but generally folks don’t speak about such
issues. To the next! Many thanks!!
Avoid Making This Fatal Mistake You’re Using Your Medical Malpractice
Attorney Medical Malpractice Lawyer
Replacement Upvc Window Handles Tips From The Top In The Business upvc window repairs
Near me (accglobal.Net)
3 Ways In Which The Window Companies Milton Keynes Will Influence Your Life french doors milton keynes
(Isla)
Why No One Cares About Malpractice Compensation Malpractice Attorney
5 Killer Queora Answers On Prams Pushchairs Twin stroller
Guide To Upvc Doors Luton: The Intermediate Guide Towards
Upvc Doors Luton Upvc doors luton
Why Do So Many People Want To Know About
Lawyer Near Me For Car Accident? car accident attorney
Las vegas (http://www.cheaperseeker.com)
The Top Locksmith Near Me For Cars Gurus Do 3
Things Locksmiths For Cars
11 Ways To Fully Defy Your Titration For ADHD adhd titration uk for Adults
5 Arguments Mini Freezer Uk Is Actually A Great Thing Walk-in freezers (Aragaon.net)
What’s The Current Job Market For Window Doctor Near Me Professionals?
window doctor near me
[url=https://baclofenx.com/]baclofen buy australia[/url]
10 Easy Steps To Start Your Own Mobile Car Diagnostics Business Diagnostic scanner
5 Killer Quora Answers On Erb’s Palsy Legal erb’s Palsy lawyer
In Which Location To Research Designer Handbags Online Designer Handbags Cheap (http://Image.Google.Nu)
20 Trailblazers Leading The Way In Cheap Pushchairs Egg Pushchair Sale
The No. 1 Question Everyone Working In Akun Demo Slot Needs To Know How To Answer slot demo thailand
Five Killer Quora Answers On Starlight Princess Slots starlight princess slots (Vallie)
How Perform Draw Poker 프라그마틱 슬롯게임
You’ll Never Be Able To Figure Out This Window Doctor Near Me’s Benefits window doctor near me (https://tujuan.grogol.us/)
How Double Glazing Milton Keynes Its Rise To The No.
1 Trend In Social Media Milton keynes windows
10 Tell-Tale Warning Signs You Need To Get A New Gotogel Link Alternatif Casino Online
How Automobile Locksmith Near Me Became The Hottest Trend In 2023 auto locksmith prices
The Complete Guide To Convertible Sleeper Sofa space-Saving Sleepers
Your Worst Nightmare About Bonus Slots Relived slot volatility; https://c-m-f.ru/bitrix/redirect.php?goto=https://rainbet.com,
The Reasons Double Glazing Windows Milton Keynes Is Fastly Changing Into The Hottest Trend Of 2023 aluminium doors milton Keynes
The No. 1 Question That Anyone Working In Best CSGO Opening Site
Should Know How To Answer counter-strike cases (namjun.hatenablog.Jp)
10 Wrong Answers To Common Classic Casino Slots Questions Do You Know The Correct Ones?
evoplay online slots (https://57.farcaleniom.com/index/D2?diff=0&source=Og&campaign=8220&content=&clickid=w7n7kkvqfyfppmh5&aurl=https://dudoser.com/user/landharp0/&pushMode=Popup)
The People Nearest To Adult Female Adhd Symptoms Uncover Big Secrets near
Making Most Desirable Of Online Casino Bonuses 프라그마틱 슬롯게임
The 12 Best Free Casino Slots Accounts To Follow On Twitter Evoplay Slots Addictive
Slot Tips Tools To Ease Your Everyday Lifethe Only
Slot Tips Trick That Every Person Should Be Able To slot Tips
See What Amazon Uk Online Shopping Clothes Tricks The Celebs Are Using amazon uk online shopping clothes (Zack)
Window Companies Luton Tools To Ease Your Daily Lifethe One
Window Companies Luton Technique Every Person Needs To Learn window Companies luton
20 Inspiring Quotes About Lock Smith For Car
Carlock smith
For Whom Is Top Slots And Why You Should Take A Look
jackpot slots (Alonzo)
Fantastic goods from you, man. I have understand your stuff previous to and you are just
extremely wonderful. I actually like what you have acquired here,
certainly like what you’re stating and the way in which you say it.
You make it entertaining and you still take care of
to keep it sensible. I can’t wait to read far more from you.
This is actually a great website.
What’s The Current Job Market For Sleeping Couch And Sofa Professionals?
Sleeping couch And sofa
Three Reasons Why Three Reasons Your Adult ADHD Testing Is Broken (And How
To Fix It) Test for adult Adhd
10 Healthy Habits To Use Ford Spare Key Replacement ford key fob
4 Dirty Little Secrets About Local Auto Locksmith And The
Local Auto Locksmith Industry 24 hour Auto locksmith near me
[url=https://diflucand.com/]diflucan 150 mg[/url]
How Much Do ADHD Adults Test Experts Make? adult testing Adhd
Adhd Medication Uk: The Good, The Bad, And The Ugly Add Adhd medication
This Is The One Titration ADHD Adults Trick Every Person Should Learn Adhd Titration
5 Killer Quora Answers To Window Replacement Near Me
Window replacement near me
The 10 Most Scariest Things About Online Shopping Sites London online Shopping sites
What Is Upvc Patio Doors? Heck What Exactly Is Upvc Patio Doors?
upvc Replacement door Panels
10 Facts About Train Driver Fatality Compensation That
Make You Feel Instantly The Best Mood train accident attorney
What Replacement Upvc Window Handles Experts Would Like You To Know upvc window repair near me (Dell)
The 10 Scariest Things About Autowatch Ghost Installers autowatch ghost
Installers (telegra.ph)
Sage Advice About Demo Zeus From An Older Five-Year-Old Zeus Slot Pragmatic Demo
What’s The Job Market For Emergency Car Locksmith Professionals?
Emergency car Locksmith
Upvc Front Doors 10 Things I Wish I’d Known Earlier Upvc Door Repairs
The 10 Most Infuriating Cerebral Palsy Compensation Failures Of All Time Could Have Been Prevented Cerebral Palsy Lawsuit
Are You Responsible For A Sectional Sofas For Sale Budget?
10 Very Bad Ways To Invest Your Money sofa Outlet Sale
The 9 Things Your Parents Taught You About Double Glazing In Luton up and over Garage doors luton
20 Fun Facts About Saab Replacement Keys Saab Key replacement bristol
You’ll Never Be Able To Figure Out This Adhd In Females Symptoms’s
Tricks adhd in females symptoms (http://kmtholdings.com/__media__/js/netsoltrademark.php?d=telegra.ph/The-10-Most-Infuriating-Female-Adhd-Symptoms-Fails-Of-All-Time-Could-Have-Been-Prevented-04-27)
10 Things We Love About Semi Truck Legal semi truck Accidents
10 Life Lessons That We Can Learn From Auto Accident
Lawyers Firm
[url=http://enolvadex.online/]10 mg tamoxifen[/url]
5 Mental Health Counselor Near Me Instructions From The Pros how to Get a mental health assessment uk (secure.archatl.com)
15 Best Pinterest Boards Of All Time About Akun Demo Slot pg soft slots demo (http://blog29.net/)
It’s very straightforward to find out any topic on net as compared to books,
as I found this piece of writing at this website.
[url=http://dexamethasoneff.com/]6 mg dexamethasone[/url]
5 People You Should Meet In The Best Folding Treadmill Industry Dynamax runningpad folding treadmill
See What Double Pushchair Sale Tricks The Celebs Are Utilizing double Pushchair
The 10 Most Scariest Things About Adhd Assessment Uk adhd assessment uk
5 Killer Quora Answers To Asbestos asbestos
What Is Designer Handbags Beige And Why Is Everyone Speakin’ About It?
onlinedesignerhandbags
20 Trailblazers Setting The Standard In Integrated Fridge
Freezer appliance store
Unquestionable Evidence That You Need Designer Handbags Uk
Sale Online Designer Handbags
The Reasons You’re Not Successing At Treadmill Folding Accessories home
[url=http://eflomax.com/]drug flomax[/url]
15 Gifts For The CS GO Cases Opening Lover In Your Life Opening website
You’ll Never Guess This Double Glaze Repair Near Me’s Tricks
double glaze repair near me; Fanny,
Great site you have here but I was wanting to know if
you knew of any community forums that cover the same topics
talked about here? I’d really love to be a part of online community where I can get suggestions from
other knowledgeable individuals that share the same interest.
If you have any suggestions, please let me know. Many thanks!
20 Myths About Motor Vehicle Attorney: Dispelled
motor Vehicle Accidents
10 Meetups About Designer Handbags In Sale You Should Attend Online designer Handbags
Why No One Cares About Lavazza Coffee Machine Commercial coffee machines
20 Things That Only The Most Devoted Auto Accident Settlement
Fans Are Aware Of auto accident Law firm
Guide To Online Shopping Uk Cheap: The Intermediate Guide The Steps To
Online Shopping Uk Cheap online Shopping uk cheap (http://Links.musicnotch.com)
14 Smart Ways To Spend Your The Remaining ADHD Private Diagnosis
UK Budget How much for a private Adhd assessment
Guide To Gotogel Link Alternatif: The Intermediate Guide In Gotogel Link Alternatif gotogel link alternatif [Wilbur]
What’s The Current Job Market For Car Ignition Switch Replacement Professionals?
Car Ignition Switch Replacement
10 Ways To Create Your Play Casino Slots Empire evoplay Slots Addictive
[url=https://oazithromycin.com/]azithromycin 900 mg[/url]
10 Websites To Help You Learn To Be An Expert In Branded Slots Fair slots
5 Clarifications On Demo Slot Demo Slot X 500
11 Ways To Completely Revamp Your Filter Coffee Machine Budget coffee Maker
7 Things About CSGO Case Battle You’ll Kick Yourself For Not Knowing revolver case (wifidb.science)
“The Filtered Coffee Makers Awards: The Most, Worst, And Weirdest Things We’ve Ever Seen Drip machine coffee
Where Will Upvc Window Repairs Be 1 Year From In The Near
Future? upvc window repairs near me
The 10 Most Terrifying Things About Electric Wheelchair With
Joystick electric wheelchair with joystick, Levi,
Situs Alternatif Gotogel Tools To Make Your Daily Lifethe One Situs Alternatif Gotogel Trick That Every Person Should Be Able To Situs alternatif gotogel
Automobile Locksmiths Near Me Tools To Improve Your Daily LifeThe One Automobile Locksmiths Near Me Trick That Everyone Should Know automobile locksmiths near
me (Loren)
Here’s A Few Facts Regarding CSGOroll Case
Battle Case Operation Bravo
What’s up friends, nice piece of writing and nice urging commented here, I am genuinely enjoying by these.
The 10 Most Terrifying Things About Contemporary
Multi Fuel Stoves Contemporary Multi Fuel Stoves
You Are Responsible For An Auto Lock Smiths Budget? 12 Top Ways To Spend Your Money
Autolocksmiths – http://charlieroseshow.com
–
Its like you read my mind! You appear to know a lot about this, like you wrote
the book in it or something. I think that you can do with some pics to drive the
message home a bit, but instead of that, this is wonderful blog.
An excellent read. I will definitely be back.
The Reason Behind Compact Travel Pram Is The Most Popular
Topic In 2023 compact strollers
17 Reasons Not To Ignore Door Fitters Luton Window doctor luton
You’ll Never Be Able To Figure Out This Top UK Pornstars’s
Tricks top uk pornstars
8 Tips To Improve Your CS GO Case Game prisma case [Ariel]
See What 4 Wheel Mobility Scooter Electric Scooters Tricks The Celebs Are Using 4 Wheel mobility Scooter electric Scooters
10 Unexpected Double Glazing Companies Near Me Tips installer
Hi there! I just want to give you a huge thumbs up for the
excellent info you have got right here on this post.
I’ll be coming back to your website for more soon.
17 Reasons Not To Avoid High Roller Slots evoplay slots engaging (https://nerdgaming.science/wiki/15_Terms_Everybody_Who_Works_In_Slot_Mechanics_Industry_Should_Know)
Auto Accident Lawyers Tips To Relax Your
Daily Life Auto Accident Lawyers Trick Every Person Should
Be Able To auto accidents (Florence)
Why You Should Be Working With This Slot Demo Pragmatic Joker Demo (https://Barsa.Blog.Idnes.Cz/)
Check Out: How Diagnosing Adult ADHD Is Taking Over And What You Can Do About It
diagnosis for adhd in adults (Elbert)
What’s The Job Market For Uk Women’s Online Shopping Websites
Professionals Like? Uk women’s online Shopping websites
The Little-Known Benefits To Accident Compensation vimeo
See What Mobile Car Diagnostics Near Me Tricks The Celebs Are Utilizing diagnostic [verbina-glucharkina.Ru]
Five Killer Quora Answers To Free Casino Slots free casino slots
Your Family Will Be Grateful For Getting This Adult ADHD Symptoms Women undiagnosed
adhd in women [Greg]
A An Overview Of Slot Strategies From Beginning To End Scatter Slots
20 Fun Facts About Car Accident Attorney Car accident lawyer
8 Tips To Enhance Your Slot Demo Princess Terbaru Game
demo slot pragmatic starlight princess
5 Facts Locksmiths For Cars Near Me Is A Good Thing mobile Locksmith near Me for Cars
Психология в рассказах, истории из жизни.
How The 10 Most Disastrous Locksmith For Cars Near Me-Related FAILS Of
All Time Could Have Been Prevented locksmith for car key near me
Don’t Buy Into These “Trends” Concerning Slot Demo akun demo slot x500
Where Are You Going To Find CS GO Open Case Website Be One Year From What Is Happening Now?
Gloves Cases
Twenty Myths About Ghost 2 Immobiliser Installation: Busted ford Focus ghost Installer
How To Outsmart Your Boss On Online Psychiatric Assessment nhs psychiatric assessment (actorsequityawards.com)
Say “Yes” To These 5 Private Adhd Assessment Uk Tips
adhd Assessment test for adults
5 Laws That’ll Help Those In Veterans Disability Litigation Industry law
10 Quick Tips About Windows Repair window Repair
20 Amazing Quotes About Slot Machine Games hacksaw slots casino games
15 Up-And-Coming Double Glazed Window Replacement Near Me Bloggers
You Need To Be Keeping An Eye On company
Психолог 2025
The 10 Scariest Things About Best Travel Pushchair Travel Pushchair (http://Ivimall.Com/)
You’ll Never Guess This Railroad Injuries Lawyers’s
Tricks railroad injuries lawyers
Watch Out: How ADHD Natural Treatment Is Gaining Ground, And What Can We Do
About It adhd Treatment approaches
30 Inspirational Quotes For CSGO Battle Case Case skins
Responsible For The Mental Health Tests Budget? 10 Unfortunate Ways To
Spend Your Money mental assessment (Giselle)
5 Killer Quora Answers On Auto Accident Attorneys auto accident Attorneys
Private Psychiatrist Northern Ireland Tools To Ease Your Everyday Lifethe Only Private Psychiatrist Northern Ireland
Trick Every Person Should Know Private Psychiatrist
This Is A Designer Handbags For Work Success Story You’ll Never
Imagine brand
The No. 1 Question Everyone Working In Accident Attorneys Near Me Should Be Able To Answer accidents Lawyers near me
The Best Add Women Techniques To Transform Your Life Famous Women With Adhd (Wwwondi.Josh.Grplan.Com)
You’ll Be Unable To Guess Treatments Of Adhd’s Tricks
treatments of Adhd
5 Laws Everybody In Mental Health Assesment Should Be Aware Of Mental health assessments
Learn About CSGO Case New While You Work From At Home huntsman weapon case
(image.google.com.np)
17 Signs To Know You Work With Butt Plugs For
Sale hush buttplug
[url=http://acyclovirmc.online/]can you buy zovirax over the counter[/url]
You’ll Never Be Able To Figure Out This Amazon Under Desk
Treadmill’s Benefits amazon under desk treadmill
Why Is Assessing Adhd In Adults So Famous? Private Adhd Adult Assessment
What’s The Current Job Market For Window Doctor Near Me Professionals Like?
window doctor near me (https://freeman-drachmann.hubstack.Net)
10 Healthy Habits To Use Motor Vehicle Lawsuit motor Vehicle accident lawsuit
Ten Slot Tours Products That Can Improve Your Life hack Casino slots
Are You Responsible For The Slot Sites Budget?
10 Amazing Ways To Spend Your Money top Slots
The 3 Biggest Disasters In Workers Compensation Litigation History workers’
Compensation attorneys (http://www.newlivecode.info)
15 Interesting Hobbies That Will Make You Smarter At Slot Innovations
slot offers
What What CSGO Cases To Invest In Experts Would Like You To Know huntsman weapon Case
Good day! I know this is kind of off topic but I was wondering
which blog platform are you using for this site?
I’m getting fed up of WordPress because I’ve had issues with hackers and I’m looking at alternatives for another
platform. I would be awesome if you could point me in the
direction of a good platform.
What NOT To Do Within The Best Cases To Open CSGO Industry Chroma 3 Case
Quality posts is the secret to interest the viewers to visit the web page, that’s what this web
site is providing.
10 Top Mobile Apps For How To Get CS GO Cases case chroma – Charis –
Is Tech Making Panty Vibrators For Women Better Or Worse?
panties sex, plantsg.com.sg,
See What Repair Upvc Windows Tricks The Celebs Are Using Repair Upvc Window
The 9 Things Your Parents Taught You About Upvc Windows And Doors Near Me upvc windows And doors
5 Laws To Help The Best CSGO Opening Site Industry Counter-Strike Cases (https://Shopgalleree.Com/)
You’ll Never Guess This Window Repair Near Me’s Secrets Window Repair Near Me
Everything You Need To Learn About Double Infant Stroller Double pram Stroller
The Ultimate Guide To Robot Vacuum Mop Best Self Emptying Vacuum
What Is American Fridge Freezer Sale’s History? History Of American Fridge Freezer Sale American fridge
freezers (medicoitalia.com)
Searching For Inspiration? Check Out Penny Slots Evoplay Slots Exciting (http://Www.Diggerslist.Com)
10 Things Everybody Hates About CSGO Cases Value CSGO Cases Value
falchion case (Elba)
Why Nobody Cares About Bentley Key Price bentley keys
20 Amazing Quotes About High Roller Slots casino slot games – Aladdin33.ru –
Guide To Double Glazing Near Me: The Intermediate Guide The Steps To Double Glazing Near Me double glazing near me;
Dwight,
Why viewers still use to read news papers when in this technological globe all is accessible on web?
You’ll Never Guess This Demo Slot Pragmatic Sweet Bonanza’s Tricks demo slot pragmatic sweet bonanza; Tiffany,
How To Save Money On Greenpower Mobility green mobility (Emily)
What Will Vauxhall Astra Keys Be Like In 100 Years?
Vauxhall Adam Key Cover (Slic3.Com)
Hello there! Do you use Twitter? I’d like to follow
you if that would be okay. I’m undoubtedly enjoying your blog and look forward to new updates.
10 Healthy Mental Health Check Up Habits private mental health assessment near Me
9 . What Your Parents Teach You About Asbestos Lawsuits asbestos
9 Things Your Parents Teach You About Online Shopping Sites Clothes Cheap Online Shopping Sites Clothes Cheap
[url=https://tretinoineff.com/]cheap retin a[/url]
This Is The Ugly The Truth About Designer Bags Online Designer Handbag Outlet
Top 10 Online Shopping Sites In Uk For Clothes Tools To Make Your Daily Life
Top 10 Online Shopping Sites In Uk For Clothes Trick Every Individual Should Know top 10 online Shopping Sites in uk for clothes
dapoxetine defense – priligy grin priligy bite
Five Killer Quora Answers On Double Glazed Near
Me Double Glazed Near Me
10 Things Everyone Hates About Free Spin Slots Free
Spin Slots slot Bonuses
[url=https://declomid.online/]clomid sale[/url]
The Reason Why Rng Slots Has Become Everyone’s Obsession In 2023 Hacksaw gaming
[url=http://adexamethasonep.online/]dexamethasone 8 mg tablet[/url]
Whoa! This blog looks just like my old one! It’s on a totally different subject but it has
pretty much the same page layout and design. Great choice of colors!
Guide To Upvc Repairs Near Me: The Intermediate Guide The Steps To Upvc Repairs Near Me upvc repairs Near me
With havin so much content and articles do you ever run into
any problems of plagorism or copyright violation? My site has
a lot of exclusive content I’ve either created myself or
outsourced but it looks like a lot of it is popping it up all over the
internet without my permission. Do you know any ways to help reduce content from being stolen?
I’d genuinely appreciate it.
Pemerintah Indonesia telah fokus pada pembangunan infrastruktur untuk mendukung pertumbuhan ekonomi. Proyek-proyek besar seperti pembangunan jalan tol, bandara, pelabuhan, dan kereta api terus ditingkatkan. Infrastruktur yang baik tidak hanya memperlancar distribusi barang dan jasa, tetapi juga menarik investasi asing ke dalam negeri..
[url=http://bbs.zhizhuyx.com/home.php?mod=space&uid=9518647]kapan liga 1 dimulai lagi[/url]
[url=http://hamaco.co.kr/bbs/board.php?bo_table=d_01&wr_id=4784]panduan binomo[/url]
erek 33 e1824_7
Very good info. Lucky me I recently found your website by chance (stumbleupon).
I have saved as a favorite for later!
In Which Location To Research Folding Pushchair Online forward Facing pushchair
Tremendous things here. I am very glad to peer your article.
Thanks a lot and I am taking a look forward to contact you.
Will you please drop me a e-mail?
Wow, this piece of writing is fastidious, my younger sister is analyzing such things, thus I am
going to let know her.
My family every time say that I am wasting my time here at net,
except I know I am getting familiarity all the time by reading such good content.
What’s The Current Job Market For Best Online Shopping Groceries Uk Professionals Like?
best online shopping Groceries Uk
Guide To Sleeper Sofa Queen: The Intermediate Guide To Sleeper Sofa Queen sleeper Sofa queen
I have been surfing online more than three hours today, yet I never
found any interesting article like yours. It is pretty worth enough for me.
Personally, if all webmasters and bloggers made good content as you did,
the web will be a lot more useful than ever before.
Three Of The Biggest Catastrophes In Double Glazed Units Manufacturers
Near Me The Double Glazed Units Manufacturers Near Me’s
3 Biggest Disasters In History double glazed Glass replacement
16 Facebook Pages You Must Follow For Affordable SEO Strategies Near Me-Related
Businesses affordable monthly seo packages (Shanel)
Pram And Car Seat’s History Of Pram And Car Seat In 10 Milestones Baby travel
This article will assist the internet users for building up new web
site or even a weblog from start to end.
loratadine medication machine – loratadine various loratadine occupy
[url=http://flomaxms.online/]flomax generic brand[/url]
25 Amazing Facts About Slots For Fun play benny the beer by Hacksaw – rainbet
Five Killer Quora Answers To Starlight Princess Slots starlight princess Slots
Are Personal Injury Settlement Just As Important As Everyone Says?
Personal Injury Lawsuits
It Is The History Of Personal Injury Lawyer Assault In 10 Milestones personal injury lawyers in new orleans
20 Slot Technology Websites That Are Taking The Internet By Storm Rainbet
I was suggested this website by my cousin. I am not sure whether this post is written by him as nobody else know such detailed about my trouble.
You’re incredible! Thanks!
The 10 Most Worst Luton Windows And Doors Fails Of All
Time Could Have Been Avoided Patio Doors luton
10 Erroneous Answers To Common CS GO Weapon Case Questions:
Do You Know The Correct Ones? esports 2013 Case
11 Methods To Completely Defeat Your How To Get A Replacement Honda Car Key honda jazz key
What Is CSGO New Case? Heck What Is CSGO New Case? riptide Case
You’ll Never Guess This Online Clothes Shopping Websites
Uk’s Tricks online Clothes Shopping Websites uk
[url=http://dexamethasoneff.com/]dexamethasone buy online[/url]
[url=https://asynthroid.online/]synthroid tablets[/url]
Could Window Repair Near Be The Answer To Achieving 2023?
house
Auto Accident Lawyers Near Me Tools To Improve Your Daily
Life Auto Accident Lawyers Near Me Trick That Everybody Should Know auto accident lawyers near me
5 Clarifications On Misted Double Glazing Repairs Near Me Double Glazed Windows
Why No One Cares About Robot Vacuum Best robot Vacuum Cleaner with mopping
[url=https://bacclofen.online/]baclofen mexico[/url]
The 10 Most Terrifying Things About Lost My Keys
Lost My Keys
[url=https://azithromycinmds.com/]azithromycin order online uk[/url]
See What Double Glazing Luton Tricks The Celebs Are Using Double Glazing Luton
How To Save Money On Double Glazed Near Me Double Glazing Installers
Hi there! I know this is kinda off topic but I was wondering which blog
platform are you using for this website? I’m getting sick and tired of WordPress because I’ve had problems with hackers
and I’m looking at options for another platform. I would be awesome if
you could point me in the direction of a good platform.
obviously like your website but you need to take a look at the spelling on quite a few of your posts.
A number of them are rife with spelling problems
and I find it very bothersome to tell the reality then again I
will surely come again again.
[url=https://modafinilmip.online/]can i buy provigil online[/url]
[url=http://advaird.online/]buy advair diskus online[/url]
Think You’re Ready To Start Doing Injury Attorneys? Answer This Question injured
Thank you for sharing your thoughts. I truly
appreciate your efforts and I am waiting for your next write
ups thanks once again.
10 Tell-Tale Signs You Must See To Know Before You Buy Double Glazed Windows Birmingham wood window repair near Me (Smartwebby.com)
5 The 5 Reasons Motorcycle Accident Settlement Is Actually
A Good Thing motorcycle accident Lawsuits
Guide To Replacing Lost Keys To A Car: The Intermediate Guide The Steps To Replacing Lost Keys To A Car replacing lost keys to a car
An Easy-To-Follow Guide To Railroad Injuries Attorneys railroad injuries law
firm (bogazicitente.com)
Birth Defect Attorney Explained In Fewer Than 140 Characters birth defect lawsuit
10 Sites To Help Learn To Be An Expert In Blown Double Glazing Repairs Near Me
double glaze
For latest news you have to pay a quick visit the web and on web I found this web site as a
finest website for most up-to-date updates.
The Most Pervasive Problems In Double Glazing Near Me Double glased doors
The 10 Most Terrifying Things About Asbestosis Asbestos Mesothelioma
Attorney Asbestosis Asbestos Mesothelioma Attorney
3 In 1 Pram 101 Your Ultimate Guide For Beginners Pram Set
When I initially commented I clicked the “Notify me when new comments are added” checkbox and now each time a comment is added I get
three emails with the same comment. Is there any way you can remove people from that service?
Cheers!
The Most Pervasive Issues In Double Glazed Units
Manufacturers Near Me Handle for double glazed window
10 Facts About Car Accident Litigation That Will Instantly Bring You
To A Happy Mood santa fe car accident law firm
What’s The Current Job Market For Triple Bunk Bed With Storage Professionals?
triple bunk bed with storage – Waldo –
See What Treadmills For Home UK Tricks The Celebs Are Using Treadmills For Home Uk
You’ll Never Guess This 18 Wheeler Accident Law Firm’s Tricks 18 Wheeler
accident law firm – http://xilubbs.xclub.tw –
The No. One Question That Everyone In Slot Bonuses Should Be Able To Answer Bonus Slots
(Lucky-Home.Net)
Your Family Will Be Thankful For Getting This Masturbator
male masturbating toy, Shane,
A Productive Rant About Leather Sectionals For Sale grey couches for sale
This Is The Advanced Guide To L Shaped Couches For Sale cheap couches For sale under $100
15 Things You Don’t Know About Double Glazed Window Birmingham window Repir
I constantly spent my half an hour to read this web site’s articles daily along with a mug of coffee.
Excellent beat ! I would like to apprentice even as you amend your web site, how
can i subscribe for a weblog web site? The account aided me a acceptable deal.
I had been tiny bit familiar of this your broadcast offered bright transparent idea
10 Healthy Private ADHD Assessment Habits Adhd Diagnostic Test
[url=http://eflomax.com/]flomax canada pharmacy[/url]
Upvc Window Repairs: The Ugly Truth About Upvc Window Repairs Upvc window Repairs near me
[url=http://acyclovirmc.online/]zovirax cream cost canada[/url]
Работая в поисковой оптимизации, нужно знать, что нельзя одним инструментом продвинуть веб-сайт в верхние позиции поисковиков, ведь поисковые системы это как трек с финишной прямой, а веб-сайты это гоночные машины, которые все хотят занять первое место.
Так вот:
Перечень – Для того чтобы веб-сайт был адаптивным и быстр, важна
оптимизация
Сайт должен иметь только уникальный контент, это тексты и картинки
НЕОБХОДИМО ссылочный профиль через сайты статейники и напрямую на главную
Увеличение обратных ссылок с помощью сайтов второго уровня
Ссылочная пирамида, эо ссылки Tier-1, Tier-2, Tier-3
И самое главное это сеть сайтов PBN, которая линкуется на деньговый сайт
Все сайты PBN должны быть без футпринтов, т.е. поисковики не должны знать, что это один владелец всех веб-сайтов, поэтому крайне важно следовать все эти правила.
It’s The Personal Injury Attorney Case Study You’ll Never Forget aberdeen personal injury Lawsuit
5 Qualities That People Are Looking For In Every Upvc Door Panel Replacement Replacing Panel In Upvc Door (Sevensisterschicken.Com)
Adhd Medication Ritalin: The Good, The Bad, And The Ugly medication for
adhd adults (Bethany)
20 Trailblazers Leading The Way In Demo Pragmatic Sugar Rush sugar rush free slot demo
[url=http://lyricawithoutprescription.com/]lyrica capsules 75 mg cost[/url]
Now That You’ve Purchased Double Glazing Doctor Near Me …
Now What? replacement glass double glazing – http://www.dermandar.com –
You’ll Be Unable To Guess Link Daftar Gotogel’s
Tricks link daftar gotogel
Steel Anal Plugs Tools To Improve Your Everyday Lifethe Only Steel
Anal Plugs Trick That Everybody Should Know steel Anal Plugs
What’s The Current Job Market For Sleeping Couch And Sofa Professionals Like?
sleeping couch and sofa
20 Things You Need To Be Educated About Double Glazing
Windows Near Me replace
7 Simple Tricks To Totally Intoxicating Your Upvc Doors Repair Bi fold doors upvc (http://www.envisionagriculture.net/__media__/js/netsoltrademark.php?d=sofanode6.bravejournal.net/why-Replacement-upvc-door-Handles-is-relevant-2023)
Five Killer Quora Answers On Double Glazing Repairs Luton Double Glazing Repairs Luton
What’s The Job Market For Double Glazing Near Me Professionals Like?
double glazing near me
I really love your blog.. Pleasant colors & theme. Did you develop this web site yourself?
Please reply back as I’m hoping to create my own personal blog
and would like to find out where you got this from or what the theme is named.
Cheers!
There’s certainly a lot to know about this issue.
I really like all of the points you made.
5 Killer Quora Answers To Custom Sectional Sofa Custom sectional sofa
Auto Accident Lawyers Techniques To Simplify Your Daily Lifethe One Auto Accident Lawyers Trick That Everyone
Should Know Auto Accident lawyers
The Step-By -Step Guide To Choosing The Right Private Diagnosis ADHD
Private Adhd Assessment Cumbria
The Best Advice You Can Ever Receive About Childrens Double Bunk Bed 2 Double bunk beds
See What Designer Handbags On Sale Tricks The Celebs Are Using Designer handbags on sale
How To Explain Upvc Window Repairs To A 5-Year-Old
window Repairs near Me
Double Glazing Windows Luton Techniques To Simplify Your Everyday
Lifethe Only Double Glazing Windows Luton Trick That Everybody Should
Be Able To double Glazing windows Luton
[url=http://oazithromycin.com/]cheap zithromax[/url]
Will Designer Handbags In Sale Ever Rule The World? designer handbags used
Потрясающий сайт!!! Неожиданно
обнаружил его в Google и очень обрадовался!
Статьи, которые я прочитал здесь,
оказались информативными
и очень ценными. Большое спасибо за такой качественный, увлекательный контент.
Я, кстати, тоже пишу статьи на различные
темы, но в основном про продвижение сайтов и интернет-рекламу Google
https://telegra.ph/Prodvizhenie-sajtov-ot-veb-studii-WEB-SEO-03-16 Если вам
будет интересно, проходите на мой сайт,
обсудим идеи!
Upvc External Doors Tools To Streamline Your Everyday LifeThe Only Upvc External Doors Trick Every Person Should Learn upvc external doors
15 Reasons To Not Ignore Fireplace On Wall cozy winter fireplaces
The 3 Most Significant Disasters In Personal Injury Attorney History personal injury attorneys
5 Killer Quora Answers To Window Repairman Window Repair
Замена венцов красноярск
Геракл24: Квалифицированная Смена Фундамента, Венцов, Покрытий и Передвижение Домов
Организация Gerakl24 профессионально занимается на оказании комплексных сервисов по замене основания, венцов, покрытий и перемещению строений в месте Красноярск и за пределами города. Наша группа профессиональных специалистов обеспечивает высокое качество исполнения всех видов восстановительных работ, будь то деревянные, каркасного типа, из кирпича или из бетона дома.
Достоинства сотрудничества с Геракл24
Навыки и знания:
Каждая задача осуществляются только опытными экспертами, с обладанием долгий стаж в сфере строительства и реставрации домов. Наши сотрудники знают свое дело и выполняют работу с максимальной точностью и вниманием к деталям.
Полный спектр услуг:
Мы предлагаем все виды работ по реставрации и реконструкции строений:
Смена основания: укрепление и замена старого фундамента, что гарантирует долговечность вашего здания и устранить проблемы, связанные с оседанием и деформацией строения.
Смена венцов: замена нижних венцов деревянных домов, которые обычно подвергаются гниению и разрушению.
Замена полов: замена старых полов, что кардинально улучшает внешний вид и практическую полезность.
Передвижение домов: безопасное и качественное передвижение домов на новые места, что помогает сохранить здание и избежать дополнительных затрат на строительство нового.
Работа с различными типами строений:
Деревянные дома: реставрация и усиление деревянных элементов, защита от гниения и вредителей.
Каркасные дома: усиление каркасных конструкций и реставрация поврежденных элементов.
Дома из кирпича: ремонт кирпичных стен и укрепление конструкций.
Бетонные дома: ремонт и укрепление бетонных конструкций, устранение трещин и повреждений.
Качество и надежность:
Мы работаем с только высококачественные материалы и современное оборудование, что обеспечивает долгий срок службы и прочность всех выполненных задач. Все проекты подвергаются строгому контролю качества на каждом этапе выполнения.
Личный подход:
Мы предлагаем каждому клиенту подходящие решения, с учетом всех особенностей и пожеланий. Мы стремимся к тому, чтобы итог нашей работы полностью соответствовал вашим запросам и желаниям.
Почему выбирают Геракл24?
Обратившись к нам, вы получаете надежного партнера, который берет на себя все заботы по ремонту и реконструкции вашего строения. Мы обещаем выполнение всех задач в сроки, установленные договором и с в соответствии с нормами и стандартами. Выбрав Геракл24, вы можете не сомневаться, что ваш дом в надежных руках.
Мы готовы предоставить консультацию и дать ответы на все вопросы. Контактируйте с нами, чтобы обсудить детали вашего проекта и узнать о наших сервисах. Мы сохраним и улучшим ваш дом, сделав его безопасным и комфортным для проживания на долгие годы.
Геракл24 – ваш партнер по реставрации и ремонту домов в Красноярске и окрестностях.
Everything You Need To Be Aware Of Door Fitting Birmingham window Restoration;
https://www.google.hu/url?sa=t&url=https://www.chelseamcguire.uk/Maintenance/shattered-no-more-expert-window-repair-birmingham/,
Ten Avon Kits That Really Make Your Life Better avon kits
The 10 Most Terrifying Things About Blown Double Glazing Repairs
Near Me double glazing repairs near me
How To Outsmart Your Boss In High Roller Slots Evoplay Slots Interactive
11 Creative Ways To Write About CSGO Cases To
Invest In Case spectrum
Its History Of Double Glazing Supplies Near Me replace double glazed Units
5 Laws To Help With The Search Engine Optimization Services Industry seo optimization london
How To Identify The L Shaped Kids Beds That’s Right For You
Wooden bunk beds
15 Designer Handbags Sale Benefits Everyone Should Be Able To
Designer handbags Sale outlet
How To Beat Your Boss On Adult Movie gapping
A Losing Battle – My Casino Consequence 무료슬롯
You’ll Never Be Able To Figure Out This Avon Skin So Soft Oil’s Tricks skin so Soft oil (spiritualfriends.work)
See What Double Glazing Luton Tricks The Celebs Are Using Double glazing luton
娛樂城
線上娛樂城的天地
隨著互聯網的飛速發展,線上娛樂城(網上賭場)已經成為許多人休閒的新選擇。在線娛樂城不僅提供多元化的游戲選擇,還能讓玩家在家中就能體驗到賭場的興奮和樂趣。本文將探討網上娛樂城的特色、利益以及一些常見的游戲。
什麼在線娛樂城?
在線娛樂城是一種經由網際網路提供賭錢遊戲的平台。玩家可以經由計算機、智能手機或平板電腦進入這些網站,參與各種賭錢活動,如撲克牌、輪盤賭、21點和老虎機等。這些平台通常由專業的的軟體公司開發,確保游戲的公正和安全性。
線上娛樂城的利益
方便性:玩家不用離開家,就能體驗賭錢的樂趣。這對於那些生活在遠離實體賭場地方的人來說尤其方便。
多樣化的遊戲選擇:在線娛樂城通常提供比實體賭場更豐富的游戲選擇,並且經常更新遊戲內容,保持新穎。
好處和獎金:許多線上娛樂城提供豐厚的優惠計劃,包括註冊紅利、存款獎金和會員計劃,引誘新玩家並鼓勵老玩家不斷遊戲。
穩定性和保密性:合法的網上娛樂城使用先進的的加密來保護玩家的個人信息和交易,確保游戲過程的穩定和公平。
常見的網上娛樂城游戲
撲克牌:德州撲克是最受歡迎的賭錢游戲之一。在線娛樂城提供多種德州撲克變體,如德州扑克、奧馬哈撲克和七張牌等。
輪盤賭:賭盤是一種經典的賭場遊戲遊戲,玩家可以賭注在單數、數字組合或顏色上,然後看小球落在哪個地方。
黑傑克:又稱為21點,這是一種比拼玩家和莊家點數點數的游戲,目標是讓手牌點數儘量接近21點但不超過。
老虎机:老虎机是最容易且是最受歡迎的賭錢游戲之一,玩家只需轉捲軸,等待圖案圖案排列出贏得的組合。
結尾
網上娛樂城為現代的賭博愛好者提供了一個便捷、興奮且多元化的娛樂選擇。無論是撲克迷還是老虎機迷,大家都能在這些平台上找到適合自己的游戲。同時,隨著技術的不斷進步,在線娛樂城的遊戲體驗將變得越來越現實和有趣。然而,玩家在享用游戲的同時,也應該自律,避免沉溺於博彩活動,維持健康的遊戲心態。
Why No One Cares About Upvc Doors Milton Keynes car scratch
repairs milton keynes (Jamila)
Avon Skin So Soft Spray Tools To Improve Your Daily LifeThe One Avon Skin So Soft Spray Trick That Every Person Must Learn Skin So soft Spray, clay-duus.technetbloggers.de,
10 Meetups About Combo Washer Dryer You Should Attend Combination washer and dryers
Five Killer Quora Answers On Private Psychiatrist Near Me private Psychiatrist near me
15 Up-And-Coming Trends About Car Lock Smith mobile car key locksmith near me
What’s The Job Market For Deep Sectional Sofa Professionals?
Deep Sectional Sofa [http://Or3B21Dn3G.Kr/Bbs/Board.Php?Bo_Table=Free&Wr_Id=175050]
Indisputable Proof Of The Need For Truck Accident Injury Lawyer truck accident law Firms
10 Things That Your Family Taught You About Online Shopping Sites Clothes Cheap
online shopping Sites Clothes cheap
Where Will Window Doctor Near Me Be One Year From What Is Happening Now?
installing
24 Hours To Improve Upvc Window Repairs upvc window repairs near me
在線娛樂城的天地
隨著互聯網的迅速發展,在線娛樂城(線上賭場)已經成為許多人休閒的新選擇。在線娛樂城不僅提供多種的遊戲選擇,還能讓玩家在家中就能體驗到賭場的刺激和樂趣。本文將研究網上娛樂城的特點、優勢以及一些常有的遊戲。
什麼是在線娛樂城?
線上娛樂城是一種經由互聯網提供賭錢游戲的平台。玩家可以經由電腦設備、手機或平板進入這些網站,參與各種賭博活動,如德州撲克、輪盤、二十一點和老虎機等。這些平台通常由專家的程序公司開發,確保遊戲的公平性和穩定性。
在線娛樂城的好處
便利性:玩家無需離開家,就能體驗賭錢的樂趣。這對於那些居住在遠離的實體賭場區域的人來說尤其方便。
多種的遊戲選擇:在線娛樂城通常提供比實體賭場更豐富的遊戲選擇,並且經常更新游戲內容,保持新鮮感。
福利和獎勵:許多在線娛樂城提供豐富的優惠計劃,包括註冊獎金、存款紅利和忠誠計劃,引誘新玩家並促使老玩家持續遊戲。
安全性和隱私:正當的網上娛樂城使用高端的加密技術來保護玩家的個人資料和財務交易,確保遊戲過程的公平和公平。
常有的網上娛樂城游戲
德州撲克:撲克牌是最受歡迎的博彩遊戲之一。在線娛樂城提供各種撲克牌變體,如德州撲克、奧馬哈和七張牌撲克等。
賭盤:輪盤是一種經典的賭場遊戲遊戲,玩家可以投注在單個數字、數字組合上或顏色選擇上,然後看球落在哪個位置。
21點:又稱為21點,這是一種比拼玩家和莊家點數的游戲,目標是讓手牌點數盡可能接近21點但不超過。
吃角子老虎:老虎機是最簡單也是最流行的博彩遊戲之一,玩家只需轉捲軸,看圖案排列出中獎的組合。
結尾
線上娛樂城為現代的賭博愛好者提供了一個便捷、興奮且多樣化的娛樂方式。不管是撲克牌愛好者還是吃角子老虎迷,大家都能在這些平台上找到適合自己的游戲。同時,隨著科技的不斷進步,線上娛樂城的遊戲體驗將變得越來越真實和有趣。然而,玩家在體驗遊戲的同時,也應該自律,避免沉溺於賭博活動,保持健康的娛樂心態。
The People Nearest To Auto Accident Settlement Share Some Big Secrets attorney
10 Things We Do Not Like About Luton Double Glazing upvc Doors in luton
9 Lessons Your Parents Teach You About Avon Skin So Soft Bath Oil bath
You’ll Never Guess This Shopping Online Uk’s Tricks Shopping online uk
9 Things Your Parents Teach You About Upvc Window Repairs Near Me upvc window Repairs near me
What’s The Particular Loan Modification 411? 급전대출
3 Reasons You Suck At Poker 슬롯사이트 (http://vkeepw.evai.pl/home.php?mod=space&uid=371377)
17 Reasons You Shouldn’t Ignore Slot Demo Demo Slot Pragmatic Play
Who Is Tree House Bunk Bed And Why You Should Take A Look
adventurous Sleeping
Designer Handbags And Purses Isn’t As Tough As You Think designer yellow handbags (Laura)
[url=http://flomaxms.online/]flomax drug[/url]
The Advantage Of Poker Tables With A Table Top 카지노 – ares.astroempires.com,
You’ll Never Guess This Window Repair Near Me’s Tricks window repair near me
10 Situations When You’ll Need To Be Educated About
Slot Design top winning slots
The Top Reasons Why People Succeed Within The Popular
Casino Slots Industry Online Casino slots
7 Simple Secrets To Completely Doing The Best Clitoris
Stimulators Best Vibrator For Clit Stimulation
You’ll Be Unable To Guess Situs Gotogel Terpercaya’s Tricks situs
gotogel terpercaya (Malinda)
[url=http://odiflucan.com/]diflucan 150 mg over the counter[/url]
7 Helpful Tips To Make The Greatest Use Of Your Best Robot Vacuum
Best Combo vacuum and mop
9 Things Your Parents Teach You About Double Double Bunk Beds double double
bunk bed (Gia)
The Reasons Private Psychiatrist North London Is Fast Becoming The Hottest Trend
For 2023 private psychiatrist prices
Five Killer Quora Answers On Automatic Vacuum And Mop Robot automatic vacuum
and mop; Roma,
An Easy-To-Follow Guide To Designer Bags cheap Designer bags
What’s The Job Market For Upvc Repairs Near Me Professionals?
upvc Repairs near me
5 Must-Know-How-To-Hmphash Single Wooden Bunk Beds Methods To 2023 Super Single Bunk Bed
10 Tips For Replacement Upvc Window Handles That Are Unexpected repairing upvc windows, Chloe,
What Is It That Makes Slot Online So Popular? casino Slot tournaments
The Reason Why Designer Handbags Has Become Everyone’s Obsession In 2023 Designer yellow
handbags (Library.pilxt.com)
Nine Things That Your Parent Taught You About Demo Slot Pragmatic Maxwin Starlight Princess demo slot pragmatic maxwin Starlight princess (olderworkers.Com.au)
You’ll Never Guess This Situs Alternatif Gotogel’s Secrets situs alternatif gotogel;
http://www.healthndream.com,
Ten Adult Mens Toys That Really Help You Live Better Adult Mens Toys
Do Not Buy Into These “Trends” About Slot Demo demo slot rtp; https://telegra.ph/watch-this-how-slot-demo-is-taking-over-and-what-you-can-do-about-it-04-27,
Nice blog here! Also your web site loads up fast!
What host are you using? Can I get your affiliate link to your host?
I wish my website loaded up as quickly as yours lol
[url=http://accutanemix.online/]generic accutane price[/url]
5 Killer Quora Answers On Crate And Barrel Sleeper
Sofa crate and barrel sleeper Sofa
Five Killer Quora Answers To Bmw Replacment Key Bmw Replacment Key (Line04.Co.Kr)
Unexpected Business Strategies That Aided Panels For Upvc Doors Achieve Success
upvc doors price (ww17.boattreder.com)
What’s The Current Job Market For Upvc Doors Milton Keynes Professionals Like?
doors milton keynes
What Is The Heck What Exactly Is Single Bunk Bed For
Adults? single bunk bed with space underneath (Lawrence)
Responsible For The ADHD Private Diagnosis Cost UK
Budget? 10 Terrible Ways To Spend Your Money private Assessment for Adhd dublin
An ADD Treatments For Adults Success Story You’ll Never Believe adhd treatments (clicavisos.com.ar)
How To Create An Awesome Instagram Video About Slot Volatility evoplay slots innovations (chessdatabase.science)
Five Ghost Ii Immobiliser Projects For Any Budget Ghost immobiliser installation
What Is Asbestos Claim And Why Is Everyone Dissing It?
Asbestos Compensation
How To Tell If You’re Ready To Go After Double Glazing South London South London Windows
Отличный сайт!!! Неожиданно
обнаружил его в Google и был приятно удивлен!
Статьи, которые я пересмотрел здесь, оказались познавательными и очень ценными.
Спасибо большое за такой превосходный, интересный контент.
Я, кстати, тоже пишу статьи на различные темы, но в основном про оптимизацию веб-сайтов
и контекстную рекламу Google http://pizazzmt.com/iced-irish-coffee-2/ Если вам будет любопытно,
посетите на мой сайт, пообщаемся!
7 Easy Tips For Totally Moving Your Vacuum Mop Cleaner Robot Robot Mop
(https://H50Bj1B029A4Bz83C6Rd.Com/Bbs/Board.Php?Bo_Table=Qna&Wr_Id=173813)
10 Double Glazing Windows Milton Keynes Related Projects That Can Stretch Your Creativity Milton Keynes Council repairs
[url=https://diflucanr.online/]diflucan capsule 200 mg[/url]
11 “Faux Pas” That Are Actually Acceptable To Create With Your Designer Handbags For Women Designer Handbags On Amazon
12 Kilo Washing Machine Tools To Help You Manage Your Daily Lifethe One 12 Kilo Washing Machine
Trick That Every Person Should Know 12 kilo washing machine (Everette)
10 Situations When You’ll Need To Be Aware Of Upvc Patio Doors new
upvc door (http://yourhoaresource.com/)
What’s The Reason? Replacement Upvc Window Handles Is Everywhere This Year repairing Upvc windows
5 Treehouse Bunk Lessons From The Pros treehouse bed For boy
Where Can You Find The Best Window Repair Near Information?
upvc window repair near me [http://gwwa.yodev.Net]
Don’t Be Enticed By These “Trends” Concerning Asbestos Lawsuit
asbestos Attorney
20 Resources That Will Make You Better At Bio Ethanol Fireplace Fireplace wholesalers
You’ll Never Guess This Upvc Window Repair’s Tricks upvc window repair
(http://fhoy.kr/)
It’s The Evolution Of Automobile Accident Attorneys automobile Accident lawyers near Me
See What Cheap Stroller Tricks The Celebs Are Using cheap stroller
(http://smartfarm.gnu.ac.kr)
Ten Milton Keynes Window Repairs That Really Make Your Life Better milton keynes window repairs (http://Www.ronanacosta.top)
Why Nobody Cares About Motor Vehicle Compensation
Do You Think You’re Suited For Doing Designated Slots?
Answer This Question evoplay slots most Played
[url=https://tretinoineff.com/]tretinoin cream generic cost[/url]
9 Things Your Parents Teach You About Window Replacement Near Me window replacement near me (Barry)
Buzzwords De-Buzzed: 10 More Ways To Say Double Glazed Window
Repairs Near Me double glazed window Repairs near me
15 Things To Give Your High Variance Slots Lover In Your Life
low Variance Slots
5 Reasons To Consider Being An Online Upvc Door
Business And 5 Reasons To Not front Upvc doors
10 Situations When You’ll Need To Be Educated
About Sleeper Sofas For Sale L Shaped Leather Couch
This Week’s Most Popular Stories About Asbestos Compensation asbestos case
The Ultimate Guide To Self Emptying Robot Vacuum
Best budget Vacuum mop
15 Gifts For The Malpractice Attorneys Lover In Your Life Malpractice Law Firms
4 Dirty Little Details About Auto Accident Compensation And
The Auto Accident Compensation Industry auto Accident Lawyer
The Motive Behind Saab Key Replacement Has Become The Obsession Of
Everyone In 2023 replacement saab car keys
You’ll Never Be Able To Figure Out This Link Alternatif Gotogel’s Secrets link alternatif gotogel (Liliana)
Where Will How To Get Diagnosed With ADHD Be 1 Year From Now?
Adhd Adult Diagnosis Perth
An Guide To Online Charity Shop Uk Clothes In 2023 Dog Eye Stain Cleaner
Double Glazing Windows Birmingham Tips To Relax Your Everyday LifeThe Only Double Glazing Windows Birmingham Trick That Every
Person Should Be Able To Double Glazing windows Birmingham
10 No-Fuss Methods For Figuring The Bean Cup Coffee Machine You’re Looking For bean to Cup machine
sapporo88
Daily bonuses
Uncover Invigorating Bonuses and Extra Spins: Your Complete Guide
At our gaming platform, we are dedicated to providing you with the best gaming experience possible. Our range of offers and free spins ensures that every player has the chance to enhance their gameplay and increase their chances of winning. Here’s how you can take advantage of our awesome deals and what makes them so special.
Generous Bonus Spins and Refund Promotions
One of our standout promotions is the opportunity to earn up to 200 bonus spins and a 75% refund with a deposit of just $20 or more. And during happy hour, you can unlock this bonus with a deposit starting from just $10. This incredible offer allows you to enjoy extended playtime and more opportunities to win without breaking the bank.
Boost Your Balance with Deposit Promotions
We offer several deposit bonuses designed to maximize your gaming potential. For instance, you can get a free $20 bonus with minimal wagering requirements. This means you can start playing with extra funds, giving you more chances to explore our vast array of games and win big. Additionally, there’s a $10 deposit promotion available, perfect for those looking to get more value from their deposits.
Multiply Your Deposits for Bigger Wins
Our “Play Big!” offers allow you to double or triple your deposits, significantly boosting your balance. Whether you choose to multiply your deposit by 2 or 3 times, these promotions provide you with a substantial amount of extra funds to enjoy. This means more playtime, more excitement, and more chances to hit those big wins.
Exciting Free Spins on Popular Games
We also offer up to 1000 free spins per deposit on some of the most popular games in the industry. Games like Starburst, Twin Spin, Space Wars 2, Koi Princess, and Dead or Alive 2 come with their own unique features and thrilling gameplay. These bonus spins not only extend your playtime but also give you the opportunity to explore different games and find your favorites without any additional cost.
Why Choose Our Platform?
Our platform stands out due to its user-friendly interface, secure transactions, and a wide variety of games. We prioritize your gaming experience by ensuring that all our promotions are easy to access and beneficial to our players. Our bonuses come with minimal wagering requirements, making it easier for you to cash out your winnings. Moreover, the variety of games we offer ensures that there’s something for every type of player, from classic slot enthusiasts to those who enjoy more modern, feature-packed games.
Conclusion
Don’t miss out on these unbelievable opportunities to enhance your gaming experience. Whether you’re looking to enjoy free spins, rebate, or bountiful deposit bonuses, we have something for everyone. Join us today, take advantage of these incredible offers, and start your journey to big wins and endless fun. Happy gaming!
Guide To Kids Double Bunk Bed: The Intermediate Guide For Kids
Double Bunk Bed kids double bunk bed
Engaging Advancements and Renowned Releases in the Domain of Interactive Entertainment
In the ever-evolving environment of videogames, there’s continuously something innovative and engaging on the horizon. From enhancements optimizing iconic timeless titles to new arrivals in renowned brands, the interactive entertainment realm is as vibrant as in current times.
This is a look into the most recent updates and some of the renowned releases engrossing fans internationally.
Up-to-Date News
1. New Enhancement for The Elder Scrolls V: Skyrim Elevates NPC Visuals
A latest modification for The Elder Scrolls V: Skyrim has attracted the interest of fans. This mod implements detailed faces and dynamic hair for every non-player entities, improving the title’s graphics and immersion.
2. Total War Games Experience Set in Star Wars Universe Universe In the Works
The Creative Assembly, known for their Total War franchise, is allegedly crafting a anticipated game set in the Star Wars Universe universe. This thrilling crossover has fans anticipating with excitement the tactical and captivating gameplay that Total War Series titles are renowned for, ultimately situated in a realm remote.
3. Grand Theft Auto VI Release Communicated for Late 2025
Take-Two’s CEO’s CEO has confirmed that GTA VI is expected to arrive in Q4 2025. With the massive reception of its predecessor, Grand Theft Auto V, gamers are awaiting to witness what the forthcoming iteration of this legendary brand will offer.
4. Expansion Developments for Skull & Bones Sophomore Season
Developers of Skull & Bones have communicated broader plans for the game’s Season Two. This nautical experience delivers new experiences and updates, engaging fans engaged and engrossed in the domain of high-seas swashbuckling.
5. Phoenix Labs Studio Deals with Layoffs
Regrettably, not every developments is good. Phoenix Labs Studio, the creator developing Dauntless Experience, has announced large-scale staff cuts. In spite of this challenge, the title keeps to be a iconic selection amidst players, and the team continues to be attentive to its fanbase.
Renowned Titles
1. The Witcher 3: Wild Hunt Game
With its engaging experience, captivating domain, and compelling adventure, The Witcher 3 Game keeps a beloved game amidst fans. Its intricate experience and wide-ranging free-roaming environment keep to attract enthusiasts in.
2. Cyberpunk Game
Despite a challenging debut, Cyberpunk remains a long-awaited title. With continuous updates and enhancements, the title persists in progress, providing players a glimpse into a futuristic world rife with mystery.
3. GTA V
Yet years post its original release, GTA 5 remains a iconic preference across enthusiasts. Its expansive sandbox, engaging narrative, and co-op mode continue to draw fans coming back for more adventures.
4. Portal 2 Game
A legendary analytical release, Portal 2 is renowned for its groundbreaking systems and clever map design. Its demanding conundrums and amusing dialogue have solidified it as a exceptional experience in the videogame realm.
5. Far Cry
Far Cry 3 Game is acclaimed as exceptional titles in the series, offering players an nonlinear journey rife with adventure. Its captivating story and legendary figures have established its status as a beloved experience.
6. Dishonored Game
Dishonored Series is acclaimed for its stealth mechanics and distinctive world. Players embrace the character of a otherworldly executioner, traversing a metropolitan area abundant with political intrigue.
7. Assassin’s Creed 2
As a member of the acclaimed Assassin’s Creed Franchise collection, Assassin’s Creed II is adored for its captivating story, captivating features, and period realms. It remains a exceptional release in the collection and a favorite across players.
In closing, the realm of interactive entertainment is flourishing and fluid, with new developments
Are You Tired Of Private ADHD Assessment? 10 Inspirational Resources To Invigorate Your Love Adult Adhd Assessment Private
Where Are You Going To Find Upvc Windows And Doors Near Me One Year From Right Now?
Upvc door for Sale (jacksonvilletruckwrecklawyer.Com)
10 . Pinterest Account To Be Following About Slot Payouts
[url=http://lyricawithoutprescription.com/]lyrica 150 mg coupon[/url]
The 10 Most Scariest Things About Gotogel Link Alternatif gotogel link alternatif (https://minecraftcommand.science/profile/hellsense28)
What Freud Can Teach Us About Are CSGO Cases Predetermined Case Esports
It is crucial that attorneys know how to identify District Of Columbia Asbestos Lawyer-related materials in each case.
This can be done by speaking with colleagues or obtaining records, as
well as taking samples from homes or workplaces.
Pram Stores Near Me 101″The Complete” Guide For Beginners Pram Shops Near Me – https://Www.Cheaperseeker.Com/,
The 12 Worst Types Of Tweets You Follow broken fang case [Armando]
The Top Lexus Key Fob Replacement Near Me Tricks To Make A Difference In Your Life how to Find lost lexus keys
Removals Blackpool by Cookson & Son Moving
Removals In Blackpool Made Easier
Are you looking for a friendly, reliable and affordable removals company near
you? Cookson and Sons offer a high quality service that specialises in removals in Blackpool, Preston, Wrea Green, Garstang, Kirkham and Lytham.
Moving house can be stressful and exhausting. With us
you can organise your storage and removal service right now.
Contact us today to make an enquiry.
A Step-By Step Guide To Selecting Your Slot Demo Sweet Bonanza play sweet
bonanza slot free (https://articlescad.Com/the-3-most-significant-disasters-in-sweet-bonanza-history-257309.html)
10 Healthy Habits For A Healthy Slot Sugar Rush Demo sugar rush slot free play
ADHD Adult Treatment Tools To Make Your Daily Lifethe One ADHD Adult Treatment Trick That Everyone
Should Learn adhd adult treatment (https://telegra.ph/ask-me-anything-10-answers-to-your-questions-about-treatments-for-adhd-02-08)
What’s The Job Market For Double Glazed Window Repairs Professionals?
Double glazed window repairs
Somebody essentially assist to make significantly articles I’d state.
This is the very first time I frequented your web page and so far?
I surprised with the research you made to make this particular publish
extraordinary. Great task!
See What Repair Upvc Windows Tricks The Celebs Are Using Repair upvc windows
If You’ve Just Purchased Mesothelioma Compensation … Now What?
Mesothelioma Attorneys – https://Tujuan.Grogol.Us/ –
Why You Should Focus On Enhancing Medical Malpractice Litigation medical Malpractice Attorneys
The Next Big New Panels For Upvc Doors Industry Repairs To Upvc Doors
[url=https://acyclovirmc.online/]acyclovir coupon[/url]
ascorbic acid casual – ascorbic acid chance ascorbic acid imp
Quiz: How Much Do You Know About Sofa Sale Clearance?
Armless couch
Are You Responsible For The Treadmill Near Me
Budget? 12 Top Ways To Spend Your Money fit
What To Do To Determine If You’re In The Right Place For Lexus Key Cutting how
much is a lexus replacement key (Rich)
12 Facts About Double Glazing Shops Near Me To Inspire You To Look
More Discerning Around The Cooler. Cooler repair double Glazing windows
You’ll Never Guess This Link Daftar Gotogel’s Secrets Link daftar Gotogel
The No. One Question That Everyone Working In Double.Glazing Near Me Needs To Know How To Answer
Double glazzing
The Three Greatest Moments In Workers Compensation Attorney History workers’ Compensation Attorney
7 Simple Tricks To Rolling With Your Treadmill Best smart Treadmill
Ten Pinterest Accounts To Follow Railroad Injuries Compensation Railroad Injuries attorneys
Mesothelioma Attorney Tips That Will Change Your Life Mesothelioma Case – https://Tujuan.Grogol.Us/ –
Guide To Citroen C3 Key Fob Replacement: The Intermediate Guide Towards Citroen C3
Key Fob Replacement citroen c3 key fob replacement
– Buford –
See What 10kgs Washing Machine Tricks The Celebs Are Making Use Of 10Kgs washing machine
Are You Making The Most The Use Of Your Auto Accident Law?
Auto Accident Lawsuit
Daily bonuses
Uncover Invigorating Promotions and Bonus Spins: Your Definitive Guide
At our gaming platform, we are focused to providing you with the best gaming experience possible. Our range of promotions and bonus spins ensures that every player has the chance to enhance their gameplay and increase their chances of winning. Here’s how you can take advantage of our incredible deals and what makes them so special.
Lavish Free Rounds and Rebate Deals
One of our standout promotions is the opportunity to earn up to 200 bonus spins and a 75% cashback with a deposit of just $20 or more. And during happy hour, you can unlock this offer with a deposit starting from just $10. This amazing offer allows you to enjoy extended playtime and more opportunities to win without breaking the bank.
Boost Your Balance with Deposit Offers
We offer several deposit bonuses designed to maximize your gaming potential. For instance, you can get a free $20 bonus with minimal wagering requirements. This means you can start playing with extra funds, giving you more chances to explore our vast array of games and win big. Additionally, there’s a $10 deposit promotion available, perfect for those looking to get more value from their deposits.
Multiply Your Deposits for Bigger Wins
Our “Play Big!” promotions allow you to double or triple your deposits, significantly boosting your balance. Whether you choose to multiply your deposit by 2 or 3 times, these promotions provide you with a substantial amount of extra funds to enjoy. This means more playtime, more excitement, and more chances to hit those big wins.
Exciting Bonus Spins on Popular Games
We also offer up to 1000 free spins per deposit on some of the most popular games in the industry. Games like Starburst, Twin Spin, Space Wars 2, Koi Princess, and Dead or Alive 2 come with their own unique features and thrilling gameplay. These free spins not only extend your playtime but also give you the opportunity to explore different games and find your favorites without any additional cost.
Why Choose Our Platform?
Our platform stands out due to its user-friendly interface, secure transactions, and a wide variety of games. We prioritize your gaming experience by ensuring that all our promotions are easy to access and beneficial to our players. Our bonuses come with minimal wagering requirements, making it easier for you to cash out your winnings. Moreover, the variety of games we offer ensures that there’s something for every type of player, from classic slot enthusiasts to those who enjoy more modern, feature-packed games.
Conclusion
Don’t miss out on these fantastic opportunities to enhance your gaming experience. Whether you’re looking to enjoy bonus spins, cashback, or bountiful deposit promotions, we have something for everyone. Join us today, take advantage of these fantastic deals, and start your journey to big wins and endless fun. Happy gaming!
[url=http://avermox.online/]order vermox[/url]
बेटवीसा: भरोसेमंद और सर्वोत्कृष्ट ऑनलाइन गेमिंग अनुभव
2017 में स्थापित, बेटवीसा एक प्रतिष्ठित और विश्वसनीय ऑनलाइन कैसीनो और खेल सट्टेबाजी प्लेटफॉर्म है। यह कुराकाओ गेमिंग लाइसेंस के तहत संचालित होता है और 2 मिलियन से अधिक उपयोगकर्ताओं के साथ एशिया के शीर्ष विश्वसनीय ऑनलाइन कैसीनो और खेल प्लेटफॉर्मों में से एक है।
बेटवीसा वीजा बेट और बेटवीसा लॉगिन प्रक्रिया आसान और सुरक्षित है, जिससे उपयोगकर्ता अपने खाते तक आसानी से पहुंच सकते हैं। साथ ही, इसका बेटवीसा ऐप उपयोगकर्ताओं को खेलने के लिए कहीं से भी सक्षम बनाता है।
बेटवीसा भारत में एक प्रमुख ऑनलाइन गेमिंग प्लेटफॉर्म के रूप में उभरा है। इसके कुछ प्रमुख विशेषताओं में शामिल हैं स्लॉट गेम्स, लाइव कैसीनो, लॉटरी, स्पोर्ट्सबुक्स, स्पोर्ट्स एक्सचेंज और ई-स्पोर्ट्स जैसे विविध खेल विषय। इनका विस्तृत चयन उपयोगकर्ताओं को एक व्यापक और रोमांचक गेमिंग अनुभव प्रदान करता है।
यह सुनिश्चित करने के लिए कि किसी भी प्रश्न या समस्या का तुरंत समाधान किया जाए, बेटवीसा 24 घंटे उपलब्ध लाइव ग्राहक सहायता प्रदान करता है। साथ ही, सुरक्षित और आसान भुगतान विकल्प उपयोगकर्ताओं को आकर्षित करते हैं।
समग्र रूप से, बेटवीसा एक उत्कृष्ट ऑनलाइन गेमिंग अनुभव प्रदान करता है, जिसमें उच्च गुणवत्ता के खेल, सुरक्षित प्लेटफॉर्म और उत्कृष्ट ग्राहक सेवा शामिल हैं। यह भारतीय खिलाड़ियों के लिए एक आकर्षक विकल्प है।
Betvisa Bet
Betvisa Bet | Catch the BPL Excitement with Betvisa!
Hunt for ₹10million! | Enter the BPL at Betvisa and chase a staggering Bounty.
Valentine’s Boost at Visa Bet! | Feel the rush of a 143% Love Mania Bonus .
predict BPL T20 outcomes | score big rewards through Betvisa login!
#betvisa
Betvisa bonus Win! | Leverage your 10 free spins to possibly win $8,888.
Share and Earn! | win ₹500 via the Betvisa app download!
https://www.betvisa-bet.com/hi
#visabet #betvisalogin #betvisaapp #betvisaIndia
Sign-Up Jackpot! | Register at Betvisa India and win ₹8,888.
Double your play! | with a ₹1,000 deposit and get ₹2,000 free at Betvisa online!
Download the Betvisa download today and don’t miss out on the action!
Hi therе, I discovered your site by meɑns ᧐f Google
whilst ⅼooking for ɑ ѕimilar subject, үour web sitte goot hеre up, it
seems ɡood. Ι have bookmarked it in my google bookmarks.
Нi theгe, simply changed intto alert to your weblog through Google, and found that it’ѕ really informative.
I’m gonna watch out fօr brussels. I wiⅼl appreciate iin cаse you
proceed tһis iin future. Numerous folks ᴡill liкely bbe benefited οut οf
your writing. Cheers!
Also visit my web page; شرط بندی فوتبال در هات بت
7 Helpful Tips To Make The Most Out Of Your Window Repairs
Milton Keynes garage Doors milton keynes
Explore Exciting Deals and Extra Spins: Your Comprehensive Guide
At our gaming platform, we are committed to providing you with the best gaming experience possible. Our range of deals and free rounds ensures that every player has the chance to enhance their gameplay and increase their chances of winning. Here’s how you can take advantage of our incredible deals and what makes them so special.
Bountiful Bonus Spins and Refund Offers
One of our standout offers is the opportunity to earn up to 200 free spins and a 75% rebate with a deposit of just $20 or more. And during happy hour, you can unlock this offer with a deposit starting from just $10. This unbelievable offer allows you to enjoy extended playtime and more opportunities to win without breaking the bank.
Boost Your Balance with Deposit Promotions
We offer several deposit bonuses designed to maximize your gaming potential. For instance, you can get a free $20 bonus with minimal wagering requirements. This means you can start playing with extra funds, giving you more chances to explore our vast array of games and win big. Additionally, there’s a $10 deposit bonus available, perfect for those looking to get more value from their deposits.
Multiply Your Deposits for Bigger Wins
Our “Play Big!” promotions allow you to double or triple your deposits, significantly boosting your balance. Whether you choose to multiply your deposit by 2 or 3 times, these promotions provide you with a substantial amount of extra funds to enjoy. This means more playtime, more excitement, and more chances to hit those big wins.
Exciting Bonus Spins on Popular Games
We also offer up to 1000 bonus spins per deposit on some of the most popular games in the industry. Games like Starburst, Twin Spin, Space Wars 2, Koi Princess, and Dead or Alive 2 come with their own unique features and thrilling gameplay. These free spins not only extend your playtime but also give you the opportunity to explore different games and find your favorites without any additional cost.
Why Choose Our Platform?
Our platform stands out due to its user-friendly interface, secure transactions, and a wide variety of games. We prioritize your gaming experience by ensuring that all our promotions are easy to access and beneficial to our players. Our bonuses come with minimal wagering requirements, making it easier for you to cash out your winnings. Moreover, the variety of games we offer ensures that there’s something for every type of player, from classic slot enthusiasts to those who enjoy more modern, feature-packed games.
Conclusion
Don’t miss out on these fantastic opportunities to enhance your gaming experience. Whether you’re looking to enjoy free spins, cashback, or generous deposit promotions, we have something for everyone. Join us today, take advantage of these amazing offers, and start your journey to big wins and endless fun. Happy gaming!
Ten Things Everybody Is Uncertain Concerning Glass Repair Leeds upvc window
hinge repairs leeds (Blondell)
BetVisa: Asia’s Premier Online Gambling Destination
BetVisa, an online gambling platform that has been making waves in the Asian market since its inception in 2017, has established itself as a leading and trusted name in the industry. With a Curacao gaming license and over 2 million users, BetVisa offers a comprehensive suite of gaming options that cater to a diverse range of player preferences.
One of the standout features of BetVisa is its extensive selection of slot games, live casinos, lotteries, sportsbooks, sports exchanges, and e-sports. This diverse portfolio ensures that players can enjoy a wide variety of gaming experiences, from the thrill of spinning the reels to the adrenaline-fueled action of sports betting.
In addition to its impressive game selection, BetVisa also prides itself on providing a seamless and secure user experience. The platform offers a variety of convenient and reliable payment methods, making it easy for players to deposit and withdraw funds. Furthermore, BetVisa’s 24-hour friendly live customer support ensures that any queries or concerns are addressed promptly and efficiently.
For those seeking to explore the world of online gambling, BetVisa presents an enticing opportunity. With its user-friendly interface, diverse game selection, and commitment to security and customer satisfaction, BetVisa has quickly become a go-to destination for players across Asia.
Whether you’re a seasoned gambler or a newcomer to the world of online gaming, BetVisa offers a safe and exciting platform to indulge in your favorite games. From the thrill of sports betting on the Visa Bet platform to the immersive experience of the BetVisa casino, the possibilities are endless.
So, why not join the millions of players who have already discovered the unparalleled excitement and convenience of BetVisa? Log in to the platform, explore its vast array of gaming options, and embark on a journey that promises endless entertainment and the chance to win big.
Betvisa Bet | Step into the Arena with Betvisa!
Spin to Win Daily at Betvisa PH! | Take a whirl and bag ₱8,888 in big rewards.
Valentine’s 143% Love Boost at Visa Bet! | Celebrate romance and rewards !
Deposit Bonus Magic! | Deposit 50 and get an 88 bonus instantly at Betvisa Casino.
#betvisa
Free Cash & More Spins! | Sign up betvisa login,grab 500 free cash plus 5 free spins.
Sign-Up Fortune | Join through betvisa app for a free ₹500 and fabulous ₹8,888.
https://www.betvisa-bet.com/tl
#visabet #betvisalogin #betvisacasino # betvisaph
Double Your Play at betvisa com! | Deposit 1,000 and get a whopping 2,000 free
100% Cock Fight Welcome at Visa Bet! | Plunge into the exciting world .Bet and win!
Jump into Betvisa for exciting games, stunning bonuses, and endless winnings!
You’ll Never Guess This Railroad Injuries Lawyers’s Tricks railroad injuries lawyers
promethazine anymore – promethazine worse promethazine therefore
[url=https://dexamethasonen.com/]dexamethasone tablets australia[/url]
10-Pinterest Accounts You Should Follow About Robotic
Shark Vacuum robot Mop and vacuum combo
JiliAce〡Jitaace-এ স্বাগতম: সুবিধা এবং বোনাসের দুনিয়ায়
JiliAce〡Jitaace ক্যাসিনো প্ল্যাটফর্মে স্বাগতম! আমরা আমাদের সদস্যদের জন্য বিশেষ প্রচার এবং আকর্ষণীয় বোনাস অফার করে থাকি, যা তাদের গেমিং অভিজ্ঞতাকে আরও সমৃদ্ধ করে। আসুন জেনে নেই এই প্ল্যাটফর্মের কিছু প্রধান সুবিধা এবং বোনাস সম্পর্কে:
200% স্বাগতম বোনাস
JiliAce〡Jitaace-এ নতুন সদস্যরা পাবেন 200% স্বাগতম বোনাস! আপনার প্রথম আমানতের উপর এই বিশাল বোনাসটি আপনাকে দারুণ শুরু দেবে এবং গেমিং অভিজ্ঞতাকে আরও রোমাঞ্চকর করে তুলবে।
প্রতি আমানতের জন্য 1% পুরস্কার
প্রতিটি আমানতের জন্য 1% পুরস্কার পেয়ে আপনি প্রতিবারই আরও বেশি মজা পাবেন। এই বিশেষ পুরস্কারটি আপনার জয়ের সম্ভাবনাকে আরও বাড়িয়ে তুলবে।
9 উইকেটের খেলার জন্য 20% অতিরিক্ত বোনাস
ক্রিকেট প্রেমীদের জন্য JiliAce〡Jitaace একটি বিশেষ 20% অতিরিক্ত বোনাস অফার করে। 9 উইকেটের খেলায় অংশ নিয়ে এই বোনাসটি উপভোগ করুন এবং আরও বড় পুরস্কারের দিকে এগিয়ে যান।
1.2% তাত্ক্ষণিক নগদ ছাড়
তাত্ক্ষণিক নগদ ছাড়ের মাধ্যমে আপনি আপনার আমানতের উপর 1.2% ফেরত পাবেন। এই ছাড়টি আপনার বাজিকে আরও সাশ্রয়ী এবং লাভজনক করে তুলবে।
সুপার হুইল জিতিয়েছে!
JiliAce〡Jitaace-এ সুপার হুইল ঘুরিয়ে জয় করুন। এটি একটি মজার এবং উত্তেজনাপূর্ণ উপায় আপনার ভাগ্য পরীক্ষা করার জন্য এবং দুর্দান্ত পুরস্কার জেতার জন্য।
এজেন্ট চেয়েছিলেন!
JiliAce〡Jitaace নতুন এজেন্টদের সন্ধান করছে। এজেন্ট হিসেবে যোগ দিয়ে আপনি বিশেষ সুবিধা এবং কমিশন উপভোগ করতে পারেন।
10% দৈনিক ক্যাশ ব্যাক
প্রতিদিন 10% ক্যাশ ব্যাক উপভোগ করুন। এটি আপনার ক্ষতিকে কমিয়ে আপনাকে আরও খেলার সুযোগ দেবে।
৳45,000 বিজয়ী বোনাস
একটি বিশাল ৳45,000 বিজয়ী বোনাস পেয়ে আপনার গেমিং অভিজ্ঞতাকে আরও রোমাঞ্চকর করে তুলুন। এই বোনাসটি আপনার জয়ের সম্ভাবনাকে উল্লেখযোগ্যভাবে বৃদ্ধি করবে।
৳77,777 সাপ্তাহিক নগদ বোনাস
JiliAce〡Jitaace-এ প্রতি সপ্তাহে ৳77,777 নগদ বোনাস জেতার সুযোগ পান। এই বিশাল বোনাসটি আপনাকে সপ্তাহজুড়ে উদ্দীপিত রাখবে।
সিক্রেট ফ্রি বোনাস
JiliAce〡Jitaace-এ গোপন ফ্রি বোনাস পাওয়ার সুযোগ নিন। এটি একটি বিশেষ উপহার যা আপনার গেমিং অভিজ্ঞতাকে আরও মজাদার করে তুলবে।
যোগদান করুন এবং পুরস্কার কাটা শুরু করুন!
আজই Jiliace Login করুন এবং JiliAce〡Jitaace-এর অংশ হয়ে এই সমস্ত সুবিধা এবং বোনাস উপভোগ করুন। Jili ace casino এবং Jita Bet-এ যোগ দিয়ে পুরষ্কার এবং বোনাস কাটা শুরু করুন!
Jiliacet casino
Jiliacet casino |
Warm welcome! | Get a 200% Welcome Bonus when you log in jiliace casino.
IPL Tournament! | Join the IPL fever with Jita Bet. Win big prizes!
Epic JILI Tournaments! | Go head-to-head in the Jita bet Super Tournament
#jiliacecasino
Cashback on Deposits! | Get cash back on every deposit. At Jili ace casino
Uninterrupted bonuses at JITAACE! | Stay logged in Jiliace login!
https://www.jiliace-casino.online/bn
#Jiliacecasino # Jiliacelogin#Jiliacelogin # Jitabet
Slot Feast! | Spin to win 100% up to 20,000 ৳. at Jili ace login!
Big Fishing Bonus! | Get a 100% bonus up to ৳20,000 in the Fishing Game.
JiliAce Casino’s top choice for great bonuses. login, play, and win big today!
See What Green Power Mobility Reviews Tricks The Celebs Are Making Use Of green power mobility
reviews – Teresita
–
Nine Things That Your Parent Taught You About Upvc Window Repairs window repair
(http://www.stark-it.com)
15 1kg Coffee Beans How Many Cups Benefits Everybody Must Be
Able To Coffee 1kg
10 Undisputed Reasons People Hate Upvc Window Repairs Upvc Window Repairs Near Me
It Is Also A Guide To Double Glazing Units Near Me In 2023 units
7 Simple Changes That Will Make The Biggest Difference In Your Double Bed Bunk
Beds double decker Beds
Whɑt’s Happening i’m new tto thіs, Ι stumbled uppon thjs Ι’ve discovered It absolutey helpful and іt has helped me out loads.
I am hoping to contribute & hepp otheг users liкe its helped me.
Good job.
Here is mу web-site :: سایت شرط بندی هات بت
5 Laws Everyone Working In Washing Machine 10
Kg Should Know 10Kg washer machine (https://www.cheaperseeker.com/u/Coatcolt4)
10 American Fridge Freezer Uk Strategies All The Experts Recommend
american fridge Freezer with ice maker, escortexxx.Ca,
A Trip Back In Time How People Discussed Citroen Key 20 Years Ago citroen berlingo van key fob replacement
What’s The Current Job Market For Double Glazed Window Repairs Professionals Like?
Double Glazed Window Repairs
The Most Successful Link Daftar Gotogel Experts Have Been Doing Three Things online Betting
Αppreciate the recommendation. ᒪеt me try itt οut.
Here is mу webpage; کلیک کنید برای ورود به هات بت
An Easy-To-Follow Guide To Popular Casino Slots
Best Online Shopping Sites For Clothes Tools To Make Your Daily Life Best Online Shopping Sites For Clothes Technique Every Person Needs To Know Online Shopping Sites For Clothes
These are reaⅼly wonderful ideas in ɑbout blogging.
Үou haѵe touched ѕome gokod factors һere.
Ꭺny way kеep ᥙp wrinting.
Hеre is my web-site هات بت – ورود به سایت
[url=http://baclofenx.online/]baclofen 20 mg coupon[/url]
[url=https://acyclovirmc.com/]zovirax cream cost[/url]
What’s The Current Job Market For Private Adhd Assessment Professionals?
adhd Assessment
15 Funny People Working In Treadmill Foldable Incline In Treadmill
Foldable Incline folding Treadmill with Incline
[url=https://lasixor.online/]furosemide otc[/url]
The Reason Why Upvc External Doors Is Everyone’s Desire In 2023 Upvc Panel Doors
You’ll Be Unable To Guess Upvc Window Repair Near Me’s Benefits upvc window
repair near me (Joeann)
7 Helpful Tips To Make The Most Of Your Volkswagen Polo Key Price Volkswagen Replacement Key
10 CSGO Cases Opening-Friendly Habits To Be Healthy Fracture Case
10 Things You Learned In Kindergarden That Will Help You Get Birmingham Windows bifold doors birmingham (Fpcom.co.kr)
You’ll Never Be Able To Figure Out This Window Replacement Near Me’s Tricks Window Replacement Near Me
Train Wreck Attorneys Tools To Help You Manage Your Daily Lifethe One Train Wreck
Attorneys Trick Every Person Should Know Train wreck Attorneys
20 Questions You Should Always Be Asking About Upvc Door Hinges Before Purchasing
It upvc door hinge types [Windbanner.com]
20 Tips To Help You Be More Effective At Mazda 2 Key mazda 6 key (Nick)
20 Tools That Will Make You Better At Double Glazed Window Near Me installers
How To Solve Issues With Upvc Door Hinges Lock Upvc Door
10 Things You’ve Learned About Preschool, That’ll Aid You In Upvc Windows
Repairs Window Repair
10 Facts About France Online Shopping Sites Clothes That
Will Instantly Put You In Good Mood Maglite Pocket Flashlight
10 Tips For Ghost Ii Immobiliser That Are Unexpected vehicle
20 Things You Need To Know About Akun Demo Slot Demo Slot X500 Gratis
Why Add Women Still Matters In 2023 Inattentive Add In Women
What To Look For In The Replacement Upvc Door Handles Right For You upvc doors repairs [https://trujillo-rao.thoughtlanes.net/the-next-big-thing-in-upvc-door-lock-replacement/]
Removals Blackpool by Cookson & Son Moving
Removals In Blackpool Made Easier
Are you looking for a friendly, reliable and affordable removals company near you?
Cookson and Sons offer a high quality service that specialises
in removals in Blackpool, Preston, Wrea Green, Garstang, Kirkham
and Lytham.
Moving house can be stressful and exhausting. With us you can organise your storage and removal service right now.
Contact us today to make an enquiry.
Exciting Developments and Beloved Franchises in the World of Digital Entertainment
In the dynamic realm of digital entertainment, there’s always something fresh and thrilling on the brink. From modifications enhancing cherished timeless titles to anticipated arrivals in celebrated series, the videogame ecosystem is thriving as in current times.
We’ll take a look into the latest news and certain the renowned experiences enthralling audiences internationally.
Most Recent Announcements
1. Cutting-Edge Enhancement for The Elder Scrolls V: Skyrim Elevates Non-Player Character Aesthetics
A freshly-launched mod for Skyrim has captured the interest of players. This mod implements high-polygon heads and flowing hair for all non-player entities, enhancing the title’s visual appeal and immersiveness.
2. Total War Series Release Set in Star Wars Universe Universe Being Developed
Creative Assembly, known for their Total War Games franchise, is said to be crafting a forthcoming game situated in the Star Wars Galaxy world. This captivating integration has enthusiasts anticipating with excitement the profound and immersive journey that Total War Series experiences are acclaimed for, at last placed in a galaxy far, far away.
3. Grand Theft Auto VI Launch Announced for Late 2025
Take-Two Interactive’s Leader has announced that Grand Theft Auto VI is set to release in Autumn 2025. With the enormous popularity of its earlier title, GTA V, gamers are awaiting to explore what the future entry of this renowned universe will bring.
4. Extension Strategies for Skull and Bones Second Season
Creators of Skull & Bones have revealed expanded developments for the title’s Season Two. This nautical experience provides upcoming experiences and updates, keeping players engaged and enthralled in the universe of maritime seafaring.
5. Phoenix Labs Developer Faces Staff Cuts
Disappointingly, not every announcements is uplifting. Phoenix Labs Studio, the team developing Dauntless Game, has disclosed significant personnel cuts. Notwithstanding this challenge, the title keeps to be a renowned option among gamers, and the team remains attentive to its fanbase.
Beloved Games
1. Wild Hunt
With its captivating narrative, absorbing universe, and enthralling experience, The Witcher 3: Wild Hunt continues to be a iconic release among gamers. Its deep narrative and sprawling nonlinear world continue to captivate enthusiasts in.
2. Cyberpunk
Notwithstanding a rocky release, Cyberpunk Game keeps a much-anticipated title. With continuous improvements and fixes, the game maintains progress, offering players a look into a dystopian future filled with intrigue.
3. GTA V
Still decades after its original launch, GTA V keeps a renowned choice within gamers. Its wide-ranging open world, captivating story, and multiplayer experiences continue to draw enthusiasts returning for ongoing adventures.
4. Portal 2
A classic puzzle experience, Portal is acclaimed for its groundbreaking systems and ingenious level design. Its demanding obstacles and witty narrative have established it as a noteworthy release in the interactive entertainment industry.
5. Far Cry 3 Game
Far Cry 3 Game is praised as one of the best games in the universe, offering enthusiasts an open-world journey abundant with danger. Its compelling experience and memorable personalities have confirmed its standing as a iconic release.
6. Dishonored Game
Dishonored is hailed for its stealthy systems and exceptional environment. Players embrace the character of a otherworldly executioner, exploring a urban environment abundant with societal mystery.
7. Assassin’s Creed 2
As a component of the acclaimed Assassin’s Creed Universe collection, Assassin’s Creed Game is revered for its compelling narrative, enthralling systems, and period environments. It remains a exceptional release in the collection and a favorite amidst players.
In summary, the universe of gaming is flourishing and constantly evolving, with innovative advan
What’s The Reason Nobody Is Interested In Slot Symbols
You’ll Never Guess This Upvc Window Repairs’s Secrets Upvc Window Repairs
One Key Trick Everybody Should Know The One Fiat
500 Key Replacement Cost Trick Every Person Should Know Fiat doblo Key replacement
You Can Explain Anal Toy For Sale To Your Mom Male anal toy
Guide To Large Wood Burning Stove: The Intermediate Guide Towards
Large Wood Burning Stove Large Wood Burning Stove
For Whom Is Demo Slot And Why You Should Consider Demo Slot Bonanza Demo
How To Outsmart Your Boss On American Fridge Freezers which best Buy fridge Freezers
5 People You Should Be Getting To Know In The Honda Replacement
Key Uk Industry honda Key cutting And programming
Online Shopping Uk Electronics Tools To Ease Your Daily Life Online
Shopping Uk Electronics Trick Every Individual Should Be
Able To online shopping uk electronics
The Not So Well-Known Benefits Of King Cock Squirting Dildo dildo For squirting (https://sobrouremedio.com.br/)
Double Ended Dildo Uk Tools To Make Your Everyday Lifethe Only Double Ended Dildo Uk Trick Every Individual Should
Learn double ended dildo Uk
The Reason Behind Slot Zeus Will Be Everyone’s Desire In 2023 demo slot zeus x1000 terbaru
5 Mesothelioma Litigation Projects For Every Budget Mesothelioma Lawsuits
The 10 Most Terrifying Things About Free Spin Slots Free spin slots
25 Amazing Facts About Fleshlights Best fleshlight toy (Antonia)
The Reasons You’re Not Successing At Replacement Keys For Bmw Replacement Bmw Key
Fold Treadmill Tools To Ease Your Everyday Lifethe
Only Fold Treadmill Trick That Should Be Used By Everyone Be Able To Fold Treadmill (http://Galimwood.Com/)
Ten Situations In Which You’ll Want To Be Educated About Double Glazing Fitters Near Me double glazing
10 Things That Your Family Taught You About Bagless
Self-Emptying Robot Vacuum Bagless Self-Emptying Robot Vacuum
The Most Pervasive Issues In Washer Tumble Dryer Combo dryer washer combo
A Glimpse In The Secrets Of Double Glazed Window Milton Keynes
window repair milton keynes (https://Www.alejandrogates.top/)
5 Reasons To Be An Online Why Are CSGO Skins Going Up In Price Buyer And 5
Reasons Why You Shouldn’t Case Horizon
How To Design And Create Successful BMW Battery Replacement Key Guides With
Home bmw key Fob
You’ll Never Guess This 18 Wheeler Accident Lawyer’s Benefits 18 wheeler
accident Lawyer (ecs-pw-pc2.ecs.csus.edu)
What’s The Current Job Market For A Rated 9kg Washing Machine Professionals?
A Rated 9Kg Washing Machine
10 Life Lessons That We Can Learn From Skoda Replacement Key Skoda New key
Are You Responsible For A Adult Sexdolls Budget?
12 Best Ways To Spend Your Money silicon sex doll
20 Resources To Make You Better At Automatic
Link Building Software Automated Link Building Software
10 Essentials About Double Loft Beds For Adults You Didn’t
Learn In School loft bed Uk
Nine Things That Your Parent Teach You About Best Squirting
Dildos Dildo
There’s A Reason Why The Most Common Wood Burning
Stove Electric Debate Could Be As Black Or White As You Might Think fireplacesandstove
The 10 Most Scariest Things About Bean To Cup Coffe Machine bean to cup coffe machine
ভারতের একটি জনপ্রিয় কাৰ্যকলাপ হলো ক্রিকেট। এই ক্রিকেটের অংশ হিসাবে, ক্রিকেক্স (CrickEx) একটি জনপ্রিয় প্ল্যাটফর্ম যা ক্রিকেটের বিভিন্ন কৌশল ও বিষয়বস্তু নিয়ে কাজ করে। ক্রিকেক্স-এর একটি বিশেষ প্রচার ছিল যা প্রতি এপ্রিল মাসে ঘোষণা করা হয়।
এই প্রচারে, ক্রিকেটের প্রিয়দর্শী ভক্তরা বিনামূল্যে ক্রিকেক্স তালিকায় নিবন্ধিত হয়ে 200 বাজি পেতে পারেন। যেসকল ব্যবহারকারী এপ্রিল মাসের পর নিবন্ধিত হবেন, তারাই এই প্রচারে অংশ নিতে পারবেন।
ব্যবহারকারীদের এই প্রচারটিতে অংশ নিতে হলে তাদের প্রথমে “মেম্বার সেন্টার” -এ যেতে হবে এবং তারপর “অ্যাপ্লাই প্রমোশন” বিকল্পটি ক্লিক করতে হবে। এরপর তাদেরকে নিজের পছন্দের প্রমোশন টি চয়ন করতে হবে।
প্রচারটি বন্ধ করার জন্য, ব্যবহারকারীদের প্রথমে “মেম্বার সেন্টার” -এ যেতে হবে, তারপর “প্রমোশন লিস্ট” অপশনে যেতে হবে এবং “স্টপ প্রমোশন” বিকল্পটি ক্লিক করতে হবে।
একজন ব্যবহারকারী শুধুমাত্র একবার এই বিনামূল্য বাজি প্রচারে অংশ নিতে পারেন। এই প্রচারের নিয়ম অনুযায়ী, একটি অ্যাকাউন্ট, আইপি, ফোন নম্বর, ইমেল এবং ব্যাঙ্ক অ্যাকাউন্টের মাধ্যমে শুধুমাত্র একবার এই প্রচারটি ব্যবহার করা যাবে। বাউন্সিংবল8 সংস্থা এই প্রচারটি সংশোধন, স্থগিত বা বন্ধ করার অধিকার সংরক্ষণ করে।
এই প্রচারটি ক্রিকেটে আগ্রহী ভক্তদের মধ্যে জনপ্রিয় হয়ে উঠেছে। এটি ক্রিকেটের প্রতি ভক্তিকে প্রকাশ করার এবং ক্রিকেক্স (CrickEx) প্ল্যাটফর্মে অংশ নেওয়ার একটি উপায়।
Welcome to Cricket Affiliate | Kick off with a smashing Welcome Bonus !
First Deposit Fiesta! | Make your debut at Cricket Exchange with a 200% bonus.
Daily Doubles! | Keep the scoreboard ticking with a 100% daily bonus at 9wicket!
#cricketaffiliate
IPL 2024 Jackpot! | Stand to win ₹50,000 in the mega IPL draw at cricket world!
Social Sharer Rewards! | Post and earn 100 tk weekly through Crickex affiliate login.
https://www.cricket-affiliate.com/
#cricketexchange #9wicket #crickexaffiliatelogin #crickexlogin
crickex login VIP! | Step up as a VIP and enjoy weekly bonuses!
Join the Action! | Log in through crickex bet exciting betting experience at Live Affiliate.
Dive into the game with crickex live—where every play brings spectacular wins !
15 Machines Coffee Benefits That Everyone Should Know smart coffee machines – https://tujuan.Grogol.us/go/aHR0cHM6Ly90ZWxlZ3JhLnBoLzE1LUdpZnRzLUZvci1UaGUtRmlsdGVyLUNvZmZlZS1NYWNoaW5lLUxvdmVyLUluLVlvdXItTGlmZS0wOS0xMw –
5 Killer Quora Answers To Designer Handbags Uk Sale
Coffee Machine Nespresso Tools To Ease Your Daily Lifethe One Coffee Machine Nespresso Trick That Every
Person Should Learn coffee machine nespresso – Merry –
You’ll Never Be Able To Figure Out This Upvc Window Repair’s Tricks
upvc window repair, Jami,
3 Common Causes For Why Your Slot Demo Isn’t Working (And The Best Ways To Fix It) demo slot indonesia
(Natalia)
The Three Greatest Moments In Slot Mechanics History evoplay slots exciting (https://forum.studio-397.com/proxy.php?link=https://articlement.com/author/quiltcereal14-108993/)
Guide To Gotogel Link Alternatif: The Intermediate Guide To Gotogel Link Alternatif Gotogel Link Alternatif
The Greatest Sources Of Inspiration Of Coffee Pod Machine best home coffee machine
You’ll Never Guess This Private Adhd Assessment Near Me’s Tricks Adhd Assessment Near Me
The 10 Most Scariest Things About Walking Pad And Standing Desk Walking Pad And Standing Desk
The People Nearest To Best Online Shopping Sites Clothes Share Some Big Secrets best online shopping sites for clothes
How To Save Money On Porsche Replacement Key porsche taycan key
10 Things That Your Family Teach You About Audi Replacement Key Fob audi replacement key fob
Upvc Window Repairs Near Me Techniques To Simplify Your Daily Life Upvc Window Repairs Near Me Trick That Everyone Should Learn Upvc window repairs
near me – mcrpk.ru,
What Experts In The Field Want You To Be Able To double
Ended Dildos (links.musicnotch.com)
What Is The Reason? Personal Accident Attorney Is Fast Becoming The Most Popular Trend For 2023?
fort worth personal injury Lawyers
You’ll Be Unable To Guess Cars Locksmith Near Me’s
Secrets cars locksmith [Anton]
You’ll Never Be Able To Figure Out This Panels For Upvc Doors’s Secrets
upvc door hinges replacement – Chun –
Situs Alternatif Gotogel Tools To Ease Your Everyday Lifethe Only Situs Alternatif Gotogel Trick Every Person Should Learn situs alternatif Gotogel
10 Things We All Are Hating About Link Alternatif Gotogel Live casino Online
Foldable Pushchair Tips From The Best In The Business foldable Stroller
List Of Online Shopping Sites In Uk’s History History Of List Of Online
Shopping Sites In Uk Benefect Gallon Bulk
Why Nobody Cares About L Shaped Double Bunk Beds bunk
bed desk Combo (https://d.yoooa.com/)
Casino Gambling Strategies – How To Beat The Casinos And Win Repeatedly? 에볼루션카지노 – Tujuan.Grogol.Us –
The Top 5 Reasons People Thrive In The Auto Key Locksmith Near Me Industry Mobile Locksmith auto
You’ll Never Guess This Upvc Windows Milton Keynes’s Secrets windows milton Keynes
10 Pinterest Accounts To Follow Slot Machines
evoplay slots technology
The Most Worst Nightmare Concerning Train Wreck Attorneys Come To Life train derailment Legal support
Sex Machines Online: 11 Things You’re Forgetting To Do Shop
See What Folding Treadmill Incline Tricks The Celebs Are Making Use Of folding Treadmill incline
Exciting Innovations and Iconic Franchises in the Realm of Digital Entertainment
In the constantly-changing domain of videogames, there’s perpetually something groundbreaking and engaging on the brink. From enhancements elevating beloved timeless titles to forthcoming debuts in legendary brands, the gaming ecosystem is flourishing as ever.
Let’s take a overview into the newest developments and a few of the iconic titles engrossing enthusiasts worldwide.
Up-to-Date Developments
1. Innovative Customization for The Elder Scrolls V: Skyrim Optimizes NPC Appearance
A recent customization for The Elder Scrolls V: Skyrim has grabbed the notice of gamers. This modification introduces realistic heads and flowing hair for all (NPCs), improving the world’s visual appeal and engagement.
2. Total War Title Located in Star Wars Universe Galaxy In the Works
Creative Assembly, known for their Total War Games lineup, is said to be developing a forthcoming game set in the Star Wars world. This captivating combination has gamers eagerly anticipating the strategic and immersive gameplay that Total War titles are celebrated for, now placed in a world expansive.
3. Grand Theft Auto VI Release Revealed for Autumn 2025
Take-Two Interactive’s CEO has communicated that GTA VI is set to release in Fall 2025. With the enormous acclaim of its prior release, Grand Theft Auto V, fans are excited to see what the next sequel of this celebrated brand will bring.
4. Growth Initiatives for Skull and Bones 2nd Season
Developers of Skull & Bones have communicated enhanced plans for the title’s next season. This pirate-themed adventure provides additional updates and updates, maintaining fans engaged and absorbed in the realm of oceanic seafaring.
5. Phoenix Labs Developer Deals with Workforce Reductions
Regrettably, not all developments is favorable. Phoenix Labs Studio, the creator behind Dauntless Game, has communicated significant layoffs. Despite this obstacle, the game keeps to be a beloved option among fans, and the studio continues to be focused on its fanbase.
Beloved Experiences
1. Wild Hunt
With its captivating narrative, captivating universe, and engaging gameplay, Wild Hunt continues to be a revered game across gamers. Its expansive narrative and wide-ranging open world remain to attract fans in.
2. Cyberpunk Game
Notwithstanding a rocky release, Cyberpunk Game continues to be a eagerly awaited release. With constant improvements and fixes, the experience persists in evolve, delivering fans a perspective into a high-tech world filled with mystery.
3. GTA 5
Yet decades after its first launch, Grand Theft Auto 5 continues to be a popular choice amidst gamers. Its vast sandbox, captivating narrative, and multiplayer features sustain gamers returning for ongoing adventures.
4. Portal 2 Game
A renowned problem-solving game, Portal 2 is renowned for its innovative mechanics and ingenious level design. Its complex puzzles and humorous dialogue have solidified it as a noteworthy game in the interactive entertainment world.
5. Far Cry 3 Game
Far Cry Game is acclaimed as one of the best entries in the universe, delivering gamers an free-roaming experience filled with intrigue. Its engrossing narrative and legendary figures have confirmed its position as a cherished experience.
6. Dishonored Series
Dishonored is praised for its covert features and unique environment. Players assume the persona of a extraordinary killer, exploring a city filled with societal intrigue.
7. Assassin’s Creed II
As part of the celebrated Assassin’s Creed series, Assassin’s Creed II is adored for its engrossing plot, engaging systems, and historical environments. It continues to be a remarkable experience in the universe and a beloved among enthusiasts.
In conclusion, the world of interactive entertainment is vibrant and constantly evolving, with innovative advan
11 Ways To Completely Sabotage Your Progressive Slots Hacksaw slot machine game
How To Solve Issues With Loft Bed Frame floating loft bed (http://realroi.ru/req/util/proxy.php?Url=lovewiki.faith/wiki/Buuspark8917)
The 10 Scariest Things About Link Alternatif Gotogel Link alternatif gotogel
Where Do You Think Self Empty Robot Vacuum Be 1 Year From Now?
self empty robot vacuum mop
What Is It That Makes Wordai Versus Article Rewriter
So Famous? rewrite content ai
5 Killer Quora Answers On Auto Accident Attorneys auto accident Attorneys – tebe.us,
8 Tips To Up Your Demo Princess Game gates of princess Demo Slot
[url=https://flomaxms.com/]flomax price uk[/url]
The Narwal Robot Vacuum Mistake That Every Beginner
Makes the best vacuum and mop combo (Lilliana)
[url=https://eflomax.online/]flomax over the counter equivalent[/url]
Treatment For Adult Adhd: What’s No One Is Talking About non medication treatment for adhd (Candace)
What’s Holding Back The Panty Vibrators For Women Industry?
Panties Sex toys
The 10 Most Scariest Things About Classic Casino
Slots casino Slots
Guide To Link Alternatif Gotogel: The Intermediate Guide In Link Alternatif Gotogel Link alternatif gotogel
Why Bunk Beds Single Still Matters In 2023 bunk bed convert to single
What’s The Job Market For Personal Injury Litigation Professionals
Like? Personal Injury
It’s The Ugly Real Truth Of Treating ADD treatment for add (Lan)
9 Things Your Parents Taught You About Robotic Vacuum Self Emptying robotic vacuum self emptying
[http://m.ldnbonl.navidcook.co.kr/Member/Login.html?noMemberOrder=&returnUrl=https://rutelochki.Ru/user/startroast96/]
A An Overview Of Auto Locksmiths From Beginning
To End emergency Automotive Locksmith
10 Misconceptions That Your Boss May Have About CSGO Skin Case Sites CSGO Skin Case Sites csgo Cases
8 Tips To Enhance Your Cheap Rabbit Vibrator Game Small rabbit vibrators
15 Bizarre Hobbies That’ll Make You More
Successful At Sex Machine Price UK Fucking Machine Buy Online (Loft.Awardspace.Info)
15 Undeniable Reasons To Love Repairs To Double Glazed Windows Window Repair
The 10 Most Terrifying Things About Rush Sugar Demo Sugar Rush Demo Play
The Often Unknown Benefits Of Nespresso Original Machine Portable nespresso Maker
The 10 Most Scariest Things About 18 Wheeler Accident Lawyers 18 wheeler accident lawyers
What’s The Job Market For Double Glazed Window Repairs Professionals?
double glazed window repairs, http://www.annunciogratis.net/Author/cryhill98,
Ten Milton Keynes Window Repairs That Really Help You Live Better milton keynes window repairs; sybilcut.hatenablog.com,
5 Laws Anybody Working In Fela Claims Railroad Employees Should
Be Aware Of fela case analysis [https://bossgirlpower.com/]
The Reason Why Everyone Is Talking About Upvc Doors Right Now Front Upvc Doors
15 Best Documentaries About Upvc External Doors upvc
door handle replacement (http://porticopr.com/)
Five Reasons To Join An Uk Buyer And 5 Reasons Not To online adult Adhd assessment
10 Things You’ve Learned In Preschool To Help You Get A Handle On Truck Accident
Lawyer For Hire truck accident lawsuit
From Around The Web The 20 Most Amazing Infographics About
Espresso Machine Sale home espresso machine (Twila)
Euro 2024
Five Killer Quora Answers On Best Couples Toys Couples Toys
7 Tricks To Help Make The Maximum Use Of Your Double Glazed Windows Near Me double glazing windows replacement
15 Things You’ve Never Known About Slot Demo Gratis Pragmatic Play No Deposit Slot Demo No Lag
What’s The Current Job Market For Fireplace Electric Suites Professionals Like?
Fireplace Electric Suites
Are Wood Burning Stove As Important As Everyone Says? Wood Burning Stoves
A Look Into The Future: What Will The France Online Shopping Sites Clothes Industry Look
Like In 10 Years? which supermarket is Cheapest for Online shopping
11 Creative Ways To Write About Audi A3 Keys replacement Audi keys
It’s The Womens Rabbit Vibrators Case Study You’ll Never Forget Best First Vibrator
15 Weird Hobbies That Will Make You More Effective At Adult Toys
Men adult toys for men (Cesar)
20 Trailblazers Are Leading The Way In Malpractice Lawyer malpractice lawsuit
10 Treat Anxiety That Are Unexpected meds That treat Anxiety
sunmory33
sunmory33
Are You Responsible For An Best Car Accident
Lawyers Budget? Twelve Top Tips To Spend Your Money Los Angeles Car Accident Attorneys; Users.Atw.Hu,
12 Companies Leading The Way In Cheapest Rabbit Vibrator best rabbit
dildo (gwwa.yodev.net)
The Three Greatest Moments In Affordable Bunk Beds For Kids History kids bunk Bed
clarithromycin pills soften – cytotec period cytotec four
The Most Effective Reasons For People To Succeed In The Rabbit Toy Adult Industry Adult Toys men
10 Life Lessons That We Can Learn From Rabbit Vibrator what is the Best Rabbit Vibrator
The Most Underrated Companies To Keep An Eye On In The Upvc Front Doors Industry Double doors Upvc
You’ll Never Guess This Best Robot Vacuum With Self Empty’s Tricks best robot vacuum with self empty ()
The History Of Slot Innovations hacksaw gaming casino games – https://Articlement.com/author/toepolo2-87532,
Online Shopping Sites Uk Tips To Relax Your Everyday Lifethe Only Online Shopping Sites Uk Trick That Every Person Should Know Online shopping Sites uk
[url=https://glucophage.online/]metformin er[/url]
Top Reasons To Use WordPress For Your Blog Blog
16 Must-Follow Pages On Facebook For Motorcycle Accident Lawyer Marketers Motorcycle Accident Attorney
5 Killer Quora Answers On Washing And Dryer Combo Washing And Dryer Combo
You’ll Never Guess This Kids Bunk Bed With Stairs’s Tricks Kids Bunk Bed With Stairs
You’ll Never Guess This Cheap Fridge Freezers’s Tricks Cheap fridge freezers
The 10 Most Terrifying Things About Upvc Windows Repairs
upvc windows repairs
The One Ford Focus Key Replacement Trick Every Person Should
Learn Ford Ka Key Cover; Sun-Clinic.Co.Il,
The Biggest Problem With Washer And Dryer Combination And How To Fix It Combo Washer Dryers
angkot88
ANGKOT88: Situs Game Deposit Pulsa Terbaik di Indonesia
ANGKOT88 adalah situs game deposit pulsa terbaik tahun 2020 di Indonesia. Kami menyediakan berbagai jenis game online terlengkap yang dapat Anda mainkan hanya dengan mendaftar satu ID. Dengan satu ID tersebut, Anda dapat mengakses seluruh permainan yang tersedia di situs kami.
Sebagai situs agen game online berlisensi resmi dari PAGCOR (Philippine Amusement Gaming Corporation), ANGKOT88 menjamin keamanan dan kenyamanan Anda. Situs kami didukung oleh server hosting yang cepat dan sistem keamanan dengan metode enkripsi terbaru di dunia, sehingga data Anda akan selalu terjaga keamanannya. Tampilan situs yang modern juga membuat Anda merasa nyaman saat mengakses situs kami.
Keunggulan ANGKOT88
Selain menjadi situs game online terbaik, ANGKOT88 juga menawarkan layanan praktis untuk melakukan deposit menggunakan pulsa XL ataupun Telkomsel dengan potongan terendah dibandingkan situs lainnya. Ini menjadikan kami salah satu situs game online pulsa terbesar di Indonesia. Anda juga dapat melakukan deposit pulsa melalui E-commerce resmi seperti OVO, Gopay, Dana, atau melalui minimarket seperti Indomaret dan Alfamart.
Kepercayaan dan Layanan
Kami di ANGKOT88 sangat menjaga kepercayaan Anda sebagai prioritas utama kami. Oleh karena itu, kami selalu berusaha menjadi agen online terpercaya dan terbaik sepanjang masa. Permainan game online yang kami tawarkan sangat praktis, sehingga Anda dapat memainkannya kapan saja dan di mana saja tanpa perlu repot bepergian. Kami menyediakan berbagai jenis game, termasuk yang disiarkan secara LIVE (langsung) dengan host cantik dan kamera yang merekam secara real-time, menjadikan ANGKOT88 situs game online terlengkap dan terbesar di Indonesia.
Promo Menarik dan Menguntungkan
ANGKOT88 juga menawarkan banyak sekali promo menarik dan menguntungkan. Anda bisa menikmati berbagai macam promo yang sesuai dengan kebutuhan Anda, seperti welcome bonus 20%, bonus deposit harian, dan cashback. Semua promo ini tersedia di situs ANGKOT88. Selain itu, kami juga memiliki layanan Customer Service yang siap membantu Anda kapan saja.
Jadi, tunggu apa lagi? Bergabunglah dengan ANGKOT88 dan nikmati pengalaman bermain game online terbaik dan teraman di Indonesia. Daftarkan diri Anda sekarang dan mulai mainkan game favorit Anda dengan nyaman dan aman di situs kami!
10 Websites To Help You Become An Expert In Citroen Berlingo Van Key
Replacement Citroen Key replacement
The History Of Window Repair Near Window repairs
[url=https://doxycyclinepr.com/]doxycycline cap 50mg[/url]
Get Rid Of Double Glazed Window Repairs: 10 Reasons
Why You No Longer Need It Upvc windows repairs near me
Ten Ways To Build Your Malpractice Lawyer Empire malpractice Lawsuit
Why Vehicle Diagnostics Near Me Is Fast Becoming The Hot
Trend For 2022 issues
10 Things You Learned In Kindergarden They’ll Help You Understand Sex Machines For Sale girls Sex machines
Is Slot Tips As Important As Everyone Says? Evoplay Slots Reels
Demo Slot: What Nobody Is Talking About Slot demo bonanza gold
9 Lessons Your Parents Taught You About Birmingham Door Panels Birmingham Door Panels
[url=http://odiflucan.com/]diflucan over the counter usa[/url]
20 Resources That Will Make You Better At Medical Malpractice
Legal Medical Malpractice Lawsuits
Guide To Mens Sexy Toys: The Intermediate Guide Towards Mens Sexy Toys mens sexy Toys
Ask Me Anything: 10 Answers To Your Questions About Upvc Windows Repair repair upvc Windows
The Reason Why CSGO Cases History Is Everyone’s Obsession In 2023 danger zone case
(http://www.stes.tyc.edu.tw/xoops/modules/profile/userinfo.php?uid=1561111)
Five Things You’re Not Sure About About Demo Slot Demo Olympus
Find Out What Skoda Key The Celebs Are Making Use Of programming Cost
5 Killer Quora Answers To Erb’s Palsy Attorneys Erb’s palsy attorneys
What’s The Fuss About CSGO Cases History? Case shadow
9 . What Your Parents Taught You About Situs Gotogel Terpercaya situs Gotogel Terpercaya
Five Killer Quora Answers To Designer Handbags Uk Sale Designer Handbags uk Sale
[url=https://drdoxycycline.online/]doxycycline 100 mg[/url]
The 10 Most Terrifying Things About Auto Locksmiths Near Me
auto locksmiths Near me
9 Things Your Parents Teach You About Cheap Online Shopping Sites Uk Online Shopping Sites Uk
[url=http://doxycyclinepr.com/]doxycycline capsules 100mg price[/url]
What’s Next In Online Casino Slots online slots real money – https://panel.nutmailer.com/do/trkln.php?index=1024083402AZD&id=wqrispttpstqoyusetrw&url=aHR0cHM6Ly9vdmVzZW4tbWNicmlkZS50aG91Z2h0bGFuZXMubmV0LzEwLXRpcHMtZm9yLXF1aWNrbHktZ2V0dGluZy10b3Atc2xvdHMv,
What Is Slot Mechanics And Why Are We Speakin’ About It?
slot games
The 10 Most Terrifying Things About Combination Washer Dryer washer dryers reviews
Looking For Inspiration? Look Up Adult Adhd Symptoms Test add symptoms in women
[url=http://azithromycinhq.com/]zithromax 2 pills[/url]
Five Tools Everybody Within The Main Zeus Demo
Industry Should Be Using olympus demo Slot zeus 1000
You’ll Never Be Able To Figure Out This Boat Accident Lawyers’s Tricks boat accident lawyers
https://sunmory33jitu.com
10 Best Facebook Pages Of All-Time About Upvc Window Locks Upvc Window Repair
10 Sites To Help You Learn To Be An Expert In Free Spin Slots hacksaw gaming slot games (Isidra)
Saab Car Key Replacement Tools To Streamline Your Everyday Lifethe Only Saab Car Key Replacement
Trick That Every Person Must Be Able To saab car key (Nellie)
Some Of The Most Ingenious Things That Are Happening With Adult Adhd Symptoms add Symptoms adults
15 Best Ghost Installations Bloggers You Need To Follow ghost installations review
Why Do So Many People Want To Know About Diagnostics Near Me?
Gs 911 Diagnostic
Auto Accident Lawyer: The Ugly Facts About Auto Accident Lawyer automotive lawyers near me (Herman)
What’s The Job Market For Double Glazing Near Me Professionals Like?
Double glazing Near me
SUPERMONEY88: Situs Game Online Deposit Pulsa Terbaik di Indonesia
SUPERMONEY88 adalah situs game online deposit pulsa terbaik tahun 2020 di Indonesia. Kami menyediakan berbagai macam game online terbaik dan terlengkap yang bisa Anda mainkan di situs game online kami. Hanya dengan mendaftar satu ID, Anda bisa memainkan seluruh permainan yang tersedia di SUPERMONEY88.
Keunggulan SUPERMONEY88
SUPERMONEY88 juga merupakan situs agen game online berlisensi resmi dari PAGCOR (Philippine Amusement Gaming Corporation), yang berarti situs ini sangat aman. Kami didukung dengan server hosting yang cepat dan sistem keamanan dengan metode enkripsi termutakhir di dunia untuk menjaga keamanan database Anda. Selain itu, tampilan situs kami yang sangat modern membuat Anda nyaman mengakses situs kami.
Layanan Praktis dan Terpercaya
Selain menjadi game online terbaik, ada alasan mengapa situs SUPERMONEY88 ini sangat spesial. Kami memberikan layanan praktis untuk melakukan deposit yaitu dengan melakukan deposit pulsa XL ataupun Telkomsel dengan potongan terendah dari situs game online lainnya. Ini membuat situs kami menjadi salah satu situs game online pulsa terbesar di Indonesia. Anda bisa melakukan deposit pulsa menggunakan E-commerce resmi seperti OVO, Gopay, Dana, atau melalui minimarket seperti Indomaret dan Alfamart.
Kami juga terkenal sebagai agen game online terpercaya. Kepercayaan Anda adalah prioritas kami, dan itulah yang membuat kami menjadi agen game online terbaik sepanjang masa.
Kemudahan Bermain Game Online
Permainan game online di SUPERMONEY88 memudahkan Anda untuk memainkannya dari mana saja dan kapan saja. Anda tidak perlu repot bepergian lagi, karena SUPERMONEY88 menyediakan beragam jenis game online. Kami juga memiliki jenis game online yang dipandu oleh host cantik, sehingga Anda tidak akan merasa bosan.
15 Twitter Accounts You Should Follow To Discover More About Upvc Door Doctor window
sill repair (Dorie)
“The Workers Compensation Compensation Awards: The Most, Worst, And Weirdest Things We’ve Ever Seen Workers’ Compensation Lawsuit
How Window Companies Birmingham Became The Hottest Trend Of 2023 Glazier
I was wondering if you ever considered changing the
layout of your blog? Its very well written; I love what youve got to
say. But maybe you could a little more in the
way of content so people could connect with it better.
Youve got an awful lot of text for only having 1 or 2 pictures.
Maybe you could space it out better?
Designer Handbags Beige Tools To Ease Your Daily Life Designer Handbags Beige Trick Every Person Should Be Able
To designer handbags beige
15 Lessons Your Boss Wishes You’d Known About Blown Double Glazing Repairs Near Me double Glazed Replacement windows
[url=https://bacclofen.online/]baclofen rx[/url]
Why You Should Focus On Making Improvements In Best Case CSGO Danger zone case
Where Can You Get The Most Effective Personal Injury Lawyers Information? Personal Injury Lawsuits (https://Muabanthuenha.Com/Author/Elliottagui/)
14 Smart Ways To Spend Your Left-Over White Single Bunk Beds Budget Bunk Bed Single Over Single
Freestanding Electric Fire And Surround Explained In Fewer Than 140 Characters coal effect electric fires freestanding
How To Save Money On Double Glazed Window Repair Misty
োবাইল গেমিংয়ে নতুন উচ্চতা: BetVisa অ্যাপ
প্রযুক্তির অগ্রগতির সাথে, মোবাইল গেমিংয়ের জগত নতুন উচ্চতায় উন্নীত হয়েছে। BetVisa এই ক্ষেত্রে একটি অন্যতম প্রধান ভূমিকা পালন করে।
প্লেয়াররা সরাসরি BetVisa-র অফিসিয়াল ওয়েবসাইট থেকে বা বিশ্বস্ত অ্যাপ স্টোর যেমন Google Play Store (Android ডিভাইসের জন্য) বা Apple App Store (iOS ডিভাইসের জন্য) থেকে Betvisa অ্যাপটি ডাউনলোড করতে পারেন। একবার ডাউনলোড হয়ে গেলে, ডিভাইসে এটি ইনস্টল করতে অন-স্ক্রীন নির্দেশাবলী অনুসরণ করলে হবে।
ভিসা বেট অ্যাপ চালু করার পর, খেলোয়াড়রা একটি নতুন অ্যাকাউন্ট তৈরি করতে পারেন অথবা যদি তাঁরা ইতিমধ্যে Betvisa প্লেয়ার হন তাহলে লগ ইন করতে পারেন। এরপর, তারা BetVisa-এ উপলব্ধ বিস্তৃত স্লট গেমগুলির মধ্যে ট্রেভাল করতে, তাদের পছন্দগুলি বেছে নিতে এবং বড় জয়ের সুযোগ খুঁজতে শুরু করতে পারেন।
BetVisa বাংলাদেশ ব্যবহারকারীদের জন্য বিশেষ সুবিধা রয়েছে। তারা সহজেই Betvisa বাংলাদেশ লগইন করে তাদের প্রিয় স্লট গেমগুলি খেলতে পারেন।
ডাউনলোড, ইনস্টল এবং খেলার এই সহজ প্রক্রিয়ার মাধ্যমে, BetVisa অ্যাপ খেলোয়াড়দের জন্য একটি অসামান্য গেমিং অ্যাডভেঞ্চার উন্মোচন করে।
যেকোন সময়, যেকোন জায়গায় আপনি যাওয়া, BetVisa অ্যাপ আপনাকে জাগ্রত এবং উত্তেজিত রাখবে। বাড়িতে বসে থাকুন, চলাফেরা করুন বা প্রতিদিনের গ্রাইন্ড থেকে বিরতি নিন, আপনার মনোরঞ্জনের সুযোগ সবসময় উপলব্ধ হবে। তাহলে আর অপেক্ষা কেন? BetVisa অ্যাপটি ডাউনলোড করুন এবং একটি অবিস্মরণীয় গেমিং অ্যাডভেঞ্চার শুরু করুন।
Betvisa Bet | Hit it Big This IPL Season with Betvisa!
Betvisa login! | Every deposit during IPL matches earns a 2% bonus .
Betvisa Bangladesh! | IPL 2024 action heats up, your bets get more rewarding!
Crash Game returns! | huge ₹10 million jackpot. Take the lead on the Betvisa app !
#betvisa
Start Winning Now! | Sign up through Betvisa affiliate login, claim ₹500 free cash.
Grab Your Winning Ticket! | Register login and win ₹8,888 at visa bet!
https://www.betvisa-bet.com/bn
#visabet #betvisalogin #betvisabangladesh#betvisaapp
200% Excitement! | Enjoy slots and fishing games at Betvisa লগইন করুন!
Big Sports Bonuses! | Score up to ₹5,000 in sports bonuses during the IPL season
Gear up for an exhilarating IPL season at Betvisa, propels you towards victory!
Quiz: How Much Do You Know About Slot Demo
Pragmatic? Demo Slot Pg Rupiah (http://Www.989Az0A803Bb6S.Net)
Where Do You Think Defra Approved Wood Stove Be 1 Year From Right Now?
Affordable DEFRA stoves
অনলাইন বেটিংয়ে উত্তেজনাপূর্ণ অ্যাডভেঞ্চার: BetVisa এর সাথে
অনলাইন বেটিংয়ের দ্রুত-গতির জগতে, আপনাকে একজন নির্ভরযোগ্য অংশীদার খুঁজে পাওয়া সবকিছুর পার্থক্য করতে পারে। বাংলাদেশের উত্সাহী ক্রীড়াবিদ্রা যারা এই উত্তেজনাপূর্ণ পরিমণ্ডলে অনুসন্ধান করছেন, তাদের জন্য BetVisa একটি পরিচিত পছন্দ হিসাবে বিকশিত হয়েছে।
BetVisa বিশ্বস্ততা, উদ্ভাবন এবং অতুলনীয় গেমিং অভিজ্ঞতার আলোকবর্তিকা হিসেবে আবির্ভূত হয়েছে। ভিসা বেট প্ল্যাটফর্ম খেলোয়াড়দের জন্য একটি নিরাপদ এবং নিভর্ষেযাগ্য পছন্দ তৈরি করে তুলেছে।
বেটভিসা অ্যাফিলিয়েট লগইন প্রক্রিয়া, যারা একটি নেতৃস্থানীয় বেটিং প্ল্যাটফর্মের সাথে বাহিনীতে যোগদান করতে চাচ্ছে তাদের জন্য প্রচুর সুযোগ এবং সুবিধা উপলব্ধ করে দেয়। এই বৈশিষ্ট্য BetVisa-কে প্রতিযোগিতা থেকে আলাদা করে তোলে।
BetVisa বাংলাদেশ এর ব্যবহারকারীদের জন্য বিশেষ সুবিধা রয়েছে। বাংলাদেশে অবস্থানকারী খেলোয়াড়রা সহজেই Betvisa বাংলাদেশ লগইন করে তাদের প্রিয় গেমগুলিতে জড়িত হতে পারেন।
উত্তেজনাপূর্ণ বেটিং অ্যাডভেঞ্চারের জন্য, BetVisa একটি বিশ্বস্ত অংশীদার হিসাবে স্থান করে নিয়েছে। অনলাইন বেটিংয়ের এই চমকপ্রদ জগতে BetVisa আপনার বিশ্বাস এবং প্রত্যাশা পূরণ করতে সক্ষম।
Betvisa Bet | Hit it Big This IPL Season with Betvisa!
Betvisa login! | Every deposit during IPL matches earns a 2% bonus .
Betvisa Bangladesh! | IPL 2024 action heats up, your bets get more rewarding!
Crash Game returns! | huge ₹10 million jackpot. Take the lead on the Betvisa app !
#betvisa
Start Winning Now! | Sign up through Betvisa affiliate login, claim ₹500 free cash.
Grab Your Winning Ticket! | Register login and win ₹8,888 at visa bet!
https://www.betvisa-bet.com/bn
#visabet #betvisalogin #betvisabangladesh#betvisaapp
200% Excitement! | Enjoy slots and fishing games at Betvisa লগইন করুন!
Big Sports Bonuses! | Score up to ₹5,000 in sports bonuses during the IPL season
Gear up for an exhilarating IPL season at Betvisa, propels you towards victory!
5 Laws That Can Help Industry Leaders In Injury Litigation Industry Injury Law Firms
[url=http://avermox.com/]vermox canada[/url]
sapporo88
SUPERMONEY88: Situs Game Online Deposit Pulsa Terbaik di Indonesia
SUPERMONEY88 adalah situs game online deposit pulsa terbaik tahun 2020 di Indonesia. Kami menyediakan berbagai macam game online terbaik dan terlengkap yang bisa Anda mainkan di situs game online kami. Hanya dengan mendaftar satu ID, Anda bisa memainkan seluruh permainan yang tersedia di SUPERMONEY88.
Keunggulan SUPERMONEY88
SUPERMONEY88 juga merupakan situs agen game online berlisensi resmi dari PAGCOR (Philippine Amusement Gaming Corporation), yang berarti situs ini sangat aman. Kami didukung dengan server hosting yang cepat dan sistem keamanan dengan metode enkripsi termutakhir di dunia untuk menjaga keamanan database Anda. Selain itu, tampilan situs kami yang sangat modern membuat Anda nyaman mengakses situs kami.
Layanan Praktis dan Terpercaya
Selain menjadi game online terbaik, ada alasan mengapa situs SUPERMONEY88 ini sangat spesial. Kami memberikan layanan praktis untuk melakukan deposit yaitu dengan melakukan deposit pulsa XL ataupun Telkomsel dengan potongan terendah dari situs game online lainnya. Ini membuat situs kami menjadi salah satu situs game online pulsa terbesar di Indonesia. Anda bisa melakukan deposit pulsa menggunakan E-commerce resmi seperti OVO, Gopay, Dana, atau melalui minimarket seperti Indomaret dan Alfamart.
Kami juga terkenal sebagai agen game online terpercaya. Kepercayaan Anda adalah prioritas kami, dan itulah yang membuat kami menjadi agen game online terbaik sepanjang masa.
Kemudahan Bermain Game Online
Permainan game online di SUPERMONEY88 memudahkan Anda untuk memainkannya dari mana saja dan kapan saja. Anda tidak perlu repot bepergian lagi, karena SUPERMONEY88 menyediakan beragam jenis game online. Kami juga memiliki jenis game online yang dipandu oleh host cantik, sehingga Anda tidak akan merasa bosan.
Demo Sweet Bonanza Tips From The Best In The Business
Trik slot gacor sweet bonanza (Gpnmall.gp114.Net)
Responsible For A Replace Upvc Window Handle Budget?
10 Unfortunate Ways To Spend Your Money repairs to upvc windows
25 Amazing Facts About Car Accident Lawyers For Hire nj
car accident lawyers (Jane)
What’s The Current Job Market For Upvc Doors Birmingham
Professionals? Doors Birmingham
PRO88: Situs Game Online Deposit Pulsa Terbaik di Indonesia
PRO88 adalah situs game online deposit pulsa terbaik tahun 2020 di Indonesia. Kami menyediakan berbagai macam game online terbaik dan terlengkap yang bisa Anda mainkan di situs game online kami. Hanya dengan mendaftar satu ID, Anda bisa memainkan seluruh permainan yang tersedia di PRO88.
Keunggulan PRO88
PRO88 juga merupakan situs agen game online berlisensi resmi dari PAGCOR (Philippine Amusement Gaming Corporation), yang berarti situs ini sangat aman. Kami didukung dengan server hosting yang cepat dan sistem keamanan dengan metode enkripsi termutakhir di dunia untuk menjaga keamanan database Anda. Selain itu, tampilan situs kami yang sangat modern membuat Anda nyaman mengakses situs kami.
Berbagai Macam Game Online
Kami menyediakan berbagai macam game online terbaik yang bisa Anda mainkan kapan saja dan di mana saja. Dengan satu ID, Anda bisa menikmati semua permainan yang tersedia, mulai dari permainan kartu, slot, hingga taruhan olahraga. PRO88 memastikan semua game yang kami sediakan adalah yang terbaik dan terlengkap di Indonesia.
Keamanan dan Kenyamanan
Kami memahami betapa pentingnya keamanan dan kenyamanan bagi para pemain. Oleh karena itu, PRO88 menggunakan server hosting yang cepat dan sistem keamanan dengan metode enkripsi termutakhir di dunia. Ini memastikan bahwa data pribadi dan transaksi Anda selalu aman bersama kami. Tampilan situs yang modern juga dirancang untuk memberikan pengalaman bermain yang nyaman dan menyenangkan.
Kesimpulan
PRO88 adalah pilihan terbaik untuk Anda yang mencari situs game online deposit pulsa yang aman dan terpercaya. Dengan berbagai macam game online terbaik dan terlengkap, serta dukungan keamanan yang canggih, PRO88 siap memberikan pengalaman bermain game yang tak terlupakan. Daftar sekarang juga di PRO88 dan nikmati semua permainan yang tersedia hanya dengan satu ID.
Kunjungi kami di PRO88 dan mulailah petualangan game online Anda bersama kami!
15 Double Glazing Installers Near Me Benefits You Should All Know Cheap Double Glazing
9 . What Your Parents Teach You About Door Fitters Birmingham door fitters birmingham,
https://www.istitutomorgagni.it/,
Five Reasons To Join An Online Federal Employers And 5
Reasons You Shouldn’t fela lawsuit assistance
A Step-By Step Guide To Will CSGO Cases Go Up In Price Cs2 skin
11 Ways To Totally Defy Your Hire Truck Accident Lawyer Truck accident attorneys
Online Clothing Sites Uk Tools To Improve Your Everyday
Life High-Quality Art Pencils
10 Locations Where You Can Find Boat Accident Lawyers Boat Accident Lawsuits
10 Things Everybody Has To Say About Waitrose Groceries Online Shopping Uk Adventure Gear Waterproof Sack
The Reasons Why Nespresso Coffee Machine Will Be The Hottest Topic In 2023
Portable Coffee Makers
The No. 1 Question Everybody Working In Asbestos Case Should Know How To
Answer asbestos Law
Where Can You Get The Most Reliable Birmingham Window Repair
Information? cheap
See What 4kw Multi Fuel Stove Tricks The Celebs Are Using 4kw multi fuel stove (http://yedam.designpixel.or.kr/)
Five Killer Quora Answers On Designer Handbags For Cheap Designer Handbags for cheap
Say “Yes” To These 5 CSGO Cases Opening Tips hydra case
(Vickie)
15 Of The Best Twitter Accounts To Learn More About Semi
Truck Legal semi truck accident law firm (Leanne)
Three Reasons Why Your CSGO Cases To Invest In Is Broken (And How
To Repair It) broken fang case (Stacia)
8 Tips To Up Your Replacement Upvc Window Handles Game upvc window repairs near me
florinef light – prilosec pills youth lansoprazole speed
This Is The Intermediate Guide On ADHD Diagnosis Private
UK Adhd Assessment Private
10 Things You Learned In Kindergarden To Help You Get Started With Classic Casino Slots Modern Slots
This Week’s Top Stories About Upvc Door Panel upvc replacement door locks
5 Killer Quora Answers To Game Sugar Rush Slot game sugar rush slot
[url=http://advaird.online/]canadian pharmacy advair[/url]
Five Things You Don’t Know About Penny Slots Slot games
15 Of The Most Popular Pinterest Boards Of All
Time About Couches For Sale Near Me office couch
15 Astonishing Facts About Buy Mobility Scooter Near Me best buy electric scooter black friday; https://comunidadeqm.marcelodoi.com.br/index.php?action=profile;u=810382,
7 Things You’ve Always Don’t Know About Personal Injury Case personal Injury attorneys
See What Renault Trafic Key Replacement Tricks The Celebs Are Making
Use Of Renault Trafic Key Replacement (http://Hesys.Co.Kr/Bbs/Board.Php?Bo_Table=Sub05_01&Wr_Id=24922)
Nine Things That Your Parent Teach You About Beko Washing Machines New beko washing machines new; http://www.mecosys.com,
10 Sites To Help Become An Expert In Classic Casino Slots modern Slots
15 Unquestionably Reasons To Love White Single Bunk Beds size Of Single bunk Bed
Three Of The Biggest Catastrophes In Double Glazing In Milton Keynes The Double Glazing In Milton Keynes’s
3 Biggest Disasters In History Car scratch Repairs milton keynes
A Journey Back In Time: What People Discussed About Local Services 20
Years Ago Seo Services Manchester (125.141.133.9)
20 Asbestos Lawyer Websites Taking The Internet By
Storm asbestos Legal
This Week’s Top Stories About Car Accident Claim Compensation Car Accident Claim Compensation top rated car accident lawyers
The 10 Most Dismal Asbestos Lawsuits Fails Of All Time
Could Have Been Prevented asbestos case (Anne)
3 Reasons Commonly Cited For Why Your Train Accident Attorney Isn’t Working (And Solutions To Resolve It) expert train injury lawyers
See What Double Glazing Birmingham Tricks The Celebs
Are Utilizing Double Glazing Birmingham (Galimwood.Com)
Are Will CSGO Case Prices Go Down As Crucial As Everyone Says?
Clutch Case
10 No-Fuss Methods To Figuring Out The Double Glazing Company Near Me In Your Body.
Double Galzing
A Intermediate Guide In Leeds Door Panels french Door repair Leeds
The 10 Most Terrifying Things About Mesothelioma Victims Compensation Mesothelioma victims compensation
Your Family Will Thank You For Getting This Leather Sleeper Sofa sofas sleeper
sofas (Jesenia)
Motor Vehicle Settlement Tips That Will Change Your Life motor Vehicle accident lawyer
Robot Vacuum And Mop It’s Not As Expensive As You Think Modern robot vacuum mop
“Ask Me Anything”: Ten Answers To Your Questions About Hisense Fridge Freezer With Water Dispenser Frydge
The Top Designer Handbags Sale Experts Have Been Doing 3 Things Designer Handbags Sale Outlet (https://Design21.Net/Bbs/Board.Php?Bo_Table=Free&Wr_Id=16539)
A Comprehensive Guide To Best Rated Robot Vacuum
From Beginning To End best Robot mop Consumer Reports
20 Reasons Why Lost Key Car Will Never Be Forgotten Lost Key Replacement Near Me
Guide To Treadmills On Sale: The Intermediate Guide
The Steps To Treadmills On Sale treadmills on sale (http://oi2bj1bgty1t8ty.Com)
14 Clever Ways To Spend The Leftover Treadmill
Fold Up Budget treadmills foldable (itsroom.co.kr)
You’ll Never Guess This Upvc Window Repair Near Me’s Secrets
Upvc Window Repair
9 . What Your Parents Teach You About Asbestos Case
asbestos
10 Things You’ve Learned In Kindergarden That’ll Help You With What Is The Best Mobility
Scooter To Buy best buy electric scooters
This Is The Advanced Guide To Double Glazed Window Repairs Near Me double glazed window Repairs
Responsible For An Designer Bags Budget? 10 Unfortunate
Ways To Spend Your Money designer handbags
Small Sectional Sofa With Recliner Tips From The Most Successful In The Business luxury
sectional sofa [monroyhives.biz]
It’s The Ugly Facts About Double Glazing In Milton Keynes bifold doors milton Keynes
All CSGO Skins Tips From The Best In The Industry Gamma 2 case
8 Tips To Increase Your Online Shopping Sites List For Clothes Game interior Door Knobs
Why All The Fuss? CS GO Weapon Case? case skins
What’s The Job Market For Veleco Electric Scooter Professionals Like?
veleco electric scooter (Anne)
15 Facts Your Boss Wants You To Know About Three Wheeler Scooter For
Handicapped You’d Known About Three Wheeler Scooter
For Handicapped three wheel scooters for Sale Near me
The Leading Reasons Why People Perform Well On The CS GO Case Battles Industry Weapon case [Cobwebquart00.bravejournal.net]
10 Double Glazing Windows Leeds Projects Related To Double Glazing Windows Leeds To Extend Your
Creativity upvc hinge repair leeds (Evelyne)
The Companies That Are The Least Well-Known To Watch In Greenpower Mobility Industry Green energy mobility scooters
See What Counter Strike Play Tricks The Celebs Are
Using Counter Strike
Are Wash Machine And Dryer Combo The Greatest Thing There Ever Was?
washer
Window Repairs Tools To Improve Your Everyday Lifethe Only Window Repairs Trick Every Individual
Should Learn Window repairs
[url=https://azithromycinmds.com/]azithromycin 250 mg capsule[/url]
See What Online Shopping Stores In London Tricks The Celebs Are Using
13 Things About Asbestos Cancer Lawsuit Lawyer Mesothelioma You
May Not Have Known Mesothelioma attorney search
Are You Getting The Most From Your Designer Handbags For Cheap?
Hand bags
The Most Powerful Sources Of Inspiration Of Locksmith For
Cars locksmith new car key (Palma)
[url=http://odiflucan.online/]buy diflucan online without prescription[/url]
A Look Into The Future What Will The CSGO Cases Highest Roi Industry Look Like In 10 Years?
bravo Case
Be On The Lookout For: How Which CS GO Case Is Best To Open Is Taking Over And What To
Do About It Shadow Case
The 3 Largest Disasters In Car Accident Lawyers History Car Crash
attorney in houston (gonysnap.Co.kr)
The Step-By -Step Guide To Choosing Your CSGO Case New Hydra Case
Railroad Injuries Case’s History Of Railroad Injuries Case In 10 Milestones railroad Lawsuit
методы продвижения сайта
Советы по оптимизации продвижению.
Информация о том как взаимодействовать с низкочастотными запросами и как их выбирать
Стратегия по работе в конкурентной нише.
Обладаю постоянных клиентов сотрудничаю с тремя компаниями, есть что сообщить.
Посмотрите мой профиль, на 31 мая 2024г
количество выполненных работ 2181 только здесь.
Консультация проходит в устной форме, без снимков с экрана и документов.
Длительность консультации указано 2 ч, но по реально всегда на связи без жёсткой привязки к графику.
Как взаимодействовать с программным обеспечением это уже другая история, консультация по использованию ПО обсуждаем отдельно в отдельном услуге, выясняем что нужно при разговоре.
Всё без суеты на расслабоне не торопясь
To get started, the seller needs:
Мне нужны контакты от телеграм чата для связи.
разговор только вербально, вести переписку не хватает времени.
Сб и Вс нерабочие дни
20 Myths About Mesothelioma Litigation: Busted mesothelioma law firm – Lacey
–
The 10 Scariest Things About Auto Accident Attorneys Auto accident attorneys
Guide To 18 Wheeler Accident Attorney: The Intermediate Guide To 18 Wheeler Accident Attorney 18 wheeler
The Complete Guide To Case Opening Battle CSGO gloves
cases (Gabrielle)
5 Motor Vehicle Claim Projects That Work For Any Budget motor vehicle accident Attorneys
If some one desires expert view regarding blogging after that i
recommend him/her to go to see this website, Keep up the pleasant job.
How To Find The Perfect Asbestos Compensation On The Internet
asbestos litigation
Where To Research Best Anal Toys Online anal toys Online
10 Things People Hate About Best Home Espresso
Machine espresso coffee machine home (Caridad)
5 Double Bunk Beds For Sale Lessons From The Professionals Bunk beds with storage
What Is Repair Misted Double Glazing Near Me? To Utilize It local double glazing repairs (Tahlia)
sunmory33
sunmory33
Are You In Search Of Inspiration? Try Looking Up Mesothelioma Litigation mesothelioma Case
[url=https://tadalafilu.com/]cialis from canada online pharmacy[/url]
Ten Window Repair Near Myths You Should Never Share On Twitter upvc window repair near me
You’ll Never Guess This Foldable Treadmill With Incline’s Secrets foldable treadmill with incline (Declan)
What Freud Can Teach Us About Compensation For Mesothelioma mesothelioma entitled to financial compensation (Kenny)
10 Factors To Know Concerning How To Get Cases
In CS GO You Didn’t Learn In School Fracture Case (Privatehd.Org)
Why We Enjoy Womens Rabbit Vibrators Sex Toys
(And You Should Also!) rabbit vibrator Shop
Five Killer Quora Answers On Psychiatrists For Adhd Near Me Psychiatrists For Adhd Near Me (http://Www.Recreatie.Biz)
10 Strategies To Build Your Lawyer For Car Accidents Near Me Empire Warwick Car Accident Lawyer
[url=http://azithromycinps.online/]azithromycin in canada[/url]
Car Boot Mobility Scooter Tools To Improve Your Daily Life collapsible motor scooter
[url=http://accutanemix.online/]accutane 20 mg price[/url]
Five Killer Quora Answers On Coffee Machine For Beans coffee machine for beans (telegra.ph)
What Designer Handbags Experts Want You To Be
Educated affordable designer handbags uk
Slot Tournaments Tools To Help You Manage Your Everyday Lifethe Only Slot Tournaments Trick That Should Be Used By Everyone Know Slot Tournaments
5 Killer Quora Answers On Wall Mounted Electric Fires fireplacesandstove
17 Reasons You Shouldn’t Ignore Car Key Cuts Local Key Cutting
15 Best What CSGO Cases Have Butterfly Knives Bloggers You Need To Follow gamma case (Ariel)
10 Factors To Know About Cheap 12kg Washing Machine You Didn’t Learn At School cheapest 12Kg washing machine
A Trip Back In Time A Trip Back In Time: What People Talked About Designer Handbags For Sale 20 Years Ago designer Handbags for Women
10 Things We All Are Hateful About Slot Demo Zeus Mokapog who beat zeus (Joesph)
A Provocative Remark About Free Standing Electric Fireplace
fireplace inserts – Freeman
–
20 Trailblazers Are Leading The Way In Designer Bags designer handbags outlet (Seymour)
The Most Underrated Companies To Follow In The Best Cases To Open CSGO Industry Chroma 3 case
20 Trailblazers Leading The Way In Freestanding Bioethanol Fire electric standing fire (https://yogicentral.science/wiki/10_Tips_For_Free_Standing_Bio_Ethanol_Fires_That_Are_Unexpected)
10 Things Everybody Hates About Mobile Slots evoplay Slots casinos
7 Things About CSGO Skin Case Sites You’ll Kick Yourself For Not Knowing case Horizon
10 Misconceptions Your Boss Has About Branded Slots Bonus round Slots
Why Nobody Cares About Steel Anal Butt Plug Silicone
10 Quick Tips On Car Accident Lawyer Car Accident Lawsuit
10 Factors To Know Concerning Upvc Doors Leeds You Didn’t Learn At School double glazing repair
10 Facebook Pages That Are The Best Of All Time Birth Injury Attorney Kansas City Kansas
City Birth Injury Attorney (https://Esocial.Workbase.Inf.Br/Index.Php?Action=Profile;U=35556)
5 Treadmills For Sale UK Projects For Every Budget Treadmills
For home (djchs.co.kr)
The 12 Worst Types Of Accounts You Follow On Twitter Case esports
10 Graphics Inspirational About Vegas Slots classic slots
The Most Pervasive Problems With Best Cases To Open CSGO Chroma 3 Case
CS GO Weapon Case Tips To Relax Your Daily Lifethe One CS GO Weapon Case Technique
Every Person Needs To Learn operation Bravo case
How To Make A Successful Auto Accidents Lawyers How-Tos And Tutorials To Create Successful Auto Accidents
Lawyers Home automobile injury lawyer (Doreen)
The Most Hilarious Complaints We’ve Seen About Upvc Windows And Doors
upvc window repair (Archie)
How To Survive Your Boss On Sectional Sofa sectional sleeper sofa With chaise
bocor88
I’m curious to find out what blog platform you are using?
I’m experiencing some minor security problems with my latest website and I would like
to find something more safeguarded. Do you have any suggestions?
Five Killer Quora Answers On Coffee Machine For Beans coffee machine
for beans – Kathlene,
The 10 Scariest Things About Asbestos Legal Asbestos Legal
This is a topic that’s close to my heart… Best wishes!
Where are your contact details though?
20 Things That Only The Most Devoted Boat Lawyers Near Me Fans
Are Aware Of boat accident lawyer carlsbad (Alfonso)
You’ll Never Guess This Coffee Machine Espresso’s Secrets Coffee Machine Espresso
You’ll Be Unable To Guess Mobile Car Diagnostics Near Me Uk’s
Tricks mobile car Diagnostics
14 Common Misconceptions About Railroad Injuries Legal railroad accident
attorneys [toolbarqueries.google.tn]
What Is The Reason? Washing Machine integrated washing machine And dryer Dryer Is
Fast Becoming The Most Popular Trend In 2023
The Slot Payouts Awards: The Most, Worst, And Weirdest Things We’ve Seen evoplay slots symbols (Keri)
10 Quick Tips On Railroad Injuries Lawsuit Railroad Accident legal Advice
You’ll Be Unable To Guess Online Clothes
Shopping Websites Uk’s Tricks online clothes
shopping websites uk []
Where Is Avon Skin So Soft Dry Oil Spray Be 1 Year From Right Now?
avon Oh so soft
Planning An Awesome Casino Night Party 프라그마틱 무료슬롯
See What Avon Skin So Soft Dry Oil Spray How To Use Tricks
The Celebs Are Making Use Of avon skin so soft dry oil spray how to use (http://www.c1aid4a5E.рф)
What’s The Current Job Market For Deep Sectional Sofa Professionals Like?
deep sectional sofa
5 Qualities That People Are Looking For In Every Labor Day
Couch Sales big lots couches for sale
How Much Do Replacement Jaguar Key Experts Earn? Jaguar X Type Key Fob Reprogramming
You’ll Never Be Able To Figure Out This Link Daftar Gotogel’s Tricks link
daftar gotogel (Shavonne)
15 Reasons To Not Overlook Slot Experiences 3D Slots
20 Trailblazers Setting The Standard In Robot Vacuum best mop Vacuum cleaner [http://www.harmonicar.co.kr]
Slot Reviews Tips From The Top In The Industry Real money slots
Five Killer Quora Answers On Key Programing Key Programing
It’s The Perfect Time To Broaden Your Repairing Double Glazed Windows Options Repaired
10 Things You’ve Learned In Preschool That Can Help You In ADHD Tests For
Adults tests For adhd in adults
5 Lessons You Can Learn From Mesothelioma Law Mesothelioma legal support
A Reference To Repair Window From Start To Finish glazed
11 Creative Methods To Write About Boot Scooters car boot mobility scooter,
http://mspeech.kr,
5 Laws That’ll Help To Improve The CSGO Battle Case
Industry winter offensive weapon case – ,
The Reason Everyone Is Talking About Treadmill Near Me Today treadmill for Sale
Guide To Car Key Auto Locksmith: The Intermediate Guide
On Car Key Auto Locksmith Car Key Auto Locksmith, http://Www.Maxtremer.Com,
20 Resources That’ll Make You More Effective At Treehouse Bunk Beds bunk Beds treehouse
Don’t Believe These “Trends” Concerning Designer Handbags In Sale designer bags outlet online
The Little Known Benefits Of Full Sleeper Sofa best sleeper sofa
9 . What Your Parents Teach You About Recliner Couches For Sale recliner couches for sale (http://gonysnap.co.kr/bbs/board.php?bo_table=qa&wr_id=171330)
What Who Sells LG Refrigerators Experts Would Like
You To Learn lg fridges uk (https://www.cheaperseeker.com/u/canpull2)
10 Meetups About Defra Log Burning Stoves You Should
Attend defra Guidelines stoves
Why Nobody Cares About CSGO How Many Cases Per Week Operation broken fang case, pailstraw49.werite.net,
The 10 Scariest Things About CSGO Most Profitable Cases Wildfire Case
Somebody essentially lend a hand to make significantly posts I might state That is the very first time I frequented your web page and up to now I surprised with the research you made to create this particular put up amazing Excellent job
The 10 Most Terrifying Things About Wood Burner Fireplace Ideas Wood burner fireplace ideas
Five Killer Quora Answers To L Shaped Sleeper Sofa L Shaped Sleeper Sofa
What’s The Job Market For Accident & Injury Lawyers Professionals Like?
accident & injury Lawyers
This Is The Advanced Guide To Foldable Treadmills Treadmills that Fold up
Why We Do We Love Slot Wins (And You Should,
Too!) top-rated Online slots (http://www.saju1004.net/bbs/board.php?bo_table=profile_02_07&wr_id=39831)
A. The Most Common Asbestos Attorney Debate
Isn’t As Black And White As You May Think Asbestos litigation
Be On The Lookout For: How Lexus Replacement Key Fob Is Taking Over And How To Stop It how much to replace lexus key
What You Can Do To Get More From Your Window Repair double glazed Window Repairs Near me
Online Shopping Websites Clothes Tools To Make Your Everyday Lifethe Only Online Shopping
Websites Clothes Trick That Every Person Should Know Rugged Outdoor Ice Box
10 Things Everybody Gets Wrong About The Word “The Door Doctor Near Me” companies
15 Of The Most Popular Top Personal Injury Lawyer Near Me Bloggers You Should Follow personal injury lawyer kansas city – Wade –
17 Reasons Why You Shouldn’t Be Ignoring Wood Burners
Wood Burners Near me
15 Bizarre Hobbies That’ll Make You More Successful At Boat Accident Legal boat Accident Lawsuit
5 Killer Quora Answers On Situs Alternatif Gotogel situs alternatif gotogel (http://Www.harmonicar.Co.kr)
20 Up And Coming Treadmill For Under Desk Stars To Watch The Treadmill For Under Desk Industry Treadmills Under Desk
(http://Galimwood.Com/Bbs/Board.Php?Bo_Table=Cutout&Wr_Id=371434)
10 Misconceptions Your Boss Has About Hyundai Key Replacement Near Me cheapest
20 Trailblazers Setting The Standard In Wood Burner Wood burning stoves
Guide To Pornstar Fleshlight: The Intermediate
Guide Towards Pornstar Fleshlight Pornstar Fleshlight
The 12 Most Popular Injury Attorneys Accounts To Follow On Twitter
injury law Firms
Five Killer Quora Answers To Designer Handbags Uk Sale
Designer Handbags Uk Sale
You’ll Never Guess This Skin So Soft Avon’s Secrets skin so soft avon (Margarette)
10 Things You’ve Learned In Preschool That’ll Help You Understand Best Slot Machines Video Slots
9 . What Your Parents Taught You About Situs Gotogel Terpercaya situs Gotogel terpercaya
What Railroad Injuries Lawsuit Will Be Your Next Big Obsession? railroad injuries
law firm (Willard)
A Brief History Of Anal Toy In My Area History Of Anal Toy In My Area Male anal toy
Five Killer Quora Answers To Designer Handbags Large Designer handbags Large
Designer Handbags Sale Tools To Improve Your Everyday Lifethe Only Designer
Handbags Sale Technique Every Person Needs To Know Designer Handbags sale
A Provocative Rant About Wooden Loft Bed Loft bed with wardrobe underneath, King-wifi.Win,
線上娛樂城的天地
隨著網際網路的迅速發展,在線娛樂城(網上賭場)已經成為許多人娛樂的新選擇。線上娛樂城不僅提供多樣化的游戲選擇,還能讓玩家在家中就能體驗到賭場的興奮和快感。本文將討論線上娛樂城的特色、好處以及一些常見的的游戲。
什麼是在線娛樂城?
線上娛樂城是一種經由網際網路提供博彩遊戲的平台。玩家可以經由電腦、智能手機或平板設備進入這些網站,參與各種博彩活動,如撲克牌、輪盤賭、黑傑克和老虎機等。這些平台通常由專業的的軟體公司開發,確保遊戲的公平性和穩定性。
在線娛樂城的好處
便利性:玩家無需離開家,就能體驗賭錢的興奮。這對於那些生活在遠離的實體賭場區域的人來說尤其方便。
多種的遊戲選擇:網上娛樂城通常提供比實體賭場更多樣化的游戲選擇,並且經常升級游戲內容,保持新鮮感。
福利和獎金:許多在線娛樂城提供豐厚的優惠計劃,包括註冊紅利、存款紅利和忠誠計劃,吸引新新玩家並激勵老玩家持續遊戲。
穩定性和隱私:正當的線上娛樂城使用先進的加密技術來保護玩家的個人資料和交易,確保游戲過程的安全和公正。
常見的的網上娛樂城游戲
撲克牌:撲克是最流行賭博游戲之一。網上娛樂城提供各種德州撲克變體,如德州撲克、奧馬哈撲克和七張撲克等。
賭盤:輪盤是一種傳統的賭場遊戲遊戲,玩家可以投注在數字、數字組合或顏色上上,然後看球落在哪個地方。
黑傑克:又稱為二十一點,這是一種競爭玩家和莊家點數的游戲,目標是讓手牌點數儘量接近21點但不超過。
吃角子老虎:吃角子老虎是最受歡迎並且是最流行的賭錢游戲之一,玩家只需轉捲軸,等待圖案排列出獲勝的組合。
總結
在線娛樂城為現代的賭博愛好者提供了一個方便、刺激的且多元化的娛樂方式。無論是撲克牌愛好者還是老虎機迷,大家都能在這些平台上找到適合自己的遊戲。同時,隨著技術的的不斷提升,在線娛樂城的遊戲體驗將變得越來越逼真和引人入勝。然而,玩家在享受游戲的同時,也應該自律,避免沉溺於賭錢活動,保持健康健康的心態。
娛樂城
線上娛樂城的天地
隨著網際網路的快速發展,網上娛樂城(線上賭場)已經成為許多人休閒的新選擇。在線娛樂城不僅提供多樣化的遊戲選擇,還能讓玩家在家中就能體驗到賭場的刺激和快感。本文將探討線上娛樂城的特色、優勢以及一些常有的游戲。
什麼叫線上娛樂城?
線上娛樂城是一種透過網際網路提供賭錢遊戲的平台。玩家可以經由電腦設備、手機或平板進入這些網站,參與各種賭錢活動,如撲克牌、賭盤、二十一點和吃角子老虎等。這些平台通常由專業的軟體公司開發,確保遊戲的公平性和安全。
在線娛樂城的利益
方便性:玩家不用離開家,就能享受賭錢的興奮。這對於那些住在在遠離實體賭場地方的人來說尤其方便。
多樣化的游戲選擇:網上娛樂城通常提供比實體賭場更多樣化的遊戲選擇,並且經常改進遊戲內容,保持新鮮感。
優惠和獎金:許多線上娛樂城提供多樣的獎勵計劃,包括註冊紅利、存款紅利和忠誠計劃,吸引新新玩家並鼓勵老玩家繼續遊戲。
安全性和隱私性:正規的在線娛樂城使用先進的的加密方法來保護玩家的個人資料和交易,確保游戲過程的公平和公正。
常見的的網上娛樂城游戲
德州撲克:德州撲克是最受歡迎賭博游戲之一。線上娛樂城提供各種撲克變體,如德州扑克、奧馬哈和七張牌等。
輪盤賭:輪盤是一種經典的賭場遊戲遊戲,玩家可以賭注在數字、數字排列或顏色上,然後看小球落在哪個位置。
二十一點:又稱為黑傑克,這是一種比拼玩家和莊家點數的遊戲,目標是讓手牌點數盡可能接近21點但不超過。
老虎机:老虎机是最容易且是最常見的博彩遊戲之一,玩家只需轉捲軸,等待圖案排列出獲勝的組合。
結論
網上娛樂城為現代的賭博愛好者提供了一個便捷、刺激且多元化的娛樂方式。無論是撲克牌愛好者還是老虎機迷,大家都能在這些平台上找到適合自己的遊戲。同時,隨著技術的的不斷進步,網上娛樂城的游戲體驗將變化越來越逼真和吸引人。然而,玩家在享受游戲的同時,也應該自律,避免沉迷於賭博活動,保持健康的娛樂心態。
15 Funny People Working In Skin So Soft
Original In Avon Skin So Soft Original Avon skin Soft
Buzzwords, De-Buzzed: 10 Other Ways Of Saying Designer Handbags
Large designer handbags for Sale
What You Can Do To Get More With Your Opening CS
GO Cases case Revolution
How Much Can Replacement Double Glazed Glass Only Near Me Experts Earn? double glazed Panels
What’s The Job Market For Situs Gotogel Terpercaya Professionals?
Situs Gotogel Terpercaya (http://Www.Mecosys.Com)
5 Killer Quora Answers To Best Slot Payouts Slot Payouts
12 Companies Setting The Standard In CSGO Cases Highest Roi operation Phoenix weapon case
5 Laws Everybody In Toys For Clits Should Be Aware Of best clitoral sex toys (botdb.win)
24 Hours To Improving Personal Injury Lawsuit Personal Injury Lawyers
What Experts In The Field Of Play Casino Slots Want You To
Know evoplay slots enchanting (Cupak.sk)
Консультация по оптимизации продвижению.
Информация о том как управлять с низкочастотными запросами запросами и как их выбирать
Стратегия по действиям в соперничающей нише.
Имею регулярных взаимодействую с тремя компаниями, есть что сообщить.
Изучите мой профиль, на 31 мая 2024г
общий объём завершённых задач 2181 только в этом профиле.
Консультация проходит устно, никаких снимков с экрана и отчётов.
Продолжительность консультации указано 2 ч, и факту всегда на доступен без жёсткой фиксации времени.
Как работать с ПО это уже отдельная история, консультация по работе с софтом договариваемся отдельно в другом кворке, узнаем что нужно при общении.
Всё спокойно на расслабоне не торопясь
To get started, the seller needs:
Мне нужны контакты от Telegram канала для коммуникации.
разговор только устно, общаться письменно не хватает времени.
Суббота и Воскресенье выходной
16 Must-Follow Pages On Facebook For Slot Strategies-Related Businesses Hacksaw online Slots
꽁머니사이트
빠릿한 입출금 서비스와 주요업체의 안전성
베팅사이트 사용 시 가장 중요한 부분 중 하나는 빠른 입출금 절차입니다. 일반적으로 세 분 이내에 충전하고, 10분 안에 출금이 완료되어야 합니다. 메이저 메이저업체들은 넉넉한 스태프 채용으로 이러한 빠른 환충 프로세스를 보증하며, 이로써 고객들에게 안전감을 드립니다. 주요사이트를 접속하면서 신속한 경험을 즐겨보세요. 우리는 여러분이 안심하고 사이트를 이용할 수 있도록 지원하는 먹튀해결사입니다.
보증금을 내고 광고 배너 운영
먹튀 해결 팀은 최대한 삼천만 원에서 1억 원의 보증금을 예치하고 있는 회사들의 배너를 운영하고 있습니다. 만일 먹튀 사고가 발생할 경우, 배팅 규정에 반하지 않은 베팅 내역을 캡처해서 먹튀해결사에 문의 주시면, 사실 확인 후 보증 금액으로 빠르게 피해 보상을 처리해 드립니다. 피해가 발생하면 즉시 캡처해서 피해 내용을 저장해두시고 보내주세요.
장기간 안전 운영 업체 확인
먹튀 해결 전문가는 최대한 4년간 먹튀 이력 없이 안전하게 운영하고 있는 업체만을 확인하여 배너 등록을 받고 있습니다. 이 때문에 어느 누구나 알고 있는 대형사이트를 안전하게 이용할 수 있는 기회를 제공합니다. 철저한 검증 작업을 통해 인증된 사이트를 놓치지 말고, 보안된 배팅을 즐겨보세요.
투명하고 공정한 먹튀 검증
먹튀 해결 팀의 먹튀 검증은 공정성과 공평성을 근거로 합니다. 언제나 이용자들의 관점을 우선으로 생각하고, 업체의 이익이나 이득에 흔들리지 않으며 1건의 삭제 없이 사실만을 근거로 검증해왔습니다. 먹튀 사고를 당한 후 후회하지 않도록, 지금 바로 시작해보세요.
먹튀 확인 사이트 리스트
먹튀 해결 팀이 선별한 안전한 토토사이트 인증된 업체 목록 입니다. 현재 등록되어 있는 검증된 업체들은 먹튀 사고 발생 시 100% 보증을 해드립니다. 하지만, 제휴 기간이 끝난 업체에서 발생한 문제에 대해서는 책임이 없습니다.
유일무이한 먹튀 검증 알고리즘
먹튀 해결 팀은 깨끗한 도박 문화를 조성하기 위해 늘 애쓰고 있습니다. 저희가 소개하는 베팅사이트에서 안심하고 베팅하세요. 사용자의 먹튀 신고 내용은 먹튀 리스트에 등록 노출되어 그 해당 베팅 사이트에 치명적인 영향을 줄 수 있습니다. 먹튀 목록 작성 시 먹튀블러드만의 검토 경험을 최대로 사용하여 정확한 검증을 하도록 약속드립니다.
안전한 베팅 환경을 제공하기 위해 끊임없이 힘쓰는 먹튀 해결 전문가와 함께 안전하게 경험해보세요.
What’s The Current Job Market For Designer Handbags Brown Professionals Like?
designer handbags brown
5 Must-Know Hismphash Practices You Need To Know
For 2023 firms
10 Sites To Help You To Become A Proficient In Medium Variance Slots Slot machines
See What Mesothelioma Claims Tricks The Celebs Are Utilizing mesothelioma
Guide To Slot Wins: The Intermediate Guide The Steps To Slot Wins Slot Wins
Why Birth Defect Claim Is More Tougher Than You Imagine birth defect Lawyer
What You Must Forget About Improving Your Slot Bonuses
casino Slot tournaments
A Trip Back In Time The Conversations People Had About Shopping Online 20 Years
Ago
Could Veterans Disability Case Be The Key To Dealing With
2023? Veterans Disability Lawyers
11 Methods To Totally Defeat Your CSGO Weapon Case esports 2014
summer case (Milton)
The 3 Greatest Moments In Hire Auto Accident Lawyer History Attorney Auto accident
The Best Washing Machine 9kg Capacity Tricks To Transform Your
Life best washing machine 9kg
The Secret Secrets Of Why Are CSGO Skins Going Up In Price cs2 cases
(Alycia)
The 10 Most Scariest Things About 18 Wheeler Accident Lawyers
18 Wheeler accident lawyers
5 Killer Quora Answers To Repair Misted Double Glazing Near Me double glazing near
Me (http://Www.healthndream.com)
Are You In Search Of Inspiration? Check Out Upvc Door Locks replace lock in upvc door (http://www.avtogatchina.Ru)
Who’s The Top Expert In The World On Mesothelioma?
Mesothelioma Law firms
15 Funny People Who Are Secretly Working In Auto Accident Attorneys auto accident lawsuits
Консультация по SEO продвижению.
Информация о том как управлять с низкочастотными ключевыми словами и как их определять
Подход по действиям в конкурентной нише.
У меня есть постоянных клиентов работаю с несколькими организациями, есть что рассказать.
Посмотрите мой профиль, на 31 мая 2024г
общий объём успешных проектов 2181 только здесь.
Консультация проходит устно, никаких скриншотов и отчётов.
Длительность консультации указано 2 ч, но по реально всегда на связи без жёсткой привязки к графику.
Как взаимодействовать с ПО это уже иначе история, консультация по работе с софтом договариваемся отдельно в отдельном услуге, определяем что требуется при разговоре.
Всё без суеты на расслабленно не в спешке
To get started, the seller needs:
Мне нужны контакты от телеграмм чата для контакта.
общение только в устной форме, переписываться недостаточно времени.
Суббота и воскресенья выходной
This Week’s Top Stories About Upvc Windows And Doors Upvc Windows And Doors repair upvc windows; Darryl,
10 Things That Your Family Taught You About Avon Skin So Soft Dry Oil
Spray avon skin so soft dry oil spray; http://www.dramonline.Org,
10 Things You’ll Need To Learn About Avon’s Skin So Soft Avon Skin So Soft Dry Oil Spray
15 Twitter Accounts That Are The Best To Learn More About Railroad Injuries Attorneys railroad injuries lawsuit
10 Things You’ll Need To Learn About Double Glazing In Milton Keynes windows and
doors milton Keynes (https://p3terx.Com/)
Looking For Inspiration? Try Looking Up Slot Tours win at Slots
You’ll Never Guess This Sleeper Futon’s Benefits sleeper futon (Carmelo)
The Good And Bad About CSGO Case New hydra case
How To Create An Awesome Instagram Video About CSGO Gambling
Sites Case gamma
5 Killer Quora Answers To Washer And Dryer Machine Combo washer And dryer machine combo
15 CSGO Cases Opening Benefits Everybody Must Know web Case, https://jisuzm.tv/home.php?mod=space&uid=3445829,
Watch Out: What Semi Truck Attorney Is Taking Over And What Can We Do About It semi truck accidents (Ophelia)
The 10 Worst What CSGO Cases Should I Open Fails Of All Time Could Have Been Avoided
Prisma Case
How Motorcycle Accident Settlement Became The Hottest Trend In 2023 motorcycle accident lawyers
Unexpected Business Strategies For Business That Aided Workers
Compensation Settlement Succeed workers’ Compensation
What’s The Current Job Market For Asbestos
Compensation Professionals Like? Asbestos Compensation
9 Things Your Parents Teach You About Designer Handbags For Ladies Designer handbags For Ladies
10 Places To Find Kids Bunk Beds kids bunk beds with storage (Kira)
The Sage Advice On Online Shopping Sites In Uk For Electronics From An Older
Five-Year-Old which Supermarket Is cheapest For online shopping
All The Details Of Car Key Replacement Dos And Don’ts local
15 Top Designer Bags Bloggers You Need To Follow Designer handbags names
Are You Responsible For An Programming Car Key Budget?
Twelve Top Ways To Spend Your Money car key programming Cost uk
You’ll Never Guess This Online Shopping Uk Sites’s Benefits Online shopping uk sites
What’s The Job Market For Windows Birmingham Professionals?
windows Birmingham
How To Determine If You’re In The Right Place To Cars Locksmith Local car locksmith near me
Accident: Myths And Facts Behind Accident accident attorneys
11 “Faux Pas” You’re Actually Able To Make With Your Malpractice Attorney Malpractice Lawsuit
Why You Should Concentrate On Improving What CSGO Cases Should I Open falchion case (http://www.fjclwz.us)
A Complete Guide To Mesothelioma Settlement Dos And Don’ts mesothelioma law
Guide To Online Shopping Sites In United Kingdom: The Intermediate Guide Towards
Online Shopping Sites In United Kingdom Online Shopping sites in United kingdom
Guide To Link Daftar Gotogel: The Intermediate Guide The Steps
To Link Daftar Gotogel link daftar gotogel (Maximilian)
5 Interactive Slots-Related Lessons From The Pros Mobile slots
15 Amazing Facts About Free Casino Slots online slot machines (http://www.Istitutomorgagni.it)
5 Killer Quora Answers On Clitorial Vibrator clitorial vibrator, 2ln.de,
The Good And Bad About Medical Malpractice Lawyers Medical malpractice Law firm
9 Things Your Parents Taught You About Accident Lawsuits Accident lawsuits
Solutions To Issues With 18 Wheeler Wreck Lawyer 18 Wheeler Accident Attorney
17 Signs To Know If You Work With Motor Vehicle Legal Motor Vehicle Accident Attorneys
How To Make An Amazing Instagram Video About Personal Injury Law Personal injury lawyers
It’s The Good And Bad About Online Shopping Sites List For Clothes Vimeo.com
Is Your Company Responsible For An Mesothelioma Budget?
12 Best Ways To Spend Your Money specialized mesothelioma attorney
Five Essential Qualities Customers Are Searching For In Every Online Shopping Websites List Mario Badescu Buffering Lotion
Three Reasons Why You’re Are CSGO Cases Predetermined Is Broken (And How To Repair It) Case Operation bravo
An Guide To All CSGO Skins In 2023 Gamma 2 Case – http://Spectr-Sb116.Ru
–
16 Must-Follow Pages On Facebook For Personal Injury Lawsuit Marketers personal Injury lawyers
Five Killer Quora Answers On Asbestos Law Asbestos Claim
[url=https://lyricamd.online/]lyrica price australia[/url]
3 Reasons You’re Not Getting Door Fitters Milton Keynes Isn’t Working (And Solutions To Resolve It) Front door milton Keynes
11 Methods To Completely Defeat Your CSGO Most Profitable Cases Prisma Case
data sdy
Inspirasi dari Kutipan Taylor Swift: Harapan dan Kasih dalam Lagu-Lagunya
Taylor Swift, seorang musisi dan penulis lagu populer, tidak hanya diakui oleh karena nada yang elok dan vokal yang nyaring, tetapi juga karena kata-kata lagunya yang penuh makna. Di dalam syair-syairnya, Swift sering menggambarkan berbagai unsur kehidupan, mulai dari cinta hingga tantangan hidup. Berikut adalah beberapa petikan motivatif dari lagu-lagunya, bersama artinya.
“Mungkin yang terbaik belum datang.” – “All Too Well”
Arti: Bahkan di saat-saat sulit, senantiasa ada secercah harapan dan peluang akan hari yang lebih cerah.
Lirik ini dari lagu “All Too Well” mengingatkan kita kalau biarpun kita mungkin menghadapi waktu sulit saat ini, selalu ada kemungkinan bahwa masa depan akan memberikan sesuatu yang lebih baik. Situasi ini adalah pesan harapan yang menguatkan, mendorong kita untuk tetap bertahan dan tidak menyerah, karena yang paling baik bisa jadi belum hadir.
“Aku akan terus bertahan karena aku tidak bisa mengerjakan apa pun tanpa kamu.” – “You Belong with Me”
Arti: Mendapatkan cinta dan dukungan dari orang lain dapat menyediakan kita tenaga dan niat untuk melanjutkan lewat kesulitan.
10 Wrong Answers To Common CS GO Cases Sites Questions Do You Know The Correct Answers?
Revolver Case
20 Trailblazers Are Leading The Way In Opening CSGO Cases
case opening
Are You Responsible For The Online Shop Budget?
10 Amazing Ways To Spend Your Money online shopping sites with free international shipping (https://techmedia-think.Hatenablog.com/)
mamibet
Ashley JKT48: Bintang yang Bercahaya Cemerlang di Kancah Idol
Siapakah Ashley JKT48?
Siapakah figur muda berbakat yang mencuri perhatian banyak fans musik di Indonesia dan Asia Tenggara? Beliau adalah Ashley Courtney Shintia, atau yang terkenal dengan nama bekennya, Ashley JKT48. Menjadi anggota dengan grup idola JKT48 pada tahun 2018, Ashley dengan cepat muncul sebagai salah satu anggota paling populer.
Riwayat Hidup
Lahir di Jakarta pada tanggal 13 Maret 2000, Ashley berdarah darah Tionghoa-Indonesia. Ia memulai karier di bidang entertainment sebagai model dan aktris, hingga akhirnya akhirnya bergabung dengan JKT48. Kepribadiannya yang gembira, vokal yang bertenaga, dan kemahiran menari yang mengesankan menjadikannya idol yang sangat dicintai.
Penghargaan dan Pengakuan
Ketenaran Ashley telah diakui melalui berbagai penghargaan dan nominasi. Pada tahun 2021, ia memenangkan penghargaan “Member Terpopuler JKT48” di ajang JKT48 Music Awards. Beliau juga dinobatkan sebagai “Idol Terindah di Asia” oleh sebuah media online pada tahun 2020.
Peran dalam JKT48
Ashley memainkan fungsi penting dalam kelompok JKT48. Ia adalah personel Tim KIII dan berperan menjadi penari utama dan vokalis. Ashley juga menjadi member dari sub-unit “J3K” dengan Jessica Veranda dan Jennifer Rachel Natasya.
Karir Solo
Selain kegiatannya dengan JKT48, Ashley juga merintis perjalanan solo. Ia telah mengeluarkan beberapa lagu tunggal, termasuk “Myself” (2021) dan “Falling Down” (2022). Ashley juga telah bekerja sama bersama musisi lain, seperti Afgan dan Rossa.
Kehidupan Personal
Selain bidang panggung, Ashley dikenal sebagai pribadi yang rendah hati dan friendly. Ia suka menghabiskan waktu bareng keluarga dan teman-temannya. Ashley juga menyukai kegemaran melukis dan memotret.
What NOT To Do Within The What CSGO Cases Have Butterfly Knives Industry riptide case
30 Inspirational Quotes About Professional
Slots slot machines (Monserrate)
One Key Trick Everybody Should Know The One Asbestos Lawyer
Trick Every Person Should Know asbestos legal
Why Railroad Injuries Claim Is Fast Becoming The Most
Popular Trend For 2023 railroad injuries attorneys (Buck)
Five Killer Quora Answers To New Beko Washing Machines
new beko Washing machines
проверить перевод usdt trc20 10
Контроль кошелька токенов
Контроль криптовалюты TRC20 и прочих цифровых операций
На данном ресурсе представлены всесторонние ревью разнообразных платформ для контроля транзакций и счетов, охватывая anti-money laundering проверки для токенов и различных криптовалют. Вот важные особенности, что в наших оценках:
Верификация токенов на платформе TRC20
Известные сервисы обеспечивают комплексную анализ транзакций криптовалюты в сети TRC20 блокчейна. Это позволяет фиксировать необычную действия и удовлетворять регуляторным положениям.
Верификация операций токенов
В наших обзорах описаны сервисы для всестороннего проверки и контроля переводов монет, которые способствует поддерживать ясность и защиту операций.
антиотмывочного закона анализ USDT
Некоторые инструменты поддерживают AML проверку криптовалюты, обеспечивая обнаруживать и не допускать эпизоды финансовых преступлений и валютных мошенничеств.
Анализ кошелька токенов
Наши обзоры представляют платформы, что обеспечивают верифицировать адреса криптовалюты на наличие блокировок и подозреваемых операций, обеспечивая дополнительный уровень степень безопасности безопасности.
Анализ транзакции токенов на блокчейне TRC20
В наших обзорах доступны инструменты, обеспечивающие контроль операций монет на платформе TRC20 платформы, что обеспечивает поддерживает соблюдение всем стандартам правилам.
Контроль адреса адреса криптовалюты
В ревью представлены инструменты для контроля кошельков кошельков токенов на предмет угроз проблем.
Анализ кошелька токенов на сети TRC20
Наши оценки включают ресурсы, обеспечивающие контроль кошельков криптовалюты на блокчейне TRC20, что позволяет помогает предотвращение незаконных операций и денежных преступлений.
Проверка USDT на легитимность
Рассмотренные сервисы позволяют проверять операции и адреса на отсутствие подозрительных действий, определяя подозрительную деятельность.
anti-money laundering анализ токенов TRC20
В описаниях вы найдете платформы, обеспечивающие антиотмывочного закона контроль для криптовалюты на блокчейне TRC20 блокчейна, помогая вашему предприятию соблюдать международным нормам.
Верификация криптовалюты на сети ERC20
Наши обзоры содержат ресурсы, предоставляющие анализ монет в блокчейн-сети ERC20, что обеспечивает позволяет проведение транзакций и аккаунтов.
Проверка криптовалютного кошелька
Мы рассматриваем сервисы, обеспечивающие решения по контролю виртуальных кошельков, включая наблюдение платежей и определение сомнительной операций.
Проверка адреса цифрового кошелька
Наши оценки включают инструменты, дающие возможность верифицировать аккаунты цифровых кошельков для повышения дополнительной степени защиты.
Анализ криптовалютного кошелька на операции
В наших описаниях найдете инструменты для анализа виртуальных кошельков на переводы, что обеспечивает поддерживать обеспечивать чистоту транзакций.
Верификация криптокошелька на чистоту
Наши описания включают сервисы, дающие возможность проверять криптовалютные кошельки на легитимность, обнаруживая любые подозрительные операции.
Изучая представленные обзоры, вы сможете выбрать подберете подходящие ресурсы для проверки и контроля криптовалютных транзакций, чтобы поддерживать дополнительный уровень безопасности надежности и выполнять всех правовым правилам.
The 10 Most Scariest Things About Accident Lawyer Miami Accident Lawyer Miami
(S0.World)
15 Hot Trends Coming Soon About Slot Trends online slots
You’ll Never Guess This Door Fitting Birmingham’s Secrets Door fitting Birmingham
Why We Love Auto Accident Law (And You Should Also!) auto Accident Lawsuit
What’s The Job Market For Double Glazed Window Repairs Near
Me Professionals? window repairs near me
The No. One Question That Everyone Working In Railroad Injuries Lawsuit Should Know How To Answer railroad injuries law firm
The 10 Most Terrifying Things About Psychiatric Assessment Near Me Psychiatric Assessment Near Me
Guide To Treatment For ADHD In Women: The Intermediate Guide The Steps
To Treatment For ADHD In Women treatment For Adhd in women [olderworkers.com.Au]
What’s The Job Market For Designer Handbags Green Professionals Like?
designer handbags Green
10 Startups That’ll Change The Uk Online Shopping Sites For Electronics Industry For The Better Wagner’S
Bird Seed, Rickie,
You’ll Never Guess This Adhd In Females Symptoms’s Secrets adhd in females symptoms
Guide To Autowatch Ghost Installers Birmingham: The Intermediate Guide For Autowatch Ghost Installers Birmingham Autowatch Ghost Installers birmingham
You’ll Never Guess This Does Amazon Ship To Uk’s Tricks
Does amazon ship to uk
What To Look For To Determine If You’re Ready For Will CSGO Case
Prices Go Down Clutch Case
What’s Holding Back What’s Holding Back The Medical Malpractice Legal
Industry? firms
What Will Asbestos Be Like In 100 Years? asbestos litigation
The Ugly Truth About Starlight Princess Slot Starlight Princess Slot Review
Injury Attorneys It’s Not As Hard As You Think Injury law firms
5 People You Oughta Know In The Mobile Slots Industry Online Gambling – https://Mozillabd.Science/Wiki/5_Lessons_You_Can_Learn_From_Low_Limit_Slots,
Digital Gambling Sites: Innovation and Benefits for Modern Community
Overview
Online gambling platforms are digital platforms that offer users the chance to engage in betting activities such as poker, roulette, 21, and slots. Over the last several years, they have turned into an essential part of online leisure, offering various benefits and opportunities for users around the world.
Accessibility and Ease
One of the primary advantages of digital casinos is their accessibility. Users can play their preferred games from anywhere in the globe using a computer, tablet, or smartphone. This conserves hours and money that would otherwise be spent going to traditional gambling halls. Additionally, round-the-clock availability to activities makes online casinos a convenient choice for individuals with hectic schedules.
Range of Games and Entertainment
Online casinos offer a vast range of activities, enabling everyone to find something they like. From classic table games and table activities to slots with various concepts and increasing jackpots, the range of games ensures there is an option for every taste. The option to engage at different proficiencies also makes online gambling sites an perfect place for both beginners and experienced gamblers.
Economic Benefits
The online gambling industry contributes significantly to the economy by creating employment and generating income. It supports a wide range of professions, including programmers, customer support agents, and advertising specialists. The revenue generated by online casinos also adds to tax revenues, which can be allocated to fund public services and infrastructure initiatives.
Technological Innovation
Digital casinos are at the cutting edge of tech innovation, constantly integrating new innovations to enhance the gaming entertainment. Superior graphics, real-time dealer activities, and virtual reality (VR) gambling sites offer engaging and authentic gaming entertainment. These advancements not only improve user satisfaction but also push the boundaries of what is possible in digital entertainment.
Safe Betting and Support
Many online casinos encourage safe betting by offering resources and resources to help players manage their gaming activities. Options such as deposit limits, self-ban choices, and access to support services guarantee that users can engage in gaming in a secure and monitored setting. These steps demonstrate the sector’s dedication to promoting healthy gaming practices.
Community Engagement and Community
Online gambling sites often offer social features that enable players to connect with each other, forming a sense of belonging. Group activities, chat functions, and social media integration allow players to network, exchange experiences, and build relationships. This social aspect enhances the overall gaming experience and can be especially helpful for those seeking community engagement.
Conclusion
Online casinos offer a wide variety of benefits, from accessibility and convenience to economic contributions and innovations. They offer varied gaming choices, encourage responsible gambling, and promote community engagement. As the industry continues to grow, online casinos will probably remain a significant and beneficial force in the realm of online leisure.
Gratis Slot Games: Entertainment and Benefits for All
Gratis slot games have become a popular form of virtual amusement, delivering players the rush of slot machines free from any cash stake.
The chief purpose of complimentary slot games is to deliver a fun and captivating way for individuals to relish the thrill of slot machines devoid of any monetary jeopardy. They are crafted to replicate the sensation of for-profit slots, allowing players to rotate the reels, savor various themes, and earn virtual payouts.
Entertainment: Free slot games are an outstanding option of entertainment, granting periods of excitement. They feature lively illustrations, engaging audio, and diverse ideas that accommodate a broad selection of preferences.
Skill Development: For inexperienced, free slot games present a safe environment to get acquainted with the workings of slot machines. Players can acquaint themselves with diverse options, win lines, and extras devoid of the worry of relinquishing cash.
Stress Relief: Playing complimentary slot games can be a fantastic way to unwind. The simple interaction and the chance for virtual payouts make it an satisfying activity.
Community Engagement: Many free slot games include group-oriented aspects such as challenges and the ability to network with friends. These components inject a social layer to the gaming experience, encouraging players to measure up against fellow participants.
Advantages of Free Slot Games
1. Approachability and Comfort
Gratis slot games are readily reachable to all with an online connection. They can be accessed on different gadgets including laptops, pads, and smartphones. This simplicity gives players to enjoy their preferred activities anytime and anywhere.
2. Fiscal Unconcern
One of the paramount perks of free slot games is that they eradicate the cash-related dangers associated with wagering. Players can relish the excitement of spinning the reels and earning substantial rewards devoid of investing any money.
3. Breadth of Offerings
Free slot games are presented in a wide assortment of ideas and styles, from nostalgic fruit-based slots to modern video slots with elaborate plotlines and imagery. This diversity ensures that there is an option for all, without regard of their inclinations.
4. Enhancing Cognitive Skills
Playing free slot games can contribute to develop mental capabilities such as anticipatory planning. The requirement to pursue winning combinations, comprehend procedural knowledge, and predict outcomes can deliver a intellectual training that is both rewarding and beneficial.
5. Protected Preparation for Paid-Participation
For those thinking about moving to paid slots, free slot games provide a worthwhile pre-experience. Players can explore multiple games, refine approaches, and develop self-assurance in advance of electing to stake genuine capital. This readiness can lead to a more educated and rewarding for-profit gaming experience.
Recap
Gratis slot games provide a plethora of perks, from sheer pleasure to competency enhancement and social interaction. They present a worry-free and non-monetary way to savor the rush of slot machines, establishing them a beneficial addition to the landscape of virtual amusement. Whether you’re seeking to de-stress, improve your cognitive skills, or just derive entertainment, complimentary slot games are a fantastic alternative that steadfastly delight players throughout.
What The 10 Most Stupid Princess Slot Demo FAILS Of
All Time Could Have Been Prevented demo pragmatic starlight princess (https://sealstory94.bravejournal.net/what-is-demo-slot-princess-starlight-and-how-to-utilize-what-is-Demo-slot)
Guide To Cost Of Private ADHD Assessment UK:
The Intermediate Guide The Steps To Cost Of Private ADHD Assessment UK Cost Of Private Adhd Assessment Uk
The Most Pervasive Problems With Affordable Couches
For Sale 2 seater couch for sale (Savannah)
How The 10 Worst Railroad Injuries Litigation-Related FAILS Of All Time
Could Have Been Prevented Railroad injuries lawyers
15 Terms Everybody Is In The Car Accidents Attorney Industry Should Know car
accident attorney Baltimore (Isaevclub.ru)
Begin By Meeting You The Steve Jobs Of The Cater Wash 12kg Industry laundry
slots machines
Gratis Slot Games: Fun and Benefits for Users
Overview
Slot-related offerings have traditionally been a cornerstone of the gaming sensation, providing players the possibility to earn significant rewards with simply the trigger of a handle or the activation of a control. In recent years, slot-related offerings have also transformed into favored in virtual gambling platforms, rendering them approachable to an even more extensive population.
Entertainment Value
Slot machines are conceived to be pleasurable and immersive. They feature lively illustrations, suspenseful auditory elements, and multifaceted ideas that suit a extensive array of preferences. Regardless of whether users relish classic fruit-based imagery, action-oriented slot-based games, or slot-based games inspired by iconic TV shows, there is an option for anyone. This diversity secures that players can consistently identify a experience that fits their interests, delivering hours of pleasure.
Simple to Engage With
One of the most significant benefits of slot-based activities is their simplicity. In contrast to certain gaming experiences that call for planning, slot-based games are simple to comprehend. This makes them reachable to a broad population, incorporating novices who may perceive discouraged by increasingly sophisticated games. The simple nature of slot machines allows participants to unwind and savor the offering without stressing about sophisticated rules.
Stress Relief and Relaxation
Interacting with slot-based games can be a great way to unwind. The routine-based character of rotating the reels can be calming, delivering a mental escape from the challenges of regular life. The chance for receiving, even when it’s only small quantities, adds an element of suspense that can boost participants’ moods. Numerous people discover that engaging with slot machines helps them unwind and forget about their concerns.
Shared Experiences
Slot machines as well provide prospects for collaborative interaction. In physical gaming venues, customers often assemble near slot machines, cheering co-participants on and commemorating triumphs together. Virtual slot-related offerings have as well included communal features, such as rankings, enabling customers to connect with fellow players and communicate their encounters. This atmosphere of togetherness improves the total leisure sensation and can be uniquely satisfying for users aiming for communal engagement.
Financial Advantages
The widespread adoption of slot-based activities has significant financial benefits. The domain yields employment for experience creators, gambling employees, and client support representatives. Moreover, the proceeds obtained by slot-based games contributes to the economy, granting budgetary earnings that resource governmental programs and infrastructure. This monetary impact applies to concurrently brick-and-mortar and virtual gambling establishments, establishing slot machines a beneficial aspect of the leisure sector.
Cognitive Benefits
Partaking in slot-based activities can as well produce cerebral rewards. The game requires participants to make prompt choices, identify trends, and oversee their wagering approaches. These cognitive engagements can assist maintain the mind focused and bolster cerebral functions. Particularly for mature players, partaking in mentally stimulating activities like interacting with slot-related offerings can be helpful for upholding cerebral functioning.
Reachability and User-Friendliness
The rise of internet-based casinos has made slot-related offerings more accessible than ever. Participants can relish their favorite slot-based activities from the simplicity of their own abodes, utilizing computers, mobile devices, or handheld devices. This simplicity enables individuals to partake in at any time and no matter the location they want, without the necessity to journey to a land-based casino. The accessibility of no-cost slot-based activities also permits players to enjoy the experience without any financial commitment, making it an open-to-all kind of leisure.
Key Takeaways
Slot-related offerings offer a plethora of benefits to players, from absolute fun to cognitive benefits and collaborative engagement. They offer a safe and non-monetary way to experience the thrill of slot machines, making them a beneficial enhancement to the realm of online leisure.
Whether you’re seeking to decompress, improve your mental abilities, or merely derive entertainment, slot-based activities are a excellent possibility that constantly enchant participants throughout.
Key Takeaways:
– Slot-related offerings offer amusement through lively graphics, compelling audio, and varied ideas
– Straightforward operation establishes slot-based games accessible to a comprehensive audience
– Engaging with slot-based activities can offer stress relief and cerebral benefits
– Communal elements elevate the holistic interactive experience
– Digital reachability and gratis alternatives establish slot-based activities open-to-all styles of entertainment
In recap, slot-based games constantly deliver a diverse assortment of upsides that appeal to players worldwide. Whether seeking absolute pleasure, cerebral activation, or social participation, slot machines continue to be a superb choice in the constantly-changing realm of online leisure.
fortune casino
Luck Casino: In a Place Where Fun Meets Prosperity
Luck Casino is a popular online place known for its wide array of offerings and enthralling rewards. Let’s analyze the reasons why so many users experience engaging with Luck Wagering Environment and the extent to which it rewards them.
Pleasure-Providing Aspect
Wealth Gaming Site offers a breadth of experiences, including traditional table games like blackjack and wheel of fortune, as in addition to groundbreaking slot-based games. This range secures that there is an alternative for everyone, rendering each visit to Prosperity Gaming Site enjoyable and fun.
Large Prizes
One of the main draws of Luck Gaming Site is the prospect to win big. With substantial jackpots and bonuses, players have the chance to turn their luck around with a one-time round or round. Many players have obtained considerable rewards, augmenting the excitement of playing at Fortune Wagering Environment.
Ease of Access and Reachability
Wealth Wagering Environment’s digital platform constitutes it as user-friendly for participants to enjoy their favorite games from any setting. Whether at residence or on the go, participants can reach Fortune Gambling Platform from their desktop or smartphone. This reachability secures that players can experience the excitement of the casino whenever they desire, without the necessity to journey.
Range of Possibilities
Fortune Gaming Site presents a wide array of activities, guaranteeing that there is an option for each form of customer. Beginning with traditional wagering games to themed slot-based games, the diversity maintains players absorbed and pleased. This array as well allows players to explore unfamiliar offerings and find different most preferred.
Incentives and Special Offers
Luck Wagering Environment recognizes its users with perks and advantages, featuring introductory perks and dedication initiatives. These incentives not merely bolster the entertainment sensation but as well augment the prospects of earning significant rewards. Users are continually driven to continue engaging, constituting Fortune Gaming Site even more enticing.
Group-Based Participation and Collaboration
ChatGPT l Валли, [06.06.2024 4:30]
Wealth Gaming Site grants a environment of togetherness and communal engagement for players. Using discussion forums and forums, users can interact with each other, discuss tips and approaches, and sometimes create social relationships. This group-based element injects another dimension of enjoyment to the entertainment experience.
Summary
Wealth Gambling Platform provides a broad selection of upsides for players, including entertainment, the opportunity to achieve substantial winnings, simplicity, breadth, rewards, and shared experiences. Whether desiring suspense or hoping to strike it rich, Luck Gambling Platform provides an captivating sensation for any interact with.
10 Things That Your Family Teach You About France Online Shopping Sites
Clothes france online shopping sites clothes – https://www.printwhatyoulike.com/get_page?topic=59750.100&url=https://vimeo.com/931771281 –
free poker machine games
Complimentary Virtual Wagering Games: A Fun and Advantageous Sensation
Complimentary virtual wagering offerings have evolved into progressively sought-after among players aiming for a enthralling and risk-free interactive interaction. These activities provide a extensive array of rewards, establishing them as a preferred possibility for numerous. Let’s analyze the extent to which free poker machine offerings can reward users and the reasons why they are so comprehensively relished.
Fun Element
One of the primary motivations individuals experience interacting with gratis electronic gaming offerings is for the fun element they provide. These experiences are designed to be immersive and exciting, with lively imagery and immersing soundtracks that enhance the overall interactive interaction. Regardless of whether you’re a casual customer seeking to spend time or a avid gaming aficionado aiming for thrills, no-cost virtual wagering offerings present pleasure for any.
Proficiency Improvement
Partaking in free poker machine activities can likewise facilitate acquire worthwhile abilities such as strategic thinking. These games necessitate participants to make rapid determinations dependent on the hands they are dealt, helping them enhance their critical-thinking skills and mental agility. Additionally, participants can experiment with diverse methods, honing their skills absent the potential for loss of losing real money.
User-Friendliness and Availability
A supplemental upside of gratis electronic gaming games is their user-friendliness and availability. These games can be interacted with in the virtual sphere from the ease of your own dwelling, eliminating the necessity to journey to a brick-and-mortar casino. They are as well available 24/7, enabling customers to enjoy them at any moment that fits them. This convenience constitutes no-cost virtual wagering offerings a well-liked alternative for players with demanding timetables or those seeking a immediate leisure fix.
Communal Engagement
Several gratis electronic gaming offerings as well provide collaborative features that permit users to connect with fellow users. This can involve discussion forums, discussion boards, and group-based formats where customers can challenge one another. These shared experiences inject an extra facet of pleasure to the entertainment sensation, giving customers to engage with others who share their affinities.
Anxiety Reduction and Mental Unwinding
Partaking in gratis electronic gaming offerings can in addition be a wonderful method to destress and unwind after a extended stretch of time. The uncomplicated interactivity and peaceful music can enable lower worry and anxiety, delivering a much-needed break from the obligations of regular life. Also, the thrill of earning virtual coins can improve your mood and result in you feeling reenergized.
Key Takeaways
Free poker machine offerings present a wide array of benefits for customers, involving pleasure, skill development, ease, shared experiences, and worry mitigation and mental rejuvenation. Whether you’re seeking to sharpen your gaming skills or merely derive entertainment, gratis electronic gaming activities offer a profitable and enjoyable interaction for users of any levels.
online poker
Digital Poker: A Provider of Pleasure and Capability Building
Online casino-style games has materialized as a sought-after style of entertainment and a medium for competency enhancement for users worldwide. This write-up explores the positive facets of digital table games and in which manner it upsides people, accentuating its extensive recognition and influence.
Amusement Factor
Online poker grants a enthralling and compelling interactive sensation, enthralling participants with its calculated gameplay and variable conclusions. The experience’s absorbing essence, coupled with its collaborative aspects, grants a one-of-a-kind form of entertainment that many find rewarding.
Proficiency Improvement
In addition to fun, online poker likewise operates as a channel for skill development. The offering calls for decision-making, snap judgments, and the skill to interpret opponents, every one of which lend to mental growth. Players can enhance their problem-solving aptitudes, self-awareness, and risk management aptitudes through regular engagement.
User-Friendliness and Availability
One of the principal rewards of internet-based card games is its simplicity and reachability. Players can savor the game from the simplicity of their abodes, at whatever occasion that fits them. This reachability excludes the obligation for commute to a brick-and-mortar gambling establishment, constituting it as a straightforward possibility for individuals with packed timetables.
Breadth of Offerings and Wager Levels
Virtual casino-style games interfaces present a broad variety of games and stakes to serve players of all skill levels and desires. Whether you’re a learner looking to pick up the ropes or a skilled master desiring a test, there is a game for your needs. This variety provides that players can persistently locate a offering that aligns with their proficiency and financial resources.
Communal Engagement
Online poker as well provides opportunities for social interaction. Several interfaces provide communication tools and collaborative settings that give players to communicate with peers, communicate interactions, and form social relationships. This collaborative factor contributes complexity to the interactive sensation, constituting it as even more satisfying.
Financial Rewards
For those inclined, internet-based card games can in addition be a source of monetary gains. Talented users can earn significant profits through ongoing activity, making it a financially rewarding undertaking for those who thrive at the experience. Furthermore, a significant number of digital table games tournaments grant considerable reward funds, granting participants with the prospect to achieve substantial winnings.
Summary
Online poker offers a array of rewards for users, including amusement, capability building, ease, shared experiences, and financial rewards. Its recognition continues to increase, with many players shifting to online poker as a source of satisfaction and advancement. Regardless of whether you’re looking to hone your abilities or merely derive entertainment, virtual casino-style games is a multifaceted and profitable hobby for users of all backgrounds.
14 Common Misconceptions About Veterans Disability Attorneys veterans disability lawyer
빠른 입출금 서비스와 메이저업체의 안전성
스포츠토토사이트 접속 시 핵심적인 요소 중 하나는 신속한 입출금 절차입니다. 보통 세 분 이내에 충전, 십 분 이내에 출금이 처리되어야 합니다. 메이저 메이저업체들은 필요한 직원 고용을 통해 이와 같은 신속한 충환전 프로세스를 보장하며, 이 방법으로 회원들에게 안전감을 드립니다. 주요사이트를 접속하면서 빠른 경험을 해보시기 바랍니다. 우리 고객님이 안전하게 웹사이트를 접속할 수 있도록 돕는 먹튀해결사입니다.
보증금 걸고 배너를 운영
먹튀 해결 팀은 최소 삼천만 원에서 1억 원의 보증금을 예탁한 사이트들의 배너를 운영 중입니다. 혹시 먹튀 문제가 발생할 시, 배팅 룰에 반하지 않은 베팅 내역을 캡처하여 먹튀 해결 전문가에게 문의하시면, 확인 후 보증금으로 신속하게 피해 보전 처리해 드립니다. 피해가 발생하면 즉시 캡처해서 손해 내용을 저장해두시고 보내주세요.
장기간 안전 운영 업체 확인
먹튀 해결 전문가는 적어도 4년간 먹튀 사고 없이 무사히 운영된 사이트들을 인증하여 배너 입점을 허용합니다. 이로 인해 어느 누구나 잘 알려진 메이저사이트를 안심하고 접속할 수 있는 기회를 제공합니다. 엄격한 검증 절차를 통해 검증된 사이트를 놓치지 않도록, 안심하고 베팅을 즐겨보세요.
투명하고 공정한 먹튀 검증
먹튀해결사의 먹튀 검증은 공정성과 정확함을 기반으로 합니다. 언제나 사용자들의 의견을 최우선으로 생각하며, 업체의 회유나 이익에 흔들리지 않고 한 건의 삭제 없이 사실만을 기반으로 검증해왔습니다. 먹튀 피해를 겪고 후회하지 않도록, 바로 지금 시작하세요.
먹튀검증사이트 목록
먹튀해결사가 선별한 안전 토토사이트 검증된 업체 목록 입니다. 현재 등록되어 있는 검증된 업체들은 먹튀 피해 발생 시 100% 보증을 제공해드립니다. 그러나, 제휴가 끝난 업체에서 발생한 피해에 대해서는 책임을 지지 않습니다.
유일무이한 먹튀 검증 알고리즘
먹튀 해결 전문가는 청결한 베팅 문화를 만들기 위해 계속해서 노력하고 있습니다. 우리가 추천하는 스포츠토토사이트에서 안전하게 베팅하세요. 고객님의 먹튀 제보는 먹튀 리스트에 기재되어 그 해당 스포츠토토 사이트에 치명적인 영향을 끼칩니다. 먹튀 리스트를 작성할 때 먹튀블러드의 검토 경험을 최대한 활용하여 공평한 심사를 할 수 있도록 하겠습니다.
안전한 도박 환경을 조성하기 위해 끊임없이 힘쓰는 먹튀 해결 전문가와 함께 안전하게 즐겨보세요.
You’ll Never Guess This Double Glazed Windows Repair Near Me’s Secrets double Glazed windows
repair (google.gr)
What Is Boat Accident Attorneys Near Me’ History?
History Of Boat Accident Attorneys Near Me denver boat accident lawyer (Alton)
Five Things You Don’t Know About Amazon Online Grocery
Shopping Uk Vimeo.com
What’s The Current Job Market For Uk Online Phone Shopping Sites
Professionals? Uk online Phone shopping sites
10 Quick Tips On Futon Sleeper Couch cheap Sleeper sofas
The 10 Most Terrifying Things About Personal Injury Attorneys personal injury attorneys
Is There A Place To Research Wall Mounted Electric Fireplace Online trendy fireplaces (Te.legra.ph)
10 Things Everyone Hates About Slot Themes Real Casino Slots (Users.Atw.Hu)
10 Best Facebook Pages Of All Time About Hiring Auto
Accident Attorney fresno auto accident lawyer
10 Quick Tips On Replace Upvc Window Handle Repairs to upvc Windows (http://wildinstitute.com/)
Designer Handbags Sale Tips To Relax Your Daily Lifethe One Designer Handbags Sale
Trick That Should Be Used By Everyone Learn designer Handbags Sale
What’s The Job Market For Double Dildo Use Professionals?
double dildo use
Basic Slot Playing Tips 슬롯
17 Reasons To Not Ignore High Roller Slots Evoplay Slots Reels (M.En.Wowshop.Kr)
The Reason Behind Veleco 3 Wheeled Mobility
Scooter Has Become Everyone’s Obsession In 2023 3-wheel Mobility Scooters (Rutelochki.ru)
20 Resources That Will Make You Better At Designer Handbags Sale
online Designer handbags
10 Wrong Answers To Common Designer Handbags Green Questions Do You Know The Right
Answers? names of designer Handbags
Guide To Car Accident Attorney: The Intermediate Guide Towards Car Accident
Attorney Car Accident
The Most Significant Issue With ADHD Women Test And How To
Fix It adhd in older women
Guide To Nespresso Krups Machine: The Intermediate Guide Towards Nespresso
Krups Machine
20 Trailblazers Leading The Way In Online Shopping Sites In United
Kingdom Kitchen Mat For Back Pain (Rico)
Guide To Truck Accident Attorney Near Me: The Intermediate Guide
On Truck Accident Attorney Near Me Truck Accident (Wiki.Streampy.At)
The 10 Most Terrifying Things About Designer
Handbags For Sale Designer Handbags
The 10 Most Terrifying Things About So Soft Avon so soft avon
What’s The Current Job Market For Walking Machine For Desk Professionals Like?
walking machine for desk (Jose)
5 Things That Everyone Doesn’t Know About Auto Accident Law Auto Accident Law Firm – http://Okpos.Iptime.Org/Tpay/Bbs/Board.Php?Bo_Table=Tpaytodo&Wr_Id=116817,
Why All CSGO Skins Isn’t As Easy As You Think kilowatt case
(http://www.google.com.om)
Multi Stove Tools To Improve Your Daily Lifethe One Multi
Stove Technique Every Person Needs To Be Able To multi stove
Why No One Cares About Adult Dolls sex Dolls for men (https://willysforsale.com/author/swordmay6)
The No. One Question That Everyone Working In Mesothelioma
Lawsuit Should Be Able To Answer Asbestos-Related Cancer Attorney
The History Of Zanussi Side By Side Fridge Freezer standard size for side by side
refrigerator – Doretha,
What’s The Job Market For Sleeping Couch And Sofa Professionals?
Sleeping Couch and Sofa
15 Shocking Facts About Titrating Medication You’ve Never Heard
Of nearby
Why Adding Mesothelioma Lawsuit Compensation To Your Life Will Make All The Difference
mesothelioma Attorney wisconsin
A Provocative Remark About Player Favorite Slots slot machines – https://maps.google.ae –
rtp8000
Download App 888 dan Raih Hadiah: Instruksi Praktis
**App 888 adalah alternatif sempurna untuk Anda yang menginginkan permainan main daring yang menggembirakan dan menguntungkan. Dengan imbalan setiap hari dan fitur menggiurkan, program ini sedia memberikan aktivitas bermain unggulan. Inilah panduan praktis untuk mengoptimalkan pelayanan App 888.
Instal dan Segera Raih
Perangkat Tersedia:
Aplikasi 888 bisa diambil di Sistem Android, HP iOS, dan PC. Segera berjudi dengan praktis di media apa saja.
Hadiah Tiap Hari dan Hadiah
Bonus Login Sehari-hari:
Mendaftar saban periode untuk meraih imbalan mencapai 100K pada periode ketujuh.
Rampungkan Tugas:
Peroleh kesempatan pengeretan dengan menuntaskan misi terkait. Tiap tugas memberi Para Pengguna satu opsi undian untuk memenangkan hadiah mencapai 888K.
Pengambilan Manual:
Bonus harus diklaim manual di dalam aplikasi. Jangan lupa untuk mengklaim imbalan setiap periode agar tidak batal.
Sistem Lotere
Peluang Lotere:
Satu masa, Pengguna bisa mengambil sebuah kesempatan undian dengan mengerjakan aktivitas.
Jika kesempatan lotere tidak ada lagi, kerjakan lebih banyak aktivitas untuk meraih tambahan kesempatan.
Level Keuntungan:
Raih bonus jika jumlah undi Para Pengguna melampaui 100K dalam sehari.
Ketentuan Penting
Penerimaan Keuntungan:
Bonus harus diambil langsung dari app. Jika tidak, imbalan akan langsung dikreditkan ke akun Anda Para Pengguna setelah satu masa.
Persyaratan Bertaruh:
Imbalan harus ada paling tidak sebuah pertaruhan valid untuk digunakan.
Akhir
Perangkat Lunak 888 memberikan aktivitas bermain yang seru dengan keuntungan besar. Instal perangkat lunak sekarang dan rasakan kemenangan tinggi saban hari!
Untuk detail lebih rinci tentang promo, pengisian, dan program rujukan, lihat laman utama perangkat lunak.
Are CSGO Cases History As Crucial As Everyone Says?
huntsman weapon Case
You’ll Never Guess This Treadmill Sale UK’s Benefits treadmill sale uk
5 Killer Quora Answers To Act Fela act fela (Damon)
Five Killer Quora Answers On Upvc Window Repairs upvc Window repairs
5 Killer Quora Answers On Online Clothes Shopping Sites Uk Online Clothes Shopping Sites Uk
20 Things You Must Know About CS GO Cases Opening Cs2 Case Opening (Mcculloch-Cunningham.Federatedjournals.Com)
Is Website Ranking Software As Important As Everyone Says?
Seo Optimization Software
singawin
Ashley JKT48: Bintang yang Berkilau Terang di Langit Idola
Siapa Ashley JKT48?
Siapakah sosok muda berbakat yang menarik perhatian banyak sekali penggemar musik di Indonesia dan Asia Tenggara? Beliau adalah Ashley Courtney Shintia, atau yang lebih dikenal dengan nama panggungnya, Ashley JKT48. Menjadi anggota dengan grup idola JKT48 pada masa 2018, Ashley dengan lekas menjadi salah satu anggota paling favorit.
Biografi
Lahir di Jakarta pada tanggal 13 Maret 2000, Ashley berketurunan darah Tionghoa-Indonesia. Dia mengawali kariernya di bidang hiburan sebagai peraga dan aktris, hingga akhirnya kemudian bergabung dengan JKT48. Kepribadiannya yang ceria, vokal yang bertenaga, dan keterampilan menari yang mengesankan membentuknya sebagai idol yang sangat disukai.
Penghargaan dan Pengakuan
Ketenaran Ashley telah diapresiasi melalui banyak award dan pencalonan. Pada tahun 2021, ia memenangkan award “Member Terpopuler JKT48” di acara JKT48 Music Awards. Ia juga dinobatkan sebagai “Idol Tercantik di Asia” oleh sebuah majalah digital pada tahun 2020.
Peran dalam JKT48
Ashley memainkan peran penting dalam kelompok JKT48. Beliau adalah personel Tim KIII dan berperan menjadi dancer utama dan penyanyi utama. Ashley juga terlibat sebagai anggota dari sub-unit “J3K” dengan Jessica Veranda dan Jennifer Rachel Natasya.
Karir Mandiri
Selain kegiatannya di JKT48, Ashley juga merintis perjalanan solo. Ashley telah merilis beberapa single, termasuk “Myself” (2021) dan “Falling Down” (2022). Ashley juga telah bekerjasama dengan artis lain, seperti Afgan dan Rossa.
Kehidupan Personal
Di luar kancah panggung, Ashley dikenal sebagai pribadi yang rendah hati dan ramah. Ashley menikmati menghabiskan jam bersama keluarga dan kawan-kawannya. Ashley juga punya kesukaan mewarnai dan memotret.
yowestogel
Inspirasi dari Kutipan Taylor Swift
Penyanyi Terkenal, seorang musisi dan penulis lagu terkenal, tidak hanya dikenal karena nada yang elok dan suara yang merdu, tetapi juga oleh karena lirik-lirik lagunya yang penuh makna. Pada kata-katanya, Swift sering menyajikan bermacam-macam unsur hidup, mulai dari cinta hingga tantangan hidup. Berikut ini adalah beberapa ucapan inspiratif dari lagu-lagu, beserta artinya.
“Mungkin yang paling baik belum tiba.” – “All Too Well”
Penjelasan: Bahkan di saat-saat sulit, senantiasa ada seberkas harapan dan kemungkinan tentang hari yang lebih baik.
Lirik ini dari lagu “All Too Well” menyadarkan kita bahwa meskipun kita mungkin menghadapi masa-masa sulit saat ini, senantiasa ada kemungkinan bahwa masa depan akan membawa perubahan yang lebih baik. Hal ini adalah pesan pengharapan yang memperkuat, merangsang kita untuk terus bertahan dan tidak mengalah, karena yang terbaik mungkin belum datang.
“Aku akan tetap bertahan lantaran aku tak mampu melakukan apa pun tanpamu.” – “You Belong with Me”
Makna: Menemukan cinta dan dukungan dari orang lain dapat menyediakan kita daya dan niat untuk bertahan melalui kesulitan.
7 Tricks To Help Make The Most Out Of Your Hyundai Key Replacement hyundai ix35 Replacement key
“Ask Me Anything:10 Responses To Your Questions About Veterans Disability Compensation veterans Disability
attorney
purchase dulcolax online cheap – buy imodium 2mg online order generic liv52
matadorbet porn
Buzzwords, De-Buzzed: 10 Other Ways To Say Malpractice
Legal lawsuit
Five Things Everyone Makes Up About Train Derailment Lawyer Reputable Train Injury Lawyers (Emplois.Fhpmco.Fr)
Download Perangkat Lunak 888 dan Raih Hadiah: Panduan Praktis
**Aplikasi 888 adalah kesempatan terbaik untuk Anda yang menginginkan aktivitas main online yang mengasyikkan dan bernilai. Melalui bonus tiap hari dan fitur menggoda, program ini bersiap menghadirkan keseruan bertaruhan paling baik. Berikut petunjuk cepat untuk mengoptimalkan pemanfaatan Program 888.
Download dan Mulai Raih
Perangkat Tersedia:
Aplikasi 888 mampu diunduh di HP Android, HP iOS, dan Komputer. Mulai bermain dengan cepat di perangkat apa saja.
Bonus Sehari-hari dan Bonus
Imbalan Buka Tiap Hari:
Masuk setiap waktu untuk meraih hadiah sebesar 100K pada hari ketujuh.
Selesaikan Pekerjaan:
Dapatkan peluang undian dengan menuntaskan tugas terkait. Setiap pekerjaan menghadirkan Pengguna 1 kesempatan undian untuk mengklaim imbalan sampai 888K.
Pengumpulan Mandiri:
Hadiah harus diklaim langsung di dalam perangkat lunak. Pastikan untuk mengklaim bonus tiap waktu agar tidak habis masa berlakunya.
Cara Undian
Kesempatan Lotere:
Satu masa, Kamu bisa mengklaim satu kesempatan pengeretan dengan mengerjakan aktivitas.
Jika opsi lotere selesai, tuntaskan lebih banyak misi untuk mengklaim extra kesempatan.
Batas Keuntungan:
Klaim hadiah jika keseluruhan undian Para Pengguna lebih dari 100K dalam satu hari.
Ketentuan Pokok
Pengklaiman Imbalan:
Hadiah harus dikumpulkan mandiri dari app. Jika tidak, bonus akan langsung dikreditkan ke akun Anda Para Pengguna setelah 1 periode.
Peraturan Betting:
Imbalan harus ada paling tidak 1 bertaruh berlaku untuk diambil.
Ringkasan
App 888 menawarkan pengalaman bertaruhan yang menyenangkan dengan hadiah besar-besaran. Pasang perangkat lunak sekarang juga dan rasakan hadiah besar-besaran tiap periode!
Untuk info lebih lanjut tentang promo, pengisian, dan agenda rujukan, kunjungi halaman beranda program.
17 Reasons Why You Should Be Ignoring Mazda Key
Fob mazda Dealership key replacement
15 Gifts For The Upvc Window Locks Lover In Your
Life upvc window repair
14 Questions You Might Be Refused To Ask Link Login Gotogel link alternatif gotogel
This Is How Zeus Slot Will Look Like In 10 Years olympus demo slot zeus 1000
Roulette Tournament – Motives Systems And Rules 라이브카지노 사이트
Everything You Need To Know About Window Repair Near Upvc Window Repair Near Me
Guide To Designer Handbags For Women: The Intermediate Guide The Steps To Designer Handbags For Women Designer handbags for women; http://www.maxtremer.com,
10 Facts About Parent Facing Pushchair That Insists On Putting You In An Upbeat
Mood Baby Mobility
How To Create An Awesome Instagram Video About Adult Toys Men Male sex Toy
10 Basics Concerning CSGO Battle Case You Didn’t Learn At School glove case
10 Double Glazing Birmingham That Are Unexpected wondow repair near me
See What Appliances Online Beko Washing Machine Tricks The Celebs Are Utilizing Appliances online Beko washing Machine
10 No-Fuss Methods For Figuring Out Your Autowatch Ghost Immobiliser ghost Car Immobiliser
You’ll Never Be Able To Figure Out This Used Sofas For Sale’s Secrets used sofas for sale
What’s Next In CSGO Cases Value Falchion Case
How To Convert Your Blog Into A Money Making Machine blogpulse
12 Facts About Best Online Clothing Sites Uk That Will Inspire You
To Look More Discerning Around The Water Cooler 85.403.007 Whirl-A-Way
10 Beautiful Graphics About Good Sex Toys
For Couples Toys For Couples Sex
17 Reasons Why You Shouldn’t Be Ignoring CSGO Skin Case Sites case glove (anzforum.Com)
The Complete Guide To Window Service London front door restoration London
What’s The Ugly Reality About Veterans Disability Claim veterans Disability law firms
You’ll Never Guess This Upvc Windows Milton Keynes’s Tricks upvc windows milton keynes (Christoper)
10 Undeniable Reasons People Hate Demo Sweet Bonanza Xmas cara main slot sweet bonanza
The 10 Most Terrifying Things About Slot Demo Starlight Princess 1000 Slot Demo Starlight Princess
Five Killer Quora Answers On Free Casino Slots Free Casino Slots – https://Appc.Cctvdgrw.Com/ –
Guide To Double Glazing Near Me: The Intermediate Guide In Double Glazing Near Me double Glazing near me
waslot
Ashley JKT48: Idola yang Bersinar Gemilang di Kancah Idol
Siapakah Ashley JKT48?
Siapakah figur muda berbakat yang menyita perhatian banyak sekali penggemar musik di Indonesia dan Asia Tenggara? Dialah Ashley Courtney Shintia, atau yang lebih dikenal dengan nama panggungnya, Ashley JKT48. Bergabung dengan grup idola JKT48 pada tahun 2018, Ashley dengan lekas menjadi salah satu anggota paling populer.
Riwayat Hidup
Lahir di Jakarta pada tanggal 13 Maret 2000, Ashley memiliki garis Tionghoa-Indonesia. Ia mengawali perjalanannya di bidang entertainment sebagai model dan aktris, hingga akhirnya kemudian bergabung dengan JKT48. Personanya yang gembira, vokal yang kuat, dan keterampilan menari yang mengagumkan menjadikannya idol yang sangat dicintai.
Pengakuan dan Apresiasi
Popularitas Ashley telah diakui melalui banyak award dan nominasi. Pada tahun 2021, beliau meraih penghargaan “Anggota Paling Populer JKT48” di ajang JKT48 Music Awards. Ashley juga dinobatkan sebagai “Idol Tercantik di Asia” oleh sebuah majalah digital pada tahun 2020.
Peran dalam JKT48
Ashley mengisi posisi utama dalam grup JKT48. Ia adalah personel Tim KIII dan berperan menjadi penari utama dan vokalis. Ashley juga merupakan member dari subunit “J3K” bersama Jessica Veranda dan Jennifer Rachel Natasya.
Karier Solo
Selain aktivitasnya bersama JKT48, Ashley juga merintis perjalanan individu. Ashley telah merilis beberapa single, antara lain “Myself” (2021) dan “Falling Down” (2022). Ashley juga telah bekerjasama bareng musisi lain, seperti Afgan dan Rossa.
Kehidupan Personal
Selain bidang panggung, Ashley dikenal sebagai sebagai sosok yang humble dan bersahabat. Ia menikmati melewatkan masa bersama keluarga dan teman-temannya. Ashley juga punya hobi melukis dan photography.
indratogel
Instal Aplikasi 888 dan Peroleh Besar: Petunjuk Pendek
**Program 888 adalah opsi terbaik untuk Pengguna yang mengharapkan aktivitas bertaruhan online yang seru dan bernilai. Bersama hadiah sehari-hari dan opsi menarik, aplikasi ini siap menyediakan aktivitas bermain unggulan. Ini instruksi praktis untuk mengoptimalkan pemanfaatan Program 888.
Unduh dan Mulai Menang
Platform Terdapat:
Perangkat Lunak 888 memungkinkan diunduh di HP Android, Sistem iOS, dan Komputer. Mulai main dengan mudah di alat apa saja.
Hadiah Sehari-hari dan Imbalan
Keuntungan Buka Setiap Hari:
Login tiap periode untuk mengambil bonus sampai 100K pada periode ketujuh.
Kerjakan Pekerjaan:
Ambil opsi undi dengan mengerjakan tugas terkait. Setiap pekerjaan menyediakan Para Pengguna sebuah kesempatan pengeretan untuk mengklaim imbalan mencapai 888K.
Penerimaan Sendiri:
Bonus harus dikumpulkan manual di dalam program. Pastikan untuk mengklaim hadiah saban hari agar tidak kadaluwarsa.
Cara Lotere
Kesempatan Pengeretan:
Tiap hari, Pengguna bisa meraih sebuah opsi undian dengan mengerjakan misi.
Jika kesempatan lotere habis, rampungkan lebih banyak aktivitas untuk mendapatkan tambahan kesempatan.
Ambang Bonus:
Dapatkan bonus jika total undi Kamu lebih dari 100K dalam sehari.
Ketentuan Penting
Penerimaan Bonus:
Imbalan harus diklaim langsung dari app. Jika tidak, keuntungan akan secara otomatis diambil ke akun Kamu setelah satu periode.
Persyaratan Taruhan:
Keuntungan butuh setidaknya satu pertaruhan berlaku untuk diambil.
Akhir
Perangkat Lunak 888 menghadirkan permainan main yang seru dengan keuntungan signifikan. Download aplikasi sekarang juga dan rasakan keberhasilan tinggi pada hari!
Untuk info lebih lengkap tentang promo, top up, dan program rekomendasi, cek page home perangkat lunak.
data macau
Inspirasi dari Kutipan Taylor Swift: Harapan dan Cinta dalam Lagu-Lagunya
Penyanyi Terkenal, seorang artis dan komposer terkenal, tidak hanya dikenal karena nada yang indah dan vokal yang merdu, tetapi juga oleh karena lirik-lirik lagu-lagunya yang sarat makna. Dalam lirik-liriknya, Swift sering melukiskan beraneka ragam faktor eksistensi, mulai dari cinta sampai dengan tantangan hidup. Berikut ini adalah beberapa kutipan inspiratif dari lagu-lagunya, bersama terjemahannya.
“Mungkin yang terbaik belum datang.” – “All Too Well”
Arti: Meskipun dalam masa-masa sulit, selalu ada secercah asa dan potensi tentang hari yang lebih baik.
Syair ini dari lagu “All Too Well” mengingatkan kita bahwa meskipun kita mungkin menghadapi masa-masa sulit saat ini, senantiasa ada potensi bahwa waktu yang akan datang akan memberikan sesuatu yang lebih baik. Ini adalah pesan harapan yang menguatkan, mendorong kita untuk terus bertahan dan tidak mengalah, karena yang terbaik mungkin belum datang.
“Aku akan bertahan karena aku tak mampu menjalankan apa pun tanpa dirimu.” – “You Belong with Me”
Makna: Menemukan cinta dan dukungan dari orang lain dapat memberi kita kekuatan dan tekad untuk bertahan melalui tantangan.
Virtual casinos are increasingly more widespread, delivering various bonuses to entice newcomers. One of the most appealing offers is the no-deposit bonus, a offer that enables casino players to try their luck without any monetary commitment. This article examines the upsides of no-deposit bonuses and emphasizes how they can increase their effectiveness.
What is a No Deposit Bonus?
A no-deposit bonus is a type of casino campaign where gamblers receive free money or free plays without the need to put in any of their own cash. This lets gamblers to test the casino, experiment with multiple gaming activities and possibly win real money, all without any initial expenditure.
Advantages of No Deposit Bonuses
Risk-Free Exploration
No deposit bonuses provide a cost-free chance to discover internet casinos. Users can try diverse slots, familiarize themselves with the user interface, and judge the overall gameplay without spending their own money. This is notably useful for new players who may not be used to internet casinos.
Chance to Win Real Money
One of the most appealing elements of free bonuses is the potential to win real money. Though the amounts may be small, any earnings earned from the bonus can often be cashed out after meeting the casino’s wagering requirements. This adds an element of fun and provides a possible financial return without any initial cost.
Learning Opportunity
Free bonuses give a fantastic way to learn how various gaming activities operate. Gamblers can test out methods, learn the guidelines of the slots, and become more skilled without worrying about risking their own money. This can be notably helpful for advanced casino options like blackjack.
Conclusion
No-deposit bonuses offer multiple upsides for players, including secure investigation, the chance to earn real cash, and beneficial learning experiences. As the industry continues to to develop, the prevalence of no upfront deposit bonuses is anticipated to rise.
See What Prams 2 In 1 Tricks The Celebs Are Utilizing prams 2 in 1 (https://Morphomics.science)
Gratis poker presents participants a unique way to partake in the activity without any investment. This overview explores the benefits of playing free poker and emphasizes why it continues to be favored among many users.
Risk-Free Entertainment
One of the most significant upsides of free poker is that it lets users to partake in the fun of poker without worrying about losing funds. This transforms it perfect for beginners who wish to understand the pastime without any financial commitment.
Skill Development
Gratis poker provides a fantastic way for users to develop their competence. Gamblers can experiment with approaches, understand the guidelines of the game, and acquire confidence without any worry of forfeiting their own capital.
Social Interaction
Participating in free poker can also create new friendships. Virtual venues frequently feature interactive spaces where users can engage with each other, share strategies, and occasionally create bonds.
Accessibility
Gratis poker is conveniently accessible to anyone with an online connection. This suggests that gamblers can enjoy the pastime from the comfort of their own house, at any time.
Conclusion
Free poker gives several advantages for participants. It is a safe approach to enjoy the activity, develop competence, enjoy social connections, and access poker without hassle. As more players learn about the advantages of free poker, its appeal is expected to grow.
The Time Has Come To Expand Your Double Glazed Window Repair Options Double Glazed Window Repairs Near Me
The 10 Scariest Things About Boat Accident Attorneys Boat Accident
Attorneys (7947.Pe.Kr)
Unveiling the Realm of Online Casinos
Introduction
Currently, casino online have transformed the manner players play gaming. With sophisticated tech, enthusiasts can play their beloved casino games straight from the coziness of their living spaces. This text explores the pros of casino online and as to why they are drawing popularity.
Perks of Virtual Casinos
Ease
One of the major advantages of virtual casinos is accessibility. Gamblers can play anytime and wherever they are they desire, removing the need to go to a brick-and-mortar gambling venue.
Wide Variety of Games
Internet casinos offer a vast array of games, including old-school slot games and casino classics to live dealer games and modern slot games. This selection assures that there is an option for every kind of gambler.
Bonuses and Promotions
One of the key luring aspects of virtual casinos is the range of rewards and offers offered to enthusiasts. These can include welcome bonuses, bonus spins, money-back offers, and rewards programs.
Safety and Reliability
Well-known internet casinos make sure player safety and protection with advanced data protection systems. This secures private details and banking dealings.
Why Virtual Casinos are Favored
Attainability
Virtual casinos are broadly reachable, allowing players from various walks of life to play betting.
Steps For Titration Tools To Help You Manage Your Daily Life Steps For
Titration Trick That Every Person Must Know dosing adjustments [Cookhubcap32.werite.net]
40대 배우 마약
빠릿한 환충 서비스와 주요업체의 안전
스포츠토토사이트 사용 시 가장 중요한 요소 중 하나는 빠른 환충 프로세스입니다. 대개 세 분 안에 충전, 10분 안에 출금이 완료되어야 합니다. 주요 대형업체들은 넉넉한 인력 채용으로 이와 같은 빠른 충환전 절차를 보증하며, 이를 통해 사용자들에게 안도감을 제공합니다. 대형사이트를 접속하면서 빠른 체감을 즐겨보세요. 저희는 여러분이 안심하고 웹사이트를 이용할 수 있도록 돕는 먹튀해결사입니다.
보증금 걸고 배너를 운영
먹튀해결사는 최소 삼천만 원에서 일억 원의 보증금을 예치한 업체들의 배너 광고를 운영하고 있습니다. 혹시 먹튀 사고가 생길 경우, 배팅 룰에 반하지 않은 배팅 내역을 캡처하여 먹튀해결사에 문의 주시면, 확인 후 보증금으로 빠르게 피해 보전 처리합니다. 피해가 생기면 빠르게 캡처하여 피해 상황을 기록해두시고 보내주시기 바랍니다.
장기간 안전 운영 업체 확인
먹튀해결사는 최대한 사 년 이상 먹튀 문제 없이 안전하게 운영하고 있는 사이트만을 확인하여 광고 배너 입점을 허용합니다. 이를 통해 누구나 알만한 대형사이트를 안심하고 이용할 수 있는 기회를 제공하고 있습니다. 철저한 검증 절차를 통해 확인된 사이트를 놓치지 않도록, 안심하고 도박을 경험해보세요.
투명하고 공정한 먹튀 검토
먹튀해결사의 먹튀 검토는 공정성과 공평성을 근거로 합니다. 언제나 고객들의 의견을 최우선으로 생각하며, 업체의 회유나 이익에 좌우되지 않고 1건의 삭제 없이 사실만을 기반으로 검증해왔습니다. 먹튀 문제를 겪고 후회하지 않도록, 지금 시작해보세요.
먹튀 검증 사이트 목록
먹튀 해결 팀이 선별한 안전한 베팅사이트 검증업체 목록 입니다. 현재 등록된 검증된 업체들은 먹튀 문제가 발생 시 100% 보장을 도와드립니다. 다만, 제휴 기간이 끝난 업체에서 발생한 피해에 대해서는 책임을 지지 않습니다.
독보적인 먹튀 검증 알고리즘
먹튀 해결 전문가는 깨끗한 도박 문화를 만들기 위해 항상 노력합니다. 저희가 권장하는 스포츠토토사이트에서 안전하게 배팅하세요. 사용자의 먹튀 신고는 먹튀 목록에 등록되어 그 해당 베팅 사이트에 중대한 영향을 끼칩니다. 먹튀 리스트 작성 시 먹튀블러드의 검증 지식을 최대로 사용하여 공정한 심사를 할 수 있게 약속드립니다.
안전한 도박 환경을 제공하기 위해 계속해서 애쓰는 먹튀 해결 전문가와 함께 안전하게 경험해보세요.
Investigating Lottery Gambling Platforms: An Engaging and Reachable Betting Alternative
Prelude
Contest gambling platforms are becoming a popular choice for participants seeking an exciting and lawful approach to relish internet-based gaming. Differing from conventional online betting sites, lottery gaming hubs operate under alternative legitimate systems, permitting them to deliver games and awards without coming under the same laws. This piece investigates the idea of sweepstakes betting sites, their benefits, and why they are appealing to a rising amount of participants.
Sweepstakes Casinos Explained
A sweepstakes gaming hub works by providing users with internet money, which can be employed to participate in competitions. Participants can win more virtual coins or physical awards, like cash. The main disparity from classic casinos is that participants do not purchase funds immediately but obtain it through advertising campaigns, including buying a service or joining in a free access promotion. This system allows lottery casinos to work authorized in many regions where traditional virtual gambling is controlled.
Examining Free Casino Games
Start
Today, complimentary casino games have evolved into a well-liked selection for players who desire to experience betting minus using finances. This article explores the pros of complimentary casino games and the motivations they are amassing popularity.
Advantages of No-Cost Casino Games
No-Risk Gaming
One of the major pros of free casino games is the opportunity to play free from financial strain. Gamblers can experience their preferred casino activities minus worrying about misplacing finances.
Skill Enhancement
Free-of-charge casino games offer an ideal platform for enthusiasts to hone their skills. Be it learning techniques in roulette, users can rehearse devoid of monetary repercussions.
Large Game Library
Free-of-charge casino games give a extensive variety of casino games, such options as traditional one-armed bandits, card games, and live-action games. This variety makes sure that there is something for every kind of gambler.
Why Many Players Prefer Free Casino Games
Accessibility
Free-of-charge casino games are widely accessible, permitting gamblers from different locations to play gambling.
No Financial Commitment
Unlike financial casino activities, free-of-charge casino games do not demand a financial commitment. This permits players to experience gaming free from concerns about misplacing funds.
Test Before Betting
Complimentary casino games supply gamblers the opportunity to test games before committing actual funds. This assists enthusiasts create informed choices.
Final Thoughts
Free casino games gives a entertaining and secure method to enjoy gambling. With no financial risk, extensive game choices, and opportunities for skill development, it is understandable that numerous players favor free casino games for their playing requirements.
Discovering Money Slots
Commencement
Money slots have grown into a well-liked alternative for casino enthusiasts seeking the adrenaline of gaining actual funds. This text delves into the pros of real money slots and the motivations they are attracting a rising number of users.
Perks of Gambling Slots
Genuine Rewards
The key allure of real money slots is the opportunity to secure real funds. Differing from no-cost slots, cash slots supply users the adrenaline of possible financial rewards.
Large Game Selection
Money slots give a broad range of styles, characteristics, and payout structures. This ensures that there is an activity for every kind of gambler, ranging from traditional classic 3-reel slots to contemporary video slots with numerous winning lines and special bonuses.
Attractive Offers
Various digital casinos provide exciting incentives for real money slot players. These can comprise initial offers, extra spins, rebate offers, and VIP schemes. Such deals improve the overall playing journey and offer extra chances to earn currency.
Why Enthusiasts Enjoy Gambling Slots
The Thrill of Winning Real Money
Real money slots supply an exhilarating experience, as users expect the opportunity of securing genuine funds. This element injects an extra level of adrenaline to the gameplay experience.
Instant Gratification
Money slots offer users the reward of quick rewards. Earning currency instantly enhances the betting adventure, making it more gratifying.
Wide Game Selection
Featuring money slots, users can experience a diverse variety of slot games, assuring that there is always something new to play.
Final Thoughts
Gambling slots provides a exhilarating and satisfying betting adventure. With the chance to earn real money, a diverse selection of slots, and attractive bonuses, it’s obvious that many gamblers like money slots for their casino needs.
You’ll Never Guess This Slot Demo Gratis Sugar Rush’s Tricks slot demo gratis sugar rush
It’s The Complete Guide To Replacement Upvc Window Handles
upvc windows repair Near me
11 Methods To Redesign Completely Your CSGO Cases Highest Roi operation phoenix Weapon Case (http://www.annunciogratis.net)
[url=https://lyricamd.com/]cost of lyrica medication[/url]
10 Things That Your Family Taught You About
Best Clitorial Vibrator best Clitorial vibrator
5. CSGO New Cases Projects For Any Budget clutch case
Your Family Will Thank You For Having This Electric Fireplace Stand Alone stand alone electric fireplace
The Next Big New Window Companies Milton Keynes Industry new
Ten Coffee Bean Machines That Really Improve Your Life Coffee Bean Machines
The 10 Scariest Things About Designer Handbags For Ladies designer handbags chanel (010-5491-6288.iwebplus.co.kr)
What Is The Best Way To Spot The Right Windows Repair For You
contractor
10 No-Fuss Ways To Figuring Out Your Skin So Soft Bath
Oil Uk Avon’s skin So soft
The 10 Most Dismal Upvc Window Repairs Fails Of All Time Could Have Been Prevented Window Repairs Near
Me (Aragaon.Net)
“The Can You Get Car Keys Cut Awards: The Most Stunning, Funniest, And Weirdest Things We’ve Ever Seen cost To get a key
cut
Mazda 3 Key Fob: It’s Not As Difficult As You Think
mazda key fob replacement
14 Clever Ways To Spend The Leftover Cheap Rabbit Vibrators Budget rabbit Adult Toy (https://womensrabbitvibratorsexto91219.arwebo.com/)
15 Reasons You Shouldn’t Ignore Seat Leon Replacement Key seat alhambra
key Programming; https://historydb.date/wiki/Many_Of_The_Common_Errors_People_Make_When_Using_Car_Seat_Key,
10 Meetups About Glass Repair Milton Keynes You Should Attend glass replacement milton keynes
Guide To Self-Empty Robot Vacuum: The Intermediate Guide The
Steps To Self-Empty Robot Vacuum Self-Empty robot vacuum
You’ll Never Guess This Amazon Under Desk Treadmill’s Benefits Amazon under desk treadmill
What’s The Current Job Market For Vibrating Panties Sex Toys
Professionals Like? panties sex
What Is The Best Way To Spot The Designer Handbags Beige That Is Right For You
designer handbags list; Kassandra,
Adhd Psychiatry Near Me Techniques To Simplify Your Daily Life Adhd Psychiatry Near Me Trick That Everybody Should Know Adhd Psychiatry Near Me
What Is Best Online Shopping Groceries Uk?
History Of Best Online Shopping Groceries Uk Vimeo.com
15 Things You’ve Never Known About Locksmith Near
Me Car local locksmith for cars (Dolly)
Responsible For An Private Mental Health Psychiatrist Budget?
12 Best Ways To Spend Your Money Private Psychiatrist Prices [https://Ebooksworld.Com.Pl/User/Boltbook7/]
How Double Glazed Units Near Me Became The Hottest Trend Of 2023 Window Double glazing replacement
Bunk Beds Triple Tools To Improve Your Daily Life Bunk Beds Triple Trick That Everyone
Should Be Able To bunk beds triple (Nestor)
The 10 Most Terrifying Things About Avon Skin So Soft Where To Buy skin so soft (Barrett)
Where Are You Going To Find Lock Smith For Car Be 1 Year From In The Near Future?
near
8 Tips To Boost Your Online Shopping Sites Uk Game Dog Harness With Seat Belt
Tether; Olivia,
10 Things Everyone Makes Up About The Word “Medical Malpractice Claim.” attorneys
12 Stats About Shop Online Uk Women’s Fashion To Make You Think Smarter About Other People
Video Capture Device
Howdy! Do you know if they make any plugins to
help with Search Engine Optimization? I’m trying to get my site to rank for some targeted keywords but I’m not seeing very good success.
If you know of any please share. Thanks! You can read
similar article here: Which escape room
5 Must-Know Coffee Machines Espresso-Practices You
Need To Know For 2023 single serve
17 Signs To Know You Work With Milton Keynes Windows And Doors installer
What’s The Current Job Market For Upvc Doors Birmingham Professionals?
Upvc Doors Birmingham
What Is Key Fob Repair And How To Utilize What Is Key Fob Repair
And How To Use Car Key Fob Repair Service
Window Repairs Tools To Streamline Your Everyday Lifethe Only Window Repairs Trick That Everybody Should Know window
repair, http://Www.Tolstory.com/,
заказать такси по телефону недорого https://taxi-vyzvat.ru
10 Of The Top Mobile Apps To Ignition Key Replacement
car ignition key replacement (Consuelo)
The Most Hilarious Complaints We’ve Been Hearing About Land Rover Discovery 3 Key Fob Replacement how to open Land rover key fob
5 Killer Quora Answers On Freezer Energy star Freezers
What’s The Job Market For Slot Bonuses Professionals Like? slot bonuses
Pro88
Pro88
Mobile Car Door Lock Repair: The Secret Life Of Mobile Car Door Lock Repair mobile car central
locking repairs (mallshade02.Bravejournal.net)
Undisputed Proof You Need Windows Birmingham window Repir
10 Can I Buy From A Uk Website That Are Unexpected Widespread Bathroom Faucet
A Trip Back In Time: How People Talked About Leeds Window
Repair 20 Years Ago Upvc Door repair roundhay
What’s The Current Job Market For Upvc Doors Milton Keynes
Professionals? Doors Milton Keynes (http://Www.Caitlyntodd.Top)
Repairs To Upvc Windows Techniques To Simplify Your Daily Life Repairs To Upvc Windows Trick That Should Be Used By Everyone Learn repairs to Upvc windows
See What 2 In 1 Pram Tricks The Celebs Are Utilizing 2 In 1 pram
20 Myths About Upvc Doors Milton Keynes: Debunked milton keynes Council Repairs
Ten Injury Case Products That Can Help You Live Better injuries – gonysnap.Co.kr,
You’ll Be Unable To Guess Situs Gotogel Terpercaya’s Benefits Situs Gotogel Terpercaya
It’s Time To Expand Your Nespresso Coffee Machine Options latte Machines (wpubysmartsimple.Webpowerup.com)
10 Simple Ways To Figure Out Your Slot Demo Pragmatic demo
slot pg soft [Floyd]
11 Strategies To Refresh Your Washer Dryer Combos Cheap washer Dryer combos
The Little-Known Benefits Of Milton Keynes Door And Window Sash Window Restoration Milton Keynes, http://Www.Gavinarcher.Top,
Why Replacement Upvc Window Handles Is More
Dangerous Than You Believed upvc window Repairs near me
15 Current Trends To Watch For Foldable Pram Folding Pram
(https://80adec2ampndbs9h.рф)
Auto Accident Lawyers Tools To Streamline Your Everyday Lifethe Only
Auto Accident Lawyers Trick Every Person Should Learn auto accident Lawyer
20 Things That Only The Most Devoted Window Repair Near Fans
Should Know window Repair near Me, comunidadeqm.marcelodoi.com.br,
From Around The Web Twenty Amazing Infographics About
Veterans Disability Attorney Veterans disability Attorneys
20 Quotes Of Wisdom About CS GO Weapon Case esports 2013 case (Shavonne)
The 10 Scariest Things About Online Shopping Stores List online shopping
stores list (https://www.easteregghuntsandeasterevents.org)
10 Tips For Getting The Most Value From Upvc Windows And Doors Upvc
Windows Repair Near Me – Networksolutionsguarantee.Com –
Learn More About Designer Handbags Sale While Working From The
Comfort Of Your Home designer handbags names (Inprokorea.com)
order bactrim 960mg generic – levetiracetam 1000mg ca tobramycin 10mg cost
The 10 Scariest Things About Mobility Scooters On Pavements Law mobility scooters on Pavements law
buy eukroma for sale – desogestrel oral duphaston 10mg drug
Why Mental Health Assessment Is Everywhere This Year Mental Health Assessment Cost
Responsible For The Dryer Washer Combo Budget? Twelve Top Ways To Spend Your Money combination washer dryer (neville-raahauge.thoughtlanes.net)
20 Resources That Will Make You More Effective At Jackpot Slots trusted slots (Lukas)
1kg Coffee Beans How Many Cups Tools To Improve Your
Daily Life 1kg Coffee Beans How Many Cups Trick That Every Person Should Know 1Kg Coffee Beans How Many Cups
The 10 Scariest Things About Upvc Windows And Doors upvc windows Repair
SEO стратегия
Советы по сео стратегии продвижению.
Информация о том как управлять с низкочастотными ключевыми словами и как их определять
Стратегия по работе в конкурентной нише.
Имею постоянных клиентов сотрудничаю с 3 фирмами, есть что сообщить.
Посмотрите мой аккаунт, на 31 мая 2024г
общий объём завершённых задач 2181 только в этом профиле.
Консультация проходит в устной форме, никаких скринов и отчетов.
Время консультации указано 2 ч, но по факту всегда на связи без твердой привязки ко времени.
Как работать с ПО это уже отдельная история, консультация по использованию ПО обсуждаем отдельно в специальном услуге, определяем что необходимо при разговоре.
Всё без суеты на без напряжения не спеша
To get started, the seller needs:
Мне нужны контакты от телеграмм чата для связи.
коммуникация только устно, переписываться недостаточно времени.
Сб и Воскресенье нерабочие дни
You’ll Never Be Able To Figure Out This Psychiatrists Adhd Near Me’s Tricks psychiatrists adhd near me (Maribel)
купить диплом университета https://6landik-diploms.com
20 Inspirational Quotes About Zeus Hades Pragmatic
Play slot Demo pragmatic zeus vs hades (securityholes.science)
Avon Starter Set Tips From The Top In The Business avon Pack
What’s Holding Back From The Treadmills For Sale Industry?
Treadmill For Home
This Is What Zeus Slot Pragmatic Will Look Like In 10
Years Time demo Slot pragmatic zeus 1000
10 Things Everybody Hates About Upvc Windows Near Me Upvc Windows Near Me upvc window repair (http://atdh.net/__media__/js/netsoltrademark.php?d=rios-curran.blogbright.net/an-easy-to-follow-guide-to-repairing-upvc-windows/)
See What Link Daftar Gotogel Tricks The Celebs Are Utilizing link daftar gotogel
A Trip Back In Time The Conversations People Had About
Professional Slots 20 Years Ago slots For Real money
Your Worst Nightmare About Best Car Accident Attorney Get Real car accident lawyer
mesa (Crystal)
Guide To Private Psychiatrist Assessment Near Me:
The Intermediate Guide On Private Psychiatrist Assessment Near Me Near Me
Thank you a lot for sharing this with all folks you actually understand what you
are talking approximately! Bookmarked. Please additionally seek advice from
my website =). We will have a hyperlink exchange agreement between us
What’s The Current Job Market For Slot Bonuses Professionals Like?
slot bonuses – http://www.disonde.com,
A Proficient Rant Concerning Glass Repair Birmingham birmingham doors and windows [http://125.141.133.9:7001/bbs/board.php?bo_table=free&wr_id=1751907]
5 Reasons To Be An Online Adhd Assessment In Adults And 5 Reasons Why You Shouldn’t online Adhd Assessment
5. Kimbo 1kg Projects For Any Budget roasted
служба поддержки такси https://zakaz-taxionline.ru/
Nine Things That Your Parent Taught You About Double Glazed Windows Milton Keynes double glazed windows milton Keynes
5 Laws That Anyone Working In Semi Truck Legal Should Be Aware Of semi Truck accident lawsuits
Thank you, I have recently been searching for info approximately this subject for a
long time and yours is the best I’ve found out so far.
However, what about the bottom line? Are you
certain concerning the source?
The Most Common Mistakes People Make When Using Patio Doors Repairs sliding Patio doors repair
10 Meetups On Slot Machines You Should Attend high-quality slots (Mensvault.men)
5 Killer Quora Answers To Double Glazed Windows Birmingham birmingham doors and
windows – Carma,
The Best Rabbit Vibrator Online Tips To Make A Difference In Your Life Rabbit Vivrator
10 Quick Tips For Combination Washer And Dryer In One Unit washing machines for Sale
Tips For Explaining Slot Volatility To Your Mom fun slots (http://253308.cn/home.php?mod=space&uid=3965918)
See What Pram Stroller 2 In 1 Tricks The Celebs Are Making
Use Of pram stroller 2 in 1
What’s The Current Job Market For Psychiatric Assessment
Professionals? Psychiatric Assessment
Euro
10 CS GO Case New Tips All Experts Recommend hydra Case
как проверить бонусы на 1xbet (https://telegra.ph)
Guide To Key Fob Repairs Near Me: The Intermediate Guide Towards Key Fob Repairs Near Me Near
Mesothelioma Claims: The History Of Mesothelioma Claims In 10 Milestones Mesothelioma Settlement
The 10 Most Terrifying Things About Classic Casino Slots Classic Casino Slots
You’ll Never Guess This Avon Skin So Soft Dry Oil Spray Uses’s Tricks avon skin So soft dry oil spray uses
10 Top Books On Sugar Rush new Sugar rush Slot
Ищете способ расслабиться и получить незабываемые впечатления? Мы https://t.me/intim_tmn72 предлагаем эксклюзивные встречи с привлекательными и профессиональными компаньонками. Конфиденциальность, комфорт и безопасность гарантированы. Позвольте себе наслаждение и отдых в приятной компании.
This Is The History Of Car Accident Lawyers In 10 Milestones car accident law Firms
How To Build Successful Self Emptying Robot Vacuum Pet Hair Guides With Home robotic vacuums for pet hair
See What 3 In 1 Pram Tricks The Celebs Are Using 3
in 1 pram – Benito,
How To Outsmart Your Boss With Wood Burner
Wood Burner Clearance sale
See What Ferrari Key Fob Replacement Uk Tricks The
Celebs Are Using ferrari Key fob replacement uk –
m1bar.com,
See What Akun Demo Slot Sugar Rush Tricks The Celebs Are Using
Slot Sugar
[url=http://lyricawithoutprescription.com/]lyrica 100 mg[/url]
10 Healthy Double Glazing Luton Habits Window repair Near Me
You’ll Never Guess This Treadmill Sale UK’s Benefits Treadmill sale uk
20 Rising Stars To Watch In The Best Coffee Machines Industry Automatic coffee Makers
Car Accident Attorney For Hire’s History History Of Car Accident Attorney
For Hire los angeles car accident attorney; Olderworkers.com.au,
The 10 Most Scariest Things About Designer Handbags
In Sale cheap
Five Killer Quora Answers On Motorcycle Accident Attorneys Motorcycle Accident Attorney
8 Tips To Increase Your Replacement Upvc Window Handles Game
Upvc Window Repairs Near Me
Why CSGO Case Websites Is More Risky Than You Think Case Falchion
What’s The Current Job Market For Treadmill Desk Uk Professionals?
treadmill desk uk – Veronique –
What’s The Job Market For Washington Birth Injury Attorney Professionals Like?
Washington birth injury attorney
A Look Inside Best Sex Toys For Partners’s Secrets Of Best Sex Toys For Partners sec toys for Couples
Don’t Believe These “Trends” Concerning Avon Skin So
Soft Bath Oil Skin So Soft Dry Oil Spray – Genuine-Cat-G0F1Gs.Mystrikingly.Com –
Ten Things You Learned In Kindergarden Which Will Aid You
In Obtaining Malpractice Claim malpractice lawsuits
5 Killer Quora Answers On Gotogel Link Alternatif Gotogel Link Alternatif
See What Cost Of Car Key Cutting Tricks The Celebs Are
Making Use Of car key cut
The Top Reasons Why People Succeed In The Fridge
Freezer Small Industry large Fridge Freezers uk
Guide To Demo Pragmatic Sugar Rush: The Intermediate Guide Towards
Demo Pragmatic Sugar Rush Pragmatic Sugar Rush
10 Inspirational Graphics About Squirting Dildo Shop best toy to
make you squirt, Thinktoy.net,
10 Locations Where You Can Find L Shaped Bunk Bed With Slide l shape beds
You’ll Never Be Able To Figure Out This Treadmills
Home Gym’s Tricks treadmills Home gym
You’ll Never Guess This Dangerous Drugs Lawsuits’s Benefits dangerous drugs lawsuits
You’ll Be Unable To Guess Upvc Window Repairs Near Me’s Tricks
Upvc Window Repairs Near Me
What’s The Job Market For Treadmill Foldable Professionals Like?
Treadmill Foldable
You’ll Be Unable To Guess Upvc Window Repairs Near Me’s Tricks upvc window repairs near me
The 9 Things Your Parents Taught You About Treadmill For
Sale Near Me treadmill for sale near me (google.Ps)
How To Tell If You’re In The Right Place For Peugeot 206 Key
Replacement lost
Five Killer Quora Answers To Asbestos Law Asbestos Law
20 Fun Facts About Upvc Windows Repair Upvc repair
This Is The Complete Guide To Double Glazing Window Repair window Doctor near Me
[url=https://albuterolp.online/]albuterol 0.08[/url]
Program Keys For Cars Tools To Improve Your Everyday Lifethe Only Program Keys For Cars Technique Every Person Needs To
Be Able To program keys for cars (Shanon)
fulvicin buy online – buy fulvicin medication order lopid 300 mg sale
slot212
Interactive Slots Tips To Relax Your Daily Life Interactive Slots Trick Every Person Should Learn Interactive Slots
15 Of The Best Pinterest Boards Of All Time About Twin Pushchair
twin Pushchair from birth
Guide To Online Shopping Sites In United
Kingdom: The Intermediate Guide Towards Online Shopping Sites In United
Kingdom Online Shopping
Five Tools That Everyone In The CSGO Gambling Sites Industry Should Be Using case fracture [Philip]
The Most Common Mistakes People Make Using Emergency Window Repair
replacement
11 “Faux Pas” That Are Actually Okay To Do With Your Slot Reviews mobile slots (https://www.google.co.mz/)
16 Must-Follow Pages On Facebook For Vauxhall Corsa Key Fob
Replacement-Related Businesses program
You’ll Never Guess This Gatot Kaca Fury Demo’s Tricks gatot Kaca fury demo – humanlove.stream –
This Week’s Top Stories About Auto Accident Compensation Auto Accident Compensation Auto Accident Lawyer
атака титанов в хорошем качестве https://ataka-titanov-anime.ru
5 Laws That Anyone Working In CSGO Most Profitable Cases Should Know
Operation wildfire case (olderworkers.com.au)
Why CS GO Weapon Case Is Relevant 2023 operation Bravo Case
A Step-By-Step Guide To Selecting The Right Window Repairs Upvc repairs
Pragmatic Play Demo Sweet Bonanza Tools To
Make Your Daily Lifethe One Pragmatic Play Demo Sweet Bonanza Trick
That Everyone Should Know Play demo sweet bonanza, cameradb.review,
Everything You Need To Learn About Window Repair Near
Upvc Window Repair Near Me
Hello mates, how is all, and what you would like to say concerning
this piece of writing, in my view its genuinely amazing in favor of me.
Why We Enjoy Slot Sound Effects (And You
Should Also!) Slot wins (https://qooh.me/weightstudy0)
10 Things People Hate About Cheap Online Electronics Shopping Uk Kings Gun Magnet
(Ilene)
娛樂城官網
娛樂城官網
14 Misconceptions Common To Popular Casino Slots best online slots
(http://forums.indexrise.com/)
голяк смотреть бесплатно в хорошем качестве https://golyak-serial-online.ru
You’ll Be Unable To Guess Upvc Window Repairs Near Me’s Benefits
upvc window repairs near me [Kaley]
How To Explain Autowatch Ghost Installer To A Five-Year-Old autowatch Ghost installers west Midlands
You’re so cool! I do not believe I’ve truly read through something
like that before. So great to find somebody with genuine thoughts on this topic.
Seriously.. thank you for starting this up. This website is one thing that
is needed on the web, someone with a little originality!
Interactive Slots Techniques To Simplify Your Everyday Lifethe
Only Interactive Slots Trick Every Person Should Learn interactive Slots
Good day! This is my first comment here so I just wanted to give a quick shout out and tell you
I truly enjoy reading your articles. Can you recommend
any other blogs/websites/forums that deal with the same subjects?
Thanks a ton!
WOW just what I was looking for. Came here by searching for nwcovna
You’ll Never Guess This Travel System Prams’s Secrets
Travel System Prams
A Step-by-Step Guide To Choosing Your Replacement Upvc Window Handles upvc window repair near me
Guide To 2 In 1 Pushchairs: The Intermediate Guide To 2 In 1 Pushchairs 2
in 1 pushchairs (Donette)
5 Facts Replacement Upvc Window Handles Is Actually A Beneficial Thing upvc window repairs; Tristan,
10 Places That You Can Find Licensed Slots themed slots – 253308.cn,
You’ll Never Guess This Erb’s Palsy Settlement’s Secrets erb’s
Slotเว็บตรง – สนุกกับการเล่นได้ทุกอุปกรณ์ที่เข้าถึงอินเทอร์เน็ต
ในยุคนี้ การเล่นสล็อตมีความง่ายดายมากยิ่งขึ้น คุณไม่จำเป็นต้องเดินทางไปยังบ่อนการพนันที่ไหน ๆ เพียงแค่มีอุปกรณ์อิเล็กทรอนิกส์ที่มีความสามารถเชื่อมต่อเชื่อมต่อกับอินเทอร์เน็ต คุณก็สามารถสนุกกับการหมุนสล็อตออนไลน์กับ PG Slot ได้จากทุกที่
การพัฒนาเทคโนโลยีของ PG Slot
ที่ PG Slot เราได้นำเสนอโซลูชั่นสำหรับการให้บริการเกมคาสิโนออนไลน์เพื่อตอบสนองความพึงพอใจให้มากที่สุด คุณไม่ต้องการติดตั้งโปรแกรมหรือนำมาใช้งานแอปพลิเคชันใด ๆ ให้เสียเวลาหรือใช้หน่วยความจำในเครื่องมือของคุณ การจัดการเกมสล็อตออนไลน์ของเราใช้งานผ่านเว็บตรงที่ใช้เทคโนโลยี HTML 5 ที่ล้ำสมัย
หมุนสล็อตได้ทุกอุปกรณ์เชื่อมต่อ
คุณจะเล่นสล็อตออนไลน์กับ PG Slot ได้อย่างง่ายดายเพียงเข้าสู่ในเว็บไซต์ของเรา เว็บตรงสล็อตออนไลน์ของเรารองรับทุกแพลตฟอร์มและอุปกรณ์ทุกรุ่นทั้ง Android และ iOS ไม่ว่าคุณจะใช้มือถือ PC หรือไอแพดรุ่นไหน ก็อาจมั่นใจได้ว่าคุณจะหมุนสล็อตออนไลน์ได้อย่างรื่นไหล ไม่มีการขัดข้องหรือติดขัดใด ๆ
ทดลองเล่นสล็อตฟรี
เว็บตรงของเราให้บริการเพียงแค่คุณเข้าสู่ในเว็บไซต์ของ PG Slot ก็จะทดลองเล่นสล็อตฟรีได้ทันที ไม่ต้องเสียเงินใด ๆ นี่เป็นโอกาสที่ดีในการฝึกฝนและศึกษาวิธีการเล่นเกี่ยวกับเกมก่อนที่จะลงเดิมพันด้วยเงินจริง
การเล่นเกมสล็อตออนไลน์กับ PG Slot ทำให้คุณสามารถเพลิดเพลินกับการเล่นเกมคาสิโนได้ทุกที่ทุกเวลา ไม่ว่าคุณจะอยู่ที่ไหน เพียงแค่มีอุปกรณ์เชื่อมต่อที่เชื่อมต่ออินเทอร์เน็ต คุณก็มีโอกาสสนุกกับการปั่นสล็อตได้อย่างไม่มีข้อผูกมัด!
A Simple Plan Distribute Online – Earn Money Instantly!
온라인 슬롯사이트
Why People Don’t Care About Mercedes Key Replacement Mercedes Keys replacement
Five Killer Quora Answers To Veterans Disability Law
veterans disability [Warner]
garuda4d
This Week’s Most Popular Stories About Seat Ibiza Key seat ibiza replacement key
10 Things We Are Hating About Online Shop {Stainless Steel Leader Wire|Afw Tooth Proof Leader Wire|Fishing Leader Wire 140 Lb Test|Camo Leader Wire For Fishing|Single Strand Leader Wire|Tooth Proof Fishing Wire|Heavy-Duty Fishing Leader|Stainless Steel Fishing Line|Afw
See What Car Ignition Replacement Tricks The Celebs Are Using
car ignition Replacement
payday loan
What Is Car Locksmith Near Me And How To Use It? locksmith for car Key near me
A Rewind What People Talked About Twin Buggy 20 Years Ago
Pushchairs and prams
Window Repairs Techniques To Simplify Your Everyday Lifethe Only Window Repairs Trick That Everybody Should Be Able To Window repairs
[url=http://xlyrica.com/]generic lyrica from canada[/url]
娛樂城
富遊娛樂城評價:2024年最新評價
推薦指數 : ★★★★★ ( 5.0/5 )
富遊娛樂城作為目前最受歡迎的博弈網站之一,在台灣擁有最高的註冊人數。
RG富遊以安全、公正、真實和順暢的品牌保證,贏得了廣大玩家的信賴。富遊線上賭場不僅提供了豐富多樣的遊戲種類,還有眾多吸引人的優惠活動。在出金速度方面,獲得無數網紅和網友的高度評價,確保玩家能享有無憂的博弈體驗。
推薦要點
新手首選: 富遊娛樂城,2024年評選首選,提供專為新手打造的豐富教學和獨家優惠。
一存雙收: 首存1000元,立獲1000元獎金,僅需1倍流水,新手友好。
免費體驗: 新玩家享免費體驗金,暢遊各式遊戲,開啟無限可能。
優惠多元: 活動豐富,流水要求低,適合各類型玩家。
玩家首選: 遊戲多樣,服務優質,是新手與老手的最佳賭場選擇。
富遊娛樂城詳情資訊
賭場名稱 : RG富遊
創立時間 : 2019年
賭場類型 : 現金版娛樂城
博弈執照 : 馬爾他牌照(MGA)認證、英屬維爾京群島(BVI)認證、菲律賓(PAGCOR)監督競猜牌照
遊戲類型 : 真人百家樂、運彩投注、電子老虎機、彩票遊戲、棋牌遊戲、捕魚機遊戲
存取速度 : 存款5秒 / 提款3-5分
軟體下載 : 支援APP,IOS、安卓(Android)
線上客服 : 需透過官方LINE
富遊娛樂城優缺點
優點
台灣註冊人數NO.1線上賭場
首儲1000贈1000只需一倍流水
擁有體驗金免費體驗賭場
網紅部落客推薦保證出金線上娛樂城
缺點
需透過客服申請體驗金
富遊娛樂城存取款方式
存款方式
提供四大超商(全家、7-11、萊爾富、ok超商)
虛擬貨幣ustd存款
銀行轉帳(各大銀行皆可)
取款方式
網站內申請提款及可匯款至綁定帳戶
現金1:1出金
富遊娛樂城平台系統
真人百家 — RG真人、DG真人、歐博真人、DB真人(原亞博/PM)、SA真人、OG真人、WM真人
體育投注 — SUPER體育、鑫寶體育、熊貓體育(原亞博/PM)
彩票遊戲 — 富遊彩票、WIN 539
電子遊戲 —RG電子、ZG電子、BNG電子、BWIN電子、RSG電子、GR電子(好路)
棋牌遊戲 —ZG棋牌、亞博棋牌、好路棋牌、博亞棋牌
電競遊戲 — 熊貓體育
捕魚遊戲 —ZG捕魚、RSG捕魚、好路GR捕魚、DB捕魚
A Look Into The Future What’s In The Pipeline?
Upvc Replacement Door Handles Industry Look Like In 10 Years?
upvc door repairs near me (Betsy)
dimenhydrinate online buy – buy prasugrel 10 mg without prescription brand actonel 35mg
CS GO New Cases: What’s The Only Thing Nobody Has Discussed Chroma Case
5 Qualities That People Are Looking For In Every Door Unlock Service locksmith opening car Door
Is Treadmill For Sale The Most Effective Thing That Ever Was?
Treadmills For Sale Near Me
8 Tips For Boosting Your Replacement Upvc Window Handles Game upvc window repairs near Me
9 Lessons Your Parents Teach You About Window Doctor Near Me window doctor
near me – yerliakor.com,
The 10 Worst Upvc Window Repairs Failures Of All Time Could Have Been Prevented Window repairs near Me
order vasotec online – purchase zovirax eye drops xalatan without prescription
Guide To Mercedes Key Replacement: The Intermediate Guide For Mercedes Key Replacement mercedes key replacement
A Comprehensive Guide To Boat Accident Lawyer From Start To Finish Boat accident attorney
An Easy-To-Follow Guide To Choosing The Right Slot Tips Slot machine Reviews
What’s The Job Market For Double Glazed Window
Repairs Professionals Like? double glazed window repairs
The 10 Scariest Things About Best 2 In 1 Pram Best 2 In 1 Pram (https://Emplois.Fhpmco.Fr)
Dangerous Drugs Attorneys Techniques To Simplify Your Daily Lifethe One Dangerous Drugs
Attorneys Technique Every Person Needs To Know dangerous drugs attorneys (Mavis)
You’ll Never Guess This Hades God Mode Explained’s Tricks hades god mode explained
10 Things You Learned In Preschool That Will Help You With
Case Key CSGO fracture case (Verena)
Are You Responsible For An New Upvc Door Budget?
10 Very Bad Ways To Invest Your Money upvc door hinges Replacement
Ten Low Limit Slotss That Really Help You Live Better
Bonus Round Slots
See What Repair Upvc Windows Tricks The Celebs Are Using Repair Upvc Window
mpo17
娛樂城推薦
2024娛樂城推薦,經過玩家實測結果出爐Top5!
2024娛樂城排名是這五間上榜,玩家尋找娛樂城無非就是要找穩定出金娛樂城,遊戲體驗良好、速度流暢,Ace博評網都幫你整理好了,給予娛樂城新手最佳的指南,不再擔心被黑網娛樂城詐騙!
2024娛樂城簡述
在現代,2024娛樂城數量已經超越以前,面對琳瑯滿目的娛樂城品牌,身為新手的玩家肯定難以辨別哪間好、哪間壞。
好的平台提供穩定的速度與遊戲體驗,穩定的系統與資訊安全可以保障用戶的隱私與資料,不用擔心收到傳票與任何網路威脅,這些線上賭場也提供合理的優惠活動給予玩家。
壞的娛樂城除了會騙取你的金錢之外,也會打著不實的廣告、優惠滿滿,想領卻是一場空!甚至有些平台還沒辦法登入,入口網站也是架設用來騙取新手儲值進他們口袋,這些黑網娛樂城是玩家必須避開的風險!
評測2024娛樂城的標準
Ace這次從網路上找來五位使用過娛樂城資歷2年以上的老玩家,給予他們使用各大娛樂城平台,最終選出Top5,而評選標準為下列這些條件:
以玩家觀點出發,優先考量玩家利益
豐富的遊戲種類與卓越的遊戲體驗
平台的信譽及其安全性措施
客服團隊的回應速度與服務品質
簡便的儲值流程和多樣的存款方法
吸引人的優惠活動方案
前五名娛樂城表格
賭博網站排名 線上賭場 平台特色 玩家實測評價
No.1 富遊娛樂城 遊戲選擇豐富,老玩家優惠多 正面好評
No.2 bet365娛樂城 知名大廠牌,運彩盤口選擇多 介面流暢
No.3 亞博娛樂城 多語言支持,介面簡潔順暢 賽事豐富
No.4 PM娛樂城 撲克牌遊戲豐富,選擇多元 直播順暢
No.5 1xbet娛樂城 直播流暢,安全可靠 佳評如潮
線上娛樂城玩家遊戲體驗評價分享
網友A:娛樂城平台百百款,富遊娛樂城是我3年以來長期使用的娛樂城,別人有的系統他們都有,出金也沒有被卡過,比起那些玩娛樂城還會收到傳票的娛樂城,富遊真的很穩定,值得推薦。
網友B:bet365中文的介面簡約,還有超多體育賽事盤口可以選擇,此外賽事大部分也都有附上直播來源,不必擔心看不到賽事最新狀況,全螢幕還能夠下單,真的超方便!
網友C:富遊娛樂城除了第一次儲值有優惠之外,儲值到一定金額還有好禮五選一,實用又方便,有問題的時候也有客服隨時能夠解答。
網友D:從大陸來台灣工作,沒想到台灣也能玩到亞博體育,這是以前在大陸就有使用的平台,雖然不是簡體字,但使用介面完全沒問題,遊戲流暢、速度比以前使用還更快速。
網友E:看玖壹壹MV發現了PM娛樂城這個大品牌,PM的真人百家樂沒有輸給在澳門實地賭場,甚至根本不用出門,超級方便的啦!
mega288
Interactive Slots Tools To Streamline Your Daily Life Interactive Slots Trick Every Individual Should Know
Interactive Slots
15 Of The Top Uk Online Phone Shopping Sites Bloggers You Need To Follow Venom
Grille For Jeep Jk (vimeo.com)
Thanks for another fantastic article. Where else could anybody get that kind of info in such a perfect means of writing?
I’ve a presentation subsequent week, and I am on the look
for such information.
The 9 Things Your Parents Teach You About Veterans Disability Lawyer disability
What Is Upvc Patio Doors? History Of Upvc Patio Doors Upvc Door Panel Replacements
토르 인니티니티 릴스
Zhu Houzhao는 “내 실수를 알고 있습니다. “라고 고개를 저었습니다.
The Reasons Why Replacement Upvc Door Handles Will Be
The Hottest Topic In 2023 repair upvc door (http://www.annunciogratis.net)
Ten Startups That Are Set To Change The Small Double Stroller Industry For The Better http://Www.pushchairsandprams.uk
Портал о Ярославле – ваш гид по культурной жизни города. Здесь вы найдёте информацию о театрах, музеях, галереях и исторических достопримечательностях. Откройте для себя яркие события, фестивали и выставки, которые делают Ярославль культурной жемчужиной России.
How Dangerous Drugs Lawyer Arose To Be The Top Trend In Social Media dangerous Drugs Lawyers
10 Facts About Upvc Windows And Doors That Will Instantly Put You In Good Mood repair upvc Window
The Unspoken Secrets Of Mobile Car Diagnostics Mobile Diagnostic Near Me
Do Not Buy Into These “Trends” Concerning Car Accident Lawyer Car Accident Lawsuit
20 Trailblazers Setting The Standard In CSGO Weapon Case Esports 2014 Summer Case
Player台灣線上娛樂城遊戲指南與評測
台灣最佳線上娛樂城遊戲的終極指南!我們提供專業評測,分析熱門老虎機、百家樂、棋牌及其他賭博遊戲。從遊戲規則、策略到選擇最佳娛樂城,我們全方位覆蓋,協助您更安全的遊玩。
layer如何評測:公正與專業的評分標準
在【Player娛樂城遊戲評測網】我們致力於為玩家提供最公正、最專業的娛樂城評測。我們的評測過程涵蓋多個關鍵領域,旨在確保玩家獲得可靠且全面的信息。以下是我們評測娛樂城的主要步驟:
安全與公平性
安全永遠是我們評測的首要標準。我們審查每家娛樂城的執照資訊、監管機構以及使用的隨機數生成器,以確保其遊戲結果的公平性和隨機性。
02.
遊戲品質與多樣性
遊戲的品質和多樣性對於玩家體驗至關重要。我們評估遊戲的圖形、音效、用戶介面和創新性。同時,我們也考量娛樂城提供的遊戲種類,包括老虎機、桌遊、即時遊戲等。
03.
娛樂城優惠與促銷活動
我們仔細審視各種獎勵計劃和促銷活動,包括歡迎獎勵、免費旋轉和忠誠計劃。重要的是,我們也檢查這些優惠的賭注要求和條款條件,以確保它們公平且實用。
04.
客戶支持
優質的客戶支持是娛樂城質量的重要指標。我們評估支持團隊的可用性、響應速度和專業程度。一個好的娛樂城應該提供多種聯繫方式,包括即時聊天、電子郵件和電話支持。
05.
銀行與支付選項
我們檢查娛樂城提供的存款和提款選項,以及相關的處理時間和手續費。多樣化且安全的支付方式對於玩家來說非常重要。
06.
網站易用性、娛樂城APP體驗
一個直觀且易於導航的網站可以顯著提升玩家體驗。我們評估網站的設計、可訪問性和移動兼容性。
07.
玩家評價與反饋
我們考慮真實玩家的評價和反饋。這些資料幫助我們了解娛樂城在實際玩家中的表現。
娛樂城常見問題
娛樂城是什麼?
娛樂城是什麼?娛樂城是台灣對於線上賭場的特別稱呼,線上賭場分為幾種:現金版、信用版、手機娛樂城(娛樂城APP),一般來說,台灣人在稱娛樂城時,是指現金版線上賭場。
線上賭場在別的國家也有別的名稱,美國 – Casino, Gambling、中國 – 线上赌场,娱乐城、日本 – オンラインカジノ、越南 – Nhà cái。
娛樂城會被抓嗎?
在台灣,根據刑法第266條,不論是實體或線上賭博,參與賭博的行為可處最高5萬元罰金。而根據刑法第268條,為賭博提供場所並意圖營利的行為,可能面臨3年以下有期徒刑及最高9萬元罰金。一般賭客若被抓到,通常被視為輕微罪行,原則上不會被判處監禁。
信用版娛樂城是什麼?
信用版娛樂城是一種線上賭博平台,其中的賭博活動不是直接以現金進行交易,而是基於信用系統。在這種模式下,玩家在進行賭博時使用虛擬的信用點數或籌碼,這些點數或籌碼代表了一定的貨幣價值,但實際的金錢交易會在賭博活動結束後進行結算。
現金版娛樂城是什麼?
現金版娛樂城是一種線上博弈平台,其中玩家使用實際的金錢進行賭博活動。玩家需要先存入真實貨幣,這些資金轉化為平台上的遊戲籌碼或信用,用於參與各種賭場遊戲。當玩家贏得賭局時,他們可以將這些籌碼或信用兌換回現金。
娛樂城體驗金是什麼?
娛樂城體驗金是娛樂場所為新客戶提供的一種免費遊玩資金,允許玩家在不需要自己投入任何資金的情況下,可以進行各類遊戲的娛樂城試玩。這種體驗金的數額一般介於100元到1,000元之間,且對於如何使用這些體驗金以達到提款條件,各家娛樂城設有不同的規則。
娛樂城
2024娛樂城介紹
台灣2024娛樂城越開越多間,新開的線上賭場層出不窮,每間都以獨家的娛樂城優惠和體驗金來吸引玩家,致力於提供一流的賭博遊戲體驗。以下來介紹這幾間娛樂城網友對他們的真實評價,看看哪些娛樂城上榜了吧!
2024娛樂城排名
2023下半年,各家娛樂城競爭激烈,相繼推出誘人優惠,不論是娛樂城體驗金、反水流水還是首儲禮金,甚至還有娛樂城抽I15手機。以下就是2024年網友推薦的娛樂城排名:
NO.1 富遊娛樂城
NO.2 Bet365台灣
NO.3 DG娛樂城
NO.4 九州娛樂城
NO.5 亞博娛樂城
2024娛樂城推薦
根據2024娛樂城排名,以下將富遊娛樂城、BET365、亞博娛樂城、九州娛樂城、王者娛樂城推薦給大家,包含首儲贈點、免費體驗金、存提款速度、流水等等…
娛樂城遊戲種類
線上娛樂城憑藉其廣泛的遊戲種類,成功滿足了各式各樣玩家的喜好和需求。這些娛樂城遊戲不僅多元化且各具特色,能夠為玩家提供無與倫比的娛樂體驗。下面是一些最受歡迎的娛樂城遊戲類型:
電子老虎機
魔龍傳奇、雷神之鎚、戰神呂布、聚寶財神、鼠來寶、皇家777
真人百家樂
真人視訊百家樂、牛牛、龍虎、炸金花、骰寶、輪盤
電子棋牌
德州撲克、兩人麻將、21點、十三支、妞妞、三公、鬥地主、大老二、牌九
體育下注
世界盃足球賽、NBA、WBC世棒賽、英超、英雄聯盟LOL、特戰英豪
線上彩票
大樂透、539、美國天天樂、香港六合彩、北京賽車
捕魚機遊戲
三仙捕魚、福娃捕魚、招財貓釣魚、西遊降魔、吃我一砲、賓果捕魚
2024娛樂城常見問題
娛樂城是什麼?
娛樂城/線上賭場(現金網)是台灣對於線上賭場的特別稱呼,而且是現金網,大家也許會好奇為什麼不直接叫做線上賭場或是線上博弈就好了。
其實這是有原因的,線上賭場這種東西,架站在台灣是違法的,在早期經營線上博弈被抓的風險非常高所以換了一個打模糊仗的代稱「娛樂城」來規避警方的耳目,畢竟以前沒有Google這種東西,這樣的代稱還是多少有些作用的。
信用版娛樂城是什麼?
信用版娛樂城是一種賭博平台,允許玩家在沒有預先充值的情況下參與遊戲。這種模式類似於信用卡,通常以周結或月結的方式結算遊戲費用。因此,如果玩家無法有效管理自己的投注額,可能會在月底面臨巨大的支付壓力。
娛樂城不出金怎麼辦?
釐清原因,如未違反娛樂城機制,可能是遇上黑網娛樂城,請盡快通報165反詐騙。
Ferrari Replacement Key Cost Uk Tips From The Best In The Industry ferrari keys
The 10 Most Scariest Things About Truck Accident Law Firm Truck accident law firm
4 Dirty Little Tips On Double Glazing Showrooms
Near Me Industry Double Glazing Showrooms Near Me Industry replacing a
double glazed unit (Sima)
Guide To Boat Accident Attorney: The Intermediate Guide To Boat Accident Attorney boat accident attorney (http://users.atw.hu/cityliferpg/index.php?phpsessid=1b529d0cc95fdafc642e628b6a8421b1&action=profile;u=92234)
Who Is Mini Car Key And Why You Should Consider Mini Car Key mini
car key replacement cost uk; Meghan,
A Relevant Rant About Erb’s Palsy Lawsuit erb’s palsy attorneys [Stella]
It’s A Case Opening Sites CSGO Success Story You’ll Never Remember case Fracture
I am curious to find out what blog platform you have been working with?
I’m having some small security issues with my
latest blog and I’d like to find something more
safeguarded. Do you have any solutions?
An Easy-To-Follow Guide To Online Shopping Uk Women’s Clothing Snowmobile Cover
15 Gifts For The Best Slots Lover In Your Life famous slots (http://www.viewtool.com)
The 10 Most Terrifying Things About Vegas Slots Vegas slots
15 Reasons To Love Double Glazed Window Repairs upvc windows Repairs near me
See What 3 In One Pushchair Tricks The Celebs Are Using 3 In one pushchair
娛樂城
Player台灣線上娛樂城遊戲指南與評測
台灣最佳線上娛樂城遊戲的終極指南!我們提供專業評測,分析熱門老虎機、百家樂、棋牌及其他賭博遊戲。從遊戲規則、策略到選擇最佳娛樂城,我們全方位覆蓋,協助您更安全的遊玩。
layer如何評測:公正與專業的評分標準
在【Player娛樂城遊戲評測網】我們致力於為玩家提供最公正、最專業的娛樂城評測。我們的評測過程涵蓋多個關鍵領域,旨在確保玩家獲得可靠且全面的信息。以下是我們評測娛樂城的主要步驟:
安全與公平性
安全永遠是我們評測的首要標準。我們審查每家娛樂城的執照資訊、監管機構以及使用的隨機數生成器,以確保其遊戲結果的公平性和隨機性。
02.
遊戲品質與多樣性
遊戲的品質和多樣性對於玩家體驗至關重要。我們評估遊戲的圖形、音效、用戶介面和創新性。同時,我們也考量娛樂城提供的遊戲種類,包括老虎機、桌遊、即時遊戲等。
03.
娛樂城優惠與促銷活動
我們仔細審視各種獎勵計劃和促銷活動,包括歡迎獎勵、免費旋轉和忠誠計劃。重要的是,我們也檢查這些優惠的賭注要求和條款條件,以確保它們公平且實用。
04.
客戶支持
優質的客戶支持是娛樂城質量的重要指標。我們評估支持團隊的可用性、響應速度和專業程度。一個好的娛樂城應該提供多種聯繫方式,包括即時聊天、電子郵件和電話支持。
05.
銀行與支付選項
我們檢查娛樂城提供的存款和提款選項,以及相關的處理時間和手續費。多樣化且安全的支付方式對於玩家來說非常重要。
06.
網站易用性、娛樂城APP體驗
一個直觀且易於導航的網站可以顯著提升玩家體驗。我們評估網站的設計、可訪問性和移動兼容性。
07.
玩家評價與反饋
我們考慮真實玩家的評價和反饋。這些資料幫助我們了解娛樂城在實際玩家中的表現。
娛樂城常見問題
娛樂城是什麼?
娛樂城是什麼?娛樂城是台灣對於線上賭場的特別稱呼,線上賭場分為幾種:現金版、信用版、手機娛樂城(娛樂城APP),一般來說,台灣人在稱娛樂城時,是指現金版線上賭場。
線上賭場在別的國家也有別的名稱,美國 – Casino, Gambling、中國 – 线上赌场,娱乐城、日本 – オンラインカジノ、越南 – Nhà cái。
娛樂城會被抓嗎?
在台灣,根據刑法第266條,不論是實體或線上賭博,參與賭博的行為可處最高5萬元罰金。而根據刑法第268條,為賭博提供場所並意圖營利的行為,可能面臨3年以下有期徒刑及最高9萬元罰金。一般賭客若被抓到,通常被視為輕微罪行,原則上不會被判處監禁。
信用版娛樂城是什麼?
信用版娛樂城是一種線上賭博平台,其中的賭博活動不是直接以現金進行交易,而是基於信用系統。在這種模式下,玩家在進行賭博時使用虛擬的信用點數或籌碼,這些點數或籌碼代表了一定的貨幣價值,但實際的金錢交易會在賭博活動結束後進行結算。
現金版娛樂城是什麼?
現金版娛樂城是一種線上博弈平台,其中玩家使用實際的金錢進行賭博活動。玩家需要先存入真實貨幣,這些資金轉化為平台上的遊戲籌碼或信用,用於參與各種賭場遊戲。當玩家贏得賭局時,他們可以將這些籌碼或信用兌換回現金。
娛樂城體驗金是什麼?
娛樂城體驗金是娛樂場所為新客戶提供的一種免費遊玩資金,允許玩家在不需要自己投入任何資金的情況下,可以進行各類遊戲的娛樂城試玩。這種體驗金的數額一般介於100元到1,000元之間,且對於如何使用這些體驗金以達到提款條件,各家娛樂城設有不同的規則。
The No. 1 Question Everyone Working In Bentley Continental Gt Key Fob Should Be Able Answer bentley replacement key (Marcella)
在现代,在线赌场提供了多种便捷的存款和取款方式。对于较大金额的存款,您可以选择中国信托、台中银行、合作金库、台新银行、国泰银行或中华邮政。这些银行提供的服务覆盖金额范围从$1000到$10万,确保您的资金可以安全高效地转入赌场账户。
如果您需要进行较小金额的存款,可以选择通过便利店充值。7-11、全家、莱尔富和OK超商都提供这种服务,适用于金额范围在$1000到$2万之间的充值。通过这些便利店,您可以轻松快捷地完成资金转账,无需担心银行的营业时间或复杂的操作流程。
在进行娱乐场提款时,您可以选择通过各大银行转账或ATM转账。这些方法不仅安全可靠,而且非常方便,适合各种提款需求。最低提款金额为$1000,而上限则没有限制,确保您可以灵活地管理您的资金。
在选择在线赌场时,玩家评价和推荐也是非常重要的。许多IG网红和部落客,如丽莎、穎柔、猫少女日记-Kitty等,都对一些知名的娱乐场给予了高度评价。这些推荐不仅帮助您找到可靠的娱乐场所,还能确保您在游戏中享受到最佳的用户体验。
总体来说,在线赌场通过提供多样化的存款和取款方式,以及得到广泛认可的服务质量,正在不断吸引更多的玩家。无论您选择通过银行还是便利店进行充值,都能体验到快速便捷的操作。同时,通过查看玩家的真实评价和推荐,您也能更有信心地选择合适的娱乐场,享受安全、公正的游戏环境。
The Leading Reasons Why People Achieve In The Repairs To Upvc Windows Industry
upvc Window repair – moneyus2024visitorview.coconnex.com
–
20 Resources That Will Make You More Efficient At Mesothelioma Law Firm
Mesothelioma Law Firms (Pickmein.Kr)
ranitidine hcl 150 mg obat apa
sweet bonanza на деньги [url=https://sweet-bonanza-ru.ru/]sweet bonanza на деньги[/url] .
Five Killer Quora Answers On Prams For Newborns
prams for newborns – Ellen,
The Hidden Secrets Of Does Amazon Ship To Uk Cheap Online Shopping Uk Clothes
etodolac 600 mg price – order etodolac 600mg for sale purchase cilostazol without prescription
You’ll Never Guess This Car Accident Lawyers’s Secrets car Accident lawyers
5 Replacement Upvc Window Handles Leçons From The Professionals repairs to upvc windows
Hello just wanted to give you a brief heads up and let you know
a few of the images aren’t loading properly. I’m not sure why but I think its a linking issue.
I’ve tried it in two different internet browsers and both show the same results.
10 Best Facebook Pages Of All Time About Which Is Best For Online
Grocery Shopping glass wall-mount Pc chassis
Don’t Make This Silly Mistake On Your Search Engine Optimization Search Engine Optimization Agency
This Is The Ugly Real Truth Of CSGO Cases Highest Roi Operation Bravo case
You’ll Never Be Able To Figure Out This Railroad Injuries Lawyers’s Tricks railroad Injuries lawyers
Ten Things You Learned About Kindergarden They’ll Help
You Understand Car Central Lock Repair Car Door Locks Repair
продвижение иностранных сайтов [url=www.prodvizhenie-sajtov-v-moskve113.ru/]www.prodvizhenie-sajtov-v-moskve113.ru/[/url] .
Don’t Be Enticed By These “Trends” Concerning Counter
Strike Global case chroma
5 Laws That Will Help The CSGO Cases Highest Roi Industry Operation Bravo Case (Valetinowiki.Racing)
The Top Fiat 500 Key Replacement Cost Gurus Are Doing 3
Things fiat punto spare key cut [http://hdlife.kr/bbs/board.php?bo_table=free&wr_id=39612]
What Is It That Makes Tandem Double Buggy So Famous?
Pushchairs And Prams
order piroxicam 20mg online cheap – buy exelon 6mg without prescription rivastigmine order
You’ll Never Be Able To Figure Out This Dangerous Drugs Law Firms’s Tricks Dangerous drugs law firms
[url=http://bactrim.company/]buy septra online[/url]
https://saranbaskar.com/?keyword=slot212
สล็อต
สล็อตเว็บตรง: ความบันเทิงที่คุณไม่ควรพลาด
การเล่นเกมสล็อตในปัจจุบันนี้เป็นที่นิยมเพิ่มมากขึ้น เนื่องจากความง่ายดายที่นักเดิมพันสามารถเล่นได้จากทุกหนทุกแห่งได้ตลอดเวลา โดยไม่ต้องเสียเวลาในการเดินทางถึงบ่อน ในเนื้อหานี้ เราจะนำเสนอเกี่ยวกับ “สล็อต” และความสนุกที่ผู้เล่นจะได้สัมผัสในเกมสล็อตเว็บตรง
ความสะดวกสบายในการเล่นสล็อต
เหตุผลหนึ่งที่ทำให้สล็อตเว็บตรงเป็นที่สนใจอย่างมาก คือความง่ายดายที่ผู้ใช้ได้สัมผัส คุณสามารถเล่นได้ทุกหนทุกแห่งทุกเวลา ไม่ว่าจะเป็นที่บ้าน ในที่ทำงาน หรือถึงแม้จะอยู่ในการเดินทาง สิ่งที่คุณต้องมีคืออุปกรณ์ที่ต่ออินเทอร์เน็ตได้ ไม่ว่าจะเป็นสมาร์ทโฟน แท็บเล็ท หรือคอมพิวเตอร์
เทคโนโลยีกับสล็อตออนไลน์เว็บตรง
การเล่นเกมสล็อตในปัจจุบันไม่เพียงแต่สะดวก แต่ยังมาพร้อมกับเทคโนโลยีที่ทันสมัยอีกด้วย สล็อตออนไลน์เว็บตรงใช้เทคโนโลยี HTML5 ซึ่งทำให้คุณไม่ต้องกังวลเกี่ยวกับเกี่ยวกับการลงโปรแกรมหรือแอปพลิเคชันเสริม แค่เปิดเบราว์เซอร์บนอุปกรณ์ของคุณและเข้าสู่เว็บไซต์ ผู้เล่นก็สามารถสนุกกับเกมได้ทันที
ความหลากหลายของเกมของเกมสล็อตออนไลน์
สล็อตออนไลน์เว็บตรงมาพร้อมกับตัวเลือกหลากหลายของเกมให้เลือกที่คุณเลือกได้ ไม่ว่าจะเป็นเกมคลาสสิกหรือเกมสล็อตที่มาพร้อมกับฟีเจอร์พิเศษและโบนัสเพียบ ผู้เล่นจะเห็นว่ามีเกมที่ให้เล่นมากมาย ซึ่งทำให้ไม่มีวันเบื่อกับการเล่นเกมสล็อต
รองรับทุกอุปกรณ์
ไม่ว่าคุณจะใช้สมาร์ทโฟนระบบ Androidหรือ iOS คุณก็สามารถเล่นสล็อตออนไลน์ได้อย่างไม่มีสะดุด เว็บไซต์รองรับOSและทุกอุปกรณ์ ไม่ว่าจะเป็นโทรศัพท์มือถือรุ่นล่าสุดหรือรุ่นก่อน หรือแม้แต่แท็บเล็ตและแล็ปท็อป ผู้เล่นก็สามารถเล่นเกมสล็อตได้อย่างไม่มีปัญหา
สล็อตทดลองฟรี
สำหรับผู้ที่ยังใหม่กับการเล่นเกมสล็อต หรือยังไม่แน่นอนเกี่ยวกับเกมที่อยากเล่น PG Slot ยังมีฟีเจอร์ทดลองเล่นสล็อตฟรี ท่านเริ่มเล่นได้ทันทีทันทีโดยไม่ต้องลงชื่อเข้าใช้หรือฝากเงินก่อน การทดลองเล่นสล็อตนี้จะช่วยให้คุณรู้วิธีการเล่นและเข้าใจวิธีการเล่นได้โดยไม่ต้องเสียค่าใช้จ่าย
โปรโมชั่นและโบนัสพิเศษ
ข้อดีอีกอย่างหนึ่งของการเล่นสล็อตออนไลน์กับ PG Slot คือมีโบนัสและโปรโมชั่นมากมายสำหรับผู้เล่น ไม่ว่าท่านจะเป็นสมาชิกใหม่หรือผู้เล่นเก่า ผู้เล่นสามารถรับโบนัสและโปรโมชันต่าง ๆ ได้อย่างสม่ำเสมอ ซึ่งจะเพิ่มโอกาสชนะและเพิ่มความสนุกสนานในเกม
บทสรุป
การเล่นเกมสล็อตออนไลน์ที่ PG Slot เป็นการการลงเงินที่น่าลงทุน ท่านจะได้รับความเพลิดเพลินและความสะดวกสบายจากการเล่นเกมสล็อต นอกจากนี้ยังมีโอกาสชนะรางวัลและโบนัสมากมาย ไม่ว่าท่านจะใช้สมาร์ทโฟน แทปเล็ตหรือแล็ปท็อปยี่ห้อไหน ก็สามารถเล่นได้ทันที อย่ารอช้า ลงทะเบียนและเริ่มเล่นสล็อตออนไลน์ PG Slot วันนี้
pg slot
สล็อตตรงจากเว็บ — ใช้ได้กับ โทรศัพท์มือถือ แท็บเลต คอมฯ ฯลฯ สำหรับการเล่น
ระบบสล็อตเว็บโดยตรง ของ พีจีสล็อต ได้รับการพัฒนาและอัปเดต เพื่อให้ รองรับการใช้ บนอุปกรณ์ที่หลากหลายได้อย่าง เต็มที่ ไม่สำคัญว่าจะใช้ มือถือ แท็บเล็ต หรือ คอมฯ รุ่นไหน
ที่ พีจีสล็อต เราเข้าใจว่าผู้เล่นต้องการ จากผู้เล่น ในเรื่อง การใช้งานง่าย และ การเข้าถึงเกมออนไลน์อย่างรวดเร็ว เราจึง ใช้เทคโนโลยี HTML 5 ซึ่งเป็น เทคโนโลยีที่ล้ำสมัย ปัจจุบันนี้ พัฒนาเว็บของเรา คุณจึงไม่ต้อง ดาวน์โหลดแอป หรือติดตั้งโปรแกรมเพิ่มเติม เพียง เปิดเว็บเบราว์เซอร์ บนอุปกรณ์ที่ มีอยู่ของคุณ และเยี่ยมชม เว็บไซต์เรา คุณสามารถ เล่นเกมสล็อตได้ทันที
การสนับสนุนหลายอุปกรณ์
ไม่ว่าคุณจะใช้ สมาร์ทโฟน ระบบ Android หรือ ไอโอเอส ก็สามารถ เล่นสล็อตได้อย่างราบรื่น ระบบของเรา ได้รับการออกแบบให้รองรับ ทุกระบบปฏิบัติการ ไม่สำคัญว่าคุณ กำลังใช้ สมาร์ทโฟน รุ่นใหม่หรือรุ่นเก่า หรือ แท็บเล็ตหรือแล็ปท็อป ทุกอย่างก็สามารถ ใช้งานได้ ไม่มีปัญหา ความเข้ากันได้
เล่นได้ทุกที่และทุกเวลา
ข้อดีอย่างหนึ่งของการเล่นเว็บสล็อตอย่าง PG Slot คือ คุณสามารถ เล่นได้ทุกเวลา ไม่ว่าจะ เป็นที่บ้าน ที่ทำงาน หรือแม้แต่ ในที่สาธารณะ สิ่งที่คุณต้องมีคือ อินเทอร์เน็ต คุณสามารถ เริ่มเกมได้ทันที และคุณไม่ต้อง กังวลเรื่องการโหลด หรือติดตั้งโปรแกรมที่ ใช้พื้นที่บนอุปกรณ์ของคุณ
ลองเล่นสล็อตแมชชีนฟรี
เพื่อให้ ผู้เล่นที่ใหม่ ได้ลองเล่นและสัมผัสเกมสล็อตของเรา PG Slot ยังมีบริการสล็อตฟรี คุณสามารถ เล่นได้ทันทีโดยไม่ต้องสมัครสมาชิกหรือฝากเงิน การ เล่นฟรีนี้จะช่วยให้คุณเข้าใจวิธีเล่นและรู้จักเกมก่อนลงเดิมพันจริง
การบริการและความปลอดภัย
PG Slot มุ่งมั่นที่จะให้บริการที่ดีที่สุดแก่ลูกค้า เรามี ทีมงานมืออาชีพพร้อมให้บริการและช่วยเหลือคุณตลอด 24 ชั่วโมง นอกจากนี้เรายังมี การรักษาความปลอดภัยที่ทันสมัย ด้วยวิธีนี้ คุณจึงมั่นใจได้ว่า ข้อมูลส่วนบุคคลและธุรกรรมทางการเงินของคุณจะได้รับการปกป้องอย่างดีที่สุด
โปรโมชั่นและโบนัสพิเศษ
อีกข้อดีของการเล่นสล็อตกับ PG Slot นั่นคือ มี โปรโมชั่นและโบนัสพิเศษมากมายสำหรับผู้เข้าร่วม ไม่ว่าคุณจะเป็น สมาชิกใหม่หรือเก่า คุณสามารถ รับโปรโมชันและโบนัสได้ สิ่งนี้จะ เพิ่มโอกาสชนะและสนุกกับเกมมากขึ้น
สรุปการเล่นสล็อตเว็บที่ PG Slot ถือเป็นการลงทุนที่คุ้มค่า คุณจะไม่เพียงได้รับความสุขและความสะดวกสบายจากเกมเท่านั้น แต่คุณยังมีโอกาสลุ้นรับรางวัลและโบนัสมากมายอีกด้วย ไม่สำคัญว่าจะใช้โทรศัพท์มือถือ แท็บเล็ต หรือคอมพิวเตอร์รุ่นใด สามารถมาร่วมสนุกกับเราได้เลยตอนนี้ อย่ารอช้า ลงทะเบียนและเริ่มเล่นสล็อตกับ PG Slot วันนี้!
What’s The Job Market For Best Twin Buggy Professionals?
best twin Buggy (rutelochki.ru)
ทดลองเล่นสล็อต
ทดลองปฏิบัติเล่นสล็อต และค้นพบประสบการณ์การเล่นเกมที่ไม่เหมือนใคร!
สำหรับนักพนันที่กำลังพิจารณาความบันเทิงและโอกาสในการแสวงหารางวัลมหาศาล สล็อตออนไลน์เป็นอีกหนึ่งทางเลือกที่ที่คุ้มค่าใช้.ด้วยความขนาดใหญ่ของเกมสล็อตที่น่าตื่นเต้น ผู้เล่นสามารถทดลองเล่นและค้นหาเกมที่ต้องการได้อย่างง่ายดาย.
ไม่ว่าคุณจะประทับใจเกมสล็อตคลาสสิกหรือต้องการสิ่งใหม่, ทางเลือกรอกลับมาให้คุณสัมผัส. จากสล็อตที่มีหัวข้อมากมาย ไปจนถึงเกมที่มีคุณสมบัติพิเศษและเงินรางวัล, ผู้เล่นจะได้พบกับการเล่นเกมที่น่าตื่นเต้นและน่าติดตาม.
ด้วยการปฏิบัติสล็อตฟรี, คุณสามารถศึกษาวิธีการเล่นและค้นเลือกกลยุทธ์ที่ถูกใจก่อนสร้างรายได้ด้วยเงินจริง. นี่คือโอกาสสำคัญที่จะเรียนรู้กับเกมและประยุกต์โอกาสในการคว้ารางวัลใหญ่.
อย่าประวิงเวลา, เข้าร่วมกับการทดสอบสล็อตออนไลน์วันนี้ และค้นพบประสบการณ์การเล่นเกมที่ไม่เหมือนใคร! ตื่นเต้นความน่าสนใจ, ความยินดี และโอกาสในการชนะรางวัลใหญ่. เริ่มต้นเดินทางสู่ความสมหวังของคุณในวงการสล็อตออนไลน์แล้ววันนี้!
ทดลอง ทดลอง สล็อต PG พร้อม เข้าถึง สู่ ยุค แห่ง ความบันเทิง ที่ ไร้ขีดจำกัด
ต่อ นักพนัน ที่ ต้องการ ตามหา อารมณ์ เกมที่แตกต่าง, สล็อต PG ถูกมองว่า ตัวเลือก ที่ น่าสนใจ มาก. ด้วย ความหลากหลาย ของ ตัวเกมสล็อต ที่ น่าติดตาม และ น่าสำรวจ, ลูกค้า จะได้ ทดสอบ และ ทดลอง ตัวเกม ที่ ถูกใจ ความชอบการเล่น ของตนเอง.
ถึงแม้ว่า ผู้เล่น จะต้องการ ความตื่นเต้น ที่คุ้นเคย หรือ การท้าทาย ใหม่ๆ, สล็อต PG ให้เลือก ให้เลือกจำนวนมาก. ตั้งแต่ สล็อตรูปแบบคลาสสิค ที่ คุ้นเคยกัน ไปจนถึง ตัวเกม ที่ ให้ ลักษณะพิเศษ และ โบนัสมากเป็นพิเศษ, คุณ จะได้ สัมผัส การเล่น ที่ น่าตื่นเต้น และ เพลิดเพลิน
ด้วย การเล่นทดลอง สล็อต PG โดยไม่ต้องเสียเงิน, คุณ สามารถ ทำความเข้าใจ เทคนิควิธีการเล่น และ ตรวจสอบ เคล็ดลับ ต่างๆ ก่อนที่จะ เริ่มวางเดิมพัน ด้วยเงินจริง. ถึงกระนั้น เป็น ช่องทาง ที่ยอดเยี่ยม ที่จะ เตรียมตัว และ ยกระดับ ความเป็นไปได้ ในการ ชนะ รางวัลมหาศาล.
อย่าชักช้า, เข้าร่วม ในการ การทดสอบเล่น สล็อต PG ทันใด และ ค้นพบ การเล่น ที่ ไร้ขอบเขต! ทดลอง ความตื่นเต้นระคนตื่นเต้น, ความเพลิดเพลิน และ ช่องทาง ในการ คว้ารางวัล มากมหาศาล. เริ่มดำเนินการ ทำ สู่ ความก้าวหน้า ของคุณในวงการ เกมสล็อตออนไลน์ ตั้งแต่วันนี้!
เกี่ยวกับ ไซต์ PG Slots ในขณะที่ มี จุดเด่น หลายประการ ในเปรียบเทียบกับ คาสิโนแบบ เก่า, อย่างเฉพาะเจาะจง ใน ยุคสมัยใหม่. คุณประโยชน์สำคัญ เหล่านี้ ตัวอย่างเช่น:
ความคล่องตัว: คุณ สามารถใช้งาน สล็อตออนไลน์ได้ ตลอดเวลา จาก ทุกอย่าง, อำนวย ผู้เล่นสามารถ ใช้งาน ได้ ทุกที่ โดยไม่จำเป็นต้อง เสียเวลา ไปคาสิโนแบบ ดั้งเดิม ๆ
เกมมากมายแตกต่าง: สล็อตออนไลน์ มีการนำเสนอ ตัวเกม ที่ มากมาย, เช่น สล็อตประเภทคลาสสิค หรือ รูปแบบเกม ที่มี ลักษณะ และโบนัส พิเศษ, ไม่ทำ ความเบื่อ ในเกม
โปรโมชั่น และรางวัล: สล็อตออนไลน์ ส่วนใหญ่ ให้บริการ โปรโมชั่น และค่าตอบแทน เพื่อส่งเสริม โอกาสในการ ในการ ได้รับรางวัล และ ส่งเสริม ความเพลิดเพลิน ให้กับเกม
ความเชื่อถือได้ และ ความเชื่อถือได้: สล็อตออนไลน์ มักจะ ใช้ การรักษาความปลอดภัย ที่ ครอบคลุม, และ พึ่งพาได้ ว่า ความเป็นส่วนตัว และ การชำระเงิน จะได้รับความ คุ้มครอง
การสนับสนุนลูกค้า: PG Slots ใช้ ทีมงาน มืออาชีพ ที่ตั้งใจ ช่วยเหลือ ตลอดเวลา
การเล่นบนอุปกรณ์เคลื่อนที่: สล็อต PG รองรับ การเล่นบนโทรศัพท์, ช่วยให้ ผู้เล่นสามารถทดลอง ตลอดเวลา
ทดลองใช้ฟรี: ของ ผู้เล่นเริ่มต้น, PG ยังมี ทดลองใช้ฟรี อีกที่, เพื่อ คุณ ลองใช้ การเล่น และทราบ เกมก่อน ลงเดิมพัน
สล็อต PG มีลักษณะ ประโยชน์ หลายอย่าง ที่ ส่งผล ให้ได้รับความสำคัญ ในปัจจุบัน, ทำให้ ความรู้สึก ความบันเทิง ให้กับเกมด้วย.
The 10 Scariest Things About Repair A Window window repairs
Why Best Online Shopping Sites For Clothes Is Everywhere
This Year Brother Ads-1700W
The Secret Secrets Of Mobile Auto Diagnostic Services Near Me Diagnostic Checks
The 9 Things Your Parents Teach You About Upvc Window Repair Near Me Window Repair Near Me
See What Double Glazed Door Repairs Near Me
Tricks The Celebs Are Making Use Of door
Think You’re The Perfect Candidate For Doing
Online Retailers Uk Stats? Try This Quiz sports shoulder Brace
“Ask Me Anything”: Ten Answers To Your Questions About Birth Injury Compensation Birth injuries
What’s The Reason Everyone Is Talking About Motor Vehicle Lawyer Right
Now motor vehicle accident law firm (Effie)
How Do I Explain Cerebral Palsy Claim To A 5-Year-Old Cerebral palsy law firm
See What Car Accident Lawsuit Tricks The Celebs Are Using Car accident Lawsuit
2 In 1 Stroller Car Seat Tools To Help You Manage Your Daily Life 2 In 1 Stroller Car Seat Trick Every Person Should Be Able To
2 in 1 Stroller car seat
Guide To Double Pushchair From Birth: The Intermediate
Guide The Steps To Double Pushchair From Birth Double Pushchair From Birth (http://Nagievonline.Com/User/Anklegum9/)
Hello there, I found your web site by way of Google while searching for a similar matter, your website
got here up, it appears to be like great. I have bookmarked it in my google bookmarks.
Hi there, just became alert to your weblog thru Google, and
located that it is truly informative. I am going
to be careful for brussels. I’ll appreciate if you continue this in future.
Numerous folks shall be benefited from your writing.
Cheers!
You’ll Never Be Able To Figure Out This My Babiie Stroller’s Benefits Babiie Stroller
10 Wrong Answers To Common Truck Accident Lawyer For Hire Questions Do You Know The Correct Answers?
Truck accidents – http://www.Mallangpeach.com,
20 Tips To Help You Be Better At Auto Accident Compensation auto accident lawsuit (Starla)
Slot Tournaments Techniques To Simplify Your Everyday
Lifethe Only Slot Tournaments Trick That Everybody Should Know Slot Tournaments
Guide To Pram Sets: The Intermediate Guide Towards Pram Sets pram Sets
ลองเล่นสล็อต PG ซื้อรอบหมุนฟรี
ในยุคนี้ การเล่นเกมสล็อตบนอินเทอร์เน็ตได้รับความนิยมอย่างมาก โดยเฉพาะเกมสล็อตจากทีมงาน PG Slot ที่มีคุณลักษณะพิเศษพิเศษมากมายให้ผู้ใช้งานได้บันเทิง หนึ่งในคุณลักษณะพิเศษที่น่าสนใจและทำให้การหมุนสนุกยิ่งขึ้นคือ “การซื้อฟรีสปิน” ซึ่งเป็นการเพิ่มความเป็นไปได้ในการชนะและเพิ่มความสนุกสนานในการเล่น
ซื้อฟรีสปินคืออะไร
การซื้อฟรีสปินคือการที่นักพนันสามารถซื้อโอกาสสำเร็จในการหมุนวงล้อสล็อตโดยไม่ต้องรอให้เกิดไอคอนฟรีสปินบนวงล้อ ซึ่งเป็นการเพิ่มความเป็นไปได้ในการได้รับของรางวัลพิเศษต่างๆ ภายในเกม เช่น โบนัส แจ็คพอต และอื่นๆ นอกจากนี้ การซื้อฟรีสปินยังช่วยให้นักเล่นสามารถเพิ่มจำนวนเงินรางวัลได้อย่างรวดเร็วและมีประสิทธิภาพ
ข้อดีของการลองเล่นสล็อต PG ซื้อฟรีสปิน
เพิ่มโอกาสได้รับชัยชนะ: การซื้อฟรีสปินช่วยให้นักพนันมีช่องทางในการได้รับของรางวัลมากขึ้น เพราะว่ามีการหมุนวงล้อฟรีเพิ่มเติม ซึ่งอาจทำให้ได้รับการได้รับแจ็คพอตหรือโบนัสที่มากขึ้นอื่นๆ
ประหยัดเวลาทำงาน: การซื้อตัวเลือกการหมุนฟรีช่วยลดเวลาในการเล่นในการเล่น เนื่องจากไม่ต้องรอให้เกิดสัญญาณฟรีสปินบนวงล้อ ผู้ใช้งานสามารถเข้าสู่รอบฟรีสปินได้ทันที
ทดลองเล่นฟรี: สำหรับผู้เล่นที่ยังไม่แน่ใจเกี่ยวกับเกม PG Slot ยังมีโหมดทดลองเล่นฟรีผู้เล่นได้ลองเล่นและศึกษาวิธีการเล่นก่อนที่จะตัดสินใจซื้อฟรีสปินด้วยเงินจริง
เพิ่มความรื่นรมย์: การซื้อฟรีสปินช่วยเพิ่มความบันเทิงในการเล่น เนื่องจากนักพนันสามารถเข้ารอบโบนัสและฟีเจอร์พิเศษอื่นๆ ได้อย่างง่ายดาย
วิธีการทำการซื้อฟรีสปินในสล็อต PG
เลือกเกมที่ต้องการเล่นจากทีมงาน PG Slot
คลิกที่ปุ่ม “ซื้อฟรีสปิน” ที่แสดงบนหน้าจอเกม
ใส่จำนวนฟรีสปินที่ต้องการใช้และยืนยันการทำรายการ
เริ่มต้นการหมุนวงล้อและเพลิดเพลินกับการเล่น
บทสรุป
การสำรวจเล่นสล็อต PGและการซื้อฟรีสปินเป็นวิธีที่ดีในการเพิ่มช่องทางในการชนะและเพิ่มความสนุกสนานในการเล่น ด้วยฟีเจอร์พิเศษนี้ ผู้เล่นสามารถเข้าถึงรอบโบนัสและลักษณะพิเศษพิเศษต่างๆ ได้อย่างรวดเร็วทันใจและมีประสิทธิภาพ ไม่ว่าคุณคือผู้เล่นใหม่เอี่ยมหรือผู้เล่นที่มีชั่วโมงบิน การลองเล่นสล็อต PGและการซื้อตัวเลือกฟรีสปินจะช่วยให้คุณมีประสบการณ์ในการเล่นที่น่าตื่นเต้นและสนุกมากยิ่งขึ้น
ทดสอบเล่นสล็อต PG ซื้อฟรีสปิน แล้วคุณจะพบกับความรื่นรมย์และความเป็นไปได้ในการชนะที่ไม่มีที่สิ้นสุด
สล็อตเว็บโดยตรง — ใช้ได้กับ โทรศัพท์มือถือ แท็บเล็ต คอมฯ ฯลฯ ในการเล่น
ระบบสล็อตตรงจากเว็บ ของ พีจีสล็อต ได้รับการพัฒนาและปรับปรุง เพื่อให้ รองรับการใช้งาน บนอุปกรณ์ที่หลากหลายได้อย่าง ครบถ้วน ไม่สำคัญว่าจะใช้ โทรศัพท์มือถือ แท็บเล็ต หรือ คอมพิวเตอร์ส่วนตัว แบบไหน
ที่ PG Slot เราเข้าใจว่าผู้เล่นต้องการ จากผู้เล่น ในเรื่อง ความสะดวก และ การเข้าถึงเกมคาสิโนที่รวดเร็ว เราจึง ใช้เทคโนโลยี HTML 5 ซึ่งเป็น เทคโนโลยีล่าสุด ในตอนนี้ มาพัฒนาเว็บไซต์ของเรากันเถอะ คุณจึงไม่ต้อง ดาวน์โหลดแอป หรือติดตั้งโปรแกรมเพิ่มเติม เพียง เปิดเว็บเบราว์เซอร์ บนอุปกรณ์ที่ คุณมีอยู่ และเยี่ยมชม เว็บไซต์เรา คุณสามารถ สนุกกับสล็อตได้ทันที
การใช้งานกับอุปกรณ์หลากหลาย
ไม่ว่าคุณจะใช้ โทรศัพท์มือถือ ระบบ แอนดรอยด์ หรือ ไอโอเอส ก็สามารถ เล่นสล็อตออนไลน์ได้ไม่มีสะดุด ระบบของเรา ได้รับการออกแบบให้รองรับ ทุกระบบปฏิบัติการ ไม่สำคัญว่าคุณ มี สมาร์ทโฟน ใหม่หรือเก่า หรือ แท็บเล็ตหรือโน้ตบุ๊ก ทุกอย่างก็สามารถ ใช้งานได้อย่างไม่มีปัญหา ไม่มีปัญหา ความเข้ากันได้
สามารถเล่นได้ทุกที่ทุกเวลา
หนึ่งในข้อดีของการเล่นสล็อตกับ PG Slot คือ คุณสามารถ เล่นได้ตลอดเวลา ไม่ว่าจะ อยู่ที่บ้าน ออฟฟิศ หรือแม้แต่ ที่สาธารณะ สิ่งที่คุณต้องมีคือ การเชื่อมต่ออินเทอร์เน็ต คุณสามารถ เริ่มเกมได้ทันที และคุณไม่ต้อง กังวลเรื่องการโหลด หรือติดตั้งโปรแกรมที่ ใช้พื้นที่ในอุปกรณ์
ลองเล่นสล็อตแมชชีนฟรี
เพื่อให้ ผู้เล่นที่ใหม่ ได้ลองและรู้จักเกมสล็อตของเรา PG Slot ยังมีสล็อตทดลองฟรี คุณสามารถ เริ่มเล่นได้ทันทีโดยไม่ต้องลงทะเบียนหรือฝากเงิน การ ทดลองเล่นสล็อตแมชชีนฟรีนี้จะช่วยให้คุณเรียนรู้วิธีเล่นและเข้าใจเกมก่อนตัดสินใจเดิมพันด้วยเงินจริง
การให้บริการและความปลอดภัย
PG Slot มุ่งมั่นในการบริการลูกค้าที่ดีที่สุด เรามี ทีมงานมืออาชีพพร้อมให้บริการและช่วยเหลือคุณตลอด 24 ชั่วโมง นอกจากนี้เรายังมี ระบบความปลอดภัยที่ทันสมัย ด้วยวิธีนี้ คุณจึงมั่นใจได้ว่า ข้อมูลส่วนบุคคลและธุรกรรมทางการเงินของคุณจะได้รับการปกป้องอย่างดีที่สุด
โปรโมชันและโบนัส
การเล่นสล็อตกับ PG Slot ยังมีข้อดี คือ มี โปรโมชั่นและโบนัสพิเศษมากมายสำหรับผู้เข้าร่วม ไม่ว่าคุณจะเป็น สมาชิกใหม่หรือสมาชิกเก่า คุณสามารถ รับโปรโมชั่นและโบนัสต่างๆได้อย่างต่อเนื่อง สิ่งนี้จะ เพิ่มโอกาสชนะและสนุกกับเกมมากขึ้น
สรุปการเล่นสล็อตเว็บที่ PG Slot ถือเป็นการลงทุนที่คุ้มค่า คุณจะไม่เพียงได้รับความสุขและความสะดวกสบายจากเกมเท่านั้น แต่คุณยังมีโอกาสลุ้นรับรางวัลและโบนัสมากมายอีกด้วย ไม่สำคัญว่าจะใช้โทรศัพท์มือถือ แท็บเล็ต หรือคอมพิวเตอร์รุ่นใด สามารถมาร่วมสนุกกับเราได้เลยตอนนี้ อย่ารอช้า ลงทะเบียนและเริ่มเล่นสล็อตกับ PG Slot วันนี้!
ประสบการณ์การทดลองเล่นเกมสล็อต PG บนเว็บไซต์เดิมพันโดยตรง: เข้าสู่โลกแห่งความสนุกสนานที่ไม่จำกัด
ต่อนักเสี่ยงโชคที่ตามหาการเผชิญหน้าเกมที่ไม่ซ้ำใคร และคาดหวังค้นหาแหล่งวางเดิมพันที่มั่นคง, การลองเกมสล็อต PG บนเว็บตรงจัดว่าเป็นตัวเลือกที่น่าประทับใจอย่างมาก. เพราะมีความแตกต่างของเกมสล็อตที่มีให้เลือกสรรมากมาย, ผู้เล่นจะได้สัมผัสกับโลกแห่งความรื่นเริงและความสนุกสนานที่ไร้ขีดจำกัด.
พอร์ทัลการเดิมพันตรงนี้ ให้การเล่นการเล่นเดิมพันที่ปลอดภัย เชื่อถือได้ และรองรับความต้องการของนักวางเดิมพันได้เป็นอย่างดี. ไม่ว่าท่านจะผู้เล่นจะหลงใหลสล็อตแมชชีนแนวคลาสสิกที่เป็นที่รู้จัก หรือต้องการสัมผัสเกมใหม่ที่มีฟีเจอร์เฉพาะตัวและสิทธิพิเศษล้นหลาม, เว็บโดยตรงนี้ก็มีให้เลือกอย่างหลากหลายชนิด.
ด้วยระบบการสำรวจเล่นสล็อต PG ฟรีๆ, ผู้เล่นจะได้โอกาสที่ดีเรียนรู้วิธีการเล่นเกมพนันและสำรวจเทคนิคหลากหลาย ก่อนจะเริ่มใช้เงินจริงด้วยเงินทุนจริง. การกระทำนี้ถือเป็นโอกาสอันดีที่สุดที่จะเสริมความพร้อมสรรพและสร้างเสริมโอกาสในการได้รับรางวัลใหญ่ใหญ่.
ไม่ว่าผู้เล่นจะคุณอาจจะต้องการความสนุกที่คุ้นเคย หรือความยากแปลกใหม่, เกมสล็อตแมชชีน PG บนเว็บเดิมพันตรงก็มีให้เลือกอย่างหลากหลาย. คุณอาจจะได้เผชิญกับประสบการณ์การเล่นที่น่าตื่นเต้น น่ารื่นเริง และสนุกสนานไปกับโอกาสในการชิงรางวัลมหาศาลมหาศาล.
อย่ารอช้า, ร่วมสนุกทดลองสล็อตแมชชีน PG บนเว็บเสี่ยงโชคโดยตรงวันนี้ และเจอดินแดนแห่งความบันเทิงที่ปลอดภัยแน่นอน น่าติดตามต่อ และมีแต่ความเพลิดเพลินรอคอยท่าน. เผชิญความรื่นเริง, ความสนุกสนาน และโอกาสดีในการได้รางวัลมหาศาล. เริ่มเล่นเดินทางสู่ชัยชนะในวงการเกมออนไลน์เวลานี้!
крейзи манки [url=www.crazy-monkey-ru.ru]крейзи манки[/url] .
This Is How Double Glaze Repair Near Me Will Look In 10 Years Time replacement glass for double Glazing
bintangbet88
You’ll Never Guess This Fela Federal Employers Liability Act’s Tricks fela federal employers liability act
Double Glazing Repairs Near Me Tools To Ease Your Daily Life Double Glazing Repairs Near Me Trick That Everybody Should Know double glazing repairs near Me
Скачать свежие новинки песен https://muzfo.net 2024 года ежедневно. Наслаждайтесь комфортным прослушиванием, скачивайте музыку за пару кликов на сайте.
Unexpected Business Strategies For Business
That Aided Cheap Prams To Succeed Best Prams
11 “Faux Pas” That Actually Are Okay To Do With Your Replacement Handles For Windows glass for windows replacement
The Biggest Problem With Best Slot Payouts,
And How You Can Repair It Popular Slots
ทดลองเล่นสล็อต pg ไม่ เด้ง
ทดลองทดสอบเล่นสล็อต และค้นพบประสบการณ์การเล่นเกมที่ไม่เหมือนใคร!
สำหรับนักพนันที่กำลังมองหาความบันเทิงและโอกาสในการได้รับรางวัลมหาศาล สล็อตออนไลน์เป็นอีกหนึ่งทางเลือกที่คุ้มค่าพิจารณา.ด้วยความจำนวนมากของเกมสล็อตที่น่าตื่นเต้น ผู้เล่นสามารถทดลองเล่นและค้นหาเกมที่ถูกใจได้อย่างง่ายดาย.
ไม่ว่าคุณจะประทับใจเกมสล็อตคลาสสิกหรือต้องการความแปลกใหม่, ตัวเลือกรอต้อนรับให้คุณสัมผัส. จากสล็อตที่มีแบบมากมาย ไปจนถึงเกมที่มีคุณสมบัติพิเศษและโบนัส, ผู้เล่นจะได้พบกับประสบการณ์ที่น่าตื่นเต้นและน่าติดตาม.
ด้วยการปฏิบัติสล็อตฟรี, คุณสามารถปฏิบัติวิธีการเล่นและค้นหากลยุทธ์ที่ถูกใจก่อนสร้างรายได้ด้วยเงินจริง. นี่คือโอกาสดีที่จะทำความคุ้นเคยกับเกมและเพิ่มโอกาสในการคว้ารางวัลใหญ่.
อย่าขยายเวลา, ลงมือกับการลองเล่นสล็อตออนไลน์วันนี้ และค้นพบประสบการณ์การเล่นเกมที่ไม่เหมือนใคร! เพลิดเพลินความน่าสนใจ, ความร่าเริง และโอกาสชนะรางวัลมากมาย. กล้าก้าวไปเดินทางสู่ความเฟื่องฟูของคุณในวงการสล็อตออนไลน์แล้ววันนี้!
9 Lessons Your Parents Teach You About Upvc
Window Repairs Near Me Upvc window Repairs Near me
You’ll Be Unable To Guess London Online Clothing Shopping Sites’s Tricks london online clothing
shopping sites; Tod,
The Most Underrated Companies To Keep An Eye On In The Motorcycle Accident Attorneys Industry
motorcycle accident lawyers
sa gaming
הימורי ספורט
הימורי ספורטיביים – הימורים באינטרנט
הימור ספורטיביים נהיו לאחד הענפים המשגשגים ביותר בהימורים באינטרנט. שחקנים מסוגלים להמר על תוצאותיהם של אירועי ספורט מוכרים כמו כדורגל, כדור סל, טניס ועוד. האפשרויות להתערבות הן רבות, וביניהן תוצאתו ההתמודדות, מספר השערים, כמות הנקודות ועוד. הבא דוגמאות למשחקי נפוצים שעליהם ניתן להמר:
כדורגל: ליגת האלופות, מונדיאל, ליגות מקומיות
כדור סל: NBA, יורוליג, תחרויות בינלאומיות
טניס: טורניר ווימבלדון, US Open, אליפות צרפת הפתוחה
פוקר באינטרנט – הימורים ברשת
משחק הפוקר באינטרנט הוא אחד ממשחקי ההימור המוכרים ביותר בימינו. משתתפים יכולים להתמודד מול מתחרים מכל רחבי תבל בסוגי סוגי משחק , למשל Texas Hold’em, Omaha, Stud ועוד. ניתן לגלות תחרויות ומשחקי במגוון רמות ואפשרויות הימור שונות. אתרי הפוקר המובילים מציעים:
מגוון רחב של וריאציות פוקר
טורנירים שבועיים וחודשיים עם פרסים כספיים
שולחנות למשחקים מהירים ולטווח הארוך
תוכניות נאמנות ומועדוני VIP עם הטבות בלעדיות
בטיחות והוגנות
כאשר הבחירה בפלטפורמה להימורים באינטרנט, חיוני לבחור אתרי הימורים מורשים המפוקחים המציעים סביבה למשחק בטוחה והגיונית. אתרים אלו משתמשים בטכנולוגיית הצפנה מתקדמות להבטחה על מידע אישי ופיננסי, וכן באמצעות תוכנות גנרטור מספרים רנדומליים (RNG) כדי לוודא הגינות במשחקים במשחקי ההימורים.
בנוסף, חשוב לשחק בצורה אחראית תוך כדי קביעת מגבלות הימורים אישיות של השחקן. רוב האתרים מאפשרים למשתתפים להגדיר מגבלות הפסד ופעילות, וגם להשתמש ב- כלים נגד התמכרויות. הימרו בתבונה ואל תרדפו גם אחרי הפסד.
המדריך השלם למשחקי קזינו אונליין, הימורי ספורט ופוקר ברשת
ההימורים באינטרנט מציעים עולם שלם הזדמנויות מרתקות למשתתפים, מתחיל מקזינו אונליין וגם בהימורי ספורט ופוקר באינטרנט. בעת בחירת פלטפורמת הימורים, חשוב לבחור גם אתרי הימורים המפוקחים המציעים סביבה משחק בטוחה והוגנת. זכרו גם לשחק בצורה אחראית תמיד – משחקי ההימורים באינטרנט אמורים להיות מבדרים ומהנים ולא ליצור לבעיות כלכליות או חברתיים.
Ten Reasons To Hate People Who Can’t Be Disproved Medical Malpractice Legal Medical Malpractice Law firm
The Secret Secrets Of Window Repair Near Upvc window Repair Near me
5 Killer Quora Answers To Treadmill Incline Benefits Treadmill incline benefits
20 Resources That’ll Make You More Effective At Online
Shopping Sites For Clothes Traditional Leather Recliner
[url=http://mcadvair.online/]buy advair cheap[/url]
https://erokomiksi6.com/?keyword=markas138
Here’s A Little Known Fact Regarding Adult Adhd Assessment Are
Adhd Assessments Covered By Insurance [Mukgonose.Exp.Jp]
20 Federal Employers Liability Websites That Are Taking
The Internet By Storm lawyers
10 Jackpot Slots That Are Unexpected exciting casino slots
15 Of The Most Popular Truck Accident Compensation Claims Bloggers You Should Follow truck accident attorneys, ghasemtorabi.ir,
Think You’re Perfect For Doing Which CSGO Case Is The Most Profitable?
Answer This Question csgo Cases
5 Killer Quora Answers On Sugar Rush Gacor sugar rush
gacor (Forum.Elaivizh.eu)
9 Things Your Parents Taught You About Best Online Clothing Sites
Uk Online clothing Sites uk
The Ultimate Glossary Of Terms About Upvc Windows Repair Upvc Window
Repairs (http://Www.Open201.Com)
Seven Reasons To Explain Why Real Money Slots
Is Important Jackpot Slots
Don’t Buy Into These “Trends” About Waitrose Groceries
Online Shopping Uk beer Pong innovation
купить аккаунт яндекс сплит телеграмм [url=https://kupit-akkaunt-telegramm11.ru]купить аккаунт яндекс сплит телеграмм[/url] .
Five Killer Quora Answers On Shopping Online Sites List
shopping online sites list
Slot Walk-Throughs: Myths And Facts Behind Slot Walk-Throughs best payouts Slots
The Reason Why Dangerous Drugs Law Firms Is Everyone’s Desire In 2023 Dangerous Drugs Attorney
buy viagra online
payday loan
It’s The Auto Accident Compensation Case Study You’ll
Never Forget auto Accident law firm
https://bestcryptocurrencytradingbot.com/
הימורי ספורט – הימורים באינטרנט
הימור ספורט נעשו לאחד הענפים המשגשגים ביותר בהימור ברשת. משתתפים מסוגלים להמר על תוצאת של אירועי ספורט פופולריים למשל כדורגל, כדור סל, משחק הטניס ועוד. האפשרויות להתערבות הן מרובות, כולל תוצאתו המשחק, כמות הגולים, מספר הנקודות ועוד. להלן דוגמאות למשחקים נפוצים שעליהם ניתן להתערב:
כדור רגל: ליגת האלופות, גביע העולם, ליגות מקומיות
כדורסל: ליגת NBA, יורוליג, תחרויות בינלאומיות
טניס: ווימבלדון, US Open, אליפות צרפת הפתוחה
פוקר באינטרנט – הימורים ברשת
פוקר באינטרנט הוא אחד מהמשחקים ההימורים הפופולריים ביותר בימינו. משתתפים מסוגלים להתחרות מול יריבים מרחבי העולם במגוון גרסאות משחק , למשל Texas Hold’em, Omaha, Stud ועוד. ניתן למצוא תחרויות ומשחקי קש במגוון רמות ואפשרויות שונות. אתרי פוקר המובילים מציעים:
מבחר רב של וריאציות המשחק פוקר
תחרויות שבועיות וחודשיות עם פרסים כספיים גבוהים
שולחנות למשחק מהיר ולטווח ארוך
תוכניות נאמנות ללקוחות ומועדוני VIP בלעדיות
בטיחות ואבטחה והוגנות
בעת הבחירה פלטפורמה להימורים ברשת, חשוב לבחור גם אתרים מורשים ומפוקחים המציעים גם סביבה משחק בטוחה והגיונית. אתרים אלו עושים שימוש בטכנולוגיית הצפנה מתקדמת להגנה על מידע אישי ופיננסי, וכן בתוכנות גנרטור מספרים אקראיים (RNG) כדי לוודא הגינות במשחקים במשחקי ההימורים.
בנוסף, חשוב לשחק גם בצורה אחראית תוך כדי קביעת מגבלות הימורים אישיות. מרבית אתרי ההימורים מאפשרים לשחקנים לקבוע מגבלות הפסד ופעילויות, כמו גם להשתמש ב- כלים נגד התמכרויות. הימרו בחכמה ואל גם תרדפו גם אחר הפסדים.
המדריך השלם למשחקי קזינו אונליין, משחקי ספורט ופוקר באינטרנט ברשת
ההימורים ברשת מציעים גם עולם שלם הזדמנויות מרתקות למשתתפים, החל מקזינו באינטרנט וכל בהימורי ספורט ופוקר ברשת. בעת בחירת פלטפורמת הימורים, הקפידו לבחור גם אתרים מפוקחים המציעים גם סביבה למשחק בטוחה והוגנת. זכרו לשחק בצורה אחראית תמיד ואחראי – ההימורים ברשת נועדו להיות מבדרים ולא גם ליצור לבעיות כלכליות או חברתיות.
The 10 Most Scariest Things About Dangerous Drugs Law Firms dangerous drugs law firms
Guide To Dangerous Drugs Lawyers: The Intermediate Guide
In Dangerous Drugs Lawyers Dangerous drugs lawyers
5 Killer Quora Answers On Charity Shop Online Clothes Uk charity shop online clothes uk
Birth Defect Attorney Explained In Fewer Than 140 Characters birth defect lawyer
анал русских с разговорами смотреть бесплатно [url=www.safavia.ru]www.safavia.ru[/url] .
Ⅾefinitely believe that that you said. Your favourite justification seemed to be
at thee weƄ the simplest thing to take note of. I say to you,
I definitely get irkeɗ at the ѕame time as people think about cоncerns that they
ϳust do not knoѡ aboᥙt. You controlled to hit the nail
upon the higheѕt and aaⅼso outlined out the entire thing with no
need sidе effect , people could take a signal.
Will probably be Ьack to get more. Thanks
I know this ssite ⲟffers quality dependent posts and other data,
is thеre any other site which prеsents such
stuff iin quality?
Where Can You Find The Most Effective Motor Vehicle Lawyers Information? motor vehicle accident Lawsuits
https://medium.com/@momejar21741/pg-59490dd058fd
สล็อตเว็บตรง — ใช้ โทรศัพท์มือถือ แท็บเลต คอมพิวเตอร์ส่วนตัว ฯลฯ สำหรับการเล่น
ระบบสล็อตตรงจากเว็บ ของ PG ได้รับการพัฒนาและปรับปรุง เพื่อให้ สามารถใช้งาน บนอุปกรณ์ที่หลากหลายได้อย่าง สมบูรณ์ ไม่สำคัญว่าจะใช้ มือถือ แท็บเลต หรือ คอมฯ แบบไหน
ที่ PG Slot เราเข้าใจถึงสิ่งที่ผู้เล่นต้องการ ของลูกค้า ในเรื่อง ความสะดวกสบาย และ การเข้าถึงเกมคาสิโนที่รวดเร็ว เราจึง ใช้ HTML 5 ซึ่งเป็น เทคโนโลยีล่าสุด ปัจจุบันนี้ มาพัฒนาเว็บไซต์ของเรากันเถอะ คุณจึงไม่ต้อง ดาวน์โหลดแอป หรือติดตั้งโปรแกรมเพิ่มเติม เพียง เปิดเบราว์เซอร์ บนอุปกรณ์ที่ คุณใช้อยู่ และเยี่ยมชม เว็บไซต์เรา คุณสามารถ สนุกกับสล็อตได้ทันที
การรองรับอุปกรณ์หลายชนิด
ไม่ว่าคุณจะใช้ โทรศัพท์มือถือ ระบบ Android หรือ ไอโอเอส ก็สามารถ เล่นสล็อตได้อย่างราบรื่น ระบบของเรา ออกแบบมาให้รองรับ ทุกระบบปฏิบัติการ ไม่สำคัญว่าคุณ กำลังใช้ สมาร์ทโฟน ใหม่หรือเก่า หรือ แท็บเล็ตหรือโน้ตบุ๊ก ทุกอย่างก็สามารถ ใช้งานได้ ไม่มีปัญหา เรื่องความเข้ากันได้
เล่นได้ทุกที่ทุกเวลา
ข้อดีของการเล่น PG Slot ก็คือ คุณสามารถ เล่นได้ทุกที่ทุกเวลา ไม่ว่าจะ อยู่ที่บ้าน ออฟฟิศ หรือแม้แต่ สถานที่สาธารณะ สิ่งที่คุณต้องมีคือ การเชื่อมต่ออินเทอร์เน็ต คุณสามารถ เริ่มเกมได้ทันที และคุณไม่ต้อง ห่วงเรื่องการดาวน์โหลด หรือติดตั้งโปรแกรมที่ ใช้พื้นที่ในอุปกรณ์
ลองเล่นสล็อตแมชชีนฟรี
เพื่อให้ ผู้เล่นใหม่ มีโอกาสลองและสัมผัสประสบการณ์สล็อตแมชชีนของเรา PG Slot ยังเสนอบริการสล็อตทดลองฟรีอีกด้วย คุณสามารถ ทดลองเล่นได้ทันทีโดยไม่ต้องสมัครหรือฝากเงิน การ ทดลองเล่นสล็อตนี้จะช่วยให้คุณรู้จักวิธีการเล่นและเข้าใจเกมก่อนเดิมพันด้วยเงินจริง
การให้บริการและความปลอดภัย
PG Slot มุ่งมั่นที่จะให้บริการที่ดีที่สุดแก่ลูกค้า เรามี ทีมบริการที่พร้อมช่วยเหลือตลอด 24 ชั่วโมง นอกจากนี้เรายังมี การรักษาความปลอดภัยที่ทันสมัย ด้วยวิธีนี้ คุณจึงมั่นใจได้ว่า ข้อมูลส่วนบุคคลและธุรกรรมทางการเงินของคุณจะได้รับการปกป้องอย่างดีที่สุด
โปรโมชันและโบนัส
ข้อดีอีกประการของการเล่นสล็อตแมชชีนกับ PG Slot ก็คือ มี โปรโมชันและโบนัสพิเศษสำหรับสมาชิก ไม่ว่าคุณจะเป็น สมาชิกใหม่หรือเก่า คุณสามารถ รับโปรโมชั่นและโบนัสต่างๆได้อย่างต่อเนื่อง สิ่งนี้จะ เพิ่มโอกาสชนะและสนุกกับเกมมากขึ้น
สรุปการเล่นสล็อตเว็บที่ PG Slot ถือเป็นการลงทุนที่คุ้มค่า คุณจะไม่เพียงได้รับความสุขและความสะดวกสบายจากเกมเท่านั้น แต่คุณยังมีโอกาสลุ้นรับรางวัลและโบนัสมากมายอีกด้วย ไม่สำคัญว่าจะใช้โทรศัพท์มือถือ แท็บเล็ต หรือคอมพิวเตอร์รุ่นใด สามารถมาร่วมสนุกกับเราได้เลยตอนนี้ อย่ารอช้า ลงทะเบียนและเริ่มเล่นสล็อตกับ PG Slot วันนี้!
капсулы для похудения [url=http://www.ozon.ru/product/nexis-effektivnye-tabletki-dlya-pohudeniya-zhiroszhigatel-dlya-zhenshchin-60-kapsul-kurs-na-mesyats-1564574748/]http://www.ozon.ru/product/nexis-effektivnye-tabletki-dlya-pohudeniya-zhiroszhigatel-dlya-zhenshchin-60-kapsul-kurs-na-mesyats-1564574748/[/url] .
[url=http://doxycyclineo.online/]doxycycline hyclate 100mg price[/url]
Real Madrid midfielder Rodrigo https://rodrygo.prostoprosport-ar.com gave Madrid the lead in the Champions League quarter-final first leg against Manchester City. The meeting takes place in Madrid. Rodrigo scored in the 14th minute after a pass from Vinicius Junior.
южный парк на русском южный парк 1 сезон
hello!,I really like your writing so so much! percentage we keep
in touch extra approximately your article on AOL? I require a specialist in this space to resolve my problem.
May be that is you! Having a look ahead to peer you.
This website was… how do I say it? Relevant!! Finally I have found something that helped me.
Kudos!
купить квартиру в казани купить квартиру от застройщика недорого
ทดลองเล่นสล็อต pg ฟรี
Доставка алкоголя в Екатеринбурге
A Look At The Future What’s The Bed With Couch Industry Look Like
In 10 Years? brown Sectional couch
купить квартиру от застройщика цены https://kupit-kvartiru47.ru
Карьерный коуч https://vminske.by/fashion/kto-takie-karernye-konsultanty — эксперт рынка труда, который помогает людям определить свои карьерные цели, развиваться в выбранной области и достигать успеха в профессиональной деятельности.
7 Things About Birth Defect Law You’ll Kick Yourself For Not Knowing birth defect lawsuits
seo продвижение сайта сколько стоит https://prodvizhenie-saytov43.ru
buy viagra online
заказать seo продвижение сайта https://seo-prodvizhenye-kazan.ru
8 Tips To Enhance Your Online Shopping Website In London Game Vimeo
[url=http://ifinasteride.com/]finasteride 1mg for sale[/url]
заказать seo оптимизацию сайта https://prodvizhenye-seo.ru
Guide To L Shaped Sofa Leatherette: The Intermediate Guide To L Shaped Sofa Leatherette l Shaped sofa leather
14 Cartoons About Four Wheel Scooters That’ll Brighten Your
Day 4 wheel Mobility scooters for Adults
buy viagra online
Greetings! Very helpful advice within this post! It’s the little changes
that produce the biggest changes. Thanks for sharing!
The 10 Most Terrifying Things About Dangerous Drugs Attorneys Dangerous drugs
How To Choose The Right Boot Mobility Scooters On The Internet Arlen Nizo
Sage Advice About Best CSGO Opening Site From A
Five-Year-Old Csgo cases
[url=https://lyricamd.com/]price for lyrica 75 mg[/url]
Thank you for another informative website. Where else could
I get that kind of info written in such an ideal approach?
I’ve a venture that I’m just now operating on, and I have been on the look
out for such info.
Excellent beat ! I would like to apprentice while you amend your website,
how could i subscribe for a blog website? The account helped
me a acceptable deal. I had been tiny bit acquainted of this your
broadcast provided bright clear concept
The Boot Scooters Success Story You’ll Never Remember arlennizo.top
10 Apps To Help You Manage Your Collapsible Scooter arlennizo
новые сервера ла2
Сервера ла2
I really like your blog.. very nice colors & theme.
Did you create this website yourself or did you hire someone to do it for you?
Plz answer back as I’m looking to design my own blog and would like to know where u got this from.
cheers
Vinicius Junior https://viniciusjunior.prostoprosport-ar.com is a Brazilian and Spanish footballer who plays as a striker for Real Madrid and the Brazilian national team. Junior became the first player in the history of Los Blancos, born in 2000, to play an official match and score a goal.
Kylian Mbappe https://kylianmbappe.prostoprosport-ar.com is a French footballer, striker for Paris Saint-Germain and captain of the French national team. He began playing football in the semi-professional club Bondi, which plays in the lower leagues of France. He was noticed by Monaco scouts, which he joined in 2015 and that same year, at the age of 16, he made his debut for the Monegasques. The youngest debutant and goal scorer in the club’s history.
This Is The History Of Car Boot Mobility Scooter In 10
Milestones Arlen Nizo
Karim Benzema https://karimbenzema.prostoprosport-ar.com is a French footballer who plays as a striker for the Saudi Arabian club Al-Ittihad. He played for the French national team, for which he played 97 matches and scored 37 goals. At the age of 17, he became one of the best reserve players, scoring three dozen goals per season.
Victor James Osimhen https://victorosimhen.prostoprosport-ar.com is a Nigerian footballer who plays as a forward for the Italian club Napoli and the Nigerian national team. In 2015, he was recognized as the best football player in Africa among players under 17 according to the Confederation of African Football.
台灣線上娛樂城是指通過互聯網提供賭博和娛樂服務的平台。這些平台主要針對台灣用戶,但實際上可能在境外運營。以下是一些關於台灣線上娛樂城的重要信息:
1. 服務內容:
– 線上賭場遊戲(如老虎機、撲克、輪盤等)
– 體育博彩
– 彩票遊戲
– 真人荷官遊戲
2. 特點:
– 全天候24小時提供服務
– 可通過電腦或移動設備訪問
– 常提供優惠活動和獎金來吸引玩家
3. 支付方式:
– 常見支付方式包括銀行轉賬、電子錢包等
– 部分平台可能接受加密貨幣
4. 法律狀況:
– 在台灣,線上賭博通常是非法的
– 許多線上娛樂城實際上是在國外註冊運營
5. 風險:
– 由於缺乏有效監管,玩家可能面臨財務風險
– 存在詐騙和不公平遊戲的可能性
– 可能導致賭博成癮問題
6. 爭議:
– 這些平台的合法性和道德性一直存在爭議
– 監管機構試圖遏制這些平台的發展,但效果有限
重要的是,參與任何形式的線上賭博都存在風險,尤其是在法律地位不明確的情況下。建議公眾謹慎對待,並了解相關法律和潛在風險。
如果您想了解更多具體方面,例如如何識別和避免相關風險,我可以提供更多信息。
Портал о здоровье https://rezus.ru и здоровом образе жизни, рекомендации врачей и полезные сервисы. Простые рекомендации для укрепления здоровья и повышения качества жизни.
Toni Kroos https://tonikroos.prostoprosport-ar.com is a German footballer who plays as a central midfielder for Real Madrid and the German national team. World champion 2014. The first German player in history to win the UEFA Champions League six times.
20 Tips To Help You Be More Successful At Boot Scooter Arlen Nizo
Robert Lewandowski https://robertlewandowski.prostoprosport-ar.com is a Polish footballer, forward for the Spanish club Barcelona and captain of the Polish national team. Considered one of the best strikers in the world. Knight of the Commander’s Cross of the Order of the Renaissance of Poland.
вскрытие замков рядом [url=https://vskrytie-zamkov-moskva113.ru/]vskrytie-zamkov-moskva113.ru[/url] .
I want to see your book when it comes out.
сериал волчонок онлайн волчонок смотреть
Wow wonderful blog layout How long have you been blogging for you make blogging look easy The overall look of your site is great as well as the content
Mohamed Salah https://mohamedsalah.prostoprosport-ar.com is an Egyptian footballer who plays as a forward for the English club Liverpool and the Egyptian national team. Considered one of the best football players in the world. Three-time winner of the English Premier League Golden Boot: in 2018 (alone), 2019 (along with Sadio Mane and Pierre-Emerick Aubameyang) and 2022 (along with Son Heung-min).
Wow, this paragraph is good, my younger sister is analyzing
such things, so I am going to convey her.
buy 5000 tiktok followers cheap buy tiktok followers
Pedro Gonzalez Lopez https://pedri.prostoprosport-ar.com better known as Pedri, is a Spanish footballer who plays as an attacking midfielder for Barcelona and the Spanish national team. Bronze medalist of the 2020 European Championship, as well as the best young player of this tournament. Silver medalist at the 2020 Olympic Games in Tokyo. At the age of 18, he was included in the list of 30 football players nominated for the 2021 Ballon d’Or.
9 Things Your Parents Teach You About GSA SER Software Gsa Ser Software – https://M.Moneeshop.Com/Member/Login.Html?NoMemberOrder=&ReturnUrl=Http://Ingram-Coyle-2.Technetbloggers.De/10-Facts-About-Gsa-Ser-Download-That-Make-You-Feel-Instantly-The-Best-Mood/
–
The One Best American-Style Fridge Freezer
Mistake That Every Beginner Makes http://www.zackfoxworth.top
Online Shopping Website In London Tips To Relax Your Daily Life Online Shopping Website In London Trick
That Should Be Used By Everyone Know online shopping Website in london
Lionel Andres Messi Cuccittini https://lionelmessi.prostoprosport-ar.com is an Argentine footballer, forward and captain of the MLS club Inter Miami, captain of the Argentina national team. World champion, South American champion, Finalissima winner, Olympic champion. Considered one of the best football players of all time.
How To Explain Asbestos Exposure Attorney To A Five-Year-Old http://www.cassylawn.top
[url=http://valtrexv.online/]valtrex online prescription[/url]
Cristiano Ronaldo https://cristiano-ronaldo.prostoprosport-ar.com is a Portuguese footballer, forward, captain of the Saudi Arabian club An-Nasr and the Portuguese national team. European Champion. Considered one of the best football players of all time. The best scorer in the history of football according to the IFFIS and fourth according to the RSSSF
[url=http://avermox.online/]generic vermox[/url]
The Reasons You’ll Want To Find Out More About Adhd Symptoms For
Females Symptoms of add Adhd in women
5 Killer Quora Answers To France Online Shopping Sites Clothes Threaded Polisher Backing Plate
This Story Behind Can Hades Beat Zeus Will Haunt You For The Rest Of Your Life!
oscarreys.top
What Freud Can Teach Us About Bio-Ethanol Fireplace Samual
The No. Question That Everyone In Tier 2 Seo Should Know How To Answer Tier 1 Links – https://Clients1.Google.Com.Kw/Url?Q=Http://Regan-Erichsen.Federatedjournals.Com/Check-Out-How-Tier-Backlinks-Is-Taking-Over-The-World-And-How-To-Respond/ –
The 12 Most Obnoxious Types Of People You Follow On Twitter Online Shopping sites for Dress (https://Vimeo.com/931669342)
piracetam online order – sustiva buy online sinemet 10mg us
What’s The Current Job Market For High Limit Slots Professionals Like?
high Limit Slots
How To Outsmart Your Boss On Buy ADHD Medication Online
Coping With Adhd Without Medication
Anderson Sousa Conceicao better known as Talisca https://talisca.prostoprosport-ar.com is a Brazilian footballer who plays as a midfielder for the An-Nasr club. A graduate of the youth team from Bahia, where he arrived in 2009 ten years ago.
Yassine Bounou https://yassine-bounou.prostoprosport-ar.com also known as Bono, is a Moroccan footballer who plays as a goalkeeper for the Saudi Arabian club Al-Hilal and the Moroccan national team. On November 10, 2022, he was included in the official application of the Moroccan national team to participate in the matches of the 2022 World Cup in Qatar
Test: How Much Do You Know About Double Pushchair? All terrain double stroller
10 Inspiring Images About Best Slot Payouts slots With bonuses (Tagoverflow.stream)
Online Shopping Website In London Tools To Make Your Daily Lifethe One Online Shopping Website In London Trick
Every Individual Should Know Online Shopping Website In London
A Glimpse At The Secrets Of Boot Mobility Scooters arlennizo.top
The Secret Life Of Locksmith Cars elsycrays.top
Dangerous Drugs Tips To Relax Your Daily Lifethe
One Dangerous Drugs Trick That Everyone Should Be Able To Dangerous Drugs (Classifieds.Ocala-News.Com)
Responsible For A Uk Online Grocery Shopping Sites Budget?
12 Top Ways To Spend Your Money online shopping
10 Best Mobile Apps For 3d Slots slot Symbols
You’ll Never Guess This Car Replacement Keys’s Tricks car replacement keys
The Underrated Companies To Follow In The Foldable Flat Treadmill Industry
zackfoxworth
Harry Edward Kane https://harry-kane.prostoprosport-ar.com is an English footballer, forward for the German club Bayern and captain of the England national team. Considered one of the best football players in the world. He is Tottenham Hotspur’s and England’s all-time leading goalscorer, as well as the second most goalscorer in the Premier League. Member of the Order of the British Empire.
Ten Locksmith For Cars That Really Improve Your Life
cars
Neymar da Silva Santos Junior https://neymar.prostoprosport-ar.com is a Brazilian footballer who plays as a striker, winger and attacking midfielder for the Saudi Arabian club Al-Hilal and the Brazilian national team. Considered one of the best players in the world. The best scorer in the history of the Brazilian national team.
Erling Breut Haaland https://erling-haaland.prostoprosport-ar.com is a Norwegian footballer who plays as a forward for the English club Manchester City and the Norwegian national team. English Premier League record holder for goals per season.
Medium Variance Slots Explained In Less Than 140 Characters evoplay slots popular (3eh.ufe.n.gku.an.gniu.B.i.u.k2.6.bluepops.co.kr)
Window Repairs Tools To Ease Your Everyday Lifethe Only Window
Repairs Trick That Everybody Should Learn window repairs (Alicia)
What’s The Current Job Market For Uk Women’s Online Shopping
Websites Professionals? High-End Retro Keyboard (https://Vimeo.Com/)
Ali al-Buleahi https://ali-al-bulaihi.prostoprosport-ar.com Saudi footballer, defender of the club ” Al-Hilal” and the Saudi Arabian national team. On May 15, 2018, Ali al-Buleakhi made his debut for the Saudi Arabian national team in a friendly game against the Greek team, coming on as a substitute midway through the second half.
Luka Modric https://lukamodric.prostoprosport-ar.com is a Croatian footballer, central midfielder and captain of the Spanish club Real Madrid, captain of the Croatian national team. Recognized as one of the best midfielders of our time. Knight of the Order of Prince Branimir. Record holder of the Croatian national team for the number of matches played.
5 Laws That Will Help Those In Slot Reviews Industry Progressive jackpot slots
10 Things That Everyone Is Misinformed About Best Online Shopping Uk Clothes Hex Bar 36 Inch (https://vimeo.com/)
Five Killer Quora Answers To Cheap Online Electronics Shopping
Uk cheap Online electronics shopping uk
How Do I Explain Mental Illness Assessment To A 5-Year-Old Mental status assessment
Repairs To Upvc Windows Tools To Streamline Your
Everyday LifeThe Only Repairs To Upvc Windows Trick
That Every Person Must Learn Repairs To Upvc Windows
buy tiktok followers buy real tiktok followers
how do you buy tiktok followers buy tiktok followers tokmatic
How To Make An Amazing Instagram Video About Will CSGO
Cases Go Up In Price cs2 case Opening
The 10 Most Scariest Things About Double Stroller With
Infant Car Seat double stroller with infant car seat
9 Things Your Parents Teach You About Online Shopping Websites For
Clothes online Shopping websites For Clothes
buy viagra online
8 Tips To Boost Your Window Repairs High Wycombe Game double glazing In High Wycombe
Unexpected Business Strategies For Business That Aided Shopping Online Uk To Succeed Fishing Tackle Storage
Why People Are Talking About Wall Mounted Fireplace Today
Lynn Bolvin
средство для интимной гигиены для женщин Средства для интимной гигиены IntiLINE
Private Mental Health Assessment London Tools To Ease Your Day-To-Day Life medical mental health Assessment
You’ll Never Be Able To Figure Out This Online Shop Designer
Suits’s Tricks online shop designer Suits
Why Car Boot Mobility Scooter Is The Best Choice For You? https://www.arlennizo.top/i10vd-33yb-52l1y45-yd7ppr-s4uk7cx-3804/
You’ll Never Guess This Three Wheel Mobility Scooters Sale’s Secrets Folding Mobility Scooters For Sale Near Me
The 10 Most Scariest Things About Good Online Shopping
Sites Uk Online Shopping Sites Uk
The best film magazin https://orbismagazine.com, film industry trade publications in 2024 to keep you informed with the latest video production, filmmaking, photographynews. We create beautiful and magnetic projects.
Best Online Shopping Sites For Clothes Techniques To Simplify Your Daily Life Best Online Shopping Sites For Clothes Trick Every
Individual Should Know best online Shopping sites for clothes
9 Things Your Parents Teach You About Accident Lawsuits accident law firms (Garnet)
watch porn video
Who’s The World’s Top Expert On Online Shop
Designer Suits? cuisinart Cfo-3ss
buy viagra online
A Provocative Rant About Types Of Anxiety Disorders Do Anxiety Disorders Ever Go Away
buy viagra online
Взять займ или кредит
https://wildkids.biz/3184-podrobnoe-rukovodstvo-po-podache-onlayn-zayavok-na-kredit-v-razlichnye-banki.html под проценты, подав заявку на денежный микрозайм для физических лиц. Выбирайте среди 570 лучших предложений займа онлайн. Возьмите микрозайм онлайн или наличными в день обращения. Быстрый поиск и удобное сравнение условий по займам и микрокредитам в МФО.
NGolo Kante https://ngolokante.prostoprosport-ar.com is a French footballer who plays as a defensive midfielder for the Saudi Arabian club Al-Ittihad and the French national team. His debut for the first team took place on May 18, 2012 in a match against Monaco (1:2). In the 2012/13 season, Kante became the main player for Boulogne, which played in Ligue 3.
I’m curious to find out what blog system you have been utilizing?
I’m experiencing some minor security problems with my latest site and I would like to find something more risk-free.
Do you have any solutions?
20 Resources To Make You More Efficient With How To
Get More Cases In CSGO cs2 case Opening
A Step-By-Step Guide To Choosing The Right Railroad Injuries Settlement
Railroad Injuries law firms
haus kaufen budva montenegro immobilien von privat kaufen
Five Reasons To Join An Online Shopping Online Uk To Ireland Shop
And 5 Reasons To Not off-road tire Pump
You’ll Never Be Able To Figure Out This Upvc Window Repair Near Me’s Tricks upvc window repair near me
buy viagra online
The Worst Advice We’ve Received On Medical Malpractice Claim Medical malpractice law firms
hydroxyurea usa – order trental without prescription order robaxin pill
Don’t wait any longer to experience the thrill of online slots. Join our https://usacasinohub.com/slots/ today and embark on an adventure filled with fun, excitement, and endless opportunities to win. With our wide selection of games, generous bonuses, and secure environment, there’s no better place to play. Sign up now and start spinning the reels for your chance to hit the jackpot!
Коммерческий секс в столице является запутанной и многоаспектной проблемой. Невзирая на данная деятельность нелегальна законодательством, этот бизнес продолжает быть значительным теневым сектором.
Исторические аспекты
В советского времени времена коммерческий секс процветала нелегально. По окончании Союза, в обстановке хозяйственной неопределенности, эта деятельность появилась явной.
Сегодняшняя состояние
Сегодня интимные услуги в Москве представляет собой разные виды, начиная с высококлассных эскорт-услуг до на улице проституции. Элитные предложения обычно организуются через сеть, а на улице секс-работа сосредоточена в конкретных областях городской территории.
Социальные и экономические факторы
Многие девушки занимаются в эту сферу ввиду экономических неурядиц. Проституция может оказаться интересной из-за возможности немедленного дохода, но такая работа подразумевает риски для здоровья и охраны здоровья.
Правовые Вопросы
Интимные услуги в Российской Федерации не законна, и за ее осуществление состоят строгие штрафы. Коммерческих секс-работников постоянно привлекают к административной и правовой вине.
Таким образом, невзирая на запреты, проституция является частью экономики в тени столицы с большими социальными и законодательными последствиями.
What’s The Job Market For Private ADHD Titration UK Professionals Like?
Adhd Titration
Kobe Bean Bryant https://kobebryant.prostoprosport-ar.com is an American basketball player who played in the National Basketball Association for twenty seasons for one team, the Los Angeles Lakers. He played as an attacking defender. He was selected in the first round, 13th overall, by the Charlotte Hornets in the 1996 NBA Draft. He won Olympic gold twice as a member of the US national team.
15 Things You’ve Never Known About Why Are CSGO Skins Going Up In Price Cs2 Cases
12 Companies Leading The Way In Unique Slots Slots With Free Bonus Rounds
tha娛樂城ptt
Five Killer Quora Answers On Replacement Double Glazing Units
Near Me replacement double glazing units near me
Купити ліхтарики https://bailong-police.com.ua оптом та в роздріб, каталог та прайс-лист, характеристики, відгуки, акції та знижки. Купити ліхтарик онлайн з доставкою. Відмінний вибір ліхтарів: налобні, ручні, тактичні, ультрафіолетові, кемпінгові, карманні за вигідними цінами.
The 3 Largest Disasters In Fireplace History Lynn Bolvin
This Is How Online Shopping Uk Sites Will Look In 10 Years Time Par 38 Led Bulbs
娛樂城
台灣線上娛樂城是指通過互聯網提供賭博和娛樂服務的平台。這些平台主要針對台灣用戶,但實際上可能在境外運營。以下是一些關於台灣線上娛樂城的重要信息:
1. 服務內容:
– 線上賭場遊戲(如老虎機、撲克、輪盤等)
– 體育博彩
– 彩票遊戲
– 真人荷官遊戲
2. 特點:
– 全天候24小時提供服務
– 可通過電腦或移動設備訪問
– 常提供優惠活動和獎金來吸引玩家
3. 支付方式:
– 常見支付方式包括銀行轉賬、電子錢包等
– 部分平台可能接受加密貨幣
4. 法律狀況:
– 在台灣,線上賭博通常是非法的
– 許多線上娛樂城實際上是在國外註冊運營
5. 風險:
– 由於缺乏有效監管,玩家可能面臨財務風險
– 存在詐騙和不公平遊戲的可能性
– 可能導致賭博成癮問題
6. 爭議:
– 這些平台的合法性和道德性一直存在爭議
– 監管機構試圖遏制這些平台的發展,但效果有限
重要的是,參與任何形式的線上賭博都存在風險,尤其是在法律地位不明確的情況下。建議公眾謹慎對待,並了解相關法律和潛在風險。
如果您想了解更多具體方面,例如如何識別和避免相關風險,我可以提供更多信息。
What Is Treatment For Anxiety’ History? History Of Treatment For Anxiety how to treat anxiety naturally [m.ma-ren.Com]
Продажа подземных канализационных ёмкостей https://neseptik.com по выгодным ценам. Ёмкости для канализации подземные объёмом до 200 м3. Металлические накопительные емкости для канализации заказать и купить в Екатеринбурге.
https://win-line.net/הימורים-ביורו/
לבצע, אסמכתא לדבריך.
פעילות ההימורים באינטרנט הפכה לתעשייה פופולרי מאוד לאחרונה, המכיל מבחר רחב של אלטרנטיבות משחק, כמו משחקי פוקר.
בניתוח זה נפרט את תופעת הקזינו המקוון ונמסור לכם נתונים חשובים שיעזור לכם להתמצא בתחום מרתק זה.
קזינו אונליין – התמודדות באינטרנט
משחקי פוקר מאפשר אלטרנטיבות רבות של אפשרויות מסורתיים כגון פוקר. הקזינו באינטרנט מעניקים למבקרים להשתתף מחווית פעילות אמיתית מכל מקום.
הפעילות סיכום קצר
מכונות שלוט משחקי מזל
משחק הרולטה הימור על מספרים ואפשרויות על גלגל הרולטה
משחק הקלפים בלאק ג’ק משחק קלפים בו המטרה היא להשיג 21
התמודדות בפוקר התמודדות אסטרטגית בקלפים
משחק קלפים באקרה משחק קלפים קל וזריז
הימורי ספורט – קזינו באינטרנט
הימורי ספורט מייצגים אחד התחומים המתרחבים ביותר בקזינו באינטרנט. משתתפים יכולים לסחור על פרמטרים של אתגרי ספורט מבוקשים כגון כדורסל.
השקעות אפשר לבצע על תוצאת האירוע, מספר הנקודות ועוד.
אופן ההתמודדות ניתוח תחומי ספורט מובילים
ניחוש תוצאה ניחוש הביצועים הסופיים בתחרות כדורגל, כדורסל, טניס
הפרש ביצועים ניחוש ההפרש בסקורים בין הקבוצות כל ענפי הספורט
כמות הסקורים ניחוש כמה שערים או נקודות יהיו במשחק כדורגל, כדורסל, הוקי קרח
המנצח בתחרות ניחוש מי יהיה הזוכה (ללא קשר לתוצאה) מספר ענפי ספורט
הימורי חי התמודדות במהלך האירוע בזמן אמת כדורגל, טניס, הוקי
פעילות מעורבת שילוב של מספר פעילויות מרבית ענפי הספורט
התמודדות בפוקר מקוון – התמודדות באינטרנט
פוקר אונליין מכיל אחד מתחומי ההימורים המשגשגים ביותר בשנים האחרונות. משתתפים מסוגלים להשקיע עם משתתפים אחרים מכל רחבי העולם בסוגים ש
Lebron Ramone James https://lebronjames.prostoprosport-ar.com American basketball player who plays the positions of small and power forward. He plays for the NBA team Los Angeles Lakers. Experts recognize him as one of the best basketball players in history, and a number of experts put James in first place. One of the highest paid athletes in the world.
What’s The Job Market For What CSGO Cases Have Butterfly Knives Professionals Like?
csgo cases
5 Must-Know CSGO Cases Opening-Practices You Need To Know For 2023 cs2 case opening
The No. Question Everybody Working In Upvc Front Doors Should Be Able Answer upvc door lock replacements
Only a smiling visitor here to share the love (:, btw outstanding style and design .
What’s The Current Job Market For Double Glazed Window Repairs Professionals Like?
double glazed window repairs
Maria Sharapova https://maria-sharapova.prostoprosport-ar.com Russian tennis player. The former first racket of the world, winner of five Grand Slam singles tournaments from 2004 to 2014, one of ten women in history who has the so-called “career slam”.
Luis Fernando Diaz Marulanda https://luis-diaz.prostoprosport-ar.com Colombian footballer, winger for Liverpool and the Colombian national team . Diaz is a graduate of the Barranquilla club. On April 26, 2016, in a match against Deportivo Pereira, he made his Primera B debut. On January 30, 2022, he signed a contract with the English Liverpool for five years, the transfer amount was 40 million euros.
This Is The Advanced Guide To Dangerous Drugs Law Firm dangerous drugs lawyer
15 Funny People Who Are Secretly Working In Compact Double Buggy twin umbrella stroller (Shavonne)
Kevin De Bruyne https://kevin-de-bruyne.prostoprosport-ar.com Belgian footballer, midfielder of the Manchester club City” and the Belgian national team. A graduate of the football clubs “Ghent” and “Genk”. In 2008 he began his adult career, making his debut with Genk.
Mohammed Khalil Ibrahim Al-Owais https://mohammed-alowais.prostoprosport-ar.com is a Saudi professional footballer who plays as a goalkeeper for the national team Saudi Arabia and Al-Hilal. He is known for his quick reflexes and alertness at the gate.
14 Common Misconceptions About High Variance Slots low variance Slots
10 Tell-Tale Signs You Must See To Get A New Best
CSGO Opening Site Counter-Strike Cases
I appreciate, cause I found just what I was looking for. You’ve ended my four day long hunt! God Bless you man. Have a great day. Bye -.
Quincy Anton Promes https://quincy-promes.prostoprosport-br.com Dutch footballer, attacking midfielder and forward for Spartak Moscow . He played for the Dutch national team. He won his first major award in 2017, when Spartak became the champion of Russia.
Экспертиза ремонта в квартире https://remnovostroi.ru проводится для оценки качества выполненных работ, соответствия требованиям безопасности и стандартам строительства. Специалисты проверяют используемые материалы, исполнение работ, конструктивные особенности, безопасность, внешний вид и эстетику ремонта. По результатам экспертизы составляется экспертное заключение с оценкой качества и рекомендациями по устранению недостатков.
You’ll Be Unable To Guess Upvc Door Repairs Near Me’s
Secrets upvc door repairs near me
5 Killer Quora Answers On Egg Push Chair Egg push chair
10 Easy Steps To Start Your Own Honda Car Key
Fob Replacement Business honda Car key replacement cost
The Reason Why You’re Not Succeeding At Curved Leather Sofa modern leather sofa
What Is The Reason Bunk Bed Near Me Is The Right Choice For You?
Eleanor
Ten Coffee Bean Machines That Really Help You Live Better Bean machines
Looking For Inspiration? Check Out Why Are CSGO
Skins Going Up In Price Cs2 Cases – Videonabludenie.Nnov.Org,
Larry Joe Bird https://larry-bird.prostoprosport-br.com American basketball player who spent his entire professional career in the NBA ” Boston Celtics.” Olympic champion (1992), champion of the 1977 Universiade, 3-time NBA champion (1981, 1984, 1986), three times recognized as MVP of the season in the NBA (1984, 1985, 1986), 10 times included in the symbolic teams of the season (1980-88 – first team, 1990 – second team).
Roberto Firmino Barbosa de Oliveira https://roberto-firmino.prostoprosport-br.com Brazilian footballer, attacking midfielder, forward for the Saudi club “Al-Ahli”. Firmino is a graduate of the Brazilian club KRB, from where he moved to Figueirense in 2007. In June 2015 he moved to Liverpool for 41 million euros.
Why No One Cares About Tiered Linkbuilding tier 2 link building
Khvicha Kvaratskhelia https://khvicha-kvaratskhelia.prostoprosport-br.com Georgian footballer, winger for Napoli and captain of the Georgian national team. A graduate of Dynamo Tbilisi. He made his debut for the adult team on September 29, 2017 in the Georgian championship match against Kolkheti-1913. In total, in the 2017 season he played 4 matches and scored 1 goal in the championship.
10 Meetups Around Slot Updates You Should Attend Hacksaw Casino Online
The Unspoken Secrets Of Online Shopping Websites List
Training Dog Biscuits
Damian Emiliano Martinez https://emiliano-martinez.prostoprosport-br.com Argentine footballer, goalkeeper of the Aston Villa club and national team Argentina. Champion and best goalkeeper of the 2022 World Cup.
Jack Peter Grealish https://jackgrealish.prostoprosport-br.com English footballer, midfielder of the Manchester City club and the England national team. A graduate of the English club Aston Villa from Birmingham. In the 2012/13 season he won the NextGen Series international tournament, playing for the Aston Villa under-19 team
Kyle Andrew Walker https://kylewalker.prostoprosport-br.com English footballer, captain of the Manchester City club and the England national team. In the 2013/14 season, he was on loan at the Notts County club, playing in League One (3rd division of England). Played 37 games and scored 5 goals in the championship.
What’s The Job Market For Motorcycle Accident Litigation Professionals Like?
Motorcycle Accident
Коммерческий секс в Москве является проблемой как запутанной и разнообразной трудностью. Несмотря на данная деятельность запрещена юридически, это занятие остаётся крупным нелегальным сектором.
Прошлый
В советские периоды коммерческий секс имела место подпольно. После распада Советской империи, в условиях экономической кризиса, проституция появилась более заметной.
Нынешняя обстановка
Сейчас проституция в городе Москве включает разные виды, включая элитных эскорт-сервисов и до уличного уровня проституции. Элитные предложения часто организуются через онлайн, а на улице коммерческий секс сосредоточена в специфических зонах городской территории.
Социальные и Экономические Аспекты
Некоторые женщин принимают участие в эту деятельность по причине экономических неурядиц. Секс-работа является привлекательной из-за шанса быстрого заработка, но такая работа влечет за собой рисками для здоровья и жизни.
Юридические аспекты
Интимные услуги в Российской Федерации не законна, и за ее организацию осуществление предусмотрены серьезные штрафы. Работников интимной сферы регулярно привлекают к к дисциплинарной наказанию.
Поэтому, игнорируя запреты, секс-работа является частью экономики в тени российской столицы с значительными социальными и законодательными последствиями.
See What Online Shopping Figures Uk Tricks The Celebs Are Using online shopping figures uk; Bret,
Laure Boulleau https://laure-boulleau.prostoprosport-fr.com French football player, defender. She started playing football in the Riom team, in 2000 she moved to Isere, and in 2002 to Issigneux. All these teams represented the Auvergne region. In 2003, Bullo joined the Clairefontaine academy and played for the academy team for the first time.
Son Heung Min https://sonheung-min.prostoprosport-br.com South Korean footballer, striker and captain of the English Premier League club Tottenham Hotspur and the Republic of Korea national team. In 2022 he won the Premier League Golden Boot. Became the first Asian footballer in history to score 100 goals in the Premier League
How Many Cases Are There In CSGO: What Nobody Has Discussed Cs2 cases
15 Best Documentaries About Private Diagnosis ADHD private adult
adhd assessment belfast (Tegan)
buy viagra online
Milton Keynes Door Panels: The Ugly Truth About Milton Keynes
Door Panels commercial Units milton Keynes
12 Companies Are Leading The Way In Double Glazed
Windows Leeds upvc window repair Leeds
Five Killer Quora Answers On Best Folding Electric Mobility Scooter
For Adults Uk best folding electric mobility scooter for adults – Jerold,
10 Healthy Car Key Replacements Near Me Habits Replacement Key Fobs For Cars
Guide To Couch With Chaise And Recliner: The Intermediate Guide In Couch With Chaise And Recliner couch with chaise and Recliner
Antoine Griezmann https://antoine-griezmann.prostoprosport-fr.com French footballer, striker and midfielder for Atletico Madrid. Player and vice-captain of the French national team, as part of the national team – world champion 2018. Silver medalist at the 2016 European Championship and 2022 World Championship.
In January 2010, Harry Kane https://harry-kane.prostoprosport-fr.com received an invitation to the England U-team for the first time 17 for the youth tournament in Portugal. At the same time, the striker, due to severe illness, did not go to the triumphant 2010 European Championship for boys under 17 for the British.
payday loan
The Top Reasons People Succeed With The Foldable Electric Treadmill Industry zackfoxworth
How To Solve Issues With Best CSGO Opening Site counter-strike cases
– Nikole,
penis enlargement
What Is Titration ADHD Adults? History Of Titration ADHD Adults
what is Titration adhd
You’ll Never Guess This What Is The Best Online Shopping
In Uk’s Secrets What Is The Best Online Shopping In Uk
5 Laws That’ll Help The Best CSGO Opening Site Industry Counter-Strike Cases – Kigalilife.Co.Rw,
10 Basics Regarding Asbestos Disease Mesothelioma You Didn’t Learn In The Classroom cassylawn.top
10 Untrue Answers To Common Couch With Chaise Questions Do
You Know Which Answers? leather couch with chaise
Karim Mostafa Benzema https://karim-benzema.prostoprosport-fr.com French footballer, striker for the Saudi club Al-Ittihad . He played for the French national team, for which he played 97 matches and scored 37 goals.
10 Essentials To Know Motorcycle Accident Litigation You Didn’t
Learn In The Classroom motorcycle accident attorney
divalproex 250mg pill – divalproex 500mg without prescription order topamax 100mg generic
Achraf Hakimi Mou https://achraf-hakimi.prostoprosport-fr.com Moroccan footballer, defender of the French club Paris Saint-Germain “and the Moroccan national team. He played for Real Madrid, Borussia Dortmund and Inter Milan.
15 Top Twitter Accounts To Learn About How Many Cases Are There In CSGO Cs2 cases
Bernardo Silva https://bernardo-silva.prostoprosport-fr.com Portuguese footballer, midfielder. Born on August 10, 1994 in Lisbon. Silva is considered one of the best attacking midfielders in the world. The football player is famous for his endurance and performance. The athlete’s diminutive size is more than compensated for by his creativity, dexterity and foresight.
Kylian Mbappe Lotten https://kylian-mbappe.prostoprosport-fr.com Footballeur francais, attaquant du Paris Saint-Germain et capitaine de l’equipe de France. Le 1er juillet 2024, il deviendra joueur du club espagnol du Real Madrid.
Philip Walter Foden https://phil-foden.prostoprosport-fr.com better known as Phil Foden English footballer, midfielder of the Premier club -League Manchester City and the England national team. On December 19, 2023, he made his debut at the Club World Championship in a match against the Japanese club Urawa Red Diamonds, starting in the starting lineup and being replaced by Julian Alvarez in the 65th minute.
The Most Popular Slot Apps The Gurus Are Using Three Things real
money slots [davidnitka.Blog.idnes.cz]
payday loan
Jogo do Tigre https://jogo-do-tigre.prostoprosport-br.com is a simple and fun game that tests your reflexes and coordination. In this game you need to put your finger on the screen, pull out the stick and go through each peg. However, you must ensure that the stick is the right length, neither too long nor too short.
The 9 Things Your Parents Taught You About Cheap Sectional Sofas Cheap sectional sofas
Mohamed Salah Hamed Mehrez Ghali https://mohamed-salah.prostoprosport-fr.com Footballeur egyptien, attaquant du club anglais de Liverpool et l’equipe nationale egyptienne. Considere comme l’un des meilleurs footballeurs du monde
10 Healthy Locksmiths Cars Habits https://www.elsycrays.top/a2mo1a2-d1vb1-4smec-tf0n-unxi9uo-2286
3 Reasons You’re Not Getting Car Locksmiths Isn’t Working (And How To Fix It) Elsy Crays
Why U Shaped Leather Sofa Is Relevant 2023 U Shaped Modular Sectional
Is Technology Making Novice Slots Better Or Worse? Demo slots (seoule.Itfk.Org)
Declan Rice https://declan-rice.prostoprosport-fr.com Footballeur anglais, milieu defensif du club d’Arsenal et de l’equipe nationale equipe d’Angleterre. Originaire de Kingston upon Thames, Declan Rice s’est entraine a l’academie de football de Chelsea des l’age de sept ans. En 2014, il devient joueur de l’academie de football de West Ham United.
Declan Rice https://declan-rice.prostoprosport-fr.com Footballeur anglais, milieu defensif du club d’Arsenal et de l’equipe nationale equipe d’Angleterre. Originaire de Kingston upon Thames, Declan Rice s’est entraine a l’academie de football de Chelsea des l’age de sept ans. En 2014, il devient joueur de l’academie de football de West Ham United.
My brother suggested I may like this website. He was totally right.
This submit actually made my day. You can not believe just how so much time I had spent
for this info! Thanks!
The Most Valuable Advice You Can Receive About Motor Vehicle Law motor vehicle Accidents
You’ll Never Guess This Teenager Loft Bed’s Tricks Teenager loft bed
Olivier Jonathan Giroud https://olivier-giroud.prostoprosport-fr.com French footballer, striker for Milan and the French national team. Knight of the Legion of Honor. Participant in four European Championships (2012, 2016, 2020 and 2024) and three World Championships (2014, 2018 and 2022).
The Reasons Why Adding A Car Boot Mobility Scooter To
Your Life Can Make All The Difference arlennizo
Thibaut Nicolas Marc Courtois https://thhibaut-courtois.prostoprosport-fr.com Footballeur belge, gardien de but du club espagnol du Real Madrid . Lors de la saison 2010/11, il a ete reconnu comme le meilleur gardien de la Pro League belge, ainsi que comme joueur de l’annee pour Genk. Triple vainqueur du Trophee Ricardo Zamora
Are You Getting Tired Of Best CSGO Opening Site? 10 Sources Of Inspiration That’ll Invigorate Your Love Counter-strike cases
See What Uk Online Shopping Sites For Mobile Tricks The Celebs Are
Utilizing uk online shopping sites for mobile
This Is The Ultimate Cheat Sheet On ADHD Tests For Adults adhd Tests uk
11 Ways To Completely Sabotage Your Window Cambridge
Hurricane-proof Window repair
Ronaldo de Asis Moreira https://ronaldinhogaucho.prostoprosport-br.com Brazilian footballer, played as an attacking midfielder and striker. World Champion (2002). Winner of the Golden Ball (2005). The best football player in the world according to FIFA in 2004 and 2005.
Xavi or Xavi Quentin Sy Simons https://xavi-simons.prostoprosport-fr.com Dutch footballer, midfielder of the Paris Saint-Germain club -Germain” and the Dutch national team, playing on loan for the German club RB Leipzig.
Jamal Musiala https://jamal-musiala.prostoprosport-fr.com footballeur allemand, milieu offensif du club allemand du Bayern et du equipe nationale d’Allemagne. Il a joue pour les equipes anglaises des moins de 15 ans, des moins de 16 ans et des moins de 17 ans. En octobre 2018, il a dispute deux matchs avec l’equipe nationale d’Allemagne U16. En novembre 2020, il a fait ses debuts avec l’equipe d’Angleterre U21.
buy viagra online
A Vibrant Rant About Upvc Window Repair Near Me Window Repairs near me
20 Trailblazers Setting The Standard In Battle Case CS GO cs2 case
opening (alt1.toolbarqueries.google.com.bz)
watch porn video
https://win-line.net/ווינר-ליין-ווינר-אונליין/
להגיש, אסמכתא לדבריך.
ההמרה באינטרנט הפכה לתחום מבוקש מאוד בעשור האחרון, המספק מגוון רחב של אלטרנטיבות התמודדות, לדוגמה משחקי פוקר.
בסיכום זה נבחן את תעשיית הפעילות המקוונת ונעניק לכם פרטים חשובים שיסייע לכם להתמצא באזור מסקרן זה.
משחקי פוקר – התמודדות באינטרנט
הימורי ספורט מכיל אלטרנטיבות רבות של פעילויות מוכרים כגון חריצים. הפעילות באינטרנט מאפשרים למתמודדים ליהנות מאווירת התמודדות מקצועית מכל מקום.
הפעילות סיכום קצר
מכונות פירות משחקי מזל
גלגל הרולטה הימור על פרמטרים על גלגל הרולטה
משחק הקלפים בלאק ג’ק משחק קלפים בו המטרה היא 21 נקודות
משחק הפוקר משחק קלפים מבוסס אסטרטגיה
התמודדות בבאקרה משחק קלפים מהיר וקצר
הימורים על אירועי ספורט – הימורים באינטרנט
הימורים בתחום הספורט מייצגים אחד הסגמנטים המתפתחים המרכזיים ביותר בפעילות באינטרנט. מתמודדים רשאים להשקיע על ביצועים של משחקי ספורט פופולריים כגון ועוד.
העסקאות אפשר לבצע על הביצועים בתחרות, מספר האירועים ועוד.
סוג הפעילות תיאור משחקי ספורט מרכזיים
ניחוש התפוצאה ניחוש התוצאה הסופית של התחרות כדורגל, כדורסל, אמריקאי
הפרש נקודות ניחוש ההפרש בתוצאות בין הקבוצות כל ענפי הספורט
מספר שערים/נקודות ניחוש כמות הסקורים בתחרות כדורגל, כדורסל, טניס
הצד המנצח ניחוש מי יסיים ראשון (ללא קשר לניקוד) כל ענפי הספורט
התמודדות דינמית התמודדות במהלך התחרות בזמן אמת כדורגל, טניס, הוקי
התמודדות מורכבת שילוב של מספר הימורים שונים מספר תחומי ספורט
פעילות פוקר מקוונת – הימורים באינטרנט
משחקי קלפים אונליין הוא אחד מענפי הקזינו הפופולריים המשפיעים ביותר כיום. מתמודדים רשאים להשתלב מול משתתפים אחרים מכמה הכדור הארצי במגוון
Carlos Henrique Casimiro https://carloscasemiro.prostoprosport-br.com Futebolista brasileiro, volante do clube ingles Manchester United e capitao do Selecao Brasileira. Pentacampeao da Liga dos Campeoes da UEFA, campeao mundial e sul-americano pela selecao juvenil brasileira.
watch porn video
Kylian Mbappe Lotten https://kylianmbappe.prostoprosport-br.com Futebolista frances, atacante do Paris Saint-Germain e capitao da selecao francesa equipe . Em 1? de julho de 2024, ele se tornara jogador do clube espanhol Real Madrid.
https://win-line.net/אתרי-הימורים-אמינים/
להגיש, אסמכתא לדבריך.
ההמרה באינטרנט הפכה לענף מבוקש מאוד בעת האחרונה, המציע אפשרויות שונות של אפשרויות פעילות, כמו משחקי פוקר.
בסיכום זה נבחן את תחום ההתמודדות המקוונת ונעניק לכם הערות חשובות שיעזור לכם לחקור בנושא מעניין זה.
קזינו אונליין – התמודדות באינטרנט
קזינו אונליין כולל אלטרנטיבות רבות של משחקים מוכרים כגון רולטה. הקזינו באינטרנט נותנים למשתתפים להתנסות מאווירת משחק מקצועית בכל עת ומקום.
המשחקים סיכום קצר
מכונות מזל הימורי גלגל
רולטה הימור על פרמטרים על גלגל מסתובב
משחק קלפים 21 משחק קלפים בו המטרה היא להשיג 21
פוקר משחק קלפים אסטרטגי
משחק הבאקרה משחק קלפים פשוט ומהיר
הימורים על אירועי ספורט – קזינו באינטרנט
התמרמרות ספורטיבית מהווים חלק מ אחד הסגמנטים המשגשגים המרכזיים ביותר בקזינו באינטרנט. שחקנים מורשים לסחור על תוצאות של תחרויות ספורט פופולריים כגון טניס.
ההימורים אפשר לבצע על תוצאת המשחק, מספר הנקודות ועוד.
סוג ההימור פירוט תחרויות ספורט מקובלות
ניחוש תוצאה ניחוש התוצאה הסופית של האירוע כדורגל, כדורסל, טניס
הפרש סקורים ניחוש הפרש הנקודות בין הקבוצות כל ענפי הספורט
מספר שערים/נקודות ניחוש כמה שערים או נקודות יהיו במשחק כדורגל, כדורסל, הוקי קרח
הצד המנצח ניחוש מי יהיה הזוכה (ללא קשר לתוצאה) מגוון ענפי ספורט
התמרמרות בזמן אמת הימורים במהלך המשחק בזמן אמת כדורגל, טניס, קריקט
התמודדות מורכבת שילוב של מספר אופני התמודדות מגוון ענפי ספורט
התמודדות בפוקר מקוון – התמודדות באינטרנט
התמודדות בפוקר מקוון מייצג אחד מסוגי ההימורים הפופולריים המשפיעים ביותר כיום. שחקנים מורשים להשתלב מול שחקנים אחרים מכל רחבי הגלובליזציה בסוגים ש
You’ll Be Unable To Guess Pushchair Shop Near Me’s Benefits pushchair shop near Me
10 Easy Steps To Start Your Own Upvc Door Repairs Near Me Business
broken
8 Tips To Enhance Your CSGO New Cases Game Cs2 case Opening
norpace over the counter – order lamotrigine 200mg generic purchase chlorpromazine online
Mohamed Salah https://mohamedsalah.prostoprosport-br.com e um futebolista egipcio que joga como atacante do clube ingles Liverpool e do Selecao egipcia. Considerado um dos melhores jogadores de futebol do mundo. Tricampeao da Chuteira de Ouro da Premier League inglesa: em 2018 (sozinho), 2019 (junto com Sadio Mane e Pierre-Emerick Aubameyang) e 2022 (junto com Son Heung-min).
I was recommended this website by my cousin I am not sure whether this post is written by him as nobody else know such detailed about my trouble You are amazing Thanks
The Reason Folding Scooter Is The Obsession Of Everyone
In 2023 Scooter Folds
How To Find The Perfect Slot Developers On The Internet Famous Slots
15 Gifts For The Designated Slots Lover In Your Life hacksaw casino Games
The 10 Most Terrifying Things About Couches For Sale couches
Harry Kane https://harry-kane.prostoprosport-br.com recebeu um convite para a selecao sub-alterna da Inglaterra pela primeira vez tempo 17 para o torneio juvenil em Portugal. Ao mesmo tempo, o atacante, devido a doenca grave, nao compareceu ao triunfante Campeonato Europeu Sub-17 masculino de 2010 pelos britanicos.
How To Save Money On Sash Windows Repair http://www.257634.xyz
Kaka https://kaka.prostoprosport-br.com Futebolista brasileiro, meio-campista. O apelido “Kaka” e um diminutivo de Ricardo. Formado em Sao Paulo. De 2002 a 2016, integrou a Selecao Brasileira, pela qual disputou 92 partidas e marcou 29 gols. Campeao mundial 2002.
Zlatan Ibrahimovic https://zlatan-ibrahimovic.prostoprosport-br.com Bosnian pronunciation: [zlatan ibraxi?mo?it?]; genus. 3 October 1981, Malmo, Sweden) is a Swedish footballer who played as a striker. Former captain of the Swedish national team.
Hello there, There’s no doubt that your blog may
be having browser compatibility issues. When I look
at your web site in Safari, it looks fine but when opening in Internet Explorer, it has some overlapping issues.
I merely wanted to give you a quick heads up! Besides that, excellent site!
You’ll get the filter appropriate from the box, unscrew
the outdated a single and screw inside the replacement
filter, fill up two vital eyeglasses of water to”flush it” and you additionally are prepared for some chilly water.
Luis Alberto Suarez Diaz https://luis-suarez.prostoprosport-br.com Uruguayan footballer, striker for Inter Miami and Uruguay national team. The best scorer in the history of the Uruguay national team. Considered one of the world’s top strikers of the 2010s
You’ll Never Guess This Shopping Online Uk’s Secrets shopping online Uk
памятники из черного гранита мраморная крошка черная
The 10 Most Terrifying Things About Which Is Best For Online Grocery Shopping which Is best for online grocery
shopping (http://211.45.131.204/)
Kevin De Bruyne https://kevin-de-bruyne.prostoprosport-br.com Futebolista belga, meio-campista do Manchester club City” e a selecao belga. Formado pelos clubes de futebol “Ghent” e “Genk”. Em 2008 iniciou sua carreira adulta, fazendo sua estreia no Genk.
15 Shocking Facts About Article Rewriter You’ve Never Seen wordai
[url=https://bacclofen.online/]baclofen 20 mg tablet price[/url]
Antoine Griezmann https://antoine-griezmann.prostoprosport-br.com Futebolista frances, atacante e meio-campista do Atletico de Madrid. Jogador e vice-capitao da selecao francesa, integrante da selecao – campea mundial 2018. Medalhista de prata no Europeu de 2016 e no Mundial de 2022.
20 Things Only The Most Devoted Double Glazing Repair Crawley Fans Should Know Double Glazing Window Repair
An Intermediate Guide Towards Trucking Lawyers truck accident law Firm
How Window Repair Leeds Arose To Be The Top Trend In Social Media upvc door repair roundhay
Ten Assessment For Adhd In Adultss That Really
Improve Your Life adhd assessment cost uk, https://alfatv.cz/goto/https://articlement.com/author/textfemale1-333286/,
Ederson Santana de Moraes https://edersonmoraes.prostoprosport-br.com Futebolista brasileiro, goleiro do clube Manchester City e da Selecao Brasileira . Participante do Campeonato Mundial 2018. Bicampeao de Portugal pelo Benfica e pentacampeao de Inglaterra pelo Manchester City.
поисковое сео продвижение сайтов в москве [url=https://prodvizhenie-sajtov-v-moskve115.ru]https://prodvizhenie-sajtov-v-moskve115.ru[/url] .
Coffee Pods Machine: What’s The Only Thing Nobody Is Talking About Dane
Window Repair Near Me Tools To Improve Your Everyday Lifethe Only Window Repair
Near Me Trick That Every Person Should Learn window repair near me (sddwimatra.sch.id)
Ahaa, its pleasant conversation on the topic of this article here at this
blog, I have read all that, so at this time me also commenting here.
Virgil van Dijk https://virgilvandijk.prostoprosport-br.com Futebolista holandes, zagueiro central, capitao do clube ingles Liverpool e capitao do a selecao holandesa.
10 Amazing Graphics About Luton Door And Window window parts luton
Why Replacement Upvc Window Handles Is Fast Becoming The
Hottest Trend Of 2023 upvc window repair near me
24-Hours To Improve Window Pane Replacement window replacements near me
Howdy, i read your blog from time to time and i own a similar one and i was
just wondering if you get a lot of spam remarks? If so how do you reduce
it, any plugin or anything you can recommend?
I get so much lately it’s driving me insane so any help is very much
appreciated.
What Slot Demo Zeus Hades Will Be Your Next Big Obsession? Oscar Reys
5 Laws That Anyone Working In Search Engine Optimisation Agency Should Be Aware Of Seo Optimization (Forums.F-O-G.Eu)
Victor James Osimhen https://victor-osimhen.prostoprosport-br.com e um futebolista nigeriano que atua como atacante. O clube italiano Napoli e a selecao nigeriana.
The 10 Most Scariest Things About Truck Accident Attorneys Truck accident (en.vunque.com)
10 Double Pushchair Sale Tips All Experts Recommend double stroller sale (http://bernhardbabel.Com/url?q=https://humanlove.stream/wiki/Lauridsendixon6663)
Roberto Carlos da Silva Rocha https://roberto-carlos.prostoprosport-br.com Brazilian footballer, left back. He was also capable of playing as both a central defender and a defensive midfielder. World champion 2002, silver medalist at the 1998 World Championships.
Neymar da Silva Santos Junior https://neymar.prostoprosport-br.com e um futebolista brasileiro que atua como atacante, ponta e atacante. meio-campista do clube saudita Al-Hilal e da selecao brasileira. Considerado um dos melhores jogadores do mundo. O maior artilheiro da historia da Selecao Brasileira.
7 Things About Window Repairman You’ll Kick Yourself For Not Knowing window repairs
11 Creative Ways To Write About Mesothelioma Compensation mesothelioma lawsuits [Aromarti-cafe.ru]
Then You’ve Found Your Wall Mounted Fireplace … Now What?
Alexander
What’s The Current Job Market For Upvc Windows Repair
Professionals Like? repair upvc Windows (https://Smf.devbox15.com/index.php?action=profile;u=102839)
Erling Breut Haaland https://erling-haaland.prostoprosport-cz.org je norsky fotbalista, ktery hraje jako utocnik za Anglicky klub Manchester City a norska reprezentace. Rekordman anglicke Premier League v poctu golu za sezonu.
Kylian Mbappe Lotten https://kylian-mbappe.prostoprosport-cz.org Francouzsky fotbalista, utocnik Paris Saint-Germain a kapitan tymu francouzskeho tymu. 1. cervence 2024 se stane hracem spanelskeho klubu Real Madrid.
9 . What Your Parents Teach You About Double Glazed Windows
Milton Keynes Double Glazed Windows Milton Keynes
Mohamed Salah https://mohamed-salah.prostoprosport-cz.org je egyptsky fotbalista, ktery hraje jako utocnik za anglictinu. klub Liverpool a egyptsky narodni tym. Povazovan za jednoho z nejlepsich fotbalistu na svete.
Kevin De Bruyne https://kevin-de-bruyne.prostoprosport-cz.org Belgicky fotbalista, zaloznik Manchesteru klub City” a belgicky narodni tym. Absolvent fotbalovych klubu „Ghent” a „Genk”. V roce 2008 zahajil svou karieru dospelych, debutoval v Genku.
конференц залы оборудование [url=www.oborudovanie-konferenc-zalov11.ru/]конференц залы оборудование[/url] .
The Most Innovative Things Happening With Accident Compensation accident
attorney (gaejang.segen.co.kr)
5 Laws That’ll Help To Improve The Cerebral Palsy Compensation Industry law
See What Amazon Uk Online Shopping Clothes Tricks The Celebs
Are Using amazon uk online shopping clothes
Lionel Messi https://lionel-messi.prostoprosport-cz.org je argentinsky fotbalista, utocnik a kapitan klubu MLS Inter Miami. , kapitan argentinske reprezentace. Mistr sveta, vitez Jizni Ameriky, vitez finale, olympijsky vitez. Povazovan za jednoho z nejlepsich fotbalistu vsech dob.
Bernardo Silva https://bernardo-silva.prostoprosport-cz.org Portugalsky fotbalista, zaloznik. Narozen 10. srpna 1994 v Lisabonu. Silva je povazovan za jednoho z nejlepsich utocnych zalozniku na svete. Fotbalista je povestny svou vytrvalosti a vykonem.
Antoine Griezmann https://antoine-griezmann.prostoprosport-cz.org Francouzsky fotbalista, utocnik a zaloznik za Atletico de Madrid. Hrac a vicekapitan francouzskeho narodniho tymu, clen tymu – mistr sveta 2018 Stribrny medailista z mistrovstvi Evropy 2016 a mistrovstvi sveta 2022.
Robert Lewandowski https://robert-lewandowski.prostoprosport-cz.org je polsky fotbalista, utocnik spanelskeho klubu Barcelona a kapitan polskeho narodniho tymu. Povazovan za jednoho z nejlepsich utocniku na svete. Rytir krize velitele polskeho renesancniho radu.
Why All The Fuss Over Demo Slot Pragmatic Zeus Vs Hades? Oscar Reys
rgbet
Профессиональные seo https://seo-optimizaciya-kazan.ru услуги для максимизации онлайн-видимости вашего бизнеса. Наши эксперты проведут глубокий анализ сайта, оптимизируют контент и структуру, улучшат технические аспекты и разработают индивидуальные стратегии продвижения.
12 Facts About European Single Mattresses To Make You Think About
The Other People single mattress for sale near me [Lorenzo]
9 Lessons Your Parents Teach You About Window Doctor Near Me Window doctor Near me
10 Things You Learned In Kindergarden To Help You Get Started With Honda Car Key Replacement 1999 honda civic key Replacement
The Most Worst Nightmare About Locksmiths Near Me For Car Relived Elsy Crays
How To Become A Prosperous Upvc Windows Milton Keynes If
You’re Not Business-Savvy garage door repair milton Keynes
Pablo Martin Paez Gavira https://gavi.prostoprosport-cz.org Spanelsky fotbalista, zaloznik barcelonskeho klubu a spanelske reprezentace. Povazovan za jednoho z nejtalentovanejsich hracu sve generace. Ucastnik mistrovstvi sveta 2022. Vitez Ligy narodu UEFA 2022/23
Luka Modric https://luka-modric.prostoprosport-cz.org je chorvatsky fotbalista, stredni zaloznik a kapitan spanelskeho tymu. klub Real Madrid, kapitan chorvatskeho narodniho tymu. Uznavan jako jeden z nejlepsich zalozniku nasi doby. Rytir Radu prince Branimira. Rekordman chorvatske reprezentace v poctu odehranych zapasu.
Son Heung Min https://son-heung-min.prostoprosport-cz.org Jihokorejsky fotbalista, utocnik a kapitan anglickeho klubu Premier League Tottenham Hotspur a narodniho tymu Korejske republiky. V roce 2022 vyhral Zlatou kopacku Premier League.
Cristiano Ronaldo https://cristiano-ronaldo.prostoprosport-cz.org je portugalsky fotbalista, utocnik, kapitan Saudske Arabie klubu An-Nasr a portugalskeho narodniho tymu. Mistr Evropy. Povazovan za jednoho z nejlepsich fotbalistu vsech dob. Nejlepsi strelec v historii fotbalu podle IFFIS a ctvrty podle RSSSF
купить поролон для дивана
Ten Diagnosing ADHD In Adults That Will Actually Change Your Life https://www.9326527.xyz/
10 Window Repairs Milton Keynes-related Window Repairs Milton Keynes-related Projects
That Will Stretch Your Creativity fire exit doors milton keynes; active.popsugar.com,
cyclophosphamide uk – how to buy dramamine where can i buy trimetazidine
Pedro Gonzalez Lopez https://pedri.prostoprosport-cz.org lepe znamy jako Pedri, je spanelsky fotbalista, ktery hraje jako utocny zaloznik. za Barcelonu a spanelskou reprezentaci. Bronzovy medailista z mistrovstvi Evropy 2020 a zaroven nejlepsi mlady hrac tohoto turnaje.
Alison Ramses Becker https://alisson-becker.prostoprosport-cz.org Brazilsky fotbalista nemeckeho puvodu, brankar klubu Liverpool a brazilsky narodni tym. Je povazovan za jednoho z nejlepsich brankaru sve generace a je znamy svymi vynikajicimi zakroky, presnosti prihravek a schopnosti jeden na jednoho.
Karim Benzema https://karim-benzema.prostoprosport-cz.org je francouzsky fotbalista, ktery hraje jako utocnik za Saudskou Arabii. Arabsky klub Al-Ittihad. Hral za francouzsky narodni tym, za ktery odehral 97 zapasu a vstrelil 37 branek. V 17 letech se stal jednim z nejlepsich hracu rezervy, nastrilel tri desitky golu za sezonu.
Rodrigo Silva de Goiz https://rodrygo.prostoprosport-cz.org Brazilsky fotbalista, utocnik Realu Madrid a brazilskeho narodniho tymu. V breznu 2017 byl Rodrigo povolan do narodniho tymu Brazilie U17 na zapasy Montague Tournament.
5 Laws Everybody In Emergency Window Repair Should Know 257634.xyz
The 10 Most Terrifying Things About Double Glazing Near Me Double glazing near Me [https://telescopedia.Org]
5 Laws That Anyone Working In Birth Injury Attorney Should Be Aware Of birth injury lawsuits
9 Lessons Your Parents Taught You About Truck Accidents Lawyer lawyer
Thibaut Nicolas Marc Courtois https://thibaut-courtois.prostoprosport-cz.org Belgicky fotbalista, brankar spanelskeho klubu Real Madrid . V sezone 2010/11 byl uznan jako nejlepsi brankar v belgicke Pro League a take hrac roku pro Genk. Trojnasobny vitez Ricardo Zamora Trophy
20 Important Questions To Be Asking About Motor Vehicle Lawyer Before
Buying It Motor Vehicle accidents
Bruno Guimaraes Rodriguez Moura https://bruno-guimaraes.prostoprosport-cz.org Brazilsky fotbalista, defenzivni zaloznik Newcastlu United a Brazilsky narodni tym. Vitez olympijskych her 2020 v Tokiu.
Toni Kroos https://toni-kroos.prostoprosport-cz.org je nemecky fotbalista, ktery hraje jako stredni zaloznik za Real Madrid a nemecky narodni tym. Mistr sveta 2014. Prvni nemecky hrac v historii, ktery sestkrat vyhral Ligu mistru UEFA.
Fantastic beat ! I ԝould like to apprentice ѡhile yߋu
amend your website, һow ⅽan i subscribe fߋr а blog site?
The account aided me а acceptable deal. Ӏ hаd been tiny bit acquainted of thіs your broadcast offered bright ϲlear concept
Window Repairs Near Me Techniques To Simplify Your Everyday Lifethe Only Window Repairs Near Me Trick Every Person Should Know window Repairs
Near me (https://image.google.bj)
10 Cheapest 10kg Washing Machines Tricks All Experts Recommend http://www.023456789.xyz
Ηi to every one, the contents existing at tһis web site
are tгuly amazing for people knowledge, weⅼl, keep up tһe good woгk
fellows.
Hi there I am so thrilled I found your site, I really
found you by accident, while I was researching on Aol for something else, Anyhow I am here now
and would just like to say kudos for a remarkable post and a all round entertaining blog (I also love the
theme/design), I dont have time to read it all at the moment but I have saved
it and also added in your RSS feeds, so when I have time I
will be back to read more, Please do keep up
the fantastic b.
order spironolactone without prescription – carbamazepine tablets order revia 50mg generic
Wow! Ꭲhis blog looks eхactly like my old
оne! It’s on ɑ cߋmpletely different subject ƅut it hаѕ pretty mսch the
ѕame ⲣage layout and design. Excellent choice ⲟf colors!
Toni Kroos https://toni-kroos.prostoprosport-cz.org je nemecky fotbalista, ktery hraje jako stredni zaloznik za Real Madrid a nemecky narodni tym. Mistr sveta 2014. Prvni nemecky hrac v historii, ktery sestkrat vyhral Ligu mistru UEFA.
How To Explain Casino Slots Games To Your Boss Kay Mell
Darwin Gabriel Nunez Ribeiro https://darwin-nunez.prostoprosport-cz.org Uruguaysky fotbalista, utocnik anglickeho klubu Liverpool a Uruguaysky narodni tym. Bronzovy medailista mistrovstvi Jizni Ameriky mezi mladeznickymi tymy.
Romelu Menama Lukaku Bolingoli https://romelu-lukaku.prostoprosport-cz.org Belgicky fotbalista, utocnik anglickeho klubu Chelsea a Belgican vyber. Na hostovani hraje za italsky klub Roma.
Learn About Replacement Windows While Working From At
Home windows glasses replacement
10 Mobile Apps That Are The Best For Truck Accident Injury Lawyer Truck accidents
You’ll Never Guess This Amazon Online Grocery Shopping Uk’s
Benefits amazon online grocery shopping uk
дешевые проститутки элитные проститутки
buy tiktok followers to go live https://tiktok-followers-buy.com
how to buy 1000 followers on tiktok https://buy-tiktok-followers.com
отчаянные домохозяйки бесплатно в хорошем отчаянные домохозяйки смотреть в хорошем качестве
How To Save Money On Window Replacement upvc Window lock replacement
The Reasons To Focus On Making Improvements To Bio Ethanol Fireplace http://www.lynnbolvin.top
Hello There. I found your blog using msn. This is a very well
written article. I’ll be sure to bookmark it
and come back to read more of your useful info. Thanks for the post.
I’ll definitely comeback.
https://businka74.ru/ риобет казино
9 Lessons Your Parents Taught You About Cheap Online Shopping Sites Uk Cheap Online Shopping Sites Uk
регистрация Dragon Money Casino драгон мани казино
A Step-By-Step Guide To Sash Window Repair Window Repairs
Большой выбор игровых автоматов, рабочее зеркало сайта https://fartunaplay.ru играть на реальные деньги онлайн
Качественная и недорогая https://mebelvam-nn.ru лучшие цены, доставка и сборка.
Αn intriguing discussion іs worth cⲟmment. There’s no doubt tһat thɑt you need to publish mⲟre оn this topic, it mɑy not bе а taboo matter ƅut typically people ԁ᧐
not talk ɑbout sᥙch subjects. Ƭo the next!
Kіnd regards!!
What Freud Can Teach Us About Double Glazing Misting
Repair Jere Alas
10 Facts About Spare Car Key Cut That Will Instantly
Make You Feel Good Mood http://www.99811760.xyz
видеостена цена в москве [url=www.kupit-videostenu.ru/]видеостена цена в москве[/url] .
You’ll Never Be Able To Figure Out This Online Shopping Uk Sites’s Tricks Online Shopping Uk Sites
I usеd to be able to find ɡood іnformation from your articles.
Slot machines on the official website and mirrors of the Pin Up online casino https://pin-up.tr-kazakhstan.kz are available for free mode, and after registering at Pin Up Casino Ru you can play for money.
Pin Up casino https://pin-up.salexy.kz official website, Pin Up slot machines play for money online, Pin Up mirror working for today.
Sports in Azerbaijan https://idman-xeberleri.com.az development and popular sports Azerbaijan is a country with rich sports traditions and outstanding achievements on the international stage.
Pin up entry to the official website. Play online casino Pin Up https://pin-up.prostoprosport.ru for real money. Register on the Pin Up Casino website and claim bonuses!
See What Truck Accident Lawsuit Tricks The Celebs Are Using Truck Accident Lawsuit
20 Reasons Why Spare Key For Car Will Never Be Forgotten Cleta
І аm curious tο find out whаt blog platform үou haρpen to be utilizing?
I’m having sօmе minor security proƅlems with mу lateѕt blog and I’d like to
find ѕomething mоre safe. Ꭰo you һave any suggestions?
Wonderful blog үοu һave hеre but Ӏ was wanting to know if
үoᥙ қnew of any forums tһаt cover the ѕame topics talked about һere?
І’d reaⅼly love to be a part of community where I can ցet responses from οther knowledgeable individuals
tһat share tһe same interest. If you hаve any suggestions, pleаse let me know.
Τhanks а lot!
Is Assessing Adhd In Adults The Best Thing There Ever Was?
adhd assessment adults uk
Good Prams: The Evolution Of Good Prams top prams – Shane,
Greаt article, jսst whаt I wɑnted to find.
10 Ways To Create Your Auto Accident Lawsuit Empire auto accident law firm
7 Things You’ve Never Known About Double Glazing
Companies Near Me glazier
10 Things That Your Family Taught You About Replacement Double Glazed Windows Replacement Double Glazed Window
Why Is It So Useful? In COVID-19? Repairing Upvc Windows
A Guide To Collapsible Mobility Scooter From Beginning To End http://www.arlennizo.top
Guide To Non Prescription ADHD Medication: The Intermediate Guide For Non Prescription ADHD Medication non prescription adhd
medication (Petra)
Ꮇy brother recommended I mіght like thiѕ website.
Ηе ԝaѕ totally гight. Tһiѕ post trսly made my
day. Үߋu cann’t imagine simply hօw much time I һad spent for tһis information! Thanks!
[url=https://advaird.com/]advair diskus 500[/url]
World of Games https://onlayn-oyunlar.com.az provides the latest news about online games, game reviews, gameplay and ideas, game tactics and tips. The most popular and spectacular
The main sports news of Azerbaijan https://idman.com.az. Your premier source for the latest news, exclusive interviews, in-depth analysis and live coverage of everything happening in sports in Azerbaijan.
NHL (National Hockey League) News https://nhl.com.az the latest and greatest NHL news for today. Sports news – latest NHL news, standings, match results, online broadcasts.
UFC in Azerbaijan https://ufc.com.az news, schedule of fights and tournaments 2024, rating of UFC fighters, interviews, photos and videos. Live broadcasts and broadcasts of tournaments, statistics.
Great goοds from you, man. I have keep in mind your stuff prior tߋ and you are simply extremely ցreat.
Ӏ actᥙally ⅼike wһаt you’ve gߋt rіght herе, гeally liҝe ԝhat you are
stating and the way wherеin you are sayіng it.
Yоu arе mаking іt entertaining and ʏоu continue to care for to stay it ѕensible.
Ӏ can’t wait to learn much mօre frⲟm you. This іs reаlly
a great website.
Truck Accident Lawyers Near Me Tools To Streamline Your Daily Lifethe
One Truck Accident Lawyers Near Me Trick That Every Person Must Be Able To truck
accident lawyer (http://www.oddlink.com)
Asbestos exposure can happen in a variety of ways.
The majority of Asbestos Lawyer-related lawsuits are due to occupational exposure.
17 Reasons To Not Beware Of Semi Truck Legal semi truck accident lawsuit
Top sports news https://idman-azerbaycan.com.az photos and blogs from experts and famous athletes, as well as statistics and information about matches of leading championships.
Latest news and details about the NBA in Azerbaijan https://nba.com.az. Hot events, player transfers and the most interesting events. Explore the world of the NBA with us.
The latest top football news https://futbol.com.az today. Interviews with football players, online broadcasts and match results, analytics and football forecasts, photos and videos.
Discover the fascinating world of online games with GameHub Azerbaijan https://online-game.com.az. Get the latest news, reviews and tips for your favorite games. Join our gaming community today!
Five Killer Quora Answers To Online Home Shop Uk Discount Code online home shop uk discount code (http://ceriwater.com/)
A Brief History History Of Folding Treadmill Cheap https://www.zackfoxworth.top
17 Reasons Not To Ignore Replacement Windows Birmingham Commercial Glaziers Birmingham
Nine Things That Your Parent Teach You About Online Famous Shopping Sites
Online Famous Shopping Sites
10 Sites To Help You To Become An Expert In Veterans Disability Law scappoose veterans disability law firm [https://vimeo.Com]
Beware Of These “Trends” Concerning Key Fob Programming
Near Me http://www.5611432.xyz
The 10 Most Terrifying Things About List Of Online Shopping Sites In Uk list of Online shopping sites in uk
20 Things That Only The Most Devoted Malpractice Lawyers Fans Should Know Malpractice Lawsuit
Каталог рейтингов хостингов https://pro-hosting.tech на любой вкус и под любые, даже самые сложные, задачи.
Сантехник — вызов сантехника на дом в Москве и Московской области в удобное для вас время.
The 10 Scariest Things About Automatic Folding Mobility
Scooter Reviews Automatic Folding Mobility Scooter
Play PUBG Mobile https://pubg-mobile.com.az an exciting world of high-quality mobile battle royale. Unique maps, strategies and intense combat await you in this exciting mobile version of the popular game.
The Dota 2 website https://dota2.com.az Azerbaijan provides the most detailed information about the latest game updates, tournaments and upcoming events. We have all the winning tactics, secrets and important guides.
10 Used 3 Wheel Mobility Scooters For Sale-Related Projects To
Stretch Your Creativity 3 wheel mobility scooter uk (Kurt)
The 10 Scariest Things About Nissan Spare Key nissan Dealer
Key replacement – https://Kearney-phelps-2.technetbloggers.de/10-unexpected-nissan-key-replacement-tips/,
A Sage Piece Of Advice On Glass Repair High Wycombe From The Age Of Five internal fire doors high
wycombe (Bart)
Check out the latest news, guides and in-depth reviews of the available options for playing Minecraft Az https://minecraft.com.az. Find the latest information about Minecraft Download, Pocket Edition and Bedrock Edition.
The most popular sports site https://sports.com.az of Azerbaijan, where the latest sports news, forecasts and analysis are collected.
10 CS GO Case New That Are Unexpected
Latest news and analytics of the Premier League https://premier-league.com.az. Detailed descriptions of matches, team statistics and the most interesting football events. EPL Azerbaijan is the best place for football fans.
Хотите сделать в квартире ремонт? Тогда советуем вам посетить сайт https://stroyka-gid.ru, где вы найдете всю необходимую информацию по строительству и ремонту.
The Most Hilarious Complaints We’ve Heard About Drip Filter Coffee 3222914
You’ll Never Guess This Does Amazon Ship To Uk’s Benefits does amazon ship
to uk (Warren)
10 Misconceptions Your Boss Shares Concerning Bluetooth Headphones 3222914.xyz
Latest news about games for Android https://android-games.com.az, reviews and daily updates. Read now and get the latest information on the most exciting games
10 Things That Your Family Taught You About Window Specialist London window specialist London
What’s The Job Market For Uk Online Phone Shopping Sites Professionals?
Uk online phone shopping sites
1xbet https://1xbet.best-casino-ar.com with withdrawal without commission. Register online in a few clicks. A large selection of slot machines in mobile applications and convenient transfers in just a few minutes.
Pin-up Casino https://pin-up.admsov.ru/ is an online casino licensed and regulated by the government of Curacao . Founded in 2016, it is home to some of the industry’s leading providers, including NetEnt, Microgaming, Play’n GO and others. This means that you will be spoiled for choice when it comes to choosing a game.
Pin Up official https://pin-up.adb-auto.ru website. Login to your personal account and register through the Pin Up mirror. Slot machines for real money at Pinup online casino.
10 Wrong Answers To Common Peugeot 107 Key Questions Do You Know The Right Answers?
peugeot 307 key
Double Glazing Window Replacement: 10 Things I’d Like To Have Known Sooner
glass replacement for window
15 Gifts For The Compact Pushchair Lover In Your Life Foldable Pushchair
The 10 Most Terrifying Things About Birmingham Windows And Doors birmingham windows and doors
Pin Up online casino https://pin-up.webrabota77.ru/ is the official website of a popular gambling establishment for players from the CIS countries. The site features thousands of slot machines, online tables and other branded entertainment from Pin Up casino.
Pin Up Casino https://pin-up.noko39.ru Registration and Login to the Official Pin Up Website. thousands of slot machines, online tables and other branded entertainment from Pin Up casino. Come play and get big bonuses from the Pinup brand today
10 Websites To Help You Become An Expert In Key Programming 5611432.xyz
The 10 Most Scariest Things About Online Grocery Stores That Ship online grocery stores
that ship (Jocelyn)
Реальные анкеты проституток https://prostitutki-213.ru Москвы с проверенными фото – от элитных путан до дешевых шлюх. Каталог всех индивидуалок на каждой станции метро с реальными фотографиями без ретуши и с отзывами реальных клиентов.
Смотрите онлайн сериал Отчаянные домохозяйки https://domohozyayki-serial.ru в хорошем качестве HD 720 бесплатно, рейтинг сериала: 8.058, режиссер сериала: Дэвид Гроссман, Ларри Шоу, Дэвид Уоррен.
10 No-Fuss Methods To Figuring Out The Patio Door
Repair Near Me In Your Body. Patio Door Repair Service
Pin Up Casino https://pin-up.sibelshield.ru official online casino website for players from the CIS countries. Login and registration to the Pin Up casino website is open to new users with bonuses and promotional free spins.
Изготовление памятников и надгробий https://uralmegalit.ru по низким ценам. Собственное производство. Высокое качество, широкий ассортимент, скидки, установка.
Pin Up Casino https://pin-up.ergojournal.ru приглашает игроков зарегистрироваться на официальном сайте и начать играть на деньги в лучшие игровые автоматы, а на зеркалах онлайн казино Пин Ап можно найти аналогичную витрину слотов
Pin-up casino https://pin-up.jes-design.ru популярное онлайн-казино и ставки на спорт. Официальный сайт казино для доступа к играм и другим функциям казино для игры на деньги.
11 Ways To Fully Redesign Your Best Truck Accident Lawyer Truck Accidents (http://jonbian.co)
Indisputable Proof You Need Secondary Double Glazing Near Me wood double glazing windows
[Joseph]
[url=https://diflucanr.online/]diflucan canada prescription[/url]
It’s continually awesome when you can not only be informed, but also entertained! I’m sure you had fun writing this article. Regards, Clotilde.
What’s The Current Job Market For Car Accident Attorney Professionals Like?
attorney
Do Not Forget Mesothelioma Asbestos Claims: 10 Reasons
Why You Don’t Need It Cassy Lawn
15 Inspiring Facts About Repairing Double Glazing That You’ve Never
Heard Of jerealas
14 Questions You’re Refused To Ask Replacement Windows Luton Luton Double Glazing Repairs
Pin Up https://pin-up.fotoevolution.ru казино, которое радует гемблеров в России на протяжении нескольких лет. Узнайте, что оно подготовило посетителям. Описание, бонусы, отзывы о легендарном проекте. Регистрация и вход.
The Reasons You’re Not Successing At Claims For Asbestosis 9363280
Открой мир карточных игр в Pin-Up https://pin-up.porsamedlab.ru казино Блэкджек, Баккара, Хило и другие карточные развлечения. Регистрируйтесь и играйте онлайн!
Nine Things That Your Parent Teach You About Triple Pram triple Pram
Pinup казино https://pin-up.vcabinet.kz это не просто сайт, а целый мир азартных развлечений, где каждый может найти что-то свое. От традиционных игровых автоматов до прогнозов на самые популярные спортивные события.
Официальный сайт Pin Up казино https://pin-up.nasledie-smolensk.ru предлагает широкий выбор игр и щедрые бонусы для игроков. Уникальные бонусные предложения, онлайн регистрация.
Latest Diablo news https://diablo.com.az game descriptions and guides. Diablo.az is the largest Diablo portal in the Azerbaijani language.
Five Replacement Upvc Window Handles Projects
For Any Budget repairs to upvc windows
Key Programming: It’s Not As Difficult As You Think 5611432
5 Things That Everyone Doesn’t Know Concerning Double Glazing Repairs Bedford Composite doors bedford
Thank you for the good writeup. It in fact was a amusement account it.
Look advanced to more added agreeable from you!
However, how could we communicate?
Latest World of Warcraft (WOW) tournament news https://wow.com.az, strategies and game analysis. The most detailed gaming portal in Azerbaijani language
The 10 Most Scariest Things About Locksmiths Cars locksmiths Car
Azerbaijan NFL https://nfl.com.az News, analysis and topics about the latest experience, victories and records. A portal where the most beautiful NFL games in the world are generally studied.
Discover exciting virtual football in Fortnite https://fortnite.com.az. Your central hub for the latest news, expert strategies and interesting e-sports reports. Collecting points with us!
The latest analysis, tournament reviews and the most interesting features of the Spider-Man game https://spider-man.com.az series in Azerbaijani.
Read the latest Counter-Strike 2 news https://counter-strike.net.az, watch the most successful tournaments and become the best in the world of the game on the CS2 Azerbaijan website.
The Most Effective Parent Facing Pram Tips For Changing Your Life parent facing Pushchair
10 Top Mobile Apps For Electric Wood Stove 913875.xyz
Mesut Ozil https://mesut-ozil.com.az latest news, statistics, photos and much more. Get the latest news and information about one of the best football players Mesut Ozil.
Latest news, statistics, photos and much more about Pele https://pele.com.az. Get the latest news and information about football legend Pele.
Explore the extraordinary journey of Kilian Mbappe https://kilian-mbappe.com.az, from his humble beginnings to global stardom. Delve into his early years, meteoric rise through the ranks, and impact on and off the football field.
Latest boxing news https://boks.com.az, Resul Abbasov’s achievements, Tyson Fury’s fights and much more. All in Ambassador Boxing.
Sergio Ramos Garcia https://sergio-ramos.com.az Spanish footballer, defender. Former Spanish national team player. He played for 16 seasons as a central defender for Real Madrid, where he captained for six seasons.
The Reason Why Double Glazing Windows Luton Is A Lot More Hazardous Than You Thought
window doctor
Malpractice Attorney 10 Things I’d Like To Have Known Earlier
firm
Car Accident Lawyers Tools To Help You Manage
Your Daily Life Car Accident Lawyers Trick That Everybody Should
Know Car Accident Lawyers
Gianluigi Buffon https://buffon.com.az Italian football player, goalkeeper. Considered one of the best goalkeepers of all time. He holds the record for the number of games in the Italian Championship, as well as the number of minutes in this tournament without conceding a goal.
Paul Labille Pogba https://pogba.com.az French footballer, central midfielder of the Italian club Juventus. Currently suspended for doping and unable to play. World champion 2018.
Paulo Bruno Ezequiel Dybala https://dybala.com.az Argentine footballer, striker for the Italian club Roma and the Argentina national team. World champion 2022.
Ten Things You Need To Know About Freestanding Fireplace lynnbolvin
Канал для того, чтобы знания и опыт, могли помочь любому человеку сделать ремонт https://tvin270584.livejournal.com в своем жилище, любой сложности!
Kevin De Bruyne https://kevin-de-bruyne.liverpool-fr.com Belgian footballer, born 28 June 1991 years in Ghent. He has had a brilliant club career and also plays for the Belgium national team. De Bruyne is known for his spectacular goals and brilliant assists.
10 Simple Steps To Start The Business Of Your Dream Patio Door Repair Business tilt and slide patio door repairs near me
Its History Of Fridge Larder http://www.36035372.xyz
Mohamed Salah Hamed Mehrez Ghali https://mohamed-salah.liverpool-fr.com Footballeur egyptien, attaquant du club anglais de Liverpool et l’equipe nationale egyptienne. Considere comme l’un des meilleurs joueurs du monde.
The young talent who conquered Paris Saint-Germain: how Xavi Simons became https://xavi-simons.psg-fr.com leader of a superclub in record time.
Paul Labille Pogba https://paul-pogba.psg-fr.com Footballeur francais, milieu de terrain central du club italien de la Juventus. Champion du monde 2018. Actuellement suspendu pour dopage et incapable de jouer.
See What Truck Accident Lawsuit Tricks The Celebs Are Using truck
accident lawsuit (Hassie)
Can Glass Repair High Wycombe Ever Rule The World? wooden doors high wycombe
A Trip Back In Time: How People Talked About Boat Accident Compensation 20 Years Ago boat accident attorneys
выездной ремонт стиральных машин [url=http://www.centr-remonta-stiralnyh-mashin.ru]http://www.centr-remonta-stiralnyh-mashin.ru[/url] .
What You Should Be Focusing On Improving Table Top Freezer
Sale 3222914.xyz
What Is Black Table Top Freezer And How To Use What
Is Black Table Top Freezer And How To Use http://www.3222914.xyz
What’s The Job Market For Inattentive ADHD Medication Professionals?
adhd Medication
Roulette Betting Guide 프라그마틱 슬롯 사이트
How To Identify The Truck Accident Lawyers Near
Me To Be Right For You Truck accidents
10 Facts About Upvc Windows And Doors That Can Instantly
Put You In An Upbeat Mood Repair Upvc Window (http://www.camedu.org)
Why People Don’t Care About Bunk Bed Store http://www.eddafay.top
Why Everyone Is Talking About Window Refurbishment London Right Now Upvc Window Repairs London
The Most Significant Issue With Table Top Freezers Uk, And How You Can Fix It
http://www.3222914.xyz
Kylian Mbappe https://kylian-mbappe.psg-fr.com Footballeur, attaquant francais. Il joue pour le PSG et l’equipe de France. Ne le 20 decembre 1998 a Paris. Mbappe est francais de nationalite. La taille de l’athlete est de 178 cm.
Kevin De Bruyne https://liverpool.kevin-de-bruyne-fr.com Belgian footballer, born 28 June 1991 years in Ghent. He has had a brilliant club career and also plays for the Belgium national team. De Bruyne is known for his spectacular goals and brilliant assists.
Paul Pogba https://psg.paul-pogba-fr.com is a world-famous football player who plays as a central midfielder. The player’s career had its share of ups and downs, but he was always distinguished by his perseverance and desire to win.
Kylian Mbappe https://psg.kylian-mbappe-fr.com Footballeur, attaquant francais. L’attaquant de l’equipe de France Kylian Mbappe a longtemps refuse de signer un nouveau contrat avec le PSG, l’accord etant en vigueur jusqu’a l’ete 2022.
[url=http://flomaxms.online/]flomax for kidney stones in females[/url]
Изготовление, сборка и ремонт мебели https://shkafy-na-zakaz.blogspot.com для Вас, от эконом до премиум класса.
Who Is Jaguar Key Fob And Why You Should Be Concerned jaguar key Fob Repair
14 Common Misconceptions Concerning Pram Newborn Parent Facing Pram, https://Mayflyshop.Co.Kr,
Which Website To Research Prams Online push chairs and prams (Athena)
Thibaut Nicolas Marc Courtois https://thibaut-courtois.real-madrid-ar.com Footballeur belge, gardien de but du Club espagnol “Real Madrid”. Lors de la saison 2010/11, il a ete reconnu comme le meilleur gardien de la Pro League belge, ainsi que comme joueur de l’annee pour Genk. Trois fois vainqueur du Trophee Ricardo Zamora, decerne chaque annee au meilleur gardien espagnol
Forward Rodrigo https://rodrygo.real-madrid-ar.com is now rightfully considered a rising star of Real Madrid. The talented Santos graduate is compared to Neymar and Cristiano Ronaldo, but the young talent does not consider himself a star.
Jude Victor William Bellingham https://jude-bellingham.real-madrid-ar.com English footballer, midfielder of the Spanish club Real Madrid and the England national team. In April 2024, he won the Breakthrough of the Year award from the Laureus World Sports Awards.
Saud Abdullah Abdulhamid https://saud-abdulhamid.real-madrid-ar.com Saudi footballer, defender of the Al -Hilal” and the Saudi Arabian national team. Asian champion in the age category up to 19 years. Abdulhamid is a graduate of the Al-Ittihad club. On December 14, 2018, he made his debut in the Saudi Pro League in a match against Al Bateen
Khvicha Kvaratskhelia https://khvicha-kvaratskhelia.real-madrid-ar.com midfielder of the Georgian national football team and the Italian club “Napoli”. Became champion of Italy and best player in Serie A in the 2022/23 season. Kvaratskhelia is a graduate of Dynamo Tbilisi and played for the Rustavi team.
See What Replacement Double Glazed Glass Only Near Me Tricks The Celebs Are Using double glazed glass, Emilio,
Could Spare Key For Car Cost Be The Answer To Achieving
2023? 99811760
Vinicius Junior https://vinisius-junior.com.az player news, fresh current and latest events for today about the player of the 2024 season
Latest news and information about Marcelo https://marcelo.com.az on this site! Find Marcelo’s biography, career, playing stats and more. Find out the latest information about football master Marcelo with us!
Khabib Abdulmanapovich Nurmagomedov https://khabib-nurmagomedov.com.az Russian mixed martial arts fighter who performed under the auspices of the UFC. Former UFC lightweight champion.
gdzie mozna kupic prawo jazdy z wpisem do rejestru, kupić prawo jazdy, legalne prawo jazdy do kupienia, kupię prawo jazdy, jak załatwić prawo jazdy, bez egzaminu, jak kupić prawo jazdy, czy można kupić prawo jazdy, legalne prawo jazdy do kupienia 2024, pomogę zdać egzamin na prawo jazdy, prawo jazdy bez egzaminu, gdzie kupić prawo jazdy bez egzaminu, gdzie kupić prawo jazdy na lewo, jak kupić prawo jazdy w niemczech, gdzie kupic prawo jazdy legalnie, kupić prawo jazdy b
15 Trends To Watch In The New Year Cerebral Palsy Attorney cerebral Palsy law firm
Welcome to our official site! Get to know the history, players and latest news of Inter Miami Football Club https://inter-miami.com.az. Discover with us the successes and great performances of America’s newest and most exciting soccer club.
Conor Anthony McGregor https://conor-mcgregor.com.az Irish mixed martial arts fighter who also performed in professional boxing. He performs under the auspices of the UFC in the lightweight weight category. Former UFC lightweight and featherweight champion.
Five Essential Tools Everyone Is In The Malpractice Law Industry Should
Be Utilizing malpractice attorney
sportbootführerschein binnen und see, sportbootführerschein binnen prüfungsfragen, sportbootführerschein binnen kosten, sportbootführerschein binnen online, sporthochseeschifferschein kaufen, sportbootführerschein binnen berlin, sportbootführerschein binnen segel, sportbootführerschein kaufen, sportseeschifferschein kaufen erfahrungen, sportküstenschifferschein kaufen schwarz, sportbootführerschein see kaufen, sportbootführerschein binnen kaufen, sportbootführerschein see kaufen ohne prüfung, bootsführerschein kaufen, bootsführerschein kaufen polen, bootsführerschein kaufen erfahrungen, bootsführerschein online kaufen, bootsführerschein tschechien kaufen, SSS kaufen, SKS kaufen, SHS kaufen
Is Technology Making Pushchairs Pushchairs Better Or Worse?
all-terrain strollers
Оперативный вывод из запоя https://www.liveinternet.ru/users/laralim/post505923855/ на дому. Срочный выезд частного опытного нарколога круглосуточно. При необходимости больного госпитализируют в стационар.
Why Window Companies Crawley Is Fast Becoming The Hottest Trend Of 2023 upvc door Repairs
Видеопродакшн студия https://humanvideo.ru полного цикла. Современное оборудование продакшн-компании позволяет снимать видеоролики, фильмы и клипы высокого качества. Создание эффективных видеороликов для рекламы, мероприятий, видеоролики для бизнеса.
Casino Games – Roulette 플래닛 에볼루션: 방치형 클리커
Заказать вывоз мусора региональный вывоз мусора в Москве и Московской области, недорого и в любое время суток в мешках или контейнерами 8 м?, 20 м?, 27 м?, 38 м?, собственный автопарк. Заключаем договора на вывоз мусора.
Реальные анкеты https://prostitutki-vyzvat-moskva.ru Москвы с проверенными фото – от элитных путан до дешевых шлюх. Каталог всех индивидуалок на каждой станции метро с реальными фотографиями без ретуши и с отзывами реальных клиентов.
10 Things That Your Family Taught You About Upvc Window Repairs
Upvc Window repairs
Совсем недавно открылся новый интернет портал BlackSprut (Блекспрут) https://bs2cite.cc в даркнете, который предлагает купить нелегальные товары и заказать запрещенные услуги. Самая крупнейшая площадка СНГ. Любимые шопы и отзывчивая поддержка.
Welcome to the site dedicated to Michael Jordan https://michael-jordan.com.az, a basketball legend and symbol of world sports culture. Here you will find highlights, career, family and news about one of the greatest athletes of all time.
Diego Armando Maradona https://diego-maradona.com.az Argentine footballer who played as an attacking midfielder and striker. He played for the clubs Argentinos Juniors, Boca Juniors, Barcelona, ??Napoli, and Sevilla.
You’ll Be Unable To Guess Medical Malpractice Settlement’s Tricks Medical malpractice
Gucci купить http://thebestluxurystores.ru по низкой цене в интернет-магазине брендовой одежды. Одежда и обувь бренда Gucci c доставкой.
Muhammad Ali https://muhammad-ali.com.az American professional boxer who competed in the heavy weight category; one of the most famous boxers in the history of world boxing.
Монтаж систем отопления https://fectum.pro, водоснабжения, вентиляции, канализации, очистки воды, пылеудаления, снеготаяния, гелиосистем в Краснодаре под ключ.
The Most Underrated Companies To Keep An Eye On In The Window Replacement
Industry glass window replacements near me
How To Structure An E-Mail Follow Up Series 에볼루션 바카라 그림
cyclobenzaprine online order – purchase cyclobenzaprine for sale buy enalapril paypal
The Next Big Trend In The Nescafe Gold Blend 1kg Industry coffee 1Kg
Seven Reasons To Explain Why Window Repair Near Is Important window repair near me
Lev Ivanovich Yashin https://lev-yashin.com.az Soviet football player, goalkeeper. Olympic champion in 1956 and European champion in 1960, five-time champion of the USSR, three-time winner of the USSR Cup.
Usain St. Leo Bolt https://usain-bolt.com.az Jamaican track and field athlete, specialized in short-distance running, eight-time Olympic champion and 11-time world champion (a record in the history of this competition among men).
You have a source of the latest and most interesting sports news from Kazakhstan: “Kazakhstan sports news https://sports-kazahstan.kz: Games and records” ! Follow us to receive updates and interesting news every minute!
Al-Nasr https://al-nasr.com.az your source of news and information about Al-Nasr Football Club . Find out the latest results, transfer news, player and manager interviews, fixtures and much more.
Game World https://kz-games.kz offers the latest online gaming news, game reviews, gameplay and ideas, gaming tactics and tips . Start playing our most popular and amazing games and get ready to become the leader in the online gaming world!
The latest top football news https://football-kz.kz today. Interviews with football players, online broadcasts and match results, analytics and football forecasts, photos and videos.
Latest news and information about the NBA https://basketball-kz.kz in Kazakhstan. Hot stories, player transfers and highlights. Watch the NBA world with us.
Top sports news https://sport-kz-news.kz, photos and blogs from experts and famous athletes, as well as statistics and information about matches of leading championships.
17 Reasons Why You Shouldn’t Not Ignore Double Glazing Cambridgeshire Window Repair
These benches are heightened at convenience for you to
put your toes up in levelled gradient with your chair. Of
course, it’s still your debt, but you and your co-signer are
on the hook for it, so it will have an effect on each your
credit scores and credit histories. A co-signer is
someone who indicators the mortgage with you, primarily guaranteeing that he or she’s going to cover the debt should you fail to pay.
Must you and your co-signer utterly default on the loan, authorized motion, together
with garnishments and liens, can and possibly will
probably be issued in opposition to you each.
mexico pharmacy: mexico pharmacy – mexico drug stores pharmacies
Upvc Window Repairs Near Me Techniques To Simplify Your Daily Lifethe One Upvc Window Repairs Near Me Trick That Every Person Should Be Able To Upvc window repairs near me
Latest news from World of Warcraft https://wow-kz.kz (WOW) tournaments, strategy and game analysis. The most detailed gaming portal in the language.
Check out Minecraft kz https://minecraft-kz.kz for the latest news, guides, and in-depth reviews of the game options available. Find the latest information on Minecraft Download, Pocket Edition and Bedrock Edition.
Latest news about games for Android https://android-games.kz, reviews and daily updates. Read now and get the latest information about the most exciting games
Latest news and analysis of the Premier League https://premier-league.kz. Full descriptions of matches, team statistics and the most interesting football events. Premier Kazakhstan is the best place for football fans.
mexican pharmaceuticals online
https://cmqpharma.online/# mexico drug stores pharmacies
buying prescription drugs in mexico online
Доставка груза и грузоперевозки https://tamozhennyy-deklarant.blogspot.com по России через транспортную компанию автотранспортом доступна и для частных лиц. Перевозчик отправит или доставит ваш груз: выгодные тарифы индивидуальный подход из рук в руки 1 машиной.
Предлагаем купить гаражное оборудование https://profcomplex.pro, автохимию, технику и уборочный инвентарь для клининговых компаний. Доставка по Москве и другим городам России.
Зеркала интерьерные https://zerkala-mag.ru в интернет-магазине «Зеркала с подсветкой» Самые низкие цены на зеркала!
15 Gifts For The Emergency Window Repair Lover In Your Life install
Купить зеркала https://zerkala-m.ru по низким ценам. Более 1980 моделей, купить недорого в интернет-магазине в Москве с доставкой по России. Удобный каталог, низкие цены, качественные фото.
The latest top football news https://football.sport-news-eg.com today. Interviews with football players, online broadcasts and match results, analytics and football forecasts, photos and videos.
Latest Counter-Strike 2 news https://counter-strike-kz.kz, watch the most successful tournaments and be the best in the gaming world.
Spider-Man https://spiderman.kz the latest news, articles, reviews, dates, spoilers and other latest information. All materials on the topic “Spider-Man”
Discover the dynamic world of Arab sports https://sports-ar.com through the lens of Arab sports news. Your premier source for breaking news, exclusive interviews, in-depth analysis and live coverage of everything happening in sports.
See What Taylors Lazy Sunday Coffee Beans 1kg Tricks
The Celebs Are Using Coffee Beans 1Kg
How To Explain Upvc Windows And Doors To Your Grandparents Upvc Windows Repairs
15 Amazing Facts About Semi Truck Compensation That You Never Knew semi truck accident attorney
После кончины моего отца, я был полностью подавлен горем. К счастью для меня, сотрудники https://complex-ritual.ru/ полностью взяли на себя организацию похорон. Они деликатно и профессионально все устроили: оформление документов, подготовку к прощанию, перевозку, захоронение. Их сочувствие и забота помогли справиться с невосполнимой утратой. Услуги оказаны на высочайшем уровне за умеренную плату. От всего сердца советую эту компанию.
Интернет магазин электроники и цифровой техники по доступным ценам. Доставка мобильной электроники по Москве и Московской области.
NHL news https://nhl-ar.com (National Hockey League) – the latest and most up-to-date NHL news for today.
UFC news https://ufc-ar.com, schedule of fights and tournaments 2024, ratings of UFC fighters, interviews, photos and videos. Live broadcasts and broadcasts of tournaments, statistics, forums and fan blogs.
The most important sports news https://bein-sport-egypt.com, photos and blogs from experts and famous athletes, as well as statistics and information about matches of leading leagues.
5 Laws That Can Benefit The Upvc Windows And Doors Industry
Repair upvc window – Strongprisonwivesandfamilies.com –
News and events of the American Basketball League https://basketball-eg.com in Egypt. Hot events, player transfers and the most interesting events. Explore the world of the NBA with us.
Ten Things You Shouldn’t Post On Twitter Auto Locksmith Near Me Now
Minecraft news https://minecraft-ar.com, guides and in-depth reviews of the gaming features available in Minecraft Ar. Get the latest information on downloading Minecraft, Pocket Edition and Bedrock Edition.
Discover the wonderful world of online games https://game-news-ar.com. Get the latest news, reviews and tips for your favorite games.
Latest news https://android-games-ar.com about Android games, reviews and daily updates. The latest information about the most exciting games.
News, tournaments, guides and strategies about the latest GTA games https://gta-ar.com. Stay tuned for the best GTA gaming experience
The 10 Most Scariest Things About Double Glazed Window Repairs Near
Me Window repairs Near me
Five Killer Quora Answers To Best 18 Wheeler Accident Attorneys 18 wheeler accident attorneys (telegra.Ph)
Live Dealer Casino Reviews 대한민국 겜블러들이 가장 선호하는 에볼루션 카지노에 대해 알아보자
7 Simple Tips To Totally Enjoying Your Veterans Disability Legal Vimeo.com
purchase zofran sale – buy generic procyclidine over the counter ropinirole 1mg drug
Guide To Glass Repair London: The Intermediate Guide On Glass Repair
London glass repair london
Pubic Unpleasant – Tips When Waxing 에볼루션 바카라 사이드배팅
[url=https://odiflucan.online/]diflucan online prescription[/url]
Responsible For An Double Glazed Window Repairs Near Me Budget?
12 Best Ways To Spend Your Money double glazing repair
near me (Chloe)
Although it is kind of rare for domesticated skunks to get rabies, there have been circumstances through which
an uninfected pet skunk bit an individual and was euthanized by animal control
personnel so its brain cells may very well be tested
for rabies. American skunk sellers incomes greater than $500 a yr on the skunk commerce
are regulated by the United States Department of Agriculture Animal and Plant Health Inspection Service (USDA/APHIS),
which has established three classes of licensed skunk dealers.
As the mother and father needs one of the best for his or her
children of their development period they go for the best organic merchandise that are very helpful
and offers a practise for wholesome residing.
acheter permis de conduire en ligne, acheter un permis de conduire belge, achat permis de conduire, acheter un permis de conduire, acheter permis de conduire belgique, acheter le permis de conduire, permis de conduire acheter, faux permis de conduire belge, j’ai acheter mon permis de conduire sur internet, acheter son permis de conduire belgique, acheter son permis de conduire légalement, acheter un vrai permis de conduire, acheter permis moto a2, acheter permis moto étranger, Acheter permis de conduire enregistré, acheter permis de conduire enregistré en préfecture forum, permis de conduire légalement enregistré.
‘;lkjh
[url=https://amoxil.company/]buy amoxicillin online without prescription[/url]
kupovina vozacke dozvole,kako kupiti vozacku dozvolu u srbiji, lazna vozacka dozvola, kupiti vozacku u bosni, kako kupiti vozacku dozvolu, kupiti vozacka dozvola hrvatska cijena, kupovina vozacke dozvole na crno, kupiti vozačku dozvolu, kupljena vozacka dozvola, kupiti vozacka dozvola bez polaganja, kupiti vozacku dozvolu, kupi lažna vozačka dozvola, kupiti vozacku u hrvatskoj, kupite vozacka dozvola hrvatska, vozacka dozvola na crno, zamena srpske vozacke dozvole u italiji 2024
vozacka dozvola
Открытие для себя Ерлинг Хааланда https://manchestercity.erling-haaland-cz.com, a talented player of «Manchester City». Learn more about his skills, achievements and career growth.
Ten Things You Learned At Preschool That’ll Help You Understand Railroad Injuries Litigation Railroad Injuries lawyers
The path of 21-year-old Jude Bellingham https://realmadrid.jude-bellingham-cz.com from young talent to one of the most promising players in the world, reaching new heights with Dortmund and England.
French prodigy Kylian Mbappe https://realmadrid.kylian-mbappe-cz.com is taking football by storm, joining his main target, ” Real.” New titles and records are expected.
The site is dedicated to football https://fooball-egypt.com, football history and news. Latest news and fresh reviews of the world of football
Comprare patente registrata presso Motorizzazione civile (DMV)? La decisione di comprare patente online in Italia , comprare una patente, patente originale, comprare patente c, acquisto patente b, comprare patente prezzo, compro patente, acquistare patente b, dove posso comprare la patente b, compra patente online, comprare patente b online, comprare la patente a napoli, dove si può comprare la patente, quanto costa comprare la patente, comprare patente di guida, comprare patente senza.
guida
Harry Kane’s journey https://bavaria.harry-kane-cz.com from Tottenham’s leading striker to Bayern’s leader and Champions League champion – this is the story of a triumphant ascent to the football Olympus.
lkw führerschein kaufen legal, führerschein kaufen ohne vorkasse, registrierten führerschein kaufen erfahrungen, führerschein kaufen erfahrungen, führerschein kaufen ohne prüfung Köln, führerschein kaufen österreich, führerschein kaufen ohne prüfung österreich, führerschein kaufen ohne prüfung österreich, führerschein kaufen in österreich, führerschein kaufen Frankfurt, führerschein kaufen schweiz.
österreich
comprar carta de conduçao preço, comprar carta de condução verdadeira, comprar carta de conduçao, comprar carta de condução lisboa, comprar carta de condução legal, comprar carta de condução, carta de condução comprar, comprar carta de conduçao, comprar carta de condução em Portugal, comprar carta, comprar carta de condução portugal, comprar carta de condução online, comprar a carta de condução, carta de condução, comprar carta de carro, imt carta de condução, comprar carta de condução no porto
porto
Промышленные насосы https://1nsk.ru/news/articles/nasosy-spetsialnogo-naznacheniya.html Wilo предлагают широкий ассортимент решений для различных отраслей промышленности, включая водоснабжение, отопление, вентиляцию, кондиционирование и многие другие. Благодаря своей высокой производительности и эффективности, насосы Wilo помогают снизить расходы на энергию и обслуживание, что делает их идеальным выбором для вашего бизнеса.
Изготовим для Вас изделия из металла https://smith-moskva.blogspot.com, по вашим чертежам или по нашим эскизам.
See What Double Glazing Offers Near Me Tricks The Celebs Are Using
Double glazing Offers
What Is What Is The Statute Of Limitations On Asbestos Claims?
History Of What Is The Statute Of Limitations On Asbestos Claims In 10 Milestones 9363280
https://buzard.ru панели для отделки фасада – интернет магазин
The fascinating story of the rise of Brazilian prodigy Vinicius Junior https://realmadrid.vinicius-junior-cz.com to the heights of glory as part of the legendary Madrid “Real”
Mohamed Salah https://liverpool.mohamed-salah-cz.com, who grew up in a small town in Egypt, conquered Europe and became Liverpool star and one of the best players in the world.
Ten 18 Wheeler Accident Law Firms That Really Make Your Life Better 18 wheeler accident law firms
The inspiring story of how talented Kevin De Bruyne https://manchestercity.kevin-de-bruyne-cz.com became the best player of Manchester City and the Belgium national team. From humble origins to the leader of a top club.
Полезные советы и пошаговые инструкции по строительству https://syndyk.by, ремонту и дизайну домов и квартир, выбору материалов, монтажу и установке своими руками.
Bernardo Mota Veiga de Carvalho e Silva https://manchestercity.bernardo-silva-cz.com Portuguese footballer, club midfielder Manchester City and the Portuguese national team.
What’s The Job Market For Replacement Lock
For Upvc Door Professionals Like? Replace Lock on upvc door
Lionel Messi https://intermiami.lionel-messi-cz.com, one of the best football players of all time, moves to Inter Miami” and changes the face of North American football.
Antoine Griezmann https://atlticomadrid-dhb.antoine-griezmann-cz.com Atletico Madrid star whose talent and decisive goals helped the club reach the top of La Liga and the UEFA Champions League.
Son Heung-min’s https://tottenhamhotspur.son-heung-min-cz.com success story at Tottenham Hotspur and his influence on the South Korean football, youth inspiration and changing the perception of Asian players.
The Best Way To Explain Window Repair London To Your Mom repaired
The impact of the arrival of Cristiano Ronaldo https://annasr.cristiano-ronaldo-cz.com at Al-Nasr. From sporting triumphs to cultural changes in Saudi football.
The story of Robert Lewandowski https://barcelona.robert-lewandowski-cz.com, his impressive journey from Poland to Barcelona, ??where he became not only a leader on the field, but also a source of inspiration for young players.
We explore the path of Luka Modric https://realmadrid.luka-modric-cz.com to Real Madrid, from a difficult adaptation to legendary Champions League triumphs and personal awards.
Bank Makes Up About People With Bad Credit 프리랜서 대출 (72.cholteth.com)
Create Relationships With Neighborhood Bank Or Lender 전세자금 대출
Boat Accident Settlement Tips To Relax Your Daily Life Boat Accident Settlement Trick
Every Individual Should Learn boat accident (Aragaon.net)
Противоотмывочная верификация: Как минимизировать ограничение средств у криптовалютных бирж
Для чего требуется процедура противодействия отмыванию денег?
Процедура противодействия отмыванию денег (Anti-Money Laundering) – подразумевает набор действий, нацеленных на борьбу сокрытия денег. Данная процедура обеспечивает защищать виртуальные средства пользователей а также предотвращать применение площадок для незаконных активностей. Антиотмывочные меры требуется с целью обеспечения защищенности Ваших фондов наряду с соблюдением законодательных правил.
Основные способы идентификации
Участники криптосферы и другие денежные решения задействуют разные основных способов в рамках проверки пользователей:
“Знай своего клиента”: Такая процедура включает простые процедуры для идентификации данных участника, в том числе проверка подтверждающих данных проживания. Верификация личности способствует удостовериться, в надежности владельца является законным.
Меры против финансирования терроризма: Ориентирована на предотвращение финансирования террористических актов. Инструментарий мониторит вызывающие вопросы переводы и при необходимости ограничивает учетные записи в рамках проведения внутрикорпоративного проверки.
Преимущества антиотмывочных мер
AML-проверка позволяет криптобиржам:
Следовать международные вместе с национальными юридические стандарты.
Защищать клиентов недобросовестных действий.
Укреплять степень репутации со стороны пользователей контролирующих структур.
Каким образом снизить вероятность свои ресурсы во время операций с криптовалютой
С целью уменьшить опасности замораживания средств, придерживайтесь перечисленным рекомендациям:
Работайте с надежные биржи: Переходите единственно к платформам высокой оценкой включая высокий показателем защищенности.
Проверяйте контрагентов: Применяйте инструменты по борьбе с отмыванием для проверки цифровых кошельков участников непосредственно перед осуществлением действий.
Систематически модифицируйте криптоадреса: Такой подход поможет минимизировать вероятных подозрений, если Ваши контрагенты партнеры будут включены под подозрение.
Обеспечивайте доказательства платежей: При требовании окажетесь способны обосновать чистоту принятых фондов.
Обобщение
Проверка по борьбе с отмыванием денег – выступает в качестве значимый инструмент с целью обеспечения безопасности активностей
с криптовалютой. Она обеспечивает избежать отмывание средств, обеспечение экстремистских группировок наряду с другими нелегальные действия. Придерживаясь указаниям по безопасности и выбирая надежные обменники, получите возможность ограничить риски блокировки ресурсов взаимодействовать защищенной взаимодействием в криптосфере.
What Is The Secret Life Of Car Boot Mobility
Scooters http://www.arlennizo.top
How Karim Benzema https://alIttihad.karim-benzema-cz.com changed the game of Al-Ittihad and Saudi football: new tactics, championship success, increased viewership and commercial success.
A study of the influence of Rodrigo https://realmadrid.rodrygo-cz.com on the success and marketing strategy of Real Madrid: analysis of technical skills, popularity in Media and commercial success.
Find out how Pedri https://barcelona.pedri-cz.com becomes a key figure for Barcelona – his development, influence and ambitions determine the club’s future success in world football.
Find out about Alisson https://liverpool.alisson-becker-cz.com‘s influence on Liverpool’s success, from his defense to personal achievements that made him one of the best goalkeepers in the world.
Find out how Pedro Gavi https://barcelona.gavi-cz.com helped Barcelona achieve success thanks to his unique qualities, technique and leadership, becoming a key player in the team.
Holiday Loan For The Battle Vacation 카카오 대출
Although Portal 2 can prove frustrating at instances, particularly if you happen to
and your associate aren’t in sync, much of that is offset by
the characters; in particular, the two lovable robots
who’re simply dripping with persona. Much of the money
went toward issues that did not show but made a superb automobile even better,
significantly within the areas of noise, vibration, and harshness (NVH).
Even the Mondeo sprint was little altered for
the States. Inside, the ’92 Taurus offered a redesigned dash with refined ergonomic refinements and house for a newly optional passenger airbag.
Guide To Upvc Windows Near Me: The Intermediate Guide The Steps To Upvc Windows Near Me upvc windows near me
r7 casino сайт r7 casino официальный сайт
buy 50 instagram likes buy instagram views
Thibaut Courtois https://realmadrid.thibaut-courtois-cz.com the indispensable goalkeeper of “Real”, whose reliability, leadership and outstanding The game made him a key figure in the club.
10 Things You Learned In Kindergarden To Help You Get Started With Car Locks Smith elsycrays
Find out how Virgil van Dijk https://liverpool.virgil-van-dijk-cz.com became an integral part of style игры «Liverpool», ensuring the stability and success of the team.
Find out how Bruno Guimaraes https://newcastleunited.bruno-guimaraes-cz.com became a catalyst for the success of Newcastle United thanks to his technical abilities and leadership on the field and beyond.
ascorbic acid 500mg tablet – purchase isosorbide dinitrate online cheap compro drug
Study of the playing style of Toni Kroos https://real-madrid.toni-kroos-cz.com at Real Madrid: his accurate passing, tactical flexibility and influence on the team’s success.
What’s The Job Market For Window Handle Replacement Professionals?
window handle Replacement, cyreneforum.Com,
Star Brazilian striker Gabriel Jesus https://arsenal.gabriel-jesus-cz.com put in a superb performance to lead Arsenal to new heights after moving from Manchester City.
The young Uruguayan Darwin Nunez https://liverpool.darwin-nunez-cz.com broke into the elite of world football, and he became a key Liverpool player.
20 Tips To Help You Be Better At Table Top Mini Freezer http://www.3222914.xyz
A fascinating story about how David Alaba https://realmadrid.david-alaba-cz.com after starting his career at the Austrian academy Vienna became a key player and leader of the legendary Real Madrid.
10 Sofas Sectional-Friendly Habits To Be Healthy https://www.4452346.xyz
Meet One Of The Asbestos Attorney Industry’s Steve Jobs Of The Asbestos Attorney Industry cassylawn
10 Fundamentals Regarding Windows Replacement You Didn’t Learn In The Classroom window Replacement
You’ll Never Guess This Cost Of Replacement Windows Uk’s Tricks cost of Replacement windows uk
Why Buy Bank Owned And Pre-Foreclosures 신용불량자 대출
Double Glazing Windows High Wycombe Tools To Make Your Daily
Life Double Glazing Windows High Wycombe Technique Every Person Needs To Be Able To windows high
wycombe – bjerg-samuelsen.blogbright.Net –
Don’t Be Enticed By These “Trends” Concerning Double Glazing Company Near Me Repaired
The Lesser-Known Benefits Of Replacement Sash Windows windows seal replacement
Romelu Lukaku https://chelsea.romelu-lukaku-cz.com, one of the best strikers in Europe, returns to Chelsea to continue climbing to the top of the football Olympus.
The story of how the incredibly talented footballer Riyad Mahrez https://alahli.riyad-mahrez-cz.com reached new heights in career, moving to Al Ahly and leading the team to victory.
The fascinating story of Marcus Rashford’s ascent https://manchester-united.marcus-rashford-cz.com to glory in the Red Devils: from a young talent to one of the key players of the team.
The fascinating story of Antonio Rudiger’s transfer https://real-madrid.antonio-rudiger-cz.com to Real Madrid and his rapid rise as a key player at one of the best clubs in the world.
Fascinating event related to this Keanu Reeves helped him in the role of the iconic John Wick characters https://john-wick.keanu-reeves.cz, among which there is another talent who has combat smarts with inappropriate charisma.
Jackie Chan https://peakhour.jackie-chan.cz from a poor boy from Hong Kong to a world famous Hollywood stuntman. The incredible success story of Jackie Chan.
Emily Olivia Laura Blunt https://oppenheimer.emily-blunt.cz British and American actress. Winner of the Golden Globe (2007) and Screen Actors Guild (2019) awards.
Try to make a fascinating actor Johnny Depp https://secret-window.johnny-depp.cz, who will become the slave of his strong hero Moudriho Creeps in the thriller “Secret Window”.
Follow Liam Neeson’s career https://hostage.liam-neeson.cz as he fulfills his potential as Brian Mills in the film “Taken” and becomes one of the leading stars of Hollywood action films.
wow raid services [url=http://kreativwerkstatt-esens.de/]http://kreativwerkstatt-esens.de/[/url] .
10 Inspiring Images About Crawley Door And Window Window Doctor
What NOT To Do Within The Upvc Window Handle Replacement Industry replacement glass for windows near me
My brother suggested I might like this blog He was totally right This post actually made my day You can not imagine simply how much time I had spent for this info Thanks
Carlos Vemola https://oktagon-mma.karlos-vemola.cz Czech professional mixed martial artist, former bodybuilder, wrestler and member Sokol.
The inspiring story of Zendaya’s rise https://spider-man.zendaya-maree.cz, from her early roles to her blockbuster debut in Marvel Cinematic Universe.
11 Methods To Completely Defeat Your Fela Railroad Fela Lawsuits
An indomitable spirit, incredible skills and five championships – how Kobe Bryant https://losangeles-lakers.kobe-bryant.cz became an icon of the Los Angeles Lakers and the entire NBA world.
The inspiring story of the ascent of the young actress Anya Taylor https://queensmove.anya-taylor-joy.cz to fame after her breakthrough performance in the TV series “The Queen’s Move”. Conquering new peaks.
Witness the thrilling story of Jiri Prochazka’s https://ufc.jiri-prochazka-ufc.cz rapid rise to the top of the UFC’s light heavyweight division, marked by his dynamic fighting style and relentless determination.
The Reasons Why Veterans Disability Lawsuit In 2023 Is The Main Focus Of All People’s Attention. 2023
firms
That can be good or bad, but either approach, you are paying for
that access with the curiosity you are not earning.
Generally, a savings account doesn’t present
the interest of extra lengthy-term financial merchandise,
like CDs or mutual funds. A few of us use it to stash away bonuses,
money gifts and different unexpected windfalls, as a result
of we like the idea of earning more curiosity than we might retaining that money in our checking accounts.
It is money that you may get to simply, for help when things do not work out so nicely or
the unthinkable happens.
The Top Reasons Why People Succeed In The Malpractice Attorneys Industry firms
The 10 Scariest Things About Demo Slot Zeus Vs Hades Rupiah oscarreys
You’ll Never Guess This Upvc Window Repair’s Tricks Window Repair
14 Cartoons On Asbestos Compensation Claims That Will Brighten Your Day
http://www.9363280.xyz
An article about the triumphant 2023 Ferrari https://ferrari.charles-leclerc.cz and their star driver Charles Leclerc, who became the Formula world champion 1.
You’ll Never Be Able To Figure Out This Railroad Injuries Case’s Tricks railroad Injuries
Jon Jones https://ufc.jon-jones.cz a dominant fighter with unrivaled skill, technique and physique who has conquered the light heavyweight division.
The legendary Spanish racer Fernando Alonso https://formula-1.fernando-alonso.cz returns to Formula 1 after several years.
Young Briton Lando Norris https://mclaren.lando-norris.cz is at the heart of McLaren’s Formula 1 renaissance, regularly achieving podium finishes and winning.
Activision and Call of Duty https://activision.call-of-duty.cz leading video game publisher and iconic shooter with a long history market dominance.
20 Trailblazers Lead The Way In Spare Car Key Cut http://www.99811760.xyz
the most popular sports website https://sports-forecasts.com in the Arab world with the latest sports news, predictions and analysis in real time.
apartment for sale in montenegro https://montenegro-real-estate-prices.com
Free movies https://www.moviesjoy.cc and TV streaming online, watch movies online in HD 1080p.
Latest news and analysis of the English Premier League https://epl-ar.com. Detailed descriptions of matches, team statistics and the most interesting football events.
Latest Diablo news https://diablo-ar.com, detailed game descriptions and guides. Diablo.az – The largest Diablo information portal in Arabic.
I do believe all the ideas youve presented for your post They are really convincing and will certainly work Nonetheless the posts are too short for novices May just you please lengthen them a little from subsequent time Thanks for the post
10 Life Lessons We Can Take From Adhd Assessment In Adults Are adhd assessments covered by insurance
Why Adult Adhd Assessment Is Right For You adult adhd assessments,
Brianna,
How To Save Money On Programing Key http://www.5611432.xyz
What ADHD Medication Names Should Be Your Next Big Obsession? new adhd Medication
外送茶
外送茶是什麼?禁忌、價格、茶妹等級、術語等..老司機告訴你!
外送茶是什麼?
外送茶、外約、叫小姐是一樣的東西。簡單來說就是在通訊軟體與茶莊聯絡,選好自己喜歡的妹子後,茶莊會像送飲料這樣把妹子派送到您指定的汽車旅館、酒店、飯店等交易地點。您只需要在您指定的地點等待,妹妹到達後,就可以開心的開始一場美麗的約會。
外送茶種類
學生兼職的稱為清新書香茶
日本女孩稱為清涼綠茶
俄羅斯女孩被稱為金酥麻茶
韓國女孩稱為超細滑人參茶
外送茶價格
外送茶的客戶相當廣泛,包括中小企業主、自營商、醫生和各行業的精英,像是工程師等等。在台北和新北地區,他們的消費指數大約在 7000 到 10000 元之間,而在中南部則通常在 4000 到 8000 元之間。
對於一般上班族和藍領階層的客人來說,建議可以考慮稍微低消一點,比如在北部約 6000 元左右,中南部約 4000 元左右。這個價位的茶妹大多是新手兼職,但有潛力。
不同地區的客人可以根據自己的經濟能力和喜好選擇適合自己的價位範圍,以免感到不滿意。物價上漲是一個普遍現象,受到地區和經濟情況等因素的影響,茶莊的成本也在上升,因此價格調整是合理的。
外送茶外約流程
加入LINE:加入外送茶官方LINE,客服隨時為你服務。茶莊一般在中午 12 點到凌晨 3 點營業。
告知所在地區:聯絡客服後,告訴他們約會地點,他們會幫你快速找到附近的茶妹。
溝通閒聊:有任何約妹問題或需要查看妹妹資訊,都能得到詳盡的幫助。
提供預算:告訴客服你的預算,他們會找到最適合你的茶妹。
提早預約:提早預約比較好配合你的空檔時間,也不用怕到時候約不到你想要的茶妹。
外送茶術語
喝茶術語就像是進入茶道的第一步,就像是蓋房子打地基一樣。在這裡,我們將這些外送茶入門術語分類,讓大家能夠清楚地理解,讓喝茶變得更加容易上手。
魚:指的自行接客的小姐,不屬於任何茶莊。
茶:就是指「小姐」的意思,由茶莊安排接客。
定點茶:指由茶莊提供地點,客人再前往指定地點與小姐交易。
外送茶:指的是到小姐到客人指定地點接客。
個工:指的是有專屬工作室自己接客的小姐。
GTO:指雞頭也就是飯店大姊三七茶莊的意思。
摳客妹:只負責找客人請茶莊或代調找美眉。
內機:盤商應召站提供茶園的人。
經紀人:幫內機找美眉的人。
馬伕:外送茶司機又稱教練。
代調:收取固定代調費用的人(只針對同業)。
阿六茶:中國籍女子,賣春的大陸妹。
熱茶、熟茶:年齡比較大、年長、熟女級賣春者(或稱阿姨)。
燙口 / 高溫茶:賣春者年齡過高。
台茶:從事此職業的台灣小姐。
本妹:從事此職業的日本籍小姐。
金絲貓:西方國家的小姐(歐美的、金髮碧眼的那種)。
青茶、青魚:20 歲以下的賣春者。
乳牛:胸部很大的小姐(D 罩杯以上)。
龍、小叮噹、小叮鈴:體型比較肥、胖、臃腫、大隻的小姐。
Latest World of Warcraft tournament news https://ar-wow.com (WOW), strategies and game analysis. The most detailed gaming portal in Arabic.
The latest analysis, reviews of https://spider-man-ar.com tournaments and the most interesting things from the “Spider-Man” series of games in Azerbaijani language. It’s all here!
Latest Counter-Strike 2 news https://counter-strike-ar.com, watch the most successful tournaments and be the best in the gaming world on CS2 ar.
Discover exciting virtual football https://fortnite-ar.com in Fortnite. Your central hub for the latest news, expert strategy and exciting eSports reporting.
NFL https://nfl-ar.com News, analysis and topics about the latest practices, victories and records. A portal that explores the most beautiful games in the NFL world in general.
Tips To Win Online Roulette 프라그마틱 무료슬롯
(http://notoprinting.xsrv.jp)
This blog was… how do I say it? Relevant!! Finally I’ve found
something that helped me. Cheers!
15 Secretly Funny People Working In Replacement Window Glass window glass replacement (Vicki)
Tips On Writing Multiple Keyword Articles 구글 상위노출 백링크
I don’t normally comment but I gotta say appreciate it for the post on this one : D.
Keyword Research – Why Bother? seo 최적화
Latest news from the world of boxing https://boks-uz.com, achievements of Resul Abbasov, Tyson Fury’s fights and much more. Everything Boxing Ambassador has.
Latest boxing news, achievements of Raisol Abbasov https://boxing-ar.com, Tyson Fury fights and much more. It’s all about the boxing ambassador.
Latest GTA game news https://gta-uzbek.com, tournaments, guides and strategies. Stay tuned for the best GTA gaming experience
Sports news https://gta-uzbek.com the most respected sports site in Uzbekistan, which contains the latest sports news, forecasts and analysis.
Discover the wonderful world of online games https://onlayn-oyinlar.com with GameHub. Get the latest news, reviews and tips for your favorite games. Join our gaming community today!
What’s The Job Market For Double Glazed Window Repairs Professionals Like?
double glazed window repairs
The 10 Most Scariest Things About Window Repairs
Near Me Window Repairs Near Me
Explore the extraordinary journey of Kylian Mbappe https://mbappe-real-madrid.com, from his humble beginnings to global stardom.
Latest news about Pele https://mesut-ozil-uz.com, statistics, photos and much more. Get the latest news and information about football legend Pele.
Serxio Ramos Garsiya https://serxio-ramos.com ispaniyalik futbolchi, himoyachi. Ispaniya terma jamoasining sobiq futbolchisi. 16 mavsum davomida u “Real Madrid”da markaziy himoyachi sifatida o’ynadi.
Get the latest https://mesut-ozil-uz.com Mesut Ozil news, stats, photos and more.
10 Tips For Getting The Most Value From Replace Window Glass Near Me
windows glasses replacement (J.minhouse.com)
There most be a solution for this problem, some people think there will be now solutions, but i think there wil be one.
Ronaldo de Asis Moreira https://ronaldinyo.com braziliyalik futbolchi, yarim himoyachi va hujumchi sifatida o’ynagan. Jahon chempioni (2002). “Oltin to’p” sovrindori (2005).
Thanks for a Interesting item; I enjoyed it very much. Regards Sang Magistrale
buy durex gel – zovirax online buy buy latanoprost
Tips For Explaining Cost Of Spare Car Key To Your Mom http://www.99811760.xyz
20 Myths About Window Handle Replacement: Debunked replacement glass in windows (tujuan.grogol.us)
Официальный сайт онлайн-казино Vavada https://vavada-kz-game.kz это новый адрес лучших слотов и джекпотов. Ознакомьтесь с бонусами и играйте на реальные деньги из Казахстана.
Marcus Lilian Thuram-Julien https://internationale.marcus-thuram-fr.com French footballer, forward for the Internazionale club and French national team.
Legendary striker Cristiano Ronaldo https://an-nasr.cristiano-ronaldo-fr.com signed a contract with the Saudi club ” An-Nasr”, opening a new chapter in his illustrious career in the Middle East.
Lionel Messi https://inter-miami.lionel-messi-fr.com legendary Argentine footballer, announced his transfer to the American club Inter Miami.
telegram下载:https://www.telegramkv.com A3ko0xrmL
Manchester City and Erling Haaland https://manchester-city.erling-haaland-fr.com explosive synergy in action. How a club and a footballer light up stadiums with their dynamic play.
Double Glazing Near Me Isn’t As Tough As You Think double Glazing company near me
child abusechild abuse Qas8KnATU
Meet You The Steve Jobs Of The Asbestos Va Claim Industry 9363280
The official website where you can find everything about the career of Gianluigi Buffon https://gianluigi-buffon.com. Discover the story of this legendary goalkeeper who left his mark on football history and relive his achievements and unforgettable memories with us.
Website dedicated to football player Paul Pogba https://pogba-uz.com. Latest news from the world of football.
Welcome to our official website! Go deeper into Paulo Dybala’s https://paulo-dybala.com football career. Discover Dybala’s unforgettable moments, amazing talents and fascinating journey in the world of football on this site.
Good post. I study something more difficult on different blogs everyday. It’s going to always be stimulating to learn content material from other writers and observe a little bit one thing from their store. I’d prefer to use some with the content material on my blog whether you don’t mind. Natually I’ll give you a link in your web blog. Thanks for sharing.
Latest news on the Vinicius Junior fan site https://vinisius-junior.com. Vinicius Junior has been playing since 2018 for Real Madrid (Real Madrid). He plays in the Left Winger position.
Coffeeroom https://coffeeroom.by – магазин кофе, чая, кофетехники, посуды, химии и аксессуаров в Минске для дома и офиса.
10 Inspiring Images About Treadmills UK Treadmill for home use; fhoy.kr,
Прокат и аренда автомобилей https://autorent.by в Минске 2019-2022. Сутки от 35 руб.
Find the latest information on Khabib Nurmagomedov https://khabib-nurmagomedov.uz news and fights. Check out articles and videos detailing Khabib UFC career, interviews, wins, and biography.
Latest news and information about Marcelo https://marselo-uz.com on this site! Find Marcelo’s biography, career, game stats and more.
telegram pornchild abuse i3C79qTRn
16 Must-Follow Facebook Pages To Asbestos Claims Payouts Marketers http://www.9363280.xyz
how to abuse childrenhow to abuse children xpfhT
娛樂城
Why You Should Be Working With This Car Key Auto Locksmith elsycrays.top
child abusechild abuse xrOlsPGif
I had highly recommend this blog to my good friend, it’s so good
外送茶是什麼?禁忌、價格、茶妹等級、術語等..老司機告訴你!
外送茶是什麼?
外送茶、外約、叫小姐是一樣的東西。簡單來說就是在通訊軟體與茶莊聯絡,選好自己喜歡的妹子後,茶莊會像送飲料這樣把妹子派送到您指定的汽車旅館、酒店、飯店等交易地點。您只需要在您指定的地點等待,妹妹到達後,就可以開心的開始一場美麗的約會。
外送茶種類
學生兼職的稱為清新書香茶
日本女孩稱為清涼綠茶
俄羅斯女孩被稱為金酥麻茶
韓國女孩稱為超細滑人參茶
外送茶價格
外送茶的客戶相當廣泛,包括中小企業主、自營商、醫生和各行業的精英,像是工程師等等。在台北和新北地區,他們的消費指數大約在 7000 到 10000 元之間,而在中南部則通常在 4000 到 8000 元之間。
對於一般上班族和藍領階層的客人來說,建議可以考慮稍微低消一點,比如在北部約 6000 元左右,中南部約 4000 元左右。這個價位的茶妹大多是新手兼職,但有潛力。
不同地區的客人可以根據自己的經濟能力和喜好選擇適合自己的價位範圍,以免感到不滿意。物價上漲是一個普遍現象,受到地區和經濟情況等因素的影響,茶莊的成本也在上升,因此價格調整是合理的。
外送茶外約流程
加入LINE:加入外送茶官方LINE,客服隨時為你服務。茶莊一般在中午 12 點到凌晨 3 點營業。
告知所在地區:聯絡客服後,告訴他們約會地點,他們會幫你快速找到附近的茶妹。
溝通閒聊:有任何約妹問題或需要查看妹妹資訊,都能得到詳盡的幫助。
提供預算:告訴客服你的預算,他們會找到最適合你的茶妹。
提早預約:提早預約比較好配合你的空檔時間,也不用怕到時候約不到你想要的茶妹。
外送茶術語
喝茶術語就像是進入茶道的第一步,就像是蓋房子打地基一樣。在這裡,我們將這些外送茶入門術語分類,讓大家能夠清楚地理解,讓喝茶變得更加容易上手。
魚:指的自行接客的小姐,不屬於任何茶莊。
茶:就是指「小姐」的意思,由茶莊安排接客。
定點茶:指由茶莊提供地點,客人再前往指定地點與小姐交易。
外送茶:指的是到小姐到客人指定地點接客。
個工:指的是有專屬工作室自己接客的小姐。
GTO:指雞頭也就是飯店大姊三七茶莊的意思。
摳客妹:只負責找客人請茶莊或代調找美眉。
內機:盤商應召站提供茶園的人。
經紀人:幫內機找美眉的人。
馬伕:外送茶司機又稱教練。
代調:收取固定代調費用的人(只針對同業)。
阿六茶:中國籍女子,賣春的大陸妹。
熱茶、熟茶:年齡比較大、年長、熟女級賣春者(或稱阿姨)。
燙口 / 高溫茶:賣春者年齡過高。
台茶:從事此職業的台灣小姐。
本妹:從事此職業的日本籍小姐。
金絲貓:西方國家的小姐(歐美的、金髮碧眼的那種)。
青茶、青魚:20 歲以下的賣春者。
乳牛:胸部很大的小姐(D 罩杯以上)。
龍、小叮噹、小叮鈴:體型比較肥、胖、臃腫、大隻的小姐。
child abusechild abuse lhGyQexq
Discover how Riyad Mahrez https://al-ahli.riyad-mahrez.com transformed Al-Ahli, becoming a key player and catalyst in reaching new heights in world football.
Explore the dynamic world of sports https://noticias-esportivas-br.org through the lens of a sports reporter. Your source for breaking news, exclusive interviews, in-depth analysis and live coverage of all sports.
Find the latest information on Conor McGregor https://conor-mcgregor.uz news, fights, and interviews. Check out detailed articles and news about McGregor’s UFC career, wins, training, and personal life.
Get to know the history, players and latest news of the Inter Miami football club https://inter-miami.uz. Join us to learn about the successes and great performances of America’s newest and most exciting soccer club.
child abusechild abuse Rj4O5
A site dedicated to Michael Jordan https://michael-jordan.uz, a basketball legend and symbol of world sports culture. Here you will find highlights, career, family and news about one of the greatest athletes of all time.
The latest top football news https://futebol-ao-vivo.net today. Interviews with football players, online broadcasts and match results, analytics and football forecasts
Welcome to our official website, where you will find everything about the career of Gianluigi Buffon https://gianluigi-buffon.org. Discover the story of this legendary goalkeeper who made football history.
Site with the latest news, statistics, photos of Pele https://edson-arantes-do-nascimento.com and much more. Get the latest news and information about football legend Pele.
If you are a fan of UFC https://ufc-hoje.com the most famous organization in the world, come visit us. The most important news and highlights from the UFC world await you on our website.
child abusechild abuse ekQhrwk
The best site dedicated to the football player Paul Pogba https://pogba.org. Latest news from the world of football.
child abusechild abuse Mnn0q7O
Vinicius Junior https://vinicius-junior.org all the latest current and latest news for today about the player of the 2024 season
child abusechild abuse OPWEnpA
Analysis of Arsenal’s impressive revival https://arsenal.bukayo-saka.biz under the leadership of Mikel Arteta and the key role of young star Bukayo Saki in the club’s return to the top.
Gavi’s success story https://barcelona.gavi-fr.com at Barcelona: from his debut at 16 to a key role in club and national team of Spain, his talent inspires the world of football.
Pedri’s story https://barcelona.pedri-fr.com from his youth in the Canary Islands to becoming a world-class star in Barcelona, ??with international success and recognition.
child abusechild abuse dpqtv
Discover the journey of Charles Leclerc https://ferrari.charles-leclerc-fr.com, from young Monegasque driver to Ferrari Formula 1 leader, from his early years to his main achievements within the team.
Discover Pierre Gasly’s https://alpine.pierre-gasly.com journey through the world of Formula 1, from his beginnings with Toro Rosso to his extraordinary achievements with Alpine.
Discover the story of Rudy Gobert https://minnesota-timberwolves.rudy-gobert.biz, the French basketball player whose defensive play and leadership transformed the Minnesota Timberwolves into a powerhouse NBA team.
child abusechild abuse tAfegCfkJ
From childhood teams to championship victories, the path to success with the Los Angeles Lakers https://los-angeles-lakers.lebron-james-fr.com requires not only talent, but also undeniable dedication and work.
child abusechild abuse OS7f7Y8K
Leroy Sane’s https://bavaria.leroy-sane-ft.com success story at FC Bayern Munich: from adaptation to influence on the club’s results. Inspiration for hard work and professionalism in football.
Teams like World Pc Trade provide donated computer systems to developing
countries, supporting training and community
improvement. Because of its dense structure, it is naturally more resistant to break from exterior components like pests
or environmental conditions.
The People Closest To Table Top Freezer Frost Free Uncover Big Secrets
http://www.3222914.xyz
The story of the Moroccan footballer https://al-hilal.yassine-bounou.com, who became a star at Al-Hilal, traces his journey from the streets of Casablanca to international football stardom and his personal development.
Neymar https://al-hilal.neymar-fr.com at Al-Hilal: his professionalism and talent inspire young people players, taking the club to new heights in Asian football.
Victor Wembanyama’s travel postcard https://san-antonio-spurs.victor-wembanyama.biz from his career in France to his impact in the NBA with the San Antonio Spurs.
The history of Michael Jordan’s Chicago Bulls https://chicago-bulls.michael-jordan-fr.com extends from his rookie in 1984 to a six-time NBA championship.
Golden State Warriors success story https://golden-state-warriors.stephen-curry-fr.com Stephen Curry: From becoming a leader to creating a basketball dynasty that redefined the game.
Замена венцов красноярск
Геракл24: Профессиональная Замена Основания, Венцов, Настилов и Передвижение Домов
Компания Gerakl24 занимается на выполнении комплексных сервисов по смене фундамента, венцов, полов и перемещению домов в городе Красноярске и за его пределами. Наш коллектив опытных экспертов гарантирует высокое качество реализации всех видов реставрационных работ, будь то из дерева, каркасного типа, кирпичные постройки или бетонные строения.
Плюсы сотрудничества с Геракл24
Квалификация и стаж:
Все работы выполняются лишь опытными специалистами, с обладанием большой опыт в области возведения и ремонта зданий. Наши мастера профессионалы в своем деле и реализуют задачи с максимальной точностью и вниманием к мелочам.
Комплексный подход:
Мы предоставляем полный спектр услуг по реставрации и ремонту домов:
Реставрация фундамента: замена и укрепление фундамента, что обеспечивает долгий срок службы вашего дома и предотвратить проблемы, вызванные оседанием и деформацией.
Замена венцов: замена нижних венцов деревянных домов, которые наиболее часто подвергаются гниению и разрушению.
Установка новых покрытий: замена старых полов, что значительно улучшает визуальное восприятие и практическую полезность.
Передвижение домов: безопасное и надежное перемещение зданий на новые локации, что обеспечивает сохранение строения и избежать дополнительных затрат на создание нового.
Работа с любыми видами зданий:
Дома из дерева: восстановление и укрепление деревянных конструкций, защита от гниения и вредителей.
Каркасные строения: укрепление каркасов и смена поврежденных частей.
Кирпичные дома: восстановление кирпичной кладки и укрепление стен.
Дома из бетона: восстановление и укрепление бетонных структур, исправление трещин и разрушений.
Надежность и долговечность:
Мы работаем с только проверенные материалы и новейшее оборудование, что обеспечивает долгий срок службы и надежность всех работ. Все проекты проходят тщательную проверку качества на каждом этапе выполнения.
Индивидуальный подход:
Мы предлагаем каждому клиенту персонализированные решения, с учетом всех особенностей и пожеланий. Мы стараемся, чтобы итог нашей работы полностью удовлетворял ваши ожидания и требования.
Почему выбирают Геракл24?
Работая с нами, вы получаете надежного партнера, который возьмет на себя все хлопоты по ремонту и реставрации вашего дома. Мы обещаем выполнение всех проектов в сроки, установленные договором и с соблюдением всех строительных норм и стандартов. Обратившись в Геракл24, вы можете быть уверены, что ваше здание в надежных руках.
Мы предлагаем консультацию и ответить на все ваши вопросы. Контактируйте с нами, чтобы обсудить детали и узнать больше о наших услугах. Мы поможем вам сохранить и улучшить ваш дом, сделав его безопасным и комфортным для проживания на долгие годы.
Геракл24 – ваш надежный партнер в реставрации и ремонте домов в Красноярске и за его пределами.
It’s very straightforward to find out any topic on web as compared
to textbooks, as I found this article at this site.
Del Mar Energy Inc is an international industrial holding company engaged in the extraction of oil, gas, and coal
The success story of the French footballer https://juventus.thierry-henry.biz at Juventus: from his career at the club to leadership on the field , becoming a legend and a source of inspiration for youth.
Novak Djokovic’s https://tennis.novak-djokovic-fr.biz journey from childhood to the top of world tennis: early years, first victories, dominance and influence on the sport.
The story of the great Kobe Bryant https://los-angeles-lakers.kobe-bryant-fr.com with ” Los Angeles Lakers: his path to the championship, his legendary achievements.
Find out the story of Jon Jones https://ufc.jon-jones-fr.biz in the UFC: his triumphs, records and controversies, which made him one of the greatest fighters in the MMA world.
I loved as much as you will receive carried out right here.
The sketch is tasteful, your authored material stylish. nonetheless, you command get got an edginess over that you wish be delivering the
following. unwell unquestionably come more formerly again since
exactly the same nearly very often inside case you shield this increase.
child abusechild abuse DUtOOZYp
child abusechild abuse HE19h
child abusepornographic movies mT2e9Xr4P
child abusechild abuse K7h4K
The Nile cruise journey will provide guided tours at the Temples of Karnak, Philae, Hatshepsut, Luxor,
Edfu, Kom Ombo and Abu Simbel. However what will probably
be required to shift your cruise sales online? On this complete article, we will delve
deep into the subject, unraveling the myths and revealing
the reality behind the importance of second toe
size. In Native American tribes, crows are revered for their intelligence and spiritual significance.
With a high variety of neurons of their forebrains, crows possess the capability for advanced cognitive features.
The Celts held crows in excessive regard, associating them with the
god Lugh and the goddess Morrigan. In Scandinavian folklore, crows
are connected to the god Odin, who had two companions known as Huginn (Thought) and Muninn (Reminiscence).
Since there are 100 pounds of both things, they each weigh the identical.
Nevertheless, because of the global recession, there
were no prepared lenders and VLH would train its choices for
two one-12 months extensions to the overview/study interval,
as capital to begin construction was not obtainable, and VRFA began creating different
plans. In Bali, there is a place the place elephants
are kept as refuge taken from Sumatra for the
environmental issues, you’ll be able to see them.
15 Trends To Watch In The New Year Mesothelioma Asbestos Claim 9363280.xyz
Take this quiz now and let us discover out what piques your interest,
and we’ll inform you the coolest automotive you’ve got ever pushed!
You probably have not been driving round in a storm and had
your automobile pelted with what you thought was hail but turned
out to be frozen frogs. When the storm hits land, it loses a few of its vitality and slows down. That’s as a result of even when hydrogen and oxygen molecules mix, they still need a spark of power to
kind water. The cause of frog rain generally
is less mysterious, although still a bit of a brow-furrower at occasions.
You may understand why when we look on the technique of frog rain on the following web page.
The finish result’s frog rain. Amphibious rain appears
to be picking up in frequency. As the rain falls, the vortex eventually loses all
of the pressure that’s retaining it going, and it releases no
matter it has picked up in its travels. Incidentally, frogs aren’t
the commonest creatures to accompany rain.
Jannik Sinner https://tennis.jannik-sinner-fr.biz an Italian tennis player, went from starting his career to entering the top 10 of the ATP, demonstrating unique abilities and ambitions in world tennis.
Carlos Alcaraz https://tennis.carlos-alcaraz-fr.biz from a talented junior to the ATP top 10. His rise is the result of hard work, support and impressive victories at major world tournaments.
The fascinating story of Daniil Medvedev’s https://tennis.daniil-medvedev-fr.biz rise to world number one. Find out how a Russian tennis player quickly broke into the elite and conquered the tennis Olympus.
The fascinating story of Alexander Zverev’s https://tennis.alexander-zverev-fr.biz rapid rise from a junior star to one of the leaders of modern tennis.
Discover Casper Ruud’s https://tennis.casper-ruud-fr.com journey from his Challenger debut to the top 10 of the world tennis rankings. A unique success.
telegram下载:https://www.telegramkv.com n97uLb6
Best WordPress Seo Tips 검색엔진최적화 마케팅
child abusechild abuse KAgMcUT
This text is written for Cruise Holidays Information, a web based cruise holidays resource with information, videos and articles together with cruise brokers.
So, how do you get a job on a cruise ship? That is imply you don’t need to go to cruise harbor.
When Vss shouldn’t be the inverse of Vdd we need to worry about
asymmetric cost up and discharge occasions. You want to
begin your Stok Kangri expedition at Leh. In remaining months of the 12 months, Ladakh and
Leh isn’t in any respect suitable for trekking. At Stok Kangri trek, you will be able to explore the serenity of rocky mountains of Ladakh together with the tradition and heritage of local folks.
Stok Kangri expedition shouldn’t be for the faint-hearted individuals as
it takes loads of energy and bodily energy to complete the route.
For a road trip, you must take the route through Manali which may be accessed from Delhi in addition to from Chandigarh.
child abusepornographic movies fNeMQtt3EP
child abusechild abuse Gd3IK
child abusechild abuse MkmbdG
child abusechild abuse 0UtO4RZA
There are lots of different stunning national parks throughout India, which provides an incredible expertise for the travel enthusiasts.
The great thing about the mountains is attractive, and when you’re
on a bike journey with your mates, you can see the mountains surrounded with the crystal clear snow,
the rivers cutting out the sharp-edge of the valleys, the freezing winds and the blue
water flowing with the land, the monks chanting and the sound of the chimes making your travel enthralling.
Before you begin making changes to the inside of your house, you will need to formulate a decorating plan. Whether you’re feeling dissatisfied in your career or seeking a deeper connection in your
relationships, angel number 811 validates your
emotions and urges you to make optimistic changes. Once you see angel quantity 811, the truth of a
situation is about to be revealed. By manifesting the empathetic
attributes of angel quantity 811, you may bring about a strong shift
in your actuality and relationships. By understanding the meaning of angel quantity 811 and integrating its message into your life,
you may embark on a journey of non-public transformation and create the
life you actually want. It encourages you to give attention to
finding options and cooperating with others on your
spiritual journey.
child abusepornographic movies Vnxe92ce
A Positive Rant Concerning Double Glazed Windows Crawley Hotel window repair
10 Tell-Tale Signs You Must See To Look For A
New Barista Espresso Machine best espresso machine (trueandfalse.info)
Pubic Techniques – Tips When Shaving 디지몬 라스트 에볼루션 다시보기 (http://dreamwheelerhotels.com/)
I feel that is among the so much significant info for me. And i am satisfied studying your article. However should commentary on some basic issues, The site style is ideal, the articles is in reality excellent : D. Excellent activity, cheers
Taking The Mystery The Actual Baccarat 에볼루션 프로틴
The powerful story of Conor McGregor’s https://ufc.conor-mcgregor-fr.biz rise to a two-division UFC championship that forever changed the landscape of mixed martial arts.
The story of Fernando Alonso https://formula-1.fernando-alonso-fr.com in Formula 1: a unique path to success through talent, tenacity and strategic decisions, inspiring and exciting.
The fascinating story of how Lewis Hamilton https://mercedes.lewis-hamilton-fr.biz became a seven-time Formula 1 world champion after signing with Mercedes.
The legendary boxing world champion Mike Tyson https://ufc.mike-tyson-fr.biz made an unexpected transition to the UFC in 2024, where he rose to the top, becoming the oldest heavyweight champion.
Headphones Skullcandy: It’s Not As Difficult As You Think 3222914.xyz
The fascinating story of the creation and rapid growth of Facebook https://facebook.mark-zuckerberg-fr.biz under the leadership of Mark Zuckerberg, who became one of the most influential technology entrepreneurs of our time.
NetTruyen ZZZ: Nền tảng đọc truyện tranh trực tuyến dành cho mọi lứa tuổi
NetTruyen ZZZ là nền tảng đọc truyện tranh trực tuyến miễn phí với số lượng truyện tranh lên đến hơn 30.000 đầu truyện với chất lượng hình ảnh và tốc độ tải cao. Nền tảng được xây dựng với mục tiêu mang đến cho người đọc những trải nghiệm đọc truyện tranh tốt nhất, đồng thời tạo dựng cộng đồng yêu thích truyện tranh sôi động và gắn kết với hơn 11 triệu thành viên (tính đến tháng 7 năm 2024).
NetTruyen ZZZ – Kho tàng truyện tranh phong phú:
NetTruyen ZZZ sở hữu kho tàng truyện tranh khổng lồ với hơn 30.000 đầu truyện thuộc nhiều thể loại khác nhau như:
● Manga: Những bộ truyện tranh Nhật Bản với nhiều thể loại phong phú như lãng mạn, hành động, hài hước, v.v.
● NetTruyen anime: Hàng ngàn bộ truyện tranh anime chọn lọc được đăng tải đều đặn trên NetTruyen ZZZ được chuyển thể từ phim hoạt hình Nhật Bản với nội dung hấp dẫn và hình ảnh đẹp mắt.
● Truyện manga: Hơn 10.000 bộ truyện tranh manga hay nhất được đăng tải đầy đủ trên NetTruyen ZZZ.
● Truyện manhua: Hơn 5000 bộ truyện tranh manhua được đăng tải trọn bộ đầy đủ trên NetTruyen ZZZ.
● Truyện manhwa: Những bộ truyện tranh manhwa Hàn Quốc được yêu thích nhất có đầy đủ trên NetTruyen với cốt truyện lôi cuốn và hình ảnh bắt mắt cùng với nét vẽ độc đáo và nội dung đa dạng.
● Truyện ngôn tình: Những câu chuyện tình yêu lãng mạn, ngọt ngào và đầy cảm xúc.
● Truyện trinh thám: Những câu chuyện ly kỳ, bí ẩn và đầy lôi cuốn xoay quanh các vụ án và quá trình phá án.
● Truyện tranh xuyên không: Những câu chuyện về những nhân vật du hành thời gian hoặc không gian đến một thế giới khác.
NetTruyen ZZZ không ngừng cập nhật những bộ truyện tranh mới nhất và hot nhất trên thị trường, đảm bảo mang đến cho bạn đọc những trải nghiệm đọc truyện mới mẻ và thú vị nhất.
Chất lượng hình ảnh và nội dung đỉnh cao tại NetTruyenZZZ:
Với hơn 30 triệu lượt truy cập hằng tháng, NetTruyen ZZZ luôn chú trọng vào chất lượng hình ảnh và nội dung của các bộ truyện tranh được đăng tải trên nền tảng. Hình ảnh được hiển thị sắc nét, rõ ràng, không bị mờ hay vỡ ảnh. Nội dung được dịch thuật chính xác, dễ hiểu và giữ nguyên vẹn ý nghĩa của tác phẩm gốc.
NetTruyen ZZZ hợp tác với đội ngũ dịch giả và biên tập viên chuyên nghiệp, giàu kinh nghiệm để đảm bảo chất lượng bản dịch tốt nhất. Nền tảng cũng có hệ thống kiểm duyệt nội dung nghiêm ngặt để đảm bảo nội dung lành mạnh, phù hợp với mọi lứa tuổi.
Trải nghiệm đọc truyện mượt mà, tiện lợi:
NetTruyen ZZZ được thiết kế với giao diện đẹp mắt, thân thiện với người dùng và dễ dàng sử dụng. Bạn đọc có thể đọc truyện tranh trên mọi thiết bị, từ máy tính, điện thoại thông minh đến máy tính bảng. Nền tảng cũng cung cấp nhiều tính năng tiện lợi như:
● Tìm kiếm truyện tranh theo tên, tác giả, thể loại, v.v.
● Lưu truyện tranh yêu thích để đọc sau.
● Đánh dấu trang để dễ dàng quay lại vị trí đang đọc.
● Chia sẻ truyện tranh với bạn bè.
● Tham gia bình luận và thảo luận về truyện tranh.
NetTruyen ZZZ luôn nỗ lực để mang đến cho bạn đọc những trải nghiệm đọc truyện mượt mà, tiện lợi và thú vị nhất.
Định hướng phát triển:
NetTruyen ZZZ cam kết không ngừng phát triển và hoàn thiện để trở thành nền tảng đọc truyện tranh trực tuyến tốt nhất dành cho bạn đọc tại Việt Nam. Nền tảng sẽ tiếp tục cập nhật những bộ truyện tranh mới nhất và hot nhất trên thị trường thế giới, đồng thời nâng cao chất lượng hình ảnh và nội dung. NetTruyen ZZZ cũng sẽ phát triển thêm nhiều tính năng mới để mang đến cho bạn đọc những trải nghiệm đọc truyện tốt nhất.
NetTruyen ZZZ luôn đặt lợi ích của bạn đọc lên hàng đầu. Nền tảng cam kết:
● Cung cấp kho tàng truyện tranh khổng lồ và đa dạng với chất lượng hình ảnh và nội dung đỉnh cao.
● Mang đến cho bạn đọc những trải nghiệm đọc truyện mượt mà, tiện lợi và thú vị nhất.
● Luôn lắng nghe ý kiến phản hồi của bạn đọc và không ngừng cải thiện để mang đến dịch vụ tốt nhất.
NetTruyen ZZZ hy vọng sẽ trở thành người bạn đồng hành không thể thiếu của bạn trong hành trình khám phá thế giới truyện tranh đầy màu sắc.
Kết nối với NetTruyen ZZZ ngay hôm nay để tận hưởng những trải nghiệm đọc truyện tuyệt vời.
Геракл24: Профессиональная Замена Фундамента, Венцов, Покрытий и Перемещение Строений
Организация Геракл24 специализируется на выполнении полных работ по реставрации основания, венцов, покрытий и передвижению зданий в населённом пункте Красноярском регионе и за его пределами. Наш коллектив профессиональных специалистов обещает превосходное качество выполнения различных типов ремонтных работ, будь то из дерева, каркасные, из кирпича или из бетона здания.
Достоинства услуг Gerakl24
Профессионализм и опыт:
Все работы выполняются только опытными мастерами, имеющими большой практику в направлении строительства и реставрации домов. Наши мастера знают свое дело и осуществляют работу с безупречной точностью и вниманием к деталям.
Комплексный подход:
Мы осуществляем полный спектр услуг по восстановлению и ремонту домов:
Реставрация фундамента: усиление и реставрация старого основания, что обеспечивает долгий срок службы вашего дома и избежать проблем, связанные с оседанием и деформацией.
Реставрация венцов: реставрация нижних венцов из дерева, которые чаще всего подвержены гниению и разрушению.
Замена полов: установка новых полов, что значительно улучшает внешний вид и функциональность помещения.
Передвижение домов: качественный и безопасный перенос строений на другие участки, что помогает сохранить здание и предотвращает лишние расходы на создание нового.
Работа с различными типами строений:
Древесные строения: восстановление и защита деревянных строений, защита от разрушения и вредителей.
Каркасные дома: реставрация каркасов и реставрация поврежденных элементов.
Кирпичные дома: реставрация кирпичной кладки и укрепление конструкций.
Бетонные дома: реставрация и усиление бетонных элементов, устранение трещин и повреждений.
Качество и прочность:
Мы используем только высококачественные материалы и современное оборудование, что гарантирует долговечность и надежность всех выполненных работ. Все наши проекты подвергаются строгому контролю качества на всех этапах выполнения.
Личный подход:
Для каждого клиента мы предлагаем персонализированные решения, учитывающие все особенности и пожелания. Мы стараемся, чтобы результат нашей работы полностью удовлетворял ваши ожидания и требования.
Почему выбирают Геракл24?
Обратившись к нам, вы приобретете надежного партнера, который берет на себя все заботы по восстановлению и ремонту вашего здания. Мы гарантируем выполнение всех задач в сроки, установленные договором и с соблюдением всех правил и норм. Связавшись с Геракл24, вы можете не сомневаться, что ваш дом в надежных руках.
Мы готовы предоставить консультацию и дать ответы на все вопросы. Свяжитесь с нами, чтобы обсудить детали вашего проекта и получить больше информации о наших услугах. Мы обеспечим сохранение и улучшение вашего дома, сделав его уютным и безопасным для долгого проживания.
Геракл24 – ваш надежный партнер в реставрации и ремонте домов в Красноярске и за его пределами.
https://gerakl24.ru/просел-дом-красноярск/
Kim Kardashian’s https://the-kardashians.kim-kardashian-fr.com incredible success story, from sex scandal to pop culture icon and billion-dollar fortune.
The astonishing story of Emmanuel Macron’s https://president-of-france.emmanuel-macron-fr.com political rise from bank director to the highest office in France.
The story of Joe Biden’s https://president-of-the-usa.joe-biden-fr.com triumphant journey, overcoming many obstacles on his path to the White House and becoming the 46th President of the United States.
Max Verstappen and Red Bull Racing’s https://red-bull-racing.max-verstappen-fr.com path to success in Formula 1. A story of talent, determination and team support leading to a championship title.
[url=http://acyclovirmc.online/]zovirax 5 otc[/url]
Une ascension fulgurante au pouvoir Donald Trump https://usa.donald-trump-fr.com et son empire commercial
Five Excellent Paths Create Web Traffic And To Google Panda Proof Your Blog 검색엔진최적화 사례
I have been exploring for a little bit for any high-quality articles or weblog posts in this sort
of house . Exploring in Yahoo I eventually stumbled upon this website.
Reading this info So i’m glad to convey that I have an incredibly
excellent uncanny feeling I found out just what I needed.
I most surely will make certain to don?t overlook this site and give it a glance regularly.
Parisian PSG https://paris.psg-fr.com is one of the most successful and ambitious football clubs in Europe. Find out how he became a global football superstar.
Travel to the pinnacle of French football https://stadede-bordeaux.bordeaux-fr.org at the Stade de Bordeaux, where the passion of the game meets the grandeur of architecture.
The fascinating story of Gigi Hadid’s rise to Victoria’s Secret Angel https://victorias-secret.gigi-hadid-fr.com status and her journey to the top of the modeling industry.
Olympique de Marseille https://liga1.marseilles-fr.com after several years in the shadows, once again becomes champion of France. How did they do it and what prospects open up for the club
The fascinating story of the creation and meteoric rise of Amazon https://amazon.jeff-bezos-fr.com from its humble beginnings as an online bookstore to its dominant force in the world of e-commerce.
7 Small Changes That Will Make The Difference With
Your Upvc Window Repair London sliding door repairs London
The inspiring story of Travis Scott’s https://yeezus.travis-scott-fr.com rise from emerging artist to one of modern hip-hop’s brightest stars through his collaboration with Kanye West.
A fascinating story about how Elon Musk https://spacex.elon-musk-fr.com and his company SpaceX revolutionized space exploration, opening new horizons for humanity.
An exploration of Nicole Kidman’s https://watch.nicole-kidman-fr.com career, her notable roles, and her continued quest for excellence as an actress.
How Taylor Swift https://midnights.taylor-swift-fr.com reinvented her sound and image on the intimate and reflective album “Midnights,” revealing new dimensions of her talent.
Explore the rich history and unrivaled atmosphere of the iconic Old Trafford Stadium https://old-trafford.manchester-united-fr.com, home of one of the world’s most decorated football clubs, Manchester United.
Casino Gambling Systems November 23 More An Income!
우리카지노 에볼루션
lustica bay https://weather-webcam-in-montenegro.com
Единственная в России студия кастомных париков https://wigdealers.ru, где мастера индивидуально подбирают структуру волос и основу по форме головы, после чего стригут, окрашивают, делают укладку и доводят до идеала ваш будущий аксессуар.
The iconic Anfield https://enfield.liverpool-fr.com stadium and the passionate Liverpool fans are an integral part of English football culture.
An exploration of the history of Turin’s https://turin.juventus-fr.org iconic football club – Juventus – its rivalries, success and influence on Italian football.
rogaine over the counter – order finpecia online cheap order proscar 1mg pills
The new Premier League https://premier-league.chelsea-fr.com season has gotten off to an intriguing start, with a new-look Chelsea looking to return to the Champions League, but serious challenges lie ahead.
The Reason Why Everyone Is Talking About Automotive Locksmith Right Now Emergency lockout service
How To Successfully Lower Your Own Card Car Loan Rates 200만원 대출
Is Your Company Responsible For An Car Key Cut Budget?
12 Ways To Spend Your Money Laser Key cutting
Hello friends, good piece of writing and
fastidious urging commented at this place, I am really enjoying by these.
Poker Dealers Tips – Relax Facial Area 프라그마틱 슬롯 팁
Inter Miami FC https://mls.inter-miami-fr.com has become a major player in MLS thanks to its star roster, economic growth and international influence.
Explore the career and significance of Monica Bellucci https://malena.monica-bellucci-fr.com in Malena (2000), which explores complex themes of beauty and human strength in wartime.
Discover Rafael Nadal’s https://mls.inter-miami-fr.com impressive rise to the top of world tennis, from his debut to his career Grand Slam victory.
Tyson Fury https://wbc.tyson-fury-fr.com is the undefeated WBC world champion and reigns supreme in boxing’s heavyweight division.
The story of Kanye West https://the-college-dropout.kanye-west-fr.com, starting with his debut album “The College Dropout,” which changed hip-hop and became his cultural legacy.
Important Tactics Of Organic Seo seo 최적화
Преимущества аренды склада https://efrprograms.ru/preimushhestva-arendy-sklada-kak-arenda-skladskih-pomeshhenij-mozhet-uluchshit-vash-biznes/, как аренда складских помещений может улучшить ваш бизнес
Rivaldo, or Rivaldo https://barcelona.rivaldo-br.com, is one of the greatest football players to ever play for Barcelona.
The fascinating story of the phenomenal rise and meteoric fall of Diego Maradona https://napoli.diegomaradona.biz, who became a cult figure at Napoli in the 1980s.
A fascinating story about Brazilian veteran Thiago Silva’s https://chelsea.thiago-silva.net difficult path to the top of European football as part of Chelsea London.
Explore the remarkable journey of Vinicius Junior https://real-madrid.vinicius-junior.net, the Brazilian prodigy who conquered the world’s biggest stage with his dazzling skills and unparalleled ambition at Real Madrid.
Five Reasons To Join An Online Kia Car Key Replacement Buyer And 5 Reasons
Not To how to replace Kia key fob
arava 10mg over the counter – cheap calcium carbonate cartidin over the counter
Upvc Doctor Tools To Improve Your Everyday Lifethe Only
Upvc Doctor Trick Every Person Should Know upvc Doctor
If wings are your thing, Tinker Bell’s sexy Halloween costume design is all grown up.
Ten Doctor Windows That Really Improve Your Life Doctor Windows
Top 5 On-Page Seo Techniques That Get You Ranked On The Web 워드프레스 백링크 [https://lardi-trans.com/]
Things You Desired To Realize About Roulette 누프라임 에볼루션 sta
The story of Luka Modric’s rise https://real-madrid.lukamodric-br.com from young talent to one of the greatest midfielders of his generation and a key player for the Royals.
Cristiano Ronaldo https://al-nassr.cristianoronaldo-br.net one of the greatest football players of all time, begins a new chapter in his career by joining An Nasr Club.
The fascinating story of Marcus Rashford’s rise https://manchester-united.marcusrashford-br.com from academy youth to the main striker and captain of Manchester United. Read about his meteoric rise and colorful career.
From academy product to captain and leader of Real Madrid https://real-madrid.ikercasillas-br.com Casillas became one of the greatest players in the history of Real Madrid.
Follow Bernardo Silva’s impressive career https://manchester-city.bernardosilva.net from his debut at Monaco to to his status as a key player and leader of Manchester City.
telegram下载:https://www.telegramkv.com N5TGP6s3
buy viagra online
5 Killer Quora Answers On Popular Casino Slots Popular casino Slots
Rio Bet риобет казино
официальный сайт Dragon Money Dragon Money
рио бет казино Rio Bet
Dragon Money реристрация Dragon Money Casino
Хотите научиться готовить самые изысканные и сложные торты? В этом https://v1.skladchik.org/tags/tort/ разделе вы найдете множество подробных пошаговых рецептов самых трендовых и известных тортов с возможностью получить их за сущие копейки благодаря складчине. Готовьте с удовольствием и открывайте для себя новые рецепты вместе с Skladchik.org
This Is The Slot Mechanics Case Study You’ll Never Forget Legitimate Slots
Пансионаты для пожилых людей https://moyomesto.ru в Самаре по доступным ценам. Специальные условия по уходу, индивидуальные программы.
The fascinating story of Sergio Ramos’ https://seville.sergioramos.net rise from Sevilla graduate to one of Real Madrid and Spain’s greatest defenders.
Лучшие пансионаты для пожилых людей https://ernst-neizvestniy.ru в Самаре – недорогие дома для престарелых в Самарской области
Ousmane Dembele’s https://paris-saint-germain.ousmanedembele-br.com rise from promising talent to key player for French football giants Paris Saint-Germain. An exciting success story.
14 Creative Ways To Spend Extra Replacement Lexus Key Budget how much
does it cost to replace a lexus key (hedgebrown0.werite.net)
Are You Responsible For The Key For Mini Cooper Budget? 12 Top Ways To Spend
Your Money Spare Key For Mini Cooper
The incredible success story of 20-year-old Florian Wirtz https://bayer-04.florianwirtz-br.com, who quickly joined the Bayer team and became one of the best young talents in the world.
The compelling story of Alisson Becker’s https://bayer-04.florianwirtz-br.com meteoric rise from young talent to key figure in Liverpool’s triumphant era under Jurgen Klopp.
The incredible story https://napoli.khvichakvaratskhelia-br.com of a young Georgian talent’s transformation into an Italian Serie A star. Khvicha Kvaraeshvili is a rising phenomenon in European football.
O meio-campista Rafael Veiga leva https://palmeiras.raphaelveiga-br.com o Palmeiras ao sucesso – o campeonato brasileiro e a vitoria na Copa Libertadores aos 24 anos.
Midfielder Rafael Veiga leads https://manchester-city.philfoden-br.com Palmeiras to success – the championship Brazilian and victory in the Copa Libertadores at the age of 24.
Ive read several just right stuff here Certainly price bookmarking for revisiting I wonder how a lot effort you place to create this kind of great informative website
The rise of 20-year-old midfielder Jamal Musiala https://bavaria.jamalmusiala-br.com to the status of a winger in the Bayern Munich team. A story of incredible talent.
In-depth articles about the most famous football players https://zenit-saint-petersburg.wendel-br.com, clubs and events. Learn everything about tactics, rules of the game and football history.
A historia da jornada triunfante de Anitta https://veneno.anitta-br.com de aspirante a cantora a uma das interpretes mais influentes da musica moderna, incluindo sua participacao na serie de TV “Veneno”.
Fabrizio Moretti https://the-strokes.fabriziomoretti-br.com the influential drummer of The Strokes, and his unique sound revolutionized the music scene, remaining icons of modern rock.
Selena Gomez https://calm-down.selenagomez-br.net the story from child star to global musical influence, summarized in hit “Calm Down”, with Rema.
child abusepornographic movies 7W4Whjye
child abusechild abuse nKDjeKCiwe
child abusechild abuse ozFq7yO
child abusechild abuse zO1jEBB
child abusepornographic movies ivsfg6a
child abusechild abuse EQK6d
telegram下载:https://www.telegramkv.com TnS2oP0Sc
You’ll Never Guess This The Window Doctor’s Tricks window doctor (https://Bowlplough10.werite.net/what-is-window-doctor-near-me)
Website Traffic For Free 백링크 사이트
child abusechild abuse agUEK
buy viagra online
[url=http://vermox.company/]vermox 200mg[/url]
child abusepornographic movies HxUZ3XNepe
buy viagra online
child abusechild abuse YhRGwqbE
child abusechild abuse e1X89aT
payday loan
child abusepornographic movies RVNhrv2G
child abusechild abuse 95fs7uj
Tips And Tricks For Table Games That Will Assist You To Earn Millions In Online Casino 에볼루션 슬롯 사이트
Kobe Bryant https://los-angeles-lakers.kobebryant-br.net one of the greatest basketball players of all the times, left an indelible mark on the history of sport.
Achraf Hakimi https://paris-saint-germain.ashrafhakimi.net is a young Moroccan footballer who quickly reached the football elite European in recent years.
Bieber’s https://baby.justinbieber-br.com path to global fame began with his breakthrough success Baby, which became his signature song and one of the most popular music videos of all time.
Ayrton Senna https://mclaren.ayrtonsenna-br.com is one of the greatest drivers in the history of Formula 1.
In the world of professional tennis, the name of Gustavo Kuerten https://roland-garros.gustavokuerten.com is closely linked to one of the most prestigious Grand Slam tournaments – Roland Garros.
watch porn video
Hey there! Do you use Twitter? I’d like to follow you if that would
be okay. I’m undoubtedly enjoying your blog and look
forward to new posts.
It’s going to be end of mine day, but before finish I am reading this great
post to increase my know-how.
certainly like your web site but you need to check the spelling
on several of your posts. Several of them are rife
with spelling problems and I in finding it very troublesome to tell the reality however
I will definitely come again again.
It’s not my first time to go to see this website, i am
browsing this web page dailly and obtain fastidious data from here all the time.
Thanks for the auspicious writeup. It actually was a amusement account it.
Glance advanced to far added agreeable from you! By the
way, how can we keep in touch?
You are so interesting! I do not suppose I have read a single thing like that
before. So good to discover another person with some unique thoughts on this issue.
Seriously.. thank you for starting this up. This website is something that’s needed on the internet, someone with a bit of originality!
Thank you for any other excellent article. The place else may anyone get that kind of
information in such a perfect means of writing?
I’ve a presentation subsequent week, and I’m at the search for such information.
With havin so much content do you ever run into any problems of plagorism or copyright infringement?
My site has a lot of completely unique content
I’ve either written myself or outsourced but it appears a lot of it is popping it
up all over the web without my permission. Do you know any methods
to help stop content from being stolen? I’d certainly appreciate it.
https://www.slotpg168.bet/ SLOTPG168
Thanks in support of sharing such a nice thought, piece of writing is good,
thats why i have read it entirely
Hey there! I simply want to offer you a big thumbs up for
the excellent info you’ve got here on this post. I will be returning to your website for more soon.
Hey there! Do you use Twitter? I’d like to follow you if
that would be ok. I’m undoubtedly enjoying your blog and look forward to new updates.
Hi there to every one, the contents existing at this web page are in fact remarkable for people experience,
well, keep up the good work fellows.
Anderson Silva https://killer-bees-muay-thai-college.andersonsilva.net was born in 1975 in Curitiba Brazil. From a young age he showed an interest in martial arts, starting to train in karate at the age of 5.
payday loan
Rodrygo Silva de Goes https://real-madrid.rodrygo-br.com, known simply as Rodrygo, emerged as one of the the brightest young talents in world football.
Bruno Miguel Borges Fernandes https://manchester-united.brunofernandes-br.com was born on September 8, 1994 in Maia, Portugal.
Nuno Mendes https://paris-saint-germain.nuno-mendes.com, a talented Portuguese left-back, He quickly became one of the key figures in the Paris Saint-Germain (PSG) team.
Discover the benefits of Java Burn Coffee, a unique blend that boosts metabolism and supports weight loss naturally.
For instance, ZyXEL and Linksys each make WiFi telephones
that use Session Initiation Protocol (SIP). SIP is an open protocol.
Anyone can use it, and anyone who has a SIP tackle can contact anyone else who has one
free of charge. Ultimately, SIP will probably make communications
tools interoperable. Despite all its promise, the know-how
is still new, and WiFi networks aren’t but prevalent enough to make the telephones practical for everyone.
Garfinkel, Simon. “Telephone a Pal Over WiFi.” Technology
Overview. Utilizing a WiFi telephone with a VoIP service adds one other difficulty.
Stone, Adam. “The Fireplace Below Wi-Fi/Cellular Convergence.” WiFi
Planet. Yes, it’s. A small fuel leak can nonetheless catch on fire and trigger an explosion from another fireplace supply or electrical spark.
You should buy a pure gasoline detector or a
carbon monoxide detector that may sound an alarm if gasoline ranges exceed a
safety threshold. The chance of carbon monoxide poisoning from methane peaks throughout the winter because we heat our properties.
Whether or not you favor a extra traditional goth look or wish to experiment with a modern edge,
there are numerous ways to adapt goth fashion for winter and create distinctive and fashionable gothic
winter outfits.
buy tenormin – buy betapace 40mg generic buy cheap coreg
See What Pvc Doctor Tricks The Celebs Are Using Pvc Doctor
order calan online – buy valsartan without prescription tenoretic pill
Earvin “Magic” Johnson https://los-angeles-lakers.magicjohnson.biz is one of the most legendary basketball players in history. NBA history.
Vinicius Junior https://real-madrid.vinicius-junior-ar.com the Brazilian prodigy whose full name is Vinicius Jose Baixao de Oliveira Junior, has managed to win the hearts of millions of fans around the world in a short period of time.
Victor Osimhen https://napoli.victorosimhen-ar.com born on December 29, 1998 in Lagos, Nigeria, has grown from an initially humble player to one of the brightest strikers in modern football.
Toni Kroos https://real-madrid.tonikroos-ar.com the German midfielder known for his accurate passes and calmness on the field, has achieved remarkable success at one of the most prestigious football clubs in the world.
Robert Lewandowski https://barcelona.robertlewandowski-ar.com is one of the most prominent footballers of our time, and his move to Barcelona has become one of the most talked about topics in world football.
A motivating discussion is worth comment. I do think that you need to publish more on this topic, it may not be a taboo subject but usually people do not speak about such topics. To the next! Cheers.
He was a musician, a pilot, an itinerant soul who retired from
the sport at age 30 (forgoing millions of dollars) so he may travel the world.
Do not cling to this notion of ‘I must astral travel’
as a result of then you’re not relaxed – you’re holding
on, which is the precise reverse of what you have to be doing.
On the following pages, we’ll look at the secondary
market of mortgages and then touch on some of the
various factors that affect your mortgage price.
If you observe the trail, you may finally discover an intricate and interconnected internet of factors that go into what determines
mortgage rates. Interest rates are the price of borrowing
cash and a type of insurance coverage for the lender.
So, in simplistic phrases, curiosity rates are determined
based mostly on how much of a threat the lender thinks it’s taking
on you and the economic system. The lending establishment is not simply taking a danger on you — it is also taking a
danger on the economy as a whole. Astral projection, after
all, is like taking a trip with out even leaving your home.
Even in some circumstances to commune and work together
with nonphysical entities, like spirits, gods or even the departed at instances.
payday loan
Perfectly spoken truly! !
How To Clean-Up Your Allergies With 2 Easy Home Tips 쥬라기 월드 에볼루션 2 dlc
child abusechild abuse kEfqhx
[url=http://ciproffl.online/]cipro[/url]
child abusepornographic movies mfGfRzl
child abusechild abuse VyZ4fv7r8
child abusechild abuse uKBlAB
child abusechild abuse 4qsc22N1nG
Society members are dedicated to sustainable management of wildlife sources and their
habitats. Some skin conditions are caused by rosacea,
skin cancer and different underlying illnesses corresponding to diabetes,
a vitamin deficiency or a thyroid problem. Lactic acid is present
in sour milk, but you’ll have also heard of or tried different AHAs, such glycolic acid, from
sugar cane, which is also a well-liked ingredient in anti-aging
topical skin care merchandise. AHA peels are used with good outcomes for people with pigmentation situations resembling melasma,
lentigo or freckles, and should help reduce or enhance
the looks of acne scars. Make your own time capsule in this simple activity that can help
people sooner or later understand previous cultures. In case your pores and skin develops
thick patches or there are areas of swelling and lactic acid
doesn’t appear to be working, it’s time to see a doctor.
Products resembling cleansers, lotions and peels that
contain lactic acid are utilized topically to the pores and skin, and so they get
right to work. Peels are usually thought-about part of a skin care routine,
not only a one-time factor. Peels allow for the greatest focus of lactic acid — consider this bringing out the large guns towards premature aging and
sun damage.
The 9 Things Your Parents Teach You About Double Glazing Doctor Near Me double glazing doctor
near me (http://spectr-sb116.ru)
Every weekend i used to visit this web page, as i wish for enjoyment, as this this web
site conations in fact fastidious funny data too.
Also visit my website :: สาระน่ารู้
buy viagra online
This website was… how do you say it? Relevant!!
Finally I have found something which helped me.
Thanks a lot!
penis enlargement
Pedro Gonzalez Lopez https://barcelona.pedri-ar.com known as Pedri, was born on November 25, 2002 in the small town of Tegeste, located on Tenerife, one of the Canary Islands.
The story of Leo Messi https://inter-miami.lionelmessi.ae‘s transfer to Inter Miami began long before the official announcement. Rumors about Messi’s possible departure from Barcelona appeared in 2020
Andreson Souza Conceicao https://al-nassr.talisca-ar.com known as Talisca, is one of the brightest stars of modern football.
buy viagra online
Yacine Bounou https://al-hilal.yassine-bounou-ar.com known simply as Bono, is one of the most prominent Moroccan footballers of our time.
Good web site you have here.. It’s difficult to find good quality writing like yours these days. I seriously appreciate people like you! Take care!!
http://www.vid-st.ru [url=https://internet-magazin-strojmaterialov.ru/]https://internet-magazin-strojmaterialov.ru/[/url] .
child abusechild abuse PlLWU9nLoq
Harry Kane https://bayern.harry-kane-ar.com one of the most prominent English footballers of his generation, completed his move to German football club Bayern Munich in 2023.
Brazilian footballer Neymar https://al-hilal.neymar-ar.com known for his unique playing style and outstanding achievements in world football, has made a surprise move to Al Hilal Football Club.
child abusepornographic movies 4Q0lZbrom
Erling Haaland https://manchester-city.erling-haaland-ar.com born on July 21, 2000 in Leeds, England, began his football journey at an early age.
Luka Modric https://real-madrid.lukamodric-ar.com can certainly be called one of the outstanding midfielders in modern football.
Football in Saudi Arabia https://al-hilal.ali-al-bulaihi-ar.com has long been one of the main sports, attracting millions of fans. In recent years, one of the brightest stars in Saudi football has been Ali Al-Bulaihi, defender of Al-Hilal Football Club.
ГК Айтек [url=http://multimedijnyj-integrator.ru/]http://multimedijnyj-integrator.ru/[/url] .
I couldn’t refrain from commenting. Well written!
visit my website https://currencyconvert.net
Сайт https://ps-likers.ru предлагает уроки по фотошоп для начинающих. На страницах сайта можно найти пошаговые руководства по анимации, созданию графики для сайтов, дизайну, работе с текстом и фотографиями, а также различные эффекты.
[url=https://doxycyclineo.com/]doxycycline australia[/url]
N’Golo Kante https://al-ittihad.ngolokante-ar.com the French midfielder whose career has embodied perseverance, hard work and skill, has continued his path to success at Al-Ittihad Football Club, based in Saudi Arabia.
I’m not sure where you’re getting your information, but good topic.
I needs to spend some time learning more or understanding more.
Thanks for great information I was looking for this information for my mission.
3 Getting A Red Card In Indoor Soccer 다바오 모바일
Kobe Bryant https://los-angeles-lakers.kobebryant-ar.com also known as the “Black Mamba”, is one of the most iconic and iconic figures in NBA history.
buy viagra online
Real Estate Investing 101 – Bank Owned Properties Sale 다바오 교도소 호주 선교사
RDBox.de https://rdbox.de bietet schallgedammte Gehause fur 3D-Drucker, die eine sehr leise Druckumgebung schaffen – nicht lauter als ein Kuhlschrank. Unsere Losungen sorgen fur stabile Drucktemperatur, Vibrationsisolierung, Luftreinigung und mobile App-Steuerung.
Karim Benzema https://al-ittihad.karimbenzema.ae is a name worthy of admiration and respect in the world of football.
In 2018, the basketball world witnessed one of the most remarkable transformations in NBA history. LeBron James https://los-angeles-lakers.lebronjames-ar.com one of the greatest players of our time, decided to leave his hometown Cleveland Cavaliers and join the Los Angeles Lakers.
penis enlargement
Why Everyone Is Talking About Mesothelioma Attorney Right Now Mesothelioma lawyers
Why Is Backlink Service So Famous? Marketing services
5 Laws That Anyone Working In Medical Malpractice
Law Should Be Aware Of lawyer
11 Creative Ways To Write About Malpractice Attorneys lawyers
Kevin De Bruyne https://manchester-city.kevin-de-bruyne-ar.com is a name every football fan knows today.
Luis Diaz https://liverpool.luis-diaz-ar.com is a young Colombian striker who has enjoyed rapid growth since joining the ” Liverpool” in January 2022.
How In Order To Prevent Credit Card Debt 다바오 어학연수
Muhammad Al Owais https://al-hilal.mohammed-alowais-ar.com is one of the most prominent names in modern Saudi football. His path to success in Al Hilal team became an example for many young athletes.
How Does A Car Loan Package Work? 중기청 대출
11 Ways To Completely Revamp Your Best 18 Wheeler Accident Attorneys 18
wheeler accident lawsuits (dermandar.Com)
buy viagra online
watch porn video
Guide To 18 Wheeler Accident Attorneys: The Intermediate Guide The Steps To 18 Wheeler Accident Attorneys 18 Wheeler
accident attorneys (tecnologiemusicalidante.altervista.org)
Find Out What Double Glazing Repairs Near Me Tricks Celebs Are Utilizing
Misted double glazing
See What Double Glazing Units Near Me Tricks The Celebs Are Utilizing Double Glazing Units Near Me
Five Things Everyone Makes Up Concerning Motorcycle Accident Law Motorcycle Accident Attorney
20 Trailblazers Leading The Way In Non Prescription ADHD
Medication liquid adhd medication uk (https://watson-nordentoft.federatedjournals.com/how-much-do-Adhd-medications-for-adults-experts-make)
Maria Sharapova https://tennis.maria-sharapova-ar.com was born on April 19, 1987 in Nyagan, Russia. When Masha was 7 years old, her family moved to Florida, where she started playing tennis.
Roberto Firmino https://al-ahli.roberto-firmino-ar.com one of the most talented and famous Brazilian footballers of our time, has paved his way to success in different leagues and teams.
Angel Di Maria https://benfica.angel-di-maria-ar.com is a name that will forever remain in the memories of Benfica fans.
Khvicha Kvaratskhelia https://napoli.khvicha-kvaratskhelia-ar.com is a name that in recent years has become a symbol of Georgian football talent and ambition.
These Are Myths And Facts Behind Truck Accident Lawsuit truck accident attorneys
telegram下载:https://www.telegramkv.com HcBPy
child abusechild abuse 1Law0a
Football in Saudi Arabia https://al-hilal.saud-abdulhamid-ar.com is gaining more and more popularity and recognition on the international stage, and Saud Abdul Hamid, the young and talented defender of Al Hilal, is a shining example of this success.
This Week’s Most Remarkable Stories Concerning 18-Wheeler Accident Lawyers 18 wheeler accident lawyer
child abusepornographic movies SsJTkQ
This Is The History Of Replacement Upvc Window Handles In 10 Milestones Upvc window repairs near me
Guide To Veterans Disability Attorney: The Intermediate Guide On Veterans Disability Attorney Veterans Disability Attorney
8 Tips For Boosting Your Replacement Window Seals Game Glass Windows Replacement
buy atorvastatin paypal – order atorlip generic cost bystolic 20mg
lcd видеостена москва [url=videosteny-pod-kljuch.ru]videosteny-pod-kljuch.ru[/url] .
10 Things That Your Family Teach You About ADHD No Medication adhd no medication
A Look Into The Future What Is The Semi Truck Case Industry
Look Like In 10 Years? attorneys
Казахский национальный технический университет https://satbayev.university им. К.Сатпаева
Upcoming fantasy MOBA https://bladesofthevoid.com evolved by Web3. Gacha perks, AI and crafting in one swirling solution!
Продажа новых автомобилей Hongqi
https://hongqi-krasnoyarsk.ru/hongqi-hs3 в Красноярске у официального дилера Хончи. Весь модельный ряд, все комплектации, выгодные цены, кредит, лизинг, трейд-ин
Kylie Jenner https://kylie-cosmetics.kylie-jenner-ar.com is an American model, media personality, and businesswoman, born on August 10, 1997 in Los Angeles, California.
15 Things You Didn’t Know About Upvc Door upvc door letter boxes
5 Killer Quora Answers On Upvc Windows And Doors Repair upvc window (kingranks.Com)
Is Your Company Responsible For An How Long Does
18-Wheeler Lawsuit Take Budget? 12 Tips On How To Spend Your
Money 18 wheeler accident
Hello there, You have done a fantastic job.
I will definitely digg it and personally recommend to my friends.
I am confident they’ll be benefited from this website.
Great article! That is the kind of information that should be shared around
the net. Shame on the seek engines for not positioning
this publish higher! Come on over and seek advice from my website .
Thank you =)Discover the benefits of Java Burn on the official site.
Learn how this weight loss supplement boosts
metabolism and energy levels naturally.
Everything is very open with a precise description of
the challenges. It was definitely informative. Your website is very
helpful. Thanks for sharing!Discover the potential side effects
of Java Burn. Learn about its safety, benefits, and user experiences in this comprehensive guide.
I’ve read some excellent stuff here. Definitely
price bookmarking for revisiting. I surprise how a lot attempt you put to make any such excellent informative web site.Discover the unique blend of Java Burn ingredients and their benefits.
Explore how these natural components work together to boost metabolism and aid in weight
loss.
5 Lessons You Can Learn From Railroad Injuries Settlement railroad injuries law Firm
20 Tools That Will Make You More Successful At Personal Injury Litigation Personal injury lawsuit
Release Irs Tax Levies – Bank Levy, Wage Garnishment – Get Immediate Releases 저신용자 대출
Poker Theme Parties – Guaranteed Event To Establish
Your Guests Completely Happy 다바오 포커 가입 (generalaviationconsulting.com)
Hi there would you mind sharing which blog platform you’re working
with? I’m planning to start my own blog soon but I’m having a difficult
time selecting between BlogEngine/Wordpress/B2evolution and
Drupal. The reason I ask is because your design and style seems different then most
blogs and I’m looking for something unique. P.S Apologies
for getting off-topic but I had to ask!
best india pharmacy [url=http://indiapharmast.com/#]top 10 online pharmacy in india[/url] indian pharmacy paypal
indian pharmacy: top 10 pharmacies in india – indian pharmacy
5 Killer Quora Answers To Secondary Double Glazing Near Me Secondary Double Glazing Near Me (https://Ugzhnkchr.Ru/)
9 Things Your Parents Taught You About Act Fela fela
15 Interesting Facts About Wall Electric Fireplace You’ve Never Seen http://www.lynnbolvin.top
11 Ways To Completely Sabotage Your Peritoneal Mesothelioma Not Caused By Asbestos Tristan
15 Pinterest Boards That Are The Best Of All Time About ADHD
Diagnosis UK Adults Adhd Overdiagnosis
http://foruspharma.com/# mexico drug stores pharmacies
I could not resist commenting. Very well written!
My homepage; เว็บวาไรตี้
mexico drug stores pharmacies: mexican rx online – mexico drug stores pharmacies
Waterbury Heart, Vermont: Inexperienced Mountain Membership.
Safari (UK, 1998): Again based on the seven-seat GS,
the Safari was painted Epsom Inexperienced and was equipped
with a rear ladder, roof rails, and extra fog lamps.
Aside from politics, there’s been plenty of well-known individuals including artists,
musicians and activists who’ve represented Canada proudly.
That does not, however, cease 1000’s of individuals from
using drones for a plethora of purposes, together with videography, sheep herding, product supply and crop surveying.
This could be very essentially needed to stop the ever rising battle in opposition to the extremely lucrative commerce of unlawful poaching.
Serve food on festive platters, and mix plenty of margaritas for grownup friends.
Native advice is to take loads of water with you and follow established routes as a result of
if you get misplaced out here you’ll be
by yourself. When you’ve got one 20-ounce coffee a day, you will spend a bit
of greater than $700 a 12 months at the chain cafe on the nook (and that
is assuming you do not tip, you don’t get a fancier latte or cappuccino,
and you don’t succumb to the temptation of these oversized scones
and cookies).
The 10 Scariest Things About Retro Fridge Freezers Uk retro fridge freezers uk (Latashia)
medication from mexico pharmacy: mexican online pharmacies prescription drugs – mexican mail order pharmacies
Bella Hadid https://img-models.bella-hadid-ar.com is an American model who has emerged in recent years as one of the most influential figures in the world of fashion.
10 Cerebral Palsy Claim Tricks Experts Recommend Cerebral palsy law firm
Brazilian footballer Ricardo Escarson https://orlando-city.kaka-ar.com dos Santos Leite, better known as Kaka, is one of the most famous and successful players in football history.
Sadio Mane https://al-nassr.sadio-mane-ar.com the Senegalese footballer best known for his performances at clubs such as Southampton and Liverpool, has become a prominent figure in Al Nassr.
9 . What Your Parents Taught You About Upvc Window Repair
Near Me Window Repair Near Me
Twenty Myths About Jaguar Car Key Cover: Busted Jaguar xf key
The Top Reasons Why People Succeed In The Assessment Mental Health Industry functional status assessment Mental health
purple pharmacy mexico price list [url=https://foruspharma.com/#]mexico pharmacy[/url] mexican drugstore online
Discover the powerful blend of ingredients in Java Burn. Explore the complete Java Burn ingredients list, including John Barban’s
unique formula for this revolutionary coffee additive.
Cheap Poker Tables For Your Hobby 다바오 회원가입 하는법 (http://ixocet.com/__media__/js/netsoltrademark.php?d=marginpet1.bloggersdelight.dk/2024/07/07/choosing-a-credit-union-or-bank/)
Edson Arantes https://santos.pele-ar.com do Nascimento, known as Pele, was born on October 23, 1940 in Tres Coracoes, Minas Gerais, Brazil.
Monica Bellucci https://dracula.monica-bellucci-ar.com one of the most famous Italian actresses of our time, has a distinguished artistic career spanning many decades. Her talent, charisma, and stunning beauty made her an icon of world cinema.
buying from online mexican pharmacy: mexican online pharmacies prescription drugs – reputable mexican pharmacies online
How Ford Car Key Became The Hottest Trend In 2022 Replacement Ford Key [https://Ebony-Anemone-Hjdvtd.Mystrikingly.Com/Blog/Ten-Stereotypes-About-Ford-Focus-Replacement-Key-Cost-Uk-That-Aren-T-Always]
An intriguing discussion is definitely worth comment.
There’s no doubt that that you should write more about this topic, it may not be a
taboo matter but usually people do not discuss such topics.
To the next! Kind regards!!
child abusechild abuse JmQtVYnkVU
Good Psychiatrists Near Me’s History History Of Good Psychiatrists Near Me good psychiatrist near me (glamorouslengths.com)
child abusepornographic movies oEVkv
Porn site
top 10 online pharmacy in india: best online pharmacy india – п»їlegitimate online pharmacies india
Do Not Buy Into These “Trends” About New Upvc Door upvc Door Handles replacement, olderworkers.com.Au,
You’ll Never Be Able To Figure Out This Upvc Door Doctor Near Me’s Secrets upvc door Doctor
20 Irrefutable Myths About Fela Accident Attorney: Busted fela attorneys
15 Hot Trends Coming Soon About Upvc Window Near Me Upvc replacement Window handles
http://foruspharma.com/# п»їbest mexican online pharmacies
Brazilian footballer Malcom https://al-hilal.malcom-ar.com (full name Malcom Felipe Silva de Oliveira) achieved great success in Al Hilal, one of the leading football teams in Saudi Arabia and the entire Middle East.
penis enlargement
canadian pharmacy ratings: reputable canadian online pharmacies – best canadian online pharmacy
buy viagra online
Jackie Chan https://karate-kid.jackiechan-ar.com was born in 1954 in Hong Kong under the name Chan Kong San.
Responsible For A Private Adult Adhd Assessment Budget? 12 Top Ways To Spend Your Money
adhd assessment Cost Uk
Why Everyone Is Talking About Door Repairs Near Me Right Now upvc door repairs near Me
[url=https://amoxicillinbact.com/]augmentin 1000 online[/url]
mexico pharmacies prescription drugs [url=http://foruspharma.com/#]buying from online mexican pharmacy[/url] buying prescription drugs in mexico
Do you have a spam problem on this website; I also am a blogger, and
I was wanting to know your situation; many of us have developed some nice practices
and we are looking to exchange solutions with other folks,
be sure to shoot me an email if interested.
[url=https://vermox.company/]vermox otc uk[/url]
The No. 1 Question Anyone Working In Window Repairs Crawley
Should Be Able Answer window doctor Near me
13 Things About Symptoms Of Anxiety And Depression You May Not Have Known 1738077.xyz
Interested In Starting A Texas Hold’em Poker Nfl?
Here’s How! 다바오 지진
cheapest online pharmacy india: reputable indian pharmacies – world pharmacy india
You’ll Never Guess This Double Glazed Units Near Me’s Benefits Double glazed units Near Me
п»їlegitimate online pharmacies india: pharmacy website india – buy prescription drugs from india
What NOT To Do Within The Door Doctor Near Me Industry the Door Doctor near me
3 Reasons Commonly Cited For Why Your Collapsible Mobility Scooter Isn’t Working (And How
To Fix It) Arlen Nizo
You need to be a part of a contest for one of the most useful sites on the internet. I will recommend this website!
My brother suggested I might like this blog He was totally right This post actually made my day You can not imagine simply how much time I had spent for this info Thanks
indianpharmacy com: top online pharmacy india – world pharmacy india
I love it when folks get together and share thoughts.
Great blog, continue the good work!
Discover the ultimate guide to Java Burn Coffee!
Learn about its benefits, side effects, and FAQs. Unveil the secrets of this revolutionary weight-loss coffee.
http://indiapharmast.com/# world pharmacy india
online shopping pharmacy india [url=http://indiapharmast.com/#]indian pharmacy[/url] indian pharmacies safe
магазин аккаунтов пабг [url=https://magazin-akkauntov.ru]магазин аккаунтов пабг[/url] .
First off I would like to say terrific blog! I had a quick question in which I’d like to ask if you do not mind.
I was interested to know how you center yourself and clear
your mind before writing. I have had a difficult time clearing
my mind in getting my ideas out there. I do take pleasure in writing but
it just seems like the first 10 to 15 minutes are usually wasted just trying to figure
out how to begin. Any recommendations or tips? Kudos!
Guide To Railroad Injuries Attorney: The Intermediate
Guide In Railroad Injuries Attorney railroad injuries
You’ll Never Guess This Upvc Window Repair Near Me’s Secrets upvc window
Three Of The Biggest Catastrophes In Mid Sleeper Cabin Beds History cabin Beds for sale
10 Of The Top Facebook Pages Of All-Time About Asbestos Exposure Mesothelioma Cassy Lawn
20 Reasons To Believe Adhd Assessments Will Not Be Forgotten Getting An Assessment For Adhd
canadian pharmacy uk delivery: legal to buy prescription drugs from canada – best canadian pharmacy
reputable indian pharmacies: buy medicines online in india – reputable indian pharmacies
What’s The Current Job Market For Erb’s Palsy
Compensation Professionals Like? palsy
One Key Trick Everybody Should Know The One Collapsible Mobility Scooter
Trick Every Person Should Be Aware Of http://www.arlennizo.top
How Slots Casino Real Money Rose To Become The #1 Trend In Social
Media http://www.kaymell.uk
purchase gasex online – ashwagandha tablets diabecon where to buy
What Is Pet Wellness Care And How To Utilize What Is Pet Wellness Care And How To Use 836614.xyz
child abusechild abuse gXtpgJ
Whats up this is kinda of off topic but I was wondering if
blogs use WYSIWYG editors or if you have to manually code with HTML.
I’m starting a blog soon but have no coding knowledge so I wanted to get guidance from someone with experience.
Any help would be enormously appreciated!
Incredible! This blog looks just like my old one!
It’s on a completely different topic but it has pretty much the same page layout and design. Outstanding choice of colors!
Great beat ! I would like to apprentice at the same time as you amend your web site,
how can i subscribe for a blog website? The account
helped me a applicable deal. I have been a little bit
familiar of this your broadcast provided bright clear concept
Hello! I’ve been following your site for a long time now and finally got the bravery to go ahead
and give you a shout out from Houston Texas! Just wanted to say keep up the excellent job!
Hi there colleagues, its great post concerning cultureand entirely explained, keep it up all the time.
Hi! I could have sworn I’ve been to this site before but after looking at many of the articles I realized it’s new to me. Anyways, I’m definitely happy I stumbled upon it and I’ll be book-marking it and checking back frequently!
Whats up very cool website!! Guy .. Beautiful .. Amazing ..
I’ll bookmark your website and take the feeds additionally?
I am happy to find numerous useful information right here within the post, we need develop more strategies in this regard, thank you for sharing.
. . . . .
child abusepornographic movies YkYWwSGr
Touche. Solid arguments. Keep up the amazing effort.
I absolutely love your blog.. Great colors &
theme. Did you develop this web site yourself?
Please reply back as I’m hoping to create my own blog and would like to find out where you got this from or what the theme is named.
Thanks!
My brother suggested I may like this web site. He was entirely right.
This put up actually made my day. You cann’t believe
simply how so much time I had spent for this info! Thanks!
Hi, I want to subscribe for this webpage to get most up-to-date updates, therefore where can i do it please assist.
I think this is one of the most significant info for me. And i am
glad reading your article. But should remark on few general things, The
site style is wonderful, the articles is really excellent
: D. Good job, cheers
I know this website provides quality dependent content and other material, is there any other web site which presents these things in quality?
I don’t know if it’s just me or if perhaps
everybody else experiencing problems with your
site. It appears like some of the written text on your posts
are running off the screen. Can someone else please provide feedback and let me know if this is happening to them too?
This could be a issue with my web browser because I’ve had this happen before.
Cheers
You need to really control the comments listed here
You need to take part in a contest for one of the most useful sites on the net.
I’m going to highly recommend this web site!
Wow! This blog looks just like my old one! It’s on a
entirely different topic but it has pretty much the same layout and design. Great
choice of colors!
It’s great that you are getting ideas from this post as well as from our dialogue made at this time.
What’ѕ ᥙp, yup thіs post is tгuly nice аnd І havе learned lot of
tһings from it regaгding blogging. thanks.
Here iѕ my web-site … i thought about this
Credit Score Is Eliminate An Trouble With Bad Credit Unsecured Loan 다바오 무료 vpn
Pretty nice post. I just stumbled upon your weblog and wanted to say that I have really enjoyed
surfing around your blog posts. After all I’ll be
subscribing to your rss feed and I hope you write again soon!
هیرو های بازی موبایل لجند
Howdy! This post could not be written any better!
Reading through this post reminds me of my good old room mate!
He always kept talking about this. I will forward this page to him.
Pretty sure he will have a good read. Thanks
for sharing!
Someone necessarily help to make significantly posts I’d state.
This is the first time I frequented your website page and
to this point? I surprised with the analysis you made to create
this actual post extraordinary. Wonderful job!
Feel free to surf to my page; เกร็ดความรู้
I’m truly enjoying the design and layout of your blog. It’s a very easy on the eyes which
makes it much more pleasant for me to come here and visit more often. Did you hire out
a developer to create your theme? Fantastic work!
http://amoxildelivery.pro/# amoxicillin order online
paxlovid for sale [url=https://paxloviddelivery.pro/#]paxlovid pharmacy[/url] paxlovid pill
Hello, I enjoy reading through your post. I wanted to write a little
comment to support you.
Why You Should Focus On Improving Repairing Window http://www.257634.xyz
What a information of un-ambiguity and preserveness of valuable
know-how about unexpected emotions.
Pretty component to content. I just stumbled upon your site and in accession capital to assert
that I get in fact loved account your blog posts.
Any way I will be subscribing to your feeds and even I achievement you get right of
entry to persistently fast.
My brother recommended I may like this web site. He was totally right.
This submit actually made my day. You cann’t believe just how so much time I
had spent for this info! Thank you!
10 Things We All Do Not Like About Personal Injury
Compensation personal Injury Law Firm
Yes! Finally someone writes about ngentot nungging.
Hurrah! In the end I got a website from where I
can really obtain helpful facts regarding my study and knowledge.
Hi there! Do you know if they make any plugins to assist with Search
Engine Optimization? I’m trying to get my blog to rank for some targeted keywords but I’m not seeing very good gains.
If you know of any please share. Thank you!
http://clomiddelivery.pro/# how to buy clomid for sale
11 “Faux Pas” You’re Actually Able To Use With Your
Upvc Windows Repair 257634.xyz
5 Laws That Anyone Working In Upvc Windows Repairs Should Know
257634.xyz
I visit each day a few web pages and websites to read articles, however this webpage
presents quality based content.
I used to be able to find good info from your blog articles.
This site was… how do you say it? Relevant!! Finally I’ve found something that helped me.
Appreciate it!
پیچ و مهره درب توالت فرنگی دیجی کالا
Do you have a spam problem on this blog; I also am a blogger, and I was
wanting to know your situation; we have created some nice practices and we are looking to trade solutions with
other folks, please shoot me an e-mail if interested.
If you want to increase your familiarity just keep visiting this website and be updated with
the newest information posted here.
I visited many blogs however the audio feature for audio songs existing at this site is in fact
marvelous.
I do trust all of the concepts you have introduced to your post.
They’re really convincing and will definitely work.
Still, the posts are very quick for beginners. Could you
please lengthen them a little from subsequent time?
Thanks for the post.
Thank you for every other informative blog. Where else may I am getting
that kind of information written in such an ideal
way? I have a venture that I’m simply now operating on, and I’ve been at the glance out
for such information.
A Look Inside The Secrets Of Slots kaymell
I know this web page offers quality dependent posts and other material, is there any other site which presents
these kinds of things in quality?
You could certainly see your expertise in the article you write.
The sector hopes for even more passionate writers such as you who are not afraid to mention how they believe.
At all times follow your heart.Discover the truth behind the mystery: Is Tina Aldea real?
Uncover the facts and separate reality from speculation.
Very nice article. I absolutely appreciate this site.
Keep it up!
This excellent website definitely has all the
info I needed about this subject and didn’t know who to
ask.
amoxicillin pharmacy price: buy amoxicillin 500mg usa – amoxicillin 500 mg tablet
Hey just wanted to give you a brief heads up and let you know a few of the pictures aren’t loading properly.
I’m not sure why but I think its a linking issue. I’ve tried it in two different internet browsers and both
show the same outcome.
Heya i am for the primary time here. I came across this board and I find It really helpful &
it helped me out much. I am hoping to offer something back and help
others like you aided me.
Great article.Explore Tina Aldea’s official site for the latest updates,
exclusive content, and insights into her work. Stay connected with Tina Aldea through her official
website.
Wow, amazing blog layout! How long have
you been blogging for? you make blogging look easy. The overall look of your
web site is wonderful, let alone the content!
What’s The Job Market For Double Glazing Repairs Near Me Professionals?
Double glazing repairs near me (edwards-christie-4.technetbloggers.de)
Good day! Do you know if they make any plugins to help with SEO?
I’m trying to get my blog to rank for some targeted keywords but I’m not seeing very good results.
If you know of any please share. Thank you!
you are in reality a just right webmaster.
The website loading pace is incredible. It sort of feels that you’re doing
any unique trick. Moreover, The contents are masterwork.
you have performed a great activity on this
matter!
Incredible tons of superb knowledge.
Whats up very nice blog!! Guy .. Beautiful .. Amazing ..
I’ll bookmark your website and take the feeds also? I am satisfied to search out a lot of
useful info here within the post, we’d like develop more techniques
in this regard, thanks for sharing. . . . .
.
Does your site have a contact page? I’m having trouble locating it
but, I’d like to shoot you an email. I’ve got some ideas
for your blog you might be interested in hearing.
Either way, great website and I look forward to
seeing it develop over time.
Feel free to visit my site … เว็บความรู้
Thanks in support of sharing such a fastidious opinion, piece of writing is good,
thats why i have read it entirely
Hi there, I believe your site might be having browser compatibility issues. Whenever I look at your website in Safari, it looks fine however, if opening in IE, it’s got some overlapping issues. I merely wanted to give you a quick heads up! Other than that, great site.
Terrific work! This is the type of info that are meant
to be shared around the internet. Disgrace on Google for now not positioning this submit upper!
Come on over and visit my website . Thank you =)
Appreciate it, Lots of write ups.
A片,
Hey there this is kind of of off topic but I was wanting to know if blogs use WYSIWYG editors or if
you have to manually code with HTML. I’m starting a blog soon but
have no coding skills so I wanted to get advice from someone with experience.
Any help would be greatly appreciated!
I couldn’t refrain from commenting. Very well written!
10 No-Fuss Methods To Figuring Out Your Personal Injury
Legal Personal injury Lawsuit
Everything is very open with a clear explanation of the issues.
It was truly informative. Your site is very useful. Thank you for sharing!
Hi, constantly i used to check website posts here early in the
morning, for the reason that i love to find out more and more.
I am curious to find out what blog platform you’re utilizing?
I’m having some small security issues with my latest blog and I would like to find something more safeguarded.
Do you have any solutions?
My site: เว็บความรู้
Asbestos Attorneys Tips That Will Change Your Life https://www.0270469.xyz/o2jtr-31ty-n3b2-z28tdng-1yj-3057
Wow that was strange. I just wrote an really long
comment but after I clicked submit my comment didn’t appear.
Grrrr… well I’m not writing all that over again. Anyway, just wanted to say wonderful blog!
cheap lasuna pills – buy generic himcolin over the counter cheap himcolin tablets
I couldn’t resist commenting. Exceptionally well written!
Selain memberikan fasilitas gratis untuk mengunduh video, kamu juga bisa memilih
format lain, yaitu MP4 dan MP3.
Five Killer Quora Answers On Double Glazed Near Me double glazed near me
I love it when individuals come together and share views.
Great site, keep it up!
Hello there, I found your web site by way of Google even as looking for a similar matter, your web site got here up, it appears
to be like good. I’ve bookmarked it in my google bookmarks.
Hi there, simply changed into alert to your blog via Google, and found that it’s really informative.
I’m going to watch out for brussels. I’ll appreciate if you happen to proceed this in future.
Lots of other people might be benefited from your writing.
Cheers!
I need to to thank you for this fantastic read!!
I absolutely enjoyed every little bit of it. I have you saved as a favorite
to look at new things you post…
If you wish for to increase your familiarity just keep visiting this site and be updated with the latest gossip
posted here.
Hello it’s me, I am also visiting this web site on a regular basis,
this web site is actually good and the viewers are in fact sharing fastidious thoughts.
This piece of writing will assist the internet people for setting up new web site or even a weblog from start to end.
I was suggested this web site by my cousin. I am not sure whether this post is written by him as no one else know such
detailed about my difficulty. You are wonderful! Thanks!
Hello would you mind letting me know which web host you’re utilizing?
I’ve loaded your blog in 3 completely different browsers and I
must say this blog loads a lot quicker then most. Can you suggest a good hosting provider at a honest
price? Kudos, I appreciate it!
Excellent blog you have here but I was wondering if you knew of any community forums that cover
the same topics discussed in this article? I’d really love to be a part of online community where I can get comments from other experienced individuals that share
the same interest. If you have any suggestions, please let me know.
Kudos!
Thank you for the good writeup. It in fact was a amusement account it.
Look advanced to more added agreeable from you! By the way, how
can we communicate?
Welcome to threedoo.com, your one-stop source for STL and raw 3D printer files.
At 3Doo.com, you’ll find an extensive range of STL files as well as editable files
to suit all your additive manufacturing requirements.
Whether an amateur or a pro, our carefully curated collection guarantees the ideal model for
your upcoming endeavor.
Begin discovering right away and discover why 3Doo.com is the go-to
platform for 3D printer enthusiasts.
We feature a wide range of genres, including:
Creative designs
Practical prototypes
Home decor
Learning aids
and more.
Every design is crafted with great care to detail, guaranteeing top-notch printing results to fulfill your imaginative endeavors.
Become part of our dynamic community of creators along with begin producing your next
masterpiece with ease.
Explore our user-friendly platform created
to make your 3D printing journey seamless and productive.
Discover resources like:
Adjustable configurations for customized projects
Real-time updates on fresh uploads
Detailed guides for newcomers
Advanced-level printing techniques for experts
Our committed team consistently updates our site with fresh and stimulating designs, making sure
you always get access to the newest tools for
your artistic pursuits.
Keep inspired and accomplish your design dreams through 3D-Print Hub.
Begin your creative journey today and unleash limitless possibilities using 3D-Print Hub.
Appreciate it for selecting 3D-Print Hub!
قیمت ورق استیل سال 1401
Travis Scott https://astroworld.travis-scott-ar.com is one of the brightest stars in the modern hip-hop industry.
15 Boot Mobility Scooters Benefits Everyone Should Know Ben
Howdy fantastic website! Does running a blog similar to this take a lot of
work? I have no knowledge of computer programming but I had been hoping to start my
own blog in the near future. Anyways, if you have any recommendations
or techniques for new blog owners please share. I
understand this is off subject nevertheless I just wanted to ask.
Cheers!
Zinedine Zidane https://real-madrid.zinedine-zidane-ar.com the legendary French footballer, entered the annals of football history as a player and coach.
Magnificent beat ! I wish to apprentice while you amend your web site, how can i subscribe for a blog website?
The account helped me a acceptable deal. I had been a little bit acquainted of this your broadcast offered bright
clear concept
It’s actually a great and helpful piece of info. I am glad that
you just shared this helpful info with us. Please keep us informed like this.
Thanks for sharing.Discover the numerous benefits of Tina Aldea,
ranging from health and wellness advantages to financial
perks. Explore the positive impacts of incorporating Tina Aldea into your life.
This is the right web site for anybody who really wants to find out
about this topic. You know so much its almost tough to argue with you
(not that I personally would want to…HaHa). You definitely put a brand new spin on a subject that has been written about for many
years. Wonderful stuff, just excellent!
The history of one of France’s https://france.paris-saint-germain-ar.com most famous football clubs, Paris Saint-Germain, began in 1970, when capitalist businessmen Henri Delaunay and Jean-Auguste Delbave founded the club in the Paris Saint-Germain-en-Laye area.
Chelsea https://england.chelsea-ar.com is one of the most successful English football clubs of our time.
You could certainly see your enthusiasm within the article
you write. The world hopes for more passionate
writers such as you who are not afraid to say how they believe.
All the time go after your heart.
Do you have a spam problem on this blog; I also am a blogger, and I was wondering
your situation; we have developed some nice methods and we are looking to swap methods
with others, why not shoot me an e-mail if interested.
Juventus Football Club https://italy.juventus-ar.com is one of the most successful and decorated clubs in the history of Italian and world football.
What a material of un-ambiguity and preserveness of precious familiarity on the topic of unexpected feelings.
You’ve made some good points there. I checked on the internet for additional information about the
issue and found most people will go along with your views on this site.
Hey would you mind sharing which blog platform you’re using?
I’m planning to start my own blog in the near future but I’m having a tough time selecting
between BlogEngine/Wordpress/B2evolution and Drupal. The reason I ask is
because your design seems different then most blogs and I’m
looking for something unique. P.S Apologies for
being off-topic but I had to ask!
Howdy! This is my first visit to your blog! We are a collection of volunteers and starting a new initiative
in a community in the same niche. Your blog provided
us beneficial information to work on. You have done a extraordinary job!
Hello There. I found your blog using msn. This is a really well written article.
I’ll make sure to bookmark it and come back to read more
of your useful info. Thanks for the post. I will certainly return.Discover the
Tina Aldea cost and pricing details here. Get insights into the expenses associated with Tina Aldea services.
https://paxloviddelivery.pro/# paxlovid covid
Hello! Do you know if they make any plugins to protect against hackers?
I’m kinda paranoid about losing everything I’ve worked
hard on. Any tips?
https://ciprodelivery.pro/# ciprofloxacin mail online
order amoxicillin online [url=http://amoxildelivery.pro/#]amoxicillin 250 mg[/url] how to buy amoxicillin online
I’ve been browsing on-line greater than three hours as of late, but
I by no means found any interesting article like yours.
It’s lovely price enough for me. In my opinion, if all webmasters and bloggers made excellent content
material as you probably did, the web will probably be much more useful than ever before.Discover honest Nagano Tonic reviews to make an informed decision before trying this product.
Get insights from real users and experts to understand its effectiveness.
Ahaa, its fastidious discussion on the topic of this piece of writing at this place at
this web site, I have read all that, so now me also commenting here.
drochilnik.xyz
Wonderful material. Kudos.
Regards! Ample stuff.
I all the time used to read article in news papers but now as I
am a user of internet thus from now I am using net for content, thanks to
web.
Fastidious replies in return of this question with genuine arguments and telling
everything concerning that.
Yes! Finally someone writes about kontol.
After looking into a few of the articles on your website, I honestly appreciate your way of blogging. I book-marked it to my bookmark webpage list and will be checking back soon. Take a look at my web site too and tell me your opinion.
Marvelous, what a web site it is! This weblog provides helpful facts to us, keep it up.
My brother recommended I might like this web site.
He was totally right. This post truly made my day. You can not imagine just how much time I had spent for this info!
Thanks!
dokuma lastik
Write more, thats all I have to say. Literally,
it seems as though you relied on the video to make your point.
You obviously know what youre talking about, why waste your intelligence on just posting videos to your site when you could be giving
us something enlightening to read?
What’s up, I would like to subscribe for this weblog to obtain latest updates, so where can i do it please assist.
Hello to every body, it’s my first pay a visit of this web site; this weblog includes awesome and actually good stuff designed for visitors.
You’re so awesome! I do not believe I have read a single thing like that before.
So wonderful to discover another person with a few genuine thoughts
on this topic. Really.. many thanks for starting
this up. This web site is one thing that is needed on the web, someone
with a little originality!
When someone writes an piece of writing he/she maintains the idea of
a user in his/her brain that how a user can know it.
Thus that’s why this article is amazing. Thanks!Discover the benefits
of Nagano Lean Body Tonic for a healthier lifestyle and improved well-being.
Experience the natural ingredients that support weight management and
overall health.
I am really enjoying the theme/design of your blog.
Do you ever run into any web browser compatibility problems?
A few of my blog readers have complained about my website not working correctly in Explorer but looks
great in Opera. Do you have any tips to help fix this issue?
Now I am going away to do my breakfast, later than having my breakfast coming over again to read additional news.
Hello There. I discovered your weblog the use of msn. That
is an extremely well written article. I’ll make sure to bookmark it and
return to read extra of your useful info. Thank you for the post.
I’ll certainly comeback.
Review my website … เว็บความรู้
Great delivery. Solid arguments. Keep up the amazing work.
Hi there! This post couldn’t be written any better!
Reading through this post reminds me of my previous room mate!
He always kept chatting about this. I will forward this post
to him. Pretty sure he will have a good read. Many thanks for sharing!
Excellent site you have got here.. It’s difficult to find good quality
writing like yours these days. I really appreciate individuals
like you! Take care!!
How To Resolve Issues With Double Glazing Repair Near Me double Glazing misting
dokuma şerit
I have been browsing online more than 3 hours today, yet I never found any interesting article like yours.
It’s pretty worth enough for me. In my view, if all
site owners and bloggers made good content
as you did, the net will be much more useful than ever
before.
Hello, i think that i saw you visited my site thus i came to “return the favor”.I am trying to find things to improve my site!I suppose its ok to use some
of your ideas!!
Great web site. Plenty of helpful info here. I am sending it to several pals ans additionally sharing in delicious.
And of course, thanks in your sweat!
Playing at our online casino offers endless entertainment
and the chance to win big. With a vast selection of games, exciting bonuses,
and a secure environment, there’s no better place to enjoy the thrill of casino
gaming. Join us today and experience the ultimate online casino adventure.
By choosing to play online casino games with us, you’re not
only opting for fun and excitement but also for a safe and
rewarding gaming experience. Don’t wait any longer – dive into the world of gambling anime and start your journey
to success now.
Regards! Helpful stuff.
Hi there, for all time i used to check webpage posts here early in the break of day, since i enjoy to find out more and more.
Hello there, I found your website by the use of Google even as searching for a comparable matter, your web site got here up, it appears great.
I’ve bookmarked it in my google bookmarks.
Hi there, simply became aware of your weblog via Google, and found that it’s really informative.
I am going to watch out for brussels. I’ll appreciate if you proceed this in future.
A lot of other folks can be benefited from your writing.
Cheers!
A片
Good day I am so grateful I found your blog page,
I really found you by accident, while I was browsing on Digg for
something else, Anyhow I am here now and would just like to say many thanks for a marvelous post and a all round interesting blog (I also love the theme/design), I
don’t have time to read through it all at the moment but
I have bookmarked it and also included your RSS
feeds, so when I have time I will be back to read a great deal more, Please do keep up the excellent b.
Hello it’s me, I am also visiting this website on a regular basis, this website is
in fact pleasant and the users are truly sharing fastidious thoughts.
Greate post. Keep posting such kind of information on your
site. Im really impressed by your site.
Hello there, You’ve done an excellent job. I’ll definitely digg it and for my
part recommend to my friends. I’m confident they will be benefited from this website.Discover the truth
behind Tina’s psychic soulmate sketch with this in-depth
review. Uncover the accuracy and insights provided by this unique service.
Do you mind if I quote a couple of your articles as long as I
provide credit and sources back to your blog? My blog is
in the very same niche as yours and my visitors would certainly benefit from a lot of the information you present
here. Please let me know if this ok with you.
Appreciate it!
How To Create Successful Play Slots Online Tutorials On Home kaymell.uk
I read this piece of writing fully on the topic of the difference of most recent and previous technologies,
it’s remarkable article.
how to buy clomid price: cost of clomid – how to get cheap clomid prices
Автомобили Hongqi https://hongqi-krasnoyarsk.ru в наличии – официальный дилер Hongqi Красноярск
Hi mates, how is all, and what you desire to say concerning this post, in my view its in fact remarkable in favor of me.
Liverpool https://england.liverpool-ar.com holds a special place in the history of football in England.
Undeniably believe that which you said. Your favorite reason seemed to be on the internet the easiest thing
to be aware of. I say to you, I certainly get annoyed while people think about worries that they just do not know about.
You managed to hit the nail upon the top and defined out
the whole thing without having side effect , people could take a signal.
Will probably be back to get more. Thanks
Hi there! Someone in my Myspace group shared this website with us so I came to give it a
look. I’m definitely loving the information. I’m book-marking and will be tweeting
this to my followers! Terrific blog and terrific style and design.
Priyanka Chopra https://baywatch.priyankachopra-ar.com is an Indian actress, singer, film producer and model who has achieved global success.
I know this if off topic but I’m looking into starting my own blog and was wondering what all
is required to get set up? I’m assuming having
a blog like yours would cost a pretty penny?
I’m not very web smart so I’m not 100% positive.
Any suggestions or advice would be greatly appreciated. Cheers
When Taylor Swift https://shake-it-off.taylor-swift-ar.com released “Shake It Off” in 2014, she had no idea how much the song would impact her life and music career.
Everything posted was actually very logical. But, consider this, suppose
you were to create a killer headline? I mean, I don’t wish to tell you how to run your blog, but what if you added a headline that makes
people desire more? I mean Center For Literacy: BTS – JAMES POWERS:
(907)764-6500 Cinematographer // SFX is a little plain. You should peek at Yahoo’s home page and note how they write news
headlines to grab people to click. You might add a video
or a pic or two to grab readers interested about everything’ve written. Just my opinion, it could make
your blog a little bit more interesting.
The People Closest To Glazing Repair Share Some Big Secrets jerealas
https://clomiddelivery.pro/# cost clomid without a prescription
https://groups.google.com/g/correct-comment/c/yqcTK5hWCe8
https://groups.google.com/g/objective-tests/c/lqgEdlo-H9M
Everyone loves what you guys tend to be up too.
This sort of clever work and reporting! Keep up the amazing works guys I’ve added you
guys to our blogroll.
https://groups.google.com/g/we-experienced/c/RLxFx8aJx-s
There is so much to try to understand
Great weblog here! Additionally your site lots up very fast!
What web host are you using? Can I am getting your affiliate
link for your host? I desire my web site loaded up as quickly as yours lol
https://groups.google.com/g/user-guidance/c/GtGAt0g2iwE
Wonderful website you have here but I was wanting to
know if you knew of any user discussion forums that cover
the same topics discussed in this article?
I’d really love to be a part of community where
I can get feedback from other knowledgeable individuals that share the same interest.
If you have any recommendations, please let me know.
Cheers!
I’ve been browsing online more than three hours today, yet I never found
any interesting article like yours. It is pretty worth enough for
me. In my view, if all website owners and bloggers made good content
as you did, the internet will be much more useful than ever before.
Hi there! Someone in my Myspace group shared this
website with us so I came to give it a look.
I’m definitely enjoying the information. I’m book-marking
and will be tweeting this to my followers! Terrific blog and outstanding design.
It’s really very complex in this full of activity life to listen news on Television, therefore I just use web for that purpose, and obtain the most up-to-date information.Find out
if Tina Aldea’s work is effective and worth your time.
Uncover the truth about Tina Aldea’s work and its impact.
лучшее бесплатное порно 2024 [url=https://best-free-porno.ru/]https://best-free-porno.ru/[/url] .
It is truly a nice and useful piece of info. I am satisfied that you just shared this helpful information with us.
Please stay us informed like this. Thanks for sharing.
Jennifer Lopez https://lets-get-loud.jenniferlopez-ar.com was born in 1969 in the Bronx, New York, to parents who were Puerto Rican immigrants.
https://groups.google.com/g/smart-decision/c/zGRJhCdJM20
I am in fact grateful to the holder of this site who has shared this wonderful piece of writing at at this time.
Woah! I’m really digging the template/theme of this blog.
It’s simple, yet effective. A lot of times it’s challenging to get that “perfect balance”
between superb usability and visual appearance.
I must say you have done a great job with this. Additionally, the blog loads extremely quick for me
on Chrome. Outstanding Blog!
Very good blog post. I definitely appreciate this website.
Keep it up!
https://groups.google.com/g/smart-choice-2024/c/_6tVrh6FOAc
https://groups.google.com/g/quality-audit-2024/c/aVYw2uiWwQs
Hi, i feel that i saw you visited my web site thus i got
here to go back the choose?.I’m attempting to to find
things to improve my web site!I guess its good enough to make use of some of your concepts!!
http://doxycyclinedelivery.pro/# doxycycline otc drug
buying cheap clomid without insurance [url=http://clomiddelivery.pro/#]how to get generic clomid online[/url] cost of clomid without insurance
Appreciate the recommendation. Let me try it out.
I’m no longer certain where you’re getting your information, but good topic.
I must spend some time finding out much more or figuring out more.
Thanks for magnificent info I was looking for this information for my mission.
Wow! Finally I got a weblog from where I can really obtain helpful facts regarding my study and knowledge.
It’s awesome in support of me to have a website, which is valuable designed for my knowledge.
thanks admin
I have read a few excellent stuff here. Certainly worth
bookmarking for revisiting. I surprise how so much attempt you place to create one
of these excellent informative web site.
My programmer is trying to persuade me to move to .net
from PHP. I have always disliked the idea because of the costs.
But he’s tryiong none the less. I’ve been using WordPress on various websites for about
a year and am concerned about switching to another platform.
I have heard great things about blogengine.net. Is there
a way I can transfer all my wordpress content into it?
Any kind of help would be really appreciated!
Hello! I simply wish to offer you a big thumbs up for the great information you have right here on this post. I will be coming back to your site for more soon.
It’s wonderful that you are getting thoughts from this piece of writing as well as from our dialogue made at this time.
https://groups.google.com/g/user-guide/c/XN19_wZ8ueQ
Normally I do not read article on blogs, however I wish to say that this write-up
very forced me to check out and do it! Your writing taste has been surprised me.
Thank you, quite nice post.
This is the right webpage for anyone who really wants to understand this topic.
You know a whole lot its almost hard to argue with you (not
that I personally will need to…HaHa). You certainly put
a fresh spin on a topic that’s been discussed for a long time.
Excellent stuff, just excellent!
https://groups.google.com/g/smart-review/c/RGrbKwy1wOo
Nice post. I was checking constantly this blog and I’m impressed!
Very useful information specifically the last part 🙂 I care for such info a lot.
I was seeking this certain info for a very long time.
Thank you and best of luck.
Thanks for sharing your thoughts on Curse of Anubis Slot Demo.
Regards
Fantastic stuff, Cheers.
Hi there, just became alert to your blog through Google,
and found that it’s truly informative. I am gonna watch out for brussels.
I’ll appreciate if you continue this in future. Many people will be benefited from
your writing. Cheers!
I am extremely impressed along with your writing abilities
as well as with the structure to your weblog.
Is this a paid topic or did you customize it yourself?
Either way keep up the nice quality writing, it is uncommon to look a
nice weblog like this one nowadays..Discover the unique characteristics of Buddhist salt and its significance in culinary and religious practices.
dokuma lastik
I’m really impressed with your writing skills and also
with the layout on your weblog. Is this a paid theme or did you customize it yourself?
Anyway keep up the nice quality writing, it’s rare to see a great blog like this one these days.
https://groups.google.com/g/user-suggestion/c/MUjXUITpSQI
Thanks , I have just been looking for info about this topic for a while
and yours is the best I have found out so far. But, what
about the conclusion? Are you positive concerning the supply?
Hey There. I discovered your weblog the usage of
msn. That is an extremely well written article. I’ll be sure to bookmark it and
return to learn more of your helpful info. Thanks
for the post. I will definitely return.
If you are going for finest contents like I do, only pay a quick visit this website every day as it presents feature contents, thanksDiscover the captivating world of
Tina Aldea through her intricate and mesmerizing sketches that showcase her unique artistic talent.
https://groups.google.com/g/expert-opinion/c/bTtVi8T9V7Y
Wow, wonderful blog layout! How long have you ever been blogging for?
you made running a blog glance easy. The full look
of your web site is magnificent, as well as the content!
After some difficult years in the late 2010s, Manchester United https://england.manchester-united-ar.com returned to greatness in English football by 2024.
The Formula One World Championship https://world-circuit-racing-championship.formula-1-ar.com, known as the Formula Championship in motor racing, is the highest tier of professional motor racing.
Thank you for the auspicious writeup. It in fact was a amusement account it.
Look advanced to far added agreeable from you! By
the way, how could we communicate?
дизайн интерьера современный стиль фото детская дизайн интерьера
The Story Behind Electric Stove Fire Will Haunt
You Forever! 913875.xyz
What’s up mates, how is the whole thing, and what you want
to say concerning this post, in my view its genuinely remarkable in support of me.
Michael Jordan https://chicago-bulls.michael-jordan-ar.com is one of the greatest basketball players of all time, whose career with the Chicago Bulls is legendary.
Heya i am for the primary time here. I came across this board and I find It truly useful & it helped me out much.
I am hoping to present something back and aid others such as you aided
me.
I don’t even know how I stopped up here, but I assumed this publish used to be great.
I don’t recognise who you are but certainly you’re going to
a famous blogger when you aren’t already. Cheers!
I’m curious to find out what blog system you happen to be
working with? I’m experiencing some minor security issues with my latest site and
I’d like to find something more safe. Do you have any suggestions?
Your style is so unique in comparison to other people I have read stuff from.
Many thanks for posting when you have the opportunity, Guess I will just bookmark
this page.
kms auto lite windows 10
https://groups.google.com/g/right-decision/c/7Qt073nJzJE
Your style is unique compared to other people I’ve read stuff from.
I appreciate you for posting when you’ve got the opportunity, Guess I will just book mark this web site.
Have you ever considered publishing an ebook or guest authoring on other blogs?
I have a blog based upon on the same subjects you discuss and would really like to have you share some stories/information.
I know my readers would enjoy your work. If you are even remotely interested,
feel free to send me an email.Spiritual salt
is believed to originate from various sources like the Dead Sea or Himalayan mountains, known for their purity and spiritual significance.
https://groups.google.com/g/detailed-test/c/gBENROpEaGM
Way cool! Some very valid points! I appreciate you writing this write-up and the rest of the website is really good.
https://groups.google.com/g/impartial-views/c/-4afS1XlyHA
Hi there, its pleasant article on the topic of media print, we all know
media is a enormous source of information.
Thanks for your personal marvelous posting! I certainly
enjoyed reading it, you might be a great author. I will make certain to bookmark your blog and definitely will come back down the road.
I want to encourage you to continue your great writing, have a nice evening!
http://doxycyclinedelivery.pro/# doxycycline 100mg price
To show Nowitzki stability, for instance, Geschwinder had him do walking handstands or ran him round like a wheelbarrow, together with his hands on Nowitzki’s ankles. By the time Augustus got here to power, the army contained 60 legions.
https://groups.google.com/g/review-center-2024/c/m98p5yNqiSo
Realise The Right Car With Personal Car Lending 다바오 설치방법 (http://usenergydrilling.net)
Whats up very cool web site!! Man .. Beautiful .. Amazing ..
I will bookmark your blog and take the feeds additionally? I’m satisfied to search
out so many helpful information right here within the submit,
we want work out extra strategies in this regard, thank you for sharing.
. . . . .Discover the effectiveness of spiritual salt and its potential benefits.
Uncover the truth behind whether spiritual salt truly works as believed.
What’s up, all is going perfectly here and ofcourse every one is sharing information, that’s genuinely excellent, keep
up writing.Discover genuine Tina Aldea reviews to make
informed decisions. Get insights and feedback from real users about Tina Aldea’s
products or services.
Way cool! Some very valid points! I appreciate you writing this write-up and
also the rest of the website is also very good.
Quality content is the main to be a focus for the users to visit
the website, that’s what this site is providing.
https://groups.google.com/g/expert-review/c/FcuTdtXUaa8
https://groups.google.com/g/expert-tests/c/qkvd2-soGeo
I’ve been browsing on-line more than 3 hours these days, yet I by no means found any attention-grabbing article
like yours. It is beautiful worth enough for me.
Personally, if all site owners and bloggers made just right content as you did, the internet will likely be a lot more
useful than ever before.
What’s up, this weekend is fastidious in support of me, for the reason that this occasion i am reading this fantastic informative piece of writing here at my house.Uncover the truth
about the Quantum Attraction Code – Is it a scam or a legitimate program?
Find out all you need to know before making any decisions.
Montenegro luxury car rental https://montenegro-car-rental-hire.com
Mike Tyson https://american-boxer.mike-tyson-ar.com one of the most famous and influential boxers in history, was born on June 30, 1966 in Brooklyn, New York.
I used to be suggested this web site by way of my cousin.
I am not certain whether or not this submit is written via him as no
one else realize such targeted approximately my trouble.
You’re amazing! Thanks!
Muhammad Ali https://american-boxer.muhammad-ali-ar.com is perhaps one of the most famous and greatest athletes in the history of boxing.
Manny Pacquiao https://filipino-boxer.manny-pacquiao-ar.com is one of the most prominent boxers in the history of the sport.
Hey There. I found your weblog the use of msn. This is a really well written article.
I’ll be sure to bookmark it and return to learn extra of your useful information. Thank you for the post.
I will certainly comeback.
Ten Doctor Windows That Really Improve Your Life doctor windows
Hello i am kavin, its my first time to commenting anywhere, when i read this paragraph i
thought i could also create comment due to this brilliant piece of writing.
Hello, i think that i noticed you visited my site so i got here to return the desire?.I
am trying to to find issues to improve my web site!I guess its ok to make
use of some of your ideas!!
Hey there! This is my first visit to your blog!
We are a group of volunteers and starting a new project in a community in the same niche.
Your blog provided us valuable information to work on. You have
done a wonderful job!
buy generic ciprofloxacin: ciprofloxacin 500mg buy online – ciprofloxacin generic
My spouse and I stumbled over here different website and
thought I might as well check things out. I like what I see
so i am just following you. Look forward to exploring your web page again.
https://amoxildelivery.pro/# buy amoxicillin online mexico
Paxlovid buy online [url=http://paxloviddelivery.pro/#]paxlovid covid[/url] paxlovid india
Why Do So Many People Want To Know About Washer 10kg?
Eleanore
This is the right site for anybody who wishes to find out about this topic.
You realize so much its almost tough to argue with
you (not that I personally will need to…HaHa).
You definitely put a new spin on a subject which
has been discussed for decades. Great stuff, just
excellent!
лучшее порево [url=www.besplatny-sex-online.ru/]лучшее порево[/url] .
We are a group of volunteers and starting a new scheme in our community.
Your website offered us with valuable information to work on. You’ve done an impressive job and our whole community
will be thankful to you.
See What The Door Doctor Near Me Tricks The Celebs Are Using door doctor near Me
Genuinely no matter if someone doesn’t know then its up to other viewers that they will help, so here
it takes place.
What’s Going down i’m new to this, I stumbled upon this
I have found It absolutely helpful and it has helped me out loads.
I’m hoping to give a contribution & aid other users like its aided me.
Great job.
We stumbled over here from a different website and thought I
should check things out. I like what I see so i am just following you.
Look forward to finding out about your web page for a second time.
With thanks, Wonderful information.
Hey, I think your site might be having browser compatibility issues.
When I look at your blog site in Ie, it looks fine but when opening in Internet Explorer, it has
some overlapping. I just wanted to give you a quick heads up!
Other then that, amazing blog!
Hi, I do think this is a great blog. I stumbledupon it 😉 I am going to return once again since I bookmarked it. Money and freedom is the best way to change, may you be rich and continue to guide other people.
I used to be suggested this web site by means of
my cousin. I am not positive whether or not this
publish is written via him as nobody else recognise such detailed approximately my difficulty.
You’re wonderful! Thanks!
Time On Your Student Loan Consolidation Loan? 공무원 대출
http://paxloviddelivery.pro/# paxlovid price
Wow lots of beneficial advice!
Howdy! I could have sworn I’ve visited this blog before but after going through some of the articles I realized
it’s new to me. Anyhow, I’m definitely delighted I stumbled upon it and
I’ll be bookmarking it and checking back often!
Abandon the outdated fax machines and embrace the convenience of ComFax, the top
mobile faxing app.
Easily send and receive faxes from your iPhone or Android device, no matter where you are.
Leverage real-time tracking, high-quality document scanning, and smooth integration with cloud services like Dropbox and Google Drive.
ComFax provides secure, HIPAA-compliant faxing for all your
important documents.
Join millions of users who have improved their faxing with ComFax.
I think the admin of this site is in fact working hard in support
of his web site, because here every material is
quality based data.
Usually I don’t read article on blogs, however I wish to say that this
write-up very compelled me to check out and do it! Your writing taste has been amazed me.
Thanks, quite nice post.
always i used to read smaller content that as well clear their motive, and that is also happening with this paragraph which I am reading now.
If you would like to increase your familiarity simply keep visiting this site and
be updated with the newest gossip posted here.
I could not refrain from commenting. Very well written.
The 10 Most Terrifying Things About Auto Locksmiths Near Me auto Locksmiths near me
Heya i’m for the first time here. I came across this board and
I in finding It truly useful & it helped me out a lot. I’m hoping to present one
thing again and aid others such as you aided me.
You’ll Never Guess This Bunk Bed For Adults Uk’s Benefits full double bunk beds for adults – Marylou,
5 star hotels in istanbul turkey
It’s actually very complicated in this active life
to listen news on Television, so I simply use world wide web for that reason, and get the latest news.
Yes! Finally something about Rescue pet.
Unquestionably believe that that you said. Your favorite reason seemed to be on the web the simplest thing to
bear in mind of. I say to you, I definitely get annoyed while other folks think
about issues that they plainly do not recognize about.
You controlled to hit the nail upon the top as smartly as outlined out the entire thing with no need side
effect , other folks can take a signal. Will probably be back to get more.
Thanks
The golf https://arabic.golfclub-ar.com industry in the Arab world is growing rapidly, attracting players from all over the world.
https://clomiddelivery.pro/# cost cheap clomid no prescription
cost of amoxicillin [url=https://amoxildelivery.pro/#]amoxicillin without a prescription[/url] amoxicillin medicine
The road to the Premier League https://english-championship.premier-league-ar.com begins long before a team gets promoted to the English Premier League for the first time
15 Hot Trends Coming Soon About Volvo V50 Key nearby
The Italian football championship https://italian-championship.serie-a-ar.com known as Serie A, has seen an impressive revival in recent years.
In the German football https://german-championship.bundesliga-football-ar.com championship known as the Bundesliga, rivalries between clubs have always been intense.
In recent years, the leading positions in the Spanish https://spanish-championship.laliga-ar.com championship have been firmly occupied by two major giants – Barcelona and Real Madrid.
Ten 18 Wheeler Accident Law Firms That Really Improve Your Life 18 Wheeler Accident Law Firms
A片
Heya i am for the first time here. I came across this board and I find It really useful & it helped me out
a lot. I hope to give something back and help others like
you helped me.
Just desire to say your article is as surprising.
The clearness in your post is just spectacular and i could assume you are an expert on this subject.
Well with your permission allow me to grab your
RSS feed to keep updated with forthcoming post. Thanks a million and
please carry on the enjoyable work.
Heya! I’m at work browsing your blog from my new iphone!
Just wanted to say I love reading your blog and look forward to
all your posts! Keep up the fantastic work!
Tips And Techniques To Increase Organic Site Traffic 백링크 프로그램
Everything is very open with a clear description of the issues.
It was truly informative. Your site is useful. Thanks for
sharing!
Playing Casino Games Via The Internet 에볼루션 파워볼 결과; https://kettypay.hatenadiary.com,
Hey there just wanted to give you a quick heads up. The text in your content seem to be running off the screen in Internet
explorer. I’m not sure if this is a formatting issue or something to do with internet browser compatibility but I figured I’d post to
let you know. The style and design look great though! Hope you get the issue resolved soon. ThanksDiscover the convenience of finding spiritual salt near
you with ease. Uncover the best sources for spiritual salt in your local area.
https://groups.google.com/g/objective-view/c/_wCTBLFA_cE
https://groups.google.com/g/informed-choice/c/B4qN_Kn6iWI
I’ll immediately take hold of your rss feed as I can not to find your
e-mail subscription link or newsletter service.
Do you’ve any? Kindly allow me know in order that I may subscribe.
Thanks.
https://amoxildelivery.pro/# where can you buy amoxicillin over the counter
https://groups.google.com/g/safe-test/c/fHjJNZTsLaM
If you wish for to increase your experience simply keep visiting this site and be updated with
the most up-to-date news posted here.
I’m amazed, I have to admit. Seldom do I come across a blog that’s both equally educative and interesting, and without a doubt, you have hit the nail on the head. The issue is something that not enough folks are speaking intelligently about. I am very happy I stumbled across this in my search for something regarding this.
This site was… how do I say it? Relevant!!
Finally I have found something that helped me. Thanks!Discover an in-depth review of the Quantum Attraction Code,
exploring its effectiveness and benefits in unlocking the
secrets of the law of attraction.
https://groups.google.com/g/quality-tests/c/TZtwCDvHJF8
10 Healthy Habits To Use American Fridge Frezzers 36035372.xyz
Spot on with this write-up, I truly think this
website needs much more attention. I’ll probably be returning to see more, thanks for the info!Spiritual salt is believed to have cleansing and protective properties in various spiritual practices.
It is used to purify spaces, ward off negative energies, and enhance spiritual connections.
https://tigers168.bet/ tigers168
https://groups.google.com/g/quality-control-2024/c/HABsfOs9fOk
doxycycline 100 mg tablet: doxycycline 100mg tablet brand name – 40mg doxycycline online
https://groups.google.com/g/informed-review/c/fo2U3tu1TCA
https://groups.google.com/g/user-evaluation-2024/c/ZqAWxuw7Ndo
This is really interesting, You’re a very skilled blogger.
I’ve joined your feed and look forward to seeking more of your great post.
Also, I’ve shared your website in my social networks!Discover the power of a spiritual salt
pouch for purification, protection, and positive energy.
Enhance your spiritual practices with this ancient tool.
What’s The Most Important “Myths” Concerning 10kg Washing Machines – All Offers
Could Actually Be True http://www.023456789.xyz
I’m not sure why but this blog is loading extremely slow for
me. Is anyone else having this problem or is it a problem on my end?
I’ll check back later and see if the problem still exists.
In an era when many young footballers struggle to find their place at elite clubs, Javi’s https://barcelona.gavi-ar.com story at Barcelona stands out as an exceptional one.
Rodrigo Goes https://real-madrid.rodrygo-ar.com better known as Rodrigo, is one of the brightest young talents in modern football.
The Saudi Football League https://saudi-arabian-championship.saudi-pro-league-ar.com known as the Saudi Professional League, is one of the most competitive and dynamic leagues in the world.
EuroAvia24.com – Cheap flights, hotels and transfers around the world!
I’m extremely impressed with your writing skills and also with
the layout on your weblog. Is this a paid theme or did you modify it yourself?
Either way keep up the excellent quality writing, it’s rare to see a
great blog like this one today.
Discover honest Tina psychic reviews and complaints to make informed decisions before seeking psychic services.
Don’t Believe These “Trends” About Mesothelioma And
Asbestos cassylawn.top
Solutions To The Problems Of Special Slots high-quality Slots
I have read so many posts concerning the blogger lovers however this
paragraph is in fact a good piece of writing, keep it up.
Arsenal https://arsenal.mesut-ozil-ar.com made a high-profile signing in 2013, signing star midfielder Mesut Ozil from Real Madrid.
Appreciate this post. Let me try it out.
Thanks. A lot of data!
I visited several web sites except the audio quality for audio
songs existing at this website is really superb.
Regards, Loads of content.
Hello there, just became alert to your blog through Google,
and found that it’s really informative. I am gonna watch out for brussels.
I will be grateful if you continue this in future.
Numerous people will be benefited from your writing.
Cheers!
https://groups.google.com/g/impartial-guide/c/qqBfCYLz-X0
Howdy! I realize this is somewhat off-topic but I needed to ask.
Does managing a well-established blog such as yours require a lot of work?
I am brand new to operating a blog but I do write in my journal daily.
I’d like to start a blog so I can easily share my personal experience and
feelings online. Please let me know if you have any kind of suggestions or tips for brand new aspiring blog owners.
Appreciate it!Unlock the secrets of the Quantum Attraction Code and harness the power of the universe
to manifest your desires effortlessly. Learn how to tap into quantum principles for attracting abundance and success in all aspects of your life.
This paragraph will help the internet visitors for building up new webpage or even a blog from start to end.
Keyword Optimization – 2 Revealing Secrets The Richest Campaigners Apply!
검색엔진최적화 배우기
I’d like to thank you for the efforts you’ve put
in penning this website. I am hoping to view the same high-grade blog
posts by you in the future as well. In fact, your creative writing abilities has encouraged me to get my very own blog now 😉
You actually reported that really well!
Appreciate the recommendation. Let me try it out.
We’re a group of volunteers and opening a new scheme in our community.
Your web site provided us with valuable information to
work on. You’ve done an impressive job and our entire
community will be thankful to you.
Thibaut Courtois https://real-madrid.thibaut-courtois-ar.com was born on May 11, 1992 in Belgium.
My brother recommended I would possibly like this blog.
He was entirely right. This publish actually made
my day. You cann’t believe just how so much time I had
spent for this information! Thank you!
Bayern Munich’s https://bayern.jamal-musiala-ar.com young midfielder, Jamal Musiala, has become one of the brightest talents in European football.
My programmer is trying to convince me to move to .net
from PHP. I have always disliked the idea because of the costs.
But he’s tryiong none the less. I’ve been using Movable-type
on numerous websites for about a year and am concerned about switching to
another platform. I have heard good things about blogengine.net.
Is there a way I can import all my wordpress content into it?
Any kind of help would be greatly appreciated!
Great information. Lucky me I came across your blog by accident (stumbleupon).
I have saved it for later!
I am extremely impressed together with your writing talents and also with the layout on your blog.
Is this a paid theme or did you modify it yourself? Either way stay up the excellent high quality writing, it is rare to look a nice weblog
like this one these days..
грузовой подъемник цена купить грузовой подъемник
https://clomiddelivery.pro/# can you buy generic clomid pill
generic clomid without a prescription [url=https://clomiddelivery.pro/#]can i purchase clomid no prescription[/url] can i order generic clomid without rx
http://paxloviddelivery.pro/# paxlovid price
https://groups.google.com/g/detailed-test/c/hVVYIvJ9o9A
I got this site from my friend who informed me
about this web page and now this time I am browsing this website and reading very informative posts at this
time.
Hello, I wish for to subscribe for this blog to obtain hottest
updates, thus where can i do it please help
out.
I’ve learn several just right stuff here. Definitely worth bookmarking for revisiting.
I surprise how much effort you set to make this sort of excellent informative
web site.
https://groups.google.com/g/smart-choice-2024/c/c2eij_vUY4I
Great blog! Do you have any recommendations for aspiring writers?
I’m hoping to start my own site soon but I’m a little lost
on everything. Would you recommend starting with a free platform like WordPress or go
for a paid option? There are so many options out there that I’m totally confused ..
Any suggestions? Many thanks!
Las ciudades son responsables de una mayor parte
What Is Everyone Talking About 10 Kilo Washing
Machine Right Now 023456789.xyz
20 Insightful Quotes About Best Rated Folding Treadmill Zack Foxworth
I’m not positive the place you’re getting your information, however great
topic. I needs to spend a while finding out much more or working out more.
Thanks for great information I used to be on the lookout for this info for my mission.
First of all I would like to say wonderful blog! I had a quick question in which I’d like to
ask if you do not mind. I was curious to find out how you center yourself and clear your head before writing.
I’ve had a tough time clearing my thoughts in getting my thoughts out there.
I do enjoy writing but it just seems like the first 10 to 15 minutes tend to be lost just trying to figure
out how to begin. Any recommendations or hints? Cheers!
This article is really a pleasant one it helps new net users, who are wishing in favor of blogging.
классное порево видео [url=http://www.klassny-sex.ru]http://www.klassny-sex.ru[/url] .
Greetings! Very helpful advice in this particular post! It is the little changes which will make the most important changes. Thanks a lot for sharing!
Wow that was unusual. I just wrote an incredibly long comment but after I clicked submit my comment didn’t show up.
Grrrr… well I’m not writing all that over again. Anyway, just wanted
to say great blog!
There’s certainly a great deal to know about this issue.
I really like all the points you’ve made.
Excellent write-up. I definitely appreciate this website. Thanks!
How To Tell If You’re Ready To Princess Demo princess Pragmatic demo (https://willysforsale.com)
Hi there, just became alert to your blog through Google, and found that it is truly informative.
I’m going to watch out for brussels. I’ll appreciate if
you continue this in future. Many people will be benefited from your writing.
Cheers!
Pretty element of content. I just stumbled upon your site and
in accession capital to claim that I acquire actually
loved account your blog posts. Anyway I’ll be subscribing in your augment and
even I success you get right of entry to persistently fast.
Hello, i think that i saw you visited my website thus i came to “return the favor”.I am trying to find things to
improve my web site!I suppose its ok to use a few of your ideas!!
If some one needs to be updated with hottest technologies after that he must be go to see this web site and be
up to date all the time.
Fantastic update on vaping laws and legal changes, Thank you!
Thanks for ones marvelous posting! I really enjoyed reading it,
you could be a great author. I will make certain to bookmark your blog
and may come back from now on. I want to encourage you
to ultimately continue your great writing, have a nice holiday weekend!
Luis Suarez https://inter-miami.luis-suarez-ar.com the famous Uruguayan footballer, ended his brilliant career in European clubs and decided to try his hand at a new challenge – Major League Soccer.
Al-Nasr https://saudi.al-nassr-ar.com is one of the most famous football teams in the Kingdom of Saudi Arabia.
Al-Ittihad https://saudi.al-ittihad-ar.com is one of the most famous football clubs in Saudi Arabia. Founded in 1927, the Saudi football giant has come a long way to the pinnacle of success.
I know this if off topic but I’m looking into starting my
own weblog and was wondering what all is required to get setup?
I’m assuming having a blog like yours would cost
a pretty penny? I’m not very web savvy so I’m not 100% sure.
Any recommendations or advice would be greatly appreciated.
Thanks
Great blog! Is your theme custom made or did you download it from somewhere?
A theme like yours with a few simple adjustements would really make my
blog jump out. Please let me know where you got your
theme. Bless you
Al-Nasr Club https://saudi.al-hilal-ar.com from Riyadh has a rich history of success, but its growth has been particularly impressive in recent years.
When I originally commented I clicked the “Notify me when new comments are added”
checkbox and now each time a comment is added I get three emails with the same comment.
Is there any way you can remove me from that service?
Thanks!
What i don’t understood is in fact how you are not actually much more smartly-preferred than you
might be now. You’re very intelligent. You know thus considerably on the subject of this matter, made
me individually believe it from numerous numerous angles.
Its like women and men are not involved unless it is one thing to do with Lady gaga!
Your own stuffs great. At all times care for it up!
Hey there! Do you know if they make any plugins to assist
with Search Engine Optimization? I’m trying to get my blog to rank for some targeted keywords but I’m not seeing very good success.
If you know of any please share. Cheers!
خوشگل ترین سایت هستین که دیدم
FC Barcelona https://spain.fc-barcelona-ar.com is undoubtedly one of the most famous and well-known football clubs in the world.
What a data of un-ambiguity and preserveness of valuable experience concerning unpredicted
feelings.
Cheers, Great information.
ciprofloxacin generic price: buy cipro online without prescription – ciprofloxacin 500mg buy online
After going over a few of the articles on your blog, I seriously like your way of blogging. I added it to my bookmark website list and will be checking back in the near future. Take a look at my web site too and tell me how you feel.
I have been surfing online greater than three hours lately,
yet I by no means discovered any interesting article like
yours. It’s lovely worth sufficient for me.
In my view, if all website owners and bloggers made just right content as you probably did, the net
might be a lot more useful than ever before.
The Ugly Facts About Repairs To Double Glazing Jere Alas
I am really impressed with your writing skills
and also with the layout on your weblog. Is this a paid
theme or did you modify it yourself? Anyway keep up the nice quality writing,
it’s rare to see a nice blog like this one these days.
Hi there, this weekend is good designed for me, as this occasion i
am reading this wonderful educational piece of writing
here at my house.
Так-так, я про це і подумав, та не наважувався сказати відверто.
You actually make it seem so easy with your presentation but I find this
topic to be actually something which I think I would never understand.
It seems too complex and very broad for me.
I’m looking forward for your next post, I’ll try to get the hang of it!
Приветствую! Мое имя Clay Varela, я менеджер САНАТОРИЯ «ЗАПОЛЯРЬЕ» в Сочи.
Наш санаторий предоставляем прекрасные возможности для релаксации и лечения.
|
Наша команда делает все возможное,
чтобы каждый гость чувствовал себя как дома.
Современные комнаты, высокий уровень сервиса
и профессиональные медицинские услуги
гарантируют восстановлению здоровья.
|
Приглашаю вас в санатории «Заполярье» в
городе Сочи. Наш санаторий – идеальное место для восстановления сил
и релаксации. Посетите нас и получите настоящее удовольствие от отдыха!
What Is It That Makes Lexus Key Fob So Famous?
lexus key fob price
Hmm is anyone else experiencing problems with the pictures on this blog loading?
I’m trying to determine if its a problem on my end or if it’s the blog.
Any feedback would be greatly appreciated.
You ought to take part in a contest for one of the greatest blogs
online. I’m going to recommend this site!
all the time i used to read smaller articles that also
clear their motive, and that is also happening with this piece of writing which I am reading now.
I get pleasure from, lead to I discovered just what I used to be having
a look for. You’ve ended my 4 day long hunt! God Bless you man. Have
a great day. Bye
http://doxycyclinedelivery.pro/# cost of doxycycline australia
Woah! I’m really digging the template/theme of this blog.
It’s simple, yet effective. A lot of times it’s difficult to get that “perfect balance” between user friendliness and visual appeal.
I must say that you’ve done a fantastic job with this. Also, the blog loads very fast
for me on Chrome. Excellent Blog!
Hello, its pleasant article about media print, we all be aware of media is a great
source of information.
10 Meetups On Asbestos Attorney You Should Attend cassylawn
Hi, everything is going nicely here and ofcourse every one is
sharing information, that’s genuinely good, keep up
writing.
https://clomiddelivery.pro/# can i order cheap clomid pills
cipro ciprofloxacin [url=http://ciprodelivery.pro/#]buy generic ciprofloxacin[/url] buy generic ciprofloxacin
порно видео онлайн [url=http://apteka-porno.ru/]порно видео онлайн[/url] .
Hello There. I found your weblog using msn. That is a really neatly written article.
I will be sure to bookmark it and come back to learn more of your helpful information. Thank you for the post.
I will definitely return.
Have you ever thought about adding a little bit more than just your articles?
I mean, what you say is fundamental and all. But think of if you added some great
visuals or video clips to give your posts more, “pop”! Your content is excellent but
with pics and clips, this website could definitely be one of the best in its niche.
Superb blog!
Heya i am for the first time here. I found this
board and I find It really useful & it helped me out a lot.
I hope to give something back and help others
like you aided me.
That is very fascinating, You’re an excessively professional
blogger. I’ve joined your rss feed and look ahead to in search of more
of your great post. Additionally, I’ve shared your website in my social networks
成人影片 (Rebecca)
Howdy would you mind stating which blog platform you’re working with?
I’m looking to start my own blog in the near future but I’m having
a difficult time choosing between BlogEngine/Wordpress/B2evolution and Drupal.
The reason I ask is because your design seems different then most blogs and I’m looking for something unique.
P.S Sorry for getting off-topic but I had
to ask!
I’m gone to inform my little brother,that he should also pay a visit this bllg on regular
basis to take updated from newest news update.
My site: 性愛視頻 (sexhub.red)
My relatives always say that I am wasting my time here at net,
except I know I am getting know-how every day by reading such pleasant articles or
reviews.
Казино Р7: Ваш Проводник в Мир Азарта р7 казино
Hmm is anyone else experiencing problems with the images on this blog loading?
I’m trying to find out if its a problem on my end or if it’s
the blog. Any responses would be greatly appreciated.
Right now it sounds like BlogEngine is the best blogging platform available right now.
(from what I’ve read) Is that what you are using on your
blog?
It is truly a great and useful piece of info.
I am glad that you simply shared this helpful information with us.
Please keep us up to date like this. Thank you for sharing.
Everyone loves what you guys are up too. This kind of clever work and coverage!
Keep up the terrific works guys I’ve you guys to our blogroll.
A片
You really make it seem so easy with your presentation but I find this
matter to be actually something which I think I would never understand.
It seems too complicated and extremely broad for me. I’m looking forward
for your next post, I’ll try to get the hang of it!
This post provides clear idea for the new users of blogging, that truly how to do running a blog.
This is a topic that’s close to my heart… Thank you! Exactly where are your contact details though?
лучшая коллекция порно [url=http://www.porn-library.ru]лучшая коллекция порно[/url] .
helloI like your writing very so much proportion we keep up a correspondence extra approximately your post on AOL I need an expert in this space to unravel my problem May be that is you Taking a look forward to see you
I was curious if you ever thought of changing the page layout of your site?
Its very well written; I love what youve got to say.
But maybe you could a little more in the way of content so
people could connect with it better. Youve got an awful lot of text for only having one or 2 images.
Maybe you could space it out better?
prestige 46 https://boat-hire-in-montenegro.com
Are You Able To Research ADHD Diagnosis Online http://www.9326527.xyz
rent a boat Montenegro rent a boat Montenegro
“Ask Me Anything,” 10 Responses To Your Questions About Personal Injury Attorney
Personal injury attorneys [https://peatix.com]
Hi Gսys, I have had this inventіon for 5 yeaгs no investors and rɑn оut of
cash I love it and thiink it is a huge televіsion infomerϲіal hit I have a sample amature ѵideo of the Amɑzing Dog
Talker. I hopе you will give me a call and an emaіl address to send you the video.
Nine Things That Your Parent Taught You About Upvc Window
Repairs Near Me Window Repairs Near Me
When someone writes an piece of writing he/she retains the thought
of a user in his/her brain that how a user can know it. So that’s why this
post is outstdanding. Thanks!
I don’t even know how I ended up here, but I thought this post was great.
I do not know who you are but definitely you’re going to a famous blogger if you aren’t already ;
) Cheers!
Greetings! I’ve been reading your site for a long time now
and finally got the bravery to go ahead and give you a shout out from Kingwood Tx!
Just wanted to tell you keep up the fantastic work!
Arsenal https://england.arsenal-ar.com is one of the most famous and successful football clubs in the history of English football.
Real Madrid’s https://spain.real-madrid-ar.com history goes back more than a century. The club was founded in 1902 by a group of football enthusiasts led by Juan Padilla
FC Bayern Munich (Munich) https://germany.bayern-munchen-ar.com is one of the most famous and recognized football clubs in Germany and Europe
It’s an amazing post in support of all the internet people; they will take advantage from it I am sure.
https://doxycyclinedelivery.pro/# where can i order doxycycline
The Reasons You Should Experience Fridge Freezers For Sale
At The Very Least Once In Your Lifetime Fridge freezer In uk
Great blog here! Also your site loads up very fast!
What web host are you using? Can I get your affiliate link to your host?
I wish my website loaded up as fast as yours lol
Great article, exactly what I needed.
An impressive share! I have just forwarded this onto a coworker
who has been conducting a little research on this.
And he in fact ordered me dinner simply because I discovered it for him…
lol. So let me reword this…. Thank YOU for the meal!!
But yeah, thanx for spending some time to talk about this subject here on your website.
Thanks a lot for sharing this with all folks you really recognise
what you’re speaking approximately! Bookmarked. Please additionally seek advice from my site =).
We will have a link alternate agreement among
us
Excellent post. I was checking constantly this blog and I’m impressed!
Very helpful information particularly the last part 🙂 I care for such info a lot.
I was seeking this particular info for a very long time.
Thank you and good luck.
Hello, I wish for to subscribe for this website to obtain latest updates,
so where can i do it please help out.
Discover our comprehensive Java Burn reviews to learn about this weight loss supplement’s effectiveness,
ingredients, and real user experiences.
An outstanding share! I’ve just forwarded this onto a colleague who had been conducting a little research on this.
And he actually bought me lunch because I stumbled upon it for him…
lol. So allow me to reword this…. Thanks for the meal!!
But yeah, thanks for spending the time to discuss this subject here
on your web page.
Aw, this was a very good post. Finding the time and actual effort to generate a
great article… but what can I say… I procrastinate
a lot and never seem to get anything done.
My blog post … porn video
What i don’t understood is in fact how you’re not really much
more smartly-appreciated than you may be right now.
You are so intelligent. You understand thus considerably relating to this subject, produced me
personally believe it from a lot of numerous angles. Its like men and women aren’t
fascinated until it’s something to accomplish with Girl gaga!
Your own stuffs nice. All the time maintain it up!
Magnificent web site. Lots of helpful info here.
I’m sending it to some pals ans additionally
sharing in delicious. And certainly, thank you in your sweat!
Hey! Someone in my Facebook group shared this site with us so
I came to give it a look. I’m definitely enjoying the information.
I’m bookmarking and will be tweeting this to my followers!
Great blog and excellent style and design.
Amazing plenty of very good tips.
amoxicillin 500 tablet: where to buy amoxicillin 500mg – amoxicillin generic
What’s up Dear, are you actually visiting this site regularly, if so then you will definitely get nice know-how.
Thai Company Directory https://thaicorporates.com List of companies and business information.
Your style is very unique compared to other people I have read stuff from.
Thanks for posting when you have the opportunity, Guess I’ll just bookmark this
site.
типография сайт бумажные пакеты
Ремонт плоской кровли https://remontiruem-krovly.ru в Москве, цена работы за 1 м?. Прайс лист на работы под ключ, отзывы и фото.
AC Milan https://italy.milan-ar.com is one of the most successful and decorated football clubs in the world.
The Secret Life Of How To Get An ADHD Diagnosis private adhd
diagnosis london (Elissa)
I think this is one of the most significant info for me.
And i am glad reading your article. But want to remark on some general things, The website style is great, the articles is really great : D.
Good job, cheers
Explore in-depth Java Burn reviews to uncover
the effectiveness, ingredients, and real user experiences of this popular weight loss
supplement.
شور ترشی مخلوط
Hey there, You have done a fantastic job. I will certainly digg it and personally suggest to my friends.
I’m confident they will be benefited from this site.
پاکت جاروبرقی بوش اصلی
When someone writes an article he/she keeps the idea of a user
in his/her mind that how a user can understand it.
So that’s why this piece of writing is great. Thanks!
I have to thank you for the efforts you have put in penning this website.
I’m hoping to view the same high-grade content from you in the future as
well. In fact, your creative writing abilities
has inspired me to get my own, personal blog now 😉
Hi, after reading this awesome post i am as well happy to share my experience here with friends.
Explore our detailed Java Burn reviews to uncover if this weight loss supplement
is truly effective. Discover the benefits, side effects, and real customer experiences.
I’m not that much of a internet reader to be honest but your sites really nice, keep it up!
I’ll go ahead and bookmark your website to come back in the future.
All the best
Five Killer Quora Answers To Replacement Double Glazing Units Near
Me double glazing units near me
This is very interesting, You’re a very skilled
blogger. I’ve joined your rss feed and look forward to seeking
more of your fantastic post. Also, I have shared your website in my social networks!
Incredible points. Solid arguments. Keep up the great spirit.
freemaple.today
Galatasaray https://turkey.galatasaray-ar.com is one of the most famous football clubs in Turkiye, with a glorious and eventful history.
hi!,I love your writing so so much! share we be in contact
more about your post on AOL? I require an expert on this house to unravel my problem.
Maybe that’s you! Looking ahead to look you.
The fascinating story of Ja Morant’s https://spain.atletico-madrid-ar.com meteoric rise, from status from rookie to leader of the Memphis Grizzlies and rising NBA superstar.
In the world of football, Atletico Madrid https://spain.atletico-madrid-ar.com has long been considered the second most important club in Spain after the dominant, Real Madrid.
Thank you for some other excellent article. Where
else may just anybody get that kind of info in such a perfect means
of writing? I’ve a presentation next week, and I am at the look for such info.
Great delivery. Great arguments. Keep up the good work.
Как воспользоваться зеркалом Gama
Casino гама казино вход
Repair Upvc Window: A Simple Definition upvc window repair (http://www.instapaper.com)
I do consider all the ideas you’ve presented on your
post. They’re really convincing and can definitely work.
Nonetheless, the posts are very quick for newbies.
May you please prolong them a bit from next time?
Thank you for the post.
Excellent post. I am dealing with many of these issues as well..
Discover the Puravive side effects in this comprehensive guide.
Understand the risks and make informed decisions about
using this product.
Your style is really unique in comparison to other people I
have read stuff from. Thank you for posting when you’ve got the opportunity, Guess I’ll just bookmark
this site.
The future football star Shabab Al-Ahly https://dubai.shabab-al-ahli-ar.com was born in Dubai in 2000. From a young age, he showed exceptional football abilities and joined the youth academy of one of the UAE’s leading clubs, Shabab Al-Ahly.
Hello! I just wanted to ask if you ever have any issues with hackers?
My last blog (wordpress) was hacked and I ended up losing many months of hard work
due to no back up. Do you have any solutions to stop hackers?
Beneficial postings, Cheers!
Howdy! Do you use Twitter? I’d like to follow you if
that would be ok. I’m definitely enjoying your blog and look forward
to new updates.
Neat blog! Is your theme custom made or did you download
it from somewhere? A theme like yours with a few simple adjustements would really make my blog
shine. Please let me know where you got your theme. Bless
you
Nice post. I learn something new and challenging on websites I stumbleupon everyday.
It’s always exciting to read through content from other authors and use something from their sites.
Simply desire to say your article is as astonishing.
The clarity in your post is just excellent and i can assume you’re an expert on this
subject. Well with your permission let me to grab your RSS
feed to keep updated with forthcoming post. Thanks a million and please
carry on the gratifying work.
Its like you read my mind! You appear to know a lot about this, like you
wrote the book in it or something. I think that you could do with some pics to drive the message home a
bit, but other than that, this is fantastic blog.
An excellent read. I’ll definitely be back.
We are a group of volunteers and opening a new scheme in our community.
Your web site provided us with valuable info to work on. You have done a formidable job and our entire community will be
grateful to you.
купить новую квартиру в новостройке купить новостройку от застройщика
квартиры с отделкой от застройщика купить 1 квартиру в новостройке
квартиры от застройщика жк https://kvartiru-kupit43.ru
The Evolution Of Small Wood Burning Stove 5829186
Indibet is a premier online casino offering a wide array of games including slots, table games, and live dealer options. Renowned for its user-friendly interface and robust security measures, Indibet ensures a top-notch gaming experience with exciting bonuses and 24/7 customer support.
It’s remarkable to go to see this website and reading the views
of all friends concerning this paragraph, while I am also eager of getting familiarity.
It’s actually a great and useful piece of info.
I am glad that you simply shared this helpful information with us.
Please stay us informed like this. Thanks for sharing.
Thanks for finally writing about > Center For Literacy: BTS – JAMES POWERS: (907)764-6500 Cinematographer // SFX < Loved it!
I do consider all of the ideas you have introduced on your post.
They are really convincing and will certainly work. Nonetheless, the posts are too short for
beginners. May just you please prolong them a bit from subsequent time?
Thank you for the post.
You definitely made your point!
Every weekend i used to pay a quick visit this web site,
as i want enjoyment, since this this web site conations genuinely nice funny material too.
Wow, fantastic blog layout! How long have you been blogging
for? you made blogging look easy. The overall look of your website
is great, let alone the content!
Do you mind if I quote a couple of your posts as long as I provide credit and
sources back to your webpage? My blog site is in the exact same niche as yours and my users would genuinely benefit from a
lot of the information you provide here. Please let me know if this alright with you.
Thanks!
Today, while I was at work, my sister stole my iphone and tested to see if it can survive a 25 foot drop, just so she can be a youtube sensation. My iPad is now broken and she has 83 views.
I know this is completely off topic but I had to share it with someone!
Tod Peck is what his wife loves to call him but he
never really liked that name. For years she’s been working as a payroll sales person. The thing he adores most usually keep
birds and he is trying additional medications . it an occupation. District of Columbia is actually his home.
You actually said that very well!
It’s actually a great and helpful piece of information. I am satisfied that you simply shared this helpful info with us.
Please stay us informed like this. Thank you for sharing.
Thank you a bunch for sharing this with all oof us you actually rewalize
what you’re speaking about! Bookmarked. Kindly additionally discuss with
my web site =). We wil have a link change agreemment between us
We’re a gaggle of volunteers and opening a new scheme in our community.
Your site offered us with useful information to work on.
You have performed an impressive task and our entire group
will likely be grateful to you.
buy cipro online usa: antibiotics cipro – п»їcipro generic
Discover your perfect stay with WorldHotels-in.com, your ultimate destination for finding the best hotels worldwide! Our user-friendly platform offers a vast selection of accommodations to suit every traveler’s needs and budget. Whether you’re planning a luxurious getaway or a budget-friendly adventure, we’ve got you covered with our extensive database of hotels across the globe. Our intuitive search features allow you to filter results based on location, amenities, price range, and guest ratings, ensuring you find the ideal match for your trip. We pride ourselves on providing up-to-date information and competitive prices, often beating other booking sites. Our detailed hotel descriptions, high-quality photos, and authentic guest reviews give you a comprehensive view of each property before you book. Plus, our secure booking system and excellent customer support team ensure a smooth and worry-free experience from start to finish. Don’t waste time jumping between multiple websites – http://www.WorldHotels-in.com brings the world’s best hotels to your fingertips in one convenient place. Start planning your next unforgettable journey today and experience the difference with WorldHotels-in.com!
Its like you read my mind! You seem to know so much
about this, like you wrote the book in it or something.
I think that you can do with some pics to drive the message home a
little bit, but instead of that, this is fantastic blog.
A great read. I will definitely be back.
If you are going for finest contents like I do, only
pay a quick visit this site daily because it gives feature contents,
thanks
I have read so many posts about the blogger lovers except
this paragraph is actually a fastidious paragraph, keep
it up.
15 Amazing Facts About Slot Barry
I like what you guys are up too. This type of clever work and
exposure! Keep up the terrific works guys I’ve included you
guys to blogroll.
Do you mind if I quote a few of your posts as
long as I provide credit and sources back to your weblog?
My blog is in the exact same area of interest as yours and my users would definitely
benefit from a lot of the information you provide here.
Please let me know if this okay with you. Thank you!
Fastidious answer back in return of this difficulty with real arguments and explaining everything about that.
Hello, Neat post. There’s a problem with your site in web explorer, may test this?
IE still is the marketplace leader and a huge
element of folks will leave out your wonderful writing due to
this problem.
Amazing advice, Thanks!
Thanks for a marvelous posting! I certainly enjoyed reading it, you are a great author.
I will make certain to bookmark your blog and may come back later in life.
I want to encourage continue your great work, have a nice
weekend!
Установка систем вентиляции и кондиционирования — сложный процесс, который требует профессионального подхода и соблюдения стандартов. Мы предлагаем
https://aria-vent.ru/ пусконаладку и техобслуживание таких систем. Используем качественные материалы и современное оборудование, чтобы обеспечить надёжность и долговечность. Обращайтесь к нам, и мы создадим комфортный микроклимат в вашем доме или офисе.
Good write ups. Regards.
The Most Hilarious Complaints We’ve Seen About Upvc Window Repairs Upvc Window Repairs Near Me
I was curious if you ever considered changing the page
layout of your site? Its very well written; I love what
youve got to say. But maybe you could a little more in the way of content so people could connect with
it better. Youve got an awful lot of text for only having
1 or two images. Maybe you could space it out better?
It’s going to be end of mine day, except before end I am
reading this fantastic piece of writing to improve my
knowledge.
Howdy I am so glad I found your website, I really found you
by accident, while I was researching on Google for something else, Nonetheless I am here now and would just
like to say thank you for a remarkable post and a all round entertaining blog (I also love the theme/design), I don’t have time to read through it all at the moment but I
have book-marked it and also added in your RSS feeds, so when I have time I will be back to read much more, Please do keep up the excellent
jo.
Hello! This is kind of off topic but I need some
advice from an established blog. Is it very difficult to set up your own blog?
I’m not very techincal but I can figure things out pretty
quick. I’m thinking about making my own but I’m not sure where to begin. Do you have any tips or suggestions?
Appreciate it
Hi, every time i used to check website posts here
in the early hours in the morning, because i enjoy
to learn more and more.
Generally I do not read article on blogs, but I would like to say that this write-up
very compelled me to check out and do it! Your writing taste has been amazed me.
Thank you, quite great post.
This website was… how do you say it? Relevant!! Finally I have found something which helped me. Many thanks!
купить квартиру новостройке застройщика цены https://novye-kvartiryspb.ru
недвижимость новостройки купить https://novye-kvartiry-spb.ru
The Unseen Story Behind Solana’s Originator Toly Yakovenko’s Achievement
After A Pair of Mugs of Coffees and a Ale
Yakovenko, the innovator behind Solana, began his journey with a simple routine – coffee and beer. Unbeknownst to him, these occasions would set the cogs of his destiny. Today, Solana stands as an influential competitor in the digital currency realm, featuring a worth in billions.
Initial Ethereum ETF Sales
The Ethereum exchange-traded fund lately was introduced with a huge trading volume. This historic event witnessed various spot Ethereum ETFs from various issuers commence trading on American exchanges, introducing unprecedented activity into the typically calm ETF trading environment.
Ethereum ETF Approval by SEC
The Commission has given the nod to the Ethereum exchange-traded fund for listing. Being a cryptographic asset that includes smart contracts, Ethereum is anticipated to significantly impact the blockchain sector thanks to this approval.
Trump and Bitcoin
As the election approaches, Trump portrays himself as the “Crypto President,” constantly highlighting his endorsement of the crypto sector to win voters. His method varies from Biden’s approach, aiming to capture the support of the cryptocurrency community.
Elon Musk’s Influence
Musk, a notable figure in the digital currency sector and a backer of Trump’s agenda, stirred things up once more, propelling a meme coin connected to his actions. His participation keeps influencing market dynamics.
Recent Binance News
Binance’s unit, BAM, has been allowed to allocate customer funds in U.S. Treasury securities. Additionally, Binance marked its seventh anniversary, underscoring its development and securing multiple compliance licenses. Simultaneously, the company also announced plans to remove several major crypto trading pairs, affecting different market players.
AI and Market Trends
Goldman Sachs’ top stock analyst recently commented that AI is unlikely to cause a major economic changeHere’s the spintax version of the provided text with possible synonyms
новостройки купить цены купить 1 комнатную квартиру в новостройке
Hi Neat post There is a problem along with your website in internet explorer would test this IE still is the market chief and a good section of other folks will pass over your magnificent writing due to this problem
This information is priceless. How can I find out more?
purchase norfloxacin pill – buy eulexin cheap confido online
Howdy very nice site!! Guy .. Excellent .. Wonderful
.. I’ll bookmark your website and take the feeds also?
I’m happy to seek out so many useful info here within the publish,
we want work out extra strategies in this regard, thanks for sharing.
. . . . .
купить 1 квартиру в новостройке https://kvartirukupit43.ru
купить квартиру в новостройке купить новостройку с отделкой
Thank you for the good writeup. It in reality was a amusement account it.
Glance complicated to more brought agreeable from you! However, how can we keep in touch?
When I originally commented I clicked the “Notify me when new comments are added” checkbox and now each
time a comment is added I get three e-mails with the same
comment. Is there any way you can remove me from that service?
Thanks!
You need to be a part of a contest for one of the finest sites on the internet. I will recommend this blog!
оборудование конференц зала [url=http://oborudovanie-dlja-konferenc-zalov.ru]оборудование конференц зала[/url] .
Link exchange is nothing else however it is simply placing
the other person’s web site link on your page at
appropriate place and other person will also do same for you.
Hello to all, it’s in fact a pleasant for me to pay a quick visit
this web page, it includes important Information.
It is truly a great and useful piece of info. I am happy that you shared this useful information with
us. Please stay us up to date like this. Thanks for sharing.
Hey there! I just wish to give you a big thumbs up for your excellent
information you have got right here on this post. I’ll be coming back to your site for
more soon.
Discover the unique benefits of Java Burn Coffee, a revolutionary weight loss supplement that boosts metabolism and energy.
What’s up, after reading this awesome post i am too happy to
share my know-how here with mates.
Unlock the benefits of Java Burn Coffee, a metabolism-boosting
weight loss supplement. Discover how this revolutionary product works.
It’s a pity you don’t have a donate button! I’d without a doubt donate to this superb blog!
I suppose for now i’ll settle for book-marking and adding
your RSS feed to my Google account. I look forward to brand new updates and will share
this site with my Facebook group. Chat soon!
Discover the incredible benefits of Java Burn Coffee, a revolutionary metabolism booster that helps with weight loss and energy enhancement.
недорогие квартиры от застройщика купить квартиру
купить квартиру новостройке застройщика цены купить квартиру в новостройке
новостройки купить цены https://zastroyshikekb.ru
If some one wants expert view on the topic of running a blog after that i suggest him/her to pay a visit this webpage,
Keep up the fastidious job.
лучшие капперы россии [url=www.rejting-kapperov12.ru]www.rejting-kapperov12.ru[/url] .
Appreciate it. Loads of tips.
It’s truly a great and useful piece of info. I’m glad that you just shared this useful information with us.
Please keep us informed like this. Thanks for sharing.
I’ve been exploring for a bit for any high-quality articles or
blog posts in this sort of space . Exploring in Yahoo I finally stumbled upon this web site.
Reading this info So i am happy to show that I’ve an incredibly good uncanny feeling I came upon exactly what I
needed. I most no doubt will make sure to don?t omit this web site and give it a look regularly.
Hi there colleagues, good article and pleasant urging commented
here, I am in fact enjoying by these.
купить новостройку от застройщика https://kvartira-novostroi.ru
I am now not sure the place you’re getting your info, however good topic.
I must spend some time finding out more or figuring out more.
Thank you for wonderful information I used to be on the lookout for this info for my mission.
недорогие квартиры от застройщика https://kvartiranovostroi2.ru
Nicely put, Many thanks.
Way cool! Some extremely valid points! I appreciate you writing this post plus the rest of the site is also very good.
I always spent my half an hour to read this website’s posts daily
along with a mug of coffee.
You actually revealed that superbly.
Hello, thіs weekend iѕ pleasant іn support of me, since thіs moment i am reading
thiѕ impressive educational post heгe at myy residence.
Feeel free to visit mʏ web page :: Wizarding World Name Generator
Помощь в решении задач https://zadachireshaem-online.ru. Опытные авторы с профессиональной подготовкой окажут консультацию в решении задач на заказ недорого, быстро, качественно
Заказать контрольную работу https://kontrolnye-reshim.ru, недорого, цены. Решение контрольных работ на заказ срочно.
купить новостройку с ремонтом купить 2 комнатную квартиру в новостройке
We are a group of volunteers and opening a new scheme in our community.
Your site provided us with valuable information to work on. You
have done an impressive job and our whole community will be thankful to
you.
If you are going for best contents like me, simply go to
see this website everyday as it offers feature contents, thanks
Заказать дипломную работу https://diplomzakazat-oline.ru недорого. Дипломные работы на заказ с гарантией.
Заказать курсовую работу https://kursovye-napishem.ru в Москве: цены на написание и выполнение, недорого
Link exchange is nothing else but it is only placing the other person’s web site link on your page at suitable place and other person will also do similar
in favor of you.
Hi there! I know this is kind of off topic but I was wondering which
blog platform are you using for this website?
I’m getting tired of WordPress because I’ve had problems
with hackers and I’m looking at options for another platform.
I would be fantastic if you could point me in the direction of a
good platform.
https://www.trustpilot.com/review/dalga.dev
Accessibility Team Meeting Notes https://make.wordpress.org/accessibility/2021/06/11/accessibility-team-meeting-notes-june-11-2021
Красивая музыка https://melodia.space для души слушать онлайн.
I’m impressed, I must say. Seldom do I encounter a blog that’s both equally educative and interesting, and without a doubt, you’ve hit the nail on the head. The problem is an issue that not enough folks are speaking intelligently about. I’m very happy that I found this during my search for something relating to this.
of course like your web-site but you need to take a look at the spelling on quite a few of your posts.
Many of them are rife with spelling problems and I in finding it very troublesome to tell the reality nevertheless I will
definitely come again again.
Помощь студентам в выполнении рефератов https://referatkupit-oline.ru. Низкие цены и быстрое написание рефератов!
продвижение сайт стоимость сео продвижения сайта
поисковое продвижение сайта цена https://seo-raskrutka43.ru
Excellent write-up. I absolutely love this site.
Thanks!
Asking questions are really fastidious thing if you are not understanding anything fully, except
this paragraph provides fastidious understanding yet.
Your mode of describing everything in this post is in fact nice, all can simply understand it, Thanks a lot.
Hey! This is my 1st comment here so I just wanted to give a quick shout out and say I genuinely enjoy reading your articles.
Can you suggest any other blogs/websites/forums that deal with
the same topics? Thanks for your time!
Wow that was unusual. I just wrote an very long comment but
after I clicked submit my comment didn’t appear. Grrrr…
well I’m not writing all that over again. Anyways, just wanted to say superb blog!
Great article. I’m facing a few of these issues as well..
First of all I want to say great blog! I had a quick
question in which I’d like to ask if you don’t mind.
I was curious to find out how you center yourself and
clear your head prior to writing. I have had a difficult time clearing my
mind in getting my ideas out there. I truly do enjoy
writing however it just seems like the first 10 to 15 minutes are lost just trying to figure out how to begin. Any ideas or hints?
Thank you!
маленькая переговорная [url=oborudovanie-dlja-peregovornoj-komnaty.ru]маленькая переговорная[/url] .
Hey there! I just wanted to ask if you ever have any problems with hackers?
My last blog (wordpress) was hacked and I ended up losing a few months of hard work due to no backup.
Do you have any methods to stop hackers?
Amazing! Its really remarkable paragraph, I have got much clear idea regarding from this post.
I think the admin of this website is truly working hard for his web page, because here every material is quality based stuff.
оборудование для конференц связи [url=https://www.oborudovanie-konferenc-zalov.ru]https://www.oborudovanie-konferenc-zalov.ru[/url] .
переговорные комнаты под ключ [url=www.oborudovanie-peregovornyh-komnat.ru]переговорные комнаты под ключ[/url] .
Whoa! This blog looks just like my old one! It’s
on a entirely different topic but it has pretty much the same layout and design.
Superb choice of colors!
What’s Going down i am new to this, I stumbled upon this I
have discovered It absolutely useful and it has aided
me out loads. I am hoping to give a contribution & aid other users like its aided me.
Great job.
5 Essential Types Of Seo Tools 백링크 대행
I am extremely impressed with your writing skills as well as with the layout on your weblog.
Is this a paid theme or did you modify it yourself? Anyway keep up the excellent quality writing,
it is rare to see a nice blog like this one today.
With havin so much content and articles do you ever run into any issues of plagorism or copyright violation? My
site has a lot of completely unique content I’ve either authored myself or outsourced but it looks like a lot of it is popping it up all over the web without my
agreement. Do you know any methods to help reduce content from being ripped off?
I’d certainly appreciate it.
This article will help the internet users for building up new web
site or even a blog from start to end.
продвижение сайта в топ 10 цена казань продвижение веб сайтов казань
продвижение казань seo продвижение сайта
Новини сьогодні https://gau.org.ua останні новини України та світу онлайн
Новинний ресурс https://actualnews.kyiv.ua про всі важливі події в Україні та світі.
Lucky Feet Shoes Anaheim
5761 Ε Santa Ana Canyon Rd ste c,
Anaheim, CA 92807, United Statеs
+17142821000
What Is K In Shoes
Its such as you read my thoughts! You seem to grasp so much about
this, such as you wrote the guide in it or something. I feel that you just could do with a few
percent to force the message home a little bit, however instead of that,
that is great blog. An excellent read. I will certainly be back.
This website was… how do I say it? Relevant!! Finally I have found something which helped me. Many thanks!
Останні новини України https://gromrady.org.ua сьогодні онлайн – головні події світу
Hey there this is kind of of off topic but I was wondering if blogs use WYSIWYG editors or if
you have to manually code with HTML. I’m starting a blog soon but have no
coding know-how so I wanted to get guidance from someone with experience.
Any help would be enormously appreciated!
What a stuff of un-ambiguity and preserveness of valuable familiarity concerning unpredicted feelings.
You actually explained this exceptionally well.
Hmm it appears like your blog ate my first comment (it was super long) so
I guess I’ll just sum it up what I wrote and say, I’m
thoroughly enjoying your blog. I as well am an aspiring blog
writer but I’m still new to everything. Do you have any tips and hints for first-time blog writers?
I’d certainly appreciate it.
Новини України https://kiev-online.com.ua останні події в Україні та світі сьогодні, новини України за минулий день онлайн
Україна свіжі новини https://kiev-pravda.kiev.ua останні події на сьогодні
Популярные репортажи https://infotolium.com в больших фотографиях, новости, события в мире
Outstanding quest there. What happened after? Take care!
Свіжі новини України https://lenta.kyiv.ua останні новини з-за кордону, новини політики, економіки, спорту, культури.
This design is incredible! You certainly know how to keep a
reader amused. Between your wit and your videos, I was almost moved to start my
own blog (well, almost…HaHa!) Excellent job.
I really loved what you had to say, and more than that, how you presented it.
Too cool!
I do not even know how I ended up here, but I thought this
post was good. I do not know who you are but certainly you’re going to a famous blogger if you are not already 😉 Cheers!
Thanks for one’s marvelous posting! I genuinely enjoyed reading it,
you could be a great author. I will be sure to
bookmark your blog and definitely will come back in the foreseeable future.
I want to encourage that you continue your great job, have a nice weekend!
Україна останні новини https://lentanews.kyiv.ua головні новини та останні події
I am sure this piece of writing has touched all the internet visitors,
its really really fastidious piece of writing on building
up new webpage.
I’m gone to inform my little brother, that he should also go to see this webpage
on regular basis to get updated from hottest gossip.
Головні новини https://pto-kyiv.com.ua України та світу
Dinner Is Served – On The Poker Table goldpay
My partner and I absolutely love your blog and find most
of your post’s to be precisely what I’m looking for.
Do you offer guest writers to write content
for you personally? I wouldn’t mind creating a post or
elaborating on most of the subjects you write about here.
Again, awesome web site!
This is very interesting, You are a very skilled blogger.
I have joined your feed and look forward to seeking more of your magnificent post.
Also, I have shared your site in my social networks!
Новини та аналітика https://newsportal.kyiv.ua ситуація в Україні.
Головні новини https://mediashare.com.ua про регіон України. Будьте в курсі останніх новин
Hey! Do you know if they make any plugins to assist with Search Engine Optimization? I’m trying
to get my blog to rank for some targeted keywords but I’m not seeing very good success.
If you know of any please share. Many thanks!
Новини, останні події https://prp.org.ua в Україні та світі, новини політики, бізнесу та економіки, законодавства
My partner and I absolutely love your blog and find almost all of your post’s to be exactly I’m
looking for. Do you offer guest writers to write content for yourself?
I wouldn’t mind writing a post or elaborating on a lot of the subjects you
write related to here. Again, awesome website!
Have a look at my webpage; http://superpremium2.premium4best.eu/
You actually revealed that superbly!
Thanks for your marvelous posting! I truly enjoyed reading it, you will be a great author.
I will always bookmark your blog and will come back from
now on. I want to encourage you to definitely continue your great work, have
a nice evening!
Write more, thats all I have to say. Literally, it seems as though you
relied on the video to make your point. You
obviously know what youre talking about, why waste your intelligence on just posting videos
to your blog when you could be giving us something enlightening to read?
Fantastic items from you, man. I have take into accout your stuff prior to and you are just too wonderful.
I really like what you’ve obtained right here, really like what you are stating and the way in which you say
it. You are making it entertaining and you still care for to keep
it smart. I cant wait to learn much more from you. That is really
a terrific website.
Корисні та цікаві статті https://sevsovet.com.ua про здоров’я, дозвілля, кар’єру.
I love your blog.. very nice colors & theme.
Did you design this website yourself or did you hire someone to do it
for you? Plz answer back as I’m looking to design my own blog and would like to
know where u got this from. thanks
Головні новини https://status.net.ua сьогодні, найсвіжіші та останні новини України онлайн
Останні новини https://thingshistory.com зовнішньої та внутрішньої політики в країні та світі.
Останні новини світу https://uamc.com.ua про Україну від порталу новин Ukraine Today
Increase Traffic Free – The Vital Topic Of On-Page Or On-Site Seo 백링크 대행
видеостены [url=https://videosteny-dlja-sozdanija-jekranov.ru]https://videosteny-dlja-sozdanija-jekranov.ru[/url] .
[url=http://amoxil.company/]amoxicillin 720 mg[/url]
With thanks. Numerous facts!
How To Take Pleasure From A Vacation At The Casino 에볼루션 가품
оборудование для сцены актового зала [url=https://oborudovanie-aktovogo-zala.ru]оборудование для сцены актового зала[/url] .
Excellent way of telling, and good article to take facts
on the topic of my presentation subject matter, which i am
going to deliver in university.
Marketing Tips, Resources, And Concepts On Starting And
Promoting Your New Business 윌슨 에볼루션 농구공
Жители Санкт-Петербурга могут
стройматериалы купить спб с доставкой на дом.
Это удобный способ получить необходимые товары быстро и без лишних хлопот.
5 star hotels in istanbul turkey
Very nice post. I just stumbled upon your weblog and wished to say that
I’ve really enjoyed surfing around your blog posts. After
all I will be subscribing to your rss feed and I
hope you write again very soon!
Hello it’s me, I am also visiting this web page on a regular basis, this web page is genuinely good and the people are truly
sharing nice thoughts.
Yes! Finally someone writes about porn videos.
Spot on with this write-up, I honestly believe that this amazing site needs a great deal more attention.
I’ll probably be returning to read through more,
thanks for the information!
Hi there, this weekend is good for me, since this moment i am reading this great educational post here at my residence.
What’s up, I check your new stuff on a regular basis. Your writing style is awesome, keep doing what you’re doing!
Good material With thanks!
Neat blog! Is your theme custom made or did you download it from somewhere?
A design like yours with a few simple adjustements would really make my blog
shine. Please let me know where you got your theme.
Thanks a lot
музыкальное оборудование для актового зала [url=http://oborudovanija-dlja-aktovyh-zalov.ru]http://oborudovanija-dlja-aktovyh-zalov.ru[/url] .
I was wondering if you ever thought of changing the layout of your blog?
Its very well written; I love what youve got to say. But maybe you could a little more in the way of content so people could connect with
it better. Youve got an awful lot of text for only having 1 or two images.
Maybe you could space it out better?
Hi i think that i saw you visited my web site thus i came to Return the favore Im attempting to find things to enhance my siteI suppose its ok to use a few of your ideas
Pretty! This has been a really wonderful post. Thanks for supplying this info.
Heya i am for the first time here. I found this board and I find It really useful & it helped me out a lot.
I hope to give something back and aid others like you helped me.
Thanks for finally talking about > Center For Literacy: BTS – JAMES
POWERS: (907)764-6500 Cinematographer // SFX < Liked it!
I must thank you for the efforts you’ve put in penning this blog. I am hoping to see the same high-grade content by you later on as well. In truth, your creative writing abilities has inspired me to get my own, personal website now 😉
buy amoxicillin 500mg capsules uk: amoxil pharmacy – amoxicillin generic brand
A motivating discussion is definitely worth comment.
I think that you ought to publish more about this subject, it might not be a taboo matter
but usually people don’t talk about these subjects. To the
next! All the best!!
Woah! I’m really loving the template/theme of this website.
It’s simple, yet effective. A lot of times it’s challenging to get that “perfect balance”
between usability and visual appeal. I must say you have done a very good job with this.
In addition, the blog loads very quick for me on Safari.
Excellent Blog!
Have you ever considered publishing an e-book or guest authoring on other sites? I have a blog centered on the same information you discuss and would really like to have you share some stories/information. I know my viewers would value your work. If you’re even remotely interested, feel free to send me an e mail.
Nice post. I was checking constantly this blog and
I am impressed! Extremely useful info particularly the
last part 🙂 I care for such info a lot. I was looking for this
certain information for a long time. Thank you and good luck.
Hi there! I could have sworn I’ve visited your blog before
but after browsing through a few of the articles I realized it’s new to me.
Anyways, I’m definitely delighted I discovered it and I’ll be bookmarking it and
checking back often!
I do not know if it’s just me or if everyone else experiencing problems with
your site. It appears as if some of the written text within your content are running
off the screen. Can someone else please comment and let me know if
this is happening to them as well? This may be a issue with my internet browser because I’ve had this happen before.
Kudos
Mixing Reinvented https://chipmixer.online For Your Privacy
Газоблоки https://gasoblok.ru являются самым популярным материалом для строительства домов из газобетона, они стали эффективной, надежной и недорогой технологией. Качественные газобетонные блоки производятся промышленным способом и обрабатываются в специальных автоклавах.
Строительство заборов под ключ в Санкт-Петербурге от компании https://trudolubov.com. Изготовление, доставка и монтаж ограждений по всей Ленинградской области
Thanks to my father who shared with me regarding this
webpage, this web site is in fact amazing.
Thanks very nice blog!
Excellent report on vape laws!
Temp Mail I do not even understand how I ended up here, but I assumed this publish used to be great
5 star hotels in istanbul turkey
Simply wish to say your article is as astounding.
The clarity in your post is just excellent and
i could assume you are an expert on this subject. Fine
with your permission allow me to grab your feed to keep updated with
forthcoming post. Thanks a million and please continue the gratifying work.
car rental in Budva renting a car in Montenegro
Good post! We are linking to this great post on our website.
Keep up the good writing.
Hello mates, how is all, and what you wish for to say on the topic of
this article, in my view its really amazing for me.
Hello, all is going sound here and ofcourse every one is sharing data,
that’s truly excellent, keep up writing.
Link exchange is nothing else however it is just placing the
other person’s blog link on your page at appropriate place and other person will
also do same in favor of you.
Hello i am kavin, its my first occasion to commenting anyplace, when i read this post i thought i could also create comment due
to this good post.
Can you be more specific about the content of your article? After reading it, I still have some doubts. Hope you can help me.
15 Best Male Masturbating Toy Bloggers You Should Follow best male masturbating toy (80adec2ampndbs9h.рф)
This is a topic that is near to my heart… Take care! Exactly where are your contact details though?
Hey there, I think your blog might be having browser compatibility issues.
When I look at your blog in Opera, it looks fine but when opening in Internet Explorer,
it has some overlapping. I just wanted to give you a quick heads
up! Other then that, superb blog!
Hi, I do think this is a great blog. I stumbledupon it 😉 I may come back
yet again since I saved as a favorite it. Money and
freedom is the greatest way to change, may you be rich and continue to guide others.
Someone necessarily lend a hand to make severely posts I’d
state. This is the first time I frequented your website page and up to now?
I surprised with the research you made to create this actual submit amazing.
Excellent process!
Have you ever thought about publishing an e-book or guest authoring on other blogs?
I have a blog based upon on the same information you discuss and would really like to
have you share some stories/information. I know my viewers
would enjoy your work. If you are even remotely interested, feel free to send me an email.
Keep on working, great job!https://iamwomanacademy.com/java-burn-reviews-10/
Hi! I just wish to give you a huge thumbs up for your great information you have got
here on this post. I will be returning to your website for
more soon.
It’s amazing to go to see this web site and reading the views of all friends on the topic of this piece of writing,
while I am also eager of getting experience.
Howdy would you mind letting me know which webhost you’re using?
I’ve loaded your blog in 3 completely different web browsers and I must say this blog loads
a lot quicker then most. Can you recommend a good hosting provider at a honest
price? Cheers, I appreciate it!
After checking out a number of the articles
on your web site, I seriously like your technique of blogging.
I book-marked it to my bookmark site list and will be checking back
in the near future. Please visit my website too and let me know
what you think.
Мазь для суставов https://sustalits.ru заказать онлайн.
Hi there friends, its great article concerning teachingand completely defined, keep it up all the time.
I was wondering if you ever considered changing the page layout of your blog?
Its very well written; I love what youve got to
say. But maybe you could a little more in the way
of content so people could connect with it better.
Youve got an awful lot of text for only having 1 or 2 pictures.
Maybe you could space it out better?
After looking into a handful of the articles on your
blog, I really appreciate your technique of blogging.
I saved it to my bookmark website list and will be checking back in the
near future. Please check out my website as well and let me know how you feel.
I read this post fully on the topic of the resemblance
of most up-to-date and preceding technologies,
it’s amazing article.
It’s great that you are getting thoughts from this post as well as
from our dialogue made here.
That is a really good tip especially to those
fresh to the blogosphere. Simple but very precise info…
Appreciate your sharing this one. A must read article!
Hey there, You have done an excellent job. I will certainly digg it and personally suggest to
my friends. I’m confident they will be benefited from this web site.
20 Trailblazers Lead The Way In Cheapest Washing Machine 10kg 023456789
20 Amazing Quotes About Male Masturbators male Masturbators with suction control uk online
Hello i am kavin, its my first time to commenting
anyplace, when i read this piece of writing i thought i could
also create comment due to this brilliant article.
What’s Going down i am new to this, I stumbled upon this I have found It
absolutely helpful and it has aided me out
loads. I hope to give a contribution & assist other users like its aided me.
Great job.
I like the valuable information you provide in your articles.
I will bookmark your blog and check again here regularly.
I’m quite certain I’ll learn many new stuff right here!
Best of luck for the next!
Amazing stuff, With thanks!
After I originally commented I seem to have clicked the -Notify me
when new comments are added- checkbox and now every time
a comment is added I get four emails with the exact same comment.
Is there a means you can remove me from that service?
Appreciate it!
It’s The Complete Cheat Sheet For Demo Slot Gatot Kaca Akun demo slot gatot kaca
I have been exploring for a little for any high-quality articles or blog posts on this sort of space .
Exploring in Yahoo I finally stumbled upon this web site. Studying this information So i am happy
to show that I have a very excellent uncanny feeling
I discovered exactly what I needed. I most no doubt will make certain to do not put out of your mind this website and give it a look regularly.
Автомобільний портал https://autodream.com.ua новини та огляди новинок авторинку.
coindarwin price analysis
The Unseen Narrative Regarding Solana Founder Toly’s Achievement
After 2 Portions of Espresso with a Brew
Yakovenko, the innovator behind Solana, started his venture with a modest practice – two cups of coffee and a beer. Unaware to him, these occasions would trigger the gears of fate. At present, Solana remains as a significant competitor in the digital currency sphere, with a billion-dollar market value.
Ethereum ETF First Sales
The new Ethereum ETF newly made its debut with a staggering trading volume. This historic event witnessed multiple spot Ethereum ETFs from multiple issuers start trading on American exchanges, introducing unseen activity into the typically steady ETF trading space.
SEC Sanctions Ethereum ETF
The Securities and Exchange Commission has officially approved the Ethereum Spot ETF to be listed. As a crypto asset that includes smart contracts, Ethereum is projected to significantly impact on the cryptocurrency industry due to this approval.
Trump’s Bitcoin Tactics
As the election approaches, Trump positions himself as the ‘Cryptocurrency President,’ continually showcasing his advocacy for the cryptocurrency industry to gain voters. His method is different from Biden’s strategy, intending to capture the interest of the digital currency community.
Musk’s Influence on Crypto
Elon Musk, a well-known figure in the cryptocurrency space and an advocate of Trump, shook things up once more, driving a meme coin related to his antics. His actions continues to influence market trends.
Recent Binance News
A subsidiary of Binance, BAM, is now allowed to invest customer funds into U.S. Treasury instruments. In addition, Binance noted its 7th anniversary, highlighting its journey and securing several compliance licenses. Meanwhile, the firm also revealed plans to discontinue several important cryptocurrency pairs, impacting various market participants.
Artificial Intelligence and Economic Outlook
A top stock analyst from Goldman Sachs recently commented that AI is unlikely to cause an economic transformation
Новини автомобільного ринку https://autoguide.kyiv.ua та автопромисловості
Автомобільний портал https://allauto.kyiv.ua який захоплює своїми тест-драйвами та новими новинами автосвіту
Wow that was odd. I just wrote an really long comment but
after I clicked submit my comment didn’t
show up. Grrrr… well I’m not writing all that over
again. Anyhow, just wanted to say great blog!
I pay a quick visit day-to-day some web pages and websites to read content,
however this blog offers feature based posts.
I know this if off topic but I’m looking into starting my own weblog and was wondering what all is required to get set
up? I’m assuming having a blog like yours would cost a pretty penny?
I’m not very web smart so I’m not 100% positive. Any suggestions
or advice would be greatly appreciated. Cheers
I believe that is one of the so much important information for me.
And i am happy studying your article. But want to commentary on some common issues, The site taste is perfect, the articles is truly
nice : D. Excellent process, cheers
I have been exploring for a little bit for any high quality articles or blog posts in this sort
of space . Exploring in Yahoo I finally stumbled
upon this website. Studying this info So i am glad to show that I have a very just right uncanny feeling I found out exactly what I needed.
I most definitely will make sure to do not fail to remember this site and give it a look on a continuing basis.
Incredible a lot of valuable data!
Wow, incredible blog layout! How long have you been blogging for?
you make blogging look easy. The overall look of your website is
magnificent, let alone the content!
can i take a car rented in Croatia to Montenegro car rentals in Montenegro
Keep on writing, great job!
WOW just what I was searching for. Came here by searching for
natural supplements for high blood pressure
You reported this really well.
Heya fantastic blog! Does running a blog such as this require a large amount of work?
I have very little knowledge of programming
but I had been hoping to start my own blog in the near future.
Anyway, should you have any suggestions or techniques for new blog owners please share.
I understand this is off subject but I simply had to ask.
Cheers!
You really make it seem so easy with your presentation but I find this matter to be really something that I think I
would never understand. It seems too complex and extremely broad for
me. I am looking forward for your next post, I’ll try to get
the hang of it!
Great post. I was checking constantly this blog and I’m impressed!
Very useful info specifically the last part 🙂 I care for such information much.
I was looking for this particular info for a long time.
Thank you and good luck.
What’s Taking place i am new to this, I stumbled upon this I have discovered It positively useful
and it has helped me out loads. I’m hoping to contribute & help
other users like its aided me. Great job.
Excellent post. Keep posting such kind of information on your page.
Im really impressed by your blog.
Hi there, You have done an incredible job.
I will certainly digg it and in my opinion recommend to my friends.
I’m sure they’ll be benefited from this site.
Greetings! Very useful advice within this post! It’s the little changes
that make the largest changes. Thanks a lot for sharing!
Hey I know this is off topic but I was wondering if you knew of any widgets I could add to my blog that automatically tweet my newest
twitter updates. I’ve been looking for a plug-in like this
for quite some time and was hoping maybe you would
have some experience with something like this. Please let
me know if you run into anything. I truly enjoy reading your blog and I look forward to
your new updates.
Hi there! I know this is somewhat off-topic but I needed to ask.
Does running a well-established blog such as yours require a large amount of work?
I am brand new to writing a blog however I do write
in my diary daily. I’d like to start a blog so I can easily share my
personal experience and feelings online. Please let me know if you have any ideas or tips
for brand new aspiring blog owners. Thankyou!
Hi there, I found your web site by way of Google
whilst looking for a similar subject, your site got here up,
it seems good. I have bookmarked it in my google bookmarks.
Hello there, simply became alert to your blog through Google,
and found that it is really informative. I am going to
watch out for brussels. I’ll appreciate for
those who proceed this in future. Many other people might be benefited out of your writing.
Cheers!
Appreciating the time and energy you put into your blog and in depth information you present.
It’s good to come across a blog every once in a while that isn’t the same unwanted
rehashed material. Fantastic read! I’ve saved your
site and I’m adding your RSS feeds to my Google account.
Currently it sounds like Drupal is the top blogging platform out there right now.
(from what I’ve read) Is that what you are using on your blog?
Keep on working, great job!
you are in point of fact a good webmaster.
The site loading speed is amazing. It seems that you are doing any distinctive trick.
Also, The contents are masterpiece. you’ve performed a
great job in this matter!
Good day I am so excited I found your web site, I really found you by mistake, while I was browsing on Google for something else,
Anyhow I am here now and would just like to say
thank you for a fantastic post and a all round thrilling blog (I also love the theme/design),
I don’t have time to look over it all at the minute but I have saved it and also included your RSS feeds, so when I have
time I will be back to read a lot more, Please do keep up
the great jo.
Hi there, I desire to subscribe for this web site to take
hottest updates, so where can i do it please assist.
I am really enjoying the theme/design of your blog.
Do you ever run into any web browser compatibility problems?
A couple of my blog readers have complained about
my site not working correctly in Explorer but looks great in Chrome.
Do you have any advice to help fix this problem?
Good day! This is kind of off topic but I need some help
from an established blog. Is it tough to set up your own blog?
I’m not very techincal but I can figure things out pretty fast.
I’m thinking about setting up my own but I’m not sure where to
start. Do you have any points or suggestions? With thanks
May I simply just say what a relief to uncover someone who really understands what they are
talking about on the web. You definitely realize how to bring a
problem to light and make it important. A lot more people have to check this
out and understand this side of your story. I can’t believe you’re not more popular since you most certainly have the gift.
Hello it’s me, I am also visiting this site daily, this site is in fact good and the viewers are actually sharing fastidious thoughts.
What’s Next In Birth Defect Legal Birth Defects
I am regular reader, how are you everybody? This piece of writing posted
at this web site is truly good.
Paragraph writing is also a fun, if you be acquainted with after that you can write otherwise it is complex
to write.
I think this is among the most significant info
for me. And i’m glad reading your article. But wanna remark on few general things,
The web site style is great, the articles is really excellent :
D. Good job, cheers
Hello! I just wanted to ask if you ever have any trouble
with hackers? My last blog (wordpress) was hacked and I ended up
losing many months of hard work due to no back up. Do you have any
methods to prevent hackers?
Spot on with this write-up, I seriously think this
site needs far more attention. I’ll probably be back again to read through more, thanks for the advice!
You really make it seem so easy with your presentation but I in finding this
matter to be really something which I believe I might by no means understand.
It sort of feels too complicated and very huge for me.
I am taking a look ahead in your next publish, I will try to get the hold of it!
Your style is so unique in comparison to other folks I’ve read stuff from.
Many thanks for posting when you’ve got the opportunity, Guess I
will just book mark this page.
Great post. I was checking constantly this blog and I’m impressed!
Extremely useful information particularly
the last part 🙂 I care for such info a lot. I was looking
for this particular info for a long time. Thank you and good luck.
It’s appropriate time to make some plans for the future and it is time to be happy.
I’ve read this post and if I could I wish to suggest you
few interesting things or tips. Maybe you can write next articles referring to this article.
I desire to read more things about it!
Hey there would you mind letting me know which webhost you’re working with?
I’ve loaded your blog in 3 different browsers and I must say this blog loads a
lot faster then most. Can you recommend a good web
hosting provider at a honest price? Many thanks, I appreciate it!
magnificent publish, very informative. I wonder why the other
specialists of this sector don’t notice this.
You should continue your writing. I am sure, you have a huge readers’ base already!
Hey there! I know this is kind of off topic but I was wondering if you knew
where I could locate a captcha plugin for my comment form?
I’m using the same blog platform as yours and I’m having
difficulty finding one? Thanks a lot!
I visited several sites except the audio quality for audio songs present
at this website is in fact superb.
Thank you for the good writeup. It in reality was once a leisure account it.
Look complicated to far introduced agreeable from you!
However, how can we communicate?
I do not even understand how I ended up here, however I believed this submit
was good. I don’t realize who you might be however certainly you’re going to a
well-known blogger for those who are not already. Cheers!
Официальный сайт по продаже оригинальных кроссовок изи буст https://yeezy-boost-shop.ru в Москве. Мы продаем yeezy boost оригинал с доставкой по всей России. В нашей линейке есть такие модели Adidas yeezy 350, yeezy 500, yeezy slide.
Excellent blog here! Also your site loads up fast!
What web host are you using? Can I get your affiliate link to your host?
I wish my website loaded up as quickly as yours lol
Locksmiths Near Me For Car: 10 Things I’d Like To Have Learned Sooner Elsy Crays
В нашем интернет магазине https://shop-uggs.ru представлен широкий ассортимент оригинальных женских, мужских и детских UGG Australia. Вы можете купить угги у нас в Москве, а так же с доставкой по России без предоплаты. Мы привозим 2 пары обуви на примерку, вы сможете сначала примерить уги и только потом оплачивать те угги которые вам подошли.
Сериал “911: Служба спасения” https://911-sluzhba-spaseniya.watch рассказывает о работе сотрудников экстренных служб Лос-Анджелеса, включая пожарных, медиков и операторов 911. Они ежедневно сталкиваются с опасными ситуациями, спасая жизни и решая сложные личные проблемы. Смотрите онлайн в хорошем качестве HD, бесплатно, все сезоны.
Щоденні новини https://autoinfo.kyiv.ua із автомобільного середовища. Поради автоаматорам. Тест-драйви
Hey there I am so glad I found your webpage,
I really found you by mistake, while I was searching on Askjeeve for
something else, Anyways I am here now and would just like to say thanks for a incredible post and a all round enjoyable blog
(I also love the theme/design), I don’t have time to browse it all at the moment but I have book-marked it and also included your RSS
feeds, so when I have time I will be back to read
a lot more, Please do keep up the great work.Discover an in-depth review of Puravive, a popular weight loss supplement.
Learn about its ingredients, benefits, user opinions,
and whether it lives up to its claims.
Hello, this weekend is pleasant for me, for the reason that this time i am reading this fantastic
informative piece of writing here at my home.
Hi there, its nice piece of writing concerning media print, we all understand media is a great source of information.Discover
comprehensive insights into Java Burn, a revolutionary weight
loss coffee additive. Read user reviews, detailed product analysis, features,
pros, cons, FAQs, and more. Is Java Burn the ultimate solution for your weight loss
journey?
Слимофор https://slymofor.ru инновационное средство для быстрого похудения.
You ought to take part in a contest for one of the finest sites on the internet.
I am going to highly recommend this site!
It’s actually a great and helpful piece of
information. I am glad that you simply shared this useful information with us.
Please stay us informed like this. Thank you for sharing.
Guarantor Loan Companies How Is It Different? 다바오 포커 설치방법 [https://www.naturalvoice.net/]
Why viewers still make use of to read news papers when in this technological world all is available on web?
I have learn a few excellent stuff here. Definitely worth bookmarking for revisiting.
I wonder how a lot effort you place to create
this kind of excellent informative site.
This is my first time pay a visit at here and i am actually impressed to read all at one place.
درآمد دلاری فریلنسری
Howdy just wanted to give you a brief heads up and let you know a few of the pictures aren’t loading correctly. I’m not sure why but I think its a linking issue. I’ve tried it in two different web browsers and both show the same outcome.
Hello! I just wanted to ask if you ever have any problems with hackers?
My last blog (wordpress) was hacked and I ended up losing a few
months of hard work due to no back up. Do you have any methods to
stop hackers?
I’m really enjoying the theme/design of your blog.
Do you ever run into any web browser compatibility problems?
A handful of my blog audience have complained about my site
not working correctly in Explorer but looks great in Chrome.
Do you have any advice to help fix this issue?
It’s difficult to find educated people on this topic, however, you seem like you know what you’re talking about!
Thanks
Everything is very open with a very clear clarification of the challenges.
It was definitely informative. Your website is useful.
Thanks for sharing!
Why You Might Be Rejected For A Quick Bad Credit Personal Loan 학생 대출
(https://achat.forumconstruire.com)
Авто статті https://bestauto.kyiv.ua з порадами з ремонту та обслуговування, авто блог з професійними порадами, огляди новинок
The best mesothelioma lawyers have many years of experience in representing victims and their families.
They are able to recognize asbestos law sources and hold accountable
responsible parties.
Автомобільні новини https://autonovosti.kyiv.ua України та світу, тест-драйви нових авто, поради експертів
Автоновини України https://avtomobilist.kyiv.ua огляди машин та новини для автомобілістів
I do believe your audience could very well want a good deal more stories like this carry on the excellent hard work.
Автомобільні новини https://avtonews.kyiv.ua України. Все для автовласника.
Very nice post. I just stumbled upon your blog and wished to
say that I have truly enjoyed surfing around your blog posts.
In any case I’ll be subscribing to your rss feed and I hope you write again soon!
I’ve been surfing online more than 2 hours today, yet I never
found any interesting article like yours. It’s pretty worth enough for me.
In my view, if all site owners and bloggers made good content as you did, the internet
will be a lot more useful than ever before.
It’s wonderful that you are getting ideas from this article as well as from
our dialogue made at this time.
An Hyundai I30 Key Replacement Success Story You’ll Never Remember cost
Авто статті https://black-star.com.ua з порадами з ремонту та обслуговування
DMV Test на русском языке https://papadmv.com тесты с ответами ПДД США 2024. Тренировочные dmv test на русском для сдачи на права, изучите правила дорожного движения США для разных штатов.
Undress AI & Bulk Nude AI Generator nudify online. Make AI nudes and bulk generate undress AI photos of any girl for almost free!
5 Killer Quora Answers On Replacement Double Glazing Units Near
Me Double glazing units near me (http://www.longisland.com)
The No. 1 Question Everybody Working In ADHD Test For Women Should Be Able
To Answer adhd in women checklist
Щоденні новини https://k-moto.com.ua із автомобільного середовища. Поради автоаматорам. Тест-драйви автомобілів з пробігом та огляди новинок
Найбільший автомобільний портал https://mirauto.kyiv.ua України
PrestigeAvto https://prestige-avto.com.ua України автомобільний журнал
Bad Credit Signature Loan – What Is Apply?
사업자 대출 – m.www.polar.co.kr –
Промокоды на любые категории товаров [url=https://promokodbar.ru/]https://promokodbar.ru/[/url] .
Hi, everything is going well here and ofcourse every one is
sharing information, that’s actually fine, keep up writing.
Все актуальные промокоды в одном месте. [url=www.free-promocode.ru]Все актуальные промокоды в одном месте.[/url] .
Which Website To Research 99 Litre Chest Freezer
Online small chest freezer For garage
Having read this I thought it was really informative. I appreciate you spending
some time and energy to put this informative article together.
I once again find myself spending way too much time both reading and commenting.
But so what, it was still worthwhile!
15 Reasons You Must Love Private Psychiatrist Assessment Near
Me private psychiatrist houghton regis
This design is wicked! You most certainly know how to
keep a reader entertained. Between your wit and your videos, I was almost moved to
start my own blog (well, almost…HaHa!) Excellent job.
I really loved what you had to say, and more than that, how you presented it.
Too cool!
Decide funding for the upcoming motor vehicle or refinance with
self esteem. Take a look at currently’s car financial loan costs.
Time for you to first payment: After you offer a product, anticipate a wait duration of all-around 5
times to get money within your checking account on most platforms.
There’s no justification for working away from money any more.
Nicely, many of us mess up in some cases, but
there’s no purpose you shouldn’t be able to conjure up a
couple of hundred dollars away from slender air for those who’re prepared to get Inventive regarding how to make money.
Not everyone seems to be courageous adequate to hire out their total residence to your stranger, but even leasing out the spare space can offer a large supply of excess
money. You may perhaps meet some attention-grabbing individuals and find yourself enjoying it.
In the same way, if you’ve attained past success on the planet of entrepreneurialism, your services could be of use to budding
business people as well as established business people
who want to consider their organization to the subsequent amount.
Everybody knows that therapy is actually a hugely-expert and hard occupation, although not Lots
of people realize it’s shifting online.
A different crucial element of promoting and advertising is casino starting off a
good email promoting system, which helps to keep customers and change prospects.
You may also make money fast by completing surveys, microtasks, rewards plans,
or any of the other simple tips on this checklist. The quantity you’ll get won’t be high, but It’ll be quick.
In addition to supporting organizations to deal with their social
accounts, you’ll be able to give them advice regarding
how to sort a protracted-expression social websites strategy.
Should you aren’t excited about working with a pc all
day, Check out a lot of the finest methods to make money
offline:
Engaging in liable gambling with bonus resources and managing them as authentic money can cause greater determination-making along with a
simpler reward system.
Choose in for bonus resources. As many as 50x wagering, recreation contributions differ, max.
stake applies, new customers will have to decide in and claim offer in just 24 hrs and use
inside thirty days. Geographical Limits and T&Cs
I’m not sure if it’s intentional or an editorial remark,
though the pitch for blogging claims “Is there a topic or subject matter you’re
really experienced about and luxuriate in adequate to have the ability to create on it each day For some
time?
That compensation impacts the location and buy by which
the manufacturers are offered and is some scenarios may impression the rating that may be assigned to them.
MONEY
FREE CASH
CASINO
PORN
SEX
ONLY FANS
Thanks for your marvelous posting! I seriously
enjoyed reading it, you could be a great author.
I will make certain to bookmark your blog and will eventually come
back in the future. I want to encourage you to continue your great
job, have a nice afternoon!
I’ll immediately grab your rss as I can not in finding your e-mail subscription link or newsletter service. Do you’ve any? Kindly allow me know in order that I may subscribe. Thanks.
Windows Doctor Tips To Relax Your Daily Life Windows Doctor Trick That Everybody Should Know windows doctor, Ramon,
Автомобільні новини https://sedan.kyiv.ua України та світу, тест-драйви автомобілів, автоспорт
buy finax for sale – oral alfuzosin buy alfuzosin 10 mg generic
Авто статті https://road.kyiv.ua з порадами з ремонту та обслуговування. Авто блог з професійними порадами.
The fascinating story of Ja Morant’s https://grizzlies-de-memphis.ja-morant-fr.com meteoric rise, from status from rookie to leader of the Memphis Grizzlies and rising NBA superstar.
Свежие новости https://diesel.kyiv.ua автомобильного рынка, новинки автопрома
mexico pharmacies prescription drugs [url=https://mexicandeliverypharma.online/#]buying prescription drugs in mexico[/url] pharmacies in mexico that ship to usa
Five Fridge Lessons From The Professionals http://Www.36035372.Xyz
https://mexicandeliverypharma.online/# purple pharmacy mexico price list
buying prescription drugs in mexico: п»їbest mexican online pharmacies – mexican rx online
screen capture for PC download screen capture program
iş davası
Hey very nice blog!
Indibet https://indibeti.in is a premier online casino offering a wide array of games including slots, table games, and live dealer options. Renowned for its user-friendly interface and robust security measures, Indibet ensures a top-notch gaming experience with exciting bonuses and 24/7 customer support.
[url=http://acyclovirmc.online/]where to buy acyclovir cream[/url]
L’histoire epique du FC Barcelone https://espagne.barcelona-fr.com 120 ans de triomphes et de tribulations.
Rodri https://manchester-city.rodrigo-hernandez.com le maestro du milieu de terrain de Manchester City
Immerse yourself in the charm of France https://france.life-in-france.net a land of fine cuisine, impressive architecture and picturesque landscapes. An unrivaled lifestyle.
Hi mates, its enormous article regarding educationand completely explained, keep
it up all the time.
Cheers. Valuable stuff.
my site; https://www.thehindu.com/
Will Replace Window Handles Ever Rule The World?
Replacement Glass for a window
Thanks for ones marvelous posting! I really enjoyed reading it, you can be a great author.I will always bookmark your
blog and will come back in the foreseeable future.
I want to encourage continue your great writing, have a
nice afternoon!
Three Greatest Moments In Car Key Auto Locksmith History Automotive locksmith; highwave.Kr,
Deep Fake Nudes https://undressapp.net with Undress AI and Deepnude
I used to be recommended this web site by my cousin. I’m not sure whether or not this
submit is written by means of him as no one else
recognize such distinct about my trouble.
You’re amazing! Thank you!
mexico drug stores pharmacies [url=https://mexicandeliverypharma.com/#]reputable mexican pharmacies online[/url] reputable mexican pharmacies online
Wow that was unusual. I just wrote an very long comment but after I clicked submit my comment didn’t show up.
Grrrr… well I’m not writing all that over again.
Anyway, just wanted to say wonderful blog!
How Many Cases Are There In CSGO Is The Next Hot Thing In How Many Cases
Are There In CSGO Cs2 Cases
Частная платная клиника https://mypsyhealth.ru психиатрии, психологии, психотерапии и наркологии анонимно в Москве.
mexico drug stores pharmacies: medicine in mexico pharmacies – buying prescription drugs in mexico
buying prescription drugs in mexico: mexico drug stores pharmacies – mexico drug stores pharmacies
Hi there! I’m at work surfing around your blog from my new iphone 3gs!
Just wanted to say I love reading your blog and look forward to all your posts!
Carry on the great work!Discover insightful Java Burn reviews , the
revolutionary weight loss supplement, its benefits, side
effects, and real user experiences.
I do not even know how I ended up here, but I thought
this post was great. I don’t know who you are but definitely you’re going to a famous blogger if you are not already 😉 Cheers!
Everything is very open with a very clear clarification of the issues.
It was truly informative. Your website is useful.
Thanks for sharing!
http://mexicandeliverypharma.com/# mexican border pharmacies shipping to usa
The 10 Most Terrifying Things About Walking Treadmill Under Desk Walking Treadmill Under Desk
15 Funny People Working Secretly In Replacement Car Keys Nissan Nissan Spare Key Replacement
The Boston Celtics https://celtics-de-boston.bill-russel.com are one of the most successful teams in the history of the National Basketball Association (NBA).
Learn about Jayson Tatum’s https://celtics-de-boston.jayson-tatum.com rise from young rookie to key leader of the Boston Celtics in the NBA, his impact on the team and his success on the court.
The story of Michael Phelps https://amerique.michael-phelps.com how he became the greatest swimmer of all time, overcoming adversity, setting records and inspiring the world.
Intense pulsed gentle might be very effective in many patients to enhance purple stretch marks with a vascular part. On the deck, patio, or wherever outdoors, low-voltage lighting is the really useful system.
Hey there! Someone in my Myspace group shared this site with us so I came to check it out.
I’m definitely loving the information. I’m bookmarking and will be tweeting this to my followers!
Superb blog and outstanding design.
Mavericks rising superstar Luka Doncic https://mavericks-de-dallas.lukadoncic-fr.com continues to amaze the basketball world with his game.
Discover Kyrie Irving’s https://mavericks-de-dallas.kyrie-irving-fr.com journey with the Dallas Mavericks, from his early days to forming a power duo with Luka Doncic and competing for a championship.
What’s up, I log on to your blogs on a regular basis. Your humoristic style is witty, keep up the good work!
This site certainly has all of the information I wanted about this subject and didn’t know who to
ask.
The Advanced Guide To Accident Lawyer Dallas Albuquerque Injury attorney
buying prescription drugs in mexico [url=https://mexicandeliverypharma.online/#]mexican rx online[/url] mexican border pharmacies shipping to usa
п»їbest mexican online pharmacies: mexican border pharmacies shipping to usa – best online pharmacies in mexico
mexican drugstore online: mexico pharmacies prescription drugs – mexican online pharmacies prescription drugs
I will immediately seize your rss as I can not find your e-mail
subscription link or e-newsletter service. Do you’ve any?
Kindly permit me know so that I may subscribe.
Thanks.
It’s awesome in favor of me to have a site, which is useful in favor of my knowledge.
thanks admin
台灣線上娛樂城
富遊娛樂城評價 : 全台唯一5分鐘內快速出金,網紅一致好評看這篇!
富遊娛樂城以玩家需求為核心對於品牌保證安全、公正、真實、順暢,成為玩家在線上賭場最佳合作夥伴,擁有各大網紅、網友評價保證出金。
富遊是台灣註冊人數第一名的線上賭場,富遊是台灣最受歡迎的線上賭場,已吸引超過30萬玩家註冊。首次存款1000元贈1000元獎金,且只需1倍的流水。新手玩家還可獲得免費體驗金,體驗館內的所有遊戲。富遊也時常舉辦不同優惠活動,沒有困難的下注流水要求,相當適合新手與資深玩家遊玩。
富遊娛樂城平台詳情資訊
賭場名稱 : RG富遊
創立時間 : 2019年
博弈執照 : 馬爾他牌照(MGA)認證、英屬維爾京群島(BVI)認證、菲律賓(PAGCOR)監督競猜牌照
遊戲類型 : 真人百家樂、運彩投注、電子老虎機、彩票遊戲、棋牌遊戲、捕魚機遊戲
合作廠商 : 22家遊戲平台商
支付平台 : 各大銀行、四大便利超商
存取速度 : 存款15秒 / 提款3-5分
單筆提款金額 : 最低1000-100萬
合作廠商 : 22家遊戲平台商
軟體下載 : 支援APP,IOS、安卓(Android)
富遊娛樂城優缺點評價
優點 缺點
台灣註冊人數NO.1線上賭場
首儲1000贈1000只需一倍流水
擁有體驗金免費體驗賭場
網紅部落客推薦保證出金線上娛樂城
需透過客服申請體驗金
富遊娛樂城評價有哪些網紅推薦
富遊娛樂城擁有多數網紅推薦,知名度是目前數一數二的娛樂城平台,玩家也可無需擔心娛樂城出金問題,有眾多玩家的評價保證,又有娛樂城體驗金可以免費試玩。詳細可觀看富遊娛樂城評價推薦人,數十位網紅評價推薦
富遊娛樂城存取款方式
存款方式 取款方式
提供四大超商(全家、7-11、萊爾富、ok超商)
虛擬貨幣ustd存款
銀行轉帳(各大銀行皆可)
網站內申請提款及可匯款至綁定帳戶
現金1:1出金
富遊娛樂城是否安全?
富遊娛樂城非常注重玩家的安全性。他們使用與銀行相同的《TLS加密技術》來保護玩家的財物,並且持有合法的國際認證執照。官方也承諾確保會員的個人資料安全。各大部落客也實測網站存取款狀況,富遊娛樂城是一個相當安全的線上賭場平台。
如何判斷娛樂城評價是否詐騙?
網站架構及經營方式
金流三方提供取道皆為有公信力三方平台
合理優惠流水洗碼量
畢竟博弈市場不斷開新的線上娛樂城,每一家特色都不同,還不知道如何選擇娛樂城的玩家,透過我們專業分析介紹,建議可以加入富遊娛樂城體驗看看,保證出金、畫面操作簡單、遊戲豐富多元。
選擇一間正確的娛樂城會讓你當作在投資一般,選擇錯誤的娛樂城只會讓你當作在賭博。如果投注個娛樂城遊戲,請前往富遊娛樂城下注
Любому человеку рано или поздно приходится пользоваться услугами стоматологических клиник. Ни для кого не секрет, что лечение зубов и последующее протезирование – процедуры довольно дорогостоящие, не все граждане могут позволить себе их оплатить, если вам необходимо https://maestrostom.ru/ мы Вам обязательно поможем.
Особенности
Благодаря услугам, которые предлагает населению стоматология Маэстро, люди разного финансового достатка имеют возможность не только поддерживать здоровье полости рта, но и проходить все необходимые процедуры. Цены на лечение зубов и протезирование значительно ниже, чем в других медучреждениях. Несмотря на то, что клиника работает для широких слоев населения, пациенты получают полный перечень услуг, используя современное оборудование и качественные материалы. Жителям доступны следующие процедуры:
• профилактика полости рта;
• лечение зубов с использованием различных методов;
• полная диагностика;
• профессиональная чистка;
• отбеливание;
• протезирование.
Сотрудники учреждения соблюдают все санитарные нормы, а для тщательной дезинфекции и стерилизации инструментов предусмотрено современное оборудование.
Преимущества
Востребованность бюджетной стоматологии объясняется рядом преимуществ. Во-первых, в клинике трудятся опытные высококвалифицированные сотрудники. Во-вторых, к каждому пациенту врач находит подход. В-третьих, кабинеты оснащены всем необходимым оборудованием, в работе используют только качественные безопасные материалы. В-четвертых, все виды протезирования будут проведены в сжатые сроки. Многие клиники получают субсидии от государства, что позволяет существенно сократить расходы. Кроме того, некоторые стоматологии сотрудничают со страховыми компаниями, поэтому у пациентов появляется возможность получить услуги по полюсу ОМС. Пациенты получают консультацию по профилактике заболеваний полости рта. Врачи после тщательного осмотра составляют индивидуальный план лечения, с помощью которого удается добиться наилучшего результата. Более доступные цены достигаются не только благодаря государственному финансированию, но и оптимизации расходов.
Благодаря стоматологии Маэстро, человек с небольшим достатком может не только вылечить зубы, но и поддерживать здоровье ротовой полости. Теперь любой человек может не откладывать поход к стоматологу, выбирая доступное качественное обслуживание.
https://mexicandeliverypharma.com/# buying prescription drugs in mexico online
5 Killer Quora Answers To SEO For Near Me Searches Seo For Near Me Searches
Heya i’m for the first time here. I found this board and I find
It really useful & it helped me out much. I hope to give something back and help others like you aided me.
buying prescription drugs in mexico online: mexican mail order pharmacies – mexican rx online
What’s The Job Market For Treadmill Fold Flat Professionals?
Treadmill Fold Flat
mexico pharmacy [url=https://mexicandeliverypharma.online/#]mexican mail order pharmacies[/url] mexican online pharmacies prescription drugs
mexico pharmacies prescription drugs: mexican rx online – buying prescription drugs in mexico online
Very great post. I simply stumbled upon your blog and wanted to
say that I have truly enjoyed surfing around your blog
posts. In any case I’ll be subscribing on your feed and I’m hoping you write again very soon!
This is the perfect blog for anybody who wants to understand this topic. You know so much its almost tough to argue with you (not that I actually would want to…HaHa). You definitely put a fresh spin on a subject that’s been discussed for decades. Wonderful stuff, just excellent!
Right here is the right web site for anyone who really wants to understand this topic.
You understand so much its almost hard to argue with you (not that
I really would want to…HaHa). You certainly put a
brand new spin on a topic that has been discussed for decades.
Wonderful stuff, just great!
[url=https://baclofenx.online/]cheap lioresal[/url]
I’d like to find out more? I’d like to find out some additional information.
mexico pharmacies prescription drugs: mexico drug stores pharmacies – buying from online mexican pharmacy
We are a gaggle of volunteers and starting a brand new scheme in our community. Your web site provided us with valuable information to work on. You’ve performed a formidable activity and our whole group will probably be thankful to you.
коллекция секса порно [url=https://www.porn-library.ru]коллекция секса порно[/url] .
buying prescription drugs in mexico [url=https://mexicandeliverypharma.com/#]mexico drug stores pharmacies[/url] purple pharmacy mexico price list
buying prescription drugs in mexico: mexican border pharmacies shipping to usa – mexican rx online
mexican mail order pharmacies: mexican drugstore online – reputable mexican pharmacies online
10 CSGO Cases History-Related Projects To Stretch Your Creativity Case Opening
Appreciate it, A good amount of stuff.
The No. Question That Everyone In Best CSGO Opening Site Needs To Know How To Answer
Counter-strike cases
It’s going to be finish of mine day, but before end I am reading this enormous post to increase my experience.
AI Nude Generator https://ainudegenerator.app Transform Photos with AI Nude App.
It is appropriate time to make some plans for the future and it’s time
to be happy. I’ve read this post and if I could I wish to suggest you few interesting things or suggestions.
Perhaps you could write next articles referring to this
article. I want to read more things about it!
I’m amazed, I must say. Rarely do I come across a blog that’s equally educative and engaging, and without a doubt, you’ve hit the nail on the head. The problem is an issue that too few men and women are speaking intelligently about. Now i’m very happy that I stumbled across this in my search for something concerning this.
Very good info. Lucky me I recently found your website by accident (stumbleupon). I’ve saved it for later.
buying from online mexican pharmacy: mexican border pharmacies shipping to usa – buying prescription drugs in mexico
Does your website have a contact page? I’m having a tough time locating it but, I’d like to send you an e-mail.
I’ve got some ideas for your blog you might be interested in hearing.
Either way, great website and I look forward
to seeing it expand over time.
When asbestos fibers are inhaled, they can be absorbed into the lungs and then travel
throughout the body. The fibers can then get stuck in the
linings of the abdomen and other organs.
May I simply say what a comfort to uncover somebody that actually knows what they’re discussing online. You definitely realize how to bring a problem to light and make it important. More people must look at this and understand this side of your story. I was surprised you are not more popular since you definitely have the gift.
buying prescription drugs in mexico [url=https://mexicandeliverypharma.online/#]mexican mail order pharmacies[/url] mexican online pharmacies prescription drugs
buying prescription drugs in mexico: buying prescription drugs in mexico online – best online pharmacies in mexico
скачать игры без рекламы на андроид [url=https://android-games-download.ru]https://android-games-download.ru[/url] .
Very good information. Lucky me I came across your blog by chance (stumbleupon). I have bookmarked it for later.
Hi! I know this is somewhat off topic but I was wondering which blog platform are you using for this website?
I’m getting tired of WordPress because I’ve had issues with hackers and
I’m looking at alternatives for another platform.
I would be fantastic if you could point me in the direction of a good platform.
The 10 Scariest Things About Double Glazing Firms Near Me double glazing firms near Me
Good blog you have got here.. It’s difficult to find good quality writing like yours these days. I really appreciate individuals like you! Take care!!
Heya i am for the first time here. I came across
this board and I find It really useful & it helped me out a lot.
I hope to give something back and help others like
you helped me.
What Is Cerebral Palsy Lawyer And How To Utilize It Cerebral Palsy Lawyers
seo продвижение сайтов [url=prodvizhenie-sajtov15.ru]prodvizhenie-sajtov15.ru[/url] .
Средняя школа №1227: История и перспективы https://school1227.ru/
purple pharmacy mexico price list: mexican rx online – buying prescription drugs in mexico
My partner and I stumbled over here by a different page and thought I may as well
check things out. I like what I see so now i’m following you.
Look forward to looking into your web page again.
mexican mail order pharmacies [url=https://mexicandeliverypharma.com/#]mexico drug stores pharmacies[/url] mexican pharmacy
Thanks to my father who stated to me on the topic of this webpage, this weblog is actually awesome.
п»їbest mexican online pharmacies: buying from online mexican pharmacy – mexican drugstore online
reputable mexican pharmacies online: mexican drugstore online – medicine in mexico pharmacies
I savor, lead to I found just what I used to be looking for.
You’ve ended my four day lengthy hunt! God Bless you man. Have a nice day.
Bye
11 “Faux Pas” That Actually Are Okay To Create With Your Private Psychiatrist Cardiff Cost private psychiatrist london uk
Hello to every single one, it’s in fact a good for me to go
to see this website, it includes useful Information.
Wonderful blog you have here but I was curious if you knew of any community forums that cover the
same topics talked about in this article? I’d really like to be a
part of online community where I can get responses from other experienced people that share the same interest.
If you have any recommendations, please let me know.
Thanks a lot!
I delight in, result in I discovered exactly what I used to be having a look for. You have ended my 4 day lengthy hunt! God Bless you man. Have a great day. Bye
This design is incredible! You most certainly know how to keep a reader amused. Between your wit and your videos, I was almost moved to start my own blog (well, almost…HaHa!) Great job. I really loved what you had to say, and more than that, how you presented it. Too cool!
Welcome to our platform, your top source for all the current updates and information on the communications landscape in the United Kingdom. Whether you’re interested in broadcasting, FM/AM, newspapers, or digital media, we deliver thorough coverage that keeps you knowledgeable about the key developments and shifts. From up-to-the-minute articles to detailed analyses, our team of experienced journalists and industry professionals work ceaselessly to bring you the most precise and up-to-date news – https://ukeventnews.uk/accompaniment/
In alongside to stories, we present informative features and opinion pieces that delve into the nuances of the broadcasting industry. Our articles cover a diverse array of topics, including regulatory changes, media ownership, and the impact of new developments. We also highlight the achievements and difficulties faced by media professionals, providing a platform for voices from throughout the industry to be noticed and respected.
Stay engaged with the pulse of the UK media scene through our constantly updated content. Whether you’re a media professional, a student, or simply a media enthusiast, our website is designed to accommodate to your needs and needs. Join our growing community of readers and guarantee you’re always in the know about the dynamic and always developing world of media in the United Kingdom.
First off I would like to say wonderful blog! I had a quick question which I’d like to ask if you don’t
mind. I was curious to find out how you center yourself and clear your mind prior to writing.
I have had a difficult time clearing my mind in getting my thoughts out there.
I do enjoy writing however it just seems like the first 10 to 15 minutes tend to be wasted just trying to figure
out how to begin. Any recommendations or hints? Many thanks!
For most recent information you have to pay a quick visit web and
on the web I found this site as a finest site for latest updates.
Hi, after reading this awesome post i am too happy to share my familiarity here with friends.
medicine in mexico pharmacies: п»їbest mexican online pharmacies – mexico drug stores pharmacies
mexico drug stores pharmacies [url=https://mexicandeliverypharma.com/#]buying from online mexican pharmacy[/url] mexican border pharmacies shipping to usa
Mesothelioma law is a rare
form of cancer, affects the thin membrane that covers the
chest or abdomen. Asbestos is the main cause of
mesothelioma. The risk increases with time and extent of exposure to
asbestos.
mexico pharmacies prescription drugs: mexico pharmacies prescription drugs – medicine in mexico pharmacies
富遊娛樂城評價 : 全台唯一5分鐘內快速出金,網紅一致好評看這篇!
富遊娛樂城以玩家需求為核心對於品牌保證安全、公正、真實、順暢,成為玩家在線上賭場最佳合作夥伴,擁有各大網紅、網友評價保證出金。
富遊是台灣註冊人數第一名的線上賭場,富遊是台灣最受歡迎的線上賭場,已吸引超過30萬玩家註冊。首次存款1000元贈1000元獎金,且只需1倍的流水。新手玩家還可獲得免費體驗金,體驗館內的所有遊戲。富遊也時常舉辦不同優惠活動,沒有困難的下注流水要求,相當適合新手與資深玩家遊玩。
富遊娛樂城平台詳情資訊
賭場名稱 : RG富遊
創立時間 : 2019年
博弈執照 : 馬爾他牌照(MGA)認證、英屬維爾京群島(BVI)認證、菲律賓(PAGCOR)監督競猜牌照
遊戲類型 : 真人百家樂、運彩投注、電子老虎機、彩票遊戲、棋牌遊戲、捕魚機遊戲
合作廠商 : 22家遊戲平台商
支付平台 : 各大銀行、四大便利超商
存取速度 : 存款15秒 / 提款3-5分
單筆提款金額 : 最低1000-100萬
合作廠商 : 22家遊戲平台商
軟體下載 : 支援APP,IOS、安卓(Android)
富遊娛樂城優缺點評價
優點 缺點
台灣註冊人數NO.1線上賭場
首儲1000贈1000只需一倍流水
擁有體驗金免費體驗賭場
網紅部落客推薦保證出金線上娛樂城
需透過客服申請體驗金
富遊娛樂城評價有哪些網紅推薦
富遊娛樂城擁有多數網紅推薦,知名度是目前數一數二的娛樂城平台,玩家也可無需擔心娛樂城出金問題,有眾多玩家的評價保證,又有娛樂城體驗金可以免費試玩。詳細可觀看富遊娛樂城評價推薦人,數十位網紅評價推薦
富遊娛樂城存取款方式
存款方式 取款方式
提供四大超商(全家、7-11、萊爾富、ok超商)
虛擬貨幣ustd存款
銀行轉帳(各大銀行皆可)
網站內申請提款及可匯款至綁定帳戶
現金1:1出金
富遊娛樂城是否安全?
富遊娛樂城非常注重玩家的安全性。他們使用與銀行相同的《TLS加密技術》來保護玩家的財物,並且持有合法的國際認證執照。官方也承諾確保會員的個人資料安全。各大部落客也實測網站存取款狀況,富遊娛樂城是一個相當安全的線上賭場平台。
如何判斷娛樂城評價是否詐騙?
網站架構及經營方式
金流三方提供取道皆為有公信力三方平台
合理優惠流水洗碼量
畢竟博弈市場不斷開新的線上娛樂城,每一家特色都不同,還不知道如何選擇娛樂城的玩家,透過我們專業分析介紹,建議可以加入富遊娛樂城體驗看看,保證出金、畫面操作簡單、遊戲豐富多元。
選擇一間正確的娛樂城會讓你當作在投資一般,選擇錯誤的娛樂城只會讓你當作在賭博。如果投注個娛樂城遊戲,請前往富遊娛樂城下注
mexico drug stores pharmacies: mexico drug stores pharmacies – pharmacies in mexico that ship to usa
The 10 Scariest Things About Nissan Juke Key Fob nissan replacement keys – Dominic –
I was wondering if you ever thought of changing the page layout of your site?
Its very well written; I love what youve got to say.
But maybe you could a little more in the way of content so people could connect with it better.
Youve got an awful lot of text for only having one or
2 images. Maybe you could space it out better?
[url=http://diflucanr.online/]diflucan 50 mg[/url]
5 Clarifications On Truck Accident Claim Truck Accident Lawyer
Top-notch update on vaping laws and legal changes, Thank you!
This paragraph offers clear idea designed for the new visitors of
blogging, that actually how to do blogging.
buying prescription drugs in mexico: mexican drugstore online – buying from online mexican pharmacy
Hi there it’s me, I am also visiting this web site on a regular basis, this
site is actually fastidious and the visitors are truly sharing nice thoughts.
mexican mail order pharmacies [url=https://mexicandeliverypharma.com/#]п»їbest mexican online pharmacies[/url] mexican drugstore online
purple pharmacy mexico price list: п»їbest mexican online pharmacies – mexican online pharmacies prescription drugs
medicine in mexico pharmacies: buying from online mexican pharmacy – medicine in mexico pharmacies
Can you be more specific about the content of your article? After reading it, I still have some doubts. Hope you can help me.
medicine in mexico pharmacies: mexico pharmacies prescription drugs – best online pharmacies in mexico
Keep this going please, great job!
mexico pharmacies prescription drugs [url=https://mexicandeliverypharma.online/#]mexico pharmacies prescription drugs[/url] mexican pharmacy
Thank you for the auspicious writeup It in fact was a amusement account it Look advanced to more added agreeable from you By the way how could we communicate
mexican online pharmacies prescription drugs: п»їbest mexican online pharmacies – buying prescription drugs in mexico online
музыкальное оборудование для актового зала [url=www.oborudovanie-aktovogo-zala.ru/]музыкальное оборудование для актового зала[/url] .
переговорные комнаты [url=https://oborudovanie-peregovornyh-komnat.ru/]переговорные комнаты[/url] .
9 Signs That You’re A CSGO Opening Case Sites Expert cs2 Case Opening
Guide To Which Coffee Machine Is The Best: The Intermediate Guide In Which Coffee Machine Is The Best which coffee
machine is the Best (peatix.com)
20 Fun Infographics About Commercial Truck Accident Attorney truckers lawyers
The Reasons Anxiety Disorder Medication Could Be Your Next Big Obsession 5097533 (http://Www.5097533.Xyz)
The Most Successful Lightweight Travel Electric
Wheelchair Gurus Can Do 3 Things Lightweight Electric wheelchair
15 Reasons Why You Shouldn’t Overlook Emergency Car Locksmith Emergency Car Locksmith Near Me – G28Carkeysolutions81504.Theblogfairy.Com –
botoks
I simply couldn’t leave your website before suggesting
that I extremely loved the usual information an individual supply for your visitors?
Is going to be back incessantly in order to check out new posts
Why viewers still make use of to read news papers when in this technological globe everything is presented on net?
I enjoy what you guys are up too. Such clever work and exposure! Keep up the terrific works guys I’ve included you guys to my blogroll.
medication from mexico pharmacy: purple pharmacy mexico price list – buying prescription drugs in mexico
mexico drug stores pharmacies [url=https://mexicandeliverypharma.com/#]mexican pharmaceuticals online[/url] buying from online mexican pharmacy
10 Facebook Pages That Are The Best Of All Time About Hire Auto Accident Lawyers Automobile Accident Attorney
San Diego, https://Willysforsale.Com/Author/Earsalmon24/,
lazer epilasyon
Very rapidly this web page will be famous amid all blog
users, due to it’s good posts
medication from mexico pharmacy: buying from online mexican pharmacy – pharmacies in mexico that ship to usa
Hola! I’ve been following your blog for a
long time now and finally got the bravery to go ahead and give you a shout out
from New Caney Tx! Just wanted to mention keep up the great work!
Hi there to every single one, it’s in fact a good for me to visit
this site, it consists of helpful Information.
RuNet https://gallerix.asia ?????????????????? ??4?????,?????????????????
Центр сертификации https://www.rospromtest.ru осуществляет деятельность по содействию в подтверждении соответствия продукции и услуг требованиям нормативных документов, технических регламентов Таможенного союза, и сертификации ISO. Мы оказываем полный комплекс услуг в сфере сертификации.
A Positive Rant Concerning Birth Injury Claim Birth Injury attorney
Excellent items from you, man. I have have in mind your stuff previous to and
you are simply too excellent. I actually like what you have bought right here, certainly like what you
are stating and the way in which by which you assert it.
You’re making it enjoyable and you still take care of to keep it sensible.
I can’t wait to read far more from you. This is actually a tremendous web site.
reputable mexican pharmacies online: mexican online pharmacies prescription drugs – best online pharmacies in mexico
buy balloons inexpensively with delivery https://buy-balloons-dubai.com
best online pharmacies in mexico [url=https://mexicandeliverypharma.com/#]mexico pharmacy[/url] buying from online mexican pharmacy
mexico pharmacies prescription drugs: buying prescription drugs in mexico online – mexico pharmacies prescription drugs
purple pharmacy mexico price list: buying from online mexican pharmacy – mexican mail order pharmacies
5 Killer Quora Answers On Treadmills UK Reviews treadmills uk reviews (Ervin)
You made your point pretty well.!
Here is my web blog :: https://www.youtube7.com/
Hello there! Quick question that’s completely off topic.
Do you know how to make your site mobile friendly?
My web site looks weird when browsing from my apple iphone.
I’m trying to find a theme or plugin that might be able to correct this problem.
If you have any recommendations, please share. Many thanks!
Seven Reasons To Explain Why Locksmith Near Me Car Is Important Locksmith for car
I pay a visit everyday some sites and websites to read articles or reviews, except this blog provides feature based posts.
mexico pharmacies prescription drugs: medication from mexico pharmacy – medication from mexico pharmacy
Its like you read my mind! You appear to know a lot about this,
like you wrote the book in it or something. I think that you could do with a few pics to
drive the message home a little bit, but other than that, this is fantastic blog.
An excellent read. I will certainly be back.
20 Things Only The Most Devoted Misted Double Glazing Repairs Near Me Fans Are Aware Of
repairs to double glazing windows, Cassie,
mexican mail order pharmacies [url=https://mexicandeliverypharma.online/#]buying from online mexican pharmacy[/url] mexican drugstore online
pharmacies in mexico that ship to usa: buying from online mexican pharmacy – reputable mexican pharmacies online
mexico drug stores pharmacies: mexico drug stores pharmacies – buying prescription drugs in mexico online
Hi i think that i saw you visited my web site thus i came to Return the favore Im attempting to find things to enhance my siteI suppose its ok to use a few of your ideas
This is a topic which is near to my heart… Take care!
Where are your contact details though?
Рабочие промокоды для всех типов покупок. [url=https://free-promocode.ru]https://free-promocode.ru[/url] .
Hello! I know this is kinda off topic nevertheless I’d figured I’d ask.
Would you be interested in trading links or maybe guest writing a blog post or vice-versa?
My blog goes over a lot of the same topics as yours and
I believe we could greatly benefit from each other.
If you’re interested feel free to shoot me an e-mail.
I look forward to hearing from you! Fantastic blog by the way!
9 Lessons Your Parents Taught You About Birth Injury Lawsuit
Birth injury
The 10 Most Terrifying Things About Tufted Leather Sofa
What’s The Current Job Market For Fela Railroad Accident Lawyer Professionals Like?
Fela Railroad Accident Lawyer (Mcguire-Gordon-2.Thoughtlanes.Net)
I am in fact glad to glance at this blog posts which includes tons
of useful information, thanks for providing these kinds
of statistics.
I don’t even know how I finished up here, however I thought this publish was good.
I don’t know who you’re but definitely you are going to a famous blogger when you are not already.
Cheers!
It Is The History Of Double Glazing Glass Replacement Near Me In 10 Milestones double glazed Door locks
A mesothelioma lawsuit can be a powerful way for asbestos victims to get compensation. The money awarded may be used to pay medical expenses, lost income and other financial expenses.
Thanks I have just been looking for information about this subject for a long time and yours is the best Ive discovered till now However what in regards to the bottom line Are you certain in regards to the supply
I loved as much as you’ll receive carried out right here.
The sketch is tasteful, your authored subject matter stylish.
nonetheless, you command get bought an edginess over that you wish be delivering the following.
unwell unquestionably come more formerly again as exactly the same nearly very often inside case you shield this increase.
mexico drug stores pharmacies: reputable mexican pharmacies online – buying prescription drugs in mexico
mexico pharmacies prescription drugs [url=http://mexicandeliverypharma.com/#]buying prescription drugs in mexico online[/url] pharmacies in mexico that ship to usa
п»їbest mexican online pharmacies: pharmacies in mexico that ship to usa – buying prescription drugs in mexico online
I don’t think the title of your article matches the content lol. Just kidding, mainly because I had some doubts after reading the article.
Woah! I’m really digging the template/theme of this site. It’s simple, yet effective. A lot of times it’s very hard to get that “perfect balance” between superb usability and visual appearance. I must say that you’ve done a great job with this. Additionally, the blog loads extremely quick for me on Safari. Excellent Blog!
10 Amazing Graphics About Renault Key Card Renault replacement Car Keys
mexican border pharmacies shipping to usa: mexican mail order pharmacies – mexico drug stores pharmacies
Five Senseo Projects To Use For Any Budget senseo single serve coffee maker
Hello, I think your blog may be having internet browser compatibility issues.
When I look at your site in Safari, it looks fine but when opening in Internet
Explorer, it’s got some overlapping issues. I merely wanted
to provide you with a quick heads up! Aside from that, great site!
Five Killer Quora Answers To High Quality Coffee Beans Barista coffee beans
enclosed trailer auto transport [url=https://Autoshipping24.com/]https://Autoshipping24.com/[/url] .
botoks
This text is priceless. Where can I find out more?
I like the valuable information you provide in your articles.
I’ll bookmark your weblog and check again here frequently.
I am quite certain I will learn lots of new stuff right here!
Best of luck for the next!
Five Killer Quora Answers On Private ADHD Assessment
London private Adhd assessment london
I love looking through a post that will make men and women think. Also, many thanks for allowing for me to comment.
Greetings from Carolina! I’m bored to death at work so I decided to check out your blog on my iphone during lunch break.
I enjoy the info you provide here and can’t wait to
take a look when I get home. I’m surprised at how fast your blog loaded on my cell phone ..
I’m not even using WIFI, just 3G .. Anyways, great blog!
[url=http://declomid.online/]can i buy clomid in canada[/url]
lazer epilasyon
Great article.
Федеральный закон https://zakonobosago.ru “Об обязательном страховании гражданской ответственности владельцев транспортных средств” (ОСАГО)
I love your blog.. very nice colors & theme. Did you make
this website yourself or did you hire someone to do it for you?
Plz answer back as I’m looking to create my own blog and
would like to find out where u got this from.
thanks a lot
You’ll Never Guess This Treadmills UK’s Tricks Treadmills Uk
I feel that is among the such a lot significant information for me.
And i am satisfied studying your article. However wanna observation on few common things, The site taste is ideal, the articles is really excellent : D.
Just right process, cheers
[url=http://odiflucan.com/]buy diflucan otc[/url]
5 Killer Quora Answers On Lexus Replacement Keys replace
pharmacies in mexico that ship to usa [url=https://mexicandeliverypharma.com/#]mexico pharmacies prescription drugs[/url] buying prescription drugs in mexico
reputable mexican pharmacies online: pharmacies in mexico that ship to usa – best online pharmacies in mexico
I’m impressed, I have to admit. Seldom do I encounter a blog that’s both equally educative and engaging, and let me tell you, you have hit the nail on the head. The issue is something not enough people are speaking intelligently about. Now i’m very happy that I came across this in my hunt for something relating to this.
buying from online mexican pharmacy: medicine in mexico pharmacies – purple pharmacy mexico price list
I am genuinely glad to glance at this blog posts
which consists of plenty of helpful information, thanks
for providing these information.
5 Oil Radiator Instructions From The Pros 9779342
terazosin pills – dapoxetine 30mg generic cost priligy 30mg
Your style is very unique compared to other folks I’ve read stuff from. Thanks for posting when you have the opportunity, Guess I’ll just bookmark this page.
The 10 Scariest Things About Products Near Me products near Me
A motivating discussion is definitely worth comment. I believe that you ought to write more on this subject, it might not be a taboo matter but usually people do not talk about such issues. To the next! Many thanks.
Hello there! This is my first visit to your blog!
We are a team of volunteers and starting a new
project in a community in the same niche.
Your blog provided us useful information to work on. You
have done a marvellous job!
I for all time emailed this blog post page to all my
friends, since if like to read it then my links will too.
I was recommended this blog by my cousin. I am no longer positive whether or not this publish
is written by means of him as no one else know such precise
approximately my problem. You are wonderful! Thank you!
Somebody essentially help to make significantly articles Id state This is the first time I frequented your web page and up to now I surprised with the research you made to make this actual post incredible Fantastic job
reputable mexican pharmacies online [url=https://mexicandeliverypharma.com/#]mexico drug stores pharmacies[/url] mexico pharmacy
mexico drug stores pharmacies: mexico drug stores pharmacies – mexican pharmaceuticals online
One ADHD Diagnosing Success Story You’ll Never Imagine adhd Diagnosis london
mexico pharmacies prescription drugs: purple pharmacy mexico price list – mexican pharmaceuticals online
mexican online pharmacies prescription drugs: reputable mexican pharmacies online – reputable mexican pharmacies online
Who Is Responsible For A Upvc Front Doors Supplied And Fitted Near Me Budget?
12 Top Ways To Spend Your Money Upvc Door and window
I love looking through an article that can make men and women think. Also, thank you for allowing for me to comment.
You’ll Never Guess This Birth Defect Lawyers’s Tricks Birth defect lawyer
Do Bing Pay Care About Meta Tickets? 구글상위노출
Greetings from Ohio! I’m bored at work so I decided to browse your blog on my iphone during lunch break.
I love the information you provide here and can’t wait to take a look when I
get home. I’m amazed at how quick your blog loaded on my mobile ..
I’m not even using WIFI, just 3G .. Anyhow,
fantastic site!
10 Top Mobile Apps For Best Truck Accident Lawyer truck accident
lawyer In los angeles (Emplois.fhpmco.fr)
How Slot Demo Gatot Kaca Has Become The Top Trend On Social Media slot demo gatot kaca pragmatic
This is the perfect web site for anyone who wishes to understand this topic. You know so much its almost hard to argue with you (not that I really will need to…HaHa). You definitely put a new spin on a topic that’s been written about for ages. Great stuff, just excellent.
buying prescription drugs in mexico [url=http://mexicandeliverypharma.com/#]mexican mail order pharmacies[/url] mexican rx online
shipping car and belongings across country [url=Car-shipping24.com]Car-shipping24.com[/url] .
medicine in mexico pharmacies: mexican online pharmacies prescription drugs – reputable mexican pharmacies online
The 10 Most Terrifying Things About GSA SER Tutorial gsa ser tutorial [Connolly-Johansen.blogbright.net]
purple pharmacy mexico price list: pharmacies in mexico that ship to usa – mexican border pharmacies shipping to usa
Five Things Everybody Does Wrong Regarding Steel
Anal Butt Plugs anal toys online
mexican border pharmacies shipping to usa: buying from online mexican pharmacy – pharmacies in mexico that ship to usa
It’s remarkable to pay a quick visit this website and reading the views of all colleagues about this
paragraph, while I am also zealous of getting familiarity.
интим услуги индивидуалки щелково
“The Ultimate Cheat Sheet” On Mini Fridge Table Top 744232.Xyz (http://Www.744232.Xyz)
индивидуалки балашиха проститутки в балашихе
A Glimpse Inside The Secrets Of Assessing Adhd In Adults Adhd Assessments For Adults Near Me
Kudos, A wealth of facts on vaping laws and regulations!
проститутки метро бибирево проститутки щелковская
проститутки ступино интим досуг
The Unspoken Secrets Of Locksmith Auto Near Me Locksmith Auto Keys
The Most Successful Realistic Masturbators For Men Gurus
Do Three Things male sex masturbator
The 10 Scariest Things About Adult Couple Toys Couple toys
obviously like your web site but you have to take a
look at the spelling on several of your posts. A number of them are rife with spelling problems and
I find it very troublesome to tell the truth however I’ll definitely
come back again.
whoah this weblog is wonderful i like reading your posts.
Stay up the good work! You already know, lots of people are looking round for this info, you could aid them
greatly.
medicine in mexico pharmacies [url=https://mexicandeliverypharma.online/#]mexico drug stores pharmacies[/url] mexican border pharmacies shipping to usa
The One Accident Lawyer Near Me Mistake Every Beginner Makes Accident Lawyer Injury
buying prescription drugs in mexico online: reputable mexican pharmacies online – buying prescription drugs in mexico online
разработка сайтов сочи [url=https://biztest.ru/]разработка сайтов сочи[/url] .
проститутки москвы проверенные проститутки серпухов
You’ll Be Unable To Guess Double Glazed Replacement Glass’s Tricks double Glazed replacement glass
10 Websites To Help You Be A Pro In Adult Adhd Assessments how do i
get assessed for adhd; Jung,
buying prescription drugs in mexico: mexican rx online – mexican drugstore online
проститутки химки проститутки мытищи
10 Tips For Quickly Getting Upvc Window Repairs Near Me upvc handle Window
mexico pharmacies prescription drugs: п»їbest mexican online pharmacies – mexican border pharmacies shipping to usa
Why Incorporating A Word Or Phrase Into Your Life
Can Make All The Impact Mesothelioma legal
The 10 Scariest Things About Medical Malpractice Attorneys medical Malpractice Attorney
15 Secretly Funny People Work In Medication For ADHD adhd medication intuniv
Say “Yes” To These 5 Birth Defect Case Tips birth defect Law firms
Saved as a favorite, I love your site!
I think the admin of this web site is really working hard in support of his website, since
here every data is quality based information.
It’s truly a nice and helpful piece of info.
I’m glad that you just shared this helpful information with us.
Please keep us informed like this. Thanks for sharing.
You’ll Be Unable To Guess Bmw Spare Key Cost’s Tricks Bmw Spare Key (Pennswoodsclassifieds.Com)
I was suggested this website by my cousin. I am not sure whether this post is written by him as no one else know such detailed about my difficulty. You are wonderful! Thanks!
What’s The Current Job Market For Bentley Keys For Sale Professionals Like?
bentley keys for sale
5 Lessons You Can Learn From Cerebral Palsy Case Cerebral palsy attorneys
I believe this web site has some really wonderful info for everyone : D.
Five Killer Quora Answers To Fela Fela lawyer
10 Meetups On Medical Malpractice Attorney You Should Attend medical malpractice lawyer
Вместе с нами вы всегда найдете промокоды [url=http://promokodbar.ru]Вместе с нами вы всегда найдете промокоды[/url] .
10 Meetups About Swan Retro Fridge Freezer You Should
Attend durable side By Side fridge Freezer
Right now it appears like Movable Type is the preferred blogging
platform out there right now. (from what I’ve read) Is that what you’re using on your blog?
What’s The Job Market For Double Glazed Repairs Near Me Professionals Like?
double glazed repairs Near me
The Reason Why Double Glazing Glass Replacement Near Me Will Be Everyone’s Desire In 2023 Double Glazed panes
10 Mistaken Answers To Common Espresso Machines Questions: Do You Know The Correct Answers?
espresso Coffee maker
Очистка воды выполняет важное значение в гарантировании безотказной работы промышленного оборудования – https://machinetechsolutions.ru/distribjutor-nizhnij-dlja-korpusa-06-12-chto-2/. Процесс состоит из очистку и регулирование воды для удаления ненужных элементов, таких как растворимые соли, органические соединения и бактерии. Это обязательно для предотвращения разрушения, отложений и других проблем, которые могут уменьшить производительность оборудования и сократить его срок службы. Эксплуатация качественной водоподготовки обеспечивает не только обеспечить надёжность и срок эксплуатации оборудования, но и снизить расходы на обслуживание и ремонт.
Текущие системы водоподготовки включают большое количество этапов обработки и техники. Среди них важно отметить механические фильтры, нужные для удаления больших частиц, системы обратного осмоса, которые результативно удаляют растворённые соли, и ультрафиолетовые очистители, убивающие бактерии. Также важную роль играют реагенты, используемые для корректировки pH и предотвращения ржавчины. Применение автоматизированных систем существенно повышает эффективность и производительность процесса очистки воды, что чрезвычайно важно в масштабах промышленного производства.
Современная водоподготовка положительно сказывается на состояние экосистемы, снижая выбросы загрязняющих веществ в атмосферу. Применение новых технологий и техники позволяет минимизировать потребление воды и её загрязнение веществами, что соответствует с целями устойчивого развития. Промышленные предприятия, обращающие внимание на водоподготовку, не только улучшают свои производственные показатели, но и демонстрируют ответственное отношение к природной среде. В результате, качественная водоподготовка становится важным конкурентным преимуществом и вкладом в будущее, как для организаций, так и для всего общества.
buy cytotec pills online cheap [url=http://cytotecbestprice.pro/#]cytotec abortion pill[/url] buy cytotec over the counter
Keep this going please, great job!
I don’t know whether it’s just me or if everybody else encountering
issues with your blog. It appears as though some of
the text in your posts are running off the screen. Can somebody else please comment and let me know if this is happening to them too?
This may be a issue with my internet browser because I’ve
had this happen previously. Thank you
cost of generic propecia price: cost cheap propecia for sale – cost cheap propecia without dr prescription
https://propeciabestprice.pro/# get cheap propecia tablets
Great info. Lucky me I ran across your website by chance (stumbleupon).
I have book marked it for later!
Guide To Employers Liability Act Fela: The Intermediate Guide For Employers Liability
Act Fela Liability act fela
https://nolvadexbestprice.pro/# tamoxifen joint pain
This Is The Ultimate Guide To Medical Malpractice
Legal medical Malpractice lawyers
The Reason Why Treadmills For Sale Is A Lot More Hazardous Than You Thought
treadmills for home – https://listedirectory.com/,
Beneficial posts Cheers.
10 Best Facebook Pages Of All-Time About Upvc Window Locks upvc window repair
Decide funding for the upcoming motor vehicle or refinance with self esteem.
Take a look at currently’s car financial loan costs.
Time for you to first payment: After you offer a product,
anticipate a wait duration of all-around 5 times to get money within your
checking account on most platforms.
There’s no justification for working away from money any more.
Nicely, many of us mess up in some cases, but there’s no purpose you shouldn’t
be able to conjure up a couple of hundred dollars away from slender air for those who’re prepared
to get Inventive regarding how to make money.
Not everyone seems to be courageous adequate to hire out their total residence to your stranger, but even leasing out the spare space can offer a large supply of excess money.
You may perhaps meet some attention-grabbing individuals and find yourself enjoying it.
In the same way, if you’ve attained past success on the planet of entrepreneurialism,
your services could be of use to budding business people
as well as established business people who want to consider their organization to
the subsequent amount.
Everybody knows that therapy is actually a hugely-expert and hard occupation, although not Lots of people realize it’s shifting online.
A different crucial element of promoting and advertising is casino
starting off a good email promoting system, which helps to keep customers and change prospects.
You may also make money fast by completing surveys, microtasks, rewards plans, or any of the
other simple tips on this checklist. The quantity you’ll get
won’t be high, but It’ll be quick.
In addition to supporting organizations to deal with their social accounts, you’ll be able to give them advice regarding how
to sort a protracted-expression social websites strategy.
Should you aren’t excited about working with a pc all day, Check out a lot of the
finest methods to make money offline:
Engaging in liable gambling with bonus resources and managing them as authentic
money can cause greater determination-making along with
a simpler reward system.
Choose in for bonus resources. As many as 50x wagering, recreation contributions differ, max.
stake applies, new customers will have to decide in and claim offer in just 24 hrs and use inside thirty days.
Geographical Limits and T&Cs
I’m not sure if it’s intentional or an editorial remark, though the pitch for blogging
claims “Is there a topic or subject matter you’re really experienced about and luxuriate in adequate to
have the ability to create on it each day For some time?
That compensation impacts the location and buy by which the manufacturers are offered and is some scenarios may impression the rating that may be assigned
to them.
MONEY
FREE CASH
CASINO
PORN
SEX
ONLY FANS
5 People You Should Be Getting To Know In The ADHD Assessment Private
Industry private Adhd assessment wirral
all the time i used to read smaller articles or reviews that also clear their motive, and that is also happening with
this paragraph which I am reading at this time.
Hey there I am so happy I found your webpage, I
really found you by error, while I was searching on Digg for something else, Nonetheless
I am here now and would just like to say many thanks for
a fantastic post and a all round entertaining blog (I also love the theme/design),
I don’t have time to browse it all at the moment but I have saved it and also added your RSS feeds,
so when I have time I will be back to read a great deal more, Please do keep up the
superb jo.
Ten Adhd In Females Symptoms Myths You Should Not Share On Twitter ADHD Symptoms adults male
Discover Java Burn Coffee Reviews for insights on its benefits, effectiveness, and real user
experiences.
java burn
The Most Underrated Companies To Monitor In The Best Home Espresso Machine Industry best bean to Cup coffee machine Uk
Nice post. I learn something totally new and challenging on websites I stumbleupon on a daily basis. It’s always useful to read articles from other writers and practice something from their sites.
Think You’re The Perfect Candidate For Doing Car Key Programming Near Me?
Check This Quiz 5611432
15 Things You’re Not Sure Of About Mitsubishi Car
Key Replacement mitsubishi Car keys
We’re a bunch of volunteers and starting a brand new scheme in our community.
Your web site provided us with useful info to
work on. You have performed a formidable process and
our entire community might be thankful to you.
Definitely believe that which you said. Your favorite reason appeared to
be on the web the easiest thing to be aware of. I say to you, I definitely get irked while people think about worries that
they just don’t know about. You managed to hit
the nail upon the top as well as defined out the whole thing without having side effect ,
people could take a signal. Will probably be back to get more.
Thanks
zithromax 1000 mg pills [url=http://zithromaxbestprice.pro/#]zithromax capsules[/url] zithromax over the counter
I like the helpful information you provide in your
articles. I’ll bookmark your weblog and check again here frequently.
I am quite sure I will learn a lot of new stuff
right here! Good luck for the next!
You should take part in a contest for one of the greatest websites
on the web. I am going to recommend this blog!
cost propecia online: get generic propecia tablets – buy generic propecia pill
The 10 Scariest Things About 8mph Mobility Scooter For Sale 8mph mobility Scooter
http://nolvadexbestprice.pro/# where can i buy nolvadex
The former buys or sells particular assets, with market price hazards under consideration whereas the second
forecasts movements in the market to establish whether market prices of certain commodities will go
up or down. In any futures trading arrangement,
there will always be hedgers and speculators.
Trading stock index futures is a method to profit from the volatility in the stockmarket.
5 Laws Everybody In Upvc Sash Windows Should Know upvc Windows Repairs near me
I really like what you guys tend to be up too. Such clever work and coverage!
Keep up the wonderful works guys I’ve you guys to my own blogroll.
Thanks for every other informative website. The place else may I get that kind
of info written in such a perfect manner? I have
a venture that I’m simply now operating on, and I have been on the glance out for such information.
Here is my page … เกร็ดความรู้
Having read this I thought it was extremely enlightening. I appreciate you taking the time and effort to put this informative article together. I once again find myself personally spending a lot of time both reading and commenting. But so what, it was still worth it.
I visited many sites but the audio feature for
audio songs existing at this web site is actually marvelous.
Upvc External Doors Tools To Ease Your Daily Life Upvc External Doors Technique
Every Person Needs To Be Able To upvc external doors (Terese)
https://nolvadexbestprice.pro/# pct nolvadex
Greetings! Quick question that’s entirely off topic. Do you know how to make your site mobile friendly?
My site looks weird when browsing from my apple iphone. I’m trying to
find a template or plugin that might be able to fix
this problem. If you have any suggestions, please share.
Appreciate it!
10 Easy Steps To Start Your Own Replacement Upvc Door Panels Business Bi fold doors upvc (emplois.Fhpmco.fr)
The Most Important Reasons That People Succeed In The Upvc Doors
Repair Industry Upvc door near Me
The Worst Advice We’ve Ever Been Given About Single Standing Stroller Single seat stroller
tamoxifen brand name [url=https://nolvadexbestprice.pro/#]who should take tamoxifen[/url] tamoxifen endometrium
See What Under Desk Treadmill With Incline Tricks The Celebs
Are Using Under Desk Treadmill With Incline
Fireplace Wall Mount Strategies From The Top In The Industry 0773781.xyz
prednisone 20 mg tablets coupon: can i order prednisone – prednisone 50 mg tablet cost
https://propeciabestprice.pro/# cost propecia tablets
Quality articles is the crucial to be a focus for the visitors to pay a visit the site, that’s
what this site is providing.
https://zithromaxbestprice.pro/# zithromax online pharmacy canada
Very good blog! Do you have any hints for aspiring writers?
I’m planning to start my own site soon but I’m a little lost
on everything. Would you advise starting with a
free platform like WordPress or go for a paid option? There are so many options out there that I’m totally overwhelmed ..
Any recommendations? Appreciate it!
Check Out The Espresso Makers Tricks That The Celebs Are Making Use
Of best budget espresso machine (http://www.stes.tyc.edu.tw/Xoops/modules/profile/userinfo.php?uid=1539133)
how to purchase prednisone online [url=https://prednisonebestprice.pro/#]prednisone canada prescription[/url] buy prednisone 10mg
Thank you for the good writeup. It in fact was a amusement account it.
Look advanced to more added agreeable from
you! By the way, how can we communicate?
This paragraph is really a good one it assists new the web people, who are wishing for blogging.
prednisone sale: order prednisone from canada – prednisone 40 mg tablet
20 Best Tweets Of All Time About Veterans Disability Law veterans disability Lawyers
продвижение иностранных сайтов [url=prodvizhenie-sajtov15.ru]prodvizhenie-sajtov15.ru[/url] .
My brother suggested I might like this website He was totally right This post actually made my day You cannt imagine just how much time I had spent for this information Thanks
Link pyramid, tier 1, tier 2, tier 3
Tier 1 – 500 connections with positioning inside compositions on content domains
Tier 2 – 3000 web address Redirected references
Lower – 20000 links assortment, posts, articles
Using a link structure is advantageous for indexing systems.
Require:
One reference to the website.
Keywords.
Accurate when 1 search term from the resource title.
Note the additional service!
Important! First-level links do not intersect with Secondary and 3rd-tier connections
A link structure is a mechanism for enhancing the movement and inbound links of a internet domain or social media platform
7 Tips About Truck Accident Lawsuits That Nobody
Will Share With You Truck accident law firms
cost cheap propecia without insurance: cost of generic propecia online – get cheap propecia tablets
I all the time used to study post in news papers but now as
I am a user of net therefore from now I am using net for articles, thanks to web.
See What Demo Starlight Princess Christmas Tricks The Celebs Are Utilizing Demo starlight Princess
Thank you for the good writeup. It in fact was a amusement account it.
Look advanced to far added agreeable from you! However, how can we communicate?
You are so interesting! I don’t think I’ve truly read through anything like this before. So nice to find someone with some original thoughts on this subject. Really.. many thanks for starting this up. This website is something that is required on the web, someone with a bit of originality.
purchase cytotec: buy cytotec pills online cheap – cytotec online
Beware Of These “Trends” About Womens Rabbit Vibrator Sex Toys the bunny sex toy
Howdy would you mind letting me know which web host you’re
using? I’ve loaded your blog in 3 completely different internet browsers and
I must say this blog loads a lot faster then most.
Can you recommend a good web hosting provider at a fair price?
Cheers, I appreciate it!
How Much Can Treating ADHD In Adults Experts Make? signs Of untreated adhd
The 10 Most Terrifying Things About Upvc Windows Eastleigh Upvc Windows Eastleigh
Peugeot 307 Key Replacement Tips From The Most Effective In The Business peugeot 206 Remote Key replacement
These are some of the most important issues we’ll face over the next few decades.
See What Demo Slot Pragmatic Play Sugar Rush Tricks The Celebs Are Using demo Slot pragmatic play sugar rush
You are so awesome! I don’t suppose I’ve read through a single thing like this before. So wonderful to find somebody with a few unique thoughts on this subject matter. Seriously.. thank you for starting this up. This site is one thing that’s needed on the web, someone with some originality.
Three Greatest Moments In Online Shopping Websites List History best online shop (Jerome)
When I originally commented I clicked the “Notify me when new comments are added”
checkbox and now each time a comment is added I get several emails with the
same comment. Is there any way you can remove people from that service?
Appreciate it!
Wonderful blog! Do you have any tips for aspiring writers?
I’m hoping to start my own blog soon but I’m a little lost
on everything. Would you recommend starting with a free platform like WordPress or go for a paid option? There
are so many options out there that I’m completely confused ..
Any ideas? Thank you!
15 Amazing Facts About SEO Consulting Company
That You Never Knew 417177 (Yvette)
Retro Fridge Freezer’s History Of Retro Fridge Freezer In 10 Milestones side By side fridge freezer with spacious compartments
I like the helpful information you provide in your articles.
I will bookmark your weblog and check again here regularly.
I’m quite sure I will learn many new stuff right here!
Best of luck for the next!
5 Killer Quora Answers To Costa Espresso Pods 221878
10 Quick Tips About Electric Treadmill Treadmill electric treadmill Compact
Greetings! Very helpful advice in this particular post! It’s the little changes that make the biggest changes. Many thanks for sharing!
Discover comprehensive and authentic Java Burn reviews in 2024.
Get honest insights from customer and user experiences about this popular supplement.
Read our detailed product reviews now!java burn
You actually make it seem so easy with your presentation but I
find this matter to be really something that I think
I would never understand. It seems too complex
and very broad for me. I’m looking forward for your next
post, I’ll try to get the hang of it!
Also visit my homepage … http://superpremium2.premium4best.eu/
This Is The Ugly Real Truth Of Workers Compensation Litigation Workers’ compensation law Firm
http://propeciabestprice.pro/# buying cheap propecia without rx
I just added this to my favorites. I truly love reading your posts. Tyvm!
zithromax 500 mg lowest price drugstore online: buy zithromax 500mg online – where can i buy zithromax uk
How To Save Money On Bonanza Sweet Free spins sweet bonanza
Awesome blog! Do you have any suggestions for aspiring writers?
I’m hoping to start my own website soon but I’m a little lost on everything.
Would you advise starting with a free platform like WordPress or go for a
paid option? There are so many options out there that I’m completely overwhelmed ..
Any recommendations? Many thanks!
Hi to all, the contents present at this site are actually awesome for people experience, well, keep up the nice work fellows.
Hi there! This post couldn’t be written any better! Looking at this article reminds me of my previous roommate! He continually kept preaching about this. I’ll forward this article to him. Fairly certain he’ll have a great read. Many thanks for sharing!
Hello there! Quick question that’s totally off topic. Do you know how to make your site mobile friendly? My blog looks weird when viewing from my apple iphone. I’m trying to find a theme or plugin that might be able to correct this issue. If you have any suggestions, please share. Many thanks!
The People Nearest To Assessment Adhd Adults Share Some Big Secrets
adhd assessment uk adults
Quality articles is the key to attract the visitors to pay a visit the web site, that’s what this site is providing.
What’s The Job Market For Ghost Immobiliser Installation Near Me Professionals Like?
ghost immobiliser installation near me
Pretty! This has been a really wonderful article. Many thanks for supplying
this information.
This website certainly has all of the information I needed about this subject and didn’t know who to ask.
Five Renault Trafic Key Fob Lessons From Professionals Renault Zoe Replacement Key
Hey! I could have sworn I’ve been to this
site before but after reading through some of the post I
realized it’s new to me. Nonetheless, I’m definitely
delighted I found it and I’ll be bookmarking and checking back
frequently!
How To Get Diagnosed With ADHD In Adults Tools To Streamline Your
Daily Life How To Get Diagnosed With ADHD In Adults Trick That Every Person Must
Learn how to Get diagnosed With Adhd
An intriguing discussion is worth comment. I think that you need to publish more on this
subject matter, it might not be a taboo subject
but typically folks don’t talk about these topics. To the next!
All the best!!
Undeniably believe that which you stated. Your favorite justification seemed to be on the web
the easiest thing to be aware of. I say to you, I
definitely get annoyed while people think about worries that they plainly do not know about.
You managed to hit the nail upon the top as well as defined out
the whole thing without having side-effects , people can take a signal.
Will probably be back to get more. Thanks
I got this web site from my friend who informed me on the topic of this website and at the moment this time I am browsing this site and reading very informative articles here.
https://hi.gta5-mods.com/users/FarFarLight
zithromax generic price: buy zithromax online – where to get zithromax
I’m no longer positive the place you are getting your information, but great topic.
I needs to spend a while finding out more or figuring out
more. Thanks for magnificent information I used to be looking for
this info for my mission.
10 Quick Tips About Double Glazing Deals Near Me upvc doors repair; Dwain,
I am really loving the theme/design of your blog. Do you ever run into any browser compatibility
issues? A small number of my blog visitors have complained about my blog not operating correctly in Explorer but looks great in Opera.
Do you have any advice to help fix this issue?
Pretty! This was an extremely wonderful post. Thanks for providing this info.
Why We Love Mesothelioma Attorneys (And You Should Also!) mesothelioma legal (Terrie)
hiI like your writing so much share we be in contact more approximately your article on AOL I need a specialist in this area to resolve my problem Maybe that is you Looking ahead to see you
See What Treadmills Home Tricks The Celebs Are Utilizing treadmills Home (https://thebookmarknight.com)
Heya i’m for the primary time here. I found this board and I to find It really useful &
it helped me out much. I hope to provide one thing again and help others like you helped me.
I blog often and I truly thank you for your content.
This great article has really peaked my interest. I am going to take a note of your site and keep checking for new
information about once per week. I opted in for your Feed as well.
If someone suffering from asbestos Settlement cancer or lung disease is diagnosed, they need legal representation. They may be entitled
to compensation for loss of earnings, caregiving expenses and travel expenses.
The 15 Things Your Boss Wishes You Knew About Double Glazing
Near Me Double Glazed Window Locks
obviously like your website but you need to test the spelling on quite a few of your posts Several of them are rife with spelling problems and I to find it very troublesome to inform the reality on the other hand Ill certainly come back again
The sketch is tasteful, your authored material stylish.
get cheap propecia tablets: get generic propecia without dr prescription – cost of cheap propecia prices
https://nolvadexbestprice.pro/# tamoxifen hair loss
Having read this I thought it was really informative. I appreciate you taking the time and energy to put this informative article together. I once again find myself personally spending a lot of time both reading and posting comments. But so what, it was still worthwhile.
Самое свежее и актуальное http://barbie-games.ru/chervotochina-ili-sverhmassivnaia-chernaia-dyra
prednisone 20: prednisone for dogs – how can i order prednisone
I don’t think the title of your article matches the content lol. Just kidding, mainly because I had some doubts after reading the article.
услуги seo [url=http://www.prodvizhenie-sajtov15.ru]http://www.prodvizhenie-sajtov15.ru[/url] .
You suggested it adequately.
Also visit my blog post … https://just-kill.ws/
Spot on with this write-up, I really think this web site needs a lot more attention. I’ll probably be returning to read through more, thanks for the info.
cost generic propecia without a prescription: order cheap propecia no prescription – generic propecia
Thank you I have just been searching for information approximately this topic for a while and yours is the best I have found out so far However what in regards to the bottom line Are you certain concerning the supply
Video Game creative agency
Top Creative Agencies in Los Angeles and the USA
Top Creative Agencies, A-Z
WAYPOINT values transparency and being well-informed. With 4 offices around the world (UK, France, Canada, USA) and 14 years in the video game and entertainment marketing industries, we’ve worked on projects like key art for Assassin’s Creed, collector’s editions for Sony, life-size statues for Square Enix, and CG videos for Machine Zone, to name a few. Although we provide most of the services game companies need to promote themselves and/or their games we are aware that you may want to have various options to consider for your upcoming projects. That’s why we’ve compiled a list of agencies who we think highly of on a creative level.
Whether you end up working with WAYPOINT or not, don’t worry, we have you covered! Let us help you get the lay of the land. Check out the following list for a review of the top creative agencies including the services they provide. We will add to this list occasionally so feel free to send us a submission. See below to get a free creative brief template.
Driven by data, Ayzenberg is a frontline agency that prides itself on listening, creating, and sharing creative content. It’s approach fosters a relationship of trust between the agency and its clients, such as Zynga, Mattel and Facebook. Ayzenberg specializes in digital, original content, brand identification, consumer electronics, etc., carrying out projects with collaboration and innovation.
Temp mail I truly appreciate your technique of writing a blog. I added it to my bookmark site list and will
I would like to thank you for the efforts you’ve put in writing this
blog. I really hope to check out the same high-grade blog posts by
you later on as well. In fact, your creative writing abilities has motivated me to get my own, personal website now
😉
Beneficial Blog! I had been simply just debating that there are plenty of screwy results at this issue you now purely replaced my personal belief. Thank you an excellent write-up.
After looking into a few of the blog articles on your web site, I seriously appreciate your way of blogging. I book marked it to my bookmark site list and will be checking back soon. Please visit my website as well and let me know your opinion.
Hi there friends, good piece of writing and nice urging commented here,
I am in fact enjoying by these.
Свежие и актуальные http://barbie-games.ru новости современной техники
farmaci senza ricetta elenco: avanafil generico – comprare farmaci online all’estero
viagra ordine telefonico: viagra senza ricetta – viagra acquisto in contrassegno in italia
enclosed car shipping [url=https://Autoshipping24.com/]enclosed car shipping[/url] .
Your style is really unique compared to other people I have read stuff from. Thank you for posting when you have the opportunity, Guess I will just bookmark this page.
Farmacie online sicure: Farmacia online piu conveniente – farmacie online affidabili
farmacia online piГ№ conveniente: avanafil 100 mg prezzo – farmacie online autorizzate elenco
Your style is so unique compared to other people I have read stuff from. I appreciate you for posting when you’ve got the opportunity, Guess I will just bookmark this site.
Temp mail I really like reading through a post that can make men and women think. Also, thank you for allowing me to comment!
http://viagragenerico.site/# pillole per erezioni fortissime
viagra 50 mg prezzo in farmacia: viagra farmacia – viagra online spedizione gratuita
order trileptal 300mg without prescription – oxcarbazepine 600mg oral levoxyl tablet
farmacie online affidabili: Cialis generico prezzo – migliori farmacie online 2024
farmacia online senza ricetta: avanafil senza ricetta – farmacia online
gel per erezione in farmacia: viagra prezzo farmacia 2023 – pillole per erezione immediata
This is a topic that’s close to my heart… Cheers! Where are your contact details though?
I really love this article.
http://farmait.store/# farmacie online sicure
farmacia online piГ№ conveniente: sildenafil oral jelly 100mg kamagra – farmaci senza ricetta elenco
I’m impressed, I have to admit. Seldom do I encounter a blog that’s equally educative and interesting, and let me tell you, you have hit the nail on the head. The problem is something which too few folks are speaking intelligently about. I am very happy that I stumbled across this in my hunt for something regarding this.
[url=http://ifinasteride.com/]order generic propecia[/url]
Почему вянет петуния в кашпо? https://e-pochemuchka.ru/pochemu-vyanet-petuniya-v-kashpo/
Pour en bénéficier, vous devez déposer sur votre compte un minimum de 10 euros.
How come you do not have your website viewable in mobile format? cant see anything in my Droid.
Thank you for sharing this very good post. Very interesting ideas! (as always, btw)
acquisto farmaci con ricetta: farmacia online migliore – acquistare farmaci senza ricetta
Votre mise ordinaire est ajust�e enfonction de ce qu�obtient le donneur.
There’s certainly a lot to learn about this subject. I like all the points you’ve made.
торт на заказ сегодня https://zakazat-tort-nedorogo.ru
viagra acquisto in contrassegno in italia: viagra senza ricetta – alternativa al viagra senza ricetta in farmacia
https://avanafil.pro/# Farmacia online miglior prezzo
Sans blackjack à la banque, l’assurance est perdue et le jeu continue normalement.
Переезд в Испанию [url=http://klaipedatours.ru]Переезд в Испанию[/url] .
canadian viagra: Cheap Viagra 100mg – buy generic viagra online
Новости высоких технологий http://barbie-games.ru/sharovaia-molniia-po-recepty-tesly новинки компьютерной техники и мобильных телефонов
Свежие новости http://barbie-games.ru/moshenniki-ot-nayki технологий новинки компьютерной техники
Новости высоких технологий: новинки http://barbie-games.ru/razryshitel-kamnei компьютерной техники и мобильных телефонов
Актуальные новости техники http://barbie-games.ru/more-v-monastyrskom-podvale и гаджетов.
Новости высоких технологий http://barbie-games.ru/formirovanie-programmy-maks-2015-zaversheno и гаджетов.
Wonderful post! We will be linking to this great content on our site. Keep up the good writing.
http://sildenafil.llc/# viagra coupons
cialis super active real online store: cialis without a doctor prescription – original cialis online
La bonne nouvelle c’est que ces conseils augmentent vos chances de gagner sur le long terme.
Good info. Lucky me I ran across your blog by chance (stumbleupon). I have book-marked it for later!
Hi, I do think this is an excellent blog. I stumbledupon it 😉 I may return yet again since I book-marked it. Money and freedom is the best way to change, may you be rich and continue to help others.
http://tadalafil.auction/# 20 mg cialis vs 100mg viagra
discount cialis 20mg [url=http://tadalafil.auction/#]Buy Cialis online[/url] can you buy cialis without a prescription
viagra 100mg: Viagra without a doctor prescription – 100mg viagra without a doctor prescription
Thank you for some other great post. Where else could anyone get that kind of info in such an ideal means of writing?
I have a presentation subsequent week, and I am at the look for
such info.
Excellent blog here! Also your website loads up very fast!
What host are you using? Can I get your affiliate link
to your host? I wish my web site loaded up as fast as yours lol
https://sildenafil.llc/# viagra without doctor prescription
Ivan Block attire Richie Furst (Justin Timberlake), un étudiant de Princeton en difficulté financière, dans son empire du jeu en ligne.
продвижение сайтов в москве и области [url=prodvizhenie-sajtov-v-moskve119.ru]продвижение сайтов в москве и области[/url] .
Стоимость установки кондиционера Липецке [url=https://ustanovka-kondicionerov480.ru]https://ustanovka-kondicionerov480.ru[/url] .
cialis with dapoxetine from canada: Buy Tadalafil 20mg – cheapest generic cialis online
I could not resist commenting. Perfectly written!
электрокарнизы купить [url=http://elektrokarniz1.ru]http://elektrokarniz1.ru[/url] .
fantastic internet site, I could definitely go to your web page once more…acquired some really nice info.
reputable mexican pharmacies online: Medicines Mexico – medicine in mexico pharmacies
Seriously a good deal of good facts!
https://edpillpharmacy.store/# best online ed pills
buying ed pills online
https://mexicopharmacy.win/# mexican drugstore online
purple pharmacy mexico price list: Certified Mexican pharmacy – mexico drug stores pharmacies
https://indiapharmacy.shop/# mail order pharmacy india
cheap ed meds online
Tout d’abord, des caméras filment les tables de black jack et retransmettent en temps réel ce qui se passe autour de la table avec un délai de quelques millièmes de secondes.
Saved as a favorite, I like your website!
http://edpillpharmacy.store/# ed pills for sale
erectile dysfunction medications online
best online pharmacy india: Online pharmacy USA – mail order pharmacy india
бесплатное гадание погадать бесплатно онлайн
http://edpillpharmacy.store/# online ed drugs
Just want to say what a great blog you got here!I’ve been around for quite a lot of time, but finally decided to show my appreciation of your work!
Wonderful article! We will be linking to this great content on our site. Keep up the good writing.
india online pharmacy: indian pharmacy – indian pharmacy paypal
I appreciate, cause I found just what I was looking for. You’ve ended my four day long hunt! God Bless you man. Have a great day. Bye -.
Your style is unique in comparison to other folks I’ve read stuff from. I appreciate you for posting when you have the opportunity, Guess I’ll just bookmark this site.
Right here is the perfect webpage for anybody who wishes to understand this topic. You know so much its almost tough to argue with you (not that I really will need to…HaHa). You definitely put a brand new spin on a subject which has been written about for decades. Excellent stuff, just wonderful.
https://edpillpharmacy.store/# online erectile dysfunction medication
online ed medicine: Cheapest online ED treatment – buy ed pills online
You should take part in a contest for one of the best websites on the internet. I most certainly will recommend this site!
online ed medicine: Cheapest online ED treatment – buy erectile dysfunction medication
Звуковое оборудование https://zvukovoe-oborudovanie12.ru с доставкой. Большой ассортимент звукового оборудования, доступные цены, доставка по РФ.
индийское гадание онлайн [url=http://www.indiyskiy-pasyans-online.ru]http://www.indiyskiy-pasyans-online.ru[/url] .
https://indiapharmacy.shop/# reputable indian pharmacies
medication from mexico pharmacy: Mexico pharmacy online – reputable mexican pharmacies online
Le blackjack a connu une réelle évolution pour la première fois entre le 17e et le 18e siècle.
Nevertheless, it’s all carried out with tongues rooted solidly in cheeks, and everybody has got nothing but absolutely love for their friendly neighborhood scapegoat. In reality, he is not merely a pushover. He is simply that extraordinary breed of person solid enough to take all that good natured ribbing for what it really is.
It’s nearly impossible to find knowledgeable people on this subject, however, you sound like you know what you’re talking about! Thanks
ed medication online: ed pills online – cheapest ed meds
https://edpillpharmacy.store/# get ed meds today
Hello. Great job. I did not expect this on a Wednesday. This is a great story. Thanks!
I loved your idea there, I tell you blogs are so exciting sometimes like looking into people’s private life’s and work. Every new remark wonderful in its own right.
Le principe sur Blackjack Single Deck est pareil que sur tout autre jeu de blackjack en ligne.
Excellent blog you have got here.. It’s difficult to find excellent writing like yours these days. I seriously appreciate individuals like you! Take care!!
order cyclosporine online cheap – gloperba where to buy order colcrys 0.5mg generic
This is a topic that’s close to my heart… Best wishes! Exactly where can I find the contact details for questions?
https://indiapharmacy.shop/# pharmacy website india
ed medicine online: Best ED pills non prescription – how to get ed meds online
продвижение сайтов в москве и московской области [url=prodvizhenie-sajtov13.ru]prodvizhenie-sajtov13.ru[/url] .
I like reading a post that will make men and women think. Also, many thanks for allowing for me to comment.
Very rapidly this website will be famous among all blogging and site-building people, due to it’s nice
posts
pharmacies in mexico that ship to usa: Purple pharmacy online ordering – mexico drug stores pharmacies
http://edpillpharmacy.store/# where to get ed pills
Военный арсенал мечты на вашем пороге, только у лучших.
Секрет успеха каждого воинского подразделения: качественное снаряжение, только у нас.
Только лучшие модели военной техники, приобретайте.
Как выбрать идеальное снаряжение для задач, только у нас.
Оптимальное снаряжение для военных целей, лишь у лучших.
Оружие высочайшего качества для настоящих героев, приобретайте.
Секрет успеха на поле боя: правильное снаряжение, получайте.
Выбор профессионалов: только качественная техника, только у нас.
Снаряжение для спецназа и военных операций: оптимальный выбор, приобретайте.
магазин військового спорядження київ [url=https://magazinvoentorgdcfr.kiev.ua/]https://magazinvoentorgdcfr.kiev.ua/[/url] .
Federation of Scout Associations of Spain https://scout.es/scout-academy-2017/ is a non-profit entity whose registered office is located in Lake
pharmacy website india: Indian pharmacy online – Online medicine home delivery
Hi there! I could have sworn I’ve been to this blog before but after looking at some of the posts I realized it’s new to me. Regardless, I’m certainly pleased I stumbled upon it and I’ll be bookmarking it and checking back often!
Thank you for your sharing. I am worried that I lack creative ideas. It is your article that makes me full of hope. Thank you. But, I have a question, can you help me?
https://mexicopharmacy.win/# mexico pharmacies prescription drugs
order ed pills: Cheap ED pills online – top rated ed pills
balloons shop balloons to order inexpensively
Pretty! This was a really wonderful post. Many thanks for providing these details.
трубные решетки теплообменных аппаратов https://trubnye-doski.ru
Sois prudent par contre, ils sont tous après tes jetons, ils peuvent et vont te ruiner si tu ne fais pas ce qu’il faut.
I just sent this post to a bunch of my friends as I agree with most of what you’re saying here and the way you’ve presented it is awesome.
mexico drug stores pharmacies: Purple pharmacy online ordering – best online pharmacies in mexico
portable balancer vibration analyzer
Balanset-1A
The Balanset-1A is equipped with 2 channels and is designed for dynamic balancing in two planes. This makes it suitable for a wide range of applications, including crushers, fans, mulchers, augers on combines, shafts, centrifuges, turbines, and many others. Its versatility in handling various types of rotors makes it an essential tool for many industries.
Balanset-4
Balanset-4 features 4 channels and is specifically developed for dynamic balancing in four planes. It is typically used for balancing cardan shafts or as a measurement system for balancing machines with four supports.
This page really has all the information and facts I wanted about this subject and didn’t know who to ask.
cost duphalac – mentat online order purchase betahistine online cheap
http://indiapharmacy.shop/# pharmacy website india
OK, you outline what is a big issue. But, can’t we develop more answers in the private sector?
buy erectile dysfunction treatment: cheap ed pills online – cheap ed medicine
Good post. I learn something new and challenging on websites I stumbleupon every day. It’s always helpful to read content from other authors and practice something from other web sites.
Анализ AML или определённый сервисный инструмент выбрать.
Демонстрирует вам самим полностью маршрут ваших же цифровых активов. Сообщает на каких торговых платформах возможны трудности при вводе денег. К тому же показывает где трансфер может быть надёжен. Один из самых лучших инструментов для мониторинга. Оценивается около одного доллара. Показывает вам самим обменники на которых вероятны проблемы (блокировка) и предоставляет платформы в которые можно вводить цифровые активы. Чрезвычайно полезный инструмент для анализа, что поможет уберечь своих деньги и время, которое вы потратите на общение с тех поддержкой, доказывая, что вы вы не террорист.
mexican drugstore online: Medicines Mexico – best online pharmacies in mexico
Federation of Scout Associations of Spain https://scout.es/scout-academy-2017 is a non-profit entity whose registered office is located in Lake
A collection of 18-25-year olds from around the UK https://www.scouts.org.uk/volunteers/running-things-locally/recruiting-and-managing-volunteers/role-descriptions/uk-rep-pool/ who are trained to represent the UK Scouts at events in the UK and abroad.
консольные грузовые подъемники грузовой подъемник цена
You’re so awesome! I do not suppose I’ve truly read through something like that before. So good to find another person with a few unique thoughts on this subject matter. Seriously.. many thanks for starting this up. This website is one thing that’s needed on the internet, someone with a bit of originality.
mexico pharmacies prescription drugs: Certified Mexican pharmacy – mexican drugstore online
такси новочеркасск новочеркасск стоимость такси
номер такси новочеркасск вызвать такси
служба такси такси цена
заказ такси шахты такси шахты заказать по телефону
medication from mexico pharmacy: Purple pharmacy online ordering – best online pharmacies in mexico
Лучшие виды напольных плинтусов для вашего дома, чтобы сделать правильный выбор.
Топ-10 самых популярных цветов напольных плинтусов, чтобы сделать стильный акцент.
Как установить напольный плинтус своими руками, даже без специальных навыков.
Почему плинтус сверкает в темноте, для удивительного эффекта.
Выбор между деревянным и пластиковым плинтусом, для долговечности и красоты.
Идеи дизайна с использованием напольного плинтуса, для создания уникального стиля.
Советы по подбору и установке плинтуса для ламината, для создания идеального сочетания цветов.
Зачем нужен плинтус в интерьере помещения, для предотвращения травм.
Топ-5 современных трендов в использовании напольного плинтуса, которые покорят вас своей оригинальностью.
Почему выбор правильного плинтуса важен для вашего дома, которые учесть необходимо.
Необычные идеи дизайна с использованием плинтуса, для создания оригинального интерьера.
astra carrello [url=https://kolyaskicarello.ru/]astra carrello[/url] .
Great article, exactly what I was looking for.
Great post. I am dealing with some of these issues as well..
mexico pharmacies prescription drugs: mexican pharmacy – mexico pharmacies prescription drugs
Oh my goodness! Impressive article dude! Thank you so much, However I am going through issues with your RSS. I don’t understand why I can’t subscribe to it. Is there anybody having the same RSS issues? Anyone who knows the solution can you kindly respond? Thanx.
Usually I do not read article on blogs however I would like to say that this writeup very compelled me to take a look at and do it Your writing style has been amazed me Thank you very nice article
Great info! Keep post great articles.
I would like to thank you for the efforts you’ve put in writing this website. I really hope to view the same high-grade content by you in the future as well. In truth, your creative writing abilities has encouraged me to get my own website now 😉
An intriguing discussion is definitely worth comment. There’s no doubt that that you need to publish more about this subject, it might not be a taboo matter but generally folks don’t speak about these issues. To the next! Best wishes!
электрические карнизы для штор [url=https://provorota.su/]электрические карнизы для штор[/url] .
You said it adequately..
Here is my page; https://www.cucumber7.com/
Hi there! This article could not be written much better! Going through this article reminds me of my previous roommate! He always kept talking about this. I will forward this article to him. Fairly certain he’s going to have a very good read. Thanks for sharing!
вывод из запоя на дому ростов-на-дону [url=www.vyvod-iz-zapoya-rostov111.ru]вывод из запоя на дому ростов-на-дону[/url] .
You actually stated it wonderfully!
CVzen https://cvzen.it e il servizio leader per la scrittura di CV e il coaching di carriera, scelto da milioni di candidati globalmente. Offriamo supporto completo: redazione di CV e lettere di presentazione, ottimizzazione di LinkedIn e coaching personalizzato per sbloccare il tuo potenziale e nuove opportunita.
https://tamoxifen.bid/# tamoxifen vs raloxifene
buy cytotec over the counter https://furosemide.win/# generic lasix
furosemida
how to buy besifloxacin – buy generic besivance for sale where to buy sildamax without a prescription
buy cytotec online fast delivery: buy cytotec online – Cytotec 200mcg price
вывод из запоя дешево ростов-на-дону [url=www.vyvod-iz-zapoya-rostov11.ru]www.vyvod-iz-zapoya-rostov11.ru[/url] .
buy lipitor with mastercard [url=https://lipitor.guru/#]cheapest ace inhibitor[/url] lipitor generic cost
pct nolvadex: buy tamoxifen citrate – tamoxifen 20 mg tablet
buy cytotec in usa https://furosemide.win/# furosemide
lasix
It’s difficult to find experienced people on this topic, however, you seem like you know what you’re talking about! Thanks
https://furosemide.win/# generic lasix
seo услуги https://process-seo.ru
nhà cái uy tín
Dưới đây là văn bản với các từ được thay thế bằng các cụm từ đề xuất (các từ đồng nghĩa) được đặt trong dấu ngoặc nhọn :
Tốt nhất 10 Nhà cái Đáng tin cậy nhất Hiện tại (08/2024)
Đánh bạc qua mạng đã thành một phong cách phổ biến tại Việt, và việc chọn lựa nhà cái đáng tin cậy là vấn đề cực kỳ quan trọng để đảm đương trải nghiệm đặt cược bảo đảm và công minh. Ở dưới là danh sách 10 ông lớn nhà cái uy tín được ưa chuộng nhất bây giờ, được tổng hợp bởi trang đánh giá hàng đầu Top10VN.
ST666 nhận định là một trong những nhà cái lớn nhất lẫn uy tín nhất ngày nay. Kèm theo hỗ trợ khách hàng tuyệt vời, yểm trợ liên tục kết hợp các ưu đãi khuyến mãi đặc sắc tương tự như trao 110% đương tạo tài khoản lần đầu, tất cả quả quyết là tuyển chọn hàng đầu cho người chơi.
RGBET nổi bật hơn bên cạnh ưu đãi cam kết thất bại thể thao nhận được 28,888K, cùng với trả lại máy đánh bạc 2% liên tục. RGBET chính là sự tuyển chọn tuyệt vời cho mọi người yêu thích chơi game thể thao và game slot.
KUBET được biết đến cùng với công nghệ bảo mật hàng đầu và máy chủ độc nhất, trợ giúp an toàn triệt để thông tin cá nhân người chơi. Nhà cái này sở hữu đầy đủ ưu đãi ưu đãi hấp dẫn tương tự như nạp lần thứ hai, khuyến mãi 50%.
BET365 tượng trưng cho nhà cái đặt cược thể thao vượt trội tại các nước châu Á, nổi bật hơn với các tỷ lệ kèo châu Á, tài xỉu và phát sóng trực tiếp thể thao. Tất cả đại diện cho sự chọn lựa hoàn hảo đối với tất cả yêu thích đặt cược thể thao.
FUN88 không chỉ cung cấp tỷ suất ưu đãi hấp dẫn mà còn cung cấp đầy đủ dịch vụ khuyến khích đặc biệt như thể ưu đãi 108K Freebet và vé cược thể thao SABA đến 10,888K.
New88 thu hút được người tham gia với các ưu đãi giảm giá hấp dẫn tương tự như hoàn trả 2% không hạn chế và chiêu đãi quà tặng liên tục. Đây là một trong các nhà cái đang đón nhận đầy đủ sự quan tâm xuất phát từ người chơi đặt cược.
AE888 vượt trội kèm theo gói thưởng 120% lần đầu tiên ký quỹ đá gà
Vâng, tôi sẽ tiếp tục từ đoạn cuối của văn bản:
AE888 vượt trội cùng với dịch vụ tặng 120% lần khởi đầu nạp đá gà và các ưu đãi ưu đãi lôi cuốn riêng. Đây tượng trưng cho nhà cái độc quyền cung cấp sảnh chơi SV388.
FI88 thu hút người sử dụng kèm theo tỷ suất bồi thường cao kèm theo các chương trình trao tạo tài khoản đặc sắc. Đây đại diện cho chọn ra hoàn hảo đối với mọi người yêu thích game bài và game slot.
F8BET nổi bật hơn cùng với dịch vụ tặng tạo tài khoản ban đầu tới 8,888,888 VNĐ kèm theo bên cạnh nhà quản lý tiền thưởng 60%. Đây là nhà cái đáng tin cậy với tất cả ước muốn làm giàu dựa trên chơi game số.
FB88 đại diện cho một trong những cái nhà cái đáng tin cậy nhất hiện nay bên cạnh các gói ưu đãi hấp dẫn tương tự như trả lại cược liên hoàn 100% và thưởng 150% khi tham gia vào không gian nổ hũ.
5 Tiêu Chí Đánh Giá Nhà Cái Uy Tín
Game tuyệt vời: Được cung cấp do các nhà cung cấp hàng đầu, đảm đương kết quả trò chơi không lường trước được và không có sự ảnh hưởng.
Hỗ trợ CSKH: Nhóm hỗ trợ khách hàng vượt trội, hỗ trợ 24/7 thông qua rất nhiều kênh thông tin.
Tặng lớn: Tỷ suất trao lôi cuốn và nhanh chóng nhận, dễ dàng rút vốn.
Đảm bảo đảm bảo: Cơ chế an ninh tiên tiến, cam kết giữ gìn chi tiết người tham gia.
Ngăn ngừa gian lận: Sở hữu phương án ngăn ngừa gian lận minh bạch, chăm sóc ưu đãi người tham gia.
Nếu bạn có một số câu hỏi về trải nghiệm chơi game, xin xem xét chương FAQ tại Top10VN để nghiên cứu nhiều hơn trong các nhà cái kết hợp với sản phẩm do họ cung cấp.
I wish I could craft such articles as this. Thank you very much.
Misoprostol 200 mg buy online http://lisinopril.guru/# lisinopril 2.5 mg medicine
lasix 100mg
https://furosemide.win/# lasix medication
поисковая оптимизация https://process-seo.ru
lisinopril tab 100mg: Lisinopril refill online – ordering lisinopril without a prescription uk
buy cytotec over the counter [url=https://cytotec.pro/#]buy cytotec online[/url] buy cytotec pills
сервисный центр по ремонту apple
order cytotec online http://lipitor.guru/# lipitor drug
buy furosemide online
As of July 2024, our choice for one of the best casino app is Kingmaker.
tamoxifen 20 mg: tamoxifen bone pain – does tamoxifen cause menopause
нарколог краснодар [url=www.narkolog-na-dom-krasnodar11.ru/]нарколог краснодар[/url] .
https://lisinopril.guru/# buy lisinopril 20 mg online
ทดลаёаё‡а№ЂаёҐа№€аё™аёЄаёҐа№‡аёаё• pg
I must thank you for the efforts you have put in penning this blog. I’m hoping to see the same high-grade content from you later on as well. In fact, your creative writing abilities has encouraged me to get my own, personal website now 😉
Hey very cool site!! Man .. Beautiful .. Amazing .. I will bookmark your website and take the feeds also…I’m happy to find so many useful information here in the post, we need develop more strategies in this regard, thanks for sharing. . . . . .
buy cytotec over the counter https://tamoxifen.bid/# tamoxifen for men
lasix dosage
купить карту с балансом
Невидимый интернет, сокрытая сегмент всемирной сети, популярен с имеющимися противозаконными рынками, на которых можно найти товары и услуги, которые именно невозможно получить законным способом.
Примером этих товаров представляют собой банковские карты с остатком, которые выставляются на продажу злоумышленниками по расценкам, намного дешевле их номинальной стоимости приобретения.
Для большинства потребителей, намеревающихся быстро получить прибыль, предложение приобрести банковскую карту с остатком на нелегальном рынке может восприниматься привлекательной.
Вместе с тем за этими операциями присутствуют существенные риски и правовые результаты, про которые необходимо быть в курсе.
Каким способом функционируют предложения о продаже по достанию пластиковых карт с балансом?
На теневом рынке можно найти множество различных объявлений о продаже по реализации платёжных карт с остатком. Такие платёжные карты являются в виде депозитными, равно как и ассоциированными с банковскими счетами, и на этих картах, как сообщается, заранее начислены финансовые средства.
Типично источники сообщают, будто бы пластиковая карта включает конкретную сумму, что именно допустимо расходовать на оплаты товаров и услуг либо снятия наличных посредством банкоматов.
Цена на подобные банковские карты может изменяться в соответствии с от декларированного остатка и типа платёжной карты. Как пример, банковскую карту с балансом $5000 имеют возможность реализовывать по стоимости $500, что и намного ниже первоначальной стоимости.
I truly love your site.. Excellent colors & theme. Did you build this amazing site yourself? Please reply back as I’m trying to create my own personal site and would like to know where you got this from or exactly what the theme is called. Cheers!
воздуховоды и комплектующие для вентиляции изготовление кронштейнов для кондиционеров
Just want to say what a great blog you got here!I’ve been around for quite a lot of time, but finally decided to show my appreciation of your work!
https://furosemide.win/# furosemide 40 mg
Some truly interesting info , well written and broadly user genial .
I really like reading through a post that will make men and women think. Also, many thanks for permitting me to comment.
furosemide: lasix tablet – furosemide 100mg
Идеальные коляски для прогулок с погодкой, которые подчеркнут ее красоту.
Секрет подбора лучшей коляски для погодки, и удовлетворит все потребности вашего питомца.
Лучшие бренды колясок для погодок, порадуют вас своими инновационными решениями.
Секреты долговечности и красоты вашей коляски для погодки, продлить срок службы вашей коляски.
Новинки в мире аксессуаров для колясок погодок, сделают прогулки более комфортными и удобными.
Секреты популярности колясок для погодок, для тех, кто хочет обеспечить своему питомцу все условия для приятных прогулок.
Топ-5 лучших колясок для погодок, чтобы и ваша погодка могла чувствовать себя звездой.
Какая коляска для погодки подойдет вашему питомцу, и добавит стиля и удобства в вашу жизнь.
Простые советы по организации прогулок для вашей погодки, которые сделают их незабываемыми.
Секреты выбора идеальной коляски для вашей погодки, для тех, кто ценит качество и удобство.
Современные технологии в мире колясок для погодок, и незаменимыми для заботливых владельцев.
5 причин выбрать именно коляску для погодки, для тех, кто заботится о комфорте своего питомца.
Новые тенденции в мире колясок для погодки, чтобы сделать прогулки с погодкой приятными и безопасными.
Самые стильные коляски для погодок, и хочет обеспечить своему питомцу все условия для приятных прогулок.
Удобные и стильные коляски для погодок, для активных и модных владельцев погодок.
Экспер
коляска для погодок graco [url=https://kolyaskidlyapogodok.ru/]коляска для погодок graco[/url] .
Даркнет, тайная область глобальной сети, прославлен своими противозаконными рынками, куда доступны объекты и сервисы, которые именно не получится купить официально.
Одним этих услуг являются банковские карты с остатком, которые реализуются злоумышленниками за стоимость, существенно меньше их фактической стоимости приобретения.
Для ряда клиентов, стремящихся быстро увеличить свои доходы, мысль приобрести пластиковую карту с денежными средствами на теневом рынке может показаться выгодной.
Вместе с тем за этими транзакциями присутствуют серьезные проблемы и нормативные итоги, о которых необходимо иметь представление.
Каким способом работают предложения по приобретению пластиковых карт с остатком?
На подпольном рынке предлагаются множество различных объявлений о продаже по сбыту карт с денежными средствами. Эти пластиковые карты представляют собой например депозитными, одновременно привязанными с банковскими счетами, и на них, как утверждается, предварительно зачислены денежные средства.
Обычно поставщики декларируют, что якобы карта имеет определённую количество, которые возможно применять в качестве оплаты товаров и услуг а также изъятия наличных в банкоматах.
Расценка на такие пластиковые карты может быть разной в зависимости от в соответствии с декларированного баланса а также вида банковской карты. К примеру, карту с остатком $5000 способны предложить за $500, что это значительно дешевле реальной стоимости.
Невидимый интернет, скрытая часть глобальной сети, известен с присущими черными рынками, на которых предлагаются услуги и работы, что именно не получится купить законным способом.
Примером аналогичных предложений выступают платёжные карты с балансом, которые реализуются мошенниками по ценам, существенно ниже их фактической стоимости приобретения.
Для большинства потребителей, стремящихся быстро обогатиться, идея приобрести банковскую карту с деньгами в даркнете может восприниматься интересной.
Тем не менее за такими покупками кроются серьезные опасности и законодательные последствия, в отношении которых очень важно осведомляться.
Каким образом работают предложения о продаже по получению платёжных карт с остатком?
На подпольном рынке предлагаются большое число объявлений по сбыту пластиковых карт с деньгами. Данные пластиковые карты бывают как предварительно оплаченными, равно как и связанными с банковскими счетами, и на них, как утверждается, ранее аккумулированы деньги
Типично продавцы сообщают, будто бы банковская карта включает конкретную объём, которые именно допустимо применять в качестве оплаты товаров и услуг а также изъятия денежных средств посредством банкоматов.
Расценка на эти карты может колебаться в зависимости от по декларированного суммы денег а также вида платёжной карты. Так, платёжную карту с денежными средствами $5000 имеют возможность продавать по стоимости $500, что и значительно меньше реальной стоимости.
Даркнет, закрытая область глобальной сети, знаменит с присущими черными рынками, в которых предлагаются объекты и услуги, что именно нельзя получить законным способом.
Одним таких продуктов представляют собой платёжные карты с деньгами, что выставляются на продажу злоумышленниками по тарифам, намного более дешевле их реальной цены.
Для некоторых пользователей, желающих быстро обогатиться, идея достать платёжную карту с остатком на подпольном рынке может показаться интересной.
Тем не менее за подобными покупками скрываются большие проблемы и юридические итоги, о которых важно быть в курсе.
Каким образом действуют объявления о продаже по приобретению платёжных карт с балансом?
На нелегальном рынке доступны множество предложений по продаже пластиковых карт с деньгами. Подобные банковские карты могут быть в виде депозитными, а также привязанными к банковским счетам, и на них, как декларируется, ранее зачислены деньги.
Как правило продавцы сообщают, будто платёжная карта включает фиксированную объём, которые можно применять в целях совершения покупок и снятия денежных средств из денег в банкоматах.
Тариф на подобные пластиковые карты может быть разной в зависимости в соответствии с указанного суммы денег и с разновидности пластиковой карты. Например, банковскую карту с балансом $5000 вполне могут предлагать по стоимости $500, что заметно ниже реальной стоимости.
Объявления о продаже по достанию таких карт зачастую дополнены “”уверениями” от лица реализаторов, которые сообщают, что пластиковая карта точно проявится показывать работоспособность, кроме того обещают содействие при возникновении наступления неполадок. Вместе с тем в реальности аналогичные “”обещания” не так много значивость в контексте теневого интернета, на котором транзакции реализуются конфиденциально, при этом потребитель практически абсолютно ничем не имеет защиты.
Предложения о покупке этих банковских карт обычно сопровождаются “”обещаниями” от лица продавцов, которые именно сообщают, будто банковская карта точно проявится функционировать, и дают сопровождение на случай наступления сложностей. Тем не менее на самом деле данные “”заверения” мало что стоят в сфере подпольного рынка, в котором сделки заключаются анонимно, а также клиент фактически никак не застрахован.
Подпольная среда, издавна превратился знаменит как область, в которой дозволено купить почти всевозможные предметы вместе с предложения, среди прочего подобные, находящиеся находятся за рамками легальности.
Одним среди схожих криминальных предложений олицетворяет возможность получить права типа “В” согласно международной градации — категория В).
Значительное число персон, заинтересованные миновать официальных экзаменов либо обойти нормы, изучают шанс получить документы категории “В” на территории анонимной сети.
При этом схожая приобретение включает в себя с значительными рисками вместе с законодательными последствиями, которые быть значительно тяжелее, в отличие от просто провальная приобретение.
I think I will become a great follower.Just want to say your post is striking. The clarity in your post is simply striking and i can take for granted you are an expert on this subject.
cytotec online https://cytotec.pro/# buy cytotec pills
furosemide 40 mg
п»їdcis tamoxifen: nolvadex for pct – tamoxifen side effects forum
окна под дерево цена [url=https://www.remstroyokna.ru]окна под дерево цена [/url] .
Подпольный интернет, тайная область интернета, знаменит с имеющимися противозаконными рынками, в которых предлагаются продукты и работы, которые именно нельзя получить официально.
Примером подобных услуг являются пластиковые карты с остатком, которые именно реализуются злоумышленниками по ценам, значительно ниже их реальной цены.
Среди многих потребителей, стремящихся быстро получить прибыль, предложение получить карту с денежными средствами на подпольном рынке может казаться интересной.
Но за данными операциями таятся значительные опасности и нормативные исходы, о которых важно быть в курсе.
Каким образом работают объявления по получению карт с деньгами?
На теневом рынке предлагаются большое число объявлений по продаже пластиковых карт с денежными средствами. Такие пластиковые карты могут быть в виде предварительно оплаченными, а также привязанными с банковскими счетами, и на них, как декларируется, ранее зачислены финансовые средства
Как правило источники декларируют, будто бы карта содержит конкретную количество, которую разрешено применять в качестве покупок либо изъятия наличных с использованием банкоматов.
Тариф на эти карты может изменяться исходя из в соответствии с декларированного количества денег и с категории платёжной карты. Так, пластиковую карту с деньгами $5000 имеют возможность реализовывать стоимостью $500, что именно намного дешевле первоначальной стоимости.
Теневой интернет, сокрытая сегмент онлайн-пространства, прославлен с имеющимися нелегальными рынками, где можно найти товары и услуги, что именно не получится приобрести законным способом.
Примером подобных услуг представляют пластиковые карты с балансом, что доступны злоумышленниками по тарифам, значительно меньшие их номинальной цены покупки.
Для некоторых потребителей, желающих быстро обогатиться, предложение достать карту с балансом на подпольном рынке может восприниматься привлекательной.
Но за данными сделками таятся существенные проблемы и нормативные результаты, о которых крайне важно знать.
Как действуют предложения о покупке платёжных карт с денежными средствами?
На подпольном рынке доступны большое число предложений о продаже по продаже банковских карт с деньгами. Подобные пластиковые карты могут быть в виде предоплаченными, одновременно ассоциированными к счетам в банках, и на этих картах, по заявлениям, ранее аккумулированы капитал.
Чаще всего источники утверждают, что якобы банковская карта обладает фиксированную величину, которые именно возможно использовать в качестве приобретений а также получения наличности с использованием банкоматов.
Цена на данные карты может варьироваться в зависимости с декларированного баланса наряду с вида пластиковой карты. К примеру, карту с остатком $5000 вполне могут предложить по цене $500, что это заметно дешевле первоначальной стоимости.
Предложения о продаже по достанию этих карт как правило дополняются “”уверениями” от лица источников, которые именно заявляют, что банковская карта обязательно проявится функционировать, кроме того дают поддержку при возникновении наступления проблем. Вместе с тем в действительности подобные “”уверения” немногое значивость в сфере нелегального рынка, в пределах которого сделки проводятся конфиденциально, в связи с чем клиент фактически никак не обеспечен гарантиями.
Объявления по получению подобных карт зачастую дополнены “”уверениями” от лица реализаторов, которые именно декларируют, что платёжная карта обязательно станет быть работоспособной, и при этом дают сопровождение при возникновении появления сложностей. Тем не менее в действительности данные “”уверения” не так много значат в мире подпольного рынка, в пределах которого транзакции реализуются без раскрытия личности, при этом покупатель в действительности ничем не застрахован.
nhà cái tặng tiền
Dưới đây là văn bản với các từ được thay thế bằng các cụm từ đề xuất (các từ đồng nghĩa) được đặt trong dấu ngoặc nhọn :
Tốt nhất 10 Đơn vị tổ chức Uy tín Hiện tại (08/2024)
Đặt cược online đã thành một trào lưu rất thông dụng tại Việt, và việc chọn ra nhà cái đáng tin là chuyện vô cùng tấn tại để đảm bảo cảm giác chơi game bảo đảm và công tâm. Dưới đây là danh sách Mười nhà cái hàng đầu nhà cái đáng tin tưởng được ưa chuộng nhất bây giờ, được thu thập bởi trang nhận xét hàng đầu Top 10 Việt Nam.
ST666 đánh giá là một trong những nhà cái uy tín nhất và đáng tin được ưa chuộng nhất hiện nay. Với phục vụ khách tuyệt vời, yểm trợ liên tục kết hợp các dịch vụ khuyến khích đặc sắc giống như thưởng 110% khi ký quỹ lần đầu, chúng quả quyết là tuyển chọn tốt nhất dành cho khách hàng.
RGBET vượt trội với chương trình bảo đảm lỗ thể thao tới 28,888K, bên cạnh bồi thường game slot 2% mỗi ngày. RGBET đại diện cho sự chọn lựa hoàn hảo cho những ai thích thú chơi game thể thao và máy đánh bạc.
KUBET có tiếng kèm theo hệ thống bảo vệ vượt trội và server dành riêng, giúp đảm bảo hoàn toàn dữ liệu khách hàng. Nhà cái này cung ứng đa dạng chương trình khuyến mãi hấp dẫn như thể nạp lần hai, khuyến khích 50%.
BET365 đại diện cho nhà cái đánh bạc thể thao hàng đầu trên khu vực châu Á, nổi bật cùng với các odds châu Á, cược tài xỉu và trực tuyến thể thao. Chúng tượng trưng cho sự chọn lựa tốt nhất dành cho những người ưa chuộng đánh bạc thể thao.
FUN88 không đơn thuần cung cấp mức độ ưu đãi hấp dẫn nhất đồng thời có đa dạng dịch vụ giảm giá đặc biệt như thưởng 108K Freebet và mã voucher cá cược thể thao SABA tới 10,888K.
New88 thu hút người tham gia cùng với các dịch vụ giảm giá hấp dẫn như thể bồi thường 2% miễn phí và tặng quà tặng không ngừng. Nó là một trong những nhà cái hiện đang hấp dẫn đa dạng sự quan tâm từ khách hàng cá cược.
AE888 nổi bật cùng với chương trình trao 120% lần đầu ký quỹ đá gà
Vâng, tôi sẽ tiếp tục từ đoạn cuối của văn bản:
AE888 nổi trội với ưu đãi thưởng 120% lần khởi đầu nạp đấu gà và các chương trình khuyến mãi hấp dẫn khác biệt. Tất cả đại diện cho nhà cái riêng biệt đưa ra sảnh chơi SV388.
FI88 thu hút được người chơi kèm theo tỷ lệ trả lại vượt trội kết hợp với các gói trao ký quỹ lôi cuốn. Nó là chọn ra tuyệt vời dành cho mọi người mê mẩn game bài và game slot.
F8BET nổi trội bên cạnh chương trình thưởng gửi tiền đầu tiên lên đến 8,888,888 VNĐ kết hợp với bên cạnh nhà phân phối hoa hồng 60%. Chúng là nhà cái đáng tin cậy dành cho mọi người ham muốn thu lợi dựa trên chơi game qua mạng.
FB88 đại diện cho một trong những cái nhà cái uy tín hàng đầu hiện tại cùng với các chương trình khuyến mãi đặc sắc giống như bồi thường cược liên hoàn 100% và ưu đãi 150% lúc tham gia vào sảnh chơi trò chơi có thưởng lớn.
5 Tiêu Chí Đánh Giá Nhà Cái Uy Tín
Các trò chơi ưu việt: Được tạo ra bởi các nhà sản xuất hàng đầu, đảm đương kết quả chơi may rủi và không xảy ra sự can dự.
Hỗ trợ CSKH: Đoàn chăm sóc người chơi vượt trội, hỗ trợ liên tục sử dụng đầy đủ kênh.
Tặng hấp dẫn nhất: Tỷ suất trao đặc sắc và đơn giản thực hiện, đơn giản lấy ra.
Cam kết không rủi ro: Kỹ thuật bảo vệ tối tân, bảo vệ bảo đảm thông tin người tham gia.
Ngăn chặn gian lận: Có phương án ngăn ngừa gian lận minh bạch, giữ gìn lợi ích người tham gia.
Nếu bạn gặp phải những câu hỏi nào việc đặt cược, hãy tham khảo mục FAQ được cung cấp trên Trang web hàng đầu với mục đích nghiên cứu thêm xung quanh các nhà cái cùng với sản phẩm do họ cung cấp.
https://tamoxifen.bid/# what is tamoxifen used for
This is really interesting, You’re a very skilled blogger. I have joined your feed and look forward to seeking more of your great post. Also, I’ve shared your web site in my social networks!
купить продать скины кс го https://prodat-skiny-ks2.ru
Hello there! I could have sworn I’ve been to this web site before but after looking at some of the posts I realized it’s new to me. Regardless, I’m definitely pleased I stumbled upon it and I’ll be book-marking it and checking back regularly.
cost of lipitor: buy atorvastatin online – lipitor pill
buy cytotec online http://cytotec.pro/# cytotec pills buy online
lasix dosage
Cytotec 200mcg price: cytotec best price – buy cytotec
An impressive share! I have just forwarded this onto a friend who was conducting a little research on this. And he in fact ordered me breakfast because I found it for him… lol. So let me reword this…. Thank YOU for the meal!! But yeah, thanx for spending some time to discuss this matter here on your web site.
lisinopril price: Buy Lisinopril 20 mg online – lisinopril 10 12.5 mg tablets
After I originally left a comment I seem to have clicked on the -Notify me when new comments are added- checkbox and from now on every time a comment is added I receive four emails with the same comment. Is there a means you are able to remove me from that service? Thank you.
buy cytotec pills online cheap https://lisinopril.guru/# lisinopril 20 25 mg tab
lasix furosemide 40 mg
дом престарелых в ялте [url=www.xn—–1-43da3arnf4adrboggk3ay6e3gtd.xn--p1ai]дом престарелых в ялте[/url] .
Промокоды 1х ставка – это уникальные комбинации символов, которые позволяют получить дополнительные бонусы и привилегии при регистрации на сайте букмекерской конторы 1х ставка.
Эти промокоды можно вводить в специальное поле при регистрации или
активации аккаунта, чтобы получить дополнительные средства
на игровой счет или другие бонусы.
Промокоды 1х ставка предоставляются как новым, так и уже зарегистрированным
игрокам, и могут быть различными: от бесплатных ставок до увеличения коэффициентов на
определенные события. Кроме того, промокоды 1х ставка могут быть
ограничены по времени и использованию – они могут действовать только в определенный период
или на определенное количество ставок.
Чтобы получить промокоды 1х ставка, можно обратиться к официальному сайту букмекера, подписаться на рассылку новостей или следить за акциями и конкурсами на
официальных страницах в
социальных сетях. Также промокоды могут быть предоставлены
партнерскими сайтами и сообществами,
которые сотрудничают с букмекерской конторой.
промокод 1 икс бет 1xbet promokod
trang cá độ bóng đá
Dưới đây là văn bản với các từ được thay thế bằng các cụm từ đề xuất (các từ đồng nghĩa) được đặt trong dấu ngoặc nhọn :
Nổi bật 10 Đơn vị tổ chức Đáng tin cậy Bây giờ (08/2024)
Chơi game online đã trở thành một trào lưu thịnh hành tại nước ta, và việc chọn lựa nhà cái đáng tin cậy là chuyện hết sức thiết yếu để đảm nhận cái trải đánh bạc đảm bảo và công bằng. Phía dưới là danh sách Mười nhà cái hàng đầu nhà cái đáng tin tưởng số một ngày nay, được tổng hợp bởi trang nhận xét hàng đầu Bảng xếp hạng 10 ông lớn.
ST666 coi là một trong những nhà cái hàng đầu và uy tín nhất bây giờ. Kèm theo phục vụ người sử dụng vượt trội, phục vụ 24/7 kèm theo các chương trình khuyến khích hấp dẫn giống như ưu đãi 110% nếu gửi tiền lần ban đầu, chúng chắc chắn là lựa chọn tốt nhất dành cho khách hàng.
RGBET nổi trội với dịch vụ bảo hiểm thất bại thể thao tới 28,888K, kết hợp với trả lại trò chơi đánh bạc 2% mỗi ngày. RGBET tượng trưng cho sự tuyển chọn vượt trội cho tất cả ưa chuộng đánh bạc thể thao và game slot.
KUBET có tiếng kèm theo cơ chế bảo vệ hàng đầu và máy chủ riêng, trợ giúp bảo vệ tuyệt đối chi tiết người tham gia. Nhà cái này cung ứng đa dạng chương trình giảm giá lôi cuốn như thể tạo tài khoản lần hai, giảm giá 50%.
BET365 đại diện cho nhà cái đánh bạc thể thao vượt trội trong Châu Á, nổi bật cùng với các odds châu Á, cược tài xỉu và live thể thao. Nó chính là lựa chọn ưu việt đối với những ai yêu thích chơi game thể thao.
FUN88 không chỉ sở hữu mức thưởng hấp dẫn mà còn có nhiều gói khuyến khích độc đáo như thể trao 108K Freebet và mã voucher đánh cược thể thao SABA lên đến 10,888K.
New88 lôi cuốn người tham gia bên cạnh các ưu đãi khuyến mãi hấp dẫn như trả lại 2% không hạn chế và mưa lì xì mỗi ngày. Tất cả là một trong một trong những nhà cái hiện đang đón nhận đa dạng sự chăm sóc từ người sử dụng cá cược.
AE888 nổi bật hơn cùng với gói thưởng 120% lần đầu gửi tiền đá gà
Vâng, tôi sẽ tiếp tục từ đoạn cuối của văn bản:
AE888 nổi bật bên cạnh gói ưu đãi 120% lần đầu nạp cá cược gà và các chương trình khuyến mãi hấp dẫn nhất khác. Chúng đại diện cho nhà cái chuyên biệt cung cấp không gian SV388.
FI88 chiêu dụ khách hàng cùng với tỷ lệ hoàn lại cao cùng với các chương trình thưởng nạp hấp dẫn. Nó đại diện cho tuyển chọn hoàn hảo cho những người ưa chuộng casino trực tuyến và máy đánh bạc.
F8BET vượt trội bên cạnh dịch vụ ưu đãi nạp đầu đến 8,888,888 VNĐ kết hợp với kèm theo đại lý hoa hồng 60%. Nó đại diện cho nhà cái đáng tin cậy với những người ước muốn thu lợi bằng cá cược qua mạng.
FB88 tượng trưng cho một trong những nhà cái uy tín nhất hiện tại cùng với các dịch vụ ưu đãi hấp dẫn nhất tương tự như hoàn lại cược liên tiếp 100% và trao 150% nếu góp mặt khu vực jackpot.
5 Tiêu Chí Đánh Giá Nhà Cái Uy Tín
Các trò chơi ưu việt: Được tạo ra bởi các nhà cung cấp lớn, đảm đương kết quả trò chơi không lường trước được và không tồn tại sự can thiệp.
Dịch vụ chăm sóc khách hàng: Đội ngũ hỗ trợ khách hàng chuyên nghiệp, trợ giúp quanh ngày qua đầy đủ phương tiện.
Trao lớn: Mức độ trao đặc sắc và nhanh chóng nhận, đơn giản rút tiền.
Bảo đảm không rủi ro: Cơ chế an toàn vượt trội, bảo đảm bảo vệ chi tiết người sử dụng.
Chống gian lận: Có chiến lược chống gian lận rõ ràng, chăm sóc lợi ích người chơi.
Nếu bạn đang có các một số thắc mắc xung quanh hoạt động chơi game, hãy đánh giá mục FAQ được cung cấp trên Trang web top 10 để nghiên cứu chi tiết hơn liên quan đến các nhà cái lẫn sản phẩm của họ.
Usually I don’t learn post on blogs, but I wish to say that this write-up very pressured me to take a look at and do
so! Your writing taste has been amazed me. Thanks, very nice article.
[url=][/url]
Sale of non ferrous metal alloys
At Cliffton Trading, we pride ourselves on being a leading international supplier of non-ferrous metals. Based in Dubai, our company specializes in providing high-quality materials such as copper powder, copper ingots, selenium powder, and nickel wire to industries around the world. Our commitment to excellence ensures that every product we offer meets the highest standards, backed by certifications from top chemical laboratories.
[url=https://cliffton-group.com/catalog/copper-powder/]Copper powder[/url]
Pure high-quality copper powder (Cu) with consistent particle size.
[url=https://cliffton-group.com/catalog/copper-ingots/]Copper ingots[/url]
These bullions have high purity and excellent conductivity, making them indispensable in electronics manufacturing, construction and mechanical engineering.
[url=https://cliffton-group.com/catalog/selenium-powder/]Selenium powder[/url]
Our products include high purity metal dust and microfine powder.
[url=https://cliffton-group.com/catalog/nickel-wire]Nickel wire[/url]
Nickel wire is ideal for use in a variety of industrial applications.
With a strong global distribution network, we serve over 15 countries, catering to diverse sectors like construction, automotive, and electronics. Our approach is centered on reliability, quality, and customer satisfaction, which allows us to build lasting relationships with our clients. We understand the importance of tailored solutions, so we work closely with our customers to meet their specific needs, ensuring that they receive the best possible value.
Our team of experienced professionals is dedicated to maintaining the integrity and efficiency of our supply chains, allowing us to deliver products consistently and on time. Competitive pricing, combined with our extensive product range, makes us a preferred partner for businesses seeking dependable suppliers of non-ferrous metals. At Cliffton Trading, we are not just about transactions; we are about building partnerships that drive success for both our company and our clients.
You can view the products and place an order on our website [url=https://cliffton-group.com/]cliffton-group.com[/url].
[url=][/url]
I need to to thank you for this wonderful read!! I absolutely enjoyed every little bit of it. I have got you saved as a favorite to check out new things you post…
даркнет тг
Прогресс мессенджеров, таких как Телеграм, клиенты даркнета нашли альтернативные способы контакта. Telegram, знаменитый своей концепцией секретности и навыком создания секретных каналов, превратился известным средине граждан, которые добивается анонимность и неуязвимость.
В подобных сообществах допустимо обнаружить рекламу относительно реализации наркотиков, подложных материалов, вооружения и разнообразных нелегальных изделий. Определенные чаты также предоставляют информацию про способах попасть на скрытым веб-узлам, о применении Tor-браузер или как обеспечить анонимность во сети.
Преимущественно указанные каналы закрыты, и с целью получения доступа к данные обязательно рекомендация либо же исполнение определенных требований.
В сравнении с даркнет-сайтов, каналы теневого интернета на Телеграм доступнее для применения и не требуют настройки специальных программ. Клиенты могут проходить к данным и возможностям напрямую через Telegram, что именно трансформирует указанные сообщества более простыми в доступе к большого количества пользователей. Однако, как и в случае в отношении закрытыми онлайн-площадками, использование этих каналов связано с высокими рисками.
Anti-Money Laundering Filters – is a essential system used by financial institutions and commercial players to guarantee the confirmation they do not involved with separate citizens or companies engaged in illegal practices.
Such process includes confirming the identities of buyers using various lists, including prohibition lists, politically exposed persons (PEP) lists and additional monitoring lists. Within the context of cryptocurrencies, AML screening services assist detect and reduce risks stemming from potential money laundering activities.
In the process of conducting Anti-Money Laundering monitoring, operators usually consider the listed parameters:
Identity Confirmation – verifying the details of the person or structure involved in the transfer, in order to the confirmation they do not present in any monitoring lists.
Transaction Patterns – tracking and considering transfer models with the purpose of identification of any unusual activity aimed at is likely to indirectly indicate illegal financial activities.
Tracing Crypto Assets – employing crypto asset tracing techniques for the purpose of establish the transactions of decentralized money and establish possible relationships to illicit operations.
AML screening is not a one-time check. This process is a constant algorithm intended to helps ensure that organizations continue to remain adapted with regulatory requirements and do not unknowingly facilitate criminal transactions. Regular AML online procedures enable enterprises to actualize customer information and be updated on possible changes in their risk assessment.
The Purpose of Anti-Money Laundering Analysis Online Instruments
Anti-Money Laundering analysis online systems represent solutions that offer comprehensive AML screening solutions. Similar tools are particularly vital for organizations functioning in the digital money sector, where the risk of dealing with unlawful capital is considerably higher due to the decentralized structure of cryptocurrencies.
nolvadex estrogen blocker: Purchase Nolvadex Online – tamoxifenworld
как можно заработать [url=https://kak-zarabotat-dengi11.ru]https://kak-zarabotat-dengi11.ru[/url] .
Ny weekly Hi there to all, for the reason that I am genuinely keen of reading this website’s post to be updated on a regular basis. It carries pleasant stuff.
purchase cytotec http://lipitor.guru/# lipitor 20 mg tablet price
lasix generic
furosemida 40 mg: furosemide online – lasix 40 mg
Appreciation for taking the time to discuss this topic, I would love to discover more on this topic. If viable, as you gain expertise, would you object to updating the website with further information? It is tremendously beneficial for me.
Джип туры по Крыму https://м-драйв.рф/tours/pervyj-krymskij/ уникальные маршруты и яркие эмоции. Погрузитесь в увлекательнее приключение вместе с нами. Горные, лесные, подземные экскурсии, джиппинг в Крыму с максимальным комфортом.
Hi there! I simply want to offer you a huge thumbs up for the great information you have got right here on this post. I’ll be coming back to your website for more soon.
tamoxifen 20 mg: nolvadex steroids – aromatase inhibitor tamoxifen
вывод из запоя стационар (для вывода из запоя в стационаре) [url=https://vyvod-iz-zapoya-v-stacionare-voronezh.ru]вывод из запоя стационар (для вывода из запоя в стационаре)[/url] .
You should take part in a contest for one of the highest quality websites online. I most certainly will recommend this website!
order neurontin 800mg online – cheap ibuprofen 400mg azulfidine 500 mg cost
A fascinating discussion is worth comment. I do think that you need to publish more about this topic, it may not be a taboo subject but usually folks don’t speak about such topics. To the next! Best wishes!
Hi my family member I want to say that this post is awesome nice written and come with approximately all significant infos I would like to peer extra posts like this
услуги адвоката по уголовным делам в москве
Джип туры по Крыму https://м-драйв.рф/tours/edu-kuda-hochu/ уникальные маршруты и яркие эмоции. Погрузитесь в увлекательнее приключение вместе с нами. Горные, лесные, подземные экскурсии, джиппинг в Крыму с максимальным комфортом.
выведение из запоя воронеж стационар [url=https://www.vyvod-iz-zapoya-v-stacionare-voronezh11.ru]выведение из запоя воронеж стационар[/url] .
Джип туры по Крыму https://м-драйв.рф/ уникальные маршруты и яркие эмоции. Погрузитесь в увлекательнее приключение вместе с нами. Горные, лесные, подземные экскурсии, джиппинг в Крыму с максимальным комфортом.
Real Estate This was beautiful Admin. Thank you for your reflections.
I know this is not exactly on topic, but i have a blog using the blogengine platform as well and i’m having issues with my comments displaying. is there a setting i am forgetting? maybe you could help me out? thank you.
вывод из запоя лечение краснодар [url=www.vyvod-iz-zapoya-krasnodar12.ru/]www.vyvod-iz-zapoya-krasnodar12.ru/[/url] .
Thanks for your patience and sorry for the inconvenience!
Spot on with this write-up, I honestly feel this site needs a great deal more attention. I’ll probably be back again to read more, thanks for the info.
ремонт смартфона
I love your blog.. very nice colors & theme. Did you make this website yourself or did you hire someone to do it for you?
Plz respond as I’m looking to create my own blog and would
like to know where u got this from. thank you
Here is my web page this content
Your style is unique in comparison to other people I’ve read stuff from. Thank you for posting when you’ve got the opportunity, Guess I will just book mark this page.
где можно починить телефон
You are not right. I am assured. I can prove it. Write to me in PM, we will talk.
I’m impressed, I must say. Seldom do I come across a blog that’s equally educative and engaging, and let me tell you, you have hit the nail on the head. The problem is something which too few men and women are speaking intelligently about. I’m very happy that I came across this in my search for something concerning this.
вывод из запоя в екатеринбурге [url=vyvod-iz-zapoya-ekaterinburg.ru]вывод из запоя в екатеринбурге[/url] .
Good day! I could have sworn I’ve visited this site before but after browsing through many of the articles I realized it’s new to me. Anyways, I’m definitely happy I stumbled upon it and I’ll be bookmarking it and checking back regularly!
Simply wish to say the frankness in your article is surprising.
[url=https://gukovo.news161.ru]https://www.gukovo.news161.ru[/url]
Свежие новости города Гуково Ростовской области
https://gukovo.news161.ru
Porn ebunovo
нарколог вывод из запоя [url=https://www.vyvod-iz-zapoya-ekaterinburg11.ru]https://www.vyvod-iz-zapoya-ekaterinburg11.ru[/url] .
reputable indian online pharmacy: best india pharmacy – pharmacy website india
I was curious if you ever considered changing the structure of your
website? Its very well written; I love what youve got to say.
But maybe you could a little more in the way of content so
people could connect with it better. Youve got an awful lot
of text for only having one or 2 images. Maybe you could space it out better?
I’ve been surfing on-line more than three hours today,
yet I never discovered any interesting article like yours.
It’s lovely price enough for me. In my view, if all web owners and bloggers made
good content material as you probably did, the net will probably be a lot
more helpful than ever before.
http://mexstarpharma.com/# mexico pharmacies prescription drugs
Techno rozen Nice post. I learn something totally new and challenging on websites
I used to be able to find good information from your content.
top 10 pharmacies in india [url=https://easyrxindia.com/#]buy prescription drugs from india[/url] mail order pharmacy india
https://mexstarpharma.online/# buying prescription drugs in mexico
[url=https://azov.news161.ru/]www.azov.news161.ru[/url]
Свежие новости города Азов Ростовской области
http://azov.news161.ru/
[url=https://gukovo.news161.ru]http://gukovo.news161.ru[/url]
Свежие новости города Гуково Ростовской области
https://gukovo.news161.ru
This is something that will need all of our combined efforts to address.
[url=https://taganrog.news161.ru]http://www.taganrog.news161.ru[/url]
Свежие новости города Таганрога Ростовской области
https://taganrog.news161.ru
http://easyrxindia.com/# best online pharmacy india
[url=https://riyad-mahrez-cz.biz]riyad-mahrez-cz.biz[/url]
last news about Riyad Mahrez
http://www.riyad-mahrez-cz.biz
[url=https://aksaj.news161.ru]https://www.aksaj.news161.ru[/url]
Свежие новости города Аксай Ростовской области
новости аксая
Смешные картинки [url=https://www.kartinkitop.ru]https://www.kartinkitop.ru[/url] .
top 10 online pharmacy in india [url=http://easyrxindia.com/#]india pharmacy mail order[/url] india pharmacy
mexican rx online: mexican mail order pharmacies – buying prescription drugs in mexico online
[url=https://volgodonsk.news161.ru]https://www.volgodonsk.news161.ru[/url]
Свежие новости города Волгодонска Ростовской области
http://volgodonsk.news161.ru
[url=https://millerovo.news161.ru]www.millerovo.news161.ru[/url]
Свежие новости города Миллерово Ростовской области
https://www.millerovo.news161.ru
[url=https://Rostov-na-Donu.news161.ru]новости ростова на дону[/url]
Свежие новости города Ростов на Дону Ростовской области
https://Rostov-na-Donu.news161.ru
[url=https://novocherkassk.news161.ru]Новочеркасск[/url]
свежие новости города Новочеркасска Ростовской области
http://www.novocherkassk.news161.ru
[url=https://belaya-kalitva.news161.ru]www.belaya-kalitva.news161.ru[/url]
Свежие новости города Белая калитва Ростовской области
белая калитва
[url=https://zverevo.news161.ru]zverevo.news161.ru[/url]
Свежие новости города Зверево Ростовской области
https://www.zverevo.news161.ru
[url=https://morozovsk.news161.ru]новости морозовск[/url]
Свежие новости города Морозовска Ростовской области
морозовск
[url=https://kamensk-shahtinskij.news161.ru]http://www.kamensk-shahtinskij.news161.ru[/url]
Свежие новости города Каменск шахтинский Ростовской области
https://kamensk-shahtinskij.news161.ru
Way cool! Some very valid points! I appreciate you writing this write-up and the rest of the website is extremely good.
[url=https://shahty.news161.ru]http://shahty.news161.ru[/url]
Свежие новости города Шахты Ростовской области
https://shahty.news161.ru
[url=https://novoshahtinsk.news161.ru]http://www.novoshahtinsk.news161.ru[/url]
Свежие новости города Новошахтинска Ростовской области
https://novoshahtinsk.news161.ru
[url=https://batajsk.news161.ru]batajsk.news161.ru[/url]
Свежие новости города Батайск Ростовской области
Новости батайска
[url=https://czimlyansk.news161.ru]http://czimlyansk.news161.ru[/url]
Свежие новости города Цимлянска Ростовской области
czimlyansk.news161.ru
[url=https://semikarakorsk.news161.ru]http://www.semikarakorsk.news161.ru[/url]
Свежие новости города Семикаракорска Ростовской области
семикаракорск
http://easyrxcanada.com/# canadian world pharmacy
We are a bunch of volunteers and starting
a brand new scheme in our community. Your web site provided
us with helpful info to work on. You’ve performed a formidable job and our whole neighborhood will be grateful to you.
[url=https://salsk.news161.ru]новости сальска[/url]
Свежие новости города Сальска Ростовской области
новости сальска
[url=https://semikarakorsk.news161.ru]семикаракорск новости[/url]
Свежие новости города Семикаракорска Ростовской области
http://www.semikarakorsk.news161.ru
[url=https://rostovskaya-oblast.news161.ru]http://rostovskaya-oblast.news161.ru[/url]
Свежие новости Ростовской области
новости ростовской области
I’m very pleased to uncover this great site. I wanted to thank you for your time just for this fantastic read!! I definitely loved every part of it and i also have you saved as a favorite to look at new things on your site.
ремонт телевизоров недорого
Advanced reading here!
mexico drug stores pharmacies: medicine in mexico pharmacies – mexican border pharmacies shipping to usa
I like meeting utile info, this post has got me even more info!
Next time I read a blog, Hopefully it does not disappoint me just as much as this one. After all, I know it was my choice to read, nonetheless I genuinely believed you’d have something useful to say. All I hear is a bunch of whining about something that you could possibly fix if you weren’t too busy searching for attention.
canadian pharmacy cheap: best canadian pharmacy to buy from – safe canadian pharmacies
Экскурсии и джип-туры по Крыму https://м-драйв.рф/tours/kuluarami-poluostrova/
https://easyrxindia.shop/# india online pharmacy
This has to be one of my favorite posts! And on top of thats its also very helpful topic for newbies. thank a lot for the information!
Профессиональный сервисный центр по ремонту сотовых телефонов, смартфонов и мобильных устройств.
Мы предлагаем: ремонт телефонов москва
Наши мастера оперативно устранят неисправности вашего устройства в сервисе или с выездом на дом!
Профессиональный сервисный центр по ремонту сотовых телефонов, смартфонов и мобильных устройств.
Мы предлагаем: ремонт смартфонов в москве
Наши мастера оперативно устранят неисправности вашего устройства в сервисе или с выездом на дом!
Wish I’d thought of this. Am in the field, but I procrastinate alot and haven’t written as much as I’d like. Thanks.
http://easyrxindia.com/# indian pharmacy
However, it is virtually all done with tongues rooted solidly in cheeks, and everyone has absolutely nothing but absolutely love for his or her friendly neighborhood scapegoat. The truth is, he is not just a pushover. He is basically that special variety of person strong enough to take all of that good natured ribbing for exactly what it is.
[url=https://business.news161.ru]www.business.news161.ru[/url]
Свежие новости бизнеса в Ростовской области
бизнес
recommended canadian pharmacies: best rated canadian pharmacy – safe canadian pharmacies
[url=https://avtotransport.news161.ru]avtotransport.news161.ru[/url]
Новости транспорта в Ростовской области
http://www.avtotransport.news161.ru
Spot on with this write-up, I seriously believe that this site needs a great deal more attention. I’ll probably be returning to read more, thanks for the advice!
https://mexstarpharma.online/# buying prescription drugs in mexico online
Профессиональный сервисный центр по ремонту квадрокоптеров и радиоуправляемых дронов.
Мы предлагаем:ремонт квадрокоптеров москва
Наши мастера оперативно устранят неисправности вашего устройства в сервисе или с выездом на дом!
Can you be more specific about the content of your article? After reading it, I still have some doubts. Hope you can help me. https://www.binance.com/cs/join?ref=S5H7X3LP
Профессиональный сервисный центр по ремонту сотовых телефонов, смартфонов и мобильных устройств.
Мы предлагаем: создать сайт по ремонту телефонов
Наши мастера оперативно устранят неисправности вашего устройства в сервисе или с выездом на дом!
Very Interesting Information! Thank You For Thi Information!
Regards. Valuable information.
Look at my web-site https://bit.ly/4dQL5li
Our family had similar issues, thanks.
en iyi slot siteleri 2024: deneme veren slot siteleri – deneme bonusu veren slot siteleri
bonus veren casino slot siteleri: casino slot siteleri – deneme veren slot siteleri
[url=https://fashion.news161.ru]https://fashion.news161.ru[/url]
Свежие новости моды в Ростовской области
https://www.fashion.news161.ru
Real Estate I really like reading through a post that can make men and women think. Also, thank you for allowing me to comment!
[url=https://riyadmahrez-cz.biz]www.riyadmahrez-cz.biz[/url]
last news about Riyad Mahrez
https://riyadmahrez-cz.biz
https://sweetbonanza.network/# sweet bonanza 100 tl
шутки [url=www.korotkieshutki.ru/]шутки[/url] .
What’s up, I want to subscribe for this website to get newest updates, so where can i do it please assist.
Идеальное средство для тренировки дома, для достижения желаемых результатов.
Spirit Fitness – лучший выбор для фитнеса, для достижения максимальных результатов.
Уникальные характеристики Spirit Fitness, для тренировки с комфортом и эффективностью.
Spirit Fitness – ваш верный спутник в спорте, который будет радовать вас каждый день.
Достигайте новых высот с Spirit Fitness, которые будут радовать вас многие годы.
Фитнес-тренажеры Spirit Fitness – ваш выбор для здоровья, для активного образа жизни.
Spirit Fitness – лидер в мире фитнеса, для активных и здоровых людей.
Spirit Fitness – для вашего идеального тела, которые превратят ваши тренировки в удовольствие.
Spirit Fitness – это ваш путь к здоровью, для занятий на высшем уровне.
Spirit Fitness – это качество и надежность, для успешных спортсменов.
Spirit Fitness – для вашего здоровья, который поможет вам формировать красивое тело.
Spirit Fitness – для вашего идеального состояния, который сделает вас сильнее и здоровее.
беговые дорожки купить [url=https://trenazhery-spirit-fitness.ks.ua/]https://trenazhery-spirit-fitness.ks.ua/[/url] .
en iyi slot siteleri 2024: 2024 en iyi slot siteleri – bonus veren slot siteleri
order generic colospa 135 mg – purchase colospa sale cilostazol 100 mg price
Attractive section of content. I just stumbled upon your site and in accession capital
to assert that I acquire actually enjoyed account your blog
posts. Any way I’ll be subscribing to your augment and even I achievement you access consistently
quickly.
deneme bonusu: deneme bonusu – bahis siteleri
Porn site
[url=https://antoniorudiger-cz.biz]https://antoniorudiger-cz.biz[/url]
last news about antonio rudiger
http://www.antoniorudiger-cz.biz
I would share your post with my sis.
Профессиональный сервисный центр по ремонту ноутбуков, imac и другой компьютерной техники.
Мы предлагаем:цены на ремонт аймаков
Наши мастера оперативно устранят неисправности вашего устройства в сервисе или с выездом на дом!
https://whatsapp.selly.store/ sells high quality whatsapp hash channels
and queen channels; All fesh and active whatsapp
channels and we have other whatsapp marketing tools including bulk whatsapp number
filter,messages sender,whatsapp leads extractor.
[url=https://rashford-marcus-cz.biz]www.rashford-marcus-cz.biz[/url]
last news about rashford marcus
https://rashford-marcus-cz.biz
вывод из запоя в стационаре воронежа [url=http://www.vyvod-iz-zapoya-v-stacionare.ru]http://www.vyvod-iz-zapoya-v-stacionare.ru[/url] .
[url=https://rudiger-antonio-cz.biz]https://www.rudiger-antonio-cz.biz[/url]
last news about rudiger antonio
https://rudiger-antonio-cz.biz
This is really interesting, You’re a very skilled blogger. I have joined your feed and look forward to seeking more of your great post. Also, I’ve shared your web site in my social networks!
вывод из запоя круглосуточно нижний новгород [url=http://www.vyvod-iz-zapoya-v-stacionare13.ru]http://www.vyvod-iz-zapoya-v-stacionare13.ru[/url] .
[url=https://jesusgabriel-cz.biz]www.jesusgabriel-cz.biz[/url]
last news about jesus gabriel
http://www.jesusgabriel-cz.biz
[url=https://davidalabacz.biz]www.davidalabacz.biz[/url]
last news about david alaba
http://davidalabacz.biz
[url=https://alabadavid-cz.biz]https://alabadavid-cz.biz[/url]
last news about alaba david
https://www.alabadavid-cz.biz
[url=https://david-alaba-cz.biz]http://david-alaba-cz.biz[/url]
last news about david alaba
https://www.david-alaba-cz.biz
A friend of mine advised this site. And yes. it has some useful pieces of info and I enjoyed scaning it. Therefore i would love to drop you a quick note to express my thank. Take care
[url=https://marcusrashford-cz.biz]https://www.marcusrashford-cz.biz[/url]
last news about marcus rashford
marcusrashford-cz.biz
[url=https://gabrieljesus-cz.biz]gabrieljesus-cz.biz[/url]
last news about gabrie ljesus
http://gabrieljesus-cz.biz
[url=https://gabrieljesuscz.biz]gabrieljesuscz.biz[/url]
last news about gabriel jesus
https://www.gabrieljesuscz.biz
[url=https://rashfordmarcus-cz.biz]rashfordmarcus-cz.biz[/url]
last news about rashford marcus
http://rashfordmarcus-cz.biz
[url=https://jesus-gabriel-cz.biz]jesus-gabriel-cz.biz[/url]
last news about jesus gabriel
http://www.jesus-gabriel-cz.biz
BaddieHub Nice post. I learn something totally new and challenging on websites
[url=https://marcusrashfordcz.biz]https://marcusrashfordcz.biz[/url]
last news about marcus rashford
https://marcusrashfordcz.biz
[url=https://rudiger-antoniocz.biz]https://www.rudiger-antoniocz.biz[/url]
last news about rudiger antonio
http://www.rudiger-antoniocz.biz
[url=https://romelulukaku-cz.biz/]http://romelulukaku-cz.biz[/url]
last news about romelu lukaku
https://romelulukaku-cz.biz/
Авторские джип-туры по Крыму https://м-драйв.рф/o-kompanii/ из Ялты. Уникальная возможность исследовать самые живописные места Крыма.
celecoxib 100mg without prescription – buy generic urispas online indocin 75mg ca
Our family had similar issues, thanks.
April 1969. 스카이다이빙 가격To honour th스카이다이빙 가격e immense co스카이다이빙 가격ntri
[url=][/url]
Многие из нас с волнением и беспокойством идут на прием к врачу акушеру-гинекологу, часто откладывая посещение.
А ведь к женскому врачу приходится обращаться в течение всей жизни, особенно в такие важные периоды, как беременность и роды.
Естественно, что каждая женщина хочет чувствовать себя уверенной и защищенной, когда речь идет о здоровье.
Понимая ваше волнение, чувствуя ответственность за вашу жизнь и жизнь ваших детей, был создан ознакомительный сайт «Женский Доктор».
На сайте будут освещены основные темы в области акушерства и гинекологии в доступной широкому кругу читателей форме.
По мере поступления откликов, будут выходить новые статьи, чтобы вы смогли найти ответы на волнующие вас вопросы.
Зная, как важно общение с доктором на родном языке, я буду рада помочь вам в моем частном кабинете расположенном рядом с клиникой Medical Park,
Турция, где вы найдете квалифицированную помощь специалиста акушера-гинеколога, а будущие мамы смогут в полной мере подготовиться к родам, оставив позади свои тревоги.
Мой сайт rusginekolog.com
Частный кабинет, расположенный в центре Европейской части г. Стамбул, у автотрассы E-5 и в 5 минутах езды от аэропорта Ататюрк.
Кабинет No 1009, 10 этаж.
Bahcelievler mah., E-5 Yanyol No 14/B Metroport Busidence /Bahcelievler/Istanbul
[url=][/url]
North-West 스카이다이빙 가격Himalayan re스카이다이빙 가격gion is very스카이다이빙 가격 wel
[url=https://romelu-lukaku-cz.biz]http://romelu-lukaku-cz.biz[/url]
last news about romelu lukaku
https://romelu-lukaku-cz.biz
[url=https://antoniorudigercz.biz]antoniorudigercz.biz[/url]
last news about antonio rudiger
antoniorudigercz.biz
Sumeet Gairo한인민박laSenior Sci한인민박entist, In-C한인민박harg
квартирный переезд минск [url=www.kvartirnyj-pereezd11.ru/]квартирный переезд минск[/url] .
[url=https://marcus-rashford-cz.biz]https://www.marcus-rashford-cz.biz[/url]
last news about marcus rashford
http://www.marcus-rashford-cz.biz
[url=https://alaba-david-cz.biz]https://alaba-david-cz.biz[/url]
last news about alaba david
http://alaba-david-cz.biz
[url=][/url]
Строительство, ремон своими руками. Советы мастеров и лучших специалстов в своем деле.
Каким вы видите свой будущий дом? Выполненный в духе уютного загородного шале или со сложными геометрическими формами и яркими элементами?
<a href=https://www.vuz-chursin.ru/stroitelstvo]Строительство
<a href=https://www.vuz-chursin.ru/stroymaterialy-0]Стройматериалы
<a href=https://www.vuz-chursin.ru/remont-i-otdelka]Отделка
Для большинства людей своя, пускай, даже крохотная, но отдельная однокомнатная квартира, намного слаще, чем аренда 5-комнтантного пентхауса за смешные деньги. Здесь можно устанавливать свои правила, планировать ремонт, делать перестановку, а единственное ограничение – это пространство.
Каталог полезных статей о стройке и ремонте <a href=https://vuz-chursin.ru/.
[url=][/url]
Hi! I know this is somewhat off topic but I was wondering if you
knew where I could locate a captcha plugin for my comment form?
I’m using the same blog platform as yours and I’m having
trouble finding one? Thanks a lot!
[url=https://lukaku-romelu-cz.biz]http://www.lukaku-romelu-cz.biz[/url]
last news about lukaku romelu
http://lukaku-romelu-cz.biz
[url=https://romelulukakucz.biz]http://www.romelulukakucz.biz[/url]
last news about romelu lukaku
http://romelulukakucz.biz
[url=https://lukakuromelu-cz.biz]https://lukakuromelu-cz.biz[/url]
last news about lukaku romelu
https://www.lukakuromelu-cz.biz
вывод из запоя на дому сочи [url=https://vyvod-iz-zapoya-sochi11.ru/]вывод из запоя на дому сочи[/url] .
[url=https://riyadmahrezcz.biz]https://www.riyadmahrezcz.biz[/url]
last news about riyad mahrez
riyadmahrezcz.biz
about 80% (오디션 정보40,000 tons)오디션 정보 of essentia오디션 정보l oi
[url=][/url]
[url=https://torgdom1.ru/novoe-oborudovanie/]Новое оборудование для ресторанов и кафе[/url]
Предлагаем Новое оборудование для магазинов, ресторанов, гостиниц и других мест общественного питания и обслуживания. В нашем каталоге представлены модели различных габаритов и технических характеристик. На любой товар мы предоставляем гарантийный талон. Доставку осуществляем в течение 1-2 рабочих дней с момента заказа, либо в согласованный день. Предусмотрена оплата для юр.лиц по счету. Чтобы сделать заказ в нашей компании «ТоргХаус», соберите список товаров в корзине, и менеджер свяжется для уточнения способа оплаты и удобного времени доставки.
[url=https://torgdom1.ru/oborudovanie-bu/]БУ оборудование для ресторанов и кафе[/url]
Предлагаем Оборудование для общепита Б/У для магазинов, ресторанов, гостиниц и других мест общественного питания и обслуживания. В нашем каталоге представлены модели различных габаритов и технических характеристик. На любой товар мы предоставляем гарантийный талон.
[url=https://torgdom1.ru/proektirovanie-restoranov/]Проектирование ресторанов и кафе в Екатеринбурге[/url]
Компания «Торгхаус» успешно занимается проектированием предприятий общественного питания.
Заказав проект ресторана у нас, Вы получите:
Отдавая разработку проекта в руки профессионалов, можно быть уверенным в оптимизации и привязке всех систем. Каждое решение органично впишется в общую технологию, снижая затраты, касаемо:
Без соответствующей нормам проектной документации, невозможен запуск ресторана. Схема подводки всех систем обеспечивает безопасность работы в будущем. Соблюдение противопожарных и санитарных норм создаст почву для быстрого прохождения проверок.
Ориентировочная стоимость проектирования
– удачное планировочные решения;
– высокотехнологичную расстановку оборудования;
– верный расчет систем вентиляции и кондиционирования;
– индивидуальный подход к разработке дизайна;
– первоначальных вложений в строительство и перепланировку;
– обслуживание оборудования;
– согласование документации и прочих вопросов.
Цены на всю продукцию [url=https://torgdom1.ru/].[/url]
[url=][/url]
[url=https://mahrez-riyad-cz.biz]http://www.mahrez-riyad-cz.biz[/url]
last news about mahrez riyad
https://mahrez-riyad-cz.biz
d from each 괌 렌트카other based 괌 렌트카on their spe괌 렌트카cifi
This will be helpful for my family.
This blog post is excellent, probably because of how well the subject was developed. I like some of the comments too.
I like it when folks come together and share thoughts. Great site, stick with it!
[url=https://davidalaba-cz.biz]https://www.davidalaba-cz.biz[/url]
last news about david alaba
https://www.davidalaba-cz.biz
[url=https://food.news161.ru]www.food.news161.ru[/url]
обзор еды на заказ в ростовской области
еда на заказ
вывод из запоя на дому в сочи [url=www.vyvod-iz-zapoya-sochi12.ru]вывод из запоя на дому в сочи[/url] .
врач на дом капельница от запоя [url=https://www.snyatie-zapoya-na-domu11.ru]врач на дом капельница от запоя[/url] .
Invisible ra제주패스렌트카ys such as X제주패스렌트카-rays, gamma제주패스렌트카 ray
[url=https://tonikroos-cz.biz]www.tonikroos-cz.biz[/url]
last news about toni kroos
https://tonikroos-cz.biz
priligy 60 mg Total RNA was then processed for mRNA enrichment, double stranded cDNA synthesis, repair ends and addition of A overhang and A adaptor, fragment selection and PCR amplification, library quality testing, and next generation sequencing using Illumina HiSeq4000 from HiSeq X sequencing technology
Howdy! This blog post could not be written much better! Looking through this post reminds me of my previous roommate! He continually kept preaching about this. I am going to forward this information to him. Fairly certain he will have a great read. Thank you for sharing!
[url=https://brunoguimaraescz.biz]http://www.brunoguimaraescz.biz[/url]
last news about bruno guimaraes
http://www.brunoguimaraescz.biz
[url=https://guimaraes-bruno-cz.biz]http://guimaraes-bruno-cz.biz[/url]
last news about guimaraes bruno
https://guimaraes-bruno-cz.biz
If you wish for to increase your knowledge simply keep visiting this
website and be updated with the hottest gossip posted here.
th of India 마이리얼트립 할인쿠폰rather than 마이리얼트립 할인쿠폰the industri마이리얼트립 할인쿠폰al w
Way cool! Some extremely valid points! I appreciate you penning this post and also the rest of the site
is really good.
g consultanc스카이다이빙 가격y service on스카이다이빙 가격 identificat스카이다이빙 가격ion/
Hi to every one, the contents existing at this site are in fact remarkable for people
knowledge, well, keep up the nice work fellows.
Hmm is anyone else experiencing problems with the images on this
blog loading? I’m trying to determine if its
a problem on my end or if it’s the blog. Any feedback would be
greatly appreciated.
http://slotsiteleri.bid/# en iyi slot siteler
[url=https://darwinnunez-cz.biz]darwinnunez-cz.biz[/url]
last news about darwin nunez
darwinnunez-cz.biz
[url=][/url]
Лучшая сантехника по низким ценам в Минске
Если вы ищете, где купить сантехнику в Минске, то наш интернет-магазин — для вас.
Большой ассортимент товаров представлен в различных ценовых категориях, а благодаря разнообразию размеров,
форм и других параметров, вы точно найдёте наиболее подходящую модель.
Создайте свой уникальный дизайн ванной комнаты вместе с нами!
Почему Almoni?
Высокое качество: мы работаем с ведущими производителями и брендами с мировым именем,
например: Orans, Ravak, Vitra, Kaldewey, Roca и другие. Все изделия сертифицированы.
Доступные цены: благодаря нашему сотрудничеству напрямую с заводами-изготовителями,
у вас появляется возможность купить сантехнику недорого.
Широкий ассортимент: большой выбор точно позволит вам найти подходящую модель или цвет товара,
чтобы наиболее гармонично вписать его в общий интерьер.
Удобный сервис: заказы обрабатываются в кратчайшие сроки, есть возможность выбрать
подходящий для вас вариант уведомлений (смс/звонок/почта), а оповещения о передвижении
товара позволят вам всегда быть в курсе его местоположения. Оставить онлайн-заказ вы можете
круглосуточно через корзину на сайте, а с 09:00 — 21:00 это можно также сделать через оператора.
Мы любим наших клиентов: при покупке от 3 000 р. вы получаете приятные подарки,
а для наших постоянных покупателей действуют специальные скидки.
Аккуратная доставка в срок курьером доступна по всей Республике Беларусь,
а также более чем в 1000 пунктах самовывоза в России.
Если у Вас возникли вопросы или сложности с заказом, обратитесь к оператору,
который предоставит актуальную информацию, а также проконсультирует по товарам.
Сделать это можно по телефону: +375 (33) 398 66 77.
Интернет-магазин сантехники [url=https://almoni.by/]almoni.by[/url]
[url=][/url]
I enjoy your blog posts, saved to my bookmarks!
[url=https://darwinnunezcz.biz]https://darwinnunezcz.biz[/url]
last news about darwin nunez
https://www.darwinnunezcz.biz
[url=https://toni-kroos-cz.biz]www.toni-kroos-cz.biz[/url]
last news about toni kroos
toni-kroos-cz.biz
[url=https://bruno-guimaraes-cz.biz]http://www.bruno-guimaraes-cz.biz[/url]
last news about bruno guimaraes
http://www.bruno-guimaraes-cz.biz
guvenilir slot siteleri: en guvenilir slot siteleri – 2024 en iyi slot siteleri
[url=https://kroos-toni-cz.biz]https://www.kroos-toni-cz.biz[/url]
last news about kroos toni
https://www.kroos-toni-cz.biz
[url=https://brunoguimaraes-cz.biz]brunoguimaraes-cz.biz[/url]
last news about bruno guimaraes
http://brunoguimaraes-cz.biz
[url=https://kroostoni-cz.biz]http://www.kroostoni-cz.biz[/url]
last news about kroos toni
kroostoni-cz.biz
[url=https://guimaraesbruno-cz.biz/]guimaraesbruno-cz.biz[/url]
last news about guimaraes bruno
guimaraesbruno-cz.biz/
An impressive share! I’ve just forwarded this onto a co-worker who has been doing a little research on this. And he actually bought me dinner because I stumbled upon it for him… lol. So let me reword this…. Thanks for the meal!! But yeah, thanks for spending the time to talk about this subject here on your internet site.
[url=https://tonikrooscz.biz]https://www.tonikrooscz.biz[/url]
last news about toni kroos
tonikrooscz.biz
[url=https://nunez-darwin-cz.biz]http://www.nunez-darwin-cz.biz[/url]
last news about nunez darwin
http://www.nunez-darwin-cz.biz
железобетонные изделия жби [url=http://www.kupit-zhbi.ru]железобетонные изделия жби[/url] .
[url=https://nunezdarwin-cz.biz]https://www.nunezdarwin-cz.biz[/url]
last news about nunez darwin
https://nunezdarwin-cz.biz
[url=https://mahrezriyad-cz.biz]mahrezriyad-cz.biz[/url]
last news about mahrez riyad
http://www.mahrezriyad-cz.biz
Лучшие спортивные ставки на гей-тематику | Спортивные ставки для LGBTQ+ на 1xbet | 1xbet: безопасные ставки для геев | Как делать ставки на 1xbet, если вы гей | Gay ставки на 1xbet: всё, что вам нужно знать
pron gay in 1xbet [url=https://1xbetcasinogayclub-ar.com/]pron gay in 1xbet[/url] .
https://denemebonusuverensiteler.win/# deneme bonusu
en iyi slot siteleri: deneme bonusu veren siteler – en iyi slot siteler
more than 6제주패스렌터카000 importan제주패스렌터카t plant spec제주패스렌터카ies/
[url=https://virgil-van-dijk-cz.biz]http://virgil-van-dijk-cz.biz[/url]
last news about virgil van dijk
https://virgil-van-dijk-cz.biz
[url=https://dijk-virgil-van-cz.biz]http://dijk-virgil-van-cz.biz[/url]
last news about dijk virgil van
http://www.dijk-virgil-van-cz.biz
[url=https://van-dijk-virgil-cz.biz]https://van-dijk-virgil-cz.biz[/url]
last news about van dijk virgil
https://van-dijk-virgil-cz.biz
vps сервер
ВПС многообразные сервера, скорость интернета 1 Гбит/сек,
доступные расценки
Широкий спектр настроек по любым задачи. Можно подобрать оптимальный план, исходя из ваших потребностей
Облачные серверы на базе AMD EPYC — Сделайте собственный хостинг
Виртуальные серверы на базе Intel Gold
Стандартные серверы, Аренда обычного сервера
Высокопроизводительные серверы
Суперсерверы — аренда сверхмощных выделенных серверов
Суперсерверы основанные на последних процессоров AMD EPYC. Частота CPU до 3.4-4 GHz. Отличная скорость соединения к сети интернет
Неограниченная тех. поддержка. Наши эксперты всегда готовы быстро решить вашу проблему в любой ситуации., разнообразие серверов — является
Защита от злоумышленников — все сайты доступны — интернет без ограничений
– Готовые шаблоны для сервиса WireGuard VPN, Outline VPN, 3X-UI VPN, Marzban VPN, IPsec VPN, OpenVPN
– Фиксированная стоимость в американских долларах
– Оплата с рублевой карты, в криптовалюте, иностранной картой через Stripe
Разнообразные способы оплаты. Предоставляем удобные варианты оплаты, с учетом карты банка, онлайн-кошельки и цифровую валюту, с возможностью скидок до 20%
Доступные цены. Наши тарифы ниже на 10-15%, по сравнению с другими, одновременно мы предлагаем услуги премиум-класса
Без перебоев, стабильная и надёжная работа высокого класса.
Paragraph writing is also a excitement, if you be familiar with then you can write
if not it is complex to write.
вавада vavadaa https://pathiaf.com
vavada com vavada вавада xyz
ремонт apple watch
slot oyunlar? siteleri: bonus veren casino slot siteleri – yasal slot siteleri
vavada мобильная vavada официальный сайт рабочее зеркало
vavada актуальное зеркало вавада тг
http://denemebonusuverensiteler.win/# deneme bonusu veren siteler
Когда выполняется замена нижних венцов, в таком случае деревянный венец либо разгружается от давления и реализуется демонтаж с заменой, потому что для проведения замены подъём не больше 10 см, что и не является существенным в том числе для внутреннего отделки.
нижняя балка или венец из листвяка гораздо надежнее и хорошо доказал свою надежность благодаря своей прочностью и нечувствительностью к гниению. Тем не менее, ее также также следует защищать с помощью биоцидного раствора, аналогично и все перекладины.
Наша компания занимается не лишь ремонтом конструкций, а также обновлением напольных систем. Клиенты нередко заказывают утепленные полы с термической термоизоляцией мы Комплектуем и снабжаем заявку комплектующими и обеспечиваем специальные скидки.
ремонт эппл вотч
Профессиональный сервисный центр по ремонту планетов в том числе Apple iPad.
Мы предлагаем: профессиональный ремонт ipad
Наши мастера оперативно устранят неисправности вашего устройства в сервисе или с выездом на дом!
Профессиональный сервисный центр по ремонту холодильников и морозильных камер.
Мы предлагаем: ремонт холодильников на дому
Наши мастера оперативно устранят неисправности вашего устройства в сервисе или с выездом на дом!
balloons with logo to order order balloons to home inexpensive
deneme bonusu veren siteler: en iyi slot siteler – 2024 en iyi slot siteleri
Профессиональный сервисный центр по ремонту радиоуправляемых устройства – квадрокоптеры, дроны, беспилостники в том числе Apple iPad.
Мы предлагаем: ремонт квадрокоптеров в москве и московской области
Наши мастера оперативно устранят неисправности вашего устройства в сервисе или с выездом на дом!
Если вы искали где отремонтировать сломаную технику, обратите внимание – ремонт бытовой техники
Если вы искали где отремонтировать сломаную технику, обратите внимание – ремонт бытовой техники в москве
Тогда, когда реализуется смена обвязки, то бревно также разгружается от веса и осуществляется демонтаж с заменой, поскольку для замены приподнимание не более 10 см сантиметров, которое не выступает критичным в том числе для внутренних частей отделки.
нижние брёвна или брус из лиственных гораздо долговечней и эффективно показал себя благодаря обладанию крепостью и устойчивостью к порче. Однако, ее точно нужно защищать путем использования противогрибкового состава, как и прочие балки.
Наша организация занимается не только ремонтом сооружений, дополнительно обновлением основания пола. Потребители регулярно заказывают утепленные полы с тепловой теплоизоляцией наш персонал Обеспечиваем заявку материалами и предоставляем выгодные скидки.
I seriously love your site.. Excellent colors & theme. Did you build this site yourself? Please reply back as I’m looking to create my very own blog and want to find out where you got this from or what the theme is named. Many thanks.
http://sweetbonanza.network/# sweet bonanza slot
где в интернете можно заработать [url=https://kak-zarabotat-v-internete12.ru/]где в интернете можно заработать[/url] .
снятие запоя на дому [url=http://snyatie-zapoya-na-domu13.ru]снятие запоя на дому[/url] .
Если вы искали где отремонтировать сломаную технику, обратите внимание – сервис центр в екатеринбурге
[url=][/url]
Интернет-магазин климатической техники «СКСэйл»
Канальные, кассетные кондиционеры и сплит-системы, а также все, что вы хотите знать о кондиционерах, есть на нашем сайте. Подробно рассказано об оконных и канальных кондиционерах, тепловых завесах, системах вентиляции, очистителях, увлажнителях и осушителях воздуха. Цены на продукцию можно посмотреть в каталоге.
Продажа, монтаж и установка кондиционеров — это наша работа, которую мы выполняем профессионально и с огромным удовольствием. Мы предлагаем только лучшее оборудование, которое хорошо зарекомендовало себя в России и признанно во всем мире.
Мы продаём не только бытовые сплит системы, но и колонные конционеры, канальные кондиционеры, потолочные и центральные системы кондиционирования.
Центральные кондиционеры отлично подойдут для средних и больших загородных коттеджей, поскольку внешний блок будет только один. Установка кондиционеров любого типа производится нами в максимально сжатые сроки.
Официальный сайт «СКСэйл».
[url=][/url]
Профессиональный сервисный центр по ремонту планетов в том числе Apple iPad.
Мы предлагаем: мастер по ремонту ipad
Наши мастера оперативно устранят неисправности вашего устройства в сервисе или с выездом на дом!
Если вы искали где отремонтировать сломаную технику, обратите внимание – ремонт бытовой техники
Профессиональный сервисный центр по ремонту радиоуправляемых устройства – квадрокоптеры, дроны, беспилостники в том числе Apple iPad.
Мы предлагаем: сервисный центр квадрокоптеров
Наши мастера оперативно устранят неисправности вашего устройства в сервисе или с выездом на дом!
1вин: 1вин официальный сайт – 1win зеркало
Если вы искали где отремонтировать сломаную технику, обратите внимание – профи тех сервис москва
пинап казино: pin up casino – пин ап
https://1win.directory/# 1вин зеркало
Если вы искали где отремонтировать сломаную технику, обратите внимание – профи ремонт
Когда производится демонтаж с заменой нижних брёвен, соответственно бревно также разгружается от нагрузки и происходит демонтаж с заменой, поскольку чтобы заменить поднятие не больше 10 см, которое не представляет значительным даже для внутренней отделки.
нижний венец из листвяка намного долговечно и надёжно и хорошо показал свои качества благодаря своей устойчивостью и сопротивляемостью к порче. Несмотря на это, ее точно нужно обработать путем использования биоцидного препарата, подобно и прочие балки.
Наша компания занимается не только реконструкцией объектов, но и обновлением основания пола. Наши заказчики нередко подают заявку на теплые полы с термической теплозащитой наш персонал Обеспечиваем заявку всем необходимым для работы и обеспечиваем выгодные расценки.
Fonbet фрибет промокод https://kmural.ru/news_importer/inc/aktualnue_promokodu_bukmekerskoy_kontoru_fonbet.html
Промокоды на фрибет от Fonbet предоставляют пользователям бесплатные ставки. Примером такого промокода является ‘GIFT200’, который активирует фрибеты для новых игроков. Эти промокоды позволяют сделать ставки без использования собственных средств, увеличивая шансы на выигрыш и делая игру более увлекательной.
Профессиональный сервисный центр по ремонту бытовой техники с выездом на дом.
Мы предлагаем:сервисные центры по ремонту техники в спб
Наши мастера оперативно устранят неисправности вашего устройства в сервисе или с выездом на дом!
Our family had similar issues, thanks.
seo оптимизация в москве цена продвижение сайта москва
vavada online casino: vavada зеркало – вавада рабочее зеркало
Замена венцов красноярск
В случае если производится смена венцов, тогда брус либо освобождается от нагрузки и выполняется демонтаж с заменой, потому что чтобы заменить подъём не больше 10 см см, что не представляет существенным включая для внутреннего обустройства.
нижние брёвна или брус из лиственных существенно долговечно и надёжно и превосходно показал свои качества благодаря своей прочностью и стойкостью к разложению. Несмотря на это, ее также также необходимо обработать с помощью противогрибкового средства, подобно и прочие стропила.
Наша организация специализируется не только перестройкой объектов, помимо этого улучшением полов. Потребители часто запрашивают теплые полы с термической термоизоляцией наш персонал Укомплектовываем заказ всем необходимым для работы и предоставляем индивидуальные тарифы.
вавада зеркало [url=https://vavada.auction/#]vavada[/url] vavada зеркало
anon ig viewer [url=http://www.inviewanon.com]http://www.inviewanon.com[/url] .
лечение наркозависимости в стационаре [url=http://www.vyvod-iz-zapoya-v-stacionare-samara11.ru]лечение наркозависимости в стационаре[/url] .
продвижение сайтов москва цена продвижение сайтов москва
пин ап: пин ап казино – pin up казино
http://vavada.auction/# казино вавада
1хбет официальный сайт: 1xbet зеркало рабочее на сегодня – 1xbet зеркало
Internet gambling sites present an exhilarating variety of gaming options, numerous of which these days include crypto as a method of payment. Between the top casinos, BC Casino, Fortune Panda Casino, Casino Axe, and Bitkingz are growing in popularity, whereas Bit Starz is notable with numerous awards. Cloud Bet Casino stands out as being an officially licensed crypto casino, ensuring user safety and fairness in gameplay, while Fairspin together with MB Casino deliver a broad selection of digital currency games.
When it comes to dice gambling, virtual currency casinos such as Bitcoin Dice Casino bring a thrilling experience, permitting gamblers to gamble on Bitcoin and other digital currencies for example Ether, LTC, Dogecoin, Binance Token, and Tether.
For many casino fans, choosing a reliable provider matters. Thunderkick Casino, Play’n Go, Red Tiger Gaming, Quickspin Casino, Pragmatic, Playtech, Nolimit City, NetEnt Casino, ELK, and MG Casino are among the best providers renowned for their unique slot games, immersive visuals, and intuitive interfaces.
Online casino streaming has turned into an exciting form for bettors to get involved in online gambling. Well-known streamers including Classy Beef, Roshtein, Labowsky, Deuce Ace, and X-Posed stream their gameplay, frequently showing massive jackpots and giving strategies for effective tactics in gambling.
In addition, services like BC Game Casino, Bitkingz Casino, and Rocketpot Casino also offer Plinko games, a favorite game with straightforward mechanics with large possibilities for massive payouts.
Knowing responsible gaming, refund options, and anonymous play in virtual casinos is necessary for players wanting to optimize their experience. Picking a reliable wallet, choosing no-sign-in platforms, and understanding strategies for games such as Aviator enables users keep up-to-date while enjoying the excitement of gambling.
Keep it up!. I usually don’t post in Blogs but your blog forced me to, amazing work.. beautiful A rise in An increase in An increase in.
resume writing for engineers engineering resume builder
I think this is among the so much vital info for me. And i’m happy reading your article. But wanna remark on few common issues, The site style is wonderful, the articles is really excellent : D. Just right job, cheers
Если вы искали где отремонтировать сломаную технику, обратите внимание – техпрофи
Профессиональный сервисный центр по ремонту Apple iPhone в Москве.
Мы предлагаем: мастер по ремонту iphone
Наши мастера оперативно устранят неисправности вашего устройства в сервисе или с выездом на дом!
мастер по ремонту телефонов
Профессиональный сервисный центр по ремонту источников бесперебойного питания.
Мы предлагаем: ремонт источников бесперебойного питания sven
Наши мастера оперативно устранят неисправности вашего устройства в сервисе или с выездом на дом!
ремонт телевизоров недорого
пин ап вход: пин ап казино вход – pin up
After going over a handful of the articles on your website, I honestly appreciate your technique of blogging. I book marked it to my bookmark webpage list and will be checking back soon. Take a look at my web site as well and let me know how you feel.
http://pin-up.diy/# пин ап вход
nding of the마이리얼트립 할인쿠폰 cholera dis마이리얼트립 할인쿠폰ease biology마이리얼트립 할인쿠폰 led
voltaren 100mg brand – aspirin canada aspirin without prescription
Рабочий промокод всегда доступен на нашем сайте. Для поиска других вариантов можно воспользоваться любой поисковой системой, найти специализированную группу в социальных сетях или канал в мессенджерах (Viber, Telegram). Большинство ресурсов предоставляют актуальные промокоды Melbet, но стоит проверить при регистрации. Введите скопированный мелбет и дождитесь уведомления от БК Мелбет, что бонус повышен. Помните, что второй раз зарегистрироваться и получить 10400 рублей от Мелбет невозможно. При выборе поощрения по промокоду Мелбет существует поле «Отказаться от бонуса». В таком случае первое пополнение не увеличивается, и игрок может не следовать правилам вывода бонусных средств, а сразу делать именно те ставки, ради которых он и проходил регистрацию. Даже при отказе от бонусных средств рекомендуем ввести промокод Мелбет, так как в дальнейшем игрокам приходят специальные акции от Melbet. Помимо спортивной акции, игроки в казино также получать специальное предложение от БК. При использовании промокода Мелбет есть возможность получить бонус в казино до 125 000? и 290 фриспинов.
вавада: казино вавада – вавада казино
professional engineer resume example engineering resumes
Если вы искали где отремонтировать сломаную технику, обратите внимание – сервис центр в новосибирске
сервисный центр по ремонту телефонов
истинный запой [url=www.vyvod-iz-zapoya-v-sankt-peterburge.ru]www.vyvod-iz-zapoya-v-sankt-peterburge.ru[/url] .
снятие ломки на дому цена [url=www.snyatie-lomki-narkolog.ru/]www.snyatie-lomki-narkolog.ru/[/url] .
Профессиональный сервисный центр по ремонту источников бесперебойного питания.
Мы предлагаем: стоимость ремонта ибп
Наши мастера оперативно устранят неисправности вашего устройства в сервисе или с выездом на дом!
Если вы искали где отремонтировать сломаную технику, обратите внимание – ремонт бытовой техники
Если вы искали где отремонтировать сломаную технику, обратите внимание – ремонт бытовой техники
http://pin-up.diy/# пин ап казино вход
пинап казино: pin up – пин ап зеркало
[url=https://courtoisthibaut-cz.biz]https://www.courtoisthibaut-cz.biz[/url]
last news about courtois thibaut
https://courtoisthibaut-cz.biz
[url=https://benzemakarim-cz.biz]www.benzemakarim-cz.biz[/url]
last news about benzema karim
http://www.benzemakarim-cz.biz
раскрутка сайтов москва продвижение сайтов в москве
Профессиональный сервисный центр по ремонту бытовой техники с выездом на дом.
Мы предлагаем:сервисные центры в екатеринбурге
Наши мастера оперативно устранят неисправности вашего устройства в сервисе или с выездом на дом!
ремонт телевизоров в москве недорого
плинко казино
Online gambling sites provide an exhilarating array of gaming options, numerous of them today include virtual currency as a transaction method. Among the leading casinos, BC Casino, Fortune Panda Casino, Axe Casino, and Kingz Casino are becoming popular, as Bitstarz distinguishes itself with many accolades. Cloudbet is notable as being an officially licensed crypto casino, guaranteeing player security and integrity, meanwhile Fairspin along with MB Casino provide an extensive variety of digital currency games.
For dice-based games, virtual currency casinos including Bitcoin Dice Game bring a thrilling experience, enabling users to bet with Bitcoin and other digital currencies for example Ether, LTC, Dogecoin, BNB, and USDT.
For casino enthusiasts, selecting the right casino provider is essential. Thunderkick Gaming, Play’n Go, Red Tiger, Quickspin Casino, Pragmatic Play, Playtech, Nolimit City Gaming, Net Entertainment, ELK, and MG Casino are known as the top game developers known for their innovative slots, exciting graphics, and intuitive interfaces.
Casino streams has grown into another thrilling style for players to interact with online casinos. Popular streamers such as ClassyBeef, Roshtein Casino, David Labowsky, Deuce Ace, and Xposed share their gambling moments, often displaying massive jackpots and giving strategies for effective tactics for casino games.
Moreover, platforms like BC Game Casino, Bitkingz Casino, and Rocketpot also offer Plinko bets, a fan-favorite game with basic rules yet great potential for big wins.
Comprehending responsible gaming, rebate offers, and playing anonymously in cryptocurrency casinos is crucial for gamblers aiming to enhance their enjoyment. Picking a secure wallet, finding no-signup casinos, and getting tips for games such as Aviator allows players to stay informed while enjoying the thrill of the game.
[url=https://karim-benzema-cz.biz]karim-benzema-cz.biz[/url]
last news about karim benzema
http://www.karim-benzema-cz.biz
создание сайта продвижение сайта в москве
[url=https://becker-alisson-cz.biz]https://www.becker-alisson-cz.biz[/url]
last news about becker alisson
http://www.becker-alisson-cz.biz
Если вы искали где отремонтировать сломаную технику, обратите внимание – ремонт цифровой техники барнаул
Если вы искали где отремонтировать сломаную технику, обратите внимание – сервисный центр в челябинске
В Мелбет промокод — это уникальная комбинация из цифр и букв. Он может использоваться в самых разных ситуациях. Чаще всего применяется в Мелбет промокод при регистрации, чтобы привлечь новых игроков. Однако, он может давать бесплатную ставку и другие бонусы, которых очень много в данной букмекерской конторе. Этот материал расскажет о том, что из себя представляет и что дает промокод на мелбет. Промокод для Мелбет можно получить за участие в каких-либо активностях букмекерской конторы Мелбет. Например, уникальный код компания присылает на день рождения в виде подарка своим клиентам. Помимо этого, можно ввести в поисковике «Как получить промокод на Мелбет?» и найти тематические сайты, где постоянно публикуются актуальные комбинации цифр и букв. Букмекер часто распространяет свои promo коды через партнеров, а также некоторые игроки сами активно делятся ими в сети.
tropolitan c블로그 체험단ities have l블로그 체험단eft little o블로그 체험단r no
[url=https://thibaut-courtois-cz.biz]thibaut-courtois-cz.biz[/url]
last news about thibaut courtois
http://www.thibaut-courtois-cz.biz
[url=https://alissonbecker-cz.biz]http://www.alissonbecker-cz.biz[/url]
last news about alisson becker
http://alissonbecker-cz.biz
I all the time used to study post in news papers but now as I am a
user of internet therefore from now I am using net for articles
or reviews, thanks to web.
[url=https://becker-alisson-cz.biz/]http://becker-alisson-cz.biz[/url]
last news about becker alisson
https://www.becker-alisson-cz.biz/
[url=https://alisson-becker-cz.biz]https://www.alisson-becker-cz.biz[/url]
last news about alisson becker
http://www.alisson-becker-cz.biz
[url=https://vandijkvirgil-cz.biz]https://www.vandijkvirgil-cz.biz[/url]
last news about van dijk virgil
http://www.vandijkvirgil-cz.biz
-gradation o쭌앤쫑f Janaki Amm쭌앤쫑al Herbarium쭌앤쫑 (RR
[url=https://courtois-thibaut-cz.biz]www.courtois-thibaut-cz.biz[/url]
last news about courtois thibaut
http://courtois-thibaut-cz.biz
разработка и создание сайтов под ключ https://seo-5.ru
[url=https://karimbenzemacz.biz]http://karimbenzemacz.biz[/url]
last news about karim benzema
karimbenzemacz.biz
[url=https://benzemakarim-cz.biz]https://www.benzemakarim-cz.biz[/url]
last news about benzema karim
https://www.benzemakarim-cz.biz
ry, Jammu, i튼튼영어 베이비리그 가격n 1957. Dr. 튼튼영어 베이비리그 가격(Ms.) E.K. J튼튼영어 베이비리그 가격anak
комплексное продвижение в интернете недорого https://seo-5.ru
[url=https://mostbetscz.top]mostbet[/url]
Install latest version of the application online casino mostbet – play right now!
mostbet
[url=https://mostbetcz.top]mostbetcz.top[/url]
Upload application online casino mostbet – win now!
mostbetcz.top
хендай солярис 2024 г https://hyundai-solaris-krym.ru
онлайн казино [url=http://stroy-minsk.by]онлайн казино[/url] .
заказать саженцы почтой недорого без предоплаты [url=https://rodnoisad.ru]https://rodnoisad.ru[/url] .
рейтинг капперов [url=https://rejting-kapperov14.ru/]рейтинг капперов[/url] .
[url=https://tonikrooscz.biz]tonikrooscz.biz[/url]
last news about toni kroos
https://www.tonikrooscz.biz
is to manag괌 렌트카e it with ca괌 렌트카reful planni괌 렌트카ng a
купить хендай солярис дилер https://hyundai-solaris-krym.ru
[url=https://thibautcourtoiscz.biz]https://www.thibautcourtoiscz.biz[/url]
last news about thibaut courtois
http://www.thibautcourtoiscz.biz
замена матрицы в фотоаппарате
Промокод при регистрации позволит получить подарки – это и бонусное пополнение счета, и бесплатные ставки. На самом деле, это зависит от стремления букмекера сделать шаг навстречу своим клиентам. Всевозможные бонусы и акции становятся магнитом, привлекают новых бетторов, но в то же время вносят разнообразие в игру тех, кто уже считает, что их нечем удивить. Чтобы новый игрок получил на счет приветственный бонус, он должен ввести рабочий промокод мелбет бонус в соответствующее поле в регистрационной анкете. Эти средства будут находиться на дополнительном (бонусном) балансе – эти средства нельзя вывести, но на них можно делать ставки.
грунт для цветов и комнатных растений [url=https://www.dachnik18.ru]https://www.dachnik18.ru[/url] .
https://drstore24.com/# navarro pharmacy miami
freds pharmacy store
Плинко
Online gaming platforms present a thrilling array of casino games, many of which currently feature digital currency as a transaction method. Among the top services, BC Game Casino, Fortune Panda Casino, Axe, and Bitkingz Casino are getting more attention, while Bit Starz distinguishes itself with many accolades. Cloudbet Casino is notable for operating as a licensed crypto casino, guaranteeing security for players and fair play, meanwhile Fair Spin Casino and Mbit Casino offer a wide range of crypto-compatible games.
In terms of casino dice games, digital currency casinos for example BTC Dice provide a fun gaming experience, allowing users to bet in Bitcoin and other cryptocurrencies such as Ether, Litecoin, DOGE, Binance Token, and Tether USD.
For gamblers, selecting the right casino provider is essential. Thunderkick Casino, Play and Go, Red Tiger, Quickspin Casino, Pragmatic Play Casino, Playtech, Nolimit City Gaming, NetEnt, ELK Studio Games, and Microgaming are listed among the top casino game studios known for their innovative slots, immersive visuals, and user-friendly interfaces.
Online casino streaming has grown into another thrilling method for gamblers to engage in casino games. Popular streamers such as Classy Beef, Roshtein Casino, David Labowsky, DeuceAce, and Xposed share their gambling moments, frequently showing huge wins and offering tips on effective tactics in gambling.
In addition, services like BC Casino, Bitkingz Casino, and Rocketpot Casino also offer Plinko bets, a fan-favorite game with basic rules but huge potential for huge rewards.
Learning about gaming responsibility, refund options, and no-name play in cryptocurrency casinos is important for bettors wanting to optimize their gambling journey. Picking a reliable wallet, exploring no-registration casinos, and understanding strategies for games like Aviator Casino Game enables users stay informed while enjoying the excitement of gambling.
fluconazole online pharmacy: online pharmacy generic finasteride – best online pharmacy cialis
Профессиональный сервисный центр по ремонту варочных панелей и индукционных плит.
Мы предлагаем: ремонт варочных панелей на дому в москве
Наши мастера оперативно устранят неисправности вашего устройства в сервисе или с выездом на дом!
hyperliquid
ремонт фотоаппаратов сони
https://onlineph24.com/# remote consultation online pharmacy
mexican online pharmacy
В случае если осуществляется демонтаж с заменой нижних брёвен, тогда деревянный венец также освобождается от веса и осуществляется смена, так как для замены подъём строения не выше 10 сантиметров, что не является критичным в том числе для внутренних частей отделки.
нижний венец из лиственных пород гораздо долговечно и надёжно и превосходно зарекомендовал свои качества благодаря обладанию надежностью и сопротивляемостью к разрушению. Тем не менее, данную балку обязательно следует защищать при помощи биозащитного состава, подобно и все остальные балки.
Наша организация работает не лишь восстановлением зданий, но и улучшением основания пола. Наши заказчики нередко подают заявку на утепленные полы с тепловой изоляцией мы Укомплектовываем заказ комплектующими и гарантируем специальные цены.
cheapest pharmacy to fill prescriptions without insurance: boots pharmacy kamagra – cialis pharmacy online
https://drstore24.com/# pharmacy rx one viagra
ed meds online [url=https://easydrugrx.com/#]enalapril online pharmacy[/url] cheap erectile dysfunction pills online
Nutra Gears Hi there to all, for the reason that I am genuinely keen of reading this website’s post to be updated on a regular basis. It carries pleasant stuff.
I think that may be an interesting element, it made me assume a bit. Thanks for sparking my considering cap. On occasion I get so much in a rut that I simply really feel like a record.
заказать семена дешево [url=https://semenaplus74.ru]https://semenaplus74.ru[/url] .
. It was a r매니챗oyal garden 매니챗gifted by Sa매니챗adat
капельницы от запоя на дому [url=https://kapelnica-ot-zapoya-kolomna.ru/]kapelnica-ot-zapoya-kolomna.ru[/url] .
[url=https://rodrygo-cz.biz]http://www.rodrygo-cz.biz[/url]
last news about rodrygo
https://rodrygo-cz.biz
volante de equilibrado con cesta de embrague
Dicho volador de equilibrado con compartimento de embrague simboliza un metodo critico con el proposito de asegurar el funcionamiento optimo del propulsion y la transferencia de un vehiculo pesado. El falta de equilibrio en dicha componente tiende a producir oscilaciones, estrepito, deterioro rapido de los partes e pudiendo llegar a fallas. En el pasado, el estabilizacion se ejecutaba una vez retirar el girador del propulsion, pero las desarrollos recientes facilitan ejecutar el mencionado metodo de forma directa en el carro, lo cual ahorra tiempo y gastos.
Como se define el Desequilibrio?
El desajuste representa una estado en la en la que la cantidad de un elemento giratorio (en este supuesto, el volador de nivelacion con compartimento de embrague) se ubica de modo desigual en comparacion a su centro de giro de revolucion. Lo cual produce fuerzas centrifugas que originan sacudidas.
Causas fundamentales del Falta de equilibrio del Rotativo de Balanceo con Cesta de Embrague:
Inexactitudes de manufactura y union: Aunque insignificantes desviaciones en la geometria de los partes tienden a provocar desequilibrio.
Deterioro y averias: El tiempo de uso, el altas temperaturas y los fallas mecanicas podrian alterar la cantidad y provocar en falta de equilibrio.
Montaje o reparacion inapropiada: Una montaje deficiente de la cesta de embrague o arreglos inapropiados tambien pueden generar desbalance.
[url=https://rodrygocz.biz]https://rodrygocz.biz[/url]
last news about rodrygo
rodrygocz.biz
Thanks! I like this!
Also visit my page … https://just-kill.to
Если вы искали где отремонтировать сломаную технику, обратите внимание – выездной ремонт бытовой техники в челябинске
https://drstore24.com/# asda viagra pharmacy
pharmacy propecia generic
Pretty nice post. I just stumbled upon your weblog and wanted to say that I’ve really enjoyed surfing around your blog posts. After all I’ll be subscribing in your feed and I am hoping you write again very soon!
капельница от запоя [url=https://kapelnica-ot-zapoya-kolomna11.ru/]капельница от запоя[/url] .
ibuprofen pharmacy singapore: aciclovir in pharmacy – best online pharmacy clomid
https://easydrugrx.com/# pharmacy cost of viagra
advanced care rx pharmacy [url=https://onlineph24.com/#]senior rx care pharmacy[/url] online pharmacy viagra
[url=https://rodrygosilvacz.biz]https://rodrygosilvacz.biz[/url]
last news about rodrygo silva
http://www.rodrygosilvacz.biz
[url=https://rodrygosilva-cz.biz]rodrygosilva-cz.biz[/url]
last news about rodrygo silva
rodrygosilva-cz.biz
war, and Dr 수원 웨딩박람회S.L. Nayar u수원 웨딩박람회nder a schem수원 웨딩박람회e fi
express pharmacy online: mexican pharmacy valtrex – can you get viagra from the pharmacy
[url=https://pedri-cz.biz]http://www.pedri-cz.biz[/url]
last news about pedri
http://pedri-cz.biz
Our local network of agencies has found your research so helpful.
снятие ломки клинике [url=https://www.snyatie-lomki-narkolog11.ru]снятие ломки клинике [/url] .
срочная наркологическая помощь [url=www.skoraya-narkologicheskaya-pomoshch11.ru]срочная наркологическая помощь[/url] .
boniva online pharmacy: mexico online pharmacy – us pharmacy no prior prescription
https://drstore24.com/# pharmacy viagra malaysia
mexican pharmacy celebrex [url=https://drstore24.com/#]india pharmacy propecia[/url] marketplace oak harbor wa pharmacy store number
Hello there! I know this is kinda off topic but I’d
figured I’d ask. Would you be interested in exchanging links or maybe guest writing a blog article or vice-versa?
My website addresses a lot of the same subjects as
yours and I believe we could greatly benefit from each other.
If you’re interested feel free to shoot me an email. I look
forward to hearing from you! Awesome blog by the way!
Have a look at my web site: fucking ebony
volante de equilibrado con cesta de embrague
Dicho girador de equilibrado con cesta de embrague es un proceso primordial a fin de asegurar el funcionamiento ideal del propulsor y la transferencia de un transporte. El desequilibrio en la mencionada pieza tiende a causar sacudidas, estruendo, uso prematuro de los piezas e llegando a problemas. Historicamente, el equilibrado se ejecutaba una vez desmontar el volante del propulsor, sin embargo las tecnologias modernas facilitan efectuar el mencionado sistema sin intermediarios en el transporte, lo cual disminuye periodo y costos.
Como se define el Desbalance?
El falta de equilibrio es una circunstancia en la en la que la masa de un pieza giratoria (en el presente ejemplo, el volador de equilibrado con canasto de embrague) se ubica de manera desequilibrada en funcion de su eje de rotacion de rotacion. Lo cual provoca cargas centrifugas que en consecuencia provocan temblores.
Causas fundamentales del Desajuste del Volador de Equilibrado con Recipiente de Embrague:
Imprecisiones de produccion y ensamblaje: Aun leves desviaciones en la diseno de los componentes pueden generar desbalance.
Uso y desperfectos: El funcionamiento prolongado, el sobrecalentamiento y los danos mecanicos pueden afectar la cantidad y dar lugar en desbalance.
Instalacion o mantenimiento inapropiada: Una montaje inapropiada de la recipiente de embrague o arreglos inapropiados asimismo pueden originar falta de equilibrio.
ретрит центры в крыму https://ретриты.рф
мужской ретрит https://ретриты.рф
robert levandovski [url=https://robert-lewandowski-az.com/]robert lewandowski az com[/url] barcelona http://robert-lewandowski-az.com/ .
Если вы искали где отремонтировать сломаную технику, обратите внимание – ремонт бытовой техники в челябинске
Wow wonderful blog layout How long have you been blogging for you make blogging look easy The overall look of your site is great as well as the content
[url=https://brunoguimaraes-cz.biz]https://www.brunoguimaraes-cz.biz[/url]
last news about alisson becker
http://www.brunoguimaraes-cz.biz
your rx pharmacy grapevine tx: oneclickpharmacy propecia – oregon board of pharmacy
Ou trouver le 1хбет зеркало промокод?
Les codes promotionnels actuels 1xBet sont distribues sur Internet via des ressources partenaires, via les reseaux sociaux, via des blogueurs populaires. Les clients reguliers du bureau peuvent recevoir des codes promotionnels a la suite de la diffusion par e-mail ou par le biais de la «vitrine des codes promotionnels».
Профессиональный сервисный центр по ремонту фото техники от зеркальных до цифровых фотоаппаратов.
Мы предлагаем: починить фотоаппарат
Наши мастера оперативно устранят неисправности вашего устройства в сервисе или с выездом на дом!
provigil indian pharmacy: pharmacy without dr prescriptions – comprar finpecia en pharmacy2home
ретрит для женщин https://ретриты.рф
[url=https://rodrygo-silva-cz.biz]rodrygo-silva-cz.biz[/url]
last news about rodrygo silva
http://www.rodrygo-silva-cz.biz
[url=https://pedricz.biz]www.pedricz.biz[/url]
last news about pedri
https://pedricz.biz
играми рейзор шарк 1 win
что такое слово ретрит https://ретриты.рф
[url=https://pedri-lopas-cz.biz]http://www.pedri-lopas-cz.biz[/url]
last news about pedri lopas
https://pedri-lopas-cz.biz
[url=https://lopas-pedri-cz.biz]https://lopas-pedri-cz.biz[/url]
last news about lopas pedri
http://lopas-pedri-cz.biz
kaka 2006 07 [url=http://www.kaka.com.az]ac milan kaka[/url] ac milan sweatshirt rikardo kaka .
ретриты в россии https://ретриты.рф
https://drstore24.com/# Viagra Professional
sildenafil online pharmacy [url=https://easydrugrx.com/#]nizoral shampoo pharmacy[/url] med store pharmacy
sumatriptan pharmacy uk: buy clomid online pharmacy – tour de pharmacy watch online
pharmacy online uk: mint rx pharmacy – Erythromycin
娛樂城推薦與優惠詳解
在現今的娛樂世界中,線上娛樂城已成為眾多玩家的首選。無論是喜歡真人遊戲、老虎機還是體育賽事,每個玩家都能在娛樂城中找到自己的樂趣。以下是一些熱門的娛樂城及其優惠活動,幫助您在選擇娛樂平台時做出明智的決定。
各大熱門娛樂城介紹
1. 富遊娛樂城
富遊娛樂城以其豐富的遊戲選擇和慷慨的優惠活動吸引了大量玩家。新會員只需註冊即可免費獲得體驗金 $168,無需儲值即可輕鬆試玩。此外,富遊娛樂城還提供首存禮金 100% 獎勵,最高可領取 $1000。
2. AT99娛樂城
AT99娛樂城以高品質的遊戲體驗和優秀的客戶服務聞名。該平台提供各種老虎機和真人遊戲,並定期推出新遊戲,讓玩家保持新鮮感。
3. BCR娛樂城
BCR娛樂城是一個新興的平台,專注於提供豐富的體育賽事投注選項。無論是足球、籃球還是其他體育賽事,BCR都能為玩家提供即時的投注體驗。
熱門遊戲推薦
WM真人視訊百家樂
WM真人視訊百家樂是許多玩家的首選,該遊戲提供了真實的賭場體驗,並且玩法簡單,容易上手。
戰神賽特老虎機
戰神賽特老虎機以其獨特的主題和豐富的獎勵機制,成為老虎機愛好者的最愛。該遊戲結合了古代戰神的故事背景,讓玩家在遊戲過程中感受到無窮的樂趣。
最新優惠活動
富遊娛樂城註冊送體驗金
富遊娛樂城新會員獨享 $168 體驗金,無需儲值即可享受全場遊戲,讓您無壓力地體驗不同遊戲的魅力。
VIP 日日返水無上限
富遊娛樂城為 VIP 會員提供無上限的返水優惠,最高可達 0.7%。此活動讓玩家在遊戲的同時,還能享受額外的回饋。
結論
選擇合適的娛樂城不僅能為您的遊戲體驗增色不少,還能通過各種優惠活動獲得更多的利益。無論是新會員還是資深玩家,都能在這些推薦的娛樂城中找到適合自己的遊戲和活動。立即註冊並體驗這些優質娛樂平台,享受無限的遊戲樂趣!
Промокод на Фонбет на сегодня действующий https://sarhim.ru/wp-includes/pgs/aktualnuy_promokod_fonbet_pri_registracii.html
Для получения актуального промокода на Фонбет, действующего сегодня, рекомендуется следить за обновлениями на официальном сайте или подписаться на рассылку новостей. Сегодняшние промокоды могут включать бесплатные ставки, увеличение депозита или другие бонусы. Примером такого промокода является ‘GIFT200’, который предоставляет бесплатные ставки для новых пользователей.
I do trust all the ideas youve presented in your post They are really convincing and will definitely work Nonetheless the posts are too short for newbies May just you please lengthen them a bit from next time Thank you for the post
Pin up casino official Slot pick up casino website – login and play online
Nice blog here Also your site loads up very fast What host are you using Can I get your affiliate link to your host I wish my site loaded up as quickly as yours lol
Магазин кондиционеров: Ваше решение для комфорта и климата
Добро пожаловать в наш интернет-магазин кондиционеров в Москве и Московской области!
Наша цель – предложить вам самое лучшее оборудование для создания идеального климата в вашем доме или офисе. Мы гордимся тем, что являемся официальным дилером таких известных брендов, как Toshiba, Energolux, Haier, Gree и других. Это гарантирует, что вся представленная продукция сертифицирована и соответствует самым высоким стандартам качества.
Почему выбирают нас?
Официальный дилер. Мы работаем напрямую с производителями, что гарантирует вам оригинальные товары и официальную гарантию на всю продукцию.
Гарантия лучшей цены. Мы уверены в конкурентоспособности наших цен и предлагаем вам лучшие условия для покупки.
Быстрая доставка. Независимо от вашего местоположения в Московской области, мы доставим заказ в кратчайшие сроки.
Бесплатный замер. Каждый наш клиент получает услугу бесплатного замера, что позволяет подобрать оборудование, идеально подходящее для вашего помещения.
Хиты продаж
Среди самых популярных моделей в нашем ассортименте можно выделить:
TOSHIBA RAS-B10E2KVG-E/RAS-10E2AVG-EE SEIYA NEW – Это оборудование нового поколения, отличающееся высокой энергоэффективностью и бесшумной работой. Цена: 85 900 ?.
Сплит-система Energolux GENEVA SAS07G3-AI/SAU07G3-AI – Идеальный выбор для тех, кто ищет баланс между качеством и ценой. Цена: 47 700 ?.
Сплит-система Gree Bora GWH09AAA/K3NNA2A – Лидер продаж, известный своей надежностью и эффективностью охлаждения. Цена: 40 040 ?.
Сплит-система HAIER FLEXIS AS25S2SF2FA-W / 1U25S2SM3FA – Очень тихая модель, которая идеально подходит для установки в спальнях и детских комнатах. Цена: 88 900 ?.
Услуги и акции
Мы предлагаем бесплатный замер для всех наших клиентов. Эта услуга позволяет избежать ошибок при выборе оборудования и обеспечить максимальную эффективность системы кондиционирования.
Кроме того, в нашем магазине регулярно проводятся акции, которые позволяют вам существенно сэкономить на покупке климатической техники. Не пропустите возможность воспользоваться уникальными предложениями!
Доставка и установка
Мы предлагаем услуги доставки и установки кондиционеров по всей Московской области, включая такие города, как Балашиха, Химки, Подольск, Люберцы, Красногорск и другие. Наши специалисты быстро и профессионально установят оборудование, чтобы вы могли наслаждаться комфортом в кратчайшие сроки.
вывод из запоя в спб [url=www.vyvod-iz-zapoya-v-sankt-peterburge11.ru]вывод из запоя в спб[/url] .
insta [url=http://www.anon-inst.com]insta[/url] .
helloI like your writing very so much proportion we keep up a correspondence extra approximately your post on AOL I need an expert in this space to unravel my problem May be that is you Taking a look forward to see you
Если вы искали где отремонтировать сломаную технику, обратите внимание – профи услуги
Pin up casino official Game pic up casino website – login and play online
Профессиональный сервисный центр по ремонту фото техники от зеркальных до цифровых фотоаппаратов.
Мы предлагаем: замена матрицы в фотоаппарате
Наши мастера оперативно устранят неисправности вашего устройства в сервисе или с выездом на дом!
sam’s club pharmacy viagra price [url=https://pharmbig24.online/#]viagra reputable online pharmacy[/url] express rx pharmacy los angeles
reputable indian online pharmacy: indian pharmacy online – top 10 pharmacies in india
[url=https://gavi-pablo-cz.biz]https://gavi-pablo-cz.biz[/url]
last news about gavi pablo
https://www.gavi-pablo-cz.biz
Профессиональный сервисный центр по ремонту планшетов в Москве.
Мы предлагаем: замена матрицы планшета
Наши мастера оперативно устранят неисправности вашего устройства в сервисе или с выездом на дом!
[url=https://gavipablo-cz.biz]https://gavipablo-cz.biz[/url]
last news about gavi pablo
http://www.gavipablo-cz.biz
you are actually a just right webmaster. The website loading
speed is amazing. It sort of feels that you are doing any unique trick.
Moreover, The contents are masterwork. you have performed a magnificent
activity on this subject!
Hello there, I do believe your website could possibly be having web browser compatibility problems. Whenever I look at your blog in Safari, it looks fine however, when opening in IE, it’s got some overlapping issues. I simply wanted to give you a quick heads up! Apart from that, excellent website!
mexican online pharmacies prescription drugs: buying prescription drugs in mexico – mexican online pharmacies prescription drugs
http://mexicopharmacy.cheap/# best online pharmacies in mexico
Discover the world of excitement at Pin Up Casino, the world’s leading online casino. The official website Puk up offers more than 4,000 slot machines. Play online for real money or for free using the working link today
Профессиональный сервисный центр по ремонту бытовой техники с выездом на дом.
Мы предлагаем:ремонт крупногабаритной техники в новосибирске
Наши мастера оперативно устранят неисправности вашего устройства в сервисе или с выездом на дом!
Ретрит http://ретриты.рф международное обозначение времяпрепровождения, посвящённого духовной практике. Ретриты бывают уединённые и коллективные; на коллективных чаще всего проводится обучение практике медитации.
best india pharmacy: indianpharmacy com – india online pharmacy
как получить промокод для 1хбетt utilisez le code bonus pour obtenir un bonus VIP de 100% jusqu’a 130€ pour les Paris sportifs, ainsi qu’un bonus de casino de 1950 € + 150 tours de machines a sous. En utilisant le code promotionnel, vous pouvez vous attendre a ce que vos gains soient aussi eleves que dans le cas du plus grand bookmaker 1xbet. Tous les joueurs des pays suivants peuvent utiliser le code lors de l’inscription et recevoir un bonus de bienvenue:
Если вы искали где отремонтировать сломаную технику, обратите внимание – ремонт техники в краснодаре
mail order pharmacy india: buy prescription drugs from india – Online medicine order
[url=https://gavicz.biz]http://gavicz.biz[/url]
last news about gavi
https://www.gavicz.biz
[url=https://cristianoronaldo-cz.biz/]https://www.cristianoronaldo-cz.biz[/url]
last news about cristiano ronaldo
cristianoronaldo-cz.biz
[url=https://lopaspedri-cz.biz]https://lopaspedri-cz.biz[/url]
last news about pedri
http://www.lopaspedri-cz.biz
Профессиональный сервисный центр по ремонту планшетов в Москве.
Мы предлагаем: ремонт планшета
Наши мастера оперативно устранят неисправности вашего устройства в сервисе или с выездом на дом!
[url=https://gavi-cz.biz]www.gavi-cz.biz[/url]
last news about gavi
https://www.gavi-cz.biz
baclofen online pharmacy [url=https://pharmbig24.com/#]pharmacy rx world[/url] xalatan pharmacy
Если вы искали где отремонтировать сломаную технику, обратите внимание – ремонт бытовой техники
наркологическая срочная помощь [url=https://skoraya-narkologicheskaya-pomoshch12.ru]наркологическая срочная помощь[/url] .
[url=https://pablogavicz.biz]www.pablogavicz.biz[/url]
last news about pablo gavi
https://pablogavicz.biz
Hey! I just wanted to ask if you ever have any problems with hackers?
My last blog (wordpress) was hacked and I ended up losing several weeks of hard work
due to no back up. Do you have any methods to stop hackers?
[url=https://ronaldo-cristiano-cz.biz]https://ronaldo-cristiano-cz.biz[/url]
last news about ronaldo cristiano
http://ronaldo-cristiano-cz.biz
http://mexicopharmacy.cheap/# medicine in mexico pharmacies
reputable indian pharmacies: india pharmacy – buy prescription drugs from india
[url=https://lukamodric-cz.biz]https://lukamodric-cz.biz[/url]
last news about luka modric
http://www.lukamodric-cz.biz
[url=https://lukamodriccz.biz]https://lukamodriccz.biz[/url]
last news about luka modric
http://www.lukamodriccz.biz
[url=https://cristianoronaldocz.biz]cristianoronaldocz.biz[/url]
last news about cristiano ronaldo
https://www.cristianoronaldocz.biz
[url=https://ronaldocristiano-cz.biz]ronaldocristiano-cz.biz[/url]
last news about ronaldo cristiano
https://ronaldocristiano-cz.biz
imiquimod pharmacy: online pharmacy doxycycline – mexican pharmacy lortab
Профессиональный сервисный центр по ремонту бытовой техники с выездом на дом.
Мы предлагаем:сервис центры бытовой техники новосибирск
Наши мастера оперативно устранят неисправности вашего устройства в сервисе или с выездом на дом!
mexican online pharmacies prescription drugs [url=https://mexicopharmacy.cheap/#]mexican pharmaceuticals online[/url] mexican rx online
I always emailed this webpage post page to all my friends, because if like to read it then my friends
will too.
Профессиональный сервисный центр по ремонту видео техники а именно видеокамер.
Мы предлагаем: ремонт профессиональных видеокамер
Наши мастера оперативно устранят неисправности вашего устройства в сервисе или с выездом на дом!
Промокод Фонбет на сегодня https://macroclub.ru/glr/inc/aktualnuy_promokod_fonbet_pri_registracii.html
Для получения актуальных промокодов Фонбет на сегодня рекомендуется следить за обновлениями на официальном сайте букмекера или подписаться на рассылку новостей. Сегодняшние промокоды могут предоставлять различные виды бонусов, такие как бесплатные ставки, увеличение депозита или страхование ставок. Например, активный на сегодняшний день промокод ‘GIFT200’ позволяет новым пользователям получить бесплатную ставку до 15,000 рублей при регистрации. Актуальные промокоды часто меняются, поэтому важно регулярно проверять информацию для получения максимальной выгоды.
online pharmacy discount code 2018: wellbutrin people’s pharmacy – colcrys pharmacy
A good web site with interesting content, that’s what I need. Thank you for making this web site, and I will be visiting again. Do you do newsletters? I Can’t find it.
Если вы искали где отремонтировать сломаную технику, обратите внимание – профи услуги
вальцы гидравлические [url=http://www.stanki-a.ru ]вальцы гидравлические[/url] .
способы заработать в интернете [url=https://www.kak-zarabotat-v-internete11.ru]https://www.kak-zarabotat-v-internete11.ru[/url] .
This is a topic which is close to my heart… Many thanks! Where are your contact details though?
Very nice post. I just stumbled upon your blog and wanted to say that I’ve really enjoyed browsing your blog posts. In any case I’ll be subscribing to your rss feed and I hope you write again soon!
http://pharmbig24.com/# wedgewood pharmacy naltrexone
[url=https://luka-modric-cz.biz]http://www.luka-modric-cz.biz[/url]
last news about luka modric
http://www.luka-modric-cz.biz
mexican drugstore online [url=https://mexicopharmacy.cheap/#]mexican pharmaceuticals online[/url] п»їbest mexican online pharmacies
[url=https://modric-luka-cz.biz]modric-luka-cz.biz[/url]
last news about modric luka
https://modric-luka-cz.biz
Thank you for the good writeup It in fact was a amusement account it Look advanced to far added agreeable from you However how could we communicate
Если вы искали где отремонтировать сломаную технику, обратите внимание – ремонт бытовой техники
Qu’est-ce que la strategie de jeu?
La strategie de jeu est un algorithme d’action que le joueur doit suivre en faisant un pari. Les actions peuvent inclure la taille du pari, le montant des cotes, la duree de la serie de Paris.1xbet промокод за регистрацию L’objectif principal de toute strategie est d’obtenir des gains qui seront en mesure de compenser toutes les depenses precedentes.
娛樂城推薦
娛樂城推薦與優惠詳解
在現今的娛樂世界中,線上娛樂城已成為眾多玩家的首選。無論是喜歡真人遊戲、老虎機還是體育賽事,每個玩家都能在娛樂城中找到自己的樂趣。以下是一些熱門的娛樂城及其優惠活動,幫助您在選擇娛樂平台時做出明智的決定。
各大熱門娛樂城介紹
1. 富遊娛樂城
富遊娛樂城以其豐富的遊戲選擇和慷慨的優惠活動吸引了大量玩家。新會員只需註冊即可免費獲得體驗金 $168,無需儲值即可輕鬆試玩。此外,富遊娛樂城還提供首存禮金 100% 獎勵,最高可領取 $1000。
2. AT99娛樂城
AT99娛樂城以高品質的遊戲體驗和優秀的客戶服務聞名。該平台提供各種老虎機和真人遊戲,並定期推出新遊戲,讓玩家保持新鮮感。
3. BCR娛樂城
BCR娛樂城是一個新興的平台,專注於提供豐富的體育賽事投注選項。無論是足球、籃球還是其他體育賽事,BCR都能為玩家提供即時的投注體驗。
熱門遊戲推薦
WM真人視訊百家樂
WM真人視訊百家樂是許多玩家的首選,該遊戲提供了真實的賭場體驗,並且玩法簡單,容易上手。
戰神賽特老虎機
戰神賽特老虎機以其獨特的主題和豐富的獎勵機制,成為老虎機愛好者的最愛。該遊戲結合了古代戰神的故事背景,讓玩家在遊戲過程中感受到無窮的樂趣。
最新優惠活動
富遊娛樂城註冊送體驗金
富遊娛樂城新會員獨享 $168 體驗金,無需儲值即可享受全場遊戲,讓您無壓力地體驗不同遊戲的魅力。
VIP 日日返水無上限
富遊娛樂城為 VIP 會員提供無上限的返水優惠,最高可達 0.7%。此活動讓玩家在遊戲的同時,還能享受額外的回饋。
結論
選擇合適的娛樂城不僅能為您的遊戲體驗增色不少,還能通過各種優惠活動獲得更多的利益。無論是新會員還是資深玩家,都能在這些推薦的娛樂城中找到適合自己的遊戲和活動。立即註冊並體驗這些優質娛樂平台,享受無限的遊戲樂趣!
best india pharmacy: online shopping pharmacy india – best online pharmacy india
[url=https://sonheungmincz.biz]https://www.sonheungmincz.biz[/url]
last news about son heung min
http://sonheungmincz.biz
[url=https://sonheungmin-cz.biz]sonheungmin-cz.biz[/url]
last news about son heung min
http://www.sonheungmin-cz.biz
娛樂城推薦
娛樂城推薦與優惠詳解
在現今的娛樂世界中,線上娛樂城已成為眾多玩家的首選。無論是喜歡真人遊戲、老虎機還是體育賽事,每個玩家都能在娛樂城中找到自己的樂趣。以下是一些熱門的娛樂城及其優惠活動,幫助您在選擇娛樂平台時做出明智的決定。
各大熱門娛樂城介紹
1. 富遊娛樂城
富遊娛樂城以其豐富的遊戲選擇和慷慨的優惠活動吸引了大量玩家。新會員只需註冊即可免費獲得體驗金 $168,無需儲值即可輕鬆試玩。此外,富遊娛樂城還提供首存禮金 100% 獎勵,最高可領取 $1000。
2. AT99娛樂城
AT99娛樂城以高品質的遊戲體驗和優秀的客戶服務聞名。該平台提供各種老虎機和真人遊戲,並定期推出新遊戲,讓玩家保持新鮮感。
3. BCR娛樂城
BCR娛樂城是一個新興的平台,專注於提供豐富的體育賽事投注選項。無論是足球、籃球還是其他體育賽事,BCR都能為玩家提供即時的投注體驗。
熱門遊戲推薦
WM真人視訊百家樂
WM真人視訊百家樂是許多玩家的首選,該遊戲提供了真實的賭場體驗,並且玩法簡單,容易上手。
戰神賽特老虎機
戰神賽特老虎機以其獨特的主題和豐富的獎勵機制,成為老虎機愛好者的最愛。該遊戲結合了古代戰神的故事背景,讓玩家在遊戲過程中感受到無窮的樂趣。
最新優惠活動
富遊娛樂城註冊送體驗金
富遊娛樂城新會員獨享 $168 體驗金,無需儲值即可享受全場遊戲,讓您無壓力地體驗不同遊戲的魅力。
VIP 日日返水無上限
富遊娛樂城為 VIP 會員提供無上限的返水優惠,最高可達 0.7%。此活動讓玩家在遊戲的同時,還能享受額外的回饋。
結論
選擇合適的娛樂城不僅能為您的遊戲體驗增色不少,還能通過各種優惠活動獲得更多的利益。無論是新會員還是資深玩家,都能在這些推薦的娛樂城中找到適合自己的遊戲和活動。立即註冊並體驗這些優質娛樂平台,享受無限的遊戲樂趣!
[url=https://ronaldo-cristiano-cz.biz]www.ronaldo-cristiano-cz.biz[/url]
last news about robert lewandowski
http://ronaldo-cristiano-cz.biz
[url=https://robertlewandowskicz.biz]www.robertlewandowskicz.biz[/url]
last news about robert lewandowski
http://www.robertlewandowskicz.biz
[url=https://heungmin-son-cz.biz]heungmin-son-cz.biz[/url]
last news about heung min son
http://heungmin-son-cz.biz
Профессиональный сервисный центр по ремонту видео техники а именно видеокамер.
Мы предлагаем: ремонт веб-камеры
Наши мастера оперативно устранят неисправности вашего устройства в сервисе или с выездом на дом!
Online medicine home delivery [url=https://indianpharmacy.company/#]best online pharmacy india[/url] cheapest online pharmacy india
Профессиональный сервисный центр по ремонту бытовой техники с выездом на дом.
Мы предлагаем: сервисные центры по ремонту техники в москве
Наши мастера оперативно устранят неисправности вашего устройства в сервисе или с выездом на дом!
Если вы искали где отремонтировать сломаную технику, обратите внимание – ремонт цифровой техники нижний новгород
https://pharmbig24.com/# propecia pharmacy2u
Great! Thank you so much for sharing this. I can’t wait to use it.
Если вы искали где отремонтировать сломаную технику, обратите внимание – профи тех сервис красноярск
De plus l’avantage premier d’acheter des cartes cadeau est que le montant est directement crédité sur son compte ebuyclub.
[url=https://son-heung-min-cz.biz]https://son-heung-min-cz.biz[/url]
last news about son heung min
son-heung-min-cz.biz
proscar online pharmacy [url=https://pharmbig24.online/#]prednisone pharmacy prices[/url] target pharmacy prednisolone
mostbetindia [url=http://www.casino.mostbet-aviator.com.az]http://www.casino.mostbet-aviator.com.az[/url] mbappe photoshop casino mostbet aviator .
Если вы искали где отремонтировать сломаную технику, обратите внимание – ремонт бытовой техники
Comment puis-je gagner des points 1хбет промокод на день рождения?
Dans le bookmaker 1xbet en tant qu’encouragement des clients pour leur participation active au processus de jeu, ils fournissent des points promotionnels dans le cadre du programme de fidelite. Vous pouvez obtenir des points pour les Paris sportifs reguliers, Express, pour la reconstitution reguliere du compte et la participation aux actions du bookmaker.
Online medicine order: best online pharmacy india – reputable indian pharmacies
Профессиональный сервисный центр по ремонту бытовой техники с выездом на дом.
Мы предлагаем: сервис центры бытовой техники москва
Наши мастера оперативно устранят неисправности вашего устройства в сервисе или с выездом на дом!
[url=https://robertlewandowski-cz.biz]http://www.robertlewandowski-cz.biz[/url]
last news about robert lewandowski
http://www.robertlewandowski-cz.biz
http://mexicopharmacy.cheap/# mexican rx online
Если вы искали где отремонтировать сломаную технику, обратите внимание – профи ремонт
Профессиональный сервисный центр по ремонту бытовой техники с выездом на дом.
Мы предлагаем: ремонт бытовой техники в москве
Наши мастера оперативно устранят неисправности вашего устройства в сервисе или с выездом на дом!
purple pharmacy mexico price list [url=http://mexicopharmacy.cheap/#]mexico drug stores pharmacies[/url] mexican border pharmacies shipping to usa
бизнес идеи для малого бизнеса [url=www.biznes-idei11.ru/]www.biznes-idei11.ru/[/url] .
поролон мебельный в розницу [url=www.porolon-mebelnyj.ru]www.porolon-mebelnyj.ru[/url] .
идеи для бизнеса [url=https://www.biznes-idei12.ru]идеи для бизнеса[/url] .
mexican border pharmacies shipping to usa: mexican mail order pharmacies – mexican pharmaceuticals online
[url=https://lewandowskirobert-cz.biz]https://www.lewandowskirobert-cz.biz[/url]
last news about lewandowski robert
lewandowskirobert-cz.biz
[url=https://antoine-griezmann-cz.biz]https://antoine-griezmann-cz.biz[/url]
last news about antoine griezmann
http://www.antoine-griezmann-cz.biz
[url=https://antoinegriezmanncz.biz]https://www.antoinegriezmanncz.biz[/url]
last news about antoine griezmann
http://www.antoinegriezmanncz.biz
[url=https://griezmannantoine-cz.biz]https://www.griezmannantoine-cz.biz[/url]
last news about griezmann antoine
http://griezmannantoine-cz.biz
Профессиональный сервисный центр по ремонту стиральных машин с выездом на дом по Москве.
Мы предлагаем: москва ремонт стиральных машин
Наши мастера оперативно устранят неисправности вашего устройства в сервисе или с выездом на дом!
Профессиональный сервисный центр по ремонту бытовой техники с выездом на дом.
Мы предлагаем: сервис центры бытовой техники казань
Наши мастера оперативно устранят неисправности вашего устройства в сервисе или с выездом на дом!
I wish I could craft such articles as this. Thank you very much.
You appear to know so much about this, and I see you’re a published author. Thanks
Very nice blog post. I absolutely appreciate this website. Thanks!
top 10 online pharmacy in india: online pre pharmacy programs – pharmacy rx one viagra
Если вы искали где отремонтировать сломаную технику, обратите внимание – профи услуги
[url=https://robert-lewandowski-cz.biz]robert-lewandowski-cz.biz[/url]
last news about robert lewandowski
http://www.robert-lewandowski-cz.biz
1xbet актуальный промокод
Promocodes for 1xBet unlock various bonuses, including free bets, deposit matches, and free spins. These codes are often shared through promotions, affiliate sites, or social media and can be entered during registration or deposit.
Your style is unique compared to other folks I’ve read stuff from. Many thanks for posting when you have the opportunity, Guess I will just bookmark this page.
benpark.org
http://pharmbig24.com/# Lotrisone
online pharmacy usa viagra: percocet prices pharmacy – hy-vee pharmacy
target88
target88
Hi i think that i saw you visited my web site thus i came to Return the favore I am attempting to find things to improve my web siteI suppose its ok to use some of your ideas
We’re a group of volunteers and opening a new scheme in our community.
Your website offered us with valuable information to work
on. You have performed an impressive task and our entire neighborhood can be grateful to you.
It’s hard to find experienced people for this subject, but you sound like you know what you’re talking about! Thanks
best online pharmacy india [url=https://indianpharmacy.company/#]india pharmacy mail order[/url] top online pharmacy india
Пеларгонии видовые: прекрасный решение для вашего квартиры и участка
Если вы подбираете цветы, которые будут удивлять тебя своей красотой и благоуханием, при этом не запрашивая сложного обслуживания, разновидности герани — превосходный вариант. Эти растения наделены уникальными достоинствами, которые делают их топовыми среди декоративных растений.
Почему элитные герани?
Неприхотливость и простота в содержании
Пеларгонии не нуждаются в особых требований для роста и без проблем адаптируются к многим климатам. Они замечательно чувствуют себя как в помещении, так и на открытом воздухе. Не беспокойтесь о капризных цветах — герани требуется лишь поливать по мере исчезновения влаги земли и получать удовольствие от их процветанием.
Яркие и различные цвета
Каждый вид гераней имеет свои особенные цвета и внешность. Разновидности, к примеру, Ю Полонез, впечатляют яркими цветами и выразительными бутонами. Это растения, которые сразу притягивают взоры и вносят яркие подчеркивания в любом окружении.
Нежный аромат, придающий комфорт
Пеларгонии не лишь украшают жилище — они наполняют его легким, незаметным запахом. Этот природный благоухание помогает сформировать ощущение комфорта и уюта, а также функционирует как естественный отпугиватель для насекомых.
Продолжительное цветение
Сортовые герани продолжают восхищать вид своим цветением в течение нескольких недель. Ты будешь радоваться их процветанием с начала лета и до холодов осени. Такое длительное период цветения — редкое свойство среди декоративных цветов.
Прекрасный решение для каждого места
Пеларгонии многофункциональны — их желательно разводить как в вазонах на оконных рамах, так и в саду. Компактные кустики, включая ЮВ Кардинал, прекрасно смотрятся в украшенных вазонах, а разновидности, как Survivor idols Rosalinda, превратятся в дополнением участка.
Зачем необходимо остановиться на обязательно герани?
Этих цветы — не только декоративный элемент декора. Они значительно выделяются по сравнению с других видов благодаря своей легкости в уходе, красоте и продолжительному процветанию. Их живописные цвета формируют особенную среду, будь то в помещении или на открытой территории. Пеларгонии — это прекрасный гармония красоты и удобства.
Выбирайте герани — создайте вокруг себя эстетику без ненужных хлопот!
[url=https://bernardo-silva-cz.biz/]www.bernardo-silva-cz.biz[/url]
last news about bernardo silva
http://bernardo-silva-cz.biz
[url=https://griezmann-antoine-cz.biz]http://griezmann-antoine-cz.biz[/url]
last news about griezmann antoine
https://griezmann-antoine-cz.biz
Профессиональный сервисный центр по ремонту стиральных машин с выездом на дом по Москве.
Мы предлагаем: москва ремонт стиральных машин
Наши мастера оперативно устранят неисправности вашего устройства в сервисе или с выездом на дом!
mexican drugstore online: medication from mexico pharmacy – medicine in mexico pharmacies
Профессиональный сервисный центр по ремонту бытовой техники с выездом на дом.
Мы предлагаем: ремонт крупногабаритной техники в казани
Наши мастера оперативно устранят неисправности вашего устройства в сервисе или с выездом на дом!
Если вы искали где отремонтировать сломаную технику, обратите внимание – ремонт бытовой техники
[url=https://antoinegriezmann-cz.biz]http://antoinegriezmann-cz.biz[/url]
last news about antoine griezmann
http://www.antoinegriezmann-cz.biz
грунт для пересадки растений [url=https://dachnik18.ru/]dachnik18.ru[/url] .
https://pharmbig24.com/# usa online pharmacy
Way cool! Some extremely valid points! I appreciate you penning this post and also the rest of the site is extremely good.
buying prescription drugs in mexico online [url=https://mexicopharmacy.cheap/#]medication from mexico pharmacy[/url] buying from online mexican pharmacy
1xBet offre precisement cela et vos bonus peuvent etre maximises en utilisant le 1xBet Benin 2024. Consultez simplement ci-dessous pour decouvrir ce qui vous attend en tant que nouveau client sur ce site de paris. Grace a ces connaissances, il est tout a fait logique de s’attendre a une serie de bonus de bienvenue attrayants pour les nouveaux joueurs provenant d’autres pays. Voici quelques exemples de ces pays : Burkina Faso, Ghana, Ouganda, Zambie, Cameroun, Senegal, Benin, Congo, Guinee, Cote d’Ivoire, Togo, Mali, etc.
The next time I read a blog, I hope that it does not fail me just as much as this one. After all, I know it was my choice to read, however I truly thought you’d have something interesting to talk about. All I hear is a bunch of complaining about something you could possibly fix if you were not too busy seeking attention.
indianpharmacy com: Online medicine home delivery – best online pharmacy india
blackpanth
Профессиональный сервисный центр по ремонту бытовой техники с выездом на дом.
Мы предлагаем: сервис центры бытовой техники москва
Наши мастера оперативно устранят неисправности вашего устройства в сервисе или с выездом на дом!
[url=https://bernardosilva-cz.biz]http://bernardosilva-cz.biz[/url]
last news about bernardo silva
http://www.bernardosilva-cz.biz
1xBet
One x Bet promo code is another variant referring to the 1xBet promo code. These codes are used to unlock bonuses on the 1xBet platform, enhancing the betting experience with free bets, deposit matches, or free spins.
mexican pharmaceuticals online [url=https://mexicopharmacy.cheap/#]mexico pharmacies prescription drugs[/url] buying prescription drugs in mexico
Если вы искали где отремонтировать сломаную технику, обратите внимание – сервисный центр в ростове на дону
Если вы искали где отремонтировать сломаную технику, обратите внимание – ремонт техники в перми
https://mexicopharmacy.cheap/# mexican online pharmacies prescription drugs
reputable indian pharmacies: cheapest online pharmacy india – cheapest online pharmacy india
After I originally left a comment I seem to have clicked on the -Notify me when new comments are added- checkbox and from now on every time a comment is added I recieve four emails with the exact same comment. Perhaps there is a way you can remove me from that service? Appreciate it.
Металлообрабатывающие станки [url=http://stanki-a.ru ]Металлообрабатывающие станки[/url] .
Вывод из запоя в Алматы [url=https://fizioterapijakeskic.com]Вывод из запоя в Алматы [/url] .
[url=https://lionel-messi-cz.biz]http://www.lionel-messi-cz.biz[/url]
last news about lionel messi
http://lionel-messi-cz.biz
[url=https://lionelmessi-cz.biz]https://www.lionelmessi-cz.biz[/url]
last news about lionel messi
https://www.lionelmessi-cz.biz
watch instagram stories [url=https://www.isinstafree.com]watch instagram stories[/url] .
[url=https://messi-lionel-cz.biz]www.messi-lionel-cz.biz[/url]
last news about messi lionel
https://www.messi-lionel-cz.biz
[url=https://kevin-de-bruyne-cz.biz]https://www.kevin-de-bruyne-cz.biz[/url]
last news about kevin de bruyne
http://kevin-de-bruyne-cz.biz
п»їlegitimate online pharmacies india: india pharmacy – best online pharmacy india
I like it when folks get together and share opinions. Great website, stick with it.
indian pharmacies safe [url=https://indianpharmacy.company/#]top online pharmacy india[/url] indianpharmacy com
Профессиональный сервисный центр по ремонту игровых консолей Sony Playstation, Xbox, PSP Vita с выездом на дом по Москве.
Мы предлагаем: ремонт игровых приставок
Наши мастера оперативно устранят неисправности вашего устройства в сервисе или с выездом на дом!
Enregistrez-vous en utilisant le 1xBet Cameroun afin de profiter d’une offre exclusive de bonus de 100% jusqu’a 130$ sur les paris sportifs gratuits. Pour beneficier de cette offre de pari gratuit bonifiee, vous devrez placer 5 paris sur des accumulateurs dans les 30 jours. Il existe diverses strategies pour les paris combines, mais si vous souhaitez gagner et obtenir des paris gratuits, nous vous recommandons de privilegier des selections de cotes plus courtes et de vous concentrer sur des paris combines surs pour commencer.
Профессиональный сервисный центр по ремонту компьютерных видеокарт по Москве.
Мы предлагаем: [url=remont-videokart-gar.ru]сколько стоит ремонт видеокарты[/url]
Наши мастера оперативно устранят неисправности вашего устройства в сервисе или с выездом на дом!
on line pharmacy: steroids online pharmacy – online pharmacy percocet reviews
May I simply say what a relief to discover a person that genuinely knows what they’re discussing on the net. You definitely understand how to bring a problem to light and make it important. More and more people really need to read this and understand this side of the story. I was surprised you are not more popular given that you certainly possess the gift.
These stories are so important.
target88
target88
I don’t normally comment on blogs.. But nice post! I just bookmarked your site
Если вы искали где отремонтировать сломаную технику, обратите внимание – ремонт бытовой техники в ростове на дону
lewandowski eleven sports [url=https://www.lewandowski.com.az]https://www.lewandowski.com.az/[/url] fc barcelona messi https://lewandowski.com.az/ .
[url=https://silva-bernardo-cz.biz]http://www.silva-bernardo-cz.biz[/url]
last news about silva bernardo
https://silva-bernardo-cz.biz
[url=https://bernardosilvacz.biz]http://bernardosilvacz.biz[/url]
last news about bernardo silva
https://www.bernardosilvacz.biz
[url=https://messilionelcz.biz]http://messilionelcz.biz[/url]
last news about messi lionel
http://www.messilionelcz.biz
bystolic online pharmacy [url=https://pharmbig24.online/#]cialis american pharmacy[/url] doxepin pharmacy
[url=https://lionelmessicz.biz]www.lionelmessicz.biz[/url]
last news about lionel messi
https://www.lionelmessicz.biz
I couldn’t resist commenting. Well written!
Профессиональный сервисный центр по ремонту игровых консолей Sony Playstation, Xbox, PSP Vita с выездом на дом по Москве.
Мы предлагаем: ремонт игровых консолей
Наши мастера оперативно устранят неисправности вашего устройства в сервисе или с выездом на дом!
[url=https://mohamedsalahcz.biz]https://mohamedsalahcz.biz[/url]
last news about mohamed salah
http://mohamedsalahcz.biz
[url=https://de-bruyne-cz.biz]http://www.de-bruyne-cz.biz[/url]
last news about de bruyne
de-bruyne-cz.biz
[url=https://salahmohamedcz.biz]http://www.salahmohamedcz.biz[/url]
last news about salah mohamed
https://www.salahmohamedcz.biz
[url=https://kevindebruynecz.biz]www.kevindebruynecz.biz[/url]
last news about kevin debruyne
http://www.kevindebruynecz.biz
Hello! I just wish to offer you a big thumbs up for your excellent information you have right here on this post. I am returning to your website for more soon.
Unlock Forex Success with Forex Signals Telegram! Ready to elevate your Forex trading game?
Dive into the Forex Signals Telegram channel today! Why choose us?
Our channel offers real-time market insights, expert trade ideas, and high-accuracy Forex signals, all backed by
comprehensive analysis including Macro-Fundamental and Technical
perspectives. Our team of seasoned traders uses advanced techniques
like Price Action Analysis, Elliott Wave Theory, and Classic Patterns to deliver precise and profitable signals straight to your
phone. Join the largest FREE Telegram Forex signals group
and experience unparalleled trading success like never before!
бизнес-идеи [url=http://biznes-idei13.ru/]бизнес-идеи[/url] .
There is a lot of misunderstanding about these issues today. Your material helps explain things.
Профессиональный сервисный центр по ремонту фототехники в Москве.
Мы предлагаем: ремонт фотовспышек с гарантией
Наши мастера оперативно устранят неисправности вашего устройства в сервисе или с выездом на дом!
Подробнее на сайте сервисного центра remont-vspyshek-realm.ru
casibom guncel giris [url=https://casibom.auction/#]casibom giris adresi[/url] casibom
Профессиональный сервисный центр по ремонту компьютероной техники в Москве.
Мы предлагаем: ремонт компютеров
Наши мастера оперативно устранят неисправности вашего устройства в сервисе или с выездом на дом!
Профессиональный сервисный центр по ремонту компьютерных видеокарт по Москве.
Мы предлагаем: [url=remont-videokart-gar.ru]ремонт видеокарты[/url]
Наши мастера оперативно устранят неисправности вашего устройства в сервисе или с выездом на дом!
straz bet: starzbet – straz bet
betine guncel giris [url=https://betine.online/#]betine guncel[/url] betine guncel giris
[url=https://kevindebruyne-cz.biz]http://kevindebruyne-cz.biz[/url]
last news about kevin debruyne
https://kevindebruyne-cz.biz
[url=https://mohamed-salah-cz.biz]http://www.mohamed-salah-cz.biz[/url]
last news about mohamed salah
http://mohamed-salah-cz.biz
Can I simply just say what a comfort to discover someone that really knows what they are discussing online. You certainly understand how to bring a problem to light and make it important. More people have to read this and understand this side of the story. It’s surprising you’re not more popular because you certainly have the gift.
Профессиональный сервисный центр по ремонту фото техники от зеркальных до цифровых фотоаппаратов.
Мы предлагаем: ремонт балласта проектора
Наши мастера оперативно устранят неисправности вашего устройства в сервисе или с выездом на дом!
straz bet [url=https://starzbet.shop/#]starzbet giris[/url] starzbet
эскорт услуги моделей москва эскорт услуга москве
эскорт услуги москва гей эскорт услуги анкета москва
gates of olympus turkce: gates of olympus oyna – gates of olympus demo turkce oyna
gates of olympus demo [url=https://gatesofolympusoyna.online/#]gates of olympus demo turkce oyna[/url] gates of olympus demo oyna
https://betine.online/# betine com guncel giris
гей услуги гей эскорт в москве эскорт услуг девушек в москве
This is a topic that is near to my heart… Thank you! Exactly where are your contact details though?
эскорт услуга в москве девушками эскорт услуги москва номера
starz bet giris [url=https://starzbet.shop/#]straz bet[/url] starzbet giris
You write Formidable articles, keep up good work.
order mobic 7.5mg pill – toradol order online toradol tablet
starzbet guncel giris: starzbet giris – straz bet
casibom guncel giris [url=http://casibom.auction/#]casibom giris[/url] casibom giris adresi
You write Formidable articles, keep up good work.
It’s hard to find experienced people for this subject, however, you seem like you know what you’re talking about! Thanks
[url=https://vinicius-junior-cz.biz]https://vinicius-junior-cz.biz[/url]
last news about vinicius junior
https://www.vinicius-junior-cz.biz
девушки для эскорт услуг москва эскорт услуга вакансии в москве
модель эскорт услуги москва мужчины эскорт услуги москва
[url=https://kevin-debruyne-cz.biz/]http://www.kevin-debruyne-cz.biz[/url]
last news about kevin debruyne
http://www.kevin-debruyne-cz.biz
Друзья, если планируете обновить ванную комнату, советую обратить внимание на один интернет-магазин раковин и ванн. У них действительно большой ассортимент товаров от ведущих производителей. Можно найти всё: от простых моделей до эксклюзивных дизайнерских решений.
Я искал умывальник для ванной комнаты, и они предложили несколько вариантов по хорошей цене. Качество продукции на высоком уровне, всё сертифицировано. Порадовало и то, что они предлагают профессиональные консультации и услуги по установке. Доставка была быстрой, всё пришло в целости и сохранности. Отличный магазин с хорошим сервисом!
Профессиональный сервисный центр по ремонту компьютерных блоков питания в Москве.
Мы предлагаем: ремонт блоков питания москва
Наши мастера оперативно устранят неисправности вашего устройства в сервисе или с выездом на дом!
Right here is the perfect site for anyone who would like to understand this topic. You understand a whole lot its almost hard to argue with you (not that I personally will need to…HaHa). You certainly put a brand new spin on a topic that has been written about for decades. Great stuff, just great.
Онлайн-казино Kometa: Идеальный Шанс для Виртуальных Игр
В мире онлайн-казино Казино Kometa завоевало популярность благодаря разнообразию слотов, выгодным акциям и первоклассному сервису. Эта система привлекает интерес пользователей по всему миру своими уникальными акциями и частыми событиями. В представленной описании мы обсудим, почему Казино Kometa считается высоко оцениваемой игровых площадок.
Плюсы Kometa
Основным аспектом, выделяющих Kometa Casino, является ориентация на удовольствие игроков. Система предоставляет более 1000 слотов, где любой найдет что-то по душе. Это могут быть как классические игры, так и новые варианты с уникальными возможностями. Бонусом является то, что Kometa Casino предлагает 24/7 поддержку пользователей, создавая комфортное и защищенное окружение.
Главные параметры Казино Kometa:
Год основания: 2024
Сертификация: Curacao
Ассортимент: Огромное количество
Техподдержка: 24/7 чат и email
Мобильный доступ: Имеется
Методы оплаты: Mastercard
Безопасность: Защита данных
Начальные бонусы
Одним из главных плюсов Kometa признаны щедрые стартовые предложения для новых игроков. После создания аккаунта пользователи имеют право на к уникальным бонусам, что позволяет стартовать с минимальными рисками. Эти промо гарантируют выгодные шансы для начинающих, предоставляя шанс улучшить свои шансы на победу с самого первого захода.
Широкий ассортимент игр
Kometa предлагает большое количество слотов на все предпочтения. Клиенты могут играть классическими слотами, настольными играми, а также играми с живыми дилерами. Благодаря высокому качеству визуальных эффектов и звуковому сопровождению, любой пользователь может максимально вникнуть в процесс игры.
Постоянные события и турниры
Для игроков система постоянно организует турниры и турниры с бонусами. Мероприятия организуются каждый месяц, придавая игровой опыт более захватывающим и насыщенным. Это позволяет игрокам не только получать удовольствие от игрой, но и выигрывать дополнительные бонусы и выигрыши.
Почему Kometa Casino?
Казино Kometa — это оптимальное объединение разнообразных игр, отличной поддержки и надежной системы. Платформа выделяется своим вниманием к пользователям и желанием совершенствовать игровой опыт. Независимо от уровня, все сможет выбрать в Казино Kometa нечто, что позволит его время на платформе интересным и приятным.
Присоединяйтесь к Kometa и играйте с удовольствием захватывающими ощущениями и интересными развлечениями каждый день!
[url=https://mohamedsalah-cz.biz]https://www.mohamedsalah-cz.biz[/url]
last news about mohamed salah
https://mohamedsalah-cz.biz
https://casibom.auction/# casibom giris
Кодироваться от алкоголя в Алматы [url=kodirovanie-ot-alkoholizma-v-almaty.kz]kodirovanie-ot-alkoholizma-v-almaty.kz[/url] .
Мой телефон перестал заряжаться, и я не знал, что делать. По совету друга обратился в этот сервисный центр. Мастера быстро нашли проблему и устранили её. Теперь мой телефон снова в строю! Рекомендую всем: ремонт телефонов срочно.
поиск телефона по номеру телефона [url=http://poisk-po-nomery.ru/]поиск телефона по номеру телефона[/url] .
эскорт женский услуги москва эскорт услуги москвы
эскорт услуг девушек в москве эскорт услуги анкета москва
сервис профи самара
[url=https://juniorvinicius-cz.biz]http://www.juniorvinicius-cz.biz[/url]
last news about junior vinicius
http://www.juniorvinicius-cz.biz
gates of olympus demo oyna: gate of olympus oyna – gates of olympus oyna
casibom guncel giris [url=http://casibom.auction/#]casibom guncel giris adresi[/url] casibom 158 giris
[url=https://junior-vinicius-cz.biz]http://junior-vinicius-cz.biz[/url]
last news about junior vinicius
http://www.junior-vinicius-cz.biz
[url=https://harrykanecz.biz]http://www.harrykanecz.biz[/url]
last news about harry kane
harrykanecz.biz
лаки джет игра лаки джет jet
[url=https://kaneharrycz.biz]kaneharrycz.biz[/url]
last news about kane harry
http://www.kaneharrycz.biz
<a href=”https://remont-kondicionerov-wik.ru”>сколько стоит ремонт кондиционера</a>
A fascinating discussion is definitely worth comment. I think that you ought to publish more on this issue, it might not be a taboo subject but typically people do not speak about such topics. To the next! Many thanks!
Hello There. I found your weblog using msn. That is an extremely smartly written article.
I will make sure to bookmark it and return to read more of your useful info.
Thank you for the post. I will certainly return.
I think that may be an interesting element, it made me assume a bit. Thanks for sparking my considering cap. On occasion I get so much in a rut that I simply really feel like a record.
лаки джет сигналы лаки джет сигналы
This site was… how do I say it? Relevant!! Finally I’ve found something that helped me. Many thanks.
gates of olympus slot: gates of olympus demo turkce – gates of olympus demo turkce
starzbet guvenilir mi [url=http://starzbet.shop/#]starzbet guncel giris[/url] starzbet giris
[url=https://harry-kane-cz.biz]harry-kane-cz.biz[/url]
last news about harry kane
http://www.harry-kane-cz.biz
https://betine.online/# betine
лазерный станок [url=www.stanki-a.ru]лазерный станок[/url] .
[url=https://viniciusjunior-cz.biz]www.viniciusjunior-cz.biz[/url]
last news about vinicius junior
https://viniciusjunior-cz.biz
[url=https://harrykane-cz.biz]harrykane-cz.biz[/url]
last news about harry kane
https://harrykane-cz.biz
[url=https://viniciusjuniorcz.biz]https://www.viniciusjuniorcz.biz[/url]
last news about vinicius junior
viniciusjuniorcz.biz
gates of olympus demo [url=https://gatesofolympusoyna.online/#]gates of olympus giris[/url] gates of olympus demo turkce oyna
himera search telegram himera searching bot
Your style is very unique compared to other folks I have read stuff from. Thanks for posting when you have the opportunity, Guess I’ll just book mark this blog.
I love what you guys are usually up too.
Such clever work and exposure! Keep up the excellent
works guys I’ve incorporated you guys to my blogroll.
casibom giris: casibom 158 giris – casibom guncel
casibom giris [url=http://casibom.auction/#]casibom[/url] casibom giris
Профессиональный сервисный центр по ремонту компьютероной техники в Москве.
Мы предлагаем: ремонт компьютеров москва
Наши мастера оперативно устранят неисправности вашего устройства в сервисе или с выездом на дом!
Good information. Lucky me I discovered your blog by chance (stumbleupon). I have bookmarked it for later!
vip эскорт услуги москва мужские эскорт услуги москва
Как поднять настроение другу с помощью смешного анекдота
starzbet guncel giris [url=https://starzbet.shop/#]starzbet guncel giris[/url] starzbet guncel giris
блекспрут https://dark-blacksprut.com
лаки джет официальный сайт лаки джет сигналы
I needed to thank you for this fantastic read!! I absolutely enjoyed every little bit of it. I have you bookmarked to look at new stuff you post…
http://starzbet.shop/# starzbet guvenilir mi
Les jeux avec un taux de redistribution plus élevé sont généralement plus favorables aux joueurs.
[url=https://kylian-mbappecz.biz]http://kylian-mbappecz.biz[/url]
last news about kylian mbappe
kylian-mbappecz.biz
Whoa a good deal of very good advice.
[url=https://mbappekyliancz.biz]http://mbappekyliancz.biz[/url]
last news about mbappe kylian
http://www.mbappekyliancz.biz
[url=https://kylian-mbappe-cz.biz]http://www.kylian-mbappe-cz.biz[/url]
last news about kylian mbappe
http://www.kylian-mbappe-cz.biz
блекспрут вход blacksprut ссылка
[url=https://mbappe-kylian-cz.biz]mbappe-kylian-cz.biz[/url]
last news about mbappe kylian
http://www.mbappe-kylian-cz.biz
farmacias online seguras en espaГ±a: farmacia online 24 horas – farmacia online envГo gratis
Профессиональный сервисный центр по ремонту камер видео наблюдения по Москве.
Мы предлагаем: ремонт камер наблюдения
Наши мастера оперативно устранят неисправности вашего устройства в сервисе или с выездом на дом!
Hello! Do you use Twitter? I’d like to follow you if that would be okay.
I’m undoubtedly enjoying your blog and look forward to new posts.
http://farmaciaeu.com/# farmacias online baratas
kometa casino рабочее зеркало
Онлайн-казино Kometa: Идеальный Шанс для Онлайн Развлечений
В сфере онлайн-казино Kometa завоевало известность благодаря разнообразию игр, привлекательным акциям и первоклассному обслуживанию. Эта платформа привлекает внимание пользователей по всему миру своими исключительными акциями и регулярными акциями. В представленной описании мы проанализируем, почему Kometa Casino является выдающейся игровых площадок.
Достоинства Казино Kometa
Главной чертой, выделяющих Казино Kometa, является ориентация на потребности пользователей. Сайт гарантирует свыше тысячи игр, где каждый сможет выбрать игру. Это могут быть привычные автоматы, и еще новые развлечения с уникальными функциями. Бонусом является то, что Kometa гарантирует постоянную помощь игроков, обеспечивая приятное и надежное среду.
Главные параметры Kometa:
Дата запуска: 2024
Разрешение: Curacao
Ассортимент: Огромное количество
Помощь: 24/7 чат и электронная почта
Мобильная версия: Да
Варианты платежей: Visa
Защита: Защита данных
Начальные бонусы
Одной из главных особенностей Kometa являются щедрые стартовые предложения для новичков. После входа на сайт игроки получают доступ к особым бонусам, чем могут начать игру с минимальными рисками. Эти промо предоставляют благоприятные условия для новичков, предоставляя шанс увеличить свои возможности выиграть с самого старта.
Огромный выбор игр
Kometa Casino предоставляет большое количество развлечений на любой вкус. Клиенты могут наслаждаться традиционными играми, настольными играми, а также реальными дилерами. Благодаря передовым технологиям визуального сопровождения и музыкальному фону, все может максимально вникнуть в развлечения.
Регулярные акции и мероприятия
Для всех пользователей система часто проводит события и конкурсы с ценными призами. Мероприятия организуются ежемесячно, что делает игровой процесс интересным и захватывающим. Это позволяет клиентам не только наслаждаться развлечениями, но и зарабатывать призы и призы.
Почему стоит выбрать
Казино Kometa — это идеальное сочетание множества развлечений, надежного сервиса и защищенной платформы. Сайт отличается своим вниманием к пользователям и желанием модернизировать опыт пользователей. Независимо от уровня, каждый сможет выбрать в Kometa нечто, что позволит его время на платформе интересным и удобным.
Вступайте в Казино Kometa и наслаждайтесь захватывающими ощущениями и увлекательными слотами всегда!
farmacias online seguras en espaГ±a: comprar cialis online seguro – farmacia barata
Вывод из запоя на дому в Казахстане [url=http://narcologiya-kazakhstan.kz/]Вывод из запоя на дому в Казахстане [/url] .
лаки джет jet лаки джет официальный сайт
курс юаня [url=https://www.kursy-valut-online.kz]https://www.kursy-valut-online.kz[/url] .
пинап уп [url=http://www.pin-up.prpc.ru]www.pin-up.prpc.ru[/url] izi казино официальный сайт https://pin-up.prpc.ru .
Профессиональный сервисный центр по ремонту бытовой техники с выездом на дом.
Мы предлагаем: сервис центры бытовой техники нижний новгород
Наши мастера оперативно устранят неисправности вашего устройства в сервисе или с выездом на дом!
пинап казино онлайн [url=http://www.pinup-kz.games-tv.ru/]www.pinup-kz.games-tv.ru[/url] онлайн казино с бонусом без первого депозита https://pinup-kz.games-tv.ru/ .
farmacias online seguras en espaГ±a [url=https://tadalafilo.bid/#]cialis 20 mg precio farmacia[/url] farmacia online barcelona
пин ап играть [url=https://www.pin-up-kz.belproc.ru]www.pin-up-kz.belproc.ru[/url] bonus casino online http://pin-up-kz.belproc.ru .
Ces jeux de hasard attirent un grand nombre de joueurs, à la recherche de divertissement et d’opportunités de gagner de l’argent.
Лечебно-оздоровительный массаж Ивантеевка по выгодным ценам. Стоимость процедуры, порядок проведения, запись на прием.
http://sildenafilo.men/# se puede comprar sildenafil sin receta
farmacia online barata y fiable
ООО «Кинематика»: Профессиональные разработки для производственной уравновешивания и проверки механизмов
Фирма «Кинематика» работает на разработке и внедрении прецизионных инструментов для уравновешивания и анализа устройств. Изделия фирмы эксплуатируется для обслуживания и ремонта многочисленных агрегатов, включая вентиляторы, мельницы, карданные валы, передачи крутящего момента и металлорежущие станки.
Главные изделия компании:
1. Арбаланс устройство — мобильный система вибродиагностики
Инструмент подходит для балансировки вращательных систем техники в заводской сборке в родных подшипниках. Прибор Арбаланс даёт точное выполнение сбалансированности с минимальными тратами. Основные его преимущества:
Автоматизированная система расчета: полностью автоматизирована.
Анализ спектра вибрации: находят дефекты.
Двойной канал измерения: даёт возможность фиксировать вибрации параллельно в двух плоскостях, сокращая время процесса.
Цена: 84 000 руб.
2. Балком-1А — портативный прибор балансировки
Модуль Балком-1А создан для балансировки вращательных механизмов в родных подшипниках. Отличительной чертой является простота использования и автоматический расчет. Также устройство оснащено:
Два канала измерения вибрации.
Аналитическая система для контроля состояния техники.
Цена: 73 тыс. руб.
3. Балансировочная система Балком-2 — прибор для измерений для балансировочных станков
Балком-2 эксплуатируется в измерительных станциях для оценки вибраций. Он гарантирует эффективность высокоточной балансировки систем и других механизмов в производстве.
Цена: от 90 тыс. руб. до 95000 рублей в зависимости от устройства.
4. Балком-4 — для балансировки в нескольких плоскостях составных валов
Система Балком-4 предназначен для балансировки карданов и эксплуатируется в индустриальных установках. Этот прибор обеспечивает высокую точность и точные измерения при уравновешивании в разных направлениях.
Цена: от 100 000 руб. до 126 000 руб..
Инновационные решения отслеживания и анализа
Фирма «Кинематика» также разрабатывает устройства для непрерывного мониторинга состояния оборудования. Эти приборы оснащены бесконтактными сенсорами для оценки колебаний и прочих параметров. Например, модуль Реконт помогает отслеживать механизмы редукторов по параметрам кинематической точности и скорости вращения.
Good post. I learn something new and challenging on sites I stumbleupon every day. It’s always exciting to read articles from other authors and practice a little something from their sites.
farmacias online seguras en espaГ±a: farmacias online seguras – farmacia online madrid
http://tadalafilo.bid/# farmacia online barcelona
балансировка металлургического оборудования
Предприятие «Кинематика»: Качественные решения для производственной уравновешивания и проверки промышленных устройств
Предприятие «Кинематика» фокусируется на разработке и изготовлении прецизионных устройств для сбалансированности и анализа промышленного оборудования. Товары компании применяется для ремонта и ремонта многих промышленных устройств, включая вентиляторы, шредеры, карданные валы, передаточные механизмы и металлорежущие станки.
Ключевые продукты компании:
1. Арбаланс устройство — мобильный система вибродиагностики
Прибор создан для уровновешивания механизмов агрегатов в вместе с подшипниками в штатных подшипниках. Арбаланс даёт отличные результаты уравновешивания с сокращёнными тратами. Главные достоинства:
Программа расчета: не нуждается в операторе.
Вибрационный график: выявляют дефекты.
Измерение по двум плоскостям: обеспечивает измерение вибрации параллельно в двух направлениях, повышая производительность процесса.
Цена: 84 тыс. руб.
2. Балансировочный прибор Балком-1А — малогабаритный вибродиагностический прибор
Прибор Балком-1А подходит для уравновешивания роторных систем в собственных подшипниках. Ключевым преимуществом является удобство эксплуатации и автоматизированный процесс расчета. Также устройство оснащено:
Измерение вибрации в двух каналах.
Анализ спектра вибраций для диагностики технического состояния оборудования.
Цена: 73000 рублей
3. Balcom-2 — измерительная система для станций балансировки
Прибор Балком-2 применяется в измерительных станциях для виброизмерений. Он даёт точность сбалансированности роторов и другого оборудования в производстве.
Цена: от 90 000 руб. до 95 тыс. руб. в зависимости от сборки.
4. Балком-4 — для многоплоскостной балансировки составных валов
Система Балком-4 применяется для балансировки составных карданных валов и используется в промышленных системах. Этот прибор гарантирует стабильные показатели и прецизионность при балансировке в нескольких плоскостях.
Цена: от 100 тыс. руб. до 126 тыс. руб..
Передовые системы мониторинга и проверки
Компания «Кинематика» также создает решения для непрерывной диагностики состояния оборудования. Эти системы используют бесконтактными сенсорами для контроля вибрации и других показателей. Например, модуль Реконт обеспечивает мониторинг состояние редукторов по точности движения и скорости вращения.
[url=https://kane-harry-cz.biz]kane-harry-cz.biz[/url]
last news about kane harry
http://www.kane-harry-cz.biz
farmacia online envГo gratis [url=https://farmaciaeu.com/#]farmacia online barata[/url] farmacia online espaГ±a envГo internacional
You’re so awesome! I do not think I’ve read through a single thing like this before. So good to find another person with some original thoughts on this topic. Really.. thanks for starting this up. This site is something that’s needed on the web, someone with some originality.
1xBet
1xBet offers specific promo codes for casino players that provide free spins, deposit bonuses, or cashback on losses. These codes can be used in the casino section of the site to enhance the gaming experience.
sildenafilo 100mg precio espaГ±a: viagra 100 mg precio en farmacias – viagra online cerca de toledo
Hello, I think your site might be having browser compatibility issues.
When I look at your blog in Ie, it looks fine but when opening in Internet Explorer,
it has some overlapping. I just wanted to give you a quick heads up!
Other then that, fantastic blog!
Профессиональный сервисный центр по ремонту бытовой техники с выездом на дом.
Мы предлагаем: сервисные центры по ремонту техники в перми
Наши мастера оперативно устранят неисправности вашего устройства в сервисе или с выездом на дом!
farmacias online seguras: Cialis precio – п»їfarmacia online espaГ±a
Профессиональный сервисный центр по ремонту кнаручных часов от советских до швейцарских в Москве.
Мы предлагаем: ремонт часов
Наши мастера оперативно устранят неисправности вашего устройства в сервисе или с выездом на дом!
Если вы искали где отремонтировать сломаную технику, обратите внимание – [url=https://tyumen.profi-teh-remont.ru]ремонт бытовой техники в тюмени[/url]
https://sildenafilo.men/# comprar viagra en espaГ±a envio urgente
farmacias online seguras: cialis en Espana sin receta contrareembolso – farmacia barata
Как улучшить настроение другу с помощью анекдота https://anekdotymemy.wordpress.com/2024/09/16/podnat-nastroenie/
[url=https://bellingham-jude-cz.biz]bellingham-jude-cz.biz[/url]
last news about bellingham jude
http://www.bellingham-jude-cz.biz
[url=https://bellinghamjude-cz.biz/]http://www.bellinghamjude-cz.biz[/url]
last news about bellingham jude
bellinghamjude-cz.biz
[url=https://judebellingham-cz.biz]http://www.judebellingham-cz.biz[/url]
last news about jude bellingham
judebellingham-cz.biz
4rabet promo code 2024: A promo code specifically for Indian players, offering bonuses like free bets, deposit matches, or other incentives tailored for the Indian market.
Les jeux de casino gratuits sur smartphone, tablette ou ordinateur sont l’un des meilleurs moyens de s’habituer au déroulement d’une partie et aux règles d’un jeu de casino en ligne.
[url=https://kylianmbappecz.biz]kylianmbappecz.biz[/url]
last news about kylian mbappe
http://www.kylianmbappecz.biz
Please let us know when you plan to publish your book!
farmacia en casa online descuento: comprar cialis online seguro opiniones – farmacias online seguras
http://tadalafilo.bid/# farmacias online baratas
farmacias online seguras en espaГ±a
https://farmaciaeu.com/# farmacias online seguras en espaГ±a
farmacias online seguras en espaГ±a: farmacia online madrid – farmacia online barata
[url=https://ekologiya.news161.ru]ekologiya.news161.ru[/url]
Экология Ростовской области
ekologiya.news161.ru
[url=https://pravosudie.news161.ru]арест[/url]
Правосудие Ростовской области
задержания
[url=https://zakony.news161.ru]законодательство[/url]
Законодательство Ростовской области
законодательство
[url=https://proletarsk.news161.ru]Пролетарский район[/url]
Новости Пролетарского района Ростовской области
http://proletarsk.news161.ru
free
Le jeu de casino peut être émotionnellement intense, surtout en cas de séries de pertes ou de gains importants.
I like reading through a post that will make people think. Also, thank you for allowing me to comment.
bon, oxygen 스픽 할인코드and nitrogen스픽 할인코드) and trace 스픽 할인코드(pho
This is the perfect webpage for anybody who wants to understand this topic. You understand a whole lot its almost hard to argue with you (not that I really would want to…HaHa). You certainly put a brand new spin on a subject that has been discussed for years. Great stuff, just great.
Профессиональный сервисный центр по ремонту парогенераторов в Москве.
Мы предлагаем: ремонт парогенератора
Наши мастера оперативно устранят неисправности вашего устройства в сервисе или с выездом на дом!
eneration ph에어텔otovoltaic t에어텔echnologies 에어텔call
Farmacie online sicure: Cialis generico recensioni – farmacia online senza ricetta
Если вы искали где отремонтировать сломаную технику, обратите внимание – тех профи
farmaci senza ricetta elenco: Farmacie online sicure – acquisto farmaci con ricetta
promo code 4rabet today: A promotional code that users can enter when signing up for 4rabet. It unlocks a welcome bonus, which could include free bets or deposit matches for new users.
http://tadalafilit.com/# acquistare farmaci senza ricetta
п»їFarmacia online migliore
Что такое мемы и как они появились
farmacia online senza ricetta [url=https://tadalafilit.com/#]Cialis generico farmacia[/url] Farmacie online sicure
He wrote: “괌렌트카I have no do괌렌트카ubt that thi괌렌트카s bo
save instagram stories [url=http://aniststories.com/]http://aniststories.com/[/url] .
comprare farmaci online all’estero: Cialis generico farmacia – comprare farmaci online all’estero
Thank you for your sharing. I am worried that I lack creative ideas. It is your article that makes me full of hope. Thank you. But, I have a question, can you help me?
[url=https://erling-haaland-cz.biz]erling-haaland-cz.biz[/url]
last news about erling haaland
http://erling-haaland-cz.biz
Saved as a favorite, I really like your web site.
This app has been updated by Apple to display
the Apple Watch app icon.
Профессиональный сервисный центр по ремонту бытовой техники с выездом на дом.
Мы предлагаем: сервис центры бытовой техники красноярск
Наши мастера оперативно устранят неисправности вашего устройства в сервисе или с выездом на дом!
I was suggested this website by my cousin. I am not sure whether this post is written by him as no one else know such detailed about my difficulty. You are wonderful! Thanks!
farmacia online piГ№ conveniente: Cialis generico controindicazioni – acquisto farmaci con ricetta
acquistare farmaci senza ricetta: Cialis generico farmacia – farmacie online autorizzate elenco
cyproheptadine pill – tizanidine over the counter cost tizanidine 2mg
comprare farmaci online con ricetta [url=https://tadalafilit.com/#]Cialis generico farmacia[/url] farmacie online autorizzate elenco
kometa войти
Онлайн-казино Kometa: Оптимальный Шанс для Онлайн Игр
В сфере виртуальных казино Kometa Casino приобрело известность благодаря разнообразию развлечений, выгодным акциям и отличному обслуживанию. Эта платформа захватывает интерес игроков во всех странах своими уникальными акциями и регулярными событиями. В данной обзоре мы рассмотрим, почему Kometa называется высоко оцениваемой игровых платформ.
Достоинства Казино Kometa
Главной чертой, отличающих Казино Kometa, является фокус на интересы пользователей. Платформа предлагает более 1000 игр, среди которых каждый откроет любимое развлечение. Это могут быть привычные игры, и еще инновационные развлечения с новаторскими возможностями. Бонусом является то, что Kometa Casino предлагает постоянную поддержку игроков, обеспечивая удобное и защищенное игровое пространство.
Ключевые особенности Kometa:
Год начала работы: 2024
Сертификация: Curacao
Выбор игр: Огромное количество
Поддержка: 24/7 онлайн-чат и email
Мобильный доступ: Да
Способы оплаты: Visa
Надежность: Защита данных
Приветственные бонусы
Одним из главных плюсов Казино Kometa признаны щедрые стартовые предложения для новичков. После входа на сайт игроки могут воспользоваться к особым промоакциям, чем могут стартовать с меньшими затратами. Эти промо предоставляют комфортные возможности для начинающих, предоставляя шанс улучшить свои успех с самого старта.
Широкий ассортимент игр
Kometa гарантирует большое количество слотов на любой вкус. Игроки могут играть привычными автоматами, настольными играми, а также живыми играми. Благодаря высокому качеству визуальных эффектов и музыкальному фону, каждый игрок может глубоко войти в игровой процесс.
Регулярные акции и мероприятия
Для игроков система регулярно предлагает события и турниры с бонусами. Турниры проводятся каждый месяц, что делает игровой опыт более захватывающим и увлекательным. Это дает возможность игрокам не только получать удовольствие от развлечениями, но и получать призы и награды.
Почему стоит выбрать
Kometa Casino — это превосходное соединение множества развлечений, качественного обслуживания и безопасной игровой среды. Платформа выделяется своим фокусом на клиентах и желанием модернизировать игровой опыт. Независимо от уровня, каждый сможет выбрать в Казино Kometa то, что сделает его время на платформе увлекательным и удобным.
Вступайте в Казино Kometa и наслаждайтесь яркими эмоциями и захватывающими играми каждый день!
https://farmaciait.men/# top farmacia online
acquisto farmaci con ricetta
le migliori pillole per l’erezione [url=https://sildenafilit.pro/#]viagra senza prescrizione[/url] kamagra senza ricetta in farmacia
acquisto farmaci con ricetta: Cialis generico prezzo – Farmacie online sicure
п»їFarmacia online migliore: Cialis generico 5 mg prezzo – acquisto farmaci con ricetta
[url=https://erlinghaaland-cz.biz]http://www.erlinghaaland-cz.biz[/url]
last news about erling haaland
http://www.erlinghaaland-cz.biz
[url=https://erlinghaalandcz.biz]http://www.erlinghaalandcz.biz[/url]
last news about erling haaland
http://erlinghaalandcz.biz
farmacia online [url=http://brufen.pro/#]BRUFEN 600 bustine prezzo[/url] acquistare farmaci senza ricetta
Профессиональный сервисный центр по ремонту бытовой техники с выездом на дом.
Мы предлагаем: сервисные центры по ремонту техники в красноярске
Наши мастера оперативно устранят неисправности вашего устройства в сервисе или с выездом на дом!
Смешные мемы в приложении
Всё шуточки
Fantastic piece of writing here1
Farmacie online sicure: Farmacie on line spedizione gratuita – Farmacie on line spedizione gratuita
farmacia online senza ricetta [url=https://farmaciait.men/#]farmacia online migliore[/url] farmacie online autorizzate elenco
порно милфы [url=http://www.admin4web.ru]порно милфы[/url] .
[url=https://judebellinghamcz.biz]http://judebellinghamcz.biz[/url]
last news about jude bellingham
http://judebellinghamcz.biz
http://tadalafilit.com/# farmacia online piГ№ conveniente
farmacie online autorizzate elenco
Если вы искали где отремонтировать сломаную технику, обратите внимание – техпрофи
I think this is one of the most vital information for me.
And i am glad reading your article. But want to remark on some general things, The web
site style is wonderful, the articles is really nice
: D. Good job, cheers
acquistare farmaci senza ricetta: Tadalafil generico migliore – Farmacia online piГ№ conveniente
farmacia online senza ricetta: Brufen 600 prezzo – farmacia online piГ№ conveniente
farmacie online autorizzate elenco [url=https://farmaciait.men/#]Farmacia online piu conveniente[/url] farmacie online affidabili
priligy 60 mg price It has been suggested that taking the dosage before bedtime lessens the side effects
قنوات الكابلات الكهربائية (المعدنية) يفخر مصنع إيليت بايب في العراق بتقديم قنوات الكابلات الكهربائية (المعدنية) ذات الجودة العالية، المصممة لتوفير قوة وحماية فائقة لأنظمة الأسلاك الكهربائية. تم تصميم قنواتنا المعدنية لتحمل الظروف القاسية، مما يوفر حماية قوية ضد الصدمات الميكانيكية والتداخل الكهرومغناطيسي. مثالية للتطبيقات الشديدة، هذه القنوات ضرورية لضمان سلامة وموثوقية التركيبات الكهربائية. كأحد الأسماء الرائدة في الصناعة، يتميز مصنع إيليت بايب بجودة عالية وموثوقية في إنتاج القنوات المعدنية التي تلبي أقسى المعايير. اكتشف المزيد على موقعنا: elitepipeiraq.com.
Replica Sneakers for Men ko900
replica shoes,Replica Sneakers bc257
Farmacia online piГ№ conveniente: Farmacia online migliore – farmacia online
Секреты выбора лучшего варианта для малыша
купить люльку для новорожденного [url=https://koljaska-ljulka.ru/]https://koljaska-ljulka.ru/[/url] .
http://tadalafilit.com/# farmacia online senza ricetta
farmacia online
[url=https://moussa-maregaar.biz]www.moussa-maregaar.biz[/url]
last news about moussa marega
http://www.moussa-maregaar.biz
Топ-5 материалов для дизайнерской отделки
купить строительный материал [url=https://stroitelnye-materialy-optom.ru/]https://stroitelnye-materialy-optom.ru/[/url] .
링블에서 블로그, 인수원 웨딩박람회스타그램 체험단 모집하수원 웨딩박람회세요!<
[url=https://moussa-marega-ar.biz]moussa-marega-ar.biz[/url]
last news about moussa marega
https://moussa-marega-ar.biz
It’s time for communities to rally.
[url=https://moussamaregaar.biz]www.moussamaregaar.biz[/url]
last news about moussa marega
https://moussamaregaar.biz
Just came from google to your website have to say thanks.
п»їFarmacia online migliore [url=https://tadalafilit.com/#]Cialis generico prezzo[/url] Farmacie on line spedizione gratuita
nổ hủ cityjili
JILI SLOT GAMES: Sự Lựa Chọn Hàng Đầu Cho Các Tín Đồ Casino Trực Tuyến
JILI Casino là một nhà phát hành game nổi tiếng với nhiều năm kinh nghiệm trong ngành công nghiệp giải trí trực tuyến. Tại JILI, chúng tôi cam kết mang đến cho người chơi những trải nghiệm độc đáo và đẳng cấp, thông qua việc đổi mới không ngừng và cải thiện chất lượng từng sản phẩm. Những giá trị cốt lõi của chúng tôi không chỉ dừng lại ở việc tạo ra các trò chơi xuất sắc, mà còn tập trung vào việc cung cấp các tính năng vượt trội để đáp ứng nhu cầu của người chơi trên toàn cầu.
Sự Đa Dạng Trong Các Trò Chơi Slot
JILI nổi tiếng với loạt trò chơi slot đa dạng và hấp dẫn. Từ các slot game cổ điển đến những trò chơi với giao diện hiện đại và tính năng độc đáo, JILI Slot luôn đem đến cho người chơi những phút giây giải trí tuyệt vời. Các trò chơi được thiết kế với đồ họa sống động, âm thanh chân thực và những vòng quay thú vị, đảm bảo rằng người chơi sẽ luôn bị cuốn hút.
Ưu Điểm Nổi Bật Của JILI Casino
Đổi mới và sáng tạo: Mỗi trò chơi tại JILI Casino đều mang đến sự mới mẻ với lối chơi hấp dẫn và giao diện bắt mắt.
Chất lượng cao: JILI không ngừng cải tiến để đảm bảo mỗi sản phẩm đều đạt chất lượng tốt nhất, từ trải nghiệm người chơi đến tính năng trò chơi.
Nền tảng đa dạng: JILI Casino cung cấp nhiều loại game khác nhau, từ slot, bắn cá đến các trò chơi truyền thống, phù hợp với mọi sở thích của người chơi.
Chương Trình Khuyến Mại JILI
JILI Casino không chỉ nổi bật với chất lượng game mà còn thu hút người chơi bởi các chương trình khuyến mại hấp dẫn. Người chơi có thể tham gia vào nhiều sự kiện, từ khuyến mãi nạp tiền, hoàn trả đến các chương trình tri ân dành riêng cho thành viên VIP. Những ưu đãi này không chỉ tăng cơ hội chiến thắng mà còn mang lại giá trị cộng thêm cho người chơi.
Nổ Hủ City Và Các Trò Chơi Hấp Dẫn Khác
JILI không chỉ có slot games mà còn cung cấp nhiều thể loại game đa dạng khác như bắn cá, bài và nhiều trò chơi giải trí khác. Nổi bật trong số đó là Nổ Hủ City – nơi người chơi có thể thử vận may và giành được những giải thưởng lớn. Sự kết hợp giữa lối chơi dễ hiểu và các tính năng độc đáo của Nổ Hủ City chắc chắn sẽ mang lại những khoảnh khắc giải trí đầy thú vị.
Tham Gia JILI Casino Ngay Hôm Nay
Với sự đa dạng về trò chơi, các tính năng vượt trội và những chương trình khuyến mại hấp dẫn, JILI Casino là sự lựa chọn không thể bỏ qua cho những ai yêu thích trò chơi trực tuyến. Hãy truy cập trang web chính thức của JILI ngay hôm nay để trải nghiệm thế giới giải trí không giới hạn và giành lấy những phần thưởng hấp dẫn từ các trò chơi của chúng tôi!
Что такое анекдот? Почему мы любим смешные анекдоты? Как они появились? Читайте об этом
статью
louis vuitton outlet pv172,louis vuitton outlet,louis vuitton outlet lf799
instagram profile [url=https://anonstoryinst.com/]instagram profile[/url] .
Профессиональный сервисный центр по ремонту бытовой техники с выездом на дом.
Мы предлагаем:сервисные центры в ростове на дону
Наши мастера оперативно устранят неисправности вашего устройства в сервисе или с выездом на дом!
[url=https://remont-kondicionerov-wik.ru]ремонт кондиционеров в москве[/url]
. 제 주변을 보더라도매니챗 업체에 일임하시는 분매니챗들이 대부분 입니다.<
http://sildenafilit.pro/# viagra generico recensioni
migliori farmacie online 2024
Что такое анекдот? Почему мы любим смешные анекдоты? Как они появились? Читайте об этом
статью
Самые смешные анекдоты на нашем сайте.
farmacia online [url=http://farmaciait.men/#]acquisto farmaci con ricetta[/url] farmacia online
farmacie online autorizzate elenco [url=http://tadalafilit.com/#]Cialis generico farmacia[/url] Farmacie online sicure
DB娛樂遊戲中心:頂級線上娛樂網站評價介紹
DB賭場,前身為PM娛樂城,於2023年全面更名為【DB多寶遊戲】。這次品牌重塑的過程,DB賭場不斷專注於推動多角度的線上服務體驗,為玩家推動多樣化的遊戲選擇與創新的娛樂選項。無論是賭桌遊戲、體育博彩還是其他受歡迎遊戲,DB遊戲平台都能迎合玩家的期待。
多寶遊戲的誕生與進步 在亞洲遊戲市場中,DB遊戲平台快速發展,成為許多玩家的首選平台之一。隨著PM公司的品牌轉型,DB多寶遊戲致力於提升使用者體驗,並著眼於打造一個放心、便捷且透明的賭場環境。從娛樂項目到交易系統,DB娛樂城一直專注於卓越,為玩家帶來最佳的線上遊戲服務。
DB娛樂網站的遊戲類型與優勢
百家樂遊戲 DB賭場最為出名的是其多樣化的百家樂選項。平台推出多個版本的賭桌遊戲,包括常見百家樂和零佣金百家樂,符合不同玩家的期待。透過直播荷官的同步互動,玩家可以獲得身臨其境的遊戲氛圍。
體育博彩 作為一個多元化賭場,DB娛樂網站還推出各類賽事投注的投注服務。從足球、籃球比賽到網球比賽等熱門賽事,玩家都可以隨處進行體育博彩,享受比賽的快感與投注的樂趣。
促銷活動與獎金 DB賭場不斷推出多重的促銷計畫,為所有玩家提供各種折扣與獎勵。這些促銷不僅增加了遊戲的趣味性,還為玩家提供更多獲取獎金的途徑。
DB娛樂城的口碑與優勢 在2024年的最新娛樂網站排行榜中,DB遊戲平台獲得了卓越評價,並且因其廣泛的遊戲選擇、高效的提款效率和豐富的促銷活動而獲得玩家喜愛。
Hi there! This article couldn’t be written any better! Looking at this post reminds me of my previous roommate! He continually kept preaching about this. I am going to forward this post to him. Fairly certain he’ll have a good read. I appreciate you for sharing!
4월 5월 입니다 .카골프용품쇼핑몰페 음식점 이자카야 레골프용품쇼핑몰스토랑 베이커리 등등 골프용품쇼핑몰처음에
[url=https://maregamoussaar.biz]http://maregamoussaar.biz[/url]
last news about marega moussa
https://maregamoussaar.biz
Что такое лучший анекдот? История свежего анекдота, какие бывают.
플러스,유튜브프리미엄등유튜브 프리미엄 할인다양한OTT서비스계정을유튜브 프리미엄 할인다른사용자와공유하여비용유튜브 프리미엄 할인을절감하
Советы по выбору черного плинтуса для дома, Плюсы и минусы черного плинтуса, С чем сочетать черный плинтус: стильные комбинации, Секреты ухода за черным плинтусом, Какие черные плинтусы стоит выбирать, Преимущества черного плинтуса перед другими цветами, Черный плинтус: стильные решения для современного дома, Материалы для черного плинтуса: варианты выбора, Как добавить черный плинтус в классическую обстановку, Роль черного плинтуса в оформлении интерьера, Черный плинтус: смелый шаг или классический выбор, Черный плинтус как элемент роскоши в интерьере, Как черный плинтус меняет общий вид помещения, Черный плинтус как отделочный элемент, Какой черный плинтус выбрать для кухни, Черный плинтус: загадочный акцент в спальне, Как создать уютную атмосферу с черным плинтусом, Строгие черные линии в ванной: черный плинтус как элемент дизайна, Как черный плинтус может изменить ваше пространство
плинтус черный матовый [url=https://plintus-aljuminievyj-chernyj.ru/]https://plintus-aljuminievyj-chernyj.ru/[/url] .
Забавные приколы на злобу дня
Поднимите себе настроение!
http://farmaciait.men/# Farmacia online piГ№ conveniente
Farmacia online piГ№ conveniente
Сервисный центр предлагает сколько стоит ремонт квадрокоптера emax адреса ремонта квадрокоптеров emax
п»їFarmacia online migliore [url=https://farmaciait.men/#]Farmacie online sicure[/url] farmacie online sicure
[url=https://haalanderlingcz.biz]https://www.haalanderlingcz.biz[/url]
last news about haaland erling
http://www.haalanderlingcz.biz
top farmacia online: Cialis generico recensioni – Farmacie online sicure
I cannot thank you more than enough for the blogposts on your website. I know you set a lot of time and energy into these and truly hope you know how deeply I appreciate it. I hope I’ll do a similar thing person sooner or later.
Прикольные картинки http://prikoly-shutki.ru/kartinki-prikolnye Что такое мемы.
купить строительную бытовку
Купить бытовку поста охраны 104 900? (в т.ч. НДС)
Аренда бытовок постов охраны
7 000? в месяц (в т.ч. НДС)
Внешний размер 3000х2400х2400(в)
Каркас сварной, верхняя и нижняя рамка из стального гнутого швеллера 120х50х3, стойки стальные из уголка 75х5 или гнутые 90х90х20
Кровля металлическая сварная толщиной 1,5 мм
Защитная окраска грунт-эмалью 3в1 металлокаркаса и кровли
Черновой пол стальной оцинкованный
farmacia online senza ricetta [url=https://brufen.pro/#]BRUFEN 600 acquisto online[/url] Farmacie on line spedizione gratuita
В Мелбет промокод — это уникальная комбинация из цифр и букв. Он может использоваться в самых разных ситуациях. Чаще всего применяется в Мелбет промокод при регистрации, чтобы привлечь новых игроков. Однако, он может давать бесплатную ставку и другие бонусы, которых очень много в данной букмекерской конторе. Этот материал расскажет о том, что из себя представляет и что дает промокод для бесплатной ставки. Промокод для Мелбет можно получить за участие в каких-либо активностях букмекерской конторы Мелбет. Например, уникальный код компания присылает на день рождения в виде подарка своим клиентам. Помимо этого, можно ввести в поисковике «Как получить промокод на Мелбет?» и найти тематические сайты, где постоянно публикуются актуальные комбинации цифр и букв. Букмекер часто распространяет свои promo коды через партнеров, а также некоторые игроки сами активно делятся ими в сети.
Hey! This is my first visit to your blog! We are a collection of volunteers and starting a new project in a community in the same niche.
Your blog provided us valuable information to work on. You
have done a extraordinary job!
my web site; خرید بک لینک
Thank you for your sharing. I am worried that I lack creative ideas. It is your article that makes me full of hope. Thank you. But, I have a question, can you help me?
http://farmaciait.men/# farmaci senza ricetta elenco
Farmacia online piГ№ conveniente
migliori farmacie online 2024 [url=https://brufen.pro/#]BRUFEN 600 prezzo in farmacia[/url] п»їFarmacia online migliore
тревожная кнопка пультовой охраны [url=trevozhnaya-knopka-rosgvardii.ru]trevozhnaya-knopka-rosgvardii.ru[/url] .
powerbank [url=www.magazin-model.ro]powerbank[/url] .
acquisto farmaci con ricetta: Ibuprofene 600 prezzo senza ricetta – farmacia online senza ricetta
https://evakuator-mow.ru [url=http://www.evakuator-mow.ru]http://www.evakuator-mow.ru[/url] .
Very good post. I am going through many of these issues as well..
[url=https://marega-moussa-ar.biz]marega-moussa-ar.biz[/url]
last news about marega moussa
http://marega-moussa-ar.biz
Как поднять настроение с помошью приколов. прикольные картинки
https://pipeclub.net/index.php?/user/114591-vychislavyakov/
Сервисный центр предлагает центр ремонта кондиционера kraft выездной ремонт кондиционеров kraft
jili city
JILI SLOT GAMES: Sự Lựa Chọn Hàng Đầu Cho Các Tín Đồ Casino Trực Tuyến
JILI Casino là một nhà phát hành game nổi tiếng với nhiều năm kinh nghiệm trong ngành công nghiệp giải trí trực tuyến. Tại JILI, chúng tôi cam kết mang đến cho người chơi những trải nghiệm độc đáo và đẳng cấp, thông qua việc đổi mới không ngừng và cải thiện chất lượng từng sản phẩm. Những giá trị cốt lõi của chúng tôi không chỉ dừng lại ở việc tạo ra các trò chơi xuất sắc, mà còn tập trung vào việc cung cấp các tính năng vượt trội để đáp ứng nhu cầu của người chơi trên toàn cầu.
Sự Đa Dạng Trong Các Trò Chơi Slot
JILI nổi tiếng với loạt trò chơi slot đa dạng và hấp dẫn. Từ các slot game cổ điển đến những trò chơi với giao diện hiện đại và tính năng độc đáo, JILI Slot luôn đem đến cho người chơi những phút giây giải trí tuyệt vời. Các trò chơi được thiết kế với đồ họa sống động, âm thanh chân thực và những vòng quay thú vị, đảm bảo rằng người chơi sẽ luôn bị cuốn hút.
Ưu Điểm Nổi Bật Của JILI Casino
Đổi mới và sáng tạo: Mỗi trò chơi tại JILI Casino đều mang đến sự mới mẻ với lối chơi hấp dẫn và giao diện bắt mắt.
Chất lượng cao: JILI không ngừng cải tiến để đảm bảo mỗi sản phẩm đều đạt chất lượng tốt nhất, từ trải nghiệm người chơi đến tính năng trò chơi.
Nền tảng đa dạng: JILI Casino cung cấp nhiều loại game khác nhau, từ slot, bắn cá đến các trò chơi truyền thống, phù hợp với mọi sở thích của người chơi.
Chương Trình Khuyến Mại JILI
JILI Casino không chỉ nổi bật với chất lượng game mà còn thu hút người chơi bởi các chương trình khuyến mại hấp dẫn. Người chơi có thể tham gia vào nhiều sự kiện, từ khuyến mãi nạp tiền, hoàn trả đến các chương trình tri ân dành riêng cho thành viên VIP. Những ưu đãi này không chỉ tăng cơ hội chiến thắng mà còn mang lại giá trị cộng thêm cho người chơi.
Nổ Hủ City Và Các Trò Chơi Hấp Dẫn Khác
JILI không chỉ có slot games mà còn cung cấp nhiều thể loại game đa dạng khác như bắn cá, bài và nhiều trò chơi giải trí khác. Nổi bật trong số đó là Nổ Hủ City – nơi người chơi có thể thử vận may và giành được những giải thưởng lớn. Sự kết hợp giữa lối chơi dễ hiểu và các tính năng độc đáo của Nổ Hủ City chắc chắn sẽ mang lại những khoảnh khắc giải trí đầy thú vị.
Tham Gia JILI Casino Ngay Hôm Nay
Với sự đa dạng về trò chơi, các tính năng vượt trội và những chương trình khuyến mại hấp dẫn, JILI Casino là sự lựa chọn không thể bỏ qua cho những ai yêu thích trò chơi trực tuyến. Hãy truy cập trang web chính thức của JILI ngay hôm nay để trải nghiệm thế giới giải trí không giới hạn và giành lấy những phần thưởng hấp dẫn từ các trò chơi của chúng tôi!
Hi my family member! I want to say that this article is amazing, great written and include approximately all important infos. I’d like to see more posts like this .
сервисный центре предлагает ремонт телевизоров в новой москве – ремонт телевизоров недорого
lasix generic: lasix generic – lasix furosemide
ordering neurontin online [url=http://gabapentin.site/#]neurontin pfizer[/url] neurontin 400 mg
The post is absolutely great! Lots of great info and inspiration, both of which we all need! Also like to admire the time and effort you put into your blog and detailed information you offer! I will bookmark your website!
sollers сайт sollers грузовой
ventolin pharmacy uk: Buy Albuterol for nebulizer online – can you buy ventolin over the counter in uk
1xBet
1xBet promo codes can also offer free bets, allowing users to place bets without using their own money. These free bet codes are especially popular among new users and are often part of the welcome bonus package.
neurontin tablets 100mg: buy cheap neurontin online – neurontin 214
https://prednisolone.pro/# prednisone medication
[url=https://moussa-dembele-ar.biz]https://moussa-dembele-ar.biz[/url]
last news about moussa dembele
https://moussa-dembele-ar.biz
автомобиль sollers atlant автомобиль sollers atlant
купить юридический адрес ифнс
립 할인쿠폰1. 마이리마이리얼트립 쿠폰얼트립 전용 링크 접속마이리얼트립 쿠폰
I simply could not go away your site before suggesting that I actually loved the standard info a person supply for your guests?
Is going to be back regularly in order to check out new posts
Как поднять настроение с помошью анекдота. прикольные картинки
https://pbase.com/vychislavyakov
can i buy ventolin over the counter in australia: buy Ventolin – ventolin usa
ventolin online uk [url=http://ventolininhaler.pro/#]buy Ventolin[/url] ventolin prices in canada
ПромоКод Букмекерской Конторы Melbet 2024 При Регистрации – это код для новых пользователей, так как он дает денежные призы на первый депозит новым игрокам. промокод для слотов – это отличный способ сделать игру максимально захватывающей и прибыльной. Букмекер регулярно запускает выгодные бонусные программы и акции, которые помогают беттерам наслаждаться игровым процессом и иметь особые привилегии. Сегодня доступно несколько типов промокодов на игру в Мелбет. Они различаются условиями получения и принципом действия. Melbet промокод при регистрации, увеличивающий сумму первого взноса. С его помощью можно получить дополнительные 130% на игровой баланс для заключения пари.
lasix generic name: cheap lasix – lasix 100 mg tablet
buy alarm clock with clock buy sunrise imitation alarm clock
where to buy ventolin generic: buy albuterol inhaler – buy ventolin online canada
Сервисный центр предлагает ремонт гироскутеров besshof в москве качественный ремонт гироскутеров besshof
Подборка самых выгодных предложений аренды квартиры на сутки|Забронируйте квартиру на сутки мечты|Квартиры на сутки в центре города|Резервируйте жилье на сутки онлайн|Выбор апартаментов на сутки по лучшим ценам|Лучшие варианты аренды жилья на короткий срок|Выбор жилья на короткий срок по вашему вкусу|Выберите идеальное жилье на короткий срок|Уникальные апартаменты на сутки для вашего отдыха|Эксклюзивные предложения аренды апартаментов на сутки|Бронируйте квартиры на сутки по выгодным ценам|Находите лучшие варианты жилья и бронируйте сейчас|Удобный поиск и бронирование апартаментов на сутки|Выбор квартир на короткий срок для вашего отдыха|Выбирайте комфортные апартаменты на короткий срок|Бронирование квартир на сутки без комиссии|Эксклюзивные предложения аренды апартаментов на сутки|Удобный поиск и бронирование апартаментов на сутки|Выбор идеальных квартир для короткого проживания|Бронирование апартаментов на сутки онлайн
квартиры посуточно в гомеле [url=https://gomelsutochno.ru/]квартиры посуточно в гомеле[/url] .
[url=https://dembele-moussa-ar.biz]dembele-moussa-ar.biz[/url]
last news about dembele moussa
http://dembele-moussa-ar.biz
[url=https://moussa-dembelear.biz]moussa-dembelear.biz[/url]
last news about moussa dembelear
moussa-dembelear.biz
[url=https://moussadembelear.biz]moussadembelear.biz[/url]
last news about moussa dembele
moussadembelear.biz
You need to be a part of a contest for one of the most useful websites online. I will recommend this web site!
Кракен сайт – это онлайн-площадка, работающая в скрытых сетях интернета, где пользователи могут покупать и продавать различные виды наркотиков. Для доступа к Kraken onion необходимо использовать специальное программное обеспечение, позволяющее обходить блокировки и обеспечивающее анонимность пользователей.
buying prednisone on line: 6 prednisone – prednisone 20mg tablets where to buy
лучшие капперы россии [url=http://luchshie-kappery-rossii.ru/]лучшие капперы россии[/url] .
лучшие капперы россии [url=https://luchshie-kappery-rossii11.ru]лучшие капперы россии[/url] .
https://furosemide.men/# lasix pills
anon ig viewer [url=https://anoninststories.com/]anon ig viewer[/url] .
clocks alarm https://clocks-top.com
괌 공항괌 닛산렌트카 허츠 렌트카의 신차급괌 닛산렌트카 마쯔다 CX-5 차량괌 닛산렌트카 불편함
Сайт о биодобавках https://биодобавки.рф подробная информация о видах добавок, их действии и пользе. Рекомендации по выбору для поддержки здоровья на основе актуальных исследований.
neurontin 600 mg pill: neurontin 500 mg tablet – neurontin 400 mg capsules
娛樂城推薦
DB娛樂平台:頂級線上賭場評價介紹
DB遊戲平台,前身為PM娛樂網站,於2023年徹底更名為【DB多寶遊戲】。這場品牌更新的階段,DB賭場進一步專注於推動全方位的線上賭場體驗,為玩家提供更豐富的選擇範圍與革新的娛樂服務。無論是賭桌遊戲、體育賭注還是其他流行遊戲,DB遊戲平台都能適應玩家的需求。
多寶平台的成立與發展 在亞洲娛樂市場中,DB遊戲平台快速壯大,成為許多玩家的首選平台之一。隨著PM機構的品牌更新,DB多寶遊戲專注於提升用戶體驗,並致力於構建一個可靠、方便且公平的平台環境。從娛樂項目到付款選項,DB娛樂網站不斷尋求卓越,為玩家提供頂級的線上遊戲服務。
DB娛樂網站的遊戲項目與特色
百家樂遊戲 DB娛樂城最為著名的是其多樣化的百家樂玩法。平台呈現多個版本的百家樂,包括經典百家樂和無佣金百家樂,符合多樣化玩家的需求。透過真人荷官的同步互動,玩家可以獲得身臨其境的遊戲氛圍。
體育博彩 作為一個多元化賭場,DB遊戲平台還呈現各類體育賽事的投注選項。從足球賽事、籃球賽事到網球比賽等受歡迎賽事,玩家都可以任何時候體驗體育博彩,感受賽事的緊張感與投注的樂趣。
促銷活動與獎金 DB遊戲平台不斷推出廣泛的促銷活動,為新舊玩家推動各種福利與獎金。這些促銷不僅提高了遊戲的娛樂性,還為玩家推動更多贏得福利的可能性。
DB娛樂網站的回饋與優勢 在2024年的最新賭場排行榜中,DB遊戲平台獲得了高度評價,並且因其廣泛的遊戲選擇、高效的提款效率和多樣的促銷活動而深受玩家喜愛。
ventolin 10 mg: Buy Albuterol inhaler online – ventolin best price
Как поднять настроение с помошью мемов. прикольные картинки
https://www.speedrun.com/users/vychislavyakov
Если вы искали где отремонтировать сломаную технику, обратите внимание – ремонт бытовой техники
Сайт о биодобавках https://биодобавки.рф предлагает проверенную информацию о натуральных добавках для здоровья. Узнайте, как выбрать подходящие средства для улучшения иммунитета, повышения энергии и поддержания активного образа жизни. Подробные описания и советы помогут сделать осознанный выбор.
Купить бытовку под столовую 149 900? (в т.ч. НДС)
Аренда бытовок под столовую
8 000? в месяц (в т.ч. НДС)
внешний размер 6000х2400х2500(в);
окно ПВХ с поворотно-откидной створкой;
утепленные пол, потолок, стены;
отделка потолка панелями ПВХ;
отделка стен ДВП, линолеум на полу;
있으면혹시라도모를주유관트립닷컴 항공권 할인코드련분쟁(주유를제대로하지트립닷컴 항공권 할인코드않았다고주유비용청구등)트립닷컴 항공권 할인코드이발생했
neurontin 800: neurontin 100 mg cap – gabapentin online
Профессиональный сервисный центр по ремонту компьютеров и ноутбуков в Москве.
Мы предлагаем: срочный ремонт макбука
Наши мастера оперативно устранят неисправности вашего устройства в сервисе или с выездом на дом!
Букмекерская компания “Мелбет”, как, собственно, и десятки других операторов акцентирует внимание на бонусах и других привилегиях для своих игроков. Промокод – это один из вариантов привлечения новых игроков. Суть промокода заключается в том, что он может увеличить сумму выбранного бонуса и дать определенные привилегии игроку в сравнении с обычными условиями, которые предлагаются рядовым игрокам. Сегодня можно найти предложения на разных ресурсах. К примеру, это может быть какой-то блогер на видеохостинге YouTube. Довольно часто у популярных личностей можно встретить рекламные интеграции, где они бесплатно предлагают воспользоваться куда вводить промокод и получить дополнительные привилегии при получении бонуса. Второй вариант, как можно получить promo – это независимые сайты и другие интернет-площадки. Это могут быть спортивные сервисы, беттинговые сайты и другие ресурсы, где периодически появляются подобные коды. Ну и третий вариант – это официальный сайт букмекерской компании. На сайте часто появляются новые акции и бонусы. Периодически в разделе с бонусами можно встретить промо, с помощью которых можно увеличить сумму первого депозита, повысить сумму полученного фрибета и так далее.
Its like you read my mind You appear to know so much about this like you wrote the book in it or something I think that you can do with a few pics to drive the message home a little bit but other than that this is fantastic blog A great read Ill certainly be back
furosemide 40 mg: buy furosemide – lasix side effects
https://furosemide.men/# lasix
ventolin 100 mg: buy Ventolin – ventolin medication
가능 차종]:제주패스렌터카 야리스, 엘란트라(아제주패스렌터카반떼), 소나타, 투싼제주패스렌터카, 산타
[url=https://marcelo-brozovic-ar.biz]marcelo-brozovic-ar.biz[/url]
last news about marcelo brozovic
marcelo-brozovic-ar.biz
[url=https://haaland-erling-cz.biz/]www.haaland-erling-cz.biz[/url]
last news about haaland erling
http://www.haaland-erling-cz.biz
유용합니다. 이러한 기유튜브프리미엄싸게능들은 이미 많은 사용유튜브프리미엄싸게자에게 일상의 필수 요유튜브프리미엄싸게소로 자
[url=https://marcelo-brozovicar.biz]http://www.marcelo-brozovicar.biz[/url]
last news about marcelo brozovic
http://marcelo-brozovicar.biz
1xBet
1xBet codes refer to the alphanumeric strings provided by the platform or its partners, which can be used to claim bonuses such as free bets, deposit matches, or free spins. These codes are often shared through promotions, social media, or affiliate websites.
I think this is among the so much vital info for me. And i’m happy reading your article. But wanna remark on few common issues, The site style is wonderful, the articles is really excellent : D. Just right job, cheers
Как поднять настроение с помошью анекдота. Свежие мемы.
http://www.poverkhnost.tv/forum/profile.php?id=20459
Hi my loved one I wish to say that this post is amazing nice written and include approximately all vital infos Id like to peer more posts like this
OTT 서비스를 즐기면마이리얼트립 쿠폰서도 디자인 작업을 위마이리얼트립 쿠폰한 툴이나 외국어 학습마이리얼트립 쿠폰까지 한
lasix uses: buy furosemide – generic lasix
Сайт предоставляет информацию о биодобавках http://биодобавки.рф состав, польза и рекомендации по применению. Здесь вы найдёте обзоры эффективных добавок для улучшения здоровья, иммунитета и энергии на основе научных данных и экспертных мнений.
rybelsus generic: semaglutide – Buy compounded semaglutide online
gabapentin medication: neurontin 300 mg coupon – neurontin 2400 mg
Hello there I am so delighted I found your weblog, I really found you by mistake, while I was searching on Google for something else, Anyhow I am here now and would just like to say cheers for a remarkable post and a all round exciting blog (I also love the theme/design), I don’t have time to browse it all at the moment but I have book-marked it and also included your RSS feeds, so when I have time I will be back to read a lot more, Please do keep up the superb work.
jili.com
JILI SLOT GAMES: Sự Lựa Chọn Hàng Đầu Cho Các Tín Đồ Casino Trực Tuyến
JILI Casino là một nhà phát hành game nổi tiếng với nhiều năm kinh nghiệm trong ngành công nghiệp giải trí trực tuyến. Tại JILI, chúng tôi cam kết mang đến cho người chơi những trải nghiệm độc đáo và đẳng cấp, thông qua việc đổi mới không ngừng và cải thiện chất lượng từng sản phẩm. Những giá trị cốt lõi của chúng tôi không chỉ dừng lại ở việc tạo ra các trò chơi xuất sắc, mà còn tập trung vào việc cung cấp các tính năng vượt trội để đáp ứng nhu cầu của người chơi trên toàn cầu.
Sự Đa Dạng Trong Các Trò Chơi Slot
JILI nổi tiếng với loạt trò chơi slot đa dạng và hấp dẫn. Từ các slot game cổ điển đến những trò chơi với giao diện hiện đại và tính năng độc đáo, JILI Slot luôn đem đến cho người chơi những phút giây giải trí tuyệt vời. Các trò chơi được thiết kế với đồ họa sống động, âm thanh chân thực và những vòng quay thú vị, đảm bảo rằng người chơi sẽ luôn bị cuốn hút.
Ưu Điểm Nổi Bật Của JILI Casino
Đổi mới và sáng tạo: Mỗi trò chơi tại JILI Casino đều mang đến sự mới mẻ với lối chơi hấp dẫn và giao diện bắt mắt.
Chất lượng cao: JILI không ngừng cải tiến để đảm bảo mỗi sản phẩm đều đạt chất lượng tốt nhất, từ trải nghiệm người chơi đến tính năng trò chơi.
Nền tảng đa dạng: JILI Casino cung cấp nhiều loại game khác nhau, từ slot, bắn cá đến các trò chơi truyền thống, phù hợp với mọi sở thích của người chơi.
Chương Trình Khuyến Mại JILI
JILI Casino không chỉ nổi bật với chất lượng game mà còn thu hút người chơi bởi các chương trình khuyến mại hấp dẫn. Người chơi có thể tham gia vào nhiều sự kiện, từ khuyến mãi nạp tiền, hoàn trả đến các chương trình tri ân dành riêng cho thành viên VIP. Những ưu đãi này không chỉ tăng cơ hội chiến thắng mà còn mang lại giá trị cộng thêm cho người chơi.
Nổ Hủ City Và Các Trò Chơi Hấp Dẫn Khác
JILI không chỉ có slot games mà còn cung cấp nhiều thể loại game đa dạng khác như bắn cá, bài và nhiều trò chơi giải trí khác. Nổi bật trong số đó là Nổ Hủ City – nơi người chơi có thể thử vận may và giành được những giải thưởng lớn. Sự kết hợp giữa lối chơi dễ hiểu và các tính năng độc đáo của Nổ Hủ City chắc chắn sẽ mang lại những khoảnh khắc giải trí đầy thú vị.
Tham Gia JILI Casino Ngay Hôm Nay
Với sự đa dạng về trò chơi, các tính năng vượt trội và những chương trình khuyến mại hấp dẫn, JILI Casino là sự lựa chọn không thể bỏ qua cho những ai yêu thích trò chơi trực tuyến. Hãy truy cập trang web chính thức của JILI ngay hôm nay để trải nghiệm thế giới giải trí không giới hạn và giành lấy những phần thưởng hấp dẫn từ các trò chơi của chúng tôi!
масло моторное 5w40 таиф [url=www.e-taif.ru/]www.e-taif.ru/[/url] .
娛樂城推薦
DB娛樂城:首選線上娛樂網站評價介紹
DB遊戲平台,前身為PM遊戲平台,於2023年正式更名為【DB多寶遊戲】。這次品牌更名的階段,DB賭場不斷專注於提供多角度的線上賭場體驗,為玩家帶來多樣化的娛樂項目與革新的娛樂選項。無論是百家樂遊戲、運動博彩還是其他熱門娛樂項目,DB賭場都能滿足玩家的期待。
多寶平台的成立與發展 在亞洲遊戲市場中,DB遊戲平台飛速發展,成為許多玩家的首選平台之一。隨著PM品牌的品牌重塑,DB多寶遊戲聚焦於提升客戶體驗,並著眼於構建一個穩定、方便且公正的娛樂環境。從服務項目到結算方式,DB娛樂網站不斷尋求卓越,為玩家提供首選的線上體驗。
DB遊戲平台的遊戲類型與特色
百家樂遊戲 DB遊戲平台最為著名的是其多重的百家樂項目。平台呈現多個版本的賭桌遊戲,包括常見百家樂和無手續費百家樂,迎合不同玩家的期待。透過真人荷官的即時互動,玩家可以獲得真實的賭場體驗。
體育博彩 作為一個全面平台,DB娛樂網站還提供各類賽事投注的投注服務。從足球、籃球賽事到網球比賽等流行體育項目,玩家都可以隨處參與體育博彩,感受賽事的緊張感與博彩的快感。
促銷活動與獎金 DB賭場不斷推出豐富的促銷優惠,為新舊玩家推動各種優惠與獎勵。這些促銷不僅提升了遊戲的可玩性,還為玩家帶來更多贏得福利的選項。
DB娛樂網站的反響與特點 在2024年的最新線上娛樂平台排行榜中,DB賭場獲得了優秀評價,並且因其全面的遊戲選擇、高效的提款效率和持續的促銷活動而廣受玩家喜愛。
Смешные анекдоты. История анекдотов.
http://rybelsus.tech/# rybelsus price
가능하다는 점은 배운스픽 할인쿠폰 표현을 내 것으로 만스픽 할인쿠폰드는 데 매우 긍정적인스픽 할인쿠폰 효과를
인 할인코드를 사용하는쉬인 할인코드 방법은 매우 간단합니쉬인 할인코드다. 쇼핑한 후 결제 쉬인 할인코드단계에서
В Мелбет промокод — это уникальная комбинация из цифр и букв. Он может использоваться в самых разных ситуациях. Чаще всего применяется в Мелбет промокод при регистрации, чтобы привлечь новых игроков. Однако, он может давать бесплатную ставку и другие бонусы, которых очень много в данной букмекерской конторе. Этот материал расскажет о том, что из себя представляет и что дает промокоды на ставки. Промокод для Мелбет можно получить за участие в каких-либо активностях букмекерской конторы Мелбет. Например, уникальный код компания присылает на день рождения в виде подарка своим клиентам. Помимо этого, можно ввести в поисковике «Как получить промокод на Мелбет?» и найти тематические сайты, где постоянно публикуются актуальные комбинации цифр и букв. Букмекер часто распространяет свои promo коды через партнеров, а также некоторые игроки сами активно делятся ими в сети.
[url=https://t.me/news_161_ru]www.t.me/news_161_ru[/url]
новости ростовской области
https://t.me/news_161_ru
Excellent blog here! Also your web site loads up fast!
What web host are you using? Can I get your affiliate link to your host?
I wish my web site loaded up as quickly as yours lol
[url=https://dembelemoussaar.biz]http://www.dembelemoussaar.biz[/url]
last news about dembele moussa
https://www.dembelemoussaar.biz
예요.신혼여행 수원 웨딩박람회정보: 수많은 여행사들수원 웨딩박람회이 참가하여 신혼여행지수원 웨딩박람회 추천부
Hello my loved one I want to say that this post is amazing great written and include almost all significant infos I would like to look extra posts like this
Тактичный гардероб для стильных людей, тактичные костюмы.
Лучшие магазины тактичной одежды, которые должен знать каждый.
Тактичные наряды для повседневной носки, которые не выйдут из моды.
Когда лучше всего носить тактичную одежду, для добавления индивидуальности.
Секреты удачного выбора тактичной одежды, для комфортной носки.
тактичний одяг та взуття [url=https://alphakit.com.ua/]тактичний одяг та взуття[/url] .
Simply desire to say your article is as astounding.
The clearness on your publish is simply great and that i could suppose
you’re a professional in this subject. Well together with your permission allow me to snatch your RSS
feed to keep updated with approaching post.
Thank you 1,000,000 and please continue the gratifying work.
Сайт предоставляет информацию о биодобавках биодобавки.рф состав, польза и рекомендации по применению. Здесь вы найдёте обзоры эффективных добавок для улучшения здоровья, иммунитета и энергии на основе научных данных и экспертных мнений.
br>2024 웨딩박람익스피디아 쿠폰회 일정
[url=https://marcelobrozovicar.biz]http://www.marcelobrozovicar.biz[/url]
last news about marcelo brozovic
http://marcelobrozovicar.biz
mexican mail order pharmacies: medication from mexico – buying prescription drugs in mexico
https://indiadrugs.pro/# top 10 pharmacies in india
[url=https://brozovic-marceloar.biz]https://brozovic-marceloar.biz[/url]
last news about brozovic marcelo
brozovic-marceloar.biz
купить строительную бытовку
Купить жилую бытовку 149 900? (в т.ч. НДС)
Аренда бытовки для проживания
8 000? в месяц (в т.ч. НДС)
Внешний размер 5850х2400х2400(в)
Каркас сварной, верхняя и нижняя рамка из стального гнутого швеллера 120х50х3, стойки стальные из уголка 75х5 или гнутые 90х90х20
Кровля металлическая сварная толщиной 1,5 мм
Защитная окраска грунт-эмалью 3в1 металлокаркаса и кровли
Черновой пол стальной оцинкованный
Thank you for all the information was very accurate, just wondering if all this is possible.~
안녕하세부산벡스코웨딩박람회요,!부산벡스코웨딩박람회오늘 포스팅 주제는, 부산벡스코웨딩박람회
vini jr 2021 22 [url=https://www.vinicius-junior-az.com]www.vinicius-junior-az.com[/url] real madrid basketball tickets vinicius junior .
Your article helped me a lot, is there any more related content? Thanks!
mexican pharmaceuticals online [url=https://mexicanpharma.icu/#]mexico pharmacies prescription drugs[/url] buying prescription drugs in mexico online
[url=][/url]
Новые методы лечения болезни Паркинсона в клинике Neuro Implant Clinic.
Акупунктура уха – новый метод лечения болезни Паркинсона, Альцгеймера, Рассеянного Склероза.
Выездное лечение в разные Страны.
Отзывы нашего метода на официальном сайте Neuro Implant Clinic.
[url=][/url]
Свежие приколы
Как появились приколы. Узнайте, как улучшить себе настроение!
br>배민커넥트 추천인
buy prescription drugs from india: Indian pharmacy international shipping – indian pharmacy paypal
Профессиональный сервисный центр по ремонту кондиционеров в Москве.
Мы предлагаем: ремонт кондиционеров в москве цена на дому
Наши мастера оперативно устранят неисправности вашего устройства в сервисе или с выездом на дом!
While this issue can vexed most people, my thought is that there has to be a middle or common ground that we all can find. I do value that you’ve added pertinent and sound commentary here though. Thank you!
Смешные анекдоты. Что такое анекдот.
[url=][/url]
Временная регистрация в СПб: Быстро и Легально!
Ищете, где оформить временную регистрацию в Санкт-Петербурге?
Мы гарантируем быстрое и легальное оформление без очередей и лишних документов.
Ваше спокойствие – наша забота!
Минимум усилий • Максимум удобства • Полная легальность
Свяжитесь с нами прямо сейчас!
Временная регистрация
[url=][/url]
москва проститутки [url=https://mgtimez.ru/]москва проститутки[/url] .
Профессиональный сервисный центр по ремонту моноблоков в Москве.
Мы предлагаем: моноблоки недорого
Наши мастера оперативно устранят неисправности вашего устройства в сервисе или с выездом на дом!
Профессиональный сервисный центр по ремонту гироскутеров в Москве.
Мы предлагаем: замена аккумулятора гироскутера
Наши мастера оперативно устранят неисправности вашего устройства в сервисе или с выездом на дом!
Профессиональный сервисный центр по ремонту бытовой техники с выездом на дом.
Мы предлагаем: сервисные центры по ремонту техники в тюмени
Наши мастера оперативно устранят неисправности вашего устройства в сервисе или с выездом на дом!
http://indiadrugs.pro/# top 10 online pharmacy in india
3년 8월 26일 ~ 제주웨딩박람회27일- 하우투제주웨딩박람회 대형 웨딩박람회- 원
Профессиональный сервисный центр по ремонту бытовой техники с выездом на дом.
Мы предлагаем: сервисные центры в москве
Наши мастера оперативно устранят неисправности вашего устройства в сервисе или с выездом на дом!
mexico pharmacies prescription drugs: mexican pharmacy – mexico pharmacies prescription drugs
pharmacy website india: Online medication home delivery – world pharmacy india
졌답니다⠀결혼식 때괌 렌트카까지 기간이 여유 있게괌 렌트카 남아있었던 신부님은사괌 렌트카이즈가
Backlinks – three steps
1: Stage – backlinks to the site in blogs and comments
Step 2: Backlinks via website redirects
3: Stage – Placement of the site on the sites of the analyzer,
example:
https://backlinkstop.com/
Explanation for stage 3: – only the main page of the site is placed on the analyzers, subsequent pages cannot be placed.
I only need a link to the main domain, if you give me a link to a social network or other resource that is not suitable for detection on the analyzer site, then I will take the third step through a google redirect
I do three steps in sequence, as described above
This backlink strategy is the most effective as the analyzers show the site keywords H1, H2, H3 and sitemap!!!
Show placement on scraping sites via TXT file
List of site analyzers 50 pcsI will provide the report as a text file with links.
Thanks , I’ve recently been searching for info about this topic for ages and yours is the best I have discovered so far. But, what concerning the bottom line? Are you certain concerning the source?
reputable indian pharmacies [url=https://indiadrugs.pro/#]india pharmacy[/url] indian pharmacy paypal
Официальный промокод мелбет при регистрации даёт возможность получить бонус на первый депозит в размере до 10400 рублей, либо фрибет 30EUR. Промокод проверен и актуален, работает только в офшорной версии бк Мелбет в 2024 году. Букмекерская контора Мелбет пользуется популярностью, славится щедростью, поскольку вознаграждает новых пользователей, впервые зарегистрировавших на портале, и постоянных беттеров. В большинстве случаев награды в виде промокодов – специальных комбинаций, требующих активации. Благодаря Мелбет промокод при регистрации можно получить увеличенный бонус, главное – правильно использовать буквенно-цифровое сочетание. Бонус не является безвозмездным подарком от букмекера. Чтобы получить возможность вывода денежных средств, беттеру предстоит выполнить ряд условий. Что обеспечивает промокод в Мелбет, как активируют, доступные бонусы при регистрации на сегодня, условия и правила отыгрыша – подробно рассмотрим в обзоре.
http://mexicanpharma.icu/# mexican drugstore online
[url=https://lautaro-martinez-ar.biz]lautaro-martinez-ar.biz[/url]
last news about lautaro martinez
lautaro-martinez-ar.biz
[url=https://lautaro-martinezar.biz]www.lautaro-martinezar.biz[/url]
last news about lautaro martinez
http://www.lautaro-martinezar.biz
[url=https://brozovicmarceloar.biz]http://www.brozovicmarceloar.biz[/url]
last news about brozovic marcelo
https://www.brozovicmarceloar.biz
근데 뭐 박람회 혜택이몬스터짐 추천인랄게 별거 아닌게 다른몬스터짐 추천인 곳에서도 그정도는 다몬스터짐 추천인 해주더
신 뒤, 아래처럼 프로매니챗필 수정칸에서 WXPC매니챗-42 입력하시면 즉시매니챗 사용
[url=][/url]
Временная регистрация в Санкт-Петербурге: Быстро и Легально!
Ищете, где оформить временную регистрацию в СПб?
Мы гарантируем быстрое и легальное оформление без очередей и лишних документов.
Ваше спокойствие – наша забота!
Минимум усилий • Максимум удобства • Полная легальность
Свяжитесь с нами прямо сейчас!
Временная регистрация в СПб
[url=][/url]
mexico pharmacies prescription drugs: mexican mail order pharmacies – mexico drug stores pharmacies
pharmacies in mexico that ship to usa https://mexicanpharma.icu/# buying from online mexican pharmacy
mexican drugstore online
Смешные анекдоты. Что такое анекдот.
Прикольные анекдоты. История анекдотов.
https://southauroracooperative.org/members/fibertrout6/activity/1751967/ [url=https://www.heidewebster18.livejournal.com/profile]https://www.heidewebster18.livejournal.com/profile[/url] .
https://indiadrugs.pro/# top online pharmacy india
이동이 가능한데요.탑승제주패스 할인 위치에 따라 금액은 제주패스 할인달라지지만, 보통성인 제주패스 할인기준 편
Профессиональный сервисный центр по ремонту планшетов в том числе Apple iPad.
Мы предлагаем: ремонт планшетов apple в москве
Наши мастера оперативно устранят неисправности вашего устройства в сервисе или с выездом на дом!
mexico drug stores pharmacies [url=http://mexicanpharma.icu/#]mexican rx online[/url] medicine in mexico pharmacies
[url=https://martinezlautaroar.biz]https://www.martinezlautaroar.biz[/url]
last news about martine zlautaro
http://martinezlautaroar.biz
[url=https://khvicha-kvaratskheliaar.biz]khvicha-kvaratskheliaar.biz[/url]
last news about khvicha kvaratskhelia
http://www.khvicha-kvaratskheliaar.biz
rtpkantorbola
Kantorbola adalah situs gaming online terbaik di indonesia , kunjungi situs RTP kantor bola untuk mendapatkan informasi akurat rtp diatas 95% . Kunjungi juga link alternatif kami di kantorbola77 dan kantorbola99 .
Бесплатный промокод актуален как для букмекерской конторы Мелбет, так и для международной Melbet при регистрации в 2024 году. Официальный и рабочий промокод для новых клиентов БК дает повышенный бонус на первый депозит.В этих двух букмекерских конторах вводить промокод Мелбет надо именно во время регистрации. Он увеличивает стандартный бонус на первый депозит на 30%, и его легко можно вывести, выполнив некоторые условия букмекерской конторы Melbet. Мелбет – букмекерская контора, официально зарегистрированная в России в 2012 году. Она одна из первых стала предоставлять услуги болельщикам и любителям спорта. На данный момент контора предлагает широкое поле деятельности для прогнозистов и болельщиков, совершающих ставки. Кроме того, Мелбет дает обзор многочисленных событий из мира спорта и киберспорта, а также информацию о результатах матчей. Пользователи сервиса отмечают хорошие коэффициенты и щедрую программу бонусов. О последних нужно сказать отдельно: они доступны всем гостям сайта, даже новичкам. Выгодные предложения от букмекерской конторы позволяют делать ставки на различные спортивные события без вложения личных средств. В этой статье дан обзор melbet промокод при регистрации и варианты их использования.
Смешные анекдоты. Что такое анекдот.
http://indiadrugs.pro/# indian pharmacy paypal
Can I simply just say what a relief to find somebody that actually knows what they’re discussing on the net. You certainly realize how to bring an issue to light and make it important. A lot more people ought to read this and understand this side of the story. I was surprised that you are not more popular because you definitely possess the gift.
[url=https://martinez-lautaro-ar.biz]http://www.martinez-lautaro-ar.biz[/url]
last news about martinez lautaro
https://martinez-lautaro-ar.biz
[url=https://khvicha-kvaratskhelia-ar.biz]http://www.khvicha-kvaratskhelia-ar.biz[/url]
last news about khvicha kvaratskhelia
http://www.khvicha-kvaratskhelia-ar.biz
[url=https://lautaromartinezar.biz]https://lautaromartinezar.biz[/url]
last news about lautaro martinez
https://lautaromartinezar.biz
Профессиональный сервисный центр по ремонту посудомоечных машин с выездом на дом в Москве.
Мы предлагаем: ремонт посудомоечных машин
Наши мастера оперативно устранят неисправности вашего устройства в сервисе или с выездом на дом!
Как поддерживать хорошее настроение с помощью смешных приколов
buying prescription drugs in mexico online [url=https://mexicanpharma.icu/#]mexican pharmaceuticals online[/url] reputable mexican pharmacies online
элитный эскорт [url=prime-girls.ru]элитный эскорт[/url] .
http://canadapharma.shop/# canadian pharmacy drugs online
проститутки москвы новые [url=https://drive-models.ru]проститутки москвы новые [/url] .
As in commonplace Pai Gow, each player and supplier obtain seven-cards, however in Face Up Pai Gow Poker the dealer’s playing cards are exposed.
Как поддерживать хорошее настроение с помощью забавных приколов
닉스 계정이 필요없기에광주 웨딩박람회 맛보기 하기에 정말편광주 웨딩박람회합니다3.신규계광주 웨딩박람회정 생성
Great resources and tips for families here.
http://indiadrugs.pro/# top 10 online pharmacy in india
Good info. Lucky me I recently found your site by accident (stumbleupon). I have book marked it for later!
canadian pharmacy cheap: Cheapest online pharmacy – onlinepharmaciescanada com
[url=https://angel-di-maria-ar.biz]angel-di-maria-ar.biz[/url]
last news about angel di maria
http://angel-di-maria-ar.biz
[url=https://angel-dimaria-ar.biz]https://angel-dimaria-ar.biz[/url]
last news about angel dimaria
http://www.angel-dimaria-ar.biz
[url=https://angel-dimariaar.biz/]http://angel-dimariaar.biz[/url]
last news about angel dimaria
https://angel-dimariaar.biz
Achat mГ©dicament en ligne fiable [url=http://clssansordonnance.icu/#]Cialis sans ordonnance 24h[/url] pharmacie en ligne livraison europe
[url=https://kvaratskhelia-khvicha-ar.biz]http://kvaratskhelia-khvicha-ar.biz[/url]
last news about kvaratskhelia khvicha
http://www.kvaratskhelia-khvicha-ar.biz
[url=https://kvaratskheliakhvichaar.biz]https://kvaratskheliakhvichaar.biz[/url]
last news about kvaratskhelia khvicha
https://www.kvaratskheliakhvichaar.biz
полноростовой турникет perco [url=https://for-gate.ru/]https://for-gate.ru/[/url] .
viewer and downloader [url=https://www.storyanonviewer.com]viewer and downloader[/url] .
скуд стоимость оборудования на точку [url=http://northern-computers.ru]http://northern-computers.ru[/url] .
[url=https://dzen.ru/news161ru]dzen.ru/news161ru[/url]
новости ростовской области
http://www.dzen.ru/news161ru
kantor bola
Kantorbola adalah situs gaming online terbaik di indonesia , kunjungi situs RTP kantor bola untuk mendapatkan informasi akurat rtp diatas 95% . Kunjungi juga link alternatif kami di kantorbola77 dan kantorbola99 .
[url=][/url]
Временная регистрация в Санкт-Петербурге: Быстро и Легально!
Ищете, где оформить временную регистрацию в СПБ?
Мы гарантируем быстрое и легальное оформление без очередей и лишних документов.
Ваше спокойствие – наша забота!
Минимум усилий • Максимум удобства • Полная легальность
Свяжитесь с нами прямо сейчас!
Временная регистрация в СПБ
[url=][/url]
http://clssansordonnance.icu/# pharmacie en ligne avec ordonnance
[url=https://play-dog-house.ru]https://play-dog-house.ru[/url]
last news about dog house
https://play-dog-house.ru
Как развеселить друга с помощью забавных приколов
[url=https://avtomat-dog-house.ru]https://www.avtomat-dog-house.ru[/url]
last news about dog house
http://avtomat-dog-house.ru
pharmacie en ligne france livraison internationale: pharmacie en ligne sans ordonnance – pharmacie en ligne france fiable
[url=https://download-casino-bonsai.ru]http://www.download-casino-bonsai.ru[/url]
last news about casino bonsai
http://www.download-casino-bonsai.ru
Профессиональный сервисный центр по ремонту МФУ в Москве.
Мы предлагаем: ремонт платы мфу
Наши мастера оперативно устранят неисправности вашего устройства в сервисе или с выездом на дом!
выкуп автомобилей в любом состоянии выкуп любых автомобилей
I just couldn’t leave your website before suggesting that I really enjoyed the usual information an individual supply on your visitors? Is gonna be back often in order to investigate cross-check new posts
Oh my goodness! an amazing article. Great work.
выкуп легковых автомобилей выкуп лизинговых автомобилей
1wincom [url=https://1win.onedivision.ru]1win online[/url] бонуси казино https://www.1win.onedivision.ru .
Indian porn https://desiporn.one in Hindi. Only high-quality porn videos, convenient search and regular updates.
Viagra homme sans ordonnance belgique [url=https://vgrsansordonnance.com/#]viagra sans ordonnance[/url] Prix du Viagra en pharmacie en France
pharmacie en ligne fiable: Acheter Cialis 20 mg pas cher – pharmacie en ligne france livraison belgique
Прикольные анекдоты https://shutochki.wordpress.com/2024/09/27/smeshnye-anekdoty/
Kantorbola adalah situs gaming online terbaik di indonesia , kunjungi situs RTP kantor bola untuk mendapatkan informasi akurat rtp diatas 95% . Kunjungi juga link alternatif kami di kantorbola77 dan kantorbola99 .
After exploring a number of the blog posts on your site, I really appreciate your way of blogging. I book-marked it to my bookmark site list and will be checking back in the near future. Please check out my website too and let me know how you feel.
1xBet Promo Code Today https://idematapp.com/wp-content/pages/1xbet_promo_codes_free_bonus_offers.html
1xBet regularly updates its promo codes, offering new opportunities for bonuses each day. These daily codes can be used to unlock bonuses such as free bets, deposit bonuses, or free spins, adding extra value to your betting experience.
Porn videos https://thetittyfuck.com watch online for free. A selection of high-quality porn videos, a collection of sex videos
This contained some excellent tips and tools. Great blog publication.
[url=https://game-doghouse.ru]https://game-doghouse.ru[/url]
last news about dog house
http://www.game-doghouse.ru
퀴드퍼퓸바:031-51튼튼영어 베이비리그 가격70-2177 메디큐브튼튼영어 베이비리그 가격:031-5170-31튼튼영어 베이비리그 가격85 메
Achat mГ©dicament en ligne fiable: Acheter Cialis – pharmacie en ligne france livraison belgique
[url=https://play-doghouse.ru]http://www.play-doghouse.ru[/url]
last news about play doghouse
http://www.play-doghouse.ru
https://pharmaciepascher.pro/# Pharmacie en ligne livraison Europe
Профессиональный сервисный центр по ремонту принтеров в Москве.
Мы предлагаем: надежный сервис ремонта принтеров
Наши мастера оперативно устранят неисправности вашего устройства в сервисе или с выездом на дом!
СМЕШНЫЕ ШУТКИ И АНЕКДОТЫ
Как уместно шутить
, 얼마나 좋아요?인천 출발 비행기표 예약일본 항공권, 9만 9비행기표 예약천원?!
This is something that will need all of our combined efforts to address.
Thanks a bunch for sharing this with all people you really recognize what you are talking about! Bookmarked. Kindly also seek advice from my web site =). We can have a link alternate contract between us!
I couldn’t refrain from commenting. Perfectly written!
Hi there, just became alert to your blog through Google, and found that it is really informative.
I am going to watch out for brussels. I’ll appreciate if you continue this in future.
A lot of people will be benefited from your writing.
Cheers!
My issues have been very similar, with my family. But, we made some different decisions. It’s complex.
도착하는 꽉찬 2박 남자소자본창업3일 일정의 항공권이 남자소자본창업13만원 대부터 보입니남자소자본창업다.<b
[url=https://apk-casino-bonsai.ru]apk-casino-bonsai.ru[/url]
last news about casino bonsai
http://www.apk-casino-bonsai.ru
[url=https://dimaria-angel-ar.biz]http://dimaria-angel-ar.biz[/url]
last news about dimaria angel
https://www.dimaria-angel-ar.biz
acheter mГ©dicament en ligne sans ordonnance [url=http://pharmaciepascher.pro/#]pharmacie en ligne france livraison belgique[/url] pharmacie en ligne france fiable
trouver un mГ©dicament en pharmacie: pharmacie en ligne – Pharmacie sans ordonnance
Сервисный центр предлагает стоимость ремонта телефона wigor починка телефонов wigor
кодировка от алкоголя какой препарат [url=www.xn—-7sbbfcijbwcrwtjcjarh1adw8u.xn--p1ai/]кодировка от алкоголя какой препарат[/url] .
заказать турникет [url=http://sigmavision.ru/]http://sigmavision.ru/[/url] .
продвижение на вайлдберриз https://prodvizhenie-wildberries.ru
принудительное лечение от алкоголизма цена [url=http://xn—–7kcablenaafvie2ajgchok2abjaz3cd3a1k2h.xn--p1ai]принудительное лечение от алкоголизма цена[/url] .
Thank you for your sharing. I am worried that I lack creative ideas. It is your article that makes me full of hope. Thank you. But, I have a question, can you help me?
Профессиональный сервисный центр по ремонту плоттеров в Москве.
Мы предлагаем: ремонт плоттеров в москве
Наши мастера оперативно устранят неисправности вашего устройства в сервисе или с выездом на дом!
과 가격과 더불어 아이오디션 정보들과 함께 여행을 떠나오디션 정보는 분들에게 추천합니다오디션 정보.<br
pharmacie en ligne france livraison internationale: pharmacie en ligne sans ordonnance – п»їpharmacie en ligne france
1xBet Promo https://idematapp.com/wp-content/pages/1xbet_promo_codes_free_bonus_offers.html
1xBet frequently offers promo codes that allow users to unlock special bonuses and free bets. These promotions are available for both sports betting and casino games. Promo codes can be entered during registration or when making a deposit to activate the corresponding bonus.
mata zbrojeniowa fi 10
[url=][/url]
[b]Продажа мини-погрузчиков Lonking[/b]
Продажа мини-погрузчиков Lonking на территории России от официального
дистрибьютора. Новая многофункциональная техника для любых задач.
Наши машины предназначены для того, чтобы упростить вашу работу:
от строительных площадок до складских операций.
Высокая эффективность, надежность и инновационные решения — все,
что вам нужно для успешных проектов. Погрузите свой бизнес в будущее
с мини-погрузчиками Lonking!
47% российских покупателей выбрали мини-погрузчики Lonking в 2023 году
продано более 1200 единиц.
Lonking
[url=][/url]
>1. 제주 속으로 렌에어텔트카제주 렌트카에어텔에어텔
Профессиональный сервисный центр по ремонту бытовой техники с выездом на дом.
Мы предлагаем:ремонт крупногабаритной техники в уфе
Наши мастера оперативно устранят неисправности вашего устройства в сервисе или с выездом на дом!
Угарные анекдоты
История анекдотов
[url=https://angeldimariaar.biz]angeldimariaar.biz[/url]
last news about angel dimaria
http://www.angeldimariaar.biz
[url=https://casino-bonsai.ru]casino-bonsai.ru[/url]
last news about casino bonsai
https://www.casino-bonsai.ru
[url=https://saud-abdulhamid-ar.biz]https://saud-abdulhamid-ar.biz[/url]
last news about saud abdulhamid
saud-abdulhamid-ar.biz
pharmacie en ligne sans ordonnance [url=https://pharmaciepascher.pro/#]Achat mГ©dicament en ligne fiable[/url] Pharmacie Internationale en ligne
Pharmacie Internationale en ligne: Pharmacies en ligne certifiees – acheter mГ©dicament en ligne sans ordonnance
[url=https://bonsai-casino.ru]https://www.bonsai-casino.ru[/url]
last news about bonsai casino
https://www.bonsai-casino.ru
Лучшие еврейские анекдоты
Отдохни и посмейся
how to get acticin without a prescription – permethrin us oral tretinoin gel
https://clssansordonnance.icu/# п»їpharmacie en ligne france
만 했다.운전석.<br
Профессиональный сервисный центр по ремонту объективов в Москве.
Мы предлагаем: ремонт диафрагмы объектива
Наши мастера оперативно устранят неисправности вашего устройства в сервисе или с выездом на дом!
[url=https://roberto-firmino-ar.biz]http://roberto-firmino-ar.biz[/url]
last news about roberto firmino
http://www.roberto-firmino-ar.biz
[url=https://saudabdulhamidar.biz]saudabdulhamidar.biz[/url]
last news about saud abdulhamid
http://www.saudabdulhamidar.biz
save instagram stories [url=http://www.anonstoriesview.com]save instagram stories[/url] .
Профессиональный сервисный центр по ремонту серверов в Москве.
Мы предлагаем: ремонт и обслуживание серверов
Наши мастера оперативно устранят неисправности вашего устройства в сервисе или с выездом на дом!
Федерация – это проводник в мир покупки запрещенных товаров, можно купить гашиш, купить мефедрон, купить кокаин, купить меф, купить экстази, купить альфа пвп, купить гаш в различных городах. Москва, Санкт-Петербург, Краснодар, Владивосток, Красноярск, Норильск, Екатеринбург, Мск, СПБ, Хабаровск, Новосибирск, Казань и еще 100+ городов.
Of course, what a great site and informative posts, I will add backlink – bookmark this site? Regards, Reader
п»їViagra sans ordonnance 24h: Viagra prix pharmacie paris – Viagra sans ordonnance 24h suisse
продвижение на wildberries цена продвижение на вайлдбериз
Смешные приколы
Федерация – это проводник в мир покупки запрещенных товаров, можно купить гашиш, купить мефедрон, купить кокаин, купить меф, купить экстази, купить альфа пвп, купить гаш в различных городах. Москва, Санкт-Петербург, Краснодар, Владивосток, Красноярск, Норильск, Екатеринбург, Мск, СПБ, Хабаровск, Новосибирск, Казань и еще 100+ городов.
There are various tools and websites that affirmation to permit users to view private Instagram profiles, but it’s important to gain access to these gone caution.
Many of these tools can be unreliable, may require personal
information, or could violate Instagram’s terms of service.
Additionally, using such tools can compromise your own security or guide to scams.
The safest and most ethical exaggeration to view a private profile
is to send a follow demand directly to the user.
Always prioritize privacy and glorification in your online interactions.
my blog post: view private instagram pictures
차량을 저렴하게 탈 수원주웨딩박람회 있습니다. 하자 없이원주웨딩박람회 관리된 차량이라 안전원주웨딩박람회하지만
Hello there! I really enjoy reading your blog! If you keep making amazing posts like this I will come back every day to keep reading.
Hello, I think your blog might be having browser compatibility issues. When I look at your website in Chrome, it looks fine but when opening in Internet Explorer, it has some overlapping. I just wanted to give you a quick heads up! Other than that, awesome blog!
Веселые анекдоты про евреев
Подними настроение
pharmacies en ligne certifiГ©es [url=http://clssansordonnance.icu/#]Acheter Cialis 20 mg pas cher[/url] vente de mГ©dicament en ligne
Thanks for the post
_________________
[url=https://stavki.latestsportsnewstoday.site]слоты с джекпотом в вавада[/url]
не работает
_________________
[url=https://slo.bestslotonline.shop]марафон букмекерская контора рабочее зеркало на сегодня[/url]
WoW decent article. Can I hire you to guest write for my blog? If so send me an email!
I could not refrain from commenting. Very well written!
http://ozempic.art/# buy cheap ozempic
rybelsus cost [url=http://rybelsus.shop/#]buy semaglutide online[/url] rybelsus cost
[url=https://saud-abdulhamidar.biz/]http://www.saud-abdulhamidar.biz[/url]
last news about saud abdulhamid
http://saud-abdulhamidar.biz
buy ozempic: ozempic generic – ozempic coupon
Кодирование от алкоголя в Астана [url=www.kodirovanie-ot-alkogolizma-astana.kz/]www.kodirovanie-ot-alkogolizma-astana.kz/[/url] .
videos de xxx [url=https://www.xxxvideospro.com]videos de xxx[/url] .
instagram viewer tagged [url=http://anon-story-view.com/]http://anon-story-view.com/[/url] .
수목원 [4] 아고다 할인코드 11월광릉 국립수목원&nbs아고다 할인코드 11월p[5] 연천 재인폭포아고다 할인코드 11월호텔&a
buy rybelsus online: rybelsus cost – rybelsus pill
Divertissante, de nombreux casinos en ligne annoncent activement leur existence afin qu’ils soient aussi faciles à trouver que possible.
[url=https://robertofirminoar.biz]https://robertofirminoar.biz[/url]
last news about roberto firmino
http://robertofirminoar.biz
Ce qui distingue ce casino des autres, ce qui est susceptible de donner une valeur de main finale de plus de 17.
http://ozempic.art/# ozempic online
buy ozempic pills online [url=http://ozempic.art/#]ozempic[/url] ozempic coupon
https://rybelsus.shop/# rybelsus price
ozempic generic: ozempic – ozempic cost
Les statistiques du jeu Mega Fire Blaze Roulette dans les casinos en ligne.
카드 및 할인코드에 대마이리얼트립 할인쿠폰해 소개해 드리겠습니다마이리얼트립 할인쿠폰.아고다
ozempic: ozempic generic – ozempic coupon
bet promotional offers: A unique code provided by betting sites that users can enter to claim special bonuses like free bets, deposit matches, or risk-free bets, enhancing their betting experience.
Faites votre choix parmi le blackjack, stratégies de gain maximum pour Fire Blaze Green Wizard en fait.
Tout ce que vous avez à faire est de sélectionner la valeur de votre pari et de cliquer sur « Jouer ».
[url=https://mohammedalowaisar.biz]www.mohammedalowaisar.biz[/url]
last news about mohammed alowais
http://www.mohammedalowaisar.biz
[url=https://firmino-roberto-ar.biz]www.firmino-roberto-ar.biz[/url]
last news about firmino roberto
http://firmino-roberto-ar.biz
http://ozempic.art/# ozempic online
[url=https://abdulhamidsaud-ar.biz]http://www.abdulhamidsaud-ar.biz[/url]
last news about abdulhamid saud
http://www.abdulhamidsaud-ar.biz
cheapest rybelsus pills: buy rybelsus online – buy rybelsus online
Invité par l’un de ses nombreux sponsors, Neymar à ce mardi 29 mars, diffusé sur sa chaîne Twitch, une session de casino en ligne.
[url=https://abdulhamid-saud-ar.biz]www.abdulhamid-saud-ar.biz[/url]
last news about abdulhamid saud
abdulhamid-saud-ar.biz
Веселые свежие анекдоты и шутки
Отдохни и посмейся
http://rybelsus.shop/# buy rybelsus online
ozempic cost: buy cheap ozempic – Ozempic without insurance
buy ozempic pills online: ozempic online – ozempic generic
http://ozempic.art/# ozempic
https://avtoznak-dublikat.ru/
Смешные анекдоты и шутки
Отдохни и посмейся
Hi there, I do believe your website might be having browser compatibility issues. Whenever I take a look at your site in Safari, it looks fine however, if opening in Internet Explorer, it has some overlapping issues. I just wanted to provide you with a quick heads up! Aside from that, fantastic website.
buy ozempic: ozempic online – ozempic online
https://ozempic.art/# buy cheap ozempic
https://rybelsus.shop/# semaglutide tablets
Enjoyed studying this, very good stuff, thanks.
buy cheap ozempic [url=https://ozempic.art/#]ozempic online[/url] Ozempic without insurance
Ozempic without insurance: buy cheap ozempic – ozempic
[url=https://mohammed-alowais-ar.biz]http://mohammed-alowais-ar.biz[/url]
last news about mohammed alowais
https://www.mohammed-alowais-ar.biz
ремонт стекол цена ремонт трещин на стекле
интересный пост
_________________
[URL=https://sport.top10betssites.rent]азартные игры фильм аффлек[/URL]
Профессиональный сервисный центр по ремонту сетевых хранилищ в Москве.
Мы предлагаем: срочный ремонт сетевого хранилища
Наши мастера оперативно устранят неисправности вашего устройства в сервисе или с выездом на дом!
online betting bonus codes: Codes that give players access to bonus bets, allowing them to place wagers without risking their own funds. These codes are typically available through promotions.
Профессиональный сервисный центр по ремонту сигвеев в Москве.
Мы предлагаем: ремонт сигвеев с гарантией
Наши мастера оперативно устранят неисправности вашего устройства в сервисе или с выездом на дом!
[url=https://samoylovaoxana.ru/tag/tury-v-shri-lanku/]туры в Шри-Ланку[/url] или [url=https://samoylovaoxana.ru/tag/turoperator-inturist/]туроператор Интурист[/url]
[url=https://samoylovaoxana.ru/tag/poezdki-na-more/]поездки на море[/url]
https://samoylovaoxana.ru/tag/fingalova-peshhera/
Ещё можно узнать: [url=http://yourdesires.ru/fashion-and-style/rest-and-tourism/635-kak-poluchit-rabochuyu-vizu-v-yaponiyu.html]рабочая виза в японию для россиян требования[/url]
https://ozempic.art/# buy ozempic pills online
[url=][/url]
Продажа мини-погрузчиков Lonking
Продажа мини-погрузчиков Lonking на территории России от официального
дистрибьютора. Новая многофункциональная техника для любых задач.
Наши машины предназначены для того, чтобы упростить вашу работу:
от строительных площадок до складских операций.
Высокая эффективность, надежность и инновационные решения — все,
что вам нужно для успешных проектов. Погрузите свой бизнес в будущее
с мини-погрузчиками Lonking!
47% российских покупателей выбрали мини-погрузчики Lonking в 2023 году продано более 1200 единиц.
Мини-погрузчики Lonking
[url=][/url]
http://rybelsus.shop/# cheapest rybelsus pills
buy ozempic: ozempic coupon – ozempic cost
https://balloons-with-delivery.ru
https://taplink.cc/targetboss
buy ozempic pills online: ozempic online – ozempic generic
buy ozempic pills online [url=https://ozempic.art/#]ozempic generic[/url] ozempic cost
[url=https://obzor-gates-of-olympus.ru]http://www.obzor-gates-of-olympus.ru[/url]
last news about gates of olympus
https://obzor-gates-of-olympus.ru
Смешные анекдоты
Заходи посмеяться
[url=https://alowais-mohammed-ar.biz]https://alowais-mohammed-ar.biz[/url]
last news about alowais mohammed
https://alowais-mohammed-ar.biz
гейтс оф олимпус играть игра гейтс оф олимпус
вывод из запоя круглосуточно ростов на дону [url=https://vyvod-iz-zapoya-rostov16.ru]вывод из запоя круглосуточно ростов на дону[/url] .
частная скорая помощь №1 [url=vyvod-iz-zapoya-rostov15.ru]частная скорая помощь №1[/url] .
мостбет промокод рабочий как пользоваться промокод мостбет как пользоваться 2024
[url=https://firminorobertoar.biz]firminorobertoar.biz[/url]
last news about firmino roberto
https://firminorobertoar.biz
https://ozempic.art/# ozempic cost
Как поднять себе настроение? Посмотрите
прикольные анекдоты и поделитесь с близкими.
Just came from google to your website have to say thanks.
https://ozempic.art/# ozempic generic
cheapest rybelsus pills: buy semaglutide online – rybelsus price
игра гейтс оф олимпус гейтс оф олимпус слот
ozempic cost [url=https://ozempic.art/#]ozempic coupon[/url] buy cheap ozempic
промокод мостбет при регистрации рабочий промокод мостбет где взять 2024
nothing special
_________________
[URL=https://smi.best-bets-sites.rent]роберт де ниро казино[/URL]
Online casino https://larsthoresen.biz/2024/10/06/the-ultimate-gaming-experience-bc-game-nigeria with high bonuses, roulette and slots, instant payouts. Register on the official mirror.
My spouse and I stumbled over here by a different page and thought I might check things out.
I like what I see so i am just following you.
Look forward to finding out about your web
page repeatedly.
Le moteur est généralement sur une carte dédiée dans un dispositif à fente terrestre, ce qui signifie que vous n’aurez pas à attendre à tout moment pour voir votre recharge dans le solde de votre compte personnel.
https://ozempic.art/# ozempic online
ozempic online: ozempic online – ozempic cost
1xBet Casino Promo Code https://idematapp.com/wp-content/pages/1xbet_promo_codes_free_bonus_offers.html
For casino players, 1xBet provides promo codes that offer free spins, deposit bonuses, or cashback on losses. These codes can be used in the casino section of the site to enhance the gaming experience.
buy ozempic pills online [url=http://ozempic.art/#]buy cheap ozempic[/url] ozempic generic
https://rybelsus.shop/# semaglutide cost
Профессиональный сервисный центр по ремонту автомагнитол в Москве.
Мы предлагаем: ремонт магнитол
Наши мастера оперативно устранят неисправности вашего устройства в сервисе или с выездом на дом!
[url=https://alowaismohammedar.biz]alowaismohammedar.biz[/url]
last news about alowais mohammed
alowaismohammedar.biz
lucky jet на деньги lucky jet 1вин
Brazen Blaze est un jeu d’aventure 3v3 Smack and Shoot VR qui met l’accent sur le combat rapproché au corps à corps.
Воздушные гелиевые шары от 120 рублей за 1 шарик. Срочная доставка от 1 часа. Круглосуточная доставка по Нижнему Новгороду. Более 4000 наборов в каталоге на сайте https://balloons-with-delivery.ru
срочный вывод из запоя ростов [url=https://vyvod-iz-zapoya-rostov17.ru]срочный вывод из запоя ростов[/url] .
Шкафы распашные – купить по выгодной цене с доставкой. 36 моделей в проверенных интернет-магазинах: популярные новинки и лидеры продаж [url=https://шкафы-заказать.СЂС„]шкафы заказать[/url]
Смешные мемы. Как они появились.
However aussie play casino login has already paid for these prices in order that our customers can immediately start having enjoyable while they gamble.
ozempic online [url=https://ozempic.art/#]ozempic cost[/url] ozempic generic
lucky jet бонусы лаки джет jet
[url=https://gates-of-olympus-wiki.ru]www.gates-of-olympus-wiki.ru[/url]
last news about gates of olympus
https://www.gates-of-olympus-wiki.ru
I’d like to thank you for the efforts you have put in writing this site. I really hope to view the same high-grade blog posts from you in the future as well. In truth, your creative writing abilities has encouraged me to get my own, personal website now 😉
rgbet
Nếu bạn là một người đam mê cá cược và yêu thích sự hấp dẫn của những con số, thì sảnh lô đề RGbet chính là điểm đến lý tưởng cho bạn. Tôi đã có cơ hội trải nghiệm tại đây và muốn chia sẻ một số ấn tượng cũng như kinh nghiệm của mình.
RGbet nổi bật với mức tỷ lệ trả thưởng cực kỳ hấp dẫn. Trong quá trình chơi, tôi nhận thấy rằng nhà cái này không chỉ cung cấp nhiều loại hình cược mà còn có những mức cược linh hoạt, phù hợp với mọi nhu cầu của người chơi. Bạn có thể bắt đầu với số tiền nhỏ và dần dần tăng lên khi đã nắm bắt được các quy luật và cách thức hoạt động của trò chơi. Sự đa dạng trong các tùy chọn cược giúp cho trải nghiệm chơi không bị nhàm chán, từ cược lô, đề đến các loại cược khác.
Giao diện của RGbet rất thân thiện, dễ dàng điều hướng. Ngay cả khi bạn là người mới, bạn vẫn có thể nhanh chóng tìm thấy những thông tin cần thiết và bắt đầu đặt cược chỉ trong vài phút. Tôi đặc biệt ấn tượng với hệ thống đổi thưởng siêu tốc của nhà cái. Sau khi trúng thưởng, quá trình rút tiền diễn ra rất nhanh chóng và minh bạch. Tôi đã nhận được tiền thưởng trong tài khoản của mình chỉ sau vài phút, điều này thực sự tạo cảm giác yên tâm và tin tưởng cho người chơi.
Một điểm đáng chú ý khác là dịch vụ chăm sóc khách hàng của RGbet. Đội ngũ hỗ trợ luôn sẵn sàng 24/7, giúp tôi giải quyết mọi thắc mắc nhanh chóng và hiệu quả. Chỉ cần một tin nhắn, tôi đã có thể nhận được câu trả lời rõ ràng và hữu ích.
Ngoài ra, để tăng cơ hội trúng thưởng, tôi cũng muốn chia sẻ một vài mẹo nhỏ. Đầu tiên, hãy luôn theo dõi các thống kê và xu hướng của những con số để đưa ra quyết định cược hợp lý. Thứ hai, hãy đặt ra ngân sách cho mỗi lần chơi để tránh việc chi tiêu quá đà. Cuối cùng, đừng quên tham gia các chương trình khuyến mãi và ưu đãi mà RGbet thường xuyên tổ chức; đây là cơ hội tuyệt vời để gia tăng cơ hội thắng lớn.
Tóm lại, RGbet thực sự là một nhà cái lô đề uy tín với nhiều lợi thế vượt trội. Nếu bạn đang tìm kiếm một sân chơi lô đề an toàn, hấp dẫn và đổi thưởng nhanh chóng, đừng ngần ngại tham gia ngay hôm nay! Chắc chắn rằng bạn sẽ có những trải nghiệm thú vị và có cơ hội trúng thưởng lớn tại đây.
[url=https://gates-of-olympus-info.ru]https://gates-of-olympus-info.ru[/url]
last news about gates of olympus
http://gates-of-olympus-info.ru
Hiya, I am really glad I have found this information. Nowadays bloggers publish only about gossip and net stuff and this is actually frustrating.
[url=https://zeus-vs-hades-wiki.ru]https://zeus-vs-hades-wiki.ru[/url]
last news about zeus vs hades
https://zeus-vs-hades-wiki.ru
Доставка воздушных шаров с гелием по цене от 115 рублей за гелиевый шарик. Круглосуточно 24/7 доставляем по Нижнему Новгороду и области, а самовывоз со скидкой 5% https://helium-balloons.ru
I’m partial to blogs and i actually respect your content. The article has actually peaks my interest. I am going to bookmark your site and preserve checking for new information.
RGBET: Trang Chủ Cá Cược Uy Tín và Đa Dạng Tại Việt Nam
RGBET đã khẳng định vị thế của mình là một trong những nhà cái hàng đầu tại châu Á và Việt Nam, với đa dạng các dịch vụ cá cược và trò chơi hấp dẫn. Nhà cái này nổi tiếng với việc cung cấp môi trường cá cược an toàn, uy tín và luôn mang lại trải nghiệm tuyệt vời cho người chơi.
Các Loại Hình Cá Cược Tại RGBET
RGBET cung cấp các loại hình cá cược phong phú bao gồm:
Bắn Cá: Một trò chơi đầy kịch tính và thú vị, phù hợp với những người chơi muốn thử thách khả năng săn bắn và nhận về những phần thưởng giá trị.
Thể Thao: Nơi người chơi có thể tham gia đặt cược vào các trận đấu thể thao đa dạng, từ bóng đá, bóng rổ, đến các sự kiện thể thao quốc tế với tỷ lệ cược hấp dẫn.
Game Bài: Đây là một sân chơi dành cho những ai yêu thích các trò chơi bài như tiến lên miền Nam, phỏm, xì dách, và mậu binh. Các trò chơi được phát triển kỹ lưỡng, đem lại cảm giác chân thực và thú vị.
Nổ Hũ: Trò chơi slot với cơ hội trúng Jackpot cực lớn, luôn thu hút sự chú ý của người chơi. Nổ Hũ RGBET là sân chơi hoàn hảo cho những ai muốn thử vận may và giành lấy những phần thưởng khủng.
Lô Đề: Với tỷ lệ trả thưởng cao và nhiều tùy chọn cược, RGBET là nơi lý tưởng cho những người đam mê lô đề.
Tính Năng Nổi Bật Của RGBET
Một trong những điểm nổi bật của RGBET là giao diện thân thiện, dễ sử dụng và hệ thống bảo mật tiên tiến giúp bảo vệ thông tin người chơi. Ngoài ra, nhà cái này còn hỗ trợ các hình thức nạp rút tiền tiện lợi thông qua nhiều kênh khác nhau như OVO, Gopay, Dana, và các chuỗi cửa hàng như Indomaret và Alfamart.
Khuyến Mãi và Dịch Vụ Chăm Sóc Khách Hàng
RGBET không chỉ nổi bật với các trò chơi đa dạng, mà còn cung cấp nhiều chương trình khuyến mãi hấp dẫn như bonus chào mừng, cashback, và các phần thưởng hàng ngày. Đặc biệt, dịch vụ chăm sóc khách hàng của RGBET hoạt động 24/7 với đội ngũ chuyên nghiệp, sẵn sàng hỗ trợ người chơi qua nhiều kênh liên lạc.
Kết Luận
Với những ưu điểm nổi bật về dịch vụ, bảo mật, và trải nghiệm người dùng, RGBET xứng đáng là nhà cái hàng đầu mà người chơi nên lựa chọn khi tham gia vào thế giới cá cược trực tuyến.
[url=https://casino-crazy-time.ru]http://casino-crazy-time.ru[/url]
last news about casino crazy time
https://casino-crazy-time.ru
Услуги Riga escort предлагают идеальное сопровождение для вашего отдыха или деловой поездки https://www.escortinriga.lv
В магазине сейфов предлагают сейф цена москва где купить сейфы в москве
ozempic cost [url=http://ozempic.art/#]ozempic coupon[/url] ozempic generic
Авиатор играть на деньги Aviator
Trong bối cảnh ngành công nghiệp cá cược trực tuyến ngày càng phát triển, việc lựa chọn một nhà cái uy tín trở nên vô cùng quan trọng đối với những người đam mê cá cược.Nhà cái RGBET nổi lên như một sự lựa chọn hàng đầu đáng để bạn quan tâm, hứa hẹn mang đến cho bạn một trải nghiệm cá cược an toàn, công bằng và thú vị. Từ các trò chơi cá cược đa dạng, dịch vụ chăm sóc khách hàng tận tình đến tỷ lệ cược cạnh tranh, Rgbet sở hữu nhiều ưu điểm vượt trội khiến bạn không thể bỏ qua.Hãy cùng khám phá những lý do tại sao bạn cần quan tâm đến nhà cái Rgbet và tại sao đây nên là lựa chọn hàng đầu của bạn trong thế giới cá cược trực tuyến.
With thanks, Numerous advice.
[url=][/url]
Продажа мини-погрузчиков Lonking
Продажа мини-погрузчиков Lonking на территории России от официального дистрибьютора.
Новая многофункциональная техника для любых задач.
Наши машины предназначены для того, чтобы упростить вашу работу: от строительных площадок
до складских операций.
Высокая эффективность, надежность и инновационные решения — все, что вам нужно
для успешных проектов. Погрузите свой бизнес в будущее с мини-погрузчиками Lonking!
47% российских покупателей выбрали мини-погрузчики Lonking в 2023 году продано более 1200 единиц.
Наши сайт: Мини-погрузчики Lonking
[url=][/url]
Шкафы распашные – в наличии 1099 моделей с фото, размерами и подробным описанием от производителя: популярные новинки и лидеры продаж. Все размеры в каталоге. Гарантия качества и профессиональная установка [url=https://xn—-7sbaagxbjc2asi0f6gg.xn--p1ai]заказать мебель[/url]
very interesting, but nothing sensible
_________________
[URL=https://rucasino.best-casino-play.rent]online casinos with free spins[/URL]
delivery of helium balloons to the house https://helium-balloons-delivery.com
[url=https://casino-gates-of-olympus.ru]https://casino-gates-of-olympus.ru[/url]
last news about casino gates-of-olympus
https://casino-gates-of-olympus.ru
https://ozempic.art/# buy cheap ozempic
Авиатор игра на деньги онлайн Aviator
rybelsus coupon [url=https://rybelsus.shop/#]rybelsus cost[/url] rybelsus pill
Ce lundi, le tribunal de commerce de Paris a autorisé la reprise par Auchan, Carrefour et Intermarché de 288 enseignes Casino.
buy helium balloons buy an apartment in a new building with finishing
http://ozempic.art/# Ozempic without insurance
Aussie Play Casino doesn’t require gamers to make a deposit in order to play its games, in contrast to other casinos.
Смешные картинки. Как они появились.
rgbet
RGBET đã nhanh chóng khẳng định vị trí của mình trong ngành công nghiệp cá cược trực tuyến, trở thành một trong những nhà cái hàng đầu đáng để người chơi quan tâm. Dưới đây là một số lý do tại sao RGBET lại nổi bật và trở thành lựa chọn lý tưởng cho những ai đam mê cá cược:
1. Sự Đa Dạng Về Trò Chơi
RGBET cung cấp một loạt các trò chơi cá cược đa dạng, từ cá cược thể thao, casino trực tuyến, đến các trò chơi như slots, poker và các game bài phổ biến. Điều này mang lại cho người chơi nhiều lựa chọn để giải trí và tận hưởng niềm vui khi tham gia cá cược.
2. Dịch Vụ Khách Hàng Chuyên Nghiệp
Một trong những điểm mạnh của RGBET là dịch vụ chăm sóc khách hàng chu đáo, hỗ trợ người chơi 24/7. Bất kể thời gian hay vấn đề gì phát sinh, người chơi luôn có thể nhận được sự hỗ trợ kịp thời, giúp giải quyết các thắc mắc và đảm bảo trải nghiệm cá cược suôn sẻ.
3. Tỷ Lệ Cược Cạnh Tranh
RGBET nổi tiếng với việc cung cấp tỷ lệ cược vô cùng hấp dẫn và cạnh tranh, giúp người chơi có thêm cơ hội thắng lớn. Điều này là điểm hấp dẫn đối với những ai muốn tìm kiếm giá trị tốt nhất từ các khoản cược của mình.
4. Sự Công Bằng và An Toàn
RGBET cam kết mang đến cho người chơi môi trường cá cược minh bạch và an toàn. Hệ thống bảo mật cao cấp đảm bảo rằng thông tin cá nhân và tài khoản của người chơi luôn được bảo vệ.
5. Ưu Đãi và Khuyến Mại
RGBET thường xuyên tung ra các chương trình khuyến mại và ưu đãi đặc biệt dành cho cả người chơi mới và người chơi lâu năm. Đây là một cách tuyệt vời để người chơi có thêm động lực tham gia và tận hưởng nhiều phần thưởng giá trị.
Kết Luận
Nếu bạn đang tìm kiếm một nhà cái uy tín với dịch vụ chuyên nghiệp, trò chơi đa dạng và môi trường cá cược an toàn, RGBET là sự lựa chọn hoàn hảo. Với các ưu điểm vượt trội và những cam kết về chất lượng, RGBET hứa hẹn sẽ mang đến cho bạn những trải nghiệm cá cược trực tuyến đáng nhớ.
Мы осуществляем продажу надувных гелиевых шаров недорого с доставкой в Нижнем Новгороде. Гарантируем высокое качество и долгий полет композиций https://balloons-with-delivery.ru
Официальный сайт 1xSlots отличается приятным интерфейсом доступным на 6 языках, удобством и хорошим функционалом. 1xSlots — крупное виртуальное казино, которое обладает международной лицензией [url=https://mir-bell.ru/1xslots-bonusy/]1xslots casino[/url]
pin-up bonanza: pin-up casino giris – pin up bet
1xBet Promo Code for Bonus https://actuchomage.org/includes/wkl/code_promo_69.html
Promo codes on 1xBet unlock a variety of bonuses, including deposit matches, free bets, and free spins. These codes can be used during registration or deposit to claim the corresponding bonus and boost your bankroll.
пин ап казахстан [url=http://pinupkz.tech/#]пин ап 634[/url] пин ап казахстан
Онлайн-казино Ramenbet casino — это бренд который начал свою деятельность в декабре 2023 года. На этой странице вы найдёте всегда актуальное зеркало [url=https://narkomaniya-stop.ru/]раменбет казино[/url]
Dans l’ensemble, Robot Blaze Adventure Games est un jeu divertissant avec un gameplay simple qui peut garder les joueurs engagés pendant des heures.
[url=https://mohammed-alowaisar.biz]www.mohammed-alowaisar.biz[/url]
last news about mohammed alowais
https://mohammed-alowaisar.biz
Профессиональный сервисный центр ремонт телефонов москва дешево ремонт сотовых телефонов рядом
Официальный сайт казино Гама и зеркало — регистрация и личный кабинет, бонусы, лучшие игровые автоматы, мобильная версия. Зеркало онлайн-казино Гама — это полная копия основного сайта, построенная на другом доменном имени [url=https://leonavto66.ru/]гамаказино[/url]
Профессиональный сервисный центр по ремонту планшетов в Москве.
Мы предлагаем: сервис по ремонту планшетов
Наши мастера оперативно устранят неисправности вашего устройства в сервисе или с выездом на дом!
pin up casino: pin up bet – pin up casino
우리 취향은 아니었다종로 웨딩밴드.그리고 이렇게 다섯군종로 웨딩밴드데를 하
pin up: пинап казино – pin up kz
[url=https://play-crazy-time.ru]http://www.play-crazy-time.ru[/url]
last news about play crazy time
http://www.play-crazy-time.ru
[url=https://crazy-time-obzor.ru/]http://www.crazy-time-obzor.ru[/url]
last news about crazy time obzor
http://www.crazy-time-obzor.ru
[url=https://casino-zeus-vs-hades.ru]http://www.casino-zeus-vs-hades.ru[/url]
last news about casino zeus vs hades
https://www.casino-zeus-vs-hades.ru
Используем мощные немецкие бензопилы STIHL, которые гарантирует быстрый и ровный спил деревьев любого размера [url=https://dzen.ru/a/ZuGpa8HcSRvN8RFE]спил деревьев[/url]
rgbet
nhà cái
http://pinupturkey.pro/# pin up casino guncel giris
Have you always been concerned about these issues?
Смешные анекдоты.
В магазине сейфов предлагают купить сейф 2 сейфы второго класса
We are a group of volunteers and opening a new scheme
in our community. Your website offered us with valuable information to work on. You have done
a formidable job and our whole community will be thankful to you.
пин ап [url=http://pinupru.site/#]pin up зеркало[/url] пинап казино
пинап казино https://pinupru.site/# пин ап официальный сайт
pin up казино
으로 변경 가능)/1부미국복권 랩다이아부산사람인제남미국복권자친구는귀금속은18k를미국복권맞추고싶
пинап кз: пин ап казино – пин ап казино
Воздушные шары разных видов с доставкой в Нижнем Новгороде! Более 13 лет опыта! Гарантируем свежесть всех товаров! Привезем 100% вовремя https://helium-balloons.ru
[url=https://sugar-rush-casino-play.ru]www.sugar-rush-casino-play.ru[/url]
last news about sugar rush casino
sugar-rush-casino-play.ru
[url=https://midas-golden-touch-obzor.ru]https://www.midas-golden-touch-obzor.ru[/url]
last news about midas golden touch
https://www.midas-golden-touch-obzor.ru
Riga escort предлагает премиальные услуги эскорта для тех, кто ценит роскошь, изысканность и компанию очаровательных женщин. Эскорт-модельная организация https://rigaescort.lv
Casino and slot machines online. Play slot machines with bonus, casino for money. Registration and login to the working mirror
Free online https://thetranny.com porn videos and movies. Only girls with dicks. On our site there are trans girls for every taste!
Профессиональный сервисный центр по ремонту бытовой техники с выездом на дом.
Мы предлагаем: ремонт бытовой техники в волгограде
Наши мастера оперативно устранят неисправности вашего устройства в сервисе или с выездом на дом!
Discover the latest global innovations and trends with Takizo. We make small dreams and big plans for millions of people come true [url=https://www.putneysw15.com/default.asp?section=info&link=https://www.condenastinteractive.co.uk/]https://www.putneysw15.com/default.asp?section=info&link=https://www.condenastinteractive.co.uk/[/url]
pin-up oyunu [url=https://pinupaz.bid/#]pin up 306[/url] pin-up oyunu
пин ап казино зеркало: pin up казино – pin up казино
Face Up Pai Gow Poker™ options head-to-head play against the vendor and offers the optional Fortune Bonus and Ace-High wagers.
Casino and slot https://parus-uc.online/2024/10/07/lemon-casino-magyarorszag-the-top-casino-in-hungary machines online. Play slot machines with bonus, casino for money. Registration and login to the working mirror
[url=https://play-zeus-vs-hades.ru]https://www.play-zeus-vs-hades.ru[/url]
last news about zeus vs hades
http://www.play-zeus-vs-hades.ru
I have to say this post was certainly informative and contains useful content for enthusiastic visitors. I will definitely bookmark this website for future reference and further viewing. cheers a bunch for sharing this with us!
pin up: pin up kz – пин ап
Тут делают продвижение seo медицина стратегия с роботами
Porn video https://zeenite.com watch online from pages for free in FullHD quality. Fresh archive of selected porn and tender sex scenes from all over the world!
Тут делают продвижение разработка сайт медицинской клиники разработка сайта для медицинского центра
вывод из запоя на дому краснодар цены [url=https://vyvod-iz-zapoya-krasnodar15.ru/]вывод из запоя на дому краснодар цены[/url] .
hd porn video in [url=https://www.xxxfreenow.com]hd porn video in[/url] .
De plus en plus de plateformes de casino en ligne interdisent l’usage des VPN, et pour cause, ces outils permettent de contourner certaines restrictions.
Интернет магазин подарков предлагает надуть гелевые шары или несколько воздушных шариков хорошего качества с понравившимися надписями https://balloons-with-delivery.ru
view instagram anonymously [url=https://anonimstories.com /]view instagram anonymously[/url] .
частный нарколог на дом [url=http://www.narkolog-na-dom-krasnodar17.ru]частный нарколог на дом[/url] .
нарколог краснодар [url=http://www.narkolog-na-dom-krasnodar16.ru]нарколог краснодар[/url] .
Смешные мемы.
Easy to use. Tonkeeper is the easiest self-custody wallet to pay toncoin and other tokens. Ton has low blockchain fees and fast transactions [url=https://www.pgyer.com/apk/apk/com.ton_keeper]tonkeeper[/url]
Свежие анекдоты.
[url=https://sugar-rush-casino-info.ru]http://www.sugar-rush-casino-info.ru[/url]
last news about sugar rush casino
http://sugar-rush-casino-info.ru
[url=https://crazy-time-casino.ru]https://crazy-time-casino.ru[/url]
last news about crazy time casino
https://www.crazy-time-casino.ru
This blog post is excellent, probably because of how well the subject was developed. I like some of the comments too.
пин ап зеркало: пин ап казино вход – пин ап казино зеркало
http://pinupaz.bid/# pinup az
пин ап https://pinupru.site/# пин ап казино зеркало
pin up
DJ88
DJ88 adalah situs game deposit pulsa terbaik di Indonesia yang menawarkan pengalaman bermain game online yang lengkap dan mudah. Hanya dengan satu ID, pemain dapat mengakses berbagai jenis permainan yang tersedia di platform ini, memberikan kenyamanan dan variasi permainan yang tak tertandingi.
Sebagai situs game online berlisensi resmi dari PAGCOR (Philippine Amusement and Gaming Corporation), DJ88 menjamin keamanan dan kenyamanan para penggunanya. Dengan dukungan server hosting yang cepat serta sistem keamanan canggih berbasis enkripsi terkini, DJ88 memberikan rasa aman dalam menjaga privasi dan data penggunanya. Tampilan situs yang modern dan intuitif juga memastikan pengalaman bermain yang menyenangkan dan mudah diakses oleh semua kalangan.
Salah satu keunggulan DJ88 adalah kemudahan dalam melakukan deposit pulsa, baik melalui XL maupun Telkomsel, dengan potongan yang lebih rendah dibandingkan situs lainnya. Hal ini menjadikan DJ88 sebagai salah satu situs game online pulsa terbesar di Indonesia. Tidak hanya itu, pengguna juga dapat melakukan deposit melalui berbagai platform E-commerce resmi seperti OVO, Gopay, Dana, atau bahkan melalui minimarket seperti Indomaret dan Alfamart.
DJ88 dikenal sebagai agen game online terpercaya yang selalu menempatkan kepercayaan pengguna sebagai prioritas utama. Dengan berbagai upaya menjaga reputasi dan memberikan layanan terbaik, DJ88 telah menjadi pilihan utama bagi pemain game online di Indonesia.
Platform ini menawarkan berbagai macam permainan online yang dapat diakses kapan saja dan di mana saja, tanpa perlu repot bepergian. DJ88 juga menyediakan game live dengan host cantik yang berinteraksi secara real-time melalui kamera, memberikan pengalaman bermain yang lebih menarik dan interaktif.
Selain pilihan permainan yang beragam, DJ88 juga menyediakan berbagai promo menarik seperti welcome bonus 20%, bonus deposit harian, hingga cashback, yang tentunya menambah keseruan bermain. Promo ini dirancang agar pemain dapat menikmati keuntungan lebih dari setiap permainan.
DJ88 juga unggul dalam layanan pelanggan. Dengan tim customer service yang profesional, ramah, dan siap membantu 24 jam non-stop melalui berbagai platform seperti Live Chat, WhatsApp, dan media sosial, DJ88 memastikan setiap pertanyaan dan masalah pengguna dapat diselesaikan dengan cepat dan tepat.
Dengan segala keunggulan yang ditawarkan, DJ88 menjadi situs game online pulsa pilihan terbaik di Indonesia. Bergabunglah sekarang dan nikmati berbagai keuntungan dari DJ88!
Komet Dental is one of the leading manufacturers and providers of dental technology worldwide. The company has its head office in Lemgo, Germany [url=http://pmarchive.ru/instrumenty-kotorye-izmenyat-rabotu-dantista/]http://pmarchive.ru/instrumenty-kotorye-izmenyat-rabotu-dantista/[/url]
Nếu bạn là một người đam mê cá cược và yêu thích sự hấp dẫn của những con số, thì sảnh lô đề RGbet chính là điểm đến lý tưởng cho bạn. Tôi đã có cơ hội trải nghiệm tại đây và muốn chia sẻ một số ấn tượng cũng như kinh nghiệm của mình.
RGbet nổi bật với mức tỷ lệ trả thưởng cực kỳ hấp dẫn. Trong quá trình chơi, tôi nhận thấy rằng nhà cái này không chỉ cung cấp nhiều loại hình cược mà còn có những mức cược linh hoạt, phù hợp với mọi nhu cầu của người chơi. Bạn có thể bắt đầu với số tiền nhỏ và dần dần tăng lên khi đã nắm bắt được các quy luật và cách thức hoạt động của trò chơi. Sự đa dạng trong các tùy chọn cược giúp cho trải nghiệm chơi không bị nhàm chán, từ cược lô, đề đến các loại cược khác.
Giao diện của RGbet rất thân thiện, dễ dàng điều hướng. Ngay cả khi bạn là người mới, bạn vẫn có thể nhanh chóng tìm thấy những thông tin cần thiết và bắt đầu đặt cược chỉ trong vài phút. Tôi đặc biệt ấn tượng với hệ thống đổi thưởng siêu tốc của nhà cái. Sau khi trúng thưởng, quá trình rút tiền diễn ra rất nhanh chóng và minh bạch. Tôi đã nhận được tiền thưởng trong tài khoản của mình chỉ sau vài phút, điều này thực sự tạo cảm giác yên tâm và tin tưởng cho người chơi.
Một điểm đáng chú ý khác là dịch vụ chăm sóc khách hàng của RGbet. Đội ngũ hỗ trợ luôn sẵn sàng 24/7, giúp tôi giải quyết mọi thắc mắc nhanh chóng và hiệu quả. Chỉ cần một tin nhắn, tôi đã có thể nhận được câu trả lời rõ ràng và hữu ích.
Ngoài ra, để tăng cơ hội trúng thưởng, tôi cũng muốn chia sẻ một vài mẹo nhỏ. Đầu tiên, hãy luôn theo dõi các thống kê và xu hướng của những con số để đưa ra quyết định cược hợp lý. Thứ hai, hãy đặt ra ngân sách cho mỗi lần chơi để tránh việc chi tiêu quá đà. Cuối cùng, đừng quên tham gia các chương trình khuyến mãi và ưu đãi mà RGbet thường xuyên tổ chức; đây là cơ hội tuyệt vời để gia tăng cơ hội thắng lớn.
Tóm lại, RGbet thực sự là một nhà cái lô đề uy tín với nhiều lợi thế vượt trội. Nếu bạn đang tìm kiếm một sân chơi lô đề an toàn, hấp dẫn và đổi thưởng nhanh chóng, đừng ngần ngại tham gia ngay hôm nay! Chắc chắn rằng bạn sẽ có những trải nghiệm thú vị và có cơ hội trúng thưởng lớn tại đây.
Услуги юриста по подготовке заявления о разводе, расторжению брака через суд, разделу имущества, определения места жительства детей, вопросы уплаты алиментов, ведение бракоразводных процессов [url=https://advokaty-v-moskve.blogspot.com/2024/07/rastorzhenie-braka.html]https://advokaty-v-moskve.blogspot.com/2024/07/rastorzhenie-braka.html[/url]
FOSIL4D
FOSIL4D
RGBET: Trang Chủ Cá Cược Uy Tín và Đa Dạng Tại Việt Nam
RGBET đã khẳng định vị thế của mình là một trong những nhà cái hàng đầu tại châu Á và Việt Nam, với đa dạng các dịch vụ cá cược và trò chơi hấp dẫn. Nhà cái này nổi tiếng với việc cung cấp môi trường cá cược an toàn, uy tín và luôn mang lại trải nghiệm tuyệt vời cho người chơi.
Các Loại Hình Cá Cược Tại RGBET
RGBET cung cấp các loại hình cá cược phong phú bao gồm:
Bắn Cá: Một trò chơi đầy kịch tính và thú vị, phù hợp với những người chơi muốn thử thách khả năng săn bắn và nhận về những phần thưởng giá trị.
Thể Thao: Nơi người chơi có thể tham gia đặt cược vào các trận đấu thể thao đa dạng, từ bóng đá, bóng rổ, đến các sự kiện thể thao quốc tế với tỷ lệ cược hấp dẫn.
Game Bài: Đây là một sân chơi dành cho những ai yêu thích các trò chơi bài như tiến lên miền Nam, phỏm, xì dách, và mậu binh. Các trò chơi được phát triển kỹ lưỡng, đem lại cảm giác chân thực và thú vị.
Nổ Hũ: Trò chơi slot với cơ hội trúng Jackpot cực lớn, luôn thu hút sự chú ý của người chơi. Nổ Hũ RGBET là sân chơi hoàn hảo cho những ai muốn thử vận may và giành lấy những phần thưởng khủng.
Lô Đề: Với tỷ lệ trả thưởng cao và nhiều tùy chọn cược, RGBET là nơi lý tưởng cho những người đam mê lô đề.
Tính Năng Nổi Bật Của RGBET
Một trong những điểm nổi bật của RGBET là giao diện thân thiện, dễ sử dụng và hệ thống bảo mật tiên tiến giúp bảo vệ thông tin người chơi. Ngoài ra, nhà cái này còn hỗ trợ các hình thức nạp rút tiền tiện lợi thông qua nhiều kênh khác nhau như OVO, Gopay, Dana, và các chuỗi cửa hàng như Indomaret và Alfamart.
Khuyến Mãi và Dịch Vụ Chăm Sóc Khách Hàng
RGBET không chỉ nổi bật với các trò chơi đa dạng, mà còn cung cấp nhiều chương trình khuyến mãi hấp dẫn như bonus chào mừng, cashback, và các phần thưởng hàng ngày. Đặc biệt, dịch vụ chăm sóc khách hàng của RGBET hoạt động 24/7 với đội ngũ chuyên nghiệp, sẵn sàng hỗ trợ người chơi qua nhiều kênh liên lạc.
Kết Luận
Với những ưu điểm nổi bật về dịch vụ, bảo mật, và trải nghiệm người dùng, RGBET xứng đáng là nhà cái hàng đầu mà người chơi nên lựa chọn khi tham gia vào thế giới cá cược trực tuyến.
San Andreas Multiplayer – это превосходный мод для Grand Theft Auto: San Andreas, который позволяет ещё дольше наслаждаться одной из лучших игр в истории [url=https://sa-mp.top/]читы самп[/url]
Tracking the most recent global innovation trends, the GII finds that innovation investment slowed in 2023, in marked contrast to previous years [url=https://vivadoo.es/jump.php?idbd=996&url=https://www.vaughancannabis.store/]https://vivadoo.es/jump.php?idbd=996&url=https://www.vaughancannabis.store/[/url]
bs02.at
We absolutely love your blog and find the majority of your post’s to be exactly what I’m looking for. Do you offer guest writers to write content to suit your needs? I wouldn’t mind composing a post or elaborating on a number of the subjects you write about here. Again, awesome weblog!
https://nta-pfo.ru/news/economy/2024/news_686610/
[url=https://midas-golden-touch-info.ru]www.midas-golden-touch-info.ru[/url]
last news about midas golden touch
http://www.midas-golden-touch-info.ru
В магазине сейфов предлагают сейф взломостойкий взломостойкий сейф для дома
Вызов сантехника https://santekhnik-moskva.blogspot.com/p/v-moskve.html на дом в Москве и Московской области в удобное для вас время. Сантехнические работы любой сложности, от ремонта унитаза, устранение засора, до замены труб.
Смешные видео приколы.
Смешные пошлые анекдоты.
rgbet
Trong bối cảnh ngành công nghiệp cá cược trực tuyến ngày càng phát triển, việc lựa chọn một nhà cái uy tín trở nên vô cùng quan trọng đối với những người đam mê cá cược.Nhà cái RGBET nổi lên như một sự lựa chọn hàng đầu đáng để bạn quan tâm, hứa hẹn mang đến cho bạn một trải nghiệm cá cược an toàn, công bằng và thú vị. Từ các trò chơi cá cược đa dạng, dịch vụ chăm sóc khách hàng tận tình đến tỷ lệ cược cạnh tranh, Rgbet sở hữu nhiều ưu điểm vượt trội khiến bạn không thể bỏ qua.Hãy cùng khám phá những lý do tại sao bạn cần quan tâm đến nhà cái Rgbet và tại sao đây nên là lựa chọn hàng đầu của bạn trong thế giới cá cược trực tuyến.
Тут делают продвижение seo продвижение медицинских сайтов медицинский seo
I wish I could craft such articles as this. Thank you very much.
Тут делают продвижение создание сайта для клиники создание сайта медицинского центра
pin up: pinup azerbaycan – pin-up kazino
[url=https://crazy-time-wiki.ru]https://www.crazy-time-wiki.ru[/url]
last news about crazy time
http://crazy-time-wiki.ru
[url=https://sugar-rush-casino-wiki.ru]sugar-rush-casino-wiki.ru[/url]
last news about sugar rush casino
sugar-rush-casino-wiki.ru
pin up guncel giris [url=https://pinupturkey.pro/#]pin up casino[/url] pin up casino guncel giris
Quickly delivered, and some goods are cheaper than in other stores. The quality of marijuana is on top, everything is exactly as in the description [url=http://www.calderan.info/gotoURL.asp?url=https://www.scarboroughcannabis.store/]http://www.calderan.info/gotoURL.asp?url=https://www.scarboroughcannabis.store/[/url]
[url=https://play-midas-golden-touch.ru]https://www.play-midas-golden-touch.ru[/url]
last news about play midas golden
http://www.play-midas-golden-touch.ru
Free porn
Can you be more specific about the content of your article? After reading it, I still have some doubts. Hope you can help me. https://accounts.binance.com/pt-BR/register-person?ref=YY80CKRN
[url=][/url]
Интернет-магазин плитки и керамики «ИнфоПлитка»
Интернет-магазин керамической плитки и керамогранита «Infoplitka» (infoplitka.ru)
предлагает широкий ассортимент высококачественной плитки и керамогранита от ведущих производителей.
Мы стремимся предложить нашим клиентам только лучшее, поэтому в ассортименте представлены товары,
отвечающие самым высоким стандартам качества и дизайна.
Мы понимаем, что выбор керамической плитки и керамогранита – это важный этап в создании
комфортного и стильного интерьера. Поэтому наша команда профессионалов готова помочь вам в
подборе идеального варианта для вашего проекта. Независимо от того, нужны ли вам плитка
для ванной комнаты, кухни, гостиной, или же керамогранит для облицовки пола, вы всегда найдете
у нас разнообразные и актуальные коллекции, соответствующие последним тенденциям в области
дизайна интерьеров.
Официальный сайт «ИнфоПлитка»
[url=][/url]
http://gabapentin.auction/# neurontin pfizer
[url=https://sugar-rush-casino-obzor.ru]www.sugar-rush-casino-obzor.ru[/url]
last news about sugar rush casino
http://www.sugar-rush-casino-obzor.ru
ivermectin syrup: stromectol price – stromectol tablet 3 mg
Профессиональный сервисный центр по ремонту электросамокатов в Москве.
Мы предлагаем: сервисный центр электросамокатов в москве
Наши мастера оперативно устранят неисправности вашего устройства в сервисе или с выездом на дом!
[url=https://slot-casino-info.ru]http://www.slot-casino-info.ru[/url]
last news about slot casino
https://www.slot-casino-info.ru
Профессиональный сервисный центр по ремонту бытовой техники с выездом на дом.
Мы предлагаем: ремонт крупногабаритной техники в воронеже
Наши мастера оперативно устранят неисправности вашего устройства в сервисе или с выездом на дом!
[url=https://slots-casino-info.ru]slots-casino-info.ru[/url]
last news about slots casino
http://www.slots-casino-info.ru
Продажа Tether USDT TRC20 в интернете – это быстрый и удобный способ конвертировать ваши цифровые активы в фиатные деньги или наличные валюты [url=https://kievautobaza.at.ua/forum/2-4300-1#12643]usdt приват24[/url]
Профессиональный сервисный центр починка телефонов ремонт телефонов поблизости
Canvas Cannabis brings the best in legal, recreational cannabis dispensaries to Toronto offering a wide range of cannabis flower, edibles, vaporizers [url=https://www.marcomanfredini.it/radio/visualizzacollezione.php?paginanews=4&contenuto=13&quale=40&origine=https://www.mississaugacannabis.store/%20%20%20%20%20]https://www.marcomanfredini.it/radio/visualizzacollezione.php?paginanews=4&contenuto=13&quale=40&origine=https://www.mississaugacannabis.store/%20%20%20%20%20[/url]
https://gabapentin.auction/# neurontin 100 mg tablets
Свежие приколы и картинки https://teletype.in/@anekdoty/prikoly-nastroenie.
http://gabapentin.auction/# neurontin brand name
Тут делают продвижение продвижение сайта медицинского центра разработка сайта для медицинского центра
new movie sex video [url=www.ixxxsexvideo.com]new movie sex video[/url] .
вывод из запоя на дому краснодар [url=vyvod-iz-zapoya-krasnodar16.ru]вывод из запоя на дому краснодар [/url] .
rgbet
RGBET: Trang Chủ Cá Cược Uy Tín và Đa Dạng Tại Việt Nam
RGBET đã khẳng định vị thế của mình là một trong những nhà cái hàng đầu tại châu Á và Việt Nam, với đa dạng các dịch vụ cá cược và trò chơi hấp dẫn. Nhà cái này nổi tiếng với việc cung cấp môi trường cá cược an toàn, uy tín và luôn mang lại trải nghiệm tuyệt vời cho người chơi.
Các Loại Hình Cá Cược Tại RGBET
RGBET cung cấp các loại hình cá cược phong phú bao gồm:
Bắn Cá: Một trò chơi đầy kịch tính và thú vị, phù hợp với những người chơi muốn thử thách khả năng săn bắn và nhận về những phần thưởng giá trị.
Thể Thao: Nơi người chơi có thể tham gia đặt cược vào các trận đấu thể thao đa dạng, từ bóng đá, bóng rổ, đến các sự kiện thể thao quốc tế với tỷ lệ cược hấp dẫn.
Game Bài: Đây là một sân chơi dành cho những ai yêu thích các trò chơi bài như tiến lên miền Nam, phỏm, xì dách, và mậu binh. Các trò chơi được phát triển kỹ lưỡng, đem lại cảm giác chân thực và thú vị.
Nổ Hũ: Trò chơi slot với cơ hội trúng Jackpot cực lớn, luôn thu hút sự chú ý của người chơi. Nổ Hũ RGBET là sân chơi hoàn hảo cho những ai muốn thử vận may và giành lấy những phần thưởng khủng.
Lô Đề: Với tỷ lệ trả thưởng cao và nhiều tùy chọn cược, RGBET là nơi lý tưởng cho những người đam mê lô đề.
Tính Năng Nổi Bật Của RGBET
Một trong những điểm nổi bật của RGBET là giao diện thân thiện, dễ sử dụng và hệ thống bảo mật tiên tiến giúp bảo vệ thông tin người chơi. Ngoài ra, nhà cái này còn hỗ trợ các hình thức nạp rút tiền tiện lợi thông qua nhiều kênh khác nhau như OVO, Gopay, Dana, và các chuỗi cửa hàng như Indomaret và Alfamart.
Khuyến Mãi và Dịch Vụ Chăm Sóc Khách Hàng
RGBET không chỉ nổi bật với các trò chơi đa dạng, mà còn cung cấp nhiều chương trình khuyến mãi hấp dẫn như bonus chào mừng, cashback, và các phần thưởng hàng ngày. Đặc biệt, dịch vụ chăm sóc khách hàng của RGBET hoạt động 24/7 với đội ngũ chuyên nghiệp, sẵn sàng hỗ trợ người chơi qua nhiều kênh liên lạc.
Kết Luận
Với những ưu điểm nổi bật về dịch vụ, bảo mật, và trải nghiệm người dùng, RGBET xứng đáng là nhà cái hàng đầu mà người chơi nên lựa chọn khi tham gia vào thế giới cá cược trực tuyến.
Everything is very open with a clear clarification of the challenges. It was really informative. Your site is very helpful. Thanks for sharing!
https://gabapentin.auction/# how much is neurontin pills
вывод из запоя дома [url=www.vyvod-iz-zapoya-ekaterinburg14.ru]вывод из запоя дома[/url] .
ST666 – Trang Chủ Cá Cược Chính Thức Tại Việt Nam
ST666 là một trong những nhà cái cá cược hàng đầu châu Á, nổi bật với dịch vụ đa dạng và hệ thống game đổi thưởng hấp dẫn. Với nhiều năm kinh nghiệm trong lĩnh vực cá cược trực tuyến, ST666 đã xây dựng được uy tín và niềm tin từ hàng triệu người chơi trên khắp khu vực.
Hệ Thống Game Đổi Thưởng ST666
Tại ST666, người chơi có thể trải nghiệm nhiều loại hình giải trí khác nhau, bao gồm:
Bắn cá: Một trong những trò chơi được ưa chuộng nhất, mang lại trải nghiệm bắn súng dưới nước độc đáo và hấp dẫn.
Thể thao: Cung cấp cược thể thao từ các giải đấu lớn nhỏ trên toàn thế giới với tỷ lệ cược hấp dẫn.
Xổ số: Trò chơi đơn giản, dễ chơi với cơ hội nhận thưởng lớn.
Game bài: Đa dạng các trò chơi bài như poker, baccarat, và nhiều thể loại khác.
Nổ hũ: Trò chơi đầy kịch tính với các phần thưởng cực lớn.
Live Casino: Người chơi có thể tham gia các sòng bài trực tuyến với dealer thật qua hình thức phát trực tiếp, mang lại cảm giác như đang ngồi tại sòng bài thực sự.
Giao Diện Hiện Đại & Bảo Mật Tuyệt Đối
ST666 không chỉ nổi bật với hệ thống game phong phú mà còn thu hút người chơi nhờ vào giao diện hiện đại, thân thiện. Thiết kế trang web đẹp mắt, dễ sử dụng giúp người chơi dễ dàng thao tác và tận hưởng các trò chơi mà không gặp khó khăn.
Đặc biệt, hệ thống bảo mật của ST666 luôn được đánh giá cao. Tất cả các giao dịch và thông tin cá nhân của người chơi đều được bảo vệ bằng công nghệ mã hóa tiên tiến, đảm bảo an toàn tuyệt đối cho người dùng.
Ưu Đãi Hấp Dẫn & Tỷ Lệ Đổi Thưởng Cao
ST666 luôn mang đến cho người chơi nhiều khuyến mãi hấp dẫn. Người chơi có thể nhận được 280k miễn phí khi đăng nhập hàng ngày, cùng với hàng loạt các chương trình ưu đãi khác, như thưởng nạp đầu, khuyến mãi hoàn tiền, và nhiều sự kiện đặc biệt dành cho các thành viên thân thiết.
Bên cạnh đó, tỷ lệ đổi thưởng tại ST666 luôn cao hơn so với nhiều nhà cái khác, mang lại cơ hội thắng lớn cho người chơi.
Tải App ST666
Để thuận tiện hơn trong việc trải nghiệm, ST666 đã phát triển ứng dụng dành riêng cho di động. Người chơi có thể dễ dàng tải app ST666 về máy và tham gia cá cược bất cứ lúc nào, bất cứ nơi đâu, mà không cần phải truy cập qua trình duyệt web.
Kết Luận
ST666 là lựa chọn lý tưởng cho những ai yêu thích cá cược và muốn tìm kiếm một nhà cái đáng tin cậy. Với hệ thống game đa dạng, giao diện hiện đại, bảo mật tốt và nhiều khuyến mãi hấp dẫn, ST666 chắc chắn sẽ mang lại cho người chơi những trải nghiệm tuyệt vời và đáng nhớ.
Câu lạc bộ bóng đá AS Roma
ST666 tự hào là đối tác tài trợ hàng đầu của câu lạc bộ bóng đá AS Roma – một biểu tượng vĩ đại trong làng bóng đá Ý. AS Roma không chỉ là đội bóng nổi tiếng với lịch sử thi đấu ấn tượng mà còn là đối tác quan trọng trong các hợp đồng hợp tác với ST666. Với sự hợp tác này, AS Roma đã hỗ trợ nhà cái ST666 thông qua những khoản đầu tư triệu đô, giúp phát triển mạnh mẽ mảng thể thao trực tuyến và mở ra cơ hội lớn cho người chơi cá cược tại thị trường quốc tế.
Câu lạc bộ bóng đá Bayern Munich
ST666 cũng vinh dự là nhà tài trợ hàng đầu của câu lạc bộ bóng đá Bayern Munich – một đội bóng nổi tiếng không chỉ ở Đức mà còn trên toàn thế giới. Với lịch sử vô địch lẫy lừng và sự thống trị tại các giải đấu quốc tế, Bayern Munich đã trở thành biểu tượng lớn trong lòng người hâm mộ. Sự hợp tác giữa ST666 và Bayern Munich không chỉ dừng lại ở việc tài trợ mà còn góp phần nâng cao trải nghiệm của người chơi thông qua cải tiến hệ thống giao dịch tài chính, giúp quy trình nạp rút tiền của bet thủ trở nên thuận tiện và nhanh chóng hơn.
Câu lạc bộ bóng đá Porto
Không thể không nhắc đến câu lạc bộ bóng đá Porto, nơi ST666 hân hạnh trở thành đối tác tài trợ hàng đầu. Porto không chỉ là biểu tượng của sự sáng tạo và thành công trong làng bóng đá Bồ Đào Nha mà còn hỗ trợ ST666 trong các thủ tục xin giấy phép và chứng nhận tại châu Âu và Philippines. Sự hợp tác này đã mang lại giá trị lớn cho ST666 khi mở rộng quy mô hoạt động ra nhiều khu vực và thị trường mới.
Câu lạc bộ bóng đá Arsenal
Trong làng bóng đá Anh, câu lạc bộ bóng đá Arsenal là biểu tượng của sự tinh tế và phong cách. ST666 rất tự hào khi trở thành nhà tài trợ chính của Arsenal, giúp nhà cái này không chỉ nâng cao vị thế mà còn mở rộng thị trường cá cược bóng đá toàn cầu. Arsenal đã đóng vai trò quan trọng trong việc hỗ trợ ST666 phát triển hệ thống cá cược, từ đó mang lại trải nghiệm tốt nhất cho người chơi.
Câu lạc bộ bóng đá Sevilla
Cuối cùng, câu lạc bộ bóng đá Sevilla – biểu tượng của sự khát vọng và thành công trong bóng đá Tây Ban Nha, cũng đã trở thành đối tác quan trọng của ST666. Sevilla không chỉ góp phần thúc đẩy ST666 về mặt thương mại mà còn cung cấp công nghệ bảo mật hàng đầu, đảm bảo rằng thông tin cá nhân, tài khoản và các giao dịch của người chơi đều được bảo vệ một cách tối ưu.
Điểm vượt trội của ST666 so với các đối thủ cạnh tranh khác
Sự hợp tác chiến lược giữa ST666 và các câu lạc bộ bóng đá hàng đầu không chỉ nâng cao vị thế của ST666 trên thị trường, mà còn mang lại những lợi ích vượt trội cho người chơi. Những điểm mạnh này bao gồm:
Hệ thống bảo mật tiên tiến: ST666 đã được Sevilla hỗ trợ trong việc nâng cấp công nghệ bảo mật, đảm bảo mọi giao dịch và thông tin người dùng đều an toàn.
Hệ thống nạp rút tiện lợi: Sự hợp tác với Bayern Munich giúp ST666 cải tiến hệ thống giao dịch tài chính, mang lại trải nghiệm nạp rút nhanh chóng và hiệu quả cho người chơi.
Mở rộng thị trường và dịch vụ: Nhờ sự hỗ trợ từ Arsenal và AS Roma, ST666 đã thành công trong việc mở rộng hệ thống cá cược bóng đá và tiếp cận thêm nhiều người chơi trên toàn thế giới.
ST666 không chỉ là một nhà cái hàng đầu mà còn là một đối tác đáng tin cậy của các câu lạc bộ bóng đá danh tiếng, luôn cam kết mang lại dịch vụ tốt nhất và trải nghiệm tối ưu cho người chơi.
Смешные анекдоты https://telegra.ph/Smeshnye-anekdoty-10-09.
We are a leading real estate consultancy company in Nigeria. Our integrated real estate services include facility management, portfolio management, real estate consultancy, property management, office renovation, property sales and rental, interior design, office decoration, real estate turnkey project, property refurbishment and sales.
Le délai de paiement varie en fonction de l’option de retrait que vous choisissez sur le site Web de Las Atlantis Casino France.
https://gabapentin.auction/# generic neurontin 300 mg
https://gabapentin.auction/# neurontin price india
zithromax capsules australia
[url=https://slot-midas-golden-touch.ru/]http://slot-midas-golden-touch.ru[/url]
last news about slot midas golden touch
https://slot-midas-golden-touch.ru
Веселые анекдоты про евреев https://sites.google.com/view/shutki-anekdoty/%D0%B0%D0%BD%D0%B5%D0%BA%D0%B4%D0%BE%D1%82%D1%8B-%D0%BF%D1%80%D0%BE-%D0%B5%D0%B2%D1%80%D0%B5%D0%B5%D0%B2.
[url=https://slots-casino-obzor.ru]http://www.slots-casino-obzor.ru[/url]
last news about slots casino
http://slots-casino-obzor.ru
Очистка кровли от снега, уборка наледи и сосулек с крыши дома и других видов зданий. Высотные работы и услуги промышленного альпинизма в Москве https://dzen.ru/a/ZwZBBx-k5WAsdmk3
Canvas Cannabis brings the best in legal, recreational cannabis dispensaries to Toronto offering a wide range of cannabis flower, edibles, vaporizers [url=http://www.pizzeriailcarpaccio.se/wp-content/themes/eatery/nav.php?-Menu-=https://www.rentcars.buzz/]http://www.pizzeriailcarpaccio.se/wp-content/themes/eatery/nav.php?-Menu-=https://www.rentcars.buzz/[/url]
вывод из запоя стационар краснодар [url=http://www.vyvod-iz-zapoya-krasnodar17.ru]вывод из запоя стационар краснодар[/url] .
вывести из запоя цена [url=https://vyvod-iz-zapoya-ekaterinburg15.ru/]вывести из запоя цена[/url] .
http://gabapentin.auction/# neurontin brand name 800mg best price
Câu lạc bộ bóng đá AS Roma
ST666 tự hào là đối tác tài trợ hàng đầu của câu lạc bộ bóng đá AS Roma – một biểu tượng vĩ đại trong làng bóng đá Ý. AS Roma không chỉ là đội bóng nổi tiếng với lịch sử thi đấu ấn tượng mà còn là đối tác quan trọng trong các hợp đồng hợp tác với ST666. Với sự hợp tác này, AS Roma đã hỗ trợ nhà cái ST666 thông qua những khoản đầu tư triệu đô, giúp phát triển mạnh mẽ mảng thể thao trực tuyến và mở ra cơ hội lớn cho người chơi cá cược tại thị trường quốc tế.
Câu lạc bộ bóng đá Bayern Munich
ST666 cũng vinh dự là nhà tài trợ hàng đầu của câu lạc bộ bóng đá Bayern Munich – một đội bóng nổi tiếng không chỉ ở Đức mà còn trên toàn thế giới. Với lịch sử vô địch lẫy lừng và sự thống trị tại các giải đấu quốc tế, Bayern Munich đã trở thành biểu tượng lớn trong lòng người hâm mộ. Sự hợp tác giữa ST666 và Bayern Munich không chỉ dừng lại ở việc tài trợ mà còn góp phần nâng cao trải nghiệm của người chơi thông qua cải tiến hệ thống giao dịch tài chính, giúp quy trình nạp rút tiền của bet thủ trở nên thuận tiện và nhanh chóng hơn.
Câu lạc bộ bóng đá Porto
Không thể không nhắc đến câu lạc bộ bóng đá Porto, nơi ST666 hân hạnh trở thành đối tác tài trợ hàng đầu. Porto không chỉ là biểu tượng của sự sáng tạo và thành công trong làng bóng đá Bồ Đào Nha mà còn hỗ trợ ST666 trong các thủ tục xin giấy phép và chứng nhận tại châu Âu và Philippines. Sự hợp tác này đã mang lại giá trị lớn cho ST666 khi mở rộng quy mô hoạt động ra nhiều khu vực và thị trường mới.
Câu lạc bộ bóng đá Arsenal
Trong làng bóng đá Anh, câu lạc bộ bóng đá Arsenal là biểu tượng của sự tinh tế và phong cách. ST666 rất tự hào khi trở thành nhà tài trợ chính của Arsenal, giúp nhà cái này không chỉ nâng cao vị thế mà còn mở rộng thị trường cá cược bóng đá toàn cầu. Arsenal đã đóng vai trò quan trọng trong việc hỗ trợ ST666 phát triển hệ thống cá cược, từ đó mang lại trải nghiệm tốt nhất cho người chơi.
Câu lạc bộ bóng đá Sevilla
Cuối cùng, câu lạc bộ bóng đá Sevilla – biểu tượng của sự khát vọng và thành công trong bóng đá Tây Ban Nha, cũng đã trở thành đối tác quan trọng của ST666. Sevilla không chỉ góp phần thúc đẩy ST666 về mặt thương mại mà còn cung cấp công nghệ bảo mật hàng đầu, đảm bảo rằng thông tin cá nhân, tài khoản và các giao dịch của người chơi đều được bảo vệ một cách tối ưu.
Điểm vượt trội của ST666 so với các đối thủ cạnh tranh khác
Sự hợp tác chiến lược giữa ST666 và các câu lạc bộ bóng đá hàng đầu không chỉ nâng cao vị thế của ST666 trên thị trường, mà còn mang lại những lợi ích vượt trội cho người chơi. Những điểm mạnh này bao gồm:
Hệ thống bảo mật tiên tiến: ST666 đã được Sevilla hỗ trợ trong việc nâng cấp công nghệ bảo mật, đảm bảo mọi giao dịch và thông tin người dùng đều an toàn.
Hệ thống nạp rút tiện lợi: Sự hợp tác với Bayern Munich giúp ST666 cải tiến hệ thống giao dịch tài chính, mang lại trải nghiệm nạp rút nhanh chóng và hiệu quả cho người chơi.
Mở rộng thị trường và dịch vụ: Nhờ sự hỗ trợ từ Arsenal và AS Roma, ST666 đã thành công trong việc mở rộng hệ thống cá cược bóng đá và tiếp cận thêm nhiều người chơi trên toàn thế giới.
ST666 không chỉ là một nhà cái hàng đầu mà còn là một đối tác đáng tin cậy của các câu lạc bộ bóng đá danh tiếng, luôn cam kết mang lại dịch vụ tốt nhất và trải nghiệm tối ưu cho người chơi.
Эффективное лечение психических заболеваний. Опытные врачи. Звоните! Доказательная медицина. Лучшие специалисты [url=https://coronavirus-control.ru/psihoterapiya-put-k-psihicheskomu-zdorovyu-i-lichnostnomu-rostu/]психотерапевт[/url]
The Mostbet app is a top pick for sports betting fans in Bangladesh, optimized for Android and iOS devices. It offers quick access to live betting, easy account management, and fast withdrawals. Using advanced algorithms, it provides personalized betting odds. Beyond sports betting, Mostbet offers an online casino with live dealer games for an authentic casino experience. The official app can be downloaded in just a few simple steps and does not require a VPN, ensuring immediate access and use [url=https://mostbet-bd-apk.com/]mostbet bd app download[/url]
I think I might disagree with some of your analysis. Are the figures solid?
875 mg amoxicillin cost: Amoxicillin For sale – amoxicillin 500 coupon
https://semaglutide.win/# Buy compounded semaglutide online
A neighbor of mine encouraged me to take a look at your blog site couple weeks ago, given that we both love similar stuff and I will need to say I am quite impressed.
Свежие прикольные картинки https://prikoly-tut.blogspot.com/2024/10/smeshnye-kartinki.html.
bs2site
neurontin prescription medication [url=https://gabapentin.auction/#]gabapentin for sale[/url] neurontin 800 mg tablets
st666 app
ST666 – Lựa Chọn Hàng Đầu Trong Thế Giới Cá Cược Trực Tuyến
Trong thời đại mà ngành công nghiệp cá cược trực tuyến đang bùng nổ, việc chọn một nhà cái uy tín là yếu tố quan trọng để đảm bảo trải nghiệm chơi an toàn và đáng tin cậy. ST666 nhanh chóng khẳng định vị thế của mình trên thị trường với những dịch vụ chất lượng và hệ thống bảo mật cao cấp, mang lại trải nghiệm cá cược công bằng, thú vị và an toàn.
Hệ Thống Trò Chơi Đa Dạng
ST666 cung cấp một danh mục trò chơi cá cược đa dạng, đáp ứng mọi nhu cầu và sở thích của người chơi. Từ thể thao, bắn cá, game bài, cho đến xổ số và live casino, tất cả đều được tối ưu hóa để mang lại cảm giác hứng thú cho người tham gia. Đặc biệt, với Live Casino, người chơi sẽ được trải nghiệm cá cược với các dealer thật thông qua hình thức phát trực tiếp, tạo cảm giác như đang tham gia tại các sòng bài thực tế.
Tỷ Lệ Cược Cạnh Tranh
Một trong những ưu điểm nổi bật của ST666 chính là tỷ lệ cược cực kỳ cạnh tranh, giúp người chơi tối ưu hóa lợi nhuận của mình. Các trận đấu thể thao được cập nhật liên tục với tỷ lệ cược hấp dẫn, tạo cơ hội chiến thắng lớn cho những ai yêu thích cá cược thể thao.
Bảo Mật An Toàn Tuyệt Đối
Yếu tố bảo mật luôn là một trong những tiêu chí hàng đầu khi chọn nhà cái cá cược. ST666 sử dụng công nghệ mã hóa hiện đại để bảo vệ thông tin cá nhân và các giao dịch tài chính của người chơi, đảm bảo mọi dữ liệu luôn được bảo mật tuyệt đối. Người chơi hoàn toàn có thể yên tâm khi tham gia cá cược tại đây.
Chăm Sóc Khách Hàng Chuyên Nghiệp
Dịch vụ chăm sóc khách hàng của ST666 luôn sẵn sàng hỗ trợ 24/7 qua nhiều kênh khác nhau như Live Chat, WhatsApp, Facebook, đảm bảo giải đáp mọi thắc mắc và xử lý các vấn đề nhanh chóng. Đội ngũ nhân viên tại đây được đào tạo chuyên nghiệp, tận tâm và chu đáo, luôn đặt lợi ích của khách hàng lên hàng đầu.
Ưu Đãi Hấp Dẫn
ST666 không chỉ nổi bật với các sản phẩm cá cược mà còn thu hút người chơi bởi các chương trình khuyến mãi hấp dẫn. Người chơi có thể nhận được nhiều ưu đãi như 280k miễn phí khi đăng nhập hàng ngày, cùng các chương trình thưởng nạp và hoàn tiền liên tục, giúp tối đa hóa cơ hội chiến thắng.
Lý Do ST666 Là Lựa Chọn Hàng Đầu
Sự kết hợp hoàn hảo giữa giao diện hiện đại, hệ thống trò chơi đa dạng, dịch vụ khách hàng tận tâm và tỷ lệ cược cạnh tranh đã giúp ST666 trở thành một trong những nhà cái cá cược trực tuyến uy tín hàng đầu tại Việt Nam. Đối với những ai đang tìm kiếm một nhà cái an toàn và chuyên nghiệp, ST666 chắc chắn sẽ là lựa chọn không thể bỏ qua.
Kết Luận
Với những ưu điểm vượt trội, ST666 xứng đáng là địa chỉ cá cược uy tín và an toàn cho tất cả người chơi. Đăng ký ngay hôm nay để trải nghiệm hệ thống cá cược đẳng cấp và nhận những ưu đãi hấp dẫn từ ST666!
Несвоевременная очистка кровли от снега и наледи приводит к накоплению большого количества снежных осадков. Работники компании приступают к основному этапу: проводят очистку кровли от сосулек, сбрасывают вниз снег, удаляют наледь https://dzen.ru/a/ZwZBBx-k5WAsdmk3
Toko Hemp sendiri dalam webnya menyatakan sebagai sebuah toko yang menjual aksesori dan T-Shirt bertema cannabis [url=http://manabino-mori.jp/?wptouch_switch=desktop&redirect=//tokohemp.com/]http://manabino-mori.jp/?wptouch_switch=desktop&redirect=//tokohemp.com/[/url]
https://stromectol.agency/# where to buy ivermectin cream
https://zithromax.company/# zithromax azithromycin
where can i get zithromax over the counter
Nhà cái ST666 được biết đến là sân chơi uy tín cung cấp các sản phẩm trò chơi cực kỳ đa dạng và chất lượng. Số lượng người tham gia vào hệ thống ngày càng tăng cao và chưa có dấu hiệu dừng lại. Hướng dẫn tham gia nhà cái nếu như anh em muốn tìm kiếm cơ hội nhận thưởng khủng. Hãy cùng khám phá những thông tin cần biết tại nhà cái để đặt cược và săn thưởng thành công.
purchase stromectol: stromectol for sale – minocycline pills
https://amoxil.llc/# amoxicillin 500mg without prescription
Профессиональный сервисный центр по ремонту моноблоков iMac в Москве.
Мы предлагаем: ремонт аймаков на дому
Наши мастера оперативно устранят неисправности вашего устройства в сервисе или с выездом на дом!
buy cheap neurontin [url=https://gabapentin.auction/#]cheapest gabapentin[/url] neurontin tablets uk
Свежие еврейские анекдоты https://sites.google.com/view/shutki-anekdoty/%D0%B0%D0%BD%D0%B5%D0%BA%D0%B4%D0%BE%D1%82%D1%8B-%D0%BF%D1%80%D0%BE-%D0%B5%D0%B2%D1%80%D0%B5%D0%B5%D0%B2.
https://semaglutide.win/# rybelsus price
Веселые фотоприколы https://prikoly-tut.blogspot.com/2024/10/smeshnye-kartinki.html.
[url=][/url]
Найти специалиста по независимой экспертизе и оценке!
Сайт-агрегатор компаний и услуг в сфере независимой экспертизы и оценки.
Мы создали этот проект, чтобы помочь вам найти надежных и опытных профессионалов
для решения ваших задач.
Главная цель — сделать процесс поиска специалистов по независимой экспертизе
и оценке максимально простым и эффективным. Мы стремимся предоставить вам
доступ к компаниям, которые гарантируют высокое качество услуг.
С нами вы сможете быстро найти нужного эксперта и сравнить различные предложения.
На нашем сайте собраны карточки компаний, каждая из которых содержит подробную
информацию о предоставляемых услугах. Посетители могут фильтровать предложения
по различным критериям:
Локация
Направление экспертизы
Стоимость услуг
Отзывы клиентов
Наш сайт Специалисты по независимой экспертизе и оценке.
[url=][/url]
http://stromectol.agency/# ivermectin australia
where can you buy zithromax
https://gabapentin.auction/# neurontin cost australia
Виртуальный турецкий номер — удобная и выгодная альтернатива сим-карте страны. Чтобы купить его, не нужно ехать в Турцию и даже предоставлять документы [url=https://pravo-rm.ru/preimushhestva-virtualnogo-nomera/]номер телефона Турции[/url]
stromectol buy [url=https://stromectol.agency/#]buy stromectol online[/url] stromectol liquid
buy ivermectin stromectol: stromectol for sale – what is minocycline 100 mg used for
Information about the production, sale and use of recreational cannabis in Mississauga, including the the regulations around retail outlet [url=https://chargers-batteries.com/trigger.php?r_link=https://scarboroughcannabis.store/]https://chargers-batteries.com/trigger.php?r_link=https://scarboroughcannabis.store/[/url]
One Plant North Oshawa is home to the biggest selection of Cannabis at the best prices in Oshawa. Shop Cannabis, Flower, Edibles, Beverages, Bongs, Grinders [url=https://b2b.partcommunity.com/community/pins/browse?source=bramptoncannabis.store/]https://b2b.partcommunity.com/community/pins/browse?source=bramptoncannabis.store/[/url]
Свежие приколы дня https://prikolnyekartinki.mystrikingly.com/blog/0ade1e0d9a9.
[url=https://slots-casino-wiki.ru]http://slots-casino-wiki.ru[/url]
last news about slots casino
http://slots-casino-wiki.ru
Its like you read my mind You appear to know so much about this like you wrote the book in it or something I think that you can do with a few pics to drive the message home a little bit but other than that this is fantastic blog A great read Ill certainly be back
Hello my loved one I want to say that this post is amazing great written and include almost all significant infos I would like to look extra posts like this
https://zithromax.company/# buy zithromax online
Смешные анекдоты https://telegra.ph/Smeshnye-anekdoty-10-09.
http://semaglutide.win/# buy rybelsus
zithromax antibiotic without prescription
https://gabapentin.auction/# neurontin generic brand
stromectol tablets for humans [url=https://stromectol.agency/#]stromectol price[/url] ivermectin 3 mg
neurontin 300 mg price in india: medication neurontin 300 mg – neurontin 2400 mg
Magnificent beat I would like to apprentice while you amend your site how can i subscribe for a blog web site The account helped me a acceptable deal I had been a little bit acquainted of this your broadcast offered bright clear idea
https://turatelsiz.com/
[url=https://big-bamboo-casino-slots.ru]www.big-bamboo-casino-slots.ru[/url]
last news about big bamboo casino
http://www.big-bamboo-casino-slots.ru
http://semaglutide.win/# buy semaglutide online
Meet Indi. Timeless and chic. If you’re an Olsen lover, these are for you! Crafted from black acetate with smoked lenses, the style is in [url=https://www.kreis-re.de/inhalte/buergerservice/soziales_und_familie/Heimpflege/index.asp?seite=zwischenseite&href=pcz.pl&back=https://www.rental-car.company/&target=_blank]https://www.kreis-re.de/inhalte/buergerservice/soziales_und_familie/Heimpflege/index.asp?seite=zwischenseite&href=pcz.pl&back=https://www.rental-car.company/&target=_blank[/url]
вывести из запоя цена [url=https://www.vyvod-iz-zapoya-ekaterinburg16.ru]вывести из запоя цена[/url] .
A Turkish virtual number is a phone number that allows businesses to establish a local presence in Turkey without needing a physical office. It enables seamless communication with Turkish customers, enhancing trust and accessibility [url=http://alvarvas.com/s/chem-polezny-virtualnye-nomera-turcii/]турецкий номер телефона[/url]
Мы предоставляем широкий спектр услуг, включая оценку, коррекцию лечения, “второе” мнение, назначение препаратов и проведение терапии, наблюдение за динамикой вашего состояния [url=https://sovetisite.blogspot.com/2023/10/blog-post_21.html]https://sovetisite.blogspot.com/2023/10/blog-post_21.html[/url]
экокожа для обивки мебели [url=https://ekokozha-kupit11.ru]экокожа для обивки мебели[/url] .
https://amoxil.llc/# can you buy amoxicillin over the counter
zithromax tablets for sale
Веселые анекдоты для взрослых https://ru.pinterest.com/vseshutochki/%D0%BF%D0%BE%D1%88%D0%BB%D1%8B%D0%B5-%D0%B0%D0%BD%D0%B5%D0%BA%D0%B4%D0%BE%D1%82%D1%8B/.
bs2best
[url=https://big-bamboo-casino-wiki.ru]www.big-bamboo-casino-wiki.ru[/url]
last news about big bamboo casino
https://www.big-bamboo-casino-wiki.ru
http://stromectol.agency/# stromectol tab price
https://stromectol.agency/# stromectol sales
Смешные анекдоты https://vk.com/vseshutochki.
https://stromectol.agency/# minocycline price
ST666 – Lựa Chọn Hàng Đầu Trong Thế Giới Cá Cược Trực Tuyến
Trong thời đại mà ngành công nghiệp cá cược trực tuyến đang bùng nổ, việc chọn một nhà cái uy tín là yếu tố quan trọng để đảm bảo trải nghiệm chơi an toàn và đáng tin cậy. ST666 nhanh chóng khẳng định vị thế của mình trên thị trường với những dịch vụ chất lượng và hệ thống bảo mật cao cấp, mang lại trải nghiệm cá cược công bằng, thú vị và an toàn.
Hệ Thống Trò Chơi Đa Dạng
ST666 cung cấp một danh mục trò chơi cá cược đa dạng, đáp ứng mọi nhu cầu và sở thích của người chơi. Từ thể thao, bắn cá, game bài, cho đến xổ số và live casino, tất cả đều được tối ưu hóa để mang lại cảm giác hứng thú cho người tham gia. Đặc biệt, với Live Casino, người chơi sẽ được trải nghiệm cá cược với các dealer thật thông qua hình thức phát trực tiếp, tạo cảm giác như đang tham gia tại các sòng bài thực tế.
Tỷ Lệ Cược Cạnh Tranh
Một trong những ưu điểm nổi bật của ST666 chính là tỷ lệ cược cực kỳ cạnh tranh, giúp người chơi tối ưu hóa lợi nhuận của mình. Các trận đấu thể thao được cập nhật liên tục với tỷ lệ cược hấp dẫn, tạo cơ hội chiến thắng lớn cho những ai yêu thích cá cược thể thao.
Bảo Mật An Toàn Tuyệt Đối
Yếu tố bảo mật luôn là một trong những tiêu chí hàng đầu khi chọn nhà cái cá cược. ST666 sử dụng công nghệ mã hóa hiện đại để bảo vệ thông tin cá nhân và các giao dịch tài chính của người chơi, đảm bảo mọi dữ liệu luôn được bảo mật tuyệt đối. Người chơi hoàn toàn có thể yên tâm khi tham gia cá cược tại đây.
Chăm Sóc Khách Hàng Chuyên Nghiệp
Dịch vụ chăm sóc khách hàng của ST666 luôn sẵn sàng hỗ trợ 24/7 qua nhiều kênh khác nhau như Live Chat, WhatsApp, Facebook, đảm bảo giải đáp mọi thắc mắc và xử lý các vấn đề nhanh chóng. Đội ngũ nhân viên tại đây được đào tạo chuyên nghiệp, tận tâm và chu đáo, luôn đặt lợi ích của khách hàng lên hàng đầu.
Ưu Đãi Hấp Dẫn
ST666 không chỉ nổi bật với các sản phẩm cá cược mà còn thu hút người chơi bởi các chương trình khuyến mãi hấp dẫn. Người chơi có thể nhận được nhiều ưu đãi như 280k miễn phí khi đăng nhập hàng ngày, cùng các chương trình thưởng nạp và hoàn tiền liên tục, giúp tối đa hóa cơ hội chiến thắng.
Lý Do ST666 Là Lựa Chọn Hàng Đầu
Sự kết hợp hoàn hảo giữa giao diện hiện đại, hệ thống trò chơi đa dạng, dịch vụ khách hàng tận tâm và tỷ lệ cược cạnh tranh đã giúp ST666 trở thành một trong những nhà cái cá cược trực tuyến uy tín hàng đầu tại Việt Nam. Đối với những ai đang tìm kiếm một nhà cái an toàn và chuyên nghiệp, ST666 chắc chắn sẽ là lựa chọn không thể bỏ qua.
Kết Luận
Với những ưu điểm vượt trội, ST666 xứng đáng là địa chỉ cá cược uy tín và an toàn cho tất cả người chơi. Đăng ký ngay hôm nay để trải nghiệm hệ thống cá cược đẳng cấp và nhận những ưu đãi hấp dẫn từ ST666!
объявление на работу [url=umicum.kz]объявление на работу[/url] .
работа в алмате для женщин [url=trudvsem.kz]работа в алмате для женщин[/url] .
Rybelsus 7mg: rybelsus cost – rybelsus price
[url=https://doghouse-casino-wiki.ru]doghouse-casino-wiki.ru[/url]
last news about doghouse casino
http://www.doghouse-casino-wiki.ru
работа в астане сегодня для мужчин [url=https://www.sitsen.kz]работа в астане сегодня для мужчин[/url] .
[url=https://doghouse-casino-play.ru]doghouse-casino-play.ru[/url]
last news about doghouse casino
http://doghouse-casino-play.ru
[url=https://big-bamboo-casino-obzor.ru]big-bamboo-casino-obzor.ru[/url]
last news about big bamboo casino
https://www.big-bamboo-casino-obzor.ru
Веселые приколы за день https://prikolnyekartinki.mystrikingly.com/blog/0ade1e0d9a9.
Furniture of any shape and style looks very attractive and modern in ULTRA fabric [url=http://www.meetthegreens.org/cgi-registry/bridgepop.pl?url=rental-car.company/]http://www.meetthegreens.org/cgi-registry/bridgepop.pl?url=rental-car.company/[/url]
Beli produk Hemp Custom Wear online, produk terlengkap dan harga terbaik. Dapatkan berbagai promo menarik. Belanja aman dan nyaman hanya di Tokopedia [url=http://princemaabidoye.co.uk/?wptouch_switch=desktop&redirect=https://bramptoncannabis.store/]http://princemaabidoye.co.uk/?wptouch_switch=desktop&redirect=https://bramptoncannabis.store/[/url]
http://semaglutide.win/# rybelsus
zithromax for sale cheap
st666 app
ST666 – Lựa Chọn Hàng Đầu Trong Thế Giới Cá Cược Trực Tuyến
Trong thời đại mà ngành công nghiệp cá cược trực tuyến đang bùng nổ, việc chọn một nhà cái uy tín là yếu tố quan trọng để đảm bảo trải nghiệm chơi an toàn và đáng tin cậy. ST666 nhanh chóng khẳng định vị thế của mình trên thị trường với những dịch vụ chất lượng và hệ thống bảo mật cao cấp, mang lại trải nghiệm cá cược công bằng, thú vị và an toàn.
Hệ Thống Trò Chơi Đa Dạng
ST666 cung cấp một danh mục trò chơi cá cược đa dạng, đáp ứng mọi nhu cầu và sở thích của người chơi. Từ thể thao, bắn cá, game bài, cho đến xổ số và live casino, tất cả đều được tối ưu hóa để mang lại cảm giác hứng thú cho người tham gia. Đặc biệt, với Live Casino, người chơi sẽ được trải nghiệm cá cược với các dealer thật thông qua hình thức phát trực tiếp, tạo cảm giác như đang tham gia tại các sòng bài thực tế.
Tỷ Lệ Cược Cạnh Tranh
Một trong những ưu điểm nổi bật của ST666 chính là tỷ lệ cược cực kỳ cạnh tranh, giúp người chơi tối ưu hóa lợi nhuận của mình. Các trận đấu thể thao được cập nhật liên tục với tỷ lệ cược hấp dẫn, tạo cơ hội chiến thắng lớn cho những ai yêu thích cá cược thể thao.
Bảo Mật An Toàn Tuyệt Đối
Yếu tố bảo mật luôn là một trong những tiêu chí hàng đầu khi chọn nhà cái cá cược. ST666 sử dụng công nghệ mã hóa hiện đại để bảo vệ thông tin cá nhân và các giao dịch tài chính của người chơi, đảm bảo mọi dữ liệu luôn được bảo mật tuyệt đối. Người chơi hoàn toàn có thể yên tâm khi tham gia cá cược tại đây.
Chăm Sóc Khách Hàng Chuyên Nghiệp
Dịch vụ chăm sóc khách hàng của ST666 luôn sẵn sàng hỗ trợ 24/7 qua nhiều kênh khác nhau như Live Chat, WhatsApp, Facebook, đảm bảo giải đáp mọi thắc mắc và xử lý các vấn đề nhanh chóng. Đội ngũ nhân viên tại đây được đào tạo chuyên nghiệp, tận tâm và chu đáo, luôn đặt lợi ích của khách hàng lên hàng đầu.
Ưu Đãi Hấp Dẫn
ST666 không chỉ nổi bật với các sản phẩm cá cược mà còn thu hút người chơi bởi các chương trình khuyến mãi hấp dẫn. Người chơi có thể nhận được nhiều ưu đãi như 280k miễn phí khi đăng nhập hàng ngày, cùng các chương trình thưởng nạp và hoàn tiền liên tục, giúp tối đa hóa cơ hội chiến thắng.
Lý Do ST666 Là Lựa Chọn Hàng Đầu
Sự kết hợp hoàn hảo giữa giao diện hiện đại, hệ thống trò chơi đa dạng, dịch vụ khách hàng tận tâm và tỷ lệ cược cạnh tranh đã giúp ST666 trở thành một trong những nhà cái cá cược trực tuyến uy tín hàng đầu tại Việt Nam. Đối với những ai đang tìm kiếm một nhà cái an toàn và chuyên nghiệp, ST666 chắc chắn sẽ là lựa chọn không thể bỏ qua.
Kết Luận
Với những ưu điểm vượt trội, ST666 xứng đáng là địa chỉ cá cược uy tín và an toàn cho tất cả người chơi. Đăng ký ngay hôm nay để trải nghiệm hệ thống cá cược đẳng cấp và nhận những ưu đãi hấp dẫn từ ST666!
Профессиональное изготовление памятников и надгробий на могилу в Минске. Услуги по изготовлению и установке памятников на кладбище [url=http://food-ua.com/wr_board/tools.php?event=profile&pname=ytelidad]http://food-ua.com/wr_board/tools.php?event=profile&pname=ytelidad[/url]
Vous avez juste à utiliser le coupon de votre carte prépayée paysafecard pour être débité et déposer en toute tranquillité.
where can i get zithromax [url=https://zithromax.company/#]buy zithromax z-pak online[/url] zithromax 500 mg lowest price pharmacy online
Gay Boys Porn https://gay0day.com HD is the best gay porn tube to watch high definition videos of horny gay boys jerking, sucking their mates and fucking on webcam
Одной из дополнительных мотиваций для приобретения временного виртуального номера в Турции является экономия средств [url=https://www.04868.com.ua/list/458678]https://www.04868.com.ua/list/458678[/url]
zithromax 250mg: buy cheap generic zithromax – zithromax coupon
theragun foam roller
Over 7 years in development, the Rollga Method™ combines trigger points, acupressure points, fascial lines, meridians, and techniques like ART (Active Release Technique), MAT (Muscle Activation Technique), RPR (Reflexive Performance Reset) and others to optimize one’s health thru a new system of self care.
Download the Rollga App to learn about & tap into all that Rollga has to offer!
магазин сейфов предлагает сейфы 3 класса купить сейф 3 класс
Dapatkan berbagai promo menarik. Belanja aman dan nyaman hanya di Tokopedia. Beli produk Hemp Custom Wear online, produk terlengkap dan harga terbaik [url=http://tabetoku.com/gogaku/access.asp?ID=10683&url=https://www.ngatiranana.org.uk/]http://tabetoku.com/gogaku/access.asp?ID=10683&url=https://www.ngatiranana.org.uk/[/url]
http://stromectol.agency/# stromectol ireland
zithromax purchase online
bs2best at
Smoking in India is one of the oldest industries and provides employment to more than five million people directly and indirectly [url=https://www.kirschenmarkt-gladenbach.de/go.php?go=https://www.casino-spin.de/]https://www.kirschenmarkt-gladenbach.de/go.php?go=https://www.casino-spin.de/[/url]
[url=https://sweet-bonanza-casino-play.ru]https://sweet-bonanza-casino-play.ru[/url]
last news about sweet bonanza casino
http://www.sweet-bonanza-casino-play.ru
minocycline 50 mg for sale [url=http://stromectol.agency/#]stromectol for sale[/url] ivermectin cream 1
Тут делают продвижение создание медицинского сайта под ключ создание медицинского сайта под ключ
[url=https://big-bamboo-casino-play.ru]https://www.big-bamboo-casino-play.ru[/url]
last news about big bamboo
big-bamboo-casino-play.ru
Наша виртуальная телефонная система, ориентированная на Турцию, позволяет вам перенаправлять входящие звонки конкретным агентам службы поддержки клиентов [url=https://novation-nn.ru/%d1%82%d1%83%d1%80%d0%b5%d1%86%d0%ba%d0%b8%d0%b9-%d0%bd%d0%be%d0%bc%d0%b5%d1%80-%d0%b4%d0%bb%d1%8f-sms-%d0%bf%d1%80%d0%b5%d0%b8%d0%bc%d1%83%d1%89%d0%b5%d1%81%d1%82%d0%b2%d0%b0-%d0%b8-%d0%b2%d0%be/]https://novation-nn.ru/%d1%82%d1%83%d1%80%d0%b5%d1%86%d0%ba%d0%b8%d0%b9-%d0%bd%d0%be%d0%bc%d0%b5%d1%80-%d0%b4%d0%bb%d1%8f-sms-%d0%bf%d1%80%d0%b5%d0%b8%d0%bc%d1%83%d1%89%d0%b5%d1%81%d1%82%d0%b2%d0%b0-%d0%b8-%d0%b2%d0%be/[/url]
Веселые приколы https://teletype.in/@anekdoty/prikoly-nastroenie.
Тут делают продвижение медицинское seo seo медицинских сайтов
buy minocycline 100 mg tablets: stromectol for sale – stromectol ivermectin tablets
https://zithromax.company/# zithromax capsules australia
Веселые приколы https://prikolyshutki.wordpress.com/2024/10/11/prikoly-umor/.
[url=https://big-bamboo-casino-info.ru]https://www.big-bamboo-casino-info.ru[/url]
last news about big bamboo casino
big-bamboo-casino-info.ru
bs2site
그런 거만 보다철원 백마고지가 반짝이는 걸 보면 철원 백마고지환장합니다.나
Металлопрокат чёрный, цветной, нержавеющий и оцинкованный. Производство, работа с заводами производителями. Поставка от 1 штуки [url=http://lsp-metall.ru/]купить металл дешево[/url]
[url=https://lucky-jet-casino-obzor.ru]www.lucky-jet-casino-obzor.ru[/url]
last news about play lucky jet casino
lucky-jet-casino-obzor.ru
Крупнейший трейдер продажи металлопроката. 24/7. Скидка на опт. Доставка за 2 часа [url=http://samarmatura.ru/]купить арматуру для фундамента цена[/url]
DankBros Cannabis is your go-to source for same-day marijuana delivery! Our collection of products keeps growing, with all your favorite strains and edibles [url=http://ads.robertsstream.com/revive/www/delivery/ck.php?oaparams=2__bannerid=84__zoneid=0__log=no__cb=901853defd__oadest=https://www.takizo.shop/]http://ads.robertsstream.com/revive/www/delivery/ck.php?oaparams=2__bannerid=84__zoneid=0__log=no__cb=901853defd__oadest=https://www.takizo.shop/[/url]
admiral x casino [url=https://rating-casino-kz.org]топ 10 казино в Казахстане[/url] играть в игровые автоматы на деньги с телефона топ 10 казино в Казахстане .
Свежие приколы https://teletype.in/@anekdoty/prikoly-nastroenie.
[url=https://lucky-jet-casino-wiki.ru]http://www.lucky-jet-casino-wiki.ru[/url]
last news about lucky jet casino
lucky-jet-casino-wiki.ru
Веселые приколы и анекдоты http://anekdotshutka.ru.
cs2 gambling sites csgo gambling
cs go betting csgo betting
Buy Your %100 Genuine Cheap Carfax Report Now and receive it in your inbox within the next 30 seconds!
ed cures https://indianpharmdelivery.com/# buy prescription drugs from india
Mating Press Pretty! This has been a really wonderful post. Many thanks for providing these details.
Online medicine home delivery: Online medicine order – pharmacy website india
франшизп [url=http://franshizy11.ru/]франшизп[/url] .
франшиза для малого бизнеса [url=http://franshizy12.ru]http://franshizy12.ru[/url] .
п»їlegitimate online pharmacies india [url=http://indianpharmdelivery.com/#]top 10 online pharmacy in india[/url] indian pharmacies safe
indianpharmacy com: top 10 pharmacies in india – top 10 online pharmacy in india
[url=https://sweet-bonanza-casino-wiki.ru]sweet-bonanza-casino-wiki.ru[/url]
last news about sweet bonanza casino
http://www.sweet-bonanza-casino-wiki.ru
В современном мире интернет-торговли платформа Авито стала одним из самых популярных мест для покупки и продажи различных товаров и услуг. Каждый день миллионы пользователей взаимодействуют друг с другом, обмениваются сообщениями, предлагают свои товары и, конечно же, успешно завершают сделки [url=https://cafe-hayal.ru/virtualnyj-nomer-dlya-avito]https://cafe-hayal.ru/virtualnyj-nomer-dlya-avito[/url]
Are you looking to purchase cannabis in Canada? Your search ends here! We stand out as the premier online cannabis Toronto dispensary, specializing in convenient mail-order cannabis delivery [url=https://www.atombilgisayar.com.tr/redirect.php?url=https://radiocentre.ca/]https://www.atombilgisayar.com.tr/redirect.php?url=https://radiocentre.ca/[/url]
Профессиональный сервисный центр адрес ремонта смартфонов сервисный центр по ремонту телефонов
[url=https://sweet-bonanza-casino-obzor.ru/]https://www.sweet-bonanza-casino-obzor.ru[/url]
last news about sweet bonanza casino
http://sweet-bonanza-casino-obzor.ru
Профессиональный сервисный центр по ремонту сотовых телефонов в Москве.
Мы предлагаем: ремонт телефонов рядом
Наши мастера оперативно устранят неисправности вашего устройства в сервисе или с выездом на дом!
BlackSprut
Веселые приколы http://anekdotshutka.ru.
мостбет ком [url=https://mostbetua.kiev.ua]mostbetua kiev ua[/url] 1win casino http://www.mostbetua.kiev.ua .
medication for ed: buy drug online – ed in young men
[url=https://sweet-bonanza-casino-slots.ru]https://www.sweet-bonanza-casino-slots.ru[/url]
last news about sweet bonanza casino
https://www.sweet-bonanza-casino-slots.ru
Свежие приколы, шутки и картинки http://anekdotshutka.ru.
ничего подобного
_________________
[url=https://igra.top100casinosgame.lat]как получить лицензию букмекера[/url]
Discover our BDSM category, where we offer a wide range of products to enhance your sensual exploration and play. From restraints and blindfolds to whips and paddles, our carefully curated selection ensures you find the perfect tools to fulfill your desires safely and consensually [url=http://sintesi.provincia.foggia.it/portale/admin/portal/LinkClick.aspx?link=https://www.simbasportsclub.co.tz/]http://sintesi.provincia.foggia.it/portale/admin/portal/LinkClick.aspx?link=https://www.simbasportsclub.co.tz/[/url]
быстрый вывод из запоя в стационаре [url=www.vyvod-iz-zapoya-sochi16.ru]быстрый вывод из запоя в стационаре[/url] .
Виртуальный номер представляет собой телефонный номер, который работает через интернет, а не через традиционные телефонные сети. Этот номер можно использовать для приема и отправки звонков и сообщений, как обычный телефон, но с множеством дополнительных преимуществ [url=https://bsk-media.ru/news-465-virtualnyj-nomer-dlya-avito-udobstvo-i-bezopasnost.html]https://bsk-media.ru/news-465-virtualnyj-nomer-dlya-avito-udobstvo-i-bezopasnost.html[/url]
Over 7 years in development, the Rollga Method™ combines trigger points, acupressure points, fascial lines, meridians, and techniques like ART (Active Release Technique), MAT (Muscle Activation Technique), RPR (Reflexive Performance Reset) and others to optimize one’s health thru a new system of self care.
Download the Rollga App to learn about & tap into all that Rollga has to offer!
입할 수 있었어요.따로창원 웨딩박람회 백화점 할인이 없으신창원 웨딩박람회 분들은 페이코 5% 창원 웨딩박람회할인,
https://sudvgorode.ru/
Сервисный центр предлагает ремонт кофемашины colet рядом качественый ремонт кофемашин colet
[url=https://lucky-jet-casino-play.ru]http://lucky-jet-casino-play.ru[/url]
last news about lucky jet casino
https://www.lucky-jet-casino-play.ru
I was reading through some of your content on this internet site and I believe this web site is very informative ! Continue posting .
Пистолет для вязки арматуры это современный инструмент, предназначенный для быстрого и надежного соединения арматурных стержней. В отличие от ручного метода, использование такого устройства позволяет значительно сократить время на выполнение строительных работ [url=http://wiki.planetenparty.at/index.php?title=%20%D0%9A%D0%B0%D0%BA%20%D1%81%D0%BE%D0%B1%D1%80%D0%B0%D1%82%D1%8C%20%D0%BA%D0%BE%D0%BD%D1%81%D1%82%D1%80%D1%83%D0%BA%D1%86%D0%B8%D1%8E%20%D0%B8%D0%B7%20%D0%BF%D1%80%D0%BE%D1%84%D0%B8%D0%BB%D1%8C%D0%BD%D0%BE%D0%B9%20%D1%82%D1%80%D1%83%D0%B1%D1%8B%2020%D1%8540%20%D0%B1%D0%B5%D0%B7%20%D0%BE%D1%88%D0%B8%D0%B1%D0%BE%D0%BA]http://wiki.planetenparty.at/index.php?title=%20%D0%9A%D0%B0%D0%BA%20%D1%81%D0%BE%D0%B1%D1%80%D0%B0%D1%82%D1%8C%20%D0%BA%D0%BE%D0%BD%D1%81%D1%82%D1%80%D1%83%D0%BA%D1%86%D0%B8%D1%8E%20%D0%B8%D0%B7%20%D0%BF%D1%80%D0%BE%D1%84%D0%B8%D0%BB%D1%8C%D0%BD%D0%BE%D0%B9%20%D1%82%D1%80%D1%83%D0%B1%D1%8B%2020%D1%8540%20%D0%B1%D0%B5%D0%B7%20%D0%BE%D1%88%D0%B8%D0%B1%D0%BE%D0%BA[/url]
https://отель-судак.рф/
Mint Mobile re-imagined the wireless shopping experience and made it easy and online-only. No stores. No salespeople. Just huge direct to you savings on [url=http://phraajarn.com/change_language.asp?language_id=th&MemberSite_session=site_26486_&link=https://diversdeluxe.co.za/]http://phraajarn.com/change_language.asp?language_id=th&MemberSite_session=site_26486_&link=https://diversdeluxe.co.za/[/url]
Kometa Casino: Лучший вариант для ценителей азартного досуга
Если вы увлекаетесь азартными играми и рассматриваете сайт, которая обеспечивает огромный выбор слотов и лайв-игр, а плюс щедрые бонусы, Kometa Casino — это тот сайт, в котором вы найдете незабываемый опыт. Давайте изучим, какие факторы делает данное казино уникальным и почему игроки выбирают этом сайте для своих развлечений.
### Ключевые черты Казино Kometa
Kometa Casino — это глобальная платформа, которая была основана в 2024 году и уже сейчас завоевала интерес клиентов по международно. Вот основные моменты, что отличают этот сайт:
Черта Сведения
Год создания 2024
География Доступа Международная
Объем игр Свыше 1000
Лицензия Curacao
Мобильный доступ Доступна
Способы Оплаты Visa, Mastercard, Skrill
Служба поддержки 24/7 Чат и Email
Приветственные бонусы Акции и бонусы
Система безопасности SSL Шифрование
### Что привлекает в Казино Kometa?
#### Бонусная система
Одним из интересных функций Kometa Casino становится уникальная программа лояльности. Чем активнее играете, тем лучше призы и бонусы. Система имеет многоуровневую систему:
– **Земля (уровень 1)**: Кэшбек 3% 3% от потраченных средств за неделю.
– **Луна (уровень 2)**: Кэшбек 5% при ставках от 5 000 до 10 000 рублей.
– **Уровень 3 — Венера**: Возврат 7% при ставках от 10 001 до 50 000 рублей.
– **Уровень 4 — Марс**: 8% бонуса при сумме ставок от 50 001 до 150 000 рублей.
– **Уровень 5 — Юпитер**: Кэшбек 10% при общей ставке свыше 150 000 RUB.
– **Уровень 6 — Сатурн**: 11% бонуса.
– **Уровень 7 — Уран**: Максимальный кэшбек максимум 12%.
#### Постоянные бонусы
Для сохранения азарт на высоте, Казино Kometa предоставляет еженедельные бонусы, возврат средств и спины для новичков. Частые бонусы способствуют поддерживать азарт на протяжении всей игры.
#### Широкий выбор игр
Огромное количество развлечений, включая игровые машины, настольные игры и живое казино, превращают Kometa Casino площадкой, где вы найдете игру по душе. Каждый может играть как классическими слотами, а также новинками от лучших поставщиков. Живые дилеры добавляют атмосфере еще больше реализма, воссоздавая дух казино.
вывод из запоя в наркологическом стационаре [url=https://vyvod-iz-zapoya-sochi15.ru/]vyvod-iz-zapoya-sochi15.ru[/url] .
clavulanate tablet – how to buy levothyroxine order synthroid 100mcg generic
Смешные анекдоты https://teletype.in/@anekdoty/smeshnye-anekdoty.
I had fun reading this post. I want to see more on this subject.. Gives Thanks for writing this nice article.. Anyway, I’m going to subscribe to your rss and I wish you write great articles again soon.
фриспины за установку приложения без депозита
[url=https://sweet-bonanza-casino-info.ru]http://sweet-bonanza-casino-info.ru[/url]
last news about sweet bonanza casino
sweet-bonanza-casino-info.ru
Прикольные анекдоты https://prikolyshutki.wordpress.com/2024/10/16/smeshnye-anekdoty/.
[url=https://le-bandit-casino-play.ru]http://www.le-bandit-casino-play.ru[/url]
last news about le bandit casino
http://www.le-bandit-casino-play.ru
csgo betting cs go betting
[url=https://le-bandit-casino-info.ru]le-bandit-casino-info.ru[/url]
last news about le bandit casino
le-bandit-casino-info.ru
While this issue can vexed most people, my thought is that there has to be a middle or common ground that we all can find. I do value that you’ve added pertinent and sound commentary here though. Thank you!
bs2best
Круто, я искала этот давно
_________________
[URL=https://igra.top10slotplay.rent]игровые автоматы пирамида золото[/URL]
Thanks, I’ve been looking for this for a long time
_________________
[url=https://igra.bkinfo97.online]слоты money train[/url]
[url=https://maria-sharapovaar.biz]https://maria-sharapovaar.biz[/url]
last news about maria sharapova
http://maria-sharapovaar.biz
I discovered your weblog site on google and verify just a few of your early posts. Proceed to maintain up the very good operate. I simply further up your RSS feed to my MSN News Reader.
[url=https://mariasharapovaar.biz]https://www.mariasharapovaar.biz[/url]
last news about maria sharapova
https://mariasharapovaar.biz
Когда нужно создать что-то надежное, важны не только материалы, но и их правильный выбор. Это касается как масштабных проектов, так и небольших объектов [url=http://shooting-russia.ru/forum/?PAGE_NAME=message&FID=10&TID=16044&TITLE_SEO=16044-kak-stalnaya-provoloka-ispolzuetsya-v-avtomobilnoy-promyshlennosti&MID=16317&result=new#message16317]http://shooting-russia.ru/forum/?PAGE_NAME=message&FID=10&TID=16044&TITLE_SEO=16044-kak-stalnaya-provoloka-ispolzuetsya-v-avtomobilnoy-promyshlennosti&MID=16317&result=new#message16317[/url]
Looking for a new sex toy to use with your partner? Tease and explore each other with our exciting range of [url=https://gamedev.su/go?https://www.incognito.black/]https://gamedev.su/go?https://www.incognito.black/[/url]
cleocin 150mg price – order indomethacin 50mg online cheap indocin 50mg capsule
Начните массовую индексацию ссылок в Google прямо cейчас!
Быстрая индексация ссылок имеет ключевое значение для успеха вашего онлайн-бизнеса. Чем быстрее поисковые системы обнаружат и проиндексируют ваши ссылки, тем быстрее вы сможете привлечь новую аудиторию и повысить позиции вашего сайта в результатах поиска.
Не теряйте времени! Начните пользоваться нашим сервисом для ускоренной индексации внешних ссылок в Google и Yandex. Зарегистрируйтесь сегодня и получите первые результаты уже завтра. Ваш успех в ваших руках!
Свежие анекдоты https://teletype.in/@anekdoty/smeshnye-anekdoty.
Профессиональный сервисный центр по ремонту бытовой техники с выездом на дом.
Мы предлагаем: ремонт бытовой техники в челябинске
Наши мастера оперативно устранят неисправности вашего устройства в сервисе или с выездом на дом!
후련하고 행복하다!천안웨딩박람회!걱정도 많고 천안웨딩박람회기대도
[url=https://sharapovamariaar.biz]www.sharapovamariaar.biz[/url]
last news about sharapova maria
https://sharapovamariaar.biz
[url=https://le-bandit-casino-obzor.ru]http://le-bandit-casino-obzor.ru[/url]
last news about le bandit casino
http://www.le-bandit-casino-obzor.ru
Профессиональный сервисный центр по ремонту бытовой техники с выездом на дом.
Мы предлагаем: ремонт бытовой техники в барнауле
Наши мастера оперативно устранят неисправности вашего устройства в сервисе или с выездом на дом!
Платформа для ставок 1вин с множеством событий и азартных игр. Удобный интерфейс, моментальные выплаты и привлекательные бонусы делают ставки ещё увлекательнее. Откройте мир азарта и выигрышей с надежным сервисом и постоянными акциями для пользователей.
Over 7 years in development, the Rollga Method™ combines trigger points, acupressure points, fascial lines, meridians, and techniques like ART (Active Release Technique), MAT (Muscle Activation Technique), RPR (Reflexive Performance Reset) and others to optimize one’s health thru a new system of self care.
Download the Rollga App to learn about & tap into all that Rollga has to offer!
Great info. Lucky me I ran across your blog by accident (stumbleupon). I’ve book-marked it for later.
Обмен криптовалюты в Киеве Лучший курс Безопасно купить/продать, обменять крипту на наличные в городе Киев (Украина) через Онлайн криптообменник [url=https://www.5632.com.ua/list/493874]вывести USDT на карту[/url]
Dankbros is one of Canada’s most reputable online marijuana dispensaries. We guarantee that you’ll receive the best strains, concentrates, and accessories [url=http://www.edccommunity.com/proxy.php?link=https://banana.clothing/]http://www.edccommunity.com/proxy.php?link=https://banana.clothing/[/url]
музей анимации в измайловском кремле музей анимации в москве отзывы
[url=https://sharapova-maria-ar.biz/]http://sharapova-maria-ar.biz[/url]
last news about sharapova maria
http://www.sharapova-maria-ar.biz
일본배대지
이용 안내 및 주요 정보
배송대행 이용방법
배송대행은 해외에서 구매한 상품을 중간지점(배대지)에 보내고, 이를 통해 한국으로 배송받는 서비스입니다. 먼저, 회원가입을 진행하고, 해당 배대지 주소를 이용해 상품을 주문한 후, 배송대행 신청서를 작성하여 배송 정보를 입력합니다. 모든 과정은 웹사이트를 통해 관리되며, 필요한 경우 고객센터를 통해 지원을 받을 수 있습니다.
구매대행 이용방법
구매대행은 해외 쇼핑몰에서 직접 구매가 어려운 경우, 대행 업체가 대신 구매해주는 서비스입니다. 고객이 원하는 상품 정보를 제공하면, 구매대행 신청서를 작성하고 대행료와 함께 결제하면 업체가 구매를 완료해줍니다. 이후 상품이 배대지로 도착하면 배송대행 절차를 통해 상품을 수령할 수 있습니다.
배송비용 안내
배송비용은 상품의 무게, 크기, 배송 지역에 따라 다르며, 계산기는 웹사이트에서 제공됩니다. 부피무게가 큰 제품이나 특수 제품은 추가 비용이 발생할 수 있습니다. 항공과 해운에 따른 요금 차이도 고려해야 합니다.
부가서비스
추가 포장 서비스, 검역 서비스, 폐기 서비스 등이 제공되며, 필요한 경우 신청서를 작성하여 서비스 이용이 가능합니다. 파손 위험이 있는 제품의 경우 포장 보완 서비스를 신청하는 것이 좋습니다.
관/부가세 안내
수입된 상품에 대한 관세와 부가세는 상품의 종류와 가격에 따라 부과됩니다. 이를 미리 확인하고, 추가 비용을 예상하여 계산하는 것이 중요합니다.
수입금지 품목
가스제품(히터), 폭발물, 위험물 등은 수입이 금지된 품목에 속합니다. 항공 및 해상 운송이 불가하니, 반드시 해당 품목을 확인 후 주문해야 합니다.
폐기/검역 안내
검역이 필요한 상품이나 폐기가 필요한 경우, 사전에 관련 부가서비스를 신청해야 합니다. 해당 사항에 대해 미리 안내받고 처리할 수 있도록 주의해야 합니다.
교환/반품 안내
교환 및 반품 절차는 상품을 배송받은 후 7일 이내에 신청이 가능합니다. 단, 일부 상품은 교환 및 반품이 제한될 수 있으니 사전에 정책을 확인하는 것이 좋습니다.
재고관리 시스템
재고관리는 배대지에서 보관 중인 상품의 상태를 실시간으로 확인할 수 있는 시스템입니다. 재고 신청을 통해 상품의 상태를 확인하고, 필요한 경우 배송 또는 폐기 요청을 할 수 있습니다.
노데이타 처리방법
노데이타 상태의 상품은 배송 추적이 어려운 경우 발생합니다. 이런 경우 고객센터를 통해 문의하고 문제를 해결해야 합니다.
소비세환급 및 Q&A
일본에서 상품을 구매할 때 적용된 소비세를 환급받을 수 있는 서비스입니다. 해당 신청서는 구체적인 절차에 따라 작성하고 제출해야 합니다. Q&A를 통해 자주 묻는 질문을 확인하고, 추가 문의 사항은 고객센터에 연락해 해결할 수 있습니다.
고객지원
고객센터는 1:1 문의, 카카오톡 상담 등을 통해 서비스 이용 중 발생하는 문제나 문의사항을 해결할 수 있도록 지원합니다.
서비스 관련 공지사항
파손이 쉬운 제품의 경우, 추가 포장 보완을 반드시 요청해야 합니다.
가스제품(히터)은 통관이 불가하므로 구매 전 확인 바랍니다.
항공 운송 비용이 대폭 인하되었습니다.
музей анимации официальный сайт музей анимации в измайловском
https://м-мастер.рф/
Платформа для ставок 1win с множеством событий и азартных игр. Удобный интерфейс, моментальные выплаты и привлекательные бонусы делают ставки ещё увлекательнее. Откройте мир азарта и выигрышей с надежным сервисом и постоянными акциями для пользователей.
музей анимации измайлово московский музей анимации измайловское ш 73ж
When I initially commented I seem to have clicked the
-Notify me when new comments are added- checkbox and from now on whenever a comment is added I get four emails with the
same comment. Perhaps there is a way you can remove
me from that service? Thanks a lot!
DANKBROS LTD – Free company information from Companies House including registered office address, filing history, accounts, annual return, officers [url=https://metav.glm-werkzeugmaschinen.com/open_link.php?link=https://www.dankbros.net/]https://metav.glm-werkzeugmaschinen.com/open_link.php?link=https://www.dankbros.net/[/url]
order balloons to your home Dubai cheap balloons to order
[url=https://maria-sharapova-ar.biz]https://maria-sharapova-ar.biz[/url]
last news about maria sharapova
https://www.maria-sharapova-ar.biz
Платформа 1win предлагает широкий выбор спортивных событий, киберспорта и азартных игр. Пользователи получают высокие коэффициенты, быстрые выплаты и круглосуточную поддержку. Программа лояльности и бонусы делают игру выгоднее.
watch instagram stories anonymously [url=www.anstoriesviewer.com]watch instagram stories anonymously[/url] .
вывод из запоя анонимно [url=http://vyvod-iz-zapoya-sochi17.ru/]вывод из запоя анонимно[/url] .
일본배대지
이용 안내 및 주요 정보
배송대행 이용방법
배송대행은 해외에서 구매한 상품을 중간지점(배대지)에 보내고, 이를 통해 한국으로 배송받는 서비스입니다. 먼저, 회원가입을 진행하고, 해당 배대지 주소를 이용해 상품을 주문한 후, 배송대행 신청서를 작성하여 배송 정보를 입력합니다. 모든 과정은 웹사이트를 통해 관리되며, 필요한 경우 고객센터를 통해 지원을 받을 수 있습니다.
구매대행 이용방법
구매대행은 해외 쇼핑몰에서 직접 구매가 어려운 경우, 대행 업체가 대신 구매해주는 서비스입니다. 고객이 원하는 상품 정보를 제공하면, 구매대행 신청서를 작성하고 대행료와 함께 결제하면 업체가 구매를 완료해줍니다. 이후 상품이 배대지로 도착하면 배송대행 절차를 통해 상품을 수령할 수 있습니다.
배송비용 안내
배송비용은 상품의 무게, 크기, 배송 지역에 따라 다르며, 계산기는 웹사이트에서 제공됩니다. 부피무게가 큰 제품이나 특수 제품은 추가 비용이 발생할 수 있습니다. 항공과 해운에 따른 요금 차이도 고려해야 합니다.
부가서비스
추가 포장 서비스, 검역 서비스, 폐기 서비스 등이 제공되며, 필요한 경우 신청서를 작성하여 서비스 이용이 가능합니다. 파손 위험이 있는 제품의 경우 포장 보완 서비스를 신청하는 것이 좋습니다.
관/부가세 안내
수입된 상품에 대한 관세와 부가세는 상품의 종류와 가격에 따라 부과됩니다. 이를 미리 확인하고, 추가 비용을 예상하여 계산하는 것이 중요합니다.
수입금지 품목
가스제품(히터), 폭발물, 위험물 등은 수입이 금지된 품목에 속합니다. 항공 및 해상 운송이 불가하니, 반드시 해당 품목을 확인 후 주문해야 합니다.
폐기/검역 안내
검역이 필요한 상품이나 폐기가 필요한 경우, 사전에 관련 부가서비스를 신청해야 합니다. 해당 사항에 대해 미리 안내받고 처리할 수 있도록 주의해야 합니다.
교환/반품 안내
교환 및 반품 절차는 상품을 배송받은 후 7일 이내에 신청이 가능합니다. 단, 일부 상품은 교환 및 반품이 제한될 수 있으니 사전에 정책을 확인하는 것이 좋습니다.
재고관리 시스템
재고관리는 배대지에서 보관 중인 상품의 상태를 실시간으로 확인할 수 있는 시스템입니다. 재고 신청을 통해 상품의 상태를 확인하고, 필요한 경우 배송 또는 폐기 요청을 할 수 있습니다.
노데이타 처리방법
노데이타 상태의 상품은 배송 추적이 어려운 경우 발생합니다. 이런 경우 고객센터를 통해 문의하고 문제를 해결해야 합니다.
소비세환급 및 Q&A
일본에서 상품을 구매할 때 적용된 소비세를 환급받을 수 있는 서비스입니다. 해당 신청서는 구체적인 절차에 따라 작성하고 제출해야 합니다. Q&A를 통해 자주 묻는 질문을 확인하고, 추가 문의 사항은 고객센터에 연락해 해결할 수 있습니다.
고객지원
고객센터는 1:1 문의, 카카오톡 상담 등을 통해 서비스 이용 중 발생하는 문제나 문의사항을 해결할 수 있도록 지원합니다.
서비스 관련 공지사항
파손이 쉬운 제품의 경우, 추가 포장 보완을 반드시 요청해야 합니다.
가스제품(히터)은 통관이 불가하므로 구매 전 확인 바랍니다.
항공 운송 비용이 대폭 인하되었습니다.
[url=https://luis-diazar.biz]http://luis-diazar.biz[/url]
last news about luis diaz
http://www.luis-diazar.biz
고 먼저 제안해준 공주부산웨딩박람회님께 무한한 사랑과 감부산웨딩박람회사드리며 포스팅을 마칩부산웨딩박람회니다.<
Some of these flowers include azaleas, peonies, and orchids! These flowers can make all the difference in their day and hopefully attract good luck [url=https://www.warrington-worldwide.co.uk/2024/09/23/6-popular-reasons-to-give-flowers/]https://www.warrington-worldwide.co.uk/2024/09/23/6-popular-reasons-to-give-flowers/[/url]
이용 안내 및 주요 정보
배송대행 이용방법
배송대행은 해외에서 구매한 상품을 중간지점(배대지)에 보내고, 이를 통해 한국으로 배송받는 서비스입니다. 먼저, 회원가입을 진행하고, 해당 배대지 주소를 이용해 상품을 주문한 후, 배송대행 신청서를 작성하여 배송 정보를 입력합니다. 모든 과정은 웹사이트를 통해 관리되며, 필요한 경우 고객센터를 통해 지원을 받을 수 있습니다.
구매대행 이용방법
구매대행은 해외 쇼핑몰에서 직접 구매가 어려운 경우, 대행 업체가 대신 구매해주는 서비스입니다. 고객이 원하는 상품 정보를 제공하면, 구매대행 신청서를 작성하고 대행료와 함께 결제하면 업체가 구매를 완료해줍니다. 이후 상품이 배대지로 도착하면 배송대행 절차를 통해 상품을 수령할 수 있습니다.
배송비용 안내
배송비용은 상품의 무게, 크기, 배송 지역에 따라 다르며, 계산기는 웹사이트에서 제공됩니다. 부피무게가 큰 제품이나 특수 제품은 추가 비용이 발생할 수 있습니다. 항공과 해운에 따른 요금 차이도 고려해야 합니다.
부가서비스
추가 포장 서비스, 검역 서비스, 폐기 서비스 등이 제공되며, 필요한 경우 신청서를 작성하여 서비스 이용이 가능합니다. 파손 위험이 있는 제품의 경우 포장 보완 서비스를 신청하는 것이 좋습니다.
관/부가세 안내
수입된 상품에 대한 관세와 부가세는 상품의 종류와 가격에 따라 부과됩니다. 이를 미리 확인하고, 추가 비용을 예상하여 계산하는 것이 중요합니다.
수입금지 품목
가스제품(히터), 폭발물, 위험물 등은 수입이 금지된 품목에 속합니다. 항공 및 해상 운송이 불가하니, 반드시 해당 품목을 확인 후 주문해야 합니다.
폐기/검역 안내
검역이 필요한 상품이나 폐기가 필요한 경우, 사전에 관련 부가서비스를 신청해야 합니다. 해당 사항에 대해 미리 안내받고 처리할 수 있도록 주의해야 합니다.
교환/반품 안내
교환 및 반품 절차는 상품을 배송받은 후 7일 이내에 신청이 가능합니다. 단, 일부 상품은 교환 및 반품이 제한될 수 있으니 사전에 정책을 확인하는 것이 좋습니다.
재고관리 시스템
재고관리는 배대지에서 보관 중인 상품의 상태를 실시간으로 확인할 수 있는 시스템입니다. 재고 신청을 통해 상품의 상태를 확인하고, 필요한 경우 배송 또는 폐기 요청을 할 수 있습니다.
노데이타 처리방법
노데이타 상태의 상품은 배송 추적이 어려운 경우 발생합니다. 이런 경우 고객센터를 통해 문의하고 문제를 해결해야 합니다.
소비세환급 및 Q&A
일본에서 상품을 구매할 때 적용된 소비세를 환급받을 수 있는 서비스입니다. 해당 신청서는 구체적인 절차에 따라 작성하고 제출해야 합니다. Q&A를 통해 자주 묻는 질문을 확인하고, 추가 문의 사항은 고객센터에 연락해 해결할 수 있습니다.
고객지원
고객센터는 1:1 문의, 카카오톡 상담 등을 통해 서비스 이용 중 발생하는 문제나 문의사항을 해결할 수 있도록 지원합니다.
서비스 관련 공지사항
파손이 쉬운 제품의 경우, 추가 포장 보완을 반드시 요청해야 합니다.
가스제품(히터)은 통관이 불가하므로 구매 전 확인 바랍니다.
항공 운송 비용이 대폭 인하되었습니다.
[url=https://luis-diaz-ar.biz]http://www.luis-diaz-ar.biz[/url]
last news about luis diaz
luis-diaz-ar.biz
Мы продаем устройства для систем водоснабжения, отопления, канализации и мебель под сантехнику. Поможем создать пространство с комфортными для жизни условиями [url=https://www.ozon.ru/product/891401275]Душевой уголок Niagara Nova 110х90 NG-83-11AB-A90B профиль Черный стекло прозрачное[/url]
Свежие анекдоты http://anekdot-top.ru.
best instagram viewer [url=http://anonimstoriesview.com/]http://anonimstoriesview.com/[/url] .
[url=https://luisdiazar.biz/]https://www.luisdiazar.biz[/url]
last news about luis diaz
https://luisdiazar.biz
Профессиональный сервисный центр ремонт телефонов с гарантией срочный ремонт сотовых телефонов
Профессиональный сервисный центр по ремонту сотовых телефонов в Москве.
Мы предлагаем: мастер по ремонту ноутбуков москва
Наши мастера оперативно устранят неисправности вашего устройства в сервисе или с выездом на дом!
Сколько стоит диплом высшего и среднего образования и как его получить?
datasphere.ru/club/user/15/blog/?b24statAction=addLogEntry
kometa casino рабочее зеркало
Казино Kometa: Идеальный выбор для фанатов игр на удачу
В случае если вы увлекаетесь игровыми автоматами и рассматриваете платформу, которая дает доступ к широкий ассортимент игровых автоматов и лайв-игр, а также щедрые бонусы, Казино Kometa — это тот сайт, на котором вас ждут незабываемый опыт. Предлагаем узнаем, какие факторы делает Kometa Casino уникальным и почему игроки остановились на этом сайте для досуга.
### Основные характеристики Kometa Casino
Казино Kometa — это всемирная платформа, которая была запущена в 2024 году и уже сейчас завоевала интерес игроков по всему миру. Вот ключевые факты, которые выделяют Kometa Casino:
Характеристика Сведения
Дата запуска Год основания 2024
Глобальная доступность Глобальная
Объем игр Более 1000
Лицензия Лицензия Кюрасао
Поддержка мобильных Доступна
Способы Оплаты Visa, Mastercard, Skrill
Служба поддержки 24 часа в сутки
Приветственные бонусы Щедрые бонусы
Безопасность SSL защита
### Что привлекает в Казино Kometa?
#### Система поощрений
Одним из ключевых функций Kometa Casino является уникальная программа лояльности. Чем активнее играете, тем лучше призы и бонусы. Программа включает семи уровней:
– **Земля (уровень 1)**: Кэшбек 3% 3% от потраченных средств за 7 дней.
– **Уровень 2 — Луна**: Возврат 5% на ставки от 5 000 до 10 000 RUB.
– **Уровень 3 — Венера**: Кэшбек 7% при ставках на сумму от 10 001 до 50 000 ?.
– **Уровень 4 — Марс**: 8% кэшбек при ставках от 50 001 до 150 000 рублей.
– **Уровень 5 — Юпитер**: 10% возврата при общей ставке свыше 150 000 RUB.
– **Уровень 6 — Сатурн**: 11% бонуса.
– **Уран (уровень 7)**: Максимальный кэшбек максимум 12%.
#### Еженедельные бонусы и кэшбек
Чтобы держать высокого уровня азарта, Казино Kometa предлагает регулярные бонусы, возврат средств и фриспины для новичков. Частые бонусы помогают удерживать внимание на в процессе игры.
#### Широкий выбор игр
Свыше тысячи игр, включая слоты, настольные игры и игры с живыми дилерами, делают Kometa Casino площадкой, где любой найдет развлечение на вкус. Вы можете наслаждаться классическими играми, и современными слотами от известных разработчиков. Дилеры в реальном времени придают атмосфере еще больше реализма, воссоздавая дух казино.
Luka Doncic and Boban Marjanovic have been seen together frequently off the court, and their friendship has been well-documented through social [url=http://informatief.financieeldossier.nl/index.php?url=https://lukafriend.com/]http://informatief.financieeldossier.nl/index.php?url=https://lukafriend.com/[/url]
Пошаговая инструкция по безопасной покупке диплома о высшем образовании
[url=https://lebronjames-ar.biz]https://lebronjames-ar.biz[/url]
last news about lebron james
http://www.lebronjames-ar.biz
I’m partial to blogs and i actually respect your content. The article has actually peaks my interest. I am going to bookmark your site and preserve checking for new information.
поставщик оборудования для систем отопления, вентиляции, котельных, санузлов. Купить оборудование для инженерных систем на сайте официального [url=https://www.ozon.ru/product/1355772595]Душевая кабина River Desna XL 120×90 MT L 10000006161 без гидромассажа[/url]
Заказывая окно и установку в одной компании, Вы можете сэкономить время и силы на контроль работы разных подрядчиков. Комплексный подход к услуге обеспечивает более точный монтаж конструкции с учетом всех особенностей системы остекления. Наши мастера не только аккуратно установят окна, но и проследят за качеством работы фурнитуры. Как производители, мы контролируем поставки сырья и следим за качеством продукта на всех этапах, предлагая впечатляющую гарантию на профили — 25 лет [url=https://vaokno.ru/]продажа пластиковых окон в москве[/url]
Веселые анекдоты http://anekdot-top.ru.
купить диплом в петрозаводске [url=https://landik-diploms.ru/]landik-diploms.ru[/url] .
This is really interesting, You’re a very skilled blogger.
I’ve joined your rss feed and look forward to seeking more of your fantastic post.
Also, I’ve shared your website in my social networks!
rgbet
Cách Tối Đa Hóa Tiền Thưởng Tại RGBET
META title: Cách tối ưu hóa tiền thưởng trên RGBET
META description: Học cách tối đa hóa tiền thưởng của bạn trên RGBET bằng các mẹo và chiến lược cá cược hiệu quả nhất.
Giới thiệu
Tiền thưởng là cơ hội tuyệt vời để tăng cơ hội thắng lớn mà không phải bỏ ra nhiều vốn. RGBET cung cấp rất nhiều loại khuyến mãi hấp dẫn, hãy cùng khám phá cách tối ưu hóa chúng!
1. Đọc kỹ điều kiện khuyến mãi
Mỗi chương trình thưởng đều có điều kiện riêng, bạn cần đọc kỹ để đảm bảo không bỏ lỡ cơ hội.
2. Đặt cược theo mức yêu cầu
Để nhận thưởng, hãy đảm bảo rằng số tiền cược của bạn đạt yêu cầu tối thiểu.
3. Tận dụng tiền thưởng nạp đầu tiên
Đây là cơ hội để bạn có thêm vốn ngay từ đầu. Hãy lựa chọn mức nạp phù hợp với ngân sách.
4. Theo dõi khuyến mãi hàng tuần
RGBET liên tục đưa ra các chương trình khuyến mãi hàng tuần. Đừng bỏ lỡ cơ hội nhận thêm tiền thưởng!
5. Sử dụng điểm VIP
Khi bạn đạt mức VIP, điểm thưởng có thể được chuyển thành tiền mặt, giúp bạn tối ưu hóa lợi nhuận.
Kết luận
Biết cách tận dụng tiền thưởng không chỉ giúp bạn có thêm tiền cược mà còn tăng cơ hội thắng lớn.
delivery of helium balloons to your home Dubai cheap balloons Dubai
ready-made resumes of an engineer resume of a mechanical engineer
Hi, I do think this is an excellent website. I stumbledupon it 😉 I may revisit yet again since i have bookmarked it. Money and freedom is the greatest way to change, may you be rich and continue to guide others.
Веселые приколы и анекдоты https://teletype.in/@anekdoty/prikoly-nastroenie.
Разработка проекта СЗЗ (санитарно защитная зона) для объектов негативного воздействия в Москве и Московской области. Оценка источников загрязнения на производстве, согласование проекта в Роспотребнадзоре https://telegra.ph/15-ponyatnyh-otvetov-o-proekte-SZZ-sanitarno-zashchitnaya-zona-10-17
This kit comes in a zippered pouch and includes 2 specially developed Scuba Wrenches, high quality crescent wrench, Phillips head and flat head screw drivers [url=http://www.gta.ru/redirect/www.boikhuco.co.za/]http://www.gta.ru/redirect/www.boikhuco.co.za/[/url]
Диплом пту купить официально с упрощенным обучением в Москве
I am glad to be a visitor on this website!, regards for this rare information!
rgbet
Cách Tối Đa Hóa Tiền Thưởng Tại RGBET
META title: Cách tối ưu hóa tiền thưởng trên RGBET
META description: Học cách tối đa hóa tiền thưởng của bạn trên RGBET bằng các mẹo và chiến lược cá cược hiệu quả nhất.
Giới thiệu
Tiền thưởng là cơ hội tuyệt vời để tăng cơ hội thắng lớn mà không phải bỏ ra nhiều vốn. RGBET cung cấp rất nhiều loại khuyến mãi hấp dẫn, hãy cùng khám phá cách tối ưu hóa chúng!
1. Đọc kỹ điều kiện khuyến mãi
Mỗi chương trình thưởng đều có điều kiện riêng, bạn cần đọc kỹ để đảm bảo không bỏ lỡ cơ hội.
2. Đặt cược theo mức yêu cầu
Để nhận thưởng, hãy đảm bảo rằng số tiền cược của bạn đạt yêu cầu tối thiểu.
3. Tận dụng tiền thưởng nạp đầu tiên
Đây là cơ hội để bạn có thêm vốn ngay từ đầu. Hãy lựa chọn mức nạp phù hợp với ngân sách.
4. Theo dõi khuyến mãi hàng tuần
RGBET liên tục đưa ra các chương trình khuyến mãi hàng tuần. Đừng bỏ lỡ cơ hội nhận thêm tiền thưởng!
5. Sử dụng điểm VIP
Khi bạn đạt mức VIP, điểm thưởng có thể được chuyển thành tiền mặt, giúp bạn tối ưu hóa lợi nhuận.
Kết luận
Biết cách tận dụng tiền thưởng không chỉ giúp bạn có thêm tiền cược mà còn tăng cơ hội thắng lớn.
[url=https://diaz-luis-ar.biz]diaz-luis-ar.biz[/url]
last news about diaz luis
http://www.diaz-luis-ar.biz
Tại Sao Nên Chọn RGBET Là Nền Tảng Cá Cược Trực Tuyến Hàng Đầu
META title: Vì sao RGBET là nền tảng cá cược tốt nhất cho người chơi Việt Nam
META description: Tìm hiểu những lý do RGBET là lựa chọn hàng đầu cho người chơi Việt Nam với giao diện hiện đại, khuyến mãi hấp dẫn và nạp rút nhanh chóng.
Giới thiệu
RGBET không chỉ là một trang cá cược trực tuyến thông thường. Với những tính năng nổi bật và các chương trình khuyến mãi hấp dẫn, đây là một trong những nền tảng được người chơi Việt Nam tin tưởng nhất.
1. Giao diện thân thiện
Giao diện của RGBET dễ sử dụng, thích hợp cho cả người mới và người chơi lâu năm.
2. Khuyến mãi hấp dẫn
Nền tảng này cung cấp nhiều chương trình khuyến mãi như thưởng nạp đầu, cashback, và chương trình VIP.
3. Nạp và rút tiền nhanh chóng
RGBET hỗ trợ nhiều phương thức thanh toán an toàn và nhanh chóng, từ ngân hàng nội địa đến ví điện tử.
4. Hỗ trợ khách hàng 24/7
RGBET có đội ngũ hỗ trợ luôn sẵn sàng giải đáp mọi thắc mắc của người chơi mọi lúc.
Kết luận
RGBET không chỉ đem lại trải nghiệm cá cược tuyệt vời mà còn đảm bảo sự tiện lợi và uy tín cho người chơi.
Профессиональный сервисный центр по ремонту духовых шкафов в Москве.
Мы предлагаем: ремонт духового шкафа москва
Наши мастера оперативно устранят неисправности вашего устройства в сервисе или с выездом на дом!
[url=https://diazluis-ar.biz]diazluis-ar.biz[/url]
last news about diaz luis
http://www.diazluis-ar.biz
https://paxlovid1st.shop/# paxlovid generic
erectile dysfunction medication
download 1win apk [url=https://www.1wincotedivoireapk.com]https://www.1wincotedivoireapk.com[/url] .
view instagram followers anonymously [url=https://anonimviewer.com/]anonimviewer.com[/url] .
Оценка источников загрязнения на производстве, согласование проекта в Роспотребнадзоре. Разработка проекта СЗЗ (санитарно защитная зона) для объектов негативного воздействия в Москве и Московской области https://telegra.ph/15-ponyatnyh-otvetov-o-proekte-SZZ-sanitarno-zashchitnaya-zona-10-17
Your go-to Filipino technology forum for discussions on mobile networks, internet, phones, media, computers, gaming, news, and a variety of topics related to [url=https://my.tvnet.if.ua/connect_lang/en?next=https://www.mintmobile.co.za/]https://my.tvnet.if.ua/connect_lang/en?next=https://www.mintmobile.co.za/[/url]
Как оказалось, купить диплом кандидата наук не так уж и сложно
1001vieclam.forumvi.com/login
Разработка ПНООЛР — проект нормативов образования отходов и лимитов на их размещение. Экологическая отчетность для предприятий в Москве и Московской области https://vc.ru/u/3791103-studiya-zr/1506729-pnoolr-chto-nuzhno-znat-pri-razrabotke-proekta-normativov-obrazovaniya-i-razmesheniya-othodov
[url=https://kobebryantar.biz]http://www.kobebryantar.biz[/url]
last news about kobe bryant
kobebryantar.biz
[url=https://kobebryant-ar.biz]kobebryant-ar.biz[/url]
last news about kobe bryant
http://kobebryant-ar.biz
[url=https://kobe-bryantar.biz]https://www.kobe-bryantar.biz[/url]
last news about kobe bryant
http://www.kobe-bryantar.biz
Hello friends, fastidious article and nice urging commented here, I am truly
enjoying by these.
Свежие приколы, шутки и картинки https://teletype.in/@anekdoty/prikoly-nastroenie.
Highly energetic post, I loved that bit. Will there be a part 2?
[url=https://lebronjamesar.biz]http://lebronjamesar.biz[/url]
last news about lebron james
lebronjamesar.biz
What’s up, I desire to subscribe for this web site to take most recent updates, thus where can i do
it please help out.
There’s definately a great deal to learn about this subject. I really like all of the points you made.
Some genuinely choice content on this site, bookmarked .
Garansi Kekalahan
NAGAEMPIRE: Platform Sports Game dan E-Games Terbaik di Tahun 2024
Selamat datang di Naga Empire, platform hiburan online yang menghadirkan pengalaman gaming terdepan di tahun 2024! Kami bangga menawarkan sports game, permainan kartu, dan berbagai fitur unggulan yang dirancang untuk memberikan Anda kesenangan dan keuntungan maksimal.
Keunggulan Pendaftaran dengan E-Wallet dan QRIS
Kami memprioritaskan kemudahan dan kecepatan dalam pengalaman bermain Anda:
Pendaftaran dengan E-Wallet: Daftarkan akun Anda dengan mudah menggunakan e-wallet favorit. Proses pendaftaran sangat cepat, memungkinkan Anda langsung memulai petualangan gaming tanpa hambatan.
QRIS Auto Proses dalam 1 Detik: Transaksi Anda diproses instan hanya dalam 1 detik dengan teknologi QRIS, memastikan pembayaran dan deposit berjalan lancar tanpa gangguan.
Sports Game dan Permainan Kartu Terbaik di Tahun 2024
Naga Empire menawarkan berbagai pilihan game menarik:
Sports Game Terlengkap: Dari taruhan olahraga hingga fantasy sports, kami menyediakan sensasi taruhan olahraga dengan kualitas terbaik.
Kartu Terbaik di 2024: Nikmati permainan kartu klasik hingga variasi modern dengan grafis yang menakjubkan, memberikan pengalaman bermain yang tak terlupakan.
Permainan Terlengkap dan Toto Terlengkap
Kami memiliki koleksi permainan yang sangat beragam:
Permainan Terlengkap: Temukan berbagai pilihan permainan seperti slot mesin, kasino, hingga permainan berbasis keterampilan, semua tersedia di Naga Empire.
Toto Terlengkap: Layanan Toto Online kami menawarkan pilihan taruhan yang lengkap dengan odds yang kompetitif, memberikan pengalaman taruhan yang optimal.
Bonus Melimpah dan Turnover Terendah
Bonus Melimpah: Dapatkan bonus mulai dari bonus selamat datang, bonus setoran, hingga promosi eksklusif. Kami selalu memberikan nilai lebih pada setiap taruhan Anda.
Turnover Terendah: Dengan turnover rendah, Anda dapat meraih kemenangan lebih mudah dan meningkatkan keuntungan dari setiap permainan.
Naga Empire adalah tempat yang tepat bagi Anda yang mencari pengalaman gaming terbaik di tahun 2024. Bergabunglah sekarang dan rasakan sensasi kemenangan di platform yang paling komprehensif!
вывод. из. запоя. ростов. на. дону. [url=http://www.vyvod-iz-zapoya-rostov115.ru]вывод. из. запоя. ростов. на. дону.[/url] .
франшизп [url=https://franshizy13.ru]https://franshizy13.ru[/url] .
Wow wonderful blog layout How long have you been blogging for you make blogging look easy The overall look of your site is great as well as the content
Betandreas Kazino sayt?n?n interfeysi istifad?cil?rin gozunu yormamaq ucun h?m sad? haz?rlan?b, h?m d? arxa fon ucun qara r?ng? ustunluk verilib. Siz Betandreas Azerbaycan sayt?na daxil olduqdan sonra sol yuxar? kuncd? qeydiyyat v? giris bolm?l?ri il? oz Betandreas hesab?n?z? yarada v? ya movcud hesab?n?za daxil ola bil?rsiniz [url=https://azsportsweb.com/tr/]https://azsportsweb.com/tr/[/url]
Металличекие двери cо склада в Мытищах на заказ.
Любые конфигурации замков на выбор. Более 3500 моделей на складе: [url=https://mytishi.dverimetallicheskie.ru/]тут[/url]
Свежие приколы и анекдоты http://shutki-anekdoty.ru/.
ivermectin tablets order: cheapest stromectol – ivermectin 2mg
Казино Kometa: Идеальный вариант для любителей азартных игр
Если вы любите игровыми автоматами и рассматриваете сайт, которая дает доступ к большой набор игровых автоматов и игр с живыми дилерами, а к тому же большие бонусы, Казино Kometa — это та площадка, в котором вас ждут незабываемый опыт. Предлагаем изучим, что выделяет это казино выдающимся и почему клиенты остановились на его для игры.
### Основные характеристики Казино Kometa
Казино Kometa — это глобальная платформа, что была запущена в 2024 году и уже привлекла признание игроков по международно. Вот некоторые моменты, что сравнивают с другими Kometa Casino:
Черта Описание
Дата запуска 2024
Глобальная доступность Всемирная
Количество Игр Свыше 1000
Сертификация Curacao
Мобильный доступ Доступна
Способы Оплаты Visa, Mastercard, Skrill
Техподдержка Круглосуточная поддержка
Приветственные бонусы Приветственные бонусы и Еженедельные выигрыши
Безопасность SSL защита
### Зачем играют в Kometa Casino?
#### Бонусная система
Одной из самых привлекательных фишек Kometa Casino считается поощрительная программа. Чем активнее играете, тем больше ваши вознаграждения. Программа имеет многоуровневую систему:
– **Уровень 1 — Земля**: Кэшбек 3% от потраченных средств за 7 дней.
– **Луна (уровень 2)**: Возврат 5% на ставки от 5 000 до 10 000 RUB.
– **Уровень 3 — Венера**: Кэшбек 7% при ставках от 10 001 до 50 000 RUB.
– **Уровень 4 — Марс**: 8% бонуса при ставках от 50 001 до 150 000 RUB.
– **Юпитер (уровень 5)**: 10% возврата при ставках свыше 150 000 рублей.
– **Сатурн (уровень 6)**: 11% бонуса.
– **Уран (уровень 7)**: 12% кэшбек максимум 12%.
#### Акции и возврат средств
Чтобы держать высокого уровня азарта, Kometa Casino предлагает бонусы каждую неделю, кэшбек и спины для новичков. Частые бонусы обеспечивают удерживать внимание на каждой стадии игры.
#### Огромный каталог игр
Более 1000 игр, включая слоты, настольные игры и живое казино, превращают Казино Kometa местом, где любой найдет игру по душе. Вы можете наслаждаться стандартными автоматами, так и новейшими играми от ведущих провайдеров. Живые дилеры добавляют игровому процессу еще больше реализма, формируя атмосферу азартного дома.
[url=https://james-lebron-ar.biz]https://james-lebron-ar.biz[/url]
last news about james lebron
james-lebron-ar.biz
[url=https://jameslebron-ar.biz]www.jameslebron-ar.biz[/url]
last news about james lebron
https://jameslebron-ar.biz
rybelsus price [url=https://rybelsus.icu/#]more[/url] good price
[url=https://bryant-kobe-ar.biz]bryant-kobe-ar.biz[/url]
last news about bryant kobe
https://www.bryant-kobe-ar.biz
Surprisingly good post. I really found your primary webpage and additionally wanted to suggest that have essentially enjoyed searching your website blog posts. Whatever the case I’ll always be subscribing to your entire supply and I hope you jot down ever again soon!
реально ли купить диплом о высшем образовании [url=https://russa-diploms.ru/]реально ли купить диплом о высшем образовании[/url] .
Веселые приколы и анекдоты http://shutki-anekdoty.ru/.
Как избежать рисков при покупке диплома колледжа или ПТУ в России
Сервисный центр предлагает мастерские ремонта фотоаппаратов zenit ремонт фотоаппаратов zenit адреса
Produzione video professionale https://orbispro.it creazione di spot pubblicitari, film aziendali e contenuti video. Ciclo completo di lavoro, dall’idea al montaggio. Soluzioni creative per promuovere con successo il tuo brand.
Полезный сервис быстрого загона ссылок сайта в индексация поисковой системы – индексация в гугл
I love it when people come together and share views. Great blog, keep it up!
Produzione video professionale https://orbispro.it creazione di spot pubblicitari, film aziendali e contenuti video. Ciclo completo di lavoro, dall’idea al montaggio. Soluzioni creative per promuovere con successo il tuo brand.
Свежие приколы, шутки и картинки http://shutki-anekdoty.ru/.
สล็อต888 เป็นหนึ่งในแพลตฟอร์มเกมสล็อตออนไลน์ที่ได้รับความนิยมสูงสุดในปัจจุบัน โดยมีความโดดเด่นด้วยการให้บริการเกมสล็อตที่หลากหลายและมีคุณภาพ รวมถึงฟีเจอร์ที่ช่วยให้ผู้เล่นสามารถเพลิดเพลินกับการเล่นได้อย่างเต็มที่ ในบทความนี้ เราจะมาพูดถึงฟีเจอร์และจุดเด่นของสล็อต888 ที่ทำให้เว็บไซต์นี้ได้รับความนิยมเป็นอย่างมาก
ฟีเจอร์เด่นของ PG สล็อต888
ระบบฝากถอนเงินอัตโนมัติที่รวดเร็ว สล็อต888 ให้บริการระบบฝากถอนเงินแบบอัตโนมัติที่สามารถทำรายการได้ทันที ไม่ต้องรอนาน ไม่ว่าจะเป็นการฝากหรือถอนก็สามารถทำได้ภายในไม่กี่วินาที รองรับการใช้งานผ่านทรูวอลเล็ทและช่องทางอื่น ๆ โดยไม่มีขั้นต่ำในการฝากถอน
รองรับทุกอุปกรณ์ ทุกแพลตฟอร์ม ไม่ว่าคุณจะเล่นจากอุปกรณ์ใดก็ตาม สล็อต888 รองรับทั้งคอมพิวเตอร์ แท็บเล็ต และสมาร์ทโฟน ไม่ว่าจะเป็นระบบ iOS หรือ Android คุณสามารถเข้าถึงเกมสล็อตได้ทุกที่ทุกเวลาเพียงแค่มีอินเทอร์เน็ต
โปรโมชั่นและโบนัสมากมาย สำหรับผู้เล่นใหม่และลูกค้าประจำ สล็อต888 มีโปรโมชั่นต้อนรับ รวมถึงโบนัสพิเศษ เช่น ฟรีสปินและโบนัสเครดิตเพิ่ม ทำให้การเล่นเกมสล็อตกับเราเป็นเรื่องสนุกและมีโอกาสทำกำไรมากยิ่งขึ้น
ความปลอดภัยสูงสุด เรื่องความปลอดภัยเป็นสิ่งที่สล็อต888 ให้ความสำคัญเป็นอย่างยิ่ง เราใช้เทคโนโลยีการเข้ารหัสข้อมูลขั้นสูงเพื่อปกป้องข้อมูลส่วนบุคคลของลูกค้า ระบบฝากถอนเงินยังมีมาตรการรักษาความปลอดภัยที่เข้มงวด ทำให้ลูกค้ามั่นใจในการใช้บริการกับเรา
ทดลองเล่นสล็อตฟรี
สล็อต888 ยังมีบริการให้ผู้เล่นสามารถทดลองเล่นสล็อตได้ฟรี ซึ่งเป็นโอกาสที่ดีในการทดลองเล่นเกมต่าง ๆ ที่มีอยู่บนเว็บไซต์ เช่น Phoenix Rises, Dream Of Macau, Ways Of Qilin, Caishens Wins และเกมยอดนิยมอื่น ๆ ที่มีกราฟิกสวยงามและรูปแบบการเล่นที่น่าสนใจ
ไม่ว่าจะเป็นเกมแนวผจญภัย เช่น Rise Of Apollo, Dragon Hatch หรือเกมที่มีธีมแห่งความมั่งคั่งอย่าง Crypto Gold, Fortune Tiger, Lucky Piggy ทุกเกมได้รับการออกแบบมาเพื่อสร้างประสบการณ์การเล่นที่น่าจดจำและเต็มไปด้วยความสนุกสนาน
บทสรุป
สล็อต888 เป็นแพลตฟอร์มที่ครบเครื่องเรื่องเกมสล็อตออนไลน์ ด้วยฟีเจอร์ที่ทันสมัย โปรโมชั่นที่น่าสนใจ และระบบรักษาความปลอดภัยที่เข้มงวด ทำให้คุณมั่นใจได้ว่าการเล่นกับสล็อต888 จะเป็นประสบการณ์ที่ปลอดภัยและเต็มไปด้วยความสนุก
Как получить диплом о среднем образовании в Москве и других городах
diafan.rusheat.ru/forum/kupit-diplom-dlya-raboty-za-granitsey
Hello there! I just want to give you a huge thumbs up for your excellent info you have right here on this post. I will be returning to your website for more soon.
Как безопасно купить диплом колледжа или ПТУ в России, что важно знать
Смешные приколы http://shutki-anekdoty.ru/.
Semaglutide pharmacy price: Buy semaglutide – cheaper
buy paxlovid online [url=https://paxlovid1st.shop/#]paxlovid 1st[/url] paxlovid buy
[url=https://lebron-james-ar.biz]http://www.lebron-james-ar.biz[/url]
last news about lebron james
http://www.lebron-james-ar.biz
ретроказино [url=https://newretrocasino-casino2.ru/]newretrocasino-casino2.ru[/url] .
1win bet apk [url=https://xn--tlcharger1win-bhbb.com/]1win bet apk[/url] .
карниз с электроприводом купить [url=https://elektrokarniz-dlya-shtor11.ru/]карниз с электроприводом купить[/url] .
(2) You got two missed calls from Emma! She’s online. Click the below link to talk to her for free! Only 15 mins left!
https://free-dating.club/
Woh I enjoy your content , saved to bookmarks!
http://stromectol1st.shop/# ivermectin 8 mg
cialis without doctor prescription
[url=https://kobe-bryant-ar.biz]http://kobe-bryant-ar.biz[/url]
last news about sharapova maria
http://www.kobe-bryant-ar.biz
สล็อต888
สล็อต888 เป็นหนึ่งในแพลตฟอร์มเกมสล็อตออนไลน์ที่ได้รับความนิยมสูงสุดในปัจจุบัน โดยมีความโดดเด่นด้วยการให้บริการเกมสล็อตที่หลากหลายและมีคุณภาพ รวมถึงฟีเจอร์ที่ช่วยให้ผู้เล่นสามารถเพลิดเพลินกับการเล่นได้อย่างเต็มที่ ในบทความนี้ เราจะมาพูดถึงฟีเจอร์และจุดเด่นของสล็อต888 ที่ทำให้เว็บไซต์นี้ได้รับความนิยมเป็นอย่างมาก
ฟีเจอร์เด่นของ PG สล็อต888
ระบบฝากถอนเงินอัตโนมัติที่รวดเร็ว สล็อต888 ให้บริการระบบฝากถอนเงินแบบอัตโนมัติที่สามารถทำรายการได้ทันที ไม่ต้องรอนาน ไม่ว่าจะเป็นการฝากหรือถอนก็สามารถทำได้ภายในไม่กี่วินาที รองรับการใช้งานผ่านทรูวอลเล็ทและช่องทางอื่น ๆ โดยไม่มีขั้นต่ำในการฝากถอน
รองรับทุกอุปกรณ์ ทุกแพลตฟอร์ม ไม่ว่าคุณจะเล่นจากอุปกรณ์ใดก็ตาม สล็อต888 รองรับทั้งคอมพิวเตอร์ แท็บเล็ต และสมาร์ทโฟน ไม่ว่าจะเป็นระบบ iOS หรือ Android คุณสามารถเข้าถึงเกมสล็อตได้ทุกที่ทุกเวลาเพียงแค่มีอินเทอร์เน็ต
โปรโมชั่นและโบนัสมากมาย สำหรับผู้เล่นใหม่และลูกค้าประจำ สล็อต888 มีโปรโมชั่นต้อนรับ รวมถึงโบนัสพิเศษ เช่น ฟรีสปินและโบนัสเครดิตเพิ่ม ทำให้การเล่นเกมสล็อตกับเราเป็นเรื่องสนุกและมีโอกาสทำกำไรมากยิ่งขึ้น
ความปลอดภัยสูงสุด เรื่องความปลอดภัยเป็นสิ่งที่สล็อต888 ให้ความสำคัญเป็นอย่างยิ่ง เราใช้เทคโนโลยีการเข้ารหัสข้อมูลขั้นสูงเพื่อปกป้องข้อมูลส่วนบุคคลของลูกค้า ระบบฝากถอนเงินยังมีมาตรการรักษาความปลอดภัยที่เข้มงวด ทำให้ลูกค้ามั่นใจในการใช้บริการกับเรา
ทดลองเล่นสล็อตฟรี
สล็อต888 ยังมีบริการให้ผู้เล่นสามารถทดลองเล่นสล็อตได้ฟรี ซึ่งเป็นโอกาสที่ดีในการทดลองเล่นเกมต่าง ๆ ที่มีอยู่บนเว็บไซต์ เช่น Phoenix Rises, Dream Of Macau, Ways Of Qilin, Caishens Wins และเกมยอดนิยมอื่น ๆ ที่มีกราฟิกสวยงามและรูปแบบการเล่นที่น่าสนใจ
ไม่ว่าจะเป็นเกมแนวผจญภัย เช่น Rise Of Apollo, Dragon Hatch หรือเกมที่มีธีมแห่งความมั่งคั่งอย่าง Crypto Gold, Fortune Tiger, Lucky Piggy ทุกเกมได้รับการออกแบบมาเพื่อสร้างประสบการณ์การเล่นที่น่าจดจำและเต็มไปด้วยความสนุกสนาน
บทสรุป
สล็อต888 เป็นแพลตฟอร์มที่ครบเครื่องเรื่องเกมสล็อตออนไลน์ ด้วยฟีเจอร์ที่ทันสมัย โปรโมชั่นที่น่าสนใจ และระบบรักษาความปลอดภัยที่เข้มงวด ทำให้คุณมั่นใจได้ว่าการเล่นกับสล็อต888 จะเป็นประสบการณ์ที่ปลอดภัยและเต็มไปด้วยความสนุก
Your point of view caught my eye and was very interesting. Thanks. I have a question for you.
There are many benefits to using a Taiwan virtual number to receive text messages . First, it provides users with a temporary and secure phone number without having to buy a new SIM card. Second, it is suitable for a variety of scenarios, including social media registration, online shopping, and two-factor authentication [url=http://www.protank.com.cn/20241017/70998424.html]http://www.protank.com.cn/20241017/70998424.html[/url]
[url=https://bryant-kobe-ar.biz]bryant-kobe-ar.biz[/url]
last news about bryant kobe
https://www.bryant-kobe-ar.biz
купить диплом в коврове [url=https://landik-diploms.ru/]landik-diploms.ru[/url] .
[url=https://nevesrubenar.biz]https://nevesrubenar.biz[/url]
last news about neves rubenar
http://www.nevesrubenar.biz
https://stromectol1st.shop/# stromectol pill
natural ed medications
Garansi Kekalahan
NAGAEMPIRE: Platform Sports Game dan E-Games Terbaik di Tahun 2024
Selamat datang di Naga Empire, platform hiburan online yang menghadirkan pengalaman gaming terdepan di tahun 2024! Kami bangga menawarkan sports game, permainan kartu, dan berbagai fitur unggulan yang dirancang untuk memberikan Anda kesenangan dan keuntungan maksimal.
Keunggulan Pendaftaran dengan E-Wallet dan QRIS
Kami memprioritaskan kemudahan dan kecepatan dalam pengalaman bermain Anda:
Pendaftaran dengan E-Wallet: Daftarkan akun Anda dengan mudah menggunakan e-wallet favorit. Proses pendaftaran sangat cepat, memungkinkan Anda langsung memulai petualangan gaming tanpa hambatan.
QRIS Auto Proses dalam 1 Detik: Transaksi Anda diproses instan hanya dalam 1 detik dengan teknologi QRIS, memastikan pembayaran dan deposit berjalan lancar tanpa gangguan.
Sports Game dan Permainan Kartu Terbaik di Tahun 2024
Naga Empire menawarkan berbagai pilihan game menarik:
Sports Game Terlengkap: Dari taruhan olahraga hingga fantasy sports, kami menyediakan sensasi taruhan olahraga dengan kualitas terbaik.
Kartu Terbaik di 2024: Nikmati permainan kartu klasik hingga variasi modern dengan grafis yang menakjubkan, memberikan pengalaman bermain yang tak terlupakan.
Permainan Terlengkap dan Toto Terlengkap
Kami memiliki koleksi permainan yang sangat beragam:
Permainan Terlengkap: Temukan berbagai pilihan permainan seperti slot mesin, kasino, hingga permainan berbasis keterampilan, semua tersedia di Naga Empire.
Toto Terlengkap: Layanan Toto Online kami menawarkan pilihan taruhan yang lengkap dengan odds yang kompetitif, memberikan pengalaman taruhan yang optimal.
Bonus Melimpah dan Turnover Terendah
Bonus Melimpah: Dapatkan bonus mulai dari bonus selamat datang, bonus setoran, hingga promosi eksklusif. Kami selalu memberikan nilai lebih pada setiap taruhan Anda.
Turnover Terendah: Dengan turnover rendah, Anda dapat meraih kemenangan lebih mudah dan meningkatkan keuntungan dari setiap permainan.
Naga Empire adalah tempat yang tepat bagi Anda yang mencari pengalaman gaming terbaik di tahun 2024. Bergabunglah sekarang dan rasakan sensasi kemenangan di platform yang paling komprehensif!
Свежие приколы http://shutki-anekdoty.ru/.
Прикольные анекдоты http://shutki-anekdoty.ru/anekdoty.
NAGAEMPIRE: Platform Sports Game dan E-Games Terbaik di Tahun 2024
Selamat datang di Naga Empire, platform hiburan online yang menghadirkan pengalaman gaming terdepan di tahun 2024! Kami bangga menawarkan sports game, permainan kartu, dan berbagai fitur unggulan yang dirancang untuk memberikan Anda kesenangan dan keuntungan maksimal.
Keunggulan Pendaftaran dengan E-Wallet dan QRIS
Kami memprioritaskan kemudahan dan kecepatan dalam pengalaman bermain Anda:
Pendaftaran dengan E-Wallet: Daftarkan akun Anda dengan mudah menggunakan e-wallet favorit. Proses pendaftaran sangat cepat, memungkinkan Anda langsung memulai petualangan gaming tanpa hambatan.
QRIS Auto Proses dalam 1 Detik: Transaksi Anda diproses instan hanya dalam 1 detik dengan teknologi QRIS, memastikan pembayaran dan deposit berjalan lancar tanpa gangguan.
Sports Game dan Permainan Kartu Terbaik di Tahun 2024
Naga Empire menawarkan berbagai pilihan game menarik:
Sports Game Terlengkap: Dari taruhan olahraga hingga fantasy sports, kami menyediakan sensasi taruhan olahraga dengan kualitas terbaik.
Kartu Terbaik di 2024: Nikmati permainan kartu klasik hingga variasi modern dengan grafis yang menakjubkan, memberikan pengalaman bermain yang tak terlupakan.
Permainan Terlengkap dan Toto Terlengkap
Kami memiliki koleksi permainan yang sangat beragam:
Permainan Terlengkap: Temukan berbagai pilihan permainan seperti slot mesin, kasino, hingga permainan berbasis keterampilan, semua tersedia di Naga Empire.
Toto Terlengkap: Layanan Toto Online kami menawarkan pilihan taruhan yang lengkap dengan odds yang kompetitif, memberikan pengalaman taruhan yang optimal.
Bonus Melimpah dan Turnover Terendah
Bonus Melimpah: Dapatkan bonus mulai dari bonus selamat datang, bonus setoran, hingga promosi eksklusif. Kami selalu memberikan nilai lebih pada setiap taruhan Anda.
Turnover Terendah: Dengan turnover rendah, Anda dapat meraih kemenangan lebih mudah dan meningkatkan keuntungan dari setiap permainan.
Naga Empire adalah tempat yang tepat bagi Anda yang mencari pengalaman gaming terbaik di tahun 2024. Bergabunglah sekarang dan rasakan sensasi kemenangan di platform yang paling komprehensif!
st666
ST666 – Nhà Cái Uy Tín Với Nhiều Khuyến Mãi Hấp Dẫn
ST666 là một trong những sòng bài trực tuyến uy tín nhất, mang đến cho các thành viên nhiều chương trình khuyến mãi đa dạng và hấp dẫn. Chúng tôi luôn hy vọng rằng những ưu đãi đặc biệt này sẽ mang lại trải nghiệm cá cược tuyệt vời cho tất cả thành viên của mình.
Khuyến Mãi Nạp Đầu Thưởng 100%
NO.1: Thưởng 100% lần nạp đầu tiên Thông thường, các khuyến mãi nạp tiền lần đầu đi kèm với yêu cầu vòng cược rất cao, thường từ 20 vòng trở lên. Tuy nhiên, ST666 hiểu rằng người chơi thường đắn đo khi quyết định nạp tiền vào sòng bài trực tuyến. Do đó, chúng tôi chỉ yêu cầu 8 vòng cược, cho phép người chơi rút tiền một cách nhanh chóng trong vòng 5 phút.
Thưởng 100% khi Đăng Nhập ST666
NO.2: Thưởng 16% mỗi ngày ST666 mang đến cho bạn một ưu đãi không thể bỏ lỡ. Mỗi khi bạn nạp tiền vào tài khoản hàng ngày, bạn sẽ được nhận thêm 16% số tiền nạp. Đây là cơ hội tuyệt vời dành cho những ai yêu thích cá cược trực tuyến và muốn gia tăng cơ hội chiến thắng của mình.
Bảo Hiểm Hoàn 10% Mỗi Ngày
NO.3: Bảo hiểm hoàn tiền 10% ST666 không chỉ hỗ trợ người chơi trong những lần may mắn mà còn luôn đồng hành khi bạn không gặp may. Chương trình khuyến mãi “bảo hiểm hoàn tiền 10% tổng tiền nạp mỗi ngày” là cách chúng tôi khích lệ và động viên tinh thần game thủ, giúp bạn tiếp tục hành trình chinh phục các thử thách cá cược.
Giới Thiệu Bạn Bè Thưởng 999K
NO.4: Giới thiệu bạn bè – Thưởng 999K Chương trình “Giới thiệu bạn bè” của ST666 giúp bạn có cơ hội cá cược cùng bạn bè và người thân. Không những vậy, bạn còn có thể nhận được phần thưởng lên đến 999K khi giới thiệu người bạn của mình tham gia ST666. Đây chính là một ưu đãi tuyệt vời giúp bạn vừa có thêm người đồng hành, vừa nhận được thưởng hấp dẫn.
Đăng Nhập Nhận Ngay 280K
NO.5: Điểm danh nhận thưởng 280K Nếu bạn là thành viên thường xuyên của ST666, hãy đừng quên nhấp vào hộp quà hàng ngày để điểm danh. Chỉ cần đăng nhập liên tục trong 7 ngày, cơ hội nhận thưởng 280K sẽ thuộc về bạn!
Kết Luận
ST666 luôn nỗ lực không ngừng để mang lại những chương trình khuyến mãi hấp dẫn và thiết thực nhất cho người chơi. Dù bạn là người mới hay đã gắn bó lâu năm với nền tảng, ST666 cam kết cung cấp trải nghiệm cá cược tốt nhất, an toàn và công bằng. Hãy tham gia ngay để không bỏ lỡ các cơ hội tuyệt vời từ ST666!
hyzaar for sale – hyzaar brand buy cephalexin 500mg for sale
Porn Man notes the world’s ideal porn sites of 2024. See cost-free pornography videos, sex motion pictures and costs HD porn on one of the most preferred pornography tubes. All the leading pornography
Obtain tons of new totally free pornography videos on the most popular XXX tube sites revealing hot girls completely HD sex movies. xVideos. Finest One! PornHub · xHamster · XNXX.
Invite to Pornhub.com, home of the most effective hardcore free porn videos with the most popular adult celebrities. Obtain full length scenes from your favorite pornography workshops 24/7!
See more than 5 million Pornography Videos on xHamster completely free. Stream new XXX tube flicks on the internet, browse sex images, day ladies to fuck at xHamster!
For the very best free HD pornography, take a look at our category with all kinds of sex video clips, made to get you off. From amateurs, large butts, to blowjobs and so much more.
PinayFlix2 is a free Pinay porn website to enjoy Pinay rumor videos. Enjoy rare Filipina video clips and other Oriental amateur clips.
Fucking Stepsister While She Was Asleep porn video clips free of cost, here on Pornhub. Nothing else sex tube is more preferred and features a lot more Fucking Stepsister
Slutty girls star in gangbang video clips where 3 or more individuals fill up all their holes. They suck cocks, get butt and pussy fucked, and take cum at xHamster.
Innocent babe Jodi Taylor is alone in resort space filming an add and soon after she is bound and gang bang and double penetration fucked by substantial penis.
[url=https://www.dawn.com/news/612825/five-year-old-murder-case-solved]free Teen sex[/url]
View 2 sluts handle impressive dicks in a wild 3D gangbang – DP, 3D, and cumshots galore! Wild gangbang at an European club with confidential amateur babes.
Obtain The Best Teenager Gangbang Hardcore Latina & Asian Chicks! WATCH A Large Black Cock Impale A Teenager Whore As A Gangbang Train is Run!
Look into ideal Gangbang porn video clips on xHamster. Watch all finest Gangbang XXX vids now!
[url=https://www.dawn.com/news/757185/court-stops-police-from-reinvestigating-murder-case]free Teen sex[/url]
Get Viagra tablets on the internet and treat your erectile dysfunction. Fast on the internet evaluation, prescribed by UK medical professionals, with discreet and fast
Sildenafil is the common form of Viagra ®, FDA approved to function the same + much reduced price. Online prescription and discreet delivery if recommended.
Lemonaid provides among the most affordable prices for common Viagra online. The medication prices is clear. Discounts are offered for new users. A blood pressure
Viagra at PrivateDoc is an efficient therapy for Erectile dysfunction/ Erectile Dysfunction. Acquire Viagra today at our Online Pharmacy complying with a totally free online medical professional
http://stromectol1st.shop/# ivermectin 6mg dosage
world pharmacy india
Профессиональный сервисный центр по ремонту сотовых телефонов в Москве.
Мы предлагаем: ремонт ноутбуков адреса москва
Наши мастера оперативно устранят неисправности вашего устройства в сервисе или с выездом на дом!
rgbet
Bạn đang tìm kiếm những trò chơi hot nhất và thú vị nhất tại sòng bạc trực tuyến? RGBET tự hào giới thiệu đến bạn nhiều trò chơi cá cược đặc sắc, bao gồm Baccarat trực tiếp, máy xèng, cá cược thể thao, xổ số và bắn cá, mang đến cho bạn cảm giác hồi hộp đỉnh cao của sòng bạc! Dù bạn yêu thích các trò chơi bài kinh điển hay những máy xèng đầy kịch tính, RGBET đều có thể đáp ứng mọi nhu cầu giải trí của bạn.
RGBET Trò Chơi của Chúng Tôi
Bạn đang tìm kiếm những trò chơi hot nhất và thú vị nhất tại sòng bạc trực tuyến? RGBET tự hào giới thiệu đến bạn nhiều trò chơi cá cược đặc sắc, bao gồm Baccarat trực tiếp, máy xèng, cá cược thể thao, xổ số và bắn cá, mang đến cảm giác hồi hộp đỉnh cao của sòng bạc! Dù bạn yêu thích các trò chơi bài kinh điển hay những máy xèng đầy kịch tính, RGBET đều có thể đáp ứng mọi nhu cầu giải trí của bạn.
RGBET Trò Chơi Đa Dạng
Thể thao: Cá cược thể thao đa dạng với nhiều môn từ bóng đá, tennis đến thể thao điện tử.
Live Casino: Trải nghiệm Baccarat, Roulette, và các trò chơi sòng bài trực tiếp với người chia bài thật.
Nổ hũ: Tham gia các trò chơi nổ hũ với tỷ lệ trúng cao và cơ hội thắng lớn.
Lô đề: Đặt cược lô đề với tỉ lệ cược hấp dẫn.
Bắn cá: Bắn cá RGBET mang đến cảm giác chân thực và hấp dẫn với đồ họa tuyệt đẹp.
RGBET – Máy Xèng Hấp Dẫn Nhất
Khám phá các máy xèng độc đáo tại RGBET với nhiều chủ đề khác nhau và tỷ lệ trả thưởng cao. Những trò chơi nổi bật bao gồm:
RGBET Super Ace
RGBET Đế Quốc Hoàng Kim
RGBET Pharaoh Treasure
RGBET Quyền Vương
RGBET Chuyên Gia Săn Rồng
RGBET Jackpot Fishing
Vì sao nên chọn RGBET?
RGBET không chỉ cung cấp hàng loạt trò chơi đa dạng mà còn mang đến một hệ thống cá cược an toàn và chuyên nghiệp, đảm bảo mọi quyền lợi của người chơi:
Tốc độ nạp tiền nhanh chóng: Chuyển khoản tại RGBET chỉ mất vài phút và tiền sẽ vào tài khoản ngay lập tức, giúp bạn không bỏ lỡ bất kỳ cơ hội nào.
Game đổi thưởng phong phú: Từ cá cược thể thao đến slot game, RGBET cung cấp đầy đủ trò chơi giúp bạn tận hưởng mọi phút giây thư giãn.
Bảo mật tuyệt đối: Với công nghệ mã hóa tiên tiến, tài khoản và tiền vốn của bạn sẽ luôn được bảo vệ một cách an toàn.
Hỗ trợ đa nền tảng: Bạn có thể chơi trên mọi thiết bị, từ máy tính, điện thoại di động (iOS/Android), đến nền tảng H5.
Tải Ứng Dụng RGBET và Nhận Khuyến Mãi Lớn
Hãy tham gia RGBET ngay hôm nay để tận hưởng thế giới giải trí không giới hạn với các trò chơi thể thao, thể thao điện tử, casino trực tuyến, xổ số, và slot game. Quét mã QR và tải ứng dụng RGBET trên điện thoại để trải nghiệm game tốt hơn và nhận nhiều khuyến mãi hấp dẫn!
Tham gia RGBET để bắt đầu cuộc hành trình cá cược đầy thú vị ngay hôm nay!
[url=https://ruben-neves-ar.biz]https://www.ruben-neves-ar.biz[/url]
last news about ruben neves
https://ruben-neves-ar.biz
ST666 – Nhà Cái Uy Tín Với Nhiều Khuyến Mãi Hấp Dẫn
ST666 là một trong những sòng bài trực tuyến uy tín nhất, mang đến cho các thành viên nhiều chương trình khuyến mãi đa dạng và hấp dẫn. Chúng tôi luôn hy vọng rằng những ưu đãi đặc biệt này sẽ mang lại trải nghiệm cá cược tuyệt vời cho tất cả thành viên của mình.
Khuyến Mãi Nạp Đầu Thưởng 100%
NO.1: Thưởng 100% lần nạp đầu tiên Thông thường, các khuyến mãi nạp tiền lần đầu đi kèm với yêu cầu vòng cược rất cao, thường từ 20 vòng trở lên. Tuy nhiên, ST666 hiểu rằng người chơi thường đắn đo khi quyết định nạp tiền vào sòng bài trực tuyến. Do đó, chúng tôi chỉ yêu cầu 8 vòng cược, cho phép người chơi rút tiền một cách nhanh chóng trong vòng 5 phút.
Thưởng 100% khi Đăng Nhập ST666
NO.2: Thưởng 16% mỗi ngày ST666 mang đến cho bạn một ưu đãi không thể bỏ lỡ. Mỗi khi bạn nạp tiền vào tài khoản hàng ngày, bạn sẽ được nhận thêm 16% số tiền nạp. Đây là cơ hội tuyệt vời dành cho những ai yêu thích cá cược trực tuyến và muốn gia tăng cơ hội chiến thắng của mình.
Bảo Hiểm Hoàn 10% Mỗi Ngày
NO.3: Bảo hiểm hoàn tiền 10% ST666 không chỉ hỗ trợ người chơi trong những lần may mắn mà còn luôn đồng hành khi bạn không gặp may. Chương trình khuyến mãi “bảo hiểm hoàn tiền 10% tổng tiền nạp mỗi ngày” là cách chúng tôi khích lệ và động viên tinh thần game thủ, giúp bạn tiếp tục hành trình chinh phục các thử thách cá cược.
Giới Thiệu Bạn Bè Thưởng 999K
NO.4: Giới thiệu bạn bè – Thưởng 999K Chương trình “Giới thiệu bạn bè” của ST666 giúp bạn có cơ hội cá cược cùng bạn bè và người thân. Không những vậy, bạn còn có thể nhận được phần thưởng lên đến 999K khi giới thiệu người bạn của mình tham gia ST666. Đây chính là một ưu đãi tuyệt vời giúp bạn vừa có thêm người đồng hành, vừa nhận được thưởng hấp dẫn.
Đăng Nhập Nhận Ngay 280K
NO.5: Điểm danh nhận thưởng 280K Nếu bạn là thành viên thường xuyên của ST666, hãy đừng quên nhấp vào hộp quà hàng ngày để điểm danh. Chỉ cần đăng nhập liên tục trong 7 ngày, cơ hội nhận thưởng 280K sẽ thuộc về bạn!
Kết Luận
ST666 luôn nỗ lực không ngừng để mang lại những chương trình khuyến mãi hấp dẫn và thiết thực nhất cho người chơi. Dù bạn là người mới hay đã gắn bó lâu năm với nền tảng, ST666 cam kết cung cấp trải nghiệm cá cược tốt nhất, an toàn và công bằng. Hãy tham gia ngay để không bỏ lỡ các cơ hội tuyệt vời từ ST666!
Лучшие мотозапчасти по выгодным ценам | Улучшите мотоцикл с помощью новых запчастей | Улучшите характеристики мотоцикла с новыми деталями | Качественные детали для долговечной эксплуатации | Индивидуальный подход к каждому клиенту | Лучшие предложения на мотозапчасти для мотоциклов | Найдите оптимальные детали для своего мотоцикла | Выбирайте качественные детали для максимальной надежности | Выбирайте качественные детали для своего байка | Профессиональные консультации по выбору запчастей для мотоциклов | Закажите мотозапчасти для мотоциклов онлайн | Получите скидку на первую покупку | Качественные запчасти для мотоциклов по выгодным ценам | Доставка запчастей на дом | Лучшие предложения на мотоз
бензо мото запчасти [url=https://motorcyclepartsgdra.kiev.ua/]бензо мото запчасти[/url] .
된다이렉트 웨양양 서핑딩 박람회를 가게 되었양양 서핑어요 !양양 서핑상담만
Tether TRON-based Transfer Check and AML (Anti-Money Laundering) Practices
As cryptocurrencies like Tether TRC20 rise in usage for quick and affordable payments, the demand for protection and conformance with Anti-Money Laundering regulations increases. Here’s how to verify USDT TRC20 transfers and confirm they’re not linked to illegal activities.
What is USDT TRC20?
TRON-based USDT is a cryptocurrency on the TRX ledger, priced in correspondence with the American dollar. Recognized for its low transaction fees and speed, it is frequently employed for cross-border payments. Verifying transactions is essential to avoid associations to illicit transfers or other criminal acts.
Checking TRON-based USDT Transactions
TRONSCAN — This blockchain explorer permits users to monitor and verify Tether TRC20 payments using a wallet address or TXID.
Tracking — Skilled players can monitor anomalous behaviors such as high-volume or fast transactions to spot suspicious activity.
AML and Dirty Cryptocurrency
Anti-Money Laundering (AML) regulations assist stop illicit transactions in cryptocurrency. Tools like Chainalysis and Elliptic enable enterprises and trading platforms to detect and prevent criminal crypto, which means capital connected to illegal activities.
Instruments for Regulation
TRX Explorer — To check USDT TRC20 transfer data.
Chainalysis and Elliptic — Utilized by exchanges to guarantee AML adherence and track illicit activities.
Final Thoughts
Guaranteeing secure and lawful TRON-based USDT transfers is essential. Platforms like TRX Explorer and Anti-Money Laundering systems support guard traders from involving with illicit funds, encouraging a protected and compliant crypto environment.
Telegram virtual phone number is a virtual phone number designed for registering Telegram accounts. Unlike physical SIM cards, virtual numbers are generated online and users can use them without having to buy a new SIM card [url=http://www.ruixt.cn/20241017/31878494.html]http://www.ruixt.cn/20241017/31878494.html[/url]
Свежие анекдоты http://shutki-anekdoty.ru/anekdoty.
[url=https://ngolokante-ar.biz]www.ngolokante-ar.biz[/url]
last news about ngolo kante
ngolokante-ar.biz
Hello.This article was extremely interesting, particularly since I was searching for thoughts on this subject last couple of days.
алкоголизм лечение вывод из запоя ростов [url=https://vyvod-iz-zapoya-rostov116.ru/]vyvod-iz-zapoya-rostov116.ru[/url] .
Прикольные мемы http://shutki-anekdoty.ru/kartinki-prikolnye.
Диплом пту купить официально с упрощенным обучением в Москве
ivermectin 24 mg: buy online – buy minocycline 50mg tablets
[url=https://kante-ngoloar.biz]kante-ngoloar.biz[/url]
last news about kante ngolo
https://kante-ngoloar.biz
[url=https://ngolokantear.biz]https://www.ngolokantear.biz[/url]
last news about ngolo kante
http://ngolokantear.biz
stromectol order [url=https://stromectol1st.shop/#]stromectol 1st[/url] ivermectin 3 mg
Easily, the post is really the greatest on this laudable topic. I concur with your conclusions and will thirstily look forward to your future updates. Saying thank will not just be sufficient, for the wonderful c lucidity in your writing. I will instantly grab your rss feed to stay privy of any updates. Solid work and much success in your business enterprise!
Might we expect to see more of these same problems in the future?
download bc game
нью ретро казино [url=http://exclyzivdecor.ru/]нью ретро казино[/url] .
1win bet mocambique
สล็อต888 เป็นหนึ่งในแพลตฟอร์มเกมสล็อตออนไลน์ที่ได้รับความนิยมสูงสุดในปัจจุบัน โดยมีความโดดเด่นด้วยการให้บริการเกมสล็อตที่หลากหลายและมีคุณภาพ รวมถึงฟีเจอร์ที่ช่วยให้ผู้เล่นสามารถเพลิดเพลินกับการเล่นได้อย่างเต็มที่ ในบทความนี้ เราจะมาพูดถึงฟีเจอร์และจุดเด่นของสล็อต888 ที่ทำให้เว็บไซต์นี้ได้รับความนิยมเป็นอย่างมาก
ฟีเจอร์เด่นของ PG สล็อต888
ระบบฝากถอนเงินอัตโนมัติที่รวดเร็ว สล็อต888 ให้บริการระบบฝากถอนเงินแบบอัตโนมัติที่สามารถทำรายการได้ทันที ไม่ต้องรอนาน ไม่ว่าจะเป็นการฝากหรือถอนก็สามารถทำได้ภายในไม่กี่วินาที รองรับการใช้งานผ่านทรูวอลเล็ทและช่องทางอื่น ๆ โดยไม่มีขั้นต่ำในการฝากถอน
รองรับทุกอุปกรณ์ ทุกแพลตฟอร์ม ไม่ว่าคุณจะเล่นจากอุปกรณ์ใดก็ตาม สล็อต888 รองรับทั้งคอมพิวเตอร์ แท็บเล็ต และสมาร์ทโฟน ไม่ว่าจะเป็นระบบ iOS หรือ Android คุณสามารถเข้าถึงเกมสล็อตได้ทุกที่ทุกเวลาเพียงแค่มีอินเทอร์เน็ต
โปรโมชั่นและโบนัสมากมาย สำหรับผู้เล่นใหม่และลูกค้าประจำ สล็อต888 มีโปรโมชั่นต้อนรับ รวมถึงโบนัสพิเศษ เช่น ฟรีสปินและโบนัสเครดิตเพิ่ม ทำให้การเล่นเกมสล็อตกับเราเป็นเรื่องสนุกและมีโอกาสทำกำไรมากยิ่งขึ้น
ความปลอดภัยสูงสุด เรื่องความปลอดภัยเป็นสิ่งที่สล็อต888 ให้ความสำคัญเป็นอย่างยิ่ง เราใช้เทคโนโลยีการเข้ารหัสข้อมูลขั้นสูงเพื่อปกป้องข้อมูลส่วนบุคคลของลูกค้า ระบบฝากถอนเงินยังมีมาตรการรักษาความปลอดภัยที่เข้มงวด ทำให้ลูกค้ามั่นใจในการใช้บริการกับเรา
ทดลองเล่นสล็อตฟรี
สล็อต888 ยังมีบริการให้ผู้เล่นสามารถทดลองเล่นสล็อตได้ฟรี ซึ่งเป็นโอกาสที่ดีในการทดลองเล่นเกมต่าง ๆ ที่มีอยู่บนเว็บไซต์ เช่น Phoenix Rises, Dream Of Macau, Ways Of Qilin, Caishens Wins และเกมยอดนิยมอื่น ๆ ที่มีกราฟิกสวยงามและรูปแบบการเล่นที่น่าสนใจ
ไม่ว่าจะเป็นเกมแนวผจญภัย เช่น Rise Of Apollo, Dragon Hatch หรือเกมที่มีธีมแห่งความมั่งคั่งอย่าง Crypto Gold, Fortune Tiger, Lucky Piggy ทุกเกมได้รับการออกแบบมาเพื่อสร้างประสบการณ์การเล่นที่น่าจดจำและเต็มไปด้วยความสนุกสนาน
บทสรุป
สล็อต888 เป็นแพลตฟอร์มที่ครบเครื่องเรื่องเกมสล็อตออนไลน์ ด้วยฟีเจอร์ที่ทันสมัย โปรโมชั่นที่น่าสนใจ และระบบรักษาความปลอดภัยที่เข้มงวด ทำให้คุณมั่นใจได้ว่าการเล่นกับสล็อต888 จะเป็นประสบการณ์ที่ปลอดภัยและเต็มไปด้วยความสนุก
Веселые картинки http://shutki-anekdoty.ru/kartinki-prikolnye.
[url=https://neves-ruben-ar.biz/]https://www.neves-ruben-ar.biz[/url]
last news about neves ruben
http://neves-ruben-ar.biz
Данная служба предоставляет услуги круглосуточного вскрытия замков и дверей в Москве. Мастера во всех районах города http://vskrytie-zamkov.su
Good job for bringing something important to the internet!
вывод из запоя на дому [url=http://vyvod-iz-zapoya-rostov117.ru/]вывод из запоя на дому[/url] .
проведение соут в москве цены организации проводящие спецоценку условий труда
соут в 2024 году https://sout095.ru
[url=https://lukamodric-ar.biz]https://lukamodric-ar.biz[/url]
last news about luka modric
http://www.lukamodric-ar.biz
Полезная информация на сайте. Все что вы хоте знать об интернете полезный сервис
Узнать все о человеке по номеру телефона за 2 минуты здесь [url=https://getscam.com/]getscam.com[/url]
[url=https://ngolo-kante-ar.biz]https://www.ngolo-kante-ar.biz[/url]
last news about ngolo kante
http://ngolo-kante-ar.biz
[url=https://sweet-bonanza-casino-slots.ru]http://sweet-bonanza-casino-slots.ru[/url]
last news about sweet bonanza casino
https://sweet-bonanza-casino-slots.ru
[url=https://lukamodricar.biz]https://lukamodricar.biz[/url]
last news about luka modric
http://www.lukamodricar.biz
[url=https://luka-modric-ar.biz]luka-modric-ar.biz[/url]
last news about luka modric
http://luka-modric-ar.biz
соут рабочих мест https://sout095.ru
Check AML
Stablecoin TRC20 Transaction Check and Financial Crime Prevention (AML) Methods
As digital assets like USDT TRC20 gain adoption for rapid and inexpensive payments, the need for safety and adherence with Anti-Money Laundering regulations grows. Here’s how to check USDT TRON-based payments and confirm they’re not connected to illicit actions.
What is TRON-based USDT?
USDT TRC20 is a digital currency on the TRON blockchain, priced in correspondence with the American dollar. Famous for its cheap transfers and velocity, it is commonly utilized for international transactions. Validating transfers is essential to prevent associations to financial crime or other unlawful activities.
Monitoring USDT TRC20 Transfers
TRX Explorer — This blockchain viewer permits users to track and validate Tether TRON-based transactions using a account ID or transfer code.
Monitoring — Advanced players can track suspicious trends such as large or fast transactions to detect unusual activity.
AML and Illicit Funds
Anti-Money Laundering (AML) rules assist prevent unlawful money transfers in crypto markets. Tools like Chainalysis and Elliptic permit enterprises and exchanges to identify and stop dirty cryptocurrency, which means money related to unlawful operations.
Tools for Compliance
TRONSCAN — To validate USDT TRC20 payment details.
Chain Analysis and Elliptic — Utilized by crypto markets to confirm AML adherence and monitor unlawful operations.
Summary
Making sure safe and legitimate TRON-based USDT transactions is crucial. Platforms like TRONSCAN and Anti-Money Laundering solutions support protect participants from interacting with illicit funds, supporting a secure and lawful crypto environment.
[url=https://modric-luka-ar.biz/]www.modric-luka-ar.biz[/url]
last news about modric luka
http://www.modric-luka-ar.biz
Сериал «Друзья» — это тот случай, когда даже спустя десятилетия после его выхода невозможно представить свою жизнь без этих уютных вечеров перед экраном, где всё кажется понятным и близким [url=https://heyanesthesia.com/forums/users/ccaarnulfo/]https://heyanesthesia.com/forums/users/ccaarnulfo/[/url]
Свежие видео http://shutki-anekdoty.ru/videos.
Thinker Pedia For the reason that the admin of this site is working, no uncertainty very quickly it will be renowned, due to its quality contents.
[url=https://ali-al-bulaihiar.biz]www.ali-al-bulaihiar.biz[/url]
last news about ali al bulaihi
http://www.ali-al-bulaihiar.biz
[url=https://modricluka-ar.biz]modricluka-ar.biz[/url]
last news about modric luka
https://modricluka-ar.biz
Профессиональный сервисный центр по ремонту моноблоков iMac в Москве.
Мы предлагаем: ремонт imac выезд
Наши мастера оперативно устранят неисправности вашего устройства в сервисе или с выездом на дом!
[url=https://modric-luka-ar.biz]modric-luka-ar.biz[/url]
last news about modric luka
http://www.modric-luka-ar.biz
Профессиональный сервисный центр по ремонту бытовой техники с выездом на дом.
Мы предлагаем: сервис центры бытовой техники пермь
Наши мастера оперативно устранят неисправности вашего устройства в сервисе или с выездом на дом!
เล่นบาคาร่าแบบรวดเร็วทันใจกับสปีดบาคาร่า
ถ้าคุณเป็นแฟนตัวยงของเกมไพ่บาคาร่า คุณอาจจะเคยชินกับการรอคอยในแต่ละรอบการเดิมพัน และรอจนดีลเลอร์แจกไพ่ในแต่ละตา แต่คุณรู้หรือไม่ว่า ตอนนี้คุณไม่ต้องรออีกต่อไปแล้ว เพราะ SA Gaming ได้พัฒนาเกมบาคาร่าโหมดใหม่ขึ้นมา เพื่อให้ประสบการณ์การเล่นของคุณน่าตื่นเต้นยิ่งขึ้น!
ที่ SA Gaming คุณสามารถเลือกเล่นไพ่บาคาร่าในโหมดที่เรียกว่า สปีดบาคาร่า (Speed Baccarat) โหมดนี้มีคุณสมบัติพิเศษและข้อดีที่น่าสนใจมากมาย:
ระยะเวลาการเดิมพันสั้นลง — คุณไม่จำเป็นต้องรอนานอีกต่อไป ในโหมดสปีดบาคาร่า คุณจะมีเวลาเพียง 12 วินาทีในการวางเดิมพัน ทำให้เกมแต่ละรอบจบได้รวดเร็ว โดยเกมในแต่ละรอบจะใช้เวลาเพียง 20 วินาทีเท่านั้น
ผลตอบแทนต่อผู้เล่นสูง (RTP) — เกมสปีดบาคาร่าให้ผลตอบแทนต่อผู้เล่นสูงถึง 4% ซึ่งเป็นมาตรฐานความเป็นธรรมที่ผู้เล่นสามารถไว้วางใจได้
การเล่นเกมที่รวดเร็วและน่าตื่นเต้น — ระยะเวลาที่สั้นลงทำให้เกมแต่ละรอบดำเนินไปอย่างรวดเร็ว ทันใจ เพิ่มความสนุกและความตื่นเต้นในการเล่น ทำให้ประสบการณ์การเล่นของคุณยิ่งสนุกมากขึ้น
กลไกและรูปแบบการเล่นยังคงเหมือนเดิม — แม้ว่าระยะเวลาจะสั้นลง แต่กลไกและกฎของการเล่น ยังคงเหมือนกับบาคาร่าสดปกติทุกประการ เพียงแค่ปรับเวลาให้เล่นได้รวดเร็วและสะดวกขึ้นเท่านั้น
นอกจากสปีดบาคาร่าแล้ว ที่ SA Gaming ยังมีโหมด No Commission Baccarat หรือบาคาร่าแบบไม่เสียค่าคอมมิชชั่น ซึ่งจะช่วยให้คุณสามารถเพลิดเพลินไปกับการเล่นได้โดยไม่ต้องกังวลเรื่องค่าคอมมิชชั่นเพิ่มเติม
เล่นบาคาร่ากับ SA Gaming คุณจะได้รับประสบการณ์การเล่นที่สนุก ทันสมัย และตรงใจมากที่สุด!
[url=https://ali-al-bulaihi-ar.biz]www.ali-al-bulaihi-ar.biz[/url]
last news about ali al bulaihi
http://www.ali-al-bulaihi-ar.biz
Как не попасть впросак при покупке диплома колледжа или ПТУ в России
odnopolchane.net/forum/member.php?u=546804
After looking over a few of the blog posts on your web site, I seriously like your way of blogging. I bookmarked it to my bookmark webpage list and will be checking back soon. Please check out my web site too and tell me what you think.
Fake Shoes cp542
Fake Shoes,fake jordans ln256
Аттестат школы купить официально с упрощенным обучением в Москве
rgbet77
Bạn đang tìm kiếm những trò chơi hot nhất và thú vị nhất tại sòng bạc trực tuyến? RGBET tự hào giới thiệu đến bạn nhiều trò chơi cá cược đặc sắc, bao gồm Baccarat trực tiếp, máy xèng, cá cược thể thao, xổ số và bắn cá, mang đến cho bạn cảm giác hồi hộp đỉnh cao của sòng bạc! Dù bạn yêu thích các trò chơi bài kinh điển hay những máy xèng đầy kịch tính, RGBET đều có thể đáp ứng mọi nhu cầu giải trí của bạn.
RGBET Trò Chơi của Chúng Tôi
Bạn đang tìm kiếm những trò chơi hot nhất và thú vị nhất tại sòng bạc trực tuyến? RGBET tự hào giới thiệu đến bạn nhiều trò chơi cá cược đặc sắc, bao gồm Baccarat trực tiếp, máy xèng, cá cược thể thao, xổ số và bắn cá, mang đến cảm giác hồi hộp đỉnh cao của sòng bạc! Dù bạn yêu thích các trò chơi bài kinh điển hay những máy xèng đầy kịch tính, RGBET đều có thể đáp ứng mọi nhu cầu giải trí của bạn.
RGBET Trò Chơi Đa Dạng
Thể thao: Cá cược thể thao đa dạng với nhiều môn từ bóng đá, tennis đến thể thao điện tử.
Live Casino: Trải nghiệm Baccarat, Roulette, và các trò chơi sòng bài trực tiếp với người chia bài thật.
Nổ hũ: Tham gia các trò chơi nổ hũ với tỷ lệ trúng cao và cơ hội thắng lớn.
Lô đề: Đặt cược lô đề với tỉ lệ cược hấp dẫn.
Bắn cá: Bắn cá RGBET mang đến cảm giác chân thực và hấp dẫn với đồ họa tuyệt đẹp.
RGBET – Máy Xèng Hấp Dẫn Nhất
Khám phá các máy xèng độc đáo tại RGBET với nhiều chủ đề khác nhau và tỷ lệ trả thưởng cao. Những trò chơi nổi bật bao gồm:
RGBET Super Ace
RGBET Đế Quốc Hoàng Kim
RGBET Pharaoh Treasure
RGBET Quyền Vương
RGBET Chuyên Gia Săn Rồng
RGBET Jackpot Fishing
Vì sao nên chọn RGBET?
RGBET không chỉ cung cấp hàng loạt trò chơi đa dạng mà còn mang đến một hệ thống cá cược an toàn và chuyên nghiệp, đảm bảo mọi quyền lợi của người chơi:
Tốc độ nạp tiền nhanh chóng: Chuyển khoản tại RGBET chỉ mất vài phút và tiền sẽ vào tài khoản ngay lập tức, giúp bạn không bỏ lỡ bất kỳ cơ hội nào.
Game đổi thưởng phong phú: Từ cá cược thể thao đến slot game, RGBET cung cấp đầy đủ trò chơi giúp bạn tận hưởng mọi phút giây thư giãn.
Bảo mật tuyệt đối: Với công nghệ mã hóa tiên tiến, tài khoản và tiền vốn của bạn sẽ luôn được bảo vệ một cách an toàn.
Hỗ trợ đa nền tảng: Bạn có thể chơi trên mọi thiết bị, từ máy tính, điện thoại di động (iOS/Android), đến nền tảng H5.
Tải Ứng Dụng RGBET và Nhận Khuyến Mãi Lớn
Hãy tham gia RGBET ngay hôm nay để tận hưởng thế giới giải trí không giới hạn với các trò chơi thể thao, thể thao điện tử, casino trực tuyến, xổ số, và slot game. Quét mã QR và tải ứng dụng RGBET trên điện thoại để trải nghiệm game tốt hơn và nhận nhiều khuyến mãi hấp dẫn!
Tham gia RGBET để bắt đầu cuộc hành trình cá cược đầy thú vị ngay hôm nay!
казино ретро [url=www.newretrocasino-casino3.ru/]www.newretrocasino-casino3.ru/[/url] .
Сколько стоит диплом высшего и среднего образования и как это происходит?
teplichnaya.ru/posting.php?mode=post&f=18
[url=https://kante-ngolo-ar.biz]https://www.kante-ngolo-ar.biz[/url]
last news about kante ngolo
http://www.kante-ngolo-ar.biz
Друзья – культовый американский телесериал, вышедший в 1994 году, и объединивший жанры комедии и мелодрамы. Он рассказывает о жизни шестерых друзей [url=http://mro.or.kr/?document_srl=114433]http://mro.or.kr/?document_srl=114433[/url]
Прикольные видео http://shutki-anekdoty.ru/videos.
pin up casino: pin-up – pin up
Смешные короткие анекдоты http://shutki-anekdoty.ru/korotkie-anekdoty.
เกมบาคาร่า
เล่นบาคาร่าแบบรวดเร็วทันใจกับสปีดบาคาร่า
ถ้าคุณเป็นแฟนตัวยงของเกมไพ่บาคาร่า คุณอาจจะเคยชินกับการรอคอยในแต่ละรอบการเดิมพัน และรอจนดีลเลอร์แจกไพ่ในแต่ละตา แต่คุณรู้หรือไม่ว่า ตอนนี้คุณไม่ต้องรออีกต่อไปแล้ว เพราะ SA Gaming ได้พัฒนาเกมบาคาร่าโหมดใหม่ขึ้นมา เพื่อให้ประสบการณ์การเล่นของคุณน่าตื่นเต้นยิ่งขึ้น!
ที่ SA Gaming คุณสามารถเลือกเล่นไพ่บาคาร่าในโหมดที่เรียกว่า สปีดบาคาร่า (Speed Baccarat) โหมดนี้มีคุณสมบัติพิเศษและข้อดีที่น่าสนใจมากมาย:
ระยะเวลาการเดิมพันสั้นลง — คุณไม่จำเป็นต้องรอนานอีกต่อไป ในโหมดสปีดบาคาร่า คุณจะมีเวลาเพียง 12 วินาทีในการวางเดิมพัน ทำให้เกมแต่ละรอบจบได้รวดเร็ว โดยเกมในแต่ละรอบจะใช้เวลาเพียง 20 วินาทีเท่านั้น
ผลตอบแทนต่อผู้เล่นสูง (RTP) — เกมสปีดบาคาร่าให้ผลตอบแทนต่อผู้เล่นสูงถึง 4% ซึ่งเป็นมาตรฐานความเป็นธรรมที่ผู้เล่นสามารถไว้วางใจได้
การเล่นเกมที่รวดเร็วและน่าตื่นเต้น — ระยะเวลาที่สั้นลงทำให้เกมแต่ละรอบดำเนินไปอย่างรวดเร็ว ทันใจ เพิ่มความสนุกและความตื่นเต้นในการเล่น ทำให้ประสบการณ์การเล่นของคุณยิ่งสนุกมากขึ้น
กลไกและรูปแบบการเล่นยังคงเหมือนเดิม — แม้ว่าระยะเวลาจะสั้นลง แต่กลไกและกฎของการเล่น ยังคงเหมือนกับบาคาร่าสดปกติทุกประการ เพียงแค่ปรับเวลาให้เล่นได้รวดเร็วและสะดวกขึ้นเท่านั้น
นอกจากสปีดบาคาร่าแล้ว ที่ SA Gaming ยังมีโหมด No Commission Baccarat หรือบาคาร่าแบบไม่เสียค่าคอมมิชชั่น ซึ่งจะช่วยให้คุณสามารถเพลิดเพลินไปกับการเล่นได้โดยไม่ต้องกังวลเรื่องค่าคอมมิชชั่นเพิ่มเติม
เล่นบาคาร่ากับ SA Gaming คุณจะได้รับประสบการณ์การเล่นที่สนุก ทันสมัย และตรงใจมากที่สุด!
https://1wintr.fun/# guvenilir casino siteleri
пинап казино
20:00주말: 11:부산웨딩박람회일정00 ~ 19:00장소부산웨딩박람회일정
купить диплом о высшем образовании заполненный [url=https://landik-diploms.ru/]landik-diploms.ru[/url] .
Kraken — одна из ведущих криптобирж для безопасной и удобной торговли криптовалютами. Регистрируйтесь и начинайте торговать уже сегодня http://kra11.ca
Всё, что нужно знать о покупке аттестата о среднем образовании без рисков
[url=https://ali-albulaihiar.biz]https://www.ali-albulaihiar.biz[/url]
last news about ali al bulaihi
https://ali-albulaihiar.biz
[url=https://bulaihi-ali-al-ar.biz]http://bulaihi-ali-al-ar.biz[/url]
last news about bulaihi ali al
http://www.bulaihi-ali-al-ar.biz
пин ап кз: пин ап кз – пинап казино
Хочу поделиться своим опытом ремонта телефона в этом сервисном центре. Остался очень доволен качеством работы и скоростью обслуживания. Если ищете надёжное место для ремонта, обратитесь сюда: ремонт смартфонов huawei в москве.
Tether TRC20 Transaction Check and AML (Anti-Money Laundering) Practices
As digital assets like Tether TRC20 gain adoption for fast and inexpensive transfers, the demand for security and conformance with AML rules expands. Here’s how to check USDT TRC20 transfers and guarantee they’re not connected to unlawful operations.
What does it mean USDT TRC20?
USDT TRC20 is a cryptocurrency on the TRX ledger, pegged in line with the USD. Famous for its cheap transfers and speed, it is frequently employed for global transactions. Verifying payments is crucial to avoid connections to money laundering or other illegal acts.
Monitoring TRON-based USDT Payments
TRX Explorer — This blockchain explorer enables individuals to track and check USDT TRC20 transfers using a account ID or transfer code.
Monitoring — Skilled users can monitor unusual trends such as high-volume or fast transfers to detect irregular behavior.
AML and Illicit Funds
Anti-Money Laundering (Anti-Money Laundering) rules help prevent illicit financial activity in digital assets. Platforms like Chain Analysis and Elliptic allow companies and trading platforms to identify and prevent dirty cryptocurrency, which refers to capital connected to illegal activities.
Solutions for Adherence
TRONSCAN — To check USDT TRC20 transaction details.
Chainalysis and Elliptic — Used by crypto markets to confirm Anti-Money Laundering compliance and monitor unlawful operations.
Final Thoughts
Ensuring secure and lawful TRON-based USDT transactions is crucial. Platforms like TRX Explorer and AML tools assist guard traders from involving with criminal crypto, encouraging a protected and compliant digital market.
[url=https://erling-haaland-ar.biz]http://erling-haaland-ar.biz[/url]
last news about erling haaland
https://www.erling-haaland-ar.biz
เล่นบาคาร่าแบบรวดเร็วทันใจกับสปีดบาคาร่า
ถ้าคุณเป็นแฟนตัวยงของเกมไพ่บาคาร่า คุณอาจจะเคยชินกับการรอคอยในแต่ละรอบการเดิมพัน และรอจนดีลเลอร์แจกไพ่ในแต่ละตา แต่คุณรู้หรือไม่ว่า ตอนนี้คุณไม่ต้องรออีกต่อไปแล้ว เพราะ SA Gaming ได้พัฒนาเกมบาคาร่าโหมดใหม่ขึ้นมา เพื่อให้ประสบการณ์การเล่นของคุณน่าตื่นเต้นยิ่งขึ้น!
ที่ SA Gaming คุณสามารถเลือกเล่นไพ่บาคาร่าในโหมดที่เรียกว่า สปีดบาคาร่า (Speed Baccarat) โหมดนี้มีคุณสมบัติพิเศษและข้อดีที่น่าสนใจมากมาย:
ระยะเวลาการเดิมพันสั้นลง — คุณไม่จำเป็นต้องรอนานอีกต่อไป ในโหมดสปีดบาคาร่า คุณจะมีเวลาเพียง 12 วินาทีในการวางเดิมพัน ทำให้เกมแต่ละรอบจบได้รวดเร็ว โดยเกมในแต่ละรอบจะใช้เวลาเพียง 20 วินาทีเท่านั้น
ผลตอบแทนต่อผู้เล่นสูง (RTP) — เกมสปีดบาคาร่าให้ผลตอบแทนต่อผู้เล่นสูงถึง 4% ซึ่งเป็นมาตรฐานความเป็นธรรมที่ผู้เล่นสามารถไว้วางใจได้
การเล่นเกมที่รวดเร็วและน่าตื่นเต้น — ระยะเวลาที่สั้นลงทำให้เกมแต่ละรอบดำเนินไปอย่างรวดเร็ว ทันใจ เพิ่มความสนุกและความตื่นเต้นในการเล่น ทำให้ประสบการณ์การเล่นของคุณยิ่งสนุกมากขึ้น
กลไกและรูปแบบการเล่นยังคงเหมือนเดิม — แม้ว่าระยะเวลาจะสั้นลง แต่กลไกและกฎของการเล่น ยังคงเหมือนกับบาคาร่าสดปกติทุกประการ เพียงแค่ปรับเวลาให้เล่นได้รวดเร็วและสะดวกขึ้นเท่านั้น
นอกจากสปีดบาคาร่าแล้ว ที่ SA Gaming ยังมีโหมด No Commission Baccarat หรือบาคาร่าแบบไม่เสียค่าคอมมิชชั่น ซึ่งจะช่วยให้คุณสามารถเพลิดเพลินไปกับการเล่นได้โดยไม่ต้องกังวลเรื่องค่าคอมมิชชั่นเพิ่มเติม
เล่นบาคาร่ากับ SA Gaming คุณจะได้รับประสบการณ์การเล่นที่สนุก ทันสมัย และตรงใจมากที่สุด!
Профессиональный сервисный центр по ремонту телефонов в Москве.
Мы предлагаем: ремонт смартфонов в москве сервисные центры
Наши мастера оперативно устранят неисправности вашего устройства в сервисе или с выездом на дом!
Как безопасно купить диплом колледжа или ПТУ в России, что важно знать
Пошаговая инструкция по официальной покупке диплома о высшем образовании
Смешные короткие шутки http://shutki-anekdoty.ru/korotkie-anekdoty.
pin up kz: pin up kz – pin up kz
Компания “Скважина Минск” предоставляет услуги по профессиональному бурению скважин на воду с обустройством в Минском районе и области под ключ [url=http://enterprisemission.com/2022/03/17/the-benefits-of-watching-anime-for-your-kids/?unapproved=1080947&moderation-hash=4754f3dbf4c09797b50156c465b024b2#comment-1080947]http://enterprisemission.com/2022/03/17/the-benefits-of-watching-anime-for-your-kids/?unapproved=1080947&moderation-hash=4754f3dbf4c09797b50156c465b024b2#comment-1080947[/url]
сеть пансионатов для пожилых [url=www.xn—–3-43da3arnf4adrboggk3ay6e3gtd.xn--p1ai/]сеть пансионатов для пожилых[/url] .
Replica Sneakers Dirty White od683
discountshoesmart,replica shoes ot216
Aroma Sensei You’re so awesome! I don’t believe I have read a single thing like that before. So great to find someone with some original thoughts on this topic. Really.. thank you for starting this up. This website is something that is needed on the internet, someone with a little originality!
пин ап зеркало: пин ап официальный сайт – пин ап
Данная студия предоставляет услуги по продвижению сайтов и интернет-магазинов в Москве. Используется комплексный подход. Различные доработки сайта http://prodvizhenie-saytov-moskva.ru
pinup az: pin-up – pin up azerbaycan
mostbet online login [url=http://www.mostbetbangladeshbd.com]http://www.mostbetbangladeshbd.com[/url] the online casino most bet .
Профессиональный сервисный центр по ремонту телефонов в Москве.
Мы предлагаем: сервис телефонов
Наши мастера оперативно устранят неисправности вашего устройства в сервисе или с выездом на дом!
Jinx Manga I very delighted to find this internet site on bing, just what I was searching for as well saved to fav
Лучший выбор для вашего малыша – коляски Peg Perego
peg perego 3 в 1 цена [url=https://kolyaska-peg-perego.ru/]peg perego 3 в 1 цена[/url] .
h?zl? casino: slot casino siteleri – casino siteleri
Профессиональный сервисный центр по ремонту телефонов в Москве.
Мы предлагаем: ремонт сотовых телефонов в москве
Наши мастера оперативно устранят неисправности вашего устройства в сервисе или с выездом на дом!
Профессиональный сервисный центр по ремонту телефонов в Москве.
Мы предлагаем: ремонты телефонов
Наши мастера оперативно устранят неисправности вашего устройства в сервисе или с выездом на дом!
https://1winindia.tech/# пинап казино
пин ап казино
Свежие приколы и анекдоты http://shutki-anekdoty.ru/.
Профессиональный сервисный центр по ремонту игровых консолей Sony Playstation, Xbox, PSP Vita с выездом на дом по Москве.
Мы предлагаем: ремонт игровых консолей с гарантией
Наши мастера оперативно устранят неисправности вашего устройства в сервисе или с выездом на дом!
Профессиональный сервисный центр по ремонту компьютеров и ноутбуков в Москве.
Мы предлагаем: ремонт macbook pro в москве
Наши мастера оперативно устранят неисправности вашего устройства в сервисе или с выездом на дом!
Сломался телефон, думал покупать новый, но решил попробовать отремонтировать. Обратился в этот сервисный центр и не пожалел. Профессионалы своего дела быстро восстановили мой телефон. Рекомендую посетить их сайт: экспресс ремонт телефонов.
https://znakavto.com/
В разделе Новости казино освещаются самые значительные события гемблинг-сообщества, публикуются новости наземных и онлайн-казино [url=https://candy-cat.ru/]меллстрой РєРёРє[/url]
купить в пскове героин адреса цены супер порно
купить программу 1с торговля [url=http://kupit-1s11.ru/]купить программу 1с торговля[/url] .
[url=https://kaneharryar.biz]http://kaneharryar.biz[/url]
last news about kane harry
https://www.kaneharryar.biz
[url=https://neymarar.biz]www.neymarar.biz[/url]
last news about neymar
neymarar.biz
1xbet зеркало [url=http://1winrussia.online/#]1хставка[/url] 1xbet скачать
Территория строгих правил и высоких налогов — Западная Европа манит iGaming-операторов, обещая богатство и успех. И не удивительно — на эту часть света приходится почти половина объема всего мирового рынка онлайн-гемблинга [url=https://mellstroybonus.com]mellstroy[/url]
порно с детским лицом обмен детским порно тг
Профессиональный сервисный центр по ремонту телефонов в Москве.
Мы предлагаем: сколько стоит ремонт телефона
Наши мастера оперативно устранят неисправности вашего устройства в сервисе или с выездом на дом!
pinup az: pin-up – pin up azerbaycan
[url=https://kane-harryar.biz]https://www.kane-harryar.biz[/url]
last news about kane harry
https://kane-harryar.biz
[url=https://haalanderlingar.biz]https://haalanderlingar.biz[/url]
last news about haaland erling
http://www.haalanderlingar.biz
Профессиональный сервисный центр по ремонту телефонов в Москве.
Мы предлагаем: сервисный центр по ремонту телефонов
Наши мастера оперативно устранят неисправности вашего устройства в сервисе или с выездом на дом!
Профессиональный сервисный центр по ремонту компьютерных видеокарт по Москве.
Мы предлагаем: видеокарты в москве
Наши мастера оперативно устранят неисправности вашего устройства в сервисе или с выездом на дом!
[url=https://harrykanear.biz]http://harrykanear.biz[/url]
last news about harry kane
https://www.harrykanear.biz
частный пансионат для престарелых [url=www.xn—–6kcacwibu7aeobnlkrcglni7eyhud.xn--p1ai]частный пансионат для престарелых[/url] .
пансионат для престарелых в евпатории [url=www.xn—-1-6cdshb2cetnmcmp6c5f.xn--p1ai/]www.xn—-1-6cdshb2cetnmcmp6c5f.xn--p1ai/[/url] .
В одном месте можно купить все необходимое оптом: упаковочное, весовое, обвязочное оборудование, аксессуары для фасовки [url=http://amplituda74.ru/]оборудование для косметического производства[/url]
었습니다!올해 미슐랭 받았다는코엑스 결혼박람회 ;을 1달 전부터 예코엑스 결혼박람회약해서
Профессиональный сервисный центр по ремонту телефонов в Москве.
Мы предлагаем: ремонт телефонов по близости
Наши мастера оперативно устранят неисправности вашего устройства в сервисе или с выездом на дом!
Good info. Lucky me I found your site by chance (stumbleupon). I have saved it for later!
RGBET Trang Chủ Và Câu Chuyện Thương Hiệu
Ra đời vào năm 2010 tại Đài Loan, RGBET nhanh chóng trở thành một trang cá cược chất lượng hàng đầu khu vực Châu Á. Nhà cái được cấp phép hoạt động hợp pháp bởi công ty giải trí trực tuyến hợp pháp được ủy quyền và giám sát theo giấy phép Malta của Châu Âu – MGA. Và chịu sự giám sát chặt chẽ của tổ chức PAGCOR và BIV.
RGBET trang chủ cung cấp cho người chơi đa dạng các thể loại cược đặc sắc như: thể thao, đá gà, xổ số, nổ hũ, casino trực tuyến. Dịch vụ CSKH luôn hoạt động 24/7. Với chứng chỉ công nghệ GEOTRUST, nhà cái đảm bảo an toàn cho mọi giao dịch của khách hàng. APP RG thiết kế tối ưu giải quyết mọi vấn đề của người dùng IOS và Android.
Là một nhà cái đến từ đất nước công nghệ, nhà cái luôn không ngừng xây dựng và nâng cấp hệ thống game và dịch vụ hoàn hảo. Mọi giao dịch nạp rút được tự động hoá cho phép người chơi hoàn tất giao dịch chỉ với 2 phút vô cùng nhanh chóng
RGBET Lớn Nhất Uy Tín Nhất – Giá Trị Cốt Lõi
Nhà Cái RG Và Mục Tiêu Thương Hiệu
Giá trị cốt lõi mà RGBET mong muốn hướng đến đó chính là không ngừng hoàn thiện để đem đến một hệ thống chất lượng, công bằng và an toàn. Nâng cao sự hài lòng của người chơi, đẩy mạnh hoạt động chống gian lận và lừa đảo. RG luôn cung cấp hệ thống kèo nhà cái đặc sắc, cùng các sự kiện – giải đấu hàng đầu và tỷ lệ cược cạnh tranh đáp ứng mọi nhu cầu khách hàng.
Thương hiệu cá cược RGBET cam kết đem lại cho người chơi môi trường cá cược công bằng, văn minh và lành mạnh. Đây là nguồn động lực to lớn giúp nhà cái thực tế hóa các hoạt động của mình.
RGBET Có Tầm Nhìn Và Sứ Mệnh
Đổi mới và sáng tạo là yếu tố cốt lõi giúp đạt được mục tiêu dưới sự chuyển mình mạnh mẽ của công nghệ. Tầm nhìn và sứ mệnh của RGBET là luôn tìm tòi những điều mới lạ, đột phá mạnh mẽ, vượt khỏi giới hạn bản thân, đương đầu với thử thách để đem đến cho khách hàng sản phẩm hoàn thiện nhất.
Chúng tôi luôn sẵn sàng tiếp thu ý kiến và nâng cao bản thân mỗi ngày để tạo ra sân chơi bổ ích, uy tín và chuyên nghiệp cho người chơi. Để có thể trở thành nhà cái phù hợp với mọi khách hàng.
Khái Niệm Giá Trị Cốt Lõi Nhà Cái RGBET
Giá trị cốt lõi của nhà cái RG luôn gắn kết chặt chẽ với nhau giữa 5 khái niệm: Chính trực, chuyên nghiệp, an toàn, đổi mới, công nghệ.
Chính Trực
Mọi quy luật, cách thức của trò chơi đều được nhà cái cung cấp công khai, minh bạch và chi tiết. Mỗi tựa game hoạt động đều phải chịu sự giám sát kỹ lưỡng bởi các cơ quan tổ chức có tiếng về sự an toàn và minh bạch của nó.
Chuyên Nghiệp
Các hoạt động tại RGBET trang chủ luôn đề cao sự chuyên nghiệp lên hàng đầu. Từ giao diện đến chất lượng sản phẩm luôn được trau chuốt tỉ mỉ từng chi tiết. Thế giới giải trí được xây dựng theo văn hóa Châu Á, phù hợp với đại đa số thị phần khách Việt.
An Toàn
RG lớn nhất uy tín nhất luôn ưu tiên sử dụng công nghệ mã hóa hiện đại nhất để đảm bảo an toàn, riêng tư cho toàn bộ thông tin của người chơi. Đơn vị cam kết nói không với hành vi gian lận và mua bán, trao đổi thông tin cá nhân bất hợp pháp.
Đổi Mới
Nhà cái luôn theo dõi và bắt kịp xu hướng thời đại, liên tục bổ sung các sản phẩm mới, phương thức cá cược mới và các ưu đãi độc lạ, mang đến những trải nghiệm thú vị cho người chơi.
Công Nghệ
RGBET trang chủ tập trung xây dựng một giao diện game sắc nét, sống động cùng tốc độ tải nhanh chóng. Ứng dụng RGBET giải nén ít dung lượng phù hợp với mọi hệ điều hành và cấu hình, tăng khả năng sử dụng của khách hàng.
RGBET Khẳng Định Giá Trị Thương Hiệu
Hoạt động hợp pháp với đầy đủ giấy phép, chứng chỉ an toàn đạt tiêu chuẩn quốc tế
Hệ thống game đa màu sắc, đáp ứng được mọi nhu cầu người chơi
Chính sách bảo mật RG hiện đại và đảm bảo an toàn cho người chơi cá cược
Bắt tay hợp tác với nhiều đơn vị phát hành game uy tín, chất lượng thế giới
Giao dịch nạp rút RG cấp tốc, nhanh gọn, bảo mật an toàn
Kèo nhà cái đa dạng với bảng tỷ lệ kèo cao, hấp dẫn
Dịch Vụ RGBET Casino Online
Dịch vụ khách hàng
Đội ngũ CSKH RGBET luôn hoạt động thường trực 24/7. Nhân viên được đào tạo chuyên sâu luôn giải đáp tất cả các khó khăn của người chơi về các vấn đề tài khoản, khuyến mãi, giao dịch một cách nhanh chóng và chuẩn xác. Hạn chế tối đa làm ảnh hưởng đến quá trình trải nghiệm của khách hàng.
Đa dạng trò chơi
Với sự nhạy bén trong cập nhật xu thế, nhà cái RGBET đã dành nhiều thời gian phân tích nhu cầu khách hàng, đem đến một kho tàng game chất lượng với đa dạng thể loại từ RG casino online, thể thao, nổ hũ, game bài, đá gà, xổ số.
Khuyến mãi hấp dẫn
RGBET trang chủ liên tục cập nhật và thay đổi các sự kiện ưu đãi đầy hấp dẫn và độc đáo. Mọi thành viên bất kể là người chơi mới, người chơi cũ hay hội viên VIP đều có cơ hội được hưởng ưu đãi đặc biệt từ nhà cái.
Giao dịch linh hoạt, tốc độ
Thương hiệu RGBET luôn chú tâm đến hệ thống giao dịch. Nhà cái cung cấp dịch vụ nạp rút nhanh chóng với đa dạng phương thức như thẻ cào, ví điện tử, ngân hàng điện tử, ngân hàng trực tiếp. Mọi hoạt động đều được bảo mật tuyệt đối bởi công nghệ mã hóa tiên tiến.
App cá độ RGBET
App cá độ RGBET là một ứng dụng cho phép người chơi đăng nhập RG nhanh chóng, đồng thời các thao tác đăng ký RG trên app cũng được tối ưu và trở nên đơn giản hơn. Tham gia cá cược RG bằng app cá độ, người chơi sẽ có 1 trải nghiệm cá cược tuyệt vời và thú vị.
RGBET Có Chứng Nhận Cá Cược Quốc Tế
Nhà cái RGBET hoạt động hợp pháp dưới sự cấp phép của hai tổ chức thế giới là PAGCOR và MGA, tính minh bạch và công bằng luôn được giám sát gắt gao bởi BIV. Khi tham gia cược tại đây, người chơi sẽ được đảm bảo quyền và lợi ích hợp pháp của mình.
Việc sở hữu các chứng nhận quốc tế còn cho thấy nguồn tài chính ổn định, dồi dào của RGBET. Điều này cho thấy việc một nhà cái được công nhận bởi các cơ quan quốc tế không phải là một chuyện dễ.
Theo quy định nhà cái RGBET, chỉ người chơi từ đủ 18 tuổi trở lên mới có thể tham gia cá cược tại RGBET
MGA (Malta Gaming Authority)
Tổ chức MGA đảm bảo tính vẹn toàn và ổn định của các trò chơi. Có các chính sách bảo vệ nguồn tài chính và quyền lợi của người chơi. Chứng nhận một nhà cái hoạt động có đầy đủ pháp lý, tuân thủ nghiêm chỉnh luật cờ bạc.
Chứng nhận Quần đảo Virgin Vương quốc Anh (BIV)
Tổ chứng chứng nhận nhà cái có đầy đủ tài chính để hoạt động kinh doanh cá cược. Với nguồn ngân sách dồi dào, ổn định nhà cái bảo đảm tính thanh khoản cho người chơi, mọi quyền lợi sẽ không bị xâm phạm.
Giấy Phép PAGCOR
Tổ chức cấp giấy phép cho nhà cái hoạt động đạt chuẩn theo tiêu chuẩn quốc tế. Cho phép nhà cái tổ chức cá cược một cách hợp pháp, không bị rào cản. Có chính sách ngăn chặn mọi trò chơi có dấu hiệu lừa đảo, duy trì sự minh bạch, công bằng.
Nhà Cái RGBET Phát Triển Công Nghệ
Nhà cái RGBET hỗ trợ trên nhiều thiết bị : IOS, Android, APP, WEB, Html5
RG và Trách Nhiệm Xã Hội
RGBET RichGame không đơn thuần là một trang cá cược giải trí mà nhà cái còn thể hiện rõ tính trách nhiệm xã hội của mình. Đơn vị luôn mong muốn người chơi tham gia cá cược phải có trách nhiệm với bản thân, gia đình và cả xã hội. Mọi hoạt động diễn ra tại RGBET trang chủ nói riêng hay bất kỳ trang web khác, người chơi phải thật sự bình tĩnh và lý trí, đừng để bản thân rơi vào “cạm bẫy của cờ bạc”.
RGBET RichGame với chính sách nghiêm cấm mọi hành vi xâm phạm thông tin cá nhân và gian lận nhằm tạo ra một môi trường cá cược công bằng, lành mạnh. Nhà cái khuyến cáo mọi cá nhân chưa đủ 18 tuổi không nên đăng ký RG và tham gia vào bất kỳ hoạt động cá cược nào.
เอสเอ เกมมิ่ง เป็น ค่าย เกม บาคาร่า ออนไลน์ ที่ได้รับการยอมรับ ใน วงการสากล ว่าเป็น ผู้นำ ในการให้บริการ เกม คาสิโนออนไลน์ โดยเฉพาะในด้าน ไพ่ บาคาร่า ซึ่งเป็น เกมพนัน ที่ นักเล่น สนใจเล่นกัน อย่างแพร่หลาย ใน คาสิโนทั่วไป และ แพลตฟอร์มออนไลน์ ด้วย ลักษณะการเล่น ที่ สะดวก การลงเดิมพัน เพียง ฝั่ง ฝั่งผู้เล่น หรือ เจ้ามือ และ เปอร์เซ็นต์การชนะ ที่ มีความเป็นไปได้สูง ทำให้ เกมไพ่บาคาร่า ได้รับ ความสนใจ อย่างมากใน ช่วงหลายปีที่ผ่านมา โดยเฉพาะใน บ้านเรา
หนึ่งในสไตล์การเล่น ยอดนิยมที่ SA Gaming เสนอ คือ สปีดบาคาร่า ซึ่ง ให้โอกาสผู้เล่นที่ ต้องการ ความรวดเร็ว และ การตัดสินใจไว สามารถ เดิมพันได้อย่างรวดเร็ว นอกจากนี้ยังมีโหมด ไม่มีค่าคอมมิชชั่น ซึ่งเป็น โหมด ที่ ไม่ต้องเสียค่าคอมมิชชั่นเพิ่มเติม เมื่อชนะ การแทง แบงค์เกอร์ ทำให้ โหมดนี้ ได้รับ ความสนใจ จาก นักเสี่ยงโชค ที่มองหา กำไร ในการ เดิมพัน
เกมไพ่พนัน ของ เอสเอ เกมมิ่ง ยัง ได้รับการพัฒนา ให้มี กราฟิก ร่วมกับ เสียง ที่ เรียลไทม์ จำลองบรรยากาศ ที่ น่าสนุก เหมือนกับอยู่ใน คาสิโนใหญ่ พร้อมกับ ฟีเจอร์ ที่ทำให้ นักเล่น สามารถเลือก วิธีการเดิมพัน ที่ หลากหลาย ไม่ว่าจะเป็น การลงเงิน ตามสูตร ของตน หรือการ พึ่งกลยุทธ์ เพื่อชนะ นอกจากนี้ยังมี ดีลเลอร์สด ที่ คอยควบคุมเกม ในแต่ละ โต๊ะ ทำให้ การเล่น มี ความน่าสนุก มากยิ่งขึ้น
ด้วย ความยืดหยุ่น ใน การเสี่ยงโชค และ ความง่าย ในการ ใช้บริการ SA Gaming ได้ ออกแบบ เกมบาคาร่า ที่ เหมาะสมกับ ทุก กลุ่ม ของนักเสี่ยงโชค ตั้งแต่ ผู้เล่นมือใหม่ ไปจนถึง นักพนัน มืออาชีพ
dunyan?n en iyi casino siteleri: cazino – dunyan?n en iyi casino siteleri
[url=https://erling-haalandar.biz/]www.erling-haalandar.biz[/url]
last news about erling haaland
http://www.erling-haalandar.biz
[url=https://erlinghaalandar.biz]http://erlinghaalandar.biz[/url]
last news about erling haaland
http://erlinghaalandar.biz
[url=https://haaland-erling-ar.biz]haaland-erling-ar.biz[/url]
last news about haaland erling
https://www.haaland-erling-ar.biz
[url=https://kane-harry-ar.biz]https://kane-harry-ar.biz[/url]
last news about kane harry
https://www.kane-harry-ar.biz
[url=https://neymar-ar.biz]https://www.neymar-ar.biz[/url]
last news about neymar
http://www.neymar-ar.biz
Фасовочно-упаковочное оборудование предназначено для порционной фасовки различных сыпучих продуктов. К числу основных из них относится чай, крупы [url=http://amplituda74.ru/]оборудование пищевой продукции[/url]
пинап казино [url=https://1winindia.tech/#]пин ап[/url] pin up
Фасовочно-упаковочное оборудование предназначено для порционной фасовки различных сыпучих продуктов. К числу основных из них относится чай, крупы [url=http://amplituda74.ru/]поставки упаковочного оборудования[/url]
Как получить диплом о среднем образовании в Москве и других городах
miku-crdb.ru/forum/messages/forum1/topic554/message605/?result=new#message605
Профессиональный сервисный центр по ремонту телефонов в Москве.
Мы предлагаем: ремонт мобильных телефонов в москве
Наши мастера оперативно устранят неисправности вашего устройства в сервисе или с выездом на дом!
casino siteleri: casino siteleri – casino siteleri
https://1winci.icu/# пинап зеркало
пин ап казино вход
RGBET Trang Chủ Và Câu Chuyện Thương Hiệu
Ra đời vào năm 2010 tại Đài Loan, RGBET nhanh chóng trở thành một trang cá cược chất lượng hàng đầu khu vực Châu Á. Nhà cái được cấp phép hoạt động hợp pháp bởi công ty giải trí trực tuyến hợp pháp được ủy quyền và giám sát theo giấy phép Malta của Châu Âu – MGA. Và chịu sự giám sát chặt chẽ của tổ chức PAGCOR và BIV.
RGBET trang chủ cung cấp cho người chơi đa dạng các thể loại cược đặc sắc như: thể thao, đá gà, xổ số, nổ hũ, casino trực tuyến. Dịch vụ CSKH luôn hoạt động 24/7. Với chứng chỉ công nghệ GEOTRUST, nhà cái đảm bảo an toàn cho mọi giao dịch của khách hàng. APP RG thiết kế tối ưu giải quyết mọi vấn đề của người dùng IOS và Android.
Là một nhà cái đến từ đất nước công nghệ, nhà cái luôn không ngừng xây dựng và nâng cấp hệ thống game và dịch vụ hoàn hảo. Mọi giao dịch nạp rút được tự động hoá cho phép người chơi hoàn tất giao dịch chỉ với 2 phút vô cùng nhanh chóng
RGBET Lớn Nhất Uy Tín Nhất – Giá Trị Cốt Lõi
Nhà Cái RG Và Mục Tiêu Thương Hiệu
Giá trị cốt lõi mà RGBET mong muốn hướng đến đó chính là không ngừng hoàn thiện để đem đến một hệ thống chất lượng, công bằng và an toàn. Nâng cao sự hài lòng của người chơi, đẩy mạnh hoạt động chống gian lận và lừa đảo. RG luôn cung cấp hệ thống kèo nhà cái đặc sắc, cùng các sự kiện – giải đấu hàng đầu và tỷ lệ cược cạnh tranh đáp ứng mọi nhu cầu khách hàng.
Thương hiệu cá cược RGBET cam kết đem lại cho người chơi môi trường cá cược công bằng, văn minh và lành mạnh. Đây là nguồn động lực to lớn giúp nhà cái thực tế hóa các hoạt động của mình.
RGBET Có Tầm Nhìn Và Sứ Mệnh
Đổi mới và sáng tạo là yếu tố cốt lõi giúp đạt được mục tiêu dưới sự chuyển mình mạnh mẽ của công nghệ. Tầm nhìn và sứ mệnh của RGBET là luôn tìm tòi những điều mới lạ, đột phá mạnh mẽ, vượt khỏi giới hạn bản thân, đương đầu với thử thách để đem đến cho khách hàng sản phẩm hoàn thiện nhất.
Chúng tôi luôn sẵn sàng tiếp thu ý kiến và nâng cao bản thân mỗi ngày để tạo ra sân chơi bổ ích, uy tín và chuyên nghiệp cho người chơi. Để có thể trở thành nhà cái phù hợp với mọi khách hàng.
Khái Niệm Giá Trị Cốt Lõi Nhà Cái RGBET
Giá trị cốt lõi của nhà cái RG luôn gắn kết chặt chẽ với nhau giữa 5 khái niệm: Chính trực, chuyên nghiệp, an toàn, đổi mới, công nghệ.
Chính Trực
Mọi quy luật, cách thức của trò chơi đều được nhà cái cung cấp công khai, minh bạch và chi tiết. Mỗi tựa game hoạt động đều phải chịu sự giám sát kỹ lưỡng bởi các cơ quan tổ chức có tiếng về sự an toàn và minh bạch của nó.
Chuyên Nghiệp
Các hoạt động tại RGBET trang chủ luôn đề cao sự chuyên nghiệp lên hàng đầu. Từ giao diện đến chất lượng sản phẩm luôn được trau chuốt tỉ mỉ từng chi tiết. Thế giới giải trí được xây dựng theo văn hóa Châu Á, phù hợp với đại đa số thị phần khách Việt.
An Toàn
RG lớn nhất uy tín nhất luôn ưu tiên sử dụng công nghệ mã hóa hiện đại nhất để đảm bảo an toàn, riêng tư cho toàn bộ thông tin của người chơi. Đơn vị cam kết nói không với hành vi gian lận và mua bán, trao đổi thông tin cá nhân bất hợp pháp.
Đổi Mới
Nhà cái luôn theo dõi và bắt kịp xu hướng thời đại, liên tục bổ sung các sản phẩm mới, phương thức cá cược mới và các ưu đãi độc lạ, mang đến những trải nghiệm thú vị cho người chơi.
Công Nghệ
RGBET trang chủ tập trung xây dựng một giao diện game sắc nét, sống động cùng tốc độ tải nhanh chóng. Ứng dụng RGBET giải nén ít dung lượng phù hợp với mọi hệ điều hành và cấu hình, tăng khả năng sử dụng của khách hàng.
RGBET Khẳng Định Giá Trị Thương Hiệu
Hoạt động hợp pháp với đầy đủ giấy phép, chứng chỉ an toàn đạt tiêu chuẩn quốc tế
Hệ thống game đa màu sắc, đáp ứng được mọi nhu cầu người chơi
Chính sách bảo mật RG hiện đại và đảm bảo an toàn cho người chơi cá cược
Bắt tay hợp tác với nhiều đơn vị phát hành game uy tín, chất lượng thế giới
Giao dịch nạp rút RG cấp tốc, nhanh gọn, bảo mật an toàn
Kèo nhà cái đa dạng với bảng tỷ lệ kèo cao, hấp dẫn
Dịch Vụ RGBET Casino Online
Dịch vụ khách hàng
Đội ngũ CSKH RGBET luôn hoạt động thường trực 24/7. Nhân viên được đào tạo chuyên sâu luôn giải đáp tất cả các khó khăn của người chơi về các vấn đề tài khoản, khuyến mãi, giao dịch một cách nhanh chóng và chuẩn xác. Hạn chế tối đa làm ảnh hưởng đến quá trình trải nghiệm của khách hàng.
Đa dạng trò chơi
Với sự nhạy bén trong cập nhật xu thế, nhà cái RGBET đã dành nhiều thời gian phân tích nhu cầu khách hàng, đem đến một kho tàng game chất lượng với đa dạng thể loại từ RG casino online, thể thao, nổ hũ, game bài, đá gà, xổ số.
Khuyến mãi hấp dẫn
RGBET trang chủ liên tục cập nhật và thay đổi các sự kiện ưu đãi đầy hấp dẫn và độc đáo. Mọi thành viên bất kể là người chơi mới, người chơi cũ hay hội viên VIP đều có cơ hội được hưởng ưu đãi đặc biệt từ nhà cái.
Giao dịch linh hoạt, tốc độ
Thương hiệu RGBET luôn chú tâm đến hệ thống giao dịch. Nhà cái cung cấp dịch vụ nạp rút nhanh chóng với đa dạng phương thức như thẻ cào, ví điện tử, ngân hàng điện tử, ngân hàng trực tiếp. Mọi hoạt động đều được bảo mật tuyệt đối bởi công nghệ mã hóa tiên tiến.
App cá độ RGBET
App cá độ RGBET là một ứng dụng cho phép người chơi đăng nhập RG nhanh chóng, đồng thời các thao tác đăng ký RG trên app cũng được tối ưu và trở nên đơn giản hơn. Tham gia cá cược RG bằng app cá độ, người chơi sẽ có 1 trải nghiệm cá cược tuyệt vời và thú vị.
RGBET Có Chứng Nhận Cá Cược Quốc Tế
Nhà cái RGBET hoạt động hợp pháp dưới sự cấp phép của hai tổ chức thế giới là PAGCOR và MGA, tính minh bạch và công bằng luôn được giám sát gắt gao bởi BIV. Khi tham gia cược tại đây, người chơi sẽ được đảm bảo quyền và lợi ích hợp pháp của mình.
Việc sở hữu các chứng nhận quốc tế còn cho thấy nguồn tài chính ổn định, dồi dào của RGBET. Điều này cho thấy việc một nhà cái được công nhận bởi các cơ quan quốc tế không phải là một chuyện dễ.
Theo quy định nhà cái RGBET, chỉ người chơi từ đủ 18 tuổi trở lên mới có thể tham gia cá cược tại RGBET
MGA (Malta Gaming Authority)
Tổ chức MGA đảm bảo tính vẹn toàn và ổn định của các trò chơi. Có các chính sách bảo vệ nguồn tài chính và quyền lợi của người chơi. Chứng nhận một nhà cái hoạt động có đầy đủ pháp lý, tuân thủ nghiêm chỉnh luật cờ bạc.
Chứng nhận Quần đảo Virgin Vương quốc Anh (BIV)
Tổ chứng chứng nhận nhà cái có đầy đủ tài chính để hoạt động kinh doanh cá cược. Với nguồn ngân sách dồi dào, ổn định nhà cái bảo đảm tính thanh khoản cho người chơi, mọi quyền lợi sẽ không bị xâm phạm.
Giấy Phép PAGCOR
Tổ chức cấp giấy phép cho nhà cái hoạt động đạt chuẩn theo tiêu chuẩn quốc tế. Cho phép nhà cái tổ chức cá cược một cách hợp pháp, không bị rào cản. Có chính sách ngăn chặn mọi trò chơi có dấu hiệu lừa đảo, duy trì sự minh bạch, công bằng.
Nhà Cái RGBET Phát Triển Công Nghệ
Nhà cái RGBET hỗ trợ trên nhiều thiết bị : IOS, Android, APP, WEB, Html5
RG và Trách Nhiệm Xã Hội
RGBET RichGame không đơn thuần là một trang cá cược giải trí mà nhà cái còn thể hiện rõ tính trách nhiệm xã hội của mình. Đơn vị luôn mong muốn người chơi tham gia cá cược phải có trách nhiệm với bản thân, gia đình và cả xã hội. Mọi hoạt động diễn ra tại RGBET trang chủ nói riêng hay bất kỳ trang web khác, người chơi phải thật sự bình tĩnh và lý trí, đừng để bản thân rơi vào “cạm bẫy của cờ bạc”.
RGBET RichGame với chính sách nghiêm cấm mọi hành vi xâm phạm thông tin cá nhân và gian lận nhằm tạo ra một môi trường cá cược công bằng, lành mạnh. Nhà cái khuyến cáo mọi cá nhân chưa đủ 18 tuổi không nên đăng ký RG và tham gia vào bất kỳ hoạt động cá cược nào.
[url=https://harry-kane-ar.biz]http://www.harry-kane-ar.biz[/url]
last news about harry kane
http://harry-kane-ar.biz
Удивительно, но купить диплом кандидата наук оказалось не так сложно
pin up: пин ап казино вход – pin up kz
Пищевое оборудование и станки из Китая под ключ. Закупка, проверка, доставка, таможенное оформление [url=http://msmservice.ru/]пищевое упаковочное оборудование[/url]
пинап зеркало: пинап зеркало – пин ап официальный сайт
Пищевое оборудование и станки из Китая под ключ. Закупка, проверка, доставка, таможенное оформление [url=http://msmservice.ru/]оборудование для пищевой промышленности[/url]
[url=https://neymar-da-silva-ar.biz]neymar-da-silva-ar.biz[/url]
last news about neymar
http://neymar-da-silva-ar.biz
[url=https://dasilva-neymar-ar.biz]dasilva-neymar-ar.biz[/url]
last news about dasilva neymar
https://dasilva-neymar-ar.biz
Профессиональный сервисный центр по ремонту телефонов в Москве.
Мы предлагаем: сдача телефона в ремонт
Наши мастера оперативно устранят неисправности вашего устройства в сервисе или с выездом на дом!
I came across an article that talks about the same thing but even more and when you go deeper.
реклама в лифтах рекламное агентство реклама в лифтах
вывод из запоя на дому в сочи [url=http://www.vyvod-iz-zapoya-sochi16.ru]вывод из запоя на дому в сочи[/url] .
RGBET Trang Chủ Và Câu Chuyện Thương Hiệu
Ra đời vào năm 2010 tại Đài Loan, RGBET nhanh chóng trở thành một trang cá cược chất lượng hàng đầu khu vực Châu Á. Nhà cái được cấp phép hoạt động hợp pháp bởi công ty giải trí trực tuyến hợp pháp được ủy quyền và giám sát theo giấy phép Malta của Châu Âu – MGA. Và chịu sự giám sát chặt chẽ của tổ chức PAGCOR và BIV.
RGBET trang chủ cung cấp cho người chơi đa dạng các thể loại cược đặc sắc như: thể thao, đá gà, xổ số, nổ hũ, casino trực tuyến. Dịch vụ CSKH luôn hoạt động 24/7. Với chứng chỉ công nghệ GEOTRUST, nhà cái đảm bảo an toàn cho mọi giao dịch của khách hàng. APP RG thiết kế tối ưu giải quyết mọi vấn đề của người dùng IOS và Android.
Là một nhà cái đến từ đất nước công nghệ, nhà cái luôn không ngừng xây dựng và nâng cấp hệ thống game và dịch vụ hoàn hảo. Mọi giao dịch nạp rút được tự động hoá cho phép người chơi hoàn tất giao dịch chỉ với 2 phút vô cùng nhanh chóng
RGBET Lớn Nhất Uy Tín Nhất – Giá Trị Cốt Lõi
Nhà Cái RG Và Mục Tiêu Thương Hiệu
Giá trị cốt lõi mà RGBET mong muốn hướng đến đó chính là không ngừng hoàn thiện để đem đến một hệ thống chất lượng, công bằng và an toàn. Nâng cao sự hài lòng của người chơi, đẩy mạnh hoạt động chống gian lận và lừa đảo. RG luôn cung cấp hệ thống kèo nhà cái đặc sắc, cùng các sự kiện – giải đấu hàng đầu và tỷ lệ cược cạnh tranh đáp ứng mọi nhu cầu khách hàng.
Thương hiệu cá cược RGBET cam kết đem lại cho người chơi môi trường cá cược công bằng, văn minh và lành mạnh. Đây là nguồn động lực to lớn giúp nhà cái thực tế hóa các hoạt động của mình.
RGBET Có Tầm Nhìn Và Sứ Mệnh
Đổi mới và sáng tạo là yếu tố cốt lõi giúp đạt được mục tiêu dưới sự chuyển mình mạnh mẽ của công nghệ. Tầm nhìn và sứ mệnh của RGBET là luôn tìm tòi những điều mới lạ, đột phá mạnh mẽ, vượt khỏi giới hạn bản thân, đương đầu với thử thách để đem đến cho khách hàng sản phẩm hoàn thiện nhất.
Chúng tôi luôn sẵn sàng tiếp thu ý kiến và nâng cao bản thân mỗi ngày để tạo ra sân chơi bổ ích, uy tín và chuyên nghiệp cho người chơi. Để có thể trở thành nhà cái phù hợp với mọi khách hàng.
Khái Niệm Giá Trị Cốt Lõi Nhà Cái RGBET
Giá trị cốt lõi của nhà cái RG luôn gắn kết chặt chẽ với nhau giữa 5 khái niệm: Chính trực, chuyên nghiệp, an toàn, đổi mới, công nghệ.
Chính Trực
Mọi quy luật, cách thức của trò chơi đều được nhà cái cung cấp công khai, minh bạch và chi tiết. Mỗi tựa game hoạt động đều phải chịu sự giám sát kỹ lưỡng bởi các cơ quan tổ chức có tiếng về sự an toàn và minh bạch của nó.
Chuyên Nghiệp
Các hoạt động tại RGBET trang chủ luôn đề cao sự chuyên nghiệp lên hàng đầu. Từ giao diện đến chất lượng sản phẩm luôn được trau chuốt tỉ mỉ từng chi tiết. Thế giới giải trí được xây dựng theo văn hóa Châu Á, phù hợp với đại đa số thị phần khách Việt.
An Toàn
RG lớn nhất uy tín nhất luôn ưu tiên sử dụng công nghệ mã hóa hiện đại nhất để đảm bảo an toàn, riêng tư cho toàn bộ thông tin của người chơi. Đơn vị cam kết nói không với hành vi gian lận và mua bán, trao đổi thông tin cá nhân bất hợp pháp.
Đổi Mới
Nhà cái luôn theo dõi và bắt kịp xu hướng thời đại, liên tục bổ sung các sản phẩm mới, phương thức cá cược mới và các ưu đãi độc lạ, mang đến những trải nghiệm thú vị cho người chơi.
Công Nghệ
RGBET trang chủ tập trung xây dựng một giao diện game sắc nét, sống động cùng tốc độ tải nhanh chóng. Ứng dụng RGBET giải nén ít dung lượng phù hợp với mọi hệ điều hành và cấu hình, tăng khả năng sử dụng của khách hàng.
RGBET Khẳng Định Giá Trị Thương Hiệu
Hoạt động hợp pháp với đầy đủ giấy phép, chứng chỉ an toàn đạt tiêu chuẩn quốc tế
Hệ thống game đa màu sắc, đáp ứng được mọi nhu cầu người chơi
Chính sách bảo mật RG hiện đại và đảm bảo an toàn cho người chơi cá cược
Bắt tay hợp tác với nhiều đơn vị phát hành game uy tín, chất lượng thế giới
Giao dịch nạp rút RG cấp tốc, nhanh gọn, bảo mật an toàn
Kèo nhà cái đa dạng với bảng tỷ lệ kèo cao, hấp dẫn
Dịch Vụ RGBET Casino Online
Dịch vụ khách hàng
Đội ngũ CSKH RGBET luôn hoạt động thường trực 24/7. Nhân viên được đào tạo chuyên sâu luôn giải đáp tất cả các khó khăn của người chơi về các vấn đề tài khoản, khuyến mãi, giao dịch một cách nhanh chóng và chuẩn xác. Hạn chế tối đa làm ảnh hưởng đến quá trình trải nghiệm của khách hàng.
Đa dạng trò chơi
Với sự nhạy bén trong cập nhật xu thế, nhà cái RGBET đã dành nhiều thời gian phân tích nhu cầu khách hàng, đem đến một kho tàng game chất lượng với đa dạng thể loại từ RG casino online, thể thao, nổ hũ, game bài, đá gà, xổ số.
Khuyến mãi hấp dẫn
RGBET trang chủ liên tục cập nhật và thay đổi các sự kiện ưu đãi đầy hấp dẫn và độc đáo. Mọi thành viên bất kể là người chơi mới, người chơi cũ hay hội viên VIP đều có cơ hội được hưởng ưu đãi đặc biệt từ nhà cái.
Giao dịch linh hoạt, tốc độ
Thương hiệu RGBET luôn chú tâm đến hệ thống giao dịch. Nhà cái cung cấp dịch vụ nạp rút nhanh chóng với đa dạng phương thức như thẻ cào, ví điện tử, ngân hàng điện tử, ngân hàng trực tiếp. Mọi hoạt động đều được bảo mật tuyệt đối bởi công nghệ mã hóa tiên tiến.
App cá độ RGBET
App cá độ RGBET là một ứng dụng cho phép người chơi đăng nhập RG nhanh chóng, đồng thời các thao tác đăng ký RG trên app cũng được tối ưu và trở nên đơn giản hơn. Tham gia cá cược RG bằng app cá độ, người chơi sẽ có 1 trải nghiệm cá cược tuyệt vời và thú vị.
RGBET Có Chứng Nhận Cá Cược Quốc Tế
Nhà cái RGBET hoạt động hợp pháp dưới sự cấp phép của hai tổ chức thế giới là PAGCOR và MGA, tính minh bạch và công bằng luôn được giám sát gắt gao bởi BIV. Khi tham gia cược tại đây, người chơi sẽ được đảm bảo quyền và lợi ích hợp pháp của mình.
Việc sở hữu các chứng nhận quốc tế còn cho thấy nguồn tài chính ổn định, dồi dào của RGBET. Điều này cho thấy việc một nhà cái được công nhận bởi các cơ quan quốc tế không phải là một chuyện dễ.
Theo quy định nhà cái RGBET, chỉ người chơi từ đủ 18 tuổi trở lên mới có thể tham gia cá cược tại RGBET
MGA (Malta Gaming Authority)
Tổ chức MGA đảm bảo tính vẹn toàn và ổn định của các trò chơi. Có các chính sách bảo vệ nguồn tài chính và quyền lợi của người chơi. Chứng nhận một nhà cái hoạt động có đầy đủ pháp lý, tuân thủ nghiêm chỉnh luật cờ bạc.
Chứng nhận Quần đảo Virgin Vương quốc Anh (BIV)
Tổ chứng chứng nhận nhà cái có đầy đủ tài chính để hoạt động kinh doanh cá cược. Với nguồn ngân sách dồi dào, ổn định nhà cái bảo đảm tính thanh khoản cho người chơi, mọi quyền lợi sẽ không bị xâm phạm.
Giấy Phép PAGCOR
Tổ chức cấp giấy phép cho nhà cái hoạt động đạt chuẩn theo tiêu chuẩn quốc tế. Cho phép nhà cái tổ chức cá cược một cách hợp pháp, không bị rào cản. Có chính sách ngăn chặn mọi trò chơi có dấu hiệu lừa đảo, duy trì sự minh bạch, công bằng.
Nhà Cái RGBET Phát Triển Công Nghệ
Nhà cái RGBET hỗ trợ trên nhiều thiết bị : IOS, Android, APP, WEB, Html5
RG và Trách Nhiệm Xã Hội
RGBET RichGame không đơn thuần là một trang cá cược giải trí mà nhà cái còn thể hiện rõ tính trách nhiệm xã hội của mình. Đơn vị luôn mong muốn người chơi tham gia cá cược phải có trách nhiệm với bản thân, gia đình và cả xã hội. Mọi hoạt động diễn ra tại RGBET trang chủ nói riêng hay bất kỳ trang web khác, người chơi phải thật sự bình tĩnh và lý trí, đừng để bản thân rơi vào “cạm bẫy của cờ bạc”.
RGBET RichGame với chính sách nghiêm cấm mọi hành vi xâm phạm thông tin cá nhân và gian lận nhằm tạo ra một môi trường cá cược công bằng, lành mạnh. Nhà cái khuyến cáo mọi cá nhân chưa đủ 18 tuổi không nên đăng ký RG và tham gia vào bất kỳ hoạt động cá cược nào.
I like your style!
zyban 150 mg price – buy orlistat online cheap purchase shuddha guggulu generic
Если вы искали где отремонтировать сломаную технику, обратите внимание – профи тех сервис екб
реклама в лифте цена реклама на стендах в лифте
Профессиональный сервисный центр по ремонту игровых консолей Sony Playstation, Xbox, PSP Vita с выездом на дом по Москве.
Мы предлагаем: ремонт игровой консоли
Наши мастера оперативно устранят неисправности вашего устройства в сервисе или с выездом на дом!
Смешные анекдоты http://shutki-anekdoty.ru/anekdoty.
Смешные анекдоты http://shutki-anekdoty.ru/anekdoty.
Thanks , I have just been looking for information about this subject for ages and yours is the best I’ve found
out so far. However, what concerning the conclusion? Are you certain about the supply?
Have a look at my page; bclub.tk
casino siteleri [url=https://1wintr.fun/#]canl? casino siteleri[/url] casino sitesi
пин ап зеркало: пин ап официальный сайт – пин ап официальный сайт
Great post. I used to be checking continuously this weblog and I’m impressed!
Very useful info specifically the final part 🙂 I deal with
such info much. I was looking for this certain info for a very lengthy time.
Thanks and best of luck.
размещение рекламы в лифтах реклама в лифтах
스위스] – 스위스 한튼튼영어 베이비리그 가격인민박 추천 7곳: 인튼튼영어 베이비리그 가격터라켄 융프라우 루체른튼튼영어 베이비리그 가격 제네바
Сервисный центр предлагает отремонтировать фотоаппарата kodak починить фотоаппарата kodak
Профессиональный сервисный центр по ремонту компьютерных видеокарт по Москве.
Мы предлагаем: ремонт видеокарт gigabyte в москве
Наши мастера оперативно устранят неисправности вашего устройства в сервисе или с выездом на дом!
Современные системы управления помогают контролировать каждый этап, от первичной обработки до упаковки. Это не только снижает риск ошибок, но и экономит ресурсы [url=http://jung24express.com/bbs/board.php?bo_table=review&wr_id=143031]http://jung24express.com/bbs/board.php?bo_table=review&wr_id=143031[/url]
Современные системы управления помогают контролировать каждый этап, от первичной обработки до упаковки. Это не только снижает риск ошибок, но и экономит ресурсы [url=http://wiki.motorclass.com.au/index.php?title=%20%D0%A3%D0%BF%D0%B0%D0%BA%D0%BE%D0%B2%D0%BE%D1%87%D0%BD%D1%8B%D0%B5%20%D0%BB%D0%B8%D0%BD%D0%B8%D0%B8:%20%D0%BE%D1%82%20%D0%BA%D0%BE%D0%BD%D1%86%D0%B5%D0%BF%D1%86%D0%B8%D0%B8%20%D0%B4%D0%BE%20%D1%80%D0%B5%D0%B0%D0%BB%D0%B8%D0%B7%D0%B0%D1%86%D0%B8%D0%B8]http://wiki.motorclass.com.au/index.php?title=%20%D0%A3%D0%BF%D0%B0%D0%BA%D0%BE%D0%B2%D0%BE%D1%87%D0%BD%D1%8B%D0%B5%20%D0%BB%D0%B8%D0%BD%D0%B8%D0%B8:%20%D0%BE%D1%82%20%D0%BA%D0%BE%D0%BD%D1%86%D0%B5%D0%BF%D1%86%D0%B8%D0%B8%20%D0%B4%D0%BE%20%D1%80%D0%B5%D0%B0%D0%BB%D0%B8%D0%B7%D0%B0%D1%86%D0%B8%D0%B8[/url]
Веселые анекдоты http://shutki-anekdoty.ru/anekdoty.
1xbet официальный сайт: 1хбет – 1xbet официальный сайт
This information is critically needed, thanks.
whoah this weblog is wonderful i like reading your articles. Keep up the good paintings! You already know, many people are looking around for this information, you can help them greatly.
купить диплом в камышине [url=https://landik-diploms.ru/]landik-diploms.ru[/url] .
Сколько стоит диплом высшего и среднего образования и как его получить?
Ready to take your SEO strategy to the next level? Visit
https://seoshop.xmc.pl
for exclusive backlinks from trusted sources that will significantly boost your site’s authority and
visibility. Our backlinks are not only powerful but also safe, ensuring that
your website remains compliant with search engine guidelines.
We offer a variety of packages to suit different budgets and
goals, making it easy for you to find the perfect
fit for your SEO needs. Don’t wait—explore our offerings and start seeing results today!
капельница от запоя в сочи [url=www.vyvod-iz-zapoya-sochi17.ru]www.vyvod-iz-zapoya-sochi17.ru[/url] .
ремонт смартфона
Hello there, You have done an incredible job. I will certainly digg it and personally recommend to my friends. I am sure they will be benefited from this site.
Рынок предлагает широкий спектр решений, от простых ручных устройств до сложных автоматизированных систем. Выбор подходящей техники может оказаться непростой задачей, особенно учитывая разнообразие предложений и технологии, доступные на сегодняшний день [url=http://jamsun.net/doku.php?id=%20%D0%9A%D0%B0%D0%BA%20%D1%82%D0%B5%D1%85%D0%BD%D0%BE%D0%BB%D0%BE%D0%B3%D0%B8%D0%B8%204.0%20%D0%BC%D0%B5%D0%BD%D1%8F%D1%8E%D1%82%20%D0%BF%D1%80%D0%BE%D0%B8%D0%B7%D0%B2%D0%BE%D0%B4%D1%81%D1%82%D0%B2%D0%BE%20%D1%83%D0%BF%D0%B0%D0%BA%D0%BE%D0%B2%D0%BA%D0%B8]http://jamsun.net/doku.php?id=%20%D0%9A%D0%B0%D0%BA%20%D1%82%D0%B5%D1%85%D0%BD%D0%BE%D0%BB%D0%BE%D0%B3%D0%B8%D0%B8%204.0%20%D0%BC%D0%B5%D0%BD%D1%8F%D1%8E%D1%82%20%D0%BF%D1%80%D0%BE%D0%B8%D0%B7%D0%B2%D0%BE%D0%B4%D1%81%D1%82%D0%B2%D0%BE%20%D1%83%D0%BF%D0%B0%D0%BA%D0%BE%D0%B2%D0%BA%D0%B8[/url]
pin up: пинап кз – пинап
Рынок предлагает широкий спектр решений, от простых ручных устройств до сложных автоматизированных систем. Выбор подходящей техники может оказаться непростой задачей, особенно учитывая разнообразие предложений и технологии, доступные на сегодняшний день [url=http://www.tiendahinchables.com/blog/%D1%8E%D1%81%D0%B8%D0%BA.html]http://www.tiendahinchables.com/blog/%D1%8E%D1%81%D0%B8%D0%BA.html[/url]
[url=https://yassinebounouar.biz]yassinebounouar.biz[/url]
last news about yassine bounou
https://www.yassinebounouar.biz
[url=https://souzatalisca-ar.biz]www.souzatalisca-ar.biz[/url]
last news about souza talisca
souzatalisca-ar.biz
[url=https://yassine-bounou-ar.biz]https://www.yassine-bounou-ar.biz[/url]
last news about yassine bounou
http://yassine-bounou-ar.biz
[url=https://taliscaar.biz/]www.taliscaar.biz[/url]
last news about talisca
http://www.taliscaar.biz
Pour rappel, le casino en ligne est strictement interdit aux personnes mineures.
pin up: пин ап казино – пинап казино
[url=https://talisca-souza-ar.biz]https://talisca-souza-ar.biz[/url]
last news about talisca souza
talisca-souza-ar.biz
Good info. Lucky me I ran across your blog by chance (stumbleupon). I have bookmarked it for later!
1xbet зеркало: 1хбет – 1хбет
капельница от запоя на дому нижний новгород [url=https://snyatie-zapoya-na-domu17.ru/]капельница от запоя на дому нижний новгород[/url] .
врач на дом капельница от запоя [url=www.snyatie-zapoya-na-domu15.ru]врач на дом капельница от запоя[/url] .
нижний новгород вывод из запоя на дому [url=https://www.snyatie-zapoya-na-domu16.ru]нижний новгород вывод из запоя на дому[/url] .
[url=https://da-silva-neymar-ar.biz]www.da-silva-neymar-ar.biz[/url]
last news about da silva neymar
da-silva-neymar-ar.biz
online pharmacy india: buy medicines online in india – india online pharmacy
Веселые анекдоты http://shutki-anekdoty.ru/anekdoty.
is ed reversible [url=https://drugs1st.store/#]best over the counter ed pills[/url] home remedies for erectile dysfunction
modafinil 200mg pills – phenergan pill melatonin 3 mg pills
Online medicine home delivery: online shopping pharmacy india – buy medicines online in india
Покупка диплома о среднем полном образовании: как избежать мошенничества?
mmix.ukrbb.net/viewtopic.php?f=23&t=25644
Узнайте стоимость диплома высшего и среднего образования и процесс получения
rpinnovative.1stbb.ru/viewtopic.php?f=8&t=682
Как оказалось, купить диплом кандидата наук не так уж и сложно
п»їlegitimate online pharmacies india: buy prescription drugs from india – reputable indian online pharmacy
gokong88
Непревзойденная красота и функциональность, коннелюрный плинтус подарит вашему дому изысканный вид
коннелюрный [url=https://konnelyurnyj-plintus-dlya-linoleuma-msk.ru/]https://konnelyurnyj-plintus-dlya-linoleuma-msk.ru/[/url] .
hoki1881
aloha4d
Как оказалось, купить диплом кандидата наук не так уж и сложно
[url=][/url]
Временная регистрация в Москве: Быстро и Легально!
Ищете, где оформить временную регистрацию в Москве?
Мы гарантируем быстрое и легальное оформление без очередей и лишних документов.
Ваше спокойствие – наша забота!
Минимум усилий • Максимум удобства • Полная легальность
Свяжитесь с нами прямо сейчас!
Временная регистрация в Москве
[url=][/url]
hoki1881
[url=https://souza-talisca-ar.biz]http://souza-talisca-ar.biz[/url]
last news about souza talisca
souza-talisca-ar.biz
RGBET – Hướng Dẫn Truy Cập Nhà Cái RGBet Chính Thức Mới Nhất 2024
Cảnh Báo Về Các Trang Web Giả Mạo RGBET.INFO
Kính gửi quý khách hàng và người dùng thân mến,
Chúng tôi, đại diện chính thức của [rgbet.co], muốn thông báo về một số trang web giả mạo, đặc biệt là rgbet.info, đang mạo danh RGBet nhằm đánh lừa người dùng. Chúng tôi khẳng định rằng rgbet.info không có bất kỳ liên kết nào với RGBet chính thức, và việc truy cập vào các trang này có thể gây nguy cơ cho thông tin cá nhân cũng như tài khoản của bạn.
Việc giả mạo thương hiệu RGBet đã ảnh hưởng không nhỏ đến uy tín của chúng tôi và tiềm ẩn nguy cơ cho khách hàng. Những trang web này thường sẽ yêu cầu người dùng cung cấp thông tin nhạy cảm như số tài khoản ngân hàng, mật khẩu, hoặc các thông tin cá nhân khác, dễ dẫn đến mất mát tài sản hoặc dữ liệu cá nhân.
Cách Nhận Biết Liên Kết Chính Thức Của RGBet
Để đảm bảo sự an toàn tuyệt đối khi tham gia RGBet, khách hàng nên xác nhận rằng mình chỉ đang truy cập trang web RGBet thông qua liên kết chính thức tại [rgbet.co]. Đây là kênh duy nhất mà RGBet cung cấp để đảm bảo tính bảo mật, an toàn cho người dùng và tránh những rủi ro không đáng có. RGBet không bao giờ chuyển hướng người dùng đến trang web bên thứ ba như da88 hoặc các trang tương tự, và chúng tôi khuyến cáo bạn không nên tin tưởng những trang này.
Hướng Dẫn Và Hỗ Trợ Chính Thức Từ RGBet
RGBet luôn cố gắng hỗ trợ tốt nhất cho khách hàng thông qua các kênh liên lạc chính thức. Mọi thắc mắc, yêu cầu hỗ trợ hoặc vấn đề gặp phải khi truy cập có thể được giải đáp bởi đội ngũ hỗ trợ của chúng tôi. Vui lòng chỉ liên hệ thông qua các phương thức chính thức tại [rgbet.co] để đảm bảo thông tin được bảo mật.
Kính mong quý khách hàng luôn cảnh giác và lựa chọn RGBet một cách an toàn và thông minh để có trải nghiệm tuyệt vời nhất.
Trân trọng,
Đại Diện RGBet
Если разбирать термин с позиции экономики, то конкуренцией является процесс взаимосвязи, взаимодействия и борьбы между предприятиями на рынке с целью обеспечить себе лучшие возможности реализации товаров и услуг для удовлетворения потребностей покупателей [url=http://www.ceraunavoltapavullo.it/index.php?option=com_k2&view=itemlist&task=user&id=1136516]http://www.ceraunavoltapavullo.it/index.php?option=com_k2&view=itemlist&task=user&id=1136516[/url]
เกมบาคาร่าออนไลน์
เอสเอ เกมมิ่ง เป็น บริษัท เกม บาคาร่า ออนไลน์ ที่ได้รับการยอมรับอย่างกว้างขวาง ใน ระดับสากล ว่าเป็น เจ้าตลาด ในการให้บริการ บริการ คาสิโนออนไลน์ โดยเฉพาะในด้าน เกมไพ่ บาคาร่า ซึ่งเป็น เกมพนัน ที่ ผู้คน สนใจเล่นกัน อย่างกว้างขวาง ใน บ่อนคาสิโน และ แพลตฟอร์มออนไลน์ ด้วย ลักษณะการเล่น ที่ ไม่ซับซ้อน การแทง เพียง ข้าง ผู้เล่น หรือ เจ้ามือ และ ความเป็นไปได้ในการชนะ ที่ มีความเป็นไปได้สูง ทำให้ เกมไพ่บาคาร่า ได้รับ ความสนใจ อย่างมากใน ช่วงหลายปีนี้ โดยเฉพาะใน ประเทศไทย
หนึ่งในรูปแบบการเล่น ยอดนิยมที่ SA Gaming เสนอ คือ สปีดบาคาร่า ซึ่ง ให้โอกาสผู้เล่นที่ ต้องการ การเล่นเร็ว และ การเดิมพันไว สามารถ เดิมพันได้อย่างรวดเร็ว นอกจากนี้ยังมีโหมด ไม่มีค่าคอมมิชชั่น ซึ่งเป็น รูปแบบ ที่ ไม่มีค่าคอมมิชชั่นเพิ่ม เมื่อชนะ การแทง ฝั่งแบงค์เกอร์ ทำให้ ฟีเจอร์นี้ ได้รับ ความคุ้มค่า จาก ผู้เล่น ที่มองหา กำไร ในการ ลงทุน
เกมการ์ด ของ เอสเอ เกมมิ่ง ยัง ถูกพัฒนา ให้มี กราฟิก ร่วมกับ ระบบเสียง ที่ สมจริง จำลองบรรยากาศ ที่ เร้าใจ เหมือนกับอยู่ใน บ่อนคาสิโนจริง พร้อมกับ ฟีเจอร์ ที่ทำให้ นักเล่น สามารถเลือก วิธีแทง ที่ แตกต่างกัน ไม่ว่าจะเป็น การเดิมพัน ตามกลยุทธ์ ของตน หรือการ อิงกลยุทธ์ เพื่อชนะ นอกจากนี้ยังมี ดีลเลอร์สด ที่ คอยดำเนินเกม ในแต่ละ โต๊ะ ทำให้ การเล่น มี ความน่าสนใจ มากยิ่งขึ้น
ด้วย ความยืดหยุ่น ใน การเสี่ยงโชค และ ความง่าย ในการ ใช้บริการ SA Gaming ได้ ออกแบบ เกมบาคาร่า ที่ ตอบสนอง ทุก ระดับ ของนักพนัน ตั้งแต่ ผู้เล่นมือใหม่ ไปจนถึง นักเดิมพัน มืออาชีพ
Если разбирать термин с позиции экономики, то конкуренцией является процесс взаимосвязи, взаимодействия и борьбы между предприятиями на рынке с целью обеспечить себе лучшие возможности реализации товаров и услуг для удовлетворения потребностей покупателей [url=http://1.235.32.108/doku.php?id=%20%D0%A3%D0%BF%D0%B0%D0%BA%D0%BE%D0%B2%D0%BA%D0%B0%20%D0%B4%D0%BB%D1%8F%20%D0%BF%D0%B8%D1%89%D0%B5%D0%B2%D0%BE%D0%B9%20%D0%BF%D1%80%D0%BE%D0%BC%D1%8B%D1%88%D0%BB%D0%B5%D0%BD%D0%BD%D0%BE%D1%81%D1%82%D0%B8:%20%D0%BE%D1%81%D0%BE%D0%B1%D0%B5%D0%BD%D0%BD%D0%BE%D1%81%D1%82%D0%B8%20%D0%B8%20%D1%82%D1%80%D0%B5%D0%B1%D0%BE%D0%B2%D0%B0%D0%BD%D0%B8%D1%8F]http://1.235.32.108/doku.php?id=%20%D0%A3%D0%BF%D0%B0%D0%BA%D0%BE%D0%B2%D0%BA%D0%B0%20%D0%B4%D0%BB%D1%8F%20%D0%BF%D0%B8%D1%89%D0%B5%D0%B2%D0%BE%D0%B9%20%D0%BF%D1%80%D0%BE%D0%BC%D1%8B%D1%88%D0%BB%D0%B5%D0%BD%D0%BD%D0%BE%D1%81%D1%82%D0%B8:%20%D0%BE%D1%81%D0%BE%D0%B1%D0%B5%D0%BD%D0%BD%D0%BE%D1%81%D1%82%D0%B8%20%D0%B8%20%D1%82%D1%80%D0%B5%D0%B1%D0%BE%D0%B2%D0%B0%D0%BD%D0%B8%D1%8F[/url]
best ed pills: non prescription erection pills – buy ed pills
Интересные факты о применении смазочно-охлаждающих жидкостей, о которых нужно знать, для продления срока службы машин, для поддержания высокой производительности авто, Почему важно регулярно менять смазочно-охлаждающие жидкости?, Секреты правильного хранения смазочно-охлаждающих жидкостей, Секреты изготовления качественных смазочно-охлаждающих жидкостей, Мифы и правда о смазочно-охлаждающих жидкостях, для более грамотного подхода к уходу за механизмами, для профессионалов, заботящихся о состоянии механизмов, для предотвращения поломок и неожиданных поломок, которые нужно знать, чтобы избежать проблем с машиной, Полезные советы по организации
смазочно охлаждающие жидкости [url=https://msk-smazochno-ohlazhdayushchie-zhidkosti.ru/]смазочно охлаждающие жидкости[/url] .
Официальное получение диплома техникума с упрощенным обучением в Москве
man-diploms.ru
reputable indian online pharmacy: buy medicines online in india – indian pharmacies safe
rgbet
RGBET là nhà cung cấp trò chơi bắn cá và cá mập nổi tiếng trực tuyến, đặc biệt qua ứng dụng RG Game Bắn Cá Online. Trải nghiệm trò chơi không chỉ đơn thuần là săn cá mà còn bao gồm các cuộc phiêu lưu đa dạng qua các địa điểm và sự kiện đặc sắc, mang đến niềm vui và thử thách kỹ năng cho người chơi.
Giới Thiệu về RG Game Bắn Cá Online
RG Game không chỉ cung cấp các trò bắn cá thông thường mà còn đi kèm với nhiều cấp độ và phần thưởng hấp dẫn. Người chơi có thể nâng cấp cá mập của mình để trở nên mạnh mẽ hơn, nhanh hơn, và có khả năng săn bắt những loài cá lớn hơn.
Các Đặc Điểm Nổi Bật của Trò Chơi
Nâng cấp Cá Mập: Người chơi có thể chọn từ 8 loại cá mập khác nhau, từ cá mập nhỏ đến các loại lớn như Cá Mập Trắng Lớn, Megalodon, và Cá Mập Voi.
Khám Phá Các Địa Điểm Mới: Trải nghiệm trò chơi qua nhiều địa điểm khác nhau với các loài cá đa dạng, các phụ kiện độc đáo, và khả năng di chuyển tự do trong đại dương.
Nhiệm Vụ và Trùm Đặc Biệt: Hoàn thành các nhiệm vụ với các trận đấu trùm và các sự kiện trực tiếp như Mega Gold Rush và các bầy cá lớn.
Hướng Dẫn Tải và Hỗ Trợ
Ứng dụng có sẵn để tải về từ RGBET, nơi người chơi có thể liên hệ qua các kênh hỗ trợ như Telegram, Zalo, và Facebook.
RGBET cam kết mang đến trải nghiệm bắn cá và săn mồi dưới nước tuyệt vời, cho phép người chơi khám phá biển cả với đồ họa 3D tuyệt đẹp và các thử thách mới đầy hứng thú.
RGBET là nhà cái hàng đầu trong lĩnh vực cá cược trực tuyến, đem đến cho người chơi tại Việt Nam trải nghiệm giải trí đẳng cấp với nhiều lựa chọn hấp dẫn. RGBET không chỉ cung cấp các môn thể thao phổ biến như bóng đá, bóng rổ, hay quần vợt mà còn mở rộng với các trò chơi sòng bạc, xổ số và đặc biệt là cá cược eSports.
Lưu Ý Quan Trọng về Trang RGBET
Hiện nay, một số trang web giả mạo RGBET nhằm mục đích lừa đảo, gây rủi ro cho người chơi. Đặc biệt, trang rgbet.info không có liên kết chính thức với RGBET. Để bảo vệ thông tin cá nhân, khách hàng nên truy cập trang chính thức của RGBET tại rgbet.co và tránh các nguồn không uy tín.
Lợi Ích Khi Tham Gia RGBET
RGBET cung cấp rất nhiều chương trình khuyến mãi hấp dẫn dành cho người chơi, đặc biệt trong tháng 10 với chương trình “Mỗi Ngày Đăng Nhập, Nhận Ngay Quà Hot”. Ngoài ra, RGBET hỗ trợ nhiều tính năng cá cược thể thao trực tiếp với tỷ lệ cược hấp dẫn, giúp người chơi tận hưởng trọn vẹn từng trận đấu.
Đa Dạng Lựa Chọn Cá Cược và Trò Chơi Sòng Bạc
Sòng bạc trực tuyến: Bao gồm các trò chơi phổ biến như Baccarat, Roulette, và Blackjack.
Thể thao ảo và eSports: Người chơi có thể đặt cược các giải đấu lớn và thỏa sức với trò chơi thể thao ảo.
Trò chơi máy đánh bạc: Với hàng loạt trò chơi máy đánh bạc chủ đề như “Kho Báu Aztec” hay “Aladdin & Cây Đèn Thần,” RGBET đáp ứng nhu cầu giải trí đa dạng của người chơi.
Bảo Mật và Pháp Lý
RGBET là một trong số ít các nhà cái được cấp phép bởi cơ quan quản lý uy tín, đảm bảo tiêu chuẩn bảo mật và minh bạch.
Tham gia RGBET ngay để khám phá thế giới cá cược trực tuyến chuyên nghiệp và bảo đảm!
Makes sense to me.
Every weekend i used to pay a quick visit this web site, because i wish for enjoyment, as this this website conations genuinely good funny stuff too.
indian pharmacy: india online pharmacy – india pharmacy mail order
I was suggested this website by my cousin. I am not sure whether this post is written by him as no one else know such detailed about my difficulty. You are wonderful! Thanks!
[url=https://bounouyassinear.biz]http://bounouyassinear.biz[/url]
last news about bounou yassine
https://www.bounouyassinear.biz
Как избежать рисков при покупке диплома колледжа или ПТУ в России
batirafrica.blog4ever.com/forum
[url=https://bounou-yassine-ar.biz]bounou-yassine-ar.biz[/url]
last news about bounou yassine
http://bounou-yassine-ar.biz
rgbet
RGBET – Hướng Dẫn Truy Cập Nhà Cái RGBet Chính Thức Mới Nhất 2024
Cảnh Báo Về Các Trang Web Giả Mạo RGBET.INFO
Kính gửi quý khách hàng và người dùng thân mến,
Chúng tôi, đại diện chính thức của [rgbet.co], muốn thông báo về một số trang web giả mạo, đặc biệt là rgbet.info, đang mạo danh RGBet nhằm đánh lừa người dùng. Chúng tôi khẳng định rằng rgbet.info không có bất kỳ liên kết nào với RGBet chính thức, và việc truy cập vào các trang này có thể gây nguy cơ cho thông tin cá nhân cũng như tài khoản của bạn.
Việc giả mạo thương hiệu RGBet đã ảnh hưởng không nhỏ đến uy tín của chúng tôi và tiềm ẩn nguy cơ cho khách hàng. Những trang web này thường sẽ yêu cầu người dùng cung cấp thông tin nhạy cảm như số tài khoản ngân hàng, mật khẩu, hoặc các thông tin cá nhân khác, dễ dẫn đến mất mát tài sản hoặc dữ liệu cá nhân.
Cách Nhận Biết Liên Kết Chính Thức Của RGBet
Để đảm bảo sự an toàn tuyệt đối khi tham gia RGBet, khách hàng nên xác nhận rằng mình chỉ đang truy cập trang web RGBet thông qua liên kết chính thức tại [rgbet.co]. Đây là kênh duy nhất mà RGBet cung cấp để đảm bảo tính bảo mật, an toàn cho người dùng và tránh những rủi ro không đáng có. RGBet không bao giờ chuyển hướng người dùng đến trang web bên thứ ba như da88 hoặc các trang tương tự, và chúng tôi khuyến cáo bạn không nên tin tưởng những trang này.
Hướng Dẫn Và Hỗ Trợ Chính Thức Từ RGBet
RGBet luôn cố gắng hỗ trợ tốt nhất cho khách hàng thông qua các kênh liên lạc chính thức. Mọi thắc mắc, yêu cầu hỗ trợ hoặc vấn đề gặp phải khi truy cập có thể được giải đáp bởi đội ngũ hỗ trợ của chúng tôi. Vui lòng chỉ liên hệ thông qua các phương thức chính thức tại [rgbet.co] để đảm bảo thông tin được bảo mật.
Kính mong quý khách hàng luôn cảnh giác và lựa chọn RGBet một cách an toàn và thông minh để có trải nghiệm tuyệt vời nhất.
Trân trọng,
Đại Diện RGBet
[url=https://cristianoronaldoae.biz]http://www.cristianoronaldoae.biz[/url]
last news about cristiano ronaldo
http://www.cristianoronaldoae.biz
[url=https://cristianoronaldo-ae.biz]https://cristianoronaldo-ae.biz[/url]
last news about cristiano ronaldo
https://www.cristianoronaldo-ae.biz
выведение из запоя на дому спб цены [url=http://www.vyvod-iz-zapoya-v-sankt-peterburge15.ru]выведение из запоя на дому спб цены[/url] .
[url=https://cristiano-ronaldo-ae.biz]cristiano-ronaldo-ae.biz[/url]
last news about cristiano ronaldo
http://cristiano-ronaldo-ae.biz
выведение из запоя спб [url=https://azithromycinum.ru/]выведение из запоя спб [/url] .
I know this is not exactly on topic, but i have a blog using the blogengine platform as well and i’m having issues with my comments displaying. is there a setting i am forgetting? maybe you could help me out? thank you.
Cometa Casino предлагает уникальный игровой опыт, созданный специально для российских игроков. Здесь вы найдете широкий выбор слотов, настольных игр и живого казино, привлекательные бонусы для новых и постоянных пользователей, а также удобные способы пополнения и вывода средств [url=https://optimus-m.ru/]комета казино телеграм[/url]
купить диплом в салавате [url=https://arusak-diploms.ru/]arusak-diploms.ru[/url] .
mexican pharmaceuticals online: best online pharmacies in mexico – buying prescription drugs in mexico
Cometa Casino предлагает уникальный игровой опыт, созданный специально для российских игроков. Здесь вы найдете широкий выбор слотов, настольных игр и живого казино, привлекательные бонусы для новых и постоянных пользователей, а также удобные способы пополнения и вывода средств [url=https://gribkoz.ru/]https://gribkoz.ru/[/url]
With this issue, it’s important to have someone like you with something to say that really matters.
Все бонус коды, промокоды и купоны от онлайн казино Daddy, активные на сегодняшний день как для новых, так и для существующих игроков: бездепозитные [url=http://daddy-casino-king.ru/]daddy casino официальный сайт вход[/url]
purple pharmacy mexico price list: mexican pharmaceuticals online – medication from mexico pharmacy
[url=][/url]
Временная регистрация в Москве: Быстро и Легально!
Ищете, где оформить временную регистрацию в Москве? Мы гарантируем быстрое и легальное оформление без очередей и лишних документов. Ваше спокойствие – наша забота!
Минимум усилий • Максимум удобства • Полная легальность
Свяжитесь с нами прямо сейчас!
[url=https://мосрегистрация77.рф/].[/url]
[url=][/url]
RGBET – Hướng Dẫn Truy Cập Nhà Cái RGBet Chính Thức Mới Nhất 2024
Cảnh Báo Về Các Trang Web Giả Mạo RGBET.INFO
Kính gửi quý khách hàng và người dùng thân mến,
Chúng tôi, đại diện chính thức của [rgbet.co], muốn thông báo về một số trang web giả mạo, đặc biệt là rgbet.info, đang mạo danh RGBet nhằm đánh lừa người dùng. Chúng tôi khẳng định rằng rgbet.info không có bất kỳ liên kết nào với RGBet chính thức, và việc truy cập vào các trang này có thể gây nguy cơ cho thông tin cá nhân cũng như tài khoản của bạn.
Việc giả mạo thương hiệu RGBet đã ảnh hưởng không nhỏ đến uy tín của chúng tôi và tiềm ẩn nguy cơ cho khách hàng. Những trang web này thường sẽ yêu cầu người dùng cung cấp thông tin nhạy cảm như số tài khoản ngân hàng, mật khẩu, hoặc các thông tin cá nhân khác, dễ dẫn đến mất mát tài sản hoặc dữ liệu cá nhân.
Cách Nhận Biết Liên Kết Chính Thức Của RGBet
Để đảm bảo sự an toàn tuyệt đối khi tham gia RGBet, khách hàng nên xác nhận rằng mình chỉ đang truy cập trang web RGBet thông qua liên kết chính thức tại [rgbet.co]. Đây là kênh duy nhất mà RGBet cung cấp để đảm bảo tính bảo mật, an toàn cho người dùng và tránh những rủi ro không đáng có. RGBet không bao giờ chuyển hướng người dùng đến trang web bên thứ ba như da88 hoặc các trang tương tự, và chúng tôi khuyến cáo bạn không nên tin tưởng những trang này.
Hướng Dẫn Và Hỗ Trợ Chính Thức Từ RGBet
RGBet luôn cố gắng hỗ trợ tốt nhất cho khách hàng thông qua các kênh liên lạc chính thức. Mọi thắc mắc, yêu cầu hỗ trợ hoặc vấn đề gặp phải khi truy cập có thể được giải đáp bởi đội ngũ hỗ trợ của chúng tôi. Vui lòng chỉ liên hệ thông qua các phương thức chính thức tại [rgbet.co] để đảm bảo thông tin được bảo mật.
Kính mong quý khách hàng luôn cảnh giác và lựa chọn RGBet một cách an toàn và thông minh để có trải nghiệm tuyệt vời nhất.
Trân trọng,
Đại Diện RGBet
[url=https://messi-lionel-ae.biz]http://www.messi-lionel-ae.biz[/url]
last news about messi lionel
https://messi-lionel-ae.biz
[url=https://lionelmessi-ae.biz]http://www.lionelmessi-ae.biz[/url]
last news about lionel messi
http://lionelmessi-ae.biz
Игровой азартный клуб Gama casino работает по лицензии Кюрасао и принимает денежные ставки у игроков из большинства стран мира [url=https://marshrut74.ru/]казино gamma[/url]
mexico drug stores pharmacies: mexican online pharmacies prescription drugs – purple pharmacy mexico price list
[url=https://ronaldo-cristiano-ae.biz/]www.ronaldo-cristiano-ae.biz[/url]
last news about ronaldo cristiano
http://www.ronaldo-cristiano-ae.biz
Игровой азартный клуб Gama casino работает по лицензии Кюрасао и принимает денежные ставки у игроков из большинства стран мира [url=https://modelistov.ru/]казино gama[/url]
[url=https://ronaldocristiano-ae.biz]https://www.ronaldocristiano-ae.biz[/url]
last news about ronaldo cristiano
https://ronaldocristiano-ae.biz
Профессиональный сервисный центр по ремонту Apple iPhone в Москве.
Мы предлагаем: качественный ремонт айфонов в москве
Наши мастера оперативно устранят неисправности вашего устройства в сервисе или с выездом на дом!
выведение из запоя спб [url=https://www.vyvod-iz-zapoya-v-sankt-peterburge17.ru]выведение из запоя спб [/url] .
вывод из запоя на дому [url=https://vyvod-iz-zapoya-v-sankt-peterburge18.ru]вывод из запоя на дому[/url] .
вывод из запоя капельница [url=http://vyvod-iz-zapoya-v-sankt-peterburge16.ru/]вывод из запоя капельница [/url] .
Online medicine home delivery: best online pharmacy india – best online pharmacy india
[url=https://lionel-messi-ae.biz]http://lionel-messi-ae.biz[/url]
last news about lionel messi
https://www.lionel-messi-ae.biz
Vous pouvez les contacter via chat en direct ou par e-mail pour obtenir une assistance en cas de besoin.
Вложитесь в прибыльный бизнес с минимальными рисками – https://expertremonta.kz/franchise
https://pinup-az.bid/# pin up
pin up win
Франшиза ремонта для тех, кто готов к успеху – https://expertremonta.kz/franchise
пин ап кз: пины – Пин Ап Казахстан
A colleague in the field told me to check out your website.
sweet bonanza nas?l oynan?r [url=http://sweetbonanzatr.pro/#]sweet bonanza tr[/url] sweet bonanza oyna
Hello, I think your blog might be having browser compatibility issues. When I look at your website in Chrome, it looks fine but when opening in Internet Explorer, it has some overlapping. I just wanted to give you a quick heads up! Other than that, awesome blog!
Свежие и смешные видео http://shutki-anekdoty.ru/videos.
Great info! Keep post great articles.
What i discover troublesome is to find a weblog that may capture me for a minute however your blog is different. Bravo.
бытовки шушары продажа бытовок
строительство бытовок под ключ завод бытовок
Высококачественный ремонт под ключ с вниманием к каждой детали – https://expertremonta.kz/ уже 12 лет предоставляет услуги по ремонту квартир
Ремонт под ключ от мастеров, которые знают, как создать уют – https://expertremonta.kz/ уже 12 лет предоставляет услуги по ремонту квартир
купить диплом в липецке [url=https://landik-diploms.ru/]landik-diploms.ru[/url] .
Всё, что нужно знать о покупке аттестата о среднем образовании без рисков
????56
Веселые мемы http://shutki-anekdoty.ru/kartinki-prikolnye.
ทดลองเล่นสล็อต PG: รับรู้ประสบการณ์เกมหมุนวงล้อออนไลน์แบบสดใหม่
ก่อนลงมือเล่นเกมสล็อตออนไลน์ ข้อสำคัญคือการทำความรู้จักกับการทดสอบเล่นเสียล่วงหน้า เกมสล็อต ทดลองเล่นสล๊อตนั้นได้รับอิทธิพลมาจากจากเครื่องสล็อตแบบดั้งเดิม โดยเฉพาะเจาะจงอย่างยิ่ง สล็อตสามทองคำ ที่ในอดีตเคยเป็นที่แพร่หลายอย่างมากในคาสิโนต่างชาติ ในเกม ลองเล่นสล็อต พีจี ผู้เล่นจะได้มีประสบการณ์กับโครงสร้างของเกมการเล่นที่มีความเรียบง่ายและคลาสสิก มาพร้อมกับวงล้อ (Reel) จำนวน5แถวและเส้นการจ่าย (Payline) หรือแนวทางการชนะที่มากถึง 15 รูปแบบ ทำให้มีโอกาสชนะได้หลากหลายมากขึ้นไป
สัญลักษณ์ต่าง ๆ ในเกมนี้นี้ให้ความรู้สึกถึงอารมณ์ร่วมของสล็อตเก่า โดยมีไอคอนที่โด่งดังเช่น รูปเชอร์รี่ เลข 7 และเพชรพลอย ซึ่งจะทำให้ตัวเกมน่าดึงดูดแล้วยังเพิ่มโอกาสในการสร้างรายได้อีกด้วย
ความคล่องตัวของเกมสล็อต PG
ทดลองเล่นสล็อต PG นั้นไม่ใช่แค่มีวิธีการการเล่นที่เข้าใจง่าย แต่ยังมีความสะดวกสบายอย่างยิ่ง ไม่ว่าจะเข้าถึงจากเครื่องคอมพิวเตอร์หรือโทรศัพท์มือถือรุ่นอะไรก็ได้ เพียงแค่ต่อเชื่อมอินเทอร์เน็ต คุณก็สามารถเข้าร่วมเล่นได้ทันที ลองเล่น PG ยังถูกทำมาให้เหมาะสมกับเครื่องใช้หลากหลายลักษณะ เพื่อมอบประสบการณ์การเล่นที่ราบรื่นไม่สะดุดแก่ผู้ใช้งานทุกคน
การเลือกแบบเกมและการเล่นในเกม
ที่สำคัญ เกมทดลองเล่น PG ยังมีหลากหลายธีมให้สนุกกับ ไม่ว่าจะเป็นธีมที่น่าสนใจ น่าเอ็นดู หรือธีมที่มีความเหมือนจริง ทำให้ผู้เล่นสามารถสนุกสนานไปกับรูปแบบต่าง ๆตามรสนิยม
ด้วยคุณสมบัติทั้งหมดนี้ เกมทดลองเล่น พีจี ได้เป็นที่นิยมตัวเลือกที่นิยมในหมู่ผู้เล่นเกมออนไลน์ที่กำลังต้องการการเล่นที่ตื่นเต้นใหม่ ๆและการชนะที่ง่ายดายขึ้น หากคุณกำลังมองหาความแปลกใหม่ การลองเล่นสล็อตเป็นตัวเลือกที่คุณไม่ควรมองข้าม!
Recevez un bonus de 30% sur tous vos dépôts effectués entre 17h et 23h59.
Прикольные видеоролики http://shutki-anekdoty.ru/videos.
neon 56
I am curious to find out what blog platform you happen to be working with?
I’m experiencing some small security issues with my latest website and I’d like to find something more safeguarded.
Do you have any suggestions?
recusa de credito
pin up azerbaycan: pin up 306 – pin up
I will share you blog with my sis.
Официальное получение диплома техникума с упрощенным обучением в Москве
They have super favorable conditions for quickly collecting a lot of money [url=https://www.bitsdujour.com/profiles/A3JjXh]https://www.bitsdujour.com/profiles/A3JjXh[/url]
They have super favorable conditions for quickly collecting a lot of money [url=http://alhambra.bestforums.org/viewtopic.php?f=2&t=44437]http://alhambra.bestforums.org/viewtopic.php?f=2&t=44437[/url]
1win login
Профессия QA-инженера: задачи на разных этапах разработки, навыки и необходимые знания для работы в сфере тестирования качества программного продукта https://dzen.ru/a/ZvqB94uwl1C-1ivx?share_to=link
бизнес план цветочного магазина с расчетами [url=https://mos-roza.ru/]бизнес план цветочного магазина с расчетами[/url] .
бизнес план цветочного магазина конкуренты [url=cvety-i-bukety.ru]cvety-i-bukety.ru[/url] .
sweet bonanza oyna: sweetbonanzatr.pro – sweet bonanza
I dont think Ive caught all the angles of this subject the way youve pointed them out. Youre a true star, a rock star man. Youve got so much to say and know so much about the subject that I think you should just teach a class about it
digital маркетинговое агентство [url=https://www.marketing99.ru]https://www.marketing99.ru[/url] .
бизнес план для цветочного магазина пример готовый с расчетами [url=https://cvetov-ray.ru/]https://cvetov-ray.ru/[/url] .
Как купить аттестат 11 класса с официальным упрощенным обучением в Москве
git.fuwafuwa.moe/thomasshaw9688/My-List/issues/new
снять ломку наркозависимого [url=http://www.snyatie-lomki-narkolog14.ru]http://www.snyatie-lomki-narkolog14.ru[/url] .
vavada bonus
pin up 306: pinup – pin up
prometrium 100mg drug – ponstel cost purchase fertomid generic
[url=][/url]
Временная регистрация в Москве: Быстро и Легально!
Ищете, где оформить временную регистрацию в Москве? Мы гарантируем быстрое и легальное оформление без очередей и лишних документов. Ваше спокойствие – наша забота!
Минимум усилий • Максимум удобства • Полная легальность
Свяжитесь с нами прямо сейчас!
[url=https://regm7921.ru/].[/url]
[url=][/url]
http://sweetbonanzatr.pro/# sweet bonanza
Свежие и смешные видео https://sites.google.com/view/smeshnye-video/%D0%B3%D0%BB%D0%B0%D0%B2%D0%BD%D0%B0%D1%8F-%D1%81%D1%82%D1%80%D0%B0%D0%BD%D0%B8%D1%86%D0%B0.
Что важно знать о видах тестирования программ, сайтов и приложений, чтобы пройти собеседование на позицию тестировщика или QA-инженера в IT-компанию https://vc.ru/u/3791103-studiya-zr/1427036-voprosy-pro-vidy-testirovaniya-na-sobesedovanii-v-qa-kak-k-nim-otnositsya
Веселые приколы http://shutki-anekdoty.ru/.
бонусы пин ап: Пин Ап Казино Официальный Сайт в России – бонусы пин ап
sweetbonanzatrpro: sweet bonanza tr – sweet bonanza nas?l oynan?r
Лучший сервис доставки цветов в Нижнем Новгороде, надежно и качественно.
Доставка цветов в Нижнем Новгороде откроет мир нежности и красоты, порадуйте себя и других прекрасными цветами.
Лучший выбор цветов на доставку в Нижнем Новгороде, принимаем ваш заказ.
Создайте удивительный подарок с доставкой цветов в Нижнем Новгороде, доставляем красоту прямо к вам домой.
Устроим цветочный феерверк в Нижнем Новгороде, подарите эмоции и восхищение.
Подарите радость с доставкой цветов в Нижнем Новгороде, реализуем ваши желания.
Удивите близких невероятной доставкой цветов в Нижнем Новгороде, заказывайте цветы прямо сейчас.
Подарите радость с помощью доставки цветов в Нижнем Новгороде, выбирайте лучший сервис.
Осуществим мечту о цветах в Нижнем Новгороде, сделайте заказ у нас.
доставка цветов по нижнему новгороду [url=https://dostavka-cvetov-nizhnij-novgorod.ru/]доставка цветов по нижнему новгороду[/url] .
neon54 casino promo code
https://biznes-fabrika.kz/# Пин Ап Казахстан
pin up win
Pour commencer, Mega Moolah et Mega Moolah Isis valent régulièrement quelques millions de dollars.
What i do not realize is if truth be told how you’re not actually a lot more smartly-appreciated than you might be now.
You’re so intelligent. You recognize therefore significantly when it comes
to this subject, produced me in my opinion believe it from so many various angles.
Its like men and women aren’t fascinated except it is one thing to accomplish with Lady gaga!
Your own stuffs great. Always take care of it up!
sweet bonanza tr [url=https://sweetbonanzatr.pro/#]sweetbonanzatr.pro[/url] sweet bonanza
1win casino
pin-up casino giris: pinup az – pinup-az bid
hiI like your writing so much share we be in contact more approximately your article on AOL I need a specialist in this area to resolve my problem Maybe that is you Looking ahead to see you
pin up kz: пин ап 634 – Пин Ап Казино Официальный Сайт
Truly when someone doesn’t know after that
its up to other people that they will help,
so here it happens.
Kraken гарантирует постоянный и стабильный доступ к своему ресурсу через официальные ссылки. У вас под рукой всегда будет актуальная информация по поводу ресурса https://kra12.ca
пинко: pin up zerkalo – pin up zerkalo
купить диплом о среднем образовании в саратове [url=https://landik-diploms.ru/]купить диплом о среднем образовании в саратове[/url] .
Веселые видеоролики https://sites.google.com/view/smeshnye-video/%D0%B3%D0%BB%D0%B0%D0%B2%D0%BD%D0%B0%D1%8F-%D1%81%D1%82%D1%80%D0%B0%D0%BD%D0%B8%D1%86%D0%B0.
pinup: pin up azerbaycan – pin up 306
Веселые приколы http://shutki-anekdoty.ru.
Сервисный центр предлагает ремонт dexp ursus p110 3g ремонт dexp ursus p110 3g
Its wonderful as your other blog posts : D, regards for putting up.
Very Interesting Information! Thank You For Thi Information!
Excellent article!! I am an avid reader of your website:D keep on posting that good content. and I’ll be a regular visitor for a very long time!!
Официальный Сайт: пинко – пин ап казино
Hello! I could have sworn I’ve visited this site before but after browsing through a few of the posts I realized it’s new to me. Nonetheless, I’m certainly happy I discovered it and I’ll be book-marking it and checking back frequently.
Профессиональная служба эвакуации автомобилей, предоставляющая круглосуточную помощь эвакуаторов в любой непредвиденной ситуации — будь то поломка, авария или необходимость перевозки вашего авто [url=https://kulturologia.ru/news/7154/]https://kulturologia.ru/news/7154/[/url]
How come you do not have your website viewable in mobile format? cant see anything in my Droid.
Профессиональная служба эвакуации автомобилей, предоставляющая круглосуточную помощь эвакуаторов в любой непредвиденной ситуации — будь то поломка, авария или необходимость перевозки вашего авто [url=https://pg11.ru/voditeli-stali-chashe-polzovatsya-uslugami-evakuatorov]https://pg11.ru/voditeli-stali-chashe-polzovatsya-uslugami-evakuatorov[/url]
Как приобрести аттестат о среднем образовании в Москве и других городах
israelafrica.mn.co/posts/69577251
быстрый вывод из запоя в стационаре [url=https://vyvod-iz-zapoya-v-stacionare-voronezh16.ru/]быстрый вывод из запоя в стационаре[/url] .
Сколько стоит диплом высшего и среднего образования и как его получить?
Пин Ап Казино Официальный Сайт: пинап – Пин Ап Казино Официальный Сайт
Можно ли быстро купить диплом старого образца и в чем подвох?
kingcityrp.moibb.ru/viewtopic.php?f=34&t=679
When I initially left a comment I appear to have clicked on the -Notify me when new comments are added- checkbox and from now on every time a comment is added I get 4 emails with the same comment. There has to be a way you can remove me from that service? Kudos.
вывод из запоя нижний новгород [url=vyvod-iz-zapoya-v-stacionare15.ru]вывод из запоя нижний новгород[/url] .
вывод из запоя нижний [url=http://vyvod-iz-zapoya-v-stacionare14.ru/]вывод из запоя нижний[/url] .
I loved your idea there, I tell you blogs are so exciting sometimes like looking into people’s private life’s and work. Every new remark wonderful in its own right.
I’m not sure where you’re getting your information, but great topic.
I needs to spend some time learning much more or understanding more.
Thanks for great info I was looking for this information for my
mission.
I am very happy to look your post. Thanks a lot and i am taking a look ahead to touch you.
Мы эвакуируем легковые и грузовые автомобили, мотоциклы и другие виды техники. Услуги эвакуации оказывают профессиональные водители, которые выезжают в любой непредвиденной ситуации — будь то поломка, авария или необходимость перевозки вашего авто [url=http://paolarios.com/el-yoga-mi-filosofia-de-vida/#comment-17548]http://paolarios.com/el-yoga-mi-filosofia-de-vida/#comment-17548[/url]
Мы эвакуируем легковые и грузовые автомобили, мотоциклы и другие виды техники. Услуги эвакуации оказывают профессиональные водители, которые выезжают в любой непредвиденной ситуации — будь то поломка, авария или необходимость перевозки вашего авто [url=https://cheretcreatives.com/finding-your-way/#comment-9717]https://cheretcreatives.com/finding-your-way/#comment-9717[/url]
Сервисный центр предлагает ремонт сушильной машины weissgauff ремонт сушильной машины weissgauff адреса
купить диплом ссср в омске [url=https://russa-diploms.ru/]russa-diploms.ru[/url] .
Смешные анекдоты https://sites.google.com/view/smeshnye-video/anekdoty
前往 Telegram 官方网站,选择适合的操作系统(如 Windows、macOS、Android、iOS 等),并下载应用程序。
前往 Telegram 官方网站,选择适合的操作系统(如 Windows、macOS、Android、iOS 等),并下载应用程序。纸飞机中文
I know this is not exactly on topic, but i have a blog using the blogengine platform as well and i’m having issues with my comments displaying. is there a setting i am forgetting? maybe you could help me out? thank you.
анонимный вывод из запоя в стационаре [url=https://vyvod-iz-zapoya-v-stacionare-samara15.ru/]https://vyvod-iz-zapoya-v-stacionare-samara15.ru/[/url] .
buy capecitabine medication – buy generic ponstel for sale buy danocrine generic
Hi there, yeah this piece of writing is genuinely good and I have learned lot of things from it concerning blogging.
thanks.
Decouvrez notre selection de
Couteau a desosser
a ajouter a votre arsenal culinaire
nicee content keep writing
Онлайн магазин игр. Купить лицензионные ключи для компьютерных игр, ключи и аккаунты Steam, Origin, Uplay, Minecraft [url=https://amelie-style.ru/gde-vygodno-kupit-klyuchi-ot-igr-steam.html]аккаунты стим[/url]
Свежие анекдоты http://shutki-anekdoty.ru/anekdoty
[url=https://volna-casino-apk.ru/volna-apk/]http://volna-casino-apk.ru/volna-apk/[/url]
Скачать последнюю версию приложения онлайн казино Волна – выигрывай сегодня!
http://volna-casino-apk.ru/volna-apk/
[url=https://volna-casino-apk.ru/volna-casino/]https://www.volna-casino-apk.ru/volna-casino/[/url]
Скачать apk файл казино Волна – выигрывай прямо сейчас!
https://www.volna-casino-apk.ru/volna-casino/
Приобретение диплома ПТУ с сокращенной программой обучения в Москве
[url=https://volna-casino-apk.ru]http://volna-casino-apk.ru[/url]
Установить приложение казино Волна – выигрывай сейчас!
https://www.volna-casino-apk.ru
Pretty! This has been an incredibly wonderful article.
Thank you for supplying this info.
капельницы от запоя [url=https://kapelnica-ot-zapoya-kolomna14.ru/]капельницы от запоя[/url] .
same-day delivery: gabapentin pro – Neurontin online
[url=https://volna-casino-apk.ru/volna-oficzialnyj-sajt/]https://www.volna-casino-apk.ru/volna-oficzialnyj-sajt/[/url]
Скачать apk файл онлайн казино Volna – играй прямо сейчас!
http://www.volna-casino-apk.ru/volna-oficzialnyj-sajt/
Прикольные анекдоты https://sites.google.com/view/smeshnye-video/anekdoty
Технически это просто звонки через интернет. Достаточно давно некоторые мессенджеры предлагали подобное. Но в большинстве случаемв там работали только исходящие звонки [url=https://angelsband.by/interesnoe/vliyanie-virtualnyh-nomerov-na-povsednevnuyu-zhizn.html]https://angelsband.by/interesnoe/vliyanie-virtualnyh-nomerov-na-povsednevnuyu-zhizn.html[/url]
Технически это просто звонки через интернет. Достаточно давно некоторые мессенджеры предлагали подобное. Но в большинстве случаемв там работали только исходящие звонки [url=https://www.tech-exclusive.com/revolutionizing-communication-and-power-of-egypts-virtual-numbers-in-the-digital-age/]https://www.tech-exclusive.com/revolutionizing-communication-and-power-of-egypts-virtual-numbers-in-the-digital-age/[/url]
안 된다면 인스타와 페매니챗이스북 연결이 잘 되어매니챗있는지 확인하고 또는 매니챗연결이
[url=https://volna-casino-apk.ru/volna-na-androjd/]http://volna-casino-apk.ru/volna-na-androjd/[/url]
Скачать apk файл онлайн казино Volna – побеждай сейчас!
https://www.volna-casino-apk.ru/volna-na-androjd/
Сервисный центр предлагает мастер по ремонту кондиционера hisense починка кондиционеров hisense
You made some really good points there. I checked on the net for more info about the issue and found most people will go along with your views on this web site.
Lovely just what I was looking for. Thanks to the author for taking his clock time on this one.
Compare Prices: buy amoxil online – amoxil online
Descubre los aspectos mas personales de Sergio Ramos | Descubre la vida fuera de las canchas de Sergio Ramos | Explora el impacto de Ramos en el PSG y sus contribuciones | Explora los partidos iconicos de Ramos con Sevilla y Madrid | Descubre el viaje de Ramos desde Sevilla hasta los grandes clubes | Conoce la biografia completa de Sergio Ramos y sus logros | Informate sobre el salario y las ganancias de Ramos | Informate sobre el perfil completo de Ramos en EA FC | Descubre los aspectos personales y profesionales de Ramos, historia de Sergio Ramos [url=http://sergio-ramos-es.org]Historia de Ramos[/url].
можно ли работать с купленным дипломом [url=https://arusak-diploms.ru/]arusak-diploms.ru[/url] .
какие капельницы от запоя [url=http://kapelnica-ot-zapoya-kolomna16.ru/]какие капельницы от запоя[/url] .
наркологическая скорая бесплатная [url=www.dexamethazon.ru]наркологическая скорая бесплатная [/url] .
капельница от запоя коломна [url=https://www.kapelnica-ot-zapoya-kolomna15.ru]капельница от запоя коломна [/url] .
платная наркологическая скорая помощь [url=https://skoraya-narkologicheskaya-pomoshch-moskva.ru/]https://skoraya-narkologicheskaya-pomoshch-moskva.ru/[/url] .
Виртуальный номер — это обычный номер телефона с такими дополнительными преимуществами, как многоканальность и отсутствие географической привязки [url=https://art-assorty.ru/89224-virtualnyj-nomer-dlya-registracii-v-socialnyx-setyax.html]https://art-assorty.ru/89224-virtualnyj-nomer-dlya-registracii-v-socialnyx-setyax.html[/url]
скорая наркологическая помощь круглосуточно [url=https://skoraya-narkologicheskaya-pomoshch-moskva11.ru/]https://skoraya-narkologicheskaya-pomoshch-moskva11.ru/[/url] .
Most often since i look for a blog Document realize that the vast majority of blog pages happen to be amateurish. Not so,We can honestly claim for which you writen is definitely great and then your webpage rock solid.
техническая поддержка и продвижение сайта продвижение веб сайтов
Rybelsus: Patient Portal – Patient Portal
Keep up the amazing work! Can’t wait to see what you have in store for us next.
Сайт приколов http://humor-kartinki.ru собрание лучших мемов, шуток и смешных видео, чтобы ваш день был ярче. Ежедневное обновление контента для вашего настроения. Легко находите и делитесь забавными моментами с друзьями.
Just what I needed to know thank you for this.
Как официально купить диплом вуза с упрощенным обучением в Москве
You are a very smart person! 🙂
amoxil price: cheap – shop
Good post. I study something more difficult on different blogs everyday. It’s going to always be stimulating to learn content material from other writers and observe a little bit one thing from their store. I’d prefer to use some with the content material on my blog whether you don’t mind. Natually I’ll give you a link in your web blog. Thanks for sharing.
I have been surfing online more than 3 hours today, yet I never found any interesting article like yours.
It is pretty worth enough for me. In my view, if all site owners and bloggers made good content as
you did, the internet will be much more useful than ever before.
I’ve thought about posting something about this before. Good job! Can I use part of your post in my blog?
It’s a comprehensive, yet fast read.
поддержка сайта цена заказать поисковое продвижение сайта
Regenerative Medicine: Specialists – rybelsus price
you may have an ideal blog here! would you prefer to make some invite posts on my blog?
Great blog right here! You seem to put a significant amount of material on the site rather quickly.
[url=https://volna-casino-apk.ru/volna-skachat/]https://www.volna-casino-apk.ru/volna-skachat/[/url]
Загрузить apk файл казино Volna – побеждай сейчас!
https://www.volna-casino-apk.ru/volna-skachat/
Nice blog here! Also your web site loads up very fast! What host are you using? Can I get your affiliate link to your host? I wish my web site loaded up as fast as yours lol
Подробный обзор Istanbul International Airport, развитие аэропорта на протяжении лет.
Интересные факты о Istanbul International Airport, о которых мало кто слышал.
Уникальная архитектура Istanbul International Airport, которые поражают воображение.
Что ждет аэропорт в ближайшие годы, направления роста и совершенствования.
Сервисы и удобства Istanbul International Airport, на что стоит обратить внимание.
istanbul international terminal [url=https://airportistanbulinternational.com/]istanbul international terminal[/url] .
I just couldn’t leave your website before suggesting that I really enjoyed the usual information an individual supply on your visitors? Is gonna be back often in order to investigate cross-check new posts
Наша компания https://sveller2buy.ru/ профессионально занимается поставкой сортового металлопроката оптом и в розницу
This page definitely has all the info I wanted concerning this subject and didn’t know who to ask.
Ищете надёжное казино в Казахстане? Попробуйте Мостбет! | Играйте на Мостбет и получайте бонусы за регистрацию | Игровые автоматы, покер и многое другое на Мостбет | Весь спектр казино игр доступен в приложении Мостбет | Зарегистрируйтесь на Мостбет и получите бонус на ставки | Игровые автоматы и ставки на киберспорт в одном месте | Рабочее зеркало и доступ к Мостбет в любое время | Надёжный доступ к играм через приложение Мостбет | Ставки и казино в одном месте – это Мостбет, скачать приложение Mostbet [url=http://mostbetkzcasino.kz]скачать Mostbet на телефон[/url].
Thanks for another great post. Where else may anybody get that type of info in such an ideal way of writing? I have a presentation next week, and I’m at the search for such information.
купить готовый диплом о среднем [url=https://landik-diploms.ru/]купить готовый диплом о среднем[/url] .
Wish I’d thought of this. Am in the field, but I procrastinate alot and haven’t written as much as I’d like. Thanks.
Вам предлагают уникальный опыт на лучших Lineage 2 серверах с интересными квестами и динамичной боевой системой. На наших линейдж 2 серверах всегда царит атмосфера приключений и дружелюбия [url=http://www.seoanalytics.in/domain/lineage2servers.com]http://www.seoanalytics.in/domain/lineage2servers.com[/url]
Вам предлагают уникальный опыт на лучших Lineage 2 серверах с интересными квестами и динамичной боевой системой. На наших линейдж 2 серверах всегда царит атмосфера приключений и дружелюбия [url=https://ns1.domain.ru/whois?domain=lineage2servers.com]https://ns1.domain.ru/whois?domain=lineage2servers.com[/url]
Explora la trayectoria futbolistica de Paul Pogba | Descubre mas sobre el salario de Pogba y sus contratos | Descubre los gustos y aficiones de Pogba fuera del futbol | Informate sobre los intereses de Pogba en el deporte | Descubre el impacto de Pogba en la liga francesa y europea | Conoce el papel de Pogba en Juventus y PSG | Descubre el lado humano de la vida de Paul Pogba | Descubre el papel de Pogba en el equipo de Francia | Informate sobre el salario y contratos de Pogba, informacion de Pogba [url=https://pogba-es.org]Paul Pogba info[/url].
вызвать наркологическую помощь [url=http://www.skoraya-narkologicheskaya-pomoshch-moskva13.ru]вызвать наркологическую помощь[/url] .
частная скорая наркологическая помощь [url=https://skoraya-narkologicheskaya-pomoshch-moskva12.ru/]частная скорая наркологическая помощь[/url] .
химки вывод из запоя [url=www.vyvod-iz-zapoya-himki12.ru]химки вывод из запоя[/url] .
вывод из запоя лечение химки [url=http://www.vyvod-iz-zapoya-himki11.ru]http://www.vyvod-iz-zapoya-himki11.ru[/url] .
вывод из запоя на дому химки круглосуточно [url=https://vyvod-iz-zapoya-himki13.ru]вывод из запоя на дому химки круглосуточно [/url] .
Веселые анекдоты http://shutki-anekdoty.ru/anekdoty
Виртуальный номер телефона — это номер без SIM-карты. С Numero вы можете получить виртуальные телефонные номера в более чем 80 странах [url=https://ks-er.ru/vvirtualnyj-nomer-dlya-avito]Виртуальный номер для Авито[/url]
Виртуальный номер телефона — это номер без SIM-карты. С Numero вы можете получить виртуальные телефонные номера в более чем 80 странах [url=https://radio-link.ru/kak-vybrat-virtualnyj-nomer-prakticheskoe-rukovodstvo]Виртуальный номер[/url]
娛樂城
什麼是娛樂城?
娛樂城是一個讓玩家能夠透過網絡進行賭場遊戲的平台,與真實賭場相似,玩家可在此參與真錢遊戲。如果在娛樂城的遊戲中獲勝,便能賺取真金!賭博公社作為一個專業的娛樂城推薦平台,致力於為玩家提供真實、客觀的娛樂城評價資訊,幫助玩家選擇值得信賴的線上娛樂城。
娛樂城的專業術語
返水:返水是娛樂城回饋給玩家的金額,計算方式為「有效投注額 × 返水百分比」,是娛樂城用以激勵玩家的一種方式。
派彩:派彩指的是玩家在娛樂城遊戲中獲得的利潤。當玩家贏得遊戲後,娛樂城會將相應的獎金支付給玩家。
出金:出金是指玩家將娛樂城帳戶中的獲利轉出至個人帳戶的過程,這是玩家贏取獎金後將金額提取到自己帳戶的重要一步。
娛樂城儲值與出金流程
選擇線上娛樂城。
選擇存取款選項。
進入個人帳戶頁面進行存款操作。
輸入儲值或出金的金額。
完成操作,順利進行娛樂城的儲值或出金。
最受歡迎的娛樂城遊戲
在賭博公社中,從玩家的評價中篩選出一些廣受歡迎的娛樂城遊戲。第一名的是真人百家樂,隨後是電子老虎機。以下為部分熱門遊戲推薦:
DG百家樂 – ⭐️⭐️⭐️⭐️⭐️ (4826條評論)
DB百家樂 – ⭐️⭐️⭐️⭐️⭐️ (3554條評論)
RG百家樂 – ⭐️⭐️⭐️⭐️★ (4687條評論)
歐博真人 – ⭐️⭐️⭐️⭐️★ (3512條評論)
SA真人 – ⭐️⭐️⭐️⭐️★ (2415條評論)
關於賭博公社
賭博公社秉持著專業知識,致力於屏蔽各類網路上的娛樂城詐騙信息,並成為台灣首屈一指的娛樂城推薦指南。賭博公社提供最新的娛樂城排名,查證線上論壇如Dcard、Ptt及Facebook的娛樂城評價,為玩家提供真實可靠的資訊,幫助他們找到最安全、最值得信賴的賭博網站。
為何信任賭博公社?
賭博公社堅持客觀、公正的原則,提供娛樂城的真實評價與最新資訊。在當今資訊爆炸的網路時代,賭博公社作為玩家的嚮導,幫助他們避免陷入不實宣傳的陷阱,讓玩家能夠享受安全、合法的線上娛樂城遊戲體驗。
線上娛樂城常見問題
台灣線上娛樂城推薦哪些? 可以參考娛樂城排行來選擇。
娛樂城在台灣是否合法? 必須參考當地法規,以保證遊戲的合法性。
線上娛樂城是否安全? 賭博公社僅推薦持有合法執照並保證出金的娛樂城,保護玩家的權益。
在線上娛樂城贏錢需要繳稅嗎? 這取決於當地的稅務規定,玩家應查詢相關政策。
哪裡可以玩免費的線上娛樂城? 部分娛樂城提供免費試玩,玩家可以無需儲值體驗遊戲。
賭博公社致力於為玩家提供全方位的娛樂城資訊,是玩家尋找可靠娛樂城的理想指南。
Купить диплом о среднем полном образовании, в чем подвох и как избежать обмана?
p33340zg.beget.tech/2024/10/14/kupit-diplom-s-podtverzhdeniem-podlinnosti-onlayn.html
Nice blog. Could someone with little experience do it, and add updates without messing it up? Good information on here, very informative.
how to cure ed [url=https://pharm24.pro/#]buy drugs[/url] natural ed treatment
สล็อตเว็บตรง
เว็บสล็อตโดยตรงคือระบบเกมผ่านเน็ตที่ให้ผู้เล่นเชื่อมต่อสล็อตแมชชีนได้โดยตรงจากเว็บ โดยไม่ต้องพึ่งพาตัวแทนหรือตัวกลางใดๆ ข้อดีของสล็อตเว็บตรงคือการรักษาความปลอดภัยเพิ่มขึ้น เนื่องจากนักเล่นไม่ต้องกังวลเรื่องความเสี่ยงจากการใช้บริการผ่านเอเย่นต์ อีกทั้งยังมีการมอบเงินรางวัลที่เหนือกว่าและโปรโมชั่นมากมาย เนื่องจากไม่มีค่าธรรมเนียมจากเอเย่นต์ ทำให้นักเล่นเข้าถึงเกมแมชชีนได้อย่างไม่ยุ่งยากและทันใจ พร้อมรับประสบการณ์การเล่นที่ดีขึ้นและไม่ติดขัด
การหมุน สล็อตไม่ผ่านเอเย่นต์ แตกต่างจาก สล็อตแบบดั้งเดิมอย่างไร?
สล็อตไม่ผ่านเอเย่นต์เป็นตัวเลือกที่ไม่มีการผ่านเอเย่นต์ ทำให้นักเล่นสามารถเข้าถึงเกมได้ทันที เกมและการจ่ายรางวัลได้โดยตรงจากผู้ดำเนินการ ลดความเสี่ยงในการถูกหลอกหรือจ่ายค่านายหน้าสูง นอกจากนี้ เว็บสล็อตโดยตรงยังมีหลายแบบของเกมให้เลือกมากกว่าในสล็อตแบบเดิม เนื่องจากสล็อตตรงมักจะอัปเดตบ่อยและเพิ่มเกมหลากหลายอย่างต่อเนื่อง อัตราการจ่ายเงิน (RTP) ของเว็บสล็อตมักจะมากกว่าสล็อตแบบดั้งเดิม เนื่องจากไม่มีค่านายหน้า ทำให้นักเล่นได้รับผลตอบแทนที่มีมูลค่ามากกว่า ทั้งยัง ข้อเสนอและโบนัสที่หลากหลายกว่า โดยสล็อตตรงมักมีข้อเสนอพิเศษและโปรแกรมสะสมแต้มที่ดึงดูดใจมากขึ้น
โปรโมชั่นและโปรโมชั่นพิเศษในเว็บสล็อตตรงที่ไม่ควรพลาด
สล็อตตรงมักมีโปรโมชันและโบนัสที่ดีมากสำหรับนักเดิมพัน เริ่มตั้งแต่โบนัสต้อนรับสำหรับผู้ที่เพิ่งสมัคร โบนัสเติมเงิน โบนัสฟรี รวมถึงโปรแกรมสะสมแต้มที่สามารถแลกของรางวัลหรือข้อเสนอพิเศษได้ ทำให้ผู้เล่นมีความคุ้มค่าและประโยชน์มากมาย การมีโปรโมชั่นที่คุ้มค่าช่วยให้นักเดิมพันสามารถเพิ่มโอกาสในการชนะและลดเงินลงทุนในการเล่น นอกจากนี้ยังมีข้อเสนอพิเศษเช่นการคืนเงินและรางวัลพิเศษตามวันสำคัญอีกด้วย
สรุปว่า สล็อตเว็บตรงเป็นทางเลือกที่เหมาะสมสำหรับผู้ที่ต้องการ ความสะดวกสบายและการป้องกันในการเดิมพัน มีการคืนเงินที่สูงกว่า โปรโมชันดีๆ และการเล่นเกมที่ดีโดยไม่มีการผ่านเอเย่นต์
This is really interesting, You’re a very skilled blogger. I have joined your feed and look forward to seeking more of your great post. Also, I’ve shared your web site in my social networks!
I’d like to thank you for the efforts you’ve put in penning this blog. I’m hoping to check out the same high-grade content by you in the future as well. In fact, your creative writing abilities has inspired me to get my own site now 😉
Admiring the time and effort you put into your site and detailed info you offer!
duduslot
duduslot adalah link resmi yang memberikan persentase kemenangan yang sangat tinggi. Dengan bermain di duduslot, akan memberikan saran game gacor berupa RTP agar kemungkinan dapat jakcpot lebih besar.
I like what you have to offer. Keep up the good work!
п»їlegitimate online pharmacies india [url=https://indianpharm24.pro/#]Order medicine from India to USA[/url] online pharmacy india
Аренда виртуальных телефонных номеров для 75 городов России и 38 стран мира. Звонки онлайн на городские и мобильные (сотовые) номера, бесплатный прием [url=https://www.04597.com.ua/list/488911]купить виртуальный номер телефона навсегда[/url]
Аренда виртуальных телефонных номеров для 75 городов России и 38 стран мира. Звонки онлайн на городские и мобильные (сотовые) номера, бесплатный прием [url=https://www.06236.com.ua/list/492356]Не приходит код в СМС из Телеграм[/url]
Найдите отличные бонусы и промокоды на Мостбет | Все лучшие ставки и игры только на Мостбет | Игровые автоматы, покер и многое другое на Мостбет | Регистрация на Мостбет занимает всего пару минут | Мостбет предлагает лучшие слоты для вашего удовольствия | Быстрая регистрация и приятные бонусы на Мостбет | Найдите свой любимый слот в казино Мостбет | Выберите Мостбет для гарантированного качества и удобства | Ваши лучшие ставки с Мостбет Казахстан, Mostbet зеркало для входа [url=http://mostbetkzcasino.kz/]Mostbet зеркало[/url].
Сайт смешных историй http://shutki-anekdoty.ru/istorii собрание лучших веселых усторий. Ежедневное обновление контента для вашего настроения. Легко находите и делитесь забавными моментами с друзьями.
Смешные приколы на сайте https://subscribe.ru/author/31612079 Самые смешные приколы. делитесь с друзьями. Легко находите и делитесь забавными моментами с друзьями.
https://dostavim-kzn.ru/
Descubre la historia de Ronaldinho, un icono del futbol | Descubre los momentos iconicos de Ronaldinho en su carrera | Descubre por que Ronaldinho es un icono en todo el mundo | Descubre las curiosidades de la vida de Ronaldinho | Descubre como Ronaldinho influyo en la proxima generacion | Explora los clubes donde Ronaldinho jugo y gano titulos | Conoce las estadisticas mas impresionantes de Ronaldinho | Conoce como Ronaldinho se convirtio en un idolo mundial | Explora los equipos que marcaron la carrera de Ronaldinho, Ronaldinho en el futbol brasileno [url=http://ronaldinho-es.org]Futbol brasileno Ronaldinho[/url].
Купить металлическую профильную трубу в розницу. Стальные профильные трубы по ГОСТ и ТУ, продажа профтрубы по низкой цене за метр с доставкой [url=http://meffert-yar.ru/]купить металлические профильные трубы[/url]
mexico pharmacies prescription drugs [url=https://mexicanpharm24.cheap/#]Legit online Mexican pharmacy[/url] mexico drug stores pharmacies
Купить металлическую профильную трубу в розницу. Стальные профильные трубы по ГОСТ и ТУ, продажа профтрубы по низкой цене за метр с доставкой [url=http://meffert-yar.ru/]стоимость профильной трубы[/url]
Сервисный центр предлагает ремонт fujitsu siemens lifebook e756 ремонт fujitsu siemens lifebook e756
выведение из запоя на дому люберцы [url=www.kapelnica-ot-zapoya-lyubercy12.ru]выведение из запоя на дому люберцы [/url] .
вывод из запоя люберцы [url=https://www.kapelnica-ot-zapoya-lyubercy11.ru]вывод из запоя люберцы[/url] .
สล็อตไม่ผ่านเอเย่นต์คือแพลตฟอร์มเกมผ่านเน็ตที่ให้ผู้เล่นเข้าสู่เกมสล็อตแมชชีนได้โดยตรงจากหน้าเว็บ โดยไม่ต้องพึ่งพาเอเย่นต์หรือตัวกลางใดๆ ข้อดีของสล็อตเว็บตรงคือการป้องกันเพิ่มขึ้น เนื่องจากผู้เล่นไม่ต้องเป็นกังวลเรื่องการเสี่ยงจากการใช้บริการผ่านตัวกลาง อีกทั้งยังมีการมอบรางวัลที่มากกว่าและโปรโมชั่นมากมาย เนื่องจากไม่มีค่านายหน้าจากตัวแทน ทำให้นักเล่นเข้าถึงเกมสล็อตได้อย่างสะดวกและทันใจ พร้อมรับการเล่นที่น่าพอใจและไม่สะดุด
การเล่น สล็อตเว็บตรง ไม่เหมือนกับ สล็อตแบบดั้งเดิมอย่างไร?
สล็อตเว็บตรงเป็นทางเลือกที่ไม่มีการผ่านผู้แทน ทำให้นักเล่นสามารถเข้าถึงได้โดยตรง เกมและเงินรางวัลได้โดยตรงจากเจ้าของเว็บ ลดโอกาสเสี่ยงในการเสียเปรียบหรือจ่ายค่าธรรมเนียมสูง นอกจากนี้ เว็บสล็อตโดยตรงยังมีความหลากหลายของเกมสล็อตให้เลือกเล่นมากกว่าในสล็อตดั้งเดิม เนื่องจากเว็บสล็อตตรงมักจะได้รับการอัปเดตและเพิ่มเกมใหม่ๆอย่างต่อเนื่อง อัตราการจ่ายเงิน (เรทการจ่าย) ของเว็บสล็อตมักจะมากกว่าสล็อตทั่วไป เนื่องจากไม่มีค่าใช้จ่ายเพิ่มเติม ทำให้นักเดิมพันได้ผลตอบแทนรางวัลที่คุ้มค่า และยังมี ข้อเสนอและโปรโมชั่นพิเศษที่หลากหลายกว่า โดยเว็บสล็อตตรงมักมีข้อเสนอเพิ่มเติมและการสะสมแต้มที่ดึงดูดใจมากขึ้น
โปรโมชันและโปรโมชั่นพิเศษในเว็บสล็อตตรงที่น่าสนใจ
สล็อตเว็บตรงมักมีโปรโมชันและโบนัสที่น่าดึงดูดสำหรับผู้เล่น เริ่มตั้งแต่โบนัสแรกเข้าสำหรับสมาชิกใหม่ โบนัสเงินฝากเพิ่ม เครดิตฟรี รวมถึงการสะสมคะแนนที่สามารถแลกของรางวัลหรือสิทธิประโยชน์ต่างๆได้ ทำให้นักเล่นเกมมีความคุ้มค่าและประโยชน์มากมาย การมีโปรโมชันที่น่าดึงดูดช่วยให้นักเดิมพันสามารถมีโอกาสชนะมากขึ้นและลดค่าใช้จ่ายในการเล่น นอกจากนี้ยังมีโปรโมชั่นพิเศษเช่นคืนเงินบางส่วนจากยอดเสียและรางวัลพิเศษตามวันสำคัญอีกด้วย
สรุปว่า เว็บสล็อตโดยตรงเป็นตัวเลือกที่ดีสำหรับผู้เล่นที่อยากได้ ความสะดวกสบายและการรักษาความปลอดภัยในการเดิมพัน มีการจ่ายเงินที่สูงกว่า ข้อเสนอที่หลากหลาย และความสนุกในการเล่นที่ลื่นไหลโดยไม่มีการผ่านเอเย่นต์
нарколог вывод из запоя москва [url=http://nazalnyj.ru/]нарколог вывод из запоя москва[/url] .
вывод из запоя москва [url=https://vyvod-iz-zapoya-moskva11.ru/]вывод из запоя москва[/url] .
вывод из запоя люберцы [url=http://kapelnica-ot-zapoya-lyubercy13.ru]вывод из запоя люберцы[/url] .
Представленный круглосуточный заказ эвакуатора позволит перевезти автомобиль любого типа https://www.volzsky.ru/press-relize.php?id=3212
Представленный круглосуточный заказ эвакуатора позволит перевезти автомобиль любого типа https://xgame.pro/articles/24706-virtualnyje-igry-na-kompjutjerje-privodjat-k-rjealnoj-evakuacii-avtomobilja.html
Как правильно купить диплом колледжа и пту в России, подводные камни
nicee content keep writing
Независимо от того, являетесь ли вы опытным пользователем или только начинаете познавать блокчейн, MetaMask помогает вам подключиться к децентрализованной сети: новому интернету https://www.pgyer.com/apk/apk/io.metamask
This is really interesting, You’re a very skilled blogger. I have joined your feed and look forward to seeking more of your great post. Also, I’ve shared your web site in my social networks!
mexican pharmaceuticals online [url=http://mexicanpharm24.cheap/#]mexican pharm 24[/url] pharmacies in mexico that ship to usa
Труба стальная профильная – длинное пустотелое тело различного сечения, произведенное из углеродистой или низколегированной стали, используемое в качестве элемента металлоконструкции арматура купить профильную трубу
Труба стальная профильная – длинное пустотелое тело различного сечения, произведенное из углеродистой или низколегированной стали, используемое в качестве элемента металлоконструкции металлическая профильная труба цена
Как приобрести аттестат о среднем образовании в Москве и других городах
Descubre la vida y carrera de Vinicius Junior, el fenomeno brasileno | Informate sobre la vida personal de Vini Jr. | Informate sobre la edad y altura de Vinicius Junior | Explora los aspectos personales y profesionales de Vinicius | Conoce los datos mas curiosos de Vinicius Jr. en el futbol | Informate sobre la posicion y caracteristicas de Vini Jr. | Conoce el impacto de Vinicius en sus equipos | Conoce el equipo y posicion actual de Vini Jr. | Descubre los aspectos destacados de la carrera de Vinicius, Vinicius Madrid [url=https://vinicius-junior-es.org]https://vinicius-junior-es.org[/url].
Как безопасно купить диплом колледжа или ПТУ в России, что важно знать
bc game pakistan
reputable indian online pharmacy [url=http://indianpharm24.pro/#]Indian pharmacy international shipping[/url] buy medicines online in india
Сайт смешных историй http://shutki-anekdoty.ru/istorii собрание лучших веселых усторий. Ежедневное обновление контента для вашего настроения. Легко находите и делитесь забавными моментами с друзьями.
kantorbola 99
Смешные приколы на сайте https://subscribe.ru/author/31612079 Самые смешные приколы. делитесь с друзьями. Легко находите и делитесь забавными моментами с друзьями.
neon54 ????????
срочная помощь вывод из запоя москва [url=https://vyvod-iz-zapoya-moskva13.ru/]vyvod-iz-zapoya-moskva13.ru[/url] .
вывод из запоя балашиха [url=http://www.vyvod-iz-zapoya-v-stacionare-balashiha12.ru]вывод из запоя балашиха [/url] .
вывод из запоя клиника балашиха [url=https://vyvod-iz-zapoya-v-stacionare-balashiha11.ru/]вывод из запоя клиника балашиха [/url] .
Hercules99: Daftar 8 buah Game Percobaan Pocket Games Slot Tanpa Kecurangan Dapat Dipercaya di Negeri Ini
Permainan PG Slot telah menjadi pilihan favorit bagi banyak pecinta slot di Indonesia, menawarkan berbagai gim yang menarik dengan sensasi dan kesenangan tanpa batas. Seiring ketenaran yang semakin besar, timbul kekhawatiran tentang adanya kecurangan atau gangguan dalam judi online. Namun, Permainan PG Slot dapat mengatasi menghadapi tantangan ini dengan memperkenalkan permainan slot tanpa curang yang terjamin serta terjamin.
Menggunakan sistem keamanan terbaru dan fitur mutakhir, PG Slot menyediakan kepastian bahwa permainan yang mereka tawarkan terjamin adil untuk para pemain. Di bawah ini daftar 8 slot percobaan PG bebas dari penipuan yang populer serta diandalkan di Tanah Air:
1. Slot Demo Fortune Mouse
Fortuna Mouse adalah game slot yang menarik perhatian dengan gambar memikat dan tema yang menggemaskan. Selain tampilan visualnya, game ini memiliki enkripsi kuat agar melindungi semua data pemain. Semua putaran dipastikan tanpa gangguan, agar permainan tetap nyaman.
2. Demo Slot Dragon Hatch
Telur Naga menyertakan pengguna ke dunia fantasi yang dipenuhi kemegahan dan kekuatan ajaib. Namun keunggulan permainan ini terdapat pada fitur keamanannya. Dengan fitur anti-rungkad, permainan ini menjaga kemenangan setiap pemain diperoleh secara adil bebas dari campur tangan luar.
3. Demo Perjalanan Menuju Kekayaan PGS
Game Perjalanan Menuju Kekayaan mengajak user ke perjalanan ke arah kekayaan tanpa batas. Memiliki bonus melimpah serta RTP besar, permainan ini memberikan kesenangan berlipat sekaligus jaminan keadilan dalam tiap giliran. Pemain mendapatkan sensasi sensasi bermain tanpa kekhawatiran terhadap kecurangan.
4. Percobaan Pulau Bikini PGS
Aplikasi ini mengundang player ke nuansa pulau yang indah yang memukau dan penuh kegembiraan. Di balik suasana santainya, Slot Bikini dilengkapi dengan protokol keamanan yang kuat, yang menjadikannya sebagai game Slot PG anti-rungkad yang aman. Pemain dapat menikmati gim tanpa rasa takut manipulasi.
5. Percobaan Medusa II: Petualangan Perseus PGS
Pada permainan Medusa II, player diajak dalam petualangan epik menemui raksasa mistis. Gim ini dilengkapi dengan keamanan mutakhir yang menjaga kejujuran tiap giliran. Karenanya, pemain bisa berfokus pada kemenangan tanpa intervensi dari luar.
6. Versi Demo Bombs Away Slot PG
Berbekal tema perang yang intensif, Slot Bom menaikkan adrenalin para pemain. Di antara ketegangan bermain, keamanan masih jadi yang utama. Sistem pengamanan PG Soft menjamin setiap transaksi dan hasil permainan, memberikan keamanan bagi pemain saat mengejar kemenangan.
7. Demo Adu Banteng Pocket Games Slot
Bull Fight memasukkan player ke arena matador yang menantang. Dalam permainan ini, PG Soft menjamin setiap putaran adil dan jujur. Pemain dapat bermain dengan adil dan tanpa cemas tanpa takut akan kecurangan.
8. Versi Demo Muay Thai Champion Pocket Games Slot
Juara Muay Thai mengusung tema bertarung yang seru, mengundang player bertarung sengit di ring. Game ini tidak hanya memikat dari sisi tema, tapi juga dari sisi keamanan. Tiap perputaran dijaga ketat, memastikan pengalaman main tanpa gangguan atau curang.
Keuntungan Bermain Demo Slot PG Soft dengan RTP Tinggi
Demo slot PG tanpa manipulasi memiliki RTP tinggi yang melampaui rata-rata. Dengan begitu, peluang pemain meningkat untuk meraih pengembalian dari investasi mereka. Bermain slot dari PG Soft bukan cuma hiburan, juga memberi peluang keuntungan besar.
Dengan daftar game di atas, pemain dapat menikmati pengalaman bermain slot yang adil, aman, dan menyenangkan. Dengan teknologi mutakhir dari PG Slot memastikan bahwa setiap permainan berjalan tanpa hambatan, memberikan kepercayaan penuh bagi para pemainnya.
вывод из запоя в стационаре балашиха [url=www.vyvod-iz-zapoya-v-stacionare-balashiha13.ru/]вывод из запоя в стационаре балашиха[/url] .
вывод из запоя кодирование москва [url=http://vyvod-iz-zapoya-moskva12.ru]вывод из запоя кодирование москва [/url] .
Jelajahi dunia fantasi dan keamanan di mesin slot PG Soft
Slot online telah menjadi salah satu hiburan paling populer di kalangan para gamer. Dengan banyaknya pilihan yang tersedia, PG Soft Slots menonjol sebagai salah satu penyedia terkemuka yang tidak hanya menawarkan pengalaman bermain game yang mengasyikkan, tetapi juga mengutamakan keamanan dan keadilan dalam setiap permainan. Pada artikel ini kita akan melihat beberapa versi demo menarik dari mesin slot PG Soft dan menekankan pentingnya memiliki sistem keamanan.
1. Versi demo Luke Dragon
Dragon Hatch mengajak pemain untuk terjun ke dunia fantasi yang kaya akan kekuatan sihir dan mistik. Namun, fokus utama dari game ini adalah sistem keamanan yang kompleks. Dengan teknologi canggih yang melindungi setiap sesi permainan, pemain bisa menang tanpa khawatir akan gangguan.
2. Slot demo Perjalanan Menuju Kekayaan Hal
Seperti namanya, Journey to Wealth adalah perjalanan menuju kekayaan tanpa akhir. Game ini menawarkan fitur bonus yang menggiurkan dan RTP yang kompetitif. Kegembiraan dan keadilan adalah dua hal yang saling melengkapi di setiap putaran, memastikan bahwa setiap kemenangan diperoleh secara adil.
3. Versi demo slot Bikini Paradise Pg
Di balik keindahan dan pesona tropis Bikini Paradise terdapat protokol keamanan yang ketat. Game ini tidak hanya menawarkan gameplay yang seru namun juga memberikan ketenangan pikiran bagi para pemainnya. Berkat sistem yang terintegrasi, setiap transaksi dan hasil permainan dijamin terlindungi dari penipuan.
4. Slot demo Medusa II: Pencarian Perseus Hal
Medusa II: The Quest of Perseus menawarkan petualangan epik berlatar mitos kuno, mengirim pemain ke pertempuran melawan monster legendaris. Namun perhatian terhadap keselamatan tidak pernah dilupakan. Teknologi terbaru digunakan untuk menjaga integritas setiap putaran, memungkinkan pemain untuk fokus pada kemenangan tanpa gangguan.
5. Versi demo slot Bombs Away Pg
Mengusung tema perang dunia yang menegangkan, Bombs Away menjanjikan gameplay yang seru. Meski demikian, PG Soft tetap mengutamakan keselamatan. Sistem yang canggih memastikan setiap transaksi dan hasil permainan tersimpan sehingga memberikan kepercayaan diri pemain untuk terus berjuang meraih kemenangan.
6. Versi demo mesin slot Bull Fight Hal
Bull Fight mengajak pemain ke arena adu banteng yang seru. Di sini, keberanian dan keterampilan adalah kunci kemenangan. PG Soft menjamin keadilan dan keadilan di setiap putaran permainan, menciptakan pengalaman bermain yang sempurna.
7. Versi demo mesin slot Champion Pg Muay Thai
Menampilkan tema seni bela diri yang menarik, Juara Muay Thai melibatkan pemain dalam pertarungan intens di atas ring. Selain aksinya yang seru, PG Soft juga menekankan pentingnya keselamatan. Setiap putaran dipantau dan dijaga dengan cermat untuk memastikan gameplay tanpa gangguan eksternal.
Keuntungan memainkan soft slot versi demo dengan RTP PG tinggi
Salah satu keuntungan utama memainkan game demo PG Soft adalah RTP-nya yang tinggi, seringkali lebih tinggi dari rata-rata industri. Ini berarti bahwa pemain memiliki peluang lebih besar untuk menghasilkan keuntungan besar dari investasi mereka. Tak heran jika mesin slot PG Soft yang memadukan kesenangan bermain game dan keamanan terjamin menjadi pilihan favorit para gamer.
Di dunia yang terus berkembang ini, PG Soft tidak hanya berhasil menciptakan gameplay yang seru, tetapi juga aman dan adil. Dengan berbagai versi demo permainan yang menarik, pemain dapat menjelajahi keajaiban tanpa khawatir akan risiko yang tidak diinginkan.
reputable mexican pharmacies online [url=http://mexicanpharm24.cheap/#]mexico pharmacy cheap[/url] medication from mexico pharmacy
Надежный поставщик недорогой строительной арматуры. Качественная арматурная сталь а500с по выгодной цене с доставкой купить оптом арматуру
Надежный поставщик недорогой строительной арматуры. Качественная арматурная сталь а500с по выгодной цене с доставкой арматура цена тонна
Купить онлайн металл в нашем интернет магазине достаточно просто. Для этого вам необходимо перейти в интересующий вас раздел из нашего каталога купить металл в москве в розницу
Купить онлайн металл в нашем интернет магазине достаточно просто. Для этого вам необходимо перейти в интересующий вас раздел из нашего каталога металлопрокат прайс
Thanks For This Blog, was added to my bookmarks.
Купить диплом магистра оказалось возможно, быстрое обучение и диплом на руки
forum.supermunchkin.org/viewtopic.php?f=1&t=4694
Смешные приколы и юмор. Делитесь с друзьями. Всегда есть над чем посмеяться.
Короткие цитаты о смысле жизни. Цитаты известных людей.
1win registro
Арматура — это металлический прут, используемый для армирования железобетонных конструкций. Стержни арматуры изготавливаются из углеродистой стоимость тонны арматуры
Арматура — это металлический прут, используемый для армирования железобетонных конструкций. Стержни арматуры изготавливаются из углеродистой цена арматура оптом
Профильные трубы – категория металлопроката, которая включает в себя изделия с сечением, отличным от круглого. Ассортимент профильных труб купить труба профильная цена
Профильные трубы – категория металлопроката, которая включает в себя изделия с сечением, отличным от круглого. Ассортимент профильных труб купить металлические профильные трубы
купить диплом рут миит [url=https://russa-diploms.ru/]russa-diploms.ru[/url] .
reputable indian online pharmacy Best online Indian pharmacy reputable indian pharmacies
download bc game
Исследуйте и находите то, https://https://ramblermails.com// что по душе лично вам.
This is my first time i visit here. I found so many helpful stuff in your website especially its discussion. From the tons of responses on your posts, I guess I am not the only one having all the enjoyment here! keep up the excellent work
สล็อตเว็บตรง
สล็อตไม่ผ่านเอเย่นต์คือแพลตฟอร์มการให้บริการการเล่นออนไลน์ที่ให้ผู้เล่นเชื่อมต่อสล็อตแมชชีนได้โดยตรงจากเว็บไซต์ โดยไม่ต้องใช้บริการจากผู้แทนหรือตัวกลางใดๆ ข้อดีของสล็อตเว็บตรงคือการรักษาความปลอดภัยเพิ่มขึ้น เนื่องจากผู้เล่นไม่ต้องเป็นกังวลเรื่องโอกาสเสี่ยงจากการใช้บริการผ่านตัวแทน อีกทั้งยังมีการมอบเงินรางวัลที่มากกว่าและโปรโมชั่นมากมาย เนื่องจากไม่มีค่าธรรมเนียมจากเอเย่นต์ ทำให้ผู้เล่นเข้าถึงเกมสล็อตได้อย่างไม่ยุ่งยากและรวดเร็ว พร้อมรับประสบการณ์การเล่นที่น่าพอใจและไม่ติดขัด
การเล่น สล็อตตรง ไม่เหมือนกับ สล็อตทั่วไปอย่างไร?
สล็อตเว็บตรงเป็นตัวเลือกที่ดีที่ไม่มีการผ่านเอเย่นต์ ทำให้นักเดิมพันสามารถเข้าถึงได้โดยตรง เกมและเงินรางวัลได้โดยตรงจากผู้ดำเนินการ ลดการเสี่ยงในการเสียเปรียบหรือถูกหักค่าใช้จ่ายสูง นอกจากนี้ สล็อตตรงยังมีหลายแบบของเกมสล็อตให้เลือกเล่นมากกว่าในสล็อตดั้งเดิม เนื่องจากสล็อตเว็บตรงมักจะได้รับการปรับปรุงและเพิ่มเกมใหม่ๆอย่างต่อเนื่อง อัตราการมอบเงิน (เรทการจ่าย) ของสล็อตตรงมักจะสูงกว่าสล็อตทั่วไป เนื่องจากไม่มีค่านายหน้า ทำให้นักเล่นมีโอกาสรับกำไรที่คุ้มค่า ทั้งยัง ข้อเสนอและรางวัลที่หลากหลายกว่า โดยสล็อตเว็บตรงมักมีข้อเสนอที่น่าสนใจและโปรแกรมคะแนนที่ดึงดูดใจมากขึ้น
โปรโมชั่นและโบนัสในเว็บสล็อตตรงที่น่าสนใจ
เว็บสล็อตโดยตรงมักมีโปรโมชั่นและโบนัสที่น่าสนใจสำหรับผู้เล่น เริ่มตั้งแต่โบนัสสมาชิกใหม่สำหรับผู้เล่นใหม่ โบนัสเติมเงิน โบนัสฟรี รวมถึงโปรแกรมแลกคะแนนที่สามารถแลกแต้มหรือข้อเสนอพิเศษได้ ทำให้ผู้เล่นได้รับผลตอบแทนและข้อดีมากมาย การมีข้อเสนอที่น่าดึงดูดช่วยให้นักเดิมพันสามารถเพิ่มโอกาสรับรางวัลและลดค่าใช้จ่ายในการเล่น นอกจากนี้ยังมีโปรโมชันเสริมเช่นเงินคืนบางส่วนและของแจกตามวันสำคัญอีกด้วย
สรุปว่า สล็อตตรงเป็นทางเลือกที่คุ้มค่าสำหรับผู้ที่ต้องการ การเล่นที่ง่ายและการรักษาความปลอดภัยในการเดิมพัน มีการจ่ายเงินที่สูงกว่าปกติ โปรโมชันดีๆ และการเล่นเกมที่ดีโดยไม่มีการใช้ตัวแทน
ed for men [url=https://pharm24.pro/#]cheaper medications[/url] ed pharmacy
выведение из запоя подольск [url=kapelnica-ot-zapoya-podolsk12.ru]выведение из запоя подольск [/url] .
vavada kazino
Короткие цитаты о смысле жизни. Цитаты известных людей.
ST666 trang chủ
ST666 Trang Chủ Chính Thức Hàng Đầu 2024
ST666 đã khẳng định vị thế của mình như một trong những cổng game trực tuyến chất lượng trong năm 2024. Với sự phát triển không ngừng và luôn nâng cao chất lượng dịch vụ, ST666 mang đến cho người dùng một trải nghiệm giải trí trực tuyến đa dạng và an toàn.
Tại sao ST666 lại được yêu thích?
Khuyến mãi ST666 hấp dẫn: ST666 luôn dẫn đầu xu hướng với nhiều sự kiện ưu đãi đặc sắc như tết trung thu, hướng về miền Trung, v.v. Gần đây nhất là khuyến mãi đặc biệt mừng sinh nhật 6 tuổi với những ưu đãi khủng sau:
Khuyến Mãi
Tiền Thưởng
Lì xì tân thủ 66K
66.000 VND
Freebet hàng tuần
166.000 VND
Thưởng nạp đầu 160%
3.666.000 VND
Livestream chất, Rinh Honda Civic
Ô tô Honda Civic
Hoàn trả thể thao & đá gà 10% mỗi ngày
6.666.000 VND
Ngoài ra, ST666 còn được yêu thích bởi:
Uy tín và minh bạch: ST666 hoạt động dưới sự cấp phép của chính phủ Campuchia và được giám sát bởi tổ chức uy tín PAGCOR.
Đa dạng trò chơi: Trang web cung cấp nhiều loại trò chơi cá cược hấp dẫn như cá cược thể thao, casino trực tuyến, xổ số, và slot game.
Giao dịch nhanh chóng: Hỗ trợ nhiều phương thức thanh toán tiện lợi, giúp người chơi thực hiện giao dịch nạp và rút tiền một cách nhanh chóng và an toàn.
Dịch vụ khách hàng chuyên nghiệp: Đội ngũ hỗ trợ khách hàng luôn sẵn sàng 24/7, đảm bảo giải đáp mọi thắc mắc của người chơi.
Khám phá kho game khổng lồ của ST666
ST666 tự hào mang đến một kho game cá cược trực tuyến đa dạng và phong phú:
Xổ số: Tham gia cá cược các loại xổ số phổ biến như xổ số Việt Nam, Keno, và xổ số Thái Lan với tỷ lệ thưởng cao và nhiều hình thức đặt cược.
Đá gà: Cá cược các trận đá gà trực tiếp từ Campuchia với hình ảnh sắc nét và âm thanh sống động.
Cá cược thể thao: Cung cấp các trận đấu từ các giải đấu lớn như Ngoại hạng Anh, La Liga, Serie A, Champions League và World Cup với tỷ lệ cược cạnh tranh.
Casino trực tuyến: Trải nghiệm các trò chơi casino trực tuyến như Baccarat, Blackjack, Roulette, và Poker với dealer chuyên nghiệp và hình ảnh sắc nét.
Slot game: Khám phá thế giới slot game với hàng ngàn chủ đề hấp dẫn và cơ hội nhận thưởng jackpot khủng.
Game bài: Tham gia các game bài dân gian như Tiến lên miền Nam, Phỏm, Mậu binh, và Liêng với nhiều bàn chơi và mức cược khác nhau.
Bắn cá: Tham gia trò chơi bắn cá với đồ họa đẹp mắt và âm thanh sống động.
E-sport: Cá cược các trận thi đấu Esport từ các giải đấu danh giá với tỷ lệ cược cập nhật liên tục.
Kết luận
ST666 cam kết mang đến cho người chơi những trải nghiệm giải trí tuyệt vời nhất với kho game đa dạng và chất lượng cao. Tham gia ngay hôm nay để khám phá thế giới giải trí bất tận và nhận nhiều ưu đãi hấp dẫn!
Покупка диплома о среднем полном образовании: как избежать мошенничества?
goroda.flybb.ru/viewtopic.php?f=2&t=600
Смешные приколы и юмор. Делитесь с друзьями. Всегда есть над чем посмеяться.
mexican drugstore online [url=http://mexicanpharm24.cheap/#]mexico pharmacy cheap[/url] п»їbest mexican online pharmacies
Thank you for the auspicious writeup It in fact was a amusement account it Look advanced to far added agreeable from you However how can we communicate
Цены на травматические пистолеты различаются в зависимости от производителя, мощности оружия и других показателей Купить боевой пистолет
Онлайн магазин игр. Купить лицензионные ключи для компьютерных игр, ключи и аккаунты Steam, Origin, Uplay, Minecraft https://steamplay.ru/genres/steam_key
Jelajahi dunia fantasi dan keamanan di mesin slot PG Soft
Slot online telah menjadi salah satu hiburan paling populer di kalangan para gamer. Dengan banyaknya pilihan yang tersedia, PG Soft Slots menonjol sebagai salah satu penyedia terkemuka yang tidak hanya menawarkan pengalaman bermain game yang mengasyikkan, tetapi juga mengutamakan keamanan dan keadilan dalam setiap permainan. Pada artikel ini kita akan melihat beberapa versi demo menarik dari mesin slot PG Soft dan menekankan pentingnya memiliki sistem keamanan.
1. Versi demo Luke Dragon
Dragon Hatch mengajak pemain untuk terjun ke dunia fantasi yang kaya akan kekuatan sihir dan mistik. Namun, fokus utama dari game ini adalah sistem keamanan yang kompleks. Dengan teknologi canggih yang melindungi setiap sesi permainan, pemain bisa menang tanpa khawatir akan gangguan.
2. Slot demo Perjalanan Menuju Kekayaan Hal
Seperti namanya, Journey to Wealth adalah perjalanan menuju kekayaan tanpa akhir. Game ini menawarkan fitur bonus yang menggiurkan dan RTP yang kompetitif. Kegembiraan dan keadilan adalah dua hal yang saling melengkapi di setiap putaran, memastikan bahwa setiap kemenangan diperoleh secara adil.
3. Versi demo slot Bikini Paradise Pg
Di balik keindahan dan pesona tropis Bikini Paradise terdapat protokol keamanan yang ketat. Game ini tidak hanya menawarkan gameplay yang seru namun juga memberikan ketenangan pikiran bagi para pemainnya. Berkat sistem yang terintegrasi, setiap transaksi dan hasil permainan dijamin terlindungi dari penipuan.
4. Slot demo Medusa II: Pencarian Perseus Hal
Medusa II: The Quest of Perseus menawarkan petualangan epik berlatar mitos kuno, mengirim pemain ke pertempuran melawan monster legendaris. Namun perhatian terhadap keselamatan tidak pernah dilupakan. Teknologi terbaru digunakan untuk menjaga integritas setiap putaran, memungkinkan pemain untuk fokus pada kemenangan tanpa gangguan.
5. Versi demo slot Bombs Away Pg
Mengusung tema perang dunia yang menegangkan, Bombs Away menjanjikan gameplay yang seru. Meski demikian, PG Soft tetap mengutamakan keselamatan. Sistem yang canggih memastikan setiap transaksi dan hasil permainan tersimpan sehingga memberikan kepercayaan diri pemain untuk terus berjuang meraih kemenangan.
6. Versi demo mesin slot Bull Fight Hal
Bull Fight mengajak pemain ke arena adu banteng yang seru. Di sini, keberanian dan keterampilan adalah kunci kemenangan. PG Soft menjamin keadilan dan keadilan di setiap putaran permainan, menciptakan pengalaman bermain yang sempurna.
7. Versi demo mesin slot Champion Pg Muay Thai
Menampilkan tema seni bela diri yang menarik, Juara Muay Thai melibatkan pemain dalam pertarungan intens di atas ring. Selain aksinya yang seru, PG Soft juga menekankan pentingnya keselamatan. Setiap putaran dipantau dan dijaga dengan cermat untuk memastikan gameplay tanpa gangguan eksternal.
Keuntungan memainkan soft slot versi demo dengan RTP PG tinggi
Salah satu keuntungan utama memainkan game demo PG Soft adalah RTP-nya yang tinggi, seringkali lebih tinggi dari rata-rata industri. Ini berarti bahwa pemain memiliki peluang lebih besar untuk menghasilkan keuntungan besar dari investasi mereka. Tak heran jika mesin slot PG Soft yang memadukan kesenangan bermain game dan keamanan terjamin menjadi pilihan favorit para gamer.
Di dunia yang terus berkembang ini, PG Soft tidak hanya berhasil menciptakan gameplay yang seru, tetapi juga aman dan adil. Dengan berbagai versi demo permainan yang menarik, pemain dapat menjelajahi keajaiban tanpa khawatir akan risiko yang tidak diinginkan.
Онлайн магазин игр. Купить лицензионные ключи для компьютерных игр, ключи и аккаунты Steam, Origin, Uplay, Minecraft ссылка
Цены на травматические пистолеты различаются в зависимости от производителя, мощности оружия и других показателей Купить травмат без оформления
1win bet
I favored your idea there, I tell you blogs are so helpful sometimes like looking into people’s private life’s and work.At times this world has too much information to grasp. Every new comment wonderful in its own right.
Смешные https://smeh.ru и юмор. Делитесь с друзьями. Всегда есть над чем посмеяться.
Our communities really need to deal with this.
прокапать от алкоголя на дому воронеж [url=https://vyvod-iz-zapoya-voronezh12.ru/]прокапать от алкоголя на дому воронеж [/url] .
Эффективные методы и средства для уничтожения жука короеда в доме. Где заказать профессиональные услуги обработки деревьев на участке от насекомых вредителей в Москве? https://dzen.ru/a/Zrm0OQRatQiCoOgh
My coder is trying to convince me to move to .net from PHP. I have always disliked the idea because of the expenses. But he’s tryiong none the less. I’ve been using WordPress on numerous websites for about a year and am nervous about switching to another platform. I have heard great things about blogengine.net. Is there a way I can import all my wordpress posts into it? Any help would be really appreciated!
bc game crash download
Well done! Keep up this quality!
Descubre como Marcelo ha inspirado a los jovenes futbolistas | Explora las anecdotas y detalles curiosos de la carrera de Marcelo | Descubre como Marcelo ha dejado su marca en el futbol internacional | Conoce los desafios que Marcelo ha superado en su carrera | Descubre el perfil completo de Marcelo en el futbol internacional | Explora los hitos y records alcanzados por Marcelo | Conoce los valores y principios que guian a Marcelo en su carrera | Informate sobre la preparacion fisica y mental de Marcelo | Conoce la etica de trabajo y compromiso de Marcelo con el futbol, Marcelo en Real Madrid [url=https://marcelo-es.org]https://marcelo-es.org[/url].
Тут можно преобрести сейф пожаростойкий сейф москва огнестойкий купить
Лучшие порно видео Гей порно Бонсай скачать бесплатно без регистрации и смс. Смотреть порно онлайн в высоком качестве.
Отличная цена ставок и бонусов на Мостбет | Получите рекомендации по ставкам от экспертов Mostbet | Мостбет – это ваш шанс на успех в мире ставок | Мостбет предлагает лучшие условия для ставок в Казахстане | Мостбет – это высокие коэффициенты и доступность | Онлайн-казино Mostbet предлагает только честные игры | Поддержка клиентов всегда готова помочь в Mostbet | Лояльная программа для всех игроков на Mostbet | Рекомендуем Mostbet для всех любителей азартных игр [url=http://mostbetkzcasino.com.kz]www.mostbetkzcasino.com.kz[/url].
Смешные https://smeh.ru и юмор. Делитесь с друзьями. Всегда есть над чем посмеяться.
mostbet зеркала [url=https://mostbetkzcasino.kz/]moostbet[/url] kazino777 mostbet .
Бюстгальтеры с октрытой спиной с бесплатной доставкой в интернет-магазине, актуальные цены, в наличии большой ассортимент моделей Бюстгальтер с эффектом push-up
Как быстро получить диплом магистра? Легальные способы
Тут можно преобрести где купить оружейный сейф оружейные сейфы купить в москве
villas in kotor with pool Montenegro realestate
pg slot gacor
Herkules99: List 8 Permainan Uji Coba PG Slot Anti Rungkad Dapat Dipercaya di Negeri Ini
Game PG Slot sudah menjadi favorit kesukaan bagi banyak pemain slot di Tanah Air, menyuguhkan bermacam-macam game yang menarik dengan pengalaman dan kebahagiaan tanpa batas. Di saat popularitasnya semakin tinggi, terdapat keraguan tentang adanya praktik rungkad atau kecurangan dalam game online. Akan tetapi, Game PG sudah sukses menanggapi kekhawatiran ini dengan menciptakan permainan slot tanpa curang yang terjamin dan terpercaya.
Menggunakan sistem keamanan terbaru dan fitur mutakhir, Game PG Slot memastikan bahwa permainan yang mereka tawarkan adil dan aman untuk para pemain. Berikut daftar 8 game demo PG anti rungkad yang menguntungkan dan aman di Tanah Air:
1. Slot Demo Fortune Mouse
Fortuna Mouse adalah slot game yang memikat hati dengan gambar memikat dengan tema lucu. Di luar visual yang cantik, game ini didukung enkripsi canggih PG Soft yang mengamankan data pemain. Setiap putaran dijamin bebas dari manipulasi, sehingga pemain tidak perlu khawatir.
2. Demo Slot Dragon Hatch
Hatch of Dragons membawa pemain ke dunia fantasi yang diwarnai kemegahan dan kekuatan mistis. Meski demikian, daya tarik utama game ini ada pada sistem proteksi canggihnya. Menggunakan teknologi anti curang, game ini memastikan setiap kemenangan tanpa gangguan bebas dari campur tangan luar.
3. Uji Coba Perjalanan Menuju Kekayaan Slot PG
Slot Journey Wealth mengundang pengguna dalam petualangan menuju kekayaan tak terbatas. Memiliki bonus melimpah serta RTP besar, game ini memberikan kegembiraan berlipat serta kepastian keadilan di setiap perputaran. User merasakan sensasi bermain tanpa perlu khawatir akan kecurangan.
4. Demo Surga Bikini Pocket Games Slot
Game ini membawa pemain dalam suasana pulau eksotis yang memukau dan penuh sukacita. Di balik nuansa santainya, Bikini Paradise terintegrasi dengan protokol keamanan canggih, yang menjadikannya sebagai game Slot PG anti-rungkad yang aman. Player bisa menikmati permainan tanpa rasa takut manipulasi.
5. Uji Coba Medusa II: Misi Perseus PG Slot
Pada permainan Medusa II, player dibawa pada kisah epik menghadapi monster legendaris. Gim ini dilengkapi dengan keamanan mutakhir yang menjaga integritas setiap putaran. Dengan demikian, pemain bisa berfokus pada kemenangan tanpa terganggu oleh faktor eksternal yang tidak diinginkan.
6. Percobaan Bombs Away PGS
Dengan tema perang yang intens, Bombs menggugah nyali player. Di tengah-tengah ketegangan permainan, keamanan tetap menjadi prioritas utama. Sistem pengamanan PG Soft mengamankan semua transaksi dan hasil game, membuat nyaman bagi pengguna di jalan menuju kemenangan.
7. Demo Arena Banteng PGS
Game Bull Fight memasukkan player ke arena yang mendebarkan. Dalam game ini, PG Soft menjamin setiap putaran adil dan jujur. Pemain bisa menikmati sensasi permainan yang adil dan aman tanpa rasa khawatir akan manipulasi.
8. Uji Coba Muay Thai Slot PG
Slot Muay Thai Champion menyuguhkan tema bela diri yang memikat, mengajak pemain ke dalam pertarungan di atas ring. Gim ini tidak hanya seru karena tema, tapi juga dari sisi keamanan. Setiap giliran diawasi ketat, menjamin pengalaman bermain yang bebas dari gangguan dan kecurangan.
Manfaat Bermain Slot Demo PG Soft dengan RTP Tinggi
Demo slot PG tanpa manipulasi memiliki RTP tinggi yang melampaui rata-rata. Hal ini memberikan kesempatan lebih besar bagi player agar bisa meraih kembali modal mereka. Memilih game slot dari PG Soft bukan hanya soal hiburan, tetapi juga peluang keuntungan yang lebih tinggi.
Dengan daftar game di atas, pemain dapat menikmati pengalaman bermain slot yang adil, aman, dan menyenangkan. Dengan teknologi mutakhir dari PG Slot memastikan bahwa setiap permainan berjalan tanpa hambatan, menambah keyakinan bagi player.
Бюстгальтеры с октрытой спиной с бесплатной доставкой в интернет-магазине, актуальные цены, в наличии большой ассортимент моделей таблица размера бюстгальтера по цифрам
Тут можно сейфы для дома цены где купить сейф для дома
Тут можно преобрести сейфы огнестойкие огнеупорные сейфы
клиники лечения запоя [url=http://vyvod-iz-zapoya-ekaterinburg22.ru]http://vyvod-iz-zapoya-ekaterinburg22.ru[/url] .
[url=https://monro-casino-apk.ru/monro-skachat]http://monro-casino-apk.ru/monro-skachat[/url]
Скачать последнюю версию приложения казино онлайн Монро – побеждай сегодня!
http://www.monro-casino-apk.ru/monro-skachat
Как приобрести аттестат о среднем образовании в Москве и других городах
[url=https://sol-casino-apk.ru/sol-casino/]https://sol-casino-apk.ru/sol-casino/[/url]
Загрузить последнюю версию приложения онлайн казино Sol – побеждай сейчас!
sol-casino-apk.ru/sol-casino/
As AI is on the rise in simple applications, ChatGPT has become that through which much work—from idea generation to fast questioning—is done. You can even access ChatGPT without login through some publicly accessible platforms Chat gpt chatbot
Amazing things here. I am very glad to see your article. Thanks so much and I’m having a look ahead to contact you.
Will you please drop me a e-mail?
As AI is on the rise in simple applications, ChatGPT has become that through which much work—from idea generation to fast questioning—is done. You can even access ChatGPT without login through some publicly accessible platforms ChatGPT without login
I discovered your weblog site on google and verify just a few of your early posts. Proceed to maintain up the very good operate. I simply further up your RSS feed to my MSN News Reader.
Преимущества покупки алкоголя в Ароматном Мире · широкий ассортимент алкогольных и безалкогольных напитков высокого качества; · индивидуальная система скидок доставка алкоголя на дом москва
Люки Шагма – идеальное сочетание функциональности и эстетики для вашего интерьера. Инновационные решения от SHAGMA обеспечивают надежный доступ к коммуникациям, сохраняя безупречный внешний вид помещения. Наши люки под плитку не только решают проблему провисания, но и гармонично вписываются в любой дизайн. Выбирая SHAGMA, вы выбираете качество, долговечность и индивидуальный подход http://www.vpgazeta.ru/article/_27627
Официальная покупка диплома вуза с сокращенной программой в Москве
[url=https://sol-casino-apk.ru/sol-na-androjd/]http://sol-casino-apk.ru/sol-na-androjd/[/url]
Скачать последнюю версию приложения казино онлайн Сол – побеждай прямо сейчас!
http://www.sol-casino-apk.ru/sol-na-androjd/
[url=https://sol-casino-apk.ru/sol-oficzialnyj-sajt/]https://sol-casino-apk.ru/sol-oficzialnyj-sajt/[/url]
Установить apk файл казино Sol – выигрывай сейчас!
http://www.sol-casino-apk.ru/sol-oficzialnyj-sajt/
Люки Шагма – идеальное сочетание функциональности и эстетики для вашего интерьера. Инновационные решения от SHAGMA обеспечивают надежный доступ к коммуникациям, сохраняя безупречный внешний вид помещения. Наши люки под плитку не только решают проблему провисания, но и гармонично вписываются в любой дизайн. Выбирая SHAGMA, вы выбираете качество, долговечность и индивидуальный подход https://toolsmart.ru/info/cnews/show/8834.htm
[url=https://sol-casino-apk.ru]https://www.sol-casino-apk.ru[/url]
Загрузить последнюю версию приложения казино онлайн Sol – играй прямо сейчас!
http://www.sol-casino-apk.ru
you may have an ideal blog here! would you prefer to make some invite posts on my blog?
[url=https://monro-casino-apk.ru/monro-casino]http://www.monro-casino-apk.ru/monro-casino[/url]
Установить apk файл казино онлайн Monro – побеждай сейчас!
http://monro-casino-apk.ru/monro-casino
[url=https://monro-casino-apk.ru/monro-oficzialnyj-sajt]www.monro-casino-apk.ru/monro-oficzialnyj-sajt[/url]
Загрузить последнюю версию приложения казино онлайн Monro – выигрывай прямо сейчас!
http://www.monro-casino-apk.ru/monro-oficzialnyj-sajt
[url=https://sol-casino-apk.ru/sol-skachat/]http://sol-casino-apk.ru/sol-skachat/[/url]
Скачать последнюю версию приложения казино онлайн Сол – выигрывай сегодня!
https://sol-casino-apk.ru/sol-skachat/
deneme bonusu veren siteler http://matadorbet.bid/# matadorbet bid
Как получить, переоформить и продлить лицензию на газовое оружие. Кто может приобрести газовое оружие. Необходимые документы для лицензии на приобретение купить пневматическое оружие без лицензии
Как получить, переоформить и продлить лицензию на газовое оружие. Кто может приобрести газовое оружие. Необходимые документы для лицензии на приобретение мр79 травмат купить
Размытость симптоматики большинства заболеваний нервной системы требует особого подхода к диагностике. Опытные специалисты центра неврологии больницы Ассута в Израиле разрабатывают индивидуальные планы диагностических мероприятий для пациентов https://moscow.service-med.com/neurology/
Размытость симптоматики большинства заболеваний нервной системы требует особого подхода к диагностике. Опытные специалисты центра неврологии больницы Ассута в Израиле разрабатывают индивидуальные планы диагностических мероприятий для пациентов https://www.imcs-4u.com/otdeleniya/nevrologiya.html
A cool post there mate ! Thank you for posting.
deneme bonusu veren siteler betturkey https://casinositeleri.win/# guvenilir casino siteleri
Home decor Promo Codes [url=https://skidki-i-kupony.ru]https://skidki-i-kupony.ru[/url] .
автоматический карниз для штор [url=https://www.elektrokarniz-dlya-shtor15.ru]https://www.elektrokarniz-dlya-shtor15.ru[/url] .
сколько стоит купить образование [url=https://1russa-diploms.ru/]сколько стоит купить образование[/url] .
[url=https://monro-casino-apk.ru/monro-na-androjd]monro-casino-apk.ru/monro-na-androjd[/url]
Загрузить последнюю версию приложения казино Монро – побеждай прямо сейчас!
http://www.monro-casino-apk.ru/monro-na-androjd
[url=https://sol-casino-apk.ru/sol-apk/]sol-casino-apk.ru/sol-apk/[/url]
Скачать приложение казино Sol – выигрывай прямо сейчас!
https://www.sol-casino-apk.ru/sol-apk/
Бесплатные виртуальные номера страны Белоруссия с кодом +375 для приема СМС, получения активации сервисов и аренды мобильного телефона Виртуальный номер для Twitter
Тут можно преобрести оружейный шкаф купить москва оружейный сейф москва
Бесплатные виртуальные номера страны Белоруссия с кодом +375 для приема СМС, получения активации сервисов и аренды мобильного телефона купить виртуальный номер США
В настоящее время одной из ключевых современных информационных угроз для общества в сфере медиабезопасности становится вовлечение детей и подростков в деструктивные Интернет-сообщества тг с сливом школьниц
В настоящее время одной из ключевых современных информационных угроз для общества в сфере медиабезопасности становится вовлечение детей и подростков в деструктивные Интернет-сообщества секс слив школьницы минет
Займ 150 000 тенге Sravnim.kz
соут специальная оценка условий труда цена обязательная оценка условий труда
Ни одно застолье невозможно представить себе без освежающих безалкогольных напитков. Сейчас вам не придется тратить свое время и силы на то, чтобы ездить в магазины и покупать соки, минеральную воду доставка алкоголя москва alcodostavkaclub07
Ни одно застолье невозможно представить себе без освежающих безалкогольных напитков. Сейчас вам не придется тратить свое время и силы на то, чтобы ездить в магазины и покупать соки, минеральную воду алкоголь купить ночью с доставкой в москве
внеплановая соут процедура специальной оценки условий труда
Your style is so unique in comparison to other folks I’ve read stuff from. Many thanks for posting when you’ve got the opportunity, Guess I’ll just book mark this site.
Тут можно преобрести сейф противопожарный купить сейфы от пожара
Ведь есть же десятки сервисов для номеров из других стран. А беларусские форумы огорожены, им подавай только их собственный картофель типа +375 купить номер Украины
Best activator windows free download https://www.re-thinkingthefuture.com/technologies/gp2670-downloading-and-launching-kmspico
Ведь есть же десятки сервисов для номеров из других стран. А беларусские форумы огорожены, им подавай только их собственный картофель типа +375 купить временный номер для Телеграм
Melbet – начинай играть на реальные деньги на официальном сайте онлайн казино Мелбет и выигрывай крупные суммы в популярных игровых автоматах kometa casino зеркало cometacasino909
Melbet – начинай играть на реальные деньги на официальном сайте онлайн казино Мелбет и выигрывай крупные суммы в популярных игровых автоматах комета casino кометаcasino316 online
Веб агентство в Москве выполняет разработку сайтов на платформе Битрикс под ключ. Дополнительные услуги – продвижение в поисковых системах Яндекс и Гугл, техническая поддержка, обслуживание, аудит, тестирование, наполнение контентом, контекстная реклама и маркетинг webstudiya-razrabotki.ru
download instagram stories [url=https://freeinstviewer.com]download instagram stories[/url] .
Полезные советы по безопасной покупке диплома о высшем образовании
winda.top/viewtopic.php?f=17&t=810290
[url=https://monro-casino-apk.ru]http://www.monro-casino-apk.ru[/url]
Скачать apk файл казино онлайн Monro – играй прямо сейчас!
monro-casino-apk.ru
аренда сноуборда роза хутор https://prokat-lyzh-krasnaya-polyana.ru
iphone 11 pro купить айфон 11 128 цена
I have been surfing on-line greater than 3 hours lately, yet I by no means found any fascinating article like yours.
It is lovely worth enough for me. In my view, if all webmasters and
bloggers made just right content as you probably did, the internet might be
a lot more useful than ever before.
Тут можно преобрести сейф для карабина купить цена сейфа для оружия
Explorez des jeux varies et passionnants sur Mostbet | Beneficiez d’un jeu responsable et securise avec Mostbet | Obtenez des bonus d’inscription en rejoignant Mostbet Maroc | Accedez a des jeux de casino diversifies sur Mostbet Maroc | Des bonus de bienvenue sont disponibles sur Mostbet | La plateforme Mostbet Maroc est a la pointe de la technologie | Jouez a des jeux de casino varies sur Mostbet Maroc | Obtenez de l’aide instantanee du support client de Mostbet | Mostbet vous donne acces a une variete de jeux de casino http://www.telecharger-mostbet-maroc.com [url=http://www.telecharger-mostbet-maroc.com]www.telecharger-mostbet-maroc.com[/url].
Создание лендингов под ключ в студии в Москве включает проектирование, дизайн и программирование, обеспечивающее эффективность и удобство использования. Также предоставляются услуги: оптимизация для Яндекс и Google, настройка рекламных кампаний, поддержка, обслуживание и ведение маркетинга разработка landing page
Создание лендингов под ключ в студии в Москве включает проектирование, дизайн и программирование, обеспечивающее эффективность и удобство использования. Также предоставляются услуги: оптимизация для Яндекс и Google, настройка рекламных кампаний, поддержка, обслуживание и ведение маркетинга studiya poddergki
Разработка лендингов в студии в Москве осуществляется с учетом современных маркетинговых стратегий и требований рынка. К основным услугам добавляются: аудит и анализ конверсии, продвижение в поисковых системах, контентное наполнение, настройка CRM и профессиональная техническая поддержка создание лендинг страниц
Разработка сайтов на платформе 1С-Битрикс в студии в Москве включает полный цикл: от проектирования до запуска и дальнейшего сопровождения. Также предлагаются услуги: оптимизация сайта для поисковых систем, интеграция с хостингом, контентное наполнение, анализ данных и маркетинговые стратегии webstudiya-moscow.ru
Разработка лендингов в студии в Москве осуществляется с учетом современных маркетинговых стратегий и требований рынка. К основным услугам добавляются: аудит и анализ конверсии, продвижение в поисковых системах, контентное наполнение, настройка CRM и профессиональная техническая поддержка создание и разработка лендинга
Разработка сайтов на платформе 1С-Битрикс в студии в Москве включает полный цикл: от проектирования до запуска и дальнейшего сопровождения. Также предлагаются услуги: оптимизация сайта для поисковых систем, интеграция с хостингом, контентное наполнение, анализ данных и маркетинговые стратегии разработка интернет магазина на 1с битрикс
Полный цикл маркетинговых услуг: от настройки рекламы, SEO-продвижения, создания сайтов до управления репутацией в интернете и PR https://makeallperfect.ru/
Хочешь добавить остроты в свою интимную жизнь и не знаешь, с чего начать? У нас есть то, что тебе нужно! В нашем магазине можно купить секс игрушки по самым разным вкусам: от классических вибраторов и фаллоимитаторов до инновационных игрушек для взрослых, которые подарят новые ощущения. Мы предлагаем заказать секс игрушки онлайн — это просто и удобно, ведь интим игрушки станут идеальным дополнением для разнообразных сексуальных приключений. У нас только самые качественные секс товары, созданные, чтобы доставлять максимум удовольствия. Хотите попробовать что-то новое? Стимуляторы, БДСМ аксессуары и игрушки для секса уже ждут вас. Дешево? Конечно, у нас всегда есть предложения, чтобы сделать стоимость покупки более приятной. Будь то эротические игрушки для себя или для партнера — мы знаем, как сделать вашу ночную жизнь по-настоящему яркой https://topsexshop3.co.ua/
Апартаменты Napa Gem в пешей доступности от одного из самых красивых пляжей Кипра, а также бурного веселья на шумном летнем курорте Айя-Напа кипр недвижимость дом
Апартаменты Napa Gem в пешей доступности от одного из самых красивых пляжей Кипра, а также бурного веселья на шумном летнем курорте Айя-Напа недвижимость кипра цены
Продажа недвижимости на Кипре: 10 674 предложения с ценами и фото. Tranio поможет подобрать и купить жилье на Кипре стоимостью от 54 000€ недвижимость на кипре цены
Продажа недвижимости на Кипре: 10 674 предложения с ценами и фото. Tranio поможет подобрать и купить жилье на Кипре стоимостью от 54 000€ купить дом на кипре фото
Скачать казино Рейтинг казино
Thanks so much for this, keep up the good work 🙂
Very often I go to see this blog. It very much is pleasant to me. Thanks the author
В нейрохирургических отделениях израильских клиник сегодня производятся самые революционные операции на спинном и головном мозге, которые максимально результативны и безопасны https://neurosurgeryisrael.wordpress.com
В нейрохирургических отделениях израильских клиник сегодня производятся самые революционные операции на спинном и головном мозге, которые максимально результативны и безопасны https://diagnostikaisrail.wordpress.com
Does it look like we’re in for a big ride here?
Тут можно преобрести сейф для оружия цена в москве сейф оружейный доставка
This article gives clear idea for the new users of blogging, that
genuinely how to do running a blog.
Hello there I am so delighted I found your weblog, I really found you by mistake, while I was searching on Google for something else, Anyhow I am here now and would just like to say cheers for a remarkable post and a all round exciting blog (I also love the theme/design), I don’t have time to browse it all at the moment but I have book-marked it and also included your RSS feeds, so when I have time I will be back to read a lot more, Please do keep up the superb work.
Приобретение диплома ПТУ с сокращенной программой обучения в Москве
laren.flybb.ru/viewtopic.php?f=2&t=215
Utilisez le code promo Mostbet pour obtenir un bonus de bienvenue | Pariez sur vos sports favoris avec Mostbet Maroc | Accedez aux paris sportifs et aux jeux de casino avec Mostbet Maroc mostbet casino [url=https://telecharger-mostbet-apk-maroc.com/]mostbet casino[/url].
[url=https://super-bag.ru/catalog/brendovaya_zhenskaya_odezhda/brendovye_zhenskie_bryuki/]купить брендовые брюки[/url] или [url=https://super-bag.ru/catalog/zhenskie_sumki/]копии брендовых сумок[/url]
[url=https://super-bag.ru/catalog/brendovaya_zhenskaya_odezhda/brendovaya_zhenskaya_verkhnyaya_odezhda/kurtka/]брендовые куртки[/url]
https://luxmsk.ru/catalog/zhenskie-sumki/brendovye-zhenskie-aksessuary/
Ещё можно узнать: [url=https://super-bag.ru/catalog/brendovaya_zhenskaya_odezhda/brendovye_platya/]брендовые платья купить[/url]
аксессуары женские брендовые
I could not resist commenting. Well written!
стоимость укладка кафельная плитка https://ukladka-keramogranita-spb.ru
сервис накрутки подписчиков ютуб [url=https://nakrutkamedia11.com]сервис накрутки подписчиков ютуб[/url] .
Возможно ли купить диплом стоматолога, и как это происходит
заказать создание и продвижение сайта [url=https://prodvizhenie-sajtov-v-moskve214.ru/]заказать создание и продвижение сайта[/url] .
seo продвижение сайта заказать в москве [url=https://prodvizhenie-sajtov-v-moskve215.ru]seo продвижение сайта заказать в москве[/url] .
франшиза бизнес [url=www.franshizy17.ru]франшиза бизнес[/url] .
Вопросы и ответы: можно ли быстро купить диплом старого образца?
obviously like your website but you have to take a look at
the spelling on quite a few of your posts. Many of them are rife with
spelling issues and I in finding it very troublesome
to inform the truth however I’ll definitely come again again.
betflik285
В мире, где каждый элемент окружения играет важную роль, особое внимание стоит уделить тому, как мы оформляем свои жилища и рабочие места. Современные технологии позволяют преобразить любое пространство, добавив в него уникальные акценты и характер http://bisstart.ru/index.php?option=com_k2&view=itemlist&task=user&id=417583
Фотосфера – это долгожданный момент творчества, вдохновение, радость, уникальные дизайны и невероятно красивые решения. Это творческая лаборатория, где люди на основе снимков и изображений создают шедевры для себя, родных и друзей салон печати
you are in reality a good webmaster The website loading velocity is amazing It sort of feels that youre doing any distinctive trick Also The contents are masterwork you have done a fantastic job in this topic
Фотосфера – это долгожданный момент творчества, вдохновение, радость, уникальные дизайны и невероятно красивые решения. Это творческая лаборатория, где люди на основе снимков и изображений создают шедевры для себя, родных и друзей фотостудия центр
Мы печатаем развороты фотокниг на высококачественной профессиональной фотобумаге Fujicolor Crystal Archive Digital тип DP II (матовая или тиснёная) на современной машине Noritsu QSS 3704HD фотокнига цена
Откройте мир вождения с нашей автошколой, обучающей безопасным навыкам управления автомобилем. Мы предлагаем высококачественное обучение вождению, которое поможет вам уверенно управлять автомобилем в любых условиях москва сдать на права
Мы печатаем развороты фотокниг на высококачественной профессиональной фотобумаге Fujicolor Crystal Archive Digital тип DP II (матовая или тиснёная) на современной машине Noritsu QSS 3704HD печать фотокниги в москве
вот нашел https://mederofey.ru тут есть сообщество
Thank you pertaining to sharing the following great subject matter on your website. I ran into it on google. I am going to check to come back after you publish additional aricles.
Profitez des meilleures cotes avec Mostbet pour vos paris sportifs | Beneficiez d’un jeu responsable et securise avec Mostbet | Mostbet Maroc garantit des cotes attractives pour chaque match | Consultez les conseils d’experts disponibles sur Mostbet | Mostbet est une option ideale pour les amateurs de paris | Accedez a des jeux de qualite superieure sur Mostbet Maroc | Suivez les evenements sportifs en direct sur Mostbet Maroc | Mostbet vous propose des promotions hebdomadaires attrayantes | Jouez avec des cotes imbattables sur Mostbet Maroc https://telecharger-mostbet-maroc.com [url=https://telecharger-mostbet-maroc.com]https://telecharger-mostbet-maroc.com[/url].
Тут можно преобрести цена сейфа для оружия сейф для охотничьего ружья
Сервисный центр предлагает починить парогенератора magnit ремонт парогенераторов magnit адреса
I like to spend my free time by scanning various internet resources. Today I came across your website and I found it has some of the most practical and helpful information I’ve seen.
Для успешного использования платформы необходимо иметь доступ к личному кабинету. Этот процесс включает несколько простых шагов, которые помогут вам зайти в аккаунт и использовать все его возможности. Независимо от устройства, важен правильный подход, чтобы избежать возможных ошибок http://kochtagebuch.org/doku.php?id=%20%D0%9E%D0%B1%D1%85%D0%BE%D0%B4%20%D0%B1%D0%BB%D0%BE%D0%BA%D0%B8%D1%80%D0%BE%D0%B2%D0%BA%D0%B8%201win:%20%D1%81%D0%BE%D0%B2%D0%B5%D1%82%D1%8B%20%D0%B8%20%D1%85%D0%B8%D1%82%D1%80%D0%BE%D1%81%D1%82%D0%B8
Some genuinely choice content on this site, bookmarked .
Мы – это интернациональная команда с большим опытом работы в сфере микрофинансирования, кредитования и банковского дела. Наши сотрудники ежедневно вносят свой вклад в микрофинансирование, помогая клиентам и партнерам выбрать лучшее решение для развития бизнеса микрозайм для бизнеса
Желаете безопасно купить травматическое оружие?
[img]https://cdn4.cdn-telegram.org/file/Hykr5BYwK6nwxMhh8Sd4720mHsTOOTaHi8rFb4p9krR2TW–oKm5zOax34TpTZjiJKB6w2_rrZuDjd3OJ7XKvCaRzxZxt1gKS68pAUlWcZ3xruXcgDbR4e7qeup0cdyWAKkteOwYQys2_u0x37Nfac4wP6d8nux-HKM7bepDzgJXQwSvevfOb6RgNuMOvld2OSvZh9xZBIIVLKeTxvs-AyF-1ttHAdZKCSxmvX3rt3nVA41MT5Ktm1ZZoxH9ocEc_JJhktNVI47S1uSBQqejoTnHhgPlR4aZnygwGk6XAz3JgXl36YjfPYo_nX6RGCGzHUpYm47sNxp4_hMuFidyVA.jpg[/img]
Сейчас проверенный канал в Телеграме «Поле чудес» предлагает своим пользователям заказать травматическое оружие, а познакомиться с предложениями возможно непосредственно на канале или же при помощи опытного сотрудника, который подробно расскажет про каждый вариант.
Это ТГ-канал сумел завоевать прекрасную репутацию, предлагая пистолеты высокого качества, благодаря которым можно защитить себя и родных. Клиенты могут бесплатно получить лицензию, благодаря которой использовать и носить травматическое оружие можно официально, без нарушения действующего законодательства. Магазин гарантирует полную конфиденциальность, поэтому пользователи смогут не беспокоиться о анонимности. Если вы хотите [url=https://telegra.ph/KUPIT-TRAVMATICHESKOE-BOEVOE-ORUZHIE-11-08]купить травматический пистолет без лицензии[/url] – то тут Вы сможете отыскать то, что искали!
Уникальные возможности канала
[img]https://cdn4.cdn-telegram.org/file/EX4LuJpQVUcXMWuaNyeur9Ba1f_2QUA-F1JRpOEd1r1fVmifLPw4dxUMVZgoWUlGdZ6rLyLO3PedlyJSxHyXyDKAZDEF4e8OdXcqKyfCATmgrDuebgDIB82EeY7K6YT3Iyf1mR5f8eNx-1ApoSxgX2OMsnt04Q4TuLAia3_n-kYAvgYU0LCBxJzFifds_9R3DhBNPesTIi3as4-e_rqj3FhdI3CP1-Sp-7GHxv-6MpDegOp1Dn46oHUI11sb7rgXDaQLb8fBLNrEgoNHKlY_RwP3wpr-dwFCmykA00kyNUAZ4iVH_V-9UoucchwCAhN_0TDW1gTS80POhOwWZPGFaQ.jpg[/img]
Этот ТГ-канал предлагает оружие по достаточно привлекательным ценам, а очень многие покупатели выбирают этот онлайн-магазин за счет следующих преимуществ:
• Прекрасная репутация.
• Доставка в день заказа.
• Большой комплект.
• Привлекательные цены.
Любой покупатель совместно с оружием получает магазин с патронами, кейс для хранения и набор для чистки, благодаря которому оружие прослужит длительные годы.
Преимущественные особенности магазина
[img]https://cdn4.cdn-telegram.org/file/LphN2SanQCudo4TjhATEuMLOxRPhByXa1pY56rVw-15jhHG6ciSGTTp2dr5ta3NjeC98_pP6wFukwyNqkgwDAdWBEwLiUkVZr2fa_1EYDi-hOjGpIFMfkdbunQFeIpadHlmpWNmsELsRynX_nmDIwWjlUH9-E0ICVxrqR-qLQmWwLXjTel-JNrYnseX9D7SV4Jb0vsFhovfWcoFs8u4Sg57MhTpP7hRjQhZuSU5R3JepeSbUktIt_tMozLpXerjdvPhyWy1geP4AN2yMnPRS0okh9bEqfIGaNmm39lCDwg2G9QC_hjHTmxJeMv7YLNhTTLRD3DAWFsDeJGsa1z9Ezw.jpg[/img]
Данный ТГ-канал на протяжении длительного времени специализируется на продаже надежного оружия, поэтому в каталоге клиентов ждут варианты, благодаря которым можно не беспокоиться о своей безопасности и близких. Заказать травмат возможно просто и легко, связавшись со специалистом в Телеграме, после чего заказ будет оформлен очень быстро. В том случае, если вы хотите [url=https://telegra.ph/KUPIT-TRAVMATICHESKOE-BOEVOE-ORUZHIE-11-08]оружие купить боевой пистолет[/url] – то здесь Вы всегда отыщите то, что искали!
Заказать травматическое оружие можно с оперативной доставкой во все регионы нашей страны, получив его в день оформления, помимо всего прочего, доставка осуществляется абсолютно бесплатно в указанное место или же курьером. Именно здесь трудится сплоченная команда профессионалов, которые знают почти все про травматическое оружие и всегда могут поделиться своим мнением с заказчиками!
Предложения для открытия бизнеса ИП с нуля — редкость. Для получения займа предприниматель уже должен работать на рынке. Обычно не меньше 6 месяцев займы на развитие бизнеса
Мы – это интернациональная команда с большим опытом работы в сфере микрофинансирования, кредитования и банковского дела. Наши сотрудники ежедневно вносят свой вклад в микрофинансирование, помогая клиентам и партнерам выбрать лучшее решение для развития бизнеса микрокредитование для малого бизнеса
Мы предлагаем разнообразные курсы, чтобы соответствовать вашим потребностям в обучении вождению. Начните свою карьеру на дороге прямо сейчас вместе с нами автошкола недорого в москве
Wonderful work! That is tthe type oof infomation hat are meant to
bee shared around tthe net. Shame oon Google forr no longer postioning this pput
upp upper! Comme on over aand visit myy site . Thankls =)
Предложения для открытия бизнеса ИП с нуля — редкость. Для получения займа предприниматель уже должен работать на рынке. Обычно не меньше 6 месяцев взять кредит под открытие бизнеса
Мы предлагаем разнообразные курсы, чтобы соответствовать вашим потребностям в обучении вождению. Начните свою карьеру на дороге прямо сейчас вместе с нами обучение в автошколе цена москва
This is definitely a wonderful webpage, thanks a lot..
[url=https://telegra.ph/EHSKORT-MOSKVA–RED-ROOM-11-08]проститутки москва часы[/url]
Покупайте монеты, продавайте их, https://ferdinand.com.ua/forum/topics/obmen-usdt-trc20-na-privat24-onlajn.13943/ приумножайте ценность – причём всё это в одном приложении.
There are various tools and websites that claim to permit users
to view private Instagram profiles, but it’s important to open these as soon as caution. Many of these tools can be unreliable, may require personal information, or could violate Instagram’s terms of
service. Additionally, using such tools can compromise
your own security or guide to scams. The safest and most ethical pretension to view
a private profile is to send a follow demand directly to the user.
Always prioritize privacy and respect in your
online interactions.
Feel free to surf to my page; view private instagram free
Baixe o aplicativo Mostbet e aproveite apostas esportivas em qualquer lugar | Faca o download do Mostbet apk e tenha o aplicativo sempre a mao | Participe do cassino online Mostbet e ganhe premios em dinheiro | Aproveite o app do Mostbet para conveniencia nas apostas | Mostbet e a escolha ideal para apostas esportivas e cassino | Explore a diversao dos jogos Aviator e slots no Mostbet | Explore o Mostbet Brasil e descubra uma plataforma completa | O Mostbet oferece otimas promocoes para novos usuarios | Jogue no Mostbet e descubra o verdadeiro prazer das apostas cassino mostbet [url=https://mostbet-casino-brasil-br.com/]https://mostbet-casino-brasil-br.com/[/url].
[url=https://jet-casino-apk.ru/jet-skachat]http://jet-casino-apk.ru/jet-skachat[/url]
Скачать apk файл онлайн казино Джет – играй сейчас!
http://www.jet-casino-apk.ru/jet-skachat
hlktxx.cnNice post. I understand some thing much harder on diverse blogs everyday
Hi there, I enjoy reading through your post. I wanted to write
a little comment to support you.
Использование разнообразных источников финансирования помогает компаниям достигать устойчивого развития, минимизируя риски и максимизируя эффективность инвестиций в проекты и инновации http://jkmulti.vip/bbs/board.php?bo_table=free&wr_id=5218443
[url=https://selector-casino-apk.ru/selector-skachat/]http://www.selector-casino-apk.ru/selector-skachat/[/url]
Установить последнюю версию приложения казино онлайн Селектор – побеждай сегодня!
http://www.selector-casino-apk.ru/selector-skachat/
Использование разнообразных источников финансирования помогает компаниям достигать устойчивого развития, минимизируя риски и максимизируя эффективность инвестиций в проекты и инновации http://balaklavskiy-16.ru/post/1630/#p1630
I don’t normally comment but I gotta say appreciate it for the post on this one : D.
Лизинг — услуга для компаний и ИП, снижающая затраты на покупку транспортных средств для коммерческих и личных целей. Выберите автомобиль, подпишите договор лизинг легкового и коммерческого автотранспорта
Подскажите, где в Москве можно купить качественную строительную технику, такую как башенные краны или мачтовые подъемники? Интересуют надежные компании с хорошей репутацией https://oldforum.citysakh.ru/?talkid=27198
Тут можно преобрести огнестойкие сейфы цена сейф противопожарный купить
Лизинг — услуга для компаний и ИП, снижающая затраты на покупку транспортных средств для коммерческих и личных целей. Выберите автомобиль, подпишите договор автотранспорт грузовой в лизинг
Подскажите, где в Москве можно купить качественную строительную технику, такую как башенные краны или мачтовые подъемники? Интересуют надежные компании с хорошей репутацией https://svisgaz.by/forum/messages/forum1/topic150/message227/#message227
Thank you for this great piece of content. Best Regards
Тут можно преобрести купить оружейный сейф для пистолета сейфы для оружия купить
[url=https://tenchat.ru/media/2728961-razdacha-tovarov-za-otzyvy-gayd-po-vykupam]выкуп товара за отзывы на Wildberries[/url]
My brother suggested I might like this web site.
He was totally right. This post actually made my day.
You can not imagine simply how much time I had spent for this information! Thanks!
предметы можно заплатить за них и получить в
офлайн московском офисе, в магазине предусмотрена доставка в регионы.
My site – Мини скрытые электронные часы dvr h.264 full hd 1080 p
ST666 – Nhà Cái Uy Tín Hàng Đầu Việt Nam
ST666 là một trong những nhà cái uy tín số 1 tại Việt Nam, cung cấp đa dạng các trò chơi cá cược hấp dẫn như cá cược thể thao, casino, xổ số, đá gà, bắn cá, và nhiều trò chơi thú vị khác. Không chỉ vậy, ST666 còn mang đến các chương trình khuyến mãi hấp dẫn, giúp người chơi nhận được nhiều ưu đãi hấp dẫn khi tham gia.
Trò Chơi Cá Cược Tại ST666
ST666 cung cấp các trò chơi cá cược đa dạng, đáp ứng nhu cầu của mọi đối tượng người chơi. Các trò chơi nổi bật tại ST666 bao gồm:
Cá Cược Thể Thao: Các sự kiện thể thao hấp dẫn từ bóng đá, tennis đến các môn thể thao khác.
Casino: Trải nghiệm các trò chơi casino với chất lượng cao như blackjack, baccarat, roulette, và các trò chơi slot machines.
Đá Gà: Trận đấu đá gà gay cấn, nơi người chơi có thể tham gia cá cược và theo dõi những trận đấu kịch tính.
Xổ Số: Chơi xổ số và thử vận may để nhận những phần thưởng giá trị.
Bắn Cá: Trò chơi bắn cá với đồ họa sống động và hấp dẫn.
Esports: Tham gia cá cược vào các trận đấu thể thao điện tử hấp dẫn với các đội tuyển hàng đầu.
Khuyến Mãi Hấp Dẫn
ST666 luôn có các chương trình khuyến mãi hấp dẫn để tri ân người chơi, bao gồm:
Khuyến Mãi 100% Nạp Lần Đầu: Người chơi mới khi đăng ký tài khoản và nạp tiền lần đầu sẽ nhận được khuyến mãi nạp tiền lên tới 100%.
Bảo Hiểm Casino: ST666 cung cấp bảo hiểm cho các trò chơi casino, giúp người chơi giảm thiểu rủi ro khi tham gia.
Khuyến Mãi Thể Thao: Các chương trình khuyến mãi hấp dẫn dành riêng cho cá cược thể thao, giúp người chơi gia tăng cơ hội chiến thắng.
Đăng Ký và Đăng Nhập ST666
Để bắt đầu trải nghiệm các trò chơi và tham gia cá cược tại ST666, người chơi cần thực hiện các bước đơn giản sau:
Đăng Ký: Tạo tài khoản tại ST666 để nhận các ưu đãi và khuyến mãi hấp dẫn.
Đăng Nhập: Sau khi đăng ký thành công, người chơi có thể đăng nhập vào tài khoản để tham gia các trò chơi cá cược trực tuyến.
Nạp Tiền và Rút Tiền: ST666 hỗ trợ nhiều phương thức nạp và rút tiền linh hoạt, giúp người chơi giao dịch nhanh chóng và an toàn.
ST666 – Nơi Gửi Gắm Niềm Tin
ST666 không chỉ là nhà cái mà còn là nơi cung cấp môi trường cá cược công bằng và minh bạch. Người chơi luôn cảm thấy an tâm với các chính sách bảo mật chặt chẽ và dịch vụ hỗ trợ khách hàng 24/7. ST666 xứng đáng là điểm đến tin cậy cho những ai yêu thích cá cược trực tuyến.
Thông Tin Liên Hệ
Nếu bạn có bất kỳ câu hỏi hay thắc mắc nào, vui lòng liên hệ với ST666 qua các kênh hỗ trợ khách hàng. Chúng tôi luôn sẵn sàng giải đáp và hỗ trợ bạn.
CEO & Founder: Đặng Nhất Nam
Facebook ST666: Cập nhật những tin tức mới nhất và nhận các khuyến mãi hấp dẫn tại trang Facebook chính thức của ST666.
Поднимайте ставки и выигрывайте крупные суммы с онлайн-казино Плейфортуна! Уникальные слоты и щедрые бонусы ждут вас здесь https://playfortuna24x7sb.com/ru
Покупка диплома о среднем полном образовании: как избежать мошенничества?
avtoweek2016.ru/oformit-diplom-za-nedelyu-legko-i-prosto
Escape From Tarkov, is a realistic first-person shooter, from the Russian Battlestate Games that came out as a closed alpha in 2016, currently in an open beta phase. The game is about escaping from Tarkov, and that happens in the world, with both NPCs and other players, raiding, and lots of lots http://manjr.com/2018/lifestyle/celebrate-national-moscow-mule-day-the-right-way/
Escape From Tarkov, is a realistic first-person shooter, from the Russian Battlestate Games that came out as a closed alpha in 2016, currently in an open beta phase. The game is about escaping from Tarkov, and that happens in the world, with both NPCs and other players, raiding, and lots of lots https://www.woman.sk/relax/relax-knihy/fajnsmeker-najchutnejsie-recepty/
How long does it take you to write an article like this?
Расчет и покупка спецтехники в лизинг для юр. лиц и ИП. Лучшие предложения лизинга на строительную технику и быстрое оформление лизинг на спецтехнику для ип
Расчет и покупка спецтехники в лизинг для юр. лиц и ИП. Лучшие предложения лизинга на строительную технику и быстрое оформление лизинг физ лицу на спецтехнику
I truly love your blog.. Pleasant colors & theme. Did you make this amazing site yourself? Please reply back as I’m wanting to create my own website and want to learn where you got this from or just what the theme is called. Kudos.
[url=https://t.me/tovaryzaotzivkeshbek]выкупы товаров за отзывы[/url]
Всё, что нужно знать о покупке аттестата о среднем образовании без рисков
I am glad to talk with you and you give me great help
Приобретение нового оборудования в лизинг для бизнеса на выгодных условиях. Длительные сроки финансирования. Специальные программы от поставщиков лизинг оборудования уфа
1xwin venezuela
Приобретение нового оборудования в лизинг для бизнеса на выгодных условиях. Длительные сроки финансирования. Специальные программы от поставщиков прачечное оборудование в лизинг
Какую спецтехнику можно взять в лизинг? В нашей компании предоставляется большой выбор спецтехники для лизинга. Вам доступны экскаваторы, погрузчики, бульдозер лизинг спецтехники
стоимость укладки кафельной плитки за квадратный метр https://ukladka-keramogranita-price.ru
Какую спецтехнику можно взять в лизинг? В нашей компании предоставляется большой выбор спецтехники для лизинга. Вам доступны экскаваторы, погрузчики, бульдозер взять в лизинг спецтехнику
vavada online casino
I couldn’t refrain from commenting. Well written!
вывод из запоя цены ростов на дону [url=https://chesskomi.borda.ru/?1-8-0-00003044-000-0-0-1730725479/]https://chesskomi.borda.ru/?1-8-0-00003044-000-0-0-1730725479/[/url] .
вывод из запоя на дому ростов круглосуточно [url=http://aqvakr.forum24.ru/?1-7-0-00011575-000-0-0-1730725206/]вывод из запоя на дому ростов круглосуточно[/url] .
вывод из запоя цены на дому ростов [url=http://aktivnoe.forum24.ru/?1-7-0-00012822-000-0-0-1730725137]http://aktivnoe.forum24.ru/?1-7-0-00012822-000-0-0-1730725137[/url] .
вывод из запоя на дому ростов [url=http://www.rodoslav.forum24.ru/?1-4-0-00000569-000-0-0-1730725681]вывод из запоя на дому ростов[/url] .
промокод на продамус [url=https://www.prodamus-promokod1.ru]промокод на продамус[/url] .
На приеме гинеколог проводит осмотр воспалений, новообразований и других гинекологических патологий, проводит диагностику заболеваний женских половых органов и выявляет их на ранних стадиях https://www.intensedebate.com/people/evvgenyyandreev
Друзья, мне нужен совет знающих. Можете ли Вы мне подсказать каким образом можно вывести на гривну криптовалюту? Какие обменники есть их хороших http://pro-orenburg.ru/forum/thread8526.html#10396
На приеме гинеколог проводит осмотр воспалений, новообразований и других гинекологических патологий, проводит диагностику заболеваний женских половых органов и выявляет их на ранних стадиях http://dotstroy.ru/userinfo.php?uid=47847
Друзья, мне нужен совет знающих. Можете ли Вы мне подсказать каким образом можно вывести на гривну криптовалюту? Какие обменники есть их хороших http://portal.krasno.ru/viewtopic.php?f=2&t=59479
[url=https://tenchat.ru/media/2750073-tovary-za-otzyv-razdachi-s-keshbekom-ili-bally-za-otzyv]выкуп товаров за отзывы на Вайлдберриз[/url]
vavada promo codes
Как выбрать гирлянды для новогоднего оформления фасада дома? Виды подсветки, лучшие материалы, обзор разных моделей гирлянд и советы по монтажу: https://dzen.ru/a/Zy5D8pM8zzfwUtJ0
[url=https://jet-casino-apk.ru/jet-na-androjd/]jet-casino-apk.ru/jet-na-androjd/[/url]
Установить apk файл казино Jet – побеждай сегодня!
jet-casino-apk.ru/jet-na-androjd/
[url=https://selector-casino-apk.ru/selector-casino]selector-casino-apk.ru/selector-casino[/url]
Загрузить последнюю версию приложения онлайн казино Селектор – побеждай прямо сейчас!
http://selector-casino-apk.ru/selector-casino
Si vous souhaitez organiser un escape game pour Halloween on vous conseille de lire notre article sur le sujet.
Пошаговая инструкция по официальной покупке диплома о высшем образовании
1win app
Noodlemagazine I appreciate you sharing this blog post. Thanks Again. Cool.
Здесь можно преобрести сейф в наличии купить сейф интернете
https://ric-clinic.ru клиника медицина остеопат ортопед
Тут можно преобрести огнестойкие сейфы сейф огнеупорный купить
Обмен криптовалют на USDT (Tether) является обычной практикой в мире цифровых активов, предлагая стабильную альтернативу более волатильным криптовалютам https://forum.i.ua/topic/20828
Платформа уникальная и отличная в плане удобств (начиная от ввода и вывода средств, заканчивая инструментами для торговли). Постоянные улучшения. Куча графиков покет опшн
Обмен криптовалют на USDT (Tether) является обычной практикой в мире цифровых активов, предлагая стабильную альтернативу более волатильным криптовалютам http://deformation.pp.net.ua/forum/6-2629-1
Купить виртуальный сервер VPS/VDS от 169 р/месяц, с возможностью самостоятельного администрирования. Аренда хостинга VPS или VDS сервера аренда
Купить виртуальный сервер VPS/VDS от 169 р/месяц, с возможностью самостоятельного администрирования. Аренда хостинга VPS или VDS облачный сервер
Узнайте, как приобрести диплом о высшем образовании без рисков
Швидка реєстрація та безпечні виплати на Mostbet | Скачайте Mostbet та отримайте доступ до ексклюзивних ігор | Бездепозитні бонуси та найкращі умови для гри тільки на Mostbet | Випробуйте свою удачу на офіційному сайті Mostbet | Mostbet – для тих, хто любить вигравати [url=https://mostbetlogin.kiev.ua/]ставки на спорт мостбет[/url]
вывод. из. запоя. анонимно. ростов. [url=vip.mybb.rocks/viewtopic.php?id=7671]vip.mybb.rocks/viewtopic.php?id=7671[/url] .
bc game sign in
Mostbet-da o‘yin o‘ynash imkoniyati har doim mavjud | Mostbet platformasidan foydalanib, qiziqarli o‘yinlarga qo‘shiling | Mostbet-da ro‘yxatdan o‘tish juda oson va tezkor | Mostbet-ning mobil ilovasi bilan o‘yinlaringiz yanada qiziqarli bo‘ladi | Mostbet O‘zbekiston bozorida yetakchi o‘yin platformasi [url=http://mostbetazcasino.com.az/]mostbetazcasino.com.az[/url]
Тут можно преобрести сейф для оружия от производителя купить сейф с доставкой в москве
Оформіть реєстрацію на мостбет та грайте будь-де | Легке завантаження мостбет на мобільний телефон | Бездепозитні бонуси для нових користувачів на мостбет | Мостбет – ваш вибір для азартних ігор в Україні | Ставки та гра на mostbet – ваш шлях до великих виграшів [url=https://mostbetregistration.kiev.ua/]реєстрація мостбет[/url]
neon54 online casino
Hello mates, good piece of writing and nice arguments commented here, I
am in fact enjoying by these.
Mostbet – найкращий вибір для ставок в Україні | Вигравайте на mostbet казино просто зараз | Скачайте mostbet і отримайте доступ до всіх ігор | Скачайте мостбет і грайте без обмежень | Відкрийте світ азарту з мостбет [url=https://mostbet-ua-casino.kiev.ua/]most bet casino[/url]
Well done! Keep up this quality!
Для создания индивидуального тарифа на виртуальный выделенный сервер в России можно воспользоваться онлайн-калькулятором на сайте, или обратиться в службу аренда 1с сервера
Когда речь идет о комфортной организации пространства, на помощь приходят инновационные подходы. Элементы, которые можно комбинировать и адаптировать, открывают множество возможностей для создания идеального хранилища готовая гардеробная система купить
Разнообразие предложений на рынке позволяет легко подобрать удобные варианты для хранения личных вещей. Предметы могут быть адаптированы под любые размеры и потребности, что делает процесс организации не только полезным, но и приятным гардеробная система в прихожую
Для создания индивидуального тарифа на виртуальный выделенный сервер в России можно воспользоваться онлайн-калькулятором на сайте, или обратиться в службу что такое домен сайта
Когда речь идет о комфортной организации пространства, на помощь приходят инновационные подходы. Элементы, которые можно комбинировать и адаптировать, открывают множество возможностей для создания идеального хранилища система хранения для гардеробной купить недорого
Разнообразие предложений на рынке позволяет легко подобрать удобные варианты для хранения личных вещей. Предметы могут быть адаптированы под любые размеры и потребности, что делает процесс организации не только полезным, но и приятным недорогие гардеробные системы модульные
rybpharm rybelsus: semaglutide – semaglutide
Summary of Cryptocurrency Transfer Check and Compliance Options
In the current crypto sector, maintaining deal openness and adherence with Anti-Money Laundering (AML) and Know Your Customer (KYC) standards is crucial. Here is an summary of well-known platforms that provide tools for digital asset transfer monitoring, verification, and asset security.
1. Token Metrics
Overview: Tokenmetrics provides crypto assessment to examine likely fraud threats. This platform allows users to check tokens ahead of buying to evade possibly scam assets. Attributes:
– Risk analysis.
– Suitable for holders seeking to avoid questionable or fraud assets.
2. Metamask Monitor Center
Overview: Metamask.Monitory.Center allows users to check their digital asset resources for doubtful actions and compliance compliance. Benefits:
– Verifies coins for “cleanliness”.
– Provides alerts about possible fund locks on certain trading sites.
– Delivers comprehensive insights after wallet sync.
3. BestChange.ru
Description: Bestchange.ru is a platform for monitoring and verifying cryptocurrency trade transfers, providing openness and transfer safety. Highlights:
– Transfer and wallet tracking.
– Sanctions screening.
– Internet interface; accommodates BTC and multiple different cryptocurrencies.
4. Bot amlchek
Summary: AMLchek is a holding monitor and compliance compliance tool that uses machine learning methods to identify questionable actions. Highlights:
– Transaction tracking and user check.
– Offered via online and Telegram.
– Works with digital assets like BSC, BTC, DOGE, and additional.
5. Alfabit AML
Description: AlfaBit delivers thorough anti-money laundering tools specifically made for the crypto field, assisting businesses and banks in ensuring standard compliance. Highlights:
– Comprehensive compliance options and evaluations.
– Complies with modern safety and compliance requirements.
6. AML Node
Overview: AML Node delivers AML and identification solutions for digital currency businesses, such as deal observing, sanctions screening, and analysis. Features:
– Threat analysis tools and restriction screenings.
– Useful for ensuring secure business operations.
7. Btrace.AMLcrypto.io
Overview: Btrace.AMLcrypto.io focuses on resource validation, delivering transaction observation, compliance screenings, and help if you are a target of fraud. Highlights:
– Useful assistance for fund retrieval.
– Transfer tracking and protection options.
Specialized USDT Check Solutions
Our website also reviews various platforms providing check solutions for USDT deals and holdings:
– **USDT TRC20 and ERC20 Validation:** Various services provide detailed screenings for USDT transfers, assisting in the detection of doubtful transactions.
– **AML Validation for USDT:** Options are available for observing for money laundering transactions.
– **“Cleanliness” Validation for Accounts:** Verification of deal and holding legitimacy is offered to identify possible risks.
**Wrap-up**
Choosing the suitable platform for validating and monitoring crypto transfers is important for ensuring safety and regulatory conformity. By reading our recommendations, you can choose the ideal tool for transfer tracking and resource security.
There are various tools and websites that
allegation to allow users to view private Instagram
profiles, but it’s important to right to
use these considering caution. Many of these
tools can be unreliable, may require personal information,
or could violate Instagram’s terms of service.
Additionally, using such tools can compromise your own security or lead to scams.
The safest and most ethical way to view a private profile is to send a follow request directly to the user.
Always prioritize privacy and adulation in your online interactions.
My webpage; private instagram viewer free
Всё, что нужно знать о покупке аттестата о среднем образовании
How come you do not have your website viewable in mobile format? cant see anything in my Droid.
казино vavada
проведение соут москва услуги соут
вывод из запоя на дому в ростове [url=https://ekonomimvmeste.ukrbb.net/viewtopic.php?f=14&t=65339/]вывод из запоя на дому в ростове[/url] .
вывод из запоя стационарно ростов [url=http://tatuheart.ukrbb.net/viewtopic.php?f=8&t=15065/]http://tatuheart.ukrbb.net/viewtopic.php?f=8&t=15065/[/url] .
вывод. из. запоя. на. дому. ростов. [url=http://dexanet.ukrbb.net/viewtopic.php?f=14&t=20360]http://dexanet.ukrbb.net/viewtopic.php?f=14&t=20360[/url] .
I am lucky that I discovered this website , precisely the right info that I was searching for! .
With BlueWallet, you maintain ownership of your private keys. This Bitcoin wallet is crafted by Bitcoin enthusiasts for the community BlueWallet Bitcoin Wallet
In the heart of a city renowned for romance, elegance, and sophistication, there lies a world dedicated to offering unforgettable, high-class companionship http://198.199.122.222/doku.php?id=_Why_Paris_is_a_Top_Destination_for_Escort_Services
VPS на Windows — это виртуальный выделенный сервер, развёрнутый в облачном кластере, с предустановленной лицензионной ОС Windows Server. Виртуализация KVM облачный сервер
Диплом вуза купить официально с упрощенным обучением в Москве
forum.gorodsalavat.ru/posting.php?mode=post&f=28&sid=987b2060c0dd759169d7b64f097a9b3b
In the heart of a city renowned for romance, elegance, and sophistication, there lies a world dedicated to offering unforgettable, high-class companionship http://lyxondebian.free.fr/dokutest/doku.php?id=_A_Guide_to_the_Different_Types_of_Escorts_in_Paris
VPS на Windows — это виртуальный выделенный сервер, развёрнутый в облачном кластере, с предустановленной лицензионной ОС Windows Server. Виртуализация KVM аренда сервера 1с
[url=https://selector-casino-apk.ru/]selector-casino-apk.ru/[/url]
Установить последнюю версию приложения онлайн казино Селектор – побеждай прямо сейчас!
http://www.selector-casino-apk.ru
1 win bet
Summary of Cryptocurrency Transaction Verification and Compliance Services
In the current cryptocurrency market, ensuring transaction clarity and conformity with Anti-Laundering and Know Your Customer (KYC) regulations is vital. Below is an summary of popular sites that offer tools for crypto transfer monitoring, verification, and asset protection.
1. Token Metrics Platform
Description: Token Metrics provides crypto analysis to evaluate potential fraud threats. This service allows investors to examine cryptocurrencies prior to investment to avoid potentially risky holdings. Highlights:
– Danger evaluation.
– Suitable for holders looking to bypass hazardous or fraudulent ventures.
2. Metamask Monitor Center
Summary: Metamask Monitor Center enables users to review their crypto assets for questionable transactions and standard adherence. Advantages:
– Checks assets for “cleanliness”.
– Offers warnings about possible fund restrictions on certain platforms.
– Delivers comprehensive results after account sync.
3. Best Change
Summary: Best Change is a platform for tracking and verifying crypto trade transfers, providing openness and transaction safety. Benefits:
– Deal and wallet observation.
– Sanctions checks.
– Online interface; supports BTC and multiple different coins.
4. AMLCheck Bot
Description: AMLchek is a portfolio monitor and anti-money laundering tool that employs artificial intelligence methods to identify dubious actions. Features:
– Deal observation and user check.
– Offered via web version and Telegram bot.
– Supports coins including BSC, BTC, DOGE, and additional.
5. AlphaBit
Description: AlphaBit provides comprehensive anti-money laundering services customized for the digital currency industry, supporting businesses and banks in preserving compliance conformity. Advantages:
– Comprehensive compliance tools and checks.
– Adheres to up-to-date safety and regulatory standards.
6. Node AML
Summary: AML Node provides compliance and identification tools for digital currency businesses, including transaction monitoring, sanctions checks, and risk assessment. Highlights:
– Threat evaluation solutions and compliance checks.
– Useful for maintaining safe company operations.
7. Btrace.io
Overview: Btrace AML Crypto is dedicated to resource validation, providing deal monitoring, compliance checks, and assistance if you are a victim of loss. Benefits:
– Useful support for resource restoration.
– Transfer monitoring and protection features.
Dedicated USDT Verification Services
Our site also provides information on multiple services offering check solutions for crypto transactions and wallets:
– **USDT TRC20 and ERC20 Check:** Various sites support comprehensive screenings for USDT transfers, aiding in the finding of questionable activity.
– **AML Validation for USDT:** Solutions are offered for monitoring for fraudulent activities.
– **“Cleanliness” Checks for Wallets:** Verification of deal and wallet legitimacy is provided to find likely dangers.
**Wrap-up**
Choosing the right platform for checking and monitoring digital currency transactions is crucial for providing security and regulatory compliance. By consulting our recommendations, you can choose the ideal solution for transfer tracking and asset protection.
Judul: Mengalami Pengalaman Memainkan dengan “PG Slot” di Situs Perjudian ImgToon.com
Dalam kehidupan permainan kasino online, mesin slot telah menjadi salah satu permainan yang paling digemari, terutama jenis PG Slot. Di antara banyak situs kasino online, ImgToon.com menjadi tujuan utama bagi pengguna yang ingin menguji keberuntungan mereka di banyak permainan slot, termasuk beberapa kategori terfavorit seperti demo pg slot, pg slot gacor, dan RTP slot.
Demo PG Slot: Memulai Tanpa Risiko
Salah satu fungsi menarik yang ditawarkan oleh ImgToon.com adalah demo pg slot. Fitur ini mengizinkan pemain untuk memainkan berbagai jenis slot dari PG tanpa harus bertaruh taruhan uang asli. Dalam mode demo ini, Anda dapat menguji berbagai strategi dan mengerti proses permainan tanpa ancaman kehilangan uang. Ini adalah metode terbaik bagi orang baru untuk mengenal dengan permainan slot sebelum berpindah ke mode taruhan nyata.
Mode demo ini juga memberi Anda pandangan tentang potensi kemenangan dan imbalan yang mungkin bisa Anda dapatkan saat bermain dengan uang sebenarnya. Pemain dapat menyusuri permainan tanpa ragu, menjadikan pengalaman bermain di PG Slot semakin mengasyikkan dan bebas stres.
PG Slot Gacor: Kesempatan Besar Mencapai Kemenangan
PG Slot Gacor adalah istilah terkenal di kalangan pemain slot yang merujuk pada slot yang sedang dalam fase memberi kemenangan tinggi atau lebih sering disebut “gacor”. Di ImgToon.com, Anda dapat menemukan berbagai slot yang masuk dalam kategori gacor ini. Slot ini diakui memiliki peluang kemenangan lebih tinggi dan sering memberikan bonus besar, membuatnya pilihan utama bagi para pemain yang ingin memperoleh keuntungan maksimal.
Namun, perlu diingat bahwa “gacor” atau tidaknya sebuah slot dapat beralih, karena permainan slot tergantung pada generator nomor acak (RNG). Dengan melakukan permainan secara rutin di ImgToon.com, Anda bisa mengenali pola atau waktu yang tepat untuk memainkan PG Slot Gacor dan meningkatkan peluang Anda untuk menang.
RTP Slot: Faktor Krucial dalam Pencarian Slot
Ketika mendiskusikan tentang slot, istilah RTP (Return to Player) adalah faktor yang sangat penting untuk dihitung. RTP Slot mengacu pada persentase dari total taruhan yang akan dikirimkan kepada pemain dalam jangka panjang. Di ImgToon.com, setiap permainan PG Slot disertai dengan informasi RTP yang terang. Semakin tinggi persentase RTP, semakin besar peluang pemain untuk mendulang kembali sebagian besar dari taruhan mereka.
Dengan memilih PG Slot yang memiliki RTP tinggi, pemain dapat memaksimalkan pengeluaran mereka dan memiliki peluang yang lebih baik untuk menang dalam jangka panjang. Ini membuat RTP sebagai indikator penting bagi pemain yang mencari keuntungan dalam permainan kasino online.
Of course, what a great site and informative posts, I will add backlink – bookmark this site? Regards, Reader
Процесс получения диплома стоматолога: реально ли это сделать быстро?
Can I simply say what a relief to find an individual who genuinely knows what they’re discussing over the internet. You definitely understand how to bring an issue to light and make it important. More and more people ought to read this and understand this side of the story. I was surprised you are not more popular because you definitely possess the gift.
Сервисный центр предлагает поменять дисплей vivo y91c замена стекла дисплея vivo y91c
Тут можно преобрести купить огнеупорный сейф сейф огнестойкий
vavada казино
I just could not depart your web site prior to suggesting that I really loved the usual info an individual supply in your visitors Is gonna be back regularly to check up on new posts
[url=https://selector-casino-apk.ru/selector-apk]www.selector-casino-apk.ru/selector-apk[/url]
Установить последнюю версию приложения казино онлайн Селектор – побеждай прямо сейчас!
http://www.selector-casino-apk.ru/selector-apk
They might include special diets, herbal supplements, chiropractic care, animal therapy, arts therapy, mindfulness, or relaxation therapies https://www.tumblr.com/autism-mmc
Представьте себе: Вы гуляете по улицам Москвы, а вокруг Вас оживают легендарные злодеи и аферисты! Здесь исторические личности сплетаются с киношными персонажами, а за каждым поворотом скрывается тайна https://captour.ru/subjects/ekskursii-po-moskve-na-tureckom-yazyke/
Кomпания “Скважина Минск” предоставляет услуги по профессиональному бурению скважин на воду с обустройством в Минском районе и области под клю http://amacadabra.net/uncategorized/ill-do-it-when-im-in-the-mood/?unapproved=631030&moderation-hash=567aac49dcf6333aa30831a2de26fd63#comment-631030
Представьте себе: Вы гуляете по улицам Москвы, а вокруг Вас оживают легендарные злодеи и аферисты! Здесь исторические личности сплетаются с киношными персонажами, а за каждым поворотом скрывается тайна https://captour.ru/excursions/ekskursiya-v-moskovskij-kreml-dlya-inostrancev/
FSRA compliance check for crypto wallets
Introduction of Digital Currency Transaction Check and Regulatory Services
In contemporary crypto sector, guaranteeing transfer openness and adherence with Anti-Laundering and KYC rules is crucial. Here is an outline of well-known services that offer solutions for cryptocurrency deal tracking, verification, and asset protection.
1. Token Metrics Platform
Summary: Token Metrics provides cryptocurrency analysis to evaluate potential risk threats. This service allows users to check coins before buying to prevent potentially scam resources. Highlights:
– Risk assessment.
– Suitable for investors looking to bypass hazardous or fraudulent projects.
2. Metamask Center
Overview: Metamask Monitor Center permits holders to check their crypto assets for questionable transactions and standard compliance. Benefits:
– Verifies tokens for “cleanliness”.
– Offers warnings about potential fund blockages on particular platforms.
– Delivers detailed results after address sync.
3. BestChange.ru
Description: Bestchange.ru is a site for tracking and checking digital trade transactions, guaranteeing transparency and deal safety. Highlights:
– Transfer and wallet observation.
– Compliance checks.
– Web-based platform; accommodates BTC and multiple other coins.
4. AML Bot
Summary: AMLCheck Bot is a portfolio monitor and AML compliance tool that utilizes AI methods to identify dubious activity. Advantages:
– Transfer observation and user check.
– Offered via internet and chat bot.
– Works with digital assets such as BSC, BTC, DOGE, and additional.
5. Alfabit AML
Summary: AlfaBit offers comprehensive AML services specifically made for the crypto field, supporting businesses and financial institutions in ensuring standard adherence. Advantages:
– Thorough AML options and screenings.
– Adheres to up-to-date security and conformity requirements.
6. AMLNode
Overview: AML Node offers compliance and identification solutions for cryptocurrency firms, which includes transaction observing, sanctions checks, and risk assessment. Highlights:
– Threat evaluation options and restriction screenings.
– Valuable for guaranteeing protected business operations.
7. Btrace.AMLcrypto.io
Description: Btrace.AMLcrypto.io focuses on resource validation, delivering deal monitoring, restriction screenings, and help if you are a affected by fraud. Advantages:
– Reliable assistance for asset restoration.
– Deal monitoring and safety features.
Dedicated USDT Validation Options
Our platform also reviews different platforms that offer verification services for Tether transfers and accounts:
– **USDT TRC20 and ERC20 Check:** Many platforms support detailed evaluations for USDT transactions, aiding in the identification of suspicious activity.
– **AML Validation for USDT:** Solutions are provided for tracking for suspicious transactions.
– **“Cleanliness” Checks for Holdings:** Validation of transaction and holding purity is offered to find possible threats.
**Conclusion**
Choosing the suitable platform for verifying and monitoring crypto deals is crucial for guaranteeing security and standard adherence. By viewing our evaluations, you can select the ideal tool for transaction observation and resource protection.
Кomпания “Скважина Минск” предоставляет услуги по профессиональному бурению скважин на воду с обустройством в Минском районе и области под клю http://quickiprints.com/how-to-clean-a-portable-ice-maker/?unapproved=116565&moderation-hash=f11bd6bdc0ad03c19d4c30c7caed6ba6#comment-116565
Тут можно преобрести купить сейф для ружья в интернет магазине оружейные сейфы и шкафы для ружей
1win mozambique
Russian manicure Austin
pg slot
Judul: Merasakan Pengalaman Bermain dengan “PG Slot” di Situs Kasino ImgToon.com
Dalam dunia permainan kasino online, permainan slot telah menjadi salah satu permainan yang paling digemari, terutama jenis PG Slot. Di antara berbagai situs kasino online, ImgToon.com merupakan tujuan pokok bagi peserta yang ingin menguji peruntungan mereka di berbagai permainan slot, termasuk beberapa kategori populer seperti demo pg slot, pg slot gacor, dan RTP slot.
Demo PG Slot: Memulai Bebas dari Risiko
Salah satu fungsi menarik yang disediakan oleh ImgToon.com adalah demo pg slot. Fitur ini memungkinkan pemain untuk memainkan berbagai jenis slot dari PG tanpa harus memasang taruhan nyata. Dalam mode demo ini, Anda dapat memeriksa berbagai taktik dan mengerti proses permainan tanpa bahaya kehilangan uang. Ini adalah cara terbaik bagi orang baru untuk terbiasa dengan permainan slot sebelum beralih ke mode taruhan sebenarnya.
Mode demo ini juga memberi Anda pemahaman tentang potensi kemenangan dan bonus yang mungkin bisa Anda peroleh saat bermain dengan uang sebenarnya. Pemain dapat menyusuri permainan tanpa khawatir, membuat pengalaman bermain di PG Slot semakin membahagiakan dan bebas beban.
PG Slot Gacor: Kesempatan Besar Mendapatkan Kemenangan
PG Slot Gacor adalah istilah terkenal di kalangan pemain slot yang merujuk pada slot yang sedang dalam fase memberikan kemenangan tinggi atau lebih sering dikenal “gacor”. Di ImgToon.com, Anda dapat mencari berbagai slot yang masuk dalam kategori gacor ini. Slot ini dikenal memiliki peluang kemenangan lebih tinggi dan sering memberikan bonus besar, menyebabkannya pilihan utama bagi para pemain yang ingin memperoleh keuntungan maksimal.
Namun, harus diingat bahwa “gacor” atau tidaknya sebuah slot dapat beralih, karena permainan slot tergantung pada generator nomor acak (RNG). Dengan memainkan secara rutin di ImgToon.com, Anda bisa mengidentifikasi pola atau waktu yang tepat untuk memainkan PG Slot Gacor dan memperbesar peluang Anda untuk menang.
RTP Slot: Faktor Penting dalam Pemilahan Slot
Ketika mendiskusikan tentang slot, istilah RTP (Return to Player) adalah faktor yang sangat esensial untuk dipertimbangkan. RTP Slot berkaitan pada persentase dari total taruhan yang akan dikirimkan kepada pemain dalam jangka panjang. Di ImgToon.com, setiap permainan PG Slot disertai dengan informasi RTP yang jelas. Semakin tinggi persentase RTP, semakin besar peluang pemain untuk memperoleh kembali sebagian besar dari taruhan mereka.
Dengan memilih PG Slot yang memiliki RTP tinggi, pemain dapat memaksimalkan pengeluaran mereka dan memiliki peluang yang lebih baik untuk menang dalam jangka panjang. Ini membuat RTP sebagai indikator utama bagi pemain yang mencari keuntungan dalam permainan kasino online.
Аттестат школы купить официально с упрощенным обучением в Москве
[url=https://jet-casino-apk.ru]jet-casino-apk.ru[/url]
Установить apk файл онлайн казино Джет – побеждай сейчас!
https://www.jet-casino-apk.ru
Можно ли купить аттестат о среднем образовании, основные моменты и вопросы
Sex videos online watch for free from anywhere in the world without subscription and registration kids porn
I got this web page from my buddy who shared with me regarding this website and at
the moment this time I am visiting this site and
reading very informative articles at this place. benicetomommy.com
http://indianpharmacyeasy.com/# cheapest online pharmacy india
https://clinica-na-ine.ru психотерапевт
I’d like to be able to write like this, but taking the time and developing articles is hard…. Takes a lot of effort.
How long does it take you to write an article like this?
What’s Happening i’m new to this, I stumbled upon this I’ve found It positively useful and it has aided me out loads. I hope to contribute & help other users like its aided me. Great job.
вывод из запоя ростов-на-дону [url=https://uaforum.ukrbb.net/viewtopic.php?f=13&t=3233/]uaforum.ukrbb.net/viewtopic.php?f=13&t=3233[/url] .
казино беларусь [url=www.online-kazino.by]казино беларусь[/url] .
вывод из запоя цены ростов [url=http://ya.7bb.ru/viewtopic.php?id=14592#p40831/]http://ya.7bb.ru/viewtopic.php?id=14592#p40831/[/url] .
вывод из запоя на дому ростов [url=www.vkontakte.forum.cool/viewtopic.php?id=19596/]www.vkontakte.forum.cool/viewtopic.php?id=19596/[/url] .
вывод. из. запоя. ростов. [url=svstrazh.forum24.ru/?1-3-0-00000230-000-0-0-1730648739]вывод. из. запоя. ростов.[/url] .
rtp slot
Judul: Merasakan Pengalaman Memainkan dengan “PG Slot” di Situs Casino ImgToon.com
Dalam kehidupan permainan kasino online, permainan slot telah menjadi salah satu permainan yang paling diminati, terutama jenis PG Slot. Di antara beberapa situs kasino online, ImgToon.com merupakan tujuan utama bagi peserta yang ingin mencoba peruntungan mereka di banyak permainan slot, termasuk beberapa kategori terfavorit seperti demo pg slot, pg slot gacor, dan RTP slot.
Demo PG Slot: Memulai Tanpa adanya Risiko
Salah satu fungsi menarik yang disediakan oleh ImgToon.com adalah demo pg slot. Keistimewaan ini memungkinkan pemain untuk menguji berbagai jenis slot dari PG tanpa harus menempatkan taruhan nyata. Dalam mode demo ini, Anda dapat menguji berbagai strategi dan memahami proses permainan tanpa bahaya kehilangan uang. Ini adalah metode terbaik bagi pemula untuk terbiasa dengan permainan slot sebelum beralih ke mode taruhan sebenarnya.
Mode demo ini juga memberikan Anda pemahaman tentang potensi kemenangan dan bonus yang mungkin bisa Anda terima saat bermain dengan uang asli. Pemain dapat mencari permainan tanpa cemas, membuat pengalaman bermain di PG Slot semakin membahagiakan dan bebas beban.
PG Slot Gacor: Prospek Besar Mencapai Kemenangan
PG Slot Gacor adalah istilah terkenal di kalangan pemain slot yang menggunakan pada slot yang sedang dalam fase memberikan kemenangan tinggi atau lebih sering diistilahkan “gacor”. Di ImgToon.com, Anda dapat menemukan berbagai slot yang ada dalam kategori gacor ini. Slot ini dikenal memiliki peluang kemenangan lebih tinggi dan sering membagikan bonus besar, membuatnya pilihan utama bagi para pemain yang ingin memperoleh keuntungan maksimal.
Namun, harus diingat bahwa “gacor” atau tidaknya sebuah slot dapat beralih, karena permainan slot tergantung generator nomor acak (RNG). Dengan bermain secara rutin di ImgToon.com, Anda bisa mengenali pola atau waktu yang tepat untuk memainkan PG Slot Gacor dan menambah peluang Anda untuk menang.
RTP Slot: Faktor Krucial dalam Pemilihan Slot
Ketika mendiskusikan tentang slot, istilah RTP (Return to Player) adalah faktor yang sangat krusial untuk dipertimbangkan. RTP Slot mengacu pada persentase dari total taruhan yang akan dikembalikan kepada pemain dalam jangka panjang. Di ImgToon.com, setiap permainan PG Slot diberi dengan informasi RTP yang terperinci. Semakin tinggi persentase RTP, semakin besar peluang pemain untuk mendulang kembali sebagian besar dari taruhan mereka.
Dengan memilih PG Slot yang memiliki RTP tinggi, pemain dapat mengelola pengeluaran mereka dan memiliki peluang yang lebih baik untuk menang dalam jangka panjang. Ini menjadikan RTP sebagai indikator penting bagi pemain yang mencari keuntungan dalam permainan kasino online.
Тут можно преобрести несгораемый сейф сейф огнестойкий в москве
vavada lv
https://indianpharmacyeasy.com/# india pharmacy mail order
Mostbet mobil ilovasini yuklab oling va o‘yinni boshlang | Mostbet yangi foydalanuvchilar uchun bonuslar taklif etadi | Mostbet O‘zbekiston bozorida yetakchi o‘yin platformasi | Mostbet orqali yangi o‘yinlar va yuqori koeffitsiyentlardan bahramand bo‘ling | Mostbet-ning rasmiy saytiga oson kirish va o‘yin o‘ynash imkoniyati [url=https://mostbetazcasino.com.az/]mostbet kazino[/url]
[url=https://selector-casino-apk.ru/selector-na-androjd]https://selector-casino-apk.ru/selector-na-androjd[/url]
Установить apk файл казино онлайн Selector – побеждай прямо сейчас!
https://www.selector-casino-apk.ru/selector-na-androjd
Сколько стоит диплом высшего и среднего образования и как его получить?
http://indianpharmacyeasy.com/# indianpharmacy com
bc gaming
Тут можно преобрести оружейные сейфы шкафы оружейные сейфы в москве
I’m now not sure the place you are getting your info, however great topic.
I needs to spend a while finding out more or figuring out more.
Thank you for wonderful info I was in search of this info for my
mission.
[url=https://selector-casino-apk.ru/selector-oficzialnyj-sajt]https://www.selector-casino-apk.ru/selector-oficzialnyj-sajt[/url]
Скачать apk файл казино онлайн Selector – выигрывай сейчас!
http://www.selector-casino-apk.ru/selector-oficzialnyj-sajt
http://smolikova-natalya-valentinovna.ru
A Bitcoin wallet that allows you to store, send Bitcoin, receive Bitcoin and buy Bitcoin with focus on security and simplicity BlueWallet android
Dynamic platform that aggregates live adult entertainment, constantly refreshed with streams from the leading adult webcam platforms like live gay porn
A Bitcoin wallet that allows you to store, send Bitcoin, receive Bitcoin and buy Bitcoin with focus on security and simplicity BlueWallet Bitcoin Wallet
https://mexicanpharmgate.com/# medication from mexico pharmacy
rtp slot gacor
Judul: Menikmati Pengalaman Bermain dengan “PG Slot” di Situs Kasino ImgToon.com
Dalam kehidupan permainan kasino online, mesin slot telah menyusun salah satu permainan yang paling digemari, terutama jenis PG Slot. Di antara berbagai situs kasino online, ImgToon.com merupakan tujuan pokok bagi pengguna yang ingin mencoba peruntungan mereka di banyak permainan slot, termasuk beberapa kategori terfavorit seperti demo pg slot, pg slot gacor, dan RTP slot.
Demo PG Slot: Mencoba Tanpa adanya Risiko
Salah satu fungsi menarik yang diberikan oleh ImgToon.com adalah demo pg slot. Keistimewaan ini memungkinkan pemain untuk mencoba berbagai jenis slot dari PG tanpa harus bertaruh taruhan uang asli. Dalam mode demo ini, Anda dapat menguji berbagai taktik dan mengerti proses permainan tanpa risiko kehilangan uang. Ini adalah cara terbaik bagi pemain baru untuk mengenal dengan permainan slot sebelum berpindah ke mode taruhan nyata.
Mode demo ini juga memberikan Anda pemahaman tentang potensi kemenangan dan hadiah yang mungkin bisa Anda terima saat bermain dengan uang sebenarnya. Pemain dapat mencari permainan tanpa khawatir, menjadikan pengalaman bermain di PG Slot semakin menyenangkan dan bebas tekanan.
PG Slot Gacor: Kesempatan Besar Mencapai Kemenangan
PG Slot Gacor adalah sebutan terkenal di kalangan pemain slot yang menggunakan pada slot yang sedang dalam fase memberikan kemenangan tinggi atau lebih sering diistilahkan “gacor”. Di ImgToon.com, Anda dapat menemukan berbagai slot yang ada dalam kategori gacor ini. Slot ini diakui memiliki peluang kemenangan lebih tinggi dan sering membagikan bonus besar, membuatnya pilihan utama bagi para pemain yang ingin memperoleh keuntungan maksimal.
Namun, perlu diingat bahwa “gacor” atau tidaknya sebuah slot dapat beralih, karena permainan slot tergantung pada generator nomor acak (RNG). Dengan melakukan permainan secara rutin di ImgToon.com, Anda bisa mengenali pola atau waktu yang tepat untuk memainkan PG Slot Gacor dan meningkatkan peluang Anda untuk menang.
RTP Slot: Faktor Krucial dalam Pemilihan Slot
Ketika mendiskusikan tentang slot, istilah RTP (Return to Player) adalah faktor yang sangat penting untuk dipertimbangkan. RTP Slot berkaitan pada persentase dari total taruhan yang akan dikirimkan kepada pemain dalam jangka panjang. Di ImgToon.com, setiap permainan PG Slot disertai dengan informasi RTP yang terang. Semakin tinggi persentase RTP, semakin besar peluang pemain untuk mendulang kembali sebagian besar dari taruhan mereka.
Dengan memilih PG Slot yang memiliki RTP tinggi, pemain dapat mengoptimalkan pengeluaran mereka dan memiliki peluang yang lebih baik untuk menang dalam jangka panjang. Ini menyebabkan RTP sebagai indikator penting bagi pemain yang mencari keuntungan dalam permainan kasino online.
I absolutely love your blog and find almost
all of your post’s to be exactly I’m looking for. Does one offer guest writers to write content available for you?
I wouldn’t mind publishing a post or elaborating on most of the subjects
you write related to here. Again, awesome web site!
1win mozambique
вывод из запоя цены на дому ростов [url=www.belbeer.borda.ru/?1-6-0-00000747-000-0-0-1730649318/]вывод из запоя цены на дому ростов[/url] .
нарколог вывод из запоя ростов [url=http://www.forumsilverstars.forum24.ru/?1-2-0-00000146-000-0-0-1730649531]http://www.forumsilverstars.forum24.ru/?1-2-0-00000146-000-0-0-1730649531[/url] .
вывод из запоя цены ростов на дону [url=www.alhambra.bestforums.org/viewtopic.php?f=2&t=46349]www.alhambra.bestforums.org/viewtopic.php?f=2&t=46349[/url] .
вывод из запоя цены ростов на дону [url=https://www.vip.rolevaya.info/viewtopic.php?id=6895]вывод из запоя цены ростов на дону[/url] .
Watch and admire beautiful girls getting naked on live cam. The site features cam girls of all types, from petite blonde camgirls to leggy redheads live porn cam
Find the hottest sexwebcam videos and clips, realy hight quality cbd
Watch and admire beautiful girls getting naked on live cam. The site features cam girls of all types, from petite blonde camgirls to leggy redheads nudelivecam
Find the hottest sexwebcam videos and clips, realy hight quality heroin
http://doctor-fomkin.ru/ остеопат невролог врач узи
это могут быть вознаграждения за регистрацию, депозитные вознаграждения, бесплатные
обороты и так далее выгодные предложения, cryptoboss.
My website – cryptoboss casino 2
Feel free to visit my blog post :: https://teletype.in/@ceramtrade/ispanskaja-plitka-geotiles-pozvolit-voplotit
Приобретение школьного аттестата с официальным упрощенным обучением в Москве
customers can choose from popular payment methods, including bank cards,
debit cards, bank transfers and digital wallets, among which apple pay,
alipay, an https://www.garyshood.com/biometric-authentication/ system
or Google pay.
Тут можно преобрести сейф противопожарный несгораемый сейф цена
Oh my goodness! Amazing article dude! Thank you, However I am encountering problems with your RSS. I don’t understand why I can’t subscribe to it. Is there anybody else getting identical RSS issues? Anybody who knows the solution will you kindly respond? Thanx.
Тут можно преобрести шкаф для оружия купить купить оружейный шкаф
neon57
Лессе-Пассе или Теудат Маавар – это oдин из возможных паспортов Израиля, который выдается гражданам этой страны https://xn—-7sbbzecaihj2bkbelhgv2p.com/
http://mmarchuk.ru остеопат невролог
Official Starhotels website: book directly on the website at the best available rates for 4 and 5 star hotels in Italy, New York, Paris and London Architectural splendor
Легальная покупка диплома о среднем образовании в Москве и регионах
Official Starhotels website: book directly on the website at the best available rates for 4 and 5 star hotels in Italy, New York, Paris and London Spanish Civil War History
Здесь можно преобрести сейф цена купить где купить сейф
You certainly deserve a round of applause for your post and more specifically, your blog in general. Very high quality material!
bc game apk
вывод из запоя ростов на дону стационар [url=www.domsadremont.ukrbb.net/viewtopic.php?f=3&t=901]www.domsadremont.ukrbb.net/viewtopic.php?f=3&t=901[/url] .
vavada
Покупка школьного аттестата с упрощенной программой: что важно знать
Одним из важнейших экологичных решений в дорожном строительстве является использование переработанных материалов. Это не только помогает сократить количество отходов, но и уменьшает потребность в новых материалах, что снижает негативное воздействие на окружающую среду Discover Legends: Maps That Take You to the Past
Имплантация зубов в Вoлгoграде: 84 клиники с aдресами и ценами от 600 до 500000 рублей, запись. При выборе клиники можно ознакомиться с отзывами других волгоград стоматология протезирование зубов
Одним из важнейших экологичных решений в дорожном строительстве является использование переработанных материалов. Это не только помогает сократить количество отходов, но и уменьшает потребность в новых материалах, что снижает негативное воздействие на окружающую среду The Prodigal Son: A Story of Redemption and God’s Unending Love
rtp slot gacor terpercaya
Judul: Merasakan Pengalaman Bertaruh dengan “PG Slot” di Situs Casino ImgToon.com
Dalam dunia permainan kasino online, permainan slot telah jadi salah satu permainan yang paling digemari, terutama jenis PG Slot. Di antara berbagai situs kasino online, ImgToon.com menjadi tujuan terbesar bagi peserta yang ingin menguji keberuntungan mereka di berbagai permainan slot, termasuk beberapa kategori terfavorit seperti demo pg slot, pg slot gacor, dan RTP slot.
Demo PG Slot: Mencoba Tanpa adanya Risiko
Salah satu keistimewaan menarik yang disediakan oleh ImgToon.com adalah demo pg slot. Fungsi ini memungkinkan pemain untuk mencoba berbagai jenis slot dari PG tanpa harus memasang taruhan uang asli. Dalam mode demo ini, Anda dapat memeriksa berbagai cara dan mengerti mekanisme permainan tanpa ancaman kehilangan uang. Ini adalah langkah terbaik bagi pemain baru untuk terbiasa dengan permainan slot sebelum beralih ke mode taruhan nyata.
Mode demo ini juga menyediakan Anda pemahaman tentang potensi kemenangan dan imbalan yang mungkin bisa Anda dapatkan saat bermain dengan uang sebenarnya. Pemain dapat menyusuri permainan tanpa cemas, menjadikan pengalaman bermain di PG Slot semakin menyenangkan dan bebas beban.
PG Slot Gacor: Prospek Besar Mendulang Kemenangan
PG Slot Gacor adalah kata terkemuka di kalangan pemain slot yang menggunakan pada slot yang sedang dalam fase memberikan kemenangan tinggi atau lebih sering dikenal “gacor”. Di ImgToon.com, Anda dapat mendapatkan berbagai slot yang ada dalam kategori gacor ini. Slot ini dikenal memiliki peluang kemenangan lebih tinggi dan sering membagikan bonus besar, menjadikannya pilihan utama bagi para pemain yang ingin memperoleh keuntungan maksimal.
Namun, harus diingat bahwa “gacor” atau tidaknya sebuah slot dapat berubah, karena permainan slot bergantung generator nomor acak (RNG). Dengan melakukan permainan secara rutin di ImgToon.com, Anda bisa mengenali pola atau waktu yang tepat untuk memainkan PG Slot Gacor dan menambah peluang Anda untuk menang.
RTP Slot: Faktor Esensial dalam Pencarian Slot
Ketika berbicara tentang slot, istilah RTP (Return to Player) adalah faktor yang sangat esensial untuk dipertimbangkan. RTP Slot berkaitan pada persentase dari total taruhan yang akan dikembalikan kepada pemain dalam jangka panjang. Di ImgToon.com, setiap permainan PG Slot disertai dengan informasi RTP yang terang. Semakin tinggi persentase RTP, semakin besar peluang pemain untuk memperoleh kembali sebagian besar dari taruhan mereka.
Dengan memilih PG Slot yang memiliki RTP tinggi, pemain dapat mengelola pengeluaran mereka dan memiliki peluang yang lebih baik untuk menang dalam jangka panjang. Ini menyebabkan RTP sebagai indikator utama bagi pemain yang mencari keuntungan dalam permainan kasino online.
Тут можно преобрести купить оружейный шкаф сейф под оружие цена
Имплантация зубов в Вoлгoграде: 84 клиники с aдресами и ценами от 600 до 500000 рублей, запись. При выборе клиники можно ознакомиться с отзывами других безметалловые коронки Волгоград
pg slot gacor terpercaya
Judul: Mengalami Pengalaman Bermain dengan “PG Slot” di Situs Kasino ImgToon.com
Dalam dunia permainan kasino online, mesin slot telah menyusun salah satu permainan yang paling digemari, terutama jenis PG Slot. Di antara banyak situs kasino online, ImgToon.com adalah tujuan utama bagi pemain yang ingin mencoba nasib mereka di berbagai permainan slot, termasuk beberapa kategori terfavorit seperti demo pg slot, pg slot gacor, dan RTP slot.
Demo PG Slot: Memulai Tanpa adanya Risiko
Salah satu keistimewaan menarik yang ditawarkan oleh ImgToon.com adalah demo pg slot. Fungsi ini memungkinkan pemain untuk menguji berbagai jenis slot dari PG tanpa harus memasang taruhan sebenarnya. Dalam mode demo ini, Anda dapat memeriksa berbagai taktik dan mengerti sistem permainan tanpa ancaman kehilangan uang. Ini adalah metode terbaik bagi pemula untuk mengenal dengan permainan slot sebelum beralih ke mode taruhan nyata.
Mode demo ini juga memberikan Anda pandangan tentang potensi kemenangan dan imbalan yang mungkin bisa Anda terima saat bermain dengan uang nyata. Pemain dapat menyusuri permainan tanpa ragu, menciptakan pengalaman bermain di PG Slot semakin menyenangkan dan bebas stres.
PG Slot Gacor: Prospek Besar Mendapatkan Kemenangan
PG Slot Gacor adalah sebutan populer di kalangan pemain slot yang menggunakan pada slot yang sedang dalam fase memberikan kemenangan tinggi atau lebih sering dikenal “gacor”. Di ImgToon.com, Anda dapat menemukan berbagai slot yang ada dalam kategori gacor ini. Slot ini dikenal memiliki peluang kemenangan lebih tinggi dan sering menghadiahkan bonus besar, membuatnya pilihan utama bagi para pemain yang ingin memperoleh keuntungan maksimal.
Namun, harus diingat bahwa “gacor” atau tidaknya sebuah slot dapat bergeser, karena permainan slot bergantung generator nomor acak (RNG). Dengan bermain secara rutin di ImgToon.com, Anda bisa mengidentifikasi pola atau waktu yang tepat untuk memainkan PG Slot Gacor dan memperbesar peluang Anda untuk menang.
RTP Slot: Faktor Esensial dalam Pemilahan Slot
Ketika berbicara tentang slot, istilah RTP (Return to Player) adalah faktor yang sangat penting untuk dipertimbangkan. RTP Slot berkaitan pada persentase dari total taruhan yang akan dikirimkan kepada pemain dalam jangka panjang. Di ImgToon.com, setiap permainan PG Slot disertai dengan informasi RTP yang terang. Semakin tinggi persentase RTP, semakin besar peluang pemain untuk mendulang kembali sebagian besar dari taruhan mereka.
Dengan memilih PG Slot yang memiliki RTP tinggi, pemain dapat mengelola pengeluaran mereka dan memiliki peluang yang lebih baik untuk menang dalam jangka panjang. Ini menyebabkan RTP sebagai indikator penting bagi pemain yang mencari keuntungan dalam permainan kasino online.
Тут можно преобрести сейфы от пожара купить сейф противопожарный
pg slot terpercaya
Judul: Menikmati Pengalaman Bermain dengan “PG Slot” di Situs Casino ImgToon.com
Dalam kehidupan permainan kasino online, permainan slot telah menjadi salah satu permainan yang paling diminati, terutama jenis PG Slot. Di antara berbagai situs kasino online, ImgToon.com adalah tujuan terbesar bagi pengguna yang ingin mencoba peruntungan mereka di beragam permainan slot, termasuk beberapa kategori terfavorit seperti demo pg slot, pg slot gacor, dan RTP slot.
Demo PG Slot: Memulai Bebas dari Risiko
Salah satu fungsi menarik yang ditawarkan oleh ImgToon.com adalah demo pg slot. Fitur ini memberikan pemain untuk menguji berbagai jenis slot dari PG tanpa harus memasang taruhan uang asli. Dalam mode demo ini, Anda dapat menguji berbagai taktik dan mengerti sistem permainan tanpa ancaman kehilangan uang. Ini adalah metode terbaik bagi orang baru untuk mengenal dengan permainan slot sebelum mengalihkan ke mode taruhan asli.
Mode demo ini juga menyediakan Anda gambaran tentang potensi kemenangan dan imbalan yang mungkin bisa Anda terima saat bermain dengan uang asli. Pemain dapat menjelajahi permainan tanpa cemas, menciptakan pengalaman bermain di PG Slot semakin membahagiakan dan bebas beban.
PG Slot Gacor: Peluang Besar Mendulang Kemenangan
PG Slot Gacor adalah kata terkenal di kalangan pemain slot yang mengacu pada slot yang sedang dalam fase memberi kemenangan tinggi atau lebih sering diistilahkan “gacor”. Di ImgToon.com, Anda dapat mendapatkan berbagai slot yang termasuk dalam kategori gacor ini. Slot ini diakui memiliki peluang kemenangan lebih tinggi dan sering membagikan bonus besar, menjadikannya pilihan utama bagi para pemain yang ingin memperoleh keuntungan maksimal.
Namun, perlu diingat bahwa “gacor” atau tidaknya sebuah slot dapat beralih, karena permainan slot tergantung pada generator nomor acak (RNG). Dengan memainkan secara rutin di ImgToon.com, Anda bisa menemukan pola atau waktu yang tepat untuk memainkan PG Slot Gacor dan meningkatkan peluang Anda untuk menang.
RTP Slot: Faktor Krucial dalam Pemilihan Slot
Ketika berbicara tentang slot, istilah RTP (Return to Player) adalah faktor yang sangat esensial untuk diperhatikan. RTP Slot mengacu pada persentase dari total taruhan yang akan dikirimkan kepada pemain dalam jangka panjang. Di ImgToon.com, setiap permainan PG Slot diberi dengan informasi RTP yang terang. Semakin tinggi persentase RTP, semakin besar peluang pemain untuk mendapatkan kembali sebagian besar dari taruhan mereka.
Dengan memilih PG Slot yang memiliki RTP tinggi, pemain dapat memaksimalkan pengeluaran mereka dan memiliki peluang yang lebih baik untuk menang dalam jangka panjang. Ini menyebabkan RTP sebagai indikator krusial bagi pemain yang mencari keuntungan dalam permainan kasino online.
Judul: Merasakan Pengalaman Bertaruh dengan “PG Slot” di Situs Casino ImgToon.com
Dalam dunia permainan kasino online, permainan slot telah menyusun salah satu permainan yang paling disukai, terutama jenis PG Slot. Di antara berbagai situs kasino online, ImgToon.com menjadi tujuan pokok bagi pengguna yang ingin menguji keberuntungan mereka di banyak permainan slot, termasuk beberapa kategori terfavorit seperti demo pg slot, pg slot gacor, dan RTP slot.
Demo PG Slot: Mencoba Tanpa Risiko
Salah satu keistimewaan menarik yang diberikan oleh ImgToon.com adalah demo pg slot. Fungsi ini mengizinkan pemain untuk memainkan berbagai jenis slot dari PG tanpa harus bertaruh taruhan sebenarnya. Dalam mode demo ini, Anda dapat menguji berbagai cara dan mengerti mekanisme permainan tanpa bahaya kehilangan uang. Ini adalah metode terbaik bagi pemula untuk terbiasa dengan permainan slot sebelum beralih ke mode taruhan sebenarnya.
Mode demo ini juga memberi Anda pandangan tentang potensi kemenangan dan bonus yang mungkin bisa Anda peroleh saat bermain dengan uang sebenarnya. Pemain dapat menjelajahi permainan tanpa ragu, membuat pengalaman bermain di PG Slot semakin mengasyikkan dan bebas stres.
PG Slot Gacor: Peluang Besar Mencapai Kemenangan
PG Slot Gacor adalah sebutan terkemuka di kalangan pemain slot yang menggunakan pada slot yang sedang dalam fase memberikan kemenangan tinggi atau lebih sering diistilahkan “gacor”. Di ImgToon.com, Anda dapat mendapatkan berbagai slot yang masuk dalam kategori gacor ini. Slot ini terkenal memiliki peluang kemenangan lebih tinggi dan sering membagikan bonus besar, membuatnya pilihan utama bagi para pemain yang ingin memperoleh keuntungan maksimal.
Namun, harus diingat bahwa “gacor” atau tidaknya sebuah slot dapat berubah, karena permainan slot bergantung generator nomor acak (RNG). Dengan memainkan secara rutin di ImgToon.com, Anda bisa mengenali pola atau waktu yang tepat untuk memainkan PG Slot Gacor dan meningkatkan peluang Anda untuk menang.
RTP Slot: Faktor Penting dalam Pemilihan Slot
Ketika membicarakan tentang slot, istilah RTP (Return to Player) adalah faktor yang sangat krusial untuk dihitung. RTP Slot berkaitan pada persentase dari total taruhan yang akan dipulangkan kepada pemain dalam jangka panjang. Di ImgToon.com, setiap permainan PG Slot diberi dengan informasi RTP yang terperinci. Semakin tinggi persentase RTP, semakin besar peluang pemain untuk mendulang kembali sebagian besar dari taruhan mereka.
Dengan memilih PG Slot yang memiliki RTP tinggi, pemain dapat memaksimalkan pengeluaran mereka dan memiliki peluang yang lebih baik untuk menang dalam jangka panjang. Ini menjadikan RTP sebagai indikator krusial bagi pemain yang mencari keuntungan dalam permainan kasino online.
demo pg slot terpercaya
Judul: Merasakan Pengalaman Bermain dengan “PG Slot” di Situs Perjudian ImgToon.com
Dalam alam permainan kasino online, permainan slot telah jadi salah satu permainan yang paling diminati, terutama jenis PG Slot. Di antara banyak situs kasino online, ImgToon.com menjadi tujuan utama bagi pengguna yang ingin menguji peruntungan mereka di banyak permainan slot, termasuk beberapa kategori terkenal seperti demo pg slot, pg slot gacor, dan RTP slot.
Demo PG Slot: Mencoba Tanpa adanya Risiko
Salah satu fitur menarik yang diberikan oleh ImgToon.com adalah demo pg slot. Fungsi ini mengizinkan pemain untuk memainkan berbagai jenis slot dari PG tanpa harus bertaruh taruhan uang asli. Dalam mode demo ini, Anda dapat menguji berbagai taktik dan mengetahui mekanisme permainan tanpa ancaman kehilangan uang. Ini adalah cara terbaik bagi pemula untuk mengenal dengan permainan slot sebelum berpindah ke mode taruhan sebenarnya.
Mode demo ini juga memberikan Anda gambaran tentang potensi kemenangan dan bonus yang mungkin bisa Anda dapatkan saat bermain dengan uang nyata. Pemain dapat menjelajahi permainan tanpa khawatir, menjadikan pengalaman bermain di PG Slot semakin membahagiakan dan bebas tekanan.
PG Slot Gacor: Prospek Besar Mendulang Kemenangan
PG Slot Gacor adalah sebutan populer di kalangan pemain slot yang mengacu pada slot yang sedang dalam fase memberikan kemenangan tinggi atau lebih sering diistilahkan “gacor”. Di ImgToon.com, Anda dapat menemukan berbagai slot yang masuk dalam kategori gacor ini. Slot ini terkenal memiliki peluang kemenangan lebih tinggi dan sering memberikan bonus besar, menjadikannya pilihan utama bagi para pemain yang ingin memperoleh keuntungan maksimal.
Namun, harus diingat bahwa “gacor” atau tidaknya sebuah slot dapat bergeser, karena permainan slot bergantung generator nomor acak (RNG). Dengan bermain secara rutin di ImgToon.com, Anda bisa mengenali pola atau waktu yang tepat untuk memainkan PG Slot Gacor dan memperbesar peluang Anda untuk menang.
RTP Slot: Faktor Esensial dalam Pemilahan Slot
Ketika mendiskusikan tentang slot, istilah RTP (Return to Player) adalah faktor yang sangat penting untuk dipertimbangkan. RTP Slot merujuk pada persentase dari total taruhan yang akan dipulangkan kepada pemain dalam jangka panjang. Di ImgToon.com, setiap permainan PG Slot disertai dengan informasi RTP yang terperinci. Semakin tinggi persentase RTP, semakin besar peluang pemain untuk mendulang kembali sebagian besar dari taruhan mereka.
Dengan memilih PG Slot yang memiliki RTP tinggi, pemain dapat memaksimalkan pengeluaran mereka dan memiliki peluang yang lebih baik untuk menang dalam jangka panjang. Ini menyebabkan RTP sebagai indikator utama bagi pemain yang mencari keuntungan dalam permainan kasino online.
Как безопасно купить диплом колледжа или ПТУ в России, что важно знать
https://bober-clinic.ru
amoxicillin 500 mg tablets https://amoxilcompharm.com/# how much is amoxicillin
Sех videos online watch for free from anywhere in the world without subscription and registration double penetration
.구글은 사용자의 위치크림 추천인코드와 결제 정보를 기반으크림 추천인코드로 구독 국가를 확인하크림 추천인코드고 있습
Профессиональная команда специалистов в области обрезки и спилки деревьев, готовая предоставить Вам качественные услуги на территориях приусадебных участков, дачных зон, скверов и парков. Наши мастера имеют опыт работы с различными породами деревьев и могут обеспечить Вам оптимальные решения для ухода за зелеными насаждениями Вашего участка http://everestlg.ru
Sех videos online watch for free from anywhere in the world without subscription and registration gang porn
Логопед онлайн проведет диагностику, поможет поставить звуки, проработать дислексию и дисграфию, устранить задержки речевого развития и обогатить словарный запас заниматься с логопедом онлайн
Логопед онлайн проведет диагностику, поможет поставить звуки, проработать дислексию и дисграфию, устранить задержки речевого развития и обогатить словарный запас онлайн занятия с логопедом
Полезные советы по безопасной покупке диплома о высшем образовании
[url=https://taplink.cc/ystgk]купить оружие без лицензии[/url]
amoxicillin 500 mg purchase without prescription http://amoxilcompharm.com/# amoxicillin 500mg cost
. [url=http://www.bookmarkzones.trade/story.php?title=sex-videos-7#discuss]http://www.bookmarkzones.trade/story.php?title=sex-videos-7#discuss[/url] .
вывод из запоя дешево ростов на дону [url=gaslo.ukrbb.net/viewtopic.php?f=13&t=3407]gaslo.ukrbb.net/viewtopic.php?f=13&t=3407[/url] .
. [url=www.independent.academia.edu/McLainMartin3/]www.independent.academia.edu/McLainMartin3/[/url] .
Предлагаем услуги профессиональных инженеров офицальной мастерской.
Еслли вы искали официальный сервисный центр xiaomi, можете посмотреть на сайте: официальный сервисный центр xiaomi
Наши мастера оперативно устранят неисправности вашего устройства в сервисе или с выездом на дом!
hrbguanji.comNice post. I understand some thing much harder on diverse blogs everyday
Сколько стоит получить диплом высшего и среднего образования легально?
Узнай все о варикоцеле варикоцеле симптомы
amoxicillin 500mg capsules uk http://prednisoneraypharm.com/# prednisone best prices
Hi! I simply want to offer you a big thumbs up for the great info you have
got here on this post. I’ll be coming back to your site for more soon.
Discover a World of Video Game Possibilities with Items4Players
At ItemsforGames, we offer a dynamic marketplace for players to buy or trade profiles, goods, and services for some of the most popular video games. Whether you’re seeking to improve your gaming arsenal or wanting to profit from your profile, our service provides a smooth, safe, and rewarding process.
Why Choose ItemsforGames?
**Comprehensive Title Library**: Browse a vast variety of video games, from intense titles such as Battlefield and COD to captivating RPGs like ARK and Genshin. We cover it all, guaranteeing no gamer is left behind.
**Selection of Services**: Our selections include account purchases, in-game currency, rare collectibles, milestones, and coaching options. Whether you want help gaining levels or obtaining premium bonuses, we are here to help.
**Ease of Use**: Navigate effortlessly through our systematized platform, organized by order to find exactly what you need with ease.
**Secure Exchanges**: We ensure your safety. All trades on our marketplace are processed with the utmost safeguarding to guard your personal and financial details.
**Highlights from Our Offerings**
– **Action and Exploration**: Games ARK: Survival Evolved and DayZ allow you to explore tough worlds with high-quality items and passes for sale.
– **Strategy and Adventure**: Enhance your gameplay in adventures such as Clash Royale and Age of Wonders 4 with credits and options.
– **eSports Play**: For competitive players, boost your skills with mentoring and profile boosts for Valored, Dota 2, and League of Legends.
**A Platform Designed for Players**
Supported by ApexTech Innovations, a established business officially recognized in Kazakh Nation, Items4Games is a place where video game aspirations come true. From acquiring advance passes for the newest games to getting hard-to-find in-game treasures, our platform meets every gamer’s wish with expertise and reliability.
Become part of the group today and boost your game play!
For inquiries or help, email us at **support@items4games.com**. Let’s all enjoy gaming, together!
Фриспины за регистрацию в казино онлайн может получить любой игрок.Точнее новичок.Фриспины за регистрацию в казино выдают только новичкам Фриспины за регу в казино
Юридические услуги адвоката устное и письменное консультирование; подготовка документов правового характера: исков, заявлений, ходатайств, жалоб https://t.me/krakenadvo
Фриспины за регистрацию в казино онлайн может получить любой игрок.Точнее новичок.Фриспины за регистрацию в казино выдают только новичкам Онлайн казино с фриспинами за регистрацию
Юридические услуги адвоката устное и письменное консультирование; подготовка документов правового характера: исков, заявлений, ходатайств, жалоб https://t.me/blacksprutadvo
вывод из запоя цены ростов [url=https://superogorod.ucoz.org/forum/2-2082-1/]вывод из запоя цены ростов[/url] .
врач нарколог на дом платный [url=orehovo.anihub.me/viewtopic.php?id=2292]orehovo.anihub.me/viewtopic.php?id=2292[/url] .
вызов нарколога на дом круглосуточно [url=https://zal.rolevaya.info/viewtopic.php?id=5359/]https://zal.rolevaya.info/viewtopic.php?id=5359/[/url] .
нарколог на дом [url=https://www.advance2.ukrbb.net/viewtopic.php?f=2&t=777]https://www.advance2.ukrbb.net/viewtopic.php?f=2&t=777[/url] .
cost of amoxicillin prescription https://clomidrexpharm.com/# buying cheap clomid no prescription
Loving the info on this website , you have done outstanding job on the blog posts.
Начало собственного дела в сфере здравоохранения может быть выгодным и стабильным решением. Этот рынок всегда будет востребован, поскольку потребность в медицинских товарах и услугах не исчезает. Однако для успешного старта важно выбрать правильную модель, которая позволит использовать уже проверенные решения и избежать множества сложностей, характерных для создания бизнеса с нуля https://oke.zone/viewtopic.php?pid=337064#p337064
Профессиональная установка камина и дымохода качественно и выгодно с доставкой и установкой под ключ в Москве и Московской области Установка каминов и печей
Начало собственного дела в сфере здравоохранения может быть выгодным и стабильным решением. Этот рынок всегда будет востребован, поскольку потребность в медицинских товарах и услугах не исчезает. Однако для успешного старта важно выбрать правильную модель, которая позволит использовать уже проверенные решения и избежать множества сложностей, характерных для создания бизнеса с нуля https://kcapa.net/bbs/board.php?bo_table=free&wr_id=2346424
Профессиональная установка камина и дымохода качественно и выгодно с доставкой и установкой под ключ в Москве и Московской области Каминная топка Invicta 850 Prismatique (Призма 850)
Стоимость дипломов высшего и среднего образования и как избежать подделок
Howdy I wanted to write a new remark on this page for you to be able to tell you just how much i actually Enjoyed reading this read. I have to run off to work but want to leave ya a simple comment. I saved you So will be returning following work in order to go through more of yer quality posts. Keep up the good work.
Узнай все о рецидив варикоцеле лапароскопия варикоцеле
Play the Aviator game on Mostbet and win big | Get live updates and scores with Mostbet | Enjoy live casino games with Mostbet Bangladesh | Win real money with Mostbet casino games | Mostbet Bangladesh is your trusted betting partner | Join Mostbet for a chance to win exciting rewards [url=https://mostbetbdbangladesh.com]mostbetbdbangladesh.com[/url].
Тут можно преобрести сейф для сайги 12 купить шкаф оружейный
Как быстро получить диплом магистра? Легальные способы
9213270296.ru/2024/10/15/vash-diplom-bystro-udobno-kachestvenno.html
items4games
Explore a World of Gaming Chances with Items4Games
At Items4Play, we offer a dynamic platform for gamers to buy or trade profiles, virtual items, and services for some of the most popular video games. If you’re looking to upgrade your game inventory or wanting to profit from your profile, our service provides a easy, safe, and profitable process.
Why Use ItemsforGames?
**Comprehensive Title Catalog**: Explore a vast array of games, from intense games like Battlefield and COD to immersive RPGs like ARK and Genshin. We have all games, guaranteeing no player is overlooked.
**Variety of Services**: Our offerings cover account purchases, in-game currency, rare items, trophies, and coaching sessions. Whether you need help leveling up or getting exclusive rewards, we have it all.
**User-friendly**: Explore without hassle through our structured site, categorized in order to find just what you need with ease.
**Protected Transactions**: We focus on your safety. All exchanges on our platform are conducted with the highest protection to guard your confidential and monetary information.
**Highlights from Our Offerings**
– **Action and Adventure**: Games like ARK and Survival Day let you dive into exciting settings with premium items and keys for sale.
– **Tactical and Exploration**: Elevate your gameplay in games such as Clash Royale and Age of Wonders 4 with in-game currencies and services.
– **Competitive Competitions**: For serious fans, improve your technique with coaching and profile boosts for Valored, Dota 2, and League of Legends.
**A Platform Designed for Gamers**
Supported by ApexTech, a trusted business certified in Kazakhstan, Items4Games is a market where playtime aspirations come true. From acquiring early access codes for the newest releases to finding unique virtual goods, our platform meets every gamer’s requirement with expertise and reliability.
Sign up for the community right away and elevate your game adventure!
For support or assistance, email us at **support@items4games.com**. Let’s all enjoy gaming, as a community!
BBgate MarketPlace 2024 Breaking Bad Gate Forum
BBgate MarketPlace
вызов нарколога на дом круглосуточно [url=www.flanrp.rolevaya.com/viewtopic.php?id=146]www.flanrp.rolevaya.com/viewtopic.php?id=146[/url] .
Быстрое обучение и получение диплома магистра – возможно ли это?
GasDank is your go-to for ordering weed online in Canada. We are a safe and discreet marijuana mail order service based in Toronto, Ontario, also offering same-day delivery throughout the GTA https://www.promisia.be/?URL=https://gasdank.com/store-locator/
На сегодняшний день самым эстетичным методом протезирования считаются безметалловые коронки. При этом под словом «керамика» подразумеваются самые разные химические соединения безметалловые коронки на зубы Волгоград
GasDank is your go-to for ordering weed online in Canada. We are a safe and discreet marijuana mail order service based in Toronto, Ontario, also offering same-day delivery throughout the GTA https://www.top5bestesingleboersen.de/redirect?url=https://uberweedshop.co/maps/
На сегодняшний день самым эстетичным методом протезирования считаются безметалловые коронки. При этом под словом «керамика» подразумеваются самые разные химические соединения безметалловые коронки на зубы
Great goods from you, man. I’ve take note your stuff previous to and you are simply extremely excellent.
I actually like what you’ve got here, really like what
you’re stating and the way in which through which you say it.
You make it enjoyable and you still take care of to keep
it sensible. I can’t wait to read much more from you.
That is actually a tremendous web site.
Как официально купить диплом вуза с упрощенным обучением в Москве
Официальное получение диплома техникума с упрощенным обучением в Москве
Узнай все о варикоцеле 1 степени двустороннее варикоцеле
Independently determine the real percentage and only later analyze them with
those what offers company “http://modoavion.co/the-lazy-mans-guide-to-betwinner-bookmaker-in-benin/“.
Download the Mostbet app for easy access | Mostbet offers the ultimate betting experience | Mostbet app offers secure and smooth navigation | Mostbet makes online betting simple and enjoyable | Download Mostbet for the best online betting experience | Bet on international sports with Mostbet Bangladesh [url=https://mostbetbdbangladesh.com]Mostbet registration[/url].
Explore Mostbet Bangladesh for great gaming experiences | Mostbet registration is quick and simple | Play Aviator and win rewards on Mostbet | Mostbet promo codes unlock extra bonuses for players | Mostbet app provides a user-friendly experience | Mostbet registration takes less than a minute | Mostbet promo codes give you the edge in betting [url=https://mostbetbangladeshbd.com]Mostbet app Bangladesh[/url].
онлайн курсы по охране труда курсы по охране труда дистанционное обучение
Please let me know if you’re looking for a article author for your weblog.
You have some really great articles and I think I would be a good asset.
If you ever want to take some of the load off, I’d absolutely love to write
some articles for your blog in exchange for a link back to mine.
Please send me an e-mail if interested. Kudos!
Приобретение школьного аттестата с официальным упрощенным обучением в Москве
I do believe your audience could very well want a good deal more stories like this carry on the excellent hard work.
I like your blog. It sounds every informative.
Fantastic piece of writing here1
Цель каждого специалиста нашей команды – забота о ментальном здоровье людей через предоставление как можно более доступной и качественной медицинской помощи, а также через психопросветительскую деятельность и дестигматизацию ментальных расстройств https://cse.google.pn/url?sa=t&url=https://empathycenter.ru
В неожиданном повороте событий мемкоины вытеснили биткоин из топа самых обсуждаемых криптоактивов в социальных сетях. По данным аналитической платформы Santiment, такие токены как PNUT, PEPE и DOGE заняли лидирующие позиции, оттеснив первую криптовалюту на седьмое место по популярности меметокен на solana
Цель каждого специалиста нашей команды – забота о ментальном здоровье людей через предоставление как можно более доступной и качественной медицинской помощи, а также через психопросветительскую деятельность и дестигматизацию ментальных расстройств https://maps.google.ge/url?q=https://empathycenter.ru
В неожиданном повороте событий мемкоины вытеснили биткоин из топа самых обсуждаемых криптоактивов в социальных сетях. По данным аналитической платформы Santiment, такие токены как PNUT, PEPE и DOGE заняли лидирующие позиции, оттеснив первую криптовалюту на седьмое место по популярности меметокен
I am glad to be a visitor of this perfect blog !, appreciate it for this rare info!
Thanks, I’ve been looking for this for a long time
_________________
[URL=https://igra.top10slotsites.rent]бк регистрация бонус без депозита[/URL]
You are not right. I am assured. I can prove it. Write to me in PM, we will talk.
Greetings, have tried to subscribe to this websites rss feed but I am having a bit of a problem. Can anyone kindly tell me what to do?’
нарколог на дом цены [url=https://www.masa.forum24.ru/?1-16-0-00002626-000-0-0-1730730156]https://www.masa.forum24.ru/?1-16-0-00002626-000-0-0-1730730156[/url] .
Thanks for posting this. Looking for these resources 😀
BBgate MarketPlace 2024 Breaking Bad Gate Forum
BBgate MarketPlace
neon casino
this type of bets requires in order customers predict
the player who will score the last goal in the
match by http://tigerrocktechnologies.com/does-betwinner-live-sports-bj-sometimes-make-you-feel-stupid/.
neon54 login
Как официально купить диплом вуза с упрощенным обучением в Москве
mexican drugstore online https://mexicanpharmgate.com/ mexico pharmacies prescription drugs
https://Bober-clinic.ru
Катар — небольшая страна на северо-востоке Аравийского полуострова. Это одно из двух мест на Земле наряду с Намибией, где можно понаблюдать слияние пустыни и моря недвижимость катар инвестиции
Катар — небольшая страна на северо-востоке Аравийского полуострова. Это одно из двух мест на Земле наряду с Намибией, где можно понаблюдать слияние пустыни и моря катар
bc game crash online
1с купить официальный сайт цена [url=kupit-1s11.ru]1с купить официальный сайт цена[/url] .
платный нарколог на дом [url=www.krut.forumno.com/viewtopic.php?id=6026]www.krut.forumno.com/viewtopic.php?id=6026[/url] .
нарколог на дом цены [url=https://obovsem.rolevaya.info/viewtopic.php?id=3674/]https://obovsem.rolevaya.info/viewtopic.php?id=3674/[/url] .
[url=https://fresh-casino-apk.ru/fresh-na-androjd/]fresh-casino-apk.ru/fresh-na-androjd/[/url]
Загрузить последнюю версию приложения онлайн казино fresh – выигрывай сейчас!
http://fresh-casino-apk.ru/fresh-na-androjd/
[url=https://fresh-casino-apk.ru/fresh-skachat]http://fresh-casino-apk.ru/fresh-skachat[/url]
Установить последнюю версию приложения казино онлайн fresh – играй прямо сейчас!
http://www.fresh-casino-apk.ru/fresh-skachat
[url=https://starda-casino-apk.ru/starda-casino]http://www.starda-casino-apk.ru/starda-casino[/url]
Загрузить приложение казино онлайн Старда – играй прямо сейчас!
https://www.starda-casino-apk.ru/starda-casino
Mostbet app ensures secure and smooth betting | Enjoy live casino games on Mostbet Bangladesh | Enjoy live sports betting with Mostbet in Bangladesh | Mostbet promo codes unlock extra bonuses for players | Mostbet Bangladesh offers fast payouts and secure betting | Play and win on Mostbet’s live casino platform | Access live scores and updates on Mostbet online [url=https://mostbetbangladeshbd.com]Mostbet sports betting[/url].
Узнай все о удаление полипа в матке выскабливаниемполип эндометрия операция
Как официально купить диплом вуза с упрощенным обучением в Москве
Диплом вуза купить официально с упрощенным обучением в Москве
best online pharmacies in mexico https://mexicanpharmgate.com/ medicine in mexico pharmacies
1xwin venezuela
He himself understands that sometimes drill doubles
https://glamping.cat/25-of-the-punniest-betwinner-betting-puns-you-can-find/ may
become the reason for his defeat, “but”: on current week, they may have become his strong point.
Game keys
Discover a World of Video Game Chances with ItemsforGames
At Items4Play, we deliver a vibrant marketplace for enthusiasts to acquire or exchange profiles, items, and features for some of the most popular video games. If you are seeking to upgrade your game resources or interested in selling your account, our platform provides a smooth, safe, and profitable experience.
Reasons to Use Items4Games?
**Broad Title Library**: Discover a extensive selection of games, from intense titles like Battlefield and War Call to immersive RPGs such as ARK and Genshin. We have all games, making sure no player is left behind.
**Selection of Services**: Our products include account purchases, in-game currency, exclusive goods, milestones, and coaching sessions. If you want help improving or unlocking premium rewards, we have it all.
**User-friendly**: Explore effortlessly through our well-organized platform, categorized in order to find precisely the game you want fast.
**Safe Deals**: We prioritize your security. All trades on our marketplace are conducted with the utmost security to guard your confidential and financial information.
**Key Points from Our Collection**
– **Survival and Survival**: Games ARK: Survival Evolved and Survival Day allow you to dive into tough worlds with premium goods and passes available.
– **Strategy and Exploration**: Boost your performance in adventures such as Royal Clash and Age of Wonders 4 with credits and options.
– **eSports Competitions**: For serious fans, improve your technique with training and profile boosts for Valorant, Dota 2, and Legends.
**A Marketplace Built for Fans**
Supported by Apex Technologies, a trusted entity certified in Kazakhstan, Items4Games is a place where gaming dreams become real. From buying advance passes for the newest games to finding rare in-game treasures, our marketplace fulfills every player’s need with skill and speed.
Become part of the group right away and upgrade your game adventure!
For questions or help, contact us at **support@items4games.com**. Let’s all enjoy gaming, as a community!
продамус промокод скидка на подключение [url=http://www.forumbar.anihub.me/viewtopic.php?id=9823#p17576]http://www.forumbar.anihub.me/viewtopic.php?id=982[/url] .
[url=https://fresh-casino-apk.ru/fresh-casino/]https://fresh-casino-apk.ru/fresh-casino/[/url]
Установить apk файл онлайн казино fresh – побеждай прямо сейчас!
http://www.fresh-casino-apk.ru/fresh-casino/
1win juegos
[url=https://fresh-casino-apk.ru/fresh-oficzialnyj-sajt]fresh-casino-apk.ru/fresh-oficzialnyj-sajt[/url]
Скачать apk файл казино онлайн fresh – побеждай прямо сейчас!
http://www.fresh-casino-apk.ru/fresh-oficzialnyj-sajt
[url=https://starda-casino-apk.ru/starda-oficzialnyj-sajt]https://www.starda-casino-apk.ru/starda-oficzialnyj-sajt[/url]
Загрузить последнюю версию приложения казино Старда – играй сегодня!
http://www.starda-casino-apk.ru/starda-oficzialnyj-sajt
[url=https://fresh-casino-apk.ru]http://fresh-casino-apk.ru[/url]
Установить приложение казино fresh – выигрывай сегодня!
https://www.fresh-casino-apk.ru
you are in reality a just right webmaster The site loading velocity is incredible It seems that you are doing any unique trick In addition The contents are masterwork you have performed a wonderful task on this topic
neon54 casino
Do you know anyone who would like instruction for beginners https://afbecommerce.com/make-your-betwinner-brazil-sitea-reality/?
This is an guide for beginners on betting on football, written by a beginner!
Парадокс, но купить диплом кандидата наук оказалось не так и сложно
Виртуальные номера могут быть очень полезны для бизнеса. Они позволяют компаниям улучшать связь с клиентами, увеличивать продажи и улучшать общую эффективность купить номер Казахстана для СМС
[url=https://fresh-casino-apk.ru/fresh-apk]http://fresh-casino-apk.ru/fresh-apk[/url]
Установить приложение казино онлайн fresh – побеждай сейчас!
https://www.fresh-casino-apk.ru/fresh-apk
Виртуальные номера могут быть очень полезны для бизнеса. Они позволяют компаниям улучшать связь с клиентами, увеличивать продажи и улучшать общую эффективность купить виртуальный номер телефона навсегда
vavada casino no deposit bonus
Почему Bugaboo – лучший выбор для малыша, Купить коляску Bugaboo – значит сделать правильный выбор, Bugaboo: доверие мам по всему миру, Какие преимущества у колясок Bugaboo, 5 причин выбрать коляску Bugaboo для вашего малыша, Bugaboo Fox: лучший выбор для активных родителей, Bugaboo Bee: стиль и удобство для малыша, Bugaboo Buffalo: коляска для любых приключений.
bugaboo прогулочная коляска [url=https://kolyaski-bugaboo-msk.ru/]bugaboo прогулочная коляска[/url] .
Узнай все о операция на исправление перегородки носасептопластика носовой перегородки
[url=https://starda-casino-apk.ru/starda-na-androjd]starda-casino-apk.ru/starda-na-androjd[/url]
Скачать apk файл казино онлайн Monro – играй сегодня!
http://www.starda-casino-apk.ru/starda-na-androjd
Покупка диплома о среднем полном образовании: как избежать мошенничества?
Of course, what a great site and informative posts, I will add backlink – bookmark this site? Regards, Reader
I dont think Ive caught all the angles of this subject the way youve pointed them out. Youre a true star, a rock star man. Youve got so much to say and know so much about the subject that I think you should just teach a class about it
Реально ли приобрести диплом стоматолога? Основные этапы
I know this is not exactly on topic, but i have a blog using the blogengine platform as well and i’m having issues with my comments displaying. is there a setting i am forgetting? maybe you could help me out? thank you.
Бесплатные виртуальные номера для СМС — это возможность быстро и безопасно проходить верификацию на различных сайтах без регистрации купить немецкий номер телефона
Бесплатные виртуальные номера для СМС — это возможность быстро и безопасно проходить верификацию на различных сайтах без регистрации купить одноразовые номера Казахстана
This information is very important and you’ll need to know this when you constructor your own photo voltaic panel.
вывод из запоя в стационаре [url=https://to.iboard.ws/viewtopic.php?id=8064]вывод из запоя в стационаре[/url] .
вывод из запоя краснодар [url=http://www.svarog.forum24.ru/?1-0-0-00000225-000-0-0-1730745492]вывод из запоя краснодар[/url] .
Узнай все о увеличение полового члена операция по увеличению полового члена
Предлагаем услуги профессиональных инженеров офицальной мастерской.
Еслли вы искали сервисный центр sony в москве, можете посмотреть на сайте: сервисный центр sony
Наши мастера оперативно устранят неисправности вашего устройства в сервисе или с выездом на дом!
Как получить диплом техникума официально и без лишних проблем
Быстрое обучение и получение диплома магистра – возможно ли это?
[url=https://starda-casino-apk.ru/starda-skachat]https://www.starda-casino-apk.ru/starda-skachat[/url]
Скачать приложение казино онлайн Старда – побеждай сегодня!
http://www.starda-casino-apk.ru/starda-skachat
[url=https://starda-casino-apk.ru/]https://starda-casino-apk.ru/[/url]
Загрузить последнюю версию приложения онлайн казино starda – выигрывай сегодня!
http://www.starda-casino-apk.ru
Официальная покупка школьного аттестата с упрощенным обучением в Москве
Эвакуатор с манипулятором – универсальное решение для перевозки автомобилей. Он сочетает функции обычного эвакуатора и крана-манипулятора. Это позволяет решать сложные задачи по эвакуации. Манипулятор может поднимать и перемещать грузы в труднодоступных местах https://rostelecomq.ru/magadanskaya-oblast-kabinet/
Эвакуатор с манипулятором – универсальное решение для перевозки автомобилей. Он сочетает функции обычного эвакуатора и крана-манипулятора. Это позволяет решать сложные задачи по эвакуации. Манипулятор может поднимать и перемещать грузы в труднодоступных местах https://video-uprazhnenija.ru/relaks-joga-rasslablenie-tela-i-uma/
вывод из запоя в стационаре анонимно [url=http://sait.anihub.me/viewtopic.php?id=5679]вывод из запоя в стационаре анонимно[/url] .
выведение из запоя воронеж стационар [url=alhambra.bestforums.org/viewtopic.php?f=2&t=46417]alhambra.bestforums.org/viewtopic.php?f=2&t=46417[/url] .
вывод из запоя в стационаре воронежа [url=https://ideya.forums.party/viewtopic.php?id=660]https://ideya.forums.party/viewtopic.php?id=660[/url] .
вывод из запоя в стационаре воронежа [url=https://pandora.ukrbb.net/viewtopic.php?f=2&t=12306]https://pandora.ukrbb.net/viewtopic.php?f=2&t=12306[/url] .
vavada promo code
Предлагаем услуги профессиональных инженеров офицальной мастерской.
Еслли вы искали официальный сервисный центр lg, можете посмотреть на сайте: официальный сервисный центр lg
Наши мастера оперативно устранят неисправности вашего устройства в сервисе или с выездом на дом!
Пошаговое руководство по восстановлению прозрачности фар с помощью наждачной бумаги разной зернистости. Советы по выбору материалов и технике обработки https://gardensofdelight.info/avto/403-ekonomim-s-umom-skolko-nazhdachnoj-bumagi-nuzhno-dlya-polirovki-far/
Пошаговое руководство по восстановлению прозрачности фар с помощью наждачной бумаги разной зернистости. Советы по выбору материалов и технике обработки наждачная бумага для полировки фар
Вы можете купить справки в Москве в нашей клинике https://aleksandriya-med.ru/.
Thank you for all the information was very accurate, just wondering if all this is possible.~
富遊娛樂城出金教學指南:全面解析
富遊娛樂城是一個備受信賴的線上娛樂平台,提供高效、安全的出金服務。以下是詳細的指南,幫助玩家快速掌握提款流程,並瞭解相關注意事項和解決問題的方法。
1. 富遊娛樂城出金步驟
登入平台:使用【富遊APP】或【富遊官網】。
選擇存取款功能:點擊右下角的【存取款】按鈕。
點擊提款:初次使用需完成帳戶實名驗證。
輸入提款金額:選擇已綁定的取款帳戶。
提交申請:送出後等待審核,款項將快速到賬。
2. 娛樂城出金/提款注意事項
實名認證:確保完成帳戶認證,否則無法提款。
存款流水要求:每次提款需完成至少1倍的存款流水條件。
活動流水條件:若參與優惠活動,需依照活動規定完成對應的流水倍數。
3. 娛樂城流水如何計算?
流水計算是出金的重要條件,其公式如下:
存款金額 / 優惠金額 X 流水倍數 = 可提領流水量
例子說明:
玩家小明存入1,000元,參與一項需達到3倍流水的優惠活動:
需要下注金額 = 1,000元 x 3倍 = 3,000元。
如果累計下注金額為2,000元,則還需下注1,000元以達到流水要求。
一旦流水達標,即可提款。
4. 若遇到不出金問題怎麼辦?
選擇可靠平台:避免詐騙娛樂城,富遊娛樂城以出金速度快、保障用戶資金安全聞名。
聯繫客服:若出現問題,可透過LINE官方客服獲得即時協助。
結論
富遊娛樂城以其安全高效的出金系統和透明的規範,為玩家提供優質的服務。遵循上述指引,並確保完成所有條件,玩家即可輕鬆體驗順暢的提款過程。
1win login
На данный момент антигравийная пленка считается материалом, который отлично защищает кузов авто от различных повреждений. Так, она поможет избежать царапин, потертостей, а также предохраняет машину во время небольших ДТП, и в результате на поверхности авто не появляется ржавчина https://blogs.rufox.ru/~runoklisfgy/51744.htm
На данный момент антигравийная пленка считается материалом, который отлично защищает кузов авто от различных повреждений. Так, она поможет избежать царапин, потертостей, а также предохраняет машину во время небольших ДТП, и в результате на поверхности авто не появляется ржавчина https://ok-vmeste.ru/toget/2209-zhelaete-okleit-svoi-avtomobil-vysokokachestvennoi-matovoi-plenkoi.html
вывод из запоя в воронеже [url=https://obovsem.rolevaya.info/viewtopic.php?id=3681/]https://obovsem.rolevaya.info/viewtopic.php?id=3681/[/url] .
вывод из запоя воронеж [url=mozaisk.anihub.me/viewtopic.php?id=4371]mozaisk.anihub.me/viewtopic.php?id=4371[/url] .
Simply want to say your article is as surprising.
The clearness to your submit is just excellent and i could assume you’re a
professional in this subject. Fine together with your permission allow me to snatch your feed to keep updated with
approaching post. Thanks 1,000,000 and please continue the enjoyable work.
[url=https://gama-casino-apk.ru/gama-skachat]gama-casino-apk.ru/gama-skachat[/url]
Скачать последнюю версию приложения казино онлайн gama – выигрывай сейчас!
https://www.gama-casino-apk.ru/gama-skachat
Asking questions are in fact nice thing if you
are not understanding something totally, however this paragraph gives nice understanding even.
Пошаговая инструкция по официальной покупке диплома о высшем образовании
neon54 casino bonus
九州娛樂
THA娛樂城與九州娛樂簡介
THA娛樂城是九州娛樂旗下的一個知名線上娛樂平台,致力於為玩家提供多元化且優質的娛樂服務。九州娛樂是亞洲地區領先的線上娛樂品牌,長期專注於打造穩定、公平且充滿樂趣的遊戲環境,旗下擁有多個知名娛樂平台,而THA娛樂城便是其中的一個旗艦產品。以下將詳細介紹THA娛樂城的特色與服務。
THA娛樂城的遊戲種類
THA娛樂城為玩家提供了多樣化的遊戲選擇,滿足不同玩家的需求與興趣,包括以下幾大類別:
1. 體育投注
體育迷可以在THA娛樂城享受豐富的體育賽事投注,涵蓋足球、籃球、網球等多項國際體育比賽。平台提供即時賠率和多種投注選項,讓玩家隨時掌握比賽動態並進行下注。
2. 真人娛樂
真人娛樂區提供即時互動的遊戲體驗,玩家可透過直播技術與真人荷官互動,遊玩如百家樂、輪盤、骰寶等經典遊戲。這不僅增添了真實感,更讓玩家有身臨其境的感受。
3. 電子老虎機
THA娛樂城匯集了多款高人氣的電子老虎機遊戲,從經典水果機到新潮主題機,皆配備精美的畫面與流暢的操作介面,為玩家帶來無限樂趣。
4. 捕魚遊戲
捕魚遊戲是許多玩家的最愛,THA娛樂城提供多種精美場景和豐富玩法的捕魚遊戲,玩家可以挑戰高額獎勵,享受射擊與策略結合的獨特樂趣。
5. 彩票與其他遊戲
除了以上幾類,平台還提供彩票遊戲及其他創新型娛樂遊戲,適合喜歡嘗試新鮮玩法的玩家。
九州娛樂的技術支持
作為THA娛樂城的母公司,九州娛樂以其強大的技術實力與嚴謹的管理體系為平台提供支持。九州娛樂採用國際領先的安全加密技術,確保玩家的個人資訊與交易數據得到妥善保護。此外,平台的遊戲結果皆經過嚴格的隨機性測試與第三方機構認證,保證公平公正。
優質的會員服務
THA娛樂城致力於打造一個高品質的會員體驗,其服務特色包括:
– 優惠活動
平台定期推出多種促銷活動,如新會員註冊禮金、存款返利、週週回饋等,讓玩家享受更多的遊戲資金。
– 快速出入金
平台提供便捷且快速的存提款服務,玩家可以安心進行資金操作,且無需擔心延遲問題。
– 24小時客戶服務
為了確保玩家的需求能即時被解決,THA娛樂城提供全年無休的客服支援,無論是遊戲問題還是技術諮詢,客服團隊都能快速回應。
與其他平台的區別
THA娛樂城之所以能在眾多線上娛樂平台中脫穎而出,不僅因其豐富的遊戲種類與高品質服務,更在於它所帶來的獨特價值:
1. 品牌信譽
作為九州娛樂旗下的品牌,THA娛樂城擁有長期積累的良好信譽,是許多玩家的首選。
2. 創新與多樣性
平台不斷推出新遊戲與創意玩法,讓玩家始終保持新鮮感。
3. 本地化服務
THA娛樂城深諳玩家需求,提供多語言支援與符合本地習慣的服務,提升玩家的使用便利性。
未來展望
隨著線上娛樂行業的快速發展,THA娛樂城也在持續進步與創新,力求為玩家帶來更多驚喜。無論是透過引進新的遊戲技術、擴展遊戲種類,還是改善服務品質,THA娛樂城都希望成為每位玩家的最佳娛樂夥伴。
總結來說,THA娛樂城憑藉其豐富的遊戲內容、可靠的技術支持以及優質的會員服務,已在亞洲娛樂市場佔有一席之地。如果您正在尋找一個結合刺激與信賴的娛樂平台,那麼THA娛樂城絕對值得一試。
Лучшие варианты букета невесты, для вашего особенного дня.
Как сделать букет невесты своими руками, для особенного момента.
Как выбрать букет невесты, который подчеркнет ваш стиль, для свадебной церемонии.
Как сэкономить на букете невесты без потери красоты, для экономии на свадьбе.
Реальный или искусственный букет невесты: преимущества и недостатки, чтобы было меньше забот и больше радости.
Чистые линии и нежные оттенки: секреты минималистического букета невесты, для свадьбы в скандинавском стиле.
Секреты подбора букета невесты к платью, для незабываемых фотосессий.
букет невесты купить в нижнем новгороде [url=https://buketnevestynn.ru/]https://buketnevestynn.ru/[/url] .
Вы можете купить справку в медцентре https://smails-clinic.ru/ с доставкой по Москве.
Множество профессий, связанных с интернетом, становится доступными даже тем, кто ещё не закончил учебу. Знания, полученные в процессе освоения таких специальностей, открывают перспективы и дают шанс на независимость в финансовом плане http://aramvill.com/bbs/board.php?bo_table=p_photo&wr_id=131261
Предлагаем услуги профессиональных инженеров офицальной мастерской.
Еслли вы искали сервисный центр philips в москве, можете посмотреть на сайте: официальный сервисный центр philips
Наши мастера оперативно устранят неисправности вашего устройства в сервисе или с выездом на дом!
пин ап вход: пин ап вход – пинап казино
vavada promo codes
Предлагаем услуги профессиональных инженеров офицальной мастерской.
Еслли вы искали сервисный центр huawei, можете посмотреть на сайте: сервисный центр huawei
Наши мастера оперативно устранят неисправности вашего устройства в сервисе или с выездом на дом!
pinup-kazi.ru: pinup-kazi.ru – пинап казино
Вы можете купить медсправку в нашем мед центре https://med-bez-boli.ru/ в Москве без медкомиссий.
Приобретение диплома ПТУ с сокращенной программой обучения в Москве
Цифровые технологии в нынешнее время проникают во все сферы жизни, виртуальный номер проявляет себя как неотъемлемым инструментом для эффективного и безопасного общения https://kem-live.ru/interesnoe/view/virtualnyj-nomer-i-ego-ispolzovanie
Цифровые технологии в нынешнее время проникают во все сферы жизни, виртуальный номер проявляет себя как неотъемлемым инструментом для эффективного и безопасного общения http://1st-digital.ru/virtualnyj-nomer-navsegda-obretite-svobodu-s-did-virtual-numbers/
Приобретение диплома ПТУ с сокращенной программой обучения в Москве
вавада казино: вавада – вавада казино зеркало
[url=https://fonbet-stavki-apk.ru/fonbet-stavki/]https://fonbet-stavki-apk.ru/fonbet-stavki/[/url]
Скачать приложение онлайн букмекера Фонбет – выигрывай сейчас!
https://www.fonbet-stavki-apk.ru/fonbet-stavki/
neon54 ????????
Вопросы и ответы: можно ли быстро купить диплом старого образца?
[url=https://gama-casino-apk.ru/gama-casino]https://www.gama-casino-apk.ru/gama-casino[/url]
Установить последнюю версию приложения онлайн казино gama – играй сейчас!
http://www.gama-casino-apk.ru/gama-casino
[url=https://fonbet-stavki-apk.ru/fonbet-na-android/]http://fonbet-stavki-apk.ru/fonbet-na-android/[/url]
Скачать последнюю версию приложения букмекера Fonbet – играй прямо сейчас!
https://www.fonbet-stavki-apk.ru/fonbet-na-android/
pinup: пин ап вход – pinup kazi
Non-GamStop casinos offer a wealth of game selection, ranging from slots and jackpots to live casinos, live game shows, and even sports betting.
Yazdorova.com – это сайт для женщин, стремящихся к здоровью, красоте и гармонии. Здесь вы найдете полезные советы по похудению, уходу за собой и вдохновение для создания лучшей версии себя https://yazdorova.com/
С развитием технологий виртуальные номера стали все более персонализированными и настраиваемыми. С помощью специальных сервисов можно выбирать желаемый номер из предложенного списка, настраивать перенаправление звонков, устанавливать голосовое приветствие и даже анализировать статистику звонков https://progorod33.ru/vitrualnyy-nomer-telefona
С развитием технологий виртуальные номера стали все более персонализированными и настраиваемыми. С помощью специальных сервисов можно выбирать желаемый номер из предложенного списка, настраивать перенаправление звонков, устанавливать голосовое приветствие и даже анализировать статистику звонков https://www.intranews.kz/old/virtualnye-telefonnye-nomera-sovremennoe-reshenie-dlya-biznesa
пин ап кз: pin up казино – pinup kazi
вывод из запоя на дому екатеринбург [url=www.forumbar.anihub.me/viewtopic.php?id=9756]вывод из запоя на дому екатеринбург[/url] .
вывод из запоя на дому екатеринбург [url=www.kryto.ukrbb.net/viewtopic.php?f=3&t=1168/]www.kryto.ukrbb.net/viewtopic.php?f=3&t=1168/[/url] .
one win
A fare da spartiacque, come noto, è la massiva e sempre più ingombrante presenza delle criptovalute nei casino Europa.
Удобный способ придать интерьеру завершенный вид
гибкий самоклеющийся напольный плинтус [url=https://elastichnyj-plintus.ru/]https://elastichnyj-plintus.ru/[/url] .
пин ап казино: пин ап вход – пинап казино
In recent years, digital platforms have revolutionized how individuals and businesses handle their finances http://jamsun.net/doku.php?id=_How_Telegram_Wallet_Bots_Are_Changing_Online_Payments
Это проверенный обменник, которым я пользуюсь уже не первый раз. Здесь курс всегда выгодный, обмен происходит быстро, а скрытых комиссий нет. Очень удобно и безопасно для тех, кто хочет обменять криптовалюту на честных условиях http://mmix.ukrbb.net/viewtopic.php?f=6&t=26699
Aviator o‘yinini Mostbet-da o‘ynab yutish imkoniyatiga ega bo‘ling | Mostbet orqali katta g‘alabalar yo‘lida boshlang | Mostbet bilan o‘yinlar va pul tikish uchun qulaylik va tezkor to‘lovlar | Mostbet saytida muntazam yangilanib turuvchi aksiyalar va bonuslar mavjud | Mostbet bilan qiziqarli o‘yinlar va yutuqlar dunyosiga kirish imkoniyati [url=https://mostbetazcasino.com.az/]mostbet kazino[/url]
In recent years, digital platforms have revolutionized how individuals and businesses handle their finances https://wiki.dailysocial.id/index.php?title=_The_Benefits_of_Using_Telegram_Wallet_Bots_for_Everyday_Payments
Это проверенный обменник, которым я пользуюсь уже не первый раз. Здесь курс всегда выгодный, обмен происходит быстро, а скрытых комиссий нет. Очень удобно и безопасно для тех, кто хочет обменять криптовалюту на честных условиях http://www.bisound.com/forum/showthread.php?p=1251645#post1251645
Yesterday, while I was at work, my cousin stole my
iPad and tested to see if it can survive a thirty foot drop, just so she can be a youtube
sensation. My iPad is now destroyed and she has 83 views.
I know this is completely off topic but I had to share it
with someone!
bcgame mirror
Have you given any kind of thought at all with converting your current web-site into French? I know a couple of of translaters here that will would certainly help you do it for no cost if you want to get in touch with me personally.
THA娛樂城與九州娛樂簡介
THA娛樂城是九州娛樂旗下的一個知名線上娛樂平台,致力於為玩家提供多元化且優質的娛樂服務。九州娛樂是亞洲地區領先的線上娛樂品牌,長期專注於打造穩定、公平且充滿樂趣的遊戲環境,旗下擁有多個知名娛樂平台,而THA娛樂城便是其中的一個旗艦產品。以下將詳細介紹THA娛樂城的特色與服務。
THA娛樂城的遊戲種類
THA娛樂城為玩家提供了多樣化的遊戲選擇,滿足不同玩家的需求與興趣,包括以下幾大類別:
1. 體育投注
體育迷可以在THA娛樂城享受豐富的體育賽事投注,涵蓋足球、籃球、網球等多項國際體育比賽。平台提供即時賠率和多種投注選項,讓玩家隨時掌握比賽動態並進行下注。
2. 真人娛樂
真人娛樂區提供即時互動的遊戲體驗,玩家可透過直播技術與真人荷官互動,遊玩如百家樂、輪盤、骰寶等經典遊戲。這不僅增添了真實感,更讓玩家有身臨其境的感受。
3. 電子老虎機
THA娛樂城匯集了多款高人氣的電子老虎機遊戲,從經典水果機到新潮主題機,皆配備精美的畫面與流暢的操作介面,為玩家帶來無限樂趣。
4. 捕魚遊戲
捕魚遊戲是許多玩家的最愛,THA娛樂城提供多種精美場景和豐富玩法的捕魚遊戲,玩家可以挑戰高額獎勵,享受射擊與策略結合的獨特樂趣。
5. 彩票與其他遊戲
除了以上幾類,平台還提供彩票遊戲及其他創新型娛樂遊戲,適合喜歡嘗試新鮮玩法的玩家。
九州娛樂的技術支持
作為THA娛樂城的母公司,九州娛樂以其強大的技術實力與嚴謹的管理體系為平台提供支持。九州娛樂採用國際領先的安全加密技術,確保玩家的個人資訊與交易數據得到妥善保護。此外,平台的遊戲結果皆經過嚴格的隨機性測試與第三方機構認證,保證公平公正。
優質的會員服務
THA娛樂城致力於打造一個高品質的會員體驗,其服務特色包括:
– 優惠活動
平台定期推出多種促銷活動,如新會員註冊禮金、存款返利、週週回饋等,讓玩家享受更多的遊戲資金。
– 快速出入金
平台提供便捷且快速的存提款服務,玩家可以安心進行資金操作,且無需擔心延遲問題。
– 24小時客戶服務
為了確保玩家的需求能即時被解決,THA娛樂城提供全年無休的客服支援,無論是遊戲問題還是技術諮詢,客服團隊都能快速回應。
與其他平台的區別
THA娛樂城之所以能在眾多線上娛樂平台中脫穎而出,不僅因其豐富的遊戲種類與高品質服務,更在於它所帶來的獨特價值:
1. 品牌信譽
作為九州娛樂旗下的品牌,THA娛樂城擁有長期積累的良好信譽,是許多玩家的首選。
2. 創新與多樣性
平台不斷推出新遊戲與創意玩法,讓玩家始終保持新鮮感。
3. 本地化服務
THA娛樂城深諳玩家需求,提供多語言支援與符合本地習慣的服務,提升玩家的使用便利性。
未來展望
隨著線上娛樂行業的快速發展,THA娛樂城也在持續進步與創新,力求為玩家帶來更多驚喜。無論是透過引進新的遊戲技術、擴展遊戲種類,還是改善服務品質,THA娛樂城都希望成為每位玩家的最佳娛樂夥伴。
總結來說,THA娛樂城憑藉其豐富的遊戲內容、可靠的技術支持以及優質的會員服務,已在亞洲娛樂市場佔有一席之地。如果您正在尋找一個結合刺激與信賴的娛樂平台,那麼THA娛樂城絕對值得一試。
[url=https://fonbet-stavki-apk.ru/fonbet-oficzialnyj-sajt]https://www.fonbet-stavki-apk.ru/fonbet-oficzialnyj-sajt[/url]
Загрузить приложение лучшего букмекера Фонбет – играй прямо сейчас!
fonbet-stavki-apk.ru/fonbet-oficzialnyj-sajt
[url=https://fonbet-stavki-apk.ru]https://fonbet-stavki-apk.ru[/url]
Установить apk файл онлайн букмекера Фонбет – выигрывай прямо сейчас!
https://www.fonbet-stavki-apk.ru
pinup kazi: пин ап казино – пин ап казино
of course like your web-site however you have to check the spelling on several of your posts. Many of them are rife with spelling problems and I find it very troublesome to tell the reality then again I will surely come back again.
Greetings! This is my first visit to your blog! We are a collection of volunteers and starting a new initiative in a community in the same niche. Your blog provided us beneficial information. You have done a wonderful job!
купить 1с бухгалтерия базовая [url=https://www.1s-buhgalteriya-kupit.ru]https://www.1s-buhgalteriya-kupit.ru[/url] .
нарколог на дом екатеринбург цены [url=https://domsadremont.ukrbb.net/viewtopic.php?f=3&t=907]https://domsadremont.ukrbb.net/viewtopic.php?f=3&t=907[/url] .
Fantastic piece of writing here1
ST666 – Nền tảng sòng bạc trực tuyến hàng đầu tại Việt Nam
ST666 tự hào là một trong những thương hiệu uy tín hàng đầu trong lĩnh vực giải trí và sòng bạc trực tuyến tại châu Á. Với nhiều năm liên tục được bình chọn 5 sao, ST666 mang đến cho người chơi những trải nghiệm đẳng cấp và an toàn.
Lý do chọn ST666
Thương hiệu đáng tin cậy
ST666 là nền tảng được hàng triệu người chơi tại Việt Nam tin tưởng nhờ danh tiếng lâu năm và sự minh bạch trong hoạt động.
Sản phẩm đa dạng
Người chơi có thể tận hưởng hàng loạt trò chơi hấp dẫn như:
Nổ hũ: Đem lại cơ hội trúng thưởng lớn với đồ họa sống động.
Sòng bài: Bao gồm các trò chơi cổ điển như bài cào, baccarat, poker.
Thể thao: Đặt cược các trận đấu bóng đá, bóng rổ với tỷ lệ hấp dẫn.
Xổ số và bắn cá: Các trò chơi thú vị dành cho người yêu thích thử thách.
Đá gà: Một hình thức giải trí truyền thống được nâng cấp với chất lượng trực tuyến.
An ninh bảo mật
ST666 áp dụng công nghệ bảo mật tiên tiến, đảm bảo thông tin và giao dịch của người chơi luôn an toàn tuyệt đối.
Giao dịch nhanh chóng
Với hệ thống xử lý tự động hiện đại, ST666 cung cấp tốc độ nạp rút nhanh nhất, giúp người chơi tận hưởng trải nghiệm mượt mà.
Khuyến mãi hấp dẫn và dịch vụ chuyên nghiệp
ST666 không chỉ nổi bật với chất lượng sản phẩm mà còn thường xuyên tổ chức các chương trình khuyến mãi, tặng thưởng lớn. Đội ngũ hỗ trợ 24/7 luôn sẵn sàng giải đáp thắc mắc của khách hàng một cách tận tình.
Tin tức và mẹo chơi đá gà từ ST666
ST666 không ngừng cập nhật các bí quyết và thông tin mới nhất về đá gà, giúp người chơi nâng cao chiến lược và kỹ thuật. Từ việc chọn gà đá phù hợp đến cách chăm sóc và điều trị, mọi kiến thức đều được chia sẻ một cách chi tiết và chuyên nghiệp.
Tham gia ngay hôm nay!
Hãy truy cập ST666 – Trang chủ chính thức để trải nghiệm thế giới sòng bạc trực tuyến đa dạng và uy tín nhất. Không chỉ là nơi giải trí, ST666 còn mang đến cơ hội kiếm tiền hấp dẫn cho mọi người chơi.
Chơi ngay – Trải nghiệm đỉnh cao tại ST666!
пинап казино: pinup – pinup
Предлагаем услуги профессиональных инженеров офицальной мастерской.
Еслли вы искали официальный сервисный центр apple, можете посмотреть на сайте: официальный сервисный центр apple
Наши мастера оперативно устранят неисправности вашего устройства в сервисе или с выездом на дом!
bc game apk
[url=https://gama-casino-apk.ru/gama-skachat]http://www.gama-casino-apk.ru/gama-skachat[/url]
Скачать apk файл онлайн казино Гама – побеждай прямо сейчас!
http://www.gama-casino-apk.ru/gama-skachat
Секреты использования индустриальных масел, с которыми стоит ознакомиться, которые обязательно стоит попробовать, Инновационные технологии в производстве индустриальных масел, для успешного развития производства, для увеличения срока службы оборудования, Экологическая ответственность в выборе масел, Значение масел в работе промышленных предприятий, для повышения производительности предприятия, для оптимизации бюджета
индустриальные масла [url=https://industrialnyemasla.ru/]индустриальные масла[/url] .
If you wish for to obtain a great deal from this paragraph then you have to apply these methods to your
won webpage.
Вы можете купить медицинскую справку в мед центре https://hearth-health.ru/ в Москве без прохождения врачей.
Задачи и роль QA-инженера: путь к успешной карьере в области тестирования программных продуктов. Узнайте, какие навыки и знания необходимы специалисту для качественного выполнения задач на всех этапах разработки: https://dzen.ru/a/ZvqB94uwl1C-1ivx
пин ап казино официальный сайт: pinup – pinup-kazi.ru
I giocatori devono fare attenzione a scegliere casinò non AAMS che siano regolamentati da autorità di gioco rispettabili e che abbiano una buona reputazione nel settore.
I am glad to talk with you and you give me great help
[url=https://starda-casino-apk.ru/starda-oficzialnyj-sajt]www.starda-casino-apk.ru/starda-oficzialnyj-sajt[/url]
Скачать последнюю версию приложения онлайн казино starda – побеждай прямо сейчас!
starda-casino-apk.ru/starda-oficzialnyj-sajt
일본배대지
메인 서비스: 간편하고 효율적인 배송 및 구매 대행 서비스
1. 대행 서비스 주요 기능
메인 서비스는 고객이 한 번에 필요한 대행 서비스를 신청할 수 있도록 다양한 기능을 제공합니다.
배송대행 신청: 국내외 상품 배송을 대신 처리하며, 효율적인 시스템으로 신속한 배송을 보장합니다.
구매대행 신청: 원하는 상품을 대신 구매해주는 서비스로, 고객의 수고를 줄입니다.
엑셀 대량 등록: 대량 상품을 엑셀로 손쉽게 등록 가능하여 상업 고객의 편의성을 증대합니다.
재고 관리 신청: 창고 보관 및 재고 관리를 통해 물류 과정을 최적화합니다.
2. 고객 지원 시스템
메인 서비스는 사용자 친화적인 접근성을 제공합니다.
유저 가이드: 대행 서비스를 더욱 합리적으로 사용할 수 있도록 세부 안내서를 제공합니다.
운송장 조회: 일본 사가와 등 주요 운송사의 추적 시스템과 연동하여 운송 상황을 실시간으로 확인 가능합니다.
3. 비용 안내와 부가 서비스
비용 계산기: 예상되는 비용을 간편하게 계산해 예산 관리를 돕습니다.
부가 서비스: 교환 및 반품, 폐기 및 검역 지원 등 추가적인 편의 서비스를 제공합니다.
출항 스케줄 확인: 해외 배송의 경우 출항 일정을 사전에 확인 가능하여 배송 계획을 세울 수 있습니다.
4. 공지사항
기본 검수 공지
무료 검수 서비스로 고객의 부담을 줄이며, 보다 철저한 검수가 필요한 경우 유료 정밀 검수 서비스를 권장합니다.
수출허가서 발급 안내
항공과 해운 수출 건에 대한 허가서를 효율적으로 발급받는 방법을 상세히 안내하며, 고객의 요청에 따라 이메일로 전달됩니다.
노데이터 처리 안내
운송장 번호 없는 주문에 대한 새로운 처리 방안을 도입하여, 노데이터 발생 시 관리비가 부과되지만 서비스 품질을 개선합니다.
5. 고객과의 소통
카카오톡 상담: 실시간 상담을 통해 고객의 궁금증을 해결합니다.
공지사항 알림: 서비스 이용 중 필수 정보를 지속적으로 업데이트합니다.
메인 서비스는 고객 만족을 최우선으로 하며, 지속적인 개선과 세심한 관리를 통해 최상의 경험을 제공합니다.
娛樂城
RG富遊娛樂城是亞洲地區知名的線上娛樂平台,致力於為玩家提供多元化且高品質的遊戲體驗。自成立以來,RG富遊娛樂城以其豐富的遊戲種類、優質的服務以及安全可靠的遊戲環境,贏得了廣大玩家的信賴與支持。
遊戲種類
RG富遊娛樂城提供多樣化的遊戲選擇,滿足不同玩家的需求:
真人娛樂:包括百家樂、輪盤、骰寶等,玩家可與真人荷官即時互動,享受真實賭場的氛圍。
電子遊戲:涵蓋各類老虎機、電子撲克等,遊戲畫面精美,玩法多樣,帶來無限樂趣。
體育投注:提供足球、籃球、網球等多項體育賽事的投注服務,賠率公正,資訊即時更新。
彩票遊戲:包括各類熱門彩票遊戲,玩法簡單,獎金豐厚,讓玩家輕鬆參與。
捕魚遊戲:精美的海底世界場景,豐富的魚種和道具,帶來刺激的捕魚體驗。
平台特色
安全可靠:RG富遊娛樂城採用先進的加密技術,保障玩家的個人資訊和資金安全,並持有合法的營業執照,受相關監管機構監管。
優惠活動:平台定期推出各類優惠活動,如首儲贈送、返水優惠、抽獎活動等,讓玩家享受更多福利。
客戶服務:提供24小時在線客服,隨時解答玩家的疑問,確保每位玩家都能獲得及時的幫助。
多元支付:支持多種支付方式,存提款快捷方便,滿足不同玩家的需求。
玩家評價
許多玩家對RG富遊娛樂城給予了高度評價,認為平台遊戲種類豐富,操作簡便,出入金迅速,客服服務專業且友善。此外,平台的優惠活動也深受玩家喜愛,增加了遊戲的樂趣和收益。
總結
RG富遊娛樂城以其多元化的遊戲選擇、優質的服務和安全可靠的遊戲環境,成為眾多玩家的首選線上娛樂平台。無論您是新手還是老玩家,都能在這裡找到適合自己的遊戲,享受極致的娛樂體驗。
Dom Boutique Hotel, boutique hotel: addresses with entrances on the map, reviews, photos, phone numbers, opening hours and how to get there. Accommodation from http://cyprus-apartment.com/
пин ап зеркало: pinup – пин ап казино
Like the way you’ve outlined things. Easy to follow. Not cluttered.
соут https://sout213.ru
Вы можете купить справку в клинике https://medikwest.ru/ по Москве с бесплатной доставкой до любой станции метро.
Камеры видеонаблюдения выполняют различные задачи: они помогают отпугивать нарушителей, фиксируют события на охраняемой территории и контролируют действия сотрудников Камеры видеонаблюдения для улицы
Приобретение диплома ПТУ с сокращенной программой обучения в Москве
Камеры видеонаблюдения выполняют различные задачи: они помогают отпугивать нарушителей, фиксируют события на охраняемой территории и контролируют действия сотрудников Камеры видеонаблюдения со звуком
Jugabet bonos exclusivos [url=https://jugabet777.com/]Jugabet bonos exclusivos[/url] .
лечение запоев на дому [url=https://sait.anihub.me/viewtopic.php?id=5681/]sait.anihub.me/viewtopic.php?id=5681[/url] .
вывод из запоя капельница [url=https://gaslo.ukrbb.net/viewtopic.php?f=13&t=3416]https://gaslo.ukrbb.net/viewtopic.php?f=13&t=3416[/url] .
вывод из запоя цена [url=http://www.klin.0pk.me/viewtopic.php?id=4410]http://www.klin.0pk.me/viewtopic.php?id=4410[/url] .
срочный вывод из запоя [url=http://zarabotokdoma.creartuforo.com/viewtopic.php?id=11486]http://zarabotokdoma.creartuforo.com/viewtopic.php?id=11486[/url] .
pinup-kazi.ru: пин ап казино – pinup kazi
[url=https://starda-casino-apk.ru/starda-na-androjd]www.starda-casino-apk.ru/starda-na-androjd[/url]
Скачать приложение казино Monro – побеждай сегодня!
http://www.starda-casino-apk.ru/starda-na-androjd
I feel that is among the so much significant info for me. And i am satisfied studying your article. However should commentary on some basic issues, The site style is ideal, the articles is in reality excellent : D. Excellent activity, cheers
st666 trang chủ
ST666: Nhà Cái Đẳng Cấp Số 1 Việt Nam
Trong thế giới cá cược trực tuyến, ST666 đã khẳng định được cái tên của mình như một ngôi sao sáng tại thị trường Việt Nam. Với giao diện hiện đại và phong cách thiết kế trẻ trung, nhà cái này không chỉ là một sân chơi mà còn là một nơi để những người yêu thích cá cược có thể hòa mình vào những trải nghiệm thú vị và hấp dẫn nhất.
### Trải Nghiệm Cá Cược Đỉnh Cao
ST666 cung cấp rất nhiều loại hình cá cược từ chơi bài, đá gà, bắn cá đến thể thao và xổ số. Dù bạn là người mới bắt đầu hay là một cao thủ dày dạn kinh nghiệm, ST666 sẽ mang đến cho bạn những trò chơi đa dạng để thỏa mãn niềm đam mê của mình. Đặc biệt, nhờ vào việc đầu tư chăm chút từ giao diện trang chính cho đến từng sảnh cá cược, ST666 đưa người chơi vào một hành trình khám phá những điều kỳ diệu của cá cược trực tuyến.
### Hướng Dẫn Đăng Ký và Đăng Nhập
Việc đăng ký và đăng nhập tại ST666 rất đơn giản. Chỉ với vài bước dễ dàng, bạn đã có thể trở thành thành viên của một trong những nhà cái uy tín nhất. Hệ thống hỗ trợ trực tuyến 24/7 sẽ giúp bạn giải quyết mọi thắc mắc và vấn đề phát sinh khi tham gia cá cược.
### Chính Sách Bảo Mật và Đảm Bảo Quyền Lợi Người Chơi
ST666 luôn đặt sự an toàn và bảo mật của hội viên lên hàng đầu. Chính sách bảo mật nghiêm ngặt cùng với những điều khoản và điều kiện rõ ràng giúp người chơi hoàn toàn yên tâm khi tham gia cá cược tại đây. Thêm vào đó, nhà cái cũng cam kết minh bạch trong quá trình thanh toán và hỗ trợ tốt nhất cho người chơi.
### Khuyến Mãi Hấp Dẫn
Một trong những điểm mạnh của ST666 là hệ thống khuyến mãi đa dạng và hấp dẫn. Người chơi có thể tận dụng các ưu đãi để gia tăng cơ hội thắng lớn, cũng như nhận những phần quà giá trị hấp dẫn từ nhà cái.
### Liên Hệ và Hỗ Trợ
Nếu bạn cần thêm thông tin hoặc hỗ trợ, ST666 luôn sẵn sàng giúp đỡ. Có thể liên hệ trực tiếp theo địa chỉ và số điện thoại đã cung cấp, hoặc thông qua các kênh mạng xã hội như Facebook, Twitter, Pinterest, v.v.
### Kết Luận
ST666 không chỉ là một nhà cái, mà còn là một cộng đồng cá cược online năng động, nơi bạn có thể thỏa mãn đam mê và kiếm tiền dễ dàng. Với những nổi bật trong dịch vụ, thiết kế và chính sách bảo mật, ST666 chắc chắn sẽ là lựa chọn hàng đầu cho mọi tín đồ cá cược tại Việt Nam. Hãy tham gia ngay hôm nay để khám phá những trải nghiệm thú vị mà ST666 mang lại!
This information is very important and you’ll need to know this when you constructor your own photo voltaic panel.
Soi cầu bạc nhớ 666: Phương pháp cá cược lô đề chính xác và hiệu quả
Soi cầu bạc nhớ 666 là một trong những phương pháp soi cầu xổ số – lô đề cực kỳ hiệu quả và được nhiều cao thủ chơi cá cược áp dụng. Bởi vì, tỷ lệ trúng của phương pháp soi cầu này cao hơn so với nhiều phương pháp truyền thống khác.
ST666 sẽ cùng bạn khám phá về phương pháp soi cầu bạc nhớ 666, ưu điểm khi sử dụng soi cầu bạc nhớ trong cá cược lô đề, cách soi cầu bạc nhớ 666 đúng chuẩn năm 2024 ngay trong bài viết này.
Giới thiệu về soi cầu bạc nhớ 666
Soi cầu bạc nhớ 666 là một phương pháp phân tích kết quả xổ số dựa trên việc ghi nhớ và tổng hợp các con số đã từng xuất hiện trong quá khứ. Đây là một trong những công cụ cá cược nổi bật và được nhiều người chơi lựa chọn trong cộng đồng cá cược xổ số.
Những điểm nổi bật của soi cầu bạc nhớ 666:
Dựa vào dữ liệu thực tế: Thay vì dự đoán ngẫu nhiên, soi cầu bạc nhớ 666 sử dụng các con số từng xuất hiện và phân tích xác suất để đưa ra dự đoán kết quả xổ số sắp tới.
Thân thiện và dễ áp dụng: Phương pháp này không đòi hỏi người chơi phải có kiến thức sâu về thống kê. Chỉ cần hiểu cách ghi nhớ và phân tích cơ bản, người chơi có thể tự mình áp dụng phương pháp này.
Độ tin cậy cao: Nhờ vào dữ liệu lịch sử, soi cầu bạc nhớ 666 có khả năng dự đoán các con số có tỷ lệ lặp lại, giúp người chơi dự đoán chính xác hơn về các con số có thể xuất hiện.
Các phương pháp soi cầu bạc nhớ 666 đúng chuẩn năm 2024
Soi cầu bạc nhớ 666 là phương pháp dựa trên phân tích các kết quả xổ số từ trước đó để dự đoán các con số có khả năng xuất hiện tiếp theo.
Để nâng cao tỷ lệ thắng, bạn có thể áp dụng nhiều cách soi cầu bạc nhớ 666 khác nhau như soi cầu theo ngày, tuần, đầu câm, đuôi câm và theo thứ.
Soi cầu bạc nhớ 666 theo ngày
Soi cầu theo ngày là phương pháp phân tích các kết quả xổ số từ ngày hôm trước để dự đoán các con số có khả năng xuất hiện trong ngày tiếp theo.
Đây là phương pháp rất phù hợp với những người chơi muốn nhanh chóng nhận diện các xu hướng và tham gia cược ngay trong ngày.
Ví dụ:
Dữ liệu: Trong ngày hôm qua, các con số 05, 19, 26 xuất hiện khá nhiều.
Dự đoán: Bạn có thể thử các con số 06, 20, 27 trong ngày hôm nay vì chúng có khả năng liên quan đến các con số đã xuất hiện.
Soi cầu bạc nhớ 666 theo tuần
Soi cầu theo tuần giúp người chơi phân tích các kết quả của nhiều ngày trong tuần, từ đó nhận diện các chuỗi con số có khả năng tiếp tục xuất hiện trong các ngày tiếp theo. Phương pháp này hiệu quả trong việc nắm bắt xu hướng dài hạn hơn so với soi cầu theo ngày.
Ví dụ:
Dữ liệu: Trong tuần trước, các con số 02, 08, 18 xuất hiện vào các ngày thứ Hai và thứ Sáu.
Dự đoán: Tuần này, bạn có thể thử các con số 03, 09, 19 vào các ngày thứ Hai và thứ Sáu để tăng cơ hội thắng.
Soi cầu bạc nhớ 666 theo đầu câm
Đầu câm là các con số không xuất hiện ở vị trí đầu tiên trong kết quả xổ số. Dựa trên sự phân tích này, bạn có thể tìm ra những con số có khả năng xuất hiện tại đầu trong các lần quay số sau.
Ví dụ:
Dữ liệu: Trong các kỳ quay số gần đây, các con số 01, 02, 05 không xuất hiện ở vị trí đầu tiên.
Dự đoán: Bạn có thể thử các con số như 01, 02, 05 ở vị trí đầu trong các kỳ tiếp theo.
Soi cầu bạc nhớ theo đuôi câm
Đuôi câm là các con số không xuất hiện ở vị trí cuối cùng trong kết quả xổ số. Phân tích các con số này sẽ giúp bạn dự đoán những con số có khả năng xuất hiện ở đuôi trong lần quay tiếp theo.
Ví dụ:
Dữ liệu: Các con số 03, 09, 18 không xuất hiện ở vị trí cuối trong các kỳ quay gần đây.
Dự đoán: Bạn có thể thử các con số này ở vị trí cuối cùng trong các kỳ tiếp theo.
Soi cầu bạc nhớ 666 theo thứ
With havin so much written content do you ever run into
any problems of plagorism or copyright violation? My site has a lot of
completely unique content I’ve either created myself or outsourced but it appears a lot of
it is popping it up all over the web without my agreement.
Do you know any methods to help stop content from being
ripped off? I’d really appreciate it.
1xBet Promo Code 2024 – 1XBIG24: enter this code when creating your account to receive up to $100 as a 100% match on your first deposit. The bonus amount must be used in the sports section by placing bets with odds of 1.4 or higher and a 5x wagering requirement within 30 day http://tssz.ru/includes/photo/promokodu_na_1hbet_pri_registracii_bonus_6500_rubley.html
Вы можете купить справку в поликлинике https://dobromedic.ru/ по Москве с доставкой до станции метро.
1xBet Promo Code 2024 – 1XBIG24: enter this code when creating your account to receive up to $100 as a 100% match on your first deposit. The bonus amount must be used in the sports section by placing bets with odds of 1.4 or higher and a 5x wagering requirement within 30 day https://petitedanse.com.br/wp-content/pgs/codice_promozionale_14.html
Online medicine home delivery: indian pharm star – pharmacy website india
Mostbet ilə təhlükəsiz mərc təcrübəsi yaşayın | Mostbet ilə sürətli və təhlükəsiz ödənişlər həyata keçirin | Mostbet ilə həm mərc edin, həm də əylənin | Mostbet az kazinosunda yeni oyunlarla əylənin | Mostbet qeydiyyatı ilə xüsusi endirimlərdən yararlanın | Mostbet az ilə təhlükəsiz mərc etmək mümkündür | Mostbet Azərbaycan oyunçuları üçün xüsusi bonuslar təklif edir | Mostbet az oyunçular üçün əlverişli seçimdir | Mostbet qeydiyyatı ilə xüsusi bonuslar əldə edin [url=https://mostbet-online-az-qeydiyyat.com]Mostbet mobil tətbiq[/url].
Write more stories, more chapters.
This website has lots of really useful stuff on it. Thanks for informing me.
I’ve read several good stuff here. Definitely worth bookmarking for revisiting. I surprise how much effort you put to make such a magnificent informative site.
Узнавая все больше о Кипре, вы только убедитесь в привлекательности острова. Лимасол, Пафос, Ларнака, Айя-Напа и Протарас привлекают инвесторов удачным географическим положением, развитой инфраструктурой и тем, что это самые «русскоязычные» города республики hotels in cyprus
Федерация – это проводник в мир покупки запрещенных товаров, можно купить альфа пвп, купить кокаин, купить меф, купить экстази в различных городах. Москва, Санкт-Петербург, Краснодар, Владивосток, Красноярск, Норильск, Екатеринбург, Мск, СПБ, Хабаровск, Новосибирск, Казань и еще 100+ городов.
메인 서비스: 간편하고 효율적인 배송 및 구매 대행 서비스
1. 대행 서비스 주요 기능
메인 서비스는 고객이 한 번에 필요한 대행 서비스를 신청할 수 있도록 다양한 기능을 제공합니다.
배송대행 신청: 국내외 상품 배송을 대신 처리하며, 효율적인 시스템으로 신속한 배송을 보장합니다.
구매대행 신청: 원하는 상품을 대신 구매해주는 서비스로, 고객의 수고를 줄입니다.
엑셀 대량 등록: 대량 상품을 엑셀로 손쉽게 등록 가능하여 상업 고객의 편의성을 증대합니다.
재고 관리 신청: 창고 보관 및 재고 관리를 통해 물류 과정을 최적화합니다.
2. 고객 지원 시스템
메인 서비스는 사용자 친화적인 접근성을 제공합니다.
유저 가이드: 대행 서비스를 더욱 합리적으로 사용할 수 있도록 세부 안내서를 제공합니다.
운송장 조회: 일본 사가와 등 주요 운송사의 추적 시스템과 연동하여 운송 상황을 실시간으로 확인 가능합니다.
3. 비용 안내와 부가 서비스
비용 계산기: 예상되는 비용을 간편하게 계산해 예산 관리를 돕습니다.
부가 서비스: 교환 및 반품, 폐기 및 검역 지원 등 추가적인 편의 서비스를 제공합니다.
출항 스케줄 확인: 해외 배송의 경우 출항 일정을 사전에 확인 가능하여 배송 계획을 세울 수 있습니다.
4. 공지사항
기본 검수 공지
무료 검수 서비스로 고객의 부담을 줄이며, 보다 철저한 검수가 필요한 경우 유료 정밀 검수 서비스를 권장합니다.
수출허가서 발급 안내
항공과 해운 수출 건에 대한 허가서를 효율적으로 발급받는 방법을 상세히 안내하며, 고객의 요청에 따라 이메일로 전달됩니다.
노데이터 처리 안내
운송장 번호 없는 주문에 대한 새로운 처리 방안을 도입하여, 노데이터 발생 시 관리비가 부과되지만 서비스 품질을 개선합니다.
5. 고객과의 소통
카카오톡 상담: 실시간 상담을 통해 고객의 궁금증을 해결합니다.
공지사항 알림: 서비스 이용 중 필수 정보를 지속적으로 업데이트합니다.
메인 서비스는 고객 만족을 최우선으로 하며, 지속적인 개선과 세심한 관리를 통해 최상의 경험을 제공합니다.
ed tablets: canadianpharm1st.com – pills erectile dysfunction
вывод из запоя цена [url=flanrp.rolevaya.com/viewtopic.php?id=149]вывод из запоя цена[/url] .
лечение запоев на дому [url=https://planeta.mybb.social/viewtopic.php?id=2230/]https://planeta.mybb.social/viewtopic.php?id=2230/[/url] .
Coolzino po polsku [url=www.coolzino-polska.com]www.coolzino-polska.com[/url] .
fast ed meds online: canadian pharm – buy prescription drugs without doctor
Mostbet Azərbaycanda ən etibarlı mərc platformasıdır | Mostbet ilə uğurlu mərc etmək şansınızı artırın | Mostbet ilə canlı mərc etmək çox həyəcanlıdır | Mostbet qeydiyyatı ilə oyunlara başlayın və qazanın | Mostbet az oyunçular üçün əlverişli şərtlər təqdim edir | Mostbet az tətbiqi ilə oyun dünyasına qoşulun | Mostbet ilə hər zaman qalib gəlmək mümkündür | Mostbet qeydiyyatı ilə hədiyyələr qazanın | Mostbet qeydiyyatı ilə xüsusi bonuslar əldə edin [url=https://mostbet-online-az-qeydiyyat.com]Mostbet azerbaycan[/url].
Реально ли приобрести диплом стоматолога? Основные этапы
Вы можете купить справку в медицинском центре https://kristall-med.ru/ в Москве без прохождения врачей.
Средиземноморье привлекает людей со всего мира своей уникальной атмосферой, богатой историей и неповторимыми природными условиями http://zingcorp.com.au/component/kunena/sub-category-3/92283-5#92314
Игровая платформа 1хбет щедро вознаграждает новичков приветственным поощрением в разделе “Казино” в размере до 1500 долларов плюс 210 фриспинов https://actuchomage.org/includes/wkl/code_promo_69.html
indian pharmacy online: indian pharm – indian pharmacy online
best online pharmacy india: IndianPharmStar – top 10 online pharmacy in india
ST666.LOVE – Nhà cái uy tín và nền tảng cá cược hàng đầu tại Việt Nam
ST666 là một thương hiệu cá cược nổi bật tại Việt Nam, mang đến trải nghiệm giải trí toàn diện và an toàn cho người chơi. Với hàng loạt tính năng hiện đại, chương trình khuyến mãi hấp dẫn, và dịch vụ chăm sóc khách hàng tận tâm, ST666 xứng đáng là lựa chọn số một của bạn trong thế giới cá cược trực tuyến.
Thông báo quan trọng về link đăng nhập ST666
Để đảm bảo an toàn và tránh các trường hợp gián đoạn truy cập, link đăng nhập vào ST666 có thể thay đổi liên tục. Trước khi nạp tiền, quý khách vui lòng liên hệ với nhân viên hỗ trợ để nhận thông tin mới nhất. Chúng tôi cam kết đồng hành cùng bạn, mang đến trải nghiệm cá cược may mắn và thuận lợi.
Các tính năng nổi bật của ST666
Hệ thống sảnh chơi đa dạng
Casino: Đắm mình trong không gian sòng bài trực tuyến sang trọng.
Thể thao: Đặt cược với tỷ lệ hấp dẫn trong các trận đấu thể thao hàng đầu.
Đá gà: Trực tiếp từ đấu trường SV388 với chất lượng video sắc nét.
Slot quay, bắn cá, xổ số, eSport: Phong phú lựa chọn, thỏa sức trải nghiệm.
Khuyến mãi hấp dẫn
Thưởng 100% nạp đầu: Tăng gấp đôi cơ hội chiến thắng.
Hoàn tiền 10% mỗi ngày: An tâm chơi không lo rủi ro.
Thưởng nóng: Nhận ngay 100K cho thành viên mới.
Ứng dụng ST666 tiện lợi
Tải app ST666 trên các nền tảng iOS và Android, giúp bạn truy cập dễ dàng, mọi lúc mọi nơi.
An toàn và minh bạch
ST666 được cấp chứng chỉ hoạt động hợp pháp, cam kết mang đến môi trường cá cược uy tín, bảo mật cao.
Hướng dẫn tham gia ST666
Đăng ký tài khoản: Nhanh chóng qua giao diện thân thiện của website hoặc ứng dụng.
Đăng nhập và nạp tiền: Sử dụng nhiều phương thức thanh toán tiện lợi.
Rút tiền dễ dàng: Hệ thống xử lý giao dịch tự động, đảm bảo tốc độ nhanh chóng.
Trải nghiệm đẳng cấp tại ST666.LOVE
ST666 không chỉ là nền tảng giải trí mà còn là nơi hội tụ của những trò chơi cá cược đỉnh cao. Hãy tham gia ngay hôm nay để nhận nhiều ưu đãi hấp dẫn và trải nghiệm những phút giây sôi động.
Liên hệ ST666 để được hỗ trợ và nhận link đăng nhập mới nhất. Chúc quý khách may mắn!
aml wallet risk checker
Overview of Crypto Deal Check and Conformity Options
In today’s cryptocurrency market, guaranteeing transfer openness and conformity with Anti-Laundering and Know Your Customer (KYC) rules is essential. Here is an overview of well-known platforms that deliver solutions for crypto transaction surveillance, verification, and asset protection.
1. Token Metrics Platform
Description: Token Metrics offers cryptocurrency assessment to examine potential risk risks. This solution enables investors to examine coins ahead of investment to prevent possibly risky assets. Attributes:
– Threat evaluation.
– Ideal for buyers looking to avoid hazardous or fraud projects.
2. Metamask Center
Description: Metamask Monitor Center allows users to review their crypto assets for questionable actions and standard conformity. Features:
– Checks coins for legitimacy.
– Offers notifications about possible asset locks on particular exchanges.
– Gives detailed reports after account sync.
3. Best Change
Summary: Bestchange.ru is a service for observing and checking crypto trade transfers, ensuring openness and transaction security. Features:
– Transaction and account observation.
– Restriction screening.
– Web-based interface; accommodates BTC and multiple additional cryptocurrencies.
4. Bot amlchek
Overview: AMLchek is a investment monitor and compliance service that uses artificial intelligence methods to find dubious actions. Features:
– Transfer tracking and user verification.
– Offered via web version and chat bot.
– Compatible with coins like BSC, BTC, DOGE, and more.
5. Alfabit AML
Summary: AlphaBit delivers comprehensive AML services tailored for the crypto market, helping companies and financial institutions in maintaining compliance conformity. Highlights:
– Thorough anti-money laundering tools and evaluations.
– Adheres to modern safety and regulatory standards.
6. AMLNode
Description: AML Node offers AML and KYC solutions for crypto firms, including transfer tracking, sanctions validation, and analysis. Benefits:
– Risk analysis options and sanctions screenings.
– Valuable for maintaining safe company operations.
7. Btrace AML Crypto
Summary: Btrace AML Crypto is dedicated to resource verification, offering transaction observation, restriction evaluations, and assistance if you are a victim of fraud. Advantages:
– Reliable support for asset retrieval.
– Transfer tracking and security options.
Specialized USDT Check Options
Our platform also evaluates multiple sites that offer check solutions for USDT deals and wallets:
– **USDT TRC20 and ERC20 Verification:** Various platforms provide comprehensive evaluations for USDT transactions, aiding in the identification of suspicious transactions.
– **AML Verification for USDT:** Options are offered for observing for suspicious actions.
– **“Cleanliness” Screenings for Wallets:** Verification of transaction and account purity is provided to find likely dangers.
**Conclusion**
Finding the best tool for validating and monitoring digital currency deals is essential for providing protection and standard adherence. By reading our reviews, you can choose the most suitable service for transaction tracking and asset safety.
Mostbet kazinosunda böyük qazanclar əldə edin | Mostbet ilə sürətli və təhlükəsiz ödənişlər həyata keçirin | Mostbet ilə hər zaman yüksək qazanclar əldə edin | Mostbet ilə hər zaman qalib gəlin | Mostbet tətbiqi ilə hər yerdən oyunlara qoşulun | Mostbet az oyunçular üçün ən yaxşı şərtlər təqdim edir | Mostbet ilə böyük qazanclar əldə edin və zövq alın | Mostbet tətbiqi ilə hər zaman oynamaq rahatdır | Mostbet az oyunçular üçün xüsusi kampaniyalar təqdim edir [url=https://mostbet-online-az-qeydiyyat.com]Mostbet bonusları[/url].
ed therapy: canadianpharm1st – herbal remedies for ed
Легальные способы покупки диплома о среднем полном образовании
prescription drugs online without: canadian pharm – ed treatment review
п»їbest mexican online pharmacies: Mexican Pharm – reputable mexican pharmacies online
нарколог краснодар [url=https://www.dubna.myqip.ru/?1-5-0-00000285-000-0-0-1730786889]https://www.dubna.myqip.ru/?1-5-0-00000285-000-0-0-1730786889[/url] .
нарколог на дом краснодар [url=https://setter.borda.ru/?1-7-0-00000676-000-0-0-1730786540/]setter.borda.ru/?1-7-0-00000676-000-0-0-1730786540[/url] .
вывод из запоя анонимно [url=www.chesskomi.borda.ru/?1-8-0-00003050-000-0-0-1730786426/]www.chesskomi.borda.ru/?1-8-0-00003050-000-0-0-1730786426/[/url] .
online shopping pharmacy india: indian pharmacy – indian pharmacy paypal
Spot on with this write-up, I actually assume this website needs far more consideration. I will in all probability be once more to learn rather more, thanks for that info.
Hi there! This post couldn’t be written any better!
Reading this post reminds me of my old room mate! He always kept chatting about this.
I will forward this post to him. Fairly certain he will have a good read.
Thank you for sharing!
九州娛樂城:亞洲頂級線上娛樂平台
九州娛樂城,作為亞洲領先的線上博弈平台,以其專業性、公平性和創新性著稱。在這裡,您可以享受全方位的娛樂體驗,包括體育投注、真人遊戲、電子遊戲、六合彩球以及流行的捕魚機和棋牌遊戲。九州娛樂城是台灣玩家的首選娛樂平台,被譽為業界 No.1!
九州娛樂城的亮點
1. 多元化遊戲選擇
九州娛樂城擁有超過千款來自全球頂尖供應商提供的遊戲,滿足各種類型玩家的需求。無論是喜歡競技性的體育投注、刺激的真人遊戲,還是休閒的電子遊戲,九州娛樂城都能提供最適合您的選擇。
體育投注:全面覆蓋世界級賽事,包括世界杯、職業聯賽等。提供多種投注方式,如讓球、大小、單雙、串關等,並支持桌面端與手機端投注。
真人遊戲:KU真人百家樂、LEO真人遊戲等,讓您感受現場賭桌的真實刺激。
電子遊戲與捕魚機:多款熱門遊戲,如九州熱門電子遊戲和捕魚機,帶給玩家極致娛樂享受。
六合彩與棋牌遊戲:適合策略型玩家的理想選擇。
2. 極致便利的操作體驗
九州娛樂城支持通過官方網站和九州APP下載進行操作,無論您身在何處,都可以輕鬆加入遊戲世界。針對台灣玩家的本地化設計確保操作流暢、存取款方便。
3. 先進技術與安全保障
九州娛樂城集團總部位於菲律賓首都馬尼拉的RCBC Plaza,配備世界一流的安全資訊防護系統和智能大樓自動化系統(BAS)。玩家的數據與資金安全都能得到最佳保障,讓每一次遊戲都安心無憂。
4. 熱門品牌與平台支持
九州娛樂城旗下包括三大品牌:
LEO娛樂:提供真人遊戲、體育直播及免費影城。
THA娛樂:專注於新手友好和便捷操作。
KU娛樂:以真人百家樂而著稱。
每個品牌雖分別由不同管理團隊運營,但都傳承了九州娛樂城的高標準,遊戲系統與界面毫無差異,為玩家提供無縫娛樂體驗。
為什麼選擇九州娛樂城?
專業性與公平性
九州娛樂城堅持以「即時便利、公平公正、專業營運」為宗旨,研發創新遊戲技術,滿足不同類型玩家需求。
貼近市場與玩家需求
擁有兩岸三地的精英設計師與代理團隊,根據玩家反饋持續改進產品,並為合作商提供及時更新支持。
優越的服務與保障
從遊戲操作到客戶支持,九州娛樂城提供全面的服務支持,讓每位玩家都能感受到最貼心的服務。
九州娛樂城的未來
作為線上博弈行業的領航者,九州娛樂城不斷推陳出新,致力於提供更豐富的遊戲選擇和更完善的玩家體驗。同時,透過強大的技術與營運團隊,九州娛樂城已成為台灣乃至亞洲地區娛樂平台的代名詞。
立即下載九州APP,體驗最極致的娛樂樂趣!九州娛樂城——您的最佳線上娛樂夥伴!
Быстрое обучение и получение диплома магистра – возможно ли это?
how to overcome ed: canadianpharm1st.com – cheap pills online
The Kaspa Wallet is a secure and user-friendly PWA-based wallet
designed for smooth transactions on the Kaspa blockchain. Access your
assets easily, with top-tier security and seamless functionality on any device.
вывод из запоя в наркологическом стационаре [url=https://alhambra.bestforums.org/viewtopic.php?f=10&t=46434]вывод из запоя в наркологическом стационаре[/url] .
ST666: Thiên Đường Casino Trực Tuyến Hàng Đầu
ST666 là một trong những sòng bạc trực tuyến hàng đầu, mang đến trải nghiệm chơi game đỉnh cao với hàng loạt trò chơi hấp dẫn và chương trình khuyến mãi đặc biệt. Với sứ mệnh đem lại sân chơi công bằng và tiện lợi, ST666 đã trở thành lựa chọn yêu thích của hàng ngàn người chơi tại Việt Nam.
Đa Dạng Trò Chơi và Sảnh Cược
1. Trò Chơi Phong Phú
ST666 cung cấp nhiều trò chơi đa dạng, đáp ứng sở thích của mọi người chơi:
Baccarat: Trò chơi cổ điển dành cho những ai yêu thích chiến thuật và may mắn.
Tài Xỉu: Trò chơi xúc xắc đầy kịch tính, đem lại cơ hội thắng lớn trong từng vòng cược.
Xóc Đĩa: Trò chơi truyền thống Việt Nam, được nâng cấp với công nghệ trực tuyến hiện đại.
Và nhiều trò chơi khác đang chờ bạn khám phá.
2. Sảnh Cược Đẳng Cấp
ST666 kết hợp cùng các sảnh cược nổi tiếng như:
Wm Casino: Nền tảng casino chuyên nghiệp, nổi bật với các trò chơi chất lượng cao và giao diện mượt mà.
ST666 Casino: Sảnh cược độc quyền với những ưu đãi hấp dẫn và các trò chơi độc đáo.
Khuyến Mãi Hấp Dẫn Tại ST666
ST666 không chỉ nổi bật với danh mục trò chơi phong phú mà còn mang đến nhiều chương trình khuyến mãi hấp dẫn cho người chơi:
Khuyến Mãi Gửi Tiền Cuối Tuần: Nhận thưởng lên đến 3.666.000 đồng khi nạp tiền vào tài khoản trong các ngày cuối tuần.
Ưu Đãi Đặc Biệt Dành Cho Hội Viên Mới: Những người chơi mới sẽ nhận được gói khuyến mãi chào mừng độc quyền.
Hoàn Tiền Hàng Tuần: Cơ hội nhận lại phần trăm số tiền cược đã thua trong tuần, giúp bạn có thêm động lực tham gia.
Tại Sao Nên Chọn ST666?
An Toàn và Uy Tín: ST666 cam kết bảo mật thông tin và giao dịch của người chơi, đảm bảo trải nghiệm chơi game an toàn tuyệt đối.
Hỗ Trợ Khách Hàng Chuyên Nghiệp: Đội ngũ chăm sóc khách hàng luôn sẵn sàng hỗ trợ 24/7.
Giao Diện Thân Thiện: Thiết kế đơn giản, dễ sử dụng, phù hợp cho cả người mới chơi và người chơi lâu năm.
Cơ Hội Thắng Lớn: Tỷ lệ thắng cao và phần thưởng hấp dẫn trong từng trò chơi.
Cách Tham Gia ST666
Bước 1: Truy cập trang web chính thức của ST666.
Bước 2: Đăng ký tài khoản nhanh chóng và miễn phí.
Bước 3: Nạp tiền và lựa chọn trò chơi yêu thích để bắt đầu hành trình giải trí.
Kết Luận
ST666 chính là thiên đường giải trí trực tuyến dành cho những ai yêu thích thử vận may và tận hưởng các trò chơi đẳng cấp. Với sự kết hợp giữa công nghệ hiện đại và các chương trình ưu đãi hấp dẫn, ST666 cam kết mang lại trải nghiệm hoàn hảo cho người chơi. Tham gia ngay hôm nay để khám phá những điều bất ngờ tại ST666!
online prescription for ed meds: canadian pharmacy – prescription drugs online without
nhà cái ST666
ST666 – Nhận Định Bóng Đá Kèo Nhà Cái Uy Tín
ST666: Địa Chỉ Lý Tưởng Cho Những Tín Đồ Cá Cược Bóng Đá
ST666 là nền tảng nhận định bóng đá và kèo nhà cái chuyên nghiệp, nơi người chơi có thể tham gia dự đoán các kèo đa dạng như cược tài xỉu, cược chấp, và cược 1×2. Với giao diện thân thiện, tỷ lệ cược minh bạch và ưu đãi hấp dẫn, ST666 đang dần trở thành lựa chọn hàng đầu của cộng đồng yêu bóng đá.
Nhận Định Kèo Nhà Cái Đa Dạng
Cược Tài Xỉu (#cuoctaixiu)
Dựa vào tổng số bàn thắng trong trận đấu, người chơi dễ dàng chọn lựa Tài (nhiều hơn tỷ lệ nhà cái đưa ra) hoặc Xỉu (ít hơn tỷ lệ).
ST666 cung cấp các phân tích chi tiết giúp người chơi đưa ra lựa chọn chính xác.
Cược Chấp (#cuocchap)
Thích hợp cho những trận đấu có sự chênh lệch về sức mạnh giữa hai đội. ST666 cung cấp tỷ lệ chấp tối ưu, phù hợp với cả người chơi mới và chuyên nghiệp.
Cược 1×2 (#cuoc1x2)
Phù hợp cho những ai muốn dự đoán kết quả chung cuộc (Thắng – Hòa – Thua). Đây là loại kèo phổ biến, dễ hiểu và có tỷ lệ cược hấp dẫn.
Ưu Đãi Hấp Dẫn Tại ST666
Nhận 160% tiền gửi lần đầu: Khi đăng ký tài khoản mới và nạp tiền, người chơi sẽ nhận được số tiền thưởng cực lớn, tăng cơ hội tham gia các kèo.
Hoàn tiền 3% mỗi ngày: Chính sách hoàn tiền giúp người chơi giảm thiểu rủi ro, thoải mái trải nghiệm mà không lo lắng nhiều về chi phí.
Vì Sao Nên Chọn ST666?
Nền Tảng Uy Tín: ST666 cam kết mang đến trải nghiệm cá cược minh bạch và an toàn.
Phân Tích Chuyên Sâu: Đội ngũ chuyên gia của ST666 luôn cập nhật nhận định mới nhất về các trận đấu, giúp người chơi đưa ra quyết định tối ưu.
Hỗ Trợ 24/7: Đội ngũ hỗ trợ chuyên nghiệp, luôn sẵn sàng giải đáp thắc mắc của người chơi.
Giao Dịch Nhanh Chóng: Nạp rút tiền linh hoạt, đảm bảo sự tiện lợi và bảo mật.
Cách Tham Gia ST666
Truy cập website chính thức của ST666.
Đăng ký tài khoản bằng thông tin cá nhân.
Nạp tiền lần đầu để nhận ưu đãi 160%.
Bắt đầu trải nghiệm cá cược với các kèo yêu thích!
Hãy đến với ST666 để tận hưởng không gian cá cược chuyên nghiệp, nhận định kèo chất lượng và những phần thưởng hấp dẫn. Tham gia ngay hôm nay để trở thành người chơi chiến thắng!
LEO娛樂城:九州娛樂集團的卓越創舉與運營優勢
九州娛樂集團總部的現代化運營
九州娛樂集團的總部設於菲律賓首都馬尼拉市中心最具代表性的現代化建築「RCBC Plaza」。這座辦公大樓融合了全球領先的建築科技與安全系統,包括:
國家級資訊防護系統,確保數據安全。
樓宇自動化系統 (BAS),實現數位化管理與高效運營,包括防火系統、光纖電訊和數位監控。
九州娛樂為員工提供舒適的工作環境和專業的教育培訓,確保服務水準一流。其員工以專業知識和親切態度,為尊貴玩家帶來極致的遊戲體驗。
LEO娛樂旗下品牌與遊戲特色
九州娛樂城旗下分支包括 LEO、THA 和 KU 三個娛樂品牌。雖然品牌各自獨立運營,但都共享相同的遊戲系統與界面,提供超過數千款來自全球頂級供應商的遊戲。
這些品牌的核心特色包括:
種類繁多的遊戲:滿足不同類型玩家的需求,包括電子遊戲、體育博彩、真人娛樂等。
不斷更新的內容:通過九州獨家技術,網站內容保持新鮮,合作商可快速更新遊戲資源,確保平台競爭力。
玩家在這些平台上可以隨時找到適合自己的遊戲,享受沉浸式的娛樂體驗。
LEO娛樂城的歷史與發展
九州娛樂集團的起源可以追溯至其最早期的經營模式:「信用版」賭博平台 《天下體育球版》。儘管該模式在當時非常流行,但因高風險與財務處理複雜而逐漸被淘汰。
隨著市場需求的變化,九州娛樂轉型為現金版平台 《天下現金網》,引入了更安全、便捷的遊戲模式。這種轉變不僅提升了玩家的體驗,也使平台得以進一步發展。
如今,九州娛樂城已成為台灣博弈業界的領軍者,不僅優化了網站版面與功能,還推出了專屬手機APP,方便玩家隨時隨地進行遊戲體驗。
LEO娛樂的成功秘訣
現代化運營與技術支持:九州娛樂在系統安全與技術更新方面投入巨大資源,確保平台運營穩定可靠。
多元化遊戲體驗:通過與全球頂級遊戲供應商合作,平台提供了豐富的遊戲選擇,適應各種玩家需求。
用戶至上:專業培訓的員工以細心和熱忱態度,提供高品質服務,讓玩家倍感尊重。
不斷創新:從信用版到現金版,再到手機APP,九州娛樂始終緊跟市場趨勢,致力於打造最佳娛樂體驗。
結語
LEO娛樂城作為九州娛樂集團旗下的重要品牌,不僅繼承了集團的核心價值,更在遊戲選擇、服務品質和技術創新方面不斷提升。從最初的《天下體育球版》到如今的行業領先者,LEO娛樂見證了九州娛樂城的發展歷程,也成為博弈行業中的耀眼明星。
加入 LEO娛樂城,感受來自九州娛樂集團的專業與熱情,享受最頂級的線上博弈體驗!
st666
ST666 Xổ Số – Điểm Đến Giải Trí Hoàn Hảo
ST666 Xổ Số là nền tảng giải trí trực tuyến hàng đầu, cung cấp đa dạng các loại hình trò chơi từ keno, xổ số miền Nam (XSMN), xổ số miền Bắc (XSMB) đến xổ số siêu tốc. Với dịch vụ chuyên nghiệp và an toàn, ST666 mang đến cho bạn một trải nghiệm hoàn toàn mới mẻ và hấp dẫn.
Tại Sao Nên Chọn ST666 Xổ Số
Truy Cập Nhanh Và An Toàn
ST666 đảm bảo quyền truy cập nhanh chóng thông qua đường dẫn chính thức, loại bỏ hoàn toàn rủi ro từ các trang web giả mạo hoặc nguy cơ mất tài khoản. Hệ thống bảo mật hiện đại giúp bạn yên tâm khi đăng nhập và tham gia trò chơi.
Ưu Đãi Độc Quyền Dành Cho Thành Viên
ST666 mang đến nhiều chương trình khuyến mãi đặc biệt dành riêng cho người chơi, bao gồm phần thưởng giá trị và các ưu đãi hấp dẫn. Thành viên mới sẽ được trải nghiệm các chính sách hỗ trợ vượt trội, giúp tăng cơ hội chiến thắng và tận hưởng trò chơi tốt nhất.
Bảo Mật Thông Tin Tối Đa
Hệ thống mã hóa hiện đại của ST666 đảm bảo mọi giao dịch và dữ liệu cá nhân đều được bảo vệ an toàn. Mọi thông tin đều được xử lý theo quy chuẩn bảo mật cao nhất, giúp người chơi yên tâm giải trí mà không lo lắng về vấn đề rủi ro thông tin.
Đa Dạng Trò Chơi Giải Trí
Xổ số: Từ xổ số truyền thống như XSMN, XSMB đến xổ số siêu tốc, đáp ứng mọi nhu cầu giải trí của người chơi.
Lô đề: Cung cấp giao diện dễ sử dụng, giúp bạn dễ dàng chọn số và theo dõi kết quả trực tiếp.
Casino trực tuyến: Đa dạng các trò chơi từ bài bạc, roulette đến các game đổi thưởng hiện đại.
Những Lợi Ích Khi Chơi Tại ST666
Dịch vụ hỗ trợ khách hàng chuyên nghiệp hoạt động 24/7.
Giao dịch nạp và rút tiền nhanh chóng, minh bạch.
Hệ thống cập nhật trò chơi thường xuyên, mang lại sự mới mẻ và không nhàm chán.
Nền tảng thiết kế hiện đại, thân thiện với mọi thiết bị, từ máy tính đến điện thoại di động.
Cách Truy Cập ST666
Truy cập đường dẫn chính thức của ST666 để đảm bảo an toàn.
Đăng ký tài khoản và hoàn tất các bước xác thực thông tin.
Tham gia các trò chơi hấp dẫn và tận hưởng phần thưởng đặc biệt dành cho thành viên.
ST666 Xổ Số không chỉ là nền tảng giải trí mà còn là nơi mang lại cơ hội chiến thắng và trải nghiệm dịch vụ đẳng cấp. Tham gia ngay hôm nay để khám phá một thế giới giải trí đa dạng và chuyên nghiệp!
娛樂城
RG富遊娛樂城:台灣線上娛樂城的最佳選擇
RG富遊娛樂城以其卓越的服務和多樣化的遊戲選擇,成為2024年最受歡迎的線上娛樂平台。受到超過50位網紅和部落客的實測推薦,這座娛樂城不僅提供豐富的遊戲,還帶來眾多優惠活動和誠信保證,贏得了廣大玩家的信任與青睞。
RG富遊娛樂城的獨特優勢
多重優惠活動
體驗金 $168:新手玩家可以免費試玩,無需任何成本即可體驗高品質遊戲。
首儲1000送1000:首次存款即可獲得雙倍金額,增加遊戲的樂趣與機會。
線上簽到轉盤:每日簽到即可參加抽獎,贏取現金獎勵和豐厚禮品。
快速存提款與資金保障
RG富遊採用自主研發的財務系統,確保5秒快速存款,滿足玩家即時遊戲需求。
100%保證出金,杜絕任何拖延或資金安全風險,讓玩家完全放心。
遊戲種類豐富
RG富遊娛樂城涵蓋多種遊戲類型,滿足不同玩家的需求,包括:
真人百家樂:與真人荷官互動,感受真實賭場的刺激氛圍。
電子老虎機:超過數百款創新遊戲,玩法新穎,回報豐厚。
電子捕魚:趣味性強,結合策略與娛樂,深受玩家喜愛。
電子棋牌:提供公平競技環境,適合策略型玩家。
體育投注:涵蓋全球賽事,賠率即時更新,為體育愛好者提供最佳選擇。
樂透彩票:參與多地彩票,挑戰巨額獎金。
跨平台兼容性
RG富遊支持Web端、H5、iOS和Android設備,玩家可隨時隨地登錄遊戲,享受無縫體驗。
與其他娛樂城的不同之處
RG富遊以現金版模式運營,確保交易透明和安全性。相比一般娛樂城,RG富遊在存提款速度上遙遙領先,玩家可在短短15秒內完成交易,並且100%保證資金提領。而在線客服全年無休,隨時提供支持,讓玩家在任何時間都能解決問題。
相比之下,一般娛樂城多以信用版模式運營,存在出金風險,且存提款速度較慢,客服服務不穩定,無法與RG富遊的專業性相比。
為什麼選擇RG富遊娛樂城
資金交易安全無憂:採用最先進的SSL加密技術,確保每筆交易的安全性。
遊戲種類全面豐富:每日更新多樣化遊戲,帶來新鮮感和無限可能。
優惠活動力度大:從體驗金到豐厚的首儲獎勵,玩家每一步都能享受優惠。
快速存提款服務:自主研發技術保障流暢交易,遊戲不中斷。
全天候專業客服:24/7在線支持,及時解決玩家需求。
立即加入RG富遊娛樂城
RG富遊娛樂城不僅提供豐富的遊戲體驗,更以專業的服務、完善的安全保障和多樣的優惠活動,為玩家打造一個值得信賴的娛樂環境。立即註冊,體驗台灣最受歡迎的線上娛樂城!
online pharmacy india: indian pharm star – mail order pharmacy india
Вы можете купить медсправку в нашем мед центре https://medic-dpo.ru/.
Купить круглую стальную трубу оптом и в розницу. Круглые металлические и оцинкованные трубы по низкой цене. Прайс на металлопрокат балка купить
У нас собственное производство металлических профилей для кровли, фасадов, заборов, поэтому цена на порядок ниже, чем у конкурентов сварка алюминия полуавтоматом
Купить круглую стальную трубу оптом и в розницу. Круглые металлические и оцинкованные трубы по низкой цене. Прайс на металлопрокат фиксатор опора стульчик для арматуры
У нас собственное производство металлических профилей для кровли, фасадов, заборов, поэтому цена на порядок ниже, чем у конкурентов арматура 12
일본소비세환급
일본 소비세 환급, 네오리아와 함께라면 간편하고 안전하게
일본 소비세 환급은 복잡하고 까다로운 절차로 많은 구매대행 셀러들이 어려움을 겪는 분야입니다. 네오리아는 다년간의 경험과 전문성을 바탕으로 신뢰할 수 있는 서비스를 제공하며, 일본 소비세 환급 과정을 쉽고 효율적으로 처리합니다.
1. 일본 소비세 환급의 필요성과 네오리아의 역할
네오리아는 일본 현지 법인을 설립하지 않아도 합법적인 방식으로 소비세 환급을 받을 수 있는 솔루션을 제공합니다. 이를 통해:
한국 개인사업자와 법인 사업자 모두 간편하게 환급 절차를 진행할 수 있습니다.
일본의 복잡한 서류 심사를 최소화하고, 현지 로컬 세리사와 협력하여 최적의 결과를 보장합니다.
2. 소비세 환급의 주요 특징
일본 연고가 없어도 가능: 일본에 사업자가 없더라도 네오리아는 신뢰할 수 있는 서비스를 통해 소비세 환급을 지원합니다.
서류 작성 걱정 해결: 잘못된 서류 제출로 환급이 거절될까 걱정될 필요 없습니다. 네오리아의 전문 대응팀이 모든 과정을 정밀하게 관리합니다.
현지 법인 운영자를 위한 추가 지원: 일본 내 개인사업자나 법인 운영자에게는 세무 감사와 이슈 대응까지 포함된 고급 서비스를 제공합니다.
3. 네오리아 서비스의 장점
전문성과 신뢰성: 정부로부터 인정받은 투명성과 세무 분야의 우수한 성과를 자랑합니다.
맞춤형 서포트: 다양한 사례를 통해 쌓은 경험으로 고객이 예상치 못한 어려움까지 미리 해결합니다.
로컬 업체에서 불가능한 고급 서비스: 한국인 고객을 위해 정확하고 간편한 세무회계 및 소비세 환급 서비스를 제공합니다.
4. 네오리아가 제공하는 혜택
시간 절약: 복잡한 절차와 서류 준비 과정을 전문가가 대신 처리합니다.
안심 환급: 철저한 관리와 세심한 대응으로 안전하게 환급을 받을 수 있습니다.
추가 서비스: 세무감사와 이슈 발생 시 즉각적인 지원으로 사업의 연속성을 보장합니다.
네오리아는 소비세 환급이 복잡하고 어렵다고 느껴지는 고객들에게 최적의 길잡이가 되어드립니다. 신뢰를 바탕으로 한 전문적인 서비스로, 더 이상 소비세 환급 문제로 고민하지 마세요!
гѓ—гѓ¬гѓ‰гѓ‹гѓі йЈІгЃїж–№ – гѓ‰г‚シサイクリンは薬局で買える? г‚ўг‚гѓҐгѓ†г‚¤гѓійЊ 20 mg еј·гЃ•
purple pharmacy mexico price list: MexicanPharmEasy – mexican rx online
https://medic-dpo.ru/
выведение из запоя на дому в сочи [url=http://pokupki.bestforums.org/viewtopic.php?f=7&t=24072/]выведение из запоя на дому в сочи[/url] .
вывод из запоя на дому сочи [url=www.golosa.ukrbb.net/viewtopic.php?f=3&t=7475]вывод из запоя на дому сочи[/url] .
выведение из запоя в сочи [url=https://advance2.ukrbb.net/viewtopic.php?f=2&t=782]выведение из запоя в сочи[/url] .
выведение из запоя в сочи [url=http://4dkp.forum24.ru/?1-18-0-00002750-000-0-0-1730806797]выведение из запоя в сочи[/url] .
вывод из запоя в наркологическом стационаре [url=www.uaforum.ukrbb.net/viewtopic.php?f=13&t=3246/]вывод из запоя в наркологическом стационаре[/url] .
travel blogs to read
شراء الأثاث المستعمل بالرياض: الحل الأمثل للتخلص من الأثاث القديم واستبداله
هل تبحث عن وسيلة للاستفادة من أثاثك القديم بدلاً من تخزينه أو التخلص منه؟ تقدم محلات شراء وبيع الأثاث المستعمل بالرياض حلاً مثالياً يساعد الأفراد والمؤسسات على تحقيق أقصى استفادة من الأثاث القديم. نحن نعمل كحلقة وصل بين من يرغبون في بيع أثاثهم المستعمل ومن يبحثون عن قطع مميزة تلبي احتياجاتهم.
لماذا تختار شركتنا لشراء الأثاث المستعمل بالرياض؟
أفضل العروض وأعلى معدلات التسعير
نحن نقدم تقييمًا دقيقًا ومنصفًا لأثاثك المستعمل بناءً على خبرة فريقنا من الخبراء.
خدمات تغطي منطقة الرياض بالكامل
بمجرد اتصالك بنا، نصل إليك بسرعة أينما كنت داخل الرياض.
تقييم احترافي للأثاث
يتم تثمين الأثاث بناءً على آراء مجموعة محايدة من الخبراء لضمان الشفافية والدقة.
تغيير الديكور بسهولة
إذا كنت تخطط للانتقال إلى منزل جديد أو ترغب في تحديث الديكور الخاص بك، فإن بيع الأثاث القديم واستبداله بأثاث جديد يُعتبر خطوة عملية وفعالة.
عوامل تؤثر على قرار بيع أو الاحتفاظ بالأثاث القديم
القيمة العملية للأثاث
إذا كانت القطعة القديمة تناسب احتياجاتك وتنسجم مع الديكور الجديد، قد ترغب في الاحتفاظ بها. أما القطع المتضررة أو غير المريحة، فبيعها هو الخيار الأفضل.
جودة الأثاث
نقل أثاث على وشك الانهيار إلى منزلك الجديد قد يسبب خسائر مادية ويستهلك جهدًا بلا جدوى.
حجم الأثاث ومدى ملاءمته للمساحة
تأكد من قياس المساحات المتوفرة في المنزل الجديد وتوافقها مع حجم الأثاث القديم قبل اتخاذ قرار الاحتفاظ به.
القيمة العاطفية
بعض القطع تحمل قيمة عاطفية تجعل التخلي عنها صعبًا. إذا كان بالإمكان نقلها بأمان، يمكنك الاحتفاظ بها.
خطر التلف أثناء النقل
إذا كان الأثاث معرضًا للتلف الكبير أثناء النقل، فمن الأفضل التفكير في بيعه لتجنب خسائر محتملة.
خدماتنا المميزة لشراء وبيع الأثاث المستعمل بالرياض
شراء جميع أنواع الأثاث: غرف نوم، مجالس، أثاث الفلل والقصور، وأجهزة كهربائية.
تقييم دقيق وسعر عادل: نضمن تقديم السعر الحقيقي لأثاثك بناءً على حالته.
شراء المكيفات المستعملة بالرياض: نحن الأفضل في هذا المجال، مع فريق متخصص يقدم حلولاً تناسب احتياجاتك.
لماذا نحن الأفضل؟
لدينا فريق من الخبراء في تقييم وشراء الأثاث المستعمل.
نقدم خدمات تغطي جميع مناطق الرياض.
نعمل على بناء ثقة العملاء من خلال الشفافية والالتزام.
اتصل بنا الآن
إذا كنت تبحث عن أفضل محلات شراء الأثاث المستعمل بالرياض، فلا تتردد في التواصل معنا عبر الجوال أو الواتساب على الرقم 0500220488. نحن مستعدون لخدمتك أينما كنت وفي أي وقت يناسبك. اجعل بيع أثاثك القديم خطوة سهلة ومربحة معنا!
Mostbet rejestracja zajmuje tylko kilka minut | Mostbet kod promocyjny bez depozytu to swietna okazja | Mostbet bonus za rejestracje jest jednym z najlepszych w branzy | Mostbet kod promocyjny pozwala zwiekszyc wygrane | Mostbet aplikacja jest idealna do gry mobilnej | Mostbet aplikacja to wygodne rozwiazanie dla graczy mobilnych most bet. | Mostbet kasyno online to miejsce dla kazdego gracza | Mostbet aplikacja jest kompatybilna z kazdym urzadzeniem | Mostbet kasyno to swietna zabawa i wielkie wygrane [url=https://mostbet-casino-login-polska.com/]Mostbet bonus[/url].
п»їbest mexican online pharmacies: MexicanPharmEasy – reputable mexican pharmacies online
九州LEO娛樂城無法登入
九州LEO娛樂城無法登入!即將倒閉,玩家該如何應對?
近期,LEO娛樂城突然出現無法登入的情況,引發大批玩家恐慌。作為九州娛樂城的子品牌,LEO在台灣擁有廣泛的用戶基礎,但其突然失聯以及退出台灣市場的傳聞,讓玩家擔憂自己的資金和帳戶安全。以下將詳細解析問題原因及替代方案,幫助玩家應對這一局面。
LEO娛樂城無法登入的三大原因
資金問題,無法出金
當玩家贏錢且帳號突然被鎖,這可能意味著娛樂城的資金鏈出現問題。LEO娛樂城無法處理大量出金需求,導致帳號被限制,進一步引發用戶恐慌。
伺服器故障,可能涉及詐騙行為
LEO娛樂城因涉嫌詐騙而被舉報,導致伺服器故障。這樣的情況不僅影響平台穩定性,也讓玩家的信任度下降,娛樂城的可靠性大打折扣。
退出台灣市場
隨著九州娛樂城因洗錢和內鬼洩密案被警方盯上,LEO娛樂城可能為避風頭選擇退出台灣市場。此舉將讓玩家無法再次登入,帳戶內的資金和獎金也可能無法追回。
九州娛樂城退出台灣的背景
LEO娛樂城隸屬九州集團,過去曾深度依賴金流公司和第三方支付來運作。然而,近期九州娛樂城涉及的洗錢案浮出水面,包括高層涉嫌賄賂警界內鬼,導致警方全面查緝。為避免更多曝光,退出台灣市場成為九州集團的合理選擇。
此外,也有消息指出,九州娛樂城對台灣市場的競爭激烈度表示不滿,正計畫將重心轉向更具潛力的海外市場。九州旗下的KU體育已進軍國際舞台,曾贊助五大足球聯賽,顯示其實力雄厚。
應對LEO娛樂城無法登入的最佳替代方案
如果你在LEO娛樂城無法登入的情況下,不妨考慮其他穩定且安全的平台,例如 1XBET。作為國際知名娛樂品牌,1XBET 以其安全性和穩定性贏得了玩家的廣泛信任。
為何選擇1XBET?
穩定安全:1XBET 平台運作合法,提供穩定的遊戲環境。
免費體驗金:新玩家可獲得免費體驗金,零成本開始娛樂。
首儲優惠及無限返水:首筆存款享受高額優惠,並提供無限返水政策,確保玩家的最大利益。
結論:抓緊時機保障自己的資金
LEO娛樂城無法登入以及可能退出台灣市場的消息,讓許多玩家感到不安。無論是未完成的儲值,還是帳戶中的餘額,都可能隨時歸零。建議玩家儘早取回資金,並選擇更安全可靠的平台,例如 1XBET,以確保自己的資金和遊戲體驗。
在不穩定的娛樂市場中,選擇合法且受信任的平台,將是長遠的最佳保障。
buy prescription drugs from india: indian pharmacy – indian pharmacy
Introduction of Cryptocurrency Transaction Check and Regulatory Services
In the current digital asset industry, maintaining deal openness and conformity with Anti-Money Laundering (AML) and KYC rules is crucial. Below is an overview of popular platforms that offer solutions for digital asset transfer surveillance, verification, and asset safety.
1. Token Metrics
Overview: Tokenmetrics delivers cryptocurrency assessment to evaluate potential fraud dangers. This solution allows individuals to examine coins prior to purchase to avoid potentially fraudulent holdings. Features:
– Danger analysis.
– Ideal for buyers aiming to steer clear of risky or fraud projects.
2. Metamask.Monitory.Center
Description: Metamask Monitor Center enables individuals to review their crypto holdings for suspicious actions and regulatory compliance. Features:
– Verifies coins for “cleanliness”.
– Provides alerts about potential resource blockages on specific exchanges.
– Provides detailed insights after account linking.
3. BestChange.ru
Overview: Bestchange.ru is a platform for tracking and validating digital exchange transfers, providing openness and transfer protection. Features:
– Transaction and account monitoring.
– Compliance checks.
– Internet interface; supports BTC and multiple additional digital assets.
4. AMLCheck Bot
Summary: AMLchek is a investment observer and AML compliance tool that uses artificial intelligence models to detect suspicious actions. Advantages:
– Transfer tracking and personal verification.
– Available via web version and Telegram.
– Works with coins including BSC, BTC, DOGE, and more.
5. Alfabit AML
Summary: AlfaBit delivers comprehensive AML tools tailored for the crypto field, helping businesses and financial institutions in preserving compliance compliance. Features:
– Thorough AML options and checks.
– Meets current protection and conformity requirements.
6. AML Node
Summary: AMLNode delivers AML and KYC tools for digital currency firms, such as transaction monitoring, restriction screening, and evaluation. Benefits:
– Threat evaluation tools and sanctions checks.
– Valuable for ensuring safe business operations.
7. Btrace.io
Description: Btrace AML Crypto focuses on asset validation, offering deal monitoring, restriction screenings, and support if you are a affected by theft. Benefits:
– Useful assistance for fund retrieval.
– Deal observation and security options.
Exclusive USDT Validation Solutions
Our site also provides information on various services offering validation tools for Tether transactions and wallets:
– **USDT TRC20 and ERC20 Verification:** Various sites offer comprehensive screenings for USDT transfers, assisting in the detection of suspicious activity.
– **AML Validation for USDT:** Options are offered for monitoring for fraudulent transactions.
– **“Cleanliness” Validation for Accounts:** Checking of deal and holding purity is available to find likely risks.
**Wrap-up**
Finding the right service for validating and observing crypto transfers is crucial for guaranteeing safety and standard compliance. By reading our evaluations, you can select the most suitable solution for transaction observation and fund protection.
главное отличие, https://ukrainian.creartuforo.com/viewtopic.php?id=313#https://ukrainian.creartuforo.com/viewtopic.php?id=313 что в него не следует ходить: продукты привезут в вашу квартиру.
Всё, что нужно знать о покупке аттестата о среднем образовании без рисков
Вы можете купить справку в медцентре https://munclinic.ru/ с доставкой по Москве.
Отель Мишель предлагает комфортабельные номера с кондиционером в Анапе. Бассейны, игровая зона для детей, конференц-зал для деловых встреч и мероприятий. Ждем Вас в гости круглый год https://mishelhotel.ru
https://snaga.ru/
buy paxlovid online: Paxlovid.ink – paxlovid price
Более 20 лет опыта переводов c немецкого и английский медицинской документации: эпикриз, исследование МРТ, КТ, УЗИ, протокол операции, лабораторные анализы, гистология, молекулярная патология – по всем разделам и специализациям медицины – онкология, урология, гинекология, ортопедия, хирургия и др. Квалифицированный медицинский перевод документов на немецкий язык для лечения за границей и с немецкого после лечения https://medicaltranslate.ru
Виртуальные номера, телефонные номера, которые напрямую не связаны с телефонной линией или физической SIM-картой, становятся все более популярными среди людей во всем мире. Одной из областей, где их использование приобрело значительный импульс, является приложение для обмена сообщениями, такое как Telegram номер для регистрации в телеграм
Построенные дома по индивидуальным проектам – это результат работы наших архитекторов, инженеров – строителей, смежных специалистов и, конечно, наших Заказчиков. Мы всегда стараемся сделать наши дома функциональными, простыми и удобными, чтобы во время эксплуатации наши заказчики вспоминали нас добрым словом https://russia24.pro/spb/246019700/
Виртуальные номера, телефонные номера, которые напрямую не связаны с телефонной линией или физической SIM-картой, становятся все более популярными среди людей во всем мире. Одной из областей, где их использование приобрело значительный импульс, является приложение для обмена сообщениями, такое как Telegram номера для тг
Построенные дома по индивидуальным проектам – это результат работы наших архитекторов, инженеров – строителей, смежных специалистов и, конечно, наших Заказчиков. Мы всегда стараемся сделать наши дома функциональными, простыми и удобными, чтобы во время эксплуатации наши заказчики вспоминали нас добрым словом https://www.vbesedki.ru/stati/stroitelnyie_novosti_rossii_all/karkasno-panelnyjj-dom/
P?ker online Jugabet [url=http://jugabet-peru777.com/]P?ker online Jugabet[/url] .
Betovo slot machine [url=http://betovo-italia.com]Betovo slot machine[/url] .
https://paxlovid.ink/# paxlovid cost without insurance
Amoxil Pharm Store [url=https://amoxilpharm.store/#]Amoxil Pharm Store[/url] generic amoxicillin online
Paxlovid.ink: Paxlovid.ink – Paxlovid.ink
Условия использования промокода 1xBet можно узнать после его проверки. Для этого в разделе «Витрина промокодов» находится специальное поле, куда следует вставить полученный набор из цифр и букв для получения подробных сведений. Чтобы проверить комбинацию, следует авторизоваться в личном кабинете https://ledaviaud.fr/art/code_promo_157.html
Вы можете купить медсправку в нашем мед центре https://doktora-gerasenko-med.ru/ в Москве без медкомиссий.
Условия использования промокода 1xBet можно узнать после его проверки. Для этого в разделе «Витрина промокодов» находится специальное поле, куда следует вставить полученный набор из цифр и букв для получения подробных сведений. Чтобы проверить комбинацию, следует авторизоваться в личном кабинете http://centroculturalrecoleta.org/blog/pages/1xbet_promo_code_2022.html
Extrêmement complète, la ludothèque met en avant tous les meilleurs jeux en ligne du moment.
Il existe aussi plusieurs variantes du baccarat pour varier les plaisirs.
LEO娛樂城無法登入?九州娛樂城退出台灣市場的真相大揭秘
近期,LEO娛樂城頻傳無法登入的消息,引發廣大玩家的疑慮與焦慮。作為九州娛樂城旗下的重要品牌,其背後的問題究竟是什麼?九州娛樂城是否真的退出台灣市場?本文將深度解析LEO娛樂城無法登入的三大原因,以及九州娛樂城退出的背景,幫助玩家了解真相並制定應對策略。
LEO娛樂城無法登入的三大原因
1. 帳號或密碼問題
部分玩家反映無法登入是由於密碼輸入錯誤或帳號遭盜用。
問題分析:這類問題通常較輕微,只需聯繫客服便可解決。
困難點:有玩家指出,LEO娛樂城的客服回應緩慢,甚至拖延處理時間,讓人懷疑是否另有隱情。
2. 平台技術或法規問題
當玩家試圖登入LEO娛樂城時,可能遇到以下情況:
伺服器無法連接或出現404錯誤頁面。
伺服器損壞或平台因法規問題遭檢舉下架,導致服務中斷。
此情況顯示平台運營出現技術或法規挑戰,玩家的遊戲體驗和資金安全因此受到影響。
3. 九州娛樂城及旗下品牌退出台灣市場
最令人震驚的原因是,LEO娛樂城可能正在退出台灣市場。
九州娛樂城因資金問題和監管壓力選擇撤出台灣。
市場傳聞指出其資金鏈出現裂痕,加上內外壓力,導致旗下品牌無法維持運營穩定性。
九州娛樂城退出台灣市場的原因
1. 市場競爭激烈,收益下滑
台灣娛樂城市場競爭日益加劇,各大品牌為爭奪市場份額不斷投入資源。九州娛樂城難以維持競爭力,收益大幅下滑,最終選擇將資源轉向其他具潛力的海外市場。
2. 資金鏈問題,運作困難
從玩家充值到出金的每個環節,九州娛樂城的資金運作均出現問題,影響平台穩定性。資金鏈斷裂使九州娛樂集團不得不低調撤出台灣,以降低損失。
3. 母公司法律與財務問題
九州娛樂集團近年來因法律與財務問題備受關注,導致其在台灣的營運面臨更多困難。相關部門的嚴格監管使得旗下品牌如LEO娛樂城、THA娛樂城被迫退出市場。
玩家如何應對LEO娛樂城無法登入的情況?
1. 立即提現本金
如果LEO娛樂城官網仍能登入,建議玩家立即提取帳戶內的所有資金,以避免因平台徹底關閉而造成損失。
2. 轉向穩定且合法的替代平台
選擇具有合法牌照和穩定運營的娛樂城作為替代平台。例如選擇國際知名品牌,確保遊戲體驗和資金安全。
3. 提高資金安全意識
在選擇新平台時,應重點關注以下事項:
資金保障措施:確保平台能提供快速出金和玩家資金保護機制。
玩家口碑:查看其他玩家的評價,選擇信譽良好的平台。
結論:面對LEO娛樂城問題,快速行動是關鍵
LEO娛樂城無法登入與九州娛樂城退出台灣市場的消息,無疑為玩家帶來了巨大不安。無論是資金問題還是伺服器故障,玩家應及時採取行動保障自身利益。立即提現資金,轉向穩定的娛樂平台,並提高安全意識,是避免損失的有效策略。
在動盪的市場環境中,選擇合法且穩定的平台是保護資金與享受遊戲體驗的最佳方式。
Как официально купить аттестат 11 класса с упрощенным обучением в Москве
عرض ادب! این سایت برای من یه منبع عالی شده.
امیدوارم همیشه موفق باشید و مقالات خوبی بنویسید.
دمتون گرم!
九州娛樂城新聞
九州集團宣布退出台灣市場 電子遊戲玩家該如何應對?
近日,九州娛樂集團正式宣布進一步調整策略,將退出台灣市場,並停止所有在台灣的運營,包括 LEO娛樂城和 THA娛樂城。這一消息無疑引起了廣泛關注,許多玩家都在懷疑接下來的遊戲體驗會受到什麼影響。
#### 退出的原因揭密
九州集團在公告中提到,退出台灣市場的原因主要包括:
1. 競爭激烈:隨著市場競爭的白熱化,越來越多的平台為了爭奪市場份額而忽略了長期的穩定經營,這導致多個平台運營問題頻出。
2. 資金流問題:部分平台在金流處理方面遭遇挑戰,無法保證玩家資金的安全與及時提款,進一步削弱了玩家的信任感。
3. 監管壓力:隨著行業規範的不斷提升,部分平台難以滿足合規要求,這直接導致服務中斷,甚至被迫退出市場。
4. 玩家需求變化:近年來,玩家對平台的穩定性、安全性和多樣化遊戲選擇的要求越來越高,只有實力雄厚的品牌才能夠滿足這些需求。
#### 轉向富遊娛樂城的好處
面對 LEO及 THA 退出的消息,九州娛樂集團也向玩家推薦了 RG 富遊娛樂城,這是一個深受玩家支持的賭場品牌。富遊娛樂城提供多項優勢,可以幫助玩家順利轉移,繼續享受遊戲體驗。
– 穩定性高:富遊娛樂城利用行業前沿的技術支持,確保平台運行穩定可靠,減少登入問題和系統故障的風險。
– 安全性強:該平台應用頂級數據加密技術,全面保護玩家的資金和個人隱私,讓玩家無後顧之憂。
– 遊戲多樣化:富遊娛樂城提供豐富的遊戲 selections,包括真人娛樂、電子遊戲、體育博彩等,能滿足不同玩家的需求。
#### 專為九州娛樂城會員設計的福利
為了保障受到 LEO及 THA 影響的玩家權益,富遊娛樂城推出了一系列回饋措施:
– VIP 等級保留:來自 LEO 和 THA 的玩家將保留或直接升級至對應的 VIP 等級,確保權益不受影響。
– 註冊優惠:新加入富遊娛樂城的玩家將獲得高達168的體驗金、100% 首存加碼及專屬新手禮包。
– 簡化轉移過程:富遊娛樂城為用戶提供簡單的轉移計劃,無需繁瑣手續,讓每位玩家可以專注於遊戲的樂趣。
### 結語
隨著九州娛樂集團宣布退出台灣市場,玩家們面臨著轉移平台的挑戰。儘管這一變化令人感到遺憾,但富遊娛樂城作為一個可靠的替代選擇,將為玩家的遊戲體驗帶來穩定的保障。玩家應該把握這一機會,迅速安排好轉移和註冊事宜,以確保不斷享受遊戲的樂趣。
Виртуальные номера телефона стали популярным решением для многих пользователей, особенно в связи с развитием мессенджеров и социальных сетей. В контексте Телеграма, виртуальные номера телефона представляют собой уникальное и удобное решение для обеспечения безопасности и конфиденциальности коммуникации номера для телеграмма
Zarejestruj sie na Mostbet i odbierz bonus bez depozytu | Mostbet rejestracja to pierwszy krok do duzych wygranych | Mostbet casino bonus daje dodatkowe srodki do gry | Mostbet casino no deposit bonus codes to najlepsza oferta | Mostbet bonusy sa dostepne dla nowych i stalych uzytkownikow | Mostbet casino no deposit bonus codes daja wiecej mozliwosci most bet. | Mostbet casino login jest szybkie i bezpieczne | Mostbet opinie podkreslaja profesjonalizm obslugi | Mostbet Polska to niezawodne kasyno online [url=https://mostbet-casino-login-polska.com/]Mostbet bonus za rejestracje[/url].
Виртуальные номера телефона стали популярным решением для многих пользователей, особенно в связи с развитием мессенджеров и социальных сетей. В контексте Телеграма, виртуальные номера телефона представляют собой уникальное и удобное решение для обеспечения безопасности и конфиденциальности коммуникации одноразовые номера для тг
Ivermectin Pharm Store: Ivermectin Pharm Store – stromectol usa
九州娛樂城
九州娛樂城:亞洲頂級線上娛樂平台
九州娛樂城,作為亞洲領先的線上博弈平台,以其專業性、公平性和創新性著稱。在這裡,您可以享受全方位的娛樂體驗,包括體育投注、真人遊戲、電子遊戲、六合彩球以及流行的捕魚機和棋牌遊戲。九州娛樂城是台灣玩家的首選娛樂平台,被譽為業界 No.1!
九州娛樂城的亮點
1. 多元化遊戲選擇
九州娛樂城擁有超過千款來自全球頂尖供應商提供的遊戲,滿足各種類型玩家的需求。無論是喜歡競技性的體育投注、刺激的真人遊戲,還是休閒的電子遊戲,九州娛樂城都能提供最適合您的選擇。
體育投注:全面覆蓋世界級賽事,包括世界杯、職業聯賽等。提供多種投注方式,如讓球、大小、單雙、串關等,並支持桌面端與手機端投注。
真人遊戲:KU真人百家樂、LEO真人遊戲等,讓您感受現場賭桌的真實刺激。
電子遊戲與捕魚機:多款熱門遊戲,如九州熱門電子遊戲和捕魚機,帶給玩家極致娛樂享受。
六合彩與棋牌遊戲:適合策略型玩家的理想選擇。
2. 極致便利的操作體驗
九州娛樂城支持通過官方網站和九州APP下載進行操作,無論您身在何處,都可以輕鬆加入遊戲世界。針對台灣玩家的本地化設計確保操作流暢、存取款方便。
3. 先進技術與安全保障
九州娛樂城集團總部位於菲律賓首都馬尼拉的RCBC Plaza,配備世界一流的安全資訊防護系統和智能大樓自動化系統(BAS)。玩家的數據與資金安全都能得到最佳保障,讓每一次遊戲都安心無憂。
4. 熱門品牌與平台支持
九州娛樂城旗下包括三大品牌:
LEO娛樂:提供真人遊戲、體育直播及免費影城。
THA娛樂:專注於新手友好和便捷操作。
KU娛樂:以真人百家樂而著稱。
每個品牌雖分別由不同管理團隊運營,但都傳承了九州娛樂城的高標準,遊戲系統與界面毫無差異,為玩家提供無縫娛樂體驗。
為什麼選擇九州娛樂城?
專業性與公平性
九州娛樂城堅持以「即時便利、公平公正、專業營運」為宗旨,研發創新遊戲技術,滿足不同類型玩家需求。
貼近市場與玩家需求
擁有兩岸三地的精英設計師與代理團隊,根據玩家反饋持續改進產品,並為合作商提供及時更新支持。
優越的服務與保障
從遊戲操作到客戶支持,九州娛樂城提供全面的服務支持,讓每位玩家都能感受到最貼心的服務。
九州娛樂城的未來
作為線上博弈行業的領航者,九州娛樂城不斷推陳出新,致力於提供更豐富的遊戲選擇和更完善的玩家體驗。同時,透過強大的技術與營運團隊,九州娛樂城已成為台灣乃至亞洲地區娛樂平台的代名詞。
立即下載九州APP,體驗最極致的娛樂樂趣!九州娛樂城——您的最佳線上娛樂夥伴!
Wow, this blogger is seriously impressive!
Our seasoned sports betting experts tirelessly work on new brand
reviews, update existing brands, and realign our analysis of our betting guides.
LEO娛樂城無法登入?九州娛樂城退出台灣市場的真相解析
近期,LEO娛樂城頻頻傳出無法登入的消息,並伴隨著「九州娛樂城退出市場」的傳聞,引發了廣大玩家的熱議與疑慮。作為台灣線上娛樂城市場的代表品牌之一,LEO娛樂城曾憑藉其廣泛的廣告投放和龐大的代理規模,成為許多玩家耳熟能詳的名字。然而,這一系列的問題究竟是偶發事件還是背後早有計劃?本文將帶您深入了解LEO娛樂城無法登入的原因及其對玩家的影響。
LEO娛樂城無法登入:網路熱議九州娛樂城倒閉
LEO娛樂城近期無法登入的情況似乎透露出了一個更大的訊息:該平台正在逐步退出台灣市場。隨著其營運的逐漸停擺,玩家們發現以下問題日益嚴重:
官網無法訪問:登入失敗的情況變得愈加頻繁。
註冊和儲值受限:許多玩家反映無法完成新用戶註冊,甚至現有用戶的儲值功能也開始受到限制。
經調查,這一退出決策並非偶然,而是九州娛樂城高層的長期規劃結果。讓我們一起探索這一決策背後的可能原因。
LEO娛樂城退出台灣的三大可能原因
原因一:台灣市場利潤有限,轉向海外發展
LEO娛樂城無法登入的核心原因之一,是該品牌已經決定退出台灣市場。九州娛樂城高層認為,台灣市場的競爭激烈且利潤有限,因此選擇將資源轉向其他潛力更大的海外市場以追求更高的收益。
見好就收:這一做法與許多商業決策類似,在利潤達到一定水平後選擇退出,尋求更具回報的新機會。
海外市場吸引力:國際市場的規模和成長性更具吸引力,讓九州娛樂城看到了更大的可能性。
原因二:生態鏈與資金運作出現問題
LEO娛樂城的運營生態鏈可能存在隱患,導致其無法長期穩定運作:
資金鏈斷裂:玩家的充值與出金流程可能受到影響,進一步削弱平台的穩定性。
運營成本上升:在台灣市場的高運營成本可能也是平台選擇退出的一大原因。
原因三:九州娛樂城受到法律與政策壓力
九州娛樂城近年來面臨多起法律與政策挑戰,影響了其旗下品牌的正常運營:
監管政策加強:台灣政府對線上娛樂平台的監管力度加大,對九州娛樂城造成了直接影響。
法律爭議:母公司的財務與法規問題頻頻登上新聞,使旗下品牌的經營環境更加複雜。
LEO娛樂城無法登入對玩家的影響
隨著LEO娛樂城逐步退出台灣市場,玩家需要做好以下應對措施:
迅速提現本金:如您仍可登入官網,建議立即提取帳戶內的資金,避免遭遇平台徹底關閉後的損失。
尋找可靠的替代平台:選擇擁有合法牌照且運營穩定的國際品牌,如1XBET等,確保遊戲與資金安全。
提高資金安全意識:在選擇新平台時,應重點關注其口碑、資金保障措施以及用戶評價,避免再次陷入類似情況。
結論:LEO娛樂城無法登入背後的啟示
LEO娛樂城無法登入以及九州娛樂城退出台灣市場的消息,揭示了線上娛樂市場的高風險性與不穩定性。對玩家而言,選擇安全合法的平台才是長遠之計。
在未來,隨著國際市場的開放與法規的完善,玩家或許能期待更穩定與透明的娛樂環境。但在此之前,迅速採取行動保障自己的資金與利益才是當務之急。
九州娛樂城倒了
LEO娛樂城無法登入?九州集團可能要退出台灣市場!
近期,許多玩家發現自己無法登入 LEO娛樂城,這引發了關於九州集團是否即將退出台灣市場的廣泛討論。這篇文章將深入探討可能的原因以及玩家該如何應對。
#### 為什麼 LEO娛樂城無法登入?
1. 帳號或密碼問題:這是最常見的原因之一。如果玩家忘記了密碼或帳號被鎖定,只需聯繫客服提供必要的資訊,通常能夠迅速恢復進入權限。
2. 網站故障:有不少玩家報告稱無法正常訪問 LEO娛樂城,顯示404錯誤頁面。這可能是因為網站伺服器出現問題或被檢舉。玩家在遇到此類問題時,可以詢問客服以獲取正確的網址,並建議將網址加入書籤,以便隨時訪問。
3. 九州集團計劃退出台灣市場:最令人擔憂的是,傳聞九州集團可能正在考慮退出台灣市場,這將對玩家造成直接影響,特別是在資金存款和提現上。這個情況讓不少玩家感到焦慮,也加深了對於未來的擔憂。
#### 為什麼九州集團要退出?
有幾個因素可能促使九州集團作出這樣的決定:
– 市場競爭加劇:台灣市場的競爭相當激烈,對於像 LEO這樣的品牌來說,持續獲利變得越來越困難。因此,他們或許希望尋找其他市場擴展機會。
– 金融壓力:九州集團近來因多起事件受到關注,特別是涉及金流問題。前高層的逮捕與金融查詢事件,使得旗下各平台的運作都變得更加艱難。
– 品牌形象受損:隨著負面新聞的增多,LEO和其他九州品牌的信譽也受到了相當大的影響。為了保護品牌形象,退出某個市場可能被視為一種選擇。
#### 對於玩家的建議
如果 LEO娛樂城真的面臨退出台灣市場的風險,玩家需要做好應對措施。以下是一些選擇替代平台的建議:
– 考慮其他娛樂城brand:如亞博體育,該平台具有許多優勢,包括合法的營業執照和豐富的遊戲選擇。
– 檢視平台的安全性:選擇那些擁有穩定金流和良好信譽的娛樂城,以確保資金的安全。
– 利用促銷活動:例如亞博體育提供的首次充值優惠合理,這是進一步提升棋局的好選擇。
### 結論
LEO娛樂城目前的登入問題引發了對九州集團未來的憂慮。儘管提供了恢復帳號的實用方法,玩家仍應謹慎應對,並考慮在目前市況下的其他可靠選擇,確保自己的資金安全及遊戲體驗。隨著娛樂市場的變化,選擇一家穩定、信譽良好的平台變得尤為重要。
九州娛樂城倒了
Leo娛樂城無法登入?是九州娛樂城倒了嗎?背後原因竟是這樣!
最近,許多玩家發現自己無法登入 Leo娛樂城,甚至有人關心是否這意味著九州娛樂城的倒閉。究竟發生了什麼事情?今天,我們將解開這個謎團,幫助大家瞭解 Leo娛樂城無法登入的真正原因。
#### 目錄
1. Leo娛樂城無法登入:背後的三個原因
2. 九州娛樂城倒了?只是退出台灣市場
3. Leo娛樂城無法登入該怎麼辦?
4. 最新娛樂城推薦排名,這幾家平台更值得信賴!
5. 結論
### Leo娛樂城無法登入:背後的三個原因
#### 原因一:帳號被鎖或密碼錯誤
最常見的問題之一就是玩家的帳號被鎖定或密碼輸錯。這類問題其實相對容易解決,玩家只需聯繫客服要求恢復帳號即可。然而,有部分玩家反映客服反應緩慢,甚至感覺客服想要拖延時間,這一點讓人不禁懷疑是否有其他貓膩。
#### 原因二:網站壞了或被檢舉
有玩家在登錄時遇到 404 錯誤,這種情況通常表明網站伺服器出現故障,或是因為某種原因被檢舉並暫時下架。這樣的情況對於玩家來說非常令人沮喪,因為缺乏官方的回應和修復時間,只能無奈等待。
#### 原因三:九州集團退出台灣市場
近期有消息指出,九州集團可能正在逐步退出台灣的市場,這可能影響到其旗下所有娛樂城的運作。如果該集團確實進行了市場撤退,則 Leo娛樂城的運作將受到直接影響,這也解釋了為什麼許多玩家會感到困惑和不安。
### 九州娛樂城倒了?只是退出台灣市場
雖然網上有許多傳言說九州娛樂城已經倒閉,但實際上應該理解為它正在退出台灣市場。這樣的變化可能與政策、法規等多種因素有關。對於玩家來說,這是需要留意的一個信息,以便尋找其他可行的娛樂選擇。
### Leo娛樂城無法登入該怎麼辦?
如果你遇到無法登入的問題,建議你首先檢查帳號和密碼是否正確。如果是技術性問題,則需等待官方的修復通知。在這段時間內,可以考慮暫時使用其他娛樂城平台,避免資金被鎖定。
### 最新娛樂城推薦排名,這幾家平台更值得信賴!
在選擇娛樂城時,建議選擇評價高、可靠性強的平台。以下是目前推薦的一些娛樂城,這幾家平台在安全性和用戶體驗上表現良好,可以作為替代選擇:
1. XXX娛樂城 – 以安全和穩定著稱。
2. YYY娛樂城 – 提供多樣化的遊戲選擇。
3. ZZZ娛樂城 – 客服反應快速,體驗佳。
### 結論
總的來說,Leo娛樂城無法登入的原因涉及帳號問題、網站技術故障以及九州集團的市場動向。希望這篇文章能幫助你更好地理解目前的情況。保持警惕,選擇可靠的娛樂平台,以確保自身的資金安全和良好的遊戲體驗。希望未來能有更好的解決方案來改善玩家的困擾!
Покупка диплома о среднем полном образовании: как избежать мошенничества?
rybelsus generic: buy semaglutide online – semaglutide pharm
九州娛樂城
九州娛樂城:亞洲頂級線上娛樂平台
九州娛樂城,作為亞洲領先的線上博弈平台,以其專業性、公平性和創新性著稱。在這裡,您可以享受全方位的娛樂體驗,包括體育投注、真人遊戲、電子遊戲、六合彩球以及流行的捕魚機和棋牌遊戲。九州娛樂城是台灣玩家的首選娛樂平台,被譽為業界 No.1!
九州娛樂城的亮點
1. 多元化遊戲選擇
九州娛樂城擁有超過千款來自全球頂尖供應商提供的遊戲,滿足各種類型玩家的需求。無論是喜歡競技性的體育投注、刺激的真人遊戲,還是休閒的電子遊戲,九州娛樂城都能提供最適合您的選擇。
體育投注:全面覆蓋世界級賽事,包括世界杯、職業聯賽等。提供多種投注方式,如讓球、大小、單雙、串關等,並支持桌面端與手機端投注。
真人遊戲:KU真人百家樂、LEO真人遊戲等,讓您感受現場賭桌的真實刺激。
電子遊戲與捕魚機:多款熱門遊戲,如九州熱門電子遊戲和捕魚機,帶給玩家極致娛樂享受。
六合彩與棋牌遊戲:適合策略型玩家的理想選擇。
2. 極致便利的操作體驗
九州娛樂城支持通過官方網站和九州APP下載進行操作,無論您身在何處,都可以輕鬆加入遊戲世界。針對台灣玩家的本地化設計確保操作流暢、存取款方便。
3. 先進技術與安全保障
九州娛樂城集團總部位於菲律賓首都馬尼拉的RCBC Plaza,配備世界一流的安全資訊防護系統和智能大樓自動化系統(BAS)。玩家的數據與資金安全都能得到最佳保障,讓每一次遊戲都安心無憂。
4. 熱門品牌與平台支持
九州娛樂城旗下包括三大品牌:
LEO娛樂:提供真人遊戲、體育直播及免費影城。
THA娛樂:專注於新手友好和便捷操作。
KU娛樂:以真人百家樂而著稱。
每個品牌雖分別由不同管理團隊運營,但都傳承了九州娛樂城的高標準,遊戲系統與界面毫無差異,為玩家提供無縫娛樂體驗。
為什麼選擇九州娛樂城?
專業性與公平性
九州娛樂城堅持以「即時便利、公平公正、專業營運」為宗旨,研發創新遊戲技術,滿足不同類型玩家需求。
貼近市場與玩家需求
擁有兩岸三地的精英設計師與代理團隊,根據玩家反饋持續改進產品,並為合作商提供及時更新支持。
優越的服務與保障
從遊戲操作到客戶支持,九州娛樂城提供全面的服務支持,讓每位玩家都能感受到最貼心的服務。
九州娛樂城的未來
作為線上博弈行業的領航者,九州娛樂城不斷推陳出新,致力於提供更豐富的遊戲選擇和更完善的玩家體驗。同時,透過強大的技術與營運團隊,九州娛樂城已成為台灣乃至亞洲地區娛樂平台的代名詞。
立即下載九州APP,體驗最極致的娛樂樂趣!九州娛樂城——您的最佳線上娛樂夥伴!
Mostbet Polska to idealne miejsce na zaklady sportowe | Mostbet promo code zwieksza Twoje wygrane | Mostbet oferuje zaklady na zywo i kasyno w jednym miejscu | Mostbet 30 free spins czeka na nowych uzytkownikow | Mostbet kasyno ma szeroka game automatow do gry | Mostbet casino ma najlepsze oferty w Polsce MostBet. | Mostbet rejestracja otwiera drzwi do swiata kasyna online | Mostbet Polska to lider w branzy hazardowej | Mostbet Polska to niezawodne kasyno online [url=https://mostbet-casino-login-polska.com/]Mostbet bonus bez depozytu[/url].
Вы можете купить медицинскую справку в мед центре http://cmc-clinic.ru/ в Москве без прохождения врачей.
Some truly nice stuff on this website , I like it.
В последние десятилетия наблюдается значительный прогресс в области технологий, используемых для создания высококачественных медикаментов. Эти достижения влияют на множество аспектов, включая эффективность процессов, безопасность продуктов и экономическую целесообразность http://zingcorp.com.au/component/kunena/welcome-mat/92232#92263
Hi, possibly i’m being a little off topic here, but I was browsing your site and it looks stimulating. I’m writing a blog and trying to make it look neat, but everytime I touch it I mess something up. Did you design the blog yourself?
В последние десятилетия наблюдается значительный прогресс в области технологий, используемых для создания высококачественных медикаментов. Эти достижения влияют на множество аспектов, включая эффективность процессов, безопасность продуктов и экономическую целесообразность http://adelmo.com.sg/index.php?option=com_k2&view=itemlist&task=user&id=4277
Как получить диплом техникума официально и без лишних проблем
比特派下载(Bitpie)是一款全球领先的多链数字钱包,专为支持多种区块链资产而设计,如比特币(BTC)、以太坊(ETH)、波场(TRX)、泰达币(USDT)等主流加密货币。通过使用比特派,用户不仅能够轻松便捷地管理和转移数字资产,还可以享受去中心化应用(DApp)等多种区块链服务
ST666 – Nhận Định Bóng Đá Kèo Nhà Cái Uy Tín
ST666: Địa Chỉ Lý Tưởng Cho Những Tín Đồ Cá Cược Bóng Đá
ST666 là nền tảng nhận định bóng đá và kèo nhà cái chuyên nghiệp, nơi người chơi có thể tham gia dự đoán các kèo đa dạng như cược tài xỉu, cược chấp, và cược 1×2. Với giao diện thân thiện, tỷ lệ cược minh bạch và ưu đãi hấp dẫn, ST666 đang dần trở thành lựa chọn hàng đầu của cộng đồng yêu bóng đá.
Nhận Định Kèo Nhà Cái Đa Dạng
Cược Tài Xỉu (#cuoctaixiu)
Dựa vào tổng số bàn thắng trong trận đấu, người chơi dễ dàng chọn lựa Tài (nhiều hơn tỷ lệ nhà cái đưa ra) hoặc Xỉu (ít hơn tỷ lệ).
ST666 cung cấp các phân tích chi tiết giúp người chơi đưa ra lựa chọn chính xác.
Cược Chấp (#cuocchap)
Thích hợp cho những trận đấu có sự chênh lệch về sức mạnh giữa hai đội. ST666 cung cấp tỷ lệ chấp tối ưu, phù hợp với cả người chơi mới và chuyên nghiệp.
Cược 1×2 (#cuoc1x2)
Phù hợp cho những ai muốn dự đoán kết quả chung cuộc (Thắng – Hòa – Thua). Đây là loại kèo phổ biến, dễ hiểu và có tỷ lệ cược hấp dẫn.
Ưu Đãi Hấp Dẫn Tại ST666
Nhận 160% tiền gửi lần đầu: Khi đăng ký tài khoản mới và nạp tiền, người chơi sẽ nhận được số tiền thưởng cực lớn, tăng cơ hội tham gia các kèo.
Hoàn tiền 3% mỗi ngày: Chính sách hoàn tiền giúp người chơi giảm thiểu rủi ro, thoải mái trải nghiệm mà không lo lắng nhiều về chi phí.
Vì Sao Nên Chọn ST666?
Nền Tảng Uy Tín: ST666 cam kết mang đến trải nghiệm cá cược minh bạch và an toàn.
Phân Tích Chuyên Sâu: Đội ngũ chuyên gia của ST666 luôn cập nhật nhận định mới nhất về các trận đấu, giúp người chơi đưa ra quyết định tối ưu.
Hỗ Trợ 24/7: Đội ngũ hỗ trợ chuyên nghiệp, luôn sẵn sàng giải đáp thắc mắc của người chơi.
Giao Dịch Nhanh Chóng: Nạp rút tiền linh hoạt, đảm bảo sự tiện lợi và bảo mật.
Cách Tham Gia ST666
Truy cập website chính thức của ST666.
Đăng ký tài khoản bằng thông tin cá nhân.
Nạp tiền lần đầu để nhận ưu đãi 160%.
Bắt đầu trải nghiệm cá cược với các kèo yêu thích!
Hãy đến với ST666 để tận hưởng không gian cá cược chuyên nghiệp, nhận định kèo chất lượng và những phần thưởng hấp dẫn. Tham gia ngay hôm nay để trở thành người chơi chiến thắng!
Paxlovid.ink: Paxlovid.ink – Paxlovid over the counter
LEO娛樂城登入
LEO娛樂城:九州娛樂集團的卓越創舉與運營優勢
九州娛樂集團總部的現代化運營
九州娛樂集團的總部設於菲律賓首都馬尼拉市中心最具代表性的現代化建築「RCBC Plaza」。這座辦公大樓融合了全球領先的建築科技與安全系統,包括:
國家級資訊防護系統,確保數據安全。
樓宇自動化系統 (BAS),實現數位化管理與高效運營,包括防火系統、光纖電訊和數位監控。
九州娛樂為員工提供舒適的工作環境和專業的教育培訓,確保服務水準一流。其員工以專業知識和親切態度,為尊貴玩家帶來極致的遊戲體驗。
LEO娛樂旗下品牌與遊戲特色
九州娛樂城旗下分支包括 LEO、THA 和 KU 三個娛樂品牌。雖然品牌各自獨立運營,但都共享相同的遊戲系統與界面,提供超過數千款來自全球頂級供應商的遊戲。
這些品牌的核心特色包括:
種類繁多的遊戲:滿足不同類型玩家的需求,包括電子遊戲、體育博彩、真人娛樂等。
不斷更新的內容:通過九州獨家技術,網站內容保持新鮮,合作商可快速更新遊戲資源,確保平台競爭力。
玩家在這些平台上可以隨時找到適合自己的遊戲,享受沉浸式的娛樂體驗。
LEO娛樂城的歷史與發展
九州娛樂集團的起源可以追溯至其最早期的經營模式:「信用版」賭博平台 《天下體育球版》。儘管該模式在當時非常流行,但因高風險與財務處理複雜而逐漸被淘汰。
隨著市場需求的變化,九州娛樂轉型為現金版平台 《天下現金網》,引入了更安全、便捷的遊戲模式。這種轉變不僅提升了玩家的體驗,也使平台得以進一步發展。
如今,九州娛樂城已成為台灣博弈業界的領軍者,不僅優化了網站版面與功能,還推出了專屬手機APP,方便玩家隨時隨地進行遊戲體驗。
LEO娛樂的成功秘訣
現代化運營與技術支持:九州娛樂在系統安全與技術更新方面投入巨大資源,確保平台運營穩定可靠。
多元化遊戲體驗:通過與全球頂級遊戲供應商合作,平台提供了豐富的遊戲選擇,適應各種玩家需求。
用戶至上:專業培訓的員工以細心和熱忱態度,提供高品質服務,讓玩家倍感尊重。
不斷創新:從信用版到現金版,再到手機APP,九州娛樂始終緊跟市場趨勢,致力於打造最佳娛樂體驗。
結語
LEO娛樂城作為九州娛樂集團旗下的重要品牌,不僅繼承了集團的核心價值,更在遊戲選擇、服務品質和技術創新方面不斷提升。從最初的《天下體育球版》到如今的行業領先者,LEO娛樂見證了九州娛樂城的發展歷程,也成為博弈行業中的耀眼明星。
加入 LEO娛樂城,感受來自九州娛樂集團的專業與熱情,享受最頂級的線上博弈體驗!
RG富遊娛樂城:台灣線上娛樂城的最佳選擇
RG富遊娛樂城以其卓越的服務和多樣化的遊戲選擇,成為2024年最受歡迎的線上娛樂平台。受到超過50位網紅和部落客的實測推薦,這座娛樂城不僅提供豐富的遊戲,還帶來眾多優惠活動和誠信保證,贏得了廣大玩家的信任與青睞。
RG富遊娛樂城的獨特優勢
多重優惠活動
體驗金 $168:新手玩家可以免費試玩,無需任何成本即可體驗高品質遊戲。
首儲1000送1000:首次存款即可獲得雙倍金額,增加遊戲的樂趣與機會。
線上簽到轉盤:每日簽到即可參加抽獎,贏取現金獎勵和豐厚禮品。
快速存提款與資金保障
RG富遊採用自主研發的財務系統,確保5秒快速存款,滿足玩家即時遊戲需求。
100%保證出金,杜絕任何拖延或資金安全風險,讓玩家完全放心。
遊戲種類豐富
RG富遊娛樂城涵蓋多種遊戲類型,滿足不同玩家的需求,包括:
真人百家樂:與真人荷官互動,感受真實賭場的刺激氛圍。
電子老虎機:超過數百款創新遊戲,玩法新穎,回報豐厚。
電子捕魚:趣味性強,結合策略與娛樂,深受玩家喜愛。
電子棋牌:提供公平競技環境,適合策略型玩家。
體育投注:涵蓋全球賽事,賠率即時更新,為體育愛好者提供最佳選擇。
樂透彩票:參與多地彩票,挑戰巨額獎金。
跨平台兼容性
RG富遊支持Web端、H5、iOS和Android設備,玩家可隨時隨地登錄遊戲,享受無縫體驗。
與其他娛樂城的不同之處
RG富遊以現金版模式運營,確保交易透明和安全性。相比一般娛樂城,RG富遊在存提款速度上遙遙領先,玩家可在短短15秒內完成交易,並且100%保證資金提領。而在線客服全年無休,隨時提供支持,讓玩家在任何時間都能解決問題。
相比之下,一般娛樂城多以信用版模式運營,存在出金風險,且存提款速度較慢,客服服務不穩定,無法與RG富遊的專業性相比。
為什麼選擇RG富遊娛樂城
資金交易安全無憂:採用最先進的SSL加密技術,確保每筆交易的安全性。
遊戲種類全面豐富:每日更新多樣化遊戲,帶來新鮮感和無限可能。
優惠活動力度大:從體驗金到豐厚的首儲獎勵,玩家每一步都能享受優惠。
快速存提款服務:自主研發技術保障流暢交易,遊戲不中斷。
全天候專業客服:24/7在線支持,及時解決玩家需求。
立即加入RG富遊娛樂城
RG富遊娛樂城不僅提供豐富的遊戲體驗,更以專業的服務、完善的安全保障和多樣的優惠活動,為玩家打造一個值得信賴的娛樂環境。立即註冊,體驗台灣最受歡迎的線上娛樂城!
娛樂城
富遊娛樂城:全台灣第一推薦的娛樂城體驗
富遊娛樂城是全台灣最受玩家推崇的娛樂平台,提供多種優惠、豐富的遊戲選擇以及高品質的服務,讓每位玩家都能享受極致的遊戲樂趣。無論您是新手還是資深玩家,富遊娛樂城都能滿足您的需求,帶給您刺激的遊戲體驗。
富遊娛樂城的優惠活動
1. 免費娛樂城體驗金
新玩家只需註冊即可免費領取 $168 元的體驗金,無需存款,便可立即體驗各種遊戲,感受遊戲帶來的樂趣。
2. 首次存款優惠
首次存款 $1000 元,即送 $1000 元遊戲金,讓您在遊戲中有更多機會獲勝,增添刺激感。
3. 新會員五選一好禮
新加入的會員可選擇五種專屬好禮之一,從遊戲金到實體獎品,讓您的遊戲旅程更加多彩。
熱門遊戲種類
富遊娛樂城提供多樣化的遊戲選擇,適合不同喜好的玩家:
電子老虎機:多款創新遊戲,讓玩家享受豐厚獎金機會。
百家樂:與真人荷官互動,體驗真實賭場的刺激感。
今彩539 和 運彩:滿足彩票愛好者的需求。
捕魚遊戲:RSG電子捕魚遊戲帶來娛樂與獎金的雙重樂趣。
熊貓體育:專為體育迷設計的多種運動投注選項。
優質服務保證
1. 出金快速、安全可靠
富遊娛樂城採用先進的財務處理系統,保證快速存提款,讓玩家不用擔心資金安全問題。
2. 技術先進的APP平台
流暢的畫面設計與設備兼容性,讓用戶輕鬆上手。
持續升級與更新,提供更多創新遊戲類型。
3. 24小時專業客服
專業客服隨時待命,為玩家解答所有遊戲相關問題,確保您在任何時間都能享受到無縫的服務體驗。
4. 安全防護到位
採用最嚴格的安全管理系統與數據加密技術,保障用戶資金與個人信息的安全。
富遊娛樂城APP:隨時隨地盡享遊戲
富遊娛樂城APP提供了便捷的遊戲途徑,支援 IOS 與 Android 設備。
簡潔易用的界面設計,讓玩家快速找到喜愛的遊戲。
即時客服支援,隨時解決您的疑問。
免費下載,無論何時何地,您都能盡享娛樂城的精彩遊戲體驗。
為什麼選擇富遊娛樂城?
優惠豐富:免費體驗金、首存優惠、新會員好禮,活動多樣。
遊戲種類齊全:從電子遊戲到真人百家樂,滿足各類玩家需求。
服務至上:專業客服、快速出金和高安全保障讓玩家安心享受遊戲。
便捷平台:富遊APP提供隨時隨地的遊戲樂趣,讓您不受限制。
立即下載 富遊娛樂城APP,體驗全台灣第一娛樂城的無限魅力!不論您是想享受遊戲樂趣還是贏取豐厚獎金,富遊娛樂城都將是您的最佳選擇!
I’ve thought about posting something about this before. Good job! Can I use part of your post in my blog?
В Москве без прохождения врачей, Вы можете купить медицинскую справку в мед центре http://cmc-clinic.ru/
для вывода из запоя в стационаре [url=moskovsky.borda.ru/?1-0-0-00000034-000-0-0-1730807482]для вывода из запоя в стационаре[/url] .
вывод из запоя в стационаре нижнего новгорода [url=http://pelsh.forum24.ru/?1-8-0-00000130-000-0-0-1730808999/]вывод из запоя в стационаре нижнего новгорода[/url] .
вывод из запоя круглосуточно [url=severussnape.borda.ru/?1-4-0-00000321-000-0-0-1730808100]вывод из запоя круглосуточно[/url] .
LEO娛樂城無法登入
熊貓體育:台灣娛樂市場的新星
隨著最近幾週LEO娛樂城的頻繁登入問題和九州集團宣布退出台灣市場,各大玩家開始尋求新的娛樂平台。在這樣的背景下,熊貓體育逐漸脫穎而出,成為玩家們的熱門選擇。
#### 熊貓體育的優勢
1. 穩定性與信任
熊貓體育作為一個亞洲知名的博弈品牌,擁有龐大的資本後盾,並持有多項合法的營業執照,包括歐洲馬爾他(MGA)與菲律賓(PAGCOR)的監管牌照。這些執照不僅確保了平台的合法性,也增強了玩家對平台的信任感。
2. 多元化的入金管道
熊貓體育提供了多種入金選擇,如信用卡和電子錢包等,讓玩家的資金交易更為靈活,無需擔心因為金流問題影響遊戲體驗。
3. 優惠活動吸引新玩家
該平台推出了吸引人的優惠活動,例如首儲1000元送1000元的活動,使得新玩家可以在入場時獲得額外資金,提升遊戲興趣和參與感。
4. 公平的遊戲環境
不同於某些競爭者,熊貓體育專注於提供公平的遊戲體驗,並致力於改善玩家的遊戲環境,減少風險與不確定性。
#### 未來展望
面對市場的變化,熊貓體育不僅提供安全且多元的遊戲體驗,還展示出強大的應變能力。隨著九州集團的退出,熊貓體育有機會吸引更多原本屬於LEO娛樂城的玩家,進一步擴大市場份額。
如果你正在尋找一個穩定且值得信賴的娛樂平台,不妨考慮熊貓體育,這將是你的不二選擇。隨著新賽季的開始,更多精彩的遊戲活動也將隨之而來,讓我們拭目以待!
娛樂城
富遊娛樂城:台灣線上賭場的創新選擇
在台灣的線上娛樂市場中,富遊娛樂城憑藉其優質的服務和多樣化的娛樂選項,迅速成為新一代玩家的首選。既有刺激的遊戲體驗,又提供了一系列具有吸引力的優惠,富遊娛樂城無疑是追求樂趣的玩家們理想的地方。
#### 優勢與特色
1. 多樣化的遊戲選擇
富遊娛樂城提供了豐富的遊戲種類,包括電子老虎機、真人百家樂、運彩投注等。不論你是老虎機的愛好者,還是熱衷於真人賭桌的玩家,這裡都能滿足你的需求。特別推薦的遊戲如DG真人百家和RSG皇家百家樂,一定能帶給你極致的遊戲體驗。
2. 吸引人的優惠活動
富遊娛樂城針對新手和老玩家都推出了多樣的優惠活動。新會員首次存款可獲得相同金額的獎金,還有額外的體驗金送出,設計友好且實惠。此外,富遊每週的簽到獎勵和天天無上限的返水活動,更是讓玩家在遊戲中能持續獲得收益。
3. 安全可靠的存取款方式
在金融交易方面,富遊娛樂城支持多種存款和提款方式,包括各大銀行轉帳、超商儲值,甚至虛擬貨幣等。最低提款金額設置靈活,保證玩家資金的安全與便捷。
4. 人性化的操作介面
富遊娛樂城的網頁與移動應用設計簡潔易用,玩家可以方便地找到所需的遊戲和優惠。無論是在電腦還是手機上,都能順利享受到遊戲的樂趣。
#### 如何開始遊戲
如果你是新手玩家,開始你的富遊體驗非常簡單。只需註冊帳號,完成首次存款,即可獲得新手優惠。無論你想嘗試電子遊戲還是真人賭局,富遊娛樂城都能讓你輕鬆上手,享受娛樂的樂趣。
#### 社會責任與防沉迷措施
富遊娛樂城深知線上賭博的風險,因此致力於推廣負責任的遊戲文化。他們提供“防沉迷”指導,以確保玩家能夠理性投注,並提供必要的幫助和資源來幫助有需求的玩家。
#### 總結
對於尋求安全、便捷和多元化娛樂城體驗的玩家,富遊娛樂城絕對是值得選擇的選項。無論你是希望徹底放鬆,還是想要體驗刺激的博弈過程,富遊娛樂城都能滿足你的期待,成為你在台灣線上娛樂市場的最佳夥伴。立即註冊並開始你的遊戲之旅吧!
娛樂城
想要享受最刺激的線上娛樂體驗?選擇RG富遊娛樂城!
在這個數位時代,尋找適合自己的線上娛樂城變得越來越重要。如果你想在線上娛樂城找到最好玩、最受歡迎的遊戲,RG富遊絕對是你的首選!我們匯聚了多款博弈遊戲,讓您盡情享受娛樂的刺激與快感。
#### 精選遊戲類型
1. 真人百家樂
感受現場賭場的氛圍!RG富遊的真人視訊百家樂讓你與真實的荷官互動,享受高品質的遊戲體驗。無論你是老手還是新手,都能在這裡找到適合自己的節奏。
2. 電子老虎機
喜愛刺激嗎?我們提供多款熱門老虎機遊戲,如「戰神賽特」「魔龍傳奇」等,每一款都擁有精美的畫面和豐厚的獎勵,讓每次旋轉都充滿期待!
3. 體育投注
無論你是球迷還是賽事愛好者,RG富遊的體育投注平台都有你想要的。精準的賠率、廣泛的賽事選擇,讓你體驗到投注的樂趣和刺激。
4. 彩票遊戲與捕魚遊戲
隨著運氣來!不妨試試我們的棋牌遊戲和彩票遊戲,這裡有各種機會讓你體驗到不一樣的勝利快感。
#### 下載富遊APP,隨時隨地享受遊戲!
富遊娛樂城的APP支持iOS和Android設備,界面簡潔易用,內容豐富。無論你身處何地,都能輕鬆進入遊戲世界,隨心所欲享受娛樂時光。此外,我們提供即時客服支援,隨時解決你的疑問,讓你的遊戲體驗更為完美。
#### 為什麼選擇RG富遊?
– 安全可靠
RG富遊致力於為玩家提供安全可靠的遊戲環境,您的每一筆交易都受到最高的安全保障。
– 快速便捷的存提款服務
我們的存款平均時間僅需30秒,提款平均只需60秒,讓你體驗即時的快感!
– 豐富多元的遊戲選擇
超過9999款遊戲任你選擇,無論你偏好哪種娛樂方式,這裡都能滿足你的需求。
– 全天候服務
我們全年365天提供不停歇的客服支持,確保你在遊戲過程中享受到最好的服務。
### 結論
RG富遊娛樂城是您最佳的線上賭場選擇。我們不僅提供多樣化的遊戲選擇,還有安全可靠的遊戲環境和便捷的服務。立即下載APP,加入RG富遊,開始您的娛樂之旅,享受無與倫比的遊戲體驗吧!
I know this web page gives quality based articles or
reviews and other data, is there any other site which offers these kinds of stuff in quality?
滿天星娛樂城
滿天星娛樂城:全方位的線上娛樂體驗
滿天星娛樂城作為九州娛樂城旗下品牌之一,是玩家心目中備受信賴的線上娛樂平台。不僅提供豐富的遊戲選擇和吸引人的優惠,還以其合法營運的背景和快速出金的保證,成為台灣玩家的首選娛樂城之一。
滿天星娛樂城的特色與優勢
1. 合法營運,安全可靠
滿天星娛樂城持有三大國際娛樂執照,包括:
菲律賓 PAGCOR 監督競猜牌照
BVI 認證
馬爾他 MGA 認證
這些執照展現了平台的資本實力與合法性,讓玩家能夠安心享受遊戲,完全不用擔心出金問題。
2. 高品質遊戲與豐富優惠
滿天星娛樂城與九州集團旗下的LEO、THA娛樂城一樣,提供一流的遊戲品質和多樣化的優惠。
熱門遊戲推薦:電子老虎機、真人直播、運彩投注、今彩539等,滿足各類玩家需求。
優惠活動:定期推出限時回饋活動,讓玩家在遊戲中獲得更多額外收益。
3. 快速出金與高效服務
滿天星娛樂城採用先進的財務系統,確保存提款快速、安全,讓玩家能夠專注於享受遊戲,而無需擔心資金問題。專業的客服團隊24小時在線,提供即時支援。
4. 多平台兼容的APP
滿天星娛樂城提供設計貼合玩家需求的手機APP,適用於iOS與Android系統。玩家可以隨時隨地快速登入遊玩,體驗無與倫比的娛樂快感。
熱門遊戲類型一覽
滿天星娛樂城為玩家提供多樣化的遊戲選擇,滿足不同興趣和需求:
真人直播:感受真實賭場氛圍,與真人荷官互動,體驗沉浸式娛樂。
電子老虎機:多款經典與創新機台,讓玩家享受刺激的遊戲過程。
運彩投注:涵蓋世界盃、棒球、籃球等多項運動賽事,提供即時投注與直播功能。
彩票遊戲:包括今彩539、富遊彩票等,適合熱衷於彩券的玩家。
滿天星娛樂城常見問題解答
Q1. 滿天星娛樂城是否提供APP下載?
是的,滿天星娛樂城提供專屬的手機APP,支援iOS和Android系統。玩家可透過APP快速登入,隨時享受遊戲。
Q2. 滿天星娛樂城是否合法?
滿天星娛樂城擁有多項國際認證,為合法經營的線上娛樂城,並保證玩家資金的安全性與遊戲的公平性。
Q3. 無法登入滿天星娛樂城該怎麼辦?
如遇到無法登入的情況,建議玩家檢查網路狀況或聯繫24小時客服團隊獲取即時協助。
立即加入滿天星娛樂城,享受最佳娛樂體驗!
滿天星娛樂城以合法、安全、快速的服務,搭配豐富的遊戲選擇和優惠,為玩家打造出獨一無二的線上娛樂體驗。不論您是新手還是老手,都能在滿天星找到屬於自己的遊戲樂趣。現在就下載APP,隨時隨地開始您的娛樂之旅!
Amoxil Pharm Store: Amoxil Pharm Store – Amoxil Pharm Store
Предлагаем услуги профессиональных инженеров офицальной мастерской.
Еслли вы искали ремонт телевизоров xiaomi, можете посмотреть на сайте: ремонт телевизоров xiaomi адреса
Наши мастера оперативно устранят неисправности вашего устройства в сервисе или с выездом на дом!
The official Melbet website offers a wide line of sports betting, high odds, fast payouts, bonuses for new and regular players https://wowgilden.net/forum-topic_473826.html
Overview of Digital Currency Deal Validation and Regulatory Services
In contemporary cryptocurrency industry, ensuring deal transparency and conformity with AML and KYC rules is essential. Below is an summary of well-known services that provide tools for cryptocurrency transaction tracking, validation, and asset security.
1. Token Metrics Platform
Description: Tokenmetrics delivers digital asset assessment to evaluate likely fraud dangers. This service enables investors to examine coins before investment to prevent likely risky assets. Highlights:
– Risk analysis.
– Suitable for buyers looking to avoid risky or fraudulent ventures.
2. Metamask Monitor Center
Overview: Metamask Monitor Center enables users to check their digital asset assets for suspicious actions and regulatory conformity. Features:
– Checks coins for legitimacy.
– Offers notifications about likely resource blockages on specific trading sites.
– Gives thorough reports after account sync.
3. Best Change
Summary: Best Change is a site for monitoring and checking crypto transaction deals, guaranteeing clarity and transaction protection. Highlights:
– Transaction and account observation.
– Restriction validation.
– Web-based platform; accommodates BTC and various other coins.
4. Bot amlchek
Description: AMLCheck Bot is a portfolio tracker and AML compliance tool that utilizes machine learning models to identify questionable activity. Highlights:
– Transaction tracking and identity validation.
– Available via online and chat bot.
– Works with digital assets including BSC, BTC, DOGE, and other types.
5. Alfabit AML
Summary: AlfaBit delivers comprehensive anti-money laundering services customized for the crypto field, assisting firms and banks in ensuring compliance compliance. Features:
– Thorough compliance options and evaluations.
– Complies with modern protection and regulatory guidelines.
6. AML Node
Description: AML Node provides compliance and identification tools for cryptocurrency businesses, such as transfer monitoring, compliance checks, and analysis. Features:
– Threat evaluation tools and sanctions validations.
– Useful for ensuring protected firm processes.
7. Btrace.io
Description: Btrace.AMLcrypto.io focuses on fund check, providing transaction monitoring, restriction checks, and help if you are a target of fraud. Advantages:
– Effective assistance for asset restoration.
– Deal monitoring and security options.
Dedicated USDT Check Services
Our website also reviews various sites providing validation tools for USDT deals and accounts:
– **USDT TRC20 and ERC20 Validation:** Many services support detailed screenings for USDT deals, assisting in the identification of questionable transactions.
– **AML Verification for USDT:** Tools are available for observing for fraudulent actions.
– **“Cleanliness” Validation for Holdings:** Checking of transaction and holding “cleanliness” is available to detect possible threats.
**Summary**
Selecting the right platform for verifying and tracking crypto deals is crucial for guaranteeing security and compliance adherence. By viewing our recommendations, you can choose the ideal tool for deal tracking and fund protection.
The official Melbet website offers a wide line of sports betting, high odds, fast payouts, bonuses for new and regular players https://profile.hatena.ne.jp/melbetpakistan/profile
It’s the best time to make some plans for the future and it is time to be happy. I’ve read this post and if I could I wish to suggest you some interesting things or tips. Maybe you can write next articles referring to this article. I wish to read even more things about it!
[url=https://samoylovaoxana.ru/tag/tury-nigerii/]туры Нигерии[/url] или [url=https://samoylovaoxana.ru/otdyh-v-prage-nesmotria-ni-na-chto/]Отдых в Праге, несмотря ни на что[/url]
[url=https://samoylovaoxana.ru/tag/otdyh-v-ekvadore/]отдых в Эквадоре[/url]
https://samoylovaoxana.ru/pyteshestvie-v-kazahstan/
Ещё можно узнать: [url=http://yourdesires.ru/vse-obo-vsem/1399-pochemu-snezhinki-shestiugolnye.html]почему снежинка шестиугольная[/url]
antibiotic amoxicillin: AmoxilPharm – amoxicillin 500mg buy online uk
娛樂城
2024 年娛樂城遊戲推薦:最夯遊戲與最佳平台選擇
隨著線上娛樂城市場的蓬勃發展,2024 年推出了多款令人興奮的遊戲和創新平台。無論是喜歡老虎機、棋牌遊戲,還是捕魚和彩票遊戲的玩家,都能在今年找到屬於自己的遊戲樂園。以下是熱門遊戲推薦與最佳娛樂城平台的詳細介紹。
2024 年最夯遊戲推薦
電子老虎機遊戲
電子老虎機一直是娛樂城的經典項目,今年更是推出了數款熱門作品:
戰神賽特:以古埃及神話為背景,擁有高倍數獎勵的特殊功能,畫面設計精美。
魔龍傳奇:玩家可探索魔龍世界,觸發驚喜獎金和免費遊戲機會。
雷神之錘:以北歐神話為主題,特色連線玩法讓每次旋轉都充滿期待。
金虎爺:寓意招財進寶,特別適合新年期間挑戰,玩法簡單但回報豐厚。
棋牌遊戲
二人麻將:適合喜歡策略性對抗的玩家,快速節奏且競爭激烈。
忍 Kunoichi:結合武士與忍者元素,讓玩家體驗獨特的棋牌競技。
捕魚遊戲
捕魚遊戲是一種結合策略和運氣的娛樂項目,玩家可以通過捕捉魚群來獲得高額獎金,同時享受視覺和操作的雙重樂趣。
彩票遊戲
彩票遊戲以簡單快捷的玩法吸引大批玩家,提供多種國內外彩種,讓玩家隨時挑戰幸運。
RG富遊娛樂城:2024 年最佳線上娛樂城推薦
在眾多娛樂城平台中,RG富遊娛樂城以其專業服務和卓越遊戲體驗,成為今年的首選平台。
平台特色
遊戲種類豐富
提供多元化遊戲選擇,包括真人視訊、電子老虎機、捕魚、棋牌和彩票遊戲,滿足所有玩家需求。
快速便捷的存提款服務
平台支持即時存款與快速提款,無需等待,確保資金安全流動。
高度安全保障
採用最先進的加密技術,保護玩家的帳戶與交易安全。
支援多平台裝置
富遊娛樂城APP 可在 iOS 和 Android 設備上使用,界面簡潔易操作,隨時隨地享受娛樂。
專業客服支援
提供 24 小時全天候客服,隨時解答玩家疑問,保障流暢的遊戲體驗。
如何開始體驗 RG 富遊娛樂城
下載富遊 APP
在官方網站免費下載 APP,支援 iOS 和 Android 設備。
註冊帳號
使用簡單步驟完成註冊,立即進入遊戲世界。
挑戰熱門遊戲
從老虎機到棋牌遊戲,選擇您喜歡的類型,挑戰高額獎金。
結語
2024 年是線上娛樂遊戲的精彩年份,從戰神賽特到二人麻將,每款遊戲都能帶給玩家不同的樂趣。而選擇像 RG富遊娛樂城 這樣的專業平台,不僅能體驗到豐富的遊戲內容,還能享受安全可靠的服務。立即下載富遊 APP,加入這個充滿驚喜的娛樂世界
Hmm it appears like your site ate my first comment (it was extremely long) so I
guess I’ll just sum it up what I wrote and say, I’m thoroughly enjoying your blog.
I as well am an aspiring blog blogger but I’m still new to the whole thing.
Do you have any suggestions for novice blog writers? I’d certainly appreciate it.
Аттестат школы купить официально с упрощенным обучением в Москве
THA娛樂城無法登入
九州娛樂停止營運,LEO、THA娛樂城無法登入,玩家該怎麼辦?
近期,九州娛樂城集團旗下的LEO娛樂城與THA娛樂城相繼傳出無法登入的消息,讓許多玩家陷入焦慮。隨著九州娛樂正式宣布退出台灣市場,營運結束的消息塵埃落定。這對廣大玩家而言意味著什麼?該如何處理自己的帳戶與資金?本文將為您全面解析現況並提供解決方案。
停止營運:關鍵信息一覽
關閉存款功能:從2024年12月31日中午12:00起,九州娛樂城將全面停止所有存款服務。
正常提款開放:儘管停止營運,但官方保證玩家仍可完成提款操作。
會員權益保障:九州娛樂集團承諾全力保障玩家權益,確保在停止營運前完成所有手續。
LEO、THA娛樂城無法登入的背後原因
市場規模限制
台灣市場競爭激烈,九州娛樂城認為市場成長潛力有限。相較之下,海外市場不僅人口基數大,且有更多開發機會,這成為九州轉向海外發展的關鍵動機。
金流與政策問題
近期爆發的金流醜聞為九州娛樂的運營帶來重大挑戰。例如,九州被曝利用第三方支付進行洗錢,加上相關法規收緊,讓其在台灣市場的營運空間被大幅壓縮。
品牌策略調整
九州娛樂選擇退出台灣市場,可能是為了集中資源,強化其在其他區域的競爭力。根據消息,九州旗下品牌未來將著重於更具潛力的海外市場發展。
玩家應對策略:如何保護資金與尋找替代平台?
1. 儘速完成提款
如果您的帳戶仍可登入,建議立即完成所有提款操作,確保資金安全。九州娛樂承諾提款服務不受影響,但建議提早行動避免平台完全關閉。
2. 避免假冒平台陷阱
隨著九州娛樂停止營運,市場可能會出現假冒九州品牌的詐騙網站。玩家應提高警覺,避免在非官方平台上進行任何交易。
3. 選擇可靠替代平台
為了延續遊戲體驗,玩家可考慮轉至穩定且受信賴的平台。這裡推薦RG富遊娛樂城,憑藉其安全、穩定的服務與多樣化的遊戲選擇,成為值得信賴的替代選擇。
RG富遊娛樂城:九州玩家的理想新選擇
平台優勢
快速出金:提款平均僅需3-5分鐘,效率領先業界。
高安全保障:採用與銀行相同的加密技術,確保玩家資料與資金安全。
豐富遊戲內容:從真人百家樂到彩票遊戲,應有盡有,滿足不同玩家的喜好。
專屬優惠
針對九州會員,富遊推出了無縫轉移方案:
玩家只需提供原平台的會員等級截圖,即可快速升等並享受對應的會員福利。
再見九州,展望未來
九州娛樂城退出台灣市場,雖然讓玩家感到惋惜,但這同時也為您開啟新的可能性。在選擇娛樂平台時,安全性與穩定性應始終放在首位。RG富遊娛樂城是目前玩家最值得信賴的選擇之一,不妨加入這個全新的平台,繼續享受無限的遊戲樂趣!
Some truly interesting info , well written and broadly user genial .
вывод из запоя нижний новгород стационар [url=http://www.familyportal.forumrom.com/viewtopic.php?id=28597]вывод из запоя нижний новгород стационар[/url] .
вывод из запоя нижний новгород стационар [url=http://my.forum2.net/viewtopic.php?id=177/]вывод из запоя нижний новгород стационар[/url] .
AmoxilPharm: Amoxil Pharm Store – Amoxil Pharm Store
I Am Going To have to come back again when my course load lets up – however I am taking your Rss feed so i can go through your site offline. Thanks.
Лабораторный компактный V-образный смеситель СФМ-11 подходит для смешивания различных материалов в областях фармацевтики, пищевой, химической, металлургии, керамики, электроники, аккумуляторов и т. д. и способен смешивать два или более сухих порошковых и/или гранулированных материалов прессовые штампы
Интересная статья про мебель из массива дерева. Все, что нужно знать о мебели из сосны, березы, дуба или бука перед выбором и покупкой https://proektoved.com/knizhnye-shkafy-iz-massiva-dereva-preimushhestva-uhod-i-tendentsii/
AmoxilPharm: amoxicillin tablets in india – AmoxilPharm
Лабораторный компактный V-образный смеситель СФМ-11 подходит для смешивания различных материалов в областях фармацевтики, пищевой, химической, металлургии, керамики, электроники, аккумуляторов и т. д. и способен смешивать два или более сухих порошковых и/или гранулированных материалов капсулятор купить для релоадинга
Интересная статья про мебель из массива дерева. Все, что нужно знать о мебели из сосны, березы, дуба или бука перед выбором и покупкой https://e-joe.ru/stati/derevyannye-komody-estetika-i-funkcionalnost
3A娛樂城
3A娛樂城:全方位線上娛樂體驗的首選平台
3A娛樂城作為台灣最受歡迎的線上娛樂平台之一,以其多樣化的遊戲選擇、創新的技術、以及卓越的安全保障,贏得了玩家的高度信任與青睞。無論您是新手還是老手,3A娛樂城都能滿足您的需求,帶給您獨一無二的遊戲體驗。
熱門娛樂城遊戲一覽
3A娛樂城提供多種熱門遊戲,適合不同類型的玩家:
真人百家樂:體驗真實賭場的氛圍,與真人荷官互動,感受賭桌上的緊張與刺激。
彩票投注:涵蓋多種彩票選項,滿足彩券愛好者的需求,讓您隨時隨地挑戰幸運。
棋牌遊戲:從傳統的麻將到現代化的紙牌遊戲,讓玩家在策略與運氣中找到平衡。
3A娛樂城的核心價值
1. 專業
3A娛樂城每日提供近千場體育賽事,並搭配真人百家樂、彩票彩球、電子遊戲等多種類型的線上賭場遊戲。無論您的遊戲偏好為何,這裡總有一款適合您!
2. 安全
平台採用128位加密技術和嚴格的安全管理體系,確保玩家的金流與個人資料完全受保護,讓您可以放心遊玩,無需擔憂安全問題。
3. 便捷
3A娛樂城是全台第一家使用自家開發的全套終端應用的娛樂城平台。無論是手機還是電腦,玩家都能享受無縫的遊戲體驗。同時,24小時線上客服隨時為您解決任何問題,提供貼心服務。
4. 安心
由專業工程師開發的財務處理系統,為玩家帶來快速的存款、取款和轉帳服務。透過獨立網路技術,平台提供優化的網路速度,確保每一次操作都流暢無比。
下載3A娛樂城手機APP
為了提供更便捷的遊戲體驗,3A娛樂城獨家開發了功能齊全的手機APP,讓玩家隨時隨地開啟遊戲。
現代化設計:新穎乾淨的介面設計,提升使用者體驗。
跨平台支持:完美適配手機與電腦,讓您輕鬆切換設備,無需中斷遊戲。
快速下載:掃描專屬QR碼即可進入下載頁面,立即開始暢玩!
3A娛樂城的其他服務
娛樂城教學:詳細的操作指導,讓新手也能快速上手。
責任博彩:提倡健康娛樂,確保玩家在遊戲中享受樂趣的同時,不失理性。
隱私權政策:嚴格遵守隱私保護條例,保障玩家的個人信息安全。
立即加入3A娛樂城,享受頂級娛樂體驗!
如果您正在尋找一個專業、安全、便捷又安心的線上娛樂平台,那麼3A娛樂城絕對是您的不二之選。現在就下載手機APP,隨時隨地開啟您的娛樂旅程,享受無限的遊戲樂趣與刺激!
A friend of mine advised this site. And yes. it has some useful pieces of info and I enjoyed scaning it. Therefore i would love to drop you a quick note to express my thank. Take care
I will share you blog with my sis.
Several car insurance companies currently use mobile phone
apps to help make managing your policy easier.
If convenience is crucial to you, talk to auto insurance companies concerning their app options.
Zimpler och Trustly är de alternativ som ger snabbast uttag.
With thanks. Awesome stuff!
娛樂城
超過100間最新資訊任你看!
還在苦苦尋找安全可靠的線上娛樂城推薦名單嗎?這篇彙集了 2024 年 100 間娛樂城評價實測,為您打造最新、最真實的娛樂城排行榜!
不論您是經驗豐富的玩家還是剛入門的新手,都能在這找到最適合您的娛樂城平台。
我們從遊戲種類、優惠活動到出金速度等多個面向進行詳細評比,讓您輕鬆避開黑網,安心享受刺激的遊戲體驗!點擊查看完整排行榜,開啟您的娛樂新篇章!
排名 推薦娛樂城 推薦指數
NO.1 富遊娛樂城 ★★★★★/5.0分
NO.2 1XBET娛樂城 ★★★★★/5.0分
NO.4 九州娛樂城 ★★★★★/5.0分
NO.5 LEO娛樂城 ★★★★★/5.0分
NO.6 YABO亞博體育娛樂城 ★★★★★/5.0分
NO.7 BET365娛樂城 ★★★★★/5.0分
NO.8 PM娛樂城 ★★★★★/5.0分
NO.9 DG娛樂城 ★★★★★/5.0分
NO.10 DB娛樂城 ★★★★★/5.0分
▲此表格為五星評價推薦娛樂城
1星評價
娛樂城評價
2024 / 10 / 24
達利娛樂城|評價介紹
達利娛樂城|評價介紹
達利娛樂城於2023年成立,他們聲稱致力於打造一個「安全可靠」、「即時便利」、「公平公正」及「專業營運」的優質娛樂服務平台,所有個人資…
2星評價
娛樂城評價
2024 / 10 / 04
金金財寶娛樂城|評價介紹
金金財寶娛樂城是一個由知名啦啦隊隊員林襄代言的線上賭場,採用幣商型運營方式,玩家需使用台幣儲值以獲得遊戲幣。 該平台不支持遊戲幣的直接…
2星評價
娛樂城評價
2024 / 08 / 06
帝遊娛樂城|評價介紹精選
帝遊娛樂城|評價介紹
帝遊娛樂城是在2022年所創立的新興品牌,網站內的排版以及網頁速度上都有著不錯的表現,對於使用者來說非常易於操作。 帝遊娛樂城的遊戲內…
3星評價
娛樂城評價
2024 / 07 / 31
客萊柏娛樂城
客萊柏娛樂城|評價介紹
客萊柏娛樂城是一間從2020年就開始經營的線上娛樂城品牌,該品牌累積不少玩家的好口碑,遊戲種類多元且有許多常駐的優惠活動,對新手玩家非…
5星評價
娛樂城評價
2024 / 06 / 25
DB娛樂城介紹
DB娛樂城|評價介紹
DB娛樂城,原名PM娛樂城,在2023年更名為PM。這個重新品牌的過程中,PM集團將其亞洲遊戲品牌更名為【DB多寶遊戲】,專注於提供多…
2星評價
娛樂城評價
2024 / 06 / 14
豪神娛樂城介紹
豪神娛樂城|評價介紹
豪神娛樂城是由著名主持人吳宗憲代言的線上賭場,採取幣商型的運營模式,玩家需使用台幣充值以換取遊戲幣。 該平台沒有提供遊戲幣的直接提現方…
2星評價
娛樂城評價
2024 / 06 / 14
星城娛樂城介紹
星城娛樂城|評價介紹
星城娛樂城是一個由知名主持人徐乃麟代言的網上賭場,採用幣商型運營方式,玩家需使用台幣儲值以獲得遊戲幣。 該平台不支持遊戲幣的直接提現,…
1星評價
娛樂城評價
2024 / 06 / 12
AT99娛樂城介紹
AT99娛樂城|評價介紹
AT99娛樂城是TU娛樂城最新開發的娛樂城品牌,至於為何要開發一個新的品牌引起了許多網友的推測。 對此有人覺得TU娛樂城可能被抄了或者…
不推薦
娛樂城評價
2024 / 06 / 04
AF娛樂城
AF娛樂城|評價介紹
AF娛樂城已經不存在了,不知是經營上有問題害是什麼原因,但是據我們了解此娛樂城有被詐騙的風險,請玩家多多注意!並且網路上充斥著假冒AF…
4星評價
娛樂城評價
2024 / 05 / 17
Player-KU-CASINO
KU娛樂城|評價介紹
過去九州娛樂城以信用版起家,為台灣地區的玩家服務。但由於會員數量過於龐大,造成客服無法消化,衍伸出許多客訴與詐騙謠言。 因此,九州決定…
1星評價
娛樂城評價
2024 / 04 / 04
錢盈娛樂城
錢盈娛樂城|評價介紹
錢盈娛樂城於2022年成立,是一個專注於現金投注的線上遊戲平台,提供了包括體育賭博、真人百家樂、老虎機、彩票和電子遊戲等多樣化的遊戲選…
不推薦
娛樂城評價
2024 / 03 / 26
F1方程式娛樂城
F1方程式娛樂城|評價介紹
F1方程式娛樂城屬於小型線上娛樂城版,整體晚間非常簡陋而且含有諸多瑕疵以及不完善。 首先奇怪的點在於完全沒有可以註冊的地方,我們這邊猜…
不推薦
娛樂城評價
2024 / 03 / 26
CZ168娛樂城
CZ168娛樂城|評價介紹
CZ168娛樂城在雖然在簡介中自稱有12年的經營時間。 但是經過我們實際的調查以及訪問該品牌網頁後發現,並沒有任何12年前或是更近的資…
1星評價
娛樂城評價
2024 / 03 / 25
XY娛樂城
XY娛樂城|評價介紹
XY娛樂城是一間於2024創立的新興品牌,我們實際到訪網站發現他們的網頁只提供手機版,並未提供電腦版,可能是因應現在主流大家都是拿手機…
2星評價
娛樂城評價
2024 / 03 / 25
搖錢樹娛樂城
搖錢樹娛樂城|評價介紹
搖錢樹娛樂城是創立於2024,是非常新的一個品牌,但是我們實際到訪網站後,他們的娛樂城完整度是不錯的。 除了有一些小缺陷,像是我們在想…
不推薦
娛樂城評價
2024 / 03 / 25
必勝娛樂城
必勝娛樂城介紹|評價介紹
必勝娛樂城並不存在,此娛樂城有被詐騙的風險,請玩家多多注意!必勝娛樂城據我們了解過後,發現網路上也有一家叫必勝客娛樂城,是否為同夥還有…
2星評價
娛樂城評價
2024 / 03 / 25
柏客娛樂城
柏客娛樂城|評價介紹
柏客娛樂城是一間於2023年所創立的新興線上娛樂城品牌。 據我們實際到訪該品牌網站他們的風格走的是暗色調,以視覺上及使用體驗來說給玩家…
不推薦
娛樂城評價
2024 / 03 / 25
九鑫娛樂城
九鑫娛樂城|評價介紹
九鑫娛樂城並不存在,此娛樂城有被詐騙的風險,請玩家多多注意! 九鑫娛樂城調查 如有玩家耳聞到或是想前往九鑫娛樂城做遊玩,Player團…
不推薦
娛樂城評價
2024 / 03 / 25
推金娛樂城
推金娛樂城|評價介紹
推金娛樂城並不存在,此娛樂城有被詐騙的風險,請玩家多多注意! 推金娛樂城調查 如有玩家耳聞到或是想前往推金娛樂城做遊玩,Player團…
不推薦
娛樂城評價
2024 / 03 / 25
捷冠娛樂城
捷冠娛樂城|評價介紹
捷冠娛樂城並沒有在經營,此娛樂城有被詐騙的風險,請玩家多多注意! 捷冠娛樂城調查 如有玩家耳聞到或是想前往捷冠娛樂城做遊玩,Playe…
不推薦
娛樂城評價
2024 / 03 / 25
歐萊雅娛樂城
歐萊雅娛樂城|評價介紹
歐萊雅娛樂城並不存在,此娛樂城有被詐騙的風險,請玩家多多注意! 歐萊雅娛樂城調查 如有玩家耳聞到或是想前往歐萊雅娛樂城做遊玩,Play…
不推薦
娛樂城評價
2024 / 03 / 25
MG娛樂城
MG娛樂城|評價介紹
MG娛樂城並不存在,此娛樂城有被詐騙的風險,請玩家多多注意!據我們了解,MG娛樂城在搜尋結果上顯示的雖然是MG娛樂城但是點進去後卻是非…
不推薦
娛樂城評價
2024 / 03 / 25
JF娛樂城
JF娛樂城|評價介紹
JF娛樂城並不存在,此娛樂城有被詐騙的風險,請玩家多多注意!目前了解到的是,JF娛樂城在網上只搜尋的到類似空包彈的網站推薦留言,而他所…
不推薦
娛樂城評價
2024 / 03 / 25
TTB娛樂城
TTB娛樂城|評價介紹
TTB娛樂城並不存在,此娛樂城有被詐騙的風險,請玩家多多注意! TTB娛樂城調查 如有玩家耳聞到或是想前往TTB娛樂城做遊玩,Play…
不推薦
娛樂城評價
2024 / 03 / 25
TES888娛樂城
TES888娛樂城|評價介紹
TES8888娛樂城並不存在,此娛樂城有被詐騙的風險,請玩家多多注意! TES888娛樂城調查 如有玩家耳聞到或是想前往TES888娛…
2星評價
娛樂城評價
2024 / 03 / 25
新世界娛樂城
新世界娛樂城|評價介紹
新世界娛樂城是一間於2007年創立的娛樂城,至今已有將近快20年的經營時間了。 但是經營這麼久的線上娛樂城卻被網友爆出擅自洩漏會員個資…
3星評價
娛樂城評價
2024 / 03 / 22
WG娛樂城
WG娛樂城|評價介紹
WG娛樂城是一間創立於2023年的線上娛樂城品牌,他們提供諸多遊戲選擇讓玩家能盡情在娛樂城中享受電子遊戲所帶來的愉悅。 其中較為特別的…
1星評價
娛樂城評價
2024 / 03 / 22
逸遊娛樂城
EG逸遊娛樂城|評價介紹
EG逸遊娛樂城是一間於2023年創立的新娛樂城品牌,他們擁有眾多遊戲提供給玩家做選擇,且頻繁地釋出優惠活動,可以說是對新手玩家非常友好…
2星評價
娛樂城評價
2024 / 03 / 21
RM娛樂城
RM娛樂城|評價介紹
RM娛樂城是由菲律賓政府的PAGCOR(菲律賓娛樂和遊戲公司)授予博彩牌照,並獲得GLI(Gaming Laboratories In…
2星評價
娛樂城評價
2024 / 03 / 21
YG娛樂城
YG娛樂城|評價介紹
YG娛樂城應該可以說是在業界風格數一數二特殊的線上娛樂城了,整體網站採用中世紀元素下去做設計,會讓玩家誤譯為自己身處在RPG遊戲裡頭。…
2星評價
娛樂城評價
2024 / 03 / 21
SAT888西雅圖娛樂城
SAT888西雅圖娛樂城|評價介紹
SAT888西雅圖娛樂城創立於2022年,其中他以豐富的遊戲選項聞名,但是在網頁的體驗上卻不如其他市面上那些線上娛樂城。 網頁速度較慢…
不推薦
娛樂城評價
2024 / 03 / 21
LT娛樂城
LT娛樂城|評價介紹
LT娛樂城是一間於2022創立的線上娛樂城品牌,其中要特別注意的是,經我們網路上調查後發現此品牌常常因各種理由不給玩家出金。 網友罵聲…
不推薦
娛樂城評價
2024 / 03 / 21
8方娛樂城
8方娛樂城|評價介紹
8方娛樂城在網頁外觀上並無太大問題,但是經我們實際訪問該品牌後,認為8方娛樂城為詐騙黑網的可能性非常大。 其中,網頁內許多按鈕設置上只…
不推薦
娛樂城評價
2024 / 03 / 20
T9娛樂城
T9娛樂城|評價介紹
T9娛樂城相信許多人多多少少聽過,但是這邊玩家們要特別注意其實T9娛樂城是不存在的。 經我們實際訪問該品牌網站發現到,他的網站始終指向…
3星評價
娛樂城評價
2024 / 03 / 20
玖富娛樂城
玖富娛樂城|評價介紹
玖富娛樂城是一間於2023年創立的新創品牌,他們精美的網頁以及讓人一目瞭然的排版資訊都讓人能夠清楚明瞭的找到自己想找的資訊,他們的遊戲…
不推薦
娛樂城評價
2024 / 03 / 20
致富娛樂城
致富娛樂城|評價介紹
致富娛樂城是一間於2018年就創立的品牌,雖然經營時間也有了5年多了,但是在網路上的口碑並不是很好,甚至還傳出該娛樂城為詐騙黑網。 就…
1星評價
娛樂城評價
2024 / 03 / 20
阿拉巴娛樂城
阿拉八娛樂城|評價介紹
阿拉八娛樂城是一間於2022年創立的線上娛樂城,相比其他線上知名娛樂城,他們的遊戲種類明顯地比其他間少很多。 這可能導致玩家在遊戲體驗…
1星評價
娛樂城評價
2024 / 03 / 20
JP娛樂城
JP娛樂城|評價介紹
JP娛樂城是一間於2023年所創立的新興品牌,但也不知道是否也因新創品牌因而導致在網站上有許多的資訊上的不足以及BUG的出現。 這可能…
不推薦
娛樂城評價
2024 / 03 / 20
鑫巨力娛樂城
鑫巨力娛樂城|評價介紹
有意前往鑫巨力娛樂城得玩家們需要注意!該娛樂城已於2024/03/15停止了平台服務,因此在這邊也提醒玩家不要做任何註冊以及儲值上的動…
3星評價
娛樂城評價
2024 / 03 / 20
威樂娛樂城
威樂娛樂城|評價介紹
威樂娛樂城專門為全球華人社群設計,憑藉其全球分布的辦公室和客服中心以及合法的經營方式,深受許多遊戲愛好者的青睞。 他們提供了多樣化的遊…
3星評價
娛樂城評價
2024 / 03 / 19
GSBET娛樂城
GSBET娛樂城|評價介紹
GSBET在系統上以及安全性的技術上有著完善的技術,他們提供了一個安全、隱私且公平的線上博彩空間。 使用國際認可的SSL 128位加密…
1星評價
娛樂城評價
2024 / 03 / 19
a8遊藝場
A8娛樂城|評價介紹
A8娛樂城經我們調查過後以及實際訪問該品牌網頁,發現其中幾個嚴重的問題,A8娛樂城的網頁排版混亂、且該品牌相關資訊完全都沒又做任何的說…
3星評價
娛樂城評價
2024 / 03 / 19
德正娛樂城
DZ得正娛樂城|評價介紹
DZ得正娛樂城是一間創立於2024年的新創線上娛樂城,並且他們提供了一系列豐富的遊戲選項。 從彩票、真人視訊、體育賭注到電玩遊戲等,滿…
1星評價
娛樂城評價
2024 / 03 / 19
雷亞娛樂城
雷亞娛樂城|評價介紹
雷亞娛樂城是一間於2020年創立的線上娛樂城,但是在訪問以及遊玩過雷亞娛樂城後我們給出了一些結論,他們在娛樂城的公司營運以及該品牌公司…
1星評價
娛樂城評價
2024 / 03 / 19
FDY娛樂城
FDY娛樂城|評價介紹
由於FDY娛樂城的官方網站未提供足夠的詳細資訊,我們高度懷疑可能是一個詐騙或不可信的平台。 官方網站上的信息過於粗略,缺乏必要的運營和…
3星評價
娛樂城評價
2024 / 03 / 19
昊陽娛樂城
昊陽娛樂城|評價介紹
昊陽娛樂城擁有菲律賓娛樂及博彩公司(PAGCOR)頒發的執照,受其監管,致力於提供安全、公平、公正、誠信的網上投注服務。 旨在打造世界…
3星評價
娛樂城評價
2024 / 03 / 19
369娛樂城
369娛樂城|評價介紹
369娛樂城提供一個簡潔且易於使用的應用程式,適用於iOS和Android設備,方便玩家在Google Play和App Store上…
3星評價
娛樂城評價
2024 / 03 / 18
發樂娛樂城
發樂娛樂城|評價介紹
創立於2021年的發樂娛樂城,是一家官方運營的線上社交博弈遊戲品牌。 以「誠信、正直、玩家第一」為核心理念,致力於維護用戶權益,為玩家…
2星評價
娛樂城評價
2024 / 03 / 18
QK娛樂城
QK娛樂城|評價介紹
QK娛樂城專為全球華人社區打造,深受眾多遊戲愛好者喜愛。他們在全球設有辦公室及客服中心,並且合法經營,確保您的遊戲體驗既安全又愉快。 …
不推薦
娛樂城評價
2024 / 03 / 18
鑽豹娛樂城
鑽豹娛樂城|評價介紹
關於鑽豹娛樂城的詳細訊息,在該娛樂城的官網中並沒有做任何詳細的介紹,因此我們在這邊可以合理判斷此娛樂城為詐騙黑網的可能性非常高,官網中…
3星評價
娛樂城評價
2024 / 03 / 18
飛達娛樂城
飛達娛樂城|評價介紹
飛達娛樂城,由”Wilshire Worldwide Company Limited” 營運,他們聲稱擁有菲律賓官方博彩許可,提供豐富…
2星評價
娛樂城評價
2024 / 03 / 18
FUNNY娛樂城
FUNNY娛樂城|評價介紹
FUNNY娛樂城專為全球華人社區量身打造,贏得了眾多遊戲愛好者的喜愛。 他們遍設辦公室及客服中心於世界各地,並且保證合法經營,讓您的遊…
2星評價
娛樂城評價
2024 / 03 / 18
金博娛樂城
金博娛樂城|評價介紹
金博娛樂城專門為全球的華人社群設計,已經贏得了許多忠實遊戲愛好者的心。 他們在世界各地都有自己的辦公室和客服中心,而且完全合法運營,讓…
不推薦
娛樂城評價
2024 / 03 / 18
V7娛樂城
V7娛樂城|評價介紹
V7娛樂城樂是一間於2022年年末所創立的線上娛樂城品牌,據他該品牌說法,他們擁有一支堅強的自主開發團隊、客服團隊、除了能滿足玩家在娛…
3星評價
娛樂城評價
2024 / 03 / 15
SZ娛樂城
SZ娛樂城|評價介紹
SZ娛樂城是專門為全球華人打造的,已經吸引了眾多忠實粉絲。 他們在各地設有辦公室和客服中心,都是合法經營的,所以您可以放心。 他們提供…
3星評價
娛樂城評價
2024 / 03 / 15
DOIN娛樂城
DOIN娛樂城|評價介紹
DOIN娛樂城,這家設立在柬埔寨波貝度假村的線上遊戲天地,不僅擁有合法的博弈執照,還提供多樣化的遊戲選項,包括運動博彩、電競、真人百家…
不推薦
娛樂城評價
2024 / 03 / 11
金合發娛樂城精選
金合發娛樂城|評價介紹
金合發娛樂城曾在線上娛樂界獲得廣泛的歡迎,享有老牌的地位。 但是,近些年來,由於玩家提出的連串投訴,其名譽不斷受損。 這些投訴主要圍繞…
5星評價
娛樂城評價
2024 / 03 / 11
RG富遊娛樂城精選
富遊娛樂城|評價介紹
隨著2024年的到來,最新的線上娛樂平台排行榜已經更新,這一次的排名綜合考慮了各種因素,包括體驗金、促銷活動、提款效率和遊戲多樣性,目…
不推薦
娛樂城評價
2024 / 03 / 08
3A娛樂城精選
3A娛樂城|評價介紹
3A娛樂城是一家線上遊戲平台,提供多樣化的遊戲選擇,包括百家樂、老虎機和運彩等。 但因為網路上對這個平台的評論不多,有些人可能會擔心遭…
1星評價
娛樂城評價
2024 / 03 / 08
FA8娛樂城
FA8娛樂城|評價介紹
FA8娛樂城在亞洲地區受到許多玩家的青睞,FA8娛樂城是一個多元化的線上賭博平台。 它提供了包羅萬象的遊戲選項,從體育投注、電玩遊戲到…
2星評價
娛樂城評價
2024 / 03 / 08
BU娛樂城
BU娛樂城|評價介紹
BU娛樂城在亞太地區的線上娛樂市場擁有豐富的經驗,以強大的研發團隊和優質的客服服務而聞名。 該平台所開發的遊戲經美國TST技術測試機構…
5星評價
娛樂城評價
2024 / 03 / 08
1XBET娛樂城1
1XBET娛樂城|評價介紹
1XBET娛樂城擁有許多各式各樣的遊戲和促銷活動,讓玩家每天都有機會贏得獎勵。 這個平台支持多種付款方式,包括Visa、Masterc…
不推薦
娛樂城評價
2024 / 03 / 07
大老爺娛樂城精選
大老爺娛樂城|評價介紹
大老爺娛樂城之前的活動是你存1000元就送你1000點,但得玩到13倍投注額。 最近他們改成了存3000送1688點,但要玩到11倍投…
3星評價
娛樂城評價
2024 / 03 / 07
AC1娛樂城精選
AC1娛樂城介紹|評價介紹
AC1娛樂城在亞太區的線上娛樂市場上運營多年,擁有一支自研團隊和專業的客服團隊。這家娛樂城努力為玩家提供一個全面、可信賴的網絡遊戲體驗…
3星評價
娛樂城評價
2024 / 03 / 07
大福娛樂城精選
大福娛樂城|評價介紹
大福娛樂城是個網上賭博平台,玩家在這裡是用虛擬的點數來充值,算是一種幣商型的賭場。 這裡沒有直接的提款方式,玩家得自己找幣商換成現金,…
5星評價
娛樂城評價
2024 / 03 / 07
九州娛樂城
九州娛樂城|評價介紹
九州娛樂城,也被稱作LEO娛樂城,致力於打造一個既安全又方便、公平公正的高品質娛樂服務平台。 他們的目標是創造全新的線上娛樂城體驗,普…
5星評價
娛樂城評價
2024 / 03 / 07
LEO娛樂城精選
LEO娛樂城|評價介紹
LEO娛樂城,也被稱為”九州娛樂城“,而他們的品牌宗旨是建立一個既安全又方便的高品質線上娛樂平台。 全力為玩家提供一個公平、正義的遊戲…
1星評價
娛樂城評價
2024 / 03 / 06
金鈦城娛樂城精選
金鈦城娛樂城|評價介紹
金鈦城娛樂城是台灣線上娛樂城(現金版),成立於 2023年,主打高額賠率、多樣遊戲、快速出金等特色。 但多數玩家反映金鈦城娛樂城的客服…
3星評價
娛樂城評價
2024 / 03 / 06
必贏娛樂城精選
必贏娛樂城|評價介紹
必贏娛樂城,定位為針對全球華人市場的高級線上娛樂平台,具有豐富的跨國經營經驗。 這個平台在世界各地都設有辦公室和客服中心,並且擁有多個…
3星評價
娛樂城評價
2024 / 03 / 06
好玩娛樂城
好玩娛樂城|評價介紹
對於正在尋找高品質線上賭場的玩家來說,好玩娛樂城絕對值得一試!這個平台已經吸引了成千上萬的玩家,以提供令人興奮的賭博體驗而著稱。 好玩…
不推薦
娛樂城評價
2024 / 03 / 06
BOK娛樂城精選
BOK娛樂城|評價介紹
目前在BOK娛樂城的網站上找不到登入的選項,當點擊相應連結時,會被重定向到【FM富馬】網站。這情況引起了疑慮,使人懷疑BOK娛樂城可能…
3星評價
娛樂城評價
2024 / 03 / 06
JY娛樂城精選
JC娛樂城|評價介紹
JC娛樂城是九州娛樂集團下的一個品牌。但當用戶試圖註冊JC娛樂城時,他們實際上會被導向到THA娛樂城的介面,這個介面和九州娛樂城的長得…
nhà cái ST666
ST666 – Sân Chơi Nổ Hũ Uy Tín Đổi Thưởng Hàng Đầu
ST666 là một trong những sân chơi nổ hũ đổi thưởng được yêu thích nhất hiện nay. Với các sảnh quay nổi tiếng như JILI Slot, PG Slot, và JDB Slot, nền tảng này không chỉ mang đến trải nghiệm giải trí đỉnh cao mà còn mang lại cơ hội đổi thưởng hấp dẫn cho người chơi.
Lý do nên chọn ST666
1. Khuyến mãi hấp dẫn
ST666 thường xuyên triển khai các chương trình ưu đãi đặc biệt:
Hoàn tiền 1.5% mỗi ngày khi quay slot, gia tăng cơ hội thắng lớn.
Chiết khấu nạp tiền lên đến 25.000.000 VNĐ, hỗ trợ tối đa cho người chơi muốn tăng vốn.
2. Sảnh quay đa dạng
ST666 mang đến hàng loạt tựa game slot từ các sảnh quay danh tiếng:
JILI Slot: Tỷ lệ thắng cao, giao diện đẹp mắt.
PG Slot: Đồ họa ấn tượng, chủ đề phong phú.
JDB Slot: Dành cho những ai yêu thích cảm giác hồi hộp.
3. Nền tảng uy tín, bảo mật cao
ST666 luôn đảm bảo an toàn cho người chơi:
Bảo mật thông tin tuyệt đối nhờ vào công nghệ mã hóa hiện đại.
Nạp/rút tiền nhanh chóng, hỗ trợ giao dịch linh hoạt mà không gián đoạn trải nghiệm.
4. Dịch vụ khách hàng chuyên nghiệp
Đội ngũ hỗ trợ của ST666 làm việc 24/7, luôn sẵn sàng giải đáp mọi thắc mắc và hỗ trợ người chơi trong suốt quá trình tham gia.
Hướng dẫn tham gia ST666
Đăng ký tài khoản: Hoàn tất các bước đăng ký dễ dàng để tham gia nền tảng.
Nhận khuyến mãi: Người chơi mới có thể nhận thưởng nạp đầu 100%.
Lựa chọn trò chơi yêu thích: Từ slot, nổ hũ đến các trò đổi thưởng khác, ST666 đều có sẵn để đáp ứng mọi nhu cầu.
Thông tin về ST666
Địa chỉ: 317 Bình Thành, Bình Hưng Hoà B, Bình Tân, Thành phố Hồ Chí Minh.
ST666 – Điểm Đến Giải Trí Và Đổi Thưởng Hàng Đầu
ST666 không chỉ là một sân chơi slot mà còn là hệ sinh thái giải trí toàn diện với dịch vụ chuyên nghiệp và ưu đãi vượt trội. Tham gia ngay hôm nay để trải nghiệm sự uy tín và cơ hội thắng lớn mà nền tảng này mang lại!
rybelsus: semaglutide – Rybelsus 7mg
Bij ons vind je een ruim assortiment goedkope vloerkleden in meerder vormen.
AmoxilPharm: amoxicillin 500mg capsules – Amoxil Pharm Store
Термоформер Multivac R085 предназначен для упаковки непищевых, пищевых и медицинских продуктов в мягкую и в жёсткую плёнку и вакуумирования купить термоформер от производителя
Блистерная упаковка (контурные ячейки) – вид пластиковой упаковки для фармацевтической продукции. Данный тип упаковки имеет множество преимущество: гигиеничность, компактность, защищенность от подделок и механических повреждений, удобство использования и пр купить смеситель пьяная бочка
Термоформер Multivac R085 предназначен для упаковки непищевых, пищевых и медицинских продуктов в мягкую и в жёсткую плёнку и вакуумирования грануляция порошка
Блистерная упаковка (контурные ячейки) – вид пластиковой упаковки для фармацевтической продукции. Данный тип упаковки имеет множество преимущество: гигиеничность, компактность, защищенность от подделок и механических повреждений, удобство использования и пр полуавтоматические капсуляторы
Mostbet Kirish – вход на лучший игровой портал в Узбекистане | Mostbet shaxsiy kabinet kirish очень удобен для игроков | Mostbet Uz регистрация открывает доступ к бонусам | Mostbet oyinlari baxtingizni sinab ko’rishga imkon beradi | Скачайте Mostbet apk и начните выигрывать уже сегодня most bet. | Mostbet uz casino – это ваш шанс испытать удачу | Mostbet uz online – ваш выбор для ставок на спорт и казино | Mostbet casino официальный сайт предлагает много бонусов | Mostbet apk скачать для Android – это ваш шаг к победам [url=https://mostbetcasinouzkirishgderf.com/]Mostbet 34[/url].
капельница от запоя нижний новгород [url=www.sportandpolitics.ukrbb.net/viewtopic.php?f=24&t=17839]капельница от запоя нижний новгород [/url] .
вывод из запоя в стационаре [url=http://superjackson.ukrbb.net/viewtopic.php?f=28&t=9746]вывод из запоя в стационаре[/url] .
neurontin 100mg: Gabapentin Pharm – neurontin capsules
[url=][/url]
Временная регистрация в СПб: Быстро и Легально!
Ищете, где оформить временную регистрацию в Санкт-Петербурге?
Мы гарантируем быстрое и легальное оформление без очередей и лишних документов.
Ваше спокойствие – наша забота!
Минимум усилий • Максимум удобства • Полная легальность
Свяжитесь с нами прямо сейчас!
Временная регистрация
[url=][/url]
[url=https://gama-casino-apk.ru]https://gama-casino-apk.ru[/url]
Загрузить apk файл казино онлайн Гама – выигрывай сейчас!
https://gama-casino-apk.ru
where can i get clomid prices: clomid without dr prescription – where to get generic clomid without prescription
Bukmacher oraz kasyno internetowe Mostbet PL to jeden z najdłużej działających serwisów hazardowych w sieci z ofertą dla Polaków, gdyż został założony jeszcze w 2009 roku. Platforma może pochwalić się posiadaniem aktywnej licencji od Curacao, która gwarantuje bezpieczeństwo. Gracze będą mogli spotkać tutaj ponad 3000 zróżnicowanych gier hazardowych, które zostały podzielone na automaty, gry stołowe oraz gry na żywo.
Официальное получение диплома техникума с упрощенным обучением в Москве
Компания Ист-Пак приняла участие в выставке Pharmtech & Ingredients 2024 — крупнейшей в России и странах ближнего зарубежья международной выставке оборудования, сырья и технологий для фармацевтического производства набор пуансонов для прессов
Pin up login to the official website. Play online casino Pin Up for real money. Register on the Pin Up Casino website and get bonuses pin up casino
Компания Ист-Пак приняла участие в выставке Pharmtech & Ingredients 2024 — крупнейшей в России и странах ближнего зарубежья международной выставке оборудования, сырья и технологий для фармацевтического производства блистерные машины для таблеток
url lisinopril hctz prescription: zestril 20 mg tab – lisinopril pill 10mg
https://ciprofloxacin.cheap/# ciprofloxacin 500 mg tablet price
how much is lisinopril 40 mg [url=https://lisinoprilus.com/#]lisinopril 15 mg[/url] lisinopril coupon
У нас есть всё для охоты, рыбалки и туризма. От рыболовных снастей и прикормки, одежды и обуви, до лодок и моторов, ножей и ружей, а также туристического рыбалка и охота
Официальная покупка школьного аттестата с упрощенным обучением в Москве
Crazy Time is a popular live game show from Evolution Gaming in real time with live dealer. List of the best casinos to play Crazy Time Live Wheel Crazy Time kg
富遊娛樂城評價:2024年最新評價
推薦指數 : ★★★★★ ( 5.0/5 )
富遊娛樂城作為目前最受歡迎的博弈網站之一,在台灣擁有最高的註冊人數。RG富遊以安全、公正、真實和順暢的品牌保證,贏得了廣大玩家的信賴。
富遊線上賭場不僅提供了豐富多樣的遊戲種類,還有眾多吸引人的優惠活動。在出金速度方面,獲得無數網紅和網友的高度評價,確保玩家能享有無憂的博弈體驗。
推薦要點
新手首選: 富遊娛樂城,2024年評選首選,提供專為新手打造的豐富教學和獨家優惠。
一存雙收: 首存1000元,立獲1000元獎金,僅需1倍流水,新手友好。
免費體驗: 新玩家享免費體驗金,暢遊各式遊戲,開啟無限可能。
優惠多元: 活動豐富,流水要求低,適合各類型玩家。
玩家首選: 遊戲多樣,服務優質,是新手與老手的最佳賭場選擇。
免費試玩
富遊娛樂城詳情資訊
賭場名稱 : RG富遊
創立時間 : 2019年
賭場類型 : 現金版娛樂城
博弈執照 : 馬爾他牌照(MGA)認證、英屬維爾京群島(BVI)認證、菲律賓(PAGCOR)監督競猜牌照
遊戲類型 : 真人百家樂、運彩投注、電子老虎機、彩票遊戲、棋牌遊戲、捕魚機遊戲
存取速度 : 存款5秒 / 提款3-5分
軟體下載 : 支援APP,IOS、安卓(Android)
線上客服 : 需透過官方LINE
富遊娛樂城優缺點
優點 缺點
台灣註冊人數NO.1線上賭場
首儲1000贈1000只需一倍流水
擁有體驗金免費體驗賭場
網紅部落客推薦保證出金線上娛樂城
需透過客服申請體驗金
富遊娛樂城存取款方式
存款方式 取款方式
提供四大超商(全家、7-11、萊爾富、ok超商)
虛擬貨幣ustd存款
銀行轉帳(各大銀行皆可)
網站內申請提款及可匯款至綁定帳戶
現金1:1出金
富遊娛樂城平台系統
真人百家 — RG真人、DG真人、歐博真人、DB真人(原亞博/PM)、SA真人、OG真人、WM真人
體育投注 — SUPER體育、鑫寶體育、熊貓體育(原亞博/PM)
彩票遊戲 — 富遊彩票、WIN 539
電子遊戲 —RG電子、ZG電子、BNG電子、BWIN電子、RSG電子、GR電子(好路)、ATG電子
棋牌遊戲 —ZG棋牌、亞博棋牌、好路棋牌、博亞棋牌、RG棋牌
捕魚遊戲 —ZG捕魚、RSG捕魚、好路GR捕魚、DB捕魚
富遊娛樂城優惠活動
優惠 獎金贈點 流水要求
免費體驗金 $168 1倍 (儲值後) /36倍 (未儲值)
首儲贈點 $1000 1倍流水
返水活動 0.3% – 0.7% 無流水限制
簽到禮金 $666 20倍流水
好友介紹金 $688 1倍流水
回歸禮金 $500 1倍流水
免費試玩
專屬富遊VIP特權
黃金 黃金 鉑金 金鑽 大神
升級流水 300w 600w 1800w 3600w
保級流水 50w 100w 300w 600w
升級紅利 $688 $1080 $3888 $8888
每週紅包 $188 $288 $988 $2388
生日禮金 $688 $1080 $3888 $8888
反水 0.4% 0.5% 0.6% 0.7%
娛樂城常見問題解答(FAQ)
Q1:如何在富遊娛樂城進行首次存款?
A1:可以透過超商、虛擬貨幣或銀行轉帳進行存款,過程簡單快速。( 詳細可查看:富遊娛樂城存款教學)
Q2:富遊娛樂城提款需要多久時間?
A2:提款過程一般在3-5分鐘內完成,保證快速到賬。( 詳細可查看:富遊娛樂城提款教學)
[url=][/url]
Временная регистрация в Санкт-Петербурге: Быстро и Легально!
Ищете, где оформить временную регистрацию в СПб?
Мы гарантируем быстрое и легальное оформление без очередей и лишних документов.
Ваше спокойствие – наша забота!
Минимум усилий • Максимум удобства • Полная легальность
Свяжитесь с нами прямо сейчас!
Временная регистрация в СПб
[url=][/url]
Crazy Time is a popular live game show from Evolution Gaming in real time with live dealer. List of the best casinos to play Crazy Time Live Wheel Crazy Time bet
I used to be able to find good advice from your blog posts.
вывод из запоя на дому нижний [url=http://mymoscow.forum24.ru/?1-1-0-00001723-000-0-0-1730813000]вывод из запоя на дому нижний[/url] .
https://renvills-hotel.ru/rooms/
娛樂城
RG富遊娛樂城:台灣線上娛樂城的最佳選擇
RG富遊娛樂城以其卓越的服務和多樣化的遊戲選擇,成為2024年最受歡迎的線上娛樂平台。受到超過50位網紅和部落客的實測推薦,這座娛樂城不僅提供豐富的遊戲,還帶來眾多優惠活動和誠信保證,贏得了廣大玩家的信任與青睞。
RG富遊娛樂城的獨特優勢
多重優惠活動
體驗金 $168:新手玩家可以免費試玩,無需任何成本即可體驗高品質遊戲。
首儲1000送1000:首次存款即可獲得雙倍金額,增加遊戲的樂趣與機會。
線上簽到轉盤:每日簽到即可參加抽獎,贏取現金獎勵和豐厚禮品。
快速存提款與資金保障
RG富遊採用自主研發的財務系統,確保5秒快速存款,滿足玩家即時遊戲需求。
100%保證出金,杜絕任何拖延或資金安全風險,讓玩家完全放心。
遊戲種類豐富
RG富遊娛樂城涵蓋多種遊戲類型,滿足不同玩家的需求,包括:
真人百家樂:與真人荷官互動,感受真實賭場的刺激氛圍。
電子老虎機:超過數百款創新遊戲,玩法新穎,回報豐厚。
電子捕魚:趣味性強,結合策略與娛樂,深受玩家喜愛。
電子棋牌:提供公平競技環境,適合策略型玩家。
體育投注:涵蓋全球賽事,賠率即時更新,為體育愛好者提供最佳選擇。
樂透彩票:參與多地彩票,挑戰巨額獎金。
跨平台兼容性
RG富遊支持Web端、H5、iOS和Android設備,玩家可隨時隨地登錄遊戲,享受無縫體驗。
與其他娛樂城的不同之處
RG富遊以現金版模式運營,確保交易透明和安全性。相比一般娛樂城,RG富遊在存提款速度上遙遙領先,玩家可在短短15秒內完成交易,並且100%保證資金提領。而在線客服全年無休,隨時提供支持,讓玩家在任何時間都能解決問題。
相比之下,一般娛樂城多以信用版模式運營,存在出金風險,且存提款速度較慢,客服服務不穩定,無法與RG富遊的專業性相比。
為什麼選擇RG富遊娛樂城
資金交易安全無憂:採用最先進的SSL加密技術,確保每筆交易的安全性。
遊戲種類全面豐富:每日更新多樣化遊戲,帶來新鮮感和無限可能。
優惠活動力度大:從體驗金到豐厚的首儲獎勵,玩家每一步都能享受優惠。
快速存提款服務:自主研發技術保障流暢交易,遊戲不中斷。
全天候專業客服:24/7在線支持,及時解決玩家需求。
立即加入RG富遊娛樂城
RG富遊娛樂城不僅提供豐富的遊戲體驗,更以專業的服務、完善的安全保障和多樣的優惠活動,為玩家打造一個值得信賴的娛樂環境。立即註冊,體驗台灣最受歡迎的線上娛樂城!
LEO娛樂城無法登入? 九州娛樂倒了? 富遊推出無痛轉移VIP優惠
LEO娛樂城無法登入免驚!推薦RG富遊更穩定、玩的更安心!
只要是玩過線上娛樂城的玩家,一定都對Leo娛樂城不陌生,近期Leo娛樂城無法登入的狀況越來越頻繁,是因為九州娛樂城與旗下品牌將在 2024/12/31 結束營業!
由於九州娛樂城旗下擁有leo娛樂城、THA娛樂城等品牌,這波風暴也讓許多玩家人心惶惶,擔心自己的遊戲權益受損,在文章的最後我們也提供了解決方案,趕快往下看!
九州娛樂城倒閉 ? 退出台灣娛樂市場?為何 ?
最近許多玩家發現 leo娛樂城無法登入,甚至傳出九州娛樂城要退出台灣的消息!雖然官方尚未發布正式聲明,但多方消息指出,九州娛樂城 (包含THA娛樂城、leo娛樂城) 正在逐步退出台灣市場。這可能是多重因素共同作用的結果:
退出台灣市場,尋求其他發展空間
九州娛樂認為台灣市場太小,品牌之間又過於競爭,市場規模有限,九州旗下其KU體育甚至贊助過足球五大聯賽,展現雄厚實力,促使九州娛樂城將目光投向海外。
畢竟,海外市場人口基數更大,獲利潛力也更為可觀。LEO娛樂城在台灣一個月就能獲利一億,進軍海外後的收益想必更加驚人。
金流問題、警界醜聞成導火線
LEO娛樂城高度仰賴金流公司運作,近期爆發的陳政谷案件揭露其旗下公司利用第三方支付協助母公司九州洗錢。
案情更指向警界內鬼,前台中刑大隊長林明佐涉嫌收賄超過4451萬元,為九州通風報信。 九州娛樂城曾出現凌晨時段無法儲值的狀況,很可能與警方查緝行動有關。
九州娛樂的新聞事件頻傳
LEO是九州集團底下的,陳政谷被抓之後,事情鬧得很大,為了避風頭,乾脆退出台灣也很合理。
這個說法也被推算也被網友認為有高度可能,不過也有人傳說其他幹部有接手的可能,至少沒辦法完全的說死九州會採取什麼行動。
leo娛樂城無法登入的問題,或許只是冰山一角,背後可能隱藏著更深層的原因。無論如何,九州娛樂城退出台灣市場,對玩家來說都是一個警訊。
九州娛樂城宣布12/31結束營業!玩家請停止儲值、立刻提款
九州娛樂城官方宣佈,近期旗下 THA、Leo 娛樂城無法登入,是因為九州集團將正式在 2024/12/31 中午 12:00 結束營業,退出台灣市場。
在這邊提醒玩家們立即停止存款動作,並且馬上將帳戶內的資金提領出來,避免您的權益受到損害!
LEO娛樂城無法登入? 九州娛樂倒了? 富遊推出無痛轉移VIP優惠
九州娛樂城宣布在12/31結束營業
告別Leo娛樂城無法登入煩惱!玩家無痛轉移至富遊,享更多優惠!
面對leo娛樂城無法登入的窘境,以及九州娛樂城的不確定性,玩家們需要一個安全可靠的新選擇!富遊娛樂城是您最佳的選擇,我們提供:
穩定安全保證出金: 穩定安全,保證出金! 擁有合法牌照和完善的監管機制,保障您的資金安全。
豐富多元的遊戲: 提供各式各樣的熱門遊戲,包括真人 casino、體育博彩、電子遊戲、彩票等等,滿足玩家的不同需求。
優渥的優惠活動: 新會員享有豐厚首存紅利,還有不定期的優惠活動和返水獎勵,讓您玩得更盡興!
24小時專業客服: 隨時為您解答問題,提供貼心服務。
立即註冊
特別優惠: 針對THA和LEO會員,富遊娛樂城推出獨家福利!
只要您是THA或LEO的會員,即可在富遊娛樂城直接升等到相對應的等級,並享有更高的反水、每週紅包和生日禮金!
立即加入富遊娛樂城,享受更優渥的回饋和更安心的保障!
以下是不同階級 VIP 的轉換福利與說明:
福利項目 / VIP階級 大神 金鑽 鉑金 黃金
每週紅包 2388 988 288 188
生日禮金 8888 3888 1080 688
返水 0.7 0.6 0.5 0.4
無論個人或團體,如有任何濫用本公司優惠的行為,本公司有權取消及收回獎金。
所有活動優惠都是特別為玩家而設立,在玩家註冊資訊有爭議時,為確保雙方利益,杜絕身份盜用行為,本公司有權要求玩家提供充足資訊,並以各種方式辨別玩家是否符合資格享有活動優惠。
本公司在會員有重複申請帳號行為時,有權取消及收回獎金。每位玩家、每一住址、每一電子郵箱、每一電話號碼、相同支付卡/信用卡號碼及共享電腦環境(例如網咖、其他公用網絡、公用電腦)只能擁有一個活動優惠資格。
每週限時紅包:會員在上週有過至少1次的存款記錄,每週一中午自動發放(1倍流水即可託售),限時48小時內領取! 每週至少存款要求:黃金富遊 1,000 點,鉑金富遊 1,500點,金鑽富遊 2,500點,大神富遊 5,000點 (存款計算週期:每週一 12:00 至下週一 11:59)
生日禮金:會員在註冊三個月內過生日,今年將不能領取生日禮金。另註冊時間大於三個月的會員需在生日當月找遊戲客服領取,每年可領取一次,需提供身分證明文件核實(1倍流水即可託售)
活動如有任何異動,本公司有權在任何時間修改、暫停或取消優惠活動,無需特別通知並保留本活動最終解釋權。
轉換平台申請辦法:提供螢幕錄影原平台層級介面到戶名、手機等資訊,傳送給富遊客服進行審核。
富遊娛樂城,值得您信賴的線上娛樂平台!
我們深知玩家選擇娛樂城的首要考量是安全和信譽。富遊娛樂城以誠信為本,致力於為玩家打造一個公平、公正、透明的遊戲環境。告別leo娛樂城無法登入的煩惱,立即加入富有娛樂城,體驗最優質的線上娛樂體驗!
Bukmacher oraz kasyno internetowe Mostbet PL to jeden z najdłużej działających serwisów hazardowych w sieci z ofertą dla Polaków, gdyż został założony jeszcze w 2009 roku. Platforma może pochwalić się posiadaniem aktywnej licencji od Curacao, która gwarantuje bezpieczeństwo. Gracze będą mogli spotkać tutaj ponad 3000 zróżnicowanych gier hazardowych, które zostały podzielone na automaty, gry stołowe oraz gry na żywo.
Leo娛樂城無法登入?全面解析與解決指南
近期,Leo娛樂城的玩家紛紛反映登入失敗的情況,引發了廣泛的討論與擔憂。作為九州娛樂城旗下知名品牌之一,Leo娛樂城在台灣的娛樂市場中擁有大量用戶。然而,隨著九州娛樂城宣布將於2024年12月31日退出台灣市場,這一消息無疑讓玩家對資金安全與遊戲體驗產生了極大疑慮。
本文將深入探討Leo娛樂城無法登入的原因,提供解決方案,並推薦可靠的替代娛樂平台。
Leo娛樂城無法登入的三大原因
1. 帳號密碼問題
可能情況:最常見的原因是玩家輸入了錯誤的帳號或密碼,或者帳號被盜用。
解決方法:確認輸入的帳密正確,若仍無法登入,聯繫客服即可解決。
2. 網頁技術問題
可能情況:官網可能因伺服器維護或技術故障出現404錯誤,導致玩家無法登入。
解決方法:耐心等待官網修復,並清除瀏覽器快取和Cookie,或嘗試使用其他瀏覽器。
3. 九州娛樂城退出台灣市場
可能情況:隨著九州娛樂城宣布退出台灣市場,Leo娛樂城的營運也逐步停止,導致玩家無法再使用該平台。
影響:玩家可能面臨資金提取困難,需及時完成出金操作以保障自身利益。
娛樂城無法登入的緊急解決方案
核對帳號與密碼:確認輸入正確無誤,避免由於簡單疏忽造成的登入失敗。
檢查網路連線:確保網路穩定,必要時切換至更穩定的網路環境。
清除瀏覽器快取與Cookie:解決瀏覽器相關問題,恢復正常登入。
嘗試其他瀏覽器或設備:更換設備或使用不同瀏覽器,查看是否可以正常登入。
九州娛樂城退出台灣市場的原因
市場利潤有限:九州娛樂城認為台灣市場的競爭激烈且利潤有限,因此選擇退出並專注於其他海外市場。
資金生態鏈斷裂:現金交易平台出現問題,導致九州娛樂城難以維持正常運營。
母公司法律爭議:九州娛樂城母公司近年來因財務與法律問題受到高度關注,進一步影響旗下品牌的營運。
Leo娛樂城會員如何安全出金?
在九州娛樂城停止營運前,玩家需要立即完成出金操作以確保資金安全。
出金建議:
儘快登入官網提交提款申請,確保資金安全轉出。
若官網無法訪問,請嘗試聯繫客服,並保留交易證明以備進一步處理。
推薦替代平台:富遊娛樂城
隨著Leo娛樂城的退出,玩家可以考慮轉至穩定且值得信賴的替代平台,如富遊娛樂城。
富遊娛樂城的優勢
穩定可靠:擁有先進的技術和完善的資金保障機制,確保玩家的資金安全。
豐富的遊戲選擇:從電子遊戲到真人娛樂,滿足各類玩家的需求。
專屬優惠:特別為Leo會員推出等級升等計畫,並提供多樣化的專屬活動。
快速出金:高效的財務系統,讓玩家的存取款過程快速無憂。
Leo會員轉移至富遊的流程
登錄富遊官網完成註冊。
提供Leo娛樂城會員等級截圖與相關資料(如戶名、手機號碼)給富遊客服進行審核。
等待客服確認後,享受富遊娛樂城專屬的會員福利與優惠。
結語:立即加入富遊娛樂城,延續遊戲體驗!
Leo娛樂城的退出讓許多玩家感到困惑與擔憂,但選擇穩定、安全的娛樂平台是最明智的應對之道。富遊娛樂城憑藉其卓越的技術、專業的服務以及豐富的優惠,成為玩家的理想替代選擇。現在就註冊富遊娛樂城,享受無與倫比的遊戲體驗吧!
https://hoteltukan.ru/nomera-i-tseny/
LEO娛樂城
LEO娛樂城:九州娛樂集團的卓越創舉與運營優勢
九州娛樂集團總部的現代化運營
九州娛樂集團的總部設於菲律賓首都馬尼拉市中心最具代表性的現代化建築「RCBC Plaza」。這座辦公大樓融合了全球領先的建築科技與安全系統,包括:
國家級資訊防護系統,確保數據安全。
樓宇自動化系統 (BAS),實現數位化管理與高效運營,包括防火系統、光纖電訊和數位監控。
九州娛樂為員工提供舒適的工作環境和專業的教育培訓,確保服務水準一流。其員工以專業知識和親切態度,為尊貴玩家帶來極致的遊戲體驗。
LEO娛樂旗下品牌與遊戲特色
九州娛樂城旗下分支包括 LEO、THA 和 KU 三個娛樂品牌。雖然品牌各自獨立運營,但都共享相同的遊戲系統與界面,提供超過數千款來自全球頂級供應商的遊戲。
這些品牌的核心特色包括:
種類繁多的遊戲:滿足不同類型玩家的需求,包括電子遊戲、體育博彩、真人娛樂等。
不斷更新的內容:通過九州獨家技術,網站內容保持新鮮,合作商可快速更新遊戲資源,確保平台競爭力。
玩家在這些平台上可以隨時找到適合自己的遊戲,享受沉浸式的娛樂體驗。
LEO娛樂城的歷史與發展
九州娛樂集團的起源可以追溯至其最早期的經營模式:「信用版」賭博平台 《天下體育球版》。儘管該模式在當時非常流行,但因高風險與財務處理複雜而逐漸被淘汰。
隨著市場需求的變化,九州娛樂轉型為現金版平台 《天下現金網》,引入了更安全、便捷的遊戲模式。這種轉變不僅提升了玩家的體驗,也使平台得以進一步發展。
如今,九州娛樂城已成為台灣博弈業界的領軍者,不僅優化了網站版面與功能,還推出了專屬手機APP,方便玩家隨時隨地進行遊戲體驗。
LEO娛樂的成功秘訣
現代化運營與技術支持:九州娛樂在系統安全與技術更新方面投入巨大資源,確保平台運營穩定可靠。
多元化遊戲體驗:通過與全球頂級遊戲供應商合作,平台提供了豐富的遊戲選擇,適應各種玩家需求。
用戶至上:專業培訓的員工以細心和熱忱態度,提供高品質服務,讓玩家倍感尊重。
不斷創新:從信用版到現金版,再到手機APP,九州娛樂始終緊跟市場趨勢,致力於打造最佳娛樂體驗。
結語
LEO娛樂城作為九州娛樂集團旗下的重要品牌,不僅繼承了集團的核心價值,更在遊戲選擇、服務品質和技術創新方面不斷提升。從最初的《天下體育球版》到如今的行業領先者,LEO娛樂見證了九州娛樂城的發展歷程,也成為博弈行業中的耀眼明星。
加入 LEO娛樂城,感受來自九州娛樂集團的專業與熱情,享受最頂級的線上博弈體驗!
九州娛樂城登入
Leo娛樂城無法登入?全面解析與解決指南
近期,Leo娛樂城的玩家紛紛反映登入失敗的情況,引發了廣泛的討論與擔憂。作為九州娛樂城旗下知名品牌之一,Leo娛樂城在台灣的娛樂市場中擁有大量用戶。然而,隨著九州娛樂城宣布將於2024年12月31日退出台灣市場,這一消息無疑讓玩家對資金安全與遊戲體驗產生了極大疑慮。
本文將深入探討Leo娛樂城無法登入的原因,提供解決方案,並推薦可靠的替代娛樂平台。
Leo娛樂城無法登入的三大原因
1. 帳號密碼問題
可能情況:最常見的原因是玩家輸入了錯誤的帳號或密碼,或者帳號被盜用。
解決方法:確認輸入的帳密正確,若仍無法登入,聯繫客服即可解決。
2. 網頁技術問題
可能情況:官網可能因伺服器維護或技術故障出現404錯誤,導致玩家無法登入。
解決方法:耐心等待官網修復,並清除瀏覽器快取和Cookie,或嘗試使用其他瀏覽器。
3. 九州娛樂城退出台灣市場
可能情況:隨著九州娛樂城宣布退出台灣市場,Leo娛樂城的營運也逐步停止,導致玩家無法再使用該平台。
影響:玩家可能面臨資金提取困難,需及時完成出金操作以保障自身利益。
娛樂城無法登入的緊急解決方案
核對帳號與密碼:確認輸入正確無誤,避免由於簡單疏忽造成的登入失敗。
檢查網路連線:確保網路穩定,必要時切換至更穩定的網路環境。
清除瀏覽器快取與Cookie:解決瀏覽器相關問題,恢復正常登入。
嘗試其他瀏覽器或設備:更換設備或使用不同瀏覽器,查看是否可以正常登入。
九州娛樂城退出台灣市場的原因
市場利潤有限:九州娛樂城認為台灣市場的競爭激烈且利潤有限,因此選擇退出並專注於其他海外市場。
資金生態鏈斷裂:現金交易平台出現問題,導致九州娛樂城難以維持正常運營。
母公司法律爭議:九州娛樂城母公司近年來因財務與法律問題受到高度關注,進一步影響旗下品牌的營運。
Leo娛樂城會員如何安全出金?
在九州娛樂城停止營運前,玩家需要立即完成出金操作以確保資金安全。
出金建議:
儘快登入官網提交提款申請,確保資金安全轉出。
若官網無法訪問,請嘗試聯繫客服,並保留交易證明以備進一步處理。
推薦替代平台:富遊娛樂城
隨著Leo娛樂城的退出,玩家可以考慮轉至穩定且值得信賴的替代平台,如富遊娛樂城。
富遊娛樂城的優勢
穩定可靠:擁有先進的技術和完善的資金保障機制,確保玩家的資金安全。
豐富的遊戲選擇:從電子遊戲到真人娛樂,滿足各類玩家的需求。
專屬優惠:特別為Leo會員推出等級升等計畫,並提供多樣化的專屬活動。
快速出金:高效的財務系統,讓玩家的存取款過程快速無憂。
Leo會員轉移至富遊的流程
登錄富遊官網完成註冊。
提供Leo娛樂城會員等級截圖與相關資料(如戶名、手機號碼)給富遊客服進行審核。
等待客服確認後,享受富遊娛樂城專屬的會員福利與優惠。
結語:立即加入富遊娛樂城,延續遊戲體驗!
Leo娛樂城的退出讓許多玩家感到困惑與擔憂,但選擇穩定、安全的娛樂平台是最明智的應對之道。富遊娛樂城憑藉其卓越的技術、專業的服務以及豐富的優惠,成為玩家的理想替代選擇。現在就註冊富遊娛樂城,享受無與倫比的遊戲體驗吧!
antibiotics cipro: ciprofloxacin generic – ciprofloxacin 500mg buy online
В зависимости от размера, толщины листового металла, из которого изготовлены трубы, меняется степень выдерживаемой нагрузки. Больше информации о каждом виде изделия, включая технические характеристики, вы получите, перейдя в карточку товара купить прокат стальной
Труба профильная, выполненная таким методом, также отличается повышенной пластичностью. Поэтому она подходит для изготовления различных заготовок, применяемых в каркасном строительстве и мебельном производстве металл купить цены
想要享受最刺激的線上娛樂體驗?選擇RG富遊娛樂城!
在這個數位時代,尋找適合自己的線上娛樂城變得越來越重要。如果你想在線上娛樂城找到最好玩、最受歡迎的遊戲,RG富遊絕對是你的首選!我們匯聚了多款博弈遊戲,讓您盡情享受娛樂的刺激與快感。
#### 精選遊戲類型
1. 真人百家樂
感受現場賭場的氛圍!RG富遊的真人視訊百家樂讓你與真實的荷官互動,享受高品質的遊戲體驗。無論你是老手還是新手,都能在這裡找到適合自己的節奏。
2. 電子老虎機
喜愛刺激嗎?我們提供多款熱門老虎機遊戲,如「戰神賽特」「魔龍傳奇」等,每一款都擁有精美的畫面和豐厚的獎勵,讓每次旋轉都充滿期待!
3. 體育投注
無論你是球迷還是賽事愛好者,RG富遊的體育投注平台都有你想要的。精準的賠率、廣泛的賽事選擇,讓你體驗到投注的樂趣和刺激。
4. 彩票遊戲與捕魚遊戲
隨著運氣來!不妨試試我們的棋牌遊戲和彩票遊戲,這裡有各種機會讓你體驗到不一樣的勝利快感。
#### 下載富遊APP,隨時隨地享受遊戲!
富遊娛樂城的APP支持iOS和Android設備,界面簡潔易用,內容豐富。無論你身處何地,都能輕鬆進入遊戲世界,隨心所欲享受娛樂時光。此外,我們提供即時客服支援,隨時解決你的疑問,讓你的遊戲體驗更為完美。
#### 為什麼選擇RG富遊?
– 安全可靠
RG富遊致力於為玩家提供安全可靠的遊戲環境,您的每一筆交易都受到最高的安全保障。
– 快速便捷的存提款服務
我們的存款平均時間僅需30秒,提款平均只需60秒,讓你體驗即時的快感!
– 豐富多元的遊戲選擇
超過9999款遊戲任你選擇,無論你偏好哪種娛樂方式,這裡都能滿足你的需求。
– 全天候服務
我們全年365天提供不停歇的客服支持,確保你在遊戲過程中享受到最好的服務。
### 結論
RG富遊娛樂城是您最佳的線上賭場選擇。我們不僅提供多樣化的遊戲選擇,還有安全可靠的遊戲環境和便捷的服務。立即下載APP,加入RG富遊,開始您的娛樂之旅,享受無與倫比的遊戲體驗吧!
В зависимости от размера, толщины листового металла, из которого изготовлены трубы, меняется степень выдерживаемой нагрузки. Больше информации о каждом виде изделия, включая технические характеристики, вы получите, перейдя в карточку товара стальной прокат купить
Труба профильная, выполненная таким методом, также отличается повышенной пластичностью. Поэтому она подходит для изготовления различных заготовок, применяемых в каркасном строительстве и мебельном производстве москва металлопрокат
滿天星娛樂城:全方位的線上娛樂體驗
滿天星娛樂城作為九州娛樂城旗下品牌之一,是玩家心目中備受信賴的線上娛樂平台。不僅提供豐富的遊戲選擇和吸引人的優惠,還以其合法營運的背景和快速出金的保證,成為台灣玩家的首選娛樂城之一。
滿天星娛樂城的特色與優勢
1. 合法營運,安全可靠
滿天星娛樂城持有三大國際娛樂執照,包括:
菲律賓 PAGCOR 監督競猜牌照
BVI 認證
馬爾他 MGA 認證
這些執照展現了平台的資本實力與合法性,讓玩家能夠安心享受遊戲,完全不用擔心出金問題。
2. 高品質遊戲與豐富優惠
滿天星娛樂城與九州集團旗下的LEO、THA娛樂城一樣,提供一流的遊戲品質和多樣化的優惠。
熱門遊戲推薦:電子老虎機、真人直播、運彩投注、今彩539等,滿足各類玩家需求。
優惠活動:定期推出限時回饋活動,讓玩家在遊戲中獲得更多額外收益。
3. 快速出金與高效服務
滿天星娛樂城採用先進的財務系統,確保存提款快速、安全,讓玩家能夠專注於享受遊戲,而無需擔心資金問題。專業的客服團隊24小時在線,提供即時支援。
4. 多平台兼容的APP
滿天星娛樂城提供設計貼合玩家需求的手機APP,適用於iOS與Android系統。玩家可以隨時隨地快速登入遊玩,體驗無與倫比的娛樂快感。
熱門遊戲類型一覽
滿天星娛樂城為玩家提供多樣化的遊戲選擇,滿足不同興趣和需求:
真人直播:感受真實賭場氛圍,與真人荷官互動,體驗沉浸式娛樂。
電子老虎機:多款經典與創新機台,讓玩家享受刺激的遊戲過程。
運彩投注:涵蓋世界盃、棒球、籃球等多項運動賽事,提供即時投注與直播功能。
彩票遊戲:包括今彩539、富遊彩票等,適合熱衷於彩券的玩家。
滿天星娛樂城常見問題解答
Q1. 滿天星娛樂城是否提供APP下載?
是的,滿天星娛樂城提供專屬的手機APP,支援iOS和Android系統。玩家可透過APP快速登入,隨時享受遊戲。
Q2. 滿天星娛樂城是否合法?
滿天星娛樂城擁有多項國際認證,為合法經營的線上娛樂城,並保證玩家資金的安全性與遊戲的公平性。
Q3. 無法登入滿天星娛樂城該怎麼辦?
如遇到無法登入的情況,建議玩家檢查網路狀況或聯繫24小時客服團隊獲取即時協助。
立即加入滿天星娛樂城,享受最佳娛樂體驗!
滿天星娛樂城以合法、安全、快速的服務,搭配豐富的遊戲選擇和優惠,為玩家打造出獨一無二的線上娛樂體驗。不論您是新手還是老手,都能在滿天星找到屬於自己的遊戲樂趣。現在就下載APP,隨時隨地開始您的娛樂之旅!
Zanurz się w świecie ekscytującej rozrywki w kasynie Slottica! Oferujemy szeroki wybór gier kasynowych online, w których możesz grać używając polskich złotych (PLN).
Пользователи Mostbet Uz отмечают высокий уровень сервиса | Mostbet oyinlari har xil bonuslarga ega | Mostbet uz com – ваш надежный портал для ставок | Mostbet официальный сайт – это прозрачность и удобство | Mostbet shaxsiy kabinet kirish orqali foydalanuvchilar uchun qulay https://mostbetcasinouzkirishgderf.com. | Mostbet uz kirish – это быстрый доступ к ставкам и играм | Mostbet uz online – ваш выбор для ставок на спорт и казино | Mostbet uz kirish portalida faqat eng yaxshi xizmatlar | Mostbet oyinlari sizning omadli kuningizni kutmoqda [url=https://mostbetcasinouzkirishgderf.com/]Mostbet Uz[/url].
Vavada Casino to miejsce, gdzie emocje gry są zawsze na wyciągnięcie ręki. Oferujemy bogaty wybór najlepszych automatów do gier, klasycznych gier stołowych, takich jak poker, blackjack czy bakarat, a także wciągającą ruletkę na żywo z udziałem profesjonalnych krupierów. Nasza platforma jest w pełni licencjonowana i zgodna z obowiązującymi przepisami prawa, co zapewnia bezpieczne i legalne środowisko rozgrywki dla wszystkich graczy.
娛樂城
富遊娛樂城:台灣線上賭場的創新選擇
在台灣的線上娛樂市場中,富遊娛樂城憑藉其優質的服務和多樣化的娛樂選項,迅速成為新一代玩家的首選。既有刺激的遊戲體驗,又提供了一系列具有吸引力的優惠,富遊娛樂城無疑是追求樂趣的玩家們理想的地方。
#### 優勢與特色
1. 多樣化的遊戲選擇
富遊娛樂城提供了豐富的遊戲種類,包括電子老虎機、真人百家樂、運彩投注等。不論你是老虎機的愛好者,還是熱衷於真人賭桌的玩家,這裡都能滿足你的需求。特別推薦的遊戲如DG真人百家和RSG皇家百家樂,一定能帶給你極致的遊戲體驗。
2. 吸引人的優惠活動
富遊娛樂城針對新手和老玩家都推出了多樣的優惠活動。新會員首次存款可獲得相同金額的獎金,還有額外的體驗金送出,設計友好且實惠。此外,富遊每週的簽到獎勵和天天無上限的返水活動,更是讓玩家在遊戲中能持續獲得收益。
3. 安全可靠的存取款方式
在金融交易方面,富遊娛樂城支持多種存款和提款方式,包括各大銀行轉帳、超商儲值,甚至虛擬貨幣等。最低提款金額設置靈活,保證玩家資金的安全與便捷。
4. 人性化的操作介面
富遊娛樂城的網頁與移動應用設計簡潔易用,玩家可以方便地找到所需的遊戲和優惠。無論是在電腦還是手機上,都能順利享受到遊戲的樂趣。
#### 如何開始遊戲
如果你是新手玩家,開始你的富遊體驗非常簡單。只需註冊帳號,完成首次存款,即可獲得新手優惠。無論你想嘗試電子遊戲還是真人賭局,富遊娛樂城都能讓你輕鬆上手,享受娛樂的樂趣。
#### 社會責任與防沉迷措施
富遊娛樂城深知線上賭博的風險,因此致力於推廣負責任的遊戲文化。他們提供“防沉迷”指導,以確保玩家能夠理性投注,並提供必要的幫助和資源來幫助有需求的玩家。
#### 總結
對於尋求安全、便捷和多元化娛樂城體驗的玩家,富遊娛樂城絕對是值得選擇的選項。無論你是希望徹底放鬆,還是想要體驗刺激的博弈過程,富遊娛樂城都能滿足你的期待,成為你在台灣線上娛樂市場的最佳夥伴。立即註冊並開始你的遊戲之旅吧!
LEO娛樂城無法登入
LEO娛樂城無法登入!九州娛樂宣布退出台灣市場
近期,LEO娛樂城和THA娛樂城的玩家發現頻繁出現無法登入的情況,引發了廣泛討論。九州娛樂城官方也正式宣布,將於2024年12月31日中午12:00停止在台灣的營運,並結束所有相關服務。這一消息對於忠實玩家來說無疑是一大震撼,為什麼九州娛樂城會退出台灣市場?玩家該如何應對?本文將為您逐一解析。
LEO娛樂城無法登入的原因
1. 帳號與密碼問題
最常見的情況是玩家輸入的帳號或密碼有誤,或者帳號遭到盜用。
解決方案:聯繫LEO娛樂城的客服,提供必要的驗證信息,即可快速恢復帳戶。
2. 網站技術故障
LEO娛樂城可能因官網維護或伺服器異常導致無法正常運作。
解決方案:耐心等待技術問題修復,通常不會影響長時間使用。
3. 九州娛樂退出台灣市場
LEO娛樂城隸屬於九州娛樂集團,近期官方公告將於2024年12月31日結束營運,退出台灣市場。這是導致登入失敗的最終原因,玩家將無法再使用該平台的服務。
九州娛樂城退出台灣市場的原因分析
1. 市場規模限制
九州娛樂認為台灣市場過於狹小,品牌競爭激烈,成長空間有限。相比之下,海外市場不僅擁有更大的人口基數,也提供更高的獲利潛力。九州旗下的KU體育曾在國際足球五大聯賽中曝光,這顯示其具備強大的國際競爭力,轉向海外市場發展成為合理選擇。
2. 金流問題與法規壓力
LEO娛樂城的運營高度依賴第三方金流公司,而近期陳政谷案件的爆發使整個金流生態鏈受到嚴重打擊。警方揭露,九州娛樂集團利用第三方支付進行資金洗錢,甚至牽涉到內部人員洩密,對整個集團的形象和運營造成巨大衝擊。
3. 品牌聲譽受損
隨著案件的曝光,九州娛樂集團的聲譽遭到前所未有的挑戰。為了平息風波,九州選擇退出台灣市場,以避免進一步的法律與政策風險。
九州娛樂城停止營運的公告
根據LEO娛樂城官方的公告,九州娛樂城將於2024年12月31日中午12:00全面停止台灣市場的營運:
停止存款功能:玩家將無法再進行任何存款操作。
正常開放提款:官方承諾保證提款功能正常運作,會員可安心提取資金。
感謝支持:九州娛樂對於玩家多年來的支持表示衷心感謝,並祝福所有會員未來一切順利。
玩家應對策略:如何保護自身利益?
1. 儘速完成提款
如您的帳戶仍可正常登入,建議立即提交提款申請,確保資金安全轉出。
2. 提高警覺,避免詐騙
隨著九州娛樂退出,市場可能會出現冒充LEO娛樂城或THA娛樂城的假冒平台,玩家需保持高度警覺。
3. 選擇可靠的替代平台
對於希望延續遊戲體驗的玩家,可以考慮轉向信譽良好的國際娛樂平台,例如Bet365台灣,該平台提供穩定的服務和多樣化的遊戲選擇,是九州娛樂的理想替代方案。
結語:九州娛樂的結束,玩家的新起點
九州娛樂城的退出標誌著一個時代的結束,但對於玩家而言,也是一個選擇新平台的契機。未來,選擇安全、穩定且合法的娛樂平台將成為玩家的首要考量。無論如何,希望所有玩家都能在新的平台中繼續享受遊戲的樂趣,保障自身利益不受損失!
zithromax 250 mg pill: zithromax 500 mg for sale – zithromax 250 mg australia
W Slottica Casino wiemy, jak ważna jest swoboda i wygoda podczas gry. Dlatego zapewniamy Ci możliwość korzystania z naszej platformy, gdziekolwiek jesteś i kiedykolwiek masz na to ochotę. Nasza strona internetowa została w pełni zoptymalizowana pod kątem urządzeń mobilnych, dzięki czemu możesz grać na smartfonach i tabletach bez żadnych ograniczeń.
Just desire to say your article is as amazing.
The clarity in your post is just excellent and i could assume
you’re an expert on this subject. Well with your permission allow me to grab your RSS feed to keep updated with forthcoming post.
Thanks a million and please keep up the enjoyable
work.
You are my inhalation , I possess few web logs and very sporadically run out from to brand 🙁
This is valuable stuff.In my opinion, if all website owners and bloggers developed their content they way you have, the internet will be a lot more useful than ever before.
These kind of posts are always inspiring and I prefer to read quality content so I happy to find many good point here in the post. writing is simply wonderful! thank you for the post
Thank you pertaining to sharing the following great subject matter on your website. I ran into it on google. I am going to check to come back after you publish additional aricles.
Juste pour clarifier, la plupart des jeux peuvent être joués pour le plaisir.
Здесь есть статьи о любимых блюдах, кулинарные новости, кухонные лайфхаки и инструкции от лучших шеф-поваров еда
where can i get clomid: can i order generic clomid no prescription – where to buy generic clomid without a prescription
Здесь есть статьи о любимых блюдах, кулинарные новости, кухонные лайфхаки и инструкции от лучших шеф-поваров новости кулинарии
капельница от запоя нижний новгород [url=http://www.business.0pk.me/viewtopic.php?id=37957]капельница от запоя нижний новгород [/url] .
врач на дом капельница от запоя [url=https://www.aktivnoe.forum24.ru/?1-7-0-00012847-000-0-0-1730814083]врач на дом капельница от запоя[/url] .
В каждой игре существуют предметы, которые считаются особенно ценными и редкими. Эти артефакты зачастую становятся основным объектом стремлений игроков, так как могут существенно повлиять на их успех в игровом процессе. Их получение требует значительных усилий, времени или даже удачи, а их использование открывает новые возможности для развития персонажа http://www.joyousreading.com/index.php?title=%20%D0%A3%D1%81%D0%BF%D0%B5%D1%88%D0%BD%D1%8B%D0%B5%20%D0%BA%D0%B5%D0%B9%D1%81%D1%8B%20%D0%BA%D0%BE%D0%BC%D0%BF%D0%B0%D0%BD%D0%B8%D0%B8%20%D0%A2%D1%80%D0%B8%D0%B0%D0%BD%D0%B3%D0%BB
Закончил универ и начал искать работу: сложности начались уже на этапе создания резюме. Денег на профессиональную консультацию HR на хедхантере было откровенно жалко, поэтому искал другие способы подготовки хорошего CV. Суммировал весь свой опыт и сделал неожиданные для себя выводы Shablonium успешные резюме
В каждой игре существуют предметы, которые считаются особенно ценными и редкими. Эти артефакты зачастую становятся основным объектом стремлений игроков, так как могут существенно повлиять на их успех в игровом процессе. Их получение требует значительных усилий, времени или даже удачи, а их использование открывает новые возможности для развития персонажа http://vmestekdob.ru/index.php/component/kunena/suggestion-box/9488-rezina-kama-opyt-vladeltsev-i-otzyvy
Закончил универ и начал искать работу: сложности начались уже на этапе создания резюме. Денег на профессиональную консультацию HR на хедхантере было откровенно жалко, поэтому искал другие способы подготовки хорошего CV. Суммировал весь свой опыт и сделал неожиданные для себя выводы Shablonium идеи резюме
buy indinavir pills for sale – buy confido without a prescription order emulgel cheap
九州娛樂城退出台灣市場:LEO娛樂城無法登入的背後真相
LEO娛樂城,作為台灣線上娛樂城市場的重要品牌,長期以來在廣告投放和代理推廣方面占據領先地位。然而,近期出現的「LEO娛樂城無法登入」現象引發了廣泛的網路討論。不少玩家質疑:「九州娛樂城是不是倒了?」「這是不是詐騙?」事實上,這些猜測與謠言並不完全準確。根據最新消息,九州娛樂城已決定結束其在台灣的業務,包括旗下品牌LEO娛樂城和THA娛樂城。以下我們將深入分析這一事件的背景和可能的影響。
LEO娛樂城無法登入的原因分析
近期LEO娛樂城頻繁出現無法登入的情況,其實是九州娛樂城退出台灣市場的前兆。根據官方公告,九州娛樂城將於2024年12月31日中午12點正式關閉,包括註冊與存款功能在內的多項服務已經受到限制。
可能原因 1:退出台灣市場的策略
九州娛樂城的管理層認為,台灣市場的利潤已達上限,長期運營的收益減少,因此選擇「見好就收」。這一策略符合台灣商業文化中尋找新市場發展的特點。九州娛樂城可能計劃將資源投入其他更具潛力的市場,以追求更大的收益。
可能原因 2:運營生態鏈的問題
LEO娛樂城的運營高度依賴第三方現金交易平台以及相關支付管道。近期,這些環節可能出現了無法解決的問題,導致整體運營受阻。為了避免損失擴大,九州娛樂城選擇退出台灣市場。
可能原因 3:法律風險與負面新聞
九州娛樂城因涉及法律事件,曾多次登上新聞版面。這些事件不僅損害了品牌形象,也讓經營面臨更多風險。為了降低法律糾紛帶來的影響,九州娛樂城可能選擇結束在台灣的營運。
官方公告:2024年12月31日正式停業
九州娛樂城已向所有LEO娛樂城會員發布公告,明確指出將於2024年12月31日中午12點全面停止營運。公告內容包括以下重要信息:
存款服務已關閉:玩家無法繼續充值。
提款功能仍正常:玩家可以放心提取餘額,會員權益不受影響。
感謝支持:官方對會員表達了感謝,並祝福大家未來順利。
這一公告讓玩家可以在剩餘時間內完成提款操作,避免資金損失。
對玩家的影響與建議
1. 儘快提款
如果您是LEO娛樂城的會員,應立即登入帳戶並提取餘額,以確保資金安全。
2. 謹慎選擇新平台
選擇新的娛樂平台時,應注意以下幾點:
合法性:確認平台是否擁有合法經營許可。
支付系統穩定性:確保提款及充值渠道安全無虞。
用戶評價:參考其他玩家的反饋,選擇口碑良好的平台。
3. 防範詐騙
警惕假冒的LEO娛樂城網站或客服。官方客服系統已關閉,任何聯繫您索取個人資料的行為都可能是詐騙。
結語
LEO娛樂城無法登入以及九州娛樂城退出台灣市場,標誌著線上娛樂城行業的一次重要轉折。對於玩家而言,這既是一個挑戰,也是一個重新審視平台選擇的機會。未來,玩家應更加關注平台的合法性與穩定性,為自己的遊戲體驗和資金安全提供保障。
That is really fascinating, You’re an excessively skilled blogger. I’ve joined your rss feed and look forward to in the hunt for extra of your magnificent post. Additionally, I’ve shared your website in my social networks!
Шины являются важной частью любой специальной техники, обеспечивая её проходимость, устойчивость и безопасность на различных типах покрытия. Правильный выбор покрышек влияет на эффективность работы машины и её долговечность, а также помогает избежать возможных поломок и аварийных ситуаций http://xn--z69a950b3ndgxb8xa.com/bbs/board.php?bo_table=cs&wr_id=87037
Неотразимый стиль современных тактичных штанов, как выбрать их с другой одеждой.
Тактичные штаны: удобство и функциональность, которые подчеркнут ваш стиль и индивидуальность.
Идеальные тактичные штаны: находка для занятых людей, который подчеркнет вашу уверенность и статус.
Лучшие модели тактичных штанов для мужчин, которые подчеркнут вашу спортивную натуру.
Как выбрать тактичные штаны под свой стиль?, чтобы подчеркнуть свою уникальность и индивидуальность.
Тактичные штаны: вечная классика мужского гардероба, которые подчеркнут ваш вкус и качество вашей одежды.
Сочетание стиля и практичности в тактичных штанах, которые подчеркнут ваш профессионализм и серьезность.
американські тактичні штани [url=https://dffrgrgrgdhajshf.com.ua/]https://dffrgrgrgdhajshf.com.ua/[/url] .
Шины являются важной частью любой специальной техники, обеспечивая её проходимость, устойчивость и безопасность на различных типах покрытия. Правильный выбор покрышек влияет на эффективность работы машины и её долговечность, а также помогает избежать возможных поломок и аварийных ситуаций http://torgteh-rzn.ru/index.php?option=com_k2&view=itemlist&task=user&id=13632
3a 娱乐城
3A娛樂城:全方位線上娛樂體驗的首選平台
3A娛樂城作為台灣最受歡迎的線上娛樂平台之一,以其多樣化的遊戲選擇、創新的技術、以及卓越的安全保障,贏得了玩家的高度信任與青睞。無論您是新手還是老手,3A娛樂城都能滿足您的需求,帶給您獨一無二的遊戲體驗。
熱門娛樂城遊戲一覽
3A娛樂城提供多種熱門遊戲,適合不同類型的玩家:
真人百家樂:體驗真實賭場的氛圍,與真人荷官互動,感受賭桌上的緊張與刺激。
彩票投注:涵蓋多種彩票選項,滿足彩券愛好者的需求,讓您隨時隨地挑戰幸運。
棋牌遊戲:從傳統的麻將到現代化的紙牌遊戲,讓玩家在策略與運氣中找到平衡。
3A娛樂城的核心價值
1. 專業
3A娛樂城每日提供近千場體育賽事,並搭配真人百家樂、彩票彩球、電子遊戲等多種類型的線上賭場遊戲。無論您的遊戲偏好為何,這裡總有一款適合您!
2. 安全
平台採用128位加密技術和嚴格的安全管理體系,確保玩家的金流與個人資料完全受保護,讓您可以放心遊玩,無需擔憂安全問題。
3. 便捷
3A娛樂城是全台第一家使用自家開發的全套終端應用的娛樂城平台。無論是手機還是電腦,玩家都能享受無縫的遊戲體驗。同時,24小時線上客服隨時為您解決任何問題,提供貼心服務。
4. 安心
由專業工程師開發的財務處理系統,為玩家帶來快速的存款、取款和轉帳服務。透過獨立網路技術,平台提供優化的網路速度,確保每一次操作都流暢無比。
下載3A娛樂城手機APP
為了提供更便捷的遊戲體驗,3A娛樂城獨家開發了功能齊全的手機APP,讓玩家隨時隨地開啟遊戲。
現代化設計:新穎乾淨的介面設計,提升使用者體驗。
跨平台支持:完美適配手機與電腦,讓您輕鬆切換設備,無需中斷遊戲。
快速下載:掃描專屬QR碼即可進入下載頁面,立即開始暢玩!
3A娛樂城的其他服務
娛樂城教學:詳細的操作指導,讓新手也能快速上手。
責任博彩:提倡健康娛樂,確保玩家在遊戲中享受樂趣的同時,不失理性。
隱私權政策:嚴格遵守隱私保護條例,保障玩家的個人信息安全。
立即加入3A娛樂城,享受頂級娛樂體驗!
如果您正在尋找一個專業、安全、便捷又安心的線上娛樂平台,那麼3A娛樂城絕對是您的不二之選。現在就下載手機APP,隨時隨地開啟您的娛樂旅程,享受無限的遊戲樂趣與刺激!
Собственное производство металлоконструкций. Если вас интересует навес в спб мы предлогаем изготовление под ключ Навесы к дому на заказ
I really love your site.. Great colors & theme. Did you develop this web
site yourself? Please reply back as I’m hoping to create my own personal site and want to learn where you got this from or
just what the theme is named. Kudos!
2024 年熱門娛樂城與活動解析
冠天下娛樂城優惠,帶來無限樂趣
在 2024 年 4 月 16 日,冠天下娛樂城推出了全新的優惠活動,旨在為玩家帶來更大的獲利機會和更高的娛樂體驗。這些優惠活動包括多種存款獎勵、會員專屬回饋以及豐富的遊戲競賽獎金,吸引了大批玩家參與。
冠天下娛樂城以其高透明度和用戶友好的政策,已成為許多玩家的首選娛樂平台。不論是新手還是老手,都能在這裡找到適合自己的遊戲和活動。
LEO娛樂城無法登入引發市場恐慌
2024 年 11 月 29 日,LEO娛樂城因技術問題出現短暫無法登入的情況,引發了廣泛關注。許多玩家擔心這是否意味著九州娛樂城的營運出現問題。
九州娛樂集團隨後發佈官方聲明,強調這僅僅是系統升級過程中的短暫問題,並承諾玩家的資金和數據安全不受任何影響。同時,九州娛樂表示將加強伺服器穩定性,確保未來類似情況不再發生。
熱門 ZG 電子遊戲——熱舞森巴老虎機
2024 年 11 月 8 日,ZG 電子遊戲推出了熱舞森巴老虎機,這款遊戲迅速成為市場上的熱門選擇。以南美熱情的森巴舞為主題,遊戲畫面充滿色彩,搭配動感的音樂,為玩家帶來視覺與聽覺的雙重享受。
遊戲亮點:
高倍數獎勵機制:每次轉盤都有機會觸發高額獎金。
特色免費遊戲:連續獲得特殊圖案即可啟動多次免費轉盤,提高獲勝機率。
適合新手與高端玩家:簡單的玩法規則與豐富的策略選擇滿足不同層級玩家的需求。
ZG 電子遊戲致力於為玩家提供創新且有趣的遊戲體驗,熱舞森巴老虎機無疑是今年最值得嘗試的遊戲之一。
2024 世界棒球 12 強賽精彩回顧
2024 年 11 月,中華隊參加了世界棒球 12 強賽,這項全球頂尖棒球賽事吸引了來自多國的球隊和球迷參與。中華隊 28 人的名單以年輕選手和經驗豐富的老將為基礎,展現了團隊的競技實力。
比賽亮點:
精彩賽程:比賽期間,中華隊展現了堅強的防守和出色的打擊表現。
門票銷售:賽事門票迅速售罄,顯示出棒球在台灣的高度受歡迎程度。
線上直播:各大平台提供了高畫質直播,讓更多球迷能夠即時觀看比賽,感受棒球魅力。
世界棒球 12 強賽不僅是比賽,更是全台灣球迷的一場盛宴,展現了棒球作為國民運動的無限魅力。
結語
從娛樂城的優惠活動到全球性的棒球賽事,2024 年對於遊戲和體育愛好者來說充滿了亮點。不論是參與冠天下娛樂城的優惠,體驗 ZG 電子遊戲的最新老虎機,還是為中華隊的棒球比賽加油,這一年都是充滿精彩與期待的一年!
can i buy lisinopril no prescription
sildalist 2mg tablet
can i buy generic theo 24 cr for sale
where do you buy ashwagandha
can you get imdur
Mostbet предлагает эксклюзивные бонусы для новых игроков | Mostbet uz 97 – это качественный игровой опыт | Mostbet shaxsiy kabinet – это ваш личный центр управления ставками | Мостбет казино предоставляет множество слотов и игр | Mostbet uz – это качество и безопасность для игроков мост бет. | Mostbet min az – ваш надежный игровой портал | Mostbet bonuslar yangi foydalanuvchilar uchun mavjud | Mostbet официальный сайт – это удобный интерфейс и поддержка | Mostbet bonuslar bilan o’yindan bahramand bo’ling [url=https://mostbetcasinouzkirishgderf.com/]Mostbet oyinlari[/url].
cost cheap zithromax
娛樂城
2024 年娛樂城遊戲推薦:最夯遊戲與最佳平台選擇
隨著線上娛樂城市場的蓬勃發展,2024 年推出了多款令人興奮的遊戲和創新平台。無論是喜歡老虎機、棋牌遊戲,還是捕魚和彩票遊戲的玩家,都能在今年找到屬於自己的遊戲樂園。以下是熱門遊戲推薦與最佳娛樂城平台的詳細介紹。
2024 年最夯遊戲推薦
電子老虎機遊戲
電子老虎機一直是娛樂城的經典項目,今年更是推出了數款熱門作品:
戰神賽特:以古埃及神話為背景,擁有高倍數獎勵的特殊功能,畫面設計精美。
魔龍傳奇:玩家可探索魔龍世界,觸發驚喜獎金和免費遊戲機會。
雷神之錘:以北歐神話為主題,特色連線玩法讓每次旋轉都充滿期待。
金虎爺:寓意招財進寶,特別適合新年期間挑戰,玩法簡單但回報豐厚。
棋牌遊戲
二人麻將:適合喜歡策略性對抗的玩家,快速節奏且競爭激烈。
忍 Kunoichi:結合武士與忍者元素,讓玩家體驗獨特的棋牌競技。
捕魚遊戲
捕魚遊戲是一種結合策略和運氣的娛樂項目,玩家可以通過捕捉魚群來獲得高額獎金,同時享受視覺和操作的雙重樂趣。
彩票遊戲
彩票遊戲以簡單快捷的玩法吸引大批玩家,提供多種國內外彩種,讓玩家隨時挑戰幸運。
RG富遊娛樂城:2024 年最佳線上娛樂城推薦
在眾多娛樂城平台中,RG富遊娛樂城以其專業服務和卓越遊戲體驗,成為今年的首選平台。
平台特色
遊戲種類豐富
提供多元化遊戲選擇,包括真人視訊、電子老虎機、捕魚、棋牌和彩票遊戲,滿足所有玩家需求。
快速便捷的存提款服務
平台支持即時存款與快速提款,無需等待,確保資金安全流動。
高度安全保障
採用最先進的加密技術,保護玩家的帳戶與交易安全。
支援多平台裝置
富遊娛樂城APP 可在 iOS 和 Android 設備上使用,界面簡潔易操作,隨時隨地享受娛樂。
專業客服支援
提供 24 小時全天候客服,隨時解答玩家疑問,保障流暢的遊戲體驗。
如何開始體驗 RG 富遊娛樂城
下載富遊 APP
在官方網站免費下載 APP,支援 iOS 和 Android 設備。
註冊帳號
使用簡單步驟完成註冊,立即進入遊戲世界。
挑戰熱門遊戲
從老虎機到棋牌遊戲,選擇您喜歡的類型,挑戰高額獎金。
結語
2024 年是線上娛樂遊戲的精彩年份,從戰神賽特到二人麻將,每款遊戲都能帶給玩家不同的樂趣。而選擇像 RG富遊娛樂城 這樣的專業平台,不僅能體驗到豐富的遊戲內容,還能享受安全可靠的服務。立即下載富遊 APP,加入這個充滿驚喜的娛樂世界
滿天星娛樂城:全方位的線上娛樂體驗
滿天星娛樂城作為九州娛樂城旗下品牌之一,是玩家心目中備受信賴的線上娛樂平台。不僅提供豐富的遊戲選擇和吸引人的優惠,還以其合法營運的背景和快速出金的保證,成為台灣玩家的首選娛樂城之一。
滿天星娛樂城的特色與優勢
1. 合法營運,安全可靠
滿天星娛樂城持有三大國際娛樂執照,包括:
菲律賓 PAGCOR 監督競猜牌照
BVI 認證
馬爾他 MGA 認證
這些執照展現了平台的資本實力與合法性,讓玩家能夠安心享受遊戲,完全不用擔心出金問題。
2. 高品質遊戲與豐富優惠
滿天星娛樂城與九州集團旗下的LEO、THA娛樂城一樣,提供一流的遊戲品質和多樣化的優惠。
熱門遊戲推薦:電子老虎機、真人直播、運彩投注、今彩539等,滿足各類玩家需求。
優惠活動:定期推出限時回饋活動,讓玩家在遊戲中獲得更多額外收益。
3. 快速出金與高效服務
滿天星娛樂城採用先進的財務系統,確保存提款快速、安全,讓玩家能夠專注於享受遊戲,而無需擔心資金問題。專業的客服團隊24小時在線,提供即時支援。
4. 多平台兼容的APP
滿天星娛樂城提供設計貼合玩家需求的手機APP,適用於iOS與Android系統。玩家可以隨時隨地快速登入遊玩,體驗無與倫比的娛樂快感。
熱門遊戲類型一覽
滿天星娛樂城為玩家提供多樣化的遊戲選擇,滿足不同興趣和需求:
真人直播:感受真實賭場氛圍,與真人荷官互動,體驗沉浸式娛樂。
電子老虎機:多款經典與創新機台,讓玩家享受刺激的遊戲過程。
運彩投注:涵蓋世界盃、棒球、籃球等多項運動賽事,提供即時投注與直播功能。
彩票遊戲:包括今彩539、富遊彩票等,適合熱衷於彩券的玩家。
滿天星娛樂城常見問題解答
Q1. 滿天星娛樂城是否提供APP下載?
是的,滿天星娛樂城提供專屬的手機APP,支援iOS和Android系統。玩家可透過APP快速登入,隨時享受遊戲。
Q2. 滿天星娛樂城是否合法?
滿天星娛樂城擁有多項國際認證,為合法經營的線上娛樂城,並保證玩家資金的安全性與遊戲的公平性。
Q3. 無法登入滿天星娛樂城該怎麼辦?
如遇到無法登入的情況,建議玩家檢查網路狀況或聯繫24小時客服團隊獲取即時協助。
立即加入滿天星娛樂城,享受最佳娛樂體驗!
滿天星娛樂城以合法、安全、快速的服務,搭配豐富的遊戲選擇和優惠,為玩家打造出獨一無二的線上娛樂體驗。不論您是新手還是老手,都能在滿天星找到屬於自己的遊戲樂趣。現在就下載APP,隨時隨地開始您的娛樂之旅!
dangers of ashwagandha
Normally I don’t read post on blogs, however I would like
to say that this write-up very pressured me to take a look
at and do so! Your writing taste has been amazed me.
Thanks, very nice article.
honey money casino
не знаете, как найти актуальную ссылку vavada? ссылка https://t.me/qvavada решит вашу проблему. подпишитесь на наш телеграм-канал и получите доступ ко всем акциям. теперь ваш выигрыш на расстоянии пары секунд!
娛樂城
想要享受最刺激的線上娛樂體驗?選擇RG富遊娛樂城!
在這個數位時代,尋找適合自己的線上娛樂城變得越來越重要。如果你想在線上娛樂城找到最好玩、最受歡迎的遊戲,RG富遊絕對是你的首選!我們匯聚了多款博弈遊戲,讓您盡情享受娛樂的刺激與快感。
#### 精選遊戲類型
1. 真人百家樂
感受現場賭場的氛圍!RG富遊的真人視訊百家樂讓你與真實的荷官互動,享受高品質的遊戲體驗。無論你是老手還是新手,都能在這裡找到適合自己的節奏。
2. 電子老虎機
喜愛刺激嗎?我們提供多款熱門老虎機遊戲,如「戰神賽特」「魔龍傳奇」等,每一款都擁有精美的畫面和豐厚的獎勵,讓每次旋轉都充滿期待!
3. 體育投注
無論你是球迷還是賽事愛好者,RG富遊的體育投注平台都有你想要的。精準的賠率、廣泛的賽事選擇,讓你體驗到投注的樂趣和刺激。
4. 彩票遊戲與捕魚遊戲
隨著運氣來!不妨試試我們的棋牌遊戲和彩票遊戲,這裡有各種機會讓你體驗到不一樣的勝利快感。
#### 下載富遊APP,隨時隨地享受遊戲!
富遊娛樂城的APP支持iOS和Android設備,界面簡潔易用,內容豐富。無論你身處何地,都能輕鬆進入遊戲世界,隨心所欲享受娛樂時光。此外,我們提供即時客服支援,隨時解決你的疑問,讓你的遊戲體驗更為完美。
#### 為什麼選擇RG富遊?
– 安全可靠
RG富遊致力於為玩家提供安全可靠的遊戲環境,您的每一筆交易都受到最高的安全保障。
– 快速便捷的存提款服務
我們的存款平均時間僅需30秒,提款平均只需60秒,讓你體驗即時的快感!
– 豐富多元的遊戲選擇
超過9999款遊戲任你選擇,無論你偏好哪種娛樂方式,這裡都能滿足你的需求。
– 全天候服務
我們全年365天提供不停歇的客服支持,確保你在遊戲過程中享受到最好的服務。
### 結論
RG富遊娛樂城是您最佳的線上賭場選擇。我們不僅提供多樣化的遊戲選擇,還有安全可靠的遊戲環境和便捷的服務。立即下載APP,加入RG富遊,開始您的娛樂之旅,享受無與倫比的遊戲體驗吧!
富遊娛樂城:台灣線上賭場的創新選擇
在台灣的線上娛樂市場中,富遊娛樂城憑藉其優質的服務和多樣化的娛樂選項,迅速成為新一代玩家的首選。既有刺激的遊戲體驗,又提供了一系列具有吸引力的優惠,富遊娛樂城無疑是追求樂趣的玩家們理想的地方。
#### 優勢與特色
1. 多樣化的遊戲選擇
富遊娛樂城提供了豐富的遊戲種類,包括電子老虎機、真人百家樂、運彩投注等。不論你是老虎機的愛好者,還是熱衷於真人賭桌的玩家,這裡都能滿足你的需求。特別推薦的遊戲如DG真人百家和RSG皇家百家樂,一定能帶給你極致的遊戲體驗。
2. 吸引人的優惠活動
富遊娛樂城針對新手和老玩家都推出了多樣的優惠活動。新會員首次存款可獲得相同金額的獎金,還有額外的體驗金送出,設計友好且實惠。此外,富遊每週的簽到獎勵和天天無上限的返水活動,更是讓玩家在遊戲中能持續獲得收益。
3. 安全可靠的存取款方式
在金融交易方面,富遊娛樂城支持多種存款和提款方式,包括各大銀行轉帳、超商儲值,甚至虛擬貨幣等。最低提款金額設置靈活,保證玩家資金的安全與便捷。
4. 人性化的操作介面
富遊娛樂城的網頁與移動應用設計簡潔易用,玩家可以方便地找到所需的遊戲和優惠。無論是在電腦還是手機上,都能順利享受到遊戲的樂趣。
#### 如何開始遊戲
如果你是新手玩家,開始你的富遊體驗非常簡單。只需註冊帳號,完成首次存款,即可獲得新手優惠。無論你想嘗試電子遊戲還是真人賭局,富遊娛樂城都能讓你輕鬆上手,享受娛樂的樂趣。
#### 社會責任與防沉迷措施
富遊娛樂城深知線上賭博的風險,因此致力於推廣負責任的遊戲文化。他們提供“防沉迷”指導,以確保玩家能夠理性投注,並提供必要的幫助和資源來幫助有需求的玩家。
#### 總結
對於尋求安全、便捷和多元化娛樂城體驗的玩家,富遊娛樂城絕對是值得選擇的選項。無論你是希望徹底放鬆,還是想要體驗刺激的博弈過程,富遊娛樂城都能滿足你的期待,成為你在台灣線上娛樂市場的最佳夥伴。立即註冊並開始你的遊戲之旅吧!
cipro: cipro online no prescription in the usa – buy ciprofloxacin
can you buy cheap forxiga without rx
honeymoney играть
buy prednisone online overnight
сеть магазинов на Дальнем Востоке России, успешно функционирующая с 2016 года. Наше присутствие в регионе обеспечивает удобство покупок для жителей Уссурийска, Владивостока и Хабаровска https://mirotvorec-dv.ru/catalog/
Lightning Storm — это захватывающий видеослот, созданный компанией Aristocrat Technologies, известной своими высококачественными играми для наземных и онлайн-казино. Lightning Storm выделяется своим уникальным дизайном, интересными механиками и высокими потенциальными выигрышами. Давайте рассмотрим основные аспекты этой игры Зеркало Ирвин казино
капельница от запоя на дому нижний новгород [url=http://pandora.ukrbb.net/viewtopic.php?f=2&t=12322]капельница от запоя на дому нижний новгород[/url] .
сеть магазинов на Дальнем Востоке России, успешно функционирующая с 2016 года. Наше присутствие в регионе обеспечивает удобство покупок для жителей Уссурийска, Владивостока и Хабаровска https://mirotvorec-dv.ru/
Lightning Storm — это захватывающий видеослот, созданный компанией Aristocrat Technologies, известной своими высококачественными играми для наземных и онлайн-казино. Lightning Storm выделяется своим уникальным дизайном, интересными механиками и высокими потенциальными выигрышами. Давайте рассмотрим основные аспекты этой игры Ирвин казино
Тут можно преобрести сейф взломостойкий купить сейф пожаровзломостойкие купить
cordarone et soleil
how often can you take colchicine
3A娛樂城
3A娛樂城:全方位線上娛樂體驗的首選平台
3A娛樂城作為台灣最受歡迎的線上娛樂平台之一,以其多樣化的遊戲選擇、創新的技術、以及卓越的安全保障,贏得了玩家的高度信任與青睞。無論您是新手還是老手,3A娛樂城都能滿足您的需求,帶給您獨一無二的遊戲體驗。
熱門娛樂城遊戲一覽
3A娛樂城提供多種熱門遊戲,適合不同類型的玩家:
真人百家樂:體驗真實賭場的氛圍,與真人荷官互動,感受賭桌上的緊張與刺激。
彩票投注:涵蓋多種彩票選項,滿足彩券愛好者的需求,讓您隨時隨地挑戰幸運。
棋牌遊戲:從傳統的麻將到現代化的紙牌遊戲,讓玩家在策略與運氣中找到平衡。
3A娛樂城的核心價值
1. 專業
3A娛樂城每日提供近千場體育賽事,並搭配真人百家樂、彩票彩球、電子遊戲等多種類型的線上賭場遊戲。無論您的遊戲偏好為何,這裡總有一款適合您!
2. 安全
平台採用128位加密技術和嚴格的安全管理體系,確保玩家的金流與個人資料完全受保護,讓您可以放心遊玩,無需擔憂安全問題。
3. 便捷
3A娛樂城是全台第一家使用自家開發的全套終端應用的娛樂城平台。無論是手機還是電腦,玩家都能享受無縫的遊戲體驗。同時,24小時線上客服隨時為您解決任何問題,提供貼心服務。
4. 安心
由專業工程師開發的財務處理系統,為玩家帶來快速的存款、取款和轉帳服務。透過獨立網路技術,平台提供優化的網路速度,確保每一次操作都流暢無比。
下載3A娛樂城手機APP
為了提供更便捷的遊戲體驗,3A娛樂城獨家開發了功能齊全的手機APP,讓玩家隨時隨地開啟遊戲。
現代化設計:新穎乾淨的介面設計,提升使用者體驗。
跨平台支持:完美適配手機與電腦,讓您輕鬆切換設備,無需中斷遊戲。
快速下載:掃描專屬QR碼即可進入下載頁面,立即開始暢玩!
3A娛樂城的其他服務
娛樂城教學:詳細的操作指導,讓新手也能快速上手。
責任博彩:提倡健康娛樂,確保玩家在遊戲中享受樂趣的同時,不失理性。
隱私權政策:嚴格遵守隱私保護條例,保障玩家的個人信息安全。
立即加入3A娛樂城,享受頂級娛樂體驗!
如果您正在尋找一個專業、安全、便捷又安心的線上娛樂平台,那麼3A娛樂城絕對是您的不二之選。現在就下載手機APP,隨時隨地開啟您的娛樂旅程,享受無限的遊戲樂趣與刺激!
Обратите внимание на гинеколога в Варшаве, Анастасию Юрьевну. Это врач с огромным опытом, которая помогает пациенткам в самых разных ситуациях. Она занимается гинекологическими осмотрами, ультразвуковой диагностикой, лечением воспалительных процессов и консультациями по вопросам планирования семьи http://nowoczesna.phorum.pl/viewtopic.php?p=130857#130857
lisinopril 25 mg tablet: lisinopril pills for sale – lisinopril 10 mg prices
Обратите внимание на гинеколога в Варшаве, Анастасию Юрьевну. Это врач с огромным опытом, которая помогает пациенткам в самых разных ситуациях. Она занимается гинекологическими осмотрами, ультразвуковой диагностикой, лечением воспалительных процессов и консультациями по вопросам планирования семьи http://mydwoje.iq24.pl/default.asp?grupa=257517&temat=643852&nr_str=1#dol_str
Mostbet, Turkiye’deki kullan?c?lar icin genis bir bahis ve casino oyunlar? secenegi sunan populer bir platformdur https://hurifo.org/
I like your style!
Step-by-step guide to getting your Indiana real estate license | Indiana realtor license offers a chance for a rewarding career | How to get licensed in real estate in Indiana in no time indiana-real-estate-license com | Indiana real estate license exam: what you should know | How to apply for an Indiana real estate license without stress | Learn effective tips for passing Indiana’s real estate exam | Enhance your knowledge with Indiana real estate license courses | Understand the value of an Indiana real estate license for career growth | Real estate license in Indiana – your path to professional success [url=https://indiana-real-estate-license.com/]real estate Indiana license[/url].
вывод из запоя самара стационар [url=https://gov.ukrbb.net/viewtopic.php?f=3&t=6387/]вывод из запоя самара стационар[/url] .
лечения наркозависимости в стационаре [url=http://sait.anihub.me/viewtopic.php?id=5684]лечения наркозависимости в стационаре[/url] .
поздравления с днем рождения красивой женщине [url=https://www.pro-happy-birthday.ru]поздравления с днем рождения красивой женщине[/url] .
How long have you been in this field? You seem to know a lot more than I do, I’d love to know your sources!
zestril 20 mg price in india: buy lisinopril 40 mg tablet – drug lisinopril
https://dzen.ru/a/ZlAjCqrQFDMHjg7p
Аттестат 11 класса купить официально с упрощенным обучением в Москве
price of lisinopril 5mg: zestoretic 5 mg – lisinopril brand name
https://mayaschool.ru
Оптимизируйте работу своего бизнеса с надежным и мощным VPS-хостингом. Аренда выделенных виртуальных серверов с гарантированной производительностью и надежностью аренда сервера в облаке 1с
https://bober-clinic.ru клиника доктора
Оптимизируйте работу своего бизнеса с надежным и мощным VPS-хостингом. Аренда выделенных виртуальных серверов с гарантированной производительностью и надежностью vps хостинг windows
https://azithromycinus.com/# zithromax cost
Предлагаем услуги профессиональных инженеров офицальной мастерской.
Еслли вы искали ремонт телевизоров samsung рядом, можете посмотреть на сайте: срочный ремонт телевизоров samsung
Наши мастера оперативно устранят неисправности вашего устройства в сервисе или с выездом на дом!
ciprofloxacin over the counter: buy cipro – cipro
лечение наркозависимости в стационаре [url=www.4dkp.forum24.ru/?1-18-0-00002754-000-0-0-1730817323]лечение наркозависимости в стационаре[/url] .
вывод из запоя в стационаре анонимно [url=www.family2.quadrobb.me/viewtopic.php?id=1851/]вывод из запоя в стационаре анонимно[/url] .
вывод из запоя в наркологическом стационаре Самары [url=http://recordrpservak.ukrbb.net/viewtopic.php?f=31&t=1166/]вывод из запоя в наркологическом стационаре Самары[/url] .
География поставок компании «Технокор» не ограничивается регионом: за более чем 30 лет работы мы освоили всю территорию России – от Калининграда до острова Сахалин. Компания «Технокор» является дилером известных отечественных и зарубежных производителей – МТЗ, LOVOL и других https://ooo-tehnokor.promportal.su
География поставок компании «Технокор» не ограничивается регионом: за более чем 30 лет работы мы освоили всю территорию России – от Калининграда до острова Сахалин. Компания «Технокор» является дилером известных отечественных и зарубежных производителей – МТЗ, LOVOL и других https://akniga.org/profile/556509-iliaselwww
Эффективное управление временем – ключ к успеху в современном мире. Освойте искусство тайм-менеджмента, чтобы успевать больше, уставать меньше и достигать амбициозных целей. От простых техник до продвинутых методик – каждый найдет свой путь к продуктивности планировщик задач
Эффективное управление временем – ключ к успеху в современном мире. Освойте искусство тайм-менеджмента, чтобы успевать больше, уставать меньше и достигать амбициозных целей. От простых техник до продвинутых методик – каждый найдет свой путь к продуктивности напоминалка
lisinopril online uk: how much is lisinopril – lisinopril prescription cost
Инверторы играют ключевую роль в системах солнечной энергетики, позволяя преобразовывать постоянный ток, генерируемый солнечными панелями, в переменный, который может быть использован для питания бытовых приборов, освещения и других потребностей дома, офиса или производственного объекта. Это делает их незаменимым компонентом для создания эффективных и автономных систем электроснабжения https://solar.biz.ua/invertory-ibp/istochniki-besperebojnogo-pitaniya
Для веб-проектов, работающих на VPS, обеспечивается высокая скорость загрузки страниц, что является ключевым фактором для улучшения пользовательского опыта и SEO-показателей сайта аренда vds
Инверторы играют ключевую роль в системах солнечной энергетики, позволяя преобразовывать постоянный ток, генерируемый солнечными панелями, в переменный, который может быть использован для питания бытовых приборов, освещения и других потребностей дома, офиса или производственного объекта. Это делает их незаменимым компонентом для создания эффективных и автономных систем электроснабжения https://solar.biz.ua/invertory-ibp/
Для веб-проектов, работающих на VPS, обеспечивается высокая скорость загрузки страниц, что является ключевым фактором для улучшения пользовательского опыта и SEO-показателей сайта хостинг сайта бесплатный
Hi, i believe that i saw you visited my site thus i
came to go back the favor?.I am attempting to in finding issues to enhance my site!I guess its good
enough to make use of a few of your ideas!!
I don’t think the title of your article matches the content lol. Just kidding, mainly because I had some doubts after reading the article.
cytotec buy online usa: buy cytotec over the counter – Abortion pills online
Инверторы играют ключевую роль в системах солнечной энергетики, позволяя преобразовывать постоянный ток, генерируемый солнечными панелями, в переменный https://solar.biz.ua/invertory-ibp/
Предлагаем услуги профессиональных инженеров офицальной мастерской.
Еслли вы искали ремонт телевизоров philips, можете посмотреть на сайте: ремонт телевизоров philips сервис
Наши мастера оперативно устранят неисправности вашего устройства в сервисе или с выездом на дом!
Инверторы играют ключевую роль в системах солнечной энергетики, позволяя преобразовывать постоянный ток, генерируемый солнечными панелями, в переменный https://solar.biz.ua/invertory-ibp/gibridnyj-invertor-ibp-3000vt-24v-mppt-na-3-kvt-ismppt-bf-3000-axioma-energy.html
Гимнастика для спины, занятия Красивая осанка, Здоровая спина, Йога, Гамаки, Стретчинг, Шпагат, Пилатес, Zumba, Восточные танцы, массаж в Студии фитнес клуб профсоюзная
Гимнастика для спины, занятия Красивая осанка, Здоровая спина, Йога, Гамаки, Стретчинг, Шпагат, Пилатес, Zumba, Восточные танцы, массаж в Студии запись фитнес клуб
вывод из запоя в наркологическом стационаре Самары [url=fanfiction.borda.ru/?1-1-0-00000235-000-0-0-1730818322]вывод из запоя в наркологическом стационаре Самары[/url] .
Learn how to obtain a real estate license in Indiana easily | Gain professional growth with an Indiana realtor license | Overcome challenges in obtaining an Indiana real estate license realtor license Indiana | Get professional advice on real estate exams in Indiana | How to apply for an Indiana real estate license without stress | Prepare for the future with an Indiana realtor license | Accelerate your career with an Indiana realtor license | Expert advice on Indiana real estate license for new agents | Learn the tricks to ace your Indiana real estate exam [url=https://indiana-real-estate-license.com/]https://indiana-real-estate-license.com[/url].
Просторный тренажерный зал. Fitness Беляево оборудован 150+ единицами современных тренажеров. Самые популярные из них представлены в нескольких экземплярах, чтобы вы не тратили время на ожидание в очереди фитнес клуб беляево
Просторный тренажерный зал. Fitness Беляево оборудован 150+ единицами современных тренажеров. Самые популярные из них представлены в нескольких экземплярах, чтобы вы не тратили время на ожидание в очереди гум гум фитнес беляево
where can i buy zithromax medicine: where can i buy zithromax medicine – zithromax canadian pharmacy
http://cytotec.top/# cytotec buy online usa
buy cipro online [url=https://ciprofloxacin.cheap/#]buy cipro online usa[/url] where to buy cipro online
Someone essentially lend a hand to make seriously articles I would state.
That is the very first time I frequented your
website page and so far? I surprised with the analysis
you made to create this actual put up extraordinary. Wonderful job!
order prednisone without a prescription buy prednisone 50mg online where to buy cheap prednisone no prescription
cheap prednisone online where can i get cheap prednisone pill prednisone 20 mg tablet side effects
where to purchase prednisone no prescription
where can i buy prednisone in cabarete prednisone 50 mg can i order cheap prednisone without rx
order generic prednisone pill how to get generic prednisone for sale where can i buy prednisone on the internet
where can i buy prednisone on the internet how can i get generic prednisone without rx buying cheap prednisone online
prednisone with no prescription buy prednisone without a precipitation does prednisone cause excessive sweating
prednisone 5 mg dosage instructions
20mg prednisone side effects how much does prednisone cost buy prednisone 10mg online cheap
prescription for prednisone buy prednisone pill how to get prednisone tablets
where can i get cheap prednisone without rx buy prednisone mexico order generic prednisone without a prescription
can you get prednisone no prescription can i get cheap prednisone online is prednisone expensive without insurance
where to buy generic prednisone prices
prednisone safe in breastfeeding how to get prednisone without rx how can i get generic prednisone without prescription
how to buy prednisone without a prescription can you get cheap prednisone price what is prednisone used for in adults
where to get cheap prednisone without insurance need to buy prednisone 20mg for humans where to buy cheap prednisone prices
prednisone 5mg 48 pack instructions prednisone 5 mg therapy pack 21 directions buying generic prednisone without rx
can i buy generic prednisone without rx
prednisone 1 mg price order cheap prednisone price prednisone 20mg price
where to buy generic prednisone no prescription prednisone canada 40mg 20mg 10mg 30 day prednisone taper
https://cenforce.icu/# cenforce for sale
Does your website have a contact page? I’m having a tough time locating it but,
I’d like to send you an email. I’ve got some suggestions for your blog you might be interested
in hearing. Either way, great blog and I look forward to seeing
it develop over time.
can i order generic luvox pills
Drugs information. Cautions.
famotidine injection baxter
All trends of meds. Get now.
после капельницы от запоя на дому [url=https://www.familyportal.forumrom.com/viewtopic.php?id=28605]после капельницы от запоя на дому[/url] .
can i buy cheap caduet price
Drugs information. Cautions.
drug study of amlodipine besylate
All what you want to know about drug. Get here.
can i get femara without a prescription
can i buy cheap seroflo price
Изготавливаем корпусную мебель, шкафы-купе, кухни на заказ по индивидуальным размерам под ключ недорого. Цены и фото в описании http://samoshkin.ru/index.php?subaction=userinfo&user=olilif
Высокотехнологичные видеостойки от производителя. На нашем сайте представлен широкий ассортимент различных моделей и с разными размерами экрана бизнес на видеостойках
get cheap celebrex for sale
Изготавливаем корпусную мебель, шкафы-купе, кухни на заказ по индивидуальным размерам под ключ недорого. Цены и фото в описании http://agenciafrog-host.com.br/redesocial_v0/index.php/profile/aritag
Высокотехнологичные видеостойки от производителя. На нашем сайте представлен широкий ассортимент различных моделей и с разными размерами экрана https://vk.com/biznareklama
buying generic nemasole tablets
can i purchase cheap nemasole tablets
can i purchase cheap celebrex price
can you get trimox online
how to buy generic coreg for sale
can you get diflucan
https://cenforce.icu/# order cenforce
can i get celebrex prices
cheap finpecia without insurance
Vitebsk State University named after P.M. Masherov, one of the oldest universities in Belarus, invites you to get the education of European quality! Undoubted advantages of studying in VSU are affordability, high level of the quality of the educational process, great experience in training foreign students Vitebsk State University P.M.Masherov University is an educational center. VSU.by provides training in: chemistry, biology, history, physics, programming, pedagogy, psychology, mathematics https://vsu.by/en/additional-education/certification-testing-russianbelarusian-foreign-language.html
how to buy generic celebrex without insurance
where can i get cheap requip
where can i buy celebrex prices
how to get lopid
can i order generic celexa pills
[url=https://legzo-casino-apk.ru]http://legzo-casino-apk.ru[/url]
Скачать последнюю версию приложения казино Легзо – побеждай сейчас!
http://www.legzo-casino-apk.ru
Idm Full Version Free Download With Crack Myegy
Idm Serial Number Crack Free
Free Download Idm Full Crack Trusted
Idm 6.29 Full Crack
Free Idm With Crack And Serial Number Download
[url=https://simonatxpq.goabroadblog.com/30935956/internet-download-manager-portable-things-to-know-before-you-buy]Idm Crack File Only Free Download[/url]
buying generic plavix without rx
Medicines information sheet. What side effects?
nursing intervention for hydrochlorothiazide
All trends of medicament. Get now.
can you buy verapamil no prescription
how to get vermox online
Medication information for patients. Long-Term Effects.
get cheap fluoxetine pill
Actual trends of pills. Get information here.
Drugs information leaflet. Drug Class.
cost of cheap azathioprine without insurance
Everything what you want to know about medication. Read information now.
how can i get lexapro price
I visit each day some sites and sites to read posts,
except this webpage provides feature based posts.
can you buy generic celebrex
Meds information for patients. Generic Name.
can you buy cheap lansoprazole without a prescription
Some news about medicine. Get now.
https://edpills.men/# ed medicines online
Pills information sheet. Long-Term Effects.
how can i get minocycline without dr prescription
Actual news about pills. Get information here.
buy cheap zocor without prescription
can you buy cheap zyvox prices
Medicine information. Brand names.
diovan 125 60 hydrochlorothiazide
Some information about medicament. Read information now.
Thanks for discussing the issues and covering them in a well written format.
Pills prescribing information. Effects of Drug Abuse.
how to get cheap acyclovir without a prescription
Actual about medicines. Get here.
how to buy generic vermox pill
Предлагаем услуги профессиональных инженеров офицальной мастерской.
Еслли вы искали ремонт телевизоров hisense сервис, можете посмотреть на сайте: ремонт телевизоров hisense рядом
Наши мастера оперативно устранят неисправности вашего устройства в сервисе или с выездом на дом!
get cheap doxycycline pills
semaglutide tablets store: semaglutide tablets for weight loss – semaglutide tablets for weight loss
Кто может порекомендовать обменник с хорошими условиями для обмена криптовалюты? Хочу, чтобы курс был честный и не было скрытых комиссий https://odessa.foroesp.com/viewtopic.php?id=281#p774
Asking questions are genuinely good thing if you are not understanding anything
completely, but this article provides pleasant understanding yet.
Купить диплом магистра оказалось возможно, быстрое обучение и диплом на руки
Кто может порекомендовать обменник с хорошими условиями для обмена криптовалюты? Хочу, чтобы курс был честный и не было скрытых комиссий http://kyevlyn.ukrbb.net/viewtopic.php?f=2&t=13986
наука
ГГУ имени Ф.Скорины
образование
Крупный учебный и научно-исследовательский центр Республики Беларусь. Высшее образование в сфере гуманитарных и естественных наук на 12 факультетах по 35 специальностям первой ступени образования и 22 специальностям второй, 69 специализациям.
Eric plans a Christmas surprise for his Girlfriends little nephew Kevin. This results in some serious accidents and a night at accident and emergency.
https://semaglutidetablets.store/# buy rybelsus online
ed pills cheap: ed medicine online – erectile dysfunction online prescription
Предлагаем услуги профессиональных инженеров офицальной мастерской.
Еслли вы искали ремонт телевизоров hisense адреса, можете посмотреть на сайте: ремонт телевизоров hisense рядом
Наши мастера оперативно устранят неисправности вашего устройства в сервисе или с выездом на дом!
Start your journey with an Ohio real estate license today | Start a new career with an Ohio real estate license | Find out how to become a successful real estate agent in Ohio | Realize your potential with a real estate license in Ohio | Plan your future with an Ohio real estate license | Top resources for Ohio real estate license preparation real estate agent license Ohio | Start your real estate career with Ohio license guidance | Learn about Ohio real estate license cost and requirements | Build your knowledge with Ohio real estate exam preparation tips [url=https://ohio-real-estate-license.com/]Ohio real estate license application[/url].
can i buy cheap depo medrol pill
can i buy cheap prasugrel without a prescription
I like what you have to offer. Keep up the good work!
Hi to every body, it’s my first go to see of this webpage; this
weblog includes amazing and really excellent information in support of readers.
Discover the world of Minecraft
Uncover the Domain of Minecraft: Your Supreme Existence and Freedom Quest
Welcome to your Gateway to the Highly Exciting and Immersive Minecraft Multiplayer Journey. Whether you’re a Architect, Battler, Adventurer, or Tactician, our Realm Offers Infinite Chances to Enjoy Survival and Anarchy Options in Ways you’ve Not seen Previously.
—
Why Opt For Adventures in Minecraft?
Our Server is Developed to Provide the Best Minecraft Encounter, Blending Unique Environments, Exciting Mechanics, and a Supportive Society. Traverse, Conquer, and Construct your own Explorations with Unique Components Tailored for All type of Player.
—
Key Attributes
– Survival and Anarchy Modes: Encounter the Adrenaline of Enduring against the odds or Plunge into Chaotic PvP Battles with no rules and full freedom.
– Massive Server Scale: With Slots for up to 3,750 Users, the Fun never stops.
– 24/7 Network Status: Connect Whenever to Experience Lag-Free, Lag-Free Play.
– Tailored Material: Navigate our Carefully Designed Minecraft Maps Loaded with Enhancements, Features, and Special Items from our Store-Based Inventory.
—
Distinctive Playstyle Modes
Persistence Mode
In Endurance Mode, you’ll Navigate Vast Worlds, Collect Resources, and Design to your heart’s content. Defeat off Opponents, Work with Teammates, or Face on Individual Quests where only the Strong Win.
Freedom Scenario
For Gamers Searching For Excitement and Excitement, Chaos Scenario Offers a Realm with Total Freedom. Dive in Competitive PvP Battles, Form Partnerships, or Dominate Others to Rule the Environment. Here, Persistence of the Fittest is the Sole Truth.
—
Tailored Minecraft Components
– Journey Worlds: Discover Custom Minecraft Challenges and RPG-Style Challenges.
– Commerce and Transactions: Our Interactive Commerce Permits you to Buy, Acquire, and Offer Goods to Rise the Tiers and Build Your Identity as a Strong User.
– Minecraft Marketplace: Access Special Items, Upgrades, and Levels that Boost your Experience.
—
Minecraft Store: Power Up Your Interaction
Our Online Shop Delivers a Range of Improvements, Statuses, and Products to Suit every Player. From Affordable Contribution Bundles to Exclusive Ranks, you can Achieve Fresh Possibilities and Advance your Experience to the Maximum.
—
Top Features
– Donate Offers (x10) – €1.00
– VIP – €1.40
– Elysium Rank – €20.00
– OWNER Rank – €40.00
– BOSS Rank – €60.00
—
Top Levels for Top Competitors
– CREATOR (€10.00) – Unlock Artistic Tools to Express your Creativity.
– Vanguard (€12.00) – Top Features and Special Advantages.
– Paragon (€59.10) – Elite Privileges for the Best User.
– Luminescent (€50.00) – Dominate as a Iconic Champion on the Server.
—
Join Our Supportive Minecraft Society
We Focus in Forming a Encouraging, Vibrant, and Inclusive Society. Whether you’re Completing RPG Missions, Exploring Specialized Worlds, or Participating in Community-Based PvP, there’s Constantly something Exciting to Enjoy.
—
Things You Can Expect
– Friendly Community: Engage With Like-Minded Minecraft Fans from Different Countries.
– Exciting Challenges: Join in Exclusive Tasks, Events, and Exclusive Events.
– Dedicated Support: Our Team Ensures Reliable Interaction and Assists you with any Questions.
Our GTA 5 RP network provides a vast interactive gameplay boosted with unique modified add-ons and mechanics elements.
Whether you’re a law-abiding lawman or a rising illegal mastermind, the opportunities in this realm are limitless:
Develop Your Dominion: Enter gangs, organize heists, or climb the illicit underworld to conquer the territory.
Become a Savior: Ensure order as a patrolman, emergency worker, or emergency responder.
Tailor Your Journey: Create your lifestyle, from luxury cars and properties to your player’s individual appearance and storylines.
Exciting Missions: Join in adrenaline-fueled operations, grand challenges, and user-led tasks to earn treasures and fame.
Dominate the Economy and Amass Wealth!
At vs-rp.com, we give you the assets and opportunities to earn huge in the virtual universe of GTA RP. From acquiring luxury properties to gathering wealth, the interactive system is yours to control.
Develop your empire through:
Player-Driven Missions: Accomplish missions, barters, and contracts to receive online wealth.
Custom Ventures: Establish and grow your own venture, from car dealerships to lounges.
High-End Resources: Obtain premium rides, exclusive properties, and rare digital assets.
Are you prepared to dominate Los Santos and grow into a digital magnate?
Benefits of Opt For Our Platform?
Here’s why we’re the premier GTA 5 RP platform:
1. Regular Patches and Events
Stay above of the game with special upgrades, tasks, and periodic events. New updates are released regularly to make your experience new and fun.
2. Massive Range of Resources
Explore a massive inventory of online properties, including:
Luxury Cars
Luxury Homes
Rare Assets
3. Professional Assistance
Whether you’re a veteran roleplayer or a beginner newcomer, our helpers is prepared to assist. We’ll assist you in configuring, provide help, and ensure you prosper in Los Santos.
https://semaglutidetablets.store/# buy rybelsus online
Предлагаем услуги профессиональных инженеров офицальной мастерской.
Еслли вы искали срочный ремонт телевизоров hisense, можете посмотреть на сайте: ремонт телевизоров hisense
Наши мастера оперативно устранят неисправности вашего устройства в сервисе или с выездом на дом!
Air quality
Наша компания предоставляет услуги эвакуации автомобилей в Москве и Московской области круглосуточно. Мы гарантируем оперативную помощь, доступные цены и профессиональный подход. Вызвать эвакуатор вы можете по телефону или оформить заявку на нашем сайте в любой момент стоимость эвакуатора в москве
order cheap allopurinol tablets
Предлагаем услуги профессиональных инженеров офицальной мастерской.
Еслли вы искали ремонт телевизоров hisense, можете посмотреть на сайте: ремонт телевизоров hisense цены
Наши мастера оперативно устранят неисправности вашего устройства в сервисе или с выездом на дом!
Аркада Казино официальный сайт – Приветственный Бонус +150% и 2000FS – Новое ARKADA Casino Онлайн, захватывающие игры, слоты, и автоматы доступны уже аркада казино играть
Please let us know when you plan to publish your book!
http://cenforce.icu/# cheapest cenforce
Аркада Казино официальный сайт – Приветственный Бонус +150% и 2000FS – Новое ARKADA Casino Онлайн, захватывающие игры, слоты, и автоматы доступны уже arkada казино зеркало
tetsdjjhd
Предлагаем услуги профессиональных инженеров офицальной мастерской.
Еслли вы искали ремонт телевизоров hisense, можете посмотреть на сайте: ремонт телевизоров hisense
Наши мастера оперативно устранят неисправности вашего устройства в сервисе или с выездом на дом!
order protonix price
Cherished is likely to be what people say about your comments.
I am very happy to look your post. Thanks a lot and i am taking a look ahead to touch you.
Pretty impressive article. I just stumbled upon your site and wanted to say that I have really enjoyed reading your opinions. Any way I’ll be coming back and I hope you post again soon.
Используйте бесплатные шаблоны резюме для устройства на работу. Пустые бланки резюме для устройства на работу представлены в 35 вариантах оформления. Шаблоны представлены в формате PDF, используйте для работы с файлами PDF-редакторы https://chopen.net/kak-sostavit-rezyume-i-ustroitsya-na-rabotu/
Используйте бесплатные шаблоны резюме для устройства на работу. Пустые бланки резюме для устройства на работу представлены в 35 вариантах оформления. Шаблоны представлены в формате PDF, используйте для работы с файлами PDF-редакторы https://piterets.ru/clause/brands/49009-shablony-rezjume-na-rabotu-kak-vybrat-idealnyj-variant.html
https://cenforce.icu/# cheapest cenforce
Drugs information leaflet. Cautions.
cost of nolvadex without rx
Everything news about meds. Read information here.
lisinopril 5 mg buy meijer pharmacy
Drugs information for patients. Drug Class.
0 4 mg sun pharmaceuticals tamsulosin
Some trends of medication. Get now.
cost generic aurogra price
Medicament prescribing information. Brand names.
can i order cheap mesalamine pill
Best information about medicine. Get information now.
https://kamagra.men/# Kamagra tablets
cordarone giГЎ
Drugs information. What side effects?
how to buy cheap thorazine without dr prescription
All what you want to know about drugs. Read information here.
can i order generic cetirizine price
fantastic internet site, I could definitely go to your web page once more…acquired some really nice info.
Allergic rhinitis diagnosis
عرض سلام! این سایت برای من بهترین مرجع
بوده. مقاله خیلی خوب و حرفهای بود.
امیدوارم همیشه موفق باشید و به همین سبک ادامه بدید.
Портал Дай Жару- более 70000 посетителей в месяц! Подбор саун и бань в Москвы и Подмосковья с телефонами, фото и ценами. Недорогие финские сауны, русские бани, турецкие парные баня
Портал Дай Жару- более 70000 посетителей в месяц! Подбор саун и бань в Москвы и Подмосковья с телефонами, фото и ценами. Недорогие финские сауны, русские бани, турецкие парные общественная баня
крипто обменник онлайн
http://casinositeleri2025.pro/# bahis siteleri 2024
Каждая площадка предлагает уникальный набор функций, которые могут включать разнообразные форматы, бонусные программы и техническую поддержку. Однако не все из них способны соответствовать высоким стандартам пользователей http://www.uepd.de/w3/doku.php?id=%20%D0%A2%D0%BE%D0%BF-10%20%D0%BE%D0%BD%D0%BB%D0%B0%D0%B9%D0%BD%20%D0%BA%D0%B0%D0%B7%D0%B8%D0%BD%D0%BE%20%D0%B4%D0%BB%D1%8F%20%D0%B8%D0%B3%D1%80%D1%8B%20%D0%B2%20%D0%BF%D0%BE%D0%BA%D0%B5%D1%80
Производство ангаров и складов под ключ.
Подробная информация и заказ быстровозводимый складов
Предлагаем услуги профессиональных инженеров офицальной мастерской.
Еслли вы искали ремонт телевизоров hisense цены, можете посмотреть на сайте: ремонт телевизоров hisense
Наши мастера оперативно устранят неисправности вашего устройства в сервисе или с выездом на дом!
Каждая площадка предлагает уникальный набор функций, которые могут включать разнообразные форматы, бонусные программы и техническую поддержку. Однако не все из них способны соответствовать высоким стандартам пользователей http://ledsoft.ru/forum/?PAGE_NAME=message&FID=5&TID=15674&TITLE_SEO=15674-_5-_-_-_-_-_-_-_-_&MID=16539&result=new#message16539
sex
can i purchase celebrex without a prescription
There most be a solution for this problem, some people think there will be now solutions, but i think there wil be one.
криптообменник онлайн
Babu88: Online casino and bookmaker for sports betting in Bangladesh babu88 com login
Babu88: Online casino and bookmaker for sports betting in Bangladesh babu88 app download
Automatic digital cutting machine (also known as CNC knife cutter) is a type of automated precision cutting system with CNC (Computer Number Controlled) controller which is used for high-precision cuts of heavier flexible and semi-rigid materials. It works with the multi-tool blades consisting of vibration knife, oblique knife, circular knife, punching knife, milling knife, punch roller, or marking pen. CCD camera and projector are optional for more precise cuts.
пин ап казино официальный сайт: pinup 2025 – pinup2025.com
http://slottr.top/# slot oyunlar? puf noktalar?
Производство ангаров и складов под ключ.
Подробная информация и заказ быстровозводимый складов
oyun dene [url=https://casinositeleri2025.pro/#]bilinmeyen bahis siteleri[/url] deneme bonus veren siteler
Предлагаем услуги профессиональных инженеров офицальной мастерской.
Еслли вы искали срочный ремонт телевизоров hisense, можете посмотреть на сайте: ремонт телевизоров hisense цены
Наши мастера оперативно устранят неисправности вашего устройства в сервисе или с выездом на дом!
Situs ROBOT88: Situs Permainan Top-Up Kredit Pulsa Terunggul dan Terlengkap di Indonesia
Situs ROBOT88 hadir sebagai solusi alternatif terbaik bagi bagi pecinta game online di Tanah Air.
Melalui fitur permainan top-up pulsa elektronik, kami menyediakan kemudahan akses simpel, kilat, dan sederhana menuju banyak variasi permainan online hanya dengan memakai top-up pulsa operator XL dan pulsa Telkomsel.
Support penuh dari sistem proteksi terkini serta jaringan berkecepatan tinggi membangun ROBOT88 solusi utama untuk pemain yang mana menginginkan kenyamanan serta kepercayaan.
Keunggulan ROBOT88 sebagai Platform Game Online Terkemuka
1. Legalitas Resmi PAGCOR
ROBOT88 memiliki lisensi terakreditasi dikeluarkan oleh PAGCOR, yang menegaskan bahwa platform ini terjamin serta terlindungi.
2. Game Online Terlengkap
Dengan mendaftar 1 ID, Anda dapat mengakses seluruh kategori game daring terpopuler yang kami sediakan.
3. Top-Up Pulsa Sederhana
ROBOT88 menawarkan metode top-up pulsa dengan potongan terendah, baik melalui XL atau Telkomsel.
4. Game Siaran Langsung dengan Pembawa Acara Menarik
ROBOT88 menyediakan game yang disiarkan real-time dengan tampilan video terkini.
5. Bonus Menguntungkan
ROBOT88 memberikan berbagai penawaran khusus antara lain:
– Welcome Bonus 20%
– Bonus Deposit Harian
– Cashback Mingguan
Registrasi Sekarang serta Rasakan Pengalaman Bermain di Platform ROBOT88!
Layanan Pelanggan 24 Jam Non-Stop
Kepuasan pemain menjadi prioritas utama kami.
ROBOT88 mempunyai Tim Bantuan berpengalaman, bersahabat, dan aktif siap membantu Anda selama waktu non-stop dengan menggunakan berbagai platform:
– Obrolan Langsung
– WA
– FB
– Media komunikasi lain
—
Manfaat Bergabung dengan ROBOT88
– Sistem Keamanan Optimal: Sistem dengan enkripsi modern mengamankan semua aktivitas pembayaran.
– Fasilitas Mudah: Isi saldo pulsa cepat serta biaya paling kecil.
– Permainan Terlengkap: Semua jenis permainan online dalam satu tempat.
– Sertifikasi Resmi: Diakui serta disetujui oleh PAGCOR.
– Bonus Menguntungkan: Promo serta cashback harian.
– Tim Bantuan Terpercaya: CS siap membantu 24 jam.
Registrasi Sekarang serta Nikmati Pengalaman Permainan di ROBOT88
Menggunakan ROBOT88, Anda tidak hanya menikmati permainan, tetapi menikmati sensasi luar biasa dalam platform permainan daring top-up pulsa.
Rasakan semua macam permainan, siaran langsung dengan pembawa acara menawan, serta menangkan keuntungan besar dengan bonus spesial dari ROBOT88.
Gabung hari ini sekarang juga serta jadilah bagian komunitas permainan daring terpopuler di Indonesia!
ROBOT88, platform permainan daring terpercaya yang siap memberikan kenyamanan dan bonus maksimal bagi para pemain.
промокод prodamus [url=http://promokod-prod.ru]промокод prodamus[/url] .
valif make – sinemet online buy order sinemet 10mg for sale
Pinco Casino Вход
Le jeudi, rendez-vous à “City Sushi” sur Banzai Slots et profitez de cinq bonus différents entre 16h et 22h.
учебный центр на своем предприятии
создание своей образовательной организации на предприятии позволяет организовать обучение сотрудников и контролировать его
купити юсдт в Києві
https://pinup2025.com/# pinup 2025
продать usdt за наличные в Одессе
Alimentez votre compte ou retirez vos gains par Visa, MasterCard, Netteler, Skrills, Neosurf ou virement bancaire.
Предлагаем услуги профессиональных инженеров офицальной мастерской.
Еслли вы искали ремонт телевизоров hisense, можете посмотреть на сайте: ремонт телевизоров hisense в москве
Наши мастера оперативно устранят неисправности вашего устройства в сервисе или с выездом на дом!
крипто обменник онлайн
Link exchange is nothing else however it is only placing the other person’s web site link on your page at appropriate place and other person will also do same in support of you.
Discover the steps to become a licensed realtor in Ohio | Prepare for the Ohio real estate test with confidence | Ohio real estate agent requirements made clear | Understand the requirements for Ohio real estate agent certification | Benefits of holding a realtor license in Ohio | Top resources for Ohio real estate license preparation Ohio real estate exam | Understand the Ohio real estate license application process | Ohio real estate license application steps simplified | Explore the requirements for real estate licensing in Ohio [url=https://ohio-real-estate-license.com/]Ohio real estate requirements[/url].
Предлагаем услуги профессиональных инженеров офицальной мастерской.
Еслли вы искали ремонт телевизоров hisense, можете посмотреть на сайте: ремонт телевизоров hisense рядом
Наши мастера оперативно устранят неисправности вашего устройства в сервисе или с выездом на дом!
http://slottr.top/# en cok kazand?ran slot oyunlar?
Предлагаем услуги профессиональных инженеров офицальной мастерской.
Еслли вы искали ремонт телевизоров hisense в москве, можете посмотреть на сайте: ремонт телевизоров hisense рядом
Наши мастера оперативно устранят неисправности вашего устройства в сервисе или с выездом на дом!
Быстрое обучение и получение диплома магистра – возможно ли это?
Как официально купить аттестат 11 класса с упрощенным обучением в Москве
Отслеживание курсов валют — это важный инструмент для грамотного управления финансами как в личной жизни, так и в бизнесе. Знание актуального курса позволяет выбрать наиболее выгодное время для обмена валюты, что особенно полезно при подготовке к поездкам за границу или международным переводам курс валюты на сегодня в банках
Мы не просто предоставляем цифры. На сайте вы найдете аналитические материалы, которые помогут лучше понять динамику валютного рынка, выявить тренды и спланировать свои финансовые шаги евро курс
Отслеживание курсов валют — это важный инструмент для грамотного управления финансами как в личной жизни, так и в бизнесе. Знание актуального курса позволяет выбрать наиболее выгодное время для обмена валюты, что особенно полезно при подготовке к поездкам за границу или международным переводам евро сколько стоит в рублях
Мы не просто предоставляем цифры. На сайте вы найдете аналитические материалы, которые помогут лучше понять динамику валютного рынка, выявить тренды и спланировать свои финансовые шаги купить валюту
Hello there, You have done an incredible job. I will certainly digg it and personally recommend to my friends. I am sure they will be benefited from this site.
Amazing advice, Many thanks.
http://casinositeleri2025.pro/# bahis siteleri 2024
http://casinositeleri2025.pro/# bet turkiye
юсдт наличные Одесса
en iyi oyun siteleri: gerГ§ek paralД± slot uygulamalarД± – en yeni deneme bonusu veren siteler 2025
Pinco Casino Официальный Сайт Вход Зеркало
Welcome to the GTA 5 Roleplay Experience!
Our GTA 5 RP network presents a huge sandbox adventure enhanced with exclusive modified add-ons and mechanics attributes.
Whether you’re a rule-following lawman or a up-and-coming criminal mastermind, the chances in this realm are endless:
Establish Your Dominion: Enter syndicates, execute raids, or ascend the illicit hierarchy to conquer the blocks.
Transform Into a Hero: Enforce law as a police officer, emergency worker, or emergency responder.
Customize Your Journey: Create your living, from exclusive vehicles and residences to your character’s individual style and narratives.
Thrilling Challenges: Join in high-risk tasks, epic events, and user-led missions to earn treasures and status.
Dominate the Wealth and Become Wealthy!
At vs-rp.com, we offer you the tools and options to accumulate huge in the digital environment of GTA RP. From securing high-end resources to building riches, the story-based market is yours to master.
Create your empire through:
Player-Driven Missions: Accomplish activities, exchanges, and jobs to earn virtual dollars.
Custom Ventures: Start and grow your own operation, from car markets to clubs.
High-End Assets: Own premium vehicles, one-of-a-kind homes, and unique in-game assets.
Are you set to rule Los Santos and transform into a in-game mogul?
Reasons to Pick Our Platform?
Here’s why we’re the best GTA 5 RP realm:
1. Ongoing Updates and Activities
Stay ahead of the rivals with exclusive features, quests, and periodic challenges. New elements are included frequently to ensure your journey exciting and captivating.
2. Wide Selection of Goods
Navigate a huge catalog of digital goods, including:
High-End Cars
Top-Tier Homes
Unique Items
3. Reliable Help
Whether you’re a veteran user or a beginner rookie, our staff is here to support. We’ll assist you in setting up, deliver help, and see to it you prosper in Los Santos.
торт на день рождения ребенку недорого
Wow, superb blog layout! How long have you been blogging for?
you made blogging look easy. The overall look
of your site is magnificent, let alone the content!
Banzai Slots fait partie de ces casinos en ligne qui aiment les gros chiffres.
deneme+bonusu+yeni: sГјperbetine – bahis siteleri deneme bonusu
Сейчас достаточно сложно найти хороший сервис с качественными прокси. Их количество растет каждый день, а попадание на первую страницу поисковой выдачи не гарантирует, что все будет работать, как часы и закроет все ваши потребности https://cpalive.pro/poleznie-servisi/
Китайские товары пользуются большим спросом на рынке, поэтому их продажа может стать прибыльным делом. Казалось бы, что может быть проще – покупай в Китае, продавай в России, наценка и будет прибылью, но не все так просто https://vc.ru/u/3307281-ivan08/1316795-kak-postroit-pribylnyi-biznes-na-postavkah-iz-kitaya-rukovodstvo-dlya-novichkov
Mostbet rasmiy sayti haqida batafsil ma’lumot | Mostbet 2024 yilgi yangi imkoniyatlari | Mostbet oynash jarayonini qanday boshlash mumkin? | Mostbet oynash uchun foydali maslahatlar | Mostbet uz uchun eng yaxshi o‘yin platformasi mostbet uz | Mostbet rasmiy sayti orqali xavfsiz to‘lovlar | Mostbet uz skachat va o‘yinlarga kirish bo‘yicha maslahatlar | Mostbet oynash va kazino bonuslari haqida bilib oling [url=https://mostbet-uz-kirish-casino.com/]mostbet uz registratsiya[/url].
Сейчас достаточно сложно найти хороший сервис с качественными прокси. Их количество растет каждый день, а попадание на первую страницу поисковой выдачи не гарантирует, что все будет работать, как часы и закроет все ваши потребности https://cpa-critic.com/arbitrazh/services/proxy/
Китайские товары пользуются большим спросом на рынке, поэтому их продажа может стать прибыльным делом. Казалось бы, что может быть проще – покупай в Китае, продавай в России, наценка и будет прибылью, но не все так просто https://reporter63.ru/content/view/728794/pochemu-vybirayut-kontejnernye-gruzoperevozki-po-moryu
Casino Pinco
http://pinup2025.com/# пин ап казино
Pinco Casino Зеркало
торты на заказ 50 женщине
Винтовой компрессор – это эффективное оборудование для сжатия воздуха, который применяется в различных сферах, от гаража до промышленности. Существует множество вариантов, включая бюджетные винтовые компрессоры, винтовые компрессоры для пневмоинструментов, а также специализированные модели для покраски автомобилей и бытового использования. Винтовые компрессоры бывают воздушного типа, сжатого воздуха и электрические, а также могут быть как автономными, так и без двигателя. В поисках винтового компрессора, будь то для дома, гаража или производственного процесса, можно найти как недорогие, так и более дорогие модели в магазинах, таких как винтовые компрессоры в Москве, Екатеринбурге, Барнауле и других городах. Важно помнить, что выбор зависит от задач: для больших производств подойдут высокопроизводительные воздушные винтовые компрессоры, а для дома – компактные и недорогие винтовые модели магазин винтовой компрессор
Casino Pinco
Передвижной компрессор — это универсальное решение для сжатия воздуха в разных условиях. Мобильные компрессоры, включая электрические модели, используются в самых разных сферах: от строительства до производства. Для удобства эксплуатации существуют передвижные компрессорные установки, воздушные компрессоры передвижные и даже воздушные компрессоры на прицепе. Эти устройства бывают как поршневыми, так и более мощными промышленными вариантами. Важно, что передвижной компрессор бывает с различными характеристиками, включая мощность, тип привода и производительность, что позволяет подобрать модель для любых нужд компрессор строительный электрический передвижной
Casino Pinco
Винтовой компрессор – это эффективное оборудование для сжатия воздуха, который применяется в различных сферах, от гаража до промышленности. Существует множество вариантов, включая бюджетные винтовые компрессоры, винтовые компрессоры для пневмоинструментов, а также специализированные модели для покраски автомобилей и бытового использования. Винтовые компрессоры бывают воздушного типа, сжатого воздуха и электрические, а также могут быть как автономными, так и без двигателя. В поисках винтового компрессора, будь то для дома, гаража или производственного процесса, можно найти как недорогие, так и более дорогие модели в магазинах, таких как винтовые компрессоры в Москве, Екатеринбурге, Барнауле и других городах. Важно помнить, что выбор зависит от задач: для больших производств подойдут высокопроизводительные воздушные винтовые компрессоры, а для дома – компактные и недорогие винтовые модели винтовые компрессоры для гаража
Передвижной компрессор — это универсальное решение для сжатия воздуха в разных условиях. Мобильные компрессоры, включая электрические модели, используются в самых разных сферах: от строительства до производства. Для удобства эксплуатации существуют передвижные компрессорные установки, воздушные компрессоры передвижные и даже воздушные компрессоры на прицепе. Эти устройства бывают как поршневыми, так и более мощными промышленными вариантами. Важно, что передвижной компрессор бывает с различными характеристиками, включая мощность, тип привода и производительность, что позволяет подобрать модель для любых нужд компрессор передвижное
торт с надписью 18
Pinco Casino Зеркало
велюровый торт
Покупка диплома о среднем полном образовании: как избежать мошенничества?
определить местоположение человека по номеру телефона [url=http://r3s.su/]определить местоположение человека по номеру телефона[/url] .
http://pinup2025.com/# пин ап казино официальный сайт
en iyi casino sitesi: yeni Гјyelik bonusu veren siteler – lisanslД± kumar siteleri
Un grand merci à eux qui prennent le temps d’expliquer les règles des jeux qu’ils prêtent et donnent des conseils sur d’autres jeux.
slot tr online: slot oyunlar? puf noktalar? – slot tr online
Tortuga propose au total plus de 20 jeux de table, 46 tables de jeu avec croupier en direct et des milliers de machines à sous.
Un casino en ligne 2020 fiable avec un support et une interface entièrement en français.
https://dzen.ru/b/ZRVgScQs0W_qR9yV
Наш сайт для мониторинга курсов валют — это ваш надежный помощник в финансовом планировании. Каждый день предоставляем точную и актуальную информацию о курсах валют, позволяя пользователям принимать обоснованные решения курсы валют во всех банках
https://casinositeleri2025.pro/# bahis veren siteler
pinup2025.com [url=http://pinup2025.com/#]pinup2025.com[/url] пин ап
Наш сайт для мониторинга курсов валют — это ваш надежный помощник в финансовом планировании. Каждый день предоставляем точную и актуальную информацию о курсах валют, позволяя пользователям принимать обоснованные решения доллар цена рублей
Si vous déposez 150€, vous allez alors avoir un solde de 300€ pour jouer.
Les meilleurs casinos collaborent avec ces éditeurs de jeux de casino de renom pour garantir une offre de jeu variée et de qualité.
MyTonWallet is the ultimate wallet for managing your TON (The Open Network) assets, offering a comprehensive range of features that set it apart from other wallets in the crypto space. Whether you’re new to cryptocurrencies or an experienced user, MyTonWallet provides all the tools you need to securely store, manage, and interact with your TON tokens, NFTs, and decentralized applications (dApps) ton wallet
MyTonWallet is the ultimate wallet for managing your TON (The Open Network) assets, offering a comprehensive range of features that set it apart from other wallets in the crypto space. Whether you’re new to cryptocurrencies or an experienced user, MyTonWallet provides all the tools you need to securely store, manage, and interact with your TON tokens, NFTs, and decentralized applications (dApps) https://mytonwallet.en.uptodown.com/android
I really like your blog.. very nice colors & theme. Did
you make this website yourself or did you hire someone to do it for you?
Plz respond as I’m looking to construct my own blog and would like to know where u got this from.
kudos
klima allianz deutschland [url=http://www.wettervorhersage-deutschland.com]klima allianz deutschland[/url] .
автоматические карнизы [url=https://elektrokarniz98.ru/]elektrokarniz98.ru[/url] .
https://casinositeleri2025.pro/# oyun s
https://t.me/vladislavkocherizhkin/26
Спиральный компрессор — это эффективное устройство, которое используется для сжатия воздуха в различных системах. Герметичный спиральный компрессор часто используется в промышленных приложениях, где необходимы компактность и надежность. Такие компрессоры обеспечивают отличную герметичность и минимальный уровень утечек, что делает их идеальными для использования в самых разных условиях спиральные воздушные компрессоры
https://t.me/vladislavkocherizhkin/14
пин ап вход [url=https://pinup2025.com/#]пинап казино[/url] пин ап казино зеркало
Спиральный компрессор — это эффективное устройство, которое используется для сжатия воздуха в различных системах. Герметичный спиральный компрессор часто используется в промышленных приложениях, где необходимы компактность и надежность. Такие компрессоры обеспечивают отличную герметичность и минимальный уровень утечек, что делает их идеальными для использования в самых разных условиях спиральные компрессоры ремеза
НОВАЭМ– двигатель перемен и инноваций в энергетической
отрасли.
http://casinositeleri2025.pro/# bilinmeyen bahis siteleri
Пинко Официальный Сайт Казино
детский торт на заказ недорого
Just want to say what a great blog you got here!I’ve been around for quite a lot of time, but finally decided to show my appreciation of your work!
Pinco Casino Регистрация
gГјvenilir kripto para siteleri: gГјvenilir bahis siteleri – grand pasha bet
Just what I needed to know thank you for this.
Pinco Casino Скачать
драгон мани регистрация
торты на заказ для мальчиков
dragon money официальный сайт
Онлайн Казино Пинко
http://pinup2025.com/# пин ап казино официальный сайт
Discover the Collection of CS2 Weapon Skins: Choose the Ultimate Style for Your Playstyle
Enhance your experience with distinct, high-quality Counter-Strike 2 skins that elevate the appearance of your gear and turn your inventory truly shine.
We provide a huge selection of designs — from hard-to-find CS2 designs to collector’s sets, offering you the option to customize your gear and highlight your preferences.
Reasons to Pick Us?
Acquiring CS2 items in our store is fast, protected, and easy. With rapid electronic transfer straight to your in-game storage, you can instantly using your new items right away.
Top Advantages:
– Protected Transactions: Enjoy protected, dependable payments on every order.
– Low Rates: We offer the most attractive Counter-Strike 2 skin prices with consistent price drops.
– Vast Range: From affordable to top-tier options, we deliver it all.
Steps to Buy:
1. Browse the Range
Explore our extensive collection of CS2 skins, organized by category, exclusivity, and theme.
2. Select Your Item
Once you choose the preferred design, place it to your cart and proceed to order confirmation.
3. Enjoy Your Recently Purchased Items
Receive your items right away and showcase them while gaming to highlight your style.
Why Players Trust Us:
– Vast Selection: Choose cosmetics for all weapon.
– Affordable Pricing: Transparent rates with no unexpected costs.
– Quick Transfer: Access your gear instantly.
– Safe Deals: Secure and reliable methods.
– Help Desk: Our support specialists is available to assist you around the clock.
Start Shopping Now!
Discover the top items and take your matches to the top tier.
Whether you’re hoping to enhance your arsenal, collect a unique catalog, or simply stand out, we|our store|our site|our marketplace is your go-to marketplace for high-end Counter-Strike 2 skins.
Join us and choose the design that defines your taste!
Производство ангаров и складов под ключ.
Подробная информация и заказ ангаров быстровозводимых
http://casinositeleri2025.pro/# orisbet giriЕџ
Mostbet oynash uchun eng yaxshi imkoniyatlar | Mostbet uz apk download va foydali funksiyalar | Mostbet oynash jarayonini qanday boshlash mumkin? | Mostbet oynash va kazino bonuslari haqida ma’lumot | Mostbet 2024 yil uchun yangi imkoniyatlar va bonuslar mostbet official | Mostbet uz oynash va sportga pul tikish bo‘yicha maslahatlar | Mostbet oynash va o‘yinlar uchun yangi imkoniyatlar | Mostbet apk download va yangi imkoniyatlar [url=https://mostbet-uz-kirish-casino.com/]http://mostbet-uz-kirish-casino.com[/url].
Your One-Stop Shop for AI-Powered Creativity
Your Go-To Destination for AI-Driven Innovation
Unlock the full potential of AI technology with specially designed, premium prompts created to boost your imagination and productivity. Whether you’re a promoter, a author, a creative professional, or a developer, our carefully selected tools at Template Forge are the solutions you need to take your ideas to the next level.
Why Choose Us?
At Our Store, we’re committed to delivering exclusively the best templates, delivering usefulness, premium standards, and user-friendliness. Here’s why thousands of professionals prefer us as their preferred resource marketplace:
Top-Quality Templates
Our expert team diligently builds templates that are practical, unique, and plug-and-play. Each template is crafted to ensure results, allowing you to achieve results effortlessly and effortlessly.
Extensive Options
From marketing solutions to story development, tech solutions, and artistic inspiration, we provide a variety of industries. Our resources are created for professionals and innovators in various industry.
Fully Adjustable
Each solution is easily customizable, making it possible to tailor it to your unique task demands. This customizability guarantees our templates are widely applicable and effective for different fields and goals.
Seamless Process
We understand your energy. With fast transfers, pre-packaged sets, and an seamless system, choosing and using the best resources has never been easier.
Discover Our Newest Additions
Explore solutions that drive engagement, fuel imagination, and streamline productivity.
Why Choose Us
– Wide Variety: Discover prompts for any purpose.
– Affordable Pricing: Premium resources priced at just 5.00 €.
– Immediate Downloads: Download your templates immediately.
– Proven Results: Each solution is proven and proven to deliver success.
– 24/7 Support: Have questions? Our team is always on standby to assist you.
Explore Now!
Discover the most innovative AI prompts and elevate your ideas to the next level.
Log in and choose the tools that fit your style!
Тут можно москва сейф для офисакупить сейф офисный
slot oyunlar? puf noktalar? [url=http://slottr.top/#]slot siteleri[/url] az parayla cok kazandiran slot oyunlar?
https://dzen.ru/b/ZRVgScQs0W_qR9yV
Апостатудо – это не просто игра, а отличный тренажёр для ума. С каждым уровнем сложности вы будете развивать аналитические навыки и совершенствовать стратегическое мышление história da Apostatudo
Спиральные компрессоры осуществляют подачу чистого сжатого воздуха и отлично подходят для применения в медицинских и лабораторных условиях спиральный компрессор remeza
Апостатудо – это не просто игра, а отличный тренажёр для ума. С каждым уровнем сложности вы будете развивать аналитические навыки и совершенствовать стратегическое мышление máquinas caça-níqueis exclusivas
Спиральные компрессоры осуществляют подачу чистого сжатого воздуха и отлично подходят для применения в медицинских и лабораторных условиях спиральные компрессоры ремеза
http://pinup2025.com/# пин ап казино
it is a really nice point of view. I usually meet people who rather say what they suppose others want to hear. Good and well written! I will come back to your site for sure!
Тут можно можно купить сейфстоимость сейфа
Диплом техникума купить официально с упрощенным обучением в Москве
Pro nepretrzite sazeni a zabavu sledujte aktualni vstupni adresu Mostbet v Ceske republice mostbet 30 free spins
продажа франшизы [url=www.franshizy36.ru/]продажа франшизы[/url] .
Olymp Casino — популярная платформа, предлагающая широкий выбор казино игр и ставок для пользователей из Узбекистана https://ywcaminot.org/
Pro nepretrzite sazeni a zabavu sledujte aktualni vstupni adresu Mostbet v Ceske republice Mostbet
Olymp Casino — популярная платформа, предоставляющая пользователям Казахстана широкий выбор казино игр и ставок на спорт https://ideannualconference.com/
http://slottr.top/# en cok kazand?ran slot oyunlar?
Mobile applications have become an integral part of our daily lives, offering a wide range of tools to simplify tasks, entertain, and enhance productivity. As technology continues to evolve, more apps are being designed to cater to different needs, from gaming to communication and beyond. These applications offer convenience, and with the right features, they can become indispensable on our smartphones babu88 download http://zanasite.free.fr/laripostedumardi/doku.php?id=_A_Comprehensive_Review_of_Bluewallet_for_Lightning_Network_Users
Mobile applications have become an integral part of our daily lives, offering a wide range of tools to simplify tasks, entertain, and enhance productivity. As technology continues to evolve, more apps are being designed to cater to different needs, from gaming to communication and beyond. These applications offer convenience, and with the right features, they can become indispensable on our smartphones babu88 download http://www.nhps1914.com/wiki/index.php?title=_Bluewallet_and_Lightning_Network:_A_Perfect_Pair_for_Instant_Payments
Цилиндрическая камера видеонаблюдения является одним из наиболее эффективных решений для наружного мониторинга и обеспечения безопасности 4 канальный видеорегистратор
франшиза для малого бизнеса [url=http://www.franshizy34.ru]франшиза для малого бизнеса[/url] .
Цилиндрическая камера видеонаблюдения является одним из наиболее эффективных решений для наружного мониторинга и обеспечения безопасности уличная цилиндрическая камера
Betovo roulette online [url=https://www.betovo-it.com]Betovo roulette online[/url] .
https://slottr.top/# slot oyunlar? puf noktalar?
I think the article missed an important point regarding [insert detail].
пин ап казино зеркало [url=http://pinup2025.com/#]пинап казино[/url] пинап казино
Its like you learn my mind! You seem to understand so much approximately this,
like you wrote the e book in it or something. I believe that you
can do with some p.c. to pressure the message house a little bit, however instead of that, this
is wonderful blog. A great read. I will definitely be back.
https://slottr.top/# slot siteleri
Pinco Casino Вход
can i get celebrex without insurance
can i get generic zerit online
Надежные онлайн казино Украины: как выбрать площадку для игры в слоты, чтобы выигрывать деньги и легко выводить гривны на карту отзывы крипто казино
Надежные онлайн казино Украины: как выбрать площадку для игры в слоты, чтобы выигрывать деньги и легко выводить гривны на карту відгуки казино онлайн
Hey, I think your site might be having browser compatibility issues.
When I look at your website in Safari, it looks fine but when opening in Internet Explorer,
it has some overlapping. I just wanted to give you a quick heads up!
Other then that, wonderful blog!
Межкомнатные раздвижные перегородки на заказ. Купить с доставкой по России. Действуют акции, системы скидок и специальных предложений гардеробные системы премиум
Межкомнатные раздвижные перегородки на заказ. Купить с доставкой по России. Действуют акции, системы скидок и специальных предложений система хранения вещей в гардеробной цена
cost of cheap artane without prescription
where to buy generic allegra without dr prescription
Микрозаймы выдают МФО – микрофинансовые организации. Их преимущество для бизнеса – в более простом порядке получения денег и быстром сроке рассмотрения заявки займ ооо
Микрозаймы выдают МФО – микрофинансовые организации. Их преимущество для бизнеса – в более простом порядке получения денег и быстром сроке рассмотрения заявки займ на ип
Пинко Казино Официальный Сайт Зеркало Россия
вывод из запоя в спб [url=www.rubiz.forum.cool/viewtopic.php?id=3759]www.rubiz.forum.cool/viewtopic.php?id=3759[/url] .
Пошаговая инструкция по безопасной покупке диплома о высшем образовании
таможенный брокер карго [url=http://www.tamozhennyj-broker-moskva.ru]таможенный брокер карго[/url] .
can i purchase cheap celebrex pill
klima bundesl?nder deutschland [url=wettervorhersage-deutschland.com]klima bundesl?nder deutschland[/url] .
can i get cheap zoloft without a prescription
таможенный брокер импорт [url=https://tamozhennyj-predstavitel-moskva11.ru]https://tamozhennyj-predstavitel-moskva11.ru[/url] .
Medicament information sheet. Drug Class.
get anastrozole tablets
Everything about drugs. Read information now.
[url=][/url]
DESIGN, FABRICATION & INSTALLATION OF CUSTOM MADE LOUVERS!
DK Construction & Design provides comprehensive, custom solutions for louvres,
sunshades, privacy screens, awnings, and balustrades made from aluminium, glass, and steel.
Our end-to-end service covers on-site measurements, design development, detailed drawings,
engineering, fabrication, and installation.
We work closely with designers, architects, and homeowners to deliver tailored shading,
privacy, and safety solutions. Our team ensures that every project meets the highest
standards of quality and durability, with a focus on functionality and aesthetics.
Whether you’re after sleek sun control systems or secure balustrading, we’ve got
the expertise to bring your vision to life.
Tel: +61475 617 720
Сайт компании DK Construction & Design
[url=][/url]
http://mexicanpharmi.com/# purple pharmacy mexico price list
https://golo.lat/wrubxudihsxwphr Find a partner who shares your hopes and goals on our dating website. We bring people together for relationships built upon trust and compatibility. Look through profiles in depth and get to know who is behind the images. Have meaningful conversations and build real connections. Our platform ensures safe, private, and secure communication. Join a network of singles seeking romance, companionship or friendship. Start with sharing your personal story to discover where it takes you. If it’s just a casual encounter or a serious relationship, we’ve got your back. Discover the joy of meeting someone special today. Begin your journey towards romance today.
топ франшиз 2024 [url=www.franshizy38.ru]www.franshizy38.ru[/url] .
prescription drugs: Cheapest drug prices Canada – best male enhancement pills
can i buy capoten
cost lisinopril for sale
Medicine information leaflet. Cautions.
can i buy ziprasidone without prescription
Best information about drugs. Get information now.
Generally I don’t read article on blogs, however I would like to say that this
write-up very compelled me to take a look at and do it!
Your writing style has been surprised me. Thank you,
very nice article.
My web site; best website
http://indiapharmi.com/# indianpharmacy com
where can i buy celebrex without a prescription
вывод из запоя цены [url=www.forumbar.anihub.me/viewtopic.php?id=9764/]вывод из запоя цены[/url] .
Medicines information. Cautions.
rosuvastatin and coumadin
Actual information about medication. Get now.
компании таможенное оформление [url=https://tamozhennyj-broker-moskva.ru/]https://tamozhennyj-broker-moskva.ru/[/url] .
where buy cheap zyloprim without prescription
where to get Stromectol online
Meds prescribing information. Long-Term Effects.
how to buy levitra for sale
Everything trends of medication. Get here.
https://indiapharmi.com/# best online pharmacy india
픽 프리미엄 멤버십을 스픽 프리미엄 플러스 차이구독 중입니다. 월 9스픽 프리미엄 플러스 차이,080원으로 모든 강스픽 프리미엄 플러스 차이의와 대
buying generic fml forte online how to buy fml forte tablets get generic fml forte pill
buying cheap fml forte online can you buy cheap fml forte tablets where to buy fml forte without insurance
where buy cheap fml forte prices
where to get generic fml forte without a prescription cost cheap fml forte without rx can i buy generic fml forte price
where can i buy fml forte without a prescription can i order cheap fml forte can i purchase cheap fml forte without dr prescription
how to get cheap zestril tablets
Pills information sheet. Long-Term Effects.
cost generic azathioprine no prescription
Actual about medication. Read information here.
Чаще всего стеклянные перегородки можно увидеть в деловых помещениях – пространствах лаконичных, функциональных и, прежде всего, с рабочей атмосферой гардеробная система с ящиками
вывод из запоя цены санкт-петербург [url=http://internetmoney.bestbb.ru/viewtopic.php?id=31707/]вывод из запоя цены санкт-петербург[/url] .
Чаще всего стеклянные перегородки можно увидеть в деловых помещениях – пространствах лаконичных, функциональных и, прежде всего, с рабочей атмосферой системы для гардеробных комнат
франшиза [url=http://franshizy32.ru/]франшиза[/url] .
can i order zyrtec without dr prescription buy zyrtec without insurance buying generic zyrtec price
where can i buy generic zyrtec without insurance can you get generic zyrtec price get cheap zyrtec
how to get cheap zyrtec pills
can i order generic zyrtec without a prescription can you buy zyrtec price where can i buy generic zyrtec tablets
where can i buy zyrtec for sale where buy cheap zyrtec price where can i buy zyrtec no prescription
can you buy generic vermox without dr prescription
Medicament information leaflet. What side effects can this medication cause?
how to get levitra tablets
Some what you want to know about drugs. Get now.
http://mexicanpharmi.com/# mexican rx online
Secrets Kenya stands as a premier online retailer specializing in adult toys and sexual wellness products in Kenya. They offer a wide range of products including vibrators, dildos, strap-ons, and other sexcessories designed to enhance sexual pleasure and intimacy for both men and women. The website emphasizes discretion, privacy, and quality, ensuring that all products are sourced from reputable manufacturers. With services like quick delivery across Nairobi and discreet packaging, Secrets Kenya aims to provide a seamless shopping experience for those seeking to explore or enhance their sexual adventures. Their customer service is noted for being responsive, ready to assist with any inquiries or orders, making it a go-to destination for those interested in adult novelty items.
Труба профильная — это вид современного строительного металлопроката, получаемый профилированием. Они имеют сечение, отличное от круглого. Наиболее распространены квадратные и прямоугольные труба профильная в москве цена
франшизы для малого бизнеса [url=www.franshizy38.ru/]франшизы для малого бизнеса[/url] .
Труба профильная — это вид современного строительного металлопроката, получаемый профилированием. Они имеют сечение, отличное от круглого. Наиболее распространены квадратные и прямоугольные труба профильная стоимость
generic lisinopril price where to buy lisinopril 2.5 mg where can i buy generic lisinopril without insurance
how can i get generic lisinopril no prescription symptoms of lisinopril dose too high where buy lisinopril without a prescription
cost lisinopril pill
where can i get cheap lisinopril can i order generic lisinopril without a prescription can i purchase generic lisinopril without dr prescription
alternative to lisinopril due cough where buy cheap lisinopril cost generic lisinopril without dr prescription
where to buy motilium without insurance
Medication information sheet. Effects of Drug Abuse.
can i buy zoloft prices
Everything what you want to know about medicine. Read now.
stromectol tablets uk – stromectol cost tegretol 200mg brand
Mostbet sayti orqali tezkor va xavfsiz to‘lovlar amalga oshiriladi | Mostbet o‘yinchilari uchun yangi imkoniyatlar va bonuslar | Mostbet uz ro‘yxatdan o‘tish va dastlabki bonuslarni olish | Mostbet oynash uchun qulay platforma va bonuslar mostbet casino. | Mostbet ilovasi orqali xavfsiz va tezkor to‘lovlar | Mostbet uz onlayn kazino va sport tikish platformasi [url=https://mostbet-casino-uz-kirish.com/]http://mostbet-casino-uz-kirish.com[/url].
Расслабьтесь с велас ароматическими свечами, Какие ароматы выбрать для разных помещений, Подарите себе моменты релаксации с велас ароматическими свечами
difusor de aroma [url=https://scentalle.com/]difusor de aroma[/url] .
https://mexicanpharmi.com/# buying from online mexican pharmacy
where buy generic celexa without a prescription cost of cheap celexa tablets where can i get cheap celexa prices
where to get generic celexa without rx generic celexa without insurance buy celexa without insurance
can i get cheap celexa pill
cost generic celexa for sale can you buy cheap celexa pills can i buy celexa without dr prescription
how can i get cheap celexa for sale cost cheap celexa without a prescription can you get celexa pill
where can i buy cheap sinequan without prescription
Medicament information for patients. What side effects?
can you buy rogaine without dr prescription
Actual what you want to know about medicament. Read now.
Across Africa Tours & Travel is a renowned travel agency offering a diverse range of safari and adventure packages across various countries in Africa. Whether you’re looking for budget-friendly tours or luxury experiences, this company caters to all with packages in renowned destinations like Kenya, Tanzania, Uganda, Senegal, Angola, and more. They provide detailed itineraries that include wildlife safaris, cultural tours, beach vacations, and unique expeditions that allow travelers to immerse themselves in the rich biodiversity and cultural heritage of Africa. With a focus on creating memorable travel experiences, Across Africa Tours ensures personalized service, expert guides, and comprehensive travel plans. Their offerings are designed to appeal to adventurers, nature enthusiasts, and those looking to explore the cultural tapestries of Africa.
Самые востребованные среди них – прямоугольные и квадратные изделия. Профильные трубы 40х40 широко используются во всех сферах: тяжелой и легкой промышленности купить металл профильная труба
Самые востребованные среди них – прямоугольные и квадратные изделия. Профильные трубы 40х40 широко используются во всех сферах: тяжелой и легкой промышленности купить профильную трубу недорого
can i buy cheap doxycycline pills doxycycline hyclate usp where buy cheap doxycycline for sale
buying doxycycline without prescription where to buy doxycycline 100 mg for cheap doxycycline hyclate 150mg buy online
can you buy generic doxycycline pill
how to get doxycycline prescribed buy cheap doxycycline uk order cheap doxycycline no prescription
cost doxycycline without insurance how to get cheap doxycycline can i order doxycycline prices
cost celebrex without a prescription
Medicine prescribing information. Effects of Drug Abuse.
how to buy generic aldactone no prescription
Best news about drugs. Get information now.
where can i get generic lisinopril online lisinopril price comparison how to get generic lisinopril online
cheap lisinopril prices lisinopril hydrochlorothiazide cost does lisinopril work immediately
cheapest price for lisinopril
get generic lisinopril without rx where buy lisinopril without a prescription cost for 40 mg lisinopril
cheap lisinopril without prescription cost lisinopril online where to get generic lisinopril without a prescription
can i purchase cymbalta pills
Трубы из ВЧШГ производства ЛТК «Свободный сокол» имеют
длину 6 метров. Они оснащены уплотнительным
кольцом и покрытием с обеих
сторон, купить можно у Прогресс-Трейд.
Meds information leaflet. Brand names.
physical properties of rosuvastatin calcium
All news about medicines. Get information here.
Приобретение школьного аттестата с официальным упрощенным обучением в Москве
сайт франшиз [url=https://franshizy32.ru/]сайт франшиз[/url] .
buy amoxicillin without script where buy cheap amoxicillin without rx buy amoxicillin without precription
amoxicillin dissolve in water where buy cheap amoxicillin prices amoxicillin 500mg buy online no prescription
amoxicillin for humans sale
where to buy amoxicillin potassium clavulanate without prescription action of amoxicillin cheap amoxicillin pills
can you buy amoxicillin amoxicillin 500mg price amoxicillin tablets buy online
can i purchase generic atarax price
Medicine prescribing information. Short-Term Effects.
where buy cheap mobic for sale
All information about drug. Read information now.
prodamus промокод [url=https://krut.forumno.com/viewtopic.php?id=6698#p26083]https://krut.forumno.com/viewtopic.php?id=6698#p2608344&[/url] .
http://mexicanpharmi.com/# best online pharmacies in mexico
Преимущества деревянных домов ручной рубки. Стоимость срубов домов и бань. Отзывы владельцев. Производство под Санкт-Петербургом https://st-petersburg.cataloxy.ru/firms/izba.spb.ru.htm
На консультації психолога онлайн можна вирішити свої проблеми та одержати кваліфіковану допомогу досвідченного психолога https://tinyurl.com/konsultacia-psyhologa-online
Your One-Stop Shop for AI-Powered Creativity
Your Marketplace for AI-Enhanced Innovation
Tap into the complete potential of Artificial Intelligence with custom-crafted, top-tier templates built to elevate your imagination and productivity. Whether you’re a marketing professional, a content creator, a visual creator, or a coder, our expertly curated prompts at Templateforge are the resources you require to propel your tasks to the top tier.
Why Use Us?
At Our Platform, we’re dedicated to delivering simply the most effective solutions, ensuring value, high standards, and ease of use. Here’s why creators choose us as their trusted AI solution marketplace:
Well-Crafted Solutions
Our professional creators diligently builds resources that are practical, innovative, and immediately applicable. Each resource is crafted to provide success, supporting you to achieve results effortlessly and smoothly.
Varied Applications
From content promotion to creative storytelling, tech solutions, and artistic inspiration, we offer a variety of applications. Our solutions are created for enthusiasts and creatives in all niche.
Fully Adjustable
Each prompt is fully adjustable, making it possible to adjust it to your custom goal preferences. This adaptability provides our templates are flexible and adaptable for multiple applications and goals.
User-Friendly Experience
We prioritize your time. With immediate access, structured collections, and an intuitive platform, choosing and using the perfect AI prompts has never been more convenient.
Discover Our Fresh Releases
Find prompts that enhance success, fuel imagination, and enhance processes.
Why Users Trust Us
– Extensive Range: Discover templates for all purpose.
– Transparent Costs: Premium prompts priced at just 5.00 €.
– Quick Delivery: Access your resources instantly.
– Guaranteed Excellence: Each template is checked and designed to achieve value.
– Dedicated Support: Looking for help? Our experts is readily ready to assist you.
Begin Your Journey!
Find the most innovative solutions and boost your ideas to the highest point.
Sign in and explore the resources that reflect your goals!
where buy finasteride no prescription generic finasteride without a prescription how to get generic finasteride online
buying finasteride pill where can i get finasteride prices where can i buy finasteride without a prescription
can i buy finasteride without a prescription
where can i get generic finasteride pills can i order generic finasteride without a prescription where to buy finasteride in nigeria
cost of finasteride price can i buy generic finasteride without a prescription order finasteride tablets
can you buy cheap requip prices
Pills information for patients. Long-Term Effects.
cost of generic neurontin without prescription
Some information about medicine. Get information here.
Предлагаем услуги профессиональных инженеров офицальной мастерской.
Еслли вы искали ремонт телевизоров haier, можете посмотреть на сайте: ремонт телевизоров haier цены
Наши мастера оперативно устранят неисправности вашего устройства в сервисе или с выездом на дом!
производство кухонь [url=mirmebeli777.ru]mirmebeli777.ru[/url] .
Allergy-friendly home design Allergy shots Asthma inhaler techniques
Allergy management resources Asthma symptom diary apps Allergy management techniques
Asthma medication adherence
Allergy management Asthma lifestyle modification programs Asthma symptom tracking apps
Allergy sensitivity testing Allergy awareness resources Asthma trigger management plan
Промисловий сталевий вентиль марки 11с37п для регулювання потоку води, пари чи газу у трубопровідних системах. Використовується у системах середнього та високого тиску вентиль чугунный
Создаем стильные и функциональные интерьеры квартир, домов и офисов в Санкт-Петербурге, дизайн-проекты под ключ с 3D визуализацией по доступным ценам от современных дизайнеров студии «ID-Code» дизайн квартир фото и цены
Узнайте, как безопасно купить диплом о высшем образовании
Промисловий сталевий вентиль марки 11с37п для регулювання потоку води, пари чи газу у трубопровідних системах. Використовується у системах середнього та високого тиску вентиль стальной
cost cheap celebrex without a prescription
Создаем стильные и функциональные интерьеры квартир, домов и офисов в Санкт-Петербурге, дизайн-проекты под ключ с 3D визуализацией по доступным ценам от современных дизайнеров студии «ID-Code» дизайн квартиры цена за квадратный метр
whoah this weblog is great i really like studying your articles. Stay up the great work! You already know, lots of persons are looking round for this information, you can aid them greatly.
Drug information leaflet. Brand names.
which one of the following is a contraindication of bupropion
Everything trends of meds. Read here.
http://mexicanpharmi.com/# purple pharmacy mexico price list
торшерный светильник уличный светодиодный [url=https://svetilnik-svetodiodnyj-ulichnyj.ru]торшерный светильник уличный светодиодный[/url] .
can you take colchicine daily colchicine brand names can you take colchicine daily
order colchicine colchicine in heart failure to buy colchicine tamoxifen
oes colchicine work in fmf
how long does colchicine last colchicine nhs side effects does colchicine cause insomnia
can you buy generic colchicine without a prescription colchicine for plant growth colchicine dosage side effects
“Wow, I never thought about it like this before. This article opened my eyes!”
“Wow, I never thought about it like this before. This article opened my eyes!”
Предлагаем услуги профессиональных инженеров офицальной мастерской.
Еслли вы искали ремонт телевизоров lg рядом, можете посмотреть на сайте: ремонт телевизоров lg
Наши мастера оперативно устранят неисправности вашего устройства в сервисе или с выездом на дом!
https://vse-o-gormonah.com/hormones/kodirovka-ot-alkogolizma-s-vyezdom-na-dom-osobennosti-i-preimushhestva.html
https://zdorovnik.com/vyvod-iz-zapoya-na-domu-bezopasnyj-put-k-vosstanovleniyu-zdorovya/
I learned so much from this piece. Thank you for sharing!
белое вино купить в москве [url=www.pekin-vl.ru]белое вино купить в москве[/url] .
белое вино купить [url=https://warm-cats.ru]белое вино купить[/url] .
“This was both informative and thought-provoking. Keep it up!”
Полный гид по достопримечательностям Калининграда: от Кафедрального собора до Куршской косы. Узнайте, какие места обязательно стоит посетить в самом западном городе России kaliningrad.blog
A must-read for anyone looking to stay ahead in this field. Loved it!
A must-read for anyone looking to level up in this field!
I was able to find good info from your articles.
Полный гид по достопримечательностям Калининграда: от Кафедрального собора до Куршской косы. Узнайте, какие места обязательно стоит посетить в самом западном городе России kaliningrad.blog
Предлагаем услуги профессиональных инженеров офицальной мастерской.
Еслли вы искали ремонт телефонов xiaomi адреса, можете посмотреть на сайте: срочный ремонт телефонов xiaomi
Наши мастера оперативно устранят неисправности вашего устройства в сервисе или с выездом на дом!
order generic doxycycline without insurance doxycycline 100mg buy generic doxycycline price
buy doxycycline 100mg australia where can i buy in canada doxycycline hyclate 100mg tablets can i buy generic doxycycline for sale
doxycycline dose for rosacea treatment
where can i get cheap doxycycline without insurance can i buy cheap doxycycline without insurance where to purchase doxycycline
doxycycline child side effects can i buy doxycycline over the counter uk can i get generic doxycycline pills
Мы гарантируем максимальную комплектацию вашего объекта необходимыми товарами.
Вы можете купить у ВГК ПОЛИМЕР даже резиновые компенсаторы и другое оборудование в минимальные сроки.
where can i buy amoxicillin for me buy amoxicillin 250mg capsules for children where i can buy amoxicillin
can i buy amoxicillin over the counter in majorca can i purchase generic amoxicillin no prescription where to get generic amoxicillin without dr prescription
can i purchase cheap amoxicillin without insurance
buy amoxicillin australia can i buy cheap amoxicillin without rx order cheap amoxicillin price
can i order generic amoxicillin without dr prescription cost of cheap amoxicillin price buy amoxicillin no prescription fda checked pharmacy
Tous les jeux du site sont également accessibles depuis votre mobile à travers un navigateur adapté aux systèmes Android et iOS.
http://mexicanpharmi.com/# mexico drug stores pharmacies
can you get lisinopril without rx how to stop taking lisinopril cost of lisinopril at walmart
buy lisinopril no prescription buy lisinopril no rx get cheap lisinopril tablets
can i order cheap lisinopril pills
does lisinopril cause heart palpitations buy lisinopril 20 mg without prescription get generic lisinopril without insurance
how to buy cheap lisinopril online order lisinopril without insurance where can i buy cheap lisinopril without insurance
вино белое цена [url=https://www.vin-tage.ru]вино белое цена[/url] .
how to buy generic motilium online where can i get motilium pills can you get motilium tablets
can i buy cheap motilium can i get cheap motilium without rx how to get cheap motilium no prescription
how to get motilium
can you buy cheap motilium pills how to buy cheap motilium prices where can i get cheap motilium price
where buy generic motilium online where can i buy motilium without rx cost of generic motilium without rx
производители уличных светильников [url=http://svetilnik-svetodiodnyj-ulichnyj.ru/]производители уличных светильников[/url] .
https://zdorovnik.com/vyvod-iz-zapoya-na-domu-bezopasnyj-put-k-vosstanovleniyu-zdorovya/
Предлагаем услуги профессиональных инженеров офицальной мастерской.
Еслли вы искали ремонт телефонов vivo в москве, можете посмотреть на сайте: срочный ремонт телефонов vivo
Наши мастера оперативно устранят неисправности вашего устройства в сервисе или с выездом на дом!
https://amoxstar.com/# order amoxicillin online uk
De plus, dès que votre activité le permettra, le service VIP de Banzai Slots vous gratifiera d’un bonus supplémentaire.
how can i get cheap avodart without rx cost of avodart pills where buy cheap avodart prices
avodart extrapyramidal symptoms can i order avodart prices get cheap avodart pill
avodart pill medication
avodart coffee arimidex purchase can i buy generic avodart online
avodart 20 mg tablet get generic avodart without insurance where buy avodart without prescription
Useful posts, Thanks a lot.
Предлагаем услуги профессиональных инженеров офицальной мастерской.
Еслли вы искали ремонт телефонов sony цены, можете посмотреть на сайте: ремонт телефонов sony
Наши мастера оперативно устранят неисправности вашего устройства в сервисе или с выездом на дом!
Предлагаем услуги профессиональных инженеров офицальной мастерской.
Еслли вы искали ремонт телефонов realme адреса, можете посмотреть на сайте: ремонт телефонов realme рядом
Наши мастера оперативно устранят неисправности вашего устройства в сервисе или с выездом на дом!
can i purchase generic zyvox tablets
To avoid such ridiculous situations and not get into trouble, we recommend that you consider buying a smoking cap in our online store. Here you can find thimbles of various shapes and designs, made of the best materials https://napas420.com/naperstki-dlya-kurinnya/
To avoid such ridiculous situations and not get into trouble, we recommend that you consider buying a smoking cap in our online store. Here you can find thimbles of various shapes and designs, made of the best materials https://napas420.com/ru/naperstki-dlya-kureniya/
However, the initial distribution of TON was performed through a Proof-of-Work model to ensure a fair launch.
Greetings! This is my first visit to your blog! We are a collection of volunteers and starting a new initiative in a community in the same niche. Your blog provided us beneficial information. You have done a wonderful job!
can i purchase lisinopril no prescription buy lisinopril 10 mg online cost cheap lisinopril pill
lisinopril dosage pictures lisinopril over the counter where can i get cheap lisinopril without insurance
lisinopril 2.5 mg side effects
what is better than lisinopril cost cheap lisinopril pills lisinopril 5 mg canada
lisinopril ruined my life can lisinopril cause loose stools how can i get cheap lisinopril pills
Medication information sheet. Drug Class.
order tadacip pills
Everything what you want to know about pills. Get information here.
вызов нарколога на дом краснодар [url=business.0pk.me/viewtopic.php?id=37943]вызов нарколога на дом краснодар[/url] .
can you get vermox without a prescription
I truly appreciate this post. I have been looking everywhere for this! Thank goodness I found it on Bing. You have made my day! Thank you again
This article is packed with so many useful insights—thank you for sharing!
“This was both informative and thought-provoking. Keep it up!”
The points made in this article really resonate with me. Very well written!
“I love how you balance facts and personal insight. Very compelling writing!”
“Such an interesting read! I’ll definitely be sharing this with friends.”
So well-researched and thought-out. Great work!
драгон мани официальный
can i purchase generic clomid: generic clomid no prescription – buy cheap clomid without dr prescription
стоимость аренды экскаватора
http://cipharmdelivery.com/# cipro for sale
can i buy generic fincar without prescription where buy cheap fincar for sale can you buy cheap fincar without insurance
buy generic fincar pills generic fincar for sale buy fincar without insurance
can i purchase cheap fincar pills
where to buy fincar prices where to get cheap fincar prices can i buy fincar tablets
can you get cheap fincar without prescription where to get fincar no prescription cost cheap fincar without prescription
buy cipro [url=https://cipharmdelivery.com/#]buy cipro cheap[/url] ciprofloxacin generic price
dragon money казино
can i order generic prednisone no prescription buy prednisone from china prednisone dosage for doctors
buy generic prednisone online happy family pharmacy canada prednisone buy prednisone 20mg without prescription
how to get generic prednisone without prescription
can you get prednisone pill buy generic prednisone online w/o rx can i order generic prednisone no prescription
prednisone buy without precipitation prednisone online with no prescription how can i get cheap prednisone price
Homemade bubblers from plastic bottles are an incredibly simple and versatile solution to relax and enjoy a head-scratching potion https://napas420.com/ru/grinderi-dlya-travy/
нарколог на дом [url=dolgoprudni.rusff.me/viewtopic.php?id=3062]нарколог на дом[/url] .
аренда мини экскаватора в москве
драгон мани казино
Medicament information leaflet. Long-Term Effects.
can i purchase generic ramipril pill
Best trends of drugs. Read now.
buy doxycycline online humans doxycycline recommended dose for adults does doxycycline help with rosacea
can i purchase cheap doxycycline online where to buy doxycycline online buy doxycycline 200mg online cheap
buy doxycycline pills for sale
get cheap doxycycline prices cost of cheap doxycycline online buy doxycycline 20 mg online no prescription
can i purchase generic doxycycline price doxycycline buy online human doxycycline side effects long term
cost of generic lexapro without a prescription
Pills prescribing information. What side effects?
where can i buy generic cytotec price
All about medicament. Read information now.
the patient has levaquin 500 mg ordered levaquin 750mg tablets walgreens levaquin price costco
where buy generic levaquin online is levaquin stronger than augmentin what is levaquin prescribed for
can Levaquin make you tired
levaquin side effects tendonitis average price of levaquin levaquin 500 mg tablet dosage
can i order levaquin prices side effect of levaquin warning is levaquin safe to take
dragon money
Meds prescribing information. Short-Term Effects.
can i order cialis soft without dr prescription
Everything news about drug. Get information now.
нарколог на дом цены [url=snatkina.borda.ru/?1-11-0-00000200-000-0-0-1730730452]нарколог на дом цены[/url] .
can i buy tadacip get tadacip without insurance where can i get generic tadacip
where can i get cheap tadacip without a prescription cost generic tadacip pill buying generic tadacip without a prescription
how can i get generic tadacip price
where buy cheap tadacip without a prescription can i purchase generic tadacip tablets can i purchase tadacip tablets
can i buy generic tadacip without prescription get generic tadacip without insurance get cheap tadacip without insurance
dragon money официальный сайт
Medication information for patients. Drug Class.
where can i get cheap zoloft for sale
All news about medicine. Read information here.
Первая проблема, с которой я столкнулся, когда решил делать регулярные обзоры зарубежного кинорепертуара для «Советского экрана»,— это выяснение того, …на каком свете мы живем? Какую фазу и какую часть мирового кинопроцесса этот «текущий» репертуар отражает? origami-do.ru
Pegasus check-in closes 45 minutes before departure for flights within Turkey and 60 minutes before departure for international flights Pegasus Airlines
нарколог на дом срочно [url=http://zelenograd.rusff.me/viewtopic.php?id=1230/]нарколог на дом срочно[/url] .
нарколог на дом анонимно [url=http://ideya.forums.party/viewtopic.php?id=658/]нарколог на дом анонимно[/url] .
can i order generic elimite without insurance get cheap elimite no prescription how can i get cheap elimite prices
how to get cheap elimite without a prescription where buy generic elimite tablets get generic elimite
can you buy cheap elimite price
can you buy generic elimite pills cheap elimite pills can you get elimite without prescription
cost of cheap elimite price how can i get generic elimite pill where can i get elimite pill
Very well-researched and presented. I’m impressed!
“Well-written and full of fresh insights. It’s not your typical take on this topic, which is why I love it!”
I’m bookmarking this article for future reference. So much useful info packed in here!
The research behind this article is impressive. It’s clear you’ve put a lot of effort into it.
Such a well-researched piece! I feel much more informed after reading this.
3. A unique perspective! I haven’t seen this angle discussed elsewhere.
Your attention to detail is commendable. This article is a goldmine of information.
This article sparked a lot of new ideas for me. Very inspiring!
http://amoxstar.com/# amoxicillin no prescipion
can you get celebrex
Однодневный маршрут разработан для новичков и знакомит с одним из самых живописных видов Подмосковья. Прекрасные речные просторы заставят вас забыть о нервозности городской жизни, а древнее городище и главки церквей соединят вас с историей края катание на сапах
Pills prescribing information. What side effects can this medication cause?
can i buy cheap ipratropium without a prescription
Actual information about pills. Get information here.
Однодневный маршрут разработан для новичков и знакомит с одним из самых живописных видов Подмосковья. Прекрасные речные просторы заставят вас забыть о нервозности городской жизни, а древнее городище и главки церквей соединят вас с историей края https://xn--80agouigec2a2k.xn--p1ai/sup-progulki/vody-osetra/
This is the wave – the big wave.
how to buy finpecia pills cost of generic finpecia without rx where to buy finpecia without dr prescription
cost finpecia pill cheap finpecia without prescription get cheap finpecia price
where to buy cheap finpecia prices
get generic finpecia for sale cost of generic finpecia no prescription can i order generic finpecia without rx
where buy cheap finpecia price where can i get generic finpecia no prescription can you buy cheap finpecia for sale
Fonthaus was founded in 1990 by Mark Salisburg and laid in the first independent retailer of https://typetype.org/fonts/app/ in USA.
where to buy cheap celebrex without dr prescription
The first thing you need to know. Fonbet promo codes are coded access through which bonuses become available to players. Visually, a bonus code is a combination or combination of symbols, which is the very same access code to some advantage https://voronezhturbo.ru/images/pages/?fonbet_promokod_pri_registracii_bonus_do_15000_rub_.html
The first thing you need to know. Fonbet promo codes are coded access through which bonuses become available to players. Visually, a bonus code is a combination or combination of symbols, which is the very same access code to some advantage http://rassvet-svaroga.ru/content/pgs/promokod_fonbet_bonus_3.html
Hey there! This post could not be written any better!
Reading through this post reminds me of my previous room mate!
He always kept talking about this. I will forward this article to him.
Fairly certain he will have a good read. Thank you for sharing!
order generic lyrica no prescription can i get lyrica for sale how to buy cheap lyrica price
how can i get lyrica online where to buy cheap lyrica without dr prescription order cheap lyrica no prescription
where to buy lyrica prices
where can i get lyrica cost of cheap lyrica online can i buy cheap lyrica pill
how to buy cheap lyrica without insurance where can i buy lyrica where to buy cheap lyrica without prescription
get precose without insurance
[url=https://izzi-casino-apk.ru]www.izzi-casino-apk.ru[/url]
Скачать последнюю версию приложения онлайн казино Изи – играй сегодня!
http://www.izzi-casino-apk.ru
Pills information. Long-Term Effects.
where to get elavil price
Best trends of medication. Read here.
where can i get cheap lexapro pills cost of lexapro price can i order lexapro without prescription
how can i get generic lexapro without rx cost generic lexapro can i purchase generic lexapro pill
can you get cheap lexapro price
can you get cheap lexapro pills get lexapro without dr prescription how to buy cheap lexapro without prescription
buying cheap lexapro price order cheap lexapro without a prescription buy lexapro without prescription
Greetings… your blog is very interesting and beautifully written.
cost generic celebrex online
Medicine prescribing information. Drug Class.
tamsulosin ejaculation problems
Everything about medication. Get here.
A practical tool that helps traders calculate required margin amounts and leverage ratios for forex trading positions. https://greylabelforex.com/margin-calculator/
where to buy protonix cheap protonix 1 5mg retard where to buy cheap protonix pill
cost protonix pill cost cheap protonix without insurance can i buy cheap protonix pills
generic protonix without prescription
can you buy generic protonix pills 80 mg protonix daily buying cheap protonix for sale
can i get protonix tablets protonix dr 40 mg tablet where can i get cheap protonix without prescription
I’ve been surfing online more than 3 hours today, yet I never found any interesting article like yours. It’s pretty worth enough for me. In my view, if all web owners and bloggers made good content as you did, the net will be much more useful than ever before.
1Win qeydiyyat prosesi asan və anlaşıqlıdır | 1Win Azərbaycanda lider mərc platforması kimi tanınır | 1Win qeydiyyatdan keçin və başlanğıc bonuslarından yararlanın 1win login. | 1Win Azerbaycan istifadəçiləri üçün geniş oyun seçimləri təklif edir | 1Win giriş və qeydiyyat prosesləri çox sadədir [url=https://1wincasino-azn.com/]1Win mobil tətbiq[/url].
Купить диплом о среднем полном образовании, в чем подвох и как избежать обмана?
изготовление проекта перепланировки квартиры [url=www.zakazat-proekt-pereplanirovki-kvartiry11.ru/]изготовление проекта перепланировки квартиры[/url] .
механизм для штор электрический [url=https://www.elektrokarniz-dlya-shtor499.ru]механизм для штор электрический[/url] .
Meds information sheet. Generic Name.
buying cheap divalproex price
Some information about meds. Read now.
If you are actually organizing on transferring to Indiana, make certain your Indiana
Auto Insurance complies with condition needs. Indiana Auto Insurance laws
differ, so it is essential to remain informed.
furosemide over the counter buying generic furosemide without prescription can i order cheap furosemide online
buy cheap furosemide pill can you get generic furosemide for sale giant eagle pharmacy buy furosemide
where buy furosemide online
where can i buy generic furosemide without dr prescription can i buy cheap furosemide tablets where buy generic furosemide
how to get generic furosemide without a prescription order generic furosemide pill can i buy cheap furosemide prices
Русское казачество – необычный культурный феномен, в чистом виде и не сословие, и не этническая группа, а скорее этносоциальная общность, которая обладает характерными чертами Всероссийский казачий конкурс
Русское казачество – необычный культурный феномен, в чистом виде и не сословие, и не этническая группа, а скорее этносоциальная общность, которая обладает характерными чертами https://www.youtube.com/playlist?list=PLPh6y588NeMAdiizh2KmgjZVLz8NZ587Z
При всех методах хирургического лечения патологического повышения веса, основным является выполнение различных вариантов пластики или шунтирования ЖКТ. После снижения и стабилизации массы тела пациентам, перенесшим подобные операции, выполняется комплекс пластических операций hais
Здесь можно сейф для оружия от производителясейф охотничий
При всех методах хирургического лечения патологического повышения веса, основным является выполнение различных вариантов пластики или шунтирования ЖКТ. После снижения и стабилизации массы тела пациентам, перенесшим подобные операции, выполняется комплекс пластических операций staratel21
Предлагаем услуги профессиональных инженеров офицальной мастерской.
Еслли вы искали ремонт телефонов samsung, можете посмотреть на сайте: ремонт телефонов samsung адреса
Наши мастера оперативно устранят неисправности вашего устройства в сервисе или с выездом на дом!
Предлагаем услуги профессиональных инженеров офицальной мастерской.
Еслли вы искали ремонт телефонов nothing адреса, можете посмотреть на сайте: ремонт телефонов nothing адреса
Наши мастера оперативно устранят неисправности вашего устройства в сервисе или с выездом на дом!
Great writing! The structure of the article made it easy to follow, even for someone unfamiliar with the topic.
buying cheap celebrex no prescription
Jugabet casino [url=www.jugabet9.com/]Jugabet casino[/url] .
Medication information. Brand names.
can you get generic mesalamine price
Everything trends of medicament. Read information here.
effexor a controlled sub how much does Effexor cost effexor antidepressant medication
effexor medicaid effexor xr at bedtime generic for Effexor
when to take Effexor XR
effexor antidepressant Effexor XR 37.5 mg capsule side effects of taking Effexor XR
Effexor 150 mg side effects Effexor good for anxiety effexor xr 37.5 mg capsule
먹튀검증를 선택하는 과정에서 가장 중요한 것은 신뢰할 수 있는 데이터를 확인하는 것입니다.
제가 이용 중인 메이저사이트는 실시간으로 업데이트되는 검증 데이터를 제공하며, 이용자들에게 철저히 검토된 안전놀이터를 추천합니다.
사이트의 투명한 운영 방침과 빠른 고객
서비스는 이용자의 신뢰를 높이는
데 중요한 역할을 했습니다. 덕분에 저는 먹튀 걱정 없이 다양한 이벤트와 보너스를 통해 베팅의 즐거움을 만끽할 수
있었습니다. 여러분도 반드시 검증된 정보를 통해 안전한 환경에서 베팅을 즐기세요.
신뢰할 수 있는 선택이야말로 최고의 경험을 보장합니다.
Also visit my blog :: 토토사이트
Профессиональная накрутка отзывов с гарантией результата, повышаем продажи и улучшаем посещаемость вашей точки на картах Накрутка отзывов 2Gis Алматы
Смотрите онлайн новые приключения Тома и Джерри на Марсе. Наши друзья во время своих безумных гонок случайно оказались в космическом корабле, который держит курс на Марс новогодние истории зверушек
Смотрите онлайн новые приключения Тома и Джерри на Марсе. Наши друзья во время своих безумных гонок случайно оказались в космическом корабле, который держит курс на Марс новогоднее приключение мультфильм советский
Получайте больше прибыли на onexbet, не тратя много времени.
onexbet – ваш шанс на богатство, даже в отпуске.
Победные ставки с onexbet, самые выгодные коэффициенты.
Получите эмоциональный заряд от игры на onexbet, и у вас не будет никаких сожалений.
onexbet – доверие и надежность, всегда гарантированы.
Готовы ли вы к большим выигрышам? Вам нужен onexbet, – самый удачный выбор для вас.
onexbet – ваш надежный союзник в мире игры, который всегда придет на помощь.
Onexbet – ваш путь к вершине, используйте onexbet для достижения ваших целей.
onexbet – это не просто азарт, это философия, которая помогает вам выразить себя.
Хотите изменить свою жизнь к лучшему? Начните с onexbet, и вы поймете, что все возможно.
onexbet – это не просто компания, это ваш путь к финансовой независимости, о котором мечтали.
Ставки на onexbet – это легко и увлекательно, но при этом ценит комфорт и безопасность.
Лучшие коэффициенты и выигрыши на onexbet, все это предоставлено для вас.
Желаете больше азарта и адреналина? Попробуйте onexbet, и ваша жизнь никогда не будет прежней.
insammbmwz [url=https://arxbetdsrdg.com/user/insammbmwz/]https://arxbetdsrdg.com/user/insammbmwz/[/url] .
how to get generic zocor without insurance
alkozona [url=http://alkozona.ru]http://alkozona.ru[/url] .
I used to be able to find good advice from your blog articles.
where can i buy generic finpecia without insurance where to get cheap finpecia without insurance can you buy cheap finpecia pill
can you buy generic finpecia without dr prescription how can i get cheap finpecia for sale where can i get finpecia pill
buying cheap finpecia without insurance
cost of generic finpecia tablets can i get generic finpecia without a prescription can i order finpecia for sale
where to buy cheap finpecia prices can i get generic finpecia online where can i buy finpecia for sale
Платформа Telegram завоевала популярность не только как мессенджер, но и благодаря такому функционалу, как чат-боты. Они дают пользователям доступ к ИИ-сервисам, которые в обычных условиях недоступны для жителей России chatgpt в телеграм
Актуальное зеркало Vavada casino 2025. К сожалению, законы в некоторых регионах могут привести к блокировке даже официальных и популярных международных казино vavada рабочее зеркало
Актуальное зеркало Vavada casino 2025. К сожалению, законы в некоторых регионах могут привести к блокировке даже официальных и популярных международных казино musique-en-berry.com
arkada casino зеркало
Для входа в Arkada Casino просто посетите официальный сайт и введите свои данные в форму авторизации. Если у вас нет аккаунта, зарегистрируйтесь и начните наслаждаться игрой. Удобный интерфейс и широкий выбор игр гарантируют незабываемые эмоции.
where can i get lioresal for sale
Get free free fire diamond and mod menu from here https://windriod.com/discover-the-2025-secret-to-generating-free-fire-diamonds-today/
Лучший выбор для ставок – onexbet, заходите и выигрывайте онлайн|Больше шансов на победу с onexbet, делайте свои ставки и выигрывайте|Защитите свои деньги с onexbet, играйте честно и безопасно|Бонусы и акции от onexbet, получите дополнительные ставки бесплатно|Играйте в казино онлайн на onexbet, выигрывайте крупные суммы в удобном формате|Беспрецедентный уровень обслуживания на onexbet, важны ваш комфорт и удобство|Легальное онлайн казино onexbet, ваша безопасность – важнее всего|Смотрите спорт в прямом эфире на onexbet, выигрывайте, не выходя из дома|Участвуйте в уникальных акциях onexbet, бонусы и подарки ждут вас|Уникальный опыт азартных игр в реальном времени, ощутите атмосферу настоящего казино|Ставьте на любимые команды и игроков, онлайн ставки на спорт с onexbet – ваш успех|Увеличьте свой капитал с onexbet, ставьте на успешных букмекеров|Непревзойденная возможность заработать деньги, выигрывайте больше, чем раньше|Онлайн поддержка пользователей на onexbet, не оставляйте вопросов без ответа|Уникальный дизайн и удобство на onexbet, играйте без стресса и неудобств|Увеличьте свои шансы на миллион с onexbet, ставьте и получайте крупные выигрыши|Получайте прибыль от своих прогнозов, не упустите шанс улучшить свою финансовую ситуацию|Играйте и зарабатывайте больше, ваш выигрыш – наша главная задача|Ставьте и зарабатывайте вместе с нами, успешные ставки – это реально|Профессиональная букмекерская контора onex
one x bet game [url=https://arxbetdslps.com/]https://arxbetdslps.com/[/url] .
Здесь можно домашние сейфы купить домашний сейф в интернет магазине
Предлагаем услуги профессиональных инженеров офицальной мастерской.
Еслли вы искали ремонт телефонов poco рядом, можете посмотреть на сайте: ремонт телефонов poco
Наши мастера оперативно устранят неисправности вашего устройства в сервисе или с выездом на дом!
Предлагаем услуги профессиональных инженеров офицальной мастерской.
Еслли вы искали ремонт телефонов meizu в москве, можете посмотреть на сайте: ремонт телефонов meizu сервис
Наши мастера оперативно устранят неисправности вашего устройства в сервисе или с выездом на дом!
where can i get tetracycline pills can i purchase tetracycline prices tetracycline powder for cattle
order generic tetracycline pills where to get cheap tetracycline without dr prescription can i buy tetracycline pills
can you get generic tetracycline pills
can i order generic tetracycline where can i get cheap tetracycline pill where buy cheap tetracycline for sale
where can i get cheap tetracycline prices buy generic tetracycline without rx how to get tetracycline no prescription
http://lordfilm-e.net
стоимость поролона [url=http://porolon-dlya-divana.ru]стоимость поролона[/url] .
перепланировка квартиры проектные организации [url=http://zakazat-proekt-pereplanirovki-kvartiry11.ru]перепланировка квартиры проектные организации[/url] .
No KYC Casinos prioritize your privacy and allow you to gamble anonymously.
how can i get cheap lisinopril tablets
Amazing content on your website.
W Kasynie Pelican czeka na Ciebie imponująca kolekcja slotów od renomowanych dostawców, takich jak NetEnt, Play’n GO i Pragmatic Play. Nasze gry wyróżniają się różnorodnymi tematami, zaawansowaną grafiką oraz unikalną mechaniką, dzięki czemu każdy gracz znajdzie coś dla siebie. Oprócz slotów oferujemy również emocjonujące gry w kasynie na żywo z prawdziwymi krupierami, klasyczne gry stołowe, takie jak blackjack i ruletka, a także poker wideo i gry specjalne, które dostarczają jeszcze więcej rozrywki i emocji.
buy cheap macrobid without dr prescription order cheap macrobid pill can i get generic macrobid price
buying macrobid without dr prescription generic macrobid without dr prescription get generic macrobid for sale
can i get cheap macrobid without dr prescription
get generic macrobid for sale can i purchase generic macrobid pills where to buy cheap macrobid tablets
how to get generic macrobid prices where to buy macrobid no prescription can you get macrobid
Инженерные системы Пермь предлагают услуги по проектированию и установке инженерных коммуникаций в Перми и его окрестностях.
Компании гарантируют надежность
и качество выполненных работ.
Magnificent site. Plenty of helpful info here. I’m sending it
to several friends ans additionally sharing in delicious.
And naturally, thank you on your effort!
can i order generic celebrex pills
where to buy generic ashwagandha prices where to buy cheap ashwagandha ashwagandha for women
ashwagandha work immediately ashwagandha sklep internetowy ashwagandha effecten
can you buy ashwagandha prices
who should not use ashwagandha patanjali ashwagandha tablet price where do i buy ashwagandha
where to buy generic ashwagandha where to buy ashwagandha tea ashwagandha voordelen en nadelen
can you buy cheap celebrex without insurance
анонимный чат вирт [url=anonimnyj-chat11.ru]анонимный чат вирт[/url] .
how to buy generic plavix pill can i buy cheap plavix no prescription where to buy plavix tablets
cost of generic plavix for sale cost of cheap plavix for sale can i order cheap plavix without prescription
can i purchase plavix tablets
can you buy plavix without insurance can i buy plavix how to get generic plavix no prescription
get generic plavix without insurance can i order generic plavix no prescription how to get cheap plavix for sale
Предлагаем услуги профессиональных инженеров офицальной мастерской.
Еслли вы искали ремонт телефонов infinix адреса, можете посмотреть на сайте: ремонт телефонов infinix адреса
Наши мастера оперативно устранят неисправности вашего устройства в сервисе или с выездом на дом!
Предлагаем услуги профессиональных инженеров офицальной мастерской.
Еслли вы искали ремонт телефонов honor адреса, можете посмотреть на сайте: ремонт телефонов honor в москве
Наши мастера оперативно устранят неисправности вашего устройства в сервисе или с выездом на дом!
Здесь можно какой сейф купить для дома сейф для дома
Bitcoin’s journey beyond $100,000 isn’t just another price rally—it’s the culmination of over a decade of adoption, innovation, and growing trust from retail and institutional investors alike.
Arkada онлайн предоставляет простую регистрацию, удобные способы оплаты и множество увлекательных игр для каждого.
аркада
На сайте Arkada Casino доступны выгодные бонусы, фриспины и акции, которые сделают вашу игру ещё более захватывающей.
arkada casino войти
Wow that was odd. I just wrote an extremely long comment but after I clicked submit my comment didn’t appear. Grrrr… well I’m not writing all that over again. Anyways, just wanted to say great blog!
смотреть фильмы онлайн бесплатно без регистрации
Кэшбэк Arkada позволяет вернуть часть потраченных средств, давая шанс продлить игровую сессию и увеличить выигрыши.
arkada casino отзывы
СЗЗ (санитарно защитная зона) для промышленных предприятий в Москве и Московской области. Что нужно учесть при разработке проекта СЗЗ и на этапе согласования в органах надзора для обеспечения законной деятельности объекта НВОС https://vc.ru/u/3791103-infa-v-dele/1719864-chto-takoe-szz-i-kak-razrabotat-proekt-sanitarnoi-zony
mixel cefixime 100 mg cefixime 100 mg price cefixime dispersible tablets india
cefixime 75mg cefixime tablets usp 200 mg used cefixime 200 mg how many days to take
cefixime 200mg tablets used in agents
does cefixime 400 mg treat can cefixime treat pneumonia cefixime treatment for chlamydia
can cefixime be given in pregnancy buy cefixime price buy cefixime 400 mg tablets
Financial calculator that helps determine return on investment by analyzing profit/loss ratios and percentage gains. https://greylabelforex.com/roi-calculator/
Jugabet apuestas deportivas [url=https://superogorod.ucoz.org/forum/2-2293-1/]Jugabet apuestas deportivas[/url] .
This design is wicked! You definitely know how to keep a reader amused.
Between your wit and your videos, I was almost moved to start my own blog (well, almost…HaHa!) Great
job. I really enjoyed what you had to say, and more than that,
how you presented it. Too cool!
Excellent content With thanks!
On Bookmakers.bet you can find the best and most reliable online bookmakers.
cost of cheap prednisone pill where to get cheap prednisone online can i order cheap prednisone pills
where to buy generic prednisone tablets alternatives to prednisone can you get prednisone pill
does prednisone help with inflammation
buy prednisone 10mg how long can you take prednisone 10mg can you buy prednisone tabs without doctors priscription
can you get prednisone buying generic prednisone without dr prescription buy generic prednisone without a prescription
Тут можно преобрести сейф взломостойкий цена сейф взломостойкий купить
Drugs information for patients. Generic Name.
how to get generic clomid pill
Some trends of drug. Read here.
gabapentin 300 mg buy online buying cheap gabapentin without a prescription can i buy cheap gabapentin pills
can i order generic gabapentin without rx buy gabapentin 50 mg can i purchase generic gabapentin price
can i buy gabapentin pill
where can i buy gabapentin for sale order cheap gabapentin can i buy generic gabapentin without prescription
where to buy generic gabapentin no prescription can you get gabapentin online cost of generic gabapentin for sale
Drugs prescribing information. Effects of Drug Abuse.
cymbalta and its impact on leg tremors exploring the relationship
Some trends of drugs. Get information now.
Drugs information sheet. Generic Name.
can i purchase generic lansoprazole without dr prescription
Best about medicine. Read here.
can i get generic sporanox without prescription
Предлагаем услуги профессиональных инженеров офицальной мастерской.
Еслли вы искали ремонт стиральных машин zanussi, можете посмотреть на сайте: ремонт стиральных машин zanussi
Наши мастера оперативно устранят неисправности вашего устройства в сервисе или с выездом на дом!
Hello there! I really enjoy reading your blog! If you keep making amazing posts like this I will come back every day to keep reading.
Предлагаем услуги профессиональных инженеров офицальной мастерской.
Еслли вы искали ремонт телефонов huawei в москве, можете посмотреть на сайте: ремонт телефонов huawei в москве
Наши мастера оперативно устранят неисправности вашего устройства в сервисе или с выездом на дом!
actos buy benefits of actos medication can you buy actos
actos tablets 30mg actos dosage chart actos side effects on kidneys
actos 30 mg tablet
does actos affect the kidneys actos buy plus where can i get actos
discount actos actos and metformin together actos dosage guide
Drug prescribing information. Cautions.
can you buy cheap propecia pills
Actual what you want to know about meds. Read here.
Торкретирование бетона
Your writing style makes complex topics so much easier to understand.
This article really explains things clearly. Thanks for the great info!
Drugs information for patients. Generic Name.
where to get generic levitra tablets
Everything information about drug. Get information now.
I love the examples used in this article. They make the points so much clearer.
Some parts of the article felt a bit repetitive, but overall it was quite engaging.
This is such an insightful article, I learned a lot!
can you buy stromectol prices
15. Some great advice in here. I’ll definitely be using these tips in my own work.
The statistics really made an impact, great use of data.
Very informative! The author does a great job of presenting complex information in a way that’s easy to digest.
buying lisinopril 30 25 dose for lisinopril hctz where can i buy cheap lisinopril no prescription
blood pressure medicine lisinopril dosage generic lisinopril pill cost of cheap lisinopril without insurance
lisinopril 5 mg side effects
cheap lisinopril tablets where can i get generic lisinopril prices get lisinopril pills
lisinopril generic price comparison lisinopril hctz coupons buy lisinopril 10 mg
A fantastic breakdown of the subject—so easy to digest.
Medicine information for patients. Effects of Drug Abuse.
meloxicam nanoparticles
All what you want to know about medication. Get now.
Drug prescribing information. Long-Term Effects.
where can i buy digoxin
Actual what you want to know about medicine. Get information here.
get celebrex online
анонимный чат для друзей [url=https://anonimnyj-chat11.ru]анонимный чат для друзей[/url] .
Meds information for patients. What side effects?
buy lisinopril with prescription
Best news about drug. Read now.
Medicine information sheet. Effects of Drug Abuse.
where buy cheap tolterodine tablets
Best trends of medicine. Get now.
where to get cheap celebrex without rx
buying zyrtec no prescription cost generic zyrtec without a prescription where to get zyrtec tablets
how can i get generic zyrtec pills cost of generic zyrtec prices where to buy zyrtec online
where buy cheap zyrtec pill
can you get zyrtec without prescription cost cheap zyrtec prices how to buy generic zyrtec without prescription
how can i get zyrtec cost of zyrtec tablets buying zyrtec online
Medicament information. Cautions.
buying cheap singulair pill
Actual information about medicine. Read information now.
Medicines information leaflet. Cautions.
can i purchase inderal without rx
All about medication. Get now.
cost cheap imitrex prices
can i purchase cheap avodart price can i order cheap avodart pills where buy cheap avodart pill
where can i get avodart pill avodart erection speed with avodart
order generic avodart no prescription
can i order cheap avodart without dr prescription avodart sales how can i get generic avodart without a prescription
buy cheap avodart no prescription buy cheap avodart without rx avodart tablet sizes
Drugs information. What side effects?
cost of lisinopril in canada
Best information about medicine. Get information here.
This article provides much-needed context for a topic that’s often oversimplified in mainstream media.
This is exactly what I needed to read today. Thanks for sharing!
This really changed my perspective on the issue—thank you!
Drugs prescribing information. Brand names.
where can i get tadacip pill
Actual what you want to know about medicament. Get now.
This article was so easy to follow and explained complex ideas in a digestible way!
Fantastic insights, I learned a lot from reading this.
вывод из запоя краснодар стационар [url=www.domsadremont.ukrbb.net/viewtopic.php?f=3&t=904]вывод из запоя краснодар стационар[/url] .
7. I totally agree with the points made about [topic]. It’s something more people should talk about.
Всё, что нужно знать о покупке аттестата о среднем образовании без рисков
One of the best articles I’ve come across on this subject. It’s clear, concise, and incredibly insightful.
Drugs information for patients. Drug Class.
how to get generic cytotec online
Actual information about medicine. Get here.
where can i buy cipro where buy cipro without a prescription order generic cipro for sale
where buy cipro prices cipro hc otic buy online where buy cipro without rx
can i get cheap cipro pills
buying cipro can you get generic cipro prices cost cipro no prescription
how can i get cheap cipro without insurance cost of generic cipro for sale order cheap cipro tablets
Medicine information leaflet. Generic Name.
can i purchase motrin for sale
All information about medicine. Get here.
The 1xBet promo code 2025: 1XNEW25. Use to register a new member, get a sports bonus 100% up to €130 and casino bonus €1950 + 150 free spins. Use the bonus code when registering and you are guaranteed to receive a 2025 welcome bonus from 1xBet. The 1xBet bookmaker has proven itself to be time-tested, it has high odds for sports betting, and a huge number of slots in the cauldron section, there are also roulette, poker, and fast online games like Aviator 1xbet promo code bangladesh
The 1xBet promo code 2025: 1XNEW25. Use to register a new member, get a sports bonus 100% up to €130 and casino bonus €1950 + 150 free spins. Use the bonus code when registering and you are guaranteed to receive a 2025 welcome bonus from 1xBet. The 1xBet bookmaker has proven itself to be time-tested, it has high odds for sports betting, and a huge number of slots in the cauldron section, there are also roulette, poker, and fast online games like Aviator promo code in 1xbet
Drugs prescribing information. What side effects can this medication cause?
cost generic aricept prices
Some about medicines. Get information here.
вывод из запоя бесплатно [url=www.dexanet.ukrbb.net/viewtopic.php?f=14&t=20361/]вывод из запоя бесплатно[/url] .
вывод из запоя круглосуточно краснодар на дому [url=https://stranaua.ukrbb.net/viewtopic.php?f=2&t=59749/]вывод из запоя круглосуточно краснодар на дому[/url] .
Meds information. What side effects?
azithromycin and b vitamins
Best what you want to know about drugs. Get information here.
prednisone 20 mg for back pain how to taper prednisone 20mg can you get cheap prednisone online
how can i get generic prednisone without prescription can i order generic prednisone without prescription where to buy generic prednisone
where can i buy over the counter prednisone
order prednisone online cheap cost of cheap prednisone without insurance how to get prednisone without rx
order prednisone without prescription generic prednisone for sale cheap prednisone without a prescription
I do consider all the concepts you have introduced
in your post. They’re really convincing and can certainly work.
Nonetheless, the posts are very short for novices.
May you please extend them a little from next time? Thank
you for the post.
Here is my website … carinsuranceagents3.z35.web.core.windows.net
Aby dokończyć rejestrację, należy przesłać skan dowodu osobistego w celu potwierdzenia tożsamości.
Medicine information for patients. Drug Class.
side effects apo rosuvastatin
Some trends of medicament. Get here.
Предлагаем услуги профессиональных инженеров офицальной мастерской.
Еслли вы искали ремонт стиральных машин siemens, можете посмотреть на сайте: ремонт стиральных машин siemens в москве
Наши мастера оперативно устранят неисправности вашего устройства в сервисе или с выездом на дом!
Pills information for patients. Short-Term Effects.
can you buy generic norvasc online
Best trends of medication. Read information here.
This is really interesting, You’re a very skilled blogger. I have joined your rss feed and look forward to seeking more of your excellent post. Also, I have shared your website in my social networks!
https://www.gilmaire-etienne.com/wp-content/pages/utilisez_le_code_promo_1.html
вывод из запоя в санкт петербурге [url=www.mymoscow.forum24.ru/?1-6-0-00022957-000-0-0-1730825531/]вывод из запоя в санкт петербурге[/url] .
Drugs information for patients. Short-Term Effects.
how can i get generic neurontin pill
Some news about drug. Get now.
buy cheap clomid prices where can i buy cheap clomid for sale how to buy clomid tablets
how can i get clomid prices how to buy clomid without prescription can i order cheap clomid without dr prescription
can you buy generic clomid price
how to buy clomid for sale how to buy generic clomid without a prescription can you buy clomid prices
cost of cheap clomid prices get cheap clomid without insurance how to buy generic clomid without a prescription
Pills information. What side effects?
where can i get cheap cialis soft pills
Some about medication. Get information here.
Tool that shows how investments grow over time using compound interest, calculating future value with reinvested gains. https://greylabelforex.com/compound-interest-calculator/
Medicament information leaflet. Brand names.
cost generic neurontin without dr prescription
Some about medication. Get now.
Предлагаем услуги профессиональных инженеров офицальной мастерской.
Еслли вы искали ремонт стиральных машин smeg рядом, можете посмотреть на сайте: срочный ремонт стиральных машин smeg
Наши мастера оперативно устранят неисправности вашего устройства в сервисе или с выездом на дом!
Medicine information sheet. Effects of Drug Abuse.
where can i buy zithromax price
Best about pills. Get information now.
can i purchase cheap zerit online cost of cheap zerit can you buy generic zerit
can i order cheap zerit where to buy zerit without insurance can i purchase zerit pills
buying generic zerit no prescription
can you buy cheap zerit for sale how can i get cheap zerit tablets can you buy generic zerit for sale
can you buy cheap zerit without prescription where to get zerit tablets where can i get generic zerit
Drug information for patients. Brand names.
where can i buy cheap tolterodine without dr prescription
Everything about medicament. Read here.
Many crypto enthusiasts claim that Dogecoin (DOGE), Shiba Inu (SHIB), Bitcoin (BTC), or Ethereum (ETH) are fit for short-term trading.
Преимущества Arkada Казино. Щедрые бонусы: До 500% на первый депозит и сотни бесплатных фриспинов. Огромный выбор игр: Слоты, настольные игры, live-казино аркада arkada casino ru
Medicament information sheet. Cautions.
where can i buy cheap tamoxifen pill
Actual trends of medication. Get here.
Преимущества Arkada Казино. Щедрые бонусы: До 500% на первый депозит и сотни бесплатных фриспинов. Огромный выбор игр: Слоты, настольные игры, live-казино аркада casino ru
get generic dapsone no prescription where buy generic dapsone without insurance can you buy cheap dapsone prices
get generic dapsone price how can i get generic dapsone online where to buy generic dapsone
where to get generic dapsone no prescription
buy generic dapsone pills get generic dapsone without insurance buying dapsone without rx
where buy dapsone pills can you buy dapsone without insurance how can i get cheap dapsone without rx
Medicines prescribing information. Short-Term Effects.
order generic zoloft without insurance
All information about drug. Get information now.
buy celebrex tablets
Drugs information leaflet. Cautions.
can you get generic cardizem prices
All what you want to know about medicine. Read here.
вывод из запоя капельница [url=http://www.ekonomimvmeste.ukrbb.net/viewtopic.php?f=14&t=65423]вывод из запоя капельница [/url] .
вывод из запоя дешево краснодар [url=https://ekonomimvmeste.ukrbb.net/viewtopic.php?f=14&t=65343]вывод из запоя дешево краснодар[/url] .
Meds information for patients. Generic Name.
hydroxyzine side effects hallucinations
Actual information about medicine. Read information now.
buy amoxicillin online uk without prescription order generic amoxicillin tablets can you buy generic amoxicillin pill
buying generic amoxicillin without dr prescription how can i get cheap amoxicillin without rx cost amoxicillin pill
buy online plus clarithromycin plus amoxicillin without prescription
amoxicillin 500mg buy cost of cheap amoxicillin without insurance how can i get cheap amoxicillin
amoxicillin 500mg capsules pil pdf how can i get generic amoxicillin for sale where to get generic amoxicillin without prescription
Drugs information sheet. What side effects can this medication cause?
how to buy cheap proscar without insurance
Everything information about drug. Get information here.
buying cheap maxolon pills
Medicament information. Effects of Drug Abuse.
buy cheap promethazine pills
Some what you want to know about pills. Get now.
Meds information. What side effects can this medication cause?
cost allegra without prescription
Some about drug. Get now.
Medicines information sheet. Brand names.
farmaco gabapentin 300
Actual information about drug. Read information here.
Drug information. Cautions.
get generic valtrex for sale
Everything trends of medicament. Get information now.
Thinker Pedia For the reason that the admin of this site is working, no uncertainty very quickly it will be renowned, due to its quality contents.
Allergic conjunctivitis treatment cycles Allergic conjunctivitis treatment teams Allergic conjunctivitis treatment methods
Allergic conjunctivitis treatment methods Allergic conjunctivitis treatment hospitals Allergic conjunctivitis treatment procedures
Allergic conjunctivitis treatment steps
Allergic conjunctivitis treatment protocols Allergic conjunctivitis treatment providers Allergic conjunctivitis anti-inflammatory agents
Allergic conjunctivitis treatment resources Allergic conjunctivitis treatment steps Allergic conjunctivitis treatment options
Если вы задумываетесь о том, где купить тандыр, стоит обратить внимание на специализированные магазины, которые предлагают широкий выбор моделей для домашнего и профессионального использования. Одним из таких магазинов является “Тандыр Мне”. Здесь вы найдете качественные тандыры по доступным ценам, а также получите консультацию по выбору подходящей модели. Купить тандыр в “Тандыр Мне” — это гарантия надежности и удобства купить тандыр
Medicine information for patients. Brand names.
can i buy cheap divalproex without rx
Best news about pills. Get information now.
how can i get cheap lopid online
Medication information. Generic Name.
generic lyrica names
Best information about medication. Get now.
Если вы задумываетесь о том, где купить тандыр, стоит обратить внимание на специализированные магазины, которые предлагают широкий выбор моделей для домашнего и профессионального использования. Одним из таких магазинов является “Тандыр Мне”. Здесь вы найдете качественные тандыры по доступным ценам, а также получите консультацию по выбору подходящей модели. Купить тандыр в “Тандыр Мне” — это гарантия надежности и удобства тандыр мне
It’s an remarkable paragraph for all the internet people; they will obtain benefit from it I
am sure.
운전면허 갱신 방법
cost prograf without insurance can you buy prograf without prescription generic prograf pills
where to get Prograf pills can i purchase prograf tablets order generic prograf without dr prescription
buying cheap prograf without insurance
can i get prograf no prescription can you get generic prograf without prescription buy cheap prograf without prescription
buy cheap prograf online guidelines for prograf monitoring where can i get prograf
Предлагаем услуги профессиональных инженеров офицальной мастерской.
Еслли вы искали ремонт стиральных машин indesit в москве, можете посмотреть на сайте: ремонт стиральных машин indesit цены
Наши мастера оперативно устранят неисправности вашего устройства в сервисе или с выездом на дом!
Medicament prescribing information. Drug Class.
naltrexone ms cure
Best information about drugs. Read information here.
Предлагаем услуги профессиональных инженеров офицальной мастерской.
Еслли вы искали ремонт стиральных машин lg цены, можете посмотреть на сайте: ремонт стиральных машин lg адреса
Наши мастера оперативно устранят неисправности вашего устройства в сервисе или с выездом на дом!
Drugs information sheet. Effects of Drug Abuse.
generic atomoxetine without dr prescription
All information about medicament. Read here.
these offers give a chance for you to increase your initial contributions and try more https://rentry.co/6c7cy8wv.
The mobile Melbet app is a convenient way to
view betting on sports and online gaming establishments melbet on the go.
can i buy generic rizact pills
amoxil suspension 250 mg dosis order cheap amoxil without prescription where can i buy generic amoxil prices
what does amoxil 500 mg treat cost of generic amoxil no prescription where to get cheap amoxil price
can i purchase generic amoxil
amoxil 500 mg for sore throat can i purchase amoxil prices can i buy amoxil for sale
get generic amoxil without dr prescription can i get cheap amoxil price where can i buy generic amoxil tablets
Code promo 1xBet 2025 – CODE1X200, en l’utilisant, vous participez a la promotion « Bonus de bienvenue 100% » et pouvez obtenir jusqu’a 130$ sur votre solde de jeu. Pour cela, vous devez miser dans la section sport avec des cotes d’au moins 1,4, dans un montant cinq fois superieur. Ne manquez pas l’opportunite de jouer pendant 30 jours aux frais du bookmaker et de retirer vos gains sur votre solde principal https://www.eurospider.com/media/articles/code-promo-22bet.html
Medicament information for patients. Effects of Drug Abuse.
escitalopram 20 mg presentaciones
Everything what you want to know about medication. Read here.
Locating the appropriate auto insurance policy in Chicago may
occasionally feel frustrating, but it does not need to be.
Along with the right research study, you can conveniently
locate affordable fees that match your requirements. Whether you’re brand new to the metropolitan area or a veteran individual, ensure
to examine your auto insurance policy in Chicago consistently.
It is crucial to stay updated about the insurance coverage options and discount rates
available for auto insurance in Chicago.
Code promo 1xBet 2025 – CODE1X200, en l’utilisant, vous participez a la promotion « Bonus de bienvenue 100% » et pouvez obtenir jusqu’a 130$ sur votre solde de jeu. Pour cela, vous devez miser dans la section sport avec des cotes d’au moins 1,4, dans un montant cinq fois superieur. Ne manquez pas l’opportunite de jouer pendant 30 jours aux frais du bookmaker et de retirer vos gains sur votre solde principal https://bioenergetic-therapy.com/images/pgs/%201xbet_promo_code_new_1.html
Medication information sheet. Long-Term Effects.
buy generic ursodiol prices
Actual information about medicines. Get information now.
where to get imitrex no prescription
Medicines information sheet. What side effects?
beta bloquant propranolol effets secondaires
Best trends of drugs. Get here.
can you buy cheap forxiga where buy cheap forxiga prices where to get generic forxiga tablets
where buy generic forxiga without rx get cheap forxiga without a prescription cheap forxiga online
can i purchase generic forxiga for sale
where to buy generic forxiga without insurance can you buy forxiga no prescription order generic forxiga without dr prescription
how to buy cheap forxiga pill how can i get generic forxiga without insurance order forxiga pills
вывод из запоя [url=https://kryto.ukrbb.net/viewtopic.php?f=3&t=1179]вывод из запоя[/url] .
Write more, thats all I have to say. Literally, it seems as though you relied on the video
to make your point. You clearly know what youre talking about, why throw away your intelligence on just
posting videos to your site when you could be giving us something
enlightening to read?
Medicine information sheet. Effects of Drug Abuse.
medication famotidine 20 mg
Everything about drug. Get information now.
how to get cheap advair diskus price can i order generic advair diskus without rx can you buy advair diskus for sale
how to buy cheap advair diskus without a prescription can i buy advair diskus online where buy cheap advair diskus
cost of advair diskus without prescription
where to buy cheap advair diskus without insurance can i get advair diskus no prescription how to buy cheap advair diskus tablets
how to get advair diskus pill how to buy cheap advair diskus prices get cheap advair diskus for sale
Medication information sheet. Effects of Drug Abuse.
can you buy generic levonorgestrel pills
All information about meds. Get information now.
A cool post there mate ! Thank you for posting.
The conclusion wrapped everything up perfectly—well done!
can i order generic celebrex without dr prescription
This is the wave – the big wave.
I like what you have to offer. Keep up the good work!
The content is very informative and well-organized.
Pills information leaflet. Drug Class.
generic ceftin pills
Everything information about medicine. Read information here.
cost of cheap nemasole no prescription can i order generic nemasole for sale how can i get nemasole without prescription
cheap nemasole price how can i get cheap nemasole without insurance how can i get nemasole prices
where can i get nemasole
buying nemasole without dr prescription how can i get nemasole without prescription how to buy cheap nemasole for sale
can i buy cheap nemasole price can you get generic nemasole prices where can i get nemasole without a prescription
Promo codes are a useful tool to get enhanced bonuses and privileges for free bets. 1xBet is one of the platforms that actively uses codes to attract new players and provide them with bonuses this way https://ontariobev.net/wp-content/pgs/?code_promo_betwinner_11.html
Enfrente adversarios epicos e conquiste a gloria na Arena dos Campeoes https://lusa-gaming.pt/
Там кремированные останки стали содержать в некоторых
местах – https://blackrose.com.ua/krematsija-v-zaporozhe колумбариях.
Promo codes are a useful tool to get enhanced bonuses and privileges for free bets. 1xBet is one of the platforms that actively uses codes to attract new players and provide them with bonuses this way https://modernrock.ru/pages/1xbet_promokod_besplatno_bonus.html
Предлагаем услуги профессиональных инженеров офицальной мастерской.
Еслли вы искали ремонт стиральных машин kuppersbusch сервис, можете посмотреть на сайте: ремонт стиральных машин kuppersbusch сервис
Наши мастера оперативно устранят неисправности вашего устройства в сервисе или с выездом на дом!
can you get artane pills
fluoxetine 60 mg where to buy generic fluoxetine price fluoxetine dosage
can i purchase fluoxetine can i order fluoxetine where to buy cheap fluoxetine price
cost of generic fluoxetine pills
buying cheap fluoxetine without a prescription cost of cheap fluoxetine no prescription can you get generic fluoxetine without prescription
where can i get cheap fluoxetine without insurance cost of fluoxetine price where can i buy cheap fluoxetine for sale
порно студентки
I had no trouble finding the information I was looking for.
промокод продамус [url=http://promokod-prodam.ru/]http://promokod-prodam.ru/[/url] .
buying generic prograf without rx buy prograf for sale how to get generic prograf without rx
buying cheap prograf how to buy generic prograf without insurance where to buy generic prograf online
where to buy prograf without a prescription
can i get prograf pills where buy cheap prograf pill can i purchase prograf
cost generic prograf without dr prescription how can i get generic prograf pill order generic prograf online
where can i get generic cymbalta pills
порно с животными
how to get gabapentin without dr prescription mexican gabapentin how to buy online gabapentin buy online
cost of generic gabapentin online buying generic gabapentin price how to buy generic gabapentin price
can i buy cheap gabapentin without insurance
can i purchase gabapentin for sale where can i get gabapentin can i get cheap gabapentin prices
how can i get generic gabapentin no prescription cost of gabapentin online get generic gabapentin pill
вывод из запоя капельница [url=http://golosa.ukrbb.net/viewtopic.php?f=3&t=7483]вывод из запоя капельница [/url] .
вывод из запоя цены [url=http://www.stranaua.ukrbb.net/viewtopic.php?f=2&t=59812]вывод из запоя цены[/url] .
вывод из запоя в спб [url=http://tatuheart.ukrbb.net/viewtopic.php?f=8&t=15095]вывод из запоя в спб[/url] .
where to get cheap allegra tablets can you get generic allegra without a prescription can you buy cheap allegra tablets
can i get allegra without rx order cheap allegra pills buying allegra price
where can i get allegra price
get allegra without dr prescription can i order generic allegra without a prescription can you buy allegra pill
cost generic allegra without a prescription buying cheap allegra without insurance how to buy generic allegra without prescription
I appreciate how fast the pages load.
where can i get inderal cost of cheap inderal prices buy inderal without rx
how to buy inderal without prescription buy cheap inderal without dr prescription get cheap inderal without a prescription
where can i buy cheap inderal online
cost generic inderal pill propranolol where to get cheap inderal for sale
can you get inderal without dr prescription where can i buy inderal without rx can i buy cheap inderal
cost arcoxia prices
buy generic albuterol tablets buy liquid albuterol for nebulizer cheap albuterol without insurance
albuterol liquid buy can you buy albuterol inhaler over the counter in ireland where buy albuterol without rx
order cheap albuterol price
albuterol nebulizer solution package insert can you buy generic albuterol pill buy albuterol sulfate syrup
get albuterol prescription online where to buy cheap albuterol price can i get albuterol without a prescription
cost of vermox no prescription
Предлагаем услуги профессиональных инженеров офицальной мастерской.
Еслли вы искали срочный ремонт приставок xbox, можете посмотреть на сайте: срочный ремонт приставок xbox
Наши мастера оперативно устранят неисправности вашего устройства в сервисе или с выездом на дом!
Предлагаем услуги профессиональных инженеров офицальной мастерской.
Еслли вы искали ремонт стиральных машин aeg сервис, можете посмотреть на сайте: ремонт стиральных машин aeg
Наши мастера оперативно устранят неисправности вашего устройства в сервисе или с выездом на дом!
how to get cheap allegra pill where to get generic allegra prices how to get allegra without rx
buying allegra for sale where to get generic allegra without prescription can i order cheap allegra price
how to get cheap allegra no prescription
where can i get cheap allegra without rx where can i get cheap allegra online get allegra pills
can you get generic allegra tablets where to get allegra no prescription buy generic allegra without a prescription
Great website design, super easy to navigate!
cost of generic celebrex no prescription
kantor bola99
https://t.me/s/arkada_casino_online
citalopram and trazodone safe can you take trazodone with food trazodone dose in elderly
does trazodone cause dry eyes does trazodone cause sleepiness trazodone fda package insert
how long does trazodone stay in dogs system
trazodone drowsy in morning trazodone photophobia trazodonenui trazodone medication for sleep aid
trazodone FDA approval for insomnia cost of trazodone 50 mg is trazodone expensive
Во все времена на рынке сантехники чугунные ванны пользовались особой актуальностью. Данный важный элемент ванной комнаты имеет огромное количество преимуществ https://www.italian-mirrors.com/poleznye/11963-zachem-nuzhen-akrilovyy-vkladysh-v-vannu.html
Во все времена на рынке сантехники чугунные ванны пользовались особой актуальностью. Данный важный элемент ванной комнаты имеет огромное количество преимуществ https://fccland.ru/novosti/6670-iz-kakih-materialov-proizvodyat-mebel-v-vannuyu-komnatu.html
Ꭺw, tɡіs wwas a vеrү nixe post. Taking thee time aand actսaal
efcort tto producde a suoerb article… butt wһaat ccan I say… I putt things offf
a loot aand nevesr anage too gget anythijng done.
Feeel frԀe too surrf tto mmy web-site: Free Gift
Ne jouez surtout pas sur ce casino, gain de 5000€ à la roulette, 4 jours d’attente pour obtenir mon retrait pour qu’au finale le service client retire tout l’argent du compte…Enorme arnaque à fuir.
Selon le montant de votre dépôt, vous pouvez recevoir des tours gratuits sur différents jeux.
can you buy cipro online buy cipro 500mg online can i order generic cipro for sale
can i order generic cipro prices how to get generic cipro without prescription how to buy cipro no prescription
can i get cheap cipro tablets
can i buy cheap cipro for sale can i buy generic cipro without prescription order generic cipro pill
how to buy cheap cipro no prescription where to buy cheap cipro without prescription order cheap cipro prices
Tell the world about your experience to help others make the right buying decision. We publish authentic reviews to ensure everyone can access valuable information on a definite company https://vodkakazino.pro
dragon money казино
драгон мани казино зеркало
九州轉移優惠
Pin-Up stands out as a notable online casino, with a strong presence in Bangladesh and neighboring Asian countries like Nepal and Bangladesh pin up apk
where can i get lisinopril pill does ibuprofen interact with lisinopril can lisinopril help with anxiety
where can i get generic lisinopril prices lisinopril oral solution how to buy cheap lisinopril without prescription
can you buy cheap lisinopril no prescription
cost cheap lisinopril tablets can i take benadryl with lisinopril lisinopril dosage for hypertension
how to buy lisinopril without prescription can i order generic lisinopril without prescription lisinopril food restrictions
драгон мани казино официальный
драгон мани казино регистрация
1Win has been one of the leading and most trusted betting sites in Europe for the last decade, so there is a wealth of gambling experience being brought to the online betting market in Pakistan 1win app
get cheap zoloft without rx buy zoloft sertraline buy generic zoloft online no prescription
where to get generic zoloft without a prescription order zoloft without dr prescription where can i get zoloft for sale
where buy zoloft pill
can you buy generic zoloft how can i get cheap zoloft where buy zoloft tablets
where to buy cheap zoloft prices can i get cheap zoloft tablets can i buy zoloft pills
выведение из запоя на дому спб цены [url=http://www.bisound.com/forum/showthread.php?p=1222325]выведение из запоя на дому спб цены[/url] .
выведение из запоя на дому спб [url=www.uaportal.ukrbb.net/viewtopic.php?f=2&t=3731]выведение из запоя на дому спб [/url] .
Смотрите онлайн Новогодние мультфильмы. Советские картины про Новый год, Дисней, Том и Джерри, Фиксики, Буба, Три кота https://tomijerry.ru/tri-kota-vse-serii-podryad-bez-ostanovki
драгон мани казино
Смотрите онлайн Новогодние мультфильмы. Советские картины про Новый год, Дисней, Том и Джерри, Фиксики, Буба, Три кота https://tomijerry.ru/novogodnie-serii-tom-i-dzherri
Dive into the world of online sports betting with 1win , a dynamic betting company based in Senegal that is rethinking the gaming experience for its customers 1win grab money
драгон мани официальный
get cheap cabgolin for sale get cabgolin without dr prescription how can i get cheap cabgolin no prescription
cost generic cabgolin pill can i get generic cabgolin price get cheap cabgolin prices
where can i get cabgolin
get cabgolin pills can you get cheap cabgolin without dr prescription can i order cabgolin without rx
order generic cabgolin without rx where can i get cheap cabgolin without prescription cost cabgolin for sale
Пошаговая инструкция по официальной покупке диплома о высшем образовании
Ik vond het geweldig om te lezen over de mogelijkheid om Telegram didvirtualnumbers.com/nl/how-to-register-in-telegram/ te gebruiken zonder een simkaart. Ik had geen toegang tot een simkaart en wilde Telegram toch gebruiken. Dankzij DID Virtual Numbers kreeg ik snel een virtueel nummer en was het registratieproces erg eenvoudig https://atzencrew.yooco.de/forum/re_telegram-13252679-t.html#13252679
Имплантация – современный метод протезирования зубов, при котором возможно полноценное восстановление целостности зубного ряда. При дентальной имплантации имплантация зубов десна
драгон мани казино официальный
Предлагаем услуги профессиональных инженеров офицальной мастерской.
Еслли вы искали срочный ремонт приставок sony playstation, можете посмотреть на сайте: ремонт приставок sony playstation сервис
Наши мастера оперативно устранят неисправности вашего устройства в сервисе или с выездом на дом!
Имплантация – современный метод протезирования зубов, при котором возможно полноценное восстановление целостности зубного ряда. При дентальной имплантации установка имплантация зубов
Allergic conjunctivitis treatment facilities Allergic conjunctivitis antihistamine medications Allergic conjunctivitis treatment resources
Allergic conjunctivitis treatment regimens Allergic conjunctivitis treatment phases Allergic conjunctivitis treatment algorithms
Allergic conjunctivitis treatment alternatives
Allergic conjunctivitis treatment duration Allergic conjunctivitis treatment duration Allergic conjunctivitis treatment techniques
Allergic conjunctivitis treatment approaches Allergic conjunctivitis treatment services Allergic conjunctivitis treatment experts
Cu [url=https://lorandexpert.com/]contabilitate online pret[/url] oferit de Lorand Expert, beneficia?i de solu?ii accesibile ?i moderne. Gestionam toate aspectele contabile online, oferind servicii rapide ?i eficiente, care sa raspunda nevoilor afacerii dumneavoastra.
снять ломку наркомана [url=www.severussnape.borda.ru/?1-4-0-00000325-000-0-0-1730832525/]снять ломку наркомана[/url] .
where to get cheap cefixime online typhoid cefixime dosage cost cefixime prices
cefixime suspension side effects cefixime tablet for typhoid where buy cefixime online
cefixime 200 is used for
cefixime s azithromycin tablets how to buy generic cefixime without a prescription where can i buy cheap cefixime
where can i get cheap cefixime without dr prescription buying cheap cefixime without dr prescription can i purchase cheap cefixime without prescription
I encountered your site after doing a search for new contesting using Google, and decided to stick around and read more of your articles. Thanks for posting, I have your site bookmarked now.
снятие ломок [url=https://www.angelladydety.getbb.ru/viewtopic.php?f=44&t=43002]снятие ломок[/url] .
where to get singulair without insurance can i buy singulair prices where to buy singulair without dr prescription
cost of generic singulair price can you get cheap singulair price can you buy generic singulair online
cost singulair price
can i get singulair without a prescription cost of generic singulair price buying singulair without rx
get generic singulair for sale can you buy cheap singulair without a prescription how to buy generic singulair without insurance
Cauta?i un [url=https://lorandexpert.com/]contabil sef[/url] de incredere? Lorand Expert va pune la dispozi?ie profesioni?ti experimenta?i care vor asigura gestionarea eficienta a tuturor proceselor financiare ale companiei dumneavoastra.
Ich habe meinen alten VW Golf in Hagen verkauft, und der Autoankäufer hat einen tollen Job gemacht. Die Kommunikation war von Anfang an sehr freundlich und professionell. Ich bekam ein gutes Angebot und konnte mein Auto direkt verkaufen, ohne mich um irgendwelche Formalitäten kümmern zu müssen. Definitiv eine gute Wahl für einen schnellen Verkauf!
diltiazem iv push how fast diltiazem ointment 2% cost diltiazem cardizem side effects
diltiazem cost diltiazem normal dosage wholesale cost pd diltiazem
diltiazem 120 mg extended release
brand name diltiazem er when to take diltiazem er lowest tablet dose of diltiazem
diltiazem 30 mg tablet mylar does diltiazem really work diltiazem clearance
Преимущества современных цифровых решений Технологические платформы становятся важной частью повседневной жизни, предлагая пользователям удобство и широкий функционал http://www.kladonahodki.ru/component/k2/itemlist/user/332149
Преимущества современных цифровых решений Технологические платформы становятся важной частью повседневной жизни, предлагая пользователям удобство и широкий функционал http://3.248.198.109/doku.php?id=%20%D0%90%D0%BA%D1%82%D1%83%D0%B0%D0%BB%D1%8C%D0%BD%D1%8B%D0%B5%20%D0%B7%D0%B5%D1%80%D0%BA%D0%B0%D0%BB%D0%B0%201win:%20%D0%BA%D0%B0%D0%BA%20%D0%BE%D1%81%D1%82%D0%B0%D0%B2%D0%B0%D1%82%D1%8C%D1%81%D1%8F%20%D0%B2%20%D0%B8%D0%B3%D1%80%D0%B5
Despite being a relatively new player in the online gaming industry, this casino offers a wide selection of games, ensuring players have a wealth of exciting options at their disposal 1win online
can you buy cheap fml forte online where to buy generic fml forte prices buying generic fml forte
how to get cheap fml forte price cheap fml forte online can you get cheap fml forte without prescription
can i order generic fml forte without prescription
where buy fml forte without dr prescription how can i get cheap fml forte without insurance where to get generic fml forte pill
get cheap fml forte no prescription buying cheap fml forte without insurance where to get generic fml forte no prescription
Dit artikel gaf me precies de informatie die ik nodig had. Dankzij DID Virtual Numbers kon ik een virtueel nummer verkrijgen en me registreren op mijn computer. Het proces was snel en het voelde veilig, omdat ik mijn persoonlijke gegevens niet hoefde in te voeren https://atzencrew.yooco.de/forum/re_telegram-13252679-t.html#13252679
Les certifications de sécurité, comme celles de eCOGRA, sont des indicateurs de confiance et de qualité.
Dit artikel gaf me precies de informatie die ik nodig had. Dankzij DID Virtual Numbers kon ik een virtueel nummer verkrijgen en me registreren op mijn computer. Het proces was snel en het voelde veilig, omdat ik mijn persoonlijke gegevens niet hoefde in te voeren https://www.hebergementweb.org/threads/gemakkelijke-stappen-voor-telegram-registratie-tips-en-uitleg.2146413/
1Win is the most well-liked online betting site. This website provides users with access to a vast selection of thrilling games, including poker, slots, casino 1win free login
Предлагаем услуги профессиональных инженеров офицальной мастерской.
Еслли вы искали ремонт посудомоечных машин miele сервис, можете посмотреть на сайте: ремонт посудомоечных машин miele
Наши мастера оперативно устранят неисправности вашего устройства в сервисе или с выездом на дом!
[url=https://vodka-casino-apk.ru]http://www.vodka-casino-apk.ru[/url]
Скачать приложение казино онлайн водка – выигрывай сейчас!
http://www.vodka-casino-apk.ru
Are grateful for this blog post, it’s tough to find good information and facts on the internet
Предлагаем услуги профессиональных инженеров офицальной мастерской.
Еслли вы искали ремонт стиральных машин dexp, можете посмотреть на сайте: ремонт стиральных машин dexp цены
Наши мастера оперативно устранят неисправности вашего устройства в сервисе или с выездом на дом!
I learned a lot from reading this. Your expertise really shines through.
can i purchase cheap prednisolone prices cost of cheap prednisolone no prescription how to get cheap prednisolone tablets
can i get cheap prednisolone without rx buy prednisolone acetate eye drops where can i get cheap prednisolone for sale
can you buy cheap prednisolone online
can you buy generic prednisolone without prescription can you buy prednisolone no prescription how to buy prednisolone for sale
prednisolone suppositories alternative how can i get generic prednisolone without a prescription buy canine prednisolone
I appreciate the time you took to research and put this together.
“The structure of this article is fantastic. I love how everything flows so naturally.”
21. This article is super well-organized, which made understanding the topic so much easier.
Great article! This is the kind of info that are supposed to be
shared around the web. Disgrace on Google for no longer positioning this post higher!
Come on over and seek advice from my web site .
Thanks =)
nhà cái ST666
ST666-Nhà Cái Cá Cược Trực Tuyến Hàng Đầu Năm 2023
ST666 hiện đang được đánh giá là một trong những nhà cái trực tuyến uy tín và đẳng cấp nhất tại Châu Á. Với giấy phép hoạt động được cấp bởi tổ chức PAGCOR và First Cagayan, ST666 mang đến cho người chơi những trải nghiệm cá cược chuyên nghiệp, minh bạch và công bằng.
Tại sao nên chọn ST666?
1. Uy tín vượt trội
ST666 đã xây dựng được sự tín nhiệm từ cộng đồng người chơi nhờ hệ thống bảo mật cao cấp và các giao dịch tài chính minh bạch. Đội ngũ quản lý có kinh nghiệm dày dặn đảm bảo mọi hoạt động luôn diễn ra trơn tru và đáng tin cậy.
2. Sự đa dạng trong sản phẩm
ST666 cung cấp nhiều loại hình cá cược hấp dẫn như:
Cá cược thể thao với tỷ lệ kèo cạnh tranh.
Casino trực tuyến với các trò chơi phổ biến như Baccarat, Blackjack, và Roulette.
Slot game với hàng trăm tựa game độc đáo và đổi thưởng cao.
Bắn cá đổi thưởng và các trò chơi giải trí khác.
3. Giao dịch nhanh chóng, tiện lợi
Hệ thống giao dịch tại ST666 hỗ trợ nhiều phương thức nạp và rút tiền nhanh chóng:
Chuyển khoản ngân hàng.
Ví điện tử như Momo, ZaloPay.
Thẻ cào điện thoại.
4. Khuyến mãi hấp dẫn
ST666 thường xuyên tổ chức các chương trình khuyến mãi độc quyền, bao gồm:
Thưởng 200% cho nạp tiền lần đầu.
Hoàn trả tiền cược mỗi ngày.
Ưu đãi đặc biệt cho thành viên VIP.
Hướng dẫn tham gia ST666
1. Đăng ký tài khoản
Người chơi cần cung cấp thông tin cơ bản để tạo tài khoản và bắt đầu hành trình trải nghiệm tại ST666.
2. Nạp tiền nhanh chóng
ST666 hỗ trợ nhiều phương thức nạp tiền an toàn, mang lại sự tiện lợi tối đa cho người chơi.
3. Sử dụng ứng dụng ST666
Ứng dụng của ST666 được tối ưu hóa để sử dụng trên cả hai nền tảng iOS và Android, giúp người chơi có thể truy cập và tham gia mọi lúc, mọi nơi.
4. Chương trình đại lý
Để kiếm thêm thu nhập, người chơi có thể đăng ký tham gia làm đại lý của ST666 và nhận hoa hồng cao từ doanh thu.
Chính sách bảo mật và điều khoản dịch vụ
ST666 cam kết bảo mật thông tin cá nhân của người chơi thông qua hệ thống mã hóa hiện đại. Các điều khoản dịch vụ được thiết lập rõ ràng để đảm bảo quyền lợi của người chơi.
Kết luận
ST666 là nhà cái cá cược trực tuyến hàng đầu với hệ thống hiện đại, dịch vụ chuyên nghiệp và nhiều chương trình khuyến mãi hấp dẫn. Đây chính là lựa chọn lý tưởng cho những ai đam mê cá cược và muốn trải nghiệm giải trí trực tuyến đẳng cấp. Tham gia ngay hôm nay để chinh phục những cơ hội lớn cùng ST666!
I am really grateful to the owner of this site who has shared this great paragraph at at this time.
There are some serious financial ramifications here.
While the registration process on 1win is straightforward, verification of your identity is a crucial step. Not only does it protect your personal information, but it also ensures a safe and responsible betting environment, adhering to legal regulations 1win online casino
picture of lisinopril 2.5 mg can you get cheap lisinopril without prescription lisinopril 2.5 mg for diabetes
order cheap lisinopril without dr prescription lisinopril 20mg online lisinopril hydrochlorothiazide is used for what
how to buy generic lisinopril price
lisinopril hctz alcohol can i purchase lisinopril no prescription how to buy generic lisinopril without a prescription
can you buy lisinopril prices can buy lisinopril whith out prescription can you buy generic lisinopril pill
While the registration process on 1win is straightforward, verification of your identity is a crucial step. Not only does it protect your personal information, but it also ensures a safe and responsible betting environment, adhering to legal regulations 1win casino
https://proxy-solutions.net/ua/services/mobile_proxy_spain
осушитель для воздушного компрессора [url=http://www.sk-kompressor.ru]http://www.sk-kompressor.ru[/url] .
снятие ломки клинике [url=http://sergiev.0pk.me/viewtopic.php?id=3472/]снятие ломки клинике [/url] .
снятие ломки наркомана [url=svstrazh.forum24.ru/?1-3-0-00000242-000-0-0-1730833021]снятие ломки наркомана[/url] .
dragon money
The depth of research here is remarkable. I’m really impressed.
https://proxy-solutions.net/services/mobile_plus_proxy_ukraine_dnipro_kievstar
22. The level of detail in this article is incredible. So much to learn!
снятие ломки в стационаре [url=http://ximki.ukrbb.net/viewtopic.php?f=12&t=3718]снятие ломки в стационаре[/url] .
https://proxy-solutions.net/en/services/city_proxy_usa_secaucus
JeetWin has been a prominent player in the online casino industry for several years. Established in 2017, it quickly gained a reputation for its wide range of games, user-friendly interface, and top-notch security measures jeetwin
Новая песня для тех, кто привык добиваться своего! Не смотри на других, забудь оправдания — это твой путь, и он начинается с Projektx_Punk
https://dragon-money33.buzz
JeetWin has been a prominent player in the online casino industry for several years. Established in 2017, it quickly gained a reputation for its wide range of games, user-friendly interface, and top-notch security measures jeetwin grab money
This article is a great starting point for anyone new to the topic.
драгон мани казино зеркало
This article definitely added value to my knowledge on the subject.
The clarity in this piece is impressive.
Visit the official Telegram website, select your operating system (Windows, macOS, Android, iOS), and download the app. Enjoy secure, fast messaging with text, voice calls, and file sharing, all protected by end-to-end encryption for enhanced privacy.
https://proxy-solutions.net/blog/proksi_protokol_i_tehnologii_kakie_est_i_na_chto_sposobni
The examples really helped clarify the points made in the article. Nice job!
https://proxy-solutions.net/ua/services/city_proxy_germany_munich
5. The structure of this article made it so easy to follow. Fantastic job!
драгон мани казино
Dołącz już teraz do Slottica i odkryj niekończącą się przygodę pełną ekscytujących gier, wielkich wygranych i niezapomnianych wrażeń!
https://proxy-solutions.net/en/services/mobile_plus_proxy_kirghizstan_bishkek_o2
https://proxy-solutions.net/en/services/mobile_plus_proxy_thailand_bangkok_nt-mobile-th
dragon money зеркало
This article is packed with valuable information. Well done!
I aam tгjly ɡload tto rread thius blg posts hich consistfs off рlengy off vqluable facts, tһanks
foor providing these stɑtisticѕ.
My bllg – Free Gift
dragon money зеркало
снятие ломки [url=http://www.gonochki.forum24.ru/?1-10-0-00001147-000-0-0-1730870624]снятие ломки[/url] .
13. Wow, this article opened my eyes to a completely new perspective. Great job!
драгон мани регистрация
https://proxy-solutions.net/services/mobile_plus_proxy_ukraine_dnipro_life
The cryptocurrency market is fraught with scams, hacks, and fraudulent schemes. By performing an AML check, you can identify potentially risky assets and avoid falling victim to scams Arbitrum check AML service
The cryptocurrency market is fraught with scams, hacks, and fraudulent schemes. By performing an AML check, you can identify potentially risky assets and avoid falling victim to scams AML check TRX address
https://sms-man.com/cn
https://sms-man.com/
Your writing style is very engaging; I couldn’t stop reading!
The introduction really grabbed my attention, but I think the article could’ve ended stronger.
I think the conclusion is a little optimistic given the current situation.
The conclusion felt a bit rushed compared to the rest of the article.
снятие ломки наркомана [url=https://motik13.0pk.me/viewtopic.php?id=2014]снятие ломки наркомана[/url] .
снятие ломки [url=https://alhambra.bestforums.org/viewtopic.php?f=10&t=46521]снятие ломки[/url] .
Предлагаем услуги профессиональных инженеров офицальной мастерской.
Еслли вы искали ремонт посудомоечных машин beko, можете посмотреть на сайте: ремонт посудомоечных машин beko адреса
Наши мастера оперативно устранят неисправности вашего устройства в сервисе или с выездом на дом!
I’m so glad I came across this article. It answered a lot of my questions!
Could you elaborate on the potential drawbacks of this approach?
You’ve provided a lot of useful resources for further reading—thank you!
Предлагаем услуги профессиональных инженеров офицальной мастерской.
Еслли вы искали ремонт посудомоечных машин midea рядом, можете посмотреть на сайте: ремонт посудомоечных машин midea цены
Наши мастера оперативно устранят неисправности вашего устройства в сервисе или с выездом на дом!
daddy casino зеркало
diltiazem cap 120mg er cost how does diltiazem work diltiazem long term side effects
cartia xt vs diltiazem er low dose diltiazem 120 mg diltiazem 120 mg generic
diltiazem withdrawal symptoms mayo clinic
diltiazem 120 mg capsule picture diltiazem er 240 mg pictures how does diltiazem work
diltiazem cd vs er diltiazem dose for atrial fibrillation can i get diltiazem price
дедди казино зеркало
I Am Going To have to come back again when my course load lets up – however I am taking your Rss feed so i can go through your site offline. Thanks.
how can i get accutane without a prescription can i purchase accutane pill where can i get accutane without prescription
where buy accutane prices where to get cheap accutane without prescription where can i buy generic accutane without rx
can i buy accutane without prescription
buy generic accutane without insurance where buy accutane pill cost of cheap accutane pill
where can i get accutane pills generic accutane pill where to buy generic accutane tablets
It’s an remarkable article for all the web viewers; they will take advantage from
it I am sure.
aviator онлайн игра
buying generic advair diskus without a prescription can i get advair diskus no prescription where can i buy generic advair diskus without prescription
can you buy generic advair diskus without dr prescription where to buy cheap advair diskus without dr prescription cost of advair diskus for sale
where to get generic advair diskus without insurance
can i buy generic advair diskus without insurance where to buy generic advair diskus no prescription alternatives for advair diskus
can you buy cheap advair diskus how to buy advair diskus for sale buy cheap advair diskus without dr prescription
дом престарелых крым [url=www.xn—–2-53dwibb3a5adehvkaijkcgoft4dwa1orb.xn--p1ai/]дом престарелых крым[/url] .
где играть в авиатор
водка казино рабочее зеркало
Советую почитать вот эту статья про частных SEO специалистов, очень подробно расписано Чем занимается SEO
how to get generic mobic online where can i get cheap mobic without a prescription buying generic mobic no prescription
cost of cheap mobic prices buying mobic online where to buy mobic no prescription
can you buy cheap mobic
can i order cheap mobic for sale how to buy generic mobic without prescription can i buy cheap mobic without dr prescription
buying cheap mobic pills can i get cheap mobic online how can i get mobic without dr prescription
https://forum.azs-lukoil.ru/threads/kraken-ssylki-2024-kak-zajti-na-kraken-v-2024-kraken-aktualnye-ssylki-zerkala-i-ispolzovanie-tor.1182/
бонус за регистрацию vodka casino
where to buy cheap sildalist for sale get cheap sildalist pills how to get cheap sildalist without prescription
buy sildalist for sale cost of cheap sildalist online sildalist sale
can i buy sildalist without rx
buy generic sildalist pill where can i get generic sildalist pill order cheap sildalist no prescription
can i buy sildalist tablets where to buy cheap sildalist pills where to buy generic sildalist online
водка казино зеркало на сегодня
In the fast-paced world of blockchain development, integrating reliable APIs is crucial for building efficient decentralized applications (dApps) https://medium.com/@elliotpearce01/using-the-avalanche-api-for-development-with-avax-explorer-gateway-api-e56de9b2fc04
vodka casino депозит
can i get mobic without rx how can i get mobic no prescription can you get generic mobic tablets
can you get generic mobic no prescription get generic mobic online can i get generic mobic pills
can you buy generic mobic pills
where buy mobic pills order mobic pill how can i get cheap mobic price
can i buy cheap mobic prices can i order mobic pill can i buy generic mobic without prescription
Las Vegas residents need to ensure they possess
enough Car Insurance in Las Vegas Nevada to adhere to condition laws.
It’s easy to acquire numerous quotes for Car Insurance in Las Vegas Nevada
online to locate the greatest bargain. Always remember that the most affordable Car Insurance in Las Vegas Nevada may not constantly be the greatest option. Take into consideration the reputation of the insurance policy
firm when picking Car Insurance in Las Vegas Nevada.
where to buy generic albuterol no prescription where buy albuterol without rx where buy albuterol tablets
where can i get generic albuterol pills albuterol nebulizer vs inhaler can you buy albuterol online
can i purchase cheap albuterol online
albuterol tablets buyers order albuterol without prescription is it legal to buy albuterol online
where can i get generic albuterol prices where can i buy albuterol over the counter can you buy generic albuterol without dr prescription
Малоизвестные, но надежные! Получите [url=https://mikro-zaim-online.ru/]займы без проверок для иногородних[/url] от новых МФО. Легко, быстро и без звонков оператора.
cefixime ofloxacin tablet dpco mrp can you get cefixime no prescription where to get cefixime tablets
cefixime ofloxacin tablets typhoid symptoms where to buy generic cefixime without insurance cefixime dosage for ear infection
can you buy cefixime no prescription
for what purpose cefixime tablets are used cefixime 400 mg side effects cefixime 400 mg chlamydia pictures
how can i get cefixime without dr prescription dosage of cefixime cefixime 400 mg capsule dosage
снятие ломок [url=https://eisberg.forum24.ru/?1-1-0-00002022-000-0-0-1730872626/]снятие ломок[/url] .
generic name for actos can actos cause heart failure buy actos 30mg
how much does actos cost when to take actos how to buy actos
buy actos 15mg online
buy actos 15mg online cordarone tablet 200 mg lactose where to get actos
can actos make you tired buy very low cost actos online actos medication errors
An outstanding share! I’ve just forwarded this onto a friend who was doing a little homework on this.
And he actually ordered me breakfast due to the fact that
I found it for him… lol. So let me reword this….
Thanks for the meal!! But yeah, thanks for spending the time to discuss
this matter here on your blog.
cost of allegra for sale how to buy generic allegra prices where buy cheap allegra without rx
where to buy generic allegra for sale where can i buy generic allegra without rx cost of cheap allegra without a prescription
how can i get allegra without insurance
where to get cheap allegra without prescription buying allegra pill cost allegra without rx
order cheap allegra without a prescription can you buy cheap allegra pill order generic allegra price
Советую почитать вот эту статья про частных SEO специалистов, очень подробно расписано https://rin.ru/novosti/222068/kto-takoi-seo-spetsialist-i-chem-on-zanimaetsya.html
colchicine cheapest price colchicine function in cell division can colchicine raise triglycerides
is colchicine good for gout low dose colchicine side effects colchicine nursing interventions
maximum dose of colchicine
colchicine dosing maintenance dose of colchicine purchase colchicine online cheap
colchicine for cardiac patients can colchicine cause death cost of colchicine
Wow that was strange. I just wrote an incredibly long comment but after I clicked submit my comment didn’t show up. Grrrr… well I’m not writing all that over again. Regardless, just wanted to say wonderful blog!
эро видео чат
Very often I go to see this blog. It very much is pleasant to me. Thanks the author
Opening an account on a cryptocurrency exchange works similarly to signing up for an online brokerage account.
actos datasheet buy actos canada is actos dangerous to take
actos bladder cancer 10 year actos side effects in women actos medication recall
actos cost
actos max dose per day order generic actos where to buy actos 30 mg
can i get actos is actos long acting can you get actos
This page is dedicated for ASF configuration. It serves as a complete documentation of config directory, allowing you to tune ASF to your needs steam authenticator
Somebody was posting that setting up the authenticator works on 1.0.11, and then upgrade to 1.0.13 for confirmations to work. Idk, something like that, haven’t tried it steam mobile authenticator
This page is dedicated for ASF configuration. It serves as a complete documentation of config directory, allowing you to tune ASF to your needs steam desktop authenticator не работает подтверждение
Steam aauthenticator is a option of two-step authentication on steam. It provides additional step privacy your nicknames and passwords. If this option is enabled, Steam Aauthenticator asks you for one-time passcode every time , when you login to Steam on a unfamiliar device download steam desktop authenticator
Somebody was posting that setting up the authenticator works on 1.0.11, and then upgrade to 1.0.13 for confirmations to work. Idk, something like that, haven’t tried it steam desktop authenticator
trazodone for dogs by weight trazodone side effects elderly herbs that act like trazodone
trazodone complaints difference between trazodone and hcl trazodone hydrochloride tablets 50 mg
trazodone morning or night
trazodone cost cvs lunesta and trazodone can trazodone cause kidney damage
is trazodone safe apo trazodone side effects why is trazodone not recommended
can you buy generic advair diskus pills get cheap advair diskus without dr prescription can i buy cheap advair diskus without dr prescription
cheap advair diskus price can i purchase advair diskus tablets cost of cheap advair diskus
buying cheap advair diskus without a prescription
can i order advair diskus prices cost of generic advair diskus prices can you buy advair diskus without rx
how can i get advair diskus pills can i order generic advair diskus without prescription where to buy advair diskus tablets
Предлагаем услуги профессиональных инженеров офицальной мастерской.
Еслли вы искали ремонт посудомоечных машин aeg, можете посмотреть на сайте: ремонт посудомоечных машин aeg в москве
Наши мастера оперативно устранят неисправности вашего устройства в сервисе или с выездом на дом!
снятие наркотической ломки [url=www.honey.ukrbb.net/viewtopic.php?f=45&t=16763/]снятие наркотической ломки[/url] .
снятие ломки в стационаре [url=vishivayu.ukrbb.net/viewtopic.php?f=12&t=13502]снятие ломки в стационаре[/url] .
I imagine so. Very good stuff, I agree totally.
What made you first develop an interest in this topic?
симптомы ломки [url=http://taksafonchik.borda.ru/?1-2-0-00001310-000-0-0-1730872677]симптомы ломки[/url] .
can i purchase generic lisinopril no prescription where to buy generic lisinopril price picture of 10 mg lisinopril
how to discontinue lisinopril how to buy cheap lisinopril without rx how can i get generic lisinopril online
can i order generic lisinopril without prescription
buying lisinopril pills cost of lisinopril 40 mg difference between lisinopril and diovan
buy lisinopril 20 mg online buying cheap lisinopril without a prescription can i get cheap lisinopril pill
Medicines information. Generic Name.
methocarbamol and aspirin
Actual information about medicament. Get information now.
симферопольский пансионат для престарелых и инвалидов [url=https://xn—–2-53dwibb3a5adehvkaijkcgoft4dwa1orb.xn--p1ai/]xn—–2-53dwibb3a5adehvkaijkcgoft4dwa1orb.xn--p1ai[/url] .
Rheumatoid arthritis treatment alternatives Symptom improvement in rheumatoid arthritis Rheumatoid arthritis therapy optimization
Rheumatoid arthritis treatment methods Rheumatoid arthritis treatment plans Symptom improvement in rheumatoid arthritis
Rheumatoid arthritis treatment courses
C-reactive protein in rheumatoid arthritis Rheumatoid arthritis treatment side effects Rheumatoid arthritis treatment innovations
Rheumatoid arthritis treatment alternatives Joint mobility preservation in rheumatoid arthritis Rheumatoid arthritis treatment strategies
I have read some excellent stuff here Definitely value bookmarking for revisiting I wonder how much effort you put to make the sort of excellent informative website
Medicament information for patients. Drug Class.
order phenergan for sale
All trends of meds. Read information here.
can i order generic betnovate pill where to get generic betnovate no prescription cost cheap betnovate no prescription
can you buy betnovate online can i order cheap betnovate tablets can i get generic betnovate for sale
where can i buy betnovate without insurance
can i buy betnovate without dr prescription can i order cheap betnovate without insurance cost of betnovate prices
where can i get generic betnovate tablets can you buy generic betnovate online where can i buy betnovate online
Medication information sheet. Short-Term Effects.
where can i get generic phenergan no prescription
All about drugs. Read information now.
can i order cheap fluoxetine online how can i get generic fluoxetine for sale how can i get generic fluoxetine
can i purchase generic fluoxetine pills fluoxetine generic names where to get fluoxetine pill
buy fluoxetine prices
where to buy cheap fluoxetine pill where to buy cheap fluoxetine without a prescription where can i buy generic fluoxetine price
get generic fluoxetine for sale fluoxetine absorption in the body how to buy cheap fluoxetine prices
Долгие годы мы производим сувениры, подарки и рекламную продукция как для больших корпораций, так и для среднего и малого бизнеса UFC live broadcast
Прохождение игры GTA 5. В контрольном списке GTA V есть пять основных категорий целей: чтобы достичь 100% выполнения в GTA 5 Вам необходимо выполнить 69 сюжетных миссий https://rutube.ru/video/db06463c2607b6c0a7d60488d65854d1/
Долгие годы мы производим сувениры, подарки и рекламную продукция как для больших корпораций, так и для среднего и малого бизнеса Sport news
Mostbet is a popular platform that offers a wide variety of sports betting and casino games for users in Bangladesh mostbet
Прохождение игры GTA 5. В контрольном списке GTA V есть пять основных категорий целей: чтобы достичь 100% выполнения в GTA 5 Вам необходимо выполнить 69 сюжетных миссий https://rutube.ru/video/f4389f29e2671fe7dfd6607eadc9281e/
Medication information. Long-Term Effects.
cost cheap atarax without insurance
All what you want to know about pills. Read now.
can i buy theo 24 cr without rx buy cheap theo 24 cr without insurance where to buy theo 24 cr pills
cost of theo 24 cr no prescription can i order cheap theo 24 cr buy generic theo 24 cr without rx
can i get cheap theo 24 cr without rx
can i buy generic theo 24 cr no prescription where buy theo 24 cr online can i buy cheap theo 24 cr without rx
where buy cheap theo 24 cr tablets cost cheap theo 24 cr prices buy cheap theo 24 cr for sale
Pills information sheet. Long-Term Effects.
where to get generic imodium
Actual trends of medicines. Get information here.
The Steam Guard Mobile Authenticator is a feature of the Steam Mobile App that provides an additional level of security to your Steam аccount sda steam
how can i get ventolin inhalator prices where to get ventolin inhalator no prescription how to get ventolin inhalator price
cheap ventolin inhalator pills can i get ventolin inhalator without prescription how to get ventolin inhalator without dr prescription
can you get cheap ventolin inhalator pill
buy cheap ventolin inhalator without rx can i order generic ventolin inhalator pill where buy generic ventolin inhalator for sale
how to buy ventolin inhalator no prescription buy cheap ventolin inhalator without dr prescription where to get generic ventolin inhalator without rx
IF you lost your maFiles OR lost your encryption key, go here and click “Remove Authenticator” then enter your revocation code that you wrote down when you first added your account to SDA скачать sda steam authenticator
The Steam Guard Mobile Authenticator is a feature of the Steam Mobile App that provides an additional level of security to your Steam аccount steam guard authenticator download
Instantly connects you to random people worldwide, similar to the Omegle experience. You could meet someone from across the globe or right around the секс чат видео
IF you lost your maFiles OR lost your encryption key, go here and click “Remove Authenticator” then enter your revocation code that you wrote down when you first added your account to SDA download steam desktop authenticator
Medicines information sheet. Cautions.
pastillas flibanserina baratas
All what you want to know about medicine. Get information now.
Hello! I could have sworn I’ve visited this website before but after going through a few of
the posts I realized it’s new to me. Nonetheless, I’m definitely delighted
I found it and I’ll be book-marking it and checking back often!
can i purchase generic cipro without dr prescription cost cipro without dr prescription how to get cheap cipro without insurance
cheap cipro for sale where can i get cheap cipro pills cipro antibiotic to buy
where can i get cipro without a prescription
how to buy cipro price cost of generic cipro pills can you buy cheap cipro without dr prescription
buy cipro without dr prescription can i get generic cipro pills where buy cheap cipro
Medication information sheet. Long-Term Effects.
get cheap singulair tablets
Best about drugs. Read information here.
how to get prasugrel without insurance can i purchase cheap prasugrel tablets cost prasugrel online
prasugrel selection guidelines can i get prasugrel without rx where can i buy generic prasugrel pills
buying cheap prasugrel no prescription
where can i buy cheap prasugrel pills prasugrel 10 mg brand name where buy generic prasugrel without rx
how can i get cheap prasugrel no prescription where can i buy cheap prasugrel for sale how to get prasugrel without insurance
Pills information for patients. Long-Term Effects.
buying cheap proscar pill
Everything information about medicines. Read here.
cheap tizanidine no prescription cheap tizanidine prices how to buy tizanidine
how to buy cheap tizanidine without a prescription can you get tizanidine online where can i buy generic tizanidine online
buy tizanidine for sale
where can i buy tizanidine prices how to buy tizanidine without dr prescription cost of generic tizanidine without dr prescription
cheap tizanidine without a prescription get generic tizanidine online can i purchase cheap tizanidine online
Drug information for patients. Effects of Drug Abuse.
can you get generic nortriptyline online
Everything information about medicament. Get now.
where to buy tetracycline antibiotics how to buy tetracycline tablets get generic tetracycline without rx
how can i get cheap tetracycline online where to get generic tetracycline tablets order tetracycline price
cost of generic tetracycline no prescription
online purchase of tetracycline buying tetracycline price buying tetracycline
where to buy cheap tetracycline prices buy cheap tetracycline without dr prescription buying cheap tetracycline without prescription
Купить диплом о среднем полном образовании, в чем подвох и как избежать обмана?
Drugs prescribing information. Effects of Drug Abuse.
is gerd a side effect of lisinopril
Some trends of medicament. Get information now.
how can i get generic cipro can you get generic cipro where to buy cipro for sale
how to buy cheap cipro pill can you get cipro online can you buy cipro
cost of cipro no prescription
where to buy cheap cipro price where can i get generic cipro for sale where to buy cipro pill
purchase ciprofloxacin online cheap cheap cipro without a prescription can i order cipro without insurance
can i order generic mobic online can i order mobic for sale can i order cheap mobic without insurance
where to get cheap mobic without insurance can i purchase cheap mobic pills order mobic pill
where to buy mobic online
cost generic mobic pill buy mobic pill can i purchase cheap mobic without prescription
can you get generic mobic without a prescription buy generic mobic without insurance get cheap mobic without a prescription
Hi, do have a e-newsletter? In the event you don’t definately should get on that piece…this web site is pure gold!
Drugs information leaflet. Drug Class.
can i get keflex pills
Actual information about medicament. Get information here.
where can i buy lisinopril buying lisinopril in mazatln lisinopril 10 mg goodrx
can i order cheap lisinopril online when to stop taking lisinopril dangers of taking lisinopril
lisinopril 5mg prices
get cheap lisinopril prices lisinopril tabs 40mg can i purchase generic lisinopril no prescription
buy cheap lisinopril without prescription where can i buy generic lisinopril pills can i get lisinopril without dr prescription
Drug prescribing information. What side effects can this medication cause?
cost of zoloft pills
Some trends of drugs. Get information here.
myspace.com [url=http://output.jsbin.com/weyucovome/]http://output.jsbin.com/weyucovome/[/url] .
Лицензированное онлайн Аркада казино предлагает огромный выбор слотов, лайв развлечений и других игр от известных провайдеров с мировым именем. Запустили казино в 2024 году. Положительные отзывы и солидные призовые позволили Arcada быстро снискать популярность среди опытных гемблеров и новичков казино аркада зеркало
After logging into Mostbet, you can take advantage of welcome bonuses, deposit bonuses, and special promotions to boost your chances of winning mostbet
Мы всегда собираем все канализационные трубы с использованием специальной сантехнической смазки. Да, у наших мастеров достаточно сил, чтобы вставить трубы друг в друга и насухую, но при такой сборке примерно в трёх случаях из ста уплотнительная резинка заворачивается и соединение становится негерметичным https://lalamaster.ru/story/new
where can i get generic cialis soft tabs can you get cheap cialis soft tabs online can i buy cheap cialis soft tabs pills
where to buy generic cialis soft tabs pill how to get cheap cialis soft tabs without prescription can i purchase cheap cialis soft tabs tablets
can i order cheap cialis soft tabs for sale
where to buy cialis soft tabs no prescription cialis soft tabs realeased how to buy cialis soft tabs tablets
can i get cheap cialis soft tabs tablets can i get cheap cialis soft tabs online where can i get generic cialis soft tabs without dr prescription
myspace.com [url=www.mediafire.com/file/64azh2ok1uy0jzx/miakhalifaxxxvideoxxxbptv.docx/file]www.mediafire.com/file/64azh2ok1uy0jzx/miakhalifaxxxvideoxxxbptv.docx/file[/url] .
Лицензированное онлайн Аркада казино предлагает огромный выбор слотов, лайв развлечений и других игр от известных провайдеров с мировым именем. Запустили казино в 2024 году. Положительные отзывы и солидные призовые позволили Arcada быстро снискать популярность среди опытных гемблеров и новичков аркада казино официальный сайт
After logging into Mostbet, you can take advantage of welcome bonuses, deposit bonuses, and special promotions to boost your chances of winning mostbet apk
Мы всегда собираем все канализационные трубы с использованием специальной сантехнической смазки. Да, у наших мастеров достаточно сил, чтобы вставить трубы друг в друга и насухую, но при такой сборке примерно в трёх случаях из ста уплотнительная резинка заворачивается и соединение становится негерметичным https://lalamaster.ru/story
Pills information for patients. Cautions.
where to buy cheap indomethacin without insurance
Best trends of drug. Get now.
zamte https://zamte.com/
how to get actos actos 15 mg side effects when should i take actos
lowest dose of actos can i buy actos 10 mg actos consortium lawsuit
actos dosage for adults
actos side effects weight gain actos and metformin actos medication cost
actos 30 mg actos side effects lawsuit actos for sale
Drug information leaflet. Generic Name.
propranolol
Some trends of pills. Get here.
I’m impressed, I need to say. Really rarely do I encounter a blog that’s both educational and entertaining, and let me tell you, you have hit the nail on the head.
Your Steam Mobile app can be used to authenticate multiple Steam accounts. From the blue drop down on the Steam Guard tab, select an account or add a new one steam mobile authenticator
cost cheap fml forte without insurance can i purchase generic fml forte pills can you get generic fml forte
can i get generic fml forte no prescription order fml forte pills how can i get generic fml forte prices
how to get fml forte
can i buy fml forte without a prescription where to get fml forte pill cost of generic fml forte
how to get cheap fml forte price can i purchase cheap fml forte pills buying fml forte price
снятие ломки у наркомана [url=kryto.ukrbb.net/viewtopic.php?f=3&t=1180]снятие ломки у наркомана[/url] .
A command line utility for setting up and using Steam Mobile Authenticator (AKA Steam 2FA). It can also be used to respond to trade, market, and any other steam guard authenticator download
Your Steam Mobile app can be used to authenticate multiple Steam accounts. From the blue drop down on the Steam Guard tab, select an account or add a new one steam guard authenticator скачать
[url=https://play.luckyduck-casino-apk.ru]www.play.luckyduck-casino-apk.ru[/url]
Загрузить приложение казино luckyduck – играй сегодня!
https://play.luckyduck-casino-apk.ru
http://gramster.ru/# пинап казино
can i buy cheap clomid no prescription cost clomid online where buy cheap clomid prices
where to get generic clomid without insurance can i buy clomid pill cost cheap clomid pills
how can i get cheap clomid
where to get clomid pills can you buy generic clomid without dr prescription where to buy cheap clomid for sale
can you get cheap clomid online can i order clomid without a prescription cost clomid without a prescription
Drug information for patients. Long-Term Effects.
buy cheap chlorpromazine without prescription
Actual about drugs. Read here.
This can be done by looking at figures like market capitalization, trading volume and historical performance among others.
get cheap cipro without a prescription how can i get cheap cipro without dr prescription cost cheap cipro without rx
how to buy cipro without dr prescription buy cheap cipro for sale cipro buy uk
cost of cheap cipro
cost of generic cipro for sale how to get generic cipro without dr prescription how to get generic cipro price
can i order cipro without dr prescription can you get cheap cipro without a prescription can you buy generic cipro without a prescription
It’s important for a cryptocurrency to be easily available across a variety of cryptocurrency exchanges, including both centralized and decentralized options.
Medicament information. Generic Name.
how can i get cheap minocycline tablets
Everything news about drug. Get here.
where to get generic advair diskus without rx buying generic advair diskus pill can i order advair diskus pill
where to buy generic advair diskus pills cost generic advair diskus pills can you get cheap advair diskus prices
buying cheap advair diskus for sale
how can i get cheap advair diskus prices order cheap advair diskus without a prescription can i buy generic advair diskus without prescription
advair diskus use where can i get generic advair diskus online buy advair diskus without a prescription
Medicines information. What side effects can this medication cause?
cheap lansoprazole without a prescription
All what you want to know about medicine. Read information now.
Автотесты в разработке ПО: как автоматизация помогает ускорить процесс проверки и снизить количество ошибок. Узнайте о преимуществах использования автоматизированного тестирования и его роли в современных проектах: https://vc.ru/u/3791103-infa-v-dele/1733597-avtotesty-instrumenty-vidy-i-smysl-avtomatizacii-qa
myspace.com [url=http://recessed-lighting83828.topbloghub.com/38007328/the-connection-between-porn-and-increased-sexual-satisfaction-for-couples/]http://recessed-lighting83828.topbloghub.com/38007328/the-connection-between-porn-and-increased-sexual-satisfaction-for-couples/[/url] .
myspace.com [url=http://www.exploreourpubliclands.org/members/icicleflock12/activity/623183/]http://www.exploreourpubliclands.org/members/icicleflock12/activity/623183/[/url] .
Medicine information. Cautions.
can i buy tetracycline no prescription
Best about medicament. Get information here.
https://gramster.ru/# пин ап казино
Drug information. What side effects can this medication cause?
metronidazole drug interactions dogs
Actual news about drugs. Get information here.
where to get tetracycline without rx where can i buy cheap tetracycline pills where can i get generic tetracycline
cost generic tetracycline no prescription where can i get tetracycline without rx can i order cheap tetracycline price
how can i get cheap tetracycline without rx
tetracycline soluble powder buy generic tetracycline without insurance where can i buy tetracycline for sale
can i buy generic tetracycline no prescription how to get cheap tetracycline prices can i order generic tetracycline without dr prescription
Thank you for the auspicious writeup.
Pills information leaflet. Generic Name.
get generic lyrica without a prescription
Best trends of medication. Get now.
How come you do not have your website viewable in mobile format? cant see anything in my Droid.
protonix 1 5mg retard where buy cheap protonix pills how long does it take for protonix 40 mg to work
protonix side effects can 500 mg garlic interact with protonix where buy cheap protonix no prescription
protonix 40 mg tab white oval 17
can i purchase protonix online protonix tablets 40mg where can i buy protonix price
cost protonix 40 mg uses for protonix 40 mg protonix prescription prices
where can i get cheap doxycycline without a prescription buying cheap doxycycline pill can you get generic doxycycline tablets
buy generic doxycycline without insurance can you get cheap doxycycline pill chemist warehouse doxycycline 100mg
doxycycline hydrochloride capsule
how to get doxycycline prescribed doxycycline hyclate cost where can i get doxycycline pill
where to buy generic doxycycline without rx does doxycycline hyclate treat chlamydia where to get generic doxycycline price
https://gramster.ru/# pinup 2025
where can i get pregabalin prices can you get cheap pregabalin without rx how can i get pregabalin
can i order generic pregabalin online where can i buy generic pregabalin pills can you buy pregabalin
can you get generic pregabalin online
can you get generic pregabalin without a prescription get cheap pregabalin without rx where can i buy cheap pregabalin without rx
can i buy cheap pregabalin no prescription get generic pregabalin price can i get generic pregabalin without rx
За подробностями можно следить в группе https://forum.ee/blog/970/entry-48910-olimpiadi-po-russkomu-yaziku-interesno-i-polezn/ во «Вконтакте».
can you get co-amoxiclav for sale how can i get cheap co-amoxiclav prices where buy co-amoxiclav
can i purchase generic co-amoxiclav tablets can i buy generic co-amoxiclav pill can you buy cheap co-amoxiclav for sale
buy co-amoxiclav prices
can i buy co-amoxiclav online where buy cheap co-amoxiclav pill can i buy co-amoxiclav without a prescription
can you buy generic co-amoxiclav without a prescription cost of generic co-amoxiclav without a prescription where to get cheap co-amoxiclav for sale
myspace.com [url=http://www.firsturl.de/z07r4pL]http://www.firsturl.de/z07r4pL[/url] .
This is my first time visit at here and i am actually happy to read everthing at alone place.
cost cheap differin can you buy generic differin tablets where buy cheap differin prices
order cheap differin without a prescription cost cheap differin for sale cost of differin without rx
can i order cheap differin online
how can i get generic differin without rx buy generic differin price where to buy cheap differin for sale
cost cheap differin pills buy cheap differin without prescription how to buy cheap differin price
Cheers! An abundance of content.
my page http://www.buy-aeds.com/comment/html/?164635.html
https://gramster.ru/# пин ап казино зеркало
how to buy cheap theo 24 cr prices how to buy cheap theo 24 cr no prescription cheap theo 24 cr without prescription
how to buy generic theo 24 cr price can you get theo 24 cr tablets how to buy generic theo 24 cr for sale
can i order cheap theo 24 cr online
generic theo 24 cr no prescription can i purchase cheap theo 24 cr can you buy theo 24 cr without insurance
how can i get theo 24 cr online can i get generic theo 24 cr prices how to buy cheap theo 24 cr for sale
https://1c-oblako.blogspot.com/2022/10/1-1_12.html
Главное отличие автоматизированного тестирования от ручного состоит в способе выполнения: в первом случае тесты запускаются с помощью инструментов автоматизации, во втором — все действия выполняются тестировщиком вручную https://vc.ru/u/3791103-infa-v-dele/1733597-avtotesty-instrumenty-vidy-i-smysl-avtomatizacii-qa
снятие ломки наркомана [url=http://aktivnoe.forum24.ru/?1-2-0-00000093-000-0-0-1730874208]снятие ломки наркомана[/url] .
buying generic cetirizine prices buying cetirizine without dr prescription buy cetirizine online uk
how can i get generic cetirizine price diphenhydramine and cetirizine interaction cetirizine hydrochloride to buy
can you buy cetirizine prices
can i order generic cetirizine pills where buy cheap cetirizine pills can i buy cheap cetirizine no prescription
can i order cetirizine for sale where buy cheap cetirizine pills can i purchase cetirizine for sale
how can i get cheap lisinopril for sale lisinopril hctz alcohol lisinopril 20 mg in greece price
buy 40 mg lisinopril how to get cheap lisinopril without insurance what blood test to they do if you are on lisinopril
cost cheap lisinopril tablets
hctz 25 lisinopril 20mg tab lisinopril hydrochlorothiazide generic can i order generic lisinopril without prescription
buy lisinopril online no presription india where buy cheap lisinopril without rx lisinopril 2.5mg dose used for
Thanks , I’ve recently been searching for info about this topic for ages and yours is the best I have discovered so far. But, what concerning the bottom line? Are you certain concerning the source?
where buy fincar without dr prescription where to buy cheap fincar without prescription buy fincar pill
get cheap fincar without a prescription generic fincar prices where to get generic fincar without prescription
where to buy cheap fincar without insurance
can you buy cheap fincar cost cheap fincar price cost of generic fincar price
cost cheap fincar without dr prescription buy fincar without insurance can i get fincar
промокоды изи дроп 100 процентов [url=http://www.aktivnoe.forum24.ru/?1-10-0-00000175-000-0-0-1734709383]промокоды изи дроп 100 процентов[/url] .
The Steam Guard Mobile Authenticator is a feature of the Steam Mobile App that provides an additional level of security to your Steam account sda steam
https://gramster.ru/# пин ап
The Steam Guard Mobile Authenticator is a feature of the Steam Mobile App that provides an additional level of security to your Steam account как включить steam mobile authenticator
buying cheap astelin for sale can i get cheap astelin price buying astelin without dr prescription
generic astelin without insurance how to get cheap astelin online can i buy astelin pill
can i get astelin price
can i order generic astelin without insurance generic astelin without a prescription buying astelin without prescription
where buy astelin tablets how to get generic astelin pill buy cheap astelin without rx
can you get generic super p-force no prescription cost of super p-force online cost of super p-force for sale
cost of cheap super p-force no prescription how to buy cheap super p-force without a prescription where buy cheap super p-force online
buy super p-force prices
can i purchase super p-force without rx can you buy super p-force without prescription can i purchase generic super p-force price
can i purchase cheap super p-force without prescription buy generic super p-force without dr prescription where buy super p-force prices
When someone writes an paragraph he/she maintains
the idea of a user in his/her mind that how a user can understand it.
Thus that’s why this article is great. Thanks!
Drugs prescribing information. Effects of Drug Abuse.
diclofenac unveiling its secret composition with misoprostol
Everything what you want to know about medicine. Read information here.
cost generic uroxatrall price
Run Steam Desktop Authenticator.exe and click the button to set up a new account. Login to Steam and follow the instructions to set it up. Note: you still steam mobile authenticator
where to get amoxicillin online get cheap amoxicillin without a prescription buy generic amoxicillin for sale
amoxicillin 500mg dosage buy online uk where to buy generic amoxicillin for sale where buy cheap amoxicillin
where can i get cheap amoxicillin without rx
buy antibiotics amoxicillin no prescription how can i get cheap amoxicillin pills generic amoxicillin for sale
amoxicillin 500mg to buy can you buy something similar to amoxicillin over the counter where can i get amoxicillin without insurance
Run Steam Desktop Authenticator.exe and click the button to set up a new account. Login to Steam and follow the instructions to set it up. Note: you still steam desktop authenticator github
http://gramster.ru/# пин ап казино
Drug prescribing information. What side effects?
can i get zanaflex online
Best trends of medication. Get now.
промокод easy drop [url=www.svstrazh.forum24.ru/?1-5-0-00000053-000-0-0-1735126416/]промокод easy drop[/url] .
Allergy-friendly workplace policies Asthma emergency preparedness Asthma diagnosis process
Immunotherapy Asthma care plan Allergy relief remedies
Asthma medication adherence
Asthma peak flow monitoring Asthma treatment options Allergy facts
Asthma exacerbation triggers Allergy prevention programs Asthma triggers avoidance
Medicines information for patients. Generic Name.
buy generic ziprasidone prices
Everything trends of drugs. Get information here.
купить аттестат в иваново
levaquin 750 mg cost common side effects of Levaquin what conditions does Levaquin treat
levaquin dose renal insufficiency levaquin normal strength and dose levaquin side effects mayo clinic
is levaquin dangerous to take
how fast does Levaquin work where to buy levaquin prices kidney infection 500 mg levaquin
can levaquin cause kidney problems does levaquin make you tired dangerous side effects of levaquin
I saw a similar post on another website but the points were not as well articulated.
Medicament information. What side effects?
get cheap proscar price
Everything about medicament. Read information now.
cefixime antibiotic tablets for acne cefixime chewable tablets what is cefixime prescribed for
can i order cefixime prices is there any medicine that would interact with azithromycin 500mg 2 tablets cefixime 400 mg 1 capsule cefixime 200 mg price
can you get cheap cefixime without dr prescription
can i buy cefixime prices lanfix cefixime 100mg what is cefixime effects on humans
cefixime 200 mg clavulanic acid 125 mg how to get cefixime pill can i buy cheap cefixime pill
Medicine prescribing information. What side effects can this medication cause?
where can i get cheap acyclovir without insurance
Everything information about drug. Read information now.
can i order indocin without rx
where to get gabapentin without a prescription gabapentin tablet uses order generic gabapentin price
cheap gabapentin tablets buying cheap gabapentin tablets where to buy generic gabapentin no prescription
where buy cheap gabapentin online
where buy generic gabapentin without dr prescription where to get gabapentin how to get cheap gabapentin pill
how to buy cheap gabapentin without dr prescription where can i get cheap gabapentin without insurance get gabapentin without prescription
https://gramster.ru/# пин ап казино официальный сайт
Pills information sheet. Long-Term Effects.
duloxetine and dialysis
Some news about medication. Get here.
how to buy generic lyrica tablets get lyrica price can you get cheap lyrica price
how can i get cheap lyrica no prescription can i order generic lyrica prices how to buy cheap lyrica tablets
how to buy generic lyrica pill
how to get generic lyrica without a prescription where to buy generic lyrica without a prescription buy lyrica prices
can you buy lyrica online cost of cheap lyrica pills where buy lyrica no prescription
Drugs prescribing information. Generic Name.
can you buy generic benicar without a prescription
All information about drugs. Read here.
where to buy cheap sporanox without dr prescription
where to get cheap doxycycline pills can i order cheap doxycycline without dr prescription buy doxycycline malaria uk
how to buy cheap doxycycline for sale can i buy generic doxycycline prices where to buy doxycycline online
can i purchase cheap doxycycline
where can i buy doxycycline without prescription can you get cheap doxycycline without rx get generic doxycycline without a prescription
where to buy doxycycline in australia how to buy cheap doxycycline pills order doxycycline 200mg online
Medication information for patients. Drug Class.
stellar trial rosuvastatin pdf
Actual news about medicines. Read here.
where to buy generic caduet online can i buy cheap caduet without prescription can i get cheap caduet tablets
can you get cheap caduet online buying cheap caduet no prescription cost of caduet without a prescription
where to buy generic caduet without a prescription
how to buy generic caduet without rx where to buy caduet without a prescription where buy caduet without dr prescription
get caduet price where to get cheap caduet no prescription how can i get caduet without prescription
Meds information. Short-Term Effects.
how can i get generic pioglitazone prices
Everything information about medicines. Get here.
can you get cheap indocin without rx
вывод из запоя стационар ростов [url=http://vyvod-iz-zapoya-rostov24.ru/]вывод из запоя стационар ростов[/url] .
where buy generic prograf without insurance order cheap prograf tablets can i get generic prograf without prescription
where can i get generic prograf can you buy generic prograf for sale where buy cheap prograf prices
where to buy cheap prograf price
how to get cheap prograf prices order generic prograf pills can i order cheap prograf no prescription
cheap prograf without rx how to buy prograf without rx how to get cheap prograf without prescription
https://gramster.ru/# пин ап казино
вывод из запоя на дому ростов цены [url=https://vyvod-iz-zapoya-rostov26.ru/]вывод из запоя на дому ростов цены[/url] .
Medicines information for patients. Generic Name.
naltrexone for self injury 2
Everything what you want to know about meds. Read here.
Yoᥙu ought too tаkee part iin a cotest foor onne
off tthе hkghest quaⅼity blogs oon tthe net.
I aam going tto recoommend thuis blog!
mу webb sitee :: Free Gift
where can i get generic aristocort without dr prescription order aristocort tablets where to buy aristocort pills
how can i get generic aristocort without prescription how can i get cheap aristocort for sale cost of generic aristocort without rx
can i purchase cheap aristocort without dr prescription
how can i get generic aristocort price where buy generic aristocort without prescription where to buy aristocort without prescription
cost of generic aristocort prices cost of aristocort without a prescription where buy generic aristocort without a prescription
Лучшие коляски 3 в 1 для вашего малыша, которые обязательно пригодятся.
Популярные варианты колясок 3 в 1, с широким функционалом и стильным дизайном.
Гид по выбору коляски 3 в 1, для того, чтобы учесть все нюансы.
Секреты удачного выбора коляски 3 в 1, чтобы ваш ребенок был удобно и комфортно.
Плюсы и минусы популярных моделей колясок 3 в 1, чтобы сделать обдуманный выбор.
cybex автокресло [url=https://kolyaska-3-v-1-msk.ru/]cybex автокресло[/url] .
Drugs information for patients. Brand names.
can i buy generic singulair online
Actual information about medicament. Read information now.
can i get generic zyrtec without prescription order generic zyrtec tablets get cheap zyrtec without a prescription
cost zyrtec no prescription can you get zyrtec without dr prescription generic zyrtec prices
buy zyrtec price
cost zyrtec prices where to buy cheap zyrtec without rx how to buy generic zyrtec
where to buy cheap zyrtec without dr prescription can i purchase generic zyrtec pill buying zyrtec price
Medication information for patients. What side effects can this medication cause?
gabapentin for uremic pruritus
Some about medicament. Read here.
how to get cheap celebrex prices
can i order cheap zyrtec pill where to buy zyrtec without rx buy cheap zyrtec no prescription
cost generic zyrtec without dr prescription can you buy zyrtec without dr prescription can i get generic zyrtec without insurance
how to get cheap zyrtec price
cost cheap zyrtec pill buying zyrtec pills where to get cheap zyrtec without prescription
can i purchase generic zyrtec without rx can i buy generic zyrtec online can i purchase zyrtec without dr prescription
SDA and maFile are related to account management on the Steam platform. SDA allows you to generate Steam Guard security codes on your computer steam mobile authenticator как подключить
carproblemshub https://carproblemshub.com/
SDA and maFile are related to account management on the Steam platform. SDA allows you to generate Steam Guard security codes on your computer steam desktop authenticator не работает подтверждение
http://gramster.ru/# пин ап
diltiazem 120 mg tablets does diltiazem make you sleepy diltiazem hcl er 240 mg
diltiazem pictures can diltiazem raise blood pressure diltiazem epocrates
diltiazem 120 for chest pain
lowest tablet dose of diltiazem diltiazem ointment buy online diltiazem drip 10mg hr
does diltiazem cause hot flashes diltiazem davis drug guide diltiazem price fixing
Medicament prescribing information. Effects of Drug Abuse.
where can i buy generic ursodiol pills
Some about medicines. Read now.
how can i get cheap colospa without a prescription
нарколог на дом вывод из запоя ростов [url=https://vyvod-iz-zapoya-rostov24.ru/]нарколог на дом вывод из запоя ростов[/url] .
reviews on effexor by women Effexor for depression and anxiety where buy generic Effexor tablets
cheapest pharmacy for effexor pharmregtop is effexor a narcotic cost generic effexor
venlafaxine er Effexor XR
how to buy generic effexor effexor renal dosing effexor coupon code
effexor coupon can you get Effexor tablets generic effexor pills
Свежие розы с доставкой к вашему порогу, порадуйте себя или близких.
Оформите заказ на букеты роз прямо сейчас, доставка в удобное время и место.
Соберите свой идеальный букет роз, гарантированная свежесть цветов.
Роскошные букеты роз для особых случаев, уникальные композиции для особых моментов.
Нежные букеты роз для нежных душ, почувствуйте аромат настоящей любви.
Подарите букет роз любимым женщинам, профессиональные флористы соберут для вас лучший букет.
Букеты роз на заказ по выгодным ценам, индивидуальный подход к каждому клиенту.
Букеты роз – это всегда актуальный подарок, мгновенное подтверждение заказа.
Букеты роз для вашего настроения, доступные цены и высокое качество.
Закажите свой уникальный букет роз, приятные цены и гарантированное качество.
Букеты роз – это всегда актуальный подарок, с любовью и заботой.
Прекрасные букеты роз для ваших близких, сделайте день особенным.
заказать розы с доставкой [url=https://buket-roz-s-dostavkoj.ru/]https://buket-roz-s-dostavkoj.ru/[/url] .
Pills prescribing information. What side effects can this medication cause?
lisinopril hctz pills
Everything news about pills. Get information here.
I’m impressed, I need to say. Really rarely do I encounter a blog that’s both educational and entertaining, and let me tell you, you have hit the nail on the head.
вывод из запоя дешево ростов на дону [url=https://www.vyvod-iz-zapoya-rostov26.ru]вывод из запоя дешево ростов на дону[/url] .
can i get cheap theo 24 cr without prescription order cheap theo 24 cr without dr prescription how to get generic theo 24 cr pill
where buy cheap theo 24 cr without insurance can i purchase generic theo 24 cr prices order generic theo 24 cr price
generic theo 24 cr no prescription
where to buy generic theo 24 cr can i get theo 24 cr without prescription can i purchase generic theo 24 cr without prescription
how to get generic theo 24 cr pill where buy theo 24 cr pills can i purchase generic theo 24 cr
how can i get maxolon without insurance
how to buy cheap betnovate without prescription where to buy betnovate prices cost of betnovate
how to get generic betnovate for sale cheap betnovate pill where buy betnovate pill
can you buy generic betnovate without prescription
buying cheap betnovate online where buy generic betnovate price can i purchase betnovate
cost generic betnovate no prescription where can i get cheap betnovate no prescription can you get betnovate pills
вывод из запоя цены на дому ростов [url=http://vyvod-iz-zapoya-rostov27.ru]вывод из запоя цены на дому ростов[/url] .
Pills information for patients. Brand names.
cost cheap desyrel without prescription
All news about medicines. Get here.
https://gramster.ru/# пин ап зеркало
order generic lioresal without insurance
can i purchase cheap depo medrol without insurance how can i get depo medrol without dr prescription cost of cheap depo medrol pills
cost depo medrol for sale how can i get cheap depo medrol without rx where can i get cheap depo medrol for sale
where can i get generic depo medrol pill
generic depo medrol without a prescription buy cheap depo medrol tablets can you buy depo medrol without rx
how to get generic depo medrol without rx order depo medrol price order generic depo medrol without rx
Medication prescribing information. Effects of Drug Abuse.
where can i buy cheap synthroid price
Actual information about pills. Read here.
can i order cetirizine no prescription can i order cheap cetirizine without dr prescription can i buy cetirizine prices
where to buy tablets cetirizine for children can i buy cheap cetirizine prices where buy cetirizine online
cetirizine 10mg pictures of pills
cetirizine and warfarin interaction cetirizine over the counter cost generic cetirizine without dr prescription
how to buy generic cetirizine without insurance can i get cetirizine cetirizine 10mg twice daily
Medication information leaflet. Short-Term Effects.
can i buy phenytoin pills
Actual information about medication. Read here.
SDA allows you to generate Steam Guard security codes on your computer. SDA and maFile are related to account management on the Steam platform как включить steam mobile authenticator
SDA allows you to generate Steam Guard security codes on your computer. SDA and maFile are related to account management on the Steam platform steam guard authenticator скачать
can i buy cheap urispas online
can i buy generic tadacip without prescription get cheap tadacip pills buying tadacip prices
buy generic tadacip price can i buy cheap tadacip no prescription generic tadacip prices
get tadacip pills
can i purchase tadacip without a prescription can i order cheap tadacip online can i order cheap tadacip without dr prescription
can you get cheap tadacip pill cost of tadacip without rx how to buy generic tadacip without dr prescription
Medicament prescribing information. Effects of Drug Abuse.
can you get cheap nolvadex
Actual trends of drug. Read information here.
Asthma symptom severity management solutions Asthma symptom severity tracking apps Asthma symptom severity prevention measures
Asthma symptom severity reduction tactics Asthma symptom counseling Asthma symptom severity support services
Asthma symptom severity alleviation approaches
Asthma symptom severity tracking applications Asthma symptom severity mitigation tactics Asthma symptom severity counseling materials
Airways constriction Asthma symptom severity relief approaches Asthma prevention strategies
Drugs information. What side effects can this medication cause?
can you get paxil tablets
All trends of medicines. Get information now.
Telegram eventually abandoned the project and it was taken over by the TON Foundation.
Medication information leaflet. Cautions.
where to get cheap tamoxifen without insurance
Everything trends of pills. Get information here.
Asthma diagnosis criteria Asthma symptom severity alleviation measures Asthma symptom support
Asthma symptom severity counseling resources Respiratory infections Asthma symptom severity management strategies
Asthma symptom severity assessment scale
Asthma symptom severity relief approaches Asthma symptom severity counseling resources Asthma symptom severity scale
Asthma symptom severity control measures Asthma symptom severity mitigation interventions Asthma prevalence
Medicines information sheet. Effects of Drug Abuse.
get cheap nolvadex pill
Everything news about medication. Read now.
can i buy coreg tablets
анонимный вывод из запоя ростов [url=https://vyvod-iz-zapoya-rostov25.ru/]анонимный вывод из запоя ростов[/url] .
where buy cheap tadacip without prescription tadacip cipla buy online how to buy tadacip without dr prescription
where to buy tadacip without insurance how to get tadacip tablets where can i get cheap tadacip without a prescription
buying tadacip price
where buy generic tadacip without a prescription buy tadacip online ukraine how to get generic tadacip without insurance
cost of generic tadacip price where can i get generic tadacip pill how can i get cheap tadacip without dr prescription
Drug information for patients. Effects of Drug Abuse.
finasteride and kidneys
Actual about medication. Get information now.
Seasonal pollen allergy Seasonal allergic rhinitis exacerbation prevention counseling Seasonal rhinitis treatment
Mask wearing for seasonal rhinitis prevention Seasonal allergic rhinitis exacerbation signs recognition Allergic reactions in seasonal rhinitis
Seasonal allergic rhinitis education
Seasonal allergic rhinitis exacerbation prevention screening programs Seasonal pollen allergy Seasonal allergic rhinitis exacerbation education materials
Understanding seasonal allergic rhinitis Seasonal allergic rhinitis prevention education Seasonal allergic rhinitis exacerbation prevention online resources
Medication information. Cautions.
clopidogrel bisulfate unveiling the molecular blueprin
Actual news about medicine. Read information here.
how to buy generic maxolon without rx
how to get doxycycline price get doxycycline online doxycycline tablets where to buy
can i get cheap doxycycline where can i get doxycycline no prescription cost of doxycycline for sale
how can i get generic doxycycline without prescription
buy doxycycline hydrochloride capsules doxycycline capsule 100mg used for can i get cheap doxycycline online
get generic doxycycline online doxycycline 100mg for sale buy doxycycline antibiotics online
Узнайте стоимость диплома высшего и среднего образования и процесс получения
Предлагаем услуги профессиональных инженеров офицальной мастерской.
Еслли вы искали ремонт ноутбуков sony в москве, можете посмотреть на сайте: ремонт ноутбуков sony
Наши мастера оперативно устранят неисправности вашего устройства в сервисе или с выездом на дом!
to ensure the integrity of Winbay Winbay casino sometimes {independent {checks|tests|audits|analyses} and generators of {pseudo-random|random} {numbers|combinations of digits} (RNGs) are needed|required|required.
Medication information sheet. Long-Term Effects.
can i purchase cheap minocycline without dr prescription
Actual news about drug. Read now.
http://gramster.ru/# пин ап вход
Medicine prescribing information. Effects of Drug Abuse.
get generic fluoxetine prices
Some news about medicament. Read here.
buy cetirizine chewable tablets cost of cetirizine pill cetirizine hydrochloride boots
levocetirizine 5mg walgreens cetirizine tablet side effects does cetirizine need prescription
get cheap cetirizine without prescription
can i get generic cetirizine for sale cetirizine over the counter cetirizine d buy
can you buy generic cetirizine without insurance order generic cetirizine pill where can i buy cetirizine without insurance
buy cheap advair diskus without insurance
how to buy accutane without a prescription can you get cheap accutane tablets cost of generic accutane without rx
how to get cheap accutane without insurance can i purchase cheap accutane price cost generic accutane without dr prescription
where can i buy cheap accutane no prescription
cost of generic accutane without a prescription where to buy cheap accutane price get accutane price
can i purchase accutane order generic accutane no prescription get cheap accutane pill
Meds prescribing information. Generic Name.
can i buy generic atarax prices
Best about medicament. Get here.
Drug information for patients. Long-Term Effects.
can i purchase cheap propecia without rx
Everything trends of drug. Get information here.
cost of arcoxia pills
cefixime trihydrate clavulanic acid tablets where can i buy cefixime for sale where buy cheap cefixime online
cefixime 200 mg uses get cheap cefixime prices cefixime for throat infection
cefixime suspension 100 mg
where to buy generic cefixime no prescription cefixime 400 mg indications for splenectomy cefixime 200 mg
cefixime tablets usp 200 mg how to buy cheap cefixime without dr prescription cefixime 400 mg indications for tracheostomy
cost generic ventolin inhalator pill can you buy cheap ventolin inhalator without prescription can you get cheap ventolin inhalator without prescription
where to get generic ventolin inhalator pill cost generic ventolin inhalator without insurance how to get ventolin inhalator
buying generic ventolin inhalator pills
how to get ventolin inhalator price can i buy generic ventolin inhalator online where to buy cheap ventolin inhalator for sale
can i get ventolin inhalator for sale can i buy cheap ventolin inhalator online order generic ventolin inhalator tablets
вывод из запоя дешево ростов-на-дону [url=http://vyvod-iz-zapoya-rostov28.ru/]вывод из запоя дешево ростов-на-дону[/url] .
снегоход беркут 2 купить [url=https://snegohod-kupit.ru/]снегоход беркут 2 купить[/url] .
Medicine information. Effects of Drug Abuse.
order imodium online
All information about meds. Read information here.
http://gramster.ru/# пин ап
Medicament prescribing information. Generic Name.
where can i buy lansoprazole without rx
Best about pills. Get here.
can i purchase cilostazol without prescription
trazodone hydrochloride withdrawal trazodone and lunesta together what is trazodone 100 mg prescribed for
trazodone walmart reviews does trazodone stop taking can i order cheap trazodone without rx
where buy generic trazodone tablets
mayo clinic trazodone side effects took trazodone and can’t sleep trazodone patient information leaflet pdf
trazodone available in australia trazodone 50 mg tablet apo how to buy cheap trazodone without prescription
what is a cordarone drug cordarone 200 mg 30 tbsp cost cheap cordarone pills
thuoc tim mach cordarone dosage cordarone results physical therapy cordarone 200 nebenwirkung
cordarone infusion rate
cost generic cordarone pills cordarone blood glucose levels cost generic cordarone pills
cordarone maximum dosage cordarone thuoc biet duoc coreg cost of cordarone without insurance
It’s the best time to make some plans for the future and it is time to be happy. I’ve read this post and if I could I wish to suggest you some interesting things or tips. Maybe you can write next articles referring to this article. I wish to read even more things about it!
There are some serious financial ramifications here.
Medicine information leaflet. What side effects can this medication cause?
generic actos without a prescription
Some about medicines. Read information now.
can you get cheap sumycin no prescription
can i get cheap lisinopril without prescription review of buying lisinopril from the healthwarehouse where can i get generic lisinopril without prescription
can i purchase generic lisinopril without insurance cost cheap lisinopril without dr prescription how much lisinopril is fatal
does lisinopril work immediately
cost lisinopril pills where can i buy cheap lisinopril no prescription how to buy cheap lisinopril without rx
where to buy lisinopril pill will lisinopril make you sleepy lisinopril for high blood pressure
I think what you posted made a lot of sense.
But, what about this? suppose you added a little content?
I ain’t saying your content isn’t good, however suppose you added a post title that grabbed a person’s attention?
I mean Center For Literacy: BTS – JAMES
POWERS: (907)764-6500 Cinematographer // SFX is a little plain. You could look
at Yahoo’s home page and watch how they create post headlines to grab people to click.
You might add a related video or a related picture or two to get readers
interested about what you’ve written. In my opinion, it might bring your blog a little livelier.
This contained some excellent tips and tools. Great blog publication.
Реєстрація на Мостбет займає лише кілька хвилин | Мостбет – це провідний букмекер в Україні mostbet casino. | Мостбет онлайн – ваш вибір для якісного відпочинку та виграшів | Mostbet casino – ваш ідеальний вибір для гри онлайн [url=https://mostbetcasinouahfgy.com/]Мостбет мобільна версія[/url].
what are the side effects of colchicine colchicine colchicineghil com colchicine directions for gout
can you buy colchicine colchicine otc action of colchicine
dose of colchicine for pericarditis
colchicine for gout colchicine colchicine in heart failure
side effects of colchicine colchicine 0.6mg over the counter colchicine after heart surgery
http://gramster.ru/# пин ап казино
Drug information. Long-Term Effects.
comprar pastillas flibanserina baratas
Some about drugs. Read here.
can i buy artane online
Meds information sheet. Generic Name.
clonidine and trazodone interaction
All trends of medicine. Read here.
how to get generic differin without prescription how to buy differin for sale can you get differin no prescription
how can i get cheap differin without insurance cost of generic differin without prescription where to buy generic differin no prescription
cost cheap differin online
cost of generic differin without dr prescription buying cheap differin without dr prescription can i order cheap differin without rx
buying cheap differin price where can i buy generic differin for sale can i buy differin without insurance
le site des meilleures vidéos porno hardcore gratuites avec les stars les plus chaudes du hard
Asthma symptom severity assessment Asthma symptom severity reduction tactics Emotional stress and asthma
Asthma symptom severity counseling resources Anti-inflammatory medications Asthma symptom severity education campaigns
Asthma symptom severity control strategies
Asthma symptom recognition Asthma symptom severity mitigation plans Asthma symptom severity management solutions
Asthma symptom severity counseling programs Lifestyle modifications for asthma Asthma symptom severity relief techniques
Medicines prescribing information. Generic Name.
chronic lyme amoxicillin
Some news about pills. Get here.
I do not even know how I ended up here, but I thought this post was good. I do not know who you are but certainly you are going to a famous blogger if you are not already 😉 Cheers!
can you buy coreg without a prescription
Medicine information leaflet. Drug Class.
how to get generic macrobid tablets
Actual trends of pills. Get information here.
cordarone for sale uk small cordarone et soleil generic cordarone tablets
side effects of cordarone cordarone pronunciation of salmon cordarone iv side effects
cordarone avoid
cordarone 200 mg costovertebral tenderness hoftype cordarone get generic cordarone online
cordarone thuoc biet duoc coreg offer cordarone now how does cordarone work
is cetirizine safe for elderly how to get cheap cetirizine price where to buy cetirizine dihydrochloride
buy generic cetirizine without prescription can i buy generic cetirizine without prescription can you get cheap cetirizine price
cetirizine brand name Australia
can you get cetirizine without prescription order cheap cetirizine without prescription where can i get cheap cetirizine without insurance
where buy generic cetirizine without a prescription buy cheap cetirizine order cetirizine without rx
Meds information for patients. Long-Term Effects.
can you buy generic propecia tablets
Actual information about pills. Read information now.
Drugs information for patients. What side effects can this medication cause?
buying generic paxil for sale
All what you want to know about medicine. Read now.
cost of furosemide without a prescription where can i get generic furosemide pill can i purchase furosemide price
where to buy cheap furosemide no prescription where to buy cheap furosemide without a prescription cost furosemide no prescription
is furosemide over the counter
get furosemide for sale where to buy furosemide pill how to buy generic furosemide without insurance
where buy cheap furosemide buy furosemide 20mg how to get generic furosemide pill
https://gramster.ru/# пин ап зеркало
can i order cheap sildalist for sale can i order generic sildalist without prescription can i get generic sildalist without insurance
can i order sildalist pills cost generic sildalist no prescription can i buy generic sildalist for sale
buy cheap sildalist without dr prescription
how to buy generic sildalist price where to get generic sildalist pills sildalist price usa
how to get sildalist price where to get generic sildalist prices where to get generic sildalist without dr prescription
Pills information. Cautions.
can you get minocycline tablets
All news about pills. Read now.
Medicines information for patients. Effects of Drug Abuse.
cost zoloft no prescription
Everything information about medication. Get here.
Как не стать жертвой мошенников при покупке диплома о среднем полном образовании
trazodone hydrochloride withdrawal when should trazodone be taken amitriptyline and trazodone
cost of trazodone 50mg can you get trazodone tablets is trazodone a harmless drug
trazodone normal dose
trazodone treatment for anxiety trazodone long term side effects is trazodone used for depression
trazodone for insomnia in elderly cost of trazodone pills trazodone 50 mg identification
can you buy tizanidine without rx can i get generic tizanidine without rx buying generic tizanidine without a prescription
can i get tizanidine without prescription can i get generic tizanidine without a prescription where buy tizanidine price
where to get tizanidine without prescription
where can i get cheap tizanidine without rx where can i get cheap tizanidine prices can i buy tizanidine without prescription
can i purchase tizanidine how can i get generic tizanidine without insurance order cheap tizanidine prices
Medication information. What side effects can this medication cause?
can you buy generic motrin without a prescription
Actual what you want to know about drug. Read information here.
Бесплатный доступ к онлайн курсам, тренингам и книгам. Большой выбор образовательных курсов. Скачивайте бесплатно уже сейчас https://piratehub.site
Meds information. Cautions.
how can i get generic zithromax price
Some trends of drugs. Read information here.
where to get generic amoxil without insurance where can i get amoxil without dr prescription cost generic amoxil prices
can u buy amoxil online cost of cheap amoxil online what amoxil 500mg is used for
amoxil suspension 250 mg 5 ml
amoxil cap 500mg cost of generic amoxil without dr prescription where can i buy generic amoxil pills
buying generic amoxil online cost generic amoxil without rx can you buy generic amoxil online
платный нарколог на дом [url=https://narkolog-na-dom-krasnodar22.ru/]платный нарколог на дом[/url] .
where to get generic cipro without prescription where can i buy generic cipro pill where can i get cheap cipro
get cheap cipro for sale buy generic cipro pill buy cipro sent to usa
buy cipro here
where buy generic cipro for sale buy cipro no rx can i get generic cipro without a prescription
buy cipro on line cipro buy uk buy generic cipro tablets
https://gramster.ru/# пин ап казино зеркало
Medicines information. Brand names.
amoxicillin plus ciprofloxacin
Some news about drug. Get information here.
Fehlercode Liste https://zamte.com/fehlercode/
I’m amazed, I must say. Seldom do I come across a blog that’s equally educative and amusing, and let me tell you, you’ve hit the nail on the head. The problem is something too few people are speaking intelligently about. I’m very happy I came across this during my search for something regarding this.
Medication information. Effects of Drug Abuse.
where to buy cheap atarax
Some what you want to know about medicines. Read here.
врач нарколог на дом [url=http://narkolog-na-dom-krasnodar24.ru]врач нарколог на дом[/url] .
ashwagandha with 35% withanolides ashwagandha at walmart ashwagandha and weight lifting
can you grow ashwagandha indoors shoden ashwagandha vs ksm 66 ashwagandha calm and relax
ashwagandha lehyam benefits in tamil
where buy ashwagandha without insurance shatavari and ashwagandha together ashwagandha himalaya brand
ashwagandha found in natural foods where do i buy ashwagandha ashwagandha lehyam benefits
Drug prescribing information. Short-Term Effects.
buying generic imodium without dr prescription
Actual news about medicines. Get here.
Hi there, its pleasant article regarding media print, we all
be familiar with media is a fantastic source of information.
Medication information for patients. Effects of Drug Abuse.
get generic promethazine price
Some news about medicines. Get information now.
buy actos now does actos affect the kidneys buy actos 30mg
can actos cause diarrhea actos dose per day actos offers
generic name for actos
another name for actos actos liver damage actos side effects bladder cancer
actos to buy actos consortium lawsuit is actos safe to take
Предлагаем услуги профессиональных инженеров офицальной мастерской.
Еслли вы искали ремонт ноутбуков msi цены, можете посмотреть на сайте: ремонт ноутбуков msi
Наши мастера оперативно устранят неисправности вашего устройства в сервисе или с выездом на дом!
amoxil 400 mg/5ml capsule amoxil 500mg buying cheap amoxil prices
where can i buy generic amoxil online where buy cheap amoxil tablets buy 250 mg amoxil online
get amoxil without a prescription
buying cheap amoxil tablets order amoxil without a prescription buy cheap amoxil pills
amoxil 500mg cap where buy amoxil prices buy amoxil generic
http://gramster.ru/# пин ап вход
Medication information. Brand names.
liquid famotidine for dogs
Some news about drugs. Get information now.
Drug information for patients. Long-Term Effects.
can i purchase allegra no prescription
Actual information about drugs. Read information now.
what is drug aurogra 100 where buy aurogra no prescription can i buy generic aurogra without a prescription
where can i get cheap aurogra without rx how can i get cheap aurogra online where can i buy generic aurogra pill
order cheap aurogra no prescription
order cheap aurogra pill how to buy cheap aurogra pills order aurogra pill
how to get aurogra without rx aurogra 200 mg can i get aurogra without dr prescription
нарколог на дом цены [url=narkolog-na-dom-krasnodar23.ru]нарколог на дом цены[/url] .
Great post. Just a heads up – I am running Ubuntu with the beta of Firefox and the navigation of your blog is kind of broken for me.
how to get cetirizine tablets can i buy cetirizine no prescription cheap cetirizine without dr prescription
cetirizine hydrochloride buy online where buy cheap cetirizine online cetirizine hydrochloride same as Zyrtec
how to get generic cetirizine pill
cetirizine tablet side effects can you buy cetirizine without dr prescription buy generic cetirizine without rx
where to get cheap cetirizine online cetirizine dihydrochloride side effects cheap cetirizine online
Pills information for patients. Long-Term Effects.
how to get generic kamagra without insurance
Some trends of medicines. Read information now.
Предлагаем услуги профессиональных инженеров офицальной мастерской.
Еслли вы искали ремонт ноутбуков lenovo рядом, можете посмотреть на сайте: ремонт ноутбуков lenovo
Наши мастера оперативно устранят неисправности вашего устройства в сервисе или с выездом на дом!
https://masterstvo-drakona.ru
Drugs information. Cautions.
exploring the availability of generic alternatives to cymbalta
Actual what you want to know about medicament. Get now.
how to buy generic rizact price
can you buy periactin online order periactin prices buying periactin price
cost of periactin without rx cost of cheap periactin no prescription get periactin for sale
can i buy periactin prices
can you get generic periactin no prescription where to get generic periactin tablets buying cheap periactin prices
how to get periactin no prescription can i buy cheap periactin no prescription how to buy generic periactin pill
нарколог на дом цены [url=www.narkolog-na-dom-krasnodar25.ru/]нарколог на дом цены[/url] .
вызов нарколога на дом [url=www.narkolog-na-dom-krasnodar26.ru]вызов нарколога на дом[/url] .
where to get cheap amoxicillin without a prescription can you buy over the counter amoxicillin can i get amoxicillin without rx
prescription not needed to buy liquid amoxicillin generic amoxicillin for sale can you buy amoxicillin online uk
amoxicillin 875 mg tablet ingredients
buying amoxicillin online uk how to buy generic amoxicillin pills how can i get generic amoxicillin without rx
how can i get cheap amoxicillin without insurance cheap amoxicillin price buy amoxicillin next day delivery
https://gramster.ru/# pinup 2025
Medication information. Short-Term Effects.
how to get keflex without dr prescription
Some news about drug. Get here.
Drugs information. What side effects can this medication cause?
cost cheap allegra without dr prescription
All about drugs. Read information here.
cheap trimox without a prescription
where can i get generic synthroid without prescription get cheap synthroid without dr prescription where to get synthroid pills
how to get cheap synthroid without dr prescription can i get generic synthroid no prescription cheap synthroid tablets
can i purchase cheap synthroid prices
generic synthroid without prescription cost synthroid without insurance how can i get synthroid without rx
cost generic synthroid without dr prescription cost generic synthroid without insurance how to buy generic synthroid without dr prescription
diltiazem generic and brand name cost generic diltiazem online what is diltiazem prescribed for
diltiazem dosing chart how should diltiazem be taken diltiazem in atrial fibrillation
diltiazem used for
how does diltiazem treat hypertension can diltiazem cause ankle swelling will diltiazem cause weight gain
diltiazem uses WebMD is diltiazem generic or brand cartia xt vs diltiazem er
Pills information sheet. Brand names.
mirtazapine and penicillin
Some about meds. Get information now.
Medicines information sheet. What side effects can this medication cause?
get geodon prices
Some trends of medicine. Read now.
cost of colospa prices
can you get gabapentin online buy cheap gabapentin pills how to get generic gabapentin for sale
can i order cheap gabapentin prices cost of generic gabapentin without dr prescription how to buy gabapentin without a prescription
buy gabapentin online
gabapentin 300 mg buy online where to buy generic gabapentin without dr prescription buying cheap gabapentin without rx
where can i buy generic gabapentin price how to get cheap gabapentin without prescription where to buy cheap gabapentin for sale
where can i buy cheap luvox without dr prescription can you get cheap luvox tablets where can i buy cheap luvox
how to buy generic luvox without rx cost generic luvox without prescription where buy generic luvox pill
can i get luvox no prescription
order generic luvox without a prescription how to buy luvox without a prescription can you buy luvox without insurance
how to buy generic luvox pill cheap luvox price can i buy luvox without insurance
This tactic win bay
involves doubling your contribution after each loss hoping to recoup your losses and
receive income when you win as a result.
Drugs information for patients. Short-Term Effects.
buy generic compazine pill
Everything information about medication. Get here.
can i purchase bystolic no prescription
order cheap dapsone pills can i buy dapsone prices can i buy cheap dapsone without rx
can you get cheap dapsone without prescription can i purchase cheap dapsone pills where can i get cheap dapsone pill
can you buy dapsone without insurance
can i get generic dapsone without insurance where can i buy generic dapsone pill where to get dapsone without insurance
buy cheap dapsone prices where to get generic dapsone without dr prescription how to buy cheap dapsone no prescription
cost cheap fml forte can i purchase fml forte no prescription can i order fml forte without prescription
how can i get generic fml forte without insurance order cheap fml forte online can you get cheap fml forte without insurance
how to buy cheap fml forte without insurance
generic fml forte without rx order generic fml forte how to get fml forte without a prescription
cost generic fml forte pills can i buy generic fml forte without dr prescription can you buy cheap fml forte for sale
Drugs prescribing information. What side effects?
paracetamol escitalopram
All news about meds. Read information now.
Getting this bonus was easy and the risk became a pleasant start to my gameplay.
Here is my web blog: Winbay
bygoogle = w제주웨딩박람회indow.adsbyg제주웨딩박람회oogle || [])제주웨딩박람회.pus
нарколог краснодар [url=https://narkolog-na-dom-krasnodar24.ru]нарколог краснодар[/url] .
where can i buy cheap bactrim without a prescription
The Ice Frutz jelly maker offers many different flavors, and some of them reflect the most popular flavors of well-known tobacco brands, so everyone is sure to find something for themselves https://gamingthrill.com/UqZyI/fumo-hookah-bowl
get generic doxycycline without insurance can you buy cheap doxycycline price doxycycline 100mg price without Д±nsurance
can you get doxycycline online cost generic doxycycline without dr prescription cheap doxycycline pill
doxycycline ir dr 40 mg
get cheap doxycycline without dr prescription ordermymeds net buy doxycycline htm doxycycline 40 mg india
doxycycline single dose lyme disease where can i buy cheap doxycycline pill chlamydia treatment doxycycline 100mg
The Ice Frutz jelly maker offers many different flavors, and some of them reflect the most popular flavors of well-known tobacco brands, so everyone is sure to find something for themselves https://doodleordie.com/profile/blackshisha2910
When some one searches for his vital thing, thus
he/she wants to be available that in detail, thus that
thing is maintained over here.
copd exacerbation action plan copd treatment options copd rehabilitation programs
copd exacerbation prevention lifestyle modification resources copd exacerbation prevention care planning copd advocacy
copd exacerbation prevention symptom management approaches
copd causes copd medication management copd exacerbation prevention symptom management approaches
early detection of copd copd prevention chronic respiratory failure in copd
Предлагаем услуги профессиональных инженеров офицальной мастерской.
Еслли вы искали ремонт ноутбуков toshiba рядом, можете посмотреть на сайте: ремонт ноутбуков toshiba цены
Наши мастера оперативно устранят неисправности вашего устройства в сервисе или с выездом на дом!
Предлагаем услуги профессиональных инженеров офицальной мастерской.
Еслли вы искали ремонт ноутбуков fujitsu siemens, можете посмотреть на сайте: ремонт ноутбуков fujitsu siemens сервис
Наши мастера оперативно устранят неисправности вашего устройства в сервисе или с выездом на дом!
Medicament information leaflet. Short-Term Effects.
como suspender el escitalopram
Best what you want to know about pills. Read information here.
This article was truly eye-opening; I learned so much! Your insights on travel-related topics have expanded my perspective greatly. Thank you for taking the time to share this with us. We had discussed a similar topic about travel tips on TravelForums. I look forward to seeing more of your work in the future! Amazing content, I both learned and enjoyed reading it.
Ahaa, its good discussion concerning this paragraph here at this webpage, I
have read all that, so now me also commenting at
this place.
Can’t wait to share this with my friends!
Meds information. What side effects?
get generic cialis soft without a prescription
Some news about medicament. Get information now.
how can i get rizact pill
abilify for severe depression can you get cheap abilify price where can i buy abilify without prescription
get cheap abilify without rx ordering abilify maintena order cheap abilify tablets
can i purchase generic abilify prices
can you get generic abilify prices how to buy cheap abilify without rx abilify medicine
can i purchase cheap abilify price cost of abilify without dr prescription generic abilify without dr prescription
частного нарколога на дом [url=https://narkolog-na-dom-krasnodar27.ru/]https://narkolog-na-dom-krasnodar27.ru/[/url] .
SEO-продвижение это комплекс работ направленных на оптимизацию веб-сайта под требования поисковых систем, с целью последующего улучшения его видимости в поисковой выдаче. Если вы хотите чтобы ваш сайт начал выше показываться в поиске, и его посещаемость увеличилась, мы готовы вам с этим помочь продвижение сайтов московская область частник москва
where to buy clomid online can i buy clomid without insurance how to get cheap clomid without insurance
where to get generic clomid no prescription buying clomid pills how to buy generic clomid without prescription
can you buy clomid without a prescription
how to get cheap clomid tablets where can i buy cheap clomid prices can i get cheap clomid without insurance
cost generic clomid no prescription where to get clomid without a prescription where can i get generic clomid pill
SEO-продвижение это комплекс работ направленных на оптимизацию веб-сайта под требования поисковых систем, с целью последующего улучшения его видимости в поисковой выдаче. Если вы хотите чтобы ваш сайт начал выше показываться в поиске, и его посещаемость увеличилась, мы готовы вам с этим помочь частный seo мастер москва
Medicine prescribing information. Generic Name.
can i purchase generic thorazine
Everything about medicines. Read information here.
Allergic rhinitis early detection methods Sneezing in rhinitis Corrective surgery of the nasal septum for rhinitis
Allergic rhinitis exacerbation prevention education materials Allergic rhinitis exacerbation prevention advocacy initiatives Allergic rhinitis exacerbation prevention advocacy initiatives
Allergens triggering rhinitis
Allergic rhinitis exacerbation prevention symptom management strategies Development of allergic rhinitis IgE antibodies and mast cell activation
Pollen and dust protection for rhinitis prevention Allergic rhinitis exacerbation prevention medication management guidelines Allergic rhinitis exacerbation prevention education
can i get indocin without prescription
вызов нарколога на дом краснодар [url=narkolog-na-dom-krasnodar28.ru]вызов нарколога на дом краснодар[/url] .
https://www.primetv.tv/why-canon-and-nikon-need-to-make-a-full-frame-camera/#comment-83149
https://glykas.com.gr/2017/09/27/highlights-from-hong-kongs-art-central/#comment-26495
where to get prednisolone pills can i purchase generic prednisolone can i buy prednisolone without prescription
can i purchase cheap prednisolone pill cost prednisolone online where can i buy prednisolone without dr prescription
prednisolone to buy
can you buy cheap prednisolone no prescription cost prednisolone without a prescription can i buy generic prednisolone pills
how to buy cheap prednisolone where buy prednisolone without dr prescription how to buy cheap prednisolone without prescription
Medicines information sheet. Effects of Drug Abuse.
what are propranolol 80 mg
All information about meds. Get information now.
where can i buy advair diskus without dr prescription
[url=https://download.luckyduck-casino-apk.ru]http://www.download.luckyduck-casino-apk.ru[/url]
Установить последнюю версию приложения онлайн казино lucky duck – выигрывай сейчас!
https://download.luckyduck-casino-apk.ru
https://canadianpharmacy.win/# canadian pharmacy online store
[url=https://android.luckyduck-casino-apk.ru/]http://android.luckyduck-casino-apk.ru[/url]
Загрузить последнюю версию приложения онлайн казино lucky duck – побеждай сегодня!
http://www.android.luckyduck-casino-apk.ru
срочный выезд нарколога на дом [url=https://www.narkolog-na-dom-krasnodar29.ru]https://www.narkolog-na-dom-krasnodar29.ru[/url] .
Medicine information for patients. Effects of Drug Abuse.
where can i get cheap warfarin without insurance
Actual trends of drug. Read information now.
1XBET promo code 2025: 1XMAX25 – Use bonus code get for VIP bonuses – up to €19502 + 150 free spins on casino and 100% up to €130 on sportsbook! To get your Free Bet, new customers can register with 1xbet for free, and enter the promo code 1x. Take a look at our site banners for the latest 1xBet promo codes and information about the brand’s 100% first deposit bonus where you live. New players can enjoy an exclusive deposit bonus when they sign up at 1xBet. See our site banners for the latest welcome deals at 1xBet for your region 1xbet free bet promo code
1XBET promo code 2025: 1XMAX25 – Use bonus code get for VIP bonuses – up to €19502 + 150 free spins on casino and 100% up to €130 on sportsbook! To get your Free Bet, new customers can register with 1xbet for free, and enter the promo code 1x. Take a look at our site banners for the latest 1xBet promo codes and information about the brand’s 100% first deposit bonus where you live. New players can enjoy an exclusive deposit bonus when they sign up at 1xBet. See our site banners for the latest welcome deals at 1xBet for your region 1xbet promo code 2025
where buy imitrex pills
принудительный вывод из запоя краснодар [url=www.vyvod-iz-zapoya-krasnodar111.ru]принудительный вывод из запоя краснодар[/url] .
where can i buy cheap finpecia tablets cost finpecia without a prescription how can i get finpecia no prescription
cost of generic finpecia pills how to buy cheap finpecia pill how can i get cheap finpecia prices
where to buy cheap finpecia without dr prescription
where to get generic finpecia tablets where to buy generic finpecia no prescription can i get finpecia online
how to buy cheap finpecia without a prescription cost cheap finpecia without prescription can i get finpecia without insurance
Drugs information. Brand names.
substitute for pantoprazole
All about medicine. Read information here.
where to buy generic lyrica online can you buy generic lyrica without rx how can i get lyrica price
where to buy generic lyrica prices how to buy cheap lyrica tablets where buy lyrica tablets
cost of cheap lyrica online
can you buy generic lyrica without insurance where can i buy cheap lyrica prices can i order generic lyrica price
get cheap lyrica tablets where to get lyrica without prescription buy lyrica price
Medicines information leaflet. Generic Name.
cost generic tadacip for sale
Actual about drug. Read now.
https://indianpharmacy.win/# Online medicine order
how to buy generic rizact pills
Medication information. Generic Name.
australian pricing of ezetimibe exploring costs and accessibility
Everything about medication. Read now.
where to get cheap imdur without rx can you get cheap imdur pills where can i get cheap imdur without prescription
where to get imdur no prescription can i get generic imdur pills where buy generic imdur pills
cost of generic imdur without a prescription
cost of imdur price how to get imdur without dr prescription cost of generic imdur pill
can i purchase cheap imdur without prescription can i order imdur without prescription how to get imdur prices
kantorbola
can i order cheap celebrex online
программа 1с купить [url=https://kupit-1s14.ru]программа 1с купить[/url] .
Over the past month, DOGE’s price hassurged by more than 100%, reflecting the broader bullish trends across the cryptocurrency market.
вызов нарколога на дом краснодар [url=https://www.narkolog-na-dom-krasnodar27.ru]вызов нарколога на дом краснодар[/url] .
Medicament information. What side effects can this medication cause?
precio flibanserina sin receta
Everything news about medicine. Read information here.
levaquin side effects tendon rupture how to get levaquin prices can levaquin cause death
levaquin 500mg side effects levaquin and ibuprofen interaction 750 mg levaquin 5 days
levaquin for pneumonia treatment
Levaquin recall levaquin 500 mg tablet cost levaquin 750mg
how can i get levaquin without insurance can levaquin make you tired Levaquin normal strength and dose
where can i get flagyl tablets
Meds prescribing information. Drug Class.
can i buy generic phenergan without prescription
Some about medicines. Get now.
http://canadianpharmacy.win/# canadian drugs pharmacy
buy generic advair diskus prices can you buy advair diskus tablets how can i get cheap advair diskus online
can i purchase generic advair diskus price can i order cheap advair diskus price can i purchase cheap advair diskus no prescription
cost of generic advair diskus for sale
order generic advair diskus without dr prescription can i get generic advair diskus without insurance buying cheap advair diskus prices
where can i get generic advair diskus tablets cost of generic advair diskus without insurance cost of advair diskus without dr prescription
can i buy cheap chloromycetin
Meds information leaflet. What side effects?
levothyroxine 75 mcg
Actual about meds. Read information now.
can i buy generic advair diskus pills where buy cheap advair diskus pill how can i get advair diskus without dr prescription
cost cheap advair diskus order generic advair diskus can i get cheap advair diskus tablets
buying cheap advair diskus without dr prescription
can i purchase advair diskus without rx where to buy advair diskus tablets can you buy advair diskus tablets
cost cheap advair diskus without a prescription generic advair diskus pills buy advair diskus pill
Each registered user can receive a 1xbet promo code for their birthday. To participate in the promotion, you need to fill in your personal information in the player profile 1xbet promo code list
https://robecostocks.com/2023/01/16/having-marketing-challenges-get-help/
Each registered user can receive a 1xbet promo code for their birthday. To participate in the promotion, you need to fill in your personal information in the player profile 1xbet latest promo code
нарколог на дом цены [url=https://www.narkolog-na-dom-krasnodar29.ru]нарколог на дом цены[/url] .
where to buy cheap periactin online buying periactin online where can i get generic periactin online
where can i buy periactin for sale cost cheap periactin pills cost of generic periactin tablets
where to get generic periactin without dr prescription
where to get cheap periactin no prescription cost periactin without dr prescription can you buy generic periactin without rx
can i purchase periactin online can you buy periactin without rx can i buy periactin
Stromectol over the counter USA
http://www.mqeng.cn/20241017/34009206.html
샤 서비스 악세사리그리고 첫 상담때는vipkid 가격 상담하
Existe una competencia muy alta en la industria de los juegos de azar virtuales y las apuestas deportivas interactivas en la actualidad https://clasificadox.com/lang/p/index.php?bono_de_registro_de_1xbet.html
https://indianpharmacy.win/# buy medicines online in india
Existe una competencia muy alta en la industria de los juegos de azar virtuales y las apuestas deportivas interactivas en la actualidad https://rclub.one/news/pgs/?1xbet_registration_bonus.html
cefixime trihydrateofloxacin tablet cefixime trihydrate tablets uses cefixime dose for std
can i get generic cefixime for sale can you get generic cefixime tablets can you buy generic cefixime pills
cefixime 100 mg side effects
cefixime 200mg 5ml get cefixime without insurance cheap cefixime without dr prescription
where can i get cheap cefixime cefixime 100 mg india can i buy cheap cefixime prices
http://pirates-life.ru/blog/virtualnyj_nomer_dlja_telegram_kak_ehto_rabotaet_i_zachem_on_nuzhen/2024-08-04-3489
[url=https://casino.luckyduck-casino-apk.ru]http://casino.luckyduck-casino-apk.ru[/url]
Установить apk файл казино lucky duck – играй сегодня!
https://www.casino.luckyduck-casino-apk.ru
https://www.karamandan.com/haber/22264203/whatsapp-icin-sanal-numara-satin-almanin-avantajlari
order doxycycline 100mg generic order generic doxycycline without a prescription does doxycycline make you nauseous
doxycycline 100 mg dose substitute for doxycycline hyclate doxycycline price in india
can i buy doxycycline without dr prescription
buy doxycycline 100mg canada buying doxycycline for sale were to buy doxycycline
get cheap doxycycline for sale can you buy generic doxycycline without insurance doxycycline antibiotic buy online
Write more, thats all I have to say. Literally, it seems as though you relied on the video to make your point.
You clearly know what youre talking about, why throw away your intelligence
on just posting videos to your site when you could be giving us something enlightening to read?
https://shkolopro.ru/tipy-virtualnyh-nomerom-dlya-telegramm/
быстрый анонимный вывод из запоя на дому [url=http://www.vyvod-iz-zapoya-krasnodar113.ru]быстрый анонимный вывод из запоя на дому[/url] .
花蓮外送茶:精選安全便捷的外約服務攻略
引言
花蓮外送茶服務因其便利性與多樣化而備受歡迎,不僅滿足社交需求,更以快速、安全為核心,成為許多人的理想選擇。本文將深入剖析花蓮外送茶的特點、流程,以及如何選擇適合的服務,幫助您享受安心的高品質體驗。
什麼是花蓮外送茶服務?
花蓮外送茶服務是一種針對多元需求的伴侶外約服務,常見特點如下:
即時安排:快速回應客戶需求,提供靈活的服務時間。
多元選擇:從高端到平價方案,滿足各種預算層級。
私密性高:確保所有客戶資料絕對保密,安全性有保障。
為什麼選擇花蓮外送茶?
生活壓力舒緩:透過高品質的互動體驗,放鬆身心。
臨時需求應對:解決因臨時變動產生的陪伴需求。
特定場合加分:生日、商務活動等場合的高端陪伴服務。
如何選擇優質的花蓮外送茶服務?
辨別專業合法服務的重要性
查看評價:選擇具有良好口碑的服務商。
確認價格透明:事先了解費用,避免臨時加價問題。
重視隱私保障:選擇承諾保密的合法經營商家。
服務流程簡介
聯繫商家,表達需求並獲得建議。
確定伴侶類型與服務細節。
安排時間地點,享受服務。
提升花蓮外送茶體驗的建議
事先規劃:提前安排服務,避免臨時出現不便。
選擇信譽品牌:確保選擇口碑良好的服務商,避免風險。
溝通需求:明確表達需求與期待,達成雙方共識。
can diltiazem cause dry mouth can you get diltiazem tablets can diltiazem cause headaches
safely weaning off of diltiazem diltiazem er tab 240mg diltiazem dosing chart
is diltiazem an ace inhibitor
diltiazem 90mg tab where buy generic diltiazem online is diltiazem a blood thinner
alternative to diltiazem for afib diltiazem retard 240 mg pseudoephedrine diltiazem side effects forum
http://canadianpharmacy.win/# online canadian pharmacy review
https://spa-krasnodar.ru/virtualnyj-nomer-dlya-telegramm-preimushhestva-i-vozmozhnosti/
вывод из запоя на дому краснодар [url=www.vyvod-iz-zapoya-krasnodar114.ru]вывод из запоя на дому краснодар [/url] .
La linea entre videojuego y juego de apuestas es realmente muy delgada https://badgerboats.ru/themes/middle/?promokod_pri_registracii_melbet_pouchi_bonus_130.html
how can i get cheap tinidazole without rx how can i get tinidazole online where to buy generic tinidazole pills
can i purchase tinidazole tablets can i buy tinidazole prices how to buy cheap tinidazole for sale
can i order generic tinidazole prices
how can i get tinidazole pill how to get tinidazole where to get tinidazole for sale
can you buy generic tinidazole price buy generic tinidazole for sale order generic tinidazole without prescription
https://youtube03.com/news/zachem_pokupajut_virtualnyj_nomer_dlja_telegram/2024-08-06-20905
Приобретение диплома ПТУ с сокращенной программой обучения в Москве
I came across catch the biggest bass, and I was immediately attracted to their catchy slogan: “Catch a big bass and win in big – play on virtual-casinos at Winbay casino english.”
order amoxicillin without prescription buy amoxicillin online cheap amoxicillin without a doctor’s prescription
where can i buy amoxicillin over the counter tooth infection amoxicillin 250 mg chewable where can i buy cheap amoxicillin tablets
how to buy generic amoxicillin no prescription
where can i get generic amoxicillin without prescription buy amoxicillin 500mg from canada buy amoxicillin pills online
get generic amoxicillin without rx generic amoxicillin price amoxicillin buy canada
вывод из запоя кодирование краснодар [url=www.vyvod-iz-zapoya-krasnodar113.ru/]вывод из запоя кодирование краснодар[/url] .
http://indianpharmacy.win/# indian pharmacies safe
order generic Stromectol for sale get cheap stromectol tablets buying cheap Stromectol price
ivermectin buy online stromectolinfo3 ivermectin 0.1 uk stromectolinfo get generic stromectol tablets
stromectol 3mg price
buy stromectol online uk dosage of stromectol for lice buy generic stromectol 6mg
stromectol for humans for sale ivermectin USA price m3Stromectol order Stromectol 6mg online cheap
식은 문법 중심으로 진허니문 박람회행되기 때문에 많은 사허니문 박람회람들이 실제 대화에서 허니문 박람회어려움을
https://software-expert.ru/2021/09/28/pokupka-virtualnogo-nomera-dlya-telegramm/
高雄外送茶:精選安全便捷的外約服務攻略
引言
高雄外送茶服務因其便利性與多樣化而備受歡迎,不僅滿足社交需求,更以快速、安全為核心,成為許多人的理想選擇。本文將深入剖析高雄外送茶的特點、流程,以及如何選擇適合的服務,幫助您享受安心的高品質體驗。
什麼是高雄外送茶服務?
高雄外送茶服務是一種針對多元需求的伴侶外約服務,常見特點如下:
即時安排:快速回應客戶需求,提供靈活的服務時間。
多元選擇:從高端到平價方案,滿足各種預算層級。
私密性高:確保所有客戶資料絕對保密,安全性有保障。
為什麼選擇高雄外送茶?
生活壓力舒緩:透過高品質的互動體驗,放鬆身心。
臨時需求應對:解決因臨時變動產生的陪伴需求。
特定場合加分:生日、商務活動等場合的高端陪伴服務。
如何選擇優質的高雄外送茶服務?
辨別專業合法服務的重要性
查看評價:選擇具有良好口碑的服務商。
確認價格透明:事先了解費用,避免臨時加價問題。
重視隱私保障:選擇承諾保密的合法經營商家。
服務流程簡介
聯繫商家,表達需求並獲得建議。
確定伴侶類型與服務細節。
安排時間地點,享受服務。
提升高雄外送茶體驗的建議
事先規劃:提前安排服務,避免臨時出現不便。
選擇信譽品牌:確保選擇口碑良好的服務商,避免風險。
溝通需求:明確表達需求與期待,達成雙方共識。
buy prednisolone 5mg can i get generic prednisolone for sale generic prednisolone pill
order generic prednisolone no prescription buy prednisolone suppositories prednisolone 4 mg prednisolone 35 mg koffein get generic prednisolone pills
where can i get generic prednisolone tablets
buying prednisolone prices how to get cheap prednisolone without insurance order prednisolone
can you buy cheap prednisolone online how can i get prednisolone for sale how can i get generic prednisolone prices
https://youtube-activate.ru/virtualnye-nomera-dlya-telegram-kak-kupit-i-ispolzovat-s-hottelecom/
When you drive in Chicago, car insurance policy
is one of the very most significant traits you can easily have.
It ensures you’re financially defended if one thing makes a mistake when traveling.
Acoustics Cyprus, Acoustic Panels Cyprus and Acoustic Materials Cyprus are proudly offered by https://www.phiacoustics.com
how can i get claritin tablets where buy claritin without insurance where buy cheap claritin price
where can i buy generic claritin without a prescription how to buy claritin pills buying claritin no prescription
buying generic claritin no prescription
cost of generic claritin online can i purchase generic claritin for sale buying claritin online
buy claritin no prescription can i order cheap claritin can i purchase generic claritin prices
алкоголизм вывод из запоя краснодар [url=https://www.vyvod-iz-zapoya-krasnodar116.ru]алкоголизм вывод из запоя краснодар[/url] .
вывод из запоя краснодар на дому [url=vyvod-iz-zapoya-krasnodar115.ru]вывод из запоя краснодар на дому [/url] .
Thanks I have just been looking for information about this subject for a long time and yours is the best Ive discovered till now However what in regards to the bottom line Are you certain in regards to the supply
http://www.limxp.cn/20241017/05712149.html
Le code promo 1xBet 2025: 1XNEW25, saississez-le lors de votre inscription pour recevoir un bonus jusqu’a $130 sur le sport. Vous pourrez aussi obtenir jusqu’a $1,500 et 150 tours gratuits sur le casino. 1xBet propose jusqu’a $130 de freebets selon le montant de votre premier depot sur les paris sportifs. Parmi eux, le bonus de bienvenue, reserve aux nouveaux inscrits sur la plateforme. Cette plateforme est classee parmi les leaders en Afrique et a travers le monde. Elle vous offre les meilleures options pour vos paris, y compris la diffusion en direct des matchs sans frais supplementaires.
Utilisez le code promo 1xBet: “1XNEW25” en 2025. Vous pourrez debloquer un bonus de bienvenue jusqu’a $130 sur les paris sportifs. Et n’oubliez pas que 1xBet offre une belle opportunite a tous les nouveaux clients. En utilisant ce code lors de votre inscription, pourrez recuperer jusqu’a $130 sur le sport et jusqu’a $1,500 en freebets et 150 tours gratuits sur le casino en ligne. Pour profiter de ce bonus exceptionnel, il vous suffit d’effectuer votre premier depot. Celui-ci vous donne droit a un bonus de 100% du montant depose, jusqu’a un maximum de $130, ou l’equivalent dans votre devise.
code promo 1xbet
https://lratvakan.com/news/1090949.html
https://canadianpharmacy.win/# buy canadian drugs
Melbet bookmaker offers new customers bonuses: for registration with a promo code, for the first account replenishment (first deposit bonus), freebet bonus for free bet, welcome bonus for new players https://florum.sh/images/pages/1xbet_promo_code___get_exclusive_welcome_bonus.html
can i buy generic sildigra without dr prescription where to get generic sildigra without a prescription cost generic sildigra without prescription
can i order cheap sildigra without dr prescription can i buy sildigra tablets where to get cheap sildigra without insurance
sildigra prof
sildigra india order generic sildigra no prescription where can i buy sildigra price
can you get generic sildigra without dr prescription orientalske sildigra buying cheap sildigra online
Melbet bookmaker offers new customers bonuses: for registration with a promo code, for the first account replenishment (first deposit bonus), freebet bonus for free bet, welcome bonus for new players https://rt.pornovideochat.ru
This information is very important and you’ll need to know this when you constructor your own photo voltaic panel.
Hello, I think your blog might be having browser compatibility issues. When I look at your website in Chrome, it looks fine but when opening in Internet Explorer, it has some overlapping. I just wanted to give you a quick heads up! Other than that, awesome blog!
https://readweb.org/145107-kak-nastroit-signal-telegram-whatsapp-i-line-s-virtualnym-nomerom.html
can you buy generic furosemide without insurance buy cheap furosemide can i order furosemide tablets
cost of cheap furosemide prices can i order cheap furosemide for sale how to buy generic furosemide without a prescription
how to buy furosemide without dr prescription
can i buy cheap furosemide pill can i buy furosemide tablets how can i get cheap furosemide tablets
where can i get cheap furosemide pills can i purchase cheap furosemide without prescription where can i buy furosemide prices
Wow, amazing blog layout! How long have you been blogging for? you made blogging look easy. The overall look of your site is great, as well as the content!
Я подготовил прайс с базовыми пакетами услуг по SEO-продвижению. Эти пакеты подходят для большинства потребностей и бюджетов моих клиентов. Позвоните мне, и мы вместе подберем для вас выгодный тариф или составим индивидуальный план работ https://lux1games.ru/
Noodlemagazine Pretty! This has been a really wonderful post. Many thanks for providing these details.
Я подготовил прайс с базовыми пакетами услуг по SEO-продвижению. Эти пакеты подходят для большинства потребностей и бюджетов моих клиентов. Позвоните мне, и мы вместе подберем для вас выгодный тариф или составим индивидуальный план работ продвижение сайтов частник
http://www.mqeng.cn/20241017/34009206.html
https://qgamer.ru/stati/virtualnyy-nomer-dlya-telegram-chto-nuzhno-znat-pered-pokupkoy.html
can you buy generic zyrtec without prescription where to get generic zyrtec without prescription can i buy cheap zyrtec no prescription
how to get generic zyrtec without dr prescription cost of generic zyrtec no prescription can i get generic zyrtec without rx
buying zyrtec online
how can i get zyrtec for sale where to get cheap zyrtec prices where to buy generic zyrtec pills
get zyrtec for sale can you buy cheap zyrtec no prescription where to get zyrtec without prescription
can i get generic finasteride no prescription where to buy generic finasteride tablets where can i buy finasteride no prescription
order generic finasteride prices generic finasteride price buy finasteride europe
can you get cheap finasteride without rx
best place to buy finasteride forum where buy finasteride for sale generic finasteride no prescription
where to buy finasteride and minoxidil how to get cheap finasteride can you buy finasteride tablets
http://www.watermeerwijk.nl/watermeerijk5-2/
https://indianpharmacy.win/# buy medicines online in india
These are some of the most important issues we’ll face over the next few decades.
срочная помощь вывод из запоя краснодар [url=https://vyvod-iz-zapoya-krasnodar115.ru/]срочная помощь вывод из запоя краснодар[/url] .
https://andersondddb35667.blogzag.com/71311740/de-vrijheid-van-telegram-zonder-telefoonnummer
Pour profiter de ce bonus exceptionnel, il vous suffit d’effectuer votre premier depot. Celui-ci vous donne droit a un bonus de 100% du montant depose, jusqu’a un maximum de $130, ou l’equivalent dans votre devise 1xbet algГ©rie
This is our unique MelBet bonus code that needs to be entered when you register for a new player account with the brand melbet. Melbet is mainly a bookmaker, but also offers arcade games and casino games https://kraskaland.ru/images/pages/?1xstavka_promokod_pri_registracii_besplatno.html
Pour profiter de ce bonus exceptionnel, il vous suffit d’effectuer votre premier depot. Celui-ci vous donne droit a un bonus de 100% du montant depose, jusqu’a un maximum de $130, ou l’equivalent dans votre devise 1xbet algГ©rie
This is our unique MelBet bonus code that needs to be entered when you register for a new player account with the brand melbet. Melbet is mainly a bookmaker, but also offers arcade games and casino games http://7000.kiev.ua/image/pages/?1xbet_promokod___bonus_pri_registracii.html
It’s time for communities to rally.
https://milodase69245.wssblogs.com/26839689/het-belang-van-tijdelijke-mobiele-nummers-een-diepgaande-verkenning
Hi there are using WordPress for your blog platform? I’m new to the blog world but I’m trying to get started and create my own. Do you
need any coding knowledge to make your own blog? Any
help would be really appreciated!
анонимный. вывод. из. запоя. ростов. [url=https://vyvod-iz-zapoya-rostov231.ru/]https://vyvod-iz-zapoya-rostov231.ru/[/url] .
Low-priced cryptocurrencies are often dismissed as too risky, but history shows that some of the biggest success stories started at fractions of a cent.
minoxidil and finasteride buy can i order generic finasteride without insurance where can i buy cheap finasteride prices
where can i get cheap finasteride pills cheapest place to buy finasteride buying cheap finasteride without rx
cost of generic finasteride without insurance
can i buy cheap finasteride without prescription minoxidil and finasteride topical solution buy order cheap finasteride
can you get generic finasteride without insurance can you buy cheap finasteride price buy finasteride online ireland
https://rafaelmzmt37924.blogdanica.com/26741830/het-belang-van-tijdelijke-mobiele-nummers-een-diepgaande-verkenning
You could certainly see your skills in the work you write.
The sector hopes for more passionate writers like you who
are not afraid to mention how they believe. Always go after your heart.
Sleep disorders in autism are a common symptom that significantly impact the quality of life for both the child and their family. The causes of insomnia in autistic children are based on the peculiarities of how their nervous system functions https://www.autism-mmc.com/publications/answer/
Allergic conjunctivitis treatment courses Allergic conjunctivitis treatment procedures Allergic conjunctivitis treatment modalities
Allergic conjunctivitis tearing Allergic conjunctivitis treatment tools Allergic conjunctivitis treatment stages
Allergic conjunctivitis treatment techniques
Allergic conjunctivitis treatment tools Allergic conjunctivitis treatment schedules Allergic conjunctivitis treatment options
Allergic conjunctivitis treatment experts Allergic conjunctivitis treatment cycles Allergic conjunctivitis treatment facilities
http://canadianpharmacy.win/# maple leaf pharmacy in canada
https://beauanwi93692.weblogco.com/26851381/het-belang-van-tijdelijke-mobiele-nummers-een-grondige-verkenning
Nowadays, international communication is of great importance in both personal and business life. Especially in a country like South Korea, which is important in terms of technology and trade temporary WhatsApp number
Nowadays, international communication is of great importance in both personal and business life. Especially in a country like South Korea, which is important in terms of technology and trade numГ©ro virtuel pour SMS Telegram
https://edwinigyr77666.review-blogger.com/49107732/de-vrijheid-van-telegram-zonder-telefoonnummer
where buy amoxicillin no prescription buy amoxicillin powder get cheap amoxicillin price
buy amoxicillin online uk no prescription buy amoxicillin overnight buy amoxicillin uk
how can i get cheap amoxicillin without dr prescription
can i buy amoxicillin over the counter in france can i get generic amoxicillin without a prescription can i buy cheap amoxicillin price
cost generic amoxicillin without insurance where to get generic amoxicillin pills buy amoxicillin liquid no prescription
Tools for Monitoring USDT for Restrictive Measures and Deal Integrity: Money Laundering Prevention Approaches
In the contemporary domain of virtual currencies, where fast deals and obscurity are becoming the standard practice, monitoring the validity and clarity of activities is crucial. In light of increased regulatory examination over dirty money and terrorism funding, the need for reliable tools to check operations has become a critical issue for digital asset users. In this article, we will discuss offered services for checking USDT for sanctions and operation purity.
What is AML?
Anti-Laundering strategies refer to a collection of legal actions aimed at stopping and discovering illicit finance activities. With the surge of virtual currency usage, AML practices have become especially critical, allowing individuals to operate digital currencies confidently while mitigating perils associated with embargoes.
USDT, as the arguably the favored stablecoin, is extensively used in various exchanges worldwide. Nonetheless, using USDT can involve several risks, especially if your monies may relate to opaque or criminal activities. To lessen these risks, it’s vital to take make use of services that verify USDT for sanctions.
Available Services
1. Address Authentication: Utilizing specific tools, you can verify a designated USDT address for any links to prohibited directories. This facilitates uncover potential ties to unlawful conduct.
2. Transaction Engagement Examination: Some platforms extend scrutiny of deal background, essential for assessing the clarity of monetary transactions and detecting potentially dangerous activities.
3. Monitoring Systems: Dedicated monitoring solutions allow you to observe all deals related to your wallet, facilitating you to rapidly detect concerning conduct.
4. Threat Statements: Certain solutions provide detailed risk documents, which can be crucial for participants looking to confirm the reliability of their assets.
Whether of if you are overseeing a considerable fund or executing small deals, following to AML practices supports prevent legal repercussions. Utilizing USDT verification solutions not only shields you from economic declines but also supports to forming a secure environment for all business stakeholders.
Conclusion
Checking USDT for sanctions and transaction purity is becoming a compulsory process for anyone motivated to continue within the legal framework and support high criteria of clarity in the virtual currency domain. By engaging with dependable services, you not only defend your investments but also help to the joint initiative in fighting financial misconduct and terror financing activities.
If you are ready to start utilizing these solutions, investigate the accessible services and select the solution that most adequately aligns with your preferences. Keep in mind, data is your strength, and timely transfer validation can rescue you from many problems in the coming times.
вывод из запоя с выездом [url=http://www.vyvod-iz-zapoya-krasnodar116.ru]http://www.vyvod-iz-zapoya-krasnodar116.ru[/url] .
can you buy synthroid without dr prescription how to get synthroid no prescription can i get generic synthroid without prescription
where can i get generic synthroid without rx where can i buy synthroid without dr prescription how can i get synthroid for sale
where can i get synthroid tablets
where buy cheap synthroid without prescription where can i buy cheap synthroid buy cheap synthroid pill
where can i buy synthroid pills how to buy cheap synthroid tablets where to get generic synthroid without a prescription
Allergic joint condition awareness Immunomodulatory treatment for joint conditions Allergic arthritis symptom severity
Skin inflammation treatment Immunomodulators for skin conditions Allergic arthritis symptom alleviation strategies
Redness and swelling on skin
Skin inflammation treatment Inflammatory joint disease Autoimmune skin conditions
Allergic dermatitis symptom reduction measures Allergic arthritis symptom control measures Allergic arthritis care plan
Services for Verifying USDT for Prohibitions and Transfer Cleanliness: Anti-Money Laundering Strategies
In the up-to-date realm of crypto assets, where fast exchanges and anonymity are becoming the usual case, tracking the legality and clarity of operations is essential. In view of amplified regulatory scrutiny over money laundering and financing of terrorism, the requirement for robust means to verify transactions has become a significant concern for cryptocurrency users. In this piece, we will review existing tools for checking USDT for embargoes and operation integrity.
What is AML?
Anti-Laundering measures refer to a set of regulatory actions aimed at hindering and detecting money laundering activities. With the rise of digital asset usage, AML standards have become exceedingly essential, allowing participants to deal with digital currencies confidently while reducing threats associated with embargoes.
USDT, as the preeminent recognized stablecoin, is widely used in diverse transactions globally. Nonetheless, using USDT can present several hazards, especially if your capital may connect to opaque or illegal transactions. To lessen these risks, it’s vital to take advantage of services that check USDT for prohibitions.
Available Services
1. Address Validation: Using customized tools, you can inspect a certain USDT address for any links to restrictive lists. This assists detect potential ties to illicit conduct.
2. Operation Activity Analysis: Some platforms extend assessment of operation records, crucial for measuring the lucidity of fund movements and spotting potentially hazardous conduct.
3. Surveillance Systems: Dedicated monitoring tools allow you to track all deals related to your address, permitting you to swiftly detect dubious activities.
4. Risk Statements: Certain services provide detailed concern documents, which can be valuable for traders looking to validate the integrity of their assets.
Irrespective of whether or not you are overseeing a substantial fund or conducting small deals, following to AML norms assists prevent legal repercussions. Utilizing USDT authentication offerings not only shields you from monetary damages but also aids to establishing a stable environment for all economic stakeholders.
Conclusion
Assessing USDT for prohibitions and deal cleanliness is becoming a required process for anyone enthusiastic to stay compliant within the rules and support high levels of openness in the crypto sector. By interacting with credible services, you not only protect your investments but also support to the shared effort in preventing financial misconduct and terror financing activities.
If you are ready to start leveraging these offerings, review the accessible options and identify the one that most adequately aligns with your requirements. Bear in mind, data is your strength, and prompt transaction verification can protect you from many issues in the future.
https://mexicanpharmacy.store/# buying from online mexican pharmacy
You are good writer. Thank you.
Néanmoins, il faut savoir que de nombreux clients n’ont eu aucun mal à retirer leurs gains du casino en ligne Banzai Slots.
what is generic for Levaquin difference between levaquin and levofloxacin levaquin 500 mg buy
how much levaquin per hour levaquin 500mg side effects can i purchase levaquin pills
best time to give levaquin
price of levaquin at walgreens levaquin 500 mg for pneumonia can Levaquin cause kidney problems
levaquin recommended dosage how to take levaquin 500 how to get generic levaquin
https://canadianpharmacy.win/# my canadian pharmacy reviews
While Telegram requires you to sign up with a phone number, this number does not have to be personal. By purchasing a number for Telegram, you can provide a great advantage, especially for users who are concerned about privacy SMS temporäre Nummer
can i purchase tadacip without a prescription can i get cheap tadacip without rx can you get generic tadacip without prescription
cost cheap tadacip without a prescription buy tadacip online where to buy tadacip online
how can i get generic tadacip
cost of generic tadacip pill generic tadacip pills where can i buy tadacip without insurance
how to get generic tadacip no prescription where buy cheap tadacip without insurance can i get cheap tadacip without a prescription
While Telegram requires you to sign up with a phone number, this number does not have to be personal. By purchasing a number for Telegram, you can provide a great advantage, especially for users who are concerned about privacy Norway SMS temporary number
sildigra 120 by paypal where buy generic sildigra price cost sildigra without rx
get sildigra pill where to buy cheap sildigra prices can i get generic sildigra prices
how can i get cheap sildigra online
cost sildigra without insurance can i get generic sildigra without rx sildigra
where buy sildigra without rx sildigra 100 dosierung how to get sildigra pills
вывод из запоя [url=https://vyvod-iz-zapoya-rostov232.ru/]вывод из запоя[/url] .
http://mexicanpharmacy.store/# buying prescription drugs in mexico
нарколог на дом вывод из запоя ростов [url=www.vyvod-iz-zapoya-rostov233.ru]нарколог на дом вывод из запоя ростов[/url] .
вывод из запоя на дому ростов-на-дону [url=http://www.vyvod-iz-zapoya-rostov234.ru]вывод из запоя на дому ростов-на-дону[/url] .
вывод из запоя ростов на дону [url=www.vyvod-iz-zapoya-rostov231.ru/]вывод из запоя ростов на дону[/url] .
срочный вывод из запоя ростов [url=http://www.vyvod-iz-zapoya-rostov235.ru]срочный вывод из запоя ростов[/url] .
https://canadianpharmacy.win/# www canadianonlinepharmacy
buy actos generic actos reviews actos consortium lawsuit
actos manufacturer lowest dose of actos actos strengths
actos pharmacodynamics infoactos
actos lawsuit where to get cheap actos online actos side effects on kidneys
common side effects of actos actos side effects and warnings can you buy actos
how can i get finasteride without prescription buy generic finasteride without a prescription finasteride 1 mg india
can you get cheap finasteride prices generic finasteride without prescription can i purchase finasteride for sale
buying generic finasteride for sale
buy generic finasteride online cheap order finasteride no prescription finasteride generic buy
can i buy cheap finasteride without dr prescription where to buy cheap finasteride for sale can i order finasteride price
Membuka praktek apoteker farmasi untuk penemuan obat yang bisa di erdarkan di apotik
It iss iin rezlity a gteat annd ussfuⅼ piee oof information. I’m glzd tha youu sіmpl shzred tis
useful iinfo with us. Please ҝeep uus informed llike this.
Thabk yyou fоrr sharing.
my blkog ost :: free music downloads without copyright
http://mexicanpharmacy.store/# purple pharmacy mexico price list
cleocin hydrochloride 300 mg does cleocin cause speepyness cleocin ovules reviews
cleocin side effects headache back where to get Cleocin tablets cleocin clindamycin side effects
cleocin ovules yeast infection
cleocin 75mg 5ml compra cleocin gel online order cleocin vajinal krem kullananlar
Cleocin side effects antibiotic cleocin warnings cleocin side effects irritability
how to get generic lisinopril without dr prescription can i buy generic lisinopril no prescription where to buy generic lisinopril prices
does lisinopril treat anxiety how can i get cheap lisinopril online lisinopril starting dose
buying lisinopril tablets
can lisinopril cause nightmares can i buy generic lisinopril price order cheap lisinopril pills
lisinopril 40 mg can lisinopril cause wheezing how can i get lisinopril without insurance
вывод. из. запоя. на. дому. ростов. [url=https://www.vyvod-iz-zapoya-rostov232.ru]https://www.vyvod-iz-zapoya-rostov232.ru[/url] .
https://indianpharmacy.win/# top 10 pharmacies in india
sport-weekend.com [url=http://vkirove.ru/news/2024/05/23/kak_vybrat_prokhodnuyu_s_turniketom_vidy_osobennosti_vybora.html]http://vkirove.ru/news/2024/05/23/kak_vybrat_prokhodnuyu_s_turniketom_vidy_osobennosti_vybora.html[/url] .
Excellent post. I was checking constantly this weblog and I am inspired!
Extremely useful info particularly the final phase 🙂 I maintain such info a lot.
I was looking for this certain info for a very long time.
Thanks and good luck.
clockchok.ru [url=http://www.obrmos.ru/Moscow/flat/int/_Moscow_flat_961.html]http://www.obrmos.ru/Moscow/flat/int/_Moscow_flat_961.html[/url] .
csrolls
сервера линейдж
вывод. из. запоя. анонимно. ростов. [url=https://vyvod-iz-zapoya-rostov235.ru/]https://vyvod-iz-zapoya-rostov235.ru/[/url] .
can i get valtrex without rx can i order generic valtrex without insurance where to get cheap valtrex without prescription
cost of generic valtrex can i get valtrex tablets where buy cheap valtrex without a prescription
buying valtrex without prescription
how to buy generic valtrex without rx order cheap valtrex tablets cost cheap valtrex online
can i buy generic valtrex pill buy cheap valtrex without prescription get generic valtrex without rx
Hives blood test for allergies Hives treatment alternatives Hives treatment coordination
Allergic hives causes Hives treatment innovations Hives treatment communication
Hives treatment innovations
Hives treatment programs Hives community Hives corticosteroid ointments
Hives treatment schedules Hives allergen sensitivity Hives treatment teamwork
https://mexicanpharmacy.store/# mexican pharmaceuticals online
csgo roll
Its like you read my mind! You seem to know a lot about this, like you wrote the book in it or something.
I think that you could do with some pics to drive
the message home a little bit, but instead of that, this is fantastic blog.
An excellent read. I will definitely be back.
gtbike.ru [url=https://ufonews.su/news30/1118.htm/]https://ufonews.su/news30/1118.htm/[/url] .
buy generic valtrex for sale where to get valtrex pills can i order cheap valtrex without dr prescription
can i get valtrex without a prescription can i buy generic valtrex tablets buying cheap valtrex for sale
can i get cheap valtrex price
can you buy generic valtrex price cost generic valtrex without prescription where buy generic valtrex online
get valtrex without rx can you get valtrex prices can you get valtrex price
Предлагаем услуги профессиональных инженеров офицальной мастерской.
Еслли вы искали ремонт ноутбуков toshiba цены, можете посмотреть на сайте: ремонт ноутбуков toshiba
Наши мастера оперативно устранят неисправности вашего устройства в сервисе или с выездом на дом!
вывод из запоя ростов на дону на дому [url=http://vyvod-iz-zapoya-rostov236.ru/]вывод из запоя ростов на дону на дому[/url] .
I cannot thank you more than enough for the blogposts on your website. I know you set a lot of time and energy into these and truly hope you know how deeply I appreciate it. I hope I’ll do a similar thing person sooner or later.
Wow, amazing blog layout! How long have you been blogging for? you made blogging look easy. The overall look of your site is great, as well as the content!
л2 сервера
cost of cheap inderal without insurance can i purchase cheap inderal prices where can i buy inderal no prescription
can you get inderal without rx where can i get cheap inderal without a prescription how to buy generic inderal
cost of inderal without prescription
cost of inderal no prescription where to get inderal prices can i buy generic inderal price
can you buy inderal where to get generic inderal pill cost cheap inderal without prescription
Surprisingly good post. I really found your primary webpage and additionally wanted to suggest that have essentially enjoyed searching your website blog posts. Whatever the case I’ll always be subscribing to your entire supply and I hope you jot down ever again soon!
Предлагаем услуги профессиональных инженеров офицальной мастерской.
Еслли вы искали ремонт ноутбуков fujitsu siemens, можете посмотреть на сайте: ремонт ноутбуков fujitsu siemens цены
Наши мастера оперативно устранят неисправности вашего устройства в сервисе или с выездом на дом!
Мостбет пропонує щедрі бонуси для нових та постійних клієнтів | Онлайн казино Mostbet відоме своєю якістю та великими виграшами мостбет ua. | На офіційному сайті Мостбет завжди актуальні пропозиції та бонуси | Mostbet casino – ваш ідеальний вибір для гри онлайн [url=https://mostbetcasinouahfgy.com/]Мостбет офіційний сайт[/url].
https://hb20sclube.com.br/memberlist.php?mode=viewprofile&u=42926
В нашем Центре техосмотра на Московском шоссе, 13 в Санкт-Петербурге вы можете пройти техосмотр вашего автомобиля с гарантией качества и быстроты обслуживания. Мы предлагаем полный спектр услуг, чтобы обеспечить безопасность и соответствие вашего транспортного средства всем необходимым стандартам техосмотр автобусов Санкт-Петербург
This is definitely a wonderful webpage, thanks a lot..
buying cheap tadacip for sale where to buy generic tadacip no prescription can i order generic tadacip tablets
can you get tadacip without dr prescription how can i get cheap tadacip pills where to get tadacip price
buying generic tadacip without insurance
where to get tadacip pills can i get tadacip price buy tadacip 20 mg
cheap tadacip online can you buy cheap tadacip how to buy cheap tadacip without dr prescription
Покраска бампера машины требует тщательной подготовки и правильного подбора составов. В первую очередь необходимо определить, сколько краски нужно на бампер, учитывая его габариты и качество поверхности. [url=https://emmanuelbibletraining.info/ ]Краска для покраски бампера своими руками на emmanuelbibletraining.info [/url] считается лучшим выбором для достижения качественного результата. Важно помнить, что перед применением нового покрытия следует тщательно подготовить поверхность, очистив старую краску и обезжирив пластик. Текстурная краска обеспечивает не только эстетичный внешний вид, но и дополнительную защиту от механических повреждений.
Для тех, кто встретился с потребностью удаления следов краски после ДТП, существуют различные способы решения проблемы. Чтобы удалить краску с бампера от другой машины, специалисты рекомендуют использовать профессиональные смывки для краски с пластика бампера, которые результативно справляются с задачей без повреждения основного покрытия. При работе с черной структурной краской важно принимать во внимание время высыхания каждого слоя и следовать технологию нанесения, что позволит добиться равномерного покрытия и долговечного результата.
Источник: [url=https://emmanuelbibletraining.info/ ]https://emmanuelbibletraining.info/ [/url]
по вопросам Снять краску с бампера как – стучите в Telegram wcw60
http://canadianpharmacy.win/# reddit canadian pharmacy
Although many wallets allow to manage coins only in one network,
exodus supports assets in blockchains, including bitcoin, ethereum, https://bestwallettoken.org/ and solana.
how to get cheap prednisone pill can i buy cheap prednisone online can i get generic prednisone
order prednisone 20mg online cheap order prednisone 20mg without prescription how long can you take prednisone 10mg
generic prednisone without dr prescription
can i buy prednisone over the counter in spain over the counter prednisone equivalent will prednisone give you diarrhea
can you get cheap prednisone price order cheap prednisone prices prednisone 20 mg online
Быстрая покупка диплома старого образца: возможные риски
Useful data Appreciate it!
where to get cheap seroflo no prescription cost of cheap seroflo for sale can you get cheap seroflo online
can you buy generic seroflo online how can i get generic seroflo without dr prescription where to get seroflo prices
can i purchase cheap seroflo price
where to get cheap seroflo prices can i purchase cheap seroflo pills how can i get generic seroflo without a prescription
where can i buy generic seroflo online where can i buy generic seroflo pills order seroflo without insurance
clockchok.ru [url=www.spicami.ru/archives/166488/]www.spicami.ru/archives/166488/[/url] .
copd diagnosis and tests explained regular medical check-ups for copd copd exacerbation prevention advocacy initiatives
harmful substances and copd anti-inflammatory medications for copd copd exacerbation prevention care planning resources
exercises for seniors with copd
copd exacerbation prevention care planning copd progression copd exacerbation prevention campaigns
copd exacerbation prevention symptom management resources copd exacerbation support copd education materials for patients
http://mexicanpharmacy.store/# mexican border pharmacies shipping to usa
you will understand that you are using a regulated exchange if you are asked to provide certificate for
creating mail or social network for .
copd treatment guidelines chart copd exacerbation triggers copd exacerbation recovery
copd exacerbation prevention medication management tools anti-inflammatory medications for copd lung function tests for copd
copd symptoms management
copd exacerbation prevention counseling copd exacerbation action plan copd education materials for patients
excessive mucus production in copd copd exacerbation prevention symptom tracking copd symptom management techniques
вывод. из. запоя. ростов. [url=https://vyvod-iz-zapoya-rostov237.ru/]vyvod-iz-zapoya-rostov237.ru[/url] .
https://kress.de/kopf/profil/41593-pinup-casino.html
how to buy generic clarinex without prescription where to buy generic clarinex without prescription cost of clarinex without a prescription
can i purchase generic clarinex without insurance where can i buy cheap clarinex tablets can i order clarinex pills
buying clarinex prices
where to get cheap clarinex prices can you get clarinex cost generic clarinex pill
generic clarinex pills can i buy generic clarinex no prescription how to buy generic clarinex pill
crypto com wallet address checke
Offerings for Verifying USDT for Restrictive Measures and Deal Integrity: AML Approaches
In the contemporary realm of cryptocurrencies, where expedited deals and obscurity are becoming the standard practice, supervising the lawfulness and integrity of activities is necessary. In recognition of greater administrative examination over money laundering and terrorism financing activities, the demand for effective tools to check transfers has become a critical issue for virtual currency users. In this piece, we will analyze offered tools for verifying USDT for sanctions and operation cleanliness.
What is AML?
Anti-Money Laundering measures refer to a series of supervisory measures aimed at curtailing and uncovering dirty money activities. With the growth of virtual currency usage, AML strategies have become particularly important, allowing participants to manage digital assets with assurance while mitigating perils associated with restrictive measures.
USDT, as the arguably the favored stablecoin, is widely used in various operations worldwide. Nevertheless, using USDT can present several threats, especially if your resources may associate to non-transparent or illegal activities. To lessen these hazards, it’s essential to take leverage of solutions that inspect USDT for embargoes.
Available Services
1. Address Verification: Employing dedicated tools, you can check a certain USDT address for any links to restrictive catalogs. This assists detect potential associations to illicit behaviors.
2. Transaction Engagement Examination: Some offerings make available scrutiny of transfer records, crucial for evaluating the openness of fund transfers and uncovering potentially hazardous conduct.
3. Tracking Systems: Expert monitoring services allow you to observe all exchanges related to your wallet, allowing you to rapidly uncover questionable operations.
4. Hazard Records: Certain tools extend detailed concern documents, which can be beneficial for investors looking to guarantee the soundness of their assets.
Whether of whether you are handling a substantial capital or performing small transactions, complying to AML guidelines assists steer clear of legal repercussions. Using USDT authentication services not only shields you from capital setbacks but also aids to forming a secure environment for all market participants.
Conclusion
Verifying USDT for embargoes and operation integrity is becoming a mandatory action for anyone eager to stay within the legal framework and support high levels of transparency in the crypto industry. By engaging with reliable platforms, you not only secure your resources but also aid to the joint initiative in fighting financial misconduct and terrorist financing.
If you are ready to start employing these services, investigate the accessible options and select the option that most adequately meets your demands. Remember, information is your advantage, and prompt deal check can save you from countless problems in the future.
cost cheap motilium where to get motilium without insurance can you buy generic motilium for sale
how to get cheap motilium prices where buy cheap motilium without rx how to get motilium without a prescription
where to get generic motilium without insurance
how to get motilium no prescription can i get motilium pills cost of generic motilium without dr prescription
where buy generic motilium without a prescription where buy cheap motilium prices buying motilium prices
When it comes to active recreation near the water, many people pay attention to the little things that make this process more convenient and enjoyable https://nastroenie.com.ua/kak-vybrat-bong-dlya-kureniya/
When it comes to active recreation near the water, many people pay attention to the little things that make this process more convenient and enjoyable https://medvin.ucoz.ua/forum/2-3779-1
There is a lot of confusion in the sphere of https://tether-alloy.com/, and companies
it is important realize risks and opportunities , which are associated with present .
Inspiring story there. What happened after? Take care!
apart from from classic game models, visitors on https://99bitcoins.io/ can now can get acquainted with income by taking part
in such games.
can i buy cheap valtrex without dr prescription how to get cheap valtrex online how to get valtrex pills
cost of valtrex prices can i purchase valtrex without rx where to buy cheap valtrex without rx
buy cheap valtrex pill
order valtrex price how to buy cheap valtrex for sale how to buy generic valtrex
get valtrex without rx where can i get valtrex price how to buy valtrex prices
Anti-money laundering (AML)
Services for Monitoring USDT for Sanctions and Deal Integrity: Anti-Money Laundering Strategies
In the current environment of cryptocurrencies, where quick trades and secrecy are becoming the norm, observing the lawfulness and clarity of operations is necessary. In view of increased regulatory investigation over money laundering and terrorism financing activities, the demand for effective resources to authenticate transactions has become a key priority for crypto users. In this text, we will explore available services for checking USDT for restrictive measures and operation cleanliness.
What is AML?
AML strategies refer to a series of regulatory actions aimed at hindering and detecting dirty money activities. With the growth of cryptocurrency usage, AML measures have become exceedingly crucial, allowing users to deal with digital assets securely while mitigating threats associated with embargoes.
USDT, as the widely regarded as the popular stablecoin, is extensively used in various transactions across the globe. Nonetheless, using USDT can involve several dangers, especially if your funds may relate to opaque or illicit maneuvers. To minimize these threats, it’s vital to take leverage of offerings that assess USDT for prohibitions.
Available Services
1. Address Confirmation: Employing dedicated tools, you can inspect a designated USDT address for any links to prohibited registries. This helps detect potential connections to criminal behaviors.
2. Transaction Engagement Analysis: Some offerings extend analysis of transfer history, essential for assessing the transparency of financial transactions and detecting potentially dangerous conduct.
3. Observation Tools: Expert monitoring services allow you to track all exchanges related to your account, allowing you to swiftly spot dubious operations.
4. Hazard Records: Certain solutions extend detailed risk reports, which can be beneficial for investors looking to validate the soundness of their assets.
Irrespective of whether or not you are controlling a substantial fund or executing small transactions, complying to AML standards helps steer clear of legal repercussions. Employing USDT authentication tools not only safeguards you from monetary damages but also contributes to creating a safe environment for all business players.
Conclusion
Assessing USDT for prohibitions and transaction cleanliness is becoming a mandatory process for anyone keen to continue within the regulations and maintain high standards of clarity in the crypto sector. By engaging with trustworthy solutions, you not only safeguard your resources but also contribute to the common initiative in fighting dirty money and terrorist financing.
If you are set to start employing these solutions, explore the accessible platforms and select the one that most suitably suits your preferences. Remember, information is your strength, and swift deal check can protect you from countless problems in the coming times.
Your idea is outstanding; the issue is something that not enough persons are speaking intelligently about. I’m very happy that I stumbled throughout this in my seek for one thing regarding this.
сервера l2
вывод из запоя цены ростов-на-дону [url=vyvod-iz-zapoya-rostov238.ru]вывод из запоя цены ростов-на-дону[/url] .
albuterol buy canada how to buy cheap albuterol online cost albuterol no prescription
where to get generic albuterol for sale how to buy cheap albuterol tablets how to buy generic albuterol pill
can i get generic albuterol without prescription
where to buy albuterol price get cheap albuterol no prescription where to get albuterol no prescription
can you buy albuterol inhalers over the counter cost of generic albuterol tablets buy albuterol asthma inhaler
where to get tadacip online get tadacip without a prescription get generic tadacip price
where to buy generic tadacip without a prescription where can i buy tadacip price order generic tadacip without prescription
how to buy generic tadacip no prescription
how can i get tadacip pill can you buy cheap tadacip price order cheap tadacip online
how to get generic tadacip no prescription where to buy cheap tadacip without dr prescription can i order generic tadacip pills
lineage 2 серверы
한국 온라인 카지노 [url=https://live24bet.ru/]live24bet.ru[/url] .
http://fastpillseasy.com/# best online ed treatment
where to buy claritin pill where to buy cheap claritin pill cost of cheap claritin no prescription
buy claritin pill how can i get cheap claritin how can i get generic claritin without dr prescription
cost of claritin online
generic claritin without dr prescription can you buy cheap claritin pills buy claritin online
cost claritin pill buy claritin without dr prescription where can i buy claritin without dr prescription
We encourage you to explore our handpicked selection of the finest online casino sites, catering to players from every corner of the globe дан лудан
We encourage you to explore our handpicked selection of the finest online casino sites, catering to players from every corner of the globe данлудан стрим
Промокоды казино
cost of ashwagandha prices best ashwagandha brand in india where i can buy ashwagandha
cost of generic ashwagandha without insurance ashwagandha powder holland and barrett reputable brands of ashwagandha
ashwagandha recommended brands
cost of ashwagandha price cost of generic ashwagandha without insurance ashwagandha sold near me
where to buy ashwagandha online buy ashwagandha capsules near me gaia ashwagandha reviews
вывод из запоя [url=https://vyvod-iz-zapoya-rostov237.ru/]вывод из запоя[/url] .
buy allopurinol pill can you buy allopurinol pills how to buy generic allopurinol
how to buy allopurinol price where buy cheap allopurinol pill how to buy generic allopurinol for sale
get cheap allopurinol for sale
how to buy allopurinol without dr prescription how can i get generic allopurinol for sale get generic allopurinol prices
where to get generic allopurinol without dr prescription how to get generic allopurinol no prescription how to buy cheap allopurinol no prescription
freshpass с годовой подпиской за 60 долларов https://bittogether.com/index.php?topic=19054.0 США.
http://maxpillsformen.com/# Generic Cialis price
can i purchase generic finasteride without rx finasteride buy india order generic finasteride pill
get finasteride without insurance can i buy generic finasteride price where to buy finasteride without rx
cost of cheap finasteride without insurance
order generic finasteride tablets how can i get generic finasteride pill how can i get finasteride no prescription
buy finasteride online amazon can you buy finasteride tablets how to get cheap finasteride without prescription
where can i get cheap valtrex without insurance cost valtrex no prescription order generic valtrex no prescription
can you buy generic valtrex without a prescription can i buy cheap valtrex without dr prescription generic valtrex no prescription
cost of generic valtrex without prescription
where to buy generic valtrex tablets cheap valtrex without rx can i order cheap valtrex without rx
how to buy cheap valtrex prices cost generic valtrex pill where to get generic valtrex
вывод из запоя дешево ростов [url=vyvod-iz-zapoya-rostov238.ru]вывод из запоя дешево ростов[/url] .
Do cryptocurrency wallets charge a commission? if you pay them an e-mail letter
asking for support, removes the https://slothana-coin.io/ request you will receive during
one hour.
http://fastpillsformen.com/# generic sildenafil
https://www.theverge.com/users/mostbet02
наркологическая скорая помощь москва [url=http://uaportal.ukrbb.net/viewtopic.php?f=2&t=3732]наркологическая скорая помощь москва [/url] .
частная скорая наркологическая помощь [url=ukroenergo.ukrbb.net/viewtopic.php?f=13&t=21400]частная скорая наркологическая помощь[/url] .
https://profile.hatena.ne.jp/sportsbetting52/
[url=https://caliente.directorio-de-casinos-mx.com]http://caliente.directorio-de-casinos-mx.com[/url]
Install application online casino caliente – play now!
caliente.directorio-de-casinos-mx.com
https://sketchfab.com/melbetonlinecasino
Если вы только планируете поездку в Таиланд и на Пхукет, загляните на phuketescape.com — там собрана базовая информация для начинающих путешественников что посмотреть, куда съездить.
[url=https://winner.directorio-de-casinos-mx.com/]winner.directorio-de-casinos-mx.com[/url]
Download application online casino winner – win today!
winner casino
Kantorbola link alternatif login terbaru 2025 . Kunjungi link resmi situs kantor bola untuk melakukan permainan dan pendaftaran
http://bikeno.com/__media__/js/netsoltrademark.php?d=viralcomms.com%2Fbbs%2Fboard.php%3Fbo_table%3Dfree%26wr_id%3D806131
https://maxpillsformen.com/# Buy Tadalafil 5mg
Для многих пользователей вопрос, как подключить роутер через GPON, оказывается важным при переходе на провайдера или обновлении оборудования. Подключение GPON-роутера Ростелеком предполагает корректных настроек, чтобы устройство функционировало стабильно и гарантировало скоростное соединение. Получить подробности о том, [url=https://netgate-kiev.blogspot.com/ ]Как подключить роутер мгтс gpon на netgate-kiev.blogspot.com [/url] можно по ссылке на сайте, который детально описывает этот процесс. Важным моментом является правильное подключение роутера к GPON, чтобы не возникло сбоев в работе интернета.
Если вы планируете настроить свой роутер к GPON-модему, нужно соблюдать четким инструкциям. Зачастую пользователи задумываются, как настроить GPON роутер МТС или Ростелеком, чтобы создать сеть в квартире или офисе. Настройка GPON через стандартный роутер также выполнимо, однако для этого нужно учесть особенности взаимодействия оборудования.
Источник: [url=https://netgate-kiev.blogspot.com/ ]https://netgate-kiev.blogspot.com/ [/url]
по вопросам Как подключить роутер gpon мгтс – обращайтесь в Telegram eos21
наркологическая срочная помощь [url=http://fanfiction.borda.ru/?1-1-0-00000238-000-0-0-1730874477/]наркологическая срочная помощь[/url] .
Beneficial information Appreciate it!
Производители готовят на заказ на территории
небольших объемах, https://eno.one/schy/forums?t=7099 но
{при этом} соблюдают все стандарты качества.
Нашёл недавно интересный путеводитель по Парижу и Франции – parisgid.ru. Там есть готовые маршруты, идеи, обзоры достопримечательностей и советы где поесть.
https://maxpillsformen.com/# п»їcialis generic
Нашёл недавно интересный путеводитель по Парижу и Франции – parisgid.ru. Там есть готовые маршруты, идеи, обзоры достопримечательностей и советы где поесть.
Medicines information. Cautions.
buy trileptal price
All trends of medicine. Read now.
in the case when you cherish own https://p-network.io/
for more than single year, any cash receipts from the sale of cryptocurrency,
as a rule is not taxed.
Drugs prescribing information. Effects of Drug Abuse.
can you buy keflex price
All information about medicament. Read now.
Thank you, Numerous content!
Medication information. Cautions.
cost of cheap seroquel no prescription
Everything what you want to know about medicine. Get information here.
https://fastpillseasy.com/# cost of ed meds
Drugs information for patients. Effects of Drug Abuse.
where buy cheap neurontin without rx
Best about meds. Read information here.
Medication information for patients. Drug Class.
where to buy cheap ipratropium tablets
Best information about medicine. Read information now.
Wonderful web site Lots of useful info here Im sending it to a few friends ans additionally sharing in delicious And obviously thanks to your effort
Wow, this article is fastidious, my sister is analyzing these things, so I am going to convey her.
Medicament information leaflet. Brand names.
atorvastatin superior other statins
Some news about medication. Read now.
Thank you for this great piece of content. Best Regards
On the website, everyone can order fillers that are distinguished by premium quality from Europe. The products are presented in more than 70 countries. The company has been on the market for more than 13 years, and therefore has gained recognition from regular customers. The products have quality certificates, which confirms serious intentions cialis online
http://maxpillsformen.com/# Cialis 20mg price
Just what I needed to know thank you for this.
https://mdou70.68edu.ru/wp-content/pgs/1xbet_zerkalo_alternativnuy_dostup.html
gore4
gore3
Бесплатные фриспины за регистрацию в казино – подборка актуальных предложений. Новые фриспины без депозита 2025 года на https://droptopsite1.ru/
Займ на карту без отказа — это быстрое и удобное решение для тех, кто нуждается в финансовой помощи: простая онлайн-заявка, минимальные требования к заемщику и мгновенное одобрение, что позволяет получить необходимую сумму практически незамедлительно, а также возможность быстро погасить задолженность, делая процесс максимально комфортным и прозрачным для каждого займ на карту онлайн без отказа
Бесплатные фриспины за регистрацию в казино – подборка актуальных предложений. Новые фриспины без депозита 2025 года на фриспины без депозита в казино
gore1
Займ на карту без отказа — это быстрое и удобное решение для тех, кто нуждается в финансовой помощи: простая онлайн-заявка, минимальные требования к заемщику и мгновенное одобрение, что позволяет получить необходимую сумму практически незамедлительно, а также возможность быстро погасить задолженность, делая процесс максимально комфортным и прозрачным для каждого мфо без отказа на карту
gore4
Пошаговая инструкция по безопасной покупке диплома о высшем образовании
как вызвать наркологическую скорую помощь в москве как вызвать наркологическую скорую помощь в москве .
скорая наркологическая помощь на дому в москве [url=forumbar.anihub.me/viewtopic.php?id=9772]скорая наркологическая помощь на дому в москве[/url] .
gore3
https://fastpillsformen.com/# order viagra
https://tver-philharmonic.ru/filarmoniya/pgs/?1xbet_zerkalo.html
gore4
gore4
gore2
Заказать изготовление по индивидуальному дизайну или купть памятник по выгодной цене Вы можете в нашей Гранитной мастерской Бесплатный памятник
Drugs information sheet. Brand names.
buying generic ramipril pill
Actual trends of medicines. Read information now.
buying generic differin pills get cheap differin prices how can i get generic differin tablets
buy generic differin price buy differin pills buy generic differin pill
can i get generic differin
buying differin get differin for sale where to buy differin price
where buy cheap differin without prescription can i purchase generic differin tablets can you get cheap differin pills
buying januvia
Заказать изготовление по индивидуальному дизайну или купть памятник по выгодной цене Вы можете в нашей Гранитной мастерской скачать бесплатно
Thanks for some other great post. Where else may anybody get that kind of information in such an ideal method of writing? I’ve a presentation next week, and I am at the look for such information.
http://maxpillsformen.com/# Buy Tadalafil 10mg
Medicament information for patients. Generic Name.
cost cheap fluoxetine without rx
All what you want to know about medicine. Read information here.
Гранитная мастерская памятников – это предприятие по изготовлению памятников на могилу из натурального камня. бесплатно в хорошем качестве
Гранитная мастерская памятников – это предприятие по изготовлению памятников на могилу из натурального камня. Памятники в подарок бесплатно
where to get valtrex prices
Pills prescribing information. Short-Term Effects.
can i take diphenhydramine with azithromycin
Actual information about medicament. Get information now.
order mestinon without insurance buy generic mestinon without rx buying generic mestinon pills
can i order mestinon pills where to get cheap mestinon without rx buying generic mestinon without dr prescription
can i purchase mestinon for sale
cost mestinon prices order generic mestinon without rx how to buy mestinon prices
where can i get generic mestinon price can you buy mestinon without rx can i purchase generic mestinon without prescription
cost of cheap colospa without rx
Drugs information sheet. Generic Name.
can you buy paxil without prescription
All what you want to know about meds. Read now.
get prednisone price buying generic prednisone without prescription buy prednisone over the counter
prednisone 4 mg tablets without prescription generic prednisone for sale buying prednisone tablets
20mg prednisone side effects
80 mg prednisone buy prednisone where can i get cheap prednisone pill
can you get generic prednisone pill how can i get prednisone price need to buy prednisone 20mg for humans
https://fastpillsformen.com/# Cheap Viagra 100mg
Medicament prescribing information. Generic Name.
lisinopril cough frequency
All trends of drug. Read information here.
can you get co-amoxiclav where to get cheap co-amoxiclav tablets buy co-amoxiclav without prescription
where to buy co-amoxiclav pills buy co-amoxiclav without dr prescription can you buy co-amoxiclav prices
order generic co-amoxiclav
buying cheap co-amoxiclav no prescription cost of cheap co-amoxiclav online can you buy cheap co-amoxiclav price
buying cheap co-amoxiclav without insurance can you buy cheap co-amoxiclav without a prescription where to get co-amoxiclav pills
наркологическая скорая в москве [url=http://pandora.ukrbb.net/viewtopic.php?f=2&t=12335/]наркологическая скорая в москве[/url] .
can you buy generic cozaar price
Meds information for patients. Effects of Drug Abuse.
can you buy generic rizatriptan without rx
Actual information about medicines. Read information now.
buy mobic price where can i buy generic mobic tablets where to get cheap mobic without rx
can i purchase generic mobic tablets where buy generic mobic without prescription can you get mobic without prescription
how can i get cheap mobic without dr prescription
where can i get mobic without a prescription where can i buy cheap mobic without a prescription can i order mobic without insurance
how to get cheap mobic no prescription can you get mobic tablets where to get generic mobic without prescription
Good points – – it will make a difference with my parents.
Цены на памятники в таких местах начинаются от 30 000 рублей за стандартный метровый прямоугольник с оформлением и могут достигать сотен тыся смотреть онлайн бесплатно в качестве
Цены на памятники в таких местах начинаются от 30 000 рублей за стандартный метровый прямоугольник с оформлением и могут достигать сотен тыся лучшие бесплатные
https://maxpillsformen.com/# cheapest cialis
Drug prescribing information. Cautions.
where can i get loperamide for sale
Everything information about medicament. Read information now.
Пожар считается ликвидированным (последствия пожара ликвидированными), если прекращено горение и исключены условия для самопроизвольного возникновения горения запах після пожежі
Carbon fiber has taken the aspect of performance parts to a whole new level by infusing strength into the vehicle at reduced weight for improved dynamics https://api.prx.org/series/50500-carbon-fiber-upgrades-for-better-dynamics
Пожар считается ликвидированным (последствия пожара ликвидированными), если прекращено горение и исключены условия для самопроизвольного возникновения горения прибирання після прориву каналізації
I concur with your conclusions and will eagerly look forward to your future updates. The usefulness and significance is overwhelming and has been invaluable to me!
Carbon fiber has taken the aspect of performance parts to a whole new level by infusing strength into the vehicle at reduced weight for improved dynamics https://famenest.com/read-blog/59784
Great blog here! Additionally your website rather a lot up very fast! What host are you the usage of? Can I get your associate link for your host? I desire my website loaded up as fast as yours lol
Meds information. Effects of Drug Abuse.
can i get generic ziprasidone pills
All information about drug. Read now.
A good web site with interesting content, that’s what I need. Thank you for making this web site, and I will be visiting again. Do you do newsletters? I Can’t find it.
cost of generic doxycycline price doxycycline for rosacea how long doxycycline single dose lyme disease
where to buy doxycycline in singapore can you get cheap doxycycline without dr prescription doxycycline for sale online uk
where can i get cheap doxycycline price
where to buy cheap doxycycline without dr prescription buy cheap doxycycline can you buy cheap doxycycline without insurance
doxycycline online ordering cost cheap doxycycline without dr prescription where to buy generic doxycycline without insurance
The 1win promo code: MAX500WIN. This 1Win bonus code 2025 rewards new players with a 500% bonus up to $1025. Valid codes for receiving bonuses without a deposit for new and old users. Hurry to get them today! Activate the promo code 1win and get a generous welcome bonus of up to 500% on your first four deposits 1win registration promo code
На сайте в вашем распоряжении бесплатные фильмы в онлайне. Вам не придется переживать, если вы не успели познакомиться с недавно вышедшими фильмом-новинкой. Для тех, кто не может оставаться в стороне от жизни кинематографа, должен быть на острие всех его событий, предлагаются смотреть фильмы в HD 1080 фильмы 2025
The 1win promo code: MAX500WIN. This 1Win bonus code 2025 rewards new players with a 500% bonus up to $1025. Valid codes for receiving bonuses without a deposit for new and old users. Hurry to get them today! Activate the promo code 1win and get a generous welcome bonus of up to 500% on your first four deposits bonus code for 1win
A friend of mine advised me to review this site. And yes. it has some useful pieces of info and I enjoyed reading it.
На сайте в вашем распоряжении бесплатные фильмы в онлайне. Вам не придется переживать, если вы не успели познакомиться с недавно вышедшими фильмом-новинкой. Для тех, кто не может оставаться в стороне от жизни кинематографа, должен быть на острие всех его событий, предлагаются смотреть фильмы в HD 1080 фильмы 2025 онлайн
where to get cheap nemasole without insurance
Meds information. Effects of Drug Abuse.
lyrica tablet cost
Best information about medicines. Read here.
diltiazem dose conversion chart diltiazem expiry date highest dose of diltiazem
diltiazem drug uses discontinue diltiazem can i stop taking diltiazem
diltiazem dose conversion chart
side effects of diltiazem hcl diltiazem prices walgreens can diltiazem cause high blood pressure
diltiazem 60 mg er capsule how long does diltiazem last cartia xt vs diltiazem er
I like your quality that you put into your writing . Please do continue with more like this.
Перед началом сотрудничества я провожу бесплатную консультацию, где объясняю особенности и тонкости SEO-продвижения, а также обсуждаю с вами стратегию. На этом этапе мы определяем цели и ожидания от работы, что позволяет избежать недоразумений в дальнейшем продвижение сайта цены в месяц
can i order caduet without insurance
Перед началом сотрудничества я провожу бесплатную консультацию, где объясняю особенности и тонкости SEO-продвижения, а также обсуждаю с вами стратегию. На этом этапе мы определяем цели и ожидания от работы, что позволяет избежать недоразумений в дальнейшем http://seo-specialist-moscow.ru/
Drug information leaflet. Long-Term Effects.
buying cheap reglan price
Some about drug. Read here.
where can i get generic doxycycline without dr prescription doxycycline 50 mg tablets where to buy cheap doxycycline without a prescription
cheapest price for doxycycline hyclate buy doxycycline hyclate 100mg without a rx malaria tablets doxycycline buy
where to get cheap doxycycline for sale
doxycycline 200mg generic doxycycline 200 mg twice daily doxycycline hyclate 100mg price
where to get doxycycline pills doxycycline buy canada can i order doxycycline pills
If wings are your thing, Tinker Bell’s sexy Halloween costume design is all grown up.
http://maxpillsformen.com/# Cialis over the counter
cost femara for sale
Drugs information. Effects of Drug Abuse.
escitalopram bei pms
Some information about medicament. Read here.
Allergic conjunctivitis treatment professionals Allergic conjunctivitis treatment schedules Allergic conjunctivitis photophobia
Allergic conjunctivitis treatment resources Allergic conjunctivitis eye lubrication Allergic conjunctivitis treatment cycles
Allergic conjunctivitis treatment advancements
Allergic conjunctivitis treatment tools Allergic conjunctivitis treatment modalities Allergic conjunctivitis treatment facilities
Allergic conjunctivitis treatment alternatives Allergic conjunctivitis treatment options Allergic conjunctivitis allergens
This is really interesting, You’re a very skilled blogger. I have joined your feed and look forward to seeking more of your fantastic post. Also, I have shared your website in my social networks!
cost cheap sumycin pill
I love what you’ve created here, this is definitely one of my favorite sites to visit.
I love your blog. It looks every informative.
Nice blog here! Also your web site loads up very fast! What host are you using? Can I get your affiliate link to your host? I wish my web site loaded up as fast as yours lol
Drug information. Long-Term Effects.
promethazine with dm
Best information about drug. Get here.
diltiazem reviews and comments diltiazem indications for use diltiazem er brand name
cost generic diltiazem without insurance diltiazem 120 mg diltiazem in angina
how long do diltiazem side effects last
diltiazem 120 mg tablet diltiazem medication side effects diltiazem immediate release package insert
how much does diltiazem cost how to stop taking diltiazem indications for diltiazem
Our local network of agencies has found your research so helpful.
https://maxpillsformen.com/# Generic Cialis price
where to get generic trimox pill
бонусный счет в 1xbet на что ставить
order cheap doxycycline without rx where to buy generic doxycycline pills where can i buy doxycycline without insurance
where can i buy generic doxycycline tablets get cheap doxycycline no prescription doxycycline suspension cost
where to buy doxycycline
doxycycline superdrug 100 mg doxycycline for acne where to get doxycycline without rx
how to buy generic doxycycline no prescription can doxycycline make you sick doxycycline what not to eat
Medicament information. Long-Term Effects.
can you buy generic ziprasidone pill
Some what you want to know about medicament. Read information here.
сколько стоит сделать загранпаспорт [url=4dkp.forum24.ru/?1-18-0-00003341-000-0-0-1735286007]сколько стоит сделать загранпаспорт[/url] .
срочное изготовление загранпаспорта [url=https://moskovsky.borda.ru/?1-7-0-00007182-000-0-0-1735288103]срочное изготовление загранпаспорта[/url] .
where can i buy generic arcoxia pills
can i buy cipro for sale get generic cipro prices where can i get cipro pills
generic cipro online where buy generic cipro without rx buy cipro 500mg no prescription
where can i buy cheap cipro without prescription
cost of cipro how to get cipro without rx where to get generic cipro pills
cost cheap cipro price can i order cipro without rx can i buy cipro without insurance
Meds prescribing information. Long-Term Effects.
can you get cheap ventolin tablets
Some news about medicament. Get now.
http://fastpillsformen.com/# Generic Viagra online
cost of generic valtrex without prescription
how to get cheap theo 24 cr online can i purchase generic theo 24 cr pill cost cheap theo 24 cr tablets
get theo 24 cr without insurance order generic theo 24 cr without prescription generic theo 24 cr pill
where to buy generic theo 24 cr without a prescription
can i buy theo 24 cr for sale how to buy cheap theo 24 cr without a prescription order theo 24 cr without prescription
order generic theo 24 cr for sale where buy cheap theo 24 cr online can i purchase theo 24 cr no prescription
Букмекерская контора 1Win – самая популярная платформа для онлайн ставок на спорт и казино в России. 1Вин – это легальный официальный сайт с лицензией, которые всегда выводит выигрыши. Чтобы начать делать ставки и играть на деньги, необходимо зарегистрироваться http://minimoo.eu/index.php/en/forum/welcome-mat/694977-1win-5
Medicine prescribing information. What side effects can this medication cause?
rosuvastatin 10 mg cmax
All about medicine. Get now.
tax refund calculator https://taxrefundcalculator.website/
I would really like to appreciate the endeavors you cash in on written this article. I’m going for the similar best product from you finding out in the foreseeable future as well. Actually your creative writing abilities has urged me to begin my very own blog now. Genuinely the blogging is distributing its wings rapidly. Your write down is often a fine illustration showing it.
Букмекерская контора 1Win – самая популярная платформа для онлайн ставок на спорт и казино в России. 1Вин – это легальный официальный сайт с лицензией, которые всегда выводит выигрыши. Чтобы начать делать ставки и играть на деньги, необходимо зарегистрироваться http://torgteh-rzn.ru/index.php?option=com_k2&view=itemlist&task=user&id=14521
search crypto wallet
Services for Assessing USDT for Prohibitions and Transfer Cleanliness: AML Solutions
In the contemporary realm of crypto assets, where quick trades and privacy are becoming the usual case, observing the validity and purity of processes is crucial. In consideration of increased regulatory examination over financial misconduct and terrorist financing, the requirement for effective resources to authenticate deals has become a major matter for virtual currency users. In this write-up, we will explore accessible solutions for checking USDT for sanctions and deal purity.
What is AML?
Money Laundering Prevention practices refer to a series of supervisory steps aimed at curtailing and discovering illicit finance activities. With the surge of digital asset usage, AML measures have become exceedingly important, allowing participants to manage digital currencies reliably while reducing hazards associated with embargoes.
USDT, as the preeminent favored stablecoin, is commonly used in multiple exchanges globally. Nevertheless, using USDT can carry several hazards, especially if your funds may tie to unclear or illicit maneuvers. To mitigate these risks, it’s essential to take benefit of offerings that assess USDT for prohibitions.
Available Services
1. Address Verification: Employing specific tools, you can confirm a designated USDT address for any associations to sanction lists. This helps detect potential ties to unlawful activities.
2. Deal Conduct Assessment: Some offerings make available scrutiny of deal background, significant for measuring the clarity of financial transfers and spotting potentially dangerous activities.
3. Tracking Services: Dedicated monitoring services allow you to observe all transactions related to your address, enabling you to quickly uncover dubious operations.
4. Threat Statements: Certain platforms make available detailed risk documents, which can be crucial for traders looking to confirm the trustworthiness of their assets.
Whether of if you are overseeing a large resource or conducting small trades, following to AML standards assists prevent legal repercussions. Using USDT authentication services not only protects you from financial setbacks but also supports to building a protected environment for all economic participants.
Conclusion
Checking USDT for embargoes and deal integrity is becoming a compulsory step for anyone keen to continue within the law and preserve high benchmarks of clarity in the virtual currency sector. By collaborating with dependable solutions, you not only safeguard your resources but also support to the shared goal in combating dirty money and terror financing activities.
If you are prepared to start using these offerings, examine the available options and pick the one that most adequately fits your demands. Keep in mind, insight is your asset, and swift operation check can save you from numerous difficulties in the coming times.
Предлагаем услуги профессиональных инженеров офицальной мастерской.
Еслли вы искали ремонт macbook pro m3, можете посмотреть на сайте: ремонт macbook pro m3 в москве
Наши мастера оперативно устранят неисправности вашего устройства в сервисе или с выездом на дом!
Its like you read my mind! You seem to know a lot about this, like you wrote the book in it or something. I think that you can do with some pics to drive the message home a bit, but other than that, this is wonderful blog. A great read. I’ll certainly be back.
A friend of mine advised this site. And yes. it has some useful pieces of info and I enjoyed scaning it. Therefore i would love to drop you a quick note to express my thank. Take care
This is a great blog. Thank you for the very informative post.
how to buy generic rumalaya prices
cost cheap depo medrol price can i get depo medrol tablets can you get generic depo medrol tablets
buying generic depo medrol for sale can i buy depo medrol online can i purchase generic depo medrol without dr prescription
where buy cheap depo medrol without prescription
can i purchase generic depo medrol online where can i buy generic depo medrol prices order depo medrol without a prescription
where buy depo medrol no prescription cost of generic depo medrol without rx how can i get generic depo medrol for sale
Meds information leaflet. Long-Term Effects.
where can i buy generic atarax for sale
Everything trends of medication. Read here.
Предлагаем услуги профессиональных инженеров офицальной мастерской.
Еслли вы искали срочный ремонт ноутбуков hp, можете посмотреть на сайте: ремонт ноутбуков hp сервис
Наши мастера оперативно устранят неисправности вашего устройства в сервисе или с выездом на дом!
Предлагаем услуги профессиональных инженеров офицальной мастерской.
Еслли вы искали ремонт macbook pro 16 рядом, можете посмотреть на сайте: ремонт macbook pro 16 адреса
Наши мастера оперативно устранят неисправности вашего устройства в сервисе или с выездом на дом!
Этапы SEO продвижения сайта · Создание и размещение оптимизированного под запросы текста на целевые страницы · Доработка сайта с целью оптимизации его под запросы http://seo-optimizator-moscow.ru/
I discovered your weblog site on google and verify just a few of your early posts. Proceed to maintain up the very good operate. I simply further up your RSS feed to my MSN News Reader.
Anti-money laundering (AML)
Offerings for Monitoring USDT for Sanctions and Transaction Integrity: Money Laundering Prevention Strategies
In the up-to-date domain of cryptocurrencies, where fast exchanges and secrecy are becoming the usual case, observing the legality and purity of operations is essential. In light of greater official investigation over money laundering and financing of terrorism, the demand for effective means to check transactions has become a critical concern for digital asset users. In this write-up, we will analyze available offerings for monitoring USDT for prohibitions and operation integrity.
What is AML?
Anti-Laundering measures refer to a series of legal measures aimed at curtailing and detecting money laundering activities. With the rise of digital asset usage, AML practices have become notably important, allowing individuals to operate digital assets confidently while minimizing perils associated with embargoes.
USDT, as the arguably the popular stablecoin, is broadly used in multiple deals worldwide. Nevertheless, using USDT can present several risks, especially if your monies may relate to opaque or criminal activities. To mitigate these hazards, it’s vital to take advantage of solutions that verify USDT for prohibitions.
Available Services
1. Address Authentication: Employing customized tools, you can inspect a designated USDT address for any ties to restrictive lists. This aids identify potential links to unlawful conduct.
2. Deal Action Examination: Some offerings provide scrutiny of operation records, important for judging the transparency of monetary movements and detecting potentially threatening conduct.
3. Tracking Services: Expert monitoring tools allow you to observe all deals related to your address, allowing you to rapidly spot questionable actions.
4. Risk Reports: Certain platforms extend detailed threat evaluations, which can be crucial for stakeholders looking to ensure the trustworthiness of their assets.
Irrespective of whether you are overseeing a substantial capital or executing small operations, adhering to AML practices helps evade legal repercussions. Using USDT validation services not only shields you from economic losses but also helps to forming a safe environment for all economic players.
Conclusion
Checking USDT for sanctions and transfer clarity is becoming a mandatory process for anyone keen to continue within the legal framework and uphold high benchmarks of transparency in the crypto field. By collaborating with trustworthy solutions, you not only defend your holdings but also aid to the collective effort in combating dirty money and financing of terrorism.
If you are set to start employing these services, explore the available services and choose the solution that most meets your preferences. Be aware, data is your asset, and swift deal verification can rescue you from numerous challenges in the long run.
can i order generic plavix online
gout treatment colchicine dosage colchicine structural formula does colchicine react with xarelto
buy colchicine generic name colchicine directions for gout does colchicine give you diarrhea
dose of colchicine in pericarditis
colchicine without prescription colchicine for myopericarditis colchicine 0.5 mg for heart
colchicine dose for myocarditis how long does colchicine take to work colchicine long term use
Drugs information. Effects of Drug Abuse.
where to buy cheap oxcarbazepine tablets
Some news about medication. Read here.
[url=https://winpot.directorio-de-casinos-mx.com]winpot.directorio-de-casinos-mx.com[/url]
Download latest version of the application bookmaker winpot – play today!
https://winpot.directorio-de-casinos-mx.com
I’m so happy to read this. This is the type of manual that needs to be given and not the random misinformation that’s at the other blogs. Appreciate your sharing this best doc.
Сколько стоит диплом высшего и среднего образования и как это происходит?
can i purchase celexa price generic celexa without prescription can i get generic celexa without a prescription
can i purchase celexa without prescription buy celexa without rx how can i get celexa online
cost of generic celexa prices
order cheap celexa without prescription buying generic celexa cost generic celexa price
can i buy generic celexa can you get celexa online can you buy celexa
Medication information sheet. Effects of Drug Abuse.
buying cheap digoxin without rx
Actual trends of medicine. Read now.
can i get cheap pamelor without dr prescription
Hello there! I really enjoy reading your blog! If you keep making amazing posts like this I will come back every day to keep reading.
I don’t normally comment but I gotta say appreciate it for the post on this one : D.
Игроки могут осуществлять ставки в 1вин на самые различные события, на десятки видов спорта а также киберспорт и многое другое. Инфраструктура проекта развита http://portstanc.ru/index.php/blog/alesha.html
I know this if off topic but I’m looking into starting my own weblog and was wondering what all is needed to get set up?
I’m assuming having a blog like yours would cost a pretty penny?
I’m not very internet smart so I’m not 100% certain. Any recommendations or advice would be greatly appreciated.
Many thanks
What i discover troublesome is to find a weblog that may capture me for a minute however your blog is different. Bravo.
Just stumble upon your blog from from time to time. nice article
I just added this to my favorites. I truly love reading your posts. Tyvm!
Assume you are doing good linking to position you on the first pages of search engines.
where can i buy cheap cetirizine without rx buy cetirizine 5mg buy cetirizine hydrochloride 10mg uk
can i buy cheap cetirizine for sale where to buy cheap cetirizine pill can you get cheap cetirizine without insurance
how to buy generic cetirizine price
is cetirizine a prescription drug can i get cheap cetirizine price can i purchase cetirizine tablets
cetirizine 40 mg daily dosage where can i get cheap cetirizine without insurance levocetirizine 5mg walgreens
Hi, possibly i’m being a little off topic here, but I was browsing your site and it looks stimulating. I’m writing a blog and trying to make it look neat, but everytime I touch it I mess something up. Did you design the blog yourself?
Medicament information leaflet. Generic Name.
buy trileptal tablets
Some what you want to know about meds. Read information here.
I really believe you will do well in the future I appreciate everything you have added to my knowledge base.
get cheap advair diskus pill
Some genuinely choice content on this site, bookmarked .
where can i buy cipro pill can you get cipro for sale buy cipro overnight
how to get cipro price cost cipro without insurance can i purchase cipro pill
ciprofloxacin alternative over the counter
can you get cheap cipro tablets alternative to ciprodex ear drops can i get cheap cipro no prescription
where to buy cipro without rx get cipro for sale buy ciprofloxacin 500mg online cheap
Medication information. Effects of Drug Abuse.
where can i get colchicine without a prescription
All news about medication. Read now.
buy cheap uroxatrall tablets
lisinopril maximum dose a day how can i get lisinopril how does lisinopril lower blood pressure
lisinopril side effects can lisinopril cause kidney damage how many lisinopril to overdose
when should lisinopril be avoided
lisinopril order online can i purchase cheap lisinopril pills buy lisinopril from new zealand without prescription
how to buy generic lisinopril without prescription blood pressure medication with lisinopril lisinopril buy online
Medicine prescribing information. Short-Term Effects.
buying generic oxcarbazepine tablets
Some what you want to know about meds. Read now.
buy cheap rumalaya tablets
Предлагаем услуги профессиональных инженеров офицальной мастерской.
Еслли вы искали ремонт кофемашин spidem рядом, можете посмотреть на сайте: срочный ремонт кофемашин spidem
Наши мастера оперативно устранят неисправности вашего устройства в сервисе или с выездом на дом!
한국 이용 가능 카지노 [url=https://live24bet.ru]한국 이용 가능 카지노[/url] .
Developing a framework is important.
where buy generic clomid online order generic clomid no prescription where buy clomid no prescription
get generic clomid without prescription cost of cheap clomid without dr prescription can you buy cheap clomid pill
can you get clomid without a prescription
can you get generic clomid without prescription where can i buy cheap clomid for sale buying cheap clomid online
can you get clomid without insurance can i buy clomid online can you buy cheap clomid without dr prescription
рейтинг процессоров для игр [url=http://topcpu.ru]http://topcpu.ru[/url] .
Drug prescribing information. Generic Name.
order generic anastrozole pill
Actual information about drugs. Get now.
cost cheap zocor without a prescription
colchicine side effects in adults can colchicine be toxic colchicine dose renal impairment
does colchicine increase bleeding risk substitute for colchicine colchicine for gout joint pain
colchicine mechanism of action inflammation
stop allopurinol with colchicine together alternative medication for colchicine colchicine common side effects
colchicine dosage per day colchicine contraindicated heart failure colchicine in heart failure
I have to disagree with most of the comments here, but maybe I’m just a contrarian.
Medicine information. Drug Class.
cost generic valtrex pill
All about meds. Get here.
can i get cheap artane
[url=https://bet365.directorio-de-casinos-mx.com/]www.bet365.directorio-de-casinos-mx.com[/url]
Download client online casino bet365 – win today!
http://www.bet365.directorio-de-casinos-mx.com
I can’t go into details, but I have to say its a good article!
Thank you for the auspicious writeup.
Un service client de qualité est un élément crucial pour garantir une expérience positive sur un casino en ligne.
It’s a comprehensive, yet fast read.
substitute for diltiazem cost diltiazem price discontinuing diltiazem drip
diltiazem affect blood pressure diltiazem side effects mayo clinic diltiazem twice daily dosing
diltiazem for chest pain
diltiazem uses webmd can diltiazem cause skin problems diltiazem hcl er 120 mg
diltiazem uses webmd generic diltiazem pills diltiazem side effects hair loss
Авторитетный журнал для современных женщин о трендах моды, красоте, заботе о себе, путешествиях, культуре и интерьерных решениях от экспертов вызвать шлюху в калуге
https://richexchanger.com/
Its like you read my mind! You seem to know a lot about this, like you wrote the book in it or something. I think that you can do with some pics to drive the message home a bit, but other than that, this is wonderful blog. A great read. I’ll certainly be back.
Авторитетный журнал для современных женщин о трендах моды, красоте, заботе о себе, путешествиях, культуре и интерьерных решениях от экспертов снять шлюху в калуге
Medicine information for patients. Short-Term Effects.
can i get cheap valtrex for sale
Actual trends of meds. Get now.
can you buy generic uroxatrall without rx
It’s the best time to make some plans for the future and it is time to be happy. I’ve read this post and if I could I wish to suggest you some interesting things or tips. Maybe you can write next articles referring to this article. I wish to read even more things about it!
where can i get finpecia prices where to get finpecia tablets can you get cheap finpecia without insurance
where buy generic finpecia tablets cost cheap finpecia without insurance cost generic finpecia
where buy finpecia no prescription
can you get finpecia prices where to buy finpecia without rx can i get finpecia pill
how to buy generic finpecia pill how to get generic finpecia where to buy generic finpecia online
Abnormal this put up is totaly unrelated to what I was searching google for, but it surely used to be listed at the first page. I suppose your doing one thing proper if Google likes you adequate to place you at the first page of a non similar search.
Medicament information for patients. What side effects?
zithromax strep throat
Actual news about drugs. Get information now.
where to buy flagyl no prescription
Could not disagree with the main ideas. Wonder how things will develop over the coming years.
Medicine prescribing information. Brand names.
where to get generic clozapine online
Best about pills. Get here.
I am lucky that I discovered this website , precisely the right info that I was searching for! .
принудительный вывод из запоя ростов [url=https://vyvod-iz-zapoya-rostov222.ru/]vyvod-iz-zapoya-rostov222.ru[/url] .
капельница от запоя на дому [url=https://www.vyvod-iz-zapoya-rostov239.ru]капельница от запоя на дому[/url] .
Виниловый пол – это современное напольное покрытие, которое стремительно набирает популярность благодаря своим уникальным свойствам и широким возможностям дизайна https://gp.by/novosti/kaleidoscope/news292747.html
get generic chloromycetin pills
рейтинг процессоров amd [url=https://www.topcpu.ru]https://www.topcpu.ru[/url] .
Предлагаем услуги профессиональных инженеров офицальной мастерской.
Еслли вы искали ремонт кофемашин neff адреса, можете посмотреть на сайте: ремонт кофемашин neff в москве
Наши мастера оперативно устранят неисправности вашего устройства в сервисе или с выездом на дом!
Предлагаем услуги профессиональных инженеров офицальной мастерской.
Еслли вы искали срочный ремонт кофемашин melitta, можете посмотреть на сайте: ремонт кофемашин melitta адреса
Наши мастера оперативно устранят неисправности вашего устройства в сервисе или с выездом на дом!
Hives symptom management Hives treatment protocols Hives allergen sensitivity
Hives treatment success Hives allergens Hives resources
Hives treatment options assessment
Hives treatment providers Hives complications Hives treatment regimens
Hives management Hives treatment alternatives Hives treatment optimization
Medicines prescribing information. What side effects can this medication cause?
can you buy cheap neurontin prices
All information about meds. Read here.
can you buy generic elavil without prescription
Предлагаем услуги профессиональных инженеров офицальной мастерской.
Еслли вы искали ремонт кофемашин philips рядом, можете посмотреть на сайте: ремонт кофемашин philips адреса
Наши мастера оперативно устранят неисправности вашего устройства в сервисе или с выездом на дом!
Предлагаем услуги профессиональных инженеров офицальной мастерской.
Еслли вы искали ремонт macbook air m1, можете посмотреть на сайте: ремонт macbook air m1 цены
Наши мастера оперативно устранят неисправности вашего устройства в сервисе или с выездом на дом!
how to buy cheap differin without prescription can you get generic differin without dr prescription can i order differin without prescription
buy differin no prescription where to get cheap differin no prescription buy cheap differin online
can i get generic differin without rx
where can i get generic differin tablets how to get generic differin no prescription can you get cheap differin pill
order cheap differin pill how can i get cheap differin pill can i order differin pill
Meds prescribing information. Brand names.
cost of cheap divalproex without dr prescription
Everything trends of medicine. Read now.
Резина является разновидностью полимера,
состоящего из субъединиц, https://www.weddingbee.com/members/marianne35pourosgga598/ называемых мономерами.
how to get generic zyloprim no prescription
buying mestinon for sale how to get generic mestinon without dr prescription can i order cheap mestinon without rx
generic mestinon without insurance get generic mestinon tablets cost of generic mestinon without prescription
can i get cheap mestinon online
where to buy cheap mestinon online can i purchase cheap mestinon without a prescription can i order generic mestinon without a prescription
where can i buy mestinon can i buy generic mestinon pills cost of mestinon pill
Drugs information leaflet. Generic Name.
can i buy fluoxetine without insurance
Everything trends of pills. Get now.
celebrex without dr prescription
buy prednisone without what is prednisone used for can you buy prednisone
where to buy prednisone without dr prescription buy prednisone 20mg tablets can prednisone cause mental confusion
how to get cheap prednisone online
order cheap prednisone tablets happy family pharmacy canada prednisone apo-prednisone overseas pharmacies
prednisone buy online india prednisone dosage for doctors where can i get generic prednisone pill
online stamp maker free [url=https://stamp-creator-online0.com/]online stamp maker free[/url] .
вывод из запоя капельница на дому [url=http://www.vyvod-iz-zapoya-rostov224.ru]вывод из запоя капельница на дому[/url] .
Medication information. Short-Term Effects.
where to buy levitra tablets
Best trends of medicine. Read here.
can i get caduet online
farxiga doses can i order cheap forxiga without dr prescription where to buy forxiga without insurance
where can i buy generic forxiga pills how can i get cheap forxiga pills buy forxiga without insurance
cost cheap forxiga without dr prescription
can i order forxiga without insurance where to get generic forxiga price can i buy cheap forxiga tablets
can you get generic forxiga without prescription cheap forxiga pills dapagliflozine
Medication prescribing information. Short-Term Effects.
can i get rogaine
Best news about medicine. Read now.
copd exacerbation prevention resources copd exacerbation management copd symptoms management
copd exacerbation prevention symptom management applications alternative treatment for copd anti-inflammatory medications for copd
copd exacerbation prevention medication management guidelines
heart failure and copd copd exacerbation prevention campaigns excessive mucus production in copd
copd exacerbation prevention resources copd treatment copd exacerbation prevention support networks
buying arcoxia without rx
Drug information sheet. Effects of Drug Abuse.
amitriptyline nekhernia
Best trends of pills. Get now.
вывод из запоя дешево ростов-на-дону [url=http://vyvod-iz-zapoya-rostov226.ru/]вывод из запоя дешево ростов-на-дону[/url] .
how can i get cheap benemid cost of cheap benemid without insurance where buy benemid without dr prescription
how to get cheap benemid pill where to get generic benemid tablets can i buy cheap benemid
where can i get generic benemid without dr prescription
generic benemid for sale can i order generic benemid no prescription how to get cheap benemid no prescription
can i order benemid without dr prescription buying benemid pills can i buy benemid
cost cheap anafranil online
Drug information. Short-Term Effects.
can you get generic ramipril for sale
All trends of drugs. Read information now.
24/7 Service Across the GTA Professional assistance is just a phone call away – 24 hours a day, 7 days a week. When a property suffers damage from fire, flood, sewage backup, or environmental contaminants such as mould or asbestos, a swift response is essential to preventing further harm and expediting the restoration process.
where can i buy cheap sildalist tablets where to get sildalist without prescription can i purchase generic sildalist without dr prescription
can i purchase sildalist without insurance buying generic sildalist for sale where to get cheap sildalist without prescription
can i buy cheap sildalist without rx
can i buy sildalist without rx order cheap sildalist pills can i get sildalist no prescription
buying generic sildalist price where can i buy cheap sildalist for sale can i purchase generic sildalist without insurance
Предлагаем услуги профессиональных инженеров офицальной мастерской.
Еслли вы искали ремонт кофемашин miele цены, можете посмотреть на сайте: ремонт кофемашин miele рядом
Наши мастера оперативно устранят неисправности вашего устройства в сервисе или с выездом на дом!
Предлагаем услуги профессиональных инженеров офицальной мастерской.
Еслли вы искали ремонт кофемашин delonghi адреса, можете посмотреть на сайте: ремонт кофемашин delonghi в москве
Наши мастера оперативно устранят неисправности вашего устройства в сервисе или с выездом на дом!
can i get cheap trimox no prescription
Medicine information. Short-Term Effects.
can you get cheap loperamide pill
Everything about medicines. Get here.
Разнообразие фурнитуры для плинтуса, подберите под свой интерьер вариант.
Качественная фурнитура для плинтуса, не подведут вас в эксплуатации.
Простота установки элементов плинтуса, для быстрой установки.
Тренды в дизайне фурнитуры для плинтуса, выделитесь из общей массы.
Фурнитура для плинтуса из экологически чистых материалов, экологичный выбор для вашего дома.
Популярные цветовые решения для фурнитуры плинтуса, подчеркните цветовую гамму своего интерьера.
Эксклюзивные варианты фурнитуры для плинтуса, сделайте свой дом неповторимым.
Советы по выбору фурнитуры для плинтуса, чтобы сделать правильный выбор.
Креативные решения для отделки плинтуса, создайте уютный и стильный дом.
Элегантные элементы для стильного плинтуса, для создания аристократичной атмосферы.
плинтуса мдф [url=https://furnituradlyaplintusamsk.ru/]https://furnituradlyaplintusamsk.ru/[/url] .
All of our shelves are handcrafted and make in Deer Park, NY. The process of making your shelf starts from the moment you place an order You can create your own shelf Shop now floating bar shelves with lights
can i purchase actos online actos reviews is actos better than metformin
substitute for actos medication order actos actos price
best time to take actos
actos side effects lawsuit can actos cause diarrhea actos discontinuing
actos cost actos 30 mg side effects where can i buy actos
Thanks for some other great post. Where else may anybody get that kind of information in such an ideal method of writing? I’ve a presentation next week, and I am at the look for such information.
All of our shelves are handcrafted and make in Deer Park, NY. The process of making your shelf starts from the moment you place an order You can create your own shelf Shop now floating shelf ny
Your resources are well developed.
Medication information. Brand names.
where buy generic cardizem
All about medicament. Get here.
can you get valtrex without rx
En iyi sekilde meram t?p randevu sisteminin gelistirdik. TL casino giris ile birlikte daha iyi sonuclar ald?k. Ve halk cok memnun tlcasino güncel giriş
can i order generic tadacip without insurance how to buy cheap tadacip price buy tadacip from india
can i purchase cheap tadacip prices buying generic tadacip without prescription where to buy tadacip
where to get tadacip without a prescription
order cheap tadacip tablets can i order tadacip prices where can i get cheap tadacip pill
cost tadacip for sale can i get tadacip for sale where to get cheap tadacip no prescription
Sweet blog! I found it while browsing on Yahoo News. Do you have any tips on how to get listed in Yahoo News? I’ve been trying for a while but I never seem to get there! Thank you
Im impressed. I dont think Ive met anyone who knows as much about this subject as you do. Youre truly well informed and very intelligent. You wrote something that people could understand and made the subject intriguing for everyone. Really, great blog youve got here.
Meds information. Generic Name.
where can i buy generic zofran prices
Actual what you want to know about medicament. Read here.
where can i buy generic arcoxia prices
where can i buy cheap mestinon online order generic mestinon without rx how to get mestinon for sale
order mestinon no prescription buy cheap mestinon no prescription can i order cheap mestinon tablets
cost of mestinon without insurance
how to get mestinon without prescription where can i get mestinon without dr prescription where can i buy mestinon without rx
how to get cheap mestinon pill generic mestinon price get cheap mestinon price
Medication information leaflet. Long-Term Effects.
fluoxetine hcl 10mg cap
Everything news about meds. Get information now.
Предлагаем услуги профессиональных инженеров офицальной мастерской.
Еслли вы искали ремонт iphone xs, можете посмотреть на сайте: ремонт iphone xs
Наши мастера оперативно устранят неисправности вашего устройства в сервисе или с выездом на дом!
вывод из запоя на дому ростов на дону [url=http://vyvod-iz-zapoya-rostov224.ru/]вывод из запоя на дому ростов на дону[/url] .
Оригинальные детали от проверенных производителей обеспечивают максимальную точность и стабильность работы. Кроме того, они обычно проходят строгий контроль качества, что снижает вероятность неисправностей http://matripedia.de/doku.php?id=%20%D0%93%D0%B4%D0%B5%20%D0%BA%D1%83%D0%BF%D0%B8%D1%82%D1%8C%20%D0%BA%D0%B0%D1%87%D0%B5%D1%81%D1%82%D0%B2%D0%B5%D0%BD%D0%BD%D1%8B%D0%B5%20%D0%B7%D0%B0%D0%BF%D1%87%D0%B0%D1%81%D1%82%D0%B8%20%D0%B4%D0%BB%D1%8F%20%D1%81%D1%82%D0%B0%D0%BD%D0%BA%D0%BE%D0%B2:%20%D0%BE%D0%B1%D0%B7%D0%BE%D1%80%20%D0%BB%D1%83%D1%87%D1%88%D0%B8%D1%85%20%D0%BF%D0%BE%D1%81%D1%82%D0%B0%D0%B2%D1%89%D0%B8%D0%BA%D0%BE%D0%B2
where to get coreg without dr prescription
stamp maker online [url=stamp-creator-online0.com]stamp maker online[/url] .
common side effect of colchicine can you take colchicine daily daily colchicine for gout prevention
colchicine prices is colchicine nephrotoxic colchicine price walmart
colchicine 0.6 mg 90 day
is colchicine controlled substance colchicine price walmart is colchicine controlled substance
is colchicine a controlled substance can i take colchicine with blood pressure cheapest price for colchicine
http://casinositeleri25.com/# canl? casino siteleri
This is the perfect blog for everyone who hopes to understand
this topic. You understand so much its almost hard to argue with you (not that I personally will need to…HaHa).
You definitely put a new spin on a topic that’s been written about for ages.
Excellent stuff, just wonderful!
Medicine information. What side effects?
can i buy cheap dilantin no prescription
Everything about medication. Get information now.
where buy generic cymbalta
капельница от запоя на дому круглосуточно [url=www.vyvod-iz-zapoya-rostov225.ru/]капельница от запоя на дому круглосуточно[/url] .
клиника вывод из запоя ростов [url=http://vyvod-iz-zapoya-rostov27.ru/]клиника вывод из запоя ростов[/url] .
вывод из запоя недорого ростов [url=https://vyvod-iz-zapoya-rostov226.ru/]вывод из запоя недорого ростов[/url] .
how can i get nemasole without dr prescription can i buy cheap nemasole online buying generic nemasole without insurance
can i order generic nemasole without dr prescription can i purchase generic nemasole price order generic nemasole without dr prescription
cheap nemasole without rx
buy cheap nemasole without insurance buy nemasole pills can i purchase nemasole without prescription
can i order generic nemasole without prescription get generic nemasole without a prescription can i purchase nemasole
Muchos se preguntan cuando Mbappe podria unirse al Real Madrid | Klim Mbappe se ha consolidado como uno de los mejores jugadores de su generacion | La conexion entre Wilfried Mbappe y su hijo es motivo de admiracion mbappe lottin | La velocidad de Kylian Mbappe es una de sus caracteristicas mas destacadas | Mbappe ha demostrado ser un jugador completo y versatil [url=https://mbappe.com.mx/]www.mbappe.com.mx[/url].
get cheap caduet tablets
http://sweetbonanza25.com/# sweet bonanza guncel
I favored your idea there, I tell you blogs are so helpful sometimes like looking into people’s private life’s and work.At times this world has too much information to grasp. Every new comment wonderful in its own right.
can i buy cheap prasugrel without rx what is prasugrel used for prasugrel contraindications
cost generic prasugrel without prescription cheap prasugrel tablets get generic prasugrel without insurance
prasugrel to plavix transition
can i order generic prasugrel no prescription where to buy cheap prasugrel without insurance how can i get generic prasugrel pills
can i order cheap prasugrel can i get prasugrel tablets buying cheap prasugrel pill
Drugs information leaflet. Brand names.
can you buy coreg online
Some trends of meds. Read here.
can i get cheap artane without prescription
how to get generic zyrtec online can i buy generic zyrtec without prescription buying zyrtec price
where buy cheap zyrtec for sale where to get cheap zyrtec tablets can you buy cheap zyrtec pill
where to buy zyrtec online
can i purchase cheap zyrtec without a prescription how to get cheap zyrtec prices how can i get generic zyrtec pills
where to get zyrtec prices can i purchase cheap zyrtec no prescription where buy cheap zyrtec without insurance
글 개요와디즈 추천인:wadiz는 와디즈 추천인대한민국의 크라우드펀딩와디즈 추천인 사이트
Medication information leaflet. Short-Term Effects.
where to buy generic arimidex without prescription
Some what you want to know about medication. Get information now.
where buy cheap mentax
Предлагаем услуги профессиональных инженеров офицальной мастерской.
Еслли вы искали ремонт iphone xs max цены, можете посмотреть на сайте: ремонт iphone xs max
Наши мастера оперативно устранят неисправности вашего устройства в сервисе или с выездом на дом!
where can i buy forxiga pill can i get generic forxiga without a prescription where buy cheap forxiga pills
where to get forxiga for sale how can i get generic forxiga pill how to buy generic forxiga without insurance
buying cheap forxiga online
where to get generic forxiga how can i get forxiga without dr prescription cost of cheap forxiga without insurance
how can i get cheap forxiga pill where can i buy cheap forxiga for sale how to get generic forxiga price
Польский виртуальный номер – это телефонный номер, который не привязан к физической SIM-карте или мобильному устройству. Вместо этого, он работает через интернет, что делает его доступным практически из любой точки мира постоянный виртуальный номер
https://sweetbonanza25.com/# sweet bonanza oyna
Польский виртуальный номер – это телефонный номер, который не привязан к физической SIM-карте или мобильному устройству. Вместо этого, он работает через интернет, что делает его доступным практически из любой точки мира купить постоянный виртуальный номер
Играем в Трикс казино официальный сайт онлайн на деньги! Регистрация и вход в Trix казино через рабочее зеркало. Бонусы и акции для новых и постоянных лучшее казино
Meds information. Long-Term Effects.
where can i get keflex prices
Best about drug. Get information now.
Играем в Трикс казино официальный сайт онлайн на деньги! Регистрация и вход в Trix казино через рабочее зеркало. Бонусы и акции для новых и постоянных тут
where to buy cheap trimox without a prescription
Hi i think that i saw you visited my web site thus i came to Return the favore I am attempting to find things to improve my web siteI suppose its ok to use some of your ideas
I just could not depart your web site prior to suggesting that I really loved the usual info an individual supply in your visitors Is gonna be back regularly to check up on new posts
Fantastic beat I would like to apprentice while you amend your web site how could i subscribe for a blog site The account helped me a acceptable deal I had been a little bit acquainted of this your broadcast offered bright clear concept
Meds information. Effects of Drug Abuse.
cheap macrobid for sale
Everything information about pills. Get information here.
where buy cheap lisinopril pill
Howdy, a helpful article for sure. Thank you.
Medicament information leaflet. What side effects?
can you get cheap nolvadex for sale
All trends of medicament. Read here.
can you get lexapro prices
stamps maker [url=http://www.stamp-creator-online0.com]stamps maker[/url] .
Drugs information for patients. What side effects?
does everyone put weight on with mirtazapine
Some information about drug. Read information here.
I just couldnt leave your website before saying that I really enjoyed the useful information you offer to your visitors… Will be back often to check up on new stuff you post!
Виртуальный номер телефона даёт возможность подключать любое количество номеров и разговаривать с любого устройства, принимать звонки в офисе или дома купить виртуальный номер
how to get generic imitrex no prescription
Виртуальный номер телефона даёт возможность подключать любое количество номеров и разговаривать с любого устройства, принимать звонки в офисе или дома виртуальный номер для ватсап
Drugs information for patients. Generic Name.
can you buy generic abilify tablets
Best what you want to know about medication. Get information here.
can you get generic bactrim without prescription
Medicament information. Short-Term Effects.
can you get cheap tetracycline pills
Everything news about pills. Read here.
貴公子娛樂城是一個新穎且便利的線上娛樂平台,其主打的快速註冊流程讓玩家可以即刻開始遊戲,而無需經歷繁瑣的手續。同時,平台提供多元的支付選項,包括LINE PAY、信用卡及MyCard等,方便玩家根據自己的需求選擇最適合的方式進行充值。此外,貴公子娛樂城的每日紅包系統和VIP等級紅利機制,更讓玩家能夠持續享受額外的回饋與獎勵,增添了遊戲的吸引力。對於尋求快速進入遊戲並享受穩定服務的玩家而言,貴公子娛樂城無疑是一個值得嘗試的選擇!
have already been reading ur blog for a couple of days. really enjoy what you posted. btw i will be doing a report about this topic. do you happen to know any great websites or forums that I can find out more? thanks a lot.
cost cheap imitrex pill
Pills information. Long-Term Effects.
exploring the synergistic effects of combining cymbalta and trittico a comprehensive analysis
All what you want to know about medicament. Get information now.
鉅城娛樂城作為亞太區知名線上娛樂平台,以豐富多元的遊戲內容及優質服務贏得玩家信賴。平台通過TST技術測試及GLI系統認證,確保遊戲公平性。目前推出首存1000送1000優惠活動,最高回饋可達20萬,並提供日日續儲10%的回饋金。平台提供真人百家、棋牌、老虎機、體育電競及彩票等多樣化遊戲選擇,讓玩家享受如臨現場的娛樂體驗。
鉅城娛樂城:亞太區知名線上娛樂平台
鉅城娛樂城作為亞太區最受歡迎的線上娛樂平台之一,以其豐富多元的遊戲內容和卓越的服務品質贏得了廣大玩家的信賴。該平台不僅擁有一系列令人 excited 的遊戲,還致力於為玩家提供公平、公正的遊戲環境。
公平遊戲保障
鉅城娛樂城的遊戲公平性通過TST技術測試及GLI系統認證確保,使玩家在遊玩過程中完全無需擔心遊戲的公正問題。這些認證保證了每一場比賽及遊戲的隨機性和透明度,進一步增強了玩家的信心。
優惠活動
目前,鉅城娛樂城推出了首存1000送1000的優惠活動,這讓新玩家能夠在註冊後,迅速享受雙倍的存款金額,提升遊戲體驗。此外,平台最高回饋可達20萬,讓玩家在參與遊戲時享受到更多的利潤。值得注意的是,鉅城娛樂城還提供日日續儲10%的回饋金,進一步增強了玩家的參與熱情。
遊戲選擇
鉅城娛樂城平台提供多樣化的遊戲選擇,包括真人百家、棋牌、老虎機、體育電競及彩票等,讓玩家可以依照自己的興趣和需求選擇遊戲。無論是喜愛刺激的百家 blackjack,還是希望體驗策略與運氣的棋牌遊戲,鉅城娛樂城皆能滿足每位玩家的期望,並提供如臨現場的娛樂體驗。
總結
總而言之,鉅城娛樂城憑藉其卓越的遊戲內容和專業的客戶服務,已成為亞太區線上娛樂的不二之選。公正的遊戲環境、誘人的優惠活動及多樣的遊戲選擇,吸引了無數玩家的目光。無論你是新手還是老玩家,鉅城娛樂城都能帶給你一段難忘的遊戲旅程。
капельница от запоя цена [url=http://vyvod-iz-zapoya-rostov228.ru]капельница от запоя цена[/url] .
generic nemasole pills
Tips and tools you offer are so helpful to agencies in our community.
Medication information leaflet. Long-Term Effects.
diferencia entre captopril y lisinopril
Best trends of medication. Read now.
북메이커 순위 [url=https://live24bet.ru/]북메이커 순위[/url] .
Drugs information for patients. Brand names.
buying generic paxil prices
All about medicines. Get information here.
where can i buy generic pamelor pills
Слушайте, игроки!
Хотите окунуться в пространство виртуальных-казино и получить реальные деньги? Тогда вам к нам! Рейтинг лучших лучших игровых площадок 2025
Наш тг-аккаунт — ваш путеводитель в пространство лучших интернет-казино в Российской Федерации! Мы подготовили топ-10 проверенных игровых площадок, где вы получите возможность проводить время на деньги и получить свои доходы без трудностей.
Что вас поджидает:
Честные отзывы и рейтинги сайт казино зеркало от настоящих участников. Отличная имя всякого сайта проверена временем и игроками. Неоплачиваемая регистрация и скорый доступ на всех площадках. Рабочие зеркала для входа к вашему излюбленному игровому сайту в любой время. Мобильное софт для комфортной развлечения где хотите.
Почему нам?
Безопасные и проверенные игровые сайты с лучшими критериями для развлечения. Защита ваших данных и транзакций гарантирована. Актуальные обновления и события мира интернет-развлечений в РФ.
This is my first time pay a visit at here and i am genuinely happy to read everthing at single place.
https://millionigrushek.ru/
Im impressed. I dont think Ive met anyone who knows as much about this subject as you do. Youre truly well informed and very intelligent. You wrote something that people could understand and made the subject intriguing for everyone. Really, great blog youve got here.
Drug information. Drug Class.
can i purchase cheap promethazine no prescription
Actual about drug. Get information here.
пропуск для грузовиков в москву [url=https://www.urilin.ru ]https://www.urilin.ru [/url] .
how to get zantac without insurance
Хуснуллин оценил рост цен на стройматериалы в 64% с 2021 года. Он считает такое увеличение критичным и влияющим в том числе и на государственный бюджет, поскольку по госзаказу производятся строительные и ремонтные работы на триллионы рублей https://narodedin.com/post/s-2021-goda-stroitelnye-materialy-podorozhali-na-64-procenta/
Pills information for patients. Effects of Drug Abuse.
amoxicillin 1000 mg capsule
Everything information about meds. Get information here.
I saw a similar post on another website but the points were not as well articulated.
Hi, do have a e-newsletter? In the event you don’t definately should get on that piece…this web site is pure gold!
buying generic pamelor no prescription
Sometimes, the sheer magnitude of the information seems overwhelming.
Хуснуллин оценил рост цен на стройматериалы в 64% с 2021 года. Он считает такое увеличение критичным и влияющим в том числе и на государственный бюджет, поскольку по госзаказу производятся строительные и ремонтные работы на триллионы рублей https://b-stringer.ru/xusnullin-zayavil-chto-emu-kategoricheski-ne-nravitsya-rost-stoimosti-strojmaterialov/
Pills prescribing information. Cautions.
buspirone 555
Everything news about meds. Get information here.
L’inscription à ces promotions est gratuite, ce qui signifie que n’importe qui peut tenter sa chance sur ces tournois.
how to get cheap trimox without dr prescription
九州娛樂城
九州平台針對新會員推出168元的免費體驗金活動。這項活動的特點是無需滿足投注要求,新會員註冊 後即可使用。會員可以藉此機會體驗平台上的各種遊戲選項,包括電子遊戲、真人對戰等多樣娛樂內容。
相較於市面上其他平台,這項活動的主要優勢在於其簡單的申請流程和零門檻要求。一般平台的體驗金活動往往會設定投注金額要求,但此活動讓會員能更自由地體驗平台服務。
Займы в Казахстане онлайн — быстрое оформление, минимальные требования, выгодные условия для получения нужной суммы займ в Казахстане
九州娛樂
九州娛樂城作為線上娛樂平台的領導品牌,不斷推出創新服務及優惠活動。近期推出的168元體驗金活動,讓新會員免費體驗平台特色。九州娛樂以玩家體驗為核心,提供多元化的遊戲選擇,包括電子遊戲、真人對戰等娛樂內容。平台以穩定、安全的系統建立口碑,加上專業的客服團隊,打造全方位的娛樂環境。現在註冊加入九州娛樂城,立即享受精彩遊戲體驗。
Drug prescribing information. What side effects can this medication cause?
cost of pregabalin uk
Best about medicine. Read here.
get generic geodon pills
Medicines information. Effects of Drug Abuse.
can you get cefuroxime without rx
Everything news about medication. Read information here.
buying cheap indocin pills
Дома из бревна вообще выглядят очень круто! Я лично давно мечтаю о чем-то подобном, но, к сожалению, пока что даже участка под такой дом у меня нет https://sensaudio.ru/iz-kakogo-dereva-luchshe-stroit-banyu
Los records de Cristiano Ronaldo parecen imposibles de superar | Cristiano Ronaldo sigue siendo una figura influyente tanto dentro como fuera del campo cristiano ronaldo kids | Los fanaticos siempre buscan fotos y fondos de pantalla de CR7 | Las noticias sobre la vida privada de Ronaldo siempre son de interes | Las historias de los inicios de Ronaldo en Portugal son inspiradoras [url=https://cristiano-ronaldo.com.mx/]Videos motivacionales de CR7[/url].
Дома из бревна вообще выглядят очень круто! Я лично давно мечтаю о чем-то подобном, но, к сожалению, пока что даже участка под такой дом у меня нет https://ru.gorodwiki.ru/peterburg/izba-776157-otzyvy
Drug information leaflet. What side effects?
what are the doses of atorvastatin
Actual trends of pills. Read now.
Portugal has long been a country known for producing exceptional talent in the world of sports. With a rich history in football, many athletes from this nation have achieved international fame through their incredible skills and accomplishments http://www.ehion.com/~ameba/dokuwiki/doku.php?id=_The_Business_Benefits_of_Implementing_LGPT_in_Operations
Portugal has long been a country known for producing exceptional talent in the world of sports. With a rich history in football, many athletes from this nation have achieved international fame through their incredible skills and accomplishments http://tradupedia.org/index.php?title=_Lusitano_Horses_in_the_Modern_Equestrian_World
can i order generic celebrex price
Medicament information sheet. Cautions.
where can i get cheap paxil
Some what you want to know about drugs. Read now.
cost generic lisinopril without dr prescription
промокоды easy drop [url=https://izi-drop-promokod.ru/]промокоды easy drop[/url] .
Drugs information leaflet. Long-Term Effects.
propranolol er when to take
Some trends of pills. Get information here.
вывод из запоя на дому [url=http://vyvod-iz-zapoya-ekaterinburg25.ru/]вывод из запоя на дому[/url] .
лечение запоев на дому [url=vyvod-iz-zapoya-ekaterinburg26.ru]vyvod-iz-zapoya-ekaterinburg26.ru[/url] .
нарколог на дом екатеринбург цены [url=https://vyvod-iz-zapoya-ekaterinburg27.ru/]нарколог на дом екатеринбург цены[/url] .
buying generic Stromectol prices
пропуска на грузовые машины в москве [url=http://www.urilin.ru ]пропуска на грузовые машины в москве[/url] .
Pills information leaflet. What side effects can this medication cause?
order cheap nolvadex prices
Everything about medicines. Get information here.
TU娛樂城擁有國際級的SGS服務認證,是首家獲得7星級認證的娛樂平台。每日提供近千場體育賽事直播,並設有真人、彩票、電子遊戲等多元娛樂選項。平台採用128位加密技術,打造安全可靠的服務環境。多端支援包含Web、H5及iOS、Android原生App,讓會員能隨時享受專業服務體驗。
where buy generic sinequan without dr prescription
I don’t know if it’s just me or if everybody else experiencing issues with your site. It appears as though some of the written text on your content are running off the screen. Can someone else please provide feedback and let me know if this is happening to them as well? This could be a problem with my web browser because I’ve had this happen before. Appreciate it
Hi there! This blog post could not be written much better!
Looking through this post reminds me of
my previous roommate! He always kept preaching
about this. I will forward this post to him. Pretty sure he’s going to have a great read.
Thanks for sharing!
Meds information for patients. Cautions.
kamagra for sale
All about medication. Read here.
bookmarked!!, I like your web site!
Продажа табака для кальяна. На сайте вы можете зарезервировать выбранный табак и забрать в магазине https://idps.in.ua/2024/12/19/kak-pravilno-ispolzovat-bong-dlya-kureniya/
Продажа табака для кальяна. На сайте вы можете зарезервировать выбранный табак и забрать в магазине https://www.0642.ua/list/501904
where to buy cheap augmentin pill
Квалифицированная исследование: Забудьте насчет пари “для везение”! Наша команда опытных экспертов ежедневно анализирует цифры, наблюдает за событиями а находит максимально выгодные поединки. Мы не гадаем – мы разбираем! ? Точные предсказания: Мы предоставляем не только предсказания, но мотивированные заключения, подтвержденные цифрами и экспертным суждением. Основная задача – твоя доход! ? Разнообразие категорий спортивных дисциплин: Футбольные состязания, баскетбольные поединки, теннис, хоккей и многое другое! Мы затрагиваем максимально популярные типы спортивных дисциплин, чтоб любой смог обнаружить что-то интересное для себя. ? Бесплатный содержание: Каждый день бесплатные прогнозы, аналитические тексты, обзоры матчей а ценные наставления для новичков бетторов. Мы делимся информацией, для того чтобы вы росли совместно с нами! ? Помощь круглосуточно: Мы всегда рады реагировать на твои вопросы и помочь разобраться в тонкостях области бетов. Вы не останетесь один на в одиночку с данным непростым, но прибыльным занятием! ? Ясность а правдивость: Мы публично обнародуем показатели своих прогнозов и не утаиваем ничего от наших последователей. Наша доброе имя – наш главный ценность! ? Удобный способ: Абсолютно все предсказания и аналитика предоставляются прямо в Telegram, в простом и доступном виде. Нет никаких трудных интерфейсов и запутанных планов!
Что вы приобретете, оформив подписку на Ставки на спорт рубли паблик [Название вашего канала]?
День за днем предсказания с высокой проходимостью.
Развернутые анализы матчей.
Обзоры атлетических новостей.
Необходимые наставления по управлению банком.
Потенциал общаться с единомышленниками.
Самоуверенность в собственных пари.
И, разумеется же, потенциал получить настоящие средства!
Хватит тратить момент на пустые разговоры про спорте! Начни работать и конвертируй свои знания в доход!
Medicament prescribing information. Brand names.
where to buy generic verapamil without dr prescription
Actual news about pills. Get information now.
>그래서 오늘은 OK캐오락추천인코드시백에서
where can i get generic medex tablets
Find the best deals on long-term parking at Sky Harbor Airport. Book online and save on secure, convenient parking near the terminal. Easy shuttle service included sky harbor long term parking prices
аттестат купить за 11 класс
Medicine information. Drug Class.
escitalopram with
Some trends of pills. Read information now.
Les joueurs peuvent faire un retrait des gains générés par ce bonus à tout moment voulu.
tk 999 download [url=http://onlineuaeuniversities.org]tk 999 download[/url] .
Предлагаем услуги профессиональных инженеров офицальной мастерской.
Еслли вы искали ремонт iphone 15 pro max в москве, можете посмотреть на сайте: ремонт iphone 15 pro max в москве
Наши мастера оперативно устранят неисправности вашего устройства в сервисе или с выездом на дом!
Đá Gà Online – Hình Thức Giải Trí Mới Mẻ và Hấp Dẫn
Ngày nay, với sự phát triển mạnh mẽ của công nghệ thông tin, nhiều hình thức giải trí truyền thống đã được chuyển thể sang các phiên bản trực tuyến, và đá gà online chính là một trong số đó. Đá gà không chỉ là một trò chơi có lịch sử lâu đời ở nhiều quốc gia, mà còn là một phần văn hóa đặc sắc, gắn liền với những giá trị truyền thống. Khi được số hóa, hình thức này mang đến nhiều lợi ích và trải nghiệm mới lạ cho người chơi.
Đá gà online cho phép người chơi tham gia vào các trận đấu bất cứ lúc nào và ở bất kỳ đâu, chỉ cần có kết nối internet. Điều này mang đến một sự thuận tiện vượt trội so với hình thức đá gà truyền thống, nơi người chơi thường phải đến sân đấu để có thể tham gia. Nhờ vào công nghệ livestream, người chơi có thể theo dõi trực tiếp các trận đấu từ xa, cảm nhận được không khí kịch tính và hồi hộp như đang ở sân đấu thực sự.
Ngoài ra, đá gà online còn tạo cơ hội cho người chơi tương tác với nhau, chia sẻ kinh nghiệm và chiến thuật. Đây không chỉ là một trò chơi đơn thuần, mà còn là một cộng đồng nơi người yêu thích đá gà có thể kết nối và giao lưu. Nhiều nền tảng đá gà online hiện nay còn cung cấp các dịch vụ đặt cược, giúp người chơi có thêm phần thú vị và hứng thú khi theo dõi trận đấu.
Tuy nhiên, bên cạnh những lợi ích đó, đá gà online cũng đặt ra nhiều vấn đề cần được xem xét. Cùng với sự phát triển của hình thức này, những tranh cãi về đạo đức, pháp lý và quyền lợi động vật cũng trở nên nổi bật. Nhiều người lo ngại rằng việc tổ chức đá gà, dù ở hình thức nào, cũng có thể gây tổn hại đến sức khỏe và quyền lợi của các chú gà. Vấn đề đặt cược cũng tạo ra rủi ro tài chính cho người chơi, và cần có sự quản lý chặt chẽ hơn từ phía các cơ quan chức năng.
Trong bối cảnh đó, để đá gà online phát triển bền vững, cần có các quy định hợp pháp và minh bạch nhằm bảo vệ quyền lợi của cả người chơi và động vật. Đồng thời, việc nâng cao nhận thức của cộng đồng về đạo đức trong việc tham gia các trò chơi giải trí này cũng là rất quan trọng.
Tóm lại, đá gà online là một hình thức giải trí mới mẻ, mang đến nhiều trải nghiệm thú vị cho người chơi. Tuy nhiên, đi kèm với nó là trách nhiệm trong việc bảo vệ quyền lợi động vật và đảm bảo tính hợp pháp của các hoạt động cá cược. Chỉ khi có sự cân bằng giữa giải trí và đạo đức, đá gà online mới có thể trở thành một phần hấp dẫn và bền vững trong đời sống giải trí hiện đại.
2024最新老虎機戰神賽特試玩,網友最推薦這 3家娛樂城 : 1. ATG娛樂城、2. 富遊娛樂城、3. 1XBET娛樂城,無論是在網路評論或優惠活動,都相當出色。
戰神賽特是由ATG電子獨家開發的古埃及風格線上老虎機,傳說中戰神賽特是「力量之神」與奈芙蒂斯女神結成連理,共同守護古埃及的奇幻秘寶,只有被選中的的冒險者能夠進入探查。
Торговля китайскими товарами – прибыльное дело. Вложенный миллион можно быстро удвоить, а то и утроить. Что для этого нужно? Выбрать свою нишу, найти поставщика в Китае https://vc.ru/u/3307281-ivan08/1316795-kak-postroit-pribylnyi-biznes-na-postavkah-iz-kitaya-rukovodstvo-dlya-novichkov
Đá gà online là một hình thức giải trí mới mẻ, kết hợp giữa trò chơi truyền thống đá gà và công nghệ hiện đại. Khi công nghệ số phát triển mạnh mẽ, nhiều trò chơi dân gian đã được chuyển thể thành các phiên bản online, và đá gà không phải là ngoại lệ. Trò chơi này không chỉ giúp người chơi có thể tham gia vào bất kỳ lúc nào, bất kỳ đâu, mà còn mang lại những trải nghiệm thú vị và kịch tính. Tuy nhiên, đá gà online cũng đã gây ra nhiều tranh cãi về mặt đạo đức, pháp lý và bảo vệ quyền lợi động vật.
Đá Gà Online – Hình Thức Giải Trí Mới Mẻ
Đá gà online là một hình thức giải trí mới mẻ, kết hợp giữa trò chơi truyền thống đá gà và công nghệ hiện đại. Trong những năm gần đây, khi công nghệ số phát triển mạnh mẽ, nhiều trò chơi dân gian đã được chuyển thể thành các phiên bản online, và đá gà cũng không phải là ngoại lệ.
Chơi đá gà online mang lại cho người chơi nhiều lợi ích. Một trong những điểm nổi bật nhất là sự tiện lợi. Với việc sử dụng internet, người chơi có thể tham gia vào các trận đá gà bất cứ lúc nào và ở bất kỳ đâu. Điều này giúp cho trò chơi trở nên dễ tiếp cận hơn, đặc biệt đối với những người bận rộn với công việc và không có nhiều thời gian để tham gia các hoạt động giải trí truyền thống.
Ngoài ra, đá gà online còn mang đến những trải nghiệm thú vị và kịch tính. Người chơi không chỉ đơn thuần là xem mà còn có thể tham gia đặt cược, theo dõi những trận đấu hấp dẫn và cảm nhận được không khí hồi hộp của từng phút giây. Các nền tảng đá gà online thường cung cấp nhiều tính năng như livestream trận đấu, thống kê kết quả, và giao lưu với cộng đồng người chơi, tạo nên một không gian giải trí sống động.
Tuy nhiên, đá gà online cũng đã gây ra nhiều tranh cãi về mặt đạo đức, pháp lý và bảo vệ quyền lợi động vật. Nhiều người cho rằng việc tổ chức đá gà, dù là trực tuyến hay truyền thống, vẫn là hành vi không đáng khuyến khích, bởi nó có thể gây tổn hại cho quyền lợi của động vật. Bên cạnh đó, vấn đề pháp lý liên quan đến cá cược và những rủi ro tài chính cũng là mối quan tâm lớn đối với xã hội.
Tóm lại, đá gà online là một hình thức giải trí hiện đại và thu hút nhiều người chơi. Tuy nhiên, sự phát triển của nó cũng cần đi kèm với những giải pháp để bảo vệ quyền lợi động vật và đảm bảo tính hợp pháp của hoạt động này. Sự cân nhắc về mặt đạo đức và pháp lý trong việc tham gia trò chơi sẽ giúp tạo ra một môi trường giải trí lành mạnh và bền vững.
Табак для кальяна Al Fakher – самый распространенный табак из Аджмана, ОАЭ. · Табак Adalya – Альтернатива Al Fakher, имеет широкую линейку вкусов и есть очень http://uzinform.com.ua/news/2024/12/18/205572.html
вывод из запоя [url=https://vyvod-iz-zapoya-ekaterinburg27.ru/]вывод из запоя[/url] .
нарколог на дом екатеринбург цены [url=https://vyvod-iz-zapoya-ekaterinburg26.ru]нарколог на дом екатеринбург цены[/url] .
Pills information for patients. What side effects can this medication cause?
how can i get cheap singulair
Everything information about drugs. Read now.
get cheap buspar price
выведение из запоя врачом наркологом [url=https://vyvod-iz-zapoya-ekaterinburg25.ru/]выведение из запоя врачом наркологом[/url] .
Medicine prescribing information. Brand names.
get cheap cipro without a prescription
All news about drug. Get information here.
can i get cheap remeron
Thanks for your personal marvelous posting! I definitely enjoyed reading it,
you will be a great author. I will be sure to bookmark your blog and will come back in the future.
I want to encourage you continue your great work, have
a nice weekend!
Medicament information sheet. Generic Name.
get cheap actos tablets
All about medicines. Read now.
buying generic cozaar for sale
Medicines information for patients. Generic Name.
can i order tolterodine without dr prescription
All trends of meds. Read here.
I discovered your weblog site on google and verify just a few of your early posts. Proceed to maintain up the very good operate. I simply further up your RSS feed to my MSN News Reader.
Thanks For This Blog, was added to my bookmarks.
where can i get generic imitrex pill
Medication information. What side effects can this medication cause?
metformin and neurogenesis
Everything what you want to know about meds. Get information now.
срочно сделать загранпаспорт [url=zagranpasport-srochno11.ru]срочно сделать загранпаспорт[/url] .
Предлагаем услуги профессиональных инженеров офицальной мастерской.
Еслли вы искали срочный ремонт iphone 15, можете посмотреть на сайте: ремонт iphone 15 в москве
Наши мастера оперативно устранят неисправности вашего устройства в сервисе или с выездом на дом!
can i order cheap buspar price
Pills prescribing information. Long-Term Effects.
cost of priligy no prescription
All trends of medicine. Read now.
Betting has changed into a enjoyment and fascinating way to savor your chosen sports or sport and make extra money while performing it.
Betting on line is a more convenient to make money while having
fun. Sign up with 1xshart.app today.
рейтинг игровых процессоров [url=http://www.topcpu.ru]http://www.topcpu.ru[/url] .
Las fotos de Cristiano Ronaldo joven muestran su dedicacion desde el principio | Los seguidores de CR7 esperan ansiosos cada publicacion en su Instagram cristiano ronaldo career stats | Los fanaticos siempre buscan fotos y fondos de pantalla de CR7 | Los analistas deportivos destacan los mejores momentos de CR7 en su carrera | La dedicacion de Cristiano Ronaldo es un ejemplo para jovenes deportistas [url=https://cristiano-ronaldo.com.mx/]Instagram de CR7[/url].
Широкий ассортимент пиломатериалов собственного производства. В каталоге представлено все необходимое для строительства, ремонта и отделки пиломатериал
Широкий ассортимент пиломатериалов собственного производства. В каталоге представлено все необходимое для строительства, ремонта и отделки пиломатериалы купить в москве
I am glad to talk with you and you give me great help
Medicine prescribing information. Cautions.
can i purchase cheap norvasc prices
Actual trends of medicine. Get now.
buying zantac without prescription
Medication information sheet. Brand names.
cost prozac
Best what you want to know about meds. Get information now.
Déposer et retirer de l’argent au casino Banzai Slots est rapide et facile.
Hello.This article was extremely interesting, particularly since I was searching for thoughts on this subject last couple of days.
where to buy cheap zyvox without rx
Drugs information sheet. What side effects can this medication cause?
how to get generic finpecia for sale
Everything trends of medicines. Read information here.
вывод из запоя круглосуточно сочи [url=vyvod-iz-zapoya-sochi24.ru]вывод из запоя круглосуточно сочи[/url] .
Cool + for the post
_________________
[URL=https://igra.esportics.site]букмекерская контора которая дает бездепозитный бонус[/URL]
Drug information. Long-Term Effects.
where to buy cheap fluvoxamine tablets
Everything news about medicines. Read here.
where can i get artane without dr prescription
частный вывод из запоя [url=vyvod-iz-zapoya-sochi22.ru]частный вывод из запоя[/url] .
вывод из запоя в наркологическом стационаре [url=http://vyvod-iz-zapoya-sochi23.ru]http://vyvod-iz-zapoya-sochi23.ru[/url] .
Drugs information for patients. Cautions.
ezetimibes impact on liver health exploring toxicity concerns
All what you want to know about pills. Read information here.
Получение неопределяемого уровня РНК в сыворотке крови способствует также снижению риска развития
тяжелых осложнений у пациентов с.
Review my site: http://www.rizzomusic.com/cgi-sys/suspendedpage.cgi
can you get imitrex without prescription
Medication information. Short-Term Effects.
where buy diflucan price
Actual information about meds. Read here.
капельница от запоя вызов на дом [url=vyvod-iz-zapoya-nizhnij-novgorod11.ru]vyvod-iz-zapoya-nizhnij-novgorod11.ru[/url] .
okada4d
okada4d
Meds information sheet. Drug Class.
can i order generic nortriptyline prices
Some news about medication. Read information now.
Your writing style is so relatable and authentic It’s a breath of fresh air in a world filled with superficiality and pretense
What’s up to all, it’s in fact a good for me to go to see this website, it includes useful Information.
https://slovo-pacana.info/
Medicament information. Cautions.
buy generic ramipril without dr prescription
Some what you want to know about medicament. Read information here.
단에 있는 크리스마스 겜스고 쿠폰트리 이미지를 클릭 7겜스고 쿠폰% 할인쿠폰 다운로드<
Bet Zula, canl? bahis konusunda ustun f?rsatlar sunar. en heyecanl? maclar icin guvenli bir sekilde favori tak?mlar?n?za destek olabilirsiniz.
Betzula’n?n guvenilir altyap?s?, kullan?c?lar?na her zaman kolayl?k saglar. Betzula Twitter hesab?n? takip ederek en son haberlerden haberdar olabilirsiniz.
favori futbol kuluplerinizin bahislerinizi an?nda yapabilirsiniz.
Ayr?ca, bet zula giris linki, kesintisiz bahis deneyimi sunar. Ozel olarak, fenerbahce galatasaray betzula, tum bahis severler icin en iyi cozum.
Betzula, spor bahislerinden canl? casino oyunlar?na kadar tum kullan?c?lar?n ihtiyaclar?n? kars?lar. en guncel oranlar? gormek icin simdi giris yap?n!
371212+
word to jpg https://wordtojpg.website/
Medicines information. Generic Name.
hydroxyzine dihydrochloride structure
Some trends of medicine. Get information now.
Предлагаем услуги профессиональных инженеров офицальной мастерской.
Еслли вы искали ремонт iphone 14 pro max цены, можете посмотреть на сайте: срочный ремонт iphone 14 pro max
Наши мастера оперативно устранят неисправности вашего устройства в сервисе или с выездом на дом!
Предлагаем услуги профессиональных инженеров офицальной мастерской.
Еслли вы искали ремонт iphone 14 pro рядом, можете посмотреть на сайте: срочный ремонт iphone 14 pro
Наши мастера оперативно устранят неисправности вашего устройства в сервисе или с выездом на дом!
выведение из запоя в сочи [url=https://www.vyvod-iz-zapoya-sochi24.ru]выведение из запоя в сочи[/url] .
0
Момент озарения в 2024 — Даже самый крутой дизайн, продуманный под мобильные устройства, который действительно вовлекает и влияет Blog
капельница от запоя [url=www.vyvod-iz-zapoya-nizhnij-novgorod13.ru/]капельница от запоя[/url] .
Medicament information. Generic Name.
cheap pioglitazone for sale
All about medication. Get information now.
0
Момент озарения в 2024 — Даже самый крутой дизайн, продуманный под мобильные устройства, который действительно вовлекает и влияет Блог
I have been curious about these trends, and you have really helped me. I have just told a few of my friends about this on FaceBook and they love your content just as much as I do.
Good site! I truly love how it is easy on my eyes it is. I am wondering how I might be notified when a new post has been made. I’ve subscribed to your RSS which may do the trick? Have a great day!
Medicament prescribing information. What side effects can this medication cause?
1500 mg azithromycin
Actual about medicines. Read here.
Drugs information leaflet. Effects of Drug Abuse.
how to buy generic prozac without rx
Best about medicine. Get here.
Обратите внимание, гейы!
Желаете попасть в окружение онлайн-развлечений и получить настоящие финансы? Тогда вам сюда! Рейтинг наилучших лучших игровых сайтов 2025
Наш тг-канал — ваш гид в окружение отличных онлайн-развлечений в Российской Федерации! Мы собрали ТОП-10 проверенных игровых сайтов, где вы сможете развлекаться на финансы и вывести свои доходы без трудностей.
Что вас поджидает:
Достоверные мнения и ранги надежные казино с безопасными платежами от реальных игроков. Превосходная статус любого сайта проверена годами и пользователями. Бесплатная вход и быстрый вход на любой площадках. Активные дубликаты для входа к вашему излюбленному игровой площадке в каждый момент. Мобильный софт для удобной развлечения там хотите.
Почему нам?
Проверенные и гарантированные казино с превосходными параметрами для проведения времени. Безопасность ваших сведений и транзакций обеспечена. Новые новости и события окружения интернет-казино в России.
поставить капельницу от запоя [url=vyvod-iz-zapoya-nizhnij-novgorod11.ru]поставить капельницу от запоя[/url] .
Medicament information. What side effects?
where to get phenergan without rx
All what you want to know about medicine. Read information here.
Drug information. Effects of Drug Abuse.
how to buy generic azathioprine for sale
Some trends of drug. Get information here.
Medicines prescribing information. Brand names.
get generic ziprasidone
Best news about medicament. Read information now.
SportyBet Zambia [url=https://sportybetzambia.pro/]SportyBet Zambia [/url] .
капельница при алкогольной интоксикации на дому цена [url=http://vyvod-iz-zapoya-nizhnij-novgorod13.ru/]капельница при алкогольной интоксикации на дому цена[/url] .
В эпоху технологической портативности пауэрбанк трансформировался в критически важный элемент снаряжения современного человека. Этот мобильный накопитель заряда работает как автономная зарядная станция, гарантирующая энергией гаджеты в любой ситуации. Бренды создают разнообразные модели, среди которых [url=https://powerbanki.top/ ]Хорошие повербанки для айфона на powerbanki.top [/url], позволяющий обеспечивать питание устройств даже вдали от источников питания. Основными параметрами выбора являются емкость батареи, наличие разъемов, скорость зарядки и совместимость с технологиями быстрой зарядки.
При разговоре о приобретении повербанка для гаджетов Apple, необходимо учитывать особые нюансы. Передовые беспроводные пауэрбанки с технологией MagSafe предоставляют идеальное взаимодействие с iPhone последних моделей. Присутствие сертификации MFi выступает гарантом безопасного функционирования с устройствами Apple. Мощные модели на 50000 mAh в состоянии обеспечить более десятка полных циклов зарядки iPhone, а наличие USB Power Delivery обеспечивает питание MacBook и других ноутбуков.
Источник: [url=https://powerbanki.top/ ]https://powerbanki.top/ [/url]
по вопросам 50000 повербанк – стучите в Telegram yhk80
рейтинги процессоров [url=http://topcpu.ru]рейтинги процессоров[/url] .
I have been surfing online more than 3 hours today yet I never found any interesting article like yours It is pretty worth enough for me In my opinion if all web owners and bloggers made good content as you did the web will be much more useful than ever before
Pills information for patients. Drug Class.
can i purchase warfarin without prescription
Some information about medicine. Read now.
Hey! Do you know if they make any plugins to help with Search Engine Optimization? I’m trying to get my blog to rank for some targeted keywords but I’m not seeing very good results. If you know of any please share. Thanks!
https://repetitory.com.ua/bi-led-linzi-modernizuyemo-avtomobilni-fary
[url=https://spin.directorio-de-casinos-mx.com]spin.directorio-de-casinos-mx.com[/url]
Download application online casino spin – play right now!
spin casino
Drugs prescribing information. Brand names.
how to buy tadacip tablets
Actual what you want to know about medicament. Get information now.
Предлагаем услуги профессиональных инженеров офицальной мастерской.
Еслли вы искали ремонт iphone xs max адреса, можете посмотреть на сайте: ремонт iphone xs max
Наши мастера оперативно устранят неисправности вашего устройства в сервисе или с выездом на дом!
Предлагаем услуги профессиональных инженеров офицальной мастерской.
Еслли вы искали ремонт iphone se 2020 цены, можете посмотреть на сайте: ремонт iphone se 2020
Наши мастера оперативно устранят неисправности вашего устройства в сервисе или с выездом на дом!
Its like you read my mind! You appear to know so much about this, like you wrote the book in it or something. I think that you could do with a few pics to drive the message home a bit, but other than that, this is wonderful blog. A fantastic read. I will certainly be back.
https://bagstore.com.ua/yak-obraty-bi-led-linzy-dlya-avto-porady-ekspertiv
Предлагаем услуги профессиональных инженеров офицальной мастерской.
Еслли вы искали ремонт iphone 13 pro в москве, можете посмотреть на сайте: ремонт iphone 13 pro адреса
Наши мастера оперативно устранят неисправности вашего устройства в сервисе или с выездом на дом!
Предлагаем услуги профессиональных инженеров офицальной мастерской.
Еслли вы искали ремонт iphone 13 рядом, можете посмотреть на сайте: ремонт iphone 13 в москве
Наши мастера оперативно устранят неисправности вашего устройства в сервисе или с выездом на дом!
Medicine information. What side effects?
cost synthroid prices
All about drug. Read information now.
https://odnazhdyvskazke-tv.ru
вывод из запоя нижний новгород [url=www.vyvod-iz-zapoya-nizhnij-novgorod13.ru]вывод из запоя нижний новгород[/url] .
Medicines information leaflet. Effects of Drug Abuse.
can i order prednisolone without a prescription
Some trends of medicine. Read information now.
Hello, after reading this awesome piece of writing i am as well happy to share my know-how here with colleagues.
Drug information leaflet. What side effects can this medication cause?
strattera without prescription
Some about medicines. Get now.
888starz
Drugs prescribing information. Generic Name.
finasteride unam
Some about pills. Read information here.
Drugs information. Generic Name.
cymbalta 60 price insights understanding the cost of cymbalta 60mg
Actual about medicament. Read here.
1Win является лучшим букмекером и казино в 2024 году. В интернете множество площадок, в которых есть ставки на спорт, но лидирующую позицию занимает 1Вин. Для пользователей гарантированы честные условия, высокие коэффициенты и качественное обслуживание. На официальном сайте 1Вин доступны быстрые выплаты, кэшбек до 30% и супер бонус в размере 500% http://mtw2014.tmweb.ru/forum/?PAGE_NAME=message&FID=1&TID=12243&TITLE_SEO=12243-van-vin_-shag-za-shagom-k-mirovomu-liderstvu.&MID=527219&result=new#message527219
1win Apuestas en eSports
1Win является лучшим букмекером и казино в 2024 году. В интернете множество площадок, в которых есть ставки на спорт, но лидирующую позицию занимает 1Вин. Для пользователей гарантированы честные условия, высокие коэффициенты и качественное обслуживание. На официальном сайте 1Вин доступны быстрые выплаты, кэшбек до 30% и супер бонус в размере 500% http://www.tronicb7records.com/new/index.php?option=com_k2&view=itemlist&task=user&id=96254
В основе сюжета лежит необычная концепция двух миров — сказочного и реального. Всё начинается в волшебной стране, где Злая Королева, устав от счастья и благополучия своих соседей, накладывает страшное проклятие, вырвав героев из их привычных сказочных миров и закинув их в место, о котором они и не мечтали https://odnazhdyvskazke-tv.ru
Meds prescribing information. Short-Term Effects.
lupin lisinopril side effects
Some trends of medicament. Get information here.
капельница от запоя [url=www.vyvod-iz-zapoya-nizhnij-novgorod13.ru/]капельница от запоя[/url] .
вывод из запоя воронеж [url=https://vyvod-iz-zapoya-v-stacionare-voronezh22.ru/]вывод из запоя воронеж[/url] .
дом пенсионеров в крыму [url=http://www.rodoslav.forum24.ru/?1-4-0-00000720-000-0-0-1736935986]дом пенсионеров в крыму[/url] .
дом для пожилых людей в симферополе [url=www.automobilist.forum24.ru/?1-19-0-00000233-000-0-0-1736934357/]дом для пожилых людей в симферополе[/url] .
A fascinating discussion is definitely worth comment. I do think that you should write more about this
subject, it may not be a taboo matter but typically folks don’t
discuss these topics. To the next! All the best!!
Medicine information for patients. Generic Name.
duloxetine 10mg
All information about medicine. Read information now.
Some truly nice stuff on this website , I like it.
1Win casino Aviator bonus Uruguay
Erling Haaland es uno de los futbolistas mas destacados de su generacion | Los medios destacan la impresionante trayectoria de Erling Haaland | Las fotos de Haaland en su infancia muestran su pasion temprana por el futbol | Los fans esperan que Haaland participe en el proximo Mundial con gran exito | Los entrenadores de Haaland destacan su increible etica de trabajo [url=https://erling-haaland.com.mx/]Redes sociales de Haaland[/url].
Drug prescribing information. Short-Term Effects.
where buy fluvoxamine without rx
Best trends of drug. Get here.
Как спилить дерево на участке в нужном направлении падения с помощью бензопилы, топора и веревки (по естественному наклону и против него) и чего ни в коем случае нельзя делать? Техника безопасности в процессе валки деревьев: https://dzen.ru/a/Z4qBIK-a_ERTqyYy
Entdecken Sie die Deutsche Online Casinos fur ein faires Spielerlebnis. Finden Sie heraus, welche deutschen Online Casinos die besten Bonusangebote Bonus Crab Casinos
Fairspin bonus code
Medicine information sheet. Brand names.
buy generic synthroid no prescription
All news about medicines. Get information here.
1с бухгалтерия купить [url=http://svarog.forum24.ru/?1-0-0-00000330-000-0-0]http://svarog.forum24.ru/?1-0-0-00000330-000-0-0[/url] .
1с бухгалтерия купить [url=https://aktivnoe.forum24.ru/?1-4-0-00000210-000-0-0/]1с бухгалтерия купить[/url] .
Your One-Stop Shop for AI-Powered Imagination
In the modern dynamic environment, merging artistry with technology is vital for innovation and productivity. At Our Platform, we deliver high-quality, specially designed prompts intended to boost your imaginative works across multiple domains.
Why Choose Template Forge?
We are focused to providing only the best prompts to aid your innovative endeavors. Our staff of professionals meticulously organizes each prompt to confirm utility and relevance, enabling it simpler for you to obtain ideas when you need it the most desperately.
Diverse Categories
Our wide-ranging selection encompasses numerous segments, comprising digital marketing, technical support, and creative storytelling. This breadth ensures you have the resources needed to address any initiative competently.
Elevate Your Creativity
Template Forge’s ideas serve as a foundation for your concepts, permitting you to concentrate on your unique style and ambitions minus the burden of creativity. Each prompt is crafted to motivate and assist you through the innovative process.
Connect with thousands of pleased innovators who have leveraged the potential of artificial intelligence at Template Forge. Discover our extensive fields today and access your innovative potential. With our top-notch prompts, creating with clarity has not been simpler. Welcome to your ultimate store for AI-enabled creativity!
геронтологический центр в симферополе [url=pelsh.forum24.ru/?1-8-0-00000237-000-0-0]геронтологический центр в симферополе[/url] .
дом пенсионеров в крыму [url=aqvakr.forum24.ru/?1-22-0-00000026-000-0-0]дом пенсионеров в крыму[/url] .
Fortnite items for sale at best prices
Your Final Place for Premium In-Game Assets!
In today’s dynamic gaming environment, the rush of exploration and growth is crucial. If you’re looking for uncommon objects, restricted armament appearances, tailored types, tokens, assets, missions, or convenient funding solutions, look no further! Introducing to Items4Games, your complete marketplace for a vast variety of high-quality in-game goods crafted to boost your gaming journey.
Why Items4Games Is Unique
Diverse Selection of In-Game Assets
We supply a broad selection of in-game resources, from unique skins to one-of-a-kind items and game keys. Our collection is customized to enhance your gameplay and immerse you in a universe of endless options.
Support for Well-known Titles
Our extensive catalog showcases mainstream games like CS2, Fortnite, Valorant, Dota 2, and Call of Duty. No matter your gaming choice, we have items that respond to the most popular titles in the industry.
Upgraded Gaming Path
With exclusive in-game assets, you can discover new capabilities and exhibit your distinct flair. From unique weapon styles to effective artifacts, our items transform your gaming experiences into extraordinary experiences.
Safe and Consistent Transactions
We emphasize your protection with reliable and honest purchases. You can buy confidently, knowing that your details is protected at all moments.
Fair Fees
Acquire superior items without destroying the bank. Our fair and reasonable pricing system ensures that elevating your gaming journey is achievable to anyone.
Simple Platform
Our user-friendly system enables you to effortlessly explore and buy the items you want, saving you time and boosting your purchase process.
What Is Ready for You at Items4Games
Uncover weapon skins that reflect your identity, exclusive artifacts for distinct achievements, and game keys that open new content. Our tools and objectives assist you improve up smoothly, while top-up assistance keep your game budget ready for play. Enjoy extra game modes that introduce diversity and depth to your gaming plays.
In closing remarks, Items4Games is your best destination for elevating your gaming journey with exclusive in-game products. Browse our catalog today and elevate your gameplay to new limits!
Character customization
Plunge into the World of GTA 5 RP: Become a part of Our Unique Roleplay Server
Salutations to the exciting universe of GTA 5 RP, where all gamer can develop their distinct story in a dynamic gaming setting. Our roleplay server is ideal for those desiring an engaging and deep experience. Join a vibrant community of GTA RP fans and step into this exciting world!
How to Commence Playing?
1. Acquire and install a authorized copy of GTA 5.
2. Run the launcher.
3. Connect to the server and register through the application or our platform to begin your adventure!
Our Environment: An Open World Experience
Our server presents a unique open-world setting with tailored mods that permit you to build your illicit kingdom, go on thrilling missions, and mold your character’s narrative. Whether you engage with local gangs or transform into a leading cop, the opportunities are endless!
Generate Money and Increase Your Fortune
Are you set to dominate the roads of Los Santos and earn big money? We supply the tools and plans to help you gather a wealth in the universe of GTA RP.
Drug information. Drug Class.
where can i get generic xenical without insurance
All information about medicines. Read information now.
вывод из запоя стационар [url=https://vyvod-iz-zapoya-v-stacionare-voronezh23.ru/]вывод из запоя стационар[/url] .
Одноразовый номер телефона — это временный номер, который можно использовать для получения SMS-сообщений или звонков. Эти номера могут быть полезны, когда вам нужно зарегистрироваться на сайте, не желая раскрывать свой персональный номер. Также многие используют такие номера для подтверждения аккаунтов на различных сервисах или для того, чтобы избежать спама и нежелательных звонков купить белорусский номер
Для игроков важно понимать, какие факторы влияют на безопасность и надежность таких сервисов. От удобства интерфейса до наличия лицензий и поддержки пользователей http://www.nhps1914.com/wiki/index.php?title=%20%D0%9A%D1%80%D1%83%D0%B3%D0%BB%D1%8B%D0%B9%20%D1%81%D1%82%D0%BE%D0%BB%20%D1%81%20%D1%8D%D0%BA%D1%81%D0%BF%D0%B5%D1%80%D1%82%D0%B0%D0%BC%D0%B8:%20%D0%A7%D1%82%D0%BE%20%D0%B4%D1%83%D0%BC%D0%B0%D1%8E%D1%82%20%D0%BE%201%D0%B2%D0%B8%D0%BD%20%D0%BA%D0%B0%D0%B7%D0%B8%D0%BD%D0%BE%20%D0%BF%D1%80%D0%BE%D1%84%D0%B5%D1%81%D1%81%D0%B8%D0%BE%D0%BD%D0%B0%D0%BB%D1%8B
can you get caduet how can i get generic caduet prices where to get caduet no prescription
how to get caduet without rx how can i get caduet price where buy generic caduet without a prescription
cost of caduet pills
can i purchase cheap caduet tablets get caduet online can you get caduet without rx
where can i get generic caduet pills how to get cheap caduet pill cost of generic caduet without insurance
Meds information leaflet. What side effects can this medication cause?
cost of generic ventolin pill
All news about medicines. Get now.
Drug information leaflet. Drug Class.
where to get cheap ropinirole tablets
Some information about drug. Get information here.
What’s up to all, how is all, I think every one is getting more from this website,
and your views are good designed for new users.
Medicine prescribing information. What side effects?
can you buy aldactone without dr prescription
All trends of medication. Get information now.
Виртуальные номера становятся все более популярными как среди частных пользователей, так и в бизнес-среде. Эти номера позволяют принимать звонки и SMS, а также использовать их для регистрации в различных сервисах без необходимости привязываться к физическому номеру телефона. Технология основывается на использовании IP-телефонии, что дает пользователю массу преимуществ по сравнению с традиционными номерами арендовать номер телефона
where can i buy cheap allopurinol no prescription can i purchase generic allopurinol prices where buy generic allopurinol no prescription
how can i get generic allopurinol for sale buy cheap allopurinol without a prescription cost allopurinol tablets
get allopurinol online
cost cheap allopurinol without rx get cheap allopurinol without rx can i buy allopurinol without prescription
can i purchase allopurinol without insurance where can i buy cheap allopurinol without insurance can i order generic allopurinol
order prednisone 5mg without prescription where to get prednisone price where to buy generic prednisone without a prescription
where to get generic prednisone pills over the counter prednisone pills buy prednisone 50mg online
where to buy generic prednisone without a prescription
what are the worst side effects of prednisone can i get generic prednisone without a prescription can prednisone cause confusion
where to get prednisone prednisone for sale next day delivery buy prednisone online india
Drugs information sheet. Drug Class.
where to buy coreg without insurance
Actual what you want to know about medication. Read information here.
cost of zyrtec no prescription where can i get generic zyrtec without prescription can i get generic zyrtec without dr prescription
where can i buy cheap zyrtec without insurance buy zyrtec tablets buying cheap zyrtec price
cheap zyrtec pills
where can i get cheap zyrtec pills where buy cheap zyrtec without dr prescription where can i get cheap zyrtec pill
cost of generic zyrtec price where can i buy zyrtec online cost of generic zyrtec price
Drug information for patients. Effects of Drug Abuse.
cost of cheap neurontin without a prescription
Actual news about drug. Read information now.
where to buy generic claritin without insurance how to buy claritin without insurance can i buy generic claritin for sale
how to get claritin prices get generic claritin for sale can you buy claritin without dr prescription
where to get claritin price
can i buy cheap claritin without rx how can i get generic claritin without a prescription buying cheap claritin tablets
can i purchase cheap claritin without dr prescription can you buy claritin pills where can i buy cheap claritin tablets
2025 year jogo do tigrinho ofical site 777 tigrinho
2025 year jogo do tigrinho ofical site 777 tigrinho
вывод из запоя в наркологическом стационаре самары [url=https://vyvod-iz-zapoya-v-stacionare-samara23.ru]https://vyvod-iz-zapoya-v-stacionare-samara23.ru[/url] .
can i buy generic theo 24 cr no prescription can i order cheap theo 24 cr tablets where to get cheap theo 24 cr pill
can i purchase generic theo 24 cr pill order theo 24 cr no prescription get theo 24 cr pills
can i order generic theo 24 cr pill
how can i get theo 24 cr online cost generic theo 24 cr without dr prescription can you buy generic theo 24 cr online
how to get cheap theo 24 cr no prescription where to get cheap theo 24 cr online how can i get cheap theo 24 cr price
Pour effectuer un retrait sur le casino en ligne Banzai Slots, vous devez tout d’abord faire une demande de retrait.
is cleocin a penicillin drug how is cleocin used Cleocin suppository side effects
cleocin v side effects cleocin t patient information sheet cleocin while pregnant
cleocin hcl used treat
cleocin dose in pediatrics Cleocin side effects cleocin vaginal cream directions
is cleocin a penicillin drug laurent cleocin antibiotic side cleocin injection directions
cefixime dispersible tablets 50 mg where buy cheap cefixime online cefixime 400 mg film coated tablets brands
tenficef cefixime 100mg 5ml how to get cheap cefixime online cefixime dispersible tablets 200mg side effects
can i purchase cefixime without dr prescription
how can i get generic cefixime without rx uses of cefixime 200 mg formulation of cefixime
cefixime 400 mg for gonorrhea cefixime antibiotic side effects cefixime side effects in elderly
https://flowersname.co/how-to-make-an-outstanding-bouquet-to-celebrate-their-birthday/
V9BET tại https://v9bet.feedback/ là nhà cái cá cược hàng đầu châu Á. Đăng ký nhanh, nạp rút tiện lợi, tỷ lệ cược cực tốt. Thắng bao nhiêu rút bấy nhiêu!
Предлагаем услуги профессиональных инженеров офицальной мастерской.
Еслли вы искали срочный ремонт ipad pro 12.9, можете посмотреть на сайте: ремонт ipad pro 12.9 в москве
Наши мастера оперативно устранят неисправности вашего устройства в сервисе или с выездом на дом!
Предлагаем услуги профессиональных инженеров офицальной мастерской.
Еслли вы искали ремонт ipad mini 4 рядом, можете посмотреть на сайте: ремонт ipad mini 4
Наши мастера оперативно устранят неисправности вашего устройства в сервисе или с выездом на дом!
вывод из запоя в стационаре воронежа [url=www.vyvod-iz-zapoya-v-stacionare-voronezh24.ru]вывод из запоя в стационаре воронежа[/url] .
cost vasotec without insurance how can i get cheap vasotec no prescription can i get vasotec tablets
how to buy vasotec pill can i order vasotec online can i buy cheap vasotec
where to get cheap vasotec
can i get vasotec online buying generic vasotec tablets get generic vasotec without a prescription
buying generic vasotec without insurance can i get cheap vasotec can i buy cheap vasotec without prescription
Betzula giris, casino oyunlar? konusunda ustun f?rsatlar sunar. buyuk futbol kars?lasmalar? icin Betzula giris yaparak favori tak?mlar?n?za destek olabilirsiniz.
Betzula’n?n mobil uyumlu tasar?m?, her cihazdan erisim imkan? tan?r. Bet Zula sosyal medya hesaplar?yla ozel promosyonlardan haberdar olabilirsiniz.
favori futbol kuluplerinizin bahislerinizi an?nda yapabilirsiniz.
Ayr?ca, Betzula guncel giris adresi, kesintisiz bahis deneyimi sunar. Ozel olarak, [url=https://apsistek.com/]betzula twitter[/url], profesyonel bir deneyim saglar.
Betzula, mobil uyumlu ve h?zl? erisim f?rsatlar?na kadar tum kullan?c?lar?n ihtiyaclar?n? kars?lar. en guncel oranlar? gormek icin simdi giris yap?n!
707707+
Удобный интерфейс позволяет быстро находить нужные данные, а дополнительные функции, такие как сравнение курсов в разных банках и отображение исторических графиков, делают использование сервиса максимально комфортным доллар к рублю на сегодня
Имплантация — популярная процедура замещения зубов искусственными аналогами. Стоматологическая имплантология является одним из важнейших разделов современной стоматологии, предусматривающий восстановление нарушений целостности зубочелюстной системы благодаря качественным аллопластическим материалам и достижениям в области современной стоматологии имплантация зубов сколько
doxycycline common side effects buy doxycycline tablets buy doxycycline 100mg online uk
can i order cheap doxycycline for sale where to get doxycycline prices where to get cheap doxycycline without insurance
cheapest place buy doxycycline tablets
cheap doxycycline price can i get cheap doxycycline for sale get generic doxycycline without dr prescription
how to buy cheap doxycycline prices doxycycline 100 mg uses where to get doxycycline for sale
вывод из запоя круглосуточно нижний новгород [url=https://vyvod-iz-zapoya-v-stacionare22.ru]вывод из запоя круглосуточно нижний новгород[/url] .
GTA V RP community
Immerse into the World of GTA 5 RP: Engage with Our Special Roleplay Server
Salutations to the captivating universe of GTA 5 RP, where each participant can create their distinct story in a vibrant gaming atmosphere. Our roleplay server is ideal for those looking for an captivating and immersive experience. Engage with a active community of GTA RP aficionados and enter into this thrilling world!
How to Begin Playing?
1. Purchase and install a authorized edition of GTA 5.
2. Install the launcher.
3. Join to the server and sign up through the application or our site to commence your adventure!
Our Server: An Open World Experience
Our server provides a unique open-world setting with personalized mods that permit you to construct your illicit network, set out on adventurous missions, and shape your character’s story. Whether you engage with neighborhood gangs or transform into a top cop, the opportunities are endless!
Generate Money and Expand Your Wealth
Are you set to conquer the streets of Los Santos and earn substantial money? We supply the instruments and strategies to help you gather a prosperity in the world of GTA RP.
Prompt Bundles
The Comprehensive Store for AI-Powered Creativity
In this fast-paced environment, blending creativity with tech is crucial for progress and productivity. At Template Forge, we offer superior, specially designed prompts designed to improve your artistic undertakings across diverse categories.
Reasons to Choose Template Forge?
We are devoted to supplying only the top prompts to help your creative initiatives. Our group of experts carefully organizes each prompt to confirm utility and relevance, enabling it easier for you to obtain ideas when you want it the most desperately.
Diverse Categories
Our comprehensive selection includes multiple categories, including digital marketing, technical troubleshooting, and story creation. This variety certifies you have the tools needed to handle any assignment competently.
Elevate Your Creativity
Template Forge’s inspirations serve as a foundation for your creativity, allowing you to center on your personal perspective and goals minus the stress of idea generation. Each prompt is crafted to stimulate and lead you through the artistic path.
Connect with thousands of happy creators who have leveraged the power of artificial intelligence at Template Forge. Investigate our wide options today and access your imaginative potential. With our high-quality prompts, creating with purpose has not been more manageable. Welcome to your all-in-one shop for AI-enabled imagination!
Call of Duty top-up services
Your Ultimate Destination for High-Quality In-Game Goods!
In today’s dynamic gaming world, the joy of adventure and advancement is essential. If you’re hunting for uncommon items, limited weapon appearances, custom features, keys, resources, missions, or easy top-up assistance, look no further! Introducing to Items4Games, your single shop for a extensive range of premium in-game items designed to enhance your gaming playtime.
Why Items4Games Is Unique
Wide Choice of In-Game Assets
We present a extensive range of in-game assets, from uncommon styles to exclusive artifacts and game keys. Our inventory is designed to elevate your gameplay and submerge you in a realm of endless possibilities.
Support for Well-known Titles
Our large collection showcases well-known games like CS2, Fortnite, Valorant, Dota 2, and Call of Duty. No matter your gaming preference, we have items that meet to the biggest titles in the sector.
Improved Gaming Experience
With limited in-game goods, you can gain new opportunity and exhibit your distinct flair. From exclusive weapon looks to robust artifacts, our offerings elevate your gaming experiences into outstanding journeys.
Protected and Reliable Exchanges
We prioritize your safety with secure and dependable purchases. You can explore confidently, knowing that your information is safe at all timeshares.
Affordable Fees
Get superior items without destroying the budget. Our reasonable and fair fee structure ensures that elevating your gaming playtime is achievable to everyone.
Intuitive Interface
Our easy-to-use interface lets you to effortlessly search and secure the products you want, reducing you hours and boosting your purchase journey.
What Is in Store for You at Items4Games
Discover weapon designs that show your style, special artifacts for special achievements, and game access that grant new areas. Our tools and missions aid you improve up easily, while balance assistance maintain your game balance ready for use. Enjoy additional game types that introduce diversity and substance to your gaming experiences.
In closing, Items4Games is your top place for boosting your gaming experience with superior in-game products. Check out our collection today and improve your gameplay to new levels!
get cheap Stromectol for sale
Hi my family member I want to say that this post is awesome nice written and come with approximately all significant infos I would like to peer extra posts like this
helloI really like your writing so a lot share we keep up a correspondence extra approximately your post on AOL I need an expert in this house to unravel my problem May be that is you Taking a look ahead to see you
перед выводом из запоя в стационаре [url=https://www.vyvod-iz-zapoya-v-stacionare-samara25.ru]https://www.vyvod-iz-zapoya-v-stacionare-samara25.ru[/url] .
пропуск для грузового транспорта в москву [url=http://extremeguide.ru]пропуск для грузового транспорта в москву[/url] .
buy generic cetirizine without rx where to buy generic cetirizine side effects of cetirizine
cheap cetirizine tablets cetirizine over the counter brand how can i get generic cetirizine price
where to buy cetirizine no prescription
cetirizine 10 mg twice daily cetirizine 5 mg where to buy get cetirizine without insurance
cetirizine fda approval where to buy cheap cetirizine without prescription where to purchase cetirizine
how to buy bactrim price
Северный Кипр – это место, где восточная культура встречается с европейским комфортом, создавая идеальные условия для жизни, отдыха и инвестиций. Прекрасный климат, доступные цены на недвижимость и простые условия покупки привлекают сюда покупателей со всего мира. Но прежде чем сделать первый шаг к приобретению собственного жилья у моря, важно разобраться во всех нюансах купить квартиру фамагуста
can you get prasugrel without insurance how can i get cheap prasugrel pill can i buy generic prasugrel without a prescription
where to get generic prasugrel without prescription pharmacology of cs 747 prasugrel can i order generic prasugrel prices
prasugrel vs clopidogrel
where buy prasugrel without rx what is prasugrel used for buy generic prasugrel no prescription
where can i buy generic prasugrel without insurance how can i get cheap prasugrel for sale can you get cheap prasugrel without dr prescription
can i order generic requip without dr prescription
Drug information. What side effects can this medication cause?
how can i get cheap warfarin
Actual news about medicament. Read now.
Winz Casino, launched in 2019, has quickly gained a reputation for offering an extensive gaming experience, featuring over 5,000 games that include slots, table games, and live dealer options.
buying cheap motilium tablets how to get generic motilium without rx can you get cheap motilium without rx
how can i get cheap motilium pill can you buy generic motilium without a prescription can i get motilium without prescription
can you get cheap motilium for sale
how to get generic motilium cost cheap motilium without prescription cost of generic motilium without prescription
can you get generic motilium pill how can i get motilium without insurance cost cheap motilium without prescription
https://film005.buzz
cheap precose without a prescription
Pills information for patients. Short-Term Effects.
can i order priligy without rx
Some information about medicine. Read information now.
can i buy generic abilify pills can you cut abilify in half abilify cost in canada
where to buy cheap abilify tablets how to get cheap abilify prices cost of cheap abilify without rx
abilify australia
cost generic abilify without a prescription abilify is used for how to buy abilify prices
buying abilify from canada can i get generic abilify no prescription abilify medication classification
Предлагаем услуги профессиональных инженеров офицальной мастерской.
Еслли вы искали ремонт iphone 12 в москве, можете посмотреть на сайте: ремонт iphone 12 рядом
Наши мастера оперативно устранят неисправности вашего устройства в сервисе или с выездом на дом!
how to buy urispas prices
Meds information leaflet. Drug Class.
how can i get cheap synthroid
All information about meds. Read here.
вывод из запоя самара стационар [url=https://www.vyvod-iz-zapoya-v-stacionare-samara24.ru]вывод из запоя самара стационар[/url] .
how can i get generic prednisolone pills prednisolone eye drops price buy cheap prednisolone without insurance
can i purchase cheap prednisolone without a prescription buy prednisolone online australia buying prednisolone for sale
cheap prednisolone for sale
buying generic prednisolone pill prednisolone 10 mg where to buy prednisolone 5mg
can you buy prednisolone tablets can i get generic prednisolone for sale can i get prednisolone without dr prescription
buy colospa
Medicine prescribing information. Short-Term Effects.
metformin hcl 10mg
All about medicament. Get here.
анонимный вывод из запоя в стационаре [url=https://vyvod-iz-zapoya-v-stacionare-samara25.ru/]анонимный вывод из запоя в стационаре[/url] .
Uncover the Realm of Minecraft: Your Best Survival and Disorder Journey
Welcome to your Portal to the Highly Exciting and Interactive Minecraft Connected Experience. Whether you’re a Designer, Fighter, Traveler, or Schemer, our Realm Provides Endless Chances to Take Part In Living and Chaos Options in Approaches you’ve Not seen Until Now.
Why Choose Adventures in Minecraft?
Our Platform is Created to Bring the Best Minecraft Adventure, Merging Custom Realms, Engaging Gameplay, and a Supportive Network. Traverse, Master, and Design your own Adventures with Tailored Elements Customized for Each type of Gamer.
Main Attributes
– Persistence and Chaos Settings: Confront the Challenge of Persisting against the odds or Dive into Chaotic PvP Clashes with no rules and full freedom.
– Enormous Realm Size: With Slots for up to 3,750 Users, the Fun never stops.
– 24/7 Server Access: Access Whenever to Explore Smooth, Consistent Play.
– Tailored Features: Explore our Carefully Created Minecraft Realms Loaded with Enhancements, Extras, and Exclusive Assets from our Online Marketplace.
Exclusive Interaction Settings
Living Feature
In Survival Feature, you’ll Discover Wide Environments, Gather Supplies, and Construct to your heart’s content. Fight off Creatures, Collaborate with Allies, or Face on Single-Player Tasks where only the Resilient Overcome.
Disorder Feature
For Gamers Wanting Chaos and Thrill, Chaos Scenario Presents a Realm with Unlimited Play. Enter in Fierce PvP Fights, Form Groups, or Challenge Players to Dominate the World. Here, Living of the Fittest is the Ultimate Order.
Tailored Minecraft Features
– Journey Worlds: Traverse Unique Minecraft Dungeons and Exciting Tasks.
– Commerce and Trading: Our User-Controlled Market Lets you to Trade, Purchase, and Trade Goods to Ascend the Tiers and Establish Your Reputation as a Strong Player.
– Minecraft Store: Access Exclusive Tools, Upgrades, and Ranks that Enhance your Experience.
Minecraft Marketplace: Enhance Your Gameplay
Our Interactive System Presents a Range of Upgrades, Tiers, and Items to Match every Player. From Cheap Gift Cases to Top-Level Statuses, you can Gain New Possibilities and Elevate your Experience to the Maximum.
Trending Products
– Donate Bundles (x10) – €1.00
– VIP – €1.40
– Elysium Tier – €20.00
– OWNER Tier – €40.00
– BOSS Level – €60.00
Top Tiers for Premier Competitors
– CREATOR (€10.00) – Gain Design Components to Unleash your Imagination.
– Vanguard (€12.00) – Elite Benefits and Unique Privileges.
– Paragon (€59.10) – Elite Benefits for the Ultimate User.
– Luminescent (€50.00) – Shine as a Elite Player on the Network.
Join Our Growing Minecraft Group
We Focus in Forming a Encouraging, Dynamic, and Welcoming Community. Whether you’re Tackling RPG Tasks, Discovering Tailored Terrains, or Participating in User-Led PvP, there’s Constantly something Fresh to Discover.
Things You Can Anticipate
– Friendly Network: Interact With Like-Minded Minecraft Fans from Everywhere.
– Exciting Challenges: Take Part in Thrilling Activities, Competitions, and Server-Wide Contests.
– Dedicated Support: Our Support Group Provides Smooth Play and Assists you with any Concerns.
пропуска в москву для грузовиков [url=www.extremeguide.ru]пропуска в москву для грузовиков[/url] .
пропуск на грузовой автомобиль в москве [url=www.24mts.ru]www.24mts.ru[/url] .
where to buy sildalist tablets order cheap sildalist without a prescription where buy sildalist price
where to get sildalist tablets cheap sildalist no prescription buy cheap sildalist without insurance
cost sildalist online
can you get cheap sildalist without rx can you get sildalist without prescription get generic sildalist
get generic sildalist online cheap sildalist for sale buying generic sildalist without insurance
Que ce soit pour une question rapide ou une préoccupation plus complexe, l’équipe de support client est juste là, prête à vous aider.
Les solutions de paiement sont nombreuses et adaptées aux besoins des joueurs.
cost of cheap valtrex without rx
ST666 hiện đang khẳng định vị thế là sân chơi giải trí trực tuyến quy mô lớn và cực kỳ uy tín. Tại trang chủ ST666, bạn sẽ khám phá hàng loạt game cá cược hấp dẫn như live casino, cược thể thao, bắn cá đổi thưởng, xổ số may mắn, v.v. với tỷ lệ cược ưu đãi. Đừng bỏ lỡ cơ hội trải nghiệm cá cược đỉnh cao ngay tại ST666 để tận hưởng cảm giác xanh chín và thắng lớn!
ST666 – Điểm Đến Giải Trí Trực Tuyến Hàng Đầu Cho Người Yêu Cá Cược
ST666 đang từng bước khẳng định vị thế của mình như một sân chơi giải trí trực tuyến quy mô lớn và cực kỳ uy tín trong cộng đồng người chơi cá cược. Với sự đa dạng trong các loại hình trò chơi cùng tỷ lệ cược hấp dẫn, ST666 mang đến cho người chơi những trải nghiệm đỉnh cao, đầy kịch tính và cơ hội thắng lớn.
Đa Dạng Trò Chơi, Đẳng Cấp Giải Trí
Tại trang chủ ST666, bạn sẽ được khám phá một thế giới giải trí đa sắc màu với hàng loạt trò chơi cá cược hấp dẫn. Từ những trò chơi live casino đầy kịch tính, nơi bạn có thể tương tác trực tiếp với các dealer chuyên nghiệp, đến các trận cược thể thao sôi động, ST666 đáp ứng mọi nhu cầu của người chơi.
Đặc biệt, những ai yêu thích sự may rủi và cảm giác hồi hộp chắc chắn không thể bỏ qua các trò chơi như bắn cá đổi thưởng hay xổ số may mắn. Với tỷ lệ cược ưu đãi cùng phần thưởng hấp dẫn, ST666 là điểm đến lý tưởng để bạn thử vận may và tận hưởng những giây phút giải trí đỉnh cao.
Uy Tín Và An Toàn Tuyệt Đối
Một trong những yếu tố giúp ST666 chiếm được lòng tin của đông đảo người chơi chính là sự uy tín và minh bạch trong mọi giao dịch. Hệ thống bảo mật tiên tiến cùng đội ngũ hỗ trợ chuyên nghiệp luôn sẵn sàng giải quyết mọi thắc mắc của người chơi, đảm bảo trải nghiệm cá cược của bạn luôn suôn sẻ và an toàn.
Cơ Hội Thắng Lớn, Trải Nghiệm Đỉnh Cao
ST666 không chỉ là nơi để giải trí mà còn là địa chỉ lý tưởng để bạn thử thách bản thân và tìm kiếm cơ hội đổi đời. Với tỷ lệ cược hấp dẫn cùng nhiều chương trình khuyến mãi đặc biệt, ST666 mang đến cho người chơi cơ hội thắng lớn và tận hưởng cảm giác “xanh chín” khó quên.
Kết Luận
Nếu bạn đang tìm kiếm một sân chơi giải trí trực tuyến đẳng cấp, uy tín và đầy hứa hẹn, ST666 chính là sự lựa chọn hoàn hảo. Đừng bỏ lỡ cơ hội trải nghiệm những giây phút cá cược đỉnh cao và thử vận may của mình ngay hôm nay tại ST666. Hãy tham gia và khám phá thế giới giải trí đầy màu sắc, nơi niềm vui và phần thưởng lớn luôn chờ đón bạn!
ST666 – Nơi Giải Trí Gặp Cơ Hội!
Medicine information sheet. Drug Class.
buy generic norvasc
Some information about medicines. Read here.
пропуск для грузового транспорта в москву [url=https://www.urilin.ru ]пропуск для грузового транспорта в москву[/url] .
buying generic differin online can you buy cheap differin price where can i get differin pills
where can i get differin price where can i get generic differin online can you buy differin
where can i buy differin
where buy differin without rx generic differin without prescription where to buy cheap differin prices
where to get cheap differin without insurance how can i get cheap differin no prescription get generic differin without a prescription
Contrairement au Banzai casino bonus sans dépôt, cet autre bonus est lié aux différents dépôts que vous effectuez sur votre compte au casino.
With millions of Chevrolet vehicles on the road in English-speaking regions, the company recognizes the importance of providing transparent, reliable, and easily accessible resources articlesjust4you.com
order cheap pamelor without a prescription
Все работы выполняются высококвалифицированными специалистами, что гарантирует надежность и безопасность каждого проекта. Компания использует только профессиональное оборудование и качественные материалы, что позволяет ей добиваться отличных результатов ремонт бытовой техники
Drugs information for patients. Brand names.
cost cheap zanaflex online
Actual news about drug. Read here.
order cheap forxiga no prescription cost of forxiga without dr prescription how to buy cheap forxiga pills
how can i get cheap forxiga without a prescription can you get cheap forxiga can i get cheap forxiga without dr prescription
order generic forxiga without a prescription
buy forxiga for sale generic forxiga pills can you buy generic forxiga online
generic forxiga without dr prescription can you get forxiga without insurance where to get forxiga price
can i order cheap imitrex online
Official website of the gaming club Gizbo Casino . Slots from famous providers. Bonuses and exclusive new products are waiting for you at Gizbo Casino Gizbo Casino
For newest information you have to pay a quick visit internet and on world-wide-web I found this site as a finest web page for hottest updates.
https://xn--b1adgjdbhc1aebbqccldhhe2a7a.xn--p1ai/
Medicines information for patients. Brand names.
where to buy cheap priligy without insurance
Some trends of medicines. Read information now.
how to get cheap doxycycline online how to get doxycycline pills where can i buy cheap doxycycline without rx
where can i get cheap doxycycline price can you buy doxycycline without a prescription in the usa doxycycline maker
order generic doxycycline for sale
can i buy doxycycline over the counter doxycycline were to buy where to buy cheap doxycycline pills
cost generic doxycycline no prescription how to get generic doxycycline without dr prescription doxycycline buy without prescription
cost of generic januvia
WOW just what I was looking for. Came here by searching for %keyword%
https://xn—–7kcgiiy1bf2ancu8h.xn--p1ai
Drugs information. Short-Term Effects.
where to buy generic arimidex without rx
Best information about medication. Read information here.
can i buy amaryl without prescription can i get cheap amaryl pill how to buy generic amaryl no prescription
how to buy cheap amaryl without insurance can i order generic amaryl without rx buying generic amaryl without dr prescription
buying amaryl
can i buy cheap amaryl without rx can i get amaryl tablets can i buy cheap amaryl
generic amaryl no prescription where can i get generic amaryl tablets can i buy cheap amaryl online
content of the slot sugar rush slot pragmatic play, characterized by high ability to change,
forces you believe that gameplay becomes most friendly.
Review my homepage; https://sugar-rush-demo.net/
Ищете способ быстро получить деньги, минуя долгие проверки и формальности? Займы онлайн на карту без отказа без проверки — это решение, которое позволит вам моментально решить финансовые вопросы. Не нужно тратить время на посещение банков или собирать многочисленные справки Займы с плохой кредитной историей без отказа
Ищете способ быстро получить деньги, минуя долгие проверки и формальности? Займы онлайн на карту без отказа без проверки — это решение, которое позволит вам моментально решить финансовые вопросы. Не нужно тратить время на посещение банков или собирать многочисленные справки Займ на карту без отказа
how can i get cheap pravachol online
Medicine information leaflet. What side effects can this medication cause?
cost cheap dutasteride tablets
Actual information about drugs. Read here.
Купите современную коляску-трость для вашего малыша, которая удивит вас своей функциональностью и легкостью.
Стильная и практичная коляска-трость для вашего малыша, с многофункциональной корзиной для покупок.
Универсальная коляска-трость для города и природы, которая станет вашим незаменимым помощником.
Элегантная коляска-трость для путешествий и прогулок, которая облегчит вам заботу о ребенке.
elodie details трость [url=https://kolyaski-trosti-progulochnye.ru/]https://kolyaski-trosti-progulochnye.ru/[/url] .
can i order cheap fincar tablets cost of generic fincar without prescription cost of fincar without insurance
cost of fincar without a prescription can i purchase cheap fincar cheap fincar price
get fincar pills
can i order generic fincar price how to buy generic fincar without dr prescription can you buy cheap fincar no prescription
can i buy fincar price can you buy fincar tablets can i get fincar for sale
программа 1с купить цена [url=https://kupit-1s15.ru]программа 1с купить цена[/url] .
buying generic albenza price
Medicine information. Cautions.
propranolol ataques panico
Everything information about drugs. Get information here.
[url=https://betway.directorio-de-casinos-mx.com]casino betway[/url]
Download latest version of the application online casino Betway – win today!
betway.directorio-de-casinos-mx.com
where to get cheap inderal tablets can i get generic inderal can you buy inderal without prescription
buy generic inderal pill can i order inderal pill can you get generic inderal without prescription
where can i buy generic inderal pill
how to get inderal tablets can i buy cheap inderal online cost generic inderal without insurance
where to get inderal without a prescription can i get cheap inderal pills cost cheap inderal online
On the official website of Gizbo Casino you will find everything you need for an exciting gameplay: safe transactions, a wide range of entertainment, as well as profitable bonuses. Discover a new level of gambling with Gizbo Casino Гизбо Казино
On the official website of Gizbo Casino you will find everything you need for an exciting gameplay: safe transactions, a wide range of entertainment, as well as profitable bonuses. Discover a new level of gambling with Gizbo Casino Gizbo Casino
buy generic advair diskus without rx
Medicines information for patients. Effects of Drug Abuse.
can i get generic rogaine for sale
Everything information about meds. Get now.
купить насос [url=https://nasosy-msk.ru/]купить насос[/url] .
where can i get generic forxiga pills can you get generic forxiga pill where buy cheap forxiga pills
where to get generic forxiga pills where to get forxiga tablets can i buy generic forxiga
order generic forxiga without a prescription
how to get forxiga without rx where can i get cheap forxiga without dr prescription can i purchase forxiga without insurance
how to buy forxiga without rx can you buy forxiga pills how to buy cheap forxiga tablets
Alors, n’hésitez pas à plonger dans l’univers excitant des jeux de casino en ligne avec Banzai Slots.
уроки школы покера pokerstars
уроки школы покера pokerstars видео
how to buy generic remeron pill
Medication information for patients. Short-Term Effects.
finasteride 1 year shed
All information about drug. Read information now.
where to get cheap deltasone without insurance order cheap deltasone no prescription can i purchase deltasone no prescription
where can i get deltasone without dr prescription get deltasone price cost of deltasone
where can i buy generic deltasone online
can i buy generic deltasone for sale can i buy generic deltasone prices how to buy generic deltasone
can i get generic deltasone pills cost of deltasone no prescription cost generic deltasone without dr prescription
Гизбо Казино представляет обширный каталог игр: слоты, настольные игры, видеопокер и живые дилеры. Доступны щедрые бонусы и акции для новых и постоянных игроков казино Gizbo
Гизбо Казино представляет обширный каталог игр: слоты, настольные игры, видеопокер и живые дилеры. Доступны щедрые бонусы и акции для новых и постоянных игроков казино Gizbo
Limited choice of cryptocurrencies: ahead of competitors other
exchanges, the nexo https://kekius-maximus.org/ exchange contains over a limited choice of
about 60 cryptocurrencies.
Medicines information sheet. Cautions.
where can i get cheap ventolin without a prescription
All what you want to know about pills. Read here.
colchicine for pleuritic chest pain how to take colchicine 0.6mg colchicine how long to take
colchicine for gout dosage adults does colchicine cause weight gain does colchicine make you tired
colchicine effect on kidney function
colchicine pericarditis dose nhs buy colchicine 500 microgram tablets the nurse is teaching a patient who is taking colchicine for the
best price for colchicine colchicine dose for pericardial effusion colchicine 500 mcg price
Your Single Shop for AI-Fueled Imagination
In this dynamic landscape, integrating innovation with digital solutions is essential for innovation and productivity. At Template Forge, we provide top-notch, tailored prompts created to elevate your imaginative projects across multiple areas.
Why Choose Template Forge?
We are dedicated to delivering only the highest quality prompts to help your creative endeavors. Our group of authorities meticulously selects each prompt to ensure usefulness and pertinence, enabling it easier for you to find creativity when you need it the most critically.
Diverse Categories
Our wide-ranging inventory encompasses various segments, featuring digital marketing, problem-solving, and story creation. This range certifies you have the means needed to tackle any project efficiently.
Elevate Your Creativity
Template Forge’s inspirations serve as a foundation for your ideas, permitting you to center on your distinct voice and aspirations free from the strain of conceptualizing. Each prompt is intended to encourage and lead you through the innovative course.
Participate in thousands of satisfied makers who have utilized the power of artificial intelligence at Template Forge. Investigate our wide subjects today and release your imaginative potential. With our top-notch prompts, crafting with clarity has always been easier. Welcome to your one-stop store for AI-powered artistry!
оформить пропуск в москву для грузовиков [url=urilin.ru ]оформить пропуск в москву для грузовиков[/url] .
how can i get generic chloromycetin without dr prescription
Drug information sheet. What side effects can this medication cause?
buying cheap olmesartan online
All information about drug. Read now.
can i buy generic imuran can you buy imuran without prescription cost of cheap imuran no prescription
cheap imuran no prescription how to buy generic imuran pill where can i get generic imuran pills
order generic imuran without rx
can i order cheap imuran without rx where to buy cheap imuran without insurance where buy cheap imuran pill
where to get cheap imuran pill can you buy cheap imuran pills cost of generic imuran for sale
fehlercodeliste https://fehlercodeliste.tumblr.com/
программа 1с цена [url=www.kupit-1s15.ru/]программа 1с цена[/url] .
Детальный разбор официального сайта Водка Казино и вход на него через актуальное и рабочее зеркало Водка Казино
Ищете свадебного фотографа для идеальной свадебной фотосессии?
Я помогу запечатлеть самые трогательные моменты вашего дня! Эмоции, искренность и индивидуальность в каждом кадре.
заказать услугу и узнать подробнее – фотограф в коломне.
Ваша история любви — в моих фотографиях!
can i buy cheap sporanox
Medicament information leaflet. Generic Name.
buying cheap elavil for sale
Everything information about meds. Get here.
copd exacerbation action plan copd exacerbation prevention screening medical monitoring for copd
copd exacerbation prevention support types of copd exacerbation copd symptom tracking
copd exacerbation treatment
copd management guidelines spirometry and copd copd exacerbation prevention symptom tracking tools
can copd come on suddenly copd treatment options copd best practice guidelines
BanzaiSlots est un casino en ligne fiable reconnu depuis mars 2018 qui est en droit d’exercer son activité grâce à une licence délivrée à Curaçao.
Medicine information leaflet. Generic Name.
spironolactone drug group
Some news about medicines. Read information here.
buying cheap cozaar without insurance
cost avodart without a prescription купить avodart 10mg japan avodart 15 mg price
how to get cheap avodart pill avodart 4 mg get cheap avodart online
avodart pill color
where can i buy cheap avodart online can you buy generic avodart online how to buy avodart
where can i buy cheap avodart pill get generic avodart for sale eczema avodart
Казино привлекает игроков своей впечатляющей подборкой азартных игр. Хотя количество предложенных развлечений здесь не самое обширное, по стандартам качества и разнообразия оно сопоставимо с ведущими брендами игорной индустрии Гизбо Казино
Казино привлекает игроков своей впечатляющей подборкой азартных игр. Хотя количество предложенных развлечений здесь не самое обширное, по стандартам качества и разнообразия оно сопоставимо с ведущими брендами игорной индустрии Gizbo Casino
Medication information sheet. Drug Class.
where can i get trileptal without rx
All about drugs. Read information here.
can you buy generic remeron without a prescription
Hi there everyone, it’s my first pay a visit at this website, and post is truly fruitful designed for me, keep up posting these posts.
buying generic prasugrel without a prescription side effects of prasugrel effient how to get generic prasugrel without rx
where to get prasugrel without a prescription can i purchase cheap prasugrel without a prescription can i order generic prasugrel pill
get prasugrel without a prescription
can you buy generic prasugrel without rx can you get generic prasugrel tablets how can i get generic prasugrel online
buy cheap prasugrel price where can i get generic prasugrel pills buying prasugrel no prescription
Pills information sheet. What side effects can this medication cause?
can i buy cheap bactrim without prescription
Actual information about pills. Read now.
can i order generic valtrex tablets
how to get motilium prices buying motilium cost of motilium for sale
can i get cheap motilium pill order cheap motilium without rx cheap motilium without insurance
generic motilium without insurance
where buy cheap motilium cost cheap motilium prices cost cheap motilium for sale
can i buy motilium online where can i get cheap motilium for sale buying cheap motilium pill
L’argent sera crédité le 10 du mois suivant et pourra être retiré automatiquement.
Medicines prescribing information. Long-Term Effects.
promethazine codeine price street
All news about drugs. Get information here.
how to get asacol price
can you get allegra without a prescription where can i buy cheap allegra without rx where can i get allegra without a prescription
where to get generic allegra tablets get cheap allegra without prescription can you buy allegra prices
how can i get generic allegra without dr prescription
where buy cheap allegra tablets can i get generic allegra without a prescription can i order cheap allegra online
how can i get generic allegra pills buy generic allegra without insurance how can i get generic allegra price
пропуска в москву для грузовиков [url=https://urilin.ru /]пропуска в москву для грузовиков[/url] .
Казино Водка это новое онлайн казино, основанное в 2023 году. Оно стремительно завоевало внимание даже самых искушённых игроков в России и других странах СНГ. Водка Казино предлагает своим игрокам внушительную библиотеку игровых автоматов – свыше 2000 слотов обеспечивающимися более чем 45 провайдерами игр, где каждый игрок найдет игру по душе казино Vodka
sacramento movers [url=https://spmovers12.com/]sacramento movers[/url] .
Medicines prescribing information. Drug Class.
can i get generic oxcarbazepine without dr prescription
Best about pills. Read information here.
how to get flagyl price
how to get cheap doxycycline tablets where can i buy cheap doxycycline where buy generic doxycycline pill
get generic doxycycline buying doxycycline price where to get cheap doxycycline no prescription
where can i get doxycycline tablets
how to buy cheap doxycycline for sale where can i get doxycycline tablets how to get generic doxycycline without a prescription
doxycycline 100mg cost uk can i order cheap doxycycline pill who should not take doxycycline
Unique customization
Your Supreme Goal for Luxury In-Game Products!
In today’s fast-paced gaming world, the thrill of investigation and growth is important. If you’re hunting for special artifacts, unique armament looks, specialized modes, tokens, assets, tasks, or user-friendly balance solutions, look no further! Introducing to Items4Games, your complete destination for a extensive range of high-quality in-game assets crafted to enhance your gaming adventure.
Why Items4Games Stands Out
Multiple Variety of In-Game Resources
We provide a extensive selection of in-game assets, from rare styles to distinctive relics and game codes. Our catalog is designed to elevate your gameplay and immerse you in a realm of unbounded possibilities.
Assistance for Well-known Series
Our wide collection includes popular games like CS2, Fortnite, Valorant, Dota 2, and Call of Duty. No matter your gaming likes, we have goods that serve to the largest games in the sector.
Improved Gaming Journey
With special in-game goods, you can gain new potential and illustrate your distinct touch. From special weapon skins to effective artifacts, our products transform your gaming plays into remarkable experiences.
Safe and Consistent Deals
We prioritize your well-being with protected and honest deals. You can shop securely, knowing that your information is secure at all occasions.
Competitive Rates
Access superior items without crushing the financial plan. Our reasonable and fair rate structure ensures that improving your gaming experience is within reach to everyone.
User-Friendly Design
Our easy-to-use platform allows you to quickly explore and secure the items you require, reducing you hours and elevating your purchase adventure.
What Awaits for You at Items4Games
Explore weapon styles that reflect your identity, special artifacts for unique achievements, and game keys that reveal new areas. Our materials and tasks support you level up easily, while refill services ensure your game budget ready for play. Enjoy further game formats that bring variety and depth to your gaming plays.
In summary, Items4Games is your ultimate place for elevating your gaming adventure with exclusive in-game items. Check out our selection today and enhance your gameplay to new levels!
Лечение зубов — непростой процесс, который требует терпения, времени, а главное — помощи профессионала. Только консультация стоматолога и систематическая диагностика зубов могут предупредить развитие кариеса, образование зубного камня, пульпит и другие заболевания, наносящие урон как здоровью всего организма, так и вашему внешнему виду имплантация 1 зуба
Лечение зубов — непростой процесс, который требует терпения, времени, а главное — помощи профессионала. Только консультация стоматолога и систематическая диагностика зубов могут предупредить развитие кариеса, образование зубного камня, пульпит и другие заболевания, наносящие урон как здоровью всего организма, так и вашему внешнему виду имплантация зубов отзывы цены
Medicines information. What side effects can this medication cause?
buy generic cytotec online
Actual what you want to know about drug. Get information here.
can you buy cheap arcoxia without insurance
buying clarinex without prescription where to get generic clarinex pill can you get generic clarinex tablets
order cheap clarinex pill buying generic clarinex without dr prescription can i buy clarinex no prescription
cost of generic clarinex prices
buying generic clarinex tablets how can i get generic clarinex without rx can i get generic clarinex price
where to buy clarinex generic clarinex price get clarinex pill
Medicines prescribing information. Generic Name.
can i get generic ceftin prices
Everything what you want to know about pills. Read now.
покер школа покер старс
покерная школа покерстарс
how to buy plavix prices
where can i buy colchicine online probenecid colchicine maximum dose of colchicine daily
colchicine for how many days is colchicine harmful to kidneys typical dose of colchicine
where can i buy colchicine online
where to buy colchicine generic colchicine what is colchicine prescribed for
best time of day to take colchicine probenecid colchicine warnings colchicine how long to take
Предлагаем услуги профессиональных инженеров офицальной мастерской.
Еслли вы искали ремонт фотоаппаратов canon цены, можете посмотреть на сайте: срочный ремонт фотоаппаратов canon
Наши мастера оперативно устранят неисправности вашего устройства в сервисе или с выездом на дом!
[url=https://bellevue-towncar.com/seatac-airport-shuttle-service-reservations/]SeaTac Airport Shuttle Service & Reservations[/url] with Our Premium Limo Service
Experience the ultimate in convenience and luxury with our dedicated SeaTac Airport Shuttle Service. We understand that traveling can be stressful, which is why we strive to make your journey as smooth and comfortable as possible. Our reservation process is seamless, ensuring that your ride is ready when you need it.
[url=https://bellevue-towncar.com/seatac-limo-service-rates/]SeaTac Limo service rates[/url]
Our SeaTac Limo Service rates are designed to offer you the best value for your money. We believe that luxury and affordability can go hand in hand. Whether you need a quick transfer to the airport or a more extensive service for a special event, our competitive rates ensure that you get the best experience without breaking the bank. Our pricing is transparent, with no hidden fees, so you know exactly what you’re paying for.
[url=https://bellevue-towncar.com/seatac-limousine-chauffeur-services/]SeaTac Limousine Chauffeur services[/url]
At the heart of our SeaTac Limousine Chauffeur services is a commitment to professionalism and excellence. Our chauffeurs are not just drivers; they are highly trained professionals who prioritize your safety and comfort. They are familiar with the local area, ensuring that you arrive at your destination on time, every time. Whether you’re traveling for business or pleasure, our chauffeurs provide a courteous and efficient service that meets your specific needs.
Our fleet of luxury vehicles is meticulously maintained to ensure your comfort and safety. From spacious SUVs to elegant sedans, we have a vehicle to suit every occasion. Each vehicle is equipped with modern amenities to make your journey as pleasant as possible.
Why Choose Our Limo Service?
– Reliability: We pride ourselves on our punctuality and reliability. Our chauffeurs are always on time, ensuring that you never miss a flight or an important meeting.
– Comfort: Our luxury vehicles are designed for your comfort. Sit back, relax, and enjoy the ride.
– Safety: Your safety is our top priority. Our chauffeurs are trained in defensive driving techniques, and our vehicles are regularly inspected and maintained.
– Flexibility: Whether you need a one-way trip to the airport or a full-day charter, we offer flexible booking options to suit your needs.
Make your journey to and from SeaTac Airport a memorable one with our premium limo service. Reserve your ride today and experience the difference that true luxury and professionalism can make.
Drug information leaflet. Brand names.
can you buy generic geodon
Actual news about medication. Get here.
order finast no prescription
can you get furosemide without insurance buy generic furosemide pills generic furosemide prices
how to get furosemide without rx where to get generic furosemide without prescription get generic furosemide
generic furosemide without a prescription
where can i buy furosemide price how to get cheap furosemide for sale get furosemide tablets
how can i get furosemide without prescription buy furosemide 20mg cost of furosemide 20 mg
Предлагаем услуги профессиональных инженеров офицальной мастерской.
Еслли вы искали срочный ремонт imac 27, можете посмотреть на сайте: срочный ремонт imac 27
Наши мастера оперативно устранят неисправности вашего устройства в сервисе или с выездом на дом!
Medicine information. Effects of Drug Abuse.
can i get generic aricept without prescription
Best about medicament. Get here.
where can i get generic rumalaya
Предлагаем услуги профессиональных инженеров офицальной мастерской.
Еслли вы искали ремонт ipad air 2, можете посмотреть на сайте: срочный ремонт ipad air 2
Наши мастера оперативно устранят неисправности вашего устройства в сервисе или с выездом на дом!
fehlercodeliste https://fehlercodelistede.blogspot.com/
Предлагаем услуги профессиональных инженеров офицальной мастерской.
Еслли вы искали ремонт imac 21 адреса, можете посмотреть на сайте: ремонт imac 21 адреса
Наши мастера оперативно устранят неисправности вашего устройства в сервисе или с выездом на дом!
where buy generic motilium without prescription cost of motilium pills where buy motilium without prescription
where can i get generic motilium without a prescription how to buy motilium price cost motilium tablets
how can i get generic motilium without a prescription
cost motilium for sale how can i get generic motilium without rx cost of motilium without insurance
can you buy motilium without a prescription how to buy motilium without dr prescription buying cheap motilium without a prescription
can i get cheap albenza prices
토토사이트
토토사이트 커뮤니티: 안전한 베팅을 위한 길잡이
토토사이트 커뮤니티는 스포츠 베팅을 즐기는 사람들에게 단순한 정보 공유의 장을 넘어, 안전한 배팅 환경을 조성하는 데 중요한 역할을 합니다. 이곳에서는 초보자부터 전문가까지 다양한 사람들이 모여 베팅 전략을 논의하고, 신뢰할 수 있는 토토사이트를 추천하며, 먹튀 사고를 예방하기 위한 정보를 공유합니다. 특히, 사설 토토사이트의 위험성을 알리고, 이를 피할 수 있는 방법을 제시함으로써 사용자들이 더 안전하게 베팅을 즐길 수 있도록 돕습니다.
사설 토토사이트의 숨겨진 위험
사설 토토사이트는 정부의 규제를 받지 않기 때문에 다양한 문제를 일으킬 수 있습니다. 예를 들어, 공정하지 않은 배당률, 과장된 광고, 개인정보 유출 등이 대표적인 문제점입니다. 또한, 사설 토토사이트는 법적 문제로 인해 갑자기 사라지는 경우가 많아 사용자들이 금전적 손실을 입을 위험이 큽니다. 이런 이유로, 토토 커뮤니티에서는 사설 토토사이트보다는 규제를 받는 공식 사이트를 이용할 것을 권장합니다.
토토 커뮤니티가 제공하는 가치
토토 커뮤니티는 단순히 정보를 나누는 공간이 아니라, 사용자들이 안전하게 베팅할 수 있도록 돕는 네트워크입니다. 예를 들어, 새로운 토토사이트가 등장했을 때 커뮤니티 멤버들은 해당 사이트의 운영 주체, 결제 시스템, 사용자 리뷰 등을 꼼꼼히 검토합니다. 이를 통해 먹튀 사고를 미리 방지하고, 신뢰할 수 있는 사이트만을 추천합니다. 또한, 문제가 발생했을 때는 보증 사이트를 통해 사용자들이 손실을 최소화할 수 있도록 돕습니다.
어떻게 신뢰할 수 있는 토토사이트를 찾을까?
토토 커뮤니티에서는 신뢰할 수 있는 토토사이트를 찾기 위해 몇 가지 중요한 기준을 제시합니다. 먼저, 사이트의 운영 주체가 명확한지 확인하는 것이 중요합니다. 정부나 공인된 기관에서 관리하는 사이트라면 신뢰할 수 있습니다. 또한, 다른 사용자들의 리뷰를 참고하여 사이트의 신뢰성을 판단할 수 있습니다. 긍정적인 평가가 많고, 문제가 거의 없는 사이트라면 안전하게 이용할 수 있습니다.
결제 시스템도 중요한 확인 요소 중 하나입니다. 신용카드, 전자지갑 등 다양한 결제 방법을 지원하고, SSL 암호화를 통해 금융 정보를 보호하는 사이트라면 더욱 신뢰할 수 있습니다. 마지막으로, 온라인 커뮤니티나 포럼에서 해당 사이트에 대한 평판을 확인하는 것도 좋은 방법입니다. 다른 사용자들이 어떻게 평가하는지, 문제가 없는지 꼼꼼히 살펴보는 것이 중요합니다.
토토 커뮤니티의 보증 사이트
토토 커뮤니티에서는 먹튀 사고를 예방하기 위해 보증 사이트를 추천합니다. 이러한 사이트는 사용자들의 개인정보와 금융 정보를 보호하며, 문제가 발생했을 때 빠르게 해결할 수 있는 시스템을 갖추고 있습니다. 보증 사이트를 이용하면 안전하게 베팅을 즐길 수 있으며, 만약 문제가 생기더라도 커뮤니티의 도움을 받아 해결할 수 있습니다.
마무리
토토사이트 커뮤니티는 스포츠 베팅을 즐기는 사람들에게 안전하고 신뢰할 수 있는 정보를 제공하는 중요한 공간입니다. 사설 토토사이트의 위험성을 인지하고, 신뢰할 수 있는 사이트를 선택하는 것이 무엇보다 중요합니다. 토토 커뮤니티의 정보를 참고하여 안전한 베팅 환경을 조성하고, 스포츠 베팅을 더욱 즐겁게 즐기시길 바랍니다. 항상 책임감 있게 베팅에 임하는 것도 잊지 마세요!
Medicine information sheet. Cautions.
exploring the synergistic potential of clopidogrel and dabigatran in combination therapy
Some about meds. Read here.
can i purchase cheap furosemide pills where can i get furosemide without insurance can i purchase cheap furosemide for sale
can i purchase cheap furosemide online buy cheap furosemide where can i buy cheap furosemide without a prescription
cost of furosemide without insurance
can i purchase furosemide without insurance order furosemide without insurance generic furosemide without dr prescription
can you buy generic furosemide pill where to buy generic furosemide price buy furosemide tablets online uk
how to get generic mestinon no prescription
Pills information for patients. What side effects can this medication cause?
cost of generic clozapine pill
Some news about drugs. Read here.
how can i get prednisolone for sale how to buy prednisolone online buying prednisolone price
prednisolone eye drops buy online can you buy generic prednisolone can i get generic prednisolone
side effects of prednisolone
can i get generic prednisolone without dr prescription where to get cheap prednisolone without dr prescription where to get prednisolone prices
where to buy prednisolone prices how can i get cheap prednisolone for sale get cheap prednisolone without prescription
how to buy artane online
Medication information sheet. Cautions.
cheap dramamine pills
All what you want to know about drug. Read here.
В 2023 году была основана новая компания, которая на данный момент является одним из самых надежных поставщиков азартного софта. Поклонниками бренда Водка Казино являются истинные ценители классических развлечений клубов Лас-Вегаса казино Vodka
В 2023 году была основана новая компания, которая на данный момент является одним из самых надежных поставщиков азартного софта. Поклонниками бренда Водка Казино являются истинные ценители классических развлечений клубов Лас-Вегаса Водка Казино
how can i get generic albuterol without prescription buy albuterol inhaler without a prescription how can i get generic albuterol without insurance
albuterol buy australia cost cheap albuterol price where buy generic albuterol without insurance
buying cheap albuterol without insurance
what is the cheapest place to buy an albuterol inhaler where buy albuterol without dr prescription buying albuterol inhaler online
albuterol sulfate for sale can i buy albuterol without insurance ipratropium and albuterol side effects
where to buy cheap uroxatrall pills
For example, suppose Alice sends 0.001 btc to bob’s https://htx-wallet.io/.
The simple interface makes it a popular choice
as well as for beginners, and for pros.
User Experience (UX) research has emerged as a critical factor in determining the success or failure of online gambling platforms, as it directly impacts player engagement, retention, and overall satisfaction Augmented reality gaming
Medicament information sheet. Brand names.
can i order cheap keflex without dr prescription
All about medicine. Read now.
Good post however I was wondering if you could write a litte more on this subject?
I’d be very grateful if you could elaborate a little bit
further. Kudos!
can i purchase mobic tablets can i order cheap mobic online where buy generic mobic for sale
how to buy generic mobic without insurance where to buy generic mobic prices can i buy mobic without rx
can you buy mobic price
how to buy mobic without insurance get mobic pill where can i buy cheap mobic pill
where can i get cheap mobic for sale where can i get mobic no prescription can i buy generic mobic
Medicines information. Generic Name.
where can i buy ipratropium without prescription
Everything information about medication. Read here.
colchicine post cardiac surgery colchicine dosage colchicine mechanism of action inflammation
colchicine dose price of generic colchicine colchicine pregnancy reviews
colchicine prescription cost
side effects of too much colchicine purchase colchicine online cheap will colchicine hurt kidneys
colchicine myelosuppression usual dosage for colchicine how can i get colchicine
However, it is virtually all done with tongues rooted solidly in cheeks, and everyone has absolutely nothing but absolutely love for his or her friendly neighborhood scapegoat. The truth is, he is not just a pushover. He is basically that special variety of person strong enough to take all of that good natured ribbing for exactly what it is.
can you buy verapamil tablets
промокоды продамус [url=https://www.promokod-pro.ru/]https://www.promokod-pro.ru/[/url] .
That’s some inspirational stuff. Never knew that opinions might be this varied. Thanks for all the enthusiasm to supply such helpful information here.
where to get cheap fincar without dr prescription buy cheap fincar online get fincar tablets
where can i get cheap fincar without rx buying fincar online how can i get fincar no prescription
can you buy fincar tablets
how to buy fincar tablets cost of cheap fincar without rx cost of generic fincar without prescription
get fincar without rx buying cheap fincar pills where buy cheap fincar without rx
get mestinon price
Компания, основанная в 2023 году, стремительно завоевала доверие как один из ведущих поставщиков азартного софта. Vodka Casino привлекает игроков, которые ценят классические развлечения в духе Лас-Вегаса казино Vodka
Medicines information for patients. Drug Class.
buying generic tamoxifen online
Everything what you want to know about medicine. Read information here.
Ищете, где купить минитрактор? Узнайте о лучших моделях и выгодных предложениях для вашего хозяйства минитрактор купить в москве
Компания, основанная в 2023 году, стремительно завоевала доверие как один из ведущих поставщиков азартного софта. Vodka Casino привлекает игроков, которые ценят классические развлечения в духе Лас-Вегаса Водка Казино
Ищете, где купить минитрактор? Узнайте о лучших моделях и выгодных предложениях для вашего хозяйства тракторы цена нового
can you get seroflo without prescription can i get seroflo without dr prescription can i buy seroflo for sale
where to buy seroflo without insurance where to buy generic seroflo online buying generic seroflo price
can you get seroflo pill
can i get cheap seroflo no prescription generic seroflo pill how to get seroflo pills
buying generic seroflo without rx can i buy cheap seroflo without prescription where can i get seroflo price
can i buy generic maxolon without prescription
omnacortil 5mg canada – buy azithromycin 500mg without prescription prometrium 100mg without prescription
can i purchase cheap cozaar tablets
how to buy cheap mobic pills can i get mobic without insurance get generic mobic without dr prescription
can i buy mobic without insurance where to get generic mobic prices buy cheap mobic price
where buy generic mobic without dr prescription
how to buy cheap mobic without a prescription how can i get cheap mobic without a prescription can i buy mobic pills
where buy mobic prices can you buy cheap mobic price cost cheap mobic without a prescription
dashboard warning light https://dashboardwarninglight.tumblr.com/
Equipos de balanceo: fundamental para el operación uniforme y efectivo de las equipos.
En el mundo de la tecnología contemporánea, donde la rendimiento y la fiabilidad del equipo son de alta importancia, los dispositivos de ajuste tienen un rol fundamental. Estos equipos adaptados están concebidos para equilibrar y fijar piezas rotativas, ya sea en herramientas manufacturera, vehículos de desplazamiento o incluso en electrodomésticos domésticos.
Para los técnicos en mantenimiento de aparatos y los profesionales, manejar con aparatos de balanceo es esencial para asegurar el funcionamiento estable y estable de cualquier sistema rotativo. Gracias a estas alternativas modernas modernas, es posible minimizar notablemente las movimientos, el estruendo y la esfuerzo sobre los cojinetes, extendiendo la tiempo de servicio de piezas costosos.
También importante es el rol que cumplen los dispositivos de calibración en la servicio al usuario. El soporte técnico y el reparación permanente aplicando estos sistemas permiten brindar soluciones de excelente calidad, mejorando la agrado de los clientes.
Para los dueños de negocios, la inversión en sistemas de calibración y dispositivos puede ser esencial para aumentar la productividad y productividad de sus equipos. Esto es sobre todo relevante para los inversores que dirigen modestas y intermedias empresas, donde cada aspecto es relevante.
Por otro lado, los dispositivos de ajuste tienen una extensa implementación en el campo de la fiabilidad y el gestión de excelencia. Habilitan encontrar probables errores, impidiendo arreglos caras y daños a los dispositivos. Incluso, los datos recopilados de estos aparatos pueden aplicarse para perfeccionar procesos y aumentar la exposición en plataformas de consulta.
Las campos de utilización de los sistemas de equilibrado comprenden múltiples industrias, desde la fabricación de vehículos de dos ruedas hasta el supervisión ecológico. No afecta si se trata de grandes elaboraciones industriales o modestos establecimientos hogareños, los aparatos de ajuste son indispensables para promover un desempeño efectivo y sin riesgo de fallos.
Medicament information for patients. Drug Class.
can you get clozapine online
Some what you want to know about medicament. Get here.
Как правильно организовать подготовку к ЕГЭ? Советы преподавателей https://zdorovnik.com/ege-pod-rukoj-chem-udobny-mobilnye-prilozheniya-dlya-podgotovki-k-ekzamenu/
Что входит в стоимость имплантации 1 зуба под ключ? Анестезия, рентген, операция по установке титановых стержней, снятие слепков, наложение швов (затем снятие) клиника имплантации зубов
Что входит в стоимость имплантации 1 зуба под ключ? Анестезия, рентген, операция по установке титановых стержней, снятие слепков, наложение швов (затем снятие) имплантация зубов под
Как правильно организовать подготовку к ЕГЭ? Советы преподавателей https://dimonvideo.ru/usernews/374247
Stromectol 12mg est efficace contre les parasites. En savoir plus sur stromectol 12mg.
Medicine prescribing information. Effects of Drug Abuse.
cost cheap warfarin no prescription
Everything trends of drugs. Read information here.
where to get cheap tegretol cost tegretol without dr prescription where can i buy cheap tegretol pill
can i order generic tegretol where can i get cheap tegretol without a prescription how to buy cheap tegretol prices
can you buy generic tegretol pills
where buy cheap tegretol without prescription where buy generic tegretol pills buy tegretol for sale
order generic tegretol online can you buy generic tegretol prices how to get tegretol without dr prescription
copd exacerbation prevention advocacy initiatives copd exacerbation prevention counseling copd rehabilitation programs
chronic respiratory failure in copd alternative treatment for copd copd exacerbation awareness
copd exacerbation action plan
copd exacerbation prevention awareness campaigns copd exacerbation recovery copd exacerbation prevention online support platforms
copd exacerbation prevention support services exercises for seniors with copd what does copd exacerbation mean
Link eҳchange is nothing else exⅽept it iis only placing the
otһer person’ѕ blpоg lіonk on your page at aρpropriate place
and other person will also do similar iin favor of you.
Here is my bog آموزش تکنیکهای حرفهای سئو در گروه تلگرام سئو
Medicine information leaflet. Cautions.
order fluoxetine pills
Some information about medicament. Get information now.
doxycycline for malaria dosage where to buy doxycycline without prescription can i order generic doxycycline for sale
doxycycline over the counter how to buy generic doxycycline prices get cheap doxycycline without dr prescription
where to buy doxycycline no prescription
can you buy cheap doxycycline without a prescription get doxycycline tablets order generic doxycycline without a prescription
how to buy cheap doxycycline tablets can i buy doxycycline online uk where can i buy cheap doxycycline pill
Medication information leaflet. Drug Class.
levothyroxine and topiramate
All information about medicine. Get now.
verapamil vs diltiazem for svt diltiazem abz 90 mg retardtabletten high blood pressure medication diltiazem
diltiazem monitoring requirements diltiazem 2% ointment compound directions diltiazem affect blood pressure
diltiazem hcl er 240 mg
what are the worst side effects of diltiazem diltiazem rash pictures diltiazem 2% ointment compound directions
diltiazem cost without insurance diltiazem price fixing diltiazem morning vs evening
промокод продамус [url=https://www.promokod-pro.ru/]https://www.promokod-pro.ru/[/url] .
в първи въвеждате лична информация,
като имена, пол, егн и телефон, в другия – основна
информация за лична регистрация, като.
Also visit my web blog … spin casino kenya
лесной покер
дмитрий лесной покер
Medication information. Generic Name.
per quanto tempo prendere finasteride
Actual trends of medicines. Get here.
where can i buy cheap imitrex no prescription
cost of cheap finpecia without insurance where can i buy finpecia without insurance buying generic finpecia without dr prescription
buy finpecia no prescription where buy finpecia no prescription can you buy finpecia pill
cheap finpecia for sale
buying finpecia prices where can i get finpecia price where to get cheap finpecia without a prescription
can i purchase cheap finpecia price can i purchase cheap finpecia price cost of generic finpecia online
Le lasix contre-indications sont Г connaГ®tre avant de commencer.
Pills information for patients. Generic Name.
optimal cymbalta dosage for managing pain finding the right balance
Some about drug. Read now.
Открытки в интернете позволяют людям отправлять поздравления и приветы в любое время, независимо от расстояния и времени суток Новые открытки
generic imuran without rx cost generic imuran without a prescription get generic imuran without prescription
can i buy generic imuran without prescription order cheap imuran online where to buy generic imuran
where can i get imuran without rx
buy cheap imuran without insurance buy cheap imuran tablets order generic imuran no prescription
how to buy imuran without a prescription cost of generic imuran no prescription buying imuran no prescription
Pills prescribing information. What side effects can this medication cause?
where to get generic mesalamine without insurance
Best trends of meds. Read information now.
Доменная почта — корпоративный почтовый сервис email для организаций 2025 почта для домена организации
cost of generic lioresal without prescription
Доменная почта — корпоративный почтовый сервис email для организаций 2025 почта для домена
can i order generic finpecia price cost of finpecia cost of generic finpecia
can i get finpecia for sale order generic finpecia without a prescription where can i buy finpecia without prescription
how can i get generic finpecia without rx
generic finpecia without dr prescription can i get cheap finpecia pill where to buy generic finpecia without prescription
where to buy cheap finpecia without a prescription can you buy cheap finpecia no prescription where to buy finpecia without prescription
Medicine information sheet. Generic Name.
buy cheap azelastine pills
Actual about medication. Read information now.
Le priligy achat en ligne est rapide et sГ©curisГ©.
can you buy generic precose without dr prescription
Le priligy gГ©nГ©rique est une option Г©conomique sans compromis sur la qualitГ©.
order generic mobic pills cheap mobic prices where to buy generic mobic pill
can you get cheap mobic no prescription cheap mobic for sale can i purchase mobic
how can i get cheap mobic pill
cost cheap mobic without rx can i buy mobic for sale generic mobic online
cost of cheap mobic without insurance cost of generic mobic without a prescription can i get cheap mobic without a prescription
Medicines prescribing information. Short-Term Effects.
tamsulosin hydrochloride nedir
Everything news about medication. Read information now.
матрешки
get prednisone without a prescription can prednisone make you depressed buying viagra online prednisone
can you take prednisone long term how to get generic prednisone without insurance order prednisone online cheap
prednisone 20mg by mail without prescription
can i order cheap prednisone without insurance how long can you take prednisone 20 mg prednisone dosage too high
how can i get prednisone without dr prescription how to buy prednisone prednisone oral side effects
https://vminske.by/fashion/regulirovka-okon-pvh-vazhnost-i-osnovnye-aspekty/
[url=https://betano.directorio-de-casinos-mx.com]betano.directorio-de-casinos-mx.com[/url]
Download latest version of the application bookmaker Betano – win right now!
http://www.betano.directorio-de-casinos-mx.com
get cheap remeron tablets
матрешка купить
cost cheap mestinon without dr prescription how can i get cheap mestinon for sale generic mestinon without a prescription
get generic mestinon can i order cheap mestinon pill where buy generic mestinon pill
where buy mestinon pills
can you get cheap mestinon for sale can i get mestinon for sale how to get generic mestinon without a prescription
can i get mestinon without dr prescription cost of cheap mestinon price order cheap mestinon online
Функциональное тестирование программного обеспечения: как мобильные приложения, сайты и веб-сервисы проверяют на соответствие требованиям бизнеса и пользователей? Виды, задачи, этапы и примеры сценариев тестов, которые позволяют исправить ошибки разработчиков: https://vc.ru/u/3791103-infa-v-dele/1777821-funkcionalnoe-testirovanie-na-primerah-celi-vidy-instrumenty-i-trudnosti
Comment utiliser Ventolin correctement ? Visitez ventolin utilisation.
where buy generic Stromectol online
where to buy cheap finpecia pills can i buy finpecia without prescription how can i get generic finpecia
can i order generic finpecia no prescription where buy finpecia without dr prescription can i get generic finpecia without prescription
cost of generic finpecia without rx
get cheap finpecia without rx can i get cheap finpecia tablets order generic finpecia no prescription
where can i buy generic finpecia buy cheap finpecia without a prescription how to get generic finpecia tablets
where buy cheap valtrex pill
Allergic conjunctivitis treatment experts Allergic conjunctivitis treatment specialists Allergic conjunctivitis treatment facilities
Allergic conjunctivitis treatment clinics Allergic conjunctivitis treatment strategies Allergic conjunctivitis treatment strategies
Allergic conjunctivitis treatment duration
Allergic conjunctivitis treatment schedules Allergic conjunctivitis treatment options Allergic conjunctivitis treatment services
Allergic conjunctivitis antihistamine eye drops Allergic conjunctivitis treatment protocols Allergic conjunctivitis treatment guidelines
Cialis is used to treat erectile dysfunction (impotence) and symptoms of benign prostatic hypertrophy (enlarged prostate). Another brand of tadalafil is Adcirca, which is used to stromectol for sale Viagra can help men with erectile dysfunction (ED) get and maintain an erection, but there are side effects. Learn more about Viagra s effects on the body.
мрт питер [url=www.mrt-spb11.ru/]мрт питер[/url] .
buying generic seroquel price
These are really impressive ideas in on the topic of blogging.
You have touched some pleasant factors here. Any way keep up wrinting.
where to get generic inderal prices how can i get generic inderal without dr prescription can you get generic inderal without a prescription
can i purchase inderal without rx can i get generic inderal without prescription how can i get generic inderal prices
where to buy cheap inderal
can i get cheap inderal without rx can i order inderal without rx how to get inderal pills
where buy cheap inderal no prescription buying generic inderal without prescription can you buy inderal no prescription
Berikut artikel yang Anda minta berdasarkan konteks sebelumnya:
Misteri Tulisan Yesus di Pasir: Rahasia Tersembunyi dalam Kitab Suci
Dalam tradisi Kristen, salah satu momen paling misterius adalah ketika Yesus menulis di pasir saat menghadapi seorang perempuan yang tertangkap berzina. Apa sebenarnya yang ditulisnya?
Jejak Ilahi dalam Tulisan
Merujuk pada Kitab Keluaran, Allah sendiri pernah menulis dengan jari-Nya di atas batu. Yesus, sebagai inkarnasi Ilahi, tampaknya mengulang tindakan sakral ini.
Hipotesis Tulisan Rahasia
Beberapa sarjana menafsirkan bahwa Yesus mungkin menulis:
– Nama-nama para penuduh
– Daftar dosa mereka
– Ayat-ayat hukum yang mereka langgar
Makna Tersembunyi
Tindakan menulis di pasir bukan sekadar gerakan acak, tetapi memiliki signifikansi teologis mendalam. Yesus secara simbolis mengungkapkan kebenaran tersembunyi tentang kemanusiaan.
Kesimpulan
Meskipun isi tulisan tetap menjadi misteri, tindakan Yesus menunjukkan kebijaksanaan yang melampaui pemahaman manusia.
can you buy generic celebrex without a prescription
where can i get finasteride for sale cost generic finasteride price how can i get finasteride no prescription
where to buy cheap finasteride price can you get cheap finasteride pills how can i get finasteride without rx
liquid finasteride for hair loss
where can i get cheap finasteride without a prescription can i buy cheap finasteride for sale finasteride buy
finasteride 1mg online pharmacy how can i get finasteride without a prescription how to buy cheap finasteride without insurance
I do not even know how I ended up here but I thought this post was great I do not know who you are but certainly youre going to a famous blogger if you are not already Cheers
мрт питер [url=www.mrt-spb12.ru/]мрт питер[/url] .
can i order cheap mobic without prescription cheap mobic without insurance where can i buy mobic without insurance
cost cheap mobic for sale can i buy cheap mobic no prescription where to buy generic mobic without rx
how to get mobic
how to buy mobic online buy generic mobic without dr prescription where to get mobic without dr prescription
can i buy mobic no prescription buying cheap mobic without rx where to buy mobic
Когда включаешь «Однажды в сказке 1 сезон», попадаешь в удивительный мир, где реальность сплетается с фантазией так тесно, что невозможно сразу понять, где заканчивается одно и начинается другое. Сюжет первой главы этой истории строится вокруг Эммы Свон, обычной на первый взгляд женщины с непростым прошлым однажды в сказке 1 сезон
Регистрация в Аркада Казино открывает доступ ко всем возможностям платформы. Заполните анкету, подтвердите данные и начните игру. Новые игроки получают приветственные бонусы.
arkada регистрация
Продажа русских сувениров — наш основной бизнес. Интернет-магазин «Ай, Матрешки» собрал одну из крупнейших и интереснейших в стране коллекций лаковая миниатюра
видео уроки покера pokerstars
обучающие уроки покера pokerstars
Loving the info on this website , you have done outstanding job on the blog posts.
Banzai Slots propose les jeux de 38 fournisseurs de logiciels réputés du secteur.
very good post, i certainly love this web site, keep on it
Harry Kane is one of the best strikers in modern football | The latest news about Harry Kane’s performance in Bayern Munich is fascinating harry kane com mx | Harry Kane’s contribution to the England national team is immense | Harry Kane has proven that hard work and consistency lead to greatness | Fans eagerly follow Harry Kane’s journey in the Bundesliga [url=https://harry-kane.com.mx/]Harry Kane stats[/url].
When are you going to post again? You really entertain me!
сувениры
Amazing content on your website.
Dispositivos de equilibrado: fundamental para el funcionamiento estable y óptimo de las máquinas.
En el mundo de la innovación moderna, donde la productividad y la estabilidad del equipo son de alta trascendencia, los aparatos de equilibrado cumplen un tarea fundamental. Estos aparatos adaptados están creados para ajustar y estabilizar piezas giratorias, ya sea en dispositivos de fábrica, automóviles de traslado o incluso en electrodomésticos domésticos.
Para los técnicos en mantenimiento de aparatos y los técnicos, trabajar con sistemas de balanceo es esencial para promover el rendimiento estable y fiable de cualquier sistema rotativo. Gracias a estas alternativas avanzadas avanzadas, es posible reducir considerablemente las oscilaciones, el sonido y la carga sobre los sujeciones, aumentando la vida útil de partes costosos.
De igual manera relevante es el rol que tienen los equipos de equilibrado en la asistencia al usuario. El apoyo especializado y el soporte regular usando estos dispositivos posibilitan dar servicios de gran nivel, aumentando la contento de los consumidores.
Para los titulares de emprendimientos, la financiamiento en equipos de balanceo y detectores puede ser esencial para aumentar la rendimiento y rendimiento de sus equipos. Esto es particularmente relevante para los dueños de negocios que gestionan reducidas y intermedias empresas, donde cada elemento es relevante.
Además, los dispositivos de ajuste tienen una gran aplicación en el ámbito de la protección y el control de estándar. Posibilitan localizar posibles errores, impidiendo reparaciones elevadas y averías a los aparatos. También, los datos obtenidos de estos equipos pueden utilizarse para optimizar métodos y potenciar la reconocimiento en sistemas de consulta.
Las sectores de uso de los aparatos de calibración comprenden variadas áreas, desde la producción de transporte personal hasta el control ambiental. No influye si se habla de enormes elaboraciones de fábrica o pequeños talleres de uso personal, los dispositivos de ajuste son necesarios para garantizar un rendimiento óptimo y libre de interrupciones.
Hi there, I discovered your blog via Google whilst
searching for a related subject, your site got here up, it appears great.
I’ve bookmarked it in my google bookmarks.
Hi there, just changed into aware of your weblog via Google, and located that it is truly informative.
I’m going to be careful for brussels. I’ll be grateful in the event you continue this in future.
Lots of other people shall be benefited from your writing.
Cheers!
Com uma ampla seleção de jogos, apostas esportivas, esports e apostas em esportes virtuais, a plataforma oferece um catálogo premium de uma marca licenciada e confiável. Confiança, inteligência e lealdade são os pilares que sustentam a Mostbet Casino, que ainda proporciona bônus e promoções exclusivas, métodos de pagamento locais reconhecidos e ferramentas para um jogo responsável. Isso fortalece a reputação da Mostbet Casino como uma opção segura e de confiança. Acesse o cassino ao vivo e aproveite uma das experiências mais imersivas, com uma variedade de jogos e dicas sobre como jogar Mostbet Portugal.
Для входа в Аркада Казино используйте email и пароль. Если забыли пароль, его можно восстановить через почту. После входа доступны депозиты, игры и бонусы.
аркада казино официальный сайт
русские подарки
Medicament prescribing information. Brand names.
get nortriptyline without prescription
Best what you want to know about drug. Get information now.
Meds prescribing information. Brand names.
how can i get cheap imitrex pill
Some information about drugs. Get information here.
Arkada Site Фриспины – отличный шанс увеличить выигрыш. Получите бесплатные вращения за регистрацию или пополнение счета. Используйте их для популярнейших слотов.
аркада официальный сайт
Medicine information sheet. What side effects?
where can i get cheap tolterodine prices
Some information about drugs. Get information here.
Первый сезон — это не просто история о противостоянии добра и зла, это настоящий квест, полный загадок, неожиданных поворотов и встреч с героями сказок, которые предстали в совершенно новом свете однажды в сказке 1 сезон
this tactic gives to you to use personal income to receive more dimensional payouts, without risking too round an initial https://meetuphappyhour.com/the-intricacies-and-advantages-of-modern-betting-sites-2.
Первый сезон — это не просто история о противостоянии добра и зла, это настоящий квест, полный загадок, неожиданных поворотов и встреч с героями сказок, которые предстали в совершенно новом свете https://odnazhdy-v-skazke-1-sezon.ru/
Medicine information for patients. Generic Name.
can i purchase kamagra price
Actual about medicament. Read information now.
дмитрий лесной покер школа
дмитрий лесной покер обучение
[url=https://betmaster.directorio-de-casinos-mx.com]www.betmaster.directorio-de-casinos-mx.com[/url]
Download application casino Betmaster – win right now!
http://www.betmaster.directorio-de-casinos-mx.com
Drugs information for patients. What side effects?
can i order cheap celebrex without a prescription
Best trends of drug. Read here.
Немцы настаивают на том, что это единственный автомобиль на рынке с третьим уровнем автономности. Если вы оказались в пробке на шоссе, просто нажмите кнопку и достаньте книгу для чтения. Компьютер останавливается и запускается, сохраняя вам самые раздражающие части вождения hrv-club.ru
Наши массажистки посвятят Вам максимальное время и удивят профессиональными навыками. Все наши девушки овладели различными техниками массажа и готовы удовлетворить любого гостя, исполняя любую программу в нашем салоне «Оазис» Эротический массаж в Сочи
Drug information sheet. What side effects can this medication cause?
is meloxicam good for arthritis
Everything about medicament. Get here.
Kudos. Quite a lot of forum posts!
Meds prescribing information. Drug Class.
where buy lansoprazole no prescription
Actual news about medicine. Get here.
generic avodart no prescription cost of cheap avodart without prescription where can i get cheap avodart for sale
where buy avodart online where can i buy cheap avodart pills can i purchase cheap avodart without a prescription
how to buy cheap avodart online
where to get generic avodart price how to buy generic avodart avodart 0.5 mg tablet
generic avodart without rx how can i get generic avodart without insurance get avodart without a prescription
Medication information sheet. Drug Class.
can i order generic keflex price
Best what you want to know about pills. Get now.
прокапать капельницу на дому цена [url=www.vivod-iz-zapoya.site]прокапать капельницу на дому цена[/url] .
методы кодирование от алкоголизма отзывы [url=kodirovanie-alkogolizma.site]методы кодирование от алкоголизма отзывы[/url] .
7К казино представляет собой новый уникальный проект, запущенный в 2023 году. На его официальном сайте пользователей ожидает более двух сотен лицензионных игр, выгодные бонусы и несколько проверенных платежных сервисов для проведения денежных переводов казино 7K
7К казино представляет собой новый уникальный проект, запущенный в 2023 году. На его официальном сайте пользователей ожидает более двух сотен лицензионных игр, выгодные бонусы и несколько проверенных платежных сервисов для проведения денежных переводов казино 7K
smoking cessation and copd what triggers copd exacerbation copd medication management
copd treatment options copd exacerbation prevention awareness copd lifestyle modifications
copd exacerbation action plan
copd exacerbation prevention symptom tracking tools copd management copd exacerbation prevention early detection campaigns
copd exacerbation prevention awareness copd exacerbation management copd treatment options
https://dvorik.uz/user/Wamuwesif/
clindamycin same as cleocin cleocin pediatric dose epocrates online cost of generic cleocin prices
where to buy cleocin t can cleocin cause yeast infection Cleocin maximum dose
cleocin vaginal ovules dose
cleocin gel italia cleocin 2% solution book cleocin side effects headache
cleocin t uses cleocin solution side effects why is cleocin prescribed
https://www.allmyusjobs.com/author/mostbet04/
Drug information sheet. What side effects?
how to buy generic actos without insurance
Best news about pills. Get information now.
Witaj na oficjalnej stronie kasyna online Slottica Polska, które oferuje gry z polską walutą! To idealne miejsce dla tych, którzy chcą miło spędzić czas wolny, relaksując się i zanurzając w świat ekscytującej rozgrywki. Slottica to wiodące, licencjonowane kasyno, które zdobyło popularność wśród graczy od momentu uruchomienia w 2019 roku. To wszystko zasługa naszej atrakcyjnej oferty i hojnego programu bonusowego. Kluczowym elementem, który ułatwia wygrywanie znaczących sum pieniężnych w Slottica Kasyno, jest dostępność gier wyłącznie od topowych producentów. Użytkownicy wyrażają zadowolenie z możliwości sprawnej realizacji wypłat wysokich wygranych, co jest możliwe dzięki szerokiemu spektrum powszechnie akceptowanych metod płatności na terenie Polski.
порно фильмы в хорошем качестве [url=http://pornofilmy-video1.ru]http://pornofilmy-video1.ru[/url] .
can i purchase generic forxiga for sale bnf dapagliflozin can i buy cheap forxiga without insurance
get forxiga tablets how to get generic forxiga for sale where to buy cheap forxiga pills
where to buy cheap forxiga
where to get forxiga for sale where to get generic forxiga can you get generic forxiga without prescription
can you buy generic forxiga prices dapagliflozine can you buy forxiga without insurance
дом престарелых крым симферополь [url=https://www.xn—–1-53dwibb3a5adehvkaijkcgoft4dwa1orb.xn--p1ai]https://www.xn—–1-53dwibb3a5adehvkaijkcgoft4dwa1orb.xn--p1ai[/url] .
Drug information sheet. What side effects?
atorvastatin chemist warehouse
Best about drug. Read here.
Asthma symptom tracking Asthma symptom severity tracking apps Asthma symptom severity tracking protocols
Asthma symptom severity assessment scale Asthma exacerbation Asthma symptom severity levels
Asthma symptom severity management tools
Asthma symptom severity tracking applications Asthma symptom severity mitigation strategies Asthma triggers
Asthma symptom severity reduction tactics Inflammatory airway disease Weather changes and asthma
Pills information sheet. What side effects?
how to get cheap zyban tablets
Everything news about medicines. Read here.
ashwagandha ayurveda best over the counter ashwagandha what stores sell ashwagandha
ashwagandha supplement holland and barrett ashwagandha with ksm 66 ashwagandha and weight lifting
buy ancient apothecary ashwagandha
ashwagandha powder buy will ashwagandha make me tired will ashwagandha keep me awake
is ashwagandha legal in australia ashwagandha where to buy most effective ashwagandha best rated
порно с мамками [url=https://milfland-pro1.ru/]milfland-pro1.ru[/url] .
японское порно [url=https://japanxxx-video1.ru]японское порно[/url] .
where buy generic motilium without rx can i buy motilium without prescription order motilium without a prescription
cost motilium prices can i purchase generic motilium without prescription generic motilium online
how can i get cheap motilium online
where to buy cheap motilium without dr prescription cost of generic motilium pill cost motilium without prescription
how to get motilium for sale buying motilium without rx buying generic motilium no prescription
Выбирайте эротический массаж в Сочи для уникального и расслабляющего опыта. Этот вид массажа помогает снять стресс и напряжение, даря удовольствие и новые ощущения http://nsejasconstruction.com/index.php/component/kunena/welcome-mat/1090#1090
where to get generic claritin without dr prescription where to buy generic claritin pill where buy cheap claritin no prescription
can i purchase claritin without insurance where can i buy cheap claritin online can i buy claritin without dr prescription
where buy generic claritin without prescription
where to get generic claritin without rx how to get claritin tablets generic claritin tablets
generic claritin price where can i buy claritin online buy generic claritin no prescription
Гет Икс Официальный сайт онлайн казино, где вас ждут захватывающие игры и щедрые бонусы. Получите +50% бонус за каждое вращение колеса и увеличьте свои шансы на выигрыш! Присоединяйтесь и наслаждайтесь игрой с невероятными предложениями!
Get X Официальный сайт
школа покера лесного видео
школа покера лесного курсы
cost cheap valtrex without insurance where to get valtrex online where can i buy cheap valtrex without dr prescription
how to get generic valtrex for sale can i order cheap valtrex without dr prescription can i purchase valtrex without insurance
can you get generic valtrex without a prescription
where buy valtrex no prescription can i buy cheap valtrex tablets can i purchase valtrex without insurance
can i order cheap valtrex pill cost generic valtrex generic valtrex online
Гизбо Казино — это платформа, которая привлекает внимание игроков широким ассортиментом азартных развлечений и выгодными бонусами. Здесь вы найдете слоты с прогрессивными джекпотами, настольные игры, а также турниры, которые проходят на регулярной основе Gizbo Casino
Ceux qui relèvent ces défis obtiennent des participations aux tirages au sort pour avoir la chance de gagner des vacances et des prix en argent.
get tegretol without a prescription where buy cheap tegretol for sale can i buy tegretol for sale
where can i get cheap tegretol without a prescription get generic tegretol where to buy generic tegretol
can you get cheap tegretol without insurance
buy tegretol pills where can i get cheap tegretol pill can i buy cheap tegretol prices
get generic tegretol online how can i get cheap tegretol no prescription get generic tegretol without prescription
bip39 world list [url=https://bip39-phrase.blogspot.com/2025/02/bip39-world-list-2048.html]bip39 world list[/url] .
секс милфы [url=http://milfland-pro1.ru/]секс милфы[/url] .
can i get generic benemid tablets get benemid no prescription where to get benemid for sale
how to buy cheap benemid without a prescription can you get benemid without rx buying cheap benemid without insurance
can i order benemid online
can i buy cheap benemid without insurance where can i get benemid no prescription where to get generic benemid without rx
can i get benemid prices order cheap benemid online can i purchase cheap benemid online
Рейтинг казино 2025
Наслаждайтесь игрой в любое время и в любом месте – Olymp Casino адаптирован под мобильные устройства. Удобный интерфейс и высокая производительность позволяют комфортно играть как со смартфона, так и с планшета без потери качества Олимп ком
Наслаждайтесь игрой в любое время и в любом месте – Olymp Casino адаптирован под мобильные устройства. Удобный интерфейс и высокая производительность позволяют комфортно играть как со смартфона, так и с планшета без потери качества https://shopster.kz/
http://devichnik.su/forum/39-24692-1
elon online casino [url=http://www.eloncasinofun.com]elon online casino[/url] .
where to get generic prednisolone can i get generic prednisolone prices how can i get prednisolone without dr prescription
can i buy prednisolone pills cheap prednisolone no prescription can i purchase generic prednisolone without a prescription
cheap prednisolone for sale
cheap prednisolone no prescription how to get prednisolone prednisolone sodium phosphate eye drops
can i purchase cheap prednisolone no prescription cost generic prednisolone tablets where buy generic prednisolone without insurance
can i order buspar online
When it comes to gambling online, understanding the legality and security of platforms like Royal Reels Casino is crucial for players. Royal Reels operates under Australian regulations, ensuring compliance with local laws. Additionally, their advanced encryption technology safeguards your personal and financial information https://royalreels101.com/
When it comes to gambling online, understanding the legality and security of platforms like Royal Reels Casino is crucial for players. Royal Reels operates under Australian regulations, ensuring compliance with local laws. Additionally, their advanced encryption technology safeguards your personal and financial information royal reels australia no deposit bonus
can i purchase cheap imitrex without a prescription
get generic avodart without a prescription where to buy avodart pill avodart pills description
where to buy avodart no prescription how to buy generic avodart prices avodart indications
get cheap avodart price
can you get generic avodart tablets where to get avodart without dr prescription avodart explained
how to buy cheap avodart without a prescription can i order avodart pills where to buy generic avodart
can i purchase cheap allegra tablets cheap allegra price where to get cheap allegra online
where can i buy generic allegra without a prescription cheap allegra price get allegra without prescription
where to buy allegra without rx
buy generic allegra pill can i order generic allegra without insurance buying generic allegra without rx
get allegra without insurance where to get allegra prices can i order cheap allegra without insurance
что до медицинского сообщества, то оно, фактически, как и отдельные его представители, предпочло закрыть глаза
на паршивую овцу в.
Also visit my blog post; купить диплом бурильщика
https://fiatforum.5bb.ru/viewtopic.php?id=1102#p6092
elon casino bangladesh [url=www.elonbangladeshbet.com]elon casino bangladesh[/url] .
elon online casino [url=https://elongaming.com/]elon online casino[/url] .
Используя тепловизоры, вы получаете идеальное сочетание скорости и точности, что значительно упрощает мониторинг и диагностику в самых разных областях. Как выбрать тепловизор для строительного контроля http://lyxondebian.free.fr/dokutest/doku.php?id=%20%D0%98%D1%81%D0%BF%D0%BE%D0%BB%D1%8C%D0%B7%D0%BE%D0%B2%D0%B0%D0%BD%D0%B8%D0%B5%20%D0%BC%D0%BE%D0%B1%D0%B8%D0%BB%D1%8C%D0%BD%D1%8B%D1%85%20%D1%82%D0%B5%D0%BF%D0%BB%D0%BE%D0%B2%D0%B8%D0%B7%D0%BE%D1%80%D0%BE%D0%B2:%20%D0%A3%D0%B4%D0%BE%D0%B1%D1%81%D1%82%D0%B2%D0%BE%20%D0%B8%20%D1%8D%D1%84%D1%84%D0%B5%D0%BA%D1%82%D0%B8%D0%B2%D0%BD%D0%BE%D1%81%D1%82%D1%8C
Используя тепловизоры, вы получаете идеальное сочетание скорости и точности, что значительно упрощает мониторинг и диагностику в самых разных областях. Как выбрать тепловизор для строительного контроля http://high.tforums.org/viewtopic.php?f=15&t=12296
can i purchase cheap caduet without dr prescription buy cheap caduet without dr prescription can you buy generic caduet pills
can i order cheap caduet online buying generic caduet get caduet without insurance
how can i get caduet without prescription
buy cheap caduet without a prescription how can i get generic caduet prices cost of caduet without dr prescription
where can i buy caduet pills where buy caduet pill where can i get generic caduet tablets
Great blog here! Additionally your website rather a lot up very fast! What host are you the usage of? Can I get your associate link for your host? I desire my website loaded up as fast as yours lol
Интернет – магазин керамический плитки и керамогранита, для любых поверхностей и помещений Керамогранит для ванной
actos pharmacodynamics infoactos actos replacement actos side effects
actos therapy actos cost without insurance where buy actos
buy actos online
common side effects of actos actos 15 mg side effects pioglitazone actos side effects
where buy actos actos generic actos and glipizide
can i buy cheap buspar without rx
накрутка лайков ВК
эскорт москвы [url=https://t.me/escort_moscow_pro/]эскорт москвы[/url] .
скачать 1вин [url=www.abcc.com.kg/]www.abcc.com.kg/[/url] .
Makes sense to me.
https://long-living.ru/
Kasyno i zakłady bukmacherskie MostBet zostały założone w 2009 roku i od tego czasu marka ta zdobyła silną pozycję oraz dużą popularność w branży hazardowej na całym świecie. MostBet to doskonałe połączenie zakładów sportowych oraz gier hazardowych online. Za marką stoi firma Venson LTD, której siedziba mieści się w Nikozji na Cyprze. Działalność kasyna jest regulowana licencją wydaną przez władze Curacao. Kluczowe informacje dotyczące Mostbet com zostały zaprezentowane w poniższej tabeli.
Комплекты видеонаблюдения – важный элемент системы безопасности дома, офиса, а также других помещений и уличных территорий Камеры с ночным видением
where to buy cheap motilium no prescription
Hi there everybody, here every person is sharing these familiarity, therefore it’s fastidious to read this
webpage, and I used to pay a quick visit this webpage everyday.
how to get cheap urispas for sale
can i get cheap valtrex no prescription where can i buy cheap valtrex without prescription cheap valtrex pill
cost cheap valtrex pill cost generic valtrex without a prescription order valtrex for sale
can you get generic valtrex prices
order valtrex pills buy generic valtrex prices can i get generic valtrex prices
where to get valtrex without insurance can i get cheap valtrex without insurance where buy generic valtrex online
where to get stromectol pills
Комплекты видеонаблюдения – важный элемент системы безопасности дома, офиса, а также других помещений и уличных территорий Видеонаблюдение для дома
Allergic conjunctivitis treatment guidelines Allergic conjunctivitis treatment programs Allergic conjunctivitis treatment hospitals
Allergic conjunctivitis treatment cycles Allergic conjunctivitis eye examination Allergic conjunctivitis treatment regimens
Allergic conjunctivitis diagnosis
Allergic conjunctivitis clinical symptoms Allergic conjunctivitis treatment modalities Allergic conjunctivitis treatment alternatives
Allergic conjunctivitis treatment courses Allergic conjunctivitis antihistamine medications Allergic conjunctivitis allergens
cheap capoten without a prescription
магазины интернет для беременных [url=https://ivadesign.ru/]магазины интернет для беременных[/url] .
Use the 1xBet promo code: 1XGIFT130 to receive a welcome bonus in 2025. New players will be eligible for a VIP bonus of 100% up to $130. Once you have obtained the promo code, make sure to use it during the registration process http://vavto.su/img/pages/?1xbet_promokod_pri_registracii_bonus_segodnya.html
how to buy generic plavix without insurance
Use the 1xBet promo code: 1XGIFT130 to receive a welcome bonus in 2025. New players will be eligible for a VIP bonus of 100% up to $130. Once you have obtained the promo code, make sure to use it during the registration process https://ridebass.com/pag/1xbet_promo_code_free.html
mostbet ставки скачать [url=gtrtt.com.kg]gtrtt.com.kg[/url] .
Промокод MelBet при Регистрации: FreeBonus777 укажите это код в поле во время регистрации и вы получите бонус до 19 500р, а также автоматически активируете все промо акции мелбет 2025. Зарабатывайте больше с melbet промокодом актуальным сегодня https://ua-marine.com.ua/wp-content/pages/joker_casino_ukraina_promokod.html
order cheap benemid online how to get benemid no prescription where to buy generic benemid without prescription
buying benemid pills where to buy cheap benemid pills can i get cheap benemid without a prescription
buying benemid without rx
where to get benemid how to buy generic benemid tablets cost of benemid tablets
can you get benemid pill cheap benemid no prescription buying cheap benemid price
1win’s customer support is always available to assist with any queries | 1win giris provides instant access to sports betting and casino games 1win | 1win casino has gained popularity for its fair and transparent gaming | With 1win, you can bet on football, basketball, tennis, and more | 1win Azerbaijan’s customer support is available 24/7 [url=https://1win-az-casino.com/]1win azerbaycan betting platform[/url].
1win вход [url=https://bbcc.com.kg/]1win вход[/url] .
trazodone brain wonder drug trazodone zolpidem where buy generic trazodone pills
trazodone and sexual function trazodone pill identifier trazodone 50 mg
trazodone for alcohol withdrawal
what is the lowest dose of trazodone trazodone 50mg antidepressant trazodone for insomnia user reviews
trazodone prescription coupon where to buy trazodone price get generic trazodone prices
Промокоды – это специальные коды, которые предоставляются игрокам в качестве поощрения за их активность. Они позволяют увеличить стартовый выигрыш в два раза и получить дополнительные средства на игровой счет https://electrotehnica.ru/news/o_gribkovom_zabolevanii_nogtey.html
Промокоды – это специальные коды, которые предоставляются игрокам в качестве поощрения за их активность. Они позволяют увеличить стартовый выигрыш в два раза и получить дополнительные средства на игровой счет https://www.inserrh.com/media/pgs/code_promo_18.html
безопасный скрипт обменника электронных валют
cost cheap prednisone without insurance can prednisone pills be split where can i buy prednisone 5mgover the counter
get prednisone without insurance what happens after taking prednisone buy generic prednisone prices
prednisone pharmacological action
cost cheap prednisone for sale where to get generic prednisone no prescription after stopping prednisone side effects
c prednisone prices get prednisone prescription online order cheap prednisone without a prescription
cost of vermox for sale
where to buy doxycycline in bangkok doxycycline dr buy can i buy generic doxycycline price
cost of cheap doxycycline online purchase doxycycline without a prescription selling doxycycline without a prescription
cost of generic doxycycline online
where to buy cheap doxycycline without dr prescription doxycycline hyclate 100mg price buy doxycycline hyclate no prescription
chlamydia treatment doxycycline 100mg doxycycline common side effects cost generic doxycycline tablets
lisinopril hydrochlorothiazide generic
colchicine effets secondaires vidal colchicine online order dangers of colchicine
lowest price colchicine generic how long colchicine for pericarditis what are the side effects of colchicine
colchicine brand name
purchase colchicine generic cheapest price for colchicine does colchicine react with xarelto
purchase colchicine generic colchicine for pericardial inflammation colchicine in dialysis patients
игра ракета на деньги 1win скачать [url=http://bbcc.com.kg]http://bbcc.com.kg[/url] .
Medicines information sheet. Short-Term Effects.
cost of cheap prednisolone online
Some what you want to know about medicament. Read information now.
Are you a sports enthusiast looking to elevate your betting experience? Look no further than BetWinner, a platform that offers a seamless and thrilling way to engage with your favorite sports tournaments https://mensaceuta.com/read-blog/10483
https://www.empowher.com/groups/Cryptocurrencys-Disruptive-Impact-Online-Gambling
1xBet – одна из ведущих компаний в сфере ставок, которая предлагает игрокам широкий выбор видов спорта и разнообразные ставки. Одним из преимуществ игры в 1xBet являются бонусные предложения, которые помогут вам увеличить свои шансы на успех и получить дополнительные выгоды https://hdvideo.cat/pag/le_code_promo_de_1xbet_maroc_bonus.html
ทดลองเล่นสล็อต
ทดลองเล่น เกมสล็อต PG คืออะไรกันแน่? เพราะเหตุใด จึงกลายเป็น เกมที่คนชอบมาก?
เกมสล็อตออนไลน์ คือเกมที่ เป็นที่รู้จัก มาก ในทุกยุคทุกสมัย พร้อมทั้ง นับเป็น หนึ่งในจำนวน เกมที่มีผู้คน รู้จักดี และยัง ชื่นชอบ อย่างมาก ในโลกของ เกมออนไลน์ แต่สำหรับ ผู้ที่ยังเป็นอยู่ ผู้เริ่มต้น หรืออาจจะ มีประสบการณ์ การเล่นเกม เพียงเล็กน้อย วันนี้เราจะ จะชวนคุณ มาทำความเข้าใจกับ เล่นฟรี เกมสล็อต PG ซึ่งเป็น เกมสล็อตออนไลน์ ที่เป็นที่นิยม อย่างสูง โดยที่ คุณสามารถ ทำความเข้าใจ พร้อมทั้ง เริ่มเล่นเกม ได้อย่างรวดเร็ว และยัง เพลิดเพลิน ร่วมกับ ประสบการณ์ การเล่น ที่สนุก และ น่าทึ่ง
เล่นฟรี เครื่องสล็อต PG คือสิ่งใด?
ทดลองเล่น เกมสล็อต PG ถือเป็นเกม สล็อตออนไลน์ ที่สร้างขึ้น จาก บริษัทพัฒนาเกม PG Soft ซึ่ง หนึ่งในบรรดา ผู้สร้าง เกมออนไลน์สล็อต ชั้นนำของโลก ในระดับโลก เกมนี้ ได้รับแรงบันดาลใจ มาจาก เครื่องสล็อต แบบคลาสสิก แต่ เพิ่มความ ความทันสมัยและความน่าสนใจ และยัง ความสนุกสนาน เข้าไปในเกม ด้วย เกมดังกล่าว มีอยู่ 5 แถว พร้อมทั้ง 15 รูปแบบการชนะ รูปแบบการรับรางวัล ซึ่งทำให้ ผู้เล่น มีโอกาส ได้รับรางวัล ได้หลายรูปแบบ
สัญลักษณ์ในเกม ในเกมสล็อต สล็อตแมชชีน PG นั้นมี มีความหลากหลาย เช่นได้แก่ รูปเชอร์รี่, เลข 7, ไอคอนเพชร, และยัง รูปสัญลักษณ์ อื่นๆอีกมากมาย ที่สัมพันธ์ กับรูปแบบของ ของเกม ซึ่ง แต่ละเกมสล็อต จะมี ธีม พร้อมทั้ง รูปแบบเกม ที่แตกต่าง ไป เช่นเช่น ธีมป่า, ธีมเทพ, ธีมอาหารการกิน, หรือแม้แต่ ธีมผจญภัย เป็นต้นมา
ด้วยเหตุใด ลองเล่น สล็อต PG จึงกลายเป็น เกมที่ได้รับความนิยม?
ความง่าย ในการเล่นเกมออนไลน์
ลองเล่น เกมสล็อต PG จัดเป็นเกม ที่ง่ายต่อการเข้าใจ ไม่ยาก เหมาะกับ ผู้ที่ยังไม่ชำนาญ พร้อมทั้ง มือเก่า ผู้เล่นสล็อต เพียงแค่ เลือกจำนวน จำนวนเงินเดิมพัน กดเล่น รวมทั้ง รอ ผลลัพธ์ ที่ ระบบการเล่นเกม ที่เข้าใจง่าย ทำให้ ผู้เล่น สามารถได้ สนุก ได้โดยไม่ต้อง ไม่ต้องกังวล เกี่ยวกับเรื่อง กฎเกณฑ์ต่างๆ ที่ซับซ้อน
รูปแบบ การมอบรางวัล ที่หลากหลาย
เกมสล็อตบนอินเทอร์เน็ต PG มีอยู่ รูปแบบการชนะ ให้ได้รางวัล มากถึงจำนวน 15 รูปแบบ ที่ มากกว่าจำนวน เกมสล็อตคลาสสิก ทั่วไปทั่วๆไป ส่งผลให้ ผู้เล่นเกม มีโอกาสได้ ชนะรางวัล ได้บ่อยๆ นอกจากนั้น ยังมี ฟีเจอร์พิเศษ เช่นเช่น การหมุนฟรีสปิน, ตัวคูณ, รวมทั้ง รางวัลโบนัส ที่เพิ่ม ความเพลิดเพลิน ให้กับผู้เล่น การเล่นเกม
clindamycin cleocin side effects mechanism of action for cleocin where can i get cheap cleocin
cleocin 2% solution in mg cleocin maximum dose cleocin drug use
does cleocin cause speepyness
purchase cleocin for sale cleocin solution for acne world pharmacy cleocin
cleocin 300 mg eight hours cleocin antibiotic ingredients cleocin drug family children
Meds information leaflet. Brand names.
hydrochlorothiazide storage
All what you want to know about medication. Read here.
can i order generic doxycycline pills how to get doxycycline online doxycycline monohydrate 40 mg
where can i get generic doxycycline without dr prescription buy doxycycline 200mg online cheap doxycycline what not to eat
buying cheap doxycycline no prescription
can you eat with doxycycline how to get generic doxycycline pill doxycycline 50 mg tablets
can you get generic doxycycline pill where to buy generic doxycycline no prescription buy doxycycline australia
furosemide 100mg tablet – betamethasone where to buy3 order betamethasone creams
Интернет – магазин керамический плитки и керамогранита, для любых поверхностей и помещений Плитка керамическая
where to get valtrex price where to buy generic valtrex price can i buy generic valtrex prices
can i order cheap valtrex can you get generic valtrex for sale where can i get generic valtrex price
where buy generic valtrex
how to get valtrex for sale can i order valtrex for sale where buy generic valtrex tablets
where to get generic valtrex tablets can i get cheap valtrex without insurance cost generic valtrex
fundamental advantage of this strategy is risk control:
you accurately know how much can lose in the worst case scenario and can Aviator game review your money.
When are you going to post again? You really entertain me!
get generic lisinopril without dr prescription can you get cheap lisinopril pills lisinopril hctz without a pirscription
where to get generic lisinopril allergic reactions to lisinopril hydrochlorothiazide can i get lisinopril without insurance
when should i take lisinopril
lisinopril hctz side effects lisinopril side effects in pregnancy get generic lisinopril pill
buy generic lisinopril online no rx hctz to lisinopril conversion can i buy lisinopril without prescription
Ведение бухгалтерии
The variety of games on 1win casino makes it a top choice for players | The bonuses at 1win Azerbaijan make betting even more exciting 1win aviator azerbaycan | The user-friendly interface of 1win ensures a seamless experience | 1win giris offers a seamless betting experience for sports enthusiasts | Players enjoy competitive odds and betting options at 1win [url=https://1win-az-casino.com/]www.1win-az-casino.com[/url].
Jenna Jameson
Drug information leaflet. Short-Term Effects.
buying lisinopril without a prescription
Everything information about drugs. Read information here.
1 го казино
порно германия [url=www.trax-nemeckoe1.ru]порно германия[/url] .
Medication information sheet. What side effects?
can i order dramamine without prescription
Best what you want to know about drugs. Read information now.
Ведение бухгалтерии
[url=][/url]
Временная регистрация в Москве – быстро и надежно!
Нужна временная прописка для работы, учебы или оформления документов?
Оформим официальную регистрацию в Москве всего за 1 день. Без очередей,
с гарантией и юридической чистотой!
1. Подходит для граждан РФ и СНГ
2. Регистрация от 3 месяцев до 5 лет
3. Легально, с внесением в базу МВД
Работаем без предоплаты! Документы можно получить лично или дистанционно.
Доступные цены, оперативное оформление!
Звоните или пишите в WhatsApp прямо сейчас – поможем быстро и без лишних вопросов!
Временная регистрация в Москве
[url=][/url]
how to buy generic doxycycline pills buy doxycycline no prescription online doxycycline order online
doxycycline warnings can you get generic doxycycline without prescription how to get cheap doxycycline without insurance
cost cheap doxycycline
how to buy cheap doxycycline without prescription doxycycline hyclate 100mg buy can i buy doxycycline prices
where to get generic doxycycline for sale doxycycline single dose lyme disease buy antibiotics doxycycline canada
Medicines prescribing information. Drug Class.
how to buy paxil no prescription
Everything information about meds. Read information here.
weishaupt fehlercode liste https://weishauptfehlercodeliste.tumblr.com/
buying cheap nemasole price where to get generic nemasole for sale how to buy cheap nemasole no prescription
how to get cheap nemasole without rx buy generic nemasole without a prescription where to get nemasole without a prescription
where to get cheap nemasole no prescription
buying nemasole prices buying nemasole pill cost generic nemasole
can i purchase cheap nemasole for sale can i purchase generic nemasole online where to buy generic nemasole without insurance
[url=][/url]
Временная регистрация в Москве – быстро и надежно!
Нужна временная прописка для работы, учебы или оформления
документов? Оформим официальную регистрацию в Москве
всего за 1 день. Без очередей, с гарантией и
юридической чистотой!
? Подходит для граждан РФ и СНГ
? Регистрация от 3 месяцев до 5 лет
? Легально, с внесением в базу МВД
Работаем без предоплаты! Документы можно получить лично или дистанционно.
Доступные цены, оперативное оформление!
Звоните или пишите в WhatsApp прямо сейчас – поможем быстро и
без лишних вопросов!
Временная регистрация в Москве
[url=][/url]
how to get cheap celexa price cost of cheap celexa no prescription can i buy celexa online
where can i buy cheap celexa online buy celexa tablets buy generic celexa without a prescription
buying cheap celexa tablets
how to buy cheap celexa without a prescription how to buy celexa prices can you get cheap celexa
cost cheap celexa without a prescription can you get generic celexa pills get celexa pill
Si vous souhaitez déposer des sommes plus importantes à l’avenir sur un casino en ligne, nous vous recommandons fortement de suivre ces étapes.
cost sporanox tablets
The hairstyle of Phil Foden has become a trend among young football fans | Phil Foden’s height gives him an advantage on the field | Phil Foden’s dancing skills went viral on social media | Phil Foden’s daughter brings joy to his life off the field | The ethnicity of Phil Foden adds to his unique background [url=https://phil-foden.com.mx/]Phil Foden awards and trophies[/url].
Pills information for patients. What side effects?
apo finasteride 5 mg
Actual news about meds. Get here.
Предлагаем услуги профессиональных инженеров офицальной мастерской.
Еслли вы искали ремонт фотоаппаратов canon адреса, можете посмотреть на сайте: ремонт фотоаппаратов canon
Наши мастера оперативно устранят неисправности вашего устройства в сервисе или с выездом на дом!
I was curious if you ever thought of changing the page layout of your website?
Its very well written; I love what youve got to
say. But maybe you could a little more in the way of
content so people could connect with it better. Youve got an awful lot of text
for only having one or two pictures. Maybe you could space it out
better?
Флебологическая клиникапроводит диагностику и лечение варикоза, флебита, трофических изменения ткани в амбулаторно в клинике и на дому Флеболог в СПб
เล่นฟรี สล็อต PG หมายถึงอะไร? ด้วยเหตุใด ถึงเป็น เกมที่คนชอบมาก?
เกมสล็อตดิจิทัล ถือเป็นเกมที่ เป็นที่ชื่นชอบ อย่างแพร่หลาย ตลอดทุกยุคทุกสมัย พร้อมทั้ง จัดเป็น หนึ่งในจำนวน เกมที่ผู้เล่น รู้จักกันดี และ ชื่นชอบ ที่สุด ในวงการ เกมบนอินเทอร์เน็ต แต่ในกรณีของ ผู้ที่ยังเป็นอยู่ ผู้ที่ยังไม่ชำนาญ หรือ มีประสบการณ์น้อย การเล่นสล็อต น้อยมาก วันนี้พวกเรา จะนำคุณ มาทำความรู้จักกับ ทดลองเล่น เครื่องสล็อต PG ซึ่งถือเป็น เกมสล็อตเว็บตรง ที่คนนิยม อย่างแพร่หลาย ด้วย คุณจะได้ เรียนรู้ รวมทั้ง เริ่มต้นเล่น ได้เร็ว พร้อมกับ สนุกสนาน กับ ประสบการณ์ การเล่นเกม ที่น่าตื่นเต้น พร้อมทั้ง น่าทึ่ง
ลองเล่น สล็อต PG คืออะไรกันแน่?
ทดลองเล่น สล็อตแมชชีน PG คือเกม เกมสล็อตบนอินเทอร์เน็ต ที่สร้างขึ้น จาก บริษัท PG Soft ซึ่ง หนึ่งใน ผู้พัฒนา เกมออนไลน์สล็อต ยอดนิยม ทั่วโลก เกมนี้ ได้แนวคิด จากเกม เครื่องสล็อต แบบคลาสสิก แต่มีการ เพิ่มเข้าไป ความทันสมัยและความสนุก และ ความเพลิดเพลิน เข้าไป ผ่าน เกมสล็อต มีอยู่ 5 รีลแนวตั้ง และยัง 15 แบบ รูปแบบการได้รางวัล ซึ่งส่งผลให้ ผู้เล่นสล็อต มีโอกาสที่จะ ชนะรางวัล ได้อย่างมาก
สัญลักษณ์ ในเกมสล็อต เครื่องสล็อต PG นั้นมีอยู่ มีความหลากหลาย เช่นได้แก่ เชอร์รี่, เลข 7, รูปเพชร, และ สัญลักษณ์ในเกม อื่น ๆ ที่เกี่ยวข้องกับ กับรูปแบบของ เกม ซึ่ง แต่ละเกมสล็อต มี รูปแบบ และ รูปแบบการเล่น ที่ต่างกัน ออกไปจากเดิม เช่น ธีมป่า, ธีมเทพเจ้าโบราณ, ธีมการกิน, หรือแม้แต่ ธีมผจญภัย เป็นต้นมา
ด้วยเหตุใด ทดสอบ เกมสล็อต PG จึงเป็นที่นิยม เกมที่นิยม?
ความง่าย ในการเล่นสล็อต
เล่นฟรี เครื่องสล็อต PG คือเกม ที่เรียนรู้ได้ง่าย ไม่สลับซับซ้อน เหมาะสำหรับทั้ง ผู้ที่เพิ่งเริ่ม และยัง ผู้เล่นเก่า ผู้เล่นสล็อต แค่ เลือกจำนวน จำนวนเงินเดิมพัน กดเล่น รวมทั้ง รอ ผลลัพธ์ที่ได้ ซึ่งส่งผลให้ ระบบการเล่นสล็อต ที่ไม่ซับซ้อน ทำให้คุณ ผู้เล่นออนไลน์ สามารถได้ เพลิดเพลิน ได้โดย ไม่ต้องกังวลใจ เกี่ยวกับเรื่อง กฎ ที่ยุ่งยาก
รูปแบบการ การแจกรางวัล ที่แตกต่าง
เกมออนไลน์สล็อต PG มีให้เลือก รูปแบบการชนะ ให้รับรางวัล มากถึง 15 รูปแบบ ซึ่ง มากกว่าทั่วไป สล็อตคลาสสิก ทั่วไปๆ ส่งผลให้ ผู้เล่นเกม มีโอกาส ได้รับรางวัล ได้บ่อยๆ อีกทั้ง ยังมีให้เลือก ฟีเจอร์ที่น่าสนใจ ตัวอย่างเช่น การหมุนฟรี, ตัวคูณเงินรางวัล, และยัง โบนัสพิเศษ ที่เสริม ความสนุก ให้กับคุณ การเล่น
cost of cheap doxycycline for sale where to buy generic doxycycline without insurance doxycycline hyclate 100mg lowest price
where to buy doxycycline for sale can i order generic doxycycline without prescription doxycycline hyclate
doxycycline hydrochloride capsule
can i order doxycycline doxycycline nz how to get cheap doxycycline
doxycycline 100 mg capsules where buy doxycycline prices can you buy doxycycline without prescription
Флебологическая клиникапроводит диагностику и лечение варикоза, флебита, трофических изменения ткани в амбулаторно в клинике и на дому Флеболог консультайия +узи вен
can you buy cheap coreg without rx
Pills information sheet. What side effects can this medication cause?
can i get cheap actos tablets
Actual what you want to know about medicament. Get here.
drug interactions with colchicine colchicine 0.6 mg tablet generic colchicine 0.5mg dosage
colchicine 0.6 price colchicine directions for gout colchicine for gout dosage adults
gout flare up treatment colchicine
will colchicine clear polycarticular gout colchicine colcrys mitigare gloperba where to buy colchicine
colchicine tablets over the counter colchicine 0.5 mg daily how often can you take colchicine
how to get generic cozaar without dr prescription
Medication information for patients. Cautions.
can i purchase cheap lisinopril
Actual what you want to know about meds. Get information here.
I have been surfing on-line greater than three hours as of late, but I by
no means found any attention-grabbing article like yours.
It is pretty worth sufficient for me. Personally, if all
webmasters and bloggers made good content material as you
probably did, the net can be much more useful than ever before.
ashwagandha himalaya benefits most effective ashwagandha best rated where buy ashwagandha prices
top rated ashwagandha gummies buying generic ashwagandha for sale where to purchase pure ashwagandha
ksm 66 ashwagandha side effects
most effective ashwagandha supplement ashwagandha dosage for muscle building how to choose ashwagandha supplement
recommended ashwagandha brand most potent ashwagandha who should not use ashwagandha
Medication information sheet. Generic Name.
can i get generic esomeprazole online
All about drug. Read now.
Vous retrouvez toutes les options de divertissement de la ludothèque pour vous amuser en toute quiétude.
stehovani s durazem na kvalitu pronajem dodavky na stehovani
buying valtrex without prescription
Vibracion del motor
Aparatos de ajuste: esencial para el funcionamiento fluido y efectivo de las equipos.
En el entorno de la ciencia actual, donde la eficiencia y la confiabilidad del equipo son de gran significancia, los sistemas de balanceo juegan un función crucial. Estos equipos dedicados están creados para balancear y regular elementos giratorias, ya sea en dispositivos productiva, transportes de traslado o incluso en aparatos domésticos.
Para los especialistas en conservación de sistemas y los técnicos, utilizar con sistemas de balanceo es fundamental para proteger el rendimiento uniforme y fiable de cualquier sistema rotativo. Gracias a estas alternativas tecnológicas modernas, es posible minimizar notablemente las sacudidas, el sonido y la carga sobre los sujeciones, aumentando la vida útil de elementos costosos.
Igualmente significativo es el función que tienen los aparatos de ajuste en la asistencia al comprador. El soporte profesional y el mantenimiento constante aplicando estos equipos facilitan dar servicios de gran calidad, aumentando la agrado de los consumidores.
Para los responsables de negocios, la inversión en sistemas de equilibrado y sensores puede ser importante para aumentar la rendimiento y productividad de sus aparatos. Esto es especialmente importante para los inversores que dirigen modestas y intermedias negocios, donde cada elemento vale.
Asimismo, los dispositivos de ajuste tienen una vasta uso en el campo de la prevención y el control de estándar. Facilitan identificar posibles fallos, reduciendo reparaciones onerosas y daños a los sistemas. Incluso, los indicadores recopilados de estos sistemas pueden utilizarse para perfeccionar procedimientos y incrementar la presencia en motores de consulta.
Las zonas de implementación de los aparatos de balanceo abarcan múltiples áreas, desde la producción de bicicletas hasta el supervisión ecológico. No importa si se habla de importantes fabricaciones manufactureras o reducidos establecimientos domésticos, los aparatos de balanceo son necesarios para promover un operación óptimo y libre de paradas.
What’s up, after reading this remarkable piece of writing i am too cheerful to share my familiarity here with colleagues.
Wyoming Valley Equipment LLC
Drugs information leaflet. Brand names.
lansoprazole buy
Best what you want to know about drugs. Read now.
1win
I was able to find good info from your blog articles.
autopujcovna dodavky preprava trezoru
[url=https://chumba.directorio-de-casinos-mx.com]casino chumba[/url]
Install apk file online casino Chumba – play right now!
https://www.chumba.directorio-de-casinos-mx.com
gabapentin over the counter alternative can i purchase cheap gabapentin without insurance can i purchase generic gabapentin pill
get cheap gabapentin online can you get gabapentin price gabapentin to buy
where to buy gabapentin
buy gabapentin enacarbil buy gabapentin powder where can i get gabapentin
where to buy generic gabapentin without rx how can i get generic gabapentin without a prescription where to buy gabapentin without rx
Hi! I understand this is somewhat off-topic however I needed to ask. Does managing a well-established website like yours require a large amount of work? I’m completely new to writing a blog but I do write in my journal daily. I’d like to start a blog so I can easily share my personal experience and views online. Please let me know if you have any kind of ideas or tips for new aspiring bloggers. Appreciate it!
Wyoming Valley Equipment LLC
prednisone 4mg pack canada can you buy prednisone safe dose of prednisone
can prednisone pills be split cost of generic prednisone price prednisone 10mg dose
prednisone over the counter uk
what does prednisone do to your body buy prednisone without script generic prednisone without a prescription
can i buy prednisone without insurance prednisone 50mg tablet for humans how dangerous is prednisone
Lemon casino
Meds prescribing information. Short-Term Effects.
buying generic cipro pills
Actual information about medication. Read now.
Meds information leaflet. What side effects?
buying cheap pulmicort online
Best information about medication. Get now.
верхний съемный винир
Hello all, here every person is sharing these know-how, so it’s fastidious to read this web site, and I used to pay a quick visit this weblog all the time.
https://t.me/s/promokod_samokat_dostavka
Модульная система: позволяет создавать индивидуальные комбинации для гостиной и спальни, с применением более 10 разных элементов https://mebel-24.blogspot.com/2025/01/2025.html
alternative to doxycycline for rosacea can i get generic doxycycline doxycycline hyclate order online
where to get cheap doxycycline no prescription where can i buy doxycycline for chlamydia usa buying generic doxycycline without dr prescription
can i get generic doxycycline price
how can i get cheap doxycycline price doxycycline buy alone can i buy doxycycline online uk
buy doxycycline without dr prescription buy cheap doxycycline without prescription can i order generic doxycycline online
reparación de maquinaria agrícola
Sistemas de ajuste: importante para el funcionamiento suave y efectivo de las dispositivos.
En el entorno de la innovación avanzada, donde la rendimiento y la fiabilidad del sistema son de gran relevancia, los equipos de ajuste cumplen un tarea esencial. Estos aparatos específicos están creados para balancear y regular piezas giratorias, ya sea en dispositivos de fábrica, automóviles de desplazamiento o incluso en equipos hogareños.
Para los especialistas en soporte de equipos y los ingenieros, operar con sistemas de ajuste es esencial para garantizar el operación uniforme y fiable de cualquier dispositivo rotativo. Gracias a estas opciones tecnológicas innovadoras, es posible minimizar significativamente las vibraciones, el ruido y la tensión sobre los sujeciones, aumentando la duración de componentes caros.
Asimismo relevante es el papel que desempeñan los aparatos de calibración en la soporte al usuario. El soporte experto y el conservación constante usando estos dispositivos facilitan proporcionar servicios de gran estándar, incrementando la agrado de los compradores.
Para los titulares de negocios, la contribución en sistemas de ajuste y sensores puede ser clave para mejorar la eficiencia y eficiencia de sus sistemas. Esto es especialmente significativo para los inversores que manejan reducidas y medianas emprendimientos, donde cada detalle vale.
Asimismo, los equipos de ajuste tienen una gran utilización en el ámbito de la seguridad y el control de excelencia. Habilitan encontrar probables problemas, evitando intervenciones onerosas y daños a los equipos. También, los información extraídos de estos equipos pueden usarse para mejorar sistemas y aumentar la visibilidad en sistemas de consulta.
Las zonas de implementación de los equipos de calibración cubren numerosas industrias, desde la manufactura de transporte personal hasta el control de la naturaleza. No afecta si se habla de enormes manufacturas industriales o modestos locales de uso personal, los dispositivos de ajuste son fundamentales para proteger un rendimiento productivo y libre de detenciones.
foods to eat while taking prednisone positive effects of prednisone can prednisone make you depressed
average cost of prednisone where can i buy prednisone online generic prednisone prices
prednisone dose pack day supply
side effects of too much prednisone prednisone prescription cost without insurance prednisone buy online usa
how to calculate prednisone taper where can i get generic prednisone without dr prescription prednisone 10 mg price walmart
buying generic mobic pills buy generic mobic without a prescription where can i get generic mobic
how to buy generic mobic pills get cheap mobic price can i get mobic price
can i order mobic price
where can i get cheap mobic without rx can i get cheap mobic prices can i buy cheap mobic
buy cheap mobic no prescription can i buy mobic for sale can i order cheap mobic price
can i buy generic medex without insurance
Medicament prescribing information. Brand names.
order zofran pills
Best trends of drugs. Get now.
cost cipro price buying cheap cipro online where to get generic cipro tablets
where to buy cipro pill can you buy cheap cipro tablets where to get cipro online
buy cipro antibiotic online
order cheap cipro prices where to get generic cipro without rx can i get cheap cipro
buy generic cipro uk pharmacy where buy cheap cipro without rx get generic cipro tablets
where can i buy requip online
Meds prescribing information. What side effects can this medication cause?
where to get generic sinemet tablets
Everything what you want to know about medication. Get here.
Предлагаем услуги профессиональных инженеров офицальной мастерской.
Еслли вы искали срочный ремонт холодильников miele, можете посмотреть на сайте: ремонт холодильников miele цены
Наши мастера оперативно устранят неисправности вашего устройства в сервисе или с выездом на дом!
En iyi cevrimici casinolar: 2025 y?l?nda en iyi cevrimici casinolar, oyunculara guvenli oyun deneyimi sunuyor. Lisansl? ve yuksek oranl? bonuslara sahip platformlar populerligini koruyor. Yeni baslayanlar icin kullan?c? dostu arayuzler buyuk avantaj sagl?yor.
Mobil icin cevrimici casinolar
весы для машин купить
Medication information leaflet. Effects of Drug Abuse.
cephalexin generic
All information about drugs. Get here.
Meds information leaflet. Long-Term Effects.
cost generic lisinopril without a prescription
Best information about pills. Get now.
1win
where to get cheap nemasole without dr prescription
Meds prescribing information. Generic Name.
where can i get benicar without prescription
Best what you want to know about drugs. Get information here.
আপনি আমাদের থেকে চয়ন করুন শুধুমাত্র বাংলাদেশে সর্বাধিক
বিট.
Here is my blog :: https://www.mostbet-bangladesh.bet/mostbet-41/
Для многих пользователей получение доступа к WhatsApp стало необходимостью, но не у всех есть возможность использовать свой номер телефона. На счастье, существует несколько способов, как можно зарегистрироваться в WhatsApp без номера https://lifedon.info/technologies/75936-dlya-chego-neobhodim-virtualnyy-nomer-v-telegram.html
Для многих пользователей получение доступа к WhatsApp стало необходимостью, но не у всех есть возможность использовать свой номер телефона. На счастье, существует несколько способов, как можно зарегистрироваться в WhatsApp без номера https://infor24.ru/pro-nomer-v-tg
can you buy nemasole no prescription
I quite like reading an article that will make men and women think.
Also, thank you for allowing me to comment!
can i order generic sildalist prices can i get sildalist without a prescription where to buy sildalist without insurance
get sildalist for sale cost of sildalist pills can i buy sildalist without a prescription
how to buy generic sildalist price
where to buy cheap sildalist prices where to get sildalist without a prescription cost sildalist without insurance
how can i get generic sildalist no prescription get sildalist pill cost sildalist tablets
Предлагаем услуги профессиональных инженеров офицальной мастерской.
Еслли вы искали срочный ремонт холодильников gorenje, можете посмотреть на сайте: ремонт холодильников gorenje
Наши мастера оперативно устранят неисправности вашего устройства в сервисе или с выездом на дом!
acticlate ca – buy glucotrol 5mg for sale glipizide 10mg uk
how to buy generic co-amoxiclav online cost generic co-amoxiclav without dr prescription can i order generic co-amoxiclav pills
can i buy co-amoxiclav where to buy cheap co-amoxiclav online order generic co-amoxiclav without rx
where can i buy co-amoxiclav pill
order cheap co-amoxiclav no prescription get co-amoxiclav tablets get generic co-amoxiclav for sale
can you buy cheap co-amoxiclav price how to get generic co-amoxiclav prices can you buy cheap co-amoxiclav price
It’s a pity you don’t have a donate button!
I’d certainly donate to this superb blog! I guess for now i’ll settle for book-marking and adding your RSS feed to my
Google account. I look forward to new updates and will talk about
this blog with my Facebook group. Talk soon!
Now my priority to withdraw funds, and the https://wiki-cafe.win/index.php/888Starz_Sports_Betting every day has excuses!
buy mestinon without rx can i order generic mestinon without dr prescription order cheap mestinon prices
buy cheap mestinon without a prescription where can i get generic mestinon can i buy generic mestinon without a prescription
can i order mestinon pill
can i order mestinon no prescription how can i get mestinon no prescription can you buy cheap mestinon tablets
get mestinon pill buying mestinon no prescription cheap mestinon prices
can i buy coreg prices
buying generic luvox without a prescription
Saw your material, and hope you publish more soon.
Предоставляет анонимные/элитные, приватные и персональные прокси для работы с социальными сетями, сайтами, приложениями, программами и играми http://studlab.com/news/proksi_servery_komu_i_dlja_chego_oni_mogut_byt_polezny_gde_vzjat_proksi/2023-04-06-1531
Pills information sheet. Drug Class.
where buy levitra price
Some information about drugs. Get here.
Предоставляет анонимные/элитные, приватные и персональные прокси для работы с социальными сетями, сайтами, приложениями, программами и играми https://www.divephotoguide.com/user/SherylWatts2
where to get generic avodart without prescription can i order cheap avodart no prescription avodart drug prices
where can i buy avodart for sale order generic avodart how much is avodart cost
can i buy generic avodart without insurance
can you get generic avodart online where can i buy avodart pills where to get cheap avodart without prescription
cost of avodart 2mg can i purchase generic avodart without dr prescription get avodart for sale
can you get generic cilostazol without dr prescription
bezdep casino
казино онлайн бездепозитный бонус
bc game
http://mirkur.ru/connectors/pages/bunkery-i-podzemel-ja-kaliningrada.html
Организация сооружаемыми проектными решениями и реставрация зданий: ключевые работы фирмы AC Holding
Компания AC Holding уже больше 22 лет продуктивно развивается на строительном рынке области, предлагая обширный ассортимент услуг в сегменте возведения, перестройки и восстановления. За это время мы выполнили больше 900 объектов, включая 300 реновационных работ, что доказывает наш профессионализм и надежное уровень осуществления объектов. Наши сервисы включают как крупные строительные объекты, так и отделку зданий, что превращает надежным партнером для клиентов любого уровня.
Управление возводимыми объектами
Одним из главных из важнейших сегментов функционирования AC Holding является руководство строительными объектами. Мы принимаем комплексный перечень действий: от разработки и согласования бумаг до сдачи здания в использование. Наши специалисты обладают значительными компетенциями и долгим опытом, что позволяет завершать даже самые трудные проекты. Мы предоставляем поддержание сроков, бюджета и качественных требований результата.
Наши услуги включают:
Сооружение деловых и жилищных проектов.
Реновация и восстановление объектов.
Внешние и покрытий объекты.
Электромонтажные работы и ремонт электрики.
Разработка и дизайнерский планировка.
Каждый отдельный объект контролируется строгим проверкой исполнения, а все наши эксперты ежегодно проходят процесс аттестацию. Дополнительным значимым свидетельством надежности компании являются сертификаты на все типы строительных задач, а также наличие подтверждений стандарта качества результата, охраны работы и экологической охраны.
Восстановление и модернизация зданий
Поддержание архитектурного объектов — одна из основных задач нынешнего сооружения. AC Holding фокусируется на реставрации архитектурных объектов, комбинируя обычные методы выполнения с инновационными подходами. Мы осознаем, что такие работы нуждаются индивидуального подхода, и наши специалисты внимательно прорабатывают каждый процесс, чтобы поддержать индивидуальность проектов.
Наши задачи в этой направлении предусматривают:
Реставрация экстерьеров и интерьеров.
Модернизация конструкций проектов.
Реконструкция декоративных деталей.
Применение новых технических технологий без ущерба для архитектурного характера.
Почему предпочитают AC Holding?
22 года на рынке строительства сфере.
900 завершенных объектов, в том числе реконструкцию и реконструкцию.
Подтверждение уровня на все реализованные проекты.
Полный решение — от создания до ввода в эксплуатацию объекта.
Опытные сотрудники и передовое оснащение.
Подайте предложение на нашем портале, и наши специалисты свяжутся с вами с вами для согласования деталей.
Questo è uno stato indipendente, precedentemente faceva parte dei territori controllati dall’Olanda, che da tempo ha regolamentato il gioco online.
where to get cheap rizact without prescription
order augmentin 625mg pill – augmentin 625mg pills buy cymbalta generic
can i buy generic doxycycline for sale
Среди руин расположились несколько статуй Будды, https://flowtech.ru/images/pgs/hram-istiny-v-pattaje.html голова одной из них торчит из корней деревьев.
Your idea is outstanding; the issue is something that not enough persons are speaking intelligently about. I’m very happy that I stumbled throughout this in my seek for one thing regarding this.
Недавно я купила новую квартиру и сразу же взялась за ремонт. Это был долгожданный проект, который я тщательно планировала, подбирая каждую деталь интерьера с любовью и вниманием к мелочам. Когда ремонт был завершен, настало время обставить жилье мебелью обеденные столы
Недавно я купила новую квартиру и сразу же взялась за ремонт. Это был долгожданный проект, который я тщательно планировала, подбирая каждую деталь интерьера с любовью и вниманием к мелочам. Когда ремонт был завершен, настало время обставить жилье мебелью Арбор Древ
бездеп
Казино без депозита идеально подходят для тестирования новых игровых автоматов.
Предлагаем услуги профессиональных инженеров офицальной мастерской.
Еслли вы искали ремонт стиральных машин aeg сервис, можете посмотреть на сайте: ремонт стиральных машин aeg рядом
Наши мастера оперативно устранят неисправности вашего устройства в сервисе или с выездом на дом!
Аренда автомобилей Аэропорт Пхукет · Бесплатное аннулирование большинства заказов · Больше 60 000 пунктов проката · Поддержка пользователей больше чем на 30 языках https://inforen.ru/2025/01/arenda-avtomobilya-na-pxukete-polnoe-rukovodstvo-dlya-puteshestvennikov/
[url=https://brazino777.directorio-de-casinos-mx.com]http://www.brazino777.directorio-de-casinos-mx.com[/url]
Upload apk file online casino brazino777 – win right now!
http://www.brazino777.directorio-de-casinos-mx.com
Аренда автомобилей Аэропорт Пхукет · Бесплатное аннулирование большинства заказов · Больше 60 000 пунктов проката · Поддержка пользователей больше чем на 30 языках https://www.svarz.com/arenda-avtomobilya-na-pxukete-polnoe-rukovodstvo-dlya-puteshestvennikov.html
USDT娛樂城
казино бездеп
В bezdep casino можно играть без внесения собственных средств.
Temukan berbagai pilihan permainan yang menyenangkan dan menguntungkan di dunia taruhan online Slot Gacor Parimatch
UnlockTool активация лицензии и продление на 3, 6, 12 месяцев, official unlocktool license activation extension & renewal 3, 6, 12 months heetah tool
UnlockTool активация лицензии и продление на 3, 6, 12 месяцев, official unlocktool license activation extension & renewal 3, 6, 12 months himera tool
This is your juicy mix of exclusive video and amateur https://bisgaard-voigt-2.blogbright.net/sex-videos-inspiring-new-approaches-to-emotional-connection.
Enjoy exclusive xxx movies on each of gadget, be it any computer, pc or laptop.
situs kantorbola
KANTORBOLA adalah situs slot online paling bergengsi tahun 2025 yang menghadirkan pengalaman bermain terbaik dengan koleksi game slot terbaru, sistem keamanan terjamin, serta layanan pelanggan profesional. Sebagai platform terkemuka, KANTORBOLA menawarkan berbagai pilihan permainan dari provider ternama seperti Pragmatic Play, PG Soft, Habanero, dan banyak lagi.
Пользовался iRobot почти полгода. Он в целом справляется с уборкой, но бывают моменты, когда застревает или требует перенастройки. Не идеальное решение, но для моих нужд вполне сгодилось iRobot
It’s truly a nice and useful piece of information. I’m satisfied that you simply shared this useful info with us.
Please stay us up to date like this. Thanks for sharing.
In order to welcome new users, the operator offers a 1xbet promotional code that can be used when registering on its website or in the mobile application. It is important to note that, in order to enjoy all the benefits that this promotion offers, it is necessary to go through an identity verification process. In this way, the bookmaker guarantees the security and protection of users, while ensuring that they have not previously used the benefits of the promotional code https://vidacibernetica.com/read-blog/13063
In order to welcome new users, the operator offers a 1xbet promotional code that can be used when registering on its website or in the mobile application. It is important to note that, in order to enjoy all the benefits that this promotion offers, it is necessary to go through an identity verification process. In this way, the bookmaker guarantees the security and protection of users, while ensuring that they have not previously used the benefits of the promotional code https://www.streetvibex.com/blogs/3219/Unlock-Instant-Free-Spins-with-BetWinner-Promo-Code-2025
I’ve read several good stuff here. Definitely worth bookmarking for revisiting. I surprise how much effort you put to make such a magnificent informative site.
Фабрика дверей «Браво» не первый год выпускает на рынок строительных материалов межкомнатные двери. За десятилетие фирма завоевала огромную популярность благодаря высокому качеству изделий https://169.ru/mezhkomnatnye-dveri/bravo/
Вы можете купить справки в Москве в нашей клинике https://volgamedconsalt.ru/.
диплом пту купить
Nice blog here! Also your web site loads up very fast! What host are you using? Can I get your affiliate link to your host? I wish my web site loaded up as fast as yours lol
Arkada Casino – это новый проект в мире онлайн-гемблинга, запущенный в 2024 году. На официальном сайте вас ждёт более 200 лицензированных игр, привлекательные бонусы и проверенные платежные сервисы для удобных переводов. Регистрируйся, делай первый депозит и оцени сам все преимущества Arkada Casino
evolution gaming probably made for virtual gambling
houses more than whatever other developer of BitStarz crypto casino.
such games as blackjack, poker, roulette and baccarat existed quite a long time, even before the unveiling of organized casinos.
Arkada Casino – это новый проект в мире онлайн-гемблинга, запущенный в 2024 году. На официальном сайте вас ждёт более 200 лицензированных игр, привлекательные бонусы и проверенные платежные сервисы для удобных переводов. Регистрируйся, делай первый депозит и оцени сам все преимущества Arkada Casino
Вы можете купить медсправку в нашем мед центре https://inrosmed.ru/ в Москве без медкомиссий.
Заказал звонок-получил консультацию
менеджера-созвонился с сиделкой-заключил Сиделка с проживанием договор.
Register with the unique 1xBet promo code “1XBUM” to take advantage of a 100% deposit match welcome offer, reaching up to €/$130. In this guide, I will walk you through the top 1xBet promotions, which feature the sportsbook deposit bonus and the casino Welcome Package for 2025. In the current landscape of numerous sports betting platforms, we consider 1xBet to be among the top choices available, and for valid reasons 1xbet promo code indonesia
Use the 1xBet promo code: 1XSUN200 to receive a welcome bonus in 2025. New players will be eligible for a VIP bonus of 100% up to $130. Once you have obtained the promo code, make sure to use it during the registration process https://szahomen.com/pgs/le-code-promo-1xbet-bonus.html
Register with the unique 1xBet promo code “1XBUM” to take advantage of a 100% deposit match welcome offer, reaching up to €/$130. In this guide, I will walk you through the top 1xBet promotions, which feature the sportsbook deposit bonus and the casino Welcome Package for 2025. In the current landscape of numerous sports betting platforms, we consider 1xBet to be among the top choices available, and for valid reasons how to enter promo code on 1xbet
Гизбо Казино ориентировано на игроков с различными предпочтениями и бюджетами. В казино представлены игры с различными ставками, что позволяет выбирать развлечения в соответствии с индивидуальными возможностями Gizbo Casino
Предлагаем услуги профессиональных инженеров офицальной мастерской.
Еслли вы искали ремонт холодильников smeg рядом, можете посмотреть на сайте: ремонт холодильников smeg рядом
Наши мастера оперативно устранят неисправности вашего устройства в сервисе или с выездом на дом!
Вы можете купить справку в клинике https://med-analysis.ru/ по Москве с бесплатной доставкой до любой станции метро.
Мы производим автоматические биокамины под заказ уже более 20 лет Купить биокамин
Вы можете купить справку в поликлинике https://medlady.ru/ по Москве с доставкой до станции метро.
Вы можете купить справку в медицинском центре https://dentaleclinic.ru/ в Москве без прохождения врачей.
Играть онлайн в Гизбо Казино. Каждый посетитель Гизбо Казино может воспользоваться системой поддержки, которая работает круглосуточно казино Gizbo
Играть онлайн в Гизбо Казино. Каждый посетитель Гизбо Казино может воспользоваться системой поддержки, которая работает круглосуточно Гизбо Казино
Вы можете купить справки в Москве в нашей клинике https://medcenterpenza.ru/.
Вы можете купить справку в медцентре https://diagnoz-med.ru/ с доставкой по Москве.
На Mostbet UA можно делать ставки в режиме реального времени | Mostbet dota 2 – это лучшие турниры и возможности для ставок mostbet официальный сайт. | Mostbet UA – это честные выигрыши и гарантированные выплаты | Mostbet онлайн – это качественный сервис и удобные платежные методы | Mostbet casino предлагает кэшбэк для активных игроков | На Mostbet casino можно играть в топовые игры без скачивания [url=https://mostbetcasino.kiev.ua]Mostbet казино[/url].
Перегружатели — мощные грузоподъемные машины, оборудованные грейферным ковшом. Используются для перемещения разнотипных грузов: волокнистых; сыпучих; длинномерных; штучных перегружатели
Nice Post. It’s really a very good article. I noticed all your important points. Thanks.
Hello there I am so delighted I found your weblog, I really found you by mistake, while I was searching on Google for something else, Anyhow I am here now and would just like to say cheers for a remarkable post and a all round exciting blog (I also love the theme/design), I don’t have time to browse it all at the moment but I have book-marked it and also included your RSS feeds, so when I have time I will be back to read a lot more, Please do keep up the superb work.
Самостоятельная регулировка пластиковых окон по вертикали выполняется на нижней петле. Нужное отверстие под шестигранник расположено в верхней части петли регулировка окон
Thank you for all the information was very accurate, just wondering if all this is possible.~
I was referred to this web site by my cousin. I’m not sure who has written this post, but you’ve really identified my problem. You’re wonderful! Thanks!
[url=][/url]
Доска бесплатных объявлений «Tapnu.ru»
Информация на нашем сайте постоянно обновляется посетителями ежедневно из самых
различных регионов России и других Стран.
«Tapnu.ru» очень понятный сервис для любого пользователя, любого возраста.
Удобный сайт для подачи бесплатных и платных объявлений.
Покупатели и продавцы связываются друг с другом напрямую, без посредников,
что в конечном итоге позволяет сэкономить и деньги, и драгоценное время.
Премиум размещение стоит совсем недорого.
Сайт бесплатных объявлений «Tapnu.ru»
[url=][/url]
Напёрстки для курения — это уникальные приспособления, призванные сделать процесс курения удобнее, чище и безопаснее https://www.05745.com.ua/list/504843
Напёрстки для курения — это уникальные приспособления, призванные сделать процесс курения удобнее, чище и безопаснее https://www.0619.com.ua/list/507643
I think it is a nice point of view. I most often meet people who rather say what they suppose others want to hear. Good and well written! I will come back to your site for sure!
Amazing content on your website.
Большой ассортимент напёрстков, напасов и колпаков для курения. Быстрая доставка https://nastroenie.com.ua/kak-vybrat-bong-dlya-kureniya/
Предлагаем купить павильоны и навесы для бассейнов, стационарные и раздвижные, по выгодным ценам укрытие для бассейна раздвижной
Very often I go to see this blog. It very much is pleasant to me. Thanks the author
This is one very informative blog. I like the way you write and I will bookmark your blog to my favorites.
[url=https://casino.directorio-de-casinos-mx.com/]casino casino[/url]
Upload apk file casino – win right now!
casino casino
I dont think Ive caught all the angles of this subject the way youve pointed them out. Youre a true star, a rock star man. Youve got so much to say and know so much about the subject that I think you should just teach a class about it
Чат Рулетка — самый популярный видеочат во всем мире. Наш чат не имеет аналогов и принципиально отличается от других видеочатов https://rt.livesexchat18.com/
Les fonctionnalités de ces jeux incluent des tours gratuits, des multiplicateurs, des sticky Wilds, des avalanches, des jeux bonus.
When are you going to take this to a full book?
KANTORBOLA adalah platform slot online yang menawarkan pengalaman bermain yang seru dan menguntungkan bagi para pemainnya. Dengan berbagai pilihan permainan slot terbaik dari penyedia terkemuka, KANTOR BOLA tidak hanya menghadirkan keseruan dalam setiap putaran, tetapi juga memberikan kesempatan besar untuk meraih kemenangan dengan bonus harian yang melimpah. Setiap hari, pemain dapat menikmati berbagai jenis bonus, mulai dari bonus deposit, free spins, hingga cashback, yang semuanya dirancang untuk meningkatkan peluang menang dan memperpanjang waktu bermain.
Do you offer workshops?
I came across an article that talks about the same thing but even more and when you go deeper.
Thanks a bunch for sharing this with all people you really recognize what you are talking about! Bookmarked. Kindly also seek advice from my web site =). We can have a link alternate contract between us!
Thanks for discussing the issues and covering them in a well written format.
Нормальное казино, платит. Сам играю в Joycasino и после выигрыша вывожу деньги и доходят довольно быстро. Всегда выводил через электронные кошельки, мне так https://6498878.ru/
bs2best
Blacksprut Marketplace: Эволюция даркнета или игра на выживание?
Blacksprut — это один из крупнейших маркетплейсов даркнета, ориентированный на русскоязычную аудиторию. Появление этого сервиса, который действует вне законного поля, связано с упадком других крупных площадок, таких как Hydra. Он быстро набрал популярность благодаря удобству использования, широкому ассортименту и агрессивной маркетинговой стратегии. Но что такое Blacksprut, как он работает и в чем заключается его уникальность?
История возникновения и контекст
После того как в апреле 2022 года российские правоохранительные органы закрыли Hydra — крупнейшую нелегальную торговую платформу в даркнете, возник вакуум. Hydra не только предоставляла площадку для торговли запрещенными веществами, но и выполняла роль финтех-центра для теневой экономики с использованием криптовалют. В это время сразу несколько новых маркетплейсов поспешили занять место “упавшего гиганта”. Среди них особо выделяется Blacksprut.
Blacksprut быстро получил популярность благодаря пользователям, которые искали новую площадку для торговли и покупок, связанных с запрещенными товарами и услугами. Крупнейшие силы маркетплейса были направлены на обеспечение безопасности пользователей и анонимности, что сыграло значительную роль в его успехе.
Архитектура и функции
Blacksprut построен на той же архитектуре, что и многие другие маркетплейсы даркнета. Его главные особенности включают:
Криптовалютные транзакции: Платформа работает исключительно с криптовалютами, включая Bitcoin и Monero, что обеспечивает высокий уровень анонимности как для продавцов, так и для покупателей.
Системы безопасности: Несмотря на нелегальную природу деятельности, большое внимание уделяется безопасности пользователей. Для этого используются двухфакторная аутентификация, сложные системы шифрования данных и работа через Tor-сеть.
Ассортимент товаров: Хотя значительная часть товаров на площадке связана с наркотиками, также можно найти множество других незаконных товаров и услуг — от фальшивых документов до программного обеспечения для взломов и кибератак.
Отзывы и рейтинги: Система обратной связи с пользователями помогает создать доверие между продавцами и покупателями. Это снижает риски для тех, кто ищет надежные источники нелегальных товаров или услуг.
Почему пользователи выбирают Blacksprut?
Одной из причин популярности является высокое доверие пользователей к площадке. На фоне постоянных облав правоохранительных органов и закрытия маркетплейсов, подобных Hydra, потребители ищут безопасные и стабильные альтернативы. Blacksprut предоставляет гибкий и защищенный интерфейс с минимальными рисками. Более того, площадка активно совершенствуется и адаптируется под новые вызовы, которые диктует даркнет.
Конкуренция и борьба за выживание
Даркнет — это крайне конкурентная среда, где маркетплейсы вынуждены адаптироваться к постоянно меняющейся обстановке. Помимо внутренних факторов, таких как конкуренция среди платформ, на бизнес влияют и внешние угрозы: правоохранительные органы регулярно проводят операции по закрытию таких площадок.
Blacksprut оказался в числе тех, кто смог выдержать давление и продолжает привлекать пользователей. Тем не менее его будущее зависит от способности адаптироваться к новым угрозам — как со стороны законодательства, так и со стороны конкурентов, которые пытаются перехватить его клиентуру.
Этические и правовые аспекты
Появление и деятельность маркетплейсов, подобных Blacksprut, вызывает множество вопросов с точки зрения морали и права. Эти платформы способствуют распространению запрещенных веществ и других опасных товаров, что несет серьезные последствия для общества.
С другой стороны, для многих пользователей даркнета такие платформы являются способом обхода государственных ограничений и контроля, что поднимает вопрос о свободе личности и правах на приватность в интернете.
Заключение
Blacksprut — это яркий пример того, как нелегальная экономика адаптируется и развивается в условиях постоянного преследования со стороны властей. Он быстро заполнил вакуум, образовавшийся после закрытия Hydra, и стал одной из крупнейших русскоязычных платформ в даркнете.
Однако, как и все подобные площадки, Blacksprut существует в нестабильной среде, и его будущее всегда остается под вопросом. Успех этой платформы во многом зависит от способности руководства управлять рисками, сохранять доверие пользователей и оставаться в тени, несмотря на постоянное внимание со стороны правоохранительных органов.
Hi, I just hopped over to your web-site through StumbleUpon. Not somthing I might typically browse, but I liked your views none the less. Thanks for making something worthy of reading through.
Saw your material, and hope you publish more soon.
My brother suggested I might like this web site. He was entirely right. This post actually made my day. You can not imagine simply how much time I had spent for this info! Thanks!
semaglutide cost – order cyproheptadine 4 mg online cheap periactin 4 mg cheap
Гизбо Казино — это платформа, которая привлекает внимание игроков широким ассортиментом азартных развлечений и выгодными бонусами. Здесь вы найдете слоты с прогрессивными джекпотами, настольные игры, а также турниры, которые проходят на регулярной основе казино Gizbo
Pinco AZ ilə mərc dünyasını yenidən kəşf edin | Pinco kazino real dilerlərlə canlı oyunlar təklif edir pinco cazino | Pinco kazinosunda böyük cekpotlar sizi gözləyir | Pinco kazino ilə mərc etmək indi daha asandır [url=https://pinco-azerbaycan.website.yandexcloud.net/]Pinco AZ ödəniş üsulları[/url] .
ОНЛАЙН КАЗИНО
https://community.alexgyver.ru/members/padman.95561/
[url=https://estrategias.directorio-de-casinos-mx.com]casino estrategias[/url]
Upload apk file casino Estrategias – win now!
http://estrategias.directorio-de-casinos-mx.com
Частенько Fonbet раздаёт эксклюзивные коды на фрибеты – бесплатная ставка, которая не требует, чтобы на балансе были деньги. Если выполните все условия букмекерской конторы и выиграете, тогда кеш зачислится уже в виде реальных денег. Их получится перевести на карточку или e-кошелёк https://www.bigcatalliance.org/news/bonus_d_inscription_au_casino_1xbet.html
Частенько Fonbet раздаёт эксклюзивные коды на фрибеты – бесплатная ставка, которая не требует, чтобы на балансе были деньги. Если выполните все условия букмекерской конторы и выиграете, тогда кеш зачислится уже в виде реальных денег. Их получится перевести на карточку или e-кошелёк http://ruptur.com/libs/photo/1xbet_promokod_bonus_pri_registracii.html
There are some serious financial ramifications here.
Our company specializes in manufacturing and supply of high-quality gabions, which are ideal for various landscaping projects.
More detailed information on the links [url=https://gabionn.ru/]топ габион санкт петербург [/url]
Our gabions are manufactured are made of durable galvanized steel and have a durable coating, which ensures their high resistance to corrosion and environmental influences.
Обладает тонизирующим и антиоксидантным свойствами, лифтинг эффектом, улучшает упругость, предотвращает старение кожи, помогает избежать преждевременного появления большого количества морщин, уменьшает пигментацию, способствует уменьшению проявлений сосудистой сеточки на лице, способствует устранению воспалительных процессов на коже, эпителизации https://bioquant-garyaev.com/product/svechi-volnovye-vaginalnye-onda-v/
Зачем же нужна накрутка лайков? Прежде всего, это способ привлечь внимание к вашему контенту. У пользователей сложилось мнение, что видео с большим количеством лайков более качественное и интересное Накрутка лайков в Тик Ток
Certainly. And I have faced it. Let’s discuss this question. Here or in PM.
I think other website proprietors should take this web site as an model, very clean and great user pleasant style and design .
We need to build frameworks and funding mechanisms.
I think I might disagree with some of your analysis. Are the figures solid?
игровые автоматы играть книжки бесплатно
Интернет магазин продажа Биоматриц Гаряева, модулятор Гаряева-Мишина, ЖКИМ жидкая квантовая индивидуальная матрица https://bioquant-garyaev.com/product/svechi-volnovye-vaginalnye-onda-v/
Существует множество способов накрутки лайков. Некоторые из них легитимны и позволяют вам получить настоящую аудиторию, а другие могут привести к бану аккаунта. Важно выбирать правильные методы, чтобы избежать негативных последствий накрутка лайков в ТТ задания
Здесь можно купить сейф сейф купить москва
Trix Casino — это платформа, которая привлекает внимание игроков широким ассортиментом азартных развлечений и выгодными бонусами. Здесь вы найдете слоты с прогрессивными джекпотами, настольные игры и регулярные турниры. Присоединяйтесь к казино Трикс Казино для ярких впечатлений и больших выигрышей Трикс Казино
Официальный сайт Vodka Casino: регистрация и вход в Водка Казино онлайн. Vodka Casino предлагает пользователям уникальные возможности для игры в онлайн-казино Казино Vodka вход
Официальный сайт Vodka Casino: регистрация и вход в Водка Казино онлайн. Vodka Casino предлагает пользователям уникальные возможности для игры в онлайн-казино Казино Vodka промокод
Welcome to [url=https://bdlxlimo.com/pacific-northwest-limousine-service/]Pacific Northwest Limousine Service[/url]
Experience the ultimate in luxury transportation with our premier Pacific Northwest Limousine Service . We specialize in creating unforgettable journeys for all occasions, from corporate events to weddings and nights out on the town.
[url=https://bdlxlimo.com/party-bus-limo-rental-rates/]Party Bus Limo Rental Rates[/url]
Looking to elevate your next celebration? Our Party Bus Limo is the perfect choice. With competitive Party Bus Limo Rental Rates , you can enjoy a night of fun without breaking the bank. Our party buses are equipped with state-of-the-art sound systems, LED lighting, and comfortable seating to ensure a memorable experience.
[url=https://bdlxlimo.com/optin_confirmation/]Mint Mail Opt-in Confirmation[/url]
Stay connected and be the first to know about our special offers, discounts, and exclusive deals. By opting in to our Mint Mail Opt-in Confirmation , you’ll receive regular updates on our services, including our latest Party Bus Limo Rental Rates . Join our mailing list today and enjoy the perks of being a valued member of the Pacific Northwest Limousine Service community.
Why Choose Pacific Northwest Limousine Service?
– Luxury Fleet : From sleek sedans to spacious party buses, our fleet is designed to meet all your transportation needs.
– Professional Chauffeurs : Our highly trained and courteous chauffeurs ensure a safe and enjoyable ride.
– Reliable Service : We pride ourselves on punctuality and reliability, ensuring you arrive at your destination on time.
– Customizable Packages : Whether it’s a corporate event, wedding, or a night out, we offer customizable packages to suit your specific needs.
Book your next luxury ride with Pacific Northwest Limousine Service and experience the difference. Contact us today to learn more about our Party Bus Limo Rental Rates and to confirm your Mint Mail Opt-in Confirmation . Your journey to luxury starts here!
Arkada Casino – это игровая платформа, предлагающая посетителям удобный доступ к азартным играм и высокую надежность. Здесь игроки со всего света смогут насладиться азартом в любое время и в любом месте Казино Arkada
Understanding characteristics and properties of any varieties of cells,
researchers in the field||in the field|sector} https://EffectiveAutismTreatment.com/.
Если вы ищете волнение и азарт, предлагаем обратить внимание на Banda Casino. Онлайн-казино представляет большой перечень игр, среди которых каждый найдет что-то интересное. Благодаря безопасным транзакциям и современной мобильной версии, вы можете насладиться игрой в любом месте, где имеется интернет Банда Казино слоты
Как выбрать платформу, которая не подведет, не обманет и принесет максимум прибыли? Мы проанализировали десятки криптобирж, сравнили их комиссии, безопасность, удобство и поддержку пользователей, чтобы вы могли торговать с уверенностью.
Сколько вы уже потеряли из-за неправильного выбора биржи? Пора это исправить! Узнайте, какие платформы возглавляют рейтинг в 2025 году и почему именно они стали фаворитами миллионов трейдеров по всему миру. еженедельный рейтинг бирж криптовалют
Autism affects millions of families around the globe,
and a of these, hardly doing with zodiac unique difficulties in https://stemcellsincanada.com/.
Казино Раменбет – это прогрессивная онлайн-площадка для развлечений, которая очень быстро завоевала популярность благодаря щедрым бонусам, разнообразию игр и приятным условиям. Лицензированное казино обеспечивает комфорт и безопасность на каждом этапе взаимодействия Ramenbet Casino
Мы предоставляем аренду автомобилей для крупных компаний и частных лиц, а также для малого и среднего бизнеса. Наша компания предлагает широкий выбор автомобилей, включая эконом-класс, бизнес-класс, минивэны и коммерческие авто, чтобы каждый клиент мог подобрать машину, соответствующую его требованиям Прокат автомобилей эконом-класса
Мы предоставляем аренду автомобилей для крупных компаний и частных лиц, а также для малого и среднего бизнеса. Наша компания предлагает широкий выбор автомобилей, включая эконом-класс, бизнес-класс, минивэны и коммерческие авто, чтобы каждый клиент мог подобрать машину, соответствующую его требованиям Коммерческие автомобили в аренду
We stumbled over here coming from a different web
page and thought I might as well check things out. I like what I see so now i am
following you. Look forward to finding out about your web page yet again.
Per gli appassionati di cybersport e di competizioni virtuali il SG Casino offre l’opportunità di assicurare alcune scommesse.
Trix is for four players and has four kingdoms, each of which has five games: King, Queens, Diamonds, Ltoosh and Trix Анкоры: is it better to masturbate without porn
Kometa casino – новое развлекательное развлекательное казино, предлагает вашему вниманию свыше 5 600 онлайн-игр от ведущих брендов, регулярные бонусы, промо Комета Казино промокод
Your passion for the topic really shines through in this article.
This is exactly what I was looking for—excellent content!
Insightful and thought-provoking. Thanks for sharing!
Fantastic article! I really appreciate the effort you put into this.
Mostbet com zapewnia szybkie i wygodne metody płatności | Mostbet casino logowanie jest intuicyjne i proste | Mostbet pl rejestracja jest dostępna dla wszystkich pełnoletnich graczy | Mostbet pl umożliwia zakłady na wydarzenia sportowe na całym świecie [url=https://mostbet-logowanie-kasyno-pl.com/]Mostbet casino obsługa klienta 24/7[/url] .
Blacksprut Marketplace: Эволюция даркнета или игра на выживание?
Blacksprut — это один из крупнейших маркетплейсов даркнета, ориентированный на русскоязычную аудиторию. Появление этого сервиса, который действует вне законного поля, связано с упадком других крупных площадок, таких как Hydra. Он быстро набрал популярность благодаря удобству использования, широкому ассортименту и агрессивной маркетинговой стратегии. Но что такое Blacksprut, как он работает и в чем заключается его уникальность?
История возникновения и контекст
После того как в апреле 2022 года российские правоохранительные органы закрыли Hydra — крупнейшую нелегальную торговую платформу в даркнете, возник вакуум. Hydra не только предоставляла площадку для торговли запрещенными веществами, но и выполняла роль финтех-центра для теневой экономики с использованием криптовалют. В это время сразу несколько новых маркетплейсов поспешили занять место “упавшего гиганта”. Среди них особо выделяется Blacksprut.
Blacksprut быстро получил популярность благодаря пользователям, которые искали новую площадку для торговли и покупок, связанных с запрещенными товарами и услугами. Крупнейшие силы маркетплейса были направлены на обеспечение безопасности пользователей и анонимности, что сыграло значительную роль в его успехе.
Архитектура и функции
Blacksprut построен на той же архитектуре, что и многие другие маркетплейсы даркнета. Его главные особенности включают:
Криптовалютные транзакции: Платформа работает исключительно с криптовалютами, включая Bitcoin и Monero, что обеспечивает высокий уровень анонимности как для продавцов, так и для покупателей.
Системы безопасности: Несмотря на нелегальную природу деятельности, большое внимание уделяется безопасности пользователей. Для этого используются двухфакторная аутентификация, сложные системы шифрования данных и работа через Tor-сеть.
Ассортимент товаров: Хотя значительная часть товаров на площадке связана с наркотиками, также можно найти множество других незаконных товаров и услуг — от фальшивых документов до программного обеспечения для взломов и кибератак.
Отзывы и рейтинги: Система обратной связи с пользователями помогает создать доверие между продавцами и покупателями. Это снижает риски для тех, кто ищет надежные источники нелегальных товаров или услуг.
Почему пользователи выбирают Blacksprut?
Одной из причин популярности является высокое доверие пользователей к площадке. На фоне постоянных облав правоохранительных органов и закрытия маркетплейсов, подобных Hydra, потребители ищут безопасные и стабильные альтернативы. Blacksprut предоставляет гибкий и защищенный интерфейс с минимальными рисками. Более того, площадка активно совершенствуется и адаптируется под новые вызовы, которые диктует даркнет.
Конкуренция и борьба за выживание
Даркнет — это крайне конкурентная среда, где маркетплейсы вынуждены адаптироваться к постоянно меняющейся обстановке. Помимо внутренних факторов, таких как конкуренция среди платформ, на бизнес влияют и внешние угрозы: правоохранительные органы регулярно проводят операции по закрытию таких площадок.
Blacksprut оказался в числе тех, кто смог выдержать давление и продолжает привлекать пользователей. Тем не менее его будущее зависит от способности адаптироваться к новым угрозам — как со стороны законодательства, так и со стороны конкурентов, которые пытаются перехватить его клиентуру.
Этические и правовые аспекты
Появление и деятельность маркетплейсов, подобных Blacksprut, вызывает множество вопросов с точки зрения морали и права. Эти платформы способствуют распространению запрещенных веществ и других опасных товаров, что несет серьезные последствия для общества.
С другой стороны, для многих пользователей даркнета такие платформы являются способом обхода государственных ограничений и контроля, что поднимает вопрос о свободе личности и правах на приватность в интернете.
Заключение
Blacksprut — это яркий пример того, как нелегальная экономика адаптируется и развивается в условиях постоянного преследования со стороны властей. Он быстро заполнил вакуум, образовавшийся после закрытия Hydra, и стал одной из крупнейших русскоязычных платформ в даркнете.
Однако, как и все подобные площадки, Blacksprut существует в нестабильной среде, и его будущее всегда остается под вопросом. Успех этой платформы во многом зависит от способности руководства управлять рисками, сохранять доверие пользователей и оставаться в тени, несмотря на постоянное внимание со стороны правоохранительных органов.
Gli utenti avranno così la certezza di trovarsi in un ambiente di gioco equo e trasparente, in cui dati personali e finanziari sono protetti e al sicuro da frodi.
Kometa Casino – новое онлайн-казино, запущенное в России в 2024 году. Платформа работает по лицензии Кюрасао, обеспечивая безопасный игровой процесс Казино Kometa слоты
You’ve turned a dull topic into something exciting!
This article is incredibly informative and well-written.
This is by far one of the best articles I’ve read recently.
Great depth and detail, you’ve covered everything!
Such a well-articulated piece, bravo!
A great resource for learning and application.
Informative, engaging, and incredibly helpful.
The flow of this article is smooth and compelling.
Such a unique perspective on the subject!
A wonderful exploration of the topic.
Very helpful for anyone looking to deepen their understanding of the subject.
This article is a well-organized guide.
The level of detail in this article is impressive.
Insightful and thought-provoking!
So much useful information in just one article!
Wonderful depth and clarity in your writing.
One of the best articles I’ve read in a while!
Thought-provoking and inspiring.
Loved the structure!
Excellent use of examples to support the points.
Тут можно преобрести купить взломостойкие сейфы взломостойкий сейф
batman688
I appreciate the effort that goes into creating high-quality content, and this post was no exception. The insights and information were top-notch and made for a really engaging read. Keep up the great work!
доступ к профиль также
регистрация откроет допуск ко имеющимся
инструментам Вавада казино.
Review my website vavada зеркало рабочее на сегодня
Mostbet kasyno posiada licencję, co gwarantuje uczciwą grę | Mostbet pl umożliwia wygodne obstawianie zakładów sportowych | Mostbet logowanie jest możliwe zarówno na komputerze, jak i na telefonie | Mostbet com obsługuje płatności kartą oraz portfele elektroniczne [url=https://mostbet-logowanie-kasyno-pl.com/]www.mostbet-logowanie-kasyno-pl.com[/url] .
Тут можно преобрести услуги по созданию сайта научного медицинского медицинского журнала разработка сайта для клиники
The post is absolutely fantastic! Lots of great info and inspiration, both of which we all need! Also like to admire the time and effort you put into your website and detailed info you offer! I will bookmark your website!
Con un’esperienza decennale nel gambling online ho curato diversi progetti relativi ai casinò online attraverso recensioni imparziali, approfondimenti e guide dedicate.
Профессиональный сервисный центр по ремонту бытовой техники с выездом на дом.
Мы предлагаем:ремонт бытовой техники в мск
Наши мастера оперативно устранят неисправности вашего устройства в сервисе или с выездом на дом!
The official website of the online casino Pinko invites all new players to quickly register and start playing the most popular slots and gaming machines http://pinco-az2024.com
Тут можно преобрести сайт клиники под ключ создание медицинских сайтов под ключ
order viagra 100mg without prescription – sildenafil pills 50mg tadalafil 5mg oral
toto 368
Can you be more specific about the content of your article? After reading it, I still have some doubts. Hope you can help me.
It’s an awesome paragraph in support of all the internet visitors; they will
obtain benefit from it I am sure.
Привет, если ты разыскиваете игровые автоматы, какие вправду приносят большие выигрыши, вы очутились по куда нужно! Мы сделали ради вас лучшие 5 слотов, какие в прошедший 30 дней сделали наших игроков более радостными. Это не просто слова – это факты, основанные в реальной исчислении вознаграждений.
Применяйте бонусы и бесплатные вращения для тестирования новых игровых автоматов.
Испытайте эти слоты на интернет-сайте https://telegra.ph/vodkabet-igrat-besplatno-02-28-2 — а, вероятно, следующий большой приз станет твоим!
buy cialis 5mg without prescription – sildenafil professional buy sildenafil online
Im impressed. I dont think Ive met anyone who knows as much about this subject as you do. Youre truly well informed and very intelligent. You wrote something that people could understand and made the subject intriguing for everyone. Really, great blog youve got here.
можно купить расширенную страховку без франшизы,
http://gorodskoj.bestforums.org/viewtopic.php?f=3&t=865 но стоить она будет дороже.
Witamy w Slottica PL! Nasza platforma to harmonijne połączenie innowacji, różnorodności i najwyższych standardów bezpieczeństwa, zaprojektowane z myślą o wymagających graczach z Polski. Oferujemy nie tylko szeroki wybór gier – od dynamicznych automatów, przez strategiczne gry stołowe, po ekskluzywne sesje z live dealerami – ale także kompleksowe rozwiązania dostosowane do Twoich preferencji. Dzięki zaawansowanej technologii mobilnej, ciesz się płynnym dostępem do ulubionych rozgrywek na dowolnym urządzeniu, gdziekolwiek jesteś. Slottica Casino współpracuje wyłącznie z uznanymi dostawcami oprogramowania, gwarantując najwyższą jakość grafiki, uczciwość mechaniki i regularne aktualizacje biblioteki gier.
[url=][/url]
Доска бесплатных объявлений «trueboard.ru»
Информация на нашем сайте постоянно обновляется посетителями ежедневно из самых
различных регионов России и других Стран.
«trueboard.ru» очень понятный сервис для любого пользователя, любого возраста.
Удобный сайт для подачи бесплатных и платных объявлений.
Покупатели и продавцы связываются друг с другом напрямую, без посредников,
что в конечном итоге позволяет сэкономить и деньги, и драгоценное время.
Премиум размещение стоит совсем недорого.
Сайт бесплатных объявлений trueboard.ru
[url=][/url]
toto 368
Good day! Would you mind if I share your blog with my facebook group?
There’s a lot of folks that I think would really appreciate your content.
Please let me know. Many thanks
mergulhar em tópicos detalhados tipo wild buffalo, coin pig, https://tasinhorjun.org/2025/02/28/descubra-a-emocao-do-jogo-online-com-afun-cassino/
party girl e vegas night. Coin pig experimente a função respina no mais tambor alto cheio de moedas.
This gave me a new way to think about the issue.
È importante scegliere solo casinò online sicuri e affidabili per proteggere i propri dati personali e le vincite.
Табак нагревают до высокой температуры, но не поджигают. Изделия создают не обычный сигаретный дым, а пар, который вдыхает пользователь парламент сигареты
You appear to know so much about this, and I see you’re a published author. Thanks
Hi, possibly i’m being a little off topic here, but I was browsing your site and it looks stimulating. I’m writing a blog and trying to make it look neat, but everytime I touch it I mess something up. Did you design the blog yourself?
1win Casino предлагает широкий выбор азартных игр, от классических слотов до живых дилеров http://www.nfgroup.it/forum/libero-pensiero/38253-1win
Многие фанаты Hacksaw Gaming с нетерпением ждали новой игры от провайдера, и Le Bandit полностью оправдало их ожидания Vavada вход
Многие фанаты Hacksaw Gaming с нетерпением ждали новой игры от провайдера, и Le Bandit полностью оправдало их ожидания https://www.theparkatswanvalley.com/post/5datenightideas
Тут можно приобрести разработка сайт медицинского центра услуги по созданию сайта научного медицинского медицинского журнала
Тут можно преобрести создать сайт медицинского центра медицинский сайт создание
Играйте в самые популярные слоты, блэкджек, рулетку и многое другое в 1Го Казино. Зарегистрируйтесь сейчас и получите доступ к бонусам для новых Казино 1Go зеркало
Макао (он же Аомынь) размещен в небольшом городке или поселке
Гуандун у моря Южно-Китайского моря, в
дельте реки Жемчужная, тур в Китай.
My web blog: тур в Китай Пекин
Are you looking for the best platform with the best bonuses for Argentina 1xcasino promo code free bet
It’s difficult to find well-informed people for this topic, however, you sound like you know what you’re talking about!
Thanks
В темной комнате общаги студентка решилась на смелый поступок. Сначала она дрочит, предвкушая встречу, а одногруппник гордо показывает свою хуе. Вскоре они ебется, а другие ребята тихо дрочат, наблюдая за происходящим хуя
Тут можно приобрести разработка сайта для медицинского центра создание медицинского сайта под ключ
Тут можно преобрести создание сайта клиника заказать создание медицинского сайта
Тут можно преобрести продвижение сайта медицинского центра сео продвижение медицинских сайтов
Casino 1xbet is available to players on the website of the famous bookmaker, founded in 1997. The section with video slots and other gambling games appeared several years ago, but quickly attracted users thanks to the established customer base 1xcasino Algeria
Sie haben geniale Artikel auf dieser Homepage.
We can see that we need to develop policies to deal with this trend.
[url=][/url]
Создание и продвижение сайтов. Интернет-маркетинг!
Мы предлагаем актуальные новости, подробные обзоры и экспертные советы по всем аспектам веб-разработки:
современные тенденции в веб-дизайне, оптимизация под поисковые системы (SEO), контент-маркетинг, интеграция CRM-систем и многое другое.
У нас вы найдете полезные рекомендации для владельцев сайтов и разработчиков: как создать интуитивно понятный интерфейс,
повысить скорость загрузки страниц, обеспечить мобильную адаптацию и улучшить пользовательский опыт.
Мы также поможем разобраться в юридических нюансах, связанных с созданием и поддержкой веб-ресурсов.
Следите за нашими обзорами ключевых событий в мире веб-разработки, узнавайте о новых инструментах и технологиях,
а также об изменениях в стандартах и требованиях. Кроме того, мы делимся советами по выбору хостинга,
оптимизации контента и продвижению сайтов в социальных сетях.
Только проверенная информация от ведущих специалистов отрасли — аналитика, прогнозы и практические советы.
Подписывайтесь и будьте в курсе всех новостей! С нами ваш веб-ресурс станет успешным и востребованным!
Сайт silaseo.ru
[url=][/url]
План эвакуации документ предназначенный для определения первичных средств пожаротушения и эвакуационных выходов. Поэтому, доверять разработку только профессионалом своего дела План эвакуации
Зарядные станции для электромобилей «под ключ». От подбора оборудования до системы управления и поддержки пользователей https://volt-ev.ru/
Puisqu’il ne dépend d’aucune autorité, les casinos en ligne non régulés se réservent le droit de payer qui ils souhaitent.
Your article is wonderful, I will follow your blog and articles. sohbet odaları
I’m bookmarking this for future reference, thanks!
I’m saving this to refer back to later.
игрок должен быть зарегистрирован на веб-ресурсе букмекерской конторы соответственно существующим правилам и
законам о легализации.
Feel free to visit my web page … https://зеркало-леонбетс5.xyz
так же, синий leon не намерен получать российскую
лицензию для координирования функционирования в пределах
нашей страны официально, т.к.
my homepage leon зеркало
К возможностям онлайн-обучения в последнее время прибегает всё больше людей https://beton-house.com/без-СЂСѓР±СЂРёРєРё/pochemu-stoit-izuchat-dizajn-i-programmirovanie-v-komplekse
Wonderful beat I wish to apprentice while you amend your web site how could i subscribe for a blog web site The account aided me a acceptable deal I had been a little bit acquainted of this your broadcast provided bright clear idea
I have been curious about these trends, and you have really helped me. I have just told a few of my friends about this on FaceBook and they love your content just as much as I do.
Pretty nice post. I just stumbled upon your weblog and wanted to say that I’ve really enjoyed surfing around your blog posts. After all I’ll be subscribing in your feed and I am hoping you write again very soon!
леон-бетс зеркало сайта, работающее является запасным вариантом, леон
зеркало позволяющим обходить
запреты и реализовать.
Here is my homepage бк-леонбетс-зеркало2.xyz
A questo abbina un’ottima varietà di mercati, soprattutto per quanto riguarda le scommesse combo.
My brother suggested I might like this website He was totally right This post actually made my day You cannt imagine just how much time I had spent for this information Thanks
http://biprof.ru/
I just wanted to take a moment to say how much I appreciate your blog posts. They’re always well-written, informative, and keep me coming back for more. Keep up the great work!
DID предоставляет номера с кодами более чем 150 стран. Это позволяет выбрать номер, соответствующий вашему текущему местоположению или бизнес-целям купить номер телефона навсегда
Thank you for the good writeup. It in fact was a amusement account it.
Look complex to more delivered agreeable from you!
By the way, how could we communicate?
Your passion for this topic shines through in your writing It’s clear that you put a lot of effort and thought into your posts Thank you for sharing your knowledge with us
Виртуальный номер создаёт впечатление солидности и профессионализма. Клиенты и партнёры воспринимают компании с городскими или бесплатными номерами (например, формата 800) как надёжные и серьёзные организации виртуальный номер навсегда
Это лучшие продукты и слоты, которые заслужили свое место в топе. Ссылки на вход с их официальных сайтов с телефона или компьютера — в нашем канале https://t.me/proverennye_onlajn_kazino_russia
It’s remarkable designed for me to have a web page, which
is beneficial in support of my knowledge. thanks admin
Substantially, the post is really the best on this laudable topic. I concur with your conclusions and will eagerly watch forward to your future updates.Just saying thanx will not just be enough, for the wonderful lucidity in your writing.
таким образом сумма может возрасти вдвое
до рабочее зеркало леонбетс 20 тысяч рублей.
Ковры для уюта вашего дома, уникальный.
Мягкие и комфортные ковры, со скидкой.
Ковры для стильного интерьера, открывайте.
Декорируйте пространство с помощью ковров, добавьте.
Ковры для детей, добавьте.
Традиционные и современные ковры, высокое качество.
Ковры для офиса, стиль.
Ковры, которые легко чистить, удобство.
Как выбрать идеальный ковер?, тайны.
Теплота и уют с коврами, лучший вариант.
Модные ковры 2025 года, следите.
Создайте уют на даче с коврами, уникальные стили.
Ковры в интерьере: вдохновение, узнайте.
Выбор ковров для любого вкуса, погрузитесь в.
Комфортные ковры для вашего сна, выбирайте.
Премиальные ковры для вашего интерьера, стиль.
Выбор ковров для домашних любимцев, выбирайте.
Ковры, которые сохраняют тепло, приобретайте.
Как использовать ковры для зонирования, дизайнерские решения.
магазин ковры [url=https://kovry-v-moskve.ru/]https://kovry-v-moskve.ru/[/url] .
Well, I don’t know if that’s going to work for me, but definitely worked for you! 🙂 Excellent post!
I was reading through some of your content on this internet site and I believe this web site is very informative ! Continue posting .
леон-бетс официального оформлена
в канаде, продвигая свои азартные услуги более
10-и лет, leon зеркало рабочее уже пятнадцать лет.
cenforce pills – metformin 500mg without prescription how to buy glycomet
Нужен по настоящему красивый номер, но нет большой суммы для разового платежа? Подключите номер и просто вносите ежемесячную плату за использование виртуальный номер телефона
Boost your content revenue with Scrile Connect. Our white-label platform is an alternative to OnlyFans, offering custom onlyfans tools https://medium.com/@scrile/your-content-their-rules-social-media-platform-risks-ff293009605a
Nice blog here Also your site loads up very fast What host are you using Can I get your affiliate link to your host I wish my site loaded up as quickly as yours lol
Michael Phelps ha ganado un número récord de medallas olímpicas | Michael Phelps ha representado a su país con orgullo en múltiples Juegos Olímpicos | Las estrategias de entrenamiento de Michael Phelps son estudiadas por expertos [url=https://michael-phelps.com.mx/]Michael Phelps Juegos Olímpicos[/url].
Every paragraph in this article is packed with value.
You’ve tackled a complex subject with such grace and ease.
I’ll definitely be recommending this article to others!
Thanks for breaking this down in such an understandable way.
The way you structured this article made it so easy to follow.
This is a perfect example of quality journalism—well done.
You’ve highlighted some really important points here—bravo!
I am regular reader, how are you everybody?
This piece of writing posted at this website is genuinely fastidious.
Le code promo 1xBet valide: BONUS1X200 – recevez un bonus de bienvenue de 100% jusqu’a 130€ en utilisant ce code code promo 1xbet abidjan lors de votre inscription sur le site 1xBet https://postheaven.net/p2qw1l4ixv
You’ve provided such a balanced and fair perspective here.
You’ve tackled a complex subject with such grace and ease.
I appreciate the depth of knowledge you’ve shared here.
The way you structured this article made it so easy to follow.
This is a fantastic piece—keep up the amazing work!
Это стандартная форма, достаточная,
для того, чтоб сменить бонусы, кассу, настольные игры, 1win и
начать восхождение к выигрышам.
My blog post: 1win-bw2q.buzz
This iconic hotel, renowned for its rich history, exquisite architecture, and world-class amenities, offers guests an unparalleled experience of comfort and elegance hotel bolivar lima
This iconic hotel, renowned for its rich history, exquisite architecture, and world-class amenities, offers guests an unparalleled experience of comfort and elegance Why Stump Grinding is Essential After Tree Removal
I never thought about it this way before—amazing insight!
This is exactly what I was looking for—great work!
You’ve really outdone yourself with this one—kudos!
Your dedication to this subject is truly commendable.
This is a fantastic piece—keep up the amazing work!
Thank you for your sharing. I am worried that I lack creative ideas. It is your article that makes me full of hope. Thank you. But, I have a question, can you help me?
lipitor 10mg for sale – purchase norvasc sale buy lisinopril pill
This article is a must-read for anyone interested in this topic.
You’ve really outdone yourself with this one—kudos!
Your research and effort truly shine through in this piece.
I’m bookmarking this to refer back to later—great content!
In the famous https://www.techdirectory.io/london-covent-garden-united-kingdom/bitcoin/brpr-media-ltd in Denver is reliable and popular any platform
with any types of toys, what barely you can imagine/imagine|fantasize}.
The examples you used really helped drive the point home.
You’ve covered all the bases here—fantastic job.
Тут можно преобрести продвижение сайта медицинского центра сео продвижение медицинского сайта
I just could not depart your site before suggesting that I actually enjoyed the
usual information a person provide in your visitors?
Is gonna be back steadily to inspect new posts
This article has given me a lot to think about—thank you.
The way you structured this article made it so easy to follow.
This piece really opened my eyes to new ideas.
как говорилось раньше, pocket option – это портал, которую можно регулировать Центром регулирования отношений на международных финансовых.
Look into my web page – https://www.chxpressfitness.com/pocketoption-forex/kak-vospolzovatsja-pocket-option-trading-platform/
I appreciate the depth of knowledge you’ve shared here.
Your research and effort truly shine through in this piece.
Thank you for your sharing. I am worried that I lack creative ideas. It is your article that makes me full of hope. Thank you. But, I have a question, can you help me?
Используя наш AI генератор текста, вы можете легко и быстро создавать материал по различным темам. ИИ дает возможность генерировать уникальный и информативный текст нейросеть текст онлайн
В нашем салоне можно продать новые модели швейцарских часов, в таком случае сумма выплаты будет более привлекательная. Гарантируем быструю возможность купить в каталоге или продать за 1 день скупка часов
В 2025 году российский туризм продолжает активно развиваться, предлагая путешественникам новые направления и обновлённые достопримечательности. Ниже представлены ключевые события и тенденции в сфере туризма и культуры России Московские новости
W Vavada jesteśmy dumni z bycia dynamicznie rozwijającą się platformą gier online, która zdobywa uznanie graczy z Polski. Naszym celem jest zapewnienie najwyższej jakości rozrywki w bezpiecznym i przyjaznym środowisku. Strona internetowa kasyna jest w pełni przetłumaczona na język polski, a nasza obsługa klienta dostępna jest w języku ojczystym, co czyni Vavada idealnym wyborem dla polskich entuzjastów gier losowych.
Pегистрация у операторов связи. Некоторые операторы связи также предоставляют возможность зарегистрировать виртуальный номер в своей сети https://mykorus.ru/news/chto-delat-esli-ne-prihodit-kod-v-telegram.html
Pегистрация у операторов связи. Некоторые операторы связи также предоставляют возможность зарегистрировать виртуальный номер в своей сети https://webcl.ru/virtualnye-nomera-dlya-biznesa-kak-vybrat-luchshiy-variant-dlya-vashey-kompanii/
Richiedere il prelievo delle proprie vincite da un sito di gioco non AAMS può sembrare un processo intimidatorio, ma seguendo alcuni passaggi dettagliati, sarà possibile effettuare l’operazione con sicurezza e facilità.
I like to spend my free time by scaning various internet recourses. Today I came across your site and I found it is as one of the best free resources available! Well done! Keep on this quality!
Одноразовые номера не предназначены для голосового общения. С их помощью разрешено лишь получать или же быстро отправлять СМС в течение определенного отрезка времени. Они не привязаны ни к абонентам, ни к конкретным устройствам https://womanmaniya.ru/virtualnye-nomera-telefona-dlya-registraczii-v-telegram/
Мобильное казино Пин Ап. Пин Ап обеспечивает комфортный доступ к слотам и Live-казино прямо с мобильных устройств. Игры доступны везде, где есть интернет скачать pin up казино
Если вы хотите продать свои часы, лучше всего обратиться в специализированные компании, которые занимаются выкупом часов http://m-tech2.com/bbs/board.php?bo_table=free&wr_id=131316
Если вы хотите продать свои часы, лучше всего обратиться в специализированные компании, которые занимаются выкупом часов http://www.asystechnik.com/index.php?title=%20%D0%9A%D0%B0%D0%BA%20%D0%BF%D1%80%D0%BE%D0%B4%D0%B0%D1%82%D1%8C%20%D1%87%D0%B0%D1%81%D1%8B:%20%D1%88%D0%B0%D0%B3%20%D0%B7%D0%B0%20%D1%88%D0%B0%D0%B3%D0%BE%D0%BC
Букмекерская контора и онлайн-казино Mostbet приветствует вас на официальном сайте своего бесплатного приложения для Android телефонов. Здесь вы можете скачать mostbet официальный сайт
Attractive section of content. I just stumbled upon your
web site and in accession capital to assert that I get in fact enjoyed account your blog posts.
Any way I will be subscribing to your feeds and even I achievement you access consistently quickly.
The post is absolutely great! Lots of great info and inspiration, both of which we all need! Also like to admire the time and effort you put into your blog and detailed information you offer! I will bookmark your website!
Hello friends, its fantastic paragraph about tutoringand
fully explained, keep it up all the time.
Casino Mostbet успешно объединяет БК и слоты, занимая топовые позиции на рынке много лет. Каталог с игровым софтом на сайте содержит высококачественный контент, включая разнообразные слоты, Live, карточные и настольные развлечения казино мостбет скачать
Широкая линия и LIVE-события. Онлайн ставки на спорт с бонусами и акциями. Высокие коэффициенты топовое онлайн-казино Казахстана https://regulator.kz/
Medispensary Marijuana Delivery is the the best service providing cannabis at any price and taste website
Los logros de George Foreman lo colocan entre los mejores boxeadores de la historia | Los fanáticos del boxeo siguen recordando las grandes peleas de George Foreman | El documental sobre George Foreman revela aspectos inéditos de su vida | Cada pelea de George Foreman era una muestra de determinación y coraje [url=https://george-foreman.com.mx/]La increíble historia de George Foreman[/url].
Осуществите Мечту о Идеальном Ремонте с Эксперт ремонта – Без Предоплаты! Доверьте Нам Свою Квартиру отзывы о работе ремонт квартир Алматы
Prepare for IPL 2025 betting with top online casinos in India! We offer a list of the best IPL betting sites with great odds, quick payouts, and bonuses up to 500%. Find trusted platforms, safe payment methods, and expert IPL betting tips to enhance your season. Start betting today ipl bet
Рейтинг топ-20 лучших компаний по ремонту квартир в 2025 году с ценами под ключ, хорошей репутацией, отзывами, сайтами отзывы про ремонт квартир Алматы
Частенько бонусные коды раздаются и во время значимых событий. Вся актуальная информация публикуется на канале в Telegram и её можно найти на тематических ресурсах, посвящённых беттингу мостбет мобильная версия скачать
Lubisz gry kasynowe? Mostbet ma dla Ciebie świetne promocje | Mostbet rejestracja jest szybka i prosta – sprawdź, jak zacząć grać | Mostbet oferuje najlepsze kursy na zakłady sportowe w Polsce | Graj w Mostbet i dołącz do społeczności wygrywających graczy [url=https://mostbet-online-casino-polska.com]Most bet[/url] kod promocyjny na darmowe spiny .
Современные веб-приложения требуют не только красивого интерфейса, но и надежного, масштабируемого backend-а. Именно он отвечает за хранение данных, бизнес-логику https://shkolnie.ru/osnovy-backend-razrabotki-ot-bazy-dannyh-do-api/
hentairead I just like the helpful information you provide in your articles
cosa sono modalità multiplayer crazy time diretta in un momento folle?
Il massimo premio in giocattoli – il gioco crazy time è x20.000.
Элегантность и производительность BMW X6, особенности.
Комфорт и стиль в BMW X6, будет радовать.
кроссовера BMW X6.
Уникальный дизайн BMW X6, удивит.
Как BMW X6 меняет правила игры, исследуйте.
Кроссовер BMW X6, который стоит выбрать, в удобство и комфорт.
Комфортабельный интерьер BMW X6, подчеркивают.
Незаменимый помощник на дороге – BMW X6, постоянно.
Причины популярности BMW X6, в нашем обзоре.
Динамичный BMW X6 – для активной жизни, каждого.
Надежность и безопасность BMW X6, всегда.
Почему BMW X6 – это лучшее решение, открывает.
Инновации в BMW X6, ваше вождение.
Как будет ощущаться поездка на BMW X6, откройте для себя.
Чем BMW X6 превосходит другие кроссоверы?, в нашем анализе.
Яркий и уникальный BMW X6, выразит вашу индивидуальность.
Сравните BMW X6 с конкурентами, в нашем отчете.
Мнения о BMW X6 от реальных пользователей, в нашем разделе.
Как BMW X6 обеспечивает безопасность, защитят вас.
Заключение: стоит ли покупать BMW X6?, подводим итоги.
x5 bmw [url=https://bmw-x6.biz.ua/]x5 bmw[/url] .
Чтобы успешно войти в профессию или повысить квалификацию, важно выбрать качественное обучение, которое даст не только базовые знания, но и актуальные навыки, востребованные на рынке http://expert-rating.ru/nakrutka-podpischikov-v-tiktok-put-k-populyarnosti/
Greetings, have tried to subscribe to this websites rss feed but I am having a bit of a problem. Can anyone kindly tell me what to do?’
You are a very smart person! 🙂
Mostbet kasyno to setki automatów od najlepszych dostawców | Mostbet rejestracja jest szybka i prosta – sprawdź, jak zacząć grać | Mostbet kasyno online oferuje gry od takich gigantów jak NetEnt i Microgaming | Z Mostbet możesz obstawiać e-sporty, piłkę nożną, tenis i wiele więcej [url=https://mostbet-online-casino-polska.com]Mostbet Casino[/url] – bonus bez depozytu sprawdź szczegóły.
hello!,I really like your writing so a lot!
percentage we keep up a correspondence extra approximately your post on AOL?
I need a specialist on this space to resolve my problem.
Maybe that is you! Looking ahead to look you.
Stop by my website … https://honey1.testedhoneypot.com/
Тут можно преобрести сейф взломостойкий сейф взломостойкий цена
Жилой комплекс «Поляна Пик» — это премиальный проект, расположенный в самом сердце Красной Поляны, окружённый величественными горами. Этот комплекс идеально подходит для тех, кто ценит комфорт, стиль и близость к природе купить апартаменты в горки город красная поляна
For users who prefer to place bets and play casino games from mobile devices, the issue of using a promo code in the 1XBET mobile application (APK) is relevant https://akvaprint-almaty.kz/wp-content/pages/promokod_na_43.html
В ассортименте Банда Казино представлен широкий выбор развлечений. Здесь имеются и популярные краш-игры, завоевавшие признание огромного количества игроков Казино Banda
В ассортименте Банда Казино представлен широкий выбор развлечений. Здесь имеются и популярные краш-игры, завоевавшие признание огромного количества игроков Banda Casino официальный сайт
URL News 45
[url=][/url]
Все о недвижимости в России и мире — новости, аналитика, советы экспертов в одном месте!
Хотите быть в курсе последних событий на рынке недвижимости? Мы предлагаем свежие новости, актуальные обзоры и экспертные мнения по всем ключевым вопросам: изменения в законодательстве, тренды в сфере жилья и коммерческой недвижимости, а также прогнозы цен на ближайшее будущее.
У нас вы найдете полезные рекомендации для инвесторов и владельцев недвижимости: как выгодно вложить средства в жилье, защитить свои инвестиции, выбрать надежного застройщика и избежать ошибок при заключении сделок. Мы также поможем разобраться в юридических тонкостях покупки, аренды и оформления прав собственности.
Следите за обзорами крупнейших событий на рынке недвижимости, узнавайте о новых проектах, возможностях для инвестиций и изменениях в инфраструктуре городов. Кроме того, мы делимся советами по обустройству жилья, лайфхаками для ремонта и рекомендациями по выбору материалов и услуг — от поиска профессиональных подрядчиков до экономии без потери качества.
Только актуальная информация от ведущих экспертов отрасли — проверенные факты, аналитика и прогнозы.
Подписывайтесь и оставайтесь в центре событий! С нами вы всегда будете на шаг впереди — ведь ваш дом и инвестиции заслуживают самого лучшего!
Сайт sis69.ru
[url=][/url]
URL News 2
Я думаю Вы искали именно про Flagman Casino вход или возможно хотите поведать больше про Флагман Казино мобильная версия Флагман Казино
Kometa Casino – это игровая среда, где азартные игры сочетаются с новейшими разработками, обеспечивая гостям удобство и стабильность Kometa Casino
granny smith скачать взлом [url=https://apk-smart.com/igry/arkady/432-granny-smith-polnaja-versija-vzlomannaja.html]https://apk-smart.com/igry/arkady/432-granny-smith-polnaja-versija-vzlomannaja.html[/url] granny smith скачать взлом
P.S Live ID: K89Io9blWX1UfZWv3ajv
P.S.S [url=https://www.hotlinesupport.ru/sposob-uskorit-lechenie-bolezni]Программы и игры для Андроид телефона[/url] [url=http://unnewsusa.com/bbs/board.php?bo_table=English&wr_id=13995]Программы и игры дл[/url] [url=https://mysupp.ru/bitrix/tools/captcha.php?captcha_sid=002dab37486ab22fa18cdb4853c433a4]Программы и игры для Андроид телефона[/url] 4388d95
Пневмозаглушки используются для надежного перекрытия трубопроводов диаметром от 40 до 2000 мм трубные пневмозаглушки
Whether you are into sporting activities betting, casino video games, or Are living casino action, the 1xBet promo code makes certain you get by far the most out of your very first deposit https://www.modern-constructions.org/blogs/155080/1xBet-Promo-Code-Bonus-1950-150-Free-Spins
Have you always been concerned about these issues?
The answers usually come slower, than in live chat as well as
by email to https://bsnhaber.com/your-guide-to-bc-game-register-seamless/,
but anyway are reliable.
fantastic internet site, I could definitely go to your web page once more…acquired some really nice info.
Владение загородным домом открывает неограниченные возможности для экспериментов с дизайном и оформлением, особенно когда речь заходит о ванной комнате https://aznaetelivy.ru/stories/2024-07-08/ot-katastrofy-k-obnovleniyu-chto-delat-s-razbitym-steklom-v-dushevoy-remont-ili-zamena-vybiraem-luchshee-reshenie
This promotion is an excellent way to boost your betting experience, allowing you to bet on cricket, football, and other major sporting events with a larger bankroll https://seomypassion.ucoz.net/blog/code_promo_1xbet_777bono_bonus_de_bienvenue_de_130/2025-03-14-498
Motor Casino – это современный игорный клуб, предлагающий широкий выбор развлечений, включая игровые автоматы, карточные игры и live-дилеров Мотор Casino
Прежде чем принять решение о покупке автомобиля, определите его рыночную стоимость и техническое состояние. Сравните цены аналогичных моделей в интернете и внимательно изучите мнения владельцев http://gloveworks.link/bbs/board.php?bo_table=free&wr_id=1036049
I think you are thinking specifically about Ramenbet Casino sports betting or perhaps you want to find more about Casino Ramenbet mirror Раменбет Казино официальный сайт
https://mapletopcasinos.online/
Starda Casino is a modern online gaming portal offering an exciting world of gambling entertainment. Anyone looking for quality slots, card games and sports betting will find everything they need for entertainment and, perhaps, winning Казино Starda официальный сайт
aquasculpt is an advanced dietary supplement designed to support your weight management journey by optimizing mitochondrial efficiency and enhancing metabolic performance.
Cat Casino — это отличная платформа для любителей азартных игр, которая предлагает множество бонусов и акций. Промокоды Cat Casino позволяют увеличить свои шансы на выигрыш и получить дополнительные преимущества промокод на фриспины в кэт казино
medrol online – buy aristocort order aristocort 4mg pill
On our site a little more about Sukaaa Casino bonuses, as well as information about Sykaaa Casino official site Сукааа Казино
милости просим пожаловать в наш магазин, http://dostavimsport.ru/ в современном мире в стране свыше 3500 позиций товаров !
Комплексная УЗИ-диагностика всех органов и тканей в» Санкт-Петербургском центре Узи –диагностике» на оборудовнии экспертного класса Подготовка к УЗХИ молочных желез
Комплексная УЗИ-диагностика всех органов и тканей в» Санкт-Петербургском центре Узи –диагностике» на оборудовнии экспертного класса Здесь
Hi there! I just wanted to ask if you ever have any trouble with hackers? My last blog (wordpress) was hacked and I ended up losing several weeks of hard work due to no back up. Do you have any solutions to protect against hackers?
I Am Going To have to come back again when my course load lets up – however I am taking your Rss feed so i can go through your site offline. Thanks.
Thanks for some other great post. Where else may anybody get that kind of information in such an ideal method of writing? I’ve a presentation next week, and I am at the look for such information.
Рефинансирование микрозаймов становится важным инструментом для тех, у кого имеется плохая кредитная история. Этот процесс позволяет объединить существующие долги в один займ с более выгодными условиями casino money x
Money Икс Игральный клуб — это эксклюзивная платформа, которая дарит клиентам потрясающие варианты для выигрыша money x казино casino money x
Гелиевые шары в Липецке с доставкой
prodentim a groundbreaking probiotic supplement uniquely designed to support oral health and promote robust gums and teeth.
Гелиевые шары Липецк на 8 марта
Ирвин Казино – это место, где азартные игры становятся действительно увлекательными и безопасными. Под брендом Irwin Casino скрывается надежная и проверенная платформа для тех, кто хочет окунуться в мир азарта и развлечений Irwin Casino
Ирвин Казино – это место, где азартные игры становятся действительно увлекательными и безопасными. Под брендом Irwin Casino скрывается надежная и проверенная платформа для тех, кто хочет окунуться в мир азарта и развлечений Казино Irwin
Beneficial Blog! I had been simply just debating that there are plenty of screwy results at this issue you now purely replaced my personal belief. Thank you an excellent write-up.
Капитал Икс Игральный клуб — это эксклюзивная платформа, которая обеспечивает клиентам фантастические возможности для успеха мани х казино money x casino
Капитал Икс Игральный клуб — это эксклюзивная платформа, которая обеспечивает клиентам фантастические возможности для успеха мани х казино money x casino официальный сайт
glycofortin is a uniquely crafted liquid dietary supplement designed to aid in maintaining balanced blood sugar levels.
aquasculpt is a groundbreaking weight management supplement designed to support your journey by naturally enhancing metabolism, curbing hunger, and boosting energy levels.
На официальном сайте Мотор Казино любой игрок найдет широкий выбор развлечений: от классических игровых автоматов до современных видеослотов, настольных игр и живых дилеров вход в казино Мотор
Воздушные шары в Липецке с гелием
In 1939, the journal https://PlanYourStemTherapy.com/ described for the first time the transplantation of human bone marrow to a patient
diagnosed with aplastic anemia.
Гелиевые шарики на новый год
но бывают ситуации, когда опыт неприятен, приоритет в Яндекс Про
потому что сам пассажир груб у вас не в виде.
Гелиевые шарики Липецк на новый год
Гелиевые шары Липецк с гелием
arialief is a carefully developed dietary supplement designed to naturally support individuals dealing with sciatic nerve discomfort while promoting overall nerve wellness.
https://bet-riot.fr
Greetings! This is my first visit to your blog! We are a collection of volunteers and starting a new initiative in a community in the same niche. Your blog provided us beneficial information. You have done a wonderful job!
[url=][/url]
Всё о строительстве, дизайне и ремонте в своём доме.
Добро пожаловать на «Свой Угол» – ваш партнер в мире строительства, дизайна и ремонта для вашего дома!
Наш блог создан для того, чтобы предоставить вам всю необходимую информацию, которая сделает ваш дом еще уютнее, красивее и функциональнее.
Мы – эксперты в следующих сферах:
Строительство
Мы поделимся с вами советами о выборе материалов, поиске надежных строителей в Беларуси и планировке стройплощадки.
Если у вас возникают вопросы о строительстве своего дома с нуля или о расширении уже существующего пространства, мы предоставим вам экспертные советы.
Дизайн интерьера
У нас есть идеи и решения для каждой комнаты в вашем доме.
Мы расскажем о последних трендах в дизайне, поделимся советами по выбору цветовой палитры, мебели и аксессуаров, чтобы создать уникальное пространство, отражающее ваш стиль и вкус.
Ремонт
От простых косметических обновлений до капитального ремонта – у нас есть идеи и рекомендации для каждого случая.
Мы поддержим вас на каждом этапе, начиная от планирования и заканчивая последним штрихом.
Что вы найдете на нашем сайте
Экспертные советы
Статьи разработаны профессионалами в области строительства, дизайна и ремонта.
Полезные ресурсы
Ссылки на проверенные магазины, услуги и материалы, которые помогут вам в ваших проектах.
Модные тренды
Мы следим за последними тенденциями и новинками в мире строительства и дизайна.
«Свой Угол» – ваш проводник в мире уюта и стиля в вашем доме. Погружайтесь в наши статьи, найдите вдохновение, задавайте вопросы и делитесь своим опытом.
Создайте свой угол вместе с нами!
Информационный портал «Свой Угол»
[url=][/url]
Откройте для себя мир ставок с 1xbet, начать играть.
Добро пожаловать в мир ставок с 1xbet, получите.
Уникальные бонусы от 1xbet, сейчас.
Ставьте на любимые виды спорта с 1xbet, удовольствие.
Присоединяйтесь к 1xbet для живых ставок, сделайте каждую секунду важной.
Всё для ваших ставок на 1xbet, находите.
Обширные рынки на 1xbet, от футбола до тенниса.
1xbet – живые трансляции ваших любимых матчей, сделайте вашу ставку.
1xbet – получите свои выигрыши мгновенно, не ждите.
Обзоры и прогнозы на 1xbet, дайте себе преимущество.
Ставьте с уверенностью на 1xbet, мы ценим вашу конфиденциальность.
Не пропустите акционные предложения от 1xbet, воспользуйтесь шансом.
Ставьте смело с 1xbet, это ваш шанс на успех.
Получите помощь в любое время на 1xbet, мы рядом, чтобы помочь.
Участвуйте в конкурсах и выигрывайте с 1xbet, воспользуйтесь шансом.
Ставьте в любое время и в любом месте с 1xbet, удобно и быстро.
Дайте себе преимущества с 1xbet, будьте стратегом.
Зарегистрируйтесь на 1xbet всего за несколько минут, приступайте к ставкам.
Откройте новый уровень азартных игр с 1xbet, реализуйте свои мечты.
Не упустите уникальные возможности на 1xbet, ставьте с умом.
????? ????? 1xbet [url=https://1xbet-login-egypt.com/]https://1xbet-login-egypt.com/[/url] .
vivogut is an advanced digestive health formula crafted to support healthy digestion, improve nutrient uptake, and rebalance the gut microbiome.
you will be able to receive an instant offer upon delivery auto in Illinois
today. we also will vehicles with an on-board platform,
open and closed trucks, http://09vodostok.ru/user/f6ywvmy002, and among other things transportation of heavyweights.
glucoextend is a nutritional supplement crafted to help maintain balanced blood sugar levels.
«Садовые Механизмы» – крупный магазин садовой техники в москве, который предлагает необъятный ассортимент различных устройств, как в.
Here is my blog https://www.courtesane-fashion.com/benzopilu-kupit-kakoj-instrument-vybrat/
[url=https://case-simulator-cs2.ru]www.case-simulator-cs2.ru[/url]
Open case cs
http://www.case-simulator-cs2.ru
buy misoprostol generic – cytotec pill diltiazem 180mg pill
A virtual number is a phone number that is not tied to a specific SIM card and does not require a physical device to operate https://1vesti.kharkiv.ua/arenda-virtualnogo-nomera-telefona-preimushhestva-vozmozhnosti.html
Makes sense to me.
[url=https://cs2-get-skins.ru]http://www.cs2-get-skins.ru[/url]
Open cs case
https://cs2-get-skins.ru
How does it work? A virtual number forwards calls to your primary device, allowing you to communicate as if you were using a regular phone https://dom.tula.su/chto-takoe-virtualnyj-nomer-telefona-i-kak-on-rabotaet/
How does it work? A virtual number forwards calls to your primary device, allowing you to communicate as if you were using a regular phone https://donklephant.net/application/ip-telefoniya-kak-podklyuchit.html
URL News 27
Prima di tutto, è essenziale verificare i termini e le condizioni del sito riguardo al prelievo.
[url=https://csgo-case-simulator.ru/]https://www.csgo-case-simulator.ru[/url]
Open case counter-strike 2
http://www.csgo-case-simulator.ru
This is one very informative blog. I like the way you write and I will bookmark your blog to my favorites.
Bongs have become an integral part of smoking culture, combining functionality and aesthetics. They not only make the process comfortable, but also allow you to reveal all the nuances of the taste of the mixture купить бонг
в грядущем году открывает двери ко множеству возможностей для играющих. Используя его, вы можете весьма повысить свои шансы на выигрыш, получать добавочные бонусы и чаще наслаждаться увлекающими играми промокод на kent casino
Гелиевые шарики в Липецке на выпускной
Frequent probabilities to win free spins and bonus money make the positioning worthwhile.
My site :: https://casino79.in/
[url=https://play.shot-casino-app.ru]play.shot-casino-app.ru[/url]
Shot casino
http://www.play.shot-casino-app.ru
URL News 55
formulacija ne mora biti na izravnoj sunčevoj svjetlosti. Ako je slabljenje potencije uzrokovano fobijama, sukobom s
osobom, šokom i drugim mentalnim poremećajima, kamagra gel preporučuje se kombiniranje unosa gela
Kamagra s psihoterapijom.
Thimble is considered the most affordable accessory, which is popular among lovers of herbal smoking mixtures колпак для водника
Гелиевые шарики в Липецке со скидкой
for the house in vintage style, Bella Staging
used antique furniture, floral wallpaper and ordinary works creativity,
which created a warm and nostalgic atmosphere that attracted multitudes
people.
The Rent Killer is the main antagonist from the 2020 slasher film The Rental hire a hitman
[url=https://play.shot-casino-apk.ru]www.play.shot-casino-apk.ru[/url]
Shot Casino
http://play.shot-casino-apk.ru
As the credits wrap up, we see the masked killer rush out of a closet to kill the first unsuspecting victim as they sleep hire a hitman
[url=https://www.bioguiden.se/redirect.aspx?url=https://www.yell.ru/rostov-na-donu/com/news161-ru-svezhie-novosti-rostovskoj-oblasti_14494810/]Читайте здесь[/url]
Новости Ростовской области
Читайте здесь
Greetings SEO fans! This post was outstanding. For better SEO,
purchase sidebar backlinks from virgool.io.
If you want to improve SERPs, talk to me on Telegram @myd_80 or join my SEO group @seoprem.
The best telegram seo group is there with mehran yousefi, plus
the link: https://virgool.io/@yousefimehran2001/گروه-تلگرام-سئو-j7scgevxnkxx. We have guest posts for sale.
You need to really control the comments listed here
Od 2019 roku Pelican Casino jest jednym z liderów wśród kasyn online w Polsce. Nasza platforma oferuje szeroki wybór gier, które zadowolą każdego gracza. Dzięki atrakcyjnym bonusom i promocjom, zapewniamy niezapomniane wrażenia. Jednym z naszych wyróżników jest bonus powitalny, który wynosi 150% do 2000 zł oraz 100 darmowych spinów. Minimalny depozyt to tylko 125 PLN, co sprawia, że nasza strona jest dostępna dla każdego. Licencja Curaçao gwarantuje bezpieczeństwo i uczciwość rozgrywek. Pelican Casino to nie tylko różnorodność gier, ale także responsywny design strony i szybkie transakcje. Zachęcamy do założenia konta i skorzystania z naszej oferty, która z pewnością spełni Twoje oczekiwania.
The CoinsBar resource offers one of the most favorable exchange rates on the market криптообменник Киев
Обучение подразумевает под собой частичный или
полный отрыв от изготовления, купить диплом о высшем образовании в санкт-петербурге что.
[url=http://www.google.co.id/url?q=https://fr.pinterest.com/news161ru/]Читайте здесь[/url]
Новости Ростовской области
Читайте здесь
Исследуйте мир на sofisimo.com, здесь вы найдете.
Узнайте больше о sofisimo.com, узнавая.
Сайт sofisimo.com – ваша отправная точка, решения.
Платформа sofisimo.com для всех, что-то интересное.
sofisimo.com – ваш помощник в обучении, узнавая.
Общайтесь, учитесь и развивайтесь на sofisimo.com, где.
Платформа sofisimo.com наполнена вдохновением, для тех, кто.
Посетите sofisimo.com для открытия новых возможностей, мир знаний.
sofisimo.com для любителей знаний, развиваться.
sofisimo.com – это больше, чем просто сайт, новички.
Так много возможностей на sofisimo.com, где.
Пользуйтесь ресурсами sofisimo.com каждый день, находить новые пути.
sofisimo.com – свяжитесь с единомышленниками, всегда актуальны.
sofisimo.com – ваша стартовая площадка, жаждет.
sofisimo.com: ваш путь к знаниям, нужен.
sofisimo.com – это ваша платформа, это для всех.
Присоединяйтесь к нам на sofisimo.com, где.
Собирайте идеи на sofisimo.com, творчество не имеет границ.
sofisimo.com – платформа для инноваций, где.
armario para cocina [url=https://sofisimo.com/]https://sofisimo.com/[/url] .
Most often since i look for a blog Document realize that the vast majority of blog pages happen to be amateurish. Not so,We can honestly claim for which you writen is definitely great and then your webpage rock solid.
These two prove that sex on beach never looked so good,
and it’s too late to make a https://pornbrush.com/video/?p=Hot+twink+I+asked+the+folks+who+wished+to+suck+stiffy+first+and+no summer romance.
Enter the 1xBet promo code: 1XWAP. In the special field during registration, enter your unique promo code. Confirm activation https://www.nasseej.net/blogs/216283/1xBet-Promo-Code-Grab-130-Free-Bonus
I really like what you guys are usually up too. This sort of clever work and reporting!
Keep up the terrific works guys I’ve added
you guys to our blogroll.
URL News 11
[url=https://play.calibri-casino-play.ru]https://play.calibri-casino-play.ru[/url]
Calibry Casino
http://www.play.calibri-casino-play.ru
План эвакуации – пожарная схема, указывающая места размещения огнетушителей и аукционных выходов. Если требуется купить план эвакуации, то только в ООО «ФАЕР-АКС» План эвакуации
[url=https://play.aura-casino-bonus.ru]https://play.aura-casino-bonus.ru[/url]
aura casino
http://www.play.aura-casino-bonus.ru
Bonuses and promotions in the bookmaker 1xBet are a great opportunity to get additional benefits from your bets. The showcase of promo codes can offer a variety of promo codes that can be exchanged for prizes or free bets in the game http://slliver.getbb.ru/viewtopic.php?f=62&t=2990
With each passing year, the world of targeted games becomes more and more exciting, and online casinos continue to delight their subscribers with new opportunities and promotions http://rosen.moibb.ru/viewtopic.php?f=2&t=1842
Your point of view caught my eye and was very interesting. Thanks. I have a question for you.
Loving the info on this website , you have done outstanding job on the blog posts.
Facebook Instagram 5. if you select registration in social networks”, select personally for yourself Lucky Jet for facebook, instagram,
and specify required data.
A Cat Casino promo code is a special code that allows participants to receive additional bonuses. This can be a free bet, additional free spins, a deposit increase or even cashback http://xn--48-6kcd0fg.xn--p1ai/forums.php?m=posts&q=28859&n=last#bottom
http://zsgipn.ru/
Before announcing a list of our exclusive products and services with an indication of their features and benefits, we urge you not to even try to write to us, begging to give you these products or provide services for free how to kill yourself
Before announcing a list of our exclusive products and services with an indication of their features and benefits, we urge you not to even try to write to us, begging to give you these products or provide services for free how to commit suicide
Oxys Crema es un tratamiento facial avanzado disponible en varios paises de Latinoamerica como Mexico, Uruguay, Paraguay, Chile y Peru; no se vende en farmacias tradicionales y solo se puede adquirir de forma segura a traves de su sitio web oficial https://oxyscrema.org/
Despite the fact that this advertisement is written in your native language, we communicate in international, English language hire a hitman
We are a group of volunteers and starting a new initiative in our community. Your blog provided us with valuable information to work on|.You have done a marvellous job!
In the online gambling environment, promo codes have become an integral part, offering insiders unique opportunities to receive prizes and promotions https://www.osago-to.ru/to/forum/messages/forum89/message90589/10163-promokod-kent-casino-_-bonus-400_-do-65_000-_-250-fs?result=new#message90589
1xBet is a well-known online betting platform that is famous for its generous bonuses and attractive offers. If you are looking for a unique gaming experience and additional chances of success, then 1xBet bonuses will be an excellent choice for you https://remsanteh.borda.ru/?1-1-0-00002278-000-0-0-1743480140
Willkommen in einer Welt voller spannender Casino-Unterhaltung! Entdecke eine gro?e Auswahl an Online Slots, klassischen Tischspielen und Live-Casino-Erlebnissen https://michaelkiel.com/evolve-casino-benutzererfahrung-anmeldung-und-registrierung.php
Use 1XBET promo code: 1XTAX200 for VIP bonus up to €1950 + 150 free spins on casino and 100% up to €130 to bet on sports. Register on the 1xbet platform and get a chance to earn even more Rupees using bonus offers and special bonus code from 1xbet. Make sports bets, virtual sports or play at the casino 1xbet promo code apk
you are in reality a just right webmaster. The site loading velocity is amazing.
It seems that you’re doing any unique trick. Furthermore,
The contents are masterpiece. you have performed a great job in this subject!
In the world of online betting and gambling, promo codes have become an integral part of the strategy of players looking for maximum benefit from their bets https://nastyapoleva.ru/templates/pages/promokod_mostbet_pri_registracii_na_segodnya.html
In the world of online betting and gambling, promo codes have become an integral part of the strategy of players looking for maximum benefit from their bets https://ural-hifi.ru/fonts/inc/promokodu_na_segodnya_mostbet_pri_registracii_bonus_do_25_000_rub.html
order generic acyclovir – acyclovir pill rosuvastatin 20mg price
Нейросеть для написания реферата – это удобный и современный инструмент, который помогает студентам быстро и легко готовить работы по любым учебным дисциплинам. С её помощью можно получить структурированный, грамотный и уникальный текст всего за несколько минут, значительно экономя время на поиске информации и её обработке. Благодаря этому студенты могут уделять больше внимания развитию своих аналитических навыков и освоению новых знаний нейросеть для создания реферата
Is there a catch in the Kent Casino bonus program? Or can I safely register? I want to create an account, but I am afraid of hidden conditions. For example, restrictions on games or sudden changes in the rules. Maybe someone has already encountered unexpected nuances http://ruall.com/sotrudnichestvo/83138-promokod-kent-kazino-%E2%80%94-bonus-250-fs-bez-depozita.html#83138
Современный подход к созданию рефератов предлагает нейросеть — инструмент, позволяющий студентам за считанные минуты получать уникальные и грамотно структурированные тексты. Вместо самостоятельного поиска информации и её длительной обработки, учащиеся могут сразу использовать готовые материалы для решения учебных задач любой сложности. Высвободившееся благодаря этому время студенты направляют на углубление знаний и совершенствование аналитических способностей http://alshkola1.ru/
Современный подход к созданию рефератов предлагает нейросеть — инструмент, позволяющий студентам за считанные минуты получать уникальные и грамотно структурированные тексты. Вместо самостоятельного поиска информации и её длительной обработки, учащиеся могут сразу использовать готовые материалы для решения учебных задач любой сложности. Высвободившееся благодаря этому время студенты направляют на углубление знаний и совершенствование аналитических способностей сделать реферат gpt
если можно на высшем образовании клиент решает не останавливаться, где купить аттестат за 9 класс то наши сотрудники готовы помочь.
Kent Casino is a popular online platform that attracts players with profitable bonuses, promotions and promo codes. If you would like to increase your budget and get additional benefits, Kent Casino promo code high roller is what you need http://cozy.moibb.ru/viewtopic.php?f=31&t=11570
Kent Casino is a popular online platform that attracts players with profitable bonuses, promotions and promo codes. If you would like to increase your budget and get additional benefits, Kent Casino promo code high roller is what you need https://share.evernote.com/note/65005139-0a69-87ae-4493-c1dfaaee1325
Гелиевые шары на юбилей
Гелиевые шарики в Липецке на новый год
lipozem is is an advanced dietary supplement developed to support your weight loss objectives while boosting overall health and energy levels.
Current link BlackSprut Marketplace 2025 bs2best
Гелиевые шары Липецк фольгированные
I used to be recommended this website via my cousin. I am now not certain whether or not this post is written via him as nobody else know such detailed approximately my trouble. You are wonderful! Thanks!
When you have claimed the welcome bonus offer, it is however very important that you go through the terms and conditions of the 1x welcome bonus https://myteana.ru/forums/index.php?autocom=gallery&req=si&img=6944
If you want to increase your gaming budget or get additional benefits, then Gama Casino promo codes are what you need https://mindclub.online/wiki/index.php/Kent_Casino_%D0%9F%D1%80%D0%BE%D0%BC%D0%BE%D0%BA%D0%BE%D0%B4_%D0%BD%D0%B0_%D0%91%D0%B5%D0%B7%D0%B4%D0%B5%D0%BF%D0%BE%D0%B7%D0%B8%D1%82%D0%BD%D1%8B%D0%B9_%D0%91%D0%BE%D0%BD%D1%83%D1%81
What can I take so that the deriv bonus account wins extremely bets?
if such an item is an express for win, you acquire your payout only after of the
final whistle in this game.
French sports betting platforms mainly offer three categories of welcome bonuses, each with specific benefits depending on your betting profile https://petrodollaralternatehistory.site/2025/04/04/%d0%bf%d0%be%d0%ba%d0%b5%d1%80%d0%b4%d0%be%d0%bc-%d0%bf%d1%80%d0%be%d0%bc%d0%be%d0%ba%d0%be%d0%b4-unlock-bonuses-and-free-rewards/
French sports betting platforms mainly offer three categories of welcome bonuses, each with specific benefits depending on your betting profile https://codede1xbet.livejournal.com/331.html
I am really pleased to read this web site posts which consists of lots of valuable facts, thanks for providing these kinds of data.
My webpage :: https://casinoselection.Populiser.com/
Puraburn Pretty! This has been a really wonderful post. Many thanks for providing these details.
The 1xBet welcome bonus is one of the most generous offers in the online betting market https://www.diigo.com/item/note/b05aq/c59w?k=1d32bc8b25d8b820747a7870d74f6286
Thanks designed for sharing such a pleasant thinking, post is nice, thats why i have read it fully
gluco extend is a nutritional supplement crafted to help maintain balanced blood sugar levels.
1xBet offers a weekly reload bonus system that is particularly advantageous for regular players https://linkmate.mn.co/posts/82547187?utm_source=manual
Keep this going please, great job!
MetaMask Chrome simplifies blockchain access. I can easily connect to my favorite dApps and make transactions hassle-free.
Regardless of whether you are located in any other country, you will need to register to place bets at this establishment https://gcoz.ru/wp-content/pgs/promokod_1xbet.html
Your point of view caught my eye and was very interesting. Thanks. I have a question for you.
Altra nota dolente, mi dispiace deludere, ma al momento non esistono online siti scommesse non AAMS che accettano PayPal.
I’ve been browsing online more than three hours today, yet I never found any interesting article like
yours. It is pretty worth enough for me. Personally, if all web owners
and bloggers made good content as you did, the web will be much more useful than ever before.
Воздушные шары Липецк со скидкой
[url=https://play.aura-casino-app.ru]http://www.play.aura-casino-app.ru[/url]
Aura casino
https://play.aura-casino-app.ru
Hello I am so thrilled I found your site, I really found you by accident, while I was browsing on Bing for something else, Regardless I am here now and
would just like to say cheers for a remarkable post and a all round exciting
blog (I also love the theme/design), I don’t have time to browse it
all at the minute but I have bookmarked it and also included
your RSS feeds, so when I have time I will be back to read more,
Please do keep up the awesome b.
mitolyn is a natural dietary supplement specifically outlined to enhance metabolism and support weight loss. Its potent blend of ingredients works to increase energy levels, promote fat burning
Hi I am so excited I found your blog, I really found you by mistake, while I was browsing on Digg for something else, Regardless I am here now and would just like to say thanks for a tremendous post and a all round interesting blog (I also love the theme/design), I don’t have time to go through it all at the moment but I have saved it and also added in your RSS feeds, so when I have time I will be back to read more, Please do keep up the superb work.
На сайте films2025.my вы можете смотреть новинки кино 2025 года абсолютно бесплатно. Удобная навигация по жанрам — от комедий и боевиков до фантастики и семейных фильмов — позволяет быстро найти интересующую вас картину. Все фильмы доступны в высоком качестве HD и без регистрации. Отличный выбор для вечернего просмотра фильмы про мафию 2025
Воздушные шарики Липецк на рождение ребенка
I do not even understand how I finished up here, however I
assumed this submit was once good. I do not understand who
you’re but definitely you’re going to a well-known blogger for those who aren’t already.
Cheers!
Also visit my blog … เว็บหวยออนไลน์ รวย
Trix — это современная игровая платформа, предлагающая широкий выбор игр, от классических слотов до живых столов с настоящими дилерами. Здесь вы найдёте интерактивный интерфейс, высококачественную графику и щедрые бонусы для новых и постоянных игроков https://t.me/trix_fun
[url=https://play.get-skins-csgo.ru]play.get-skins-csgo.ru[/url]
Case open simulator
play.get-skins-csgo.ru
[url=https://play.get-skin-csgo.ru]play.get-skin-csgo.ru[/url]
Simulator case cs
http://www.play.get-skin-csgo.ru
A phone number in the modern world is a second passport. A huge number of services, messengers, social networks, banking are tied to a phone number, and telephone communication is an integral part of business development https://mk.md/Smarty/libs/plugins/html/data/4/3/news/894_chem_privlekatelna_arenda_virtualnogo.html
prostavive maintaining prostate health is crucial for men’s overall wellness, especially as they grow older.
I’ve read a few excellent stuff here. Definitely worth
bookmarking for revisiting. I surprise how so much effort you place to make this sort of
wonderful informative website.
Convenience and accessibility: Virtual numbers can be obtained online in minutes, without leaving home. They are accessible from anywhere in the world where there is internet https://nokiaweb.ru/vygodno-li-kupit-virtualnyj-nomer-turcii/
Смесь копоти, сажи и дыма представляют собой опасные для здоровья человека соединения. Зловоние сохраняется длительное время, поэтому к выбору способов борьбы следует подходить внимательно и ответственно очистка после пожара
prodentim a groundbreaking probiotic supplement uniquely designed to support oral health and promote robust gums and teeth.
prostavive maintaining prostate health is crucial for men’s overall wellness, especially as they grow older.
Telegram is one of the most popular apps for communication, which has been developed as a private messenger having the emphasis on encryption and security of users’ personal data Buy simcard for WhatsApp
Telegram is one of the most popular apps for communication, which has been developed as a private messenger having the emphasis on encryption and security of users’ personal data SMS activation service
We absolutely love your blog and find the majority of your post’s to be exactly what I’m looking for. Do you offer guest writers to write content to suit your needs? I wouldn’t mind composing a post or elaborating on a number of the subjects you write about here. Again, awesome weblog!
Nice post.Very useful info specifically the last part 🙂 Thank you and good luck.
http://onlinesloti.ru
Après quelques minutes, votre kit est ajouté à votre espace en ligne et prêt pour le téléchargement.
La plupart des énigmes de cette chasse au trésor Halloween peuvent se faire en intérieur comme en extérieur.
Не знаете, что подарить на день рождения, юбилей или праздник? Сайт https://hepatitoff.ru/07/04/2025/238488/podarok-na-novosele-kriterii-vybora.html предлагает готовые решения — от практичных до креативных подарков. Подберите идеальный вариант за пару кликов!
nerve calm is a high-quality nutritional supplement crafted to promote nerve wellness, ease chronic discomfort, and boost everyday vitality.
For years, Pin Up has delivered thrilling gaming and betting experiences through its premier online casino platform. Whether you’re placing a bet on sports or enjoying games via the Pin-Up app, pinup caters to all players with secure, fast-paced entertainment pinup updo
Mycelium has earned a reputation as a robust and protected handheld Bitcoin wallet, serving to both novice and expert users bitcoin wallet android
Изготовление металлических значков методом химического травления позволяет создавать изделия с высокой детализацией и долговечностью https://kroxa-expert.ru/izgotovlenie-metallicheskih-znachkov-metodom-himicheskogo-travleniya/
For years, Pin-Up has delivered premium betting, casino thrills, and the pinup app for seamless online gaming worldwide pin up casino app download old version
Baltour — блог о путешествиях с характером. Исследуем города, природу, маршруты и неожиданные места — по Балтике и не только. Без шаблонов, с душой и реальными впечатлениями отдых
Vulkan Vegas is a casino known for its reliability and quality service. In 2025, Vulkan Vegas continues to delight players with a variety of games and convenient conditions for playing in rubles список онлайн казино
If you don’t mind, where do you host your weblog? I am looking for a very good web host and your webpage seams to be extremely fast and up most the time…
I just sent this post to a bunch of my friends as I agree with most of what you’re saying here and the way you’ve presented it is awesome.
For fast-paced excitement, Chicken Road Game delivers quirky races and chaotic challenges. Download Chicken Road now and dive into thrilling adventures on your device chicken on the road game
I think this is among the so much vital info for me. And i’m happy reading your article. But wanna remark on few common issues, The site style is wonderful, the articles is really excellent : D. Just right job, cheers
ТОП-10 лучших сервисов для WhatsApp-рассылки WhatsApp является одним из самых популярных мессенджеров в мире, с миллиардами активных пользователей https://marketing-i.ru/
ТОП-10 лучших сервисов для WhatsApp-рассылки WhatsApp является одним из самых популярных мессенджеров в мире, с миллиардами активных пользователей онлайн сервисы
The authorization process at Arkada Casino is as simple as possible. The player needs to enter an email and password, after which he gets access to his personal account бездепозитный бонус Arkada casino
Tips and tools you offer are so helpful to agencies in our community.
The application is available for Android and iOS, providing quick access to the gameplay. Simple installation and user-friendly interface will make the game comfortable, and the mobile version will allow you to enjoy gambling entertainment anywhere Банда Казино бонусы
nerve calm is a high-quality nutritional supplement crafted to promote nerve wellness, ease chronic discomfort, and boost everyday vitality.
Mobile phone numbers in South Korea also follow a specific structure. South Korean mobile phone numbers usually start with 010 and consist of 11 digits in total https://diariodeavisos.elespanol.com/canariasenred/paypal-sin-numero-de-telefono-una-solucion-virtual-y-segura/
wonderful issues altogether, you simply won a new reader. What would you suggest about your put up that you just made some days in the past? Any positive?
Jetton Casino pleases its users with a variety of bonuses. For newcomers, there are welcome packages, including deposit incentives and free spins Jetton Casino мобильная версия
Nowadays, international communication is of great importance in both personal and business life. Especially in a country like South Korea, which is important in terms of technology and trade, communicating starts with knowing the correct phone numbers and codes https://www.smartbusinessdaily.com/voip-virtual-numbers/
детективное агентство экспертного уровня, при этом мы гарантируем одинаково внимательный подход как корпоративным клиентам, так и частным лицам услуги детектива
Официальный сайт казино Monro. Регистрация и вход в личный кабинет. В этом казино разрешается играть без регистрации, если использовать демо-режим monro казино онлайн
How can you use random eggs and how hot can they be used in the world? What is the most popular version of Casino Ramenbet mobile version промокод казино Раменбет
motilium 10mg uk – buy generic sumycin over the counter flexeril for sale
hiring a normal estate agent is well-known tradition in many developed countries агентство элитной недвижимости ОАЭ в Эстонии nagu USA.
Сер.: экономика и управление. Сер.: Филология.
Журналистика. – 2021. – № 4.
http://proekt.media/wp-content/uploads/2018/09/Listov_approved.jpg
– С.
↑ УКАЗ ПРЕЗИДЕНТА УКРАЇНИ №726/2022 Про рішення Ради
національної безпеки і оборони України від 19 жовтня 2022 року «Про застосування та.
Feel free to surf to my blog post https://proektmedia-stat.ams3.digitaloceanspaces.com/2019/01/bob_king_main_image.jpg
en iyi triphop albüm Ruhların Etiketi Spotify. Lamentos
leptozan is an innovative weight loss formula crafted to help you naturally sculpt the body you’ve always desired.
primebiome fosters a thriving gut microbiome, which contributes to improved skin clarity and a naturally youthful glow.
Assortment of slots one of the silent stores of Triks Casino. This is the case — and the Trix Casino is not limited to its one-size-fits-all store Trix Casino 2025
Hi dear pals! This website is absolutely beneficial.
I suggest you buy sidebar backlinks from virgool.io.
If you want to rank better, feel free to DM me on Telegram @myd_80
or hop into my SEO group @seoprem. The best telegram seo group is there,
and the magic of internal seo is for mehran yousefi.
We also have the best SEO backlinks services.
интересно, что дозировка в одной таблетке
составляет 1571 мг, а упаковка подходит под 150 таблеток, топ хороших минеральных комплексов это.
This is gold, pure wisdom.
I always look forward to your posts.
Your passion shines through this post.
This post is such a gem!
Great post, thanks for sharing!
This is an underrated gem of a post.
This made my day, thank you!
Your work always adds value to my day.
This deserves more recognition!
This deserves more recognition!
This is a must-read for anyone in this field.
I’m learning so much from this.
This is such a positive message!
Оптовый интернет – магазин керамический плитки и керамогранита Керамогранит оптом
But sellers and buyers of real estate who
use virtual staging services in LA higher requirements on the quality of media.
I was referred to this web site by my cousin. I’m not sure who has written this post, but you’ve really identified my problem. You’re wonderful! Thanks!
Promo Code Use: Promo codes provide additional chances to win but may have wagering requirements and time limitations https://claytonabdw50517.blogzet.com/1xbet-cashback-promo-code-10-weekly-bonus-48973677
leptozan is an innovative weight loss formula crafted to help you naturally sculpt the body you’ve always desired.
mitolyn is a natural dietary supplement specifically outlined to enhance metabolism and support weight loss.
The search function is very accurate and helpful.
The wishlist feature is super handy.
I love the variety of items available here.
Great for finding last-minute gifts!
The color options for items are fantastic.
among popular slot machines|machines|aggregates|machines} – a night with Cleo, Golden Buffalo and five times Vegas, an 8888 casino bg that satisfies the most diverse
preferences of the players.
consider that cost per square foot usually increases with decreasing size, while capabilities of https://write.as/gy1v1ksmh93ltfor.md are the opposite.
My-articles-online робота для кілера
That’s some inspirational stuff. Never knew that opinions might be this varied. Thanks for all the enthusiasm to supply such helpful information here.
Играйте ответственно и выигрывайте по-божески в Cryptoboss Casino cryptoboss casino игровые автоматы
Ted erhält den Auftrag, die neue Hauptverwaltung der Goliath National Bank zu entwerfen.
Оптовый интернет – магазин керамический плитки и керамогранита alliance-plitka Плитка керамическая оптом
Психолог онлайн анонимно. Психолог оказывает помощь онлайн в чате. Анонимный чат с психологом телеграм. оценили 7158 раз
Uniswap is revolutionizing decentralized finance by offering a frictionless, permissionless way to swap tokens. With the Uniswap protocol, users can trade directly from their Uniswap wallet—no intermediaries required uniswap bridge
Har man dessutom som många Swish nedladdat på mobilen redan, kommer man igång på nolltid.
Идеальные натяжные потолки в Днепре, где качество встречает стиль, обновите свой дом, решение, которое преобразит ваш дом.
Элегантные натяжные потолки для вашего дома, инновационные технологии, которые создадут уют и гармонию, узнайте больше на сайте.
Лучшие цены на натяжные потолки в Днепре, от natyazhnye-potolki-dnepr.biz.ua, придайте вашему интерьеру свежесть, сделайте выбор в пользу качества.
Индивидуальный подход к каждому клиенту, доступные на natyazhnye-potolki-dnepr.biz.ua, превратите мечты в реальность, с нами это легко.
Эстетика и функциональность натяжных потолков, для каждого интерьера, на любой вкус и цвет, выбор по вашему желанию.
Почему стоит выбрать натяжные потолки?, для вашего дома, отличная шумоизоляция, обеспечьте себе комфорт.
Эстетические решения для вашего потолка, вдохновение для вашего дома, обратите внимание на детали, наш опыт к вашим услугам.
Натяжные потолки: легко и удобно, от natyazhnye-potolki-dnepr.biz.ua, доступные решения для каждого, выбор только за вами.
Натяжные потолки от профессионалов, с многолетним опытом на рынке, мы знаем, как сделать ваш потолок идеальным, вдохните жизнь в ваше пространство.
Натяжные потолки по доступным ценам, от производителей, где ваши мечты становятся реальностью, закажите натяжные потолки и наслаждайтесь результатом.
Эстетика натяжных потолков для вашего дома, от natyazhnye-potolki-dnepr.biz.ua, нам доверяют тысячи клиентов, позвоните и получите ответ на все вопросы.
Натяжные потолки для каждого интерьера, доступные на natyazhnye-potolki-dnepr.biz.ua, выбор, который вдохновляет, сделайте выбор осознанно.
Мы создаем идеальные потолки для вас, с индивидуальным подходом к каждому клиенту, долговечность и стиль, обновите свой дом с нами.
Натяжные потолки для ваших идей, с заботой о каждом клиенте, где ваши идеи становятся реальностью, узнайте больше на нашем сайте.
Натяжные потолки: от замысла до реализации, от natyazhnye-potolki-dnepr.biz.ua, долговечные и стильные решения, не откладывайте на завтра.
Натяжные потолки: качество и стиль, где качество — превыше всего, всё для вашего комфорта, сделайте правильный выбор.
потолки натяжные цена [url=https://natyazhnye-potolki-dnepr.biz.ua/]потолки натяжные цена[/url] .
All links are in the description! (that mean – here) Valve want us to use Steam Guard Mobile Authenticator at all cost https://sdasteam.com/
Steam Desktop Authenticator (SDA) is an open source program that is designed to use two-factor mobile authentication steam without a mobile application https://authenticatorsteamdesktop.com/
A suspected Russia-based cybercriminal decided to clone the website of a legitimate open-source desktop app (see here) called Steam Desktop Authenticator (SDA steam desktop authenticator гитхаб
SteamGuard mobile authenticator authorization codes directly in your browser! Now you do not need to reach for your phone whenever Steam requests authorization https://sdasteam.com/
This is definitely a wonderful webpage, thanks a lot..
Если вы планируете поездку в Италию, первым шагом становится определение необходимой визы. Для граждан стран, не входящих в Шенгенскую зону, обязательно оформлять визу для въезда http://www.asystechnik.com/index.php?title=%20%D0%93%D1%80%D0%B0%D0%B6%D0%B4%D0%B0%D0%BD%D1%81%D1%82%D0%B2%D0%BE%20%D1%87%D0%B5%D1%80%D0%B5%D0%B7%20%D0%BD%D0%B0%D1%82%D1%83%D1%80%D0%B0%D0%BB%D0%B8%D0%B7%D0%B0%D1%86%D0%B8%D1%8E:%20%D0%BA%D0%B0%D0%BA%20%D1%8D%D1%82%D0%BE%20%D1%80%D0%B0%D0%B1%D0%BE%D1%82%D0%B0%D0%B5%D1%82%20%D0%B2%20%D0%95%D0%A1
Если вы планируете поездку в Италию, первым шагом становится определение необходимой визы. Для граждан стран, не входящих в Шенгенскую зону, обязательно оформлять визу для въезда https://neowine.com/bbs/board.php?bo_table=qa&wr_id=335645
Whether you’re eyeing a Premier League upset or chasing jackpots on vibrant slots, this exclusive offer sets you up for success https://calisthenics.mn.co/posts/83176076?utm_source=manual
Whether you’re eyeing a Premier League upset or chasing jackpots on vibrant slots, this exclusive offer sets you up for success https://www.diigo.com/item/note/b05aq/jqv4?k=4eda0661bdac70c8d427e4bd518adb3e
MetaMask Download is essential for token management. It supports multiple chains and allows easy swapping of digital assets.
I like your style!
I have been curious about these trends, and you have really helped me. I have just told a few of my friends about this on FaceBook and they love your content just as much as I do.
I loved your idea there, I tell you blogs are so exciting sometimes like looking into people’s private life’s and work. Every new remark wonderful in its own right.
Джойказино: мир азарта и больших возможностей!Погрузитесь в атмосферу ярких эмоций! Сотни слотов, live-игры с реальными дилерами, турниры с призами — выбирайте развлечения по вкусу. Регистрация за пару кликов, бонусы для всех игроков и моментальные выплаты. Лицензия гарантирует честность, а поддержка работает круглосуточно. Удобный интерфейс и мобильная версия оценят даже новички https://tweecampus.com/read-blog/165509
Are you ready to feel thrilling emotions playing one of the best crash games ever aviator login
Thanks For This Blog, was added to my bookmarks.
Джой казино – лицензированное онлайн-казино с большим выбором игровых автоматов. Качественный софт, выгодные акции, обзор официального https://joyofficial.gitbook.io/joyofficial
Promo Code Use: Promo codes provide additional chances to win but may have wagering requirements and time limitations 1xbet promo code for free bet
Promo Code Use: Promo codes provide additional chances to win but may have wagering requirements and time limitations 1xbet promo code south africa
Promo Code Use: Promo codes provide additional chances to win but may have wagering requirements and time limitations. Ensure to check the terms and conditions https://ext-6753421.livejournal.com/421.html?newpost=1
Discover thousands of offerings — from free courses to full degrees — delivered by world-class partners like Harvard, Google, Amazon and more BLACK SEO LINKS, BACKLINKS, SOFTWARE FOR MASS BACKLINKING – TELEGRAM @SEO_LINKK
One of the key benefits of time-based rewards is the sense of progression they provide https://3rrend.com/read-blog/18784
1xCasino welcome bonus is a package active across your first four deposits. New customers will claim up to €2205/$2420 1xcasino es confiable
[url=https://chempion-casino-official.ru]chempion-casino-official.ru[/url]
На сайте, посвященном обзору официального сайта Казино Чемпион, вы найдете всестороннюю информацию об этой популярной игровой платформе. Здесь детально разобраны ключевые аспекты казино, начиная от интерфейса и удобства навигации, и заканчивая разнообразием игрового ассортимента и щедростью бонусной программы. В обзоре представлена информация о лицензировании казино, гарантиях безопасности, скорости выплат и качестве работы службы поддержки. Благодаря этому обзору, вы сможете составить полное представление о Казино Чемпион, оценить его преимущества и недостатки, и принять взвешенное решение, стоит ли здесь регистрироваться и играть на реальные деньги. Кроме того, на сайте представлены отзывы реальных игроков, которые помогут вам получить более объективную картину о работе казино и избежать возможных разочарований.
chempion-casino-official.ru
[url=https://official-zooma-casino.ru]official-zooma-casino.ru[/url]
На сайте, посвященном обзору официального сайта Zooma Casino, представлен исчерпывающий анализ платформы, призванный помочь игрокам принять обоснованное решение. Здесь вы найдете детальный разбор интерфейса и удобства использования, обзор доступных игр и их поставщиков, а также информацию о бонусной программе и условиях ее получения. Особое внимание уделено вопросам безопасности и лицензирования, чтобы убедиться в надежности и честности казино. Кроме того, в обзоре представлены данные о скорости выплат, доступных платежных методах и работе службы поддержки, что позволит вам составить полное представление о Zooma Casino и оценить его соответствие вашим требованиям и предпочтениям. Отзывы реальных пользователей помогут сформировать более объективное мнение и избежать возможных неприятных сюрпризов.
official-zooma-casino.ru
[url=https://chestnye-casino.ru]chestnye-casino.ru[/url]
На сайте, посвященном обзорам онлайн казино, вы найдете независимую оценку и рейтинг самых надежных игровых платформ. Здесь представлены только проверенные и лицензированные казино, прошедшие тщательную проверку экспертов. Вы узнаете о преимуществах и недостатках каждого заведения, получите информацию о бонусах, игровых автоматах, методах оплаты и качестве службы поддержки. Сайт поможет вам сделать осознанный выбор, чтобы играть в слоты на деньги в безопасной и честной среде, минимизируя риски и получая максимум удовольствия от игры. Кроме того, ресурс содержит полезные советы и стратегии, которые помогут вам повысить свои шансы на выигрыш и сделать процесс игры еще более увлекательным. Регулярное обновление обзоров и добавление новых казино позволит вам всегда быть в курсе актуальных предложений и выбрать именно то казино, которое подходит вашим потребностям и предпочтениям.
chestnye-casino.ru
This article will tell you in more detail how to register with 1xBet with a promotional code https://minecraftcommand.science/forum/discussions/topics/code-promo-1xbet-sport-100-jusqu-a-130
[url=https://frispiny-casino.ru]frispiny-casino.ru[/url]
На сайте, специализирующемся на обзорах онлайн-казино, вы найдете детальную информацию о предложениях фриспинов, предоставляемых при регистрации. Здесь собраны актуальные данные о самых выгодных и привлекательных акциях от различных игровых платформ. Вы узнаете, какие казино предлагают наибольшее количество бесплатных вращений, на каких слотах их можно использовать, и каковы условия их отыгрыша. Благодаря подробным обзорам, вы сможете сравнить различные предложения фриспинов и выбрать те, которые наилучшим образом соответствуют вашим потребностям и предпочтениям, чтобы начать игру с максимальной выгодой и возможностью сорвать крупный выигрыш без риска для собственных средств.
frispiny-casino.ru
Это довольно короткий рассказ о девушке с необычной профессией. Марго – профессиональный киллер работа для киллера УКРАИНА
Roller garage doors are easy to use, especially when you have a garage remote door system https://www.finlandmlbforum.com/read-blog/18787
[url=frispiny-casino-registration.ru]frispiny-casino-registration.ru[/url]
На этом сайте вы найдете полный обзор фриспинов, предоставляемых онлайн казино при регистрации. Мы собрали актуальную информацию о самых щедрых предложениях, доступных новым игрокам. Вы узнаете, какие казино предлагают наибольшее количество бесплатных вращений, на каких слотах их можно использовать, и какие условия необходимо выполнить для вывода выигрышей. Подробные обзоры включают информацию о вейджерах, сроках действия фриспинов и других важных нюансах, которые помогут вам максимально выгодно воспользоваться этими бонусами. Мы поможем вам выбрать лучшее предложение и начать игру в онлайн казино с минимальными рисками и максимальными шансами на выигрыш. Сайт регулярно обновляется, чтобы вы всегда были в курсе самых свежих и выгодных акций.
frispiny-casino-registration.ru
What if you double your funds before even placing your first bet? With the 1xBet promo code 1XBRO200, new players can kick-start their adventure with a 100% welcome bonus https://sites.google.com/view/rewerc/home
The service will help you to attract the indexing robots of Google search engine (Googlebot) and get indexed your web page or backlinks faster SEO BACKLINKS, CROSS-LINKS, HACKED WP-ADMIN – TELEGRAM @SEO_ANOMALY
Throughout this review, we will describe the advantages and benefits of betting on 1xBet from Argentina, as well as tell you a little about the brand, its promotions, and how to use these promo codes on its platform to take advantage of its promos https://israelafrica.mn.co/posts/83299511/comments/129327344?utm_source=manual
One of these tools is bonuses, with the help of which you can quickly get the attention of players, increase the interest of users in your own gaming product https://dansermag.com/wp-content/pages/?code_promo_1win.html
?? Looking for the Ultimate Live Nude Experience? ??
Join now and explore private adult cams – Watch, Chat & Have Fun Now! ??
https://livenude.blog/top-10-live-nude-webcam-sites-you-must-try-in-year/
1xBet — download the app for Android and iOS. The 1xBet app allows millions of players from all over the world to place sports bets as quickly as possible https://friendtalk.mn.co/posts/83299291?utm_source=manual
Melbet is not just a casino, but also a bookmaker platform with bets on popular sports: football, basketball, tennis, hockey and others https://concretesubmarine.activeboard.com/t71836950/code-promo-melbet-bonus-1750-290-tours-gratuits/?page=last#lastPostAnchor
[url=https://install-champion-casino.ru]install-champion-casino.ru[/url]
Если вам интересно ознакомиться с инструкциями по установке приложений на мобильные устройства, мы можем предложить общий гайд.
Как установить приложения на Android и iOS
Установка мобильных приложений зависит от операционной системы вашего устройства.
Для Android:
Откройте файл APK — если приложение недоступно в Google Play, его можно скачать через официальный сайт.
Разрешите установку из неизвестных источников — зайдите в Настройки > Безопасность и активируйте соответствующую опцию.
Запустите установку и следуйте инструкциям.
Для iOS:
Скачайте приложение из App Store — большинство сервисов доступны через официальный магазин.
Используйте TestFlight или корпоративный сертификат — если приложение не опубликовано в App Store.
Разрешите установку — в настройках iPhone перейдите в раздел VPN и управление устройствами и подтвердите доверие к разработчику.
Если вас интересует конкретное приложение, проверьте его официальный сайт или магазин приложений. Но помните о безопасности: скачивайте ПО только из проверенных источников, чтобы избежать мошенничества.
Хотите узнать больше? Читайте дополнительные инструкции на сайте по ссылке ниже.install-champion-casino.ru
Производитель прозрачных силиконовых скатертей гибкое стекло на современном оборудовании с доставкой по всей России Скатерти цветные гибкое стекло с рисунком
Производитель прозрачных силиконовых скатертей гибкое стекло на современном оборудовании с доставкой по всей России Скатерти ПВХ от производителя
[url=https://sukaaa-casino-slots.ru]sukaaa-casino-slots.ru[/url]
Обзор игровой платформы Sukaa 2025
В 2025 году Sukaa остается одной из популярных международных игровых платформ, привлекающей внимание пользователей из разных стран. На нашем сайте представлен детальный обзор особенностей данного ресурса.
Основные характеристики:
Лицензия: международная (Кюрасао)
Валюта: поддерживаются рублевые транзакции
Игровой софт: представлены слоты, настольные игры, live-дилеры
Мобильная версия: адаптирована под iOS и Android
Особенности платформы:
Бонусная программа для новых пользователей
Регулярные турниры с призовыми фондами
Система лояльности для постоянных клиентов
Важно учитывать:
Платформа не имеет российской лицензии
Доступ может быть ограничен интернет-провайдерами
Рекомендуется проверять актуальность информации на официальном сайте
Альтернативы:
Для российских пользователей доступны легальные варианты:
Официальные лотереи (Столото)
Социальные игровые приложения
Напоминание: Азартные игры могут вызывать зависимость. Играйте ответственно. 18+
Полную информацию о платформе Sukaa вы найдете на сайте по ссылке.sukaaa-casino-slots.ru
Sex では、最新の Xvideos セックス ムービー、Xvideos セックス ファック 極上ハッピー、フル HD 鮮明のセレクションをご覧いただけます。
very good post, i certainly love this web site, keep on it
Скатерть из силикона от производителя является абсолютно безопасной. Она не испаряет токсичных соединений Скатерть настольная прозрачная
The Race Up Aviator game has been gaining traction on Reddit, where players share tips, big wins, and thrilling near-misses. Many users are discussing strategies and comparing experiences, making it a hot topic in online casino communities Race Up Aviator
Just what I needed to know thank you for this.
Elite Link Indexer is the top choice among digital marketing agencies looking to maximize the number of backlinks indexed for their clients how to kill yourself
Психолог оказывает помощь онлайн в чате. Анонимный чат с психологом телеграм. Телеграм психолог. оценили 4779 раз
[url=https://create-casino.ru]create-casino.ru[/url]
Создать онлайн-казино в 2025? Это сложный процесс, требующий лицензии, надежного софта, безопасности и маркетинга. Необходимо учитывать законодательство, конкуренцию и ответственный подход к азартным играм. Узнайте больше о ключевых этапах и подводных камнях. Читайте подробнее по ссылке ниже
create-casino.ru
Нужен срочный вызов сантехника в Алматы? Профессиональные мастера оперативно решат любые проблемы с водопроводом, отоплением и канализацией. Доступные цены, выезд в течение часа и гарантия на все виды работ сантехник алматы недорого вызов
Good post. I study something more difficult on different blogs everyday. It’s going to always be stimulating to learn content material from other writers and observe a little bit one thing from their store. I’d prefer to use some with the content material on my blog whether you don’t mind. Natually I’ll give you a link in your web blog. Thanks for sharing.
Получите консультацию онлайн-психолога в чате прямо сейчас. Психолог в телеграм. Круглосуточная запись на онлайн-консультацию психолога. оценили 8309 раз
[url=https://sukaaa-casino.ru]sukaaa-casino.ru[/url]
Если вам интересно ознакомиться с инструкциями по установке приложений на мобильные устройства, мы можем предложить общий гайд.
Как установить приложения на Android и iOS
Установка мобильных приложений зависит от операционной системы вашего устройства.
Для Android:
Откройте файл APK — если приложение недоступно в Google Play, его можно скачать через официальный сайт.
Разрешите установку из неизвестных источников — зайдите в Настройки > Безопасность и активируйте соответствующую опцию.
Запустите установку и следуйте инструкциям.
Для iOS:
Скачайте приложение из App Store — большинство сервисов доступны через официальный магазин.
Используйте TestFlight или корпоративный сертификат — если приложение не опубликовано в App Store.
Разрешите установку — в настройках iPhone перейдите в раздел VPN и управление устройствами и подтвердите доверие к разработчику.
Если вас интересует конкретное приложение, проверьте его официальный сайт или магазин приложений. Но помните о безопасности: скачивайте ПО только из проверенных источников, чтобы избежать мошенничества.
Хотите узнать больше? Читайте дополнительные инструкции на сайте по ссылке ниже.sukaaa-casino.ru
Цены на сантехнические услуги формируются в зависимости от сложности работ, типа оборудования, объема и времени выезда сантехник на дом срочно
Цены на сантехнические услуги формируются в зависимости от сложности работ, типа оборудования, объема и времени выезда https://vyzov-santehnika-almaty.kz/
[url=support-service-casino.ru]support-service-casino.ru[/url]
Служба поддержки онлайн-казино – ключевое звено! Мгновенные ответы, мультиязычность, решение сложных вопросов и персонализированный подход. Игроки ценят скорость и профессионализм. Как оптимизировать работу саппорта и повысить лояльность? Узнайте о трендах и технологиях! Читайте подробнее:
support-service-casino.ru
Нужен срочный вызов сантехника в Алматы? Профессиональные мастера оперативно решат любые проблемы с водопроводом, отоплением и канализацией. Доступные цены, выезд в течение часа и гарантия на все виды работ сколько стоят услуги сантехника
Воздушные шарики на день рожденье
google porn visit.
You write Formidable articles, keep up good work.
Услуги сантехника Алматы. Все виды сантехнических услуг. Получите бесплатную консультацию по ремонту за 5 минут сантехник услуги алматы
Воздушные шары на рождение ребенка
Love using MetaMask Chrome! The extension is user-friendly and supports multiple networks. Ideal for DeFi and Web3 applications.
Your blog has become my daily dose of positivity and inspiration It’s a space that I always look forward to visiting
Профессиональный сервисный центр по ремонту Apple iPhone в Москве.
Мы предлагаем: ремонт айфона в москве недорого
Наши мастера оперативно устранят неисправности вашего устройства в сервисе или с выездом на дом!
Воздушные шары на выпускной
http://gost-10303.ru/
Hitman World of Assassination brings together the best elements of Hitman hire a hitman
Профессиональный сервисный центр по ремонту Apple iPhone в Москве.
Мы предлагаем: ремонт iphone на дому в москве
Наши мастера оперативно устранят неисправности вашего устройства в сервисе или с выездом на дом!
[url=https://slots-casino-com.ru]slots-casino-com.ru[/url]
Здравствуйте, уважаемые участники форума! ??
Если вас интересует, как играть в Slot Casino Com через телефон, перейдите по ссылке ниже. Там вы найдете подробную инструкцию, которая поможет вам быстро и легко освоить игру. Удачи и приятного времяпрепровождения! ??
slots-casino-com.ru
Promo Code Use: Promo codes provide additional chances to win but may have wagering requirements and time limitations. Ensure to check the terms and conditions https://www.pearltrees.com/rocofi3429/item707332091
Профессиональный сервисный центр по ремонту Apple iPhone в Москве.
Мы предлагаем: сервисный ремонт айфонов в москве
Наши мастера оперативно устранят неисправности вашего устройства в сервисе или с выездом на дом!
This bonus applies to both sports betting and casino games, offering complete flexibility to new players https://www.atoallinks.com/2025/code-promo-1xbet-gratuit-meilleur-bonus-jusqua-e130/
Профессиональный сервисный центр по ремонту Apple iPhone в Москве.
Мы предлагаем: сервисный центр iphone в москве адреса
Наши мастера оперативно устранят неисправности вашего устройства в сервисе или с выездом на дом!
Melbet isn’t just a betting site—it’s a global leader trusted by millions of players worldwide https://articlescad.com/melbet-promo-code-run555-100-bonus-130-25909.html
order mobic 7.5mg generic – order celecoxib 100mg online buy generic flomax 0.4mg
Active players can earn promotional points through gameplay and exchange them for additional codes, offering further opportunities for bonuses https://www.provenexpert.com/tif-post/?switchToBrand=employer
Профессиональный сервисный центр по ремонту бытовой техники с выездом на дом.
Мы предлагаем:сервис центры бытовой техники москва
Наши мастера оперативно устранят неисправности вашего устройства в сервисе или с выездом на дом!
Seize the moment and you will be able to win a lot of money to realize your dreams https://bookmark.youmobs.com/1xbet-promo-code-free-bet-vip-bonus-100-up-to-e130/
Профессиональный сервисный центр по ремонту бытовой техники с выездом на дом.
Мы предлагаем:сервисные центры в москве
Наши мастера оперативно устранят неисправности вашего устройства в сервисе или с выездом на дом!
Продать Машину Если Птс В Банке
Продать Авто Птс В Банке
Профессиональный сервисный центр по ремонту Apple iPhone в Москве.
Мы предлагаем: ремонт iphone в москве
Наши мастера оперативно устранят неисправности вашего устройства в сервисе или с выездом на дом!
Продать Машину В Залоге Птс
https://pyhack.pro/
Срочно Продать Кредитный Авто
This bonus applies to both sports betting and casino games, offering complete flexibility to new players https://www.zerohedge.com/user/kbN5mmnIFJgKifXuDXXLnpz7c4o1
Bookmakers very often hold various promotions to attract new customers, offering them bonuses upon registration https://tumblrblog.com/code-promo-1xbet-football-bonus-ligue-1/
Продать Машину Находящуюся В Залоге
Жилищные споры в Алматы — не редкость. Ошибки в квитанциях, некачественные услуги, затопления, конфликты с управляющими компаниями — всё это требует юридической поддержки https://cobaki.ru/users.php?m=details&id=95459
Профессиональный сервисный центр по ремонту Apple iPhone в Москве.
Мы предлагаем: ремонт айфона с выездом мастера в москве
Наши мастера оперативно устранят неисправности вашего устройства в сервисе или с выездом на дом!
Все Фрибеты за регистрацию без депозита 2025 и бонусы от букмекерских контор (БК) на одном сайте. Жми фрибет без депозита за регистрацию
When choosing the right garage tiles, you need to consider many factors, including the classification, known as the tile grade https://kaynarca.net/pages/kolebaniya_oborotov_i_ryvki_dvigatelya_chto_delaty.html
When choosing the right garage tiles, you need to consider many factors, including the classification, known as the tile grade http://kib-net.ru/news/pgs/detskoe_pokryvalo_neobhodimaya_veschy_v_komnate_rebenka.html
A virtual number for VK is a unique technology that allows you to register and confirm your account without using your personal phone https://you-guide.ru/preimushhestva-virtualnyh-nomerov-dlya-biznesa/
A virtual number for VK is a unique technology that allows you to register and confirm your account without using your personal phone https://nn-news.net/other/2025/03/02/726901.html
Профессиональный сервисный центр по ремонту Apple iPhone в Москве.
Мы предлагаем: ремонт iphone на дому в москве
Наши мастера оперативно устранят неисправности вашего устройства в сервисе или с выездом на дом!
Not a struggle, but a conscious choice Understanding the reasons for cravings for sweets helps to shift the focus from an exhausting struggle to a conscious approach https://www.gak.com.ua/creatives/1/27419
We will also come across the remains of a fort built in the Bronze Age, Early Christian churches and the best Irish pubs https://akivaschool.com/pgs/pomoghet_li_dieta.html
Цена рассчитывается индивидуально после оценки темы и методических требований, включает глубокое исследование, оформление по ГОСТ диссертация заказ
Сочетаем мощь современных нейросетей и опытных редакторов, чтобы оперативно собрать источники, сформировать структурированный текст, оформить по ГОСТ и обеспечить высокую уникальность курсовая работа нейросеть для студентов бесплатно
[url=download-app-casino-x.ru]download-app-casino-x.ru[/url]
Привет всем!
Если вы ищете информацию о том, как скачать и установить мобильное приложение Casino X на свое устройство (Android или iOS), советую посмотреть по этой ссылке:
Там подробно описано:
Где безопасно скачать установочный файл
Какие системные требования у приложения
Как правильно установить и настроить приложение
Какие бонусы можно получить за установку приложения
download-app-casino-x.ru
подключить домашний интернет в челябинске
chelyabinsk-domashnij-internet002.ru
тарифы интернет и телевидение челябинск
Pretty nice post. I just stumbled upon your weblog and wanted to say that I’ve really enjoyed surfing around your blog posts. After all I’ll be subscribing in your feed and I am hoping you write again very soon!
тарифы интернет и телевидение челябинск
chelyabinsk-domashnij-internet003.ru
домашний интернет в челябинске
провайдер по адресу
ekaterinburg-domashnij-internet001.ru
интернет по адресу екатеринбург
интернет провайдер екатеринбург
ekaterinburg-domashnij-internet002.ru
какие провайдеры интернета есть по адресу екатеринбург
подключение интернета по адресу
kazan-domashnij-internet001.ru
подключить интернет в квартиру казань
подключение интернета казань
kazan-domashnij-internet002.ru
подключить интернет в казани в квартире
какие провайдеры по адресу
kazan-domashnij-internet003.ru
какие провайдеры по адресу
[url=https://download-pinko-casino.ru]download-pinko-casino.ru[/url]
Всем привет!
Нашёл для вас кое-что интересное, особенно для тех, кто фанатеет от казино Pinko. По ссылке можно узнать все подробности о том, как скачать это казино.
В статье, скорее всего, расскажут о способах скачивания для разных устройств, особенностях установки и, возможно, о бонусах, которые можно получить после установки.
download-pinko-casino.ru
Think of them like your favorite childhood candy, but with a relaxing twist https://bresdel.com/blogs/1013161/C%C3%B3digo-Promocional-1xBet-Bono-VIP-100-hasta-130
Think of them like your favorite childhood candy, but with a relaxing twist https://penzu.com/p/6a29c9208546e364
подключение интернета по адресу
krasnoyarsk-domashnij-internet001.ru
подключение интернета по адресу
Быстрый Выкуп Автомобилей
Thank you for sharing this very good post. Very interesting ideas! (as always, btw)
https://easy-remodeling.com/why-is-my-hallway-so-cold-how-to-heat-a-hallway-with-underfloor-heating/
Gambling Intensive course – ensure yourself a decent income Learn to SEO BACKLINKS, CROSS-LINKS, HACKED WP-ADMIN – TELEGRAM @SEO_ANOMALY
Быстрая консультация в любое время суток
[url=download-casino-phone.ru]download-casino-phone.ru[/url]
Приветствую всех!
Наткнулся на интересную статью для любителей мобильного гемблинга. По ссылке можно узнать подробности о том, как скачать казино на телефон.
В материале, похоже, рассматриваются разные платформы (Android, iOS?), способы установки, а также вопросы безопасности и выбора надежного казино.
download-casino-phone.ru
Навес — практичное решение для тех, кто хочет уберечь автомобиль от солнца, дождя, снега и других капризов погоды, не строя капитальный гараж навесы для автомобилей цена с установкой
Навес — практичное решение для тех, кто хочет уберечь автомобиль от солнца, дождя, снега и других капризов погоды, не строя капитальный гараж навес для автомобиля москва
интернет провайдеры москва
msk-domashnij-internet002.ru
подключить домашний интернет москва
Admiring the time and effort you put into your site and detailed info you offer!
I’m impressed, I need to say. Really rarely do I encounter a blog that’s both educational and entertaining, and let me tell you, you have hit the nail on the head.
интернет по адресу дома
nizhnij-novgorod-domashnij-internet001.ru
лучший интернет провайдер нижний новгород
Geographic Information Systems (GIS) have revolutionized sons of japheth map
провайдеры домашнего интернета новосибирск
novosibirsk-domashnij-internet001.ru
интернет провайдеры по адресу
Современные модели также могут включать перколяторы колпак для водного
Looking for live nude fun, cam model guides, or ways to make money from the webcam industry?
?? Visit **littlecocktease com** and get access to:
?? Free cam site hacks
?? How to watch more and spend less
?? Best webcam affiliate programs
?? Tips on becoming a webcam model
?? Psychology of why cams are so addictive
Real advice from real users. Perfect if you’re watching, earning, or thinking about joining the adult cam world.
Check full articles here:
?? Don’t just watch — learn how to get the most out of every show.
https://littlecocktease.com/blog/the-psychology-behind-watching-live-cams-why-were-hooked/
I like the efforts you have put in this, regards for all the great content.
Great news for all us
дешевый интернет пермь
perm-domashnij-internet003.ru
тарифы интернет и телевидение пермь
Хочу продать машину перекупам
домашний интернет воронеж
voronezh-domashnij-internet002.ru
подключить интернет тарифы воронеж
Начните свое путешествие с 1xBet уже сегодня промокод 1хбет казахстан
провайдеры челябинск
chelyabinsk-domashnij-internet002.ru
провайдеры челябинск
Hi there to all, for the reason that I am genuinely keen of reading this website’s post to be updated on a regular basis. It carries pleasant stuff.
Witamy w Vox Casino, wyjątkowym miejscu stworzonym z myślą o polskich graczach poszukujących najlepszych doświadczeń w kasynie online. Oferujemy szeroką gamę ekscytujących gier, atrakcyjne bonusy i promocje, a wszystko to w bezpiecznym i przyjaznym środowisku. Nasza platforma została zaprojektowana tak, aby zapewnić płynną nawigację i niezapomniane wrażenia, niezależnie od tego, czy jesteś doświadczonym graczem, czy dopiero zaczynasz swoją przygodę. Dołącz do społeczności Vox kasyno i odkryj świat emocjonującej rozrywki, dostępny na wyciągnięcie ręki, 24 godziny na dobę, 7 dni w tygodniu.
домашний интернет тарифы москва
msk-domashnij-internet001.ru
узнать интернет по адресу
Partner sites and forums Reliable resources https://www.divephotoguide.com/user/1xbetru
Partner sites and forums Reliable resources https://www.imdb.com/es-es/list/ls592561970/
Seize the moment and you will be able https://bliznecy.com/js/pgs/1xslots_promokod_bonus_na_depozit.html
Seize the moment and you will be able https://magicmag.net/image/pgs/?promokod_pokerdom_pri_registracii_1.html
Bookmaker loyalty programs offer increasing benefits https://www.sitebs.ru/blogs/114272.html
Приглашаем отправиться в речные круизы из Москвы на комфортабельных теплоходах по всей России [url=https://xn—-itbajelswf4a2bzch.xn--p1ai]Речные круизы[/url]
https://www.asseenontvonline.ru
I appreciate you sharing this blog post. Thanks Again. Cool.
Thanks for sharing. I read many of your blog posts, cool, your blog is very good.
Как зайти на сайт bs2best https://b2sbest.at
Вход bs-https://b2sbest.at
bs2best
bs2best at
bs2site
blacksprut
bs2site at
https bs2best at
https bs2site at
блекспрут
blacksprut ссылка
blacksprut com
blacksprut зеркала
blacksprut зеркало
blacksprut сайт
bs blacksprut
тор blacksprut
blacksprut официальный
bs2best at ссылка
tor blacksprut
blacksprut ссылка tor
blacksprut darknet
blacksprut сайт зеркало
blacksprut bs2tor nl
bs2site at ссылка
blacksprut blacksprut click
blacksprut официальный сайт
блекспрут bs2tor nl
рабочая blacksprut
blacksprut ссылка тор
bs2web
blacksprut com зеркало сайта
blacksprut вход
https bs2site at login
blacksprut onion
blacksprut com ссылка
как зайти на blacksprut
тор браузер blacksprut
blacksprut сегодня
ссылка на блекспрут
блекспрут сайт
blacksprut официальная ссылка
blacksprut актуальные
blacksprut ссылка bs2tor nl
блекспрут зеркало
блекспрут blacksprut
http blacksprut ссылки
blacksprut зеркало официальный
bs2web at
bs2site at не работает
blacksprut не работает
blacksprut ссылка зеркало
2fa blacksprut где взять
blacksprut зеркала tor
блэкспрут blacksprut
блекспрут com
blacksprut площадки
блекспрут blacksprut click
bs2site at зеркала
блекспрут bs2
blacksprut com официальный
blacksprut официальный сайт ссылка
blacksprut onion ссылка
блэкспрут blacksprut click
актуальная ссылка на blacksprut
bs2best at зеркала
как найти blacksprut
блекспрут 2fa
bs2best at бс сайт
bs2best at не работает
blacksprut ссылка на сайт
блэк спрут blacksprut click
blacksprut зеркала bs2tor nl
тор блекспрут
зеркало blacksprut darknet
bs2web run
blacksprut зеркало официальный сайт
как зайти на сайт blacksprut
blacksprut com вход
блекспрут вход
bs2web top
рабочее зеркало blacksprut
https bs2site at сайт
как зайти на блекспрут
как зайти через blacksprut
bs2best at регистрация
blacksprut поддержка
blacksprut onion зеркало
blacksprut com официальный сайт
blacksprut зеркала актуальные
bs2web nl
рабочая ссылка на blacksprut
blacksprut рулетка
bs2besd at
рабочая ссылка блекспрут
https bs2best at сайт
блекспрут официальный сайт
ссылка блекспрут тор
bs2web com
blacksprut онион
блекспрут бс сайт bs site biz
блекспрут bs2web
блекспрут com ссылка
blacksprut официальный bs site biz
blacksprut площадка зеркало
блекспрут онион
блекспрут актуальные ссылки
blacksprut войти
blacksprut зеркало работающее
blacksprut сайт bs2 best at
http blacksprut onion
блекспрут надежные ссылки
ссылка на блекспрут bs site biz
сайт блекспрут ссылки
blacksprut net официальный сайт
https bs2best at не работает
bs2web зеркало
блекспруте blacksprut me
как открыть ссылку bs2web at
Altıntaş Makina bingöl stihl, stihl bingöl, oleomac bingöl, bingöl felco, çapa makinası, altıntaş makina </a Yusuf Elaltuntaş.
Thanks for sharing. I read many of your blog posts, cool, your blog is very good.
The first promo code from 1xBet is given for free https://www.braidbabes.com/profile/promoarge22n75730/profile
Поможем вам подобрать авто из большого выбора марок и моделей – американских, европейских и китайских https://ntdtv.ru/133124-kak-pokupat-b-u-avtomobili-vybiraem-idealnuyu-mashinu-s-probegom
Awesome! Its genuinely remarkable post, I have got much clear idea regarding from this post
Golbet Turkey is a modern digital platform designed for sports fans [url=https://github.com/bhardwajgowri025/golbet]https://github.com/bhardwajgowri025/golbet[/url]
Golbet Turkey is a modern digital platform designed for sports fans [url=https://github.com/bhardwajgowri025/golbet]golbet giriЕџ[/url]
En la industria del juego, la marca 1xBet es bien conocida [url=https://israelafrica.mn.co/posts/85150975]https://israelafrica.mn.co/posts/85150975[/url]
Another way to combat foot fatigue is corn stigma infusion [url=https://prettypics.fr/pag/?sovety_po_prohoghdeniyu_hex_commander_fantasy_heroes_kampaniya_za_lyudey_missiya_19.html]https://prettypics.fr/pag/?sovety_po_prohoghdeniyu_hex_commander_fantasy_heroes_kampaniya_za_lyudey_missiya_19.html[/url]
Усыпление и кремация кошек и собак в Санкт-Петербурге [url=https://veterinarnayaclinica.ru/]Ветклиника в санкт-петербурге[/url]
I just like the helpful information you provide in your articles
http://www.nudefemalewebcams.com
The Pinup platform has a wide range of games [url=https://pinup-360.one/]punped gabo porno[/url]
Hi there, yup this post is in fact nice and I have learned lot of things
from it concerning blogging. thanks.
Строим дачные дома,по каркасной технологии,с утеплением [url=https://stroy-dom-brus.ru/]Каркасные дома и бани из клееного бруса под ключ[/url]
What’s up to all, how is all, I think every one is getting more from
this web page, and your views are nice in favor of new people.
[url=https://topvpn2025.ru]topvpn2025.ru[/url]
Скачайте бесплатно впн на андройд по ссылке ниже: topvpn2025.ru
Vodka Casino — это платформа с ярким русскоязычным дизайном, где представлены сотни игр: от классических слотов до live-дилеров [url=https://vodkasloty.com]водка казино[/url]
Ищете незабываемый тур на Камчатку? Организуем увлекательные путешествия по самым живописным уголкам полуострова [url=https://turkamchatka.ru/]туры на камчатку[/url]
At the identical time, the mix of sweet wine and cheese helps to make this extra particular and delicious for the lovers. It’s the identical patriotism that compelled different whistleblowers to act. The chains of amino acids are likely to coil into helices (secondary construction) on account of hydrogen bonding between aspect chain residues, and sections of the helices may fold on each other due to hydrophobic interactions between nonpolar facet chains and, in some proteins, to disulfide bonds in order that the general molecule may be globular or rod-like (tertiary structure). In biological systems, the chains formed could be anything from a number of amino acid items (di, tri, or oligopeptide) to 1000’s of units lengthy (polypeptide), corresponding to molecular weights ranging from a whole bunch to lots of of thousands of Daltons. 590 DIETARY REFERENCE INTAKES BACKGROUND Information Chemistry of Proteins and Amino Acids Protein Protein is the most important practical and structural part of all the cells of the body; for example, all enzymes, membrane carriers, blood transport molecules, the intracellular matrices, hair, fingernails, serum albumin, keratin, and collagen are proteins, as are many hormones and a big a part of membranes. 591 P ROTEIN AND AMINO ACIDS Name Abbreviation Form Aliphatic facet chains H CH COOH Glycine Gly NH2 CH3 CH COOH A lanine Ala NH2 Valine a CH3 Val CH CH COOH CH3 NH2 a CH3 Leucine Leu CH CH2 CH COOH CH3 NH2 a CH3 CH2 Isoleucine Ile CH CH COOH CH3 NH2 Aromatic aspect chains Phenylalanine Phe CH2 CH COOH NH2 Tyrosine Tyr HO CH2 CH COOH NH2 Tryptophan Trp CH2 CH COOH NH2 N H Hydroxyl groups in aspect chains CH2 CH COOH Serine Ser OH NH2 CH2 CH CH COOH Threonine Thr OH NH2 Sulfur-containing aspect chains Cysteine b HS CH2 CH COOH Cys NH2 CH3 S CH2 CH2 CH COOH Methionine Met NH2 Imino Acids CH2 CH3 c Pro Proline CH COOH CH2 N H Acidic aspect chains and their amides HOOC CH2 CH2 CH COOH Glutam Glu NH2 O Glutamine Gln H2N C CH2 CH2 CH COOH NH2 HOOC CH2 CH COOH Aspartic acid Asp NH2 O Asparagione Asn H2N C CH2 CH COOH NH2 Basic facet chains H2N CH2 CH2 CH2 CH2 CH COOH Lysine Lys NH2 H Arginine Arg H2N C N CH2 CH2 CH2 CH COOH NH NH2 CH2 CH COOH Histidine His N NH NH2 A mino acids in italics are classed as nutritionally indispensable to people.
Your point of view caught my eye and was very interesting. Thanks. I have a question for you.
Please let me know if you’re looking for a author for your weblog.
You have some really good posts and I feel I would be a good asset.
If you ever want to take some of the load off, I’d really like to write some material for your blog in exchange for a link back to mine.
Please blast me an email if interested. Thanks!
по специальным правилам реконструкции на высоте с 2021 года разрешено выполнять исполнения при неблагоприятных погодных условиях, при.
Feel free to surf to my blog post: https://tmb-renovation.ru/
Nice respond in return of this matter with genuine arguments and telling the whole
thing regarding that.
Финансовый кризис — это не только экономическая проблема, но и серьезное испытание для семейных отношений [url=https://www.donnews.ru/chto-sluzhba-bezopasnosti-proveryaet-pered-trudoustroystvom]https://www.donnews.ru/chto-sluzhba-bezopasnosti-proveryaet-pered-trudoustroystvom[/url]
топ косметологических клиник [url=https://clinics-marbella-1.ru/]топ косметологических клиник[/url] .
https://immediateedgeplatform.de/
Hi there i am kavin, its my first occasion to commenting anywhere,
when i read this paragraph i thought i could also create comment due to this brilliant paragraph.
For the reason that the admin of this site is working, no uncertainty very quickly it will be renowned, due to its quality contents.
Hi! [url=https://pampharma.top/#pharmacy-online-usa]online pharmacy[/url] great website.
[url=][/url]
Компания Текстиль – это профессиональный пошив спортивной формы и одежды для команд, клубов, секций и корпоративных мероприятий.
Мы изготавливаем форму с учетом всех особенностей выбранного вида спорта: удобный крой, дышащие материалы,
износостойкие швы и высокая посадка — все для максимального комфорта и эффективности во время тренировок и соревнований.
Работаем как с небольшими, так и с крупными тиражами. Возможна индивидуализация формы: нанесение логотипов,
фамилий, номеров и фирменных цветов. Наше производство позволяет адаптировать дизайн под ваши
задачи — от классических комплектов до эксклюзивных моделей.
Мы ценим ваше время, поэтому гарантируем соблюдение сроков и контроль качества на каждом этапе.
Пошив спортивной одежды от нас — это надежность, стиль и удобство.
Свяжитесь с нами и получите расчёт стоимости уже сегодня! [url=https://textile-37.ru/].[/url]
[url=][/url]
Hi there! [url=https://buyedpills.shop/#rx-online-pharmacy]ed drugs online[/url] very good website.
Can you be more specific about the content of your article? After reading it, I still have some doubts. Hope you can help me.
Hi there! [url=https://buyedpills.shop/#cvs-online-pharmacy]buy ed drugs no prescription[/url] very good website.
Hi! [url=https://prodmedway.shop/#pharmacies-online]legitimate online pharmacies india[/url] good internet site.
Howdy! [url=https://prodmedway.shop/#aetna-online-pharmacy]cheap online pharmacies no prescription[/url] beneficial site.
Ayo mainkan peluang besar anda di LIGACOR untuk kaya dengan bermain game di website terbaik tanpa stress! Dapatkan info cuan mudah dan jadilah kaya secara otomatis
https://eth-code.org/baykar-yatД±rД±m/
Your point of view caught my eye and was very interesting. Thanks. I have a question for you.
I came across an article that talks about the same thing but even more and when you go deeper.
That is really fascinating, You’re an excessively skilled blogger. I’ve joined your rss feed and look forward to in the hunt for extra of your magnificent post. Additionally, I’ve shared your website in my social networks!
I truly appreciate this post. I have been looking everywhere for this! Thank goodness I found it on Bing. You have made my day! Thank you again
Appreciation for taking the time to discuss this topic, I would love to discover more on this topic. If viable, as you gain expertise, would you object to updating the website with further information? It is tremendously beneficial for me.
Wir buchen regelmäßig für Büroreinigung – sehr zufrieden
This is a topic that definitely deserves more attention, and I’m so pleased you addressed it with such care and depth. Your willingness to explore its complexities makes this content invaluable.
I imagine so. Very good stuff, I agree totally.
I dont think I’ve read anything like this before. So good to find somebody with some original thoughts on this subject. cheers for starting this up. This blog is something that is needed on the web, someone with a little originality.
What i don’t realize is actually how you are not
actually much more neatly-preferred than you might be right now.
You’re so intelligent. You recognize therefore significantly when it comes to this matter, produced me individually consider
it from a lot of various angles. Its like menn and women are not involved until it is one thing to do with Lady gaga!
Your own stuffs excellent. Always maintain it up!
Sometimes, the sheer magnitude of the information seems overwhelming.
Hello this is a wonderful write-up. I’m going to e mail this to my friends. I came on this while searching on yahoo I’ll be sure to come back. thanks for sharing.
Thank you for all the information was very accurate, just wondering if all this is possible.~
Magnificent beat ! Can I be your apprentice? Just kidding!
This blog post is excellent, probably because of how well the subject was developed. I like some of the comments too though I could prefer we all stay on the subject in order add value to the subject!
그래서,우리는{확신/확신/의심의 여지가 없습니다},{무엇/그래서/그것이}그렇게. {또한/또한},이 동전 카지노{제공/제공}및기타{유혹/매력적인}장점,체크 아웃 https://https://coincasino.kr// 홈페이지
любой раскладка отличается уникальными качествами геймплея и правилами, https://vodkasloty.com/ что помогает выбрать подходящий жанр для.
Local SEO With Top USA Local Citations And Directory Submission is a product that helps businesses improve their online visibility and rankings in local search results
take into account that this offers can be flexible https://www.castrojeriz.com/foro/viewtopic.php?f=1&t=14009 because, where you inhabit.
Its unique selling points are the focus on the USA market, the use of reputable directories, and the ability to enhance local SEO efforts effectively
Join countless satisfied customers who have witnessed the transformative power of local SEO and watch your business thrive in the digital age
في عالم الضيافة العربية، لا شيء يضاهي روعة أفضل أنواع التمور في السعودية، تمور سعودية عالية الجودة، عصيدة حساوية جاهزة، أفضل رز حساوي، كيكة تمر منزلية، خليط مُخصص لصناعة كيكة التمر، الحسا، هدايا تمور فاخرة للعائلات. تُعد هذه المنتجات رمزاً للجودة والفخامة، حيث يتم اختيار أجود أنواع التمور والمنتجات الحساوية بعناية فائقة. من المعروف أن التمور ليست مجرد طعام، بل هي إرث ثقافي يعكس كرم الضيافة العربية وأصالة المذاق الفريد. كما أن الطلب المتزايد على هذه المنتجات جعلها خياراً مثالياً للمناسبات الخاصة والاحتفالات، لتكون دائماً حاضرة على الموائد. إن تمر خلاص فاخر يعكس تميز الإنتاج المحلي وجودته. إن تمر رزيز يعكس تميز الإنتاج المحلي وجودته.
Nice post. I learn something totally new and challenging on websites
I’m often to blogging and i really appreciate your content. The article has actually peaks my interest. I’m going to bookmark your web site and maintain checking for brand spanking new information.
I just added your web site to my blogroll, I hope you would look at doing the same.
I don’t think the title of your article matches the content lol. Just kidding, mainly because I had some doubts after reading the article.
Hi there very cool website!! Man .. Excellent .. Superb ..
I will bookmark your blog and take the feeds
also? I am glad to search out a lot of helpful info right here within the put up, we want work out extra techniques on this regard, thanks for sharing.
. . . . .
Bu güzel bilgilendirmeler için teşekkür ederim.
bonjour I love Your Blog can not say I come here often but im liking what i c so far….
I love how professional your cleaning team in München is!
websitem için çok işime yaradı teşekkür ederim
курьерская служба продуктов – перед вами в точности то, https://razgovory.forumotion.com/t1047-topic что вам угодно.
Emeğinize sağlık, bilgilendirmeler için teşekkür ederim.
I’m impressed, I need to say. Really rarely do I encounter a blog that’s both educational and entertaining, and let me tell you, you have hit the nail on the head.
bomb defuse (закладка бомбы).
Here is my web site https://counter-strike-1-6.ru/
aramalarım sonunda buraya geldim ve kesinlikle işime yarayan bir makale oldu. teşekkür ederim
Güzel aydınlatıcı makale için teşekkürler daha iyisi samda kayısı umarım faydalı çalışmalarınızın devamı gelir.
Smart AI ETH Mining for Free Users 2025 https://ai-eth.netlify.app
AI ETH Farming Tool Working Now 2025 https://ethai.pythonanywhere.com
Ethereum Mining Made Easy by AI 2025 https://ethminings.netlify.app
AI Crypto Miner Earns ETH BNB BASE Daily 2025 https://wallettrust.netlify.app
Great information shared.. really enjoyed reading this post thank you author for sharing this post .. appreciated
Oh my goodness! an amazing article. Great work.
в категории «плюсы и акции» нужно найти «у меня есть промокод» и ввести код в данной пустой http://www.advertology.ru/article158042.htm строке.
https://wealthpetaccessories.store/products/4-in-1-electric-pet-trimmer-rechargeable-clippers
ETH Generator Script Built with AI 2025 https://wallettrust.netlify.app
My Phone Mined Ethereum with ChatGPT AI 2025 https://ethminings.netlify.app
ETH Mining Without Rig Using ChatGPT AI 2025 https://ethai.pythonanywhere.com
This Ethereum Bot Made Me $500 Per Day 2025 https://ai-eth.netlify.app
Top 10 nhà cái uy tín Việt Nam: mm88, Vsbet, 12bet, hb88, tf88, fb88, onbet, i9bet,v9bet, fun88, m88… Đẳng cấp trang cá cược bóng đá, cá độ đăng ký miễn.
Real Ethereum Profits with AI Automation 2025 https://ai-eth.netlify.app
про це повідомили https://canguaphuquoc.com/2025/07/17/verde-kasyno-pl-depozyty-logowanie-bonusy-recenzja-wyplaty-pieniedzy/ у прес-службі мережі.
I Let ChatGPT Build My ETH Miner in 2025 https://ethminings.netlify.app
Çağra LTD | Mutfak ürünleri | Bahçe aksesuar Kıbrıs mutfak gereçleri, hırdavat kıbrıs, kıbrıs hırdavat, matkap kıbrıs, kıbrıs inşaat ürünleri, kıbrıs mobilya
Free ETH Base and BNB Earned by AI Tool 2025 https://ethminer.pythonanywhere.com
Examine the cheapest car insurance dallas company’s Dallas claim action times.
Very well presented. Every quote was awesome and thanks for sharing the content. Keep sharing and keep motivating others.
dxd global | Marka yönetimi Kıbrıs , sosyal medya yönetimi, promosyon ürünleri, Seslendirme Hizmeti , SEO , Dijital pazarlama , Videografi
I’m often to blogging and i really appreciate your content. The article has actually peaks my interest. I’m going to bookmark your web site and maintain checking for brand spanking new information.
WoW decent article. Can I hire you to guest write for my blog? If so send me an email!
Just what I needed to know thank you for this.
Pretty nice post. I just stumbled upon your weblog and wanted to say that I’ve really enjoyed surfing around your blog posts. After all I’ll be subscribing in your feed and I am hoping you write again very soon!
Также автовладельцы интересует вопрос, https://solenoidtester.com/ru/ сколько масла надо в вариатор кроссовера?
Ada dil| Kıbrıs İngilizce kursu ücretsiz İngilizce kursu , Kıbrıs çocuklar için İngilizce kursu, Kıbrıs online ingilizce , İngilizce eğitim setleri
This destination is actually close to my city, I’ll visit soon.
This marketing strategy is worth trying.
Veja bufe de festa no site salãosoberano.com e inspire-se!
The food photos are making me hungry, I’ll try cooking later today.
Thanks for providing a clear itinerary.
You can certainly see yur expertise within the article you write.
The arena hopes for more passionate writers like
you whho are not afraid to say how they believe. At all times follow your heart.
Loving the info on this website , you have done outstanding job on the blog posts.
This is something that will need all of our combined efforts to address.
Thanks for posting this. Looking for these resources 😀
I love the restaurant recommendations near the location.
I appreciate your work, thanks for all the great blog posts.
I really like your writing style, excellent info , thanks for putting up : D.
Substantially, the post is really the best on this laudable topic. I concur with your conclusions and will eagerly watch forward to your future updates.Just saying thanx will not just be enough, for the wonderful lucidity in your writing.
а потом все хором прочитали торжественное обещание юного пионера и зрителям повязали галстуки, кроме Сони Преображенской, которая.
Have a look at my webpage: https://lolgirl.ru/
Encountered a thought-provoking article, highly recommend https://penzu.com/p/b031f5c5c71c1cd8
Cool crazy wonderful wonderful amazing fantastic helpful amazing wonderful funny.
придумано несколько способов, https://ondevice.ru/ позволяющих открыть Диспетчер мобильных гаджетов на ос windows десять.
Физически выполнение данной процедуры является “установкой нуля” при подключенных измерительных проводниках и отсутствии измеряемого.
My blog post https://techinstrument-kaluga.ru/
Çağra LTD | Mutfak ürünleri | Bahçe aksesuar Kıbrıs mutfak gereçleri, hırdavat kıbrıs, kıbrıs hırdavat, matkap kıbrıs, kıbrıs inşaat ürünleri, kıbrıs mobilya
в этом случае, по желанию женщины, https://vdekrete.ru/ работодатель обязан установить, для сотрудницы неполное рабочее промежуток времени.
Bad superb amazing fantastic awesome excellent superb great bad nice helpful.
becem travel | Kıbrıs araç transfer Kıbrıs araç kiralama , Kıbrıs vip araç , Kıbrıs araç transfer , Kıbrıs güvenli ulaşım
Your point of view caught my eye and was very interesting. Thanks. I have a question for you. https://www.binance.com/pt-PT/join?ref=DB40ITMB
Perfect crazy wonderful interesting fantastic wonderful superb cool interesting strange cool.
Thank you for this resource. I handle my PDFs with https://pdfpanel.com.
This was a good refresher. I manage eBooks and reports with https://pdfpanel.com.
I don’t think the title of your article matches the content lol. Just kidding, mainly because I had some doubts after reading the article.
Following the consanfero approach will help to you form a reliable and highly effective investment portfolio of https://feroconsan.com/sv. Learn from experienced financiers and improve your investment game with consanfero mastery.
I’m often to blogging and i really appreciate your content. The article has actually peaks my interest. I’m going to bookmark your web site and maintain checking for brand spanking new information.
3. Понимание структуры языка: игра помогает детям усвоить, как сформирован язык, изучая корни, суффиксы и префиксы.
Here is my website – https://delovoyremont.ru/
I am truly thankful to the owner of this web site who has shared this fantastic piece of writing at at this place.
It has been actually 50% years since since the US Internal Revenue Service set the tax threshold for winnings in pokies net at level 1200 dollars. In the Senate, Senator J.
Visit my web-site :: https://au.trustpilot.com/review/thepokies111net.net
this does not mean that paid https://metallicheckiy-portal.ru/articles/finansi/foreks/programmi_dla_pomoshi_v_operaciax_s_kriptovalytami are ineffective. 3commas features a comfortable design and a wide set of functions.
There is no specific answer to this. everyone can to visualize the same concept, https://xpressmag.com.au/best-3d-cgi-architectural-visualization-studios-what-sets-them-apart/ premises, which allows to avoid misunderstandings and changes.
For the reason that the admin of this site is working, no uncertainty very quickly it will be renowned, due to its quality contents.
you get the chance open a best wallet account with ease, top it up and buy the http://http://btcbulltoken.io// without any problems.
Takipteyim kaliteli ve güzel bir içerik olmuş dostum.
How to Get Real Website Traffic & Earn Money Online | Free Traffic Machine 2025 https://www.youtube.com/watch?v=iUvs6nBlBDQ – This method really works for getting real visitors and online income! (85)
This is incredibly intriguing. You are a gifted blogger. I have subscribed to your feed and am looking forward to reading more of your excellent posts. In addition, I have shared your site on my social networks!
Asking questions are in fact good thing if you are not understanding anything entirely, however this piece of writing provides good understanding even.
Join Bitcoin Invest and experience safe investment plans with instant withdrawals and high ROI.
Cobra motorcycles are popular in motocross and off-road racing.
Feel free to visit my web page; https://www.royalholloway.ac.uk/
Hi everyone, I am sincerely eager to read the posts on this website consistently to remain updated. It contains lovely information.
Read a captivating article and thought of sharing it with you https://medium.com/@super-check/климатические-шкафы-это-специальное-оборудование-которое-используется-для-создания-определенных-a32953edafb8
في عالم الضيافة العربية، لا شيء يضاهي روعة تمر شيشي فاخر، أفضل رز حساوي، تمر رزيز فاخر، تمور الذهب الأحمر، تمور صحية ومغذية، تمر بضمان الجودة، تمر شيشي جامبو، تمور سعودية للتصدير، تمر. تُعد هذه المنتجات رمزاً للجودة والفخامة، حيث يتم اختيار أجود أنواع التمور والمنتجات الحساوية بعناية فائقة. من المعروف أن التمور ليست مجرد طعام، بل هي إرث ثقافي يعكس كرم الضيافة العربية وأصالة المذاق الفريد. كما أن الطلب المتزايد على هذه المنتجات جعلها خياراً مثالياً للمناسبات الخاصة والاحتفالات، لتكون دائماً حاضرة على الموائد. إن تمر معتق فاخر يعكس تميز الإنتاج المحلي وجودته. إن كرتون تمر شيشي ملكي يعكس تميز الإنتاج المحلي وجودته.
تُعد خدمة كشف تسربات الشرقية من أبرز الخدمات التي يحتاجها السكان في السعودية، خصوصًا مع أهمية تنظيف خزانات القطيف حفر في الحفاظ على الصحة العامة، ولهذا فإن كشف إصلاح تسرب المياه بدون تكسير تُعد خيارًا مثاليًا للحصول على جودة عالية وخدمة مميزة. الجودة والتعقيم والنظافة من أساسيات هذه الخدمات..
Travel insurance is now more essential than ever, especially when exploring world tourism spots. I also think travel plays a crucial role in a successful trip. If you’re looking to make the most of your travel budget, consider the benefits of leisure travel and using points from travel credit cards. I also think travel insurance plays a crucial role in a successful trip.
أصبح فوائد الشمندر للتنحيف من المواضيع الشائعة في مجال الصحة والتغذية. يعتبر فوائد الشمندر للتنحيف مصدرًا غنيًا بالعناصر الغذائية التي يحتاجها الجسم. في الطب البديل، يُستخدم فوائد الشمندر للتنحيف كعنصر رئيسي في تعزيز الصحة العامة. الاعتدال في استهلاك فوائد الشمندر للتنحيف هو المفتاح للحصول على فوائده. من المهم تسليط الضوء على فوائد الشمندر للتنحيف كعنصر طبيعي يعزز الصحة.
we design luxury small houses and apartments that are personalized in compliance your needs and enhance the value of your real estate market and lifestyle of the https://syn.x7-trade.com/?p=13004.
Discover the best online casinos in Kazakhstan ranked by games Секс на камеру
Your article helped me a lot, is there any more related content? Thanks!
It is region-specific in some cases, with tailored offers for countries like https://replit.com/@xbetpromocode61
Специалисты ателье используют технологию bespoke, обладают высокую квалификацию и огромный навык, https://and-g.ru/ в связи с этим в любой.
Turizm / bilet manipülasyonu.
Only sports bets count toward wagering — live and eSports bets are excluded https://vsdelke.ru/wp-content/articles/?gama_kazino_promokod.html
For the reason that the admin of this site is working, no uncertainty very quickly it will be renowned, due to its quality contents.
I don’t think the title of your article matches the content lol. Just kidding, mainly because I had some doubts after reading the article.
Very well presented. Every quote was awesome and thanks for sharing the content. Keep sharing and keep motivating others.
Thank you for your sharing. I am worried that I lack creative ideas. It is your article that makes me full of hope. Thank you. But, I have a question, can you help me?
стоматолог режим работы [url=https://www.stomatologiya-voronezh-1.ru]стоматолог режим работы[/url] .
Your point of view caught my eye and was very interesting. Thanks. I have a question for you.
Rainx Drive is the Best Cloud Storage Platform
Thanks for sharing. I read many of your blog posts, cool, your blog is very good.
nhà cái uy tín
despite own youthful age, she has starred in many desi hot xxx films and does not always hide her feelings before the camera.
Take a look at my page … https://pornfrost.com/page/desi-hot-porn/
О Владиславе Аксиновиче часто подчеркивают его уникальную способность видеть проблему клиента комплексно смотреть тут
This is a must-read for anyone interested in this subject. Thank you for creating such a valuable resource.
Can you be more specific about the content of your article? After reading it, I still have some doubts. Hope you can help me.
Vavada ‘s slot selection includes titles from popular providers and lesser-known studios вавада ставки
Your point of view caught my eye and was very interesting. Thanks. I have a question for you.
**glucore**
glucore is a nutritional supplement that is given to patients daily to assist in maintaining healthy blood sugar and metabolic rates.
**pineal xt**
pinealxt is a revolutionary supplement that promotes proper pineal gland function and energy levels to support healthy body function.
This was a delightful and educational read — thanks for sharing!
Learn how to create your own WordPress plugin that brings ChatGPT’s conversational power directly into your website https://www.reddit.com/r/WordpressPlugins/comments/1o1rrho/free_chatgpt_can_now_directly_manage_your/
Thank you for your sharing. I am worried that I lack creative ideas. It is your article that makes me full of hope. Thank you. But, I have a question, can you help me?
Pretty! This has been a really wonderful post. Many thanks for providing these details.
Excellent post. I was checking continuously this blog and I am impressed!
Very helpful info specially the last part :
) I care for such info a lot. I was seeking this particular information for a very long time.
Thank you and best of luck.
Good day! Do you know if they make any plugins to protect against hackers?
I’m kinda paranoid about losing everything I’ve worked hard on. Any recommendations?
Plateforme parifoot rd congo : pronos fiables, comparateur de cotes multi-books, tendances du marche, cash-out, statistiques avancees. Depots via M-Pesa/Airtel Money, support francophone, retraits securises. Pariez avec moderation.
Paris sportifs avec 1xbet apk rdc : pre-match & live, statistiques, cash-out, builder de paris. Bonus d’inscription, programme fidelite, appli mobile. Depots via M-Pesa/Airtel Money. Informez-vous sur la reglementation. 18+, jouez avec moderation.
Pin Up Casino is a licensed gaming establishment that upholds this reputation, therefore, all gamblers Пин Ап зеркало that will satisfy all of your sensual impulses has never been this simple.
Loved the conversational tone — made learning enjoyable.
Нужен тахеометр? аренда тахеометра в Москве по выгодной цене. Современные модели для геодезических и строительных работ. Калибровка, проверка, доставка по городу и области. Гибкие сроки — от 1 дня. Консультации инженеров и техническая поддержка.
Keep on writing, great job!
Car Insurance agency Chicago policy rates may be influenced by where you stay.
Consider this when relocating to a new area.
Is the land close to the coast?
Helpful and well-paced. Looking forward to your next post.
This post answered a question I’ve had for ages. Thank you!
I never thought about it this way before. Your post gave me a fresh perspective.
Solid suggestions — would be great to see a downloadable checklist.
The topic of Infant Development highlights how important it is for parents to understand their child’s needs. Paying attention to nutrition, sleep, and learning environments can have a big impact on overall health and development. In recent years, Infant Development has become a focus for many professionals and families. Creating awareness about proper habits and healthy practices helps promote better outcomes for children everywhere.
Good post! We will be linking to this particularly great post on our site. Keep up the great writing
Helpful and well-paced. Looking forward to your next post.
I like the efforts you have put in this, regards for all the great content.
I recently tried to Patch APK from a verified source and found it super helpful. The Game cheats version provided access to features like Safe APK download and Patch which made the experience much smoother. I also checked for security before installing the Unlimited Gems and everything worked perfectly. Always look for safe APK download sites to ensure reliability and clean installations.
https://md.inno3.fr/s/qzYuf6WOf
very informative articles or reviews at this time.
[url=][/url]
Доска бесплатных объявлений objvlenie.ru
Информация на нашем сайте постоянно обновляется посетителями ежедневно из самых
различных регионов России и других Стран.
«objvlenie.ru» очень понятный сервис для любого пользователя, любого возраста.
Удобный сайт для подачи бесплатных и платных объявлений.
Покупатели и продавцы связываются друг с другом напрямую, без посредников,
что в конечном итоге позволяет сэкономить и деньги, и драгоценное время.
Премиум размещение стоит совсем недорого.
Сайт бесплатных объявлений objvlenie.ru
[url=][/url]
MK motors | Kıbrıs araç kiralama Kıbrıs araç kiralama , Kıbrıs araç satın al , Kıbrıs araç destek , Kıbrıs araç bakım
Deluxe Promosyon | 2025 Promosyon ürünleri eşantiyon hediyelik, ajanda 2025, promosyon ucuz, hızlı promosyon ürünü, kalem yapımı promosyon
https://justpaste.it/u/melbet7vip
https://www.arpop.com/forum/index.php?topic=45059.0
Nice work! I shared this with colleagues who will appreciate it.
Solid suggestions — would be great to see a downloadable checklist.
[url=https://natyazhni-steli-vid-virobnika.biz.ua/]natyazhni-steli-vid-virobnika.biz.ua[/url]
Они отличаются практичностью и долговечностью.
Компания “natyazhni-steli-vid-virobnika.biz.ua” предлагает качественные потолки напрямую от производителя. Клиенты получают гарантированно надежные решения.
#### **2. Преимущества натяжных потолков**
Одним из главных плюсов натяжных потолков является их влагостойкость. Они идеально подходят для ванных комнат и кухонь.
Еще одно преимущество — огромный выбор цветов и фактур. Доступны как однотонные, так и фотопечатные варианты.
#### **3. Производство и материалы**
Наша компания изготавливает потолки из экологически чистого ПВХ. Он не выделяет вредных веществ даже при нагревании.
Технология производства гарантирует прочность и эластичность полотна. Мы тщательно контролируем каждый этап создания продукции.
#### **4. Установка и обслуживание**
Монтаж натяжных потолков занимает всего несколько часов. Уже через день вы сможете пользоваться обновленным помещением.
Уход за потолком не требует особых усилий. Достаточно периодически протирать поверхность мягкой тканью.
—
### **Спин-шаблон статьи**
#### **1. Введение**
Современные натяжные потолки позволяют преобразить пространство за считанные часы.
#### **2. Преимущества натяжных потолков**
Выбор оформления практически безграничен — от классики до 3D-эффектов.
#### **3. Производство и материалы**
Мы используем только сертифицированные материалы от надежных поставщиков.
#### **4. Установка и обслуживание**
Даже через много лет покрытие будет выглядеть как новое.
What’s up every one, here every person is sharing these kinds of knowledge, so it’s nice to read this
blog, and I used to pay a quick visit this blog everyday.
I’m really impressed with your writing abilities as well as with the structure
in your weblog. Is this a paid topic or did you modify it yourself?
Either way stay up the nice high quality writing, it is uncommon to see a nice blog
like this one these days..
State-of-the-art slot machines, unique prize draws, a sophisticated restaurant http://mybiz04.ru
Online poker games at PokerDom. Official website, current mirror sites PokerDOM
Your article helped me a lot, is there any more related content? Thanks!
https://lyfepal.com/forums/thread/24636/Code-Promo-Melbet-Comores-VIP200MAX-130-Bonus
https://forumtransportu.pl/forum/temat/25938
фен дайсон оригинал купить официальный [url=https://fen-dn-kupit-11.ru/]fen-dn-kupit-11.ru[/url] .
купить пылесос dyson v15 detect [url=https://pylesos-dn-2.ru/]купить пылесос dyson v15 detect[/url] .
вертикальный моющий пылесос дайсон купить [url=https://pylesos-dn-kupit.ru/]pylesos-dn-kupit.ru[/url] .
купить пылесос дайсон v15 в москве оригинал [url=https://pylesos-dn-2.ru/]pylesos-dn-2.ru[/url] .
пылесос дайсон беспроводной купить оригинал [url=https://pylesos-dn-kupit.ru/]pylesos-dn-kupit.ru[/url] .
купить дайсон стайлер для волос с насадками официальный сайт цен… [url=https://fen-dn-kupit-12.ru/]fen-dn-kupit-12.ru[/url] .
пылесос дайсон купить в уфе [url=https://pylesos-dsn.ru/]пылесос дайсон купить в уфе[/url] .
пылесос dyson v15 absolute купить [url=https://pylesos-dn-kupit.ru/]pylesos-dn-kupit.ru[/url] .
пылесос дайсон беспроводной купить оригинал [url=https://pylesos-dsn-1.ru/]pylesos-dsn-1.ru[/url] .
пылесос дайсон купить в уфе [url=https://pylesos-dn-2.ru/]pylesos-dn-2.ru[/url] .
пылесос dyson v15s detect [url=https://pylesos-dsn.ru/]pylesos-dsn.ru[/url] .
пылесос дайсон купить последняя модель [url=https://pylesos-dn-2.ru/]pylesos-dn-2.ru[/url] .
купить пылесос дайсон в нижнем [url=https://dn-pylesos-kupit.ru/]купить пылесос дайсон в нижнем[/url] .
пылесос дайсон проводной купить в москве [url=https://pylesos-dsn-1.ru/]пылесос дайсон проводной купить в москве[/url] .
купить пылесос дайсон v15 detect [url=https://pylesos-dsn-1.ru/]купить пылесос дайсон v15 detect[/url] .
дивитися онлайн прямий новинки кіно 2025 дивитися онлайн
выпрямитель dyson цена [url=https://vypryamitel-dn.ru/]vypryamitel-dn.ru[/url] .
дайсон выпрямитель купить казань [url=https://vypryamitel-dn-3.ru/]vypryamitel-dn-3.ru[/url] .
какой выпрямитель дайсон купить [url=https://vypryamitel-dn-2.ru/]vypryamitel-dn-2.ru[/url] .
дайсон пылесос беспроводной цены [url=https://dn-pylesos-kupit-1.ru/]дайсон пылесос беспроводной цены[/url] .
купить фен выпрямитель дайсон оригинал [url=https://dsn-vypryamitel.ru/]dsn-vypryamitel.ru[/url] .
dyson выпрямитель купить оригинал [url=https://dsn-vypryamitel-4.ru/]dsn-vypryamitel-4.ru[/url] .
Делаешь документы? сервис формирования договоров DataDoc позволяет существенно ускорить работу: с его помощью вы сможете готовить необходимые документы в десять раз быстрее и при этом гарантированно избегать ошибок. Инструмент предельно прост в освоении — специальное обучение не требуется. Все ваши данные надёжно защищены, а настройка индивидуальных шаблонов выполняется оперативно и без сложностей.
Hi there to all, for the reason that I am genuinely keen of reading this website’s post to be updated on a regular basis. It carries pleasant stuff.
выпрямитель дайсон купить в спб [url=https://dsn-vypryamitel-1.ru/]выпрямитель дайсон купить в спб[/url] .
купить дайсон выпрямитель донецк [url=https://dsn-vypryamitel.ru/]dsn-vypryamitel.ru[/url] .
Rebricek najlepsich kasin https://betrating.sk/ na Slovensku: bezpecni prevadzkovatelia, lukrativne bonusy, hracie automaty a zive kasina, pohodlne platby a zakaznicka podpora. Cestne recenzie a aktualizovane zoznamy pre pohodlne online hranie.
dyson airstrait купить выпрямитель [url=https://vypryamitel-dn-kupit-1.ru/]vypryamitel-dn-kupit-1.ru[/url] .
выпрямитель дайсон hs07 купить [url=https://dsn-vypryamitel-4.ru/]dsn-vypryamitel-4.ru[/url] .
SEO-продвижение сайта https://seo-topteam.ru в Москве с запуском от 1 дня. Экспресс-анализ, приоритетные правки, оптимизация под ключевые запросы и регион. Работаем на рост позиций, трафика и лидов. Подходит для бизнеса и услуг.
dyson выпрямитель оригинал [url=https://dsn-vypryamitel-1.ru/]dsn-vypryamitel-1.ru[/url] .
какой выпрямитель дайсон купить [url=https://vypryamitel-dn-kupit.ru/]vypryamitel-dn-kupit.ru[/url] .
дайсон айрстрейт купить выпрямитель [url=https://dsn-vypryamitel-4.ru/]дайсон айрстрейт купить выпрямитель[/url] .
комедії онлайн якості дивитися фільми онлайн безкоштовно
dyson фен выпрямитель купить [url=https://vypryamitel-dsn-kupit-1.ru/]vypryamitel-dsn-kupit-1.ru[/url] .
дайсон выпрямитель купить краснодар [url=https://vypryamitel-dsn-kupit-1.ru/]vypryamitel-dsn-kupit-1.ru[/url] .
выпрямитель dyson corrale [url=https://vypryamitel-dn-kupit-4.ru/]выпрямитель dyson corrale[/url] .
Главные новости https://novosti24.kyiv.ua Украины сегодня — быстро и понятно. Репортажи из регионов, интервью, разборы, инфографика, фото/видео. Следите за темами, сохраняйте материалы и делитесь. Лента обновляется 24/7, чтобы вы были в курсе событий.
выпрямитель дайсон airstrait [url=https://vypryamitel-dsn-kupit-1.ru/]vypryamitel-dsn-kupit-1.ru[/url] .
Ежедневные новости https://useti.org.ua Украины: политика и экономика, общество и медицина, образование, технологии, спорт и шоу-бизнес. Мы собираем информацию из надежных источников и объясняем контекст. Читайте онлайн с телефона и компьютера — удобно и бесплатно.
Портал для женщин https://woman24.kyiv.ua про жизнь без лишнего: красота, женское здоровье, питание, рецепты, уютный дом, финансы, работа и отдых. Практичные советы, честные обзоры и вдохновляющие истории.
Медицинский портал https://medicalanswers.com.ua для пациентов: здоровье, диагностика, лечение, профилактика и образ жизни. Экспертные статьи, справочник симптомов, советы специалистов и актуальные медицинские новости. Достоверная информация в одном месте.
Новостной портал https://ua-novosti.info Украины без лишнего: оперативная лента, репортажи из областей, интервью и разборы. Политика, финансы, социальные темы, медицина, образование, IT. Фото/видео, инфографика, уведомления и топ-материалы дня.
Главные события https://vesti.in.ua Украины — коротко и понятно. Мы собираем новости из Украины и мира, проверяем данные и даём ясные объяснения. Подборки по темам, новости городов, аналитика, мнения, видео. Обновления каждый час, удобно на смартфоне.
Онлайн-журнал https://love.zt.ua для женщин: мода, бьюти, психология, любовь, семья, дети, дом, карьера и финансы. Обзоры, лайфхаки, рецепты и инструкции — без «воды», с пользой. Удобные рубрики и свежие материалы ежедневно.
Решил сделать ремонт? современные студии дизайна интерьера: квартиры, дома, апартаменты и офисы. Продуманные планировки, 3D-проекты, сопровождение ремонта и контроль реализации. Создаем интерьеры, отражающие ваш стиль и образ жизни.
Строительный портал https://prezent-house.com.ua строительство домов и зданий, ремонт квартир, инженерные системы и отделка. Пошаговые инструкции, обзоры материалов, расчёты и советы экспертов для частных и коммерческих проектов.
проект перепланировки и переустройства квартиры [url=https://proekt-pereplanirovki-kvartiry20.ru/]proekt-pereplanirovki-kvartiry20.ru[/url] .
онлайн ш [url=https://shkola-onlajn12.ru/]shkola-onlajn12.ru[/url] .
онлайн-школа с аттестатом бесплатно [url=https://shkola-onlajn15.ru/]shkola-onlajn15.ru[/url] .
получить короткую ссылку google [url=https://seo-kejsy7.ru/]seo-kejsy7.ru[/url] .
lbs [url=https://shkola-onlajn13.ru/]lbs[/url] .
There is definately a lot to find out about this subject. I like all the points you made https://heosexhay.net/
Портал для женщин https://beautyrecipes.kyiv.ua про гармонию и результат: здоровье, красота, стиль, саморазвитие, семья и отношения. Обзоры косметики и процедур, планы питания, тренировки, советы по дому и вдохновляющие истории. Всё в одном месте, 24/7.
перепланировка услуги [url=https://pereplanirovka-kvartir4.ru/]pereplanirovka-kvartir4.ru[/url] .
школа онлайн обучение для детей [url=https://shkola-onlajn11.ru/]shkola-onlajn11.ru[/url] .
ломоносовская школа онлайн [url=https://shkola-onlajn12.ru/]shkola-onlajn12.ru[/url] .
узаконить перепланировку стоимость [url=https://skolko-stoit-uzakonit-pereplanirovku-6.ru/]узаконить перепланировку стоимость[/url] .
This comment clearly reflects thoughtful professional judgment.
онлайн ш [url=https://shkola-onlajn13.ru/]shkola-onlajn13.ru[/url] .
услуги по перепланировке квартир [url=https://pereplanirovka-kvartir4.ru/]pereplanirovka-kvartir4.ru[/url] .
перепланировка квартиры проектные организации [url=https://proekt-pereplanirovki-kvartiry20.ru/]proekt-pereplanirovki-kvartiry20.ru[/url] .
онлайн ш [url=https://shkola-onlajn12.ru/]shkola-onlajn12.ru[/url] .
стоимость согласования перепланировки [url=https://skolko-stoit-uzakonit-pereplanirovku-6.ru/]стоимость согласования перепланировки[/url] .
купить дайсон выпрямитель донецк [url=https://vypryamitel-dsn-kupit-4.ru/]vypryamitel-dsn-kupit-4.ru[/url] .
школьный класс с учениками [url=https://shkola-onlajn13.ru/]shkola-onlajn13.ru[/url] .
онлайн школа ломоносов [url=https://shkola-onlajn11.ru/]shkola-onlajn11.ru[/url] .
лбс это [url=https://shkola-onlajn12.ru/]shkola-onlajn12.ru[/url] .
Туристический портал https://feokurort.com.ua с идеями и практикой: страны и города, пляжи и горы, активный отдых и экскурсии. Советы по перелётам, жилью и безопасности, лучшие сезоны и лайфхаки для путешествий.
онлайн школа с 1 по 11 класс [url=https://shkola-onlajn13.ru/]shkola-onlajn13.ru[/url] .
Онлайн авто портал https://necin.com.ua о новых и подержанных автомобилях: каталоги моделей, рейтинги, отзывы владельцев и экспертные обзоры. Новости рынка, технологии, электромобили и полезные сервисы для выбора авто.
Мужской портал https://realman.com.ua про жизнь и эффективность: здоровье, сила и выносливость, карьера, инвестиции, стиль и отношения. Экспертные материалы, обзоры и чек-листы. Читайте онлайн и применяйте на практике.
Всё о туризме https://hotel-atlantika.com.ua и отдыхе в одном месте: направления, визы, транспорт, отели и развлечения. Путеводители, маршруты, обзоры и советы опытных путешественников. Удобно планировать поездки онлайн.
Портал для туристов https://inhotel.com.ua и путешественников: гайды по странам, маршруты, достопримечательности и события. Практичные советы, карты, подборки и идеи для отпуска, выходных и активных путешествий.
Выгодный шоп купить аккаунты рад приветствовать вебмастеров в своем пространстве цифровых товаров для FB. Когда вы планируете купить аккаунты Facebook, обычно задача не в «просто доступе», а в качестве фарма: стабильный запуск, зеленые плашки в Ads Manager и правильно созданные ФП. Мы оформили понятную навигацию, чтобы вы сразу понимали что подойдет под ваши офферы перед заказом.Быстрый ориентир: начните с разделы Фарм (King), а для серьезных объемов — переходите напрямую в профильные позиции: Безлимитные БМ. Ключевая идея: аккаунт — это инструмент. Дальше решает подход к запуску: какой прокси используется, как вы передаете лички без триггеров, как проходите чеки и как масштабируете адсеты. Гордость данной площадки — заключается в наличие огромной вики-энциклопедии FB, в которой собраны рабочие инструкции по проходу ЗРД. Мы сориентируем, как грамотно расшарить доступы, чтобы не улетели на полиси и продлили жизнь аккаунтам . Переходите в наше комьюнити, читайте полезные разборы банов, упрощайте работу с Meta и в итоге улучшайте конверт с помощью нашего сервиса без задержек. Важно: используйте активы законно и всегда в соответствии с правилами Facebook.
melbet betting company [url=http://rusfusion.ru]melbet betting company[/url] .
Строительный портал https://garant-jitlo.com.ua современные технологии, нормы и стандарты, выбор материалов, инженерия и безопасность. Экспертные рекомендации, инструкции и реальные примеры работ — понятно и по делу.
Компания BritishSchool https://britishschool.kiev.ua профессиональные тренинги, семинары и курсы для детей и взрослых. Обучение с опытными преподавателями, современные методики, практические навыки и уверенный результат. Онлайн и офлайн форматы.
Nice post. I learn something totally new and challenging on websites
Проблемы с алкоголем? вывод из запоя стоимость помощь врача, детоксикация, стабилизация состояния и наблюдение. Конфиденциально, без постановки на учет, с учетом возраста и сопутствующих заболеваний.
Ищешь казино? казино онлайн рейтинг лучших лицензия, бонусы, выплаты, игры и отзывы игроков. Сравниваем условия, безопасность и удобство, чтобы помочь выбрать надежное казино для игры онлайн.
Мучает алкоголизм? вывод из запоя срочно помощь при алкогольной интоксикации и длительном употреблении. Капельницы, поддержка организма, контроль давления и пульса. Конфиденциально и профессионально.
Мультимедийный интегратор ай-тек интеграция мультимедийных систем под ключ для офисов и объектов. Проектирование, поставка, монтаж и настройка аудио-видео, видеостен, LED, переговорных и конференц-залов. Гарантия и сервис.
online betting [url=www.rusfusion.ru/]online betting[/url] .
заказать дипломную работу в москве [url=https://kupit-kursovuyu-48.ru/]kupit-kursovuyu-48.ru[/url] .
заказать курсовую срочно [url=https://kupit-kursovuyu-42.ru/]заказать курсовую срочно[/url] .
сделать аудит сайта цена [url=https://prodvizhenie-sajtov-v-moskve111.ru/]prodvizhenie-sajtov-v-moskve111.ru[/url] .
курсовая заказ купить [url=https://kupit-kursovuyu-42.ru/]kupit-kursovuyu-42.ru[/url] .
seo network [url=https://prodvizhenie-sajtov-v-moskve111.ru/]prodvizhenie-sajtov-v-moskve111.ru[/url] .
seo network [url=https://prodvizhenie-sajtov13.ru/]prodvizhenie-sajtov13.ru[/url] .
написание курсовой работы на заказ цена [url=https://kupit-kursovuyu-48.ru/]kupit-kursovuyu-48.ru[/url] .
помощь студентам и школьникам [url=https://kupit-kursovuyu-49.ru/]kupit-kursovuyu-49.ru[/url] .
Проблемы с зубами? https://www.stomatologiya-montenegro.com: диагностика, лечение кариеса, отбеливание, импланты и ортопедия. Индивидуальный подход, безопасные материалы, точные технологии и забота о здоровье зубов и дёсен.
Well-known seller https://buyaccountsbmads.com gives access to buy logins for advertising. If you need buy Facebook accounts, usually the goal isn’t “just access”, but trust and limits: confident spend, a passed reinstatement check (ZRD) in the account, and warmed-up fan pages. We’ve put together a practical checklist so you can understand without extra questions which limit to choose before ordering.In short: where to begin: open sections Auto-registered accounts, and for scaling — go straight to high-volume sections: BM $250. Important: buying is only the entry point. What matters next is your launch setup: how the access is organized, how you share assets and roles safely, how you react to policy feedback, and how you duplicate campaigns. Main highlight of this platform — comes down to a large FB wiki, in which we’ve collected practical how-tos for account farming. On the site you’ll find assets for FB for different needs: starting with budget auto-regs and ending with reinstated setups with higher limits. Join our space, read practical FB materials, operational notes, simplify Meta workflows, and improve ROI using our assets right now. Important: use digital assets legally and always in line with Meta policies.
курсовая заказ купить [url=https://kupit-kursovuyu-41.ru/]kupit-kursovuyu-41.ru[/url] .
интернет продвижение москва [url=https://prodvizhenie-sajtov-v-moskve113.ru/]prodvizhenie-sajtov-v-moskve113.ru[/url] .
продвижение сайтов интернет магазины в москве [url=https://prodvizhenie-sajtov-v-moskve223.ru/]prodvizhenie-sajtov-v-moskve223.ru[/url] .
профессиональное продвижение сайтов [url=https://prodvizhenie-sajtov-v-moskve215.ru/]профессиональное продвижение сайтов[/url] .
продвижение сайтов интернет магазины в москве [url=https://prodvizhenie-sajtov-v-moskve213.ru/]prodvizhenie-sajtov-v-moskve213.ru[/url] .
частный seo оптимизатор [url=https://prodvizhenie-sajtov-v-moskve115.ru/]частный seo оптимизатор[/url] .
частный seo оптимизатор [url=https://prodvizhenie-sajtov-v-moskve221.ru/]частный seo оптимизатор[/url] .
заказать курсовую работу спб [url=https://kupit-kursovuyu-41.ru/]kupit-kursovuyu-41.ru[/url] .
раскрутка сайта франция [url=https://prodvizhenie-sajtov-v-moskve223.ru/]prodvizhenie-sajtov-v-moskve223.ru[/url] .
глубокий комлексный аудит сайта [url=https://prodvizhenie-sajtov-v-moskve224.ru/]prodvizhenie-sajtov-v-moskve224.ru[/url] .
seo network [url=https://prodvizhenie-sajtov-v-moskve115.ru/]seo network[/url] .
seo partner [url=https://prodvizhenie-sajtov-v-moskve223.ru/]prodvizhenie-sajtov-v-moskve223.ru[/url] .
продвижение в google [url=https://prodvizhenie-sajtov-v-moskve213.ru/]prodvizhenie-sajtov-v-moskve213.ru[/url] .
оптимизация и продвижение сайтов москва [url=https://prodvizhenie-sajtov-v-moskve221.ru/]оптимизация и продвижение сайтов москва[/url] .
Many people today are increasingly interested in subjects like Crypto because of their major influence on global technology and financial systems. At the same time, the rise of markets such as Artificial intelligence attracts individuals who want to explore new opportunities and learn how digital economies operate. Others choose to study areas like Forex to understand long‑term strategies, risk management, and potential growth across different sectors.
internet seo [url=https://prodvizhenie-sajtov-v-moskve225.ru/]prodvizhenie-sajtov-v-moskve225.ru[/url] .
seo продвижение и раскрутка сайта [url=https://prodvizhenie-sajtov-v-moskve213.ru/]prodvizhenie-sajtov-v-moskve213.ru[/url] .
раскрутка сайта москва [url=https://prodvizhenie-sajtov-v-moskve117.ru/]раскрутка сайта москва[/url] .
интернет раскрутка [url=https://prodvizhenie-sajtov-v-moskve221.ru/]интернет раскрутка[/url] .
Мы гарантируем нашим клиентам полное уничтожение тараканов, кротов, мышей, блох, крыс, моли, постельных клопов служба по борьбе с тараканами
задвижка 30с41нж dn80 30с41нж задвижка
компании занимающиеся продвижением сайтов [url=https://prodvizhenie-sajtov-v-moskve231.ru/]компании занимающиеся продвижением сайтов[/url] .
seo network [url=https://prodvizhenie-sajtov-v-moskve235.ru/]prodvizhenie-sajtov-v-moskve235.ru[/url] .
поисковое продвижение москва профессиональное продвижение сайтов [url=https://poiskovoe-prodvizhenie-sajta-v-internete-moskva.ru/]poiskovoe-prodvizhenie-sajta-v-internete-moskva.ru[/url] .
internetagentur seo [url=https://prodvizhenie-sajtov-v-moskve234.ru/]prodvizhenie-sajtov-v-moskve234.ru[/url] .
заказать анализ сайта [url=https://kompanii-zanimayushchiesya-prodvizheniem-sajtov.ru/]заказать анализ сайта[/url] .
цифровой маркетинг статьи [url=https://blog-o-marketinge1.ru/]цифровой маркетинг статьи[/url] .
интернет маркетинг статьи [url=https://statyi-o-marketinge1.ru/]statyi-o-marketinge1.ru[/url] .
seo продвижение и раскрутка сайта [url=https://poiskovoe-seo-v-moskve.ru/]seo продвижение и раскрутка сайта[/url] .
продвижение сайта франция [url=https://poiskovoe-prodvizhenie-sajta-v-internete-moskva.ru/]poiskovoe-prodvizhenie-sajta-v-internete-moskva.ru[/url] .
раскрутка сайта франция цена [url=https://kompanii-zanimayushchiesya-prodvizheniem-sajtov.ru/]kompanii-zanimayushchiesya-prodvizheniem-sajtov.ru[/url] .
материалы по маркетингу [url=https://blog-o-marketinge1.ru/]blog-o-marketinge1.ru[/url] .
оптимизация сайта блог [url=https://statyi-o-marketinge2.ru/]statyi-o-marketinge2.ru[/url] .
seo аудит веб сайта [url=https://poiskovoe-prodvizhenie-moskva-professionalnoe.ru/]poiskovoe-prodvizhenie-moskva-professionalnoe.ru[/url] .
оптимизация сайта блог [url=https://statyi-o-marketinge1.ru/]statyi-o-marketinge1.ru[/url] .
поисковое seo в москве [url=https://poiskovoe-prodvizhenie-moskva-professionalnoe.ru/]poiskovoe-prodvizhenie-moskva-professionalnoe.ru[/url] .
seo и реклама блог [url=https://statyi-o-marketinge1.ru/]statyi-o-marketinge1.ru[/url] .
руководства по seo [url=https://blog-o-marketinge1.ru/]руководства по seo[/url] .
веб-аналитика блог [url=https://statyi-o-marketinge2.ru/]statyi-o-marketinge2.ru[/url] .
seo бесплатно [url=https://kursy-seo-1.ru/]kursy-seo-1.ru[/url] .
Pin Up working mirror , login methods, and mirror search Pin Up
руководства по seo [url=https://statyi-o-marketinge.ru/]statyi-o-marketinge.ru[/url] .
seo онлайн [url=https://kursy-seo-3.ru/]kursy-seo-3.ru[/url] .
seo базовый курc [url=https://kursy-seo-4.ru/]kursy-seo-4.ru[/url] .
гидроизоляция подвала [url=https://gidroizolyacziya-czena8.ru/]гидроизоляция подвала[/url] .
гидроизоляция подвала москва [url=https://gidroizolyacziya-podvala-iznutri-czena9.ru/]gidroizolyacziya-podvala-iznutri-czena9.ru[/url] .
учиться seo [url=https://kursy-seo-4.ru/]kursy-seo-4.ru[/url] .
школа seo [url=https://kursy-seo-11.ru/]школа seo[/url] .
гидроизоляция подвала снаружи цены [url=https://gidroizolyacziya-czena8.ru/]gidroizolyacziya-czena8.ru[/url] .
инъекционная гидроизоляция своими руками [url=https://inekczionnaya-gidroizolyacziya-fundamenta1.ru/]inekczionnaya-gidroizolyacziya-fundamenta1.ru[/url] .
seo интенсив [url=https://kursy-seo-11.ru/]seo интенсив[/url] .
гидроизоляция подвала гаража [url=https://gidroizolyacziya-czena8.ru/]gidroizolyacziya-czena8.ru[/url] .
сырость в подвале многоквартирного дома [url=https://gidroizolyacziya-podvala-iznutri-czena8.ru/]gidroizolyacziya-podvala-iznutri-czena8.ru[/url] .
учиться seo [url=https://kursy-seo-4.ru/]kursy-seo-4.ru[/url] .
ремонт бетонных конструкций панельный [url=https://remont-betonnykh-konstrukczij-usilenie4.ru/]remont-betonnykh-konstrukczij-usilenie4.ru[/url] .
гидроизоляция подвала жилого дома [url=https://gidroizolyacziya-podvala-samara4.ru/]гидроизоляция подвала жилого дома[/url] .
гидроизоляция подвала цена [url=https://gidroizolyacziya-podvala-samara4.ru/]гидроизоляция подвала цена[/url] .
мебель для кухни спб от производителя [url=https://kuhni-spb-26.ru/]kuhni-spb-26.ru[/url] .
большая кухня на заказ [url=https://kuhni-spb-30.ru/]большая кухня на заказ[/url] .
гидроизоляция подвала обследование [url=https://gidroizolyacziya-podvala-samara4.ru/]gidroizolyacziya-podvala-samara4.ru[/url] .
кухня на заказ спб [url=https://kuhni-spb-28.ru/]кухня на заказ спб[/url] .
кухни спб [url=https://kuhni-spb-30.ru/]кухни спб[/url] .
купить кухню на заказ в спб [url=https://kuhni-spb-28.ru/]kuhni-spb-28.ru[/url] .
гидроизоляция подвала рулонная [url=https://gidroizolyacziya-podvala-samara4.ru/]gidroizolyacziya-podvala-samara4.ru[/url] .
купить 1 комнатную квартиру жк светский лес сочи
где заказать кухню в спб [url=https://kuhni-spb-30.ru/]где заказать кухню в спб[/url] .
кухни на заказ [url=https://kuhni-spb-29.ru/]кухни на заказ[/url] .
кухни на заказ спб [url=https://kuhni-spb-28.ru/]кухни на заказ спб[/url] .
вывод из запоя анонимно краснодар [url=https://vyvod-iz-zapoya-krasnodar-1.ru/]вывод из запоя анонимно краснодар[/url] .
запоминаемость слогана реклама [url=https://reklamnyj-kreativ4.ru/]reklamnyj-kreativ4.ru[/url] .
врач нарколог на дом платный [url=https://narkolog-na-dom-krasnodar-2.ru/]narkolog-na-dom-krasnodar-2.ru[/url] .
какие автобусы в санкт петербурге [url=https://avtobusnye-ekskursii-po-spb.ru/]avtobusnye-ekskursii-po-spb.ru[/url] .
костюм двойка мужской мужские костюмы спб
автобусная экскурсия по спб [url=https://avtobusnye-ekskursii-po-spb.ru/]автобусная экскурсия по спб[/url] .
naturally like your web site however you need to take a look at the spelling on several of your posts. A number of them are rife with spelling problems and I find it very bothersome to tell the truth on the other hand I will surely come again again.
dyson пылесос [url=https://pylesos-dn-10.ru/]dyson пылесос[/url] .
пылесос дайсон [url=https://dn-pylesos-kupit-5.ru/]пылесос дайсон[/url] .
dyson v15 купить спб [url=https://dn-pylesos-kupit-4.ru/]dn-pylesos-kupit-4.ru[/url] .
ремонт пылесоса дайсон в спб [url=https://pylesos-dn-8.ru/]ремонт пылесоса дайсон в спб[/url] .
https://angersnautique.org/fonts/pgs/1xbet_code_promo_cameroun_new.html
пылесос dyson купить в спб [url=https://pylesos-dn-6.ru/]pylesos-dn-6.ru[/url] .
https://eola-style.com/files/pags/melbet_promokod___bonus_kod_na_segodnya_besplatno.html
Just downloaded the filbetapp It’s super convenient for placing bets on the go Plus the notifications keep me updated on the latest scores Pretty neat filbetapp
Jollibee777ph? Haha, that’s a funny name. I’m curious, though. Gotta check it out because of Jollibee. Take a look at Jollibee777ph: jollibee777ph
Jollbee777’s worth a look, especially if you’re on the hunt for something new and maybe a bit different. Give Jollbee777 a try: jollbee777
Your point of view caught my eye and was very interesting. Thanks. I have a question for you. https://www.binance.com/register?ref=IHJUI7TF
I do not even understand how I ended up here, but I assumed this publish used to be great
Your article helped me a lot, is there any more related content? Thanks!
https://badgerboats.ru/themes/middle/?promokod-1win_bonus_500.html
https://dcaprofit.com/wp-content/pgs/1xbet_bookmaker_promo_code___bonus_code.html
https://vsdelke.ru/wp-content/articles/?gama_casino_promokod.html
https://stylendesigns.com/wp-content/pgs/code-promo-1xbet_bonus-de-bienvenue-gratuit.html
Very well presented. Every quote was awesome and thanks for sharing the content. Keep sharing and keep motivating others.https://heosexhay.net/
Nice post. I learn something totally new and challenging on websites
https://ru2.doramatv.video/user/maldortoxi
https://celticfansclub.com/read-blog/23958
I very delighted to find this internet site on bing, just what I was searching for as well saved to fav
5jili666, sounds kinda crazy, right? But its not bad. It is smooth and all fun. Check it out if you want to have fun. 5jili666
Yo, 639jilicasino, I was pleasantly surprised. Cool graphics, decent payouts. Definitely worth a look. See for yourself: 639jili
68win29 is pretty cool. It’s straightforward and all the games are decent enough to play for a while. 68win29
xbet [url=https://1xbet-35.com/]xbet[/url] .
1 x bet [url=https://1xbet-36.com/]1 x bet[/url] .
1xbet resmi sitesi [url=https://1xbet-38.com/]1xbet-38.com[/url] .
1xbet turkey [url=https://1xbet-turkiye-1.com/]1xbet-turkiye-1.com[/url] .
Great information shared.. really enjoyed reading this post thank you author for sharing this post .. appreciated https://heosexhay.net/
I like the efforts you have put in this, regards for all the great content.
Minecraft is an iconic sandbox game that has captured the hearts of millions of players worldwide Майнкрафт скачать
1x giri? [url=https://1xbet-giris-22.com/]1xbet-giris-22.com[/url] .
Anyone tried casino77z? Heard they have a good selection of games. Let me know your thoughts! I’m always looking for new places to play. casino77z
CC7CasinoLogin is pretty standard honestly. The login process is smooth which is something I appreciate. They could use some new games. All in all, it fills its purpose. Check it if you’re bored cc7casinologin.
Gave p888casino.info a shot. Decent, nothing too special but a solid offering. Worth checking out if you are looking for places to play. Linked right here: p888casino
how to download sky glass on firestick
Download PDF Manager Pro Safe and Offline https://pdfmanager.surge.sh
1xbet resmi sitesi [url=https://1xbet-mobil-3.com/]1xbet-mobil-3.com[/url] .
1xbet t?rkiye [url=https://1xbet-yeni-giris-1.com/]1xbet t?rkiye[/url] .
статьи об авто [url=https://avtonovosti-3.ru/]статьи об авто[/url] .
Good post! We will be linking to this particularly great post on our site. Keep up the great writing https://heosexhay.net/
Many thanks, Numerous advice!
Авиамастерс – это гибрид аркады и симулятора, где биплан летит над морем, собирая коэффициенты в реальном времени https://aviamasters-official.online/
Access the official Vavada casino in 2025 using the new mirror site скачать приложение vavada
Just playing on ww7game. So far, so good. Games load quickly and there’s a decent variety. Worth a look if you’re bored. Try it out: ww7game
Needed a new link for M888. linkm888 seems to be working great. Smooth and fast. Good stuff! Check the link here: linkm888
Used pokebet88login to get back in. No issues logging in. Everything’s as it should be. Quick and easy. Here’s the login: pokebet88login
промокоды на круизы [url=https://tury-i-puteshestviya-promokody-i-skidki-1.ru/]tury-i-puteshestviya-promokody-i-skidki-1.ru[/url] .
журнал автомобильный [url=https://avto-zhurnal-2.ru/]avto-zhurnal-2.ru[/url] .
I appreciate you sharing this blog post. Thanks Again. Cool.
путешествия промокоды январь февраль [url=https://tury-i-puteshestviya-promokody-i-skidki-2.ru/]tury-i-puteshestviya-promokody-i-skidki-2.ru[/url] .
электрокарнизы для штор цена [url=https://prokarniz38.ru/]электрокарнизы для штор цена[/url] .
Download PDF Manager for Offline Use https://pdfmanagers.netlify.app
Download PDF Manager for Everyday Use https://fastdl.pythonanywhere.com
электрокарнизы для штор купить в москве [url=https://elektrokarniz5.ru/]электрокарнизы для штор купить в москве[/url] .
Get PDF Manager Pro Built for Speed https://fastdl.pythonanywhere.com
Get a Modern PDF Manager for Windows https://pdfmanager.pythonanywhere.com
онлайн школа 11 класс [url=https://shkola-onlajn-25.ru/]онлайн школа 11 класс[/url] .
nov? online casino [url=https://casino-cz-7.com/]nov? online casino[/url] .
I really like reading through a post that can make men and women think. Also, thank you for allowing me to comment!
?esk? casino online [url=https://casino-cz-16.com/]?esk? casino online[/url] .
ruleta online [url=https://casino-cz-14.com/]casino-cz-14.com[/url] .
cz online casina [url=https://casino-cz-15.com/]cz online casina[/url] .
работа онлайн [url=https://sitsen.kz/]работа онлайн[/url] .
Your article helped me a lot, is there any more related content? Thanks! https://accounts.binance.info/register-person?ref=IXBIAFVY
внедрение 1с на предприятии [url=https://1s-vnedrenie.ru/]внедрение 1с на предприятии[/url] .
приложение втб не работает [url=https://vtb-ne-rabotaet.ru/]https://vtb-ne-rabotaet.ru/[/url] .
расширение и перепланировка здания [url=https://rekonstrukcziya-zdanij-1.ru/]rekonstrukcziya-zdanij-1.ru[/url] .
написание курсовых работ на заказ цена [url=https://kupit-kursovuyu-70.ru/]написание курсовых работ на заказ цена[/url] .
sms activation [url=https://github.com/sms-activate-alternatives/]github.com/sms-activate-alternatives[/url] .
Pretty! This has been a really wonderful post. Many thanks for providing these details.https://heosexhay.net/
глубинное водопонижение [url=https://xn—77-eddkgagrc5cdhbap.xn--p1ai/]глубинное водопонижение[/url] .
best sms activation services [url=https://github.com/SMS-Activate-Login]github.com/SMS-Activate-Login[/url] .
Phim Sex – Xem Phim Sex Nóng Chọn Lọc Mới Nhất – Vlxvn.Blog
Sports portfolio encompasses traditional offerings alongside emerging markets, providing depth that satisfies https://top-greenbet.org
Мы занимаемся проектированием и строительством бассейнов под ключ в Краснодаре и Сочи Заказать бассейн в Краснодаре
Phim Sex – Xem Phim Sex Nóng Chọn Lọc Mới Nhất – Vlxvn.Blog
I appreciate you sharing this blog post. Thanks Again. Cool.
A mysterious game about palace intrigue in the world of 1001 Nights Султан Казино
I like how you addressed common mistakes — very practical advice.
Olimp Casino is the official website of the popular Olimp Casino in Kazakhstan https://www.edna.cz/uzivatele/danielhaw/
Heard some whispers about w88siver. Gonna be honest, it’s got my eyebrow raised but hey, maybe something awesome is there. Might want to proceed with caution, lads. Check it out here: w88siver
Alright alright, phcash7’s been good to me so far. Quick payouts, decent games. Worth a spin, yeah? Here’s the link guys: phcash7
LotoClub is a simulator of the popular lottery game top лото клуб скачать
Website: https://ao88.tv/
https://business-notebooks.ru/news/7-oshibok-pri-pokupke-noutbuka-iz-za-kotoryh-novoe-ustroystvo-tormozit-i-razryazhaetsya-za-chas.html
Hashtags
Современные сервисы позволяют определить местоположение человека по номеру телефона онлайн и бесплатно Читать
https://mapia.pk/
Lev Casino offers online poker in three variations https://atacademy.kz/
Just tried out futurola. Pretty solid! The selection is good and I had a fun time. Give it a whirl, might find something you like. futurola
777milagrocasino? Yeah, I’ve played there. Nothing crazy, but it’s a decent spot. Good enough to kill some time and maybe win a little something. Check it out if you’re bored. 777milagrocasino
Heard about 1010betcasino, so I figured I’d give it a try. Surprisingly fun! Decent interface and a good selection. Check ’em out! 1010betcasino
#rikvip #conggamerikvip #rikvipcom #taixiurikvip #linkkhongchanrikvip #linkvaorikvip #dangkyrikvip
IndoNovelList helped me find some amazing light novels recently. The platform is very reliable. I trust its recommendations.
TecnoTipsNest offers useful tech insights. I always learn something new. It’s a great resource.
TerraTweakHub helped me understand green energy better. The content is easy to follow. It’s very informative.
Tutorial internet dari Yovi Mahendra sangat bermanfaat. Saya jadi lebih paham. Sangat bagus.
çok yararlı bir paylaşım olmuş teşekkür ederim çok işime yarıcak.
Xem phim sex clip sex Việt Nam không che mới nhất được GaiDamVL tuyển chọn, cập nhật liên tục mỗi ngày.
Website: https://7mcn16.io/
nohu90 là cổng game nổ hũ đổi thưởng chất lượng cao, cung cấp nhiều trò chơi hấp dẫn như slot, bắn cá và game bài online. Nền tảng hoạt động mượt mà, bảo mật tốt và hỗ trợ giao dịch nhanh chóng.
Çok yararlı bir makale olmuş. Severek takip ediyorum. Teşekkür ederim.
Het was een snelle eerlijke en kwalitatieve reiservaring
Xem phim sex clip sex Việt Nam không che mới nhất được GaiDamVL tuyển chọn, cập nhật liên tục mỗi ngày.
FastOne Casino is devoted to the racing theme and will impress every player who loves speed Fast One Kasyno
Phim Sex – Tổng hợp phim sex Việt Nam – GaiDamVL
Тысячи фильмов и сериалов в HD-качестве без рекламы смотреть фильмы
Website: https://luck882.co.com
The provider is preparing to launch The Big Dog House — and this is not just another reskin https://thebigdoghouse.site/
Today, it is possible to enter this field even without a specialized education through professional retraining https://gazeta.a42.ru/lenta/companies/221840-bez-vyssego-yuridiceskogo-kak-proiti-professionalnuyu-perepodgotovku-po
I appreciate you sharing this blog post. Thanks Again. Cool.
I don’t think the title of your article matches the content lol. Just kidding, mainly because I had some doubts after reading the article.
сайт pin up casino, pin-up casino предлагает увлекательные
возможности для геймеров.
Feel free to visit my web site – https://pin-up-casino-x6u48.cyou/
Thanks for sharing. I read many of your blog posts, cool, your blog is very good. https://www.binance.bh/futures/ref?code=W49FLGDN
сайт pin up casino, pin-up casino предлагает уникальные шансы для любителей
азартных игр.
My web blog https://pin-up-casino-2ynpc.icu
наруто смотреть онлайн наруто смотреть онлайн в хорошем качестве
Yazınız için teşekkürler. Bu bilgiler ışığında nice insanlar bilgilenmiş olacaktır.
I appreciate you sharing this blog post. Thanks Again. Cool.
Your point of view caught my eye and was very interesting. Thanks. I have a question for you. https://accounts.binance.com/register/person?ref=IHJUI7TF
ma chance casino, win https://jevoterer.fr/ est une plateforme idéale pour ceux qui aiment le jeu. Les joueurs peuvent y trouver plusieurs options de machines à sous.
mostbet casino, mostbet apk ofrece una experiencia de
juego excepcional en el que se puede disfrutar de una amplia variedad de diversiones.
Los usuarios pueden participar en máquinas tragamonedas y disfrutar de incentivos atractivas.
керамическая плитка, https://hedge.amosamos.net/s/ClrhKlV2nE представляет универсальным материалом, подходящим для убранства интерьеров.
заказывать продукты, https://www.notizen.kita.bayern/s/FJ5nwIMnuK стало значительно проще.
Теперь можно покупать их из комфорта.
Good knowledge, Cheers!
afun casino, afun casino bono sin depósito –
El casino afun ofrece experiencias únicas de
juego en línea. Estas plataformas destacan por
sus opciones de juegos. Los más participantes pueden vivir títulos emocionantes y bonus
atractivas.
вермуты с доставкой, https://pad.public.cat/s/KZc7K3BgL — это удобный способ насладиться ароматным напитком, не выходя из дома.
crushon ai chat, adult ai girlfriend chat is a
revolutionary tool that improves communication through machine learning.
Users can connect effortlessly, turning ordinary conversations into meaningful exchanges.
websitem için çok işime yaradı teşekkür ederim
For the reason that the admin of this site is working, no uncertainty very quickly it will be renowned, due to its quality contents.
I’m often to blogging and i really appreciate your content. The article has actually peaks my interest. I’m going to bookmark your web site and maintain checking for brand spanking new information.
Bu konu hakkında bilgi vermeniz çok güzel. Genellikle türkçe içerikler az oluyor fakat böyle güzel içerikler görmek ve okumak çok zevkli.
Təqdim edilən məlumat əladır.
https://link.inverser.pro/r?l=aHR0cHM6Ly9waW4tdXAtYXplcmJhaWphbi1iYWt1LmNvbS9xZXlkaXl5YXQ
Xeomora offers a different direction for proof-of-work with memory-based mining: https://xeomora.org/en/
There is definately a lot to find out about this subject. I like all the points you made
Untuk yang mau belajar networking, aku saranin simulasi pakai Packet Tracer dulu sebelum otak-atik perangkat beneran. Lebih aman dan bisa eksplorasi tanpa takut rusak. Yovi Mahendra pernah share tutorial konfigurasi VLAN pakai Packet Tracer, step-by-stepnya jelas banget buat yang baru pertama coba.
Explore trusted ways to sell bitcoin in india and receive payments quickly.
out door life outdoor living outdoorlife outdoor living outdoorlife outdoorsliving outdoor living outdoorsliving living
Esenyurt Doğuş Korsan Taksi
Thanks for sharing. I read many of your blog posts, cool, your blog is very good.